| title | description | ms.reviewer | author | ms.author | manager | ms.topic | ms.date |
|---|---|---|---|---|---|---|---|
|
Deploy graphics devices using RemoteFX vGPU |
Learn how to deploy and configure RemoteFX vGPU in Windows Server |
rickman |
rick-man |
rickman |
stevelee |
article |
07/14/2020 |
Deploy graphics devices using RemoteFX vGPU
Applies to: Windows Server 2022, Windows Server 2019, Windows Server 2016, Microsoft Hyper-V Server 2016
[!NOTE]
Because of security concerns, RemoteFX vGPU is disabled by default on all versions of Windows starting with the July 14, 2020 Security Update and removed starting with the April 13, 2021 Security Update. To learn more, see KB 4570006.
The vGPU feature for RemoteFX makes it possible for multiple virtual machines to share a physical GPU. Rendering and compute resources are shared dynamically among virtual machines, making RemoteFX vGPU appropriate for high-burst workloads where dedicated GPU resources are not required. For example, in a VDI service, RemoteFX vGPU can be used to offload app rendering costs to the GPU, with the effect of decreasing CPU load and improving service scalability.
RemoteFX vGPU requirements
Host system requirements:
- Windows Server 2016
- A DirectX 11.0-compatible GPU with a WDDM 1.2-compatible driver
- A CPU with Second Level Address Translation (SLAT) support
Guest VM requirements:
- Supported guest OS. For more information, see RemoteFX 3D Video Adapter (vGPU) support.
Additional considerations for guest VMs:
- OpenGL and OpenCL functionality is only available in guests running Windows 10 or Windows Server 2016.
- DirectX 11.0 is only available for guests running Windows 8 or later.
Enable RemoteFX vGPU
To configure RemoteFX vGPU on your Windows Server 2016 host:
- Install the graphics drivers recommended by your GPU vendor for Windows Server 2016.
- Create a VM running a guest OS supported by RemoteFX vGPU. To learn more, see RemoteFX 3D Video Adapter (vGPU) support.
- Add the RemoteFX 3D graphics adapter to the VM. To learn more, see Configure the RemoteFX vGPU 3D adapter.
By default, RemoteFX vGPU will use all available and supported GPUs. To limit which GPUs the RemoteFX vGPU uses, follow these steps:
- Navigate to the Hyper-V settings in Hyper-V Manager.
- Select Physical GPUs in Hyper-V Settings.
- Select the GPU that you don’t want to use, and then clear Use this GPU with RemoteFX.
Configure the RemoteFX vGPU 3D adapter
You can use either the Hyper-V Manager UI or PowerShell cmdlets to configure the RemoteFX vGPU 3D graphics adapter.
Configure RemoteFX vGPU with Hyper-V Manager
-
Stop the VM if it’s currently running.
-
Open Hyper-V Manager, navigate to VM Settings, then select Add Hardware.
-
Select RemoteFX 3D Graphics Adapter, then select Add.
-
Set the maximum number of monitors, maximum monitor resolution, and dedicated video memory, or leave the default values.
[!NOTE]
- Setting higher values for any of these options will impact your service scale, so you should only set what is necessary.
- When you need to use 1 GB of dedicated VRAM, use a 64-bit guest VM instead of 32-bit (x86) for best results.
-
Select OK to finish the configuration.
Configure RemoteFX vGPU with PowerShell cmdlets
Use the following PowerShell cmdlets to add, review, and configure the adapter:
- Add-VMRemoteFx3dVideoAdapter
- Get-VMRemoteFx3dVideoAdapter
- Set-VMRemoteFx3dVideoAdapter
- Get-VMRemoteFXPhysicalVideoAdapter
Monitor performance
The performance and scale of a RemoteFX vGPU-enabled service are determined by a variety of factors such as number of GPUs on your system, total GPU memory, amount of system memory and memory speed, number of CPU cores and CPU clock frequency, storage speed, and NUMA implementation.
Host system memory
For every VM enabled with a vGPU, RemoteFX uses system memory both in the guest operating system and in the host server. The hypervisor guarantees the availability of system memory for a guest operating system. On the host, each vGPU-enabled virtual desktop needs to advertise its system memory requirement to the hypervisor. When the vGPU-enabled virtual desktop starts, the hypervisor reserves additional system memory in the host.
The memory requirement for the RemoteFX-enabled server is dynamic because the amount of memory consumed on the RemoteFX-enabled server is dependent on the number of monitors that are associated with the vGPU-enabled virtual desktops and the maximum resolution for those monitors.
Host GPU video memory
Every vGPU-enabled virtual desktop uses the GPU hardware video memory on the host server to render the desktop. In addition, a codec uses the video memory to compress the rendered screen. The amount of memory needed for rendering and compression is directly based on the number of monitors provisioned to the virtual machine. The amount of reserved video memory varies based on the system screen resolution and how many monitors there are. Some users require a higher screen resolution for specific tasks, but there’s greater scalability with lower resolution settings if all other settings remain constant.
Host CPU
The hypervisor schedules the host and VMs on the CPU. The overhead is increased on a RemoteFX-enabled host because the system runs an additional process (rdvgm.exe) per vGPU-enabled virtual desktop. This process uses the graphics device driver to run commands on the GPU. The codec also uses the CPU to compress screen data that needs to be sent back to the client.
More virtual processors mean a better user experience. We recommend allocating at least two virtual CPUs per vGPU-enabled virtual desktop. We also recommend using the x64 architecture for vGPU-enabled virtual desktops because the performance on x64 virtual machines is better compared to x86 virtual machines.
GPU processing power
Every vGPU-enabled virtual desktop has a corresponding DirectX process that runs on the host server. This process replays all graphics commands it receives from the RemoteFX virtual desktop onto the physical GPU. This is like running multiple DirectX applications at the same time on the same physical GPU.
Usually, graphics devices and drivers are tuned to run only a few applications on the desktop at a time, but RemoteFX stretches the GPUs to go even further. vGPUs come with performance counters that measure the GPU response to RemoteFX requests and help you make sure the GPUs aren’t stretched too far.
When a GPU is low on resources, read and write operations take a long time to complete. Administrators can use performance counters to know when to adjust resources and prevent downtime for users.
Learn more about performance counters for monitoring RemoteFX vGPU behavior at Diagnose graphics performance issues in Remote Desktop.
How to Deploy Graphics Devices Using RemoteFX vGPU
Hardware virtualization allows you to share hardware resources between virtual machines to achieve flexible and rational usage of resources. If one VM is idle, another VM running heavy applications can consume more CPU and memory resources. Sometimes you may need to run applications that require hardware video acceleration and a graphics card. While installing a video card on a physical computer is not a problem, it’s not as straightforward on a virtual machine. Virtual machines use only basic video functionality to display data by default. However, you can configure a virtual machine to use a video card and 3D acceleration. Hyper-V RemoteFX is a feature that helps you with this task. This blog post covers Hyper-V RemoteFX and explains how to configure RemoteFX on Windows machines.
What Is RemoteFX
RemoteFX is a feature that allows Hyper-V virtual machines to share a physical GPU (graphics processing unit). The resources of a video card are shared among multiple VMs. This is the optimal scenario for high-burst workloads when the dedicated resources of a video card are not required at all times. Hyper-V RemoteFX can be used to deploy a VDI (virtual desktop infrastructure). A RemoteFX GPU is a virtual device attached to a virtual machine that shares the resources of a physical video card installed on a Hyper-V host (shares the GPU and video memory).
RemoteFX was introduced in Windows 7 and has been available in Windows 8, Windows 10, Windows Server 2008 R2 SP1, Windows Server 2012, and Windows Server 2016. This feature is not present in Hyper-V Manager in the latest version of Windows Server 2019 – you cannot enable Hyper-V RemoteFX in the graphical user interface (GUI). Using RemoteFX decreases CPU (central processing unit) load and increases scalability in a virtual environment. You don’t need to attach a dedicated GPU for each VM when using Hyper-V RemoteFX because virtual machines can dynamically share the GPU for the workload.
Video rendering, processing heavy images, working with CAD applications, and 3D modeling are some of the cases when you may need 3D acceleration and a RemoteFX GPU in a VM. A modern GPU is better adapted for parallel processing than the CPU, handles more threats simultaneously, and has more processing cores. The number of monitors and used resolutions depends on the video memory and the GPU performance of a video card. Use Remote Desktop, not VMConnect (Virtual Machine Connection), to connect to VMs using RemoteFX.
The advantage of RemoteFX is that it can be used on desktop and server Windows versions. While buying a supported video card that is compatible with server hardware may not be easy, most desktop computers that usually run client Windows operating systems have PCI Express graphics adapters installed.
End of Support
There is a vulnerability (CVE-2020-1036) that can be used by cybercriminals for remote code execution. Hackers can execute remote code on a host machine by using specially crafted applications on a VM with RemoteFX GPU to attack video drivers on a Hyper-V host. A host server cannot properly validate input from an authenticated user on a guest OS in this case. Microsoft doesn’t provide a patch to fix this vulnerability and says that this is an architectural issue. Due to these security concerns, Microsoft decided to disable and remove RemoteFX from all Windows versions using automatic updates:
- RemoteFX vGPU was disabled on July 14, 2020, for all Windows versions.
- RemoteFX vGPU was removed on April 13, 2021.
RemoteFX works on Windows 10 version 1803 and earlier Windows versions (can be configured in a few clicks in the GUI of Hyper-V Manager). After the KB4571756 update (a cumulative update released in September 2020), this feature is disabled in the GUI. As a result, Windows 10 RemoteFX configuration is not available in the GUI of the Hyper-V Manager in Windows 10, version 1809, because the feature was disabled. Until the updates in April 2021, RemoteFX GPU had to be enabled in PowerShell with special commands.
RemoteFX Requirements
- A supported Windows version on a Hyper-V host (Windows 7 Ultimate/Enterprise, Windows 8 Ultimate/Enterprise, Windows 10; Windows Server 2008 R2 SP1, Windows Server 2012, Windows Server 2016, Windows Server 2019). Updates removing Hyper-V RemoteFX must not be installed.
- A GPU must be compatible with DirectX 11 on a host machine (DirectX 10 can be used on Windows Server 2008 and Windows 7 installed on a physical machine). If multiple video cards are installed on the Hyper-V host, they must be identical. DirectX 11 is available on Windows 8.1 and newer Windows versions on guest VMs.
- A CPU must support SLAT (Second Level Address Translation). The name of this feature is Extended Page Tables (EPT) for Intel processors and Nested Page Tables (NPT) for AMD processors.
- Supported guest operating systems are Windows 7 SP1, Windows 8 and 8.1, Windows 10 1703 or later, Windows Server 2008 R2, Windows Server 2012, Windows Server 2016 (in a single-session deployment only).
Prepare the physical machine that is the Hyper-V host. Make sure that you have installed graphics drivers for a graphics adapter on the Hyper-V host. It is recommended that you install the latest stable version of drivers provided by your GPU vendor (for example, NVIDIA or AMD).
Prepare a virtual machine that is running a supported version of Windows to use Hyper-V RemoteFX. In my example, the name of the VM is Windows-VM, and the name of the Hyper-V host is Hyper-V-prim.
Installing the needed features
Install the Remote Desktop Virtualization Host service on the Hyper-V host.
Open Server Manager, and click Manage > Add Roles and Features.
The Add Roles and Features Wizard opens.
Installation Type. Select Role-based or feature-based installation. Hit Next at each step of the wizard to continue.

Server Selection. Select a server from the server pool. Make sure that your Hyper-V host is selected.

Server Roles. Select Remote Desktop Services in the list of roles. If the Hyper-V role is not installed, select and install the Hyper-V role.

Features. Skip this step.
Remote Desktop Services. Read the explanation, and go to the next step.
Role Services. Select Remote Desktop Virtualization Host. You can read the description in the right pane.

Reboot the Hyper-V host when the installation of the role is finished.
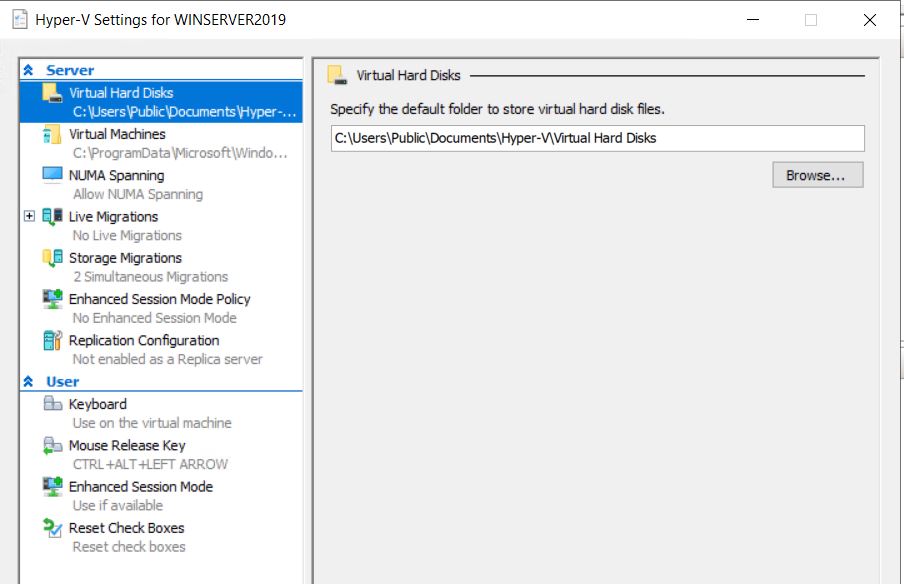
Configuring Hyper-V Settings
Open Hyper-V Manager by running virtmgmt in the command line or using the Windows GUI. Then open Hyper-V Settings.
In the navigation pane of the Hyper-V Settings window, click Physical GPUs. In the drop-down menu, select your video card, and then select the Use this GPU with RemoteFX checkbox.

If you cannot select this checkbox, then your video adapter cannot be used for RemoteFX, or RemoteFX is disabled.
Stop the virtual machine.
Open Hyper-V Manager, select your VM, right-click the VM, and open VM Settings.
In the VM Settings window, click Add Hardware in the left pane (the navigation pane). In the right pane, you see a list of devices that you can add to a virtual machine. The workflow is similar for Generation 1 and Generation 2 VMs.
If a RemoteFX 3D Video Adapter is active (a black font is used), select this adapter and click Add. This option is active in Windows versions until July 14, 2020, updates are installed.
If your Windows was updated, the RemoteFX 3D Video Adapter option is inactive (a grey font is used), and you cannot add this adapter in the GUI of Hyper-V Manager. At the same time, the Physical GPUs option is no longer displayed in Hyper-V Settings.

You can fix this in PowerShell.
Run the command in PowerShell on the Hyper-V host to add a RemoteFX 3D video adapter to a VM:
Add-VMRemoteFx3dVideoAdapter -VMName your_VM_name
If the command is executed successfully, a warning message is displayed.
WARNING: We no longer support the RemoteFX 3D video adapter. If you are still using this adapter, you may become vulnerable to security risks.
If you see the error: Add-VMRemoteFx3dVideoAdapter: To enable this device, use Server Manager to install the Remote Desktop Virtualization Host role service
The Remote Desktop Virtualization service is not installed on the Hyper-V host. See Installing the needed features earlier in this post.
Enabling Windows 10 RemoteFX after installing updates
As I mentioned earlier, if the Windows updates of July 14, 2020, are installed, Microsoft RemoteFX is disabled. If you have VMs configured to use RemoteFX, they won’t start. The following Windows 10 RemoteFX error for Windows 10 with the July 14, 2020, update is displayed when trying to start a VM:
An error occurred while attempting to start the selected virtual machine(s):
‘VM-name’ failed to start.
Synthetic 3D Display Controller (Instance ID xxxxxxxx-xxxx-xxxx-xxxx-xxxxxxxxxxxx): Failed to Power on with Error ‘Insufficient system resources exist to complete the requested service.’.
The virtual machine cannot be started because all the RemoteFX-capable GPUs are disabled in Hyper-V Manager. You must enable at least one GPU.
Another variant of the error:
The virtual machine cannot be started because the server has insufficient GPU resources.
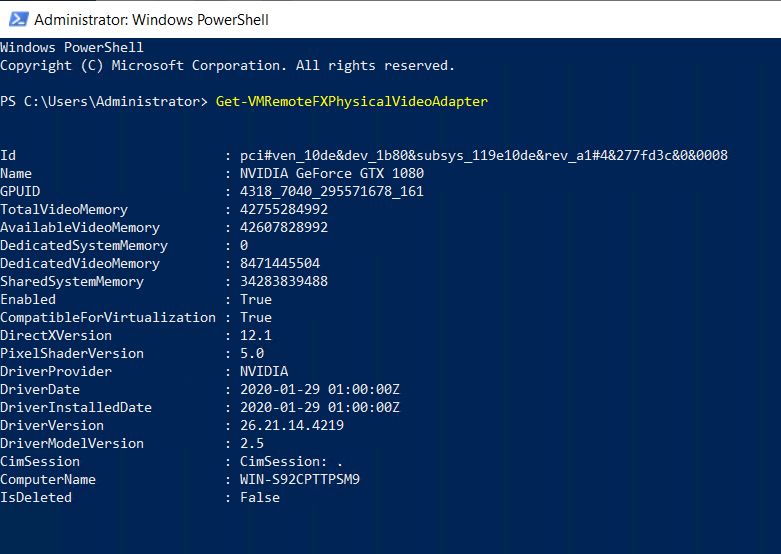
You can fix this in PowerShell. This method is applicable for Windows 10 and the appropriate Windows Server versions. Use commands in PowerShell to fix this error and enable RemoteFX. Run this command to check information about the video adapter on the Hyper-V host:
Get-VMRemoteFXPhysicalVideoAdapter
Find this string:
Enabled: False
It means that RemoteFX is disabled. Change this value to True.

Copy the name of the video card (in my example, NVIDIA GeForce GTX 1060).
Run the command:
Enable-VMRemoteFXPhysicalVideoAdapter -Name «video_card_name»
Enter your graphic card name.
Try to start your VM using RemoteFX again. The VM should start now.
Note also these PowerShell cmdlets to manage a RemoteFX 3D video adapter:
Set-VMRemoteFx3dVideoAdapter
Get-VMRemoteFXPhysicalVideoAdapter
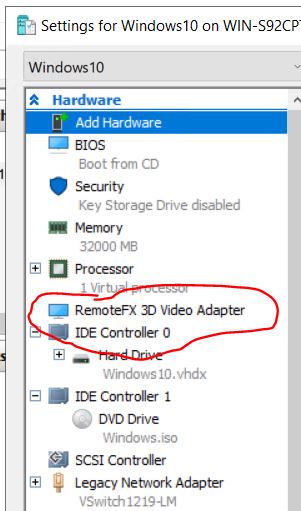
After adding a RemoteFX 3D video adapter to a VM, this adapter should be visible in the list of VM hardware with options to set resolution, the number of monitors, and dedicated video memory.
If you don’t see these options in the GUI of Hyper-V Manager, use additional parameters when adding a RemoteFX video adapter to a VM in PowerShell, for example:
Set-VMRemoteFx3dVideoAdapter -VMName Windows-VM -MaximumResolution 1024×768 -VRAMSizeBytes 536870912
If Microsoft RemoteFX was configured successfully, in the guest Windows that is running on the VM, you see a Microsoft RemoteFX Graphics Device – WDDM device in the Display Adapters section of Device Manager. This RemoteFX 3D video adapter is a virtual device that shares the resources of the physical video card installed on the physical Hyper-V host by using RemoteFX.
Troubleshooting
Sometimes additional errors may occur. Let me explain a common error when a user cannot connect to a running VM using Remote desktop RemoteFX.
Symptoms:
- Video remoting was disconnected and the appropriate message is displayed.
- RDP failed to connect: Your Remote Desktop session has been ended, possibly for one of the following reasons.
If this error occurred on your VM, edit a group policy in the guest Windows on the VM.
Click Start > Run > gpedit.msc to open the Group Policy Editor for a local machine.
In the left pane of the Group Policy Editor window, navigate to
Computer Configuration > Administrative Templates > Windows Components > Remote Desktop Services > Remote Desktop Session Host > Remote Session Environment > RemoteFX for Windows Server. Double-click Configure RemoteFX in the right pane of the window.
A window with Configure RemoteFX properties opens. Select Enabled, and hit OK to save settings.
Double-click Use WDDM graphics display driver for Remote Desktop Connections (available for Windows 10 version 1903 and newer Windows versions).
In the window that opens, select Disabled, and hit OK.
Update configuration of group policies to apply new settings with the command:
gpupdate /force
Reboot your virtual machine. Try to connect to your VM using the Enhanced Session Mode.
How to Prevent Disabling RemoteFX on a Hyper-V host
After the Windows update released in April 2021 is installed, VMs using a RemoteFX 3D video adapter fail to start. You can disable automatic updates on Windows computers at your own risk to continue using RemoteFX. Note that security patches are not installed automatically on Windows machines if Windows updates are disabled. Unpatched vulnerabilities are a threat for your computers, which are then at risk of getting infected with ransomware, viruses, and other malware. You can download Windows updates (patches) manually from the Microsoft site and install them. Learn which Window updates are intended to remove RemoteFX and don’t install them. Consider deploying WSUS (Windows Server Update Services) in your organization and deselect the updates that you don’t need.
Don’t forget to back up your Windows servers and Hyper-V virtual machines. In case of a disaster or ransomware attack, having a backup allows you to recover your data, restore workloads, and resume operations in a short time. Use NAKIVO Backup & Replication to back up your physical and virtual machines.
Alternatives to Hyper-V RemoteFX
Microsoft recommends that customers use DDA instead of using RemoteFX after April 2021.
DDA (Discrete Device Assignment) is a feature that allows you to attach a device (in my case, a PCI Express device) directly to a VM. In the case of a graphics card, the card should be disconnected from the host machine and connected to a VM. Only one VM can use a video card with DDA at any given time.
A video driver for a GPU must be installed on the guest OS of a VM, not on a host machine. In this case, features such as DirectX 12 and CUDA (Compute Unified Device Architecture) are available on a VM (CUDA is not available on a VM when using RemoteFX). When using Direct Device Assignment, VM migration between Hyper-V hosts is not possible.
Consider using VMware alternatives for servers and desktops running VMs. Use Virtual Shared Graphics Acceleration (vSGA) and Virtual Shared Pass-Through Graphics Acceleration in VMware vSphere to share GPU with multiple VMs. Use compatible video cards that support GPU virtualization and have the appropriate hardware features:
- nVidia GRID vGPU
- AMD Multiuser GPU
You can enable accelerated 3D graphics for a VM in VMware Workstation if you use a desktop machine rather than a server.
Conclusion
Hyper-V RemoteFX is a useful feature that allows VMs to share hardware resources of a physical video adapter installed on a Hyper-V host and use 3D acceleration for applications on virtual machines. To configure RemoteFX on a virtual machine, install the Remote Desktop Virtualization Host service on the Hyper-V host, edit general Hyper-V settings to select the GPU that must be used for video acceleration, and add a RemoteFX 3D video adapter in the virtual hardware options of the VM. Unfortunately, Hyper-V RemoteFX is deprecated by Microsoft, and using RemoteFX is possible only until you install Windows updates of April 2021.
Содержание
- Развертывание графических устройств с помощью дискретного назначения устройств
- Настройка виртуальной машины для DDA
- Для графических устройств требуется дополнительная подготовка виртуальных машин
- Отключение устройства из раздела узла
- Необязательно. Установка драйвера секционирования
- Поиск пути расположения устройства
- Отключение устройства
- Отключение устройства
- Назначение устройства гостевой виртуальной машине
- Дальнейшие действия
- Удаление устройства и его возвращение на узел
- Пример
- Подключение GPU к виртуальной машине
- Устранение неполадок
- Развертывание графических устройств с помощью vGPU RemoteFX
- Требования к RemoteFX vGPU
- включение RemoteFXного видеопроцессора
- Настройка трехмерного адаптера vGPU RemoteFX
- настройка RemoteFX виртуального устройства с помощью диспетчера Hyper-V
- настройка RemoteFXного gpu с помощью командлетов PowerShell
- Мониторинг производительности
- Память системы узла
- Видеопамять основного GPU узла
- ЦП узла
- Вычислительная мощность процессора
Развертывание графических устройств с помощью дискретного назначения устройств
Область применения: Windows Server 2022, Microsoft Hyper-V Server 2016, Windows Server 2016, Windows Server 2019, Microsoft Hyper-V Server 2019
Начиная с Windows Server 2016, вы можете использовать дискретное назначение устройств или DDA для передачи всего устройства PCIe в виртуальную машину. Это позволит обеспечить высокий уровень производительности доступа к таким устройствам, как хранилище NVMe или графические карточки из виртуальной машины, одновременно используя собственные драйверы устройств. Дополнительные сведения о том, какие устройства работают, каковы возможные последствия безопасности и т. д., см. в плане развертывания устройств с помощью дискретного назначения устройств.
Существует три этапа использования устройства с дискретным назначением устройств.
- Настройка виртуальной машины для дискретного назначения устройств
- Отключение устройства из раздела узла
- Назначение устройства гостевой виртуальной машине
Все команды можно выполнить на узле в консоли Windows PowerShell от имени администратора.
Настройка виртуальной машины для DDA
Дискретное назначение устройств накладывает некоторые ограничения на виртуальные машины, и необходимо выполнить следующий шаг.
- Настройка параметра «Автоматическое действие остановки» виртуальной машины для turnOff путем выполнения
Для графических устройств требуется дополнительная подготовка виртуальных машин
Некоторые аппаратные средства лучше выполняются, если виртуальная машина настроена определенным образом. Дополнительные сведения о том, нужны ли следующие конфигурации для оборудования, обратитесь к поставщику оборудования. Дополнительные сведения см. в разделе «Планирование развертывания устройств с помощью дискретного назначения устройств » и в этой записи блога.
- Включение Write-Combining на ЦП
- Настройка 32-разрядного пространства MMIO
- Настройка более 32-разрядного пространства MMIO
Приведенные выше значения пространства MMIO являются разумными значениями для экспериментирования с одним GPU. Если после запуска виртуальной машины устройство сообщает об ошибке, связанной с недостаточными ресурсами, скорее всего, потребуется изменить эти значения. Обратитесь к плану развертывания устройств с помощью дискретного назначения устройств , чтобы узнать, как точно вычислить требования MMIO.
Отключение устройства из раздела узла
Необязательно. Установка драйвера секционирования
Дискретное назначение устройств обеспечивает аппаратное обеспечение возможности предоставления драйвера для устранения рисков безопасности на своих устройствах. Обратите внимание, что этот драйвер отличается от драйвера устройства, который будет установлен на гостевой виртуальной машине. Однако, если они предоставляют этот драйвер, установите его до отключения устройства из раздела узла. Обратитесь к поставщику оборудования, чтобы получить дополнительные сведения о том, есть ли у него драйвер устранения рисков
Если драйвер секционирования не указан, во время отключения необходимо использовать -force параметр для обхода предупреждения системы безопасности. Дополнительные сведения о последствиях для безопасности в плане развертывания устройств с помощью дискретного назначения устройств.
Поиск пути расположения устройства
Путь к расположению PCI необходим для отключения и подключения устройства с узла. Пример пути расположения выглядит следующим образом: «PCIROOT(20)#PCI(0300)#PCI(0000)#PCI(0800)#PCI(0000)» Дополнительные сведения о расположении пути расположения можно найти здесь: планирование развертывания устройств с помощью дискретного назначения устройств.
Отключение устройства
С помощью диспетчера устройств или PowerShell убедитесь, что устройство «отключено».
Отключение устройства
В зависимости от того, предоставил ли поставщик драйвер устранения рисков, необходимо использовать параметр -force или нет.
- Если драйвер для устранения рисков был установлен
- Если драйвер устранения рисков не установлен
Назначение устройства гостевой виртуальной машине
Последний шаг — сообщить Hyper-V, что виртуальная машина должна иметь доступ к устройству. Помимо указанного выше пути расположения необходимо знать имя виртуальной машины.
Дальнейшие действия
После успешного подключения устройства на виртуальной машине вы сможете запустить эту виртуальную машину и взаимодействовать с ним, как обычно, если бы вы работали в системе без операционной системы. Это означает, что теперь вы можете установить драйверы поставщика оборудования на виртуальной машине и приложениях, чтобы увидеть это оборудование. Это можно проверить, открыв диспетчер устройств на гостевой виртуальной машине и убедившись, что оборудование отображается.
Удаление устройства и его возвращение на узел
Если вы хотите вернуть устройство обратно в исходное состояние, необходимо остановить виртуальную машину и выдать следующее:
Затем можно повторно включить устройство в диспетчере устройств, а операционная система узла снова сможет взаимодействовать с ним.
Пример
Подключение GPU к виртуальной машине
В этом примере мы используем PowerShell для настройки виртуальной машины с именем ddatest1, чтобы получить первый GPU, доступный производителем NVIDIA, и назначить его виртуальной машине.
Устранение неполадок
Если вы передали GPU в виртуальную машину, но удаленный рабочий стол или приложение не распознает GPU, проверьте следующие распространенные проблемы:
- Убедитесь, что вы установили последнюю версию поддерживаемого драйвера поставщика GPU и что драйвер не сообщает об ошибках, проверив состояние устройства в диспетчере устройств.
- Убедитесь, что на устройстве достаточно места MMIO, выделенного на виртуальной машине. Дополнительные сведения см. в разделе MMIO Space.
- Убедитесь, что вы используете GPU, поддерживаемый поставщиком в этой конфигурации. Например, некоторые поставщики не могут работать с карточками потребителей при передаче на виртуальную машину.
- Убедитесь, что запущенное приложение поддерживает работу на виртуальной машине, и что gpu и связанные с ним драйверы поддерживаются приложением. В некоторых приложениях есть списки разрешенных GPU и сред.
- Если вы используете роль узла сеансов удаленного рабочего стола или Службы Windows Multipoint Services на гостевом компьютере, необходимо убедиться, что для определенной записи групповой политики задано разрешение использования GPU по умолчанию. Используя объект групповой политики, примененный к гостеву (или редактору локальной групповой политики на гостевом компьютере), перейдите к следующему элементу групповой политики:Шаблоны администраторовконфигурации> компьютеров > windowsComponents> Remote DesktopServices> RemoteDesktop Host>Remote Session Environment>Use the hardware default graphics adapter for all Remote Desktop Services sessions. Задайте для этого значения значение «Включено», а затем перезагрузите виртуальную машину после применения политики.
Источник
Развертывание графических устройств с помощью vGPU RemoteFX
применимо к: Windows server 2022, Windows server 2019, Windows Server 2016, Microsoft Hyper-V Server 2016
Из соображений безопасности процессор RemoteFX vGPU по умолчанию отключен для всех версий Windows, начиная с обновления для системы безопасности за 14 июля 2020 г., и удален, начиная с обновления для системы безопасности за 13 апреля 2021 г. См. KB 4570006.
функция gpu для RemoteFX позволяет нескольким виртуальным машинам совместно использовать физический GPU. визуализация и вычисление ресурсов совместно используются виртуальными машинами, что делает RemoteFXные виртуальные машины подходящими для высокопроизводительных рабочих нагрузок, когда выделенные ресурсы GPU не требуются. например, в службе VDI RemoteFX виртуальный графический процессор можно использовать для разгрузки затрат на визуализацию приложений в GPU, что приводит к снижению нагрузки на цп и улучшению масштабируемости служб.
Требования к RemoteFX vGPU
Требования к системе узла:
- Windows Server 2016
- Совместимый с DirectX 11,0 графический процессор с драйвером 1,2 WDDM, совместимым с курьером.
- ЦП с поддержкой преобразования адресов второго уровня (SLAT)
Требования к гостевым виртуальным машинам:
- Поддерживаемая гостевая ОС. дополнительные сведения см. в разделе RemoteFX поддержка 3d-видеоадаптеров (gpu).
Дополнительные рекомендации для гостевых виртуальных машин:
- функции OpenGL и OpenCL доступны только в гостевых ос Windows 10 или Windows Server 2016.
- DirectX 11,0 доступен только для гостевых ос Windows 8 и более поздних версий.
включение RemoteFXного видеопроцессора
чтобы настроить RemoteFXный виртуальный жесткий процессор на узле Windows Server 2016:
- Установите графические драйверы, рекомендованные поставщиком GPU, для Windows Server 2016.
- создайте виртуальную машину с гостевой ос, поддерживаемой RemoteFXным графическим процессором. дополнительные сведения см. в разделе RemoteFX поддержка 3d-видеоадаптеров (gpu).
- добавьте в виртуальную машину адаптер RemoteFX 3d graphics. дополнительные сведения см. в статье настройка 3d-адаптера RemoteFX для виртуальных gpu.
по умолчанию RemoteFX виртуальный графический процессор будет использовать все доступные и поддерживаемые gpu. чтобы ограничить количество gpu, используемых RemoteFXным виртуальным графическим процессором, выполните следующие действия.
- В диспетчере Hyper-V перейдите к параметрам Hyper-V.
- выберите физические gpu в Параметры Hyper-V.
- Выберите графический процессор, который не нужно использовать, а затем снимите флажок Использовать этот графический процессор в RemoteFX.
Настройка трехмерного адаптера vGPU RemoteFX
Вы можете использовать пользовательский интерфейс диспетчера Hyper-V или командлеты PowerShell, чтобы настроить трехмерный графический адаптер vGPU RemoteFX.
настройка RemoteFX виртуального устройства с помощью диспетчера Hyper-V
Останавливает виртуальную машину, если она выполняется в данный момент.
откройте диспетчер Hyper-V, перейдите к Параметры вм, а затем выберите добавить оборудование.
выберите RemoteFX трехмерная графическая плата, а затем нажмите кнопку добавить.
Задайте максимальное число мониторов, максимальное разрешение монитора и используемой видеопамяти, либо оставьте значения по умолчанию.
- Установка большего числа значений для любого из этих параметров повлияет на масштаб службы, поэтому следует задать только то, что необходимо.
- Если необходимо использовать 1 ГБ выделенной видеопамяти, для получения наилучших результатов используйте 64-разрядную гостевую виртуальную машину вместо 32-bit (x86).
Нажмите кнопку ОК , чтобы завершить настройку.
настройка RemoteFXного gpu с помощью командлетов PowerShell
Используйте следующие командлеты PowerShell для добавления, проверки и настройки адаптера:
Мониторинг производительности
производительность и масштабирование RemoteFX службы с поддержкой виртуальных gpu определяется различными факторами, такими как количество gpu в системе, общая память gpu, объем системной памяти и скорость памяти, число ядер цп и тактовая частота цп, скорость хранения и реализация NUMA.
Память системы узла
для каждой виртуальной машины, поддерживающей виртуальный графический процессор, RemoteFX использует системную память как в гостевой операционной системе, так и на сервере узла. Гипервизор гарантирует доступность системной памяти для гостевой операционной системы. На узле каждому виртуальному рабочему столу с поддержкой виртуальных рабочих столов необходимо объявить требования к системной памяти гипервизору. Когда запускается виртуальный рабочий стол с поддержкой виртуальных рабочих столов, гипервизор резервирует дополнительный объем системной памяти на узле.
требования к памяти для сервера с поддержкой RemoteFX являются динамическими, так как объем памяти, потребляемой на сервере с поддержкой RemoteFX, зависит от числа мониторов, связанных с виртуальными рабочими столами с поддержкой виртуальных рабочих столов, и максимального разрешения этих мониторов.
Видеопамять основного GPU узла
Каждый виртуальный рабочий стол с поддержкой виртуальных рабочих столов использует аппаратную видеопамять GPU на сервере узла для подготовки к просмотру рабочего стола. Кроме того, кодек использует видео-память для сжатия отображаемого экрана. Объем памяти, необходимый для отрисовки и сжатия, непосредственно зависит от количества мониторов, подготовленных для виртуальной машины. Объем зарезервированной видеопамяти зависит от разрешения экрана системы и количества мониторов. Некоторым пользователям требуется более высокое разрешение экрана для определенных задач, но существует большая масштабируемость с более низкими параметрами разрешения, если все остальные параметры остаются постоянными.
ЦП узла
Гипервизор планирует размещение и виртуальные машины на ЦП. дополнительная нагрузка на узел с поддержкой RemoteFX увеличивается, так как система запускает дополнительный процесс (rdvgm.exe) на виртуальном рабочем столе с поддержкой виртуальных рабочих столов. Этот процесс использует драйвер графического устройства для выполнения команд GPU. Кодек также использует ЦП для сжатия данных экрана, которые необходимо отправить обратно клиенту.
Большее число виртуальных процессоров означает лучшее взаимодействие с пользователем. Мы рекомендуем выделить не менее двух виртуальных процессоров на виртуальный рабочий стол с поддержкой виртуальных рабочих столов. Мы также советуем использовать архитектуру x64 для виртуальных рабочих столов с поддержкой GPU, так как производительность виртуальных машин x64 лучше по сравнению с виртуальными машинами x86.
Вычислительная мощность процессора
У каждого виртуального рабочего стола с поддержкой виртуальных рабочих столов есть соответствующий процесс DirectX, выполняемый на сервере узла. этот процесс воспроизводит все команды графики, полученные от RemoteFX виртуального рабочего стола, на физический графический процессор. Это аналогично одновременному запуску нескольких приложений DirectX на одном физическом GPU.
как правило, графические устройства и драйверы настроены на выполнение только нескольких приложений на рабочем столе, но RemoteFX растягивает графические процессоры, чтобы продолжить работу. вгпус поставляются со счетчиками производительности, которые измеряют ответ GPU на запросы RemoteFX и позволяют убедиться, что gpu не растягиваются слишком далеко.
Когда GPU не хватает ресурсов, операции чтения и записи выполняются длительное время. Администраторы могут использовать счетчики производительности, чтобы выяснить, когда следует настраивать ресурсы и предотвращать время простоя для пользователей.
дополнительные сведения о счетчиках производительности для мониторинга RemoteFX поведения виртуальных gpu см. в статье диагностика проблем производительности графики в удаленный рабочий стол.
Источник
When trying to Enabling Physical GPUs in Hyper-V, the option is not there in the GUI. In Windows 2016 there is an option as in the below screenshot:

In Windows Server 2019, here is the screenshot and there is no option to enable it:
So, Here is how to enable it in Windows server 2019. You can also use RemoteFX vGPU feature on Windows Server 2019. Although the config UI of RemoteFX vGPU has been removed from Hyper-V Manager of Windows Server 2019, you can configure RemoteFX vGPU by using Powershell on Windows Server 2019.
Check your Host GPU – You need RemoteFX Compatible GPU Card and you need to install the Remote Desktop Virtualization Host role in Windows Server Manager.
To install the Remote Desktop Virtualization Host role, open Server Manager, and select the Add Roles and Features option from the Manage menu. This will cause Windows to launch the Add Roles and Features Wizard. Click Next to skip the wizard’s Before You Begin screen. You will now be taken to the Installation Type screen. Select the Role-Based or Feature-Based Installation option and click Next. You will now be prompted to choose the server on which you wish to install the role. Choose the Select a Server from the Server Pool option. Make sure that the correct server is selected, and click Next. You should now see the Select Server Roles screen. Select the Remote Desktop Services role, and click Next. Click Next again to bypass the Features screen, and once again to bypass the Remote Desktop Services introduction.
The next screen that you will see asks you to select the role services that you wish to install. Select the Remote Desktop Virtualization Host checkbox, as shown below. If prompted to install the Media Foundation and the Remote Server Administration Tools, be sure to click the Add Features button.
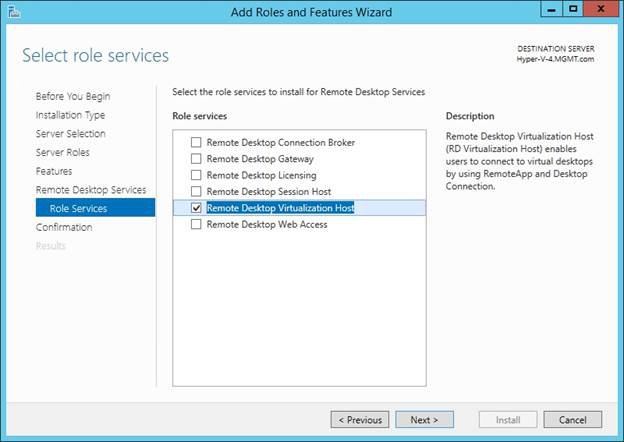
Click Next, followed by Install, and the required role services will be installed onto the server. When the process completes, click Close. You will need to reboot the server in order to finish the installation.
Now open powershell as Administrator.
Run the following commands:
Get-VMRemoteFXPhysicalVideoAdapter
Look for the following:
CompatibleForVirtualization: True
Enabled: True
Here is the screenshot for the Nvidia card I have. Make a note of the name of the card as well.
You can also use the name of the card directly or with a wildcard as below:
Next, Enable/Disable Host GPU for RemoteFX vGPU. To Enable, run this:
PS C:> Get-VMRemoteFXPhysicalVideoAdapter -Name *Nvidia* | Enable-VMRemoteFXPhysicalVideoAdapter
Next, stop the VM on hyper V. Then, Add RemoteFX vGPU to your VM:
Example: Add-VMRemoteFx3dVideoAdapter -VMName [vm_name]
Add-VMRemoteFx3dVideoAdapter -VMName [Windows10]
Now, open the VM Settings in Hyper V so you can configure RemoteFX vGPU. You should see this:
5) Start VM.
Other Resources:
1. https://techcommunity.microsoft.com/t5/windows-server-for-it-pro/server-2019-hyper-v-vm-using-gpu/m-p/303761
2. https://social.technet.microsoft.com/Forums/forefront/en-US/738f05a3-a8d2-49ca-a82a-d356b83e1cd4/hyperv-quotremotefx-3d-video-adapterquot-gone-in-windows-10-1809
3. http://techgenix.com/enabling-physical-gpus-hyper/
4. https://docs.microsoft.com/en-us/powershell/module/hyper-v/enable-vmremotefxphysicalvideoadapter?view=win10-ps
5. https://social.technet.microsoft.com/wiki/contents/articles/16652.remotefx-vgpu-setup-and-configuration-guide-for-windows-server-2012.aspx?wa=wsignin1.0&CommentPosted=true
A useful feature that was introduced not too long ago for Windows 10 has now been disabled. The RemoteFX vGPU feature lets the users of Virtual Machines (VMs) running Windows Server 2008 R2, Server 2012, Server 2016, and Windows 10 running on Hyper-V use the physical Graphics Processing Unit (GPU) of the host machine to render its graphic output.
As of the most recent update by Microsoft for Windows 10, KB4571757, Microsoft has decided to discontinue this feature due to a critical vulnerability discovered in Remote Code Execution.
Let’s look into the details of the feature, why it was discontinued, and whether or not we can find a way for it to still work.
Table of contents
- What is RemoteFX vGPU?
- Why did Microsoft remove RemoteFX vGPU feature?
- How to enable RemoteFX vGPU on Hyper-V running on Windows 10
- Alternative for RemoteFX vGPU
- Configure the VM for DDA
- Dismount the GPU from the host computer
- Assign the GPU to the VM
- Closing words
What is RemoteFX vGPU?
The VMs running on Hyper-V can use the physical GPU on the host computer to run their tasks concerning video rendering and image processing, using the RemoteFX vGPU feature. This allows users to take the load off of their CPU and run heavy image processing on their VMs using the shared GPU.
With this feature, a dedicated GPU for each VM is not required and simultaneously provides enhanced scalability and usability of the GPU, as well as the VMs. Head on to Microsoft’s web page to learn more about the feature.
Why did Microsoft remove RemoteFX vGPU feature?
Although the RemoteFX vGPU feature is old as it was introduced in Windows 7, it is now being exploited by hackers to execute remote commands on the host machine. This feature is not capable of authenticating the input of a valid user on the VM. A hacker can exploit this vulnerability to run modified applications on the VM to exploit the drivers of the host GPU and gain access. Once they have access to the host machine, they are able to execute remote commands and scripts.
Although Microsoft addresses such vulnerabilities through their regular updates, they were unable to do so as the flaw is architectural.
Microsoft started removing this feature for different versions of the OS back in July 2020. However, the Windows 10 cumulative update for September 2020 disabled the feature in all editions of Windows 10 version 2004.
Microsoft states that users will still be able to re-enable the feature until February 2021 through special commands, but should start working on alternative methods which will be discussed further down the article. Here is a notification by Microsoft on disabling RemoteFX vGPU.
How to enable RemoteFX vGPU on Hyper-V running on Windows 10
Although Microsoft has greyed out the feature to enable RemoteFX vGPU through Hyper-V on Windows 10, it can still be enabled through a command using PowerShell. Moreover, the Group Policy Settings are still there within the guest Operating Systems (VMs) which can be used to enable the feature on the VM just as before.

- First, turn on the VM you wish to configure this feature on and open the Group Policy Editor by typing in gpedit.msc in Run.
- In the Group Policy Editor, navigate to the following from the left pane:
- Computer Configuration -> Administrative Templates -> Windows Components -> Remote Desktop Services -> Remote Desktop Session Host -> Remote Session Environment -> RemoteFX for Windows Server
- In the right pane, double-click on Configure RemoteFX.
- In the Configure RemoteFX properties window, select Enabled, and then click Apply and Ok.

- Now open the Command Prompt and type in gpupdate /force to update the Group Policies.

- Download and install the recommended GPU driver according to your physical GPU. Here is a detailed review of GPUs and how to manage them.
- Now shut down the VM and navigate back to the hosting computer running Hyper-V.
- Since the RemoteFX 3D Video Adapter option is greyed out in the settings of the VM, we shall enable it through PowerShell. Run PowerShell with Administrative Rights. Here is a complete guide on how to always run PowerShell in Administrative Mode.
- Enter the following command while replacing (name) with the name of your virtual machine:
Add-VMRemoteFX3dVideoAdapter -VMName (name)
- Now open the VM Settings through the Hyper-V control panel and you will find the RemoteFX ED Video Adapter under the Processor tab. Click on it and then make the configurations according to your needs.


You can now start and connect to the virtual machine and it will now use the host machine’s GPU to process its workload. You may also configure multiple VMs to run on a shared physical GPU.
Alternative for RemoteFX vGPU
Microsoft is permanently planning on removing the feature by February 2021. However, they have not left their users stranded. Microsoft has also proposed an alternative solution to directly mount the physical GPU on the PCIe port to a VM through the Discrete Device Assignment (DDA).
This method has three phases which need to be completed in order to provide a VM with a dedicated GPU:
- Configure the VM for DDA
- Dismount the GPU from the host computer
- Assign the GPU to the VM
Configure the VM for DDA
On the host computer, run the following commands one after the other to configure its settings. Replace (name) with the name of the VM:
Set-VM -Name (name) -AutomaticStopAction TurnOffSet-VM -GuestControlledCacheTypes $true -VMName (name)Set-VM -LowMemoryMappedIoSpace 3Gb -VMName (name)Set-VM -HighMemoryMappedIoSpace 33280Mb -VMName (name)
Dismount the GPU from the host computer
Firstly, you need to disable the GPU on the PCIe port, and then dismount it. But before that, you are going to need the port’s physical address. This can be determined by performing the following:
- Head to the Device Manager by typing in devmgmt.msc in Run.
- Now expand Display Adapters and right-click on the GPU. Select Properties from the Context Menu.

- Go to the Details tab and select Location Paths from the drop-down menu under Property.
- Note that the entry starts with “PCIROOT” as this will be required when dismounting the GPU from the host device.


Now perform the following to dismount the device:
- Head to the Properties window of the GPU from the Device Manager.
- Go to the Driver tab and then click on Disable device.


Now that the device has been disabled, you need to dismount it.
Enter the following command in Command Prompt:Dismount-VMHostAssignableDevice -force -LocationPath $(LocationPath)
Replace (LocationPath) with the PCIe path you had noted earlier.
Once done, you may proceed to the next phase.
Assign the GPU to the VM
Now all you need to do is program Hyper-V to let the specified VM use the physical GPU. This can be done by running the command below in Command Prompt:Add-VMAssignableDevice -LocationPath $locationPath -VMName (name)
Replace (name) with the name of the VM.
You may now start the guest operating system and see that the video adapter it is now using will be the physical one on your host computer.
If at any time you wish to return the GPU back to the host device, simply run the following two commands in the same order, one after the other, in the Command Prompt while replacing (name) with the name of the VM:Remove-VMAssignableDevice -LocationPath $locationPath -VMName VMName<br>Mount-VMHostAssignableDevice -LocationPath $locationPath
Closing words
The RemoteFX vGPU hasn’t been around much for the version 2004. However, people liked the idea of it. Seeing it go might not be as troublesome as anticipated unless you put in the cost factor.
Although Microsoft has given an alternative for using designated GPUs for each virtual machine, it would not be ideal to place as many GPUs on the motherboard of the host computer as the virtual machines. The costs would be too high, and power consumption would not be ideal.
Microsoft needs to find a workaround for the issue as the solution provided is not feasible for most users.
Also see:
Subhan Zafar is an established IT professional with interests in Windows and Server infrastructure testing and research, and is currently working with Itechtics as a research consultant. He has studied Electrical Engineering and is also certified by Huawei (HCNA & HCNP Routing and Switching).
Hello everyone, it’s been a while since M$FT announced that remoteFX vGPU was going to be permanently disabled due to unpatchable security issues and vulnerabilities. Because of this, you were stuck with either running commands to get it running again (albeit putting you at a security risk) or using direct device assignment. Microsoft did however release some info regarding the new technology to replace it, which they call GPU-P or GPU partitioning.
Currently, this feature doesn’t work on windows server 2019 yet, but it actually works just fine on the latest releases of Windows 10 Pro and Enterprise. Within windows 10, you can add the Hyper V feature and create a windows virtual machine. The next step is to partition away your graphics card for your virtual machine. Note that you’ll get a code 43 at first, and this is because it requires special drivers to get up and running. I tested it out on my workstation running a GTX 1080, and all APIs seem to be working. (Tested with Blender)
Make sure you are using Nvidia Quadro or Radeon Pro graphics cards as this feature is not intended for use with consumer hardware. Due to the lack of windows server support, you may end up having to use a less ideal solution, that is installing windows 10 on your server and using hyperV with it. It will be some time before this feature will be put into Server 2019, but it should happen soon (I hope).
Imgur link to the picture of this running
Please don’t use this in production for now.
Code to run in PowerShell:
(Modify it to fit your needs, this one just happened to get it working for me)
$vm = "ENTER YOUR VM NAME HERE"
Remove-VMGpuPartitionAdapter -VMName $vm
Add-VMGpuPartitionAdapter -VMName $vm
Set-VMGpuPartitionAdapter -VMName $vm -MinPartitionVRAM 1
Set-VMGpuPartitionAdapter -VMName $vm -MaxPartitionVRAM 11
Set-VMGpuPartitionAdapter -VMName $vm -OptimalPartitionVRAM 10
Set-VMGpuPartitionAdapter -VMName $vm -MinPartitionEncode 1
Set-VMGpuPartitionAdapter -VMName $vm -MaxPartitionEncode 11
Set-VMGpuPartitionAdapter -VMName $vm -OptimalPartitionEncode 10
Set-VMGpuPartitionAdapter -VMName $vm -MinPartitionDecode 1
Set-VMGpuPartitionAdapter -VMName $vm -MaxPartitionDecode 11
Set-VMGpuPartitionAdapter -VMName $vm -OptimalPartitionDecode 10
Set-VMGpuPartitionAdapter -VMName $vm -MinPartitionCompute 1
Set-VMGpuPartitionAdapter -VMName $vm -MaxPartitionCompute 11
Set-VMGpuPartitionAdapter -VMName $vm -OptimalPartitionCompute 10
Set-VM -GuestControlledCacheTypes $true -VMName $vm
Set-VM -LowMemoryMappedIoSpace 1Gb -VMName $vm
Set-VM -HighMemoryMappedIoSpace 32GB -VMName $vm
Start-VM -Name $vm
Once you have completed the PowerShell config, you can load the driver. Note that you can’t just use the standard drivers, rather you will have to use host drivers.
On your host machine, go to C:WindowsSystem32DriverStoreFileRepository
and copy the nv_dispi.inf_amd64 folder to C:WindowsSystem32HostDriverStoreFileRepository on your VM (This folder will not exist, so make sure to create it)
Next you will need to copy C:WindowsSystem32nvapi64.dll file from your host to C:WindowsSystem32 on your VM
And once that is done, you can restart the VM.
You will also need to disable enhanced session and Checkpoints for the VM.

CUDA and all other APIs (DirectX, OpenGL, etc.) will work now.
Tested on GTX1080 8gb
EDIT: If you cannot get it working and are still receiving code 43, I found a post on a forum that shows some instructions on getting the driver to initialize, so credit goes to FiveM for figuring out how to fix Code 43 and get it working properly. Link to working instructions Once you load the driver you can get access to DirectX12 and OpenGL APIs, which make it possible to run cad programs and others.
Hi all,
I have to be able to add the «RemoteFX 3D Video adapter» to VMs in order to run certain software. However, it seems that in Windows 10 1809 which I just updated a few days ago. Has removed the ability to add this. It’s greyed out saying «We
no longer support the RemoteFX 3D video adapter…»
I found some articles on this
https://www.brianmadden.com/opinion/RemoteFX-vGPU-put-out-to-pasture-as-Microsoft-RDP-grows-up
Tucked away in this list of features to be deprecated was:
- “RemoteFX vGPU: We’re developing new graphics acceleration options for virtualized environments. You can also use Discrete Device Assignment (DDA) as an alternative.”
and we must now use Discrete Device Assignment (DDA):
https://docs.microsoft.com/en-us/windows-server/virtualization/hyper-v/plan/plan-for-deploying-devices-using-discrete-device-assignment
https://docs.microsoft.com/en-us/windows-server/virtualization/hyper-v/deploy/deploying-graphics-devices-using-dda
However, you need a compatible graphics card. Using
this script mentioned in the articles above I found out that mine is not compatible:
NVIDIA GeForce GTX 1050 Ti
Old-style PCI device, switch port, etc. Not assignable.
Is there any way around this?
Thanks for any ideas
m