Обновлено 12.11.2020
 Добрый день! Уважаемые читатели и гости одного из крупнейших IP блогов в рунете Pyatilistnik.org. В прошлый раз мы с вами произвели установку новой серверной системы Windows Server 2019 и произвели базовую настройку. Сегодня я хочу вам показать, какие у системного администратора есть варианты и инструменты по настройке сети в Windows Server 2019. Я покажу, как локальную настройку, так и удаленную, уверен, что новички оценят по достоинству этот материал.
Постановка задачи
Я хочу вас научить производить настройку статического IP адреса, маски, шлюза и DNS серверов на вашем сетевом интерфейсе, разными методами, локально и удаленно. Ситуаций может быть очень много. Лично я являюсь приверженцем того, что любой сервер должен иметь выделенный, статический ip-адрес исключительно под него, тут можно долго спорить, что можно делать резервирование на DHCP, через который потом можно быстрее менять настройки, но я придерживаюсь такой политики, так как из отказоустойчивый DHCP может ломаться, если вы можете меня переубедить в моем видении, то прошу в комментарии.
Методы настройки сети в Windows Server 2019
Существует ряд методов и инструментов позволяющих производить настройки вашего сетевого интерфейса, их можно разделить на два подхода:
- Локальная настройка сетевых параметров
- Удаленная настройка сетевыми параметрами
Среди инструментов можно выделить:
- Свойства сетевого интерфейса
- Утилита командной строки netsh
- Командлеты powerShell
- Использование Windows Admin Center
- Различные утилиты
Настройка сети через графический интерфейс
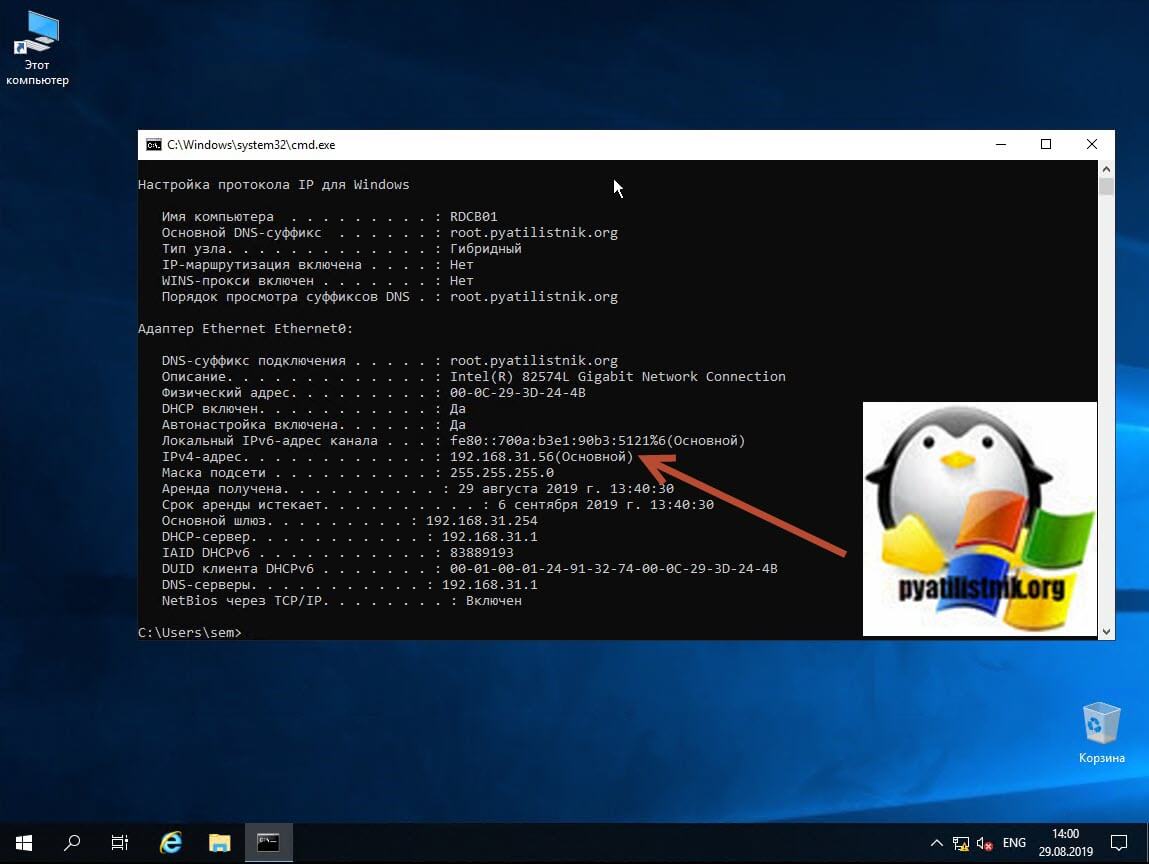
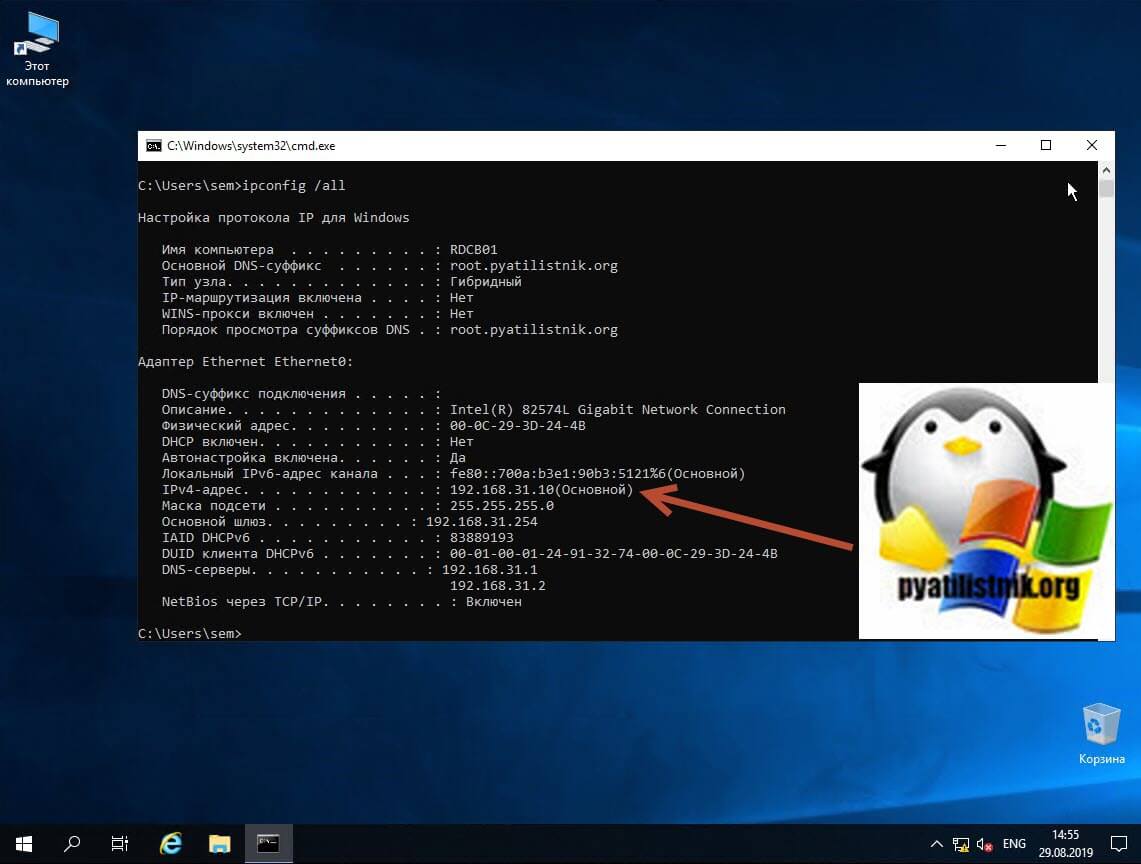
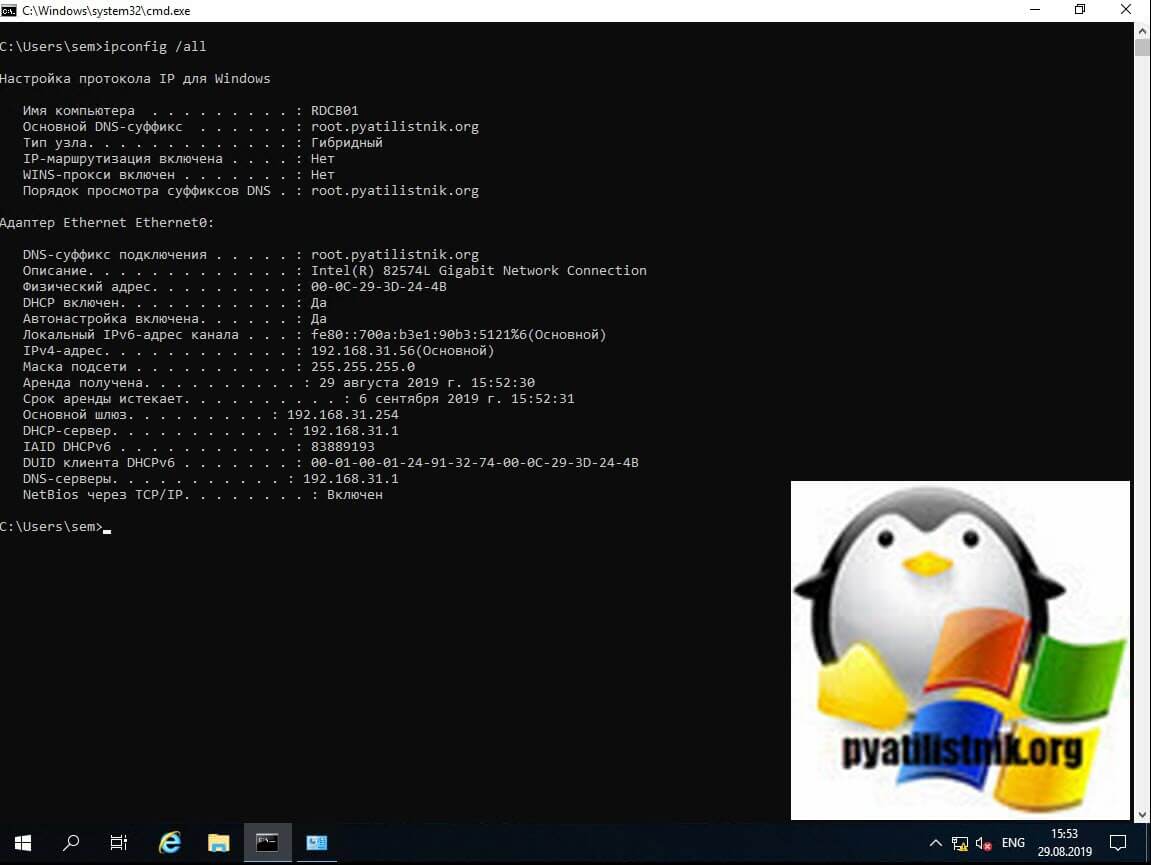
Первый метод, можно назвать классическим, так как он самый простой и подойдет для большинства администратором. Тут мы с вами будем использовать оснастку «Центр управления сетями и общим доступом«, настроим статический IP-адрес, маску сети, основной шлюз и DNS-сервера через графический интерфейс. У меня есть сервер RDCB01, для которого я выделил IP-адрес 192.168.31.10. На текущий момент айпишник прилетает от DHCP-сервера. Проверим текущие параметры интерфейса через командную строку, в которой нужно написать команду:
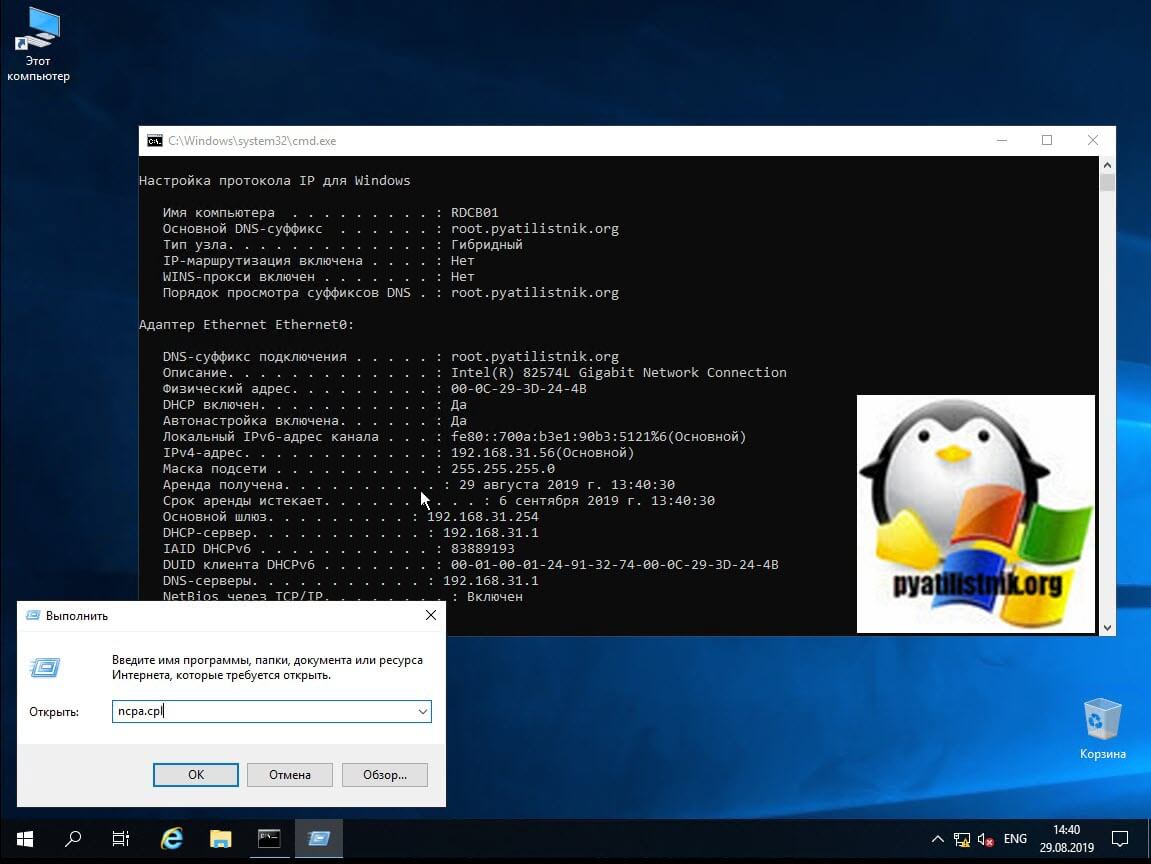
Чтобы открыть «Центр управления сетями и общим доступом» со списком сетевых интерфейсов, мы воспользуемся быстрыми командами Windows. Открываем окно выполнить и пишем в нем:
Находим нужный сетевой интерфейс, в моем примере, это единственный Ethernet0 и заходим в его свойства.

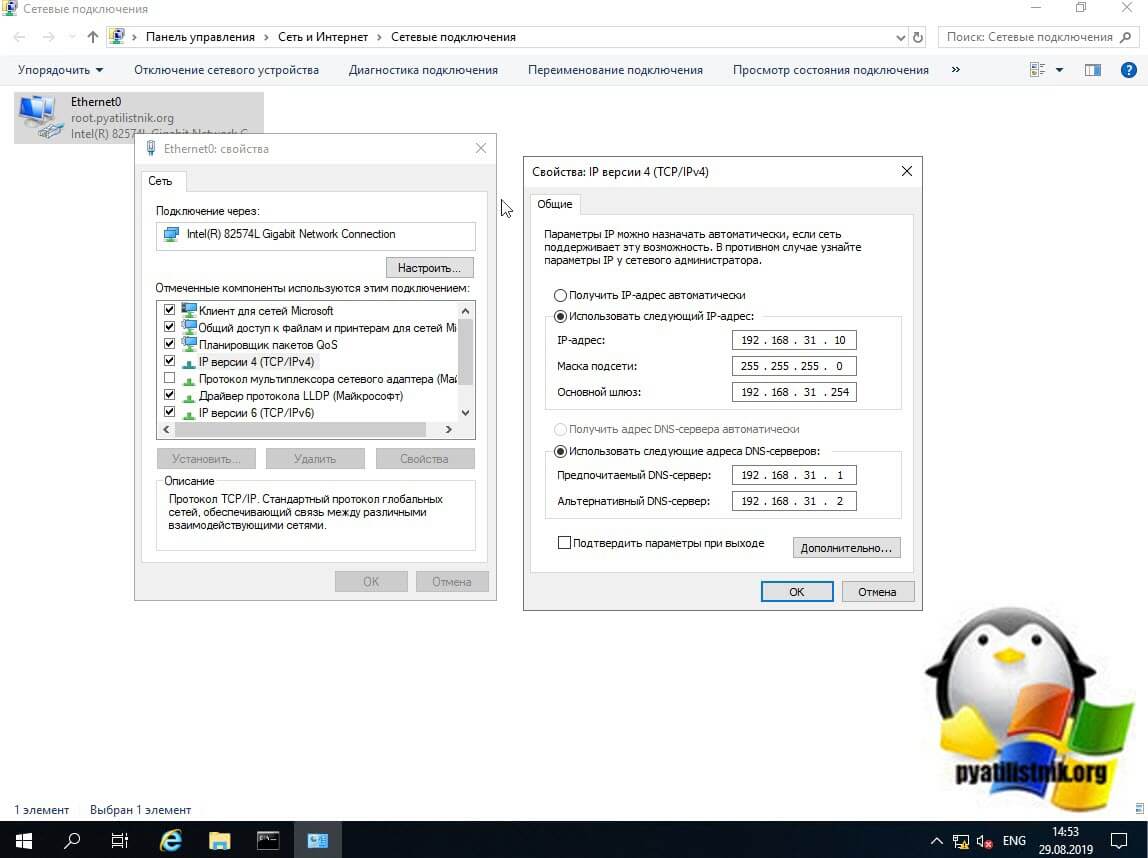
Далее находим пункт «IP версии 4 (TCP/Ipv4)»и открываем его свойства, далее мы видим, что выделение сетевых настроек производится в автоматическом режиме, через службу DHCP.
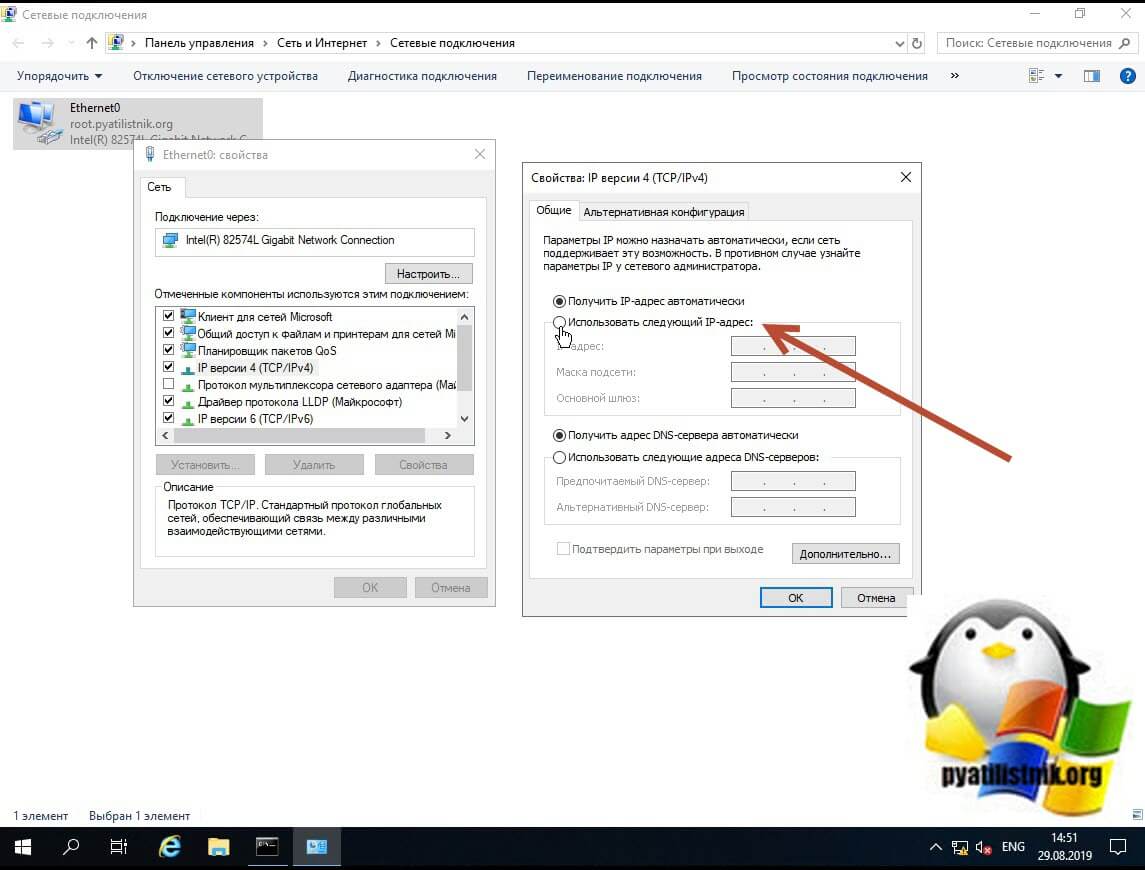
Чтобы вбить статические настройки выбираем пункт «Использовать следующий IP-адрес» и по порядку задаем настройки, подготовленные заранее. В моем случае
- IP-адрес 192.168.31.10
- Маска подсети 255.255.255.0
- Основной шлюз 192.168.31.254
- Предпочитаемый DNS-сервер 192.168.31.1
- Альтернативный DNS-сервер 192.168.31.2
Сохраняем все настройки и проверяем через Ipconfig /all, что все видится. Так же можете попробовать пропинговать ваш основной шлюз или DNS-сервер. На этом графическая настройка сети в Windows Server 2019 окончена.
Настройка сети через Windows Admin Center
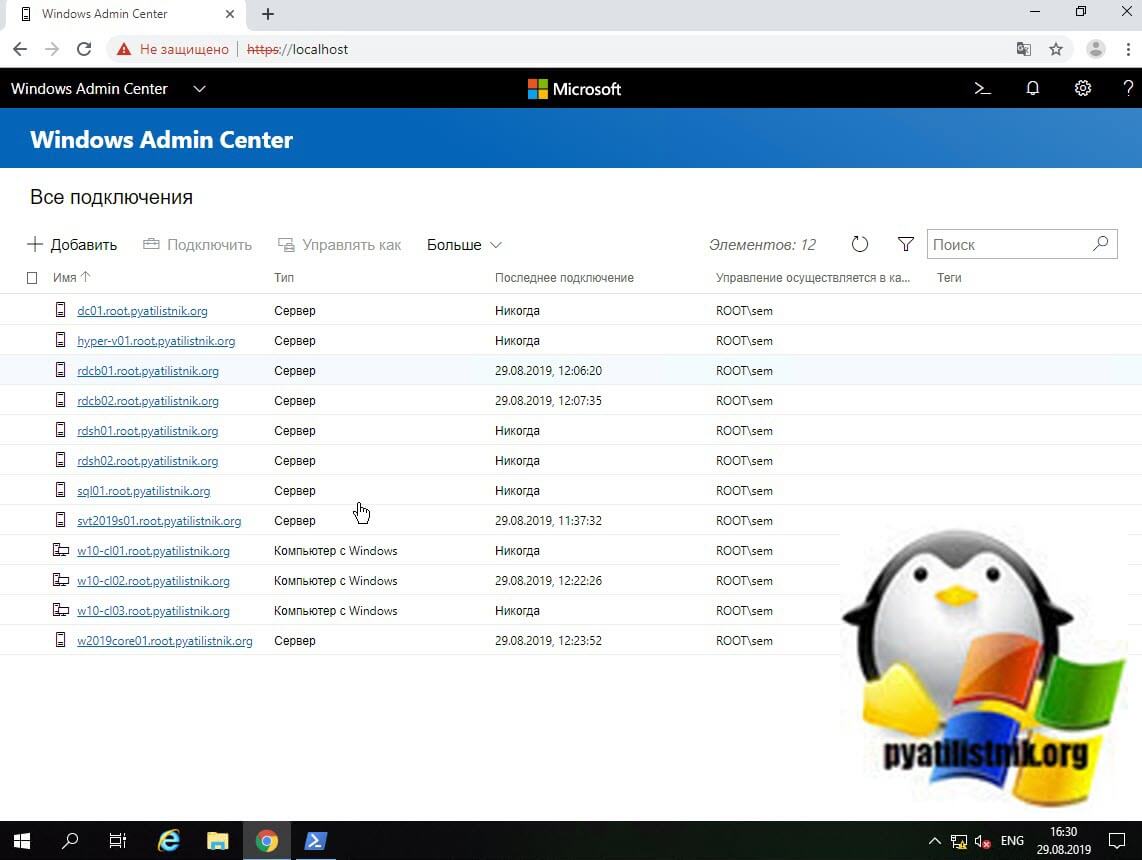
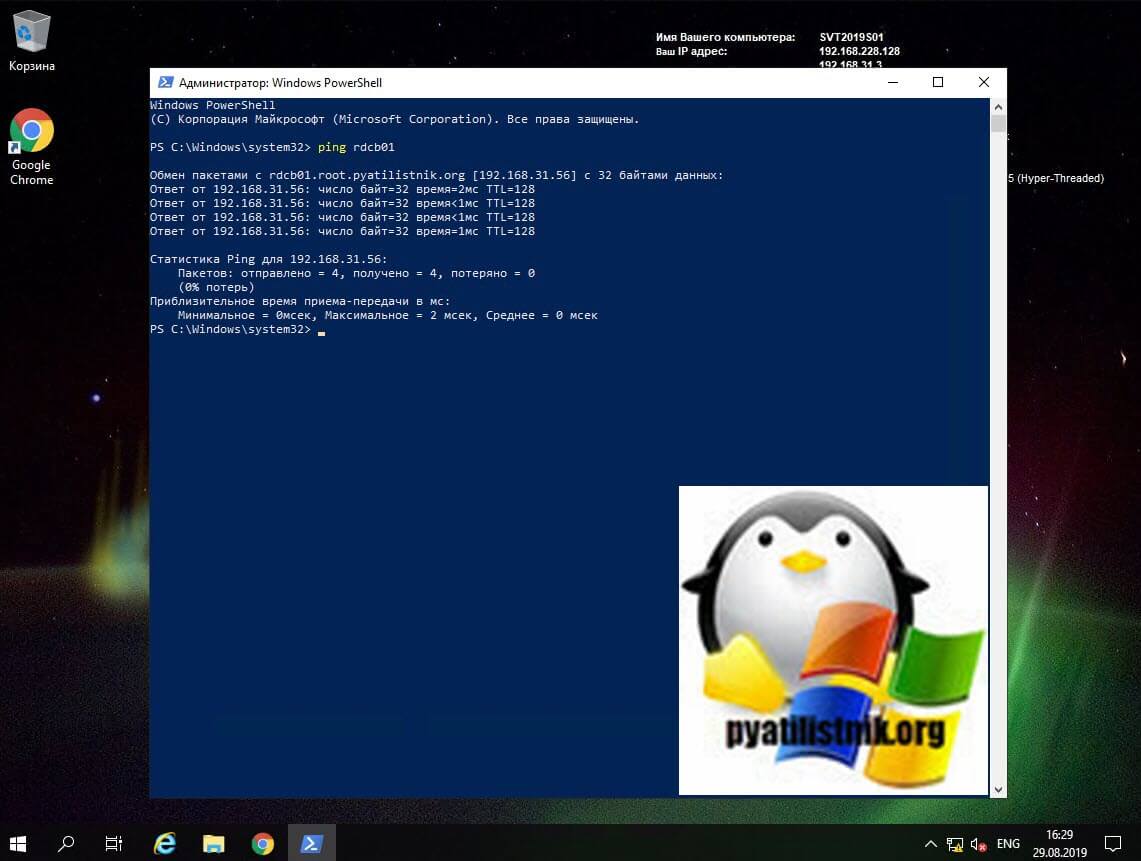
С выходом Windows Server 2019 Microsoft наконец-то создает правильный инструмент для системного администратора, я говорю, о Windows Admin Center. Я вам уже подробно рассказывал, как устанавливать Windows Admin Center и его назначение. Если в двух словах, то это крутая веб консоль позволяющая управлять серверами и рабочими станциями с любого устройства, через ваш браузер. Давайте я покажу, как вы легко можете произвести установку статического Ip-адреса, маски, основного шлюза и DNS на удаленном сервере, через WAC. Напоминаю, что делать я это буду для сервера RDCB01. Давайте его пропингуем и выясним текущий адрес. Я вижу ip-адрес 192.168.31.56.
Открываем в браузере Windows Admin Center и производим подключение к нужному серверу.
Далее находим раздел «Сеть«, тут у вас будет список всех ваших сетевых интерфейсов. Выбираем нужный, тут чем хорошо вы сразу видите много сводной информации в нижней части.
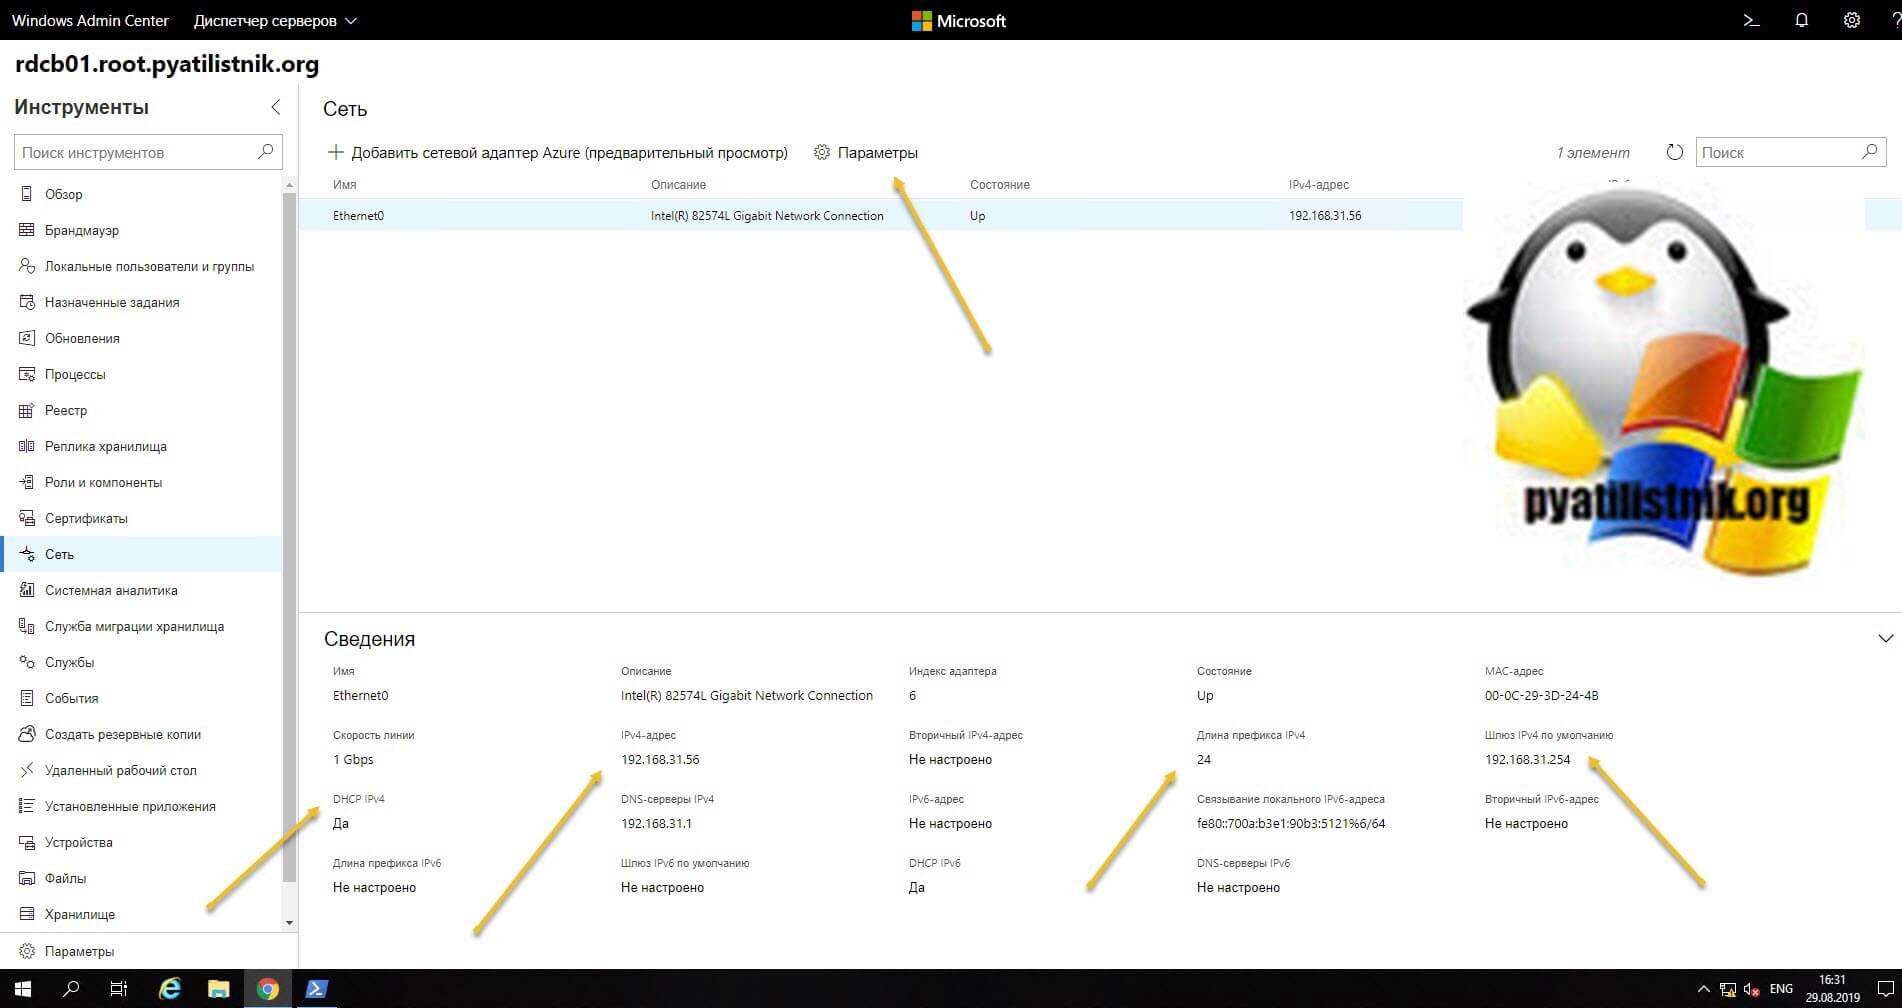
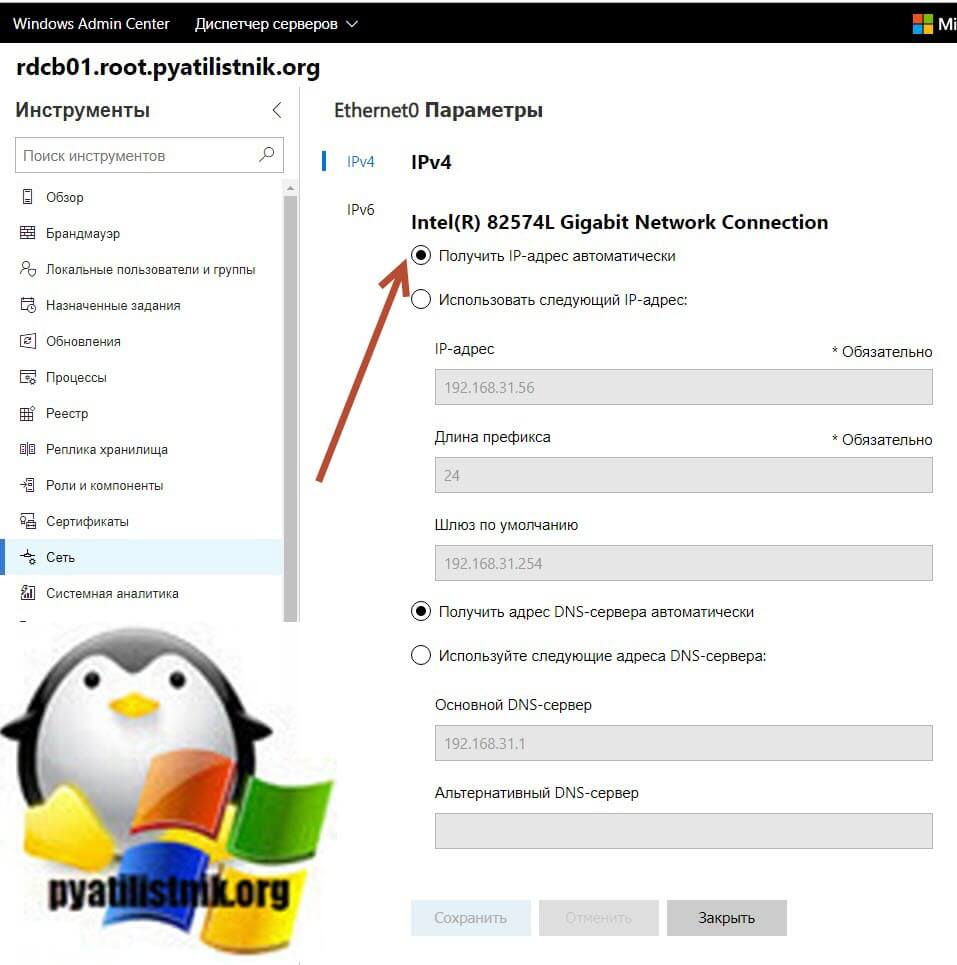
Для настройки сети нажмите кнопку «Параметры«. Как видим стоит автоматическое получение настроек.
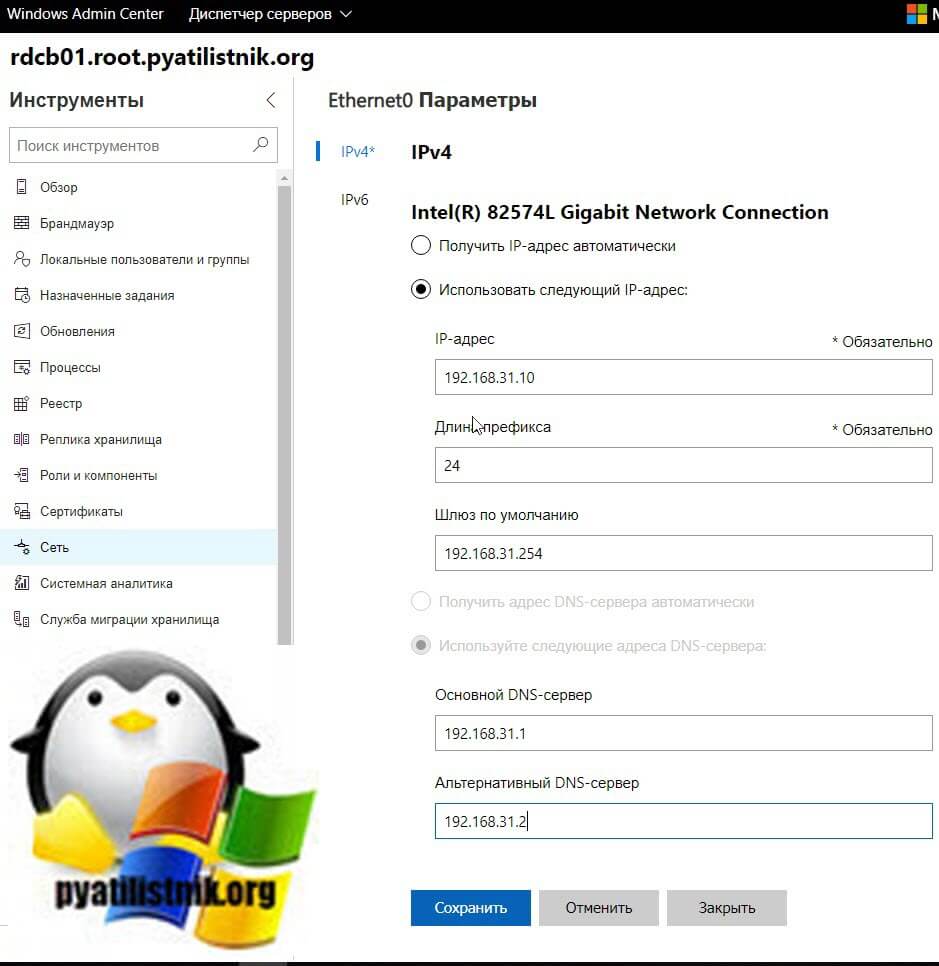
Активируем пункт «Использовать следующий IP-адрес» и задаем нужные сетевые настройки, после чего сохраняем изменения.
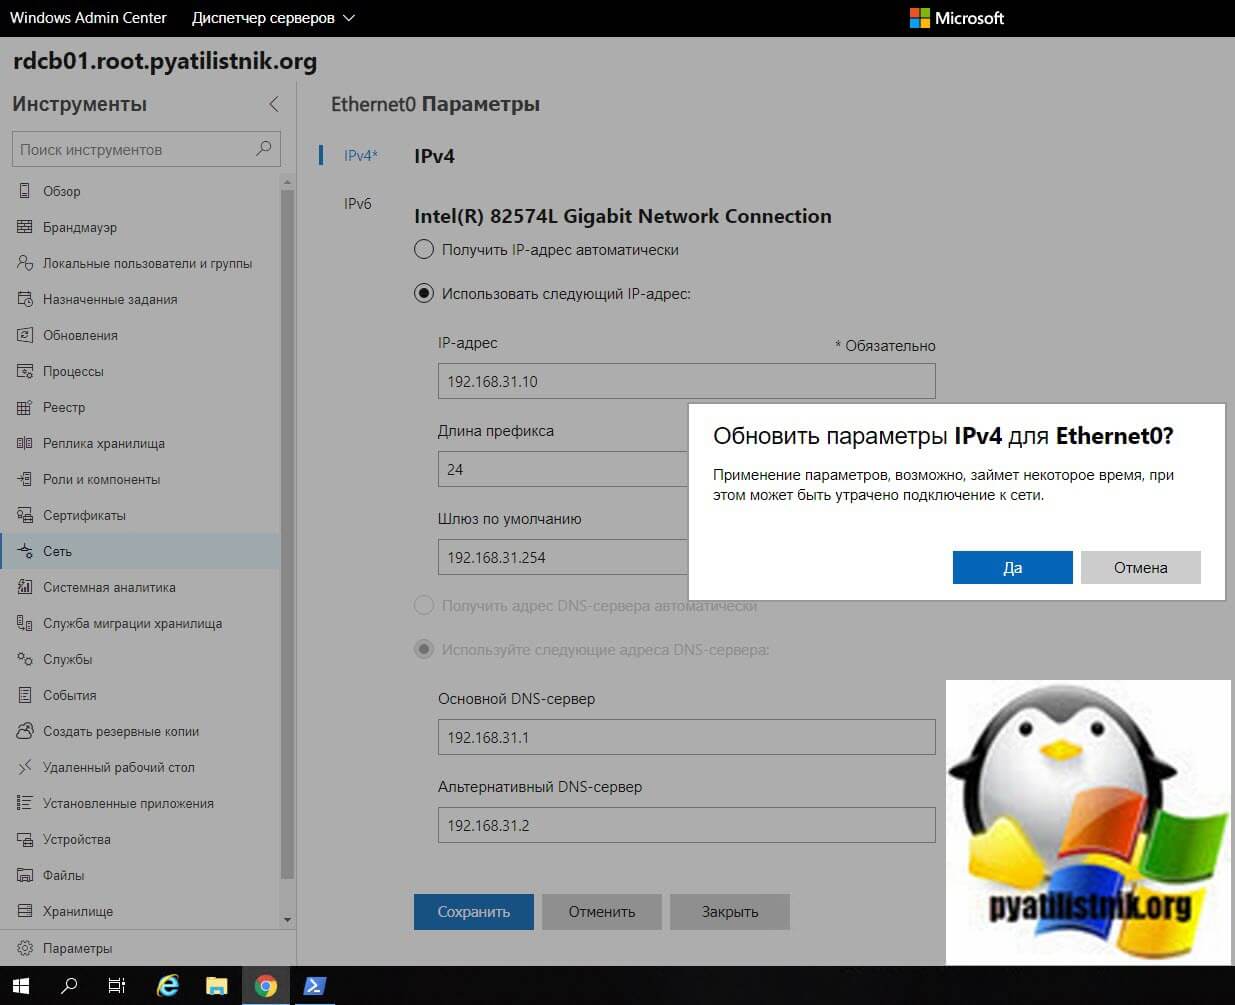
Подтверждаем применение настроек.
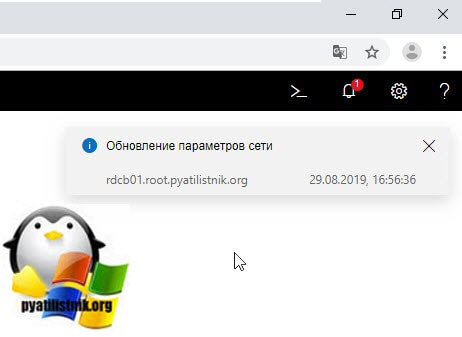
В правом верхнем углу вам покажут, что началось задание по обновлению.
Проверяем, перед этим единственное нужно очистить кэш-DNS. В итоге я вижу, что сервер пингуется по новому адресу.
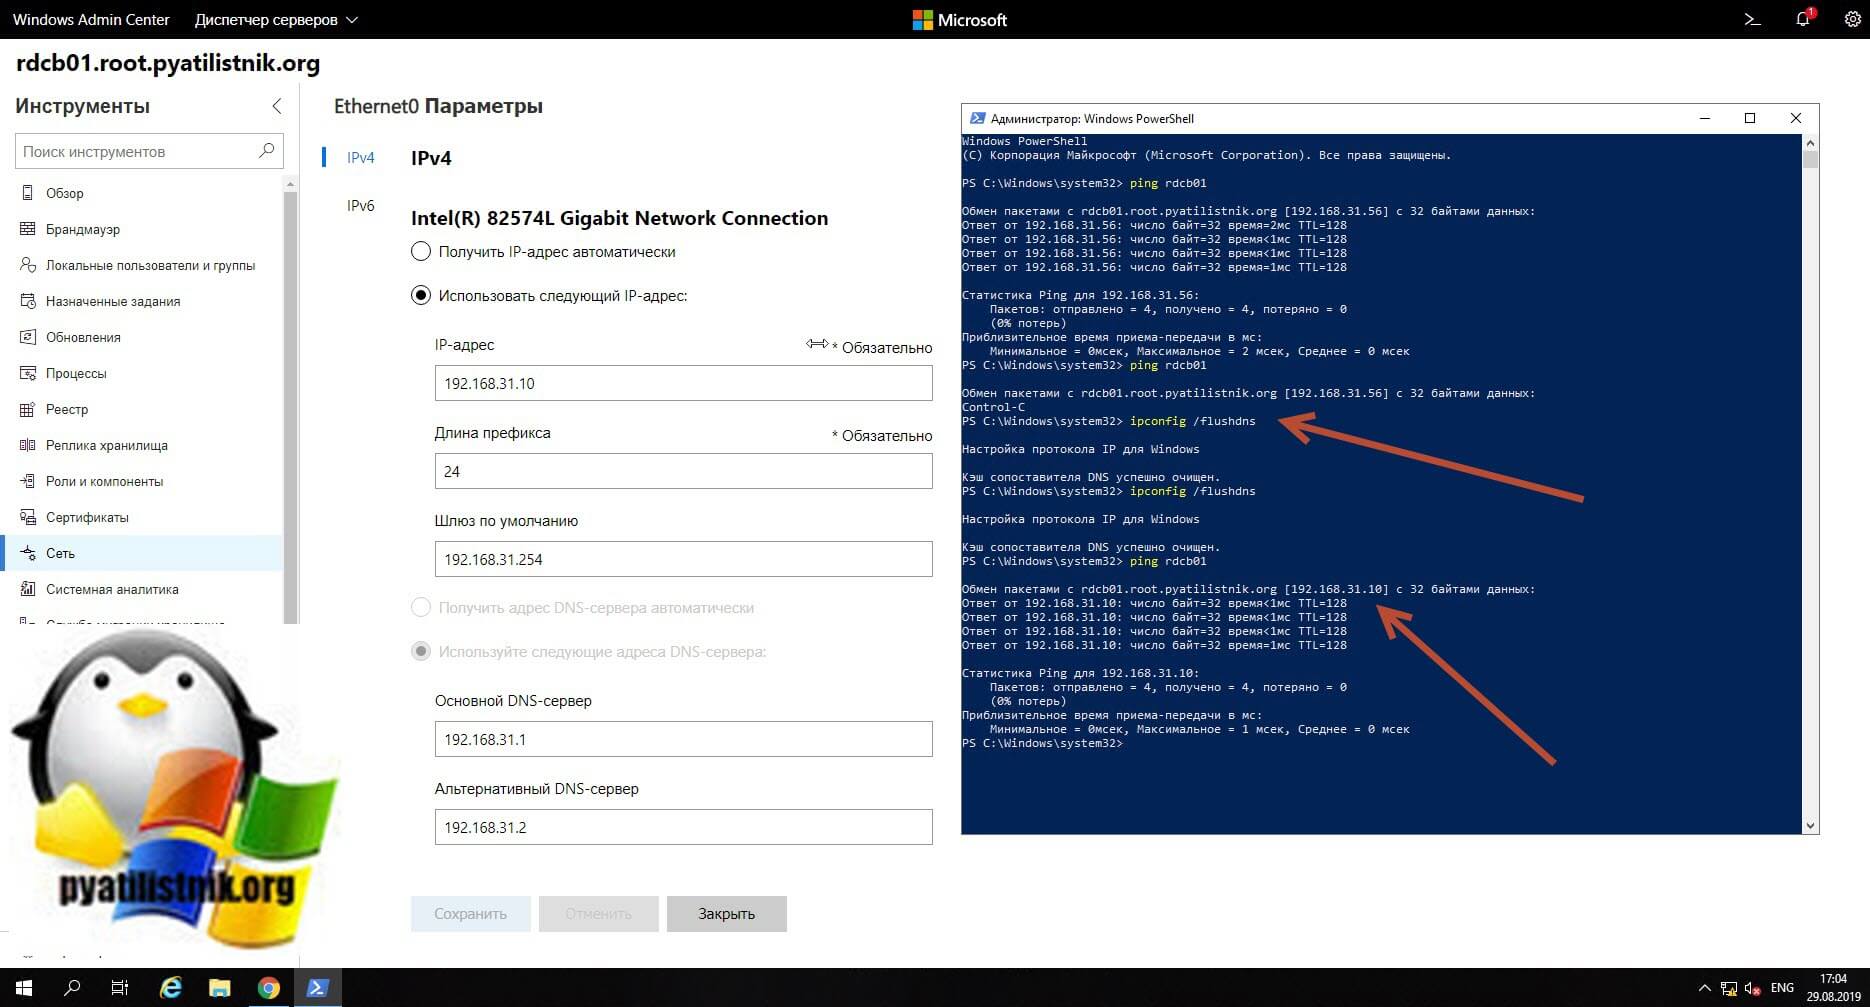
В итоге удаленная настройка сети на сервере Windows Server 2019 выполнена.
Настройка сети Windows Server 2019 через командную строку
Второй метод заключается в использовании утилиты командной строки netsh. На практике, это используется в скриптах, или при настройке Windows Server в режиме Core. Я опять переведу свои настройки на получение адреса от DHCP сервера. DHCP присвоил мне адрес 192.168.31.56.
Для того, чтобы настроить статический IP-адрес через утилиту Netsh, вам нужно знать правильное имя сетевого адаптера, он легко смотрится при выводе команды Ipconfig /all. В моем примере, это Ethernet0.
netsh interface ip set address «Ethernet0» static 192.168.31.10 255.255.255.0 192.168.31.254
Тут у меня:
- 192.168.31.10 — это мой статический Ip-адрес
- 255.255.255.0 — это моя маска подсети
- 192.168.31.254 — это мой основной шлюз
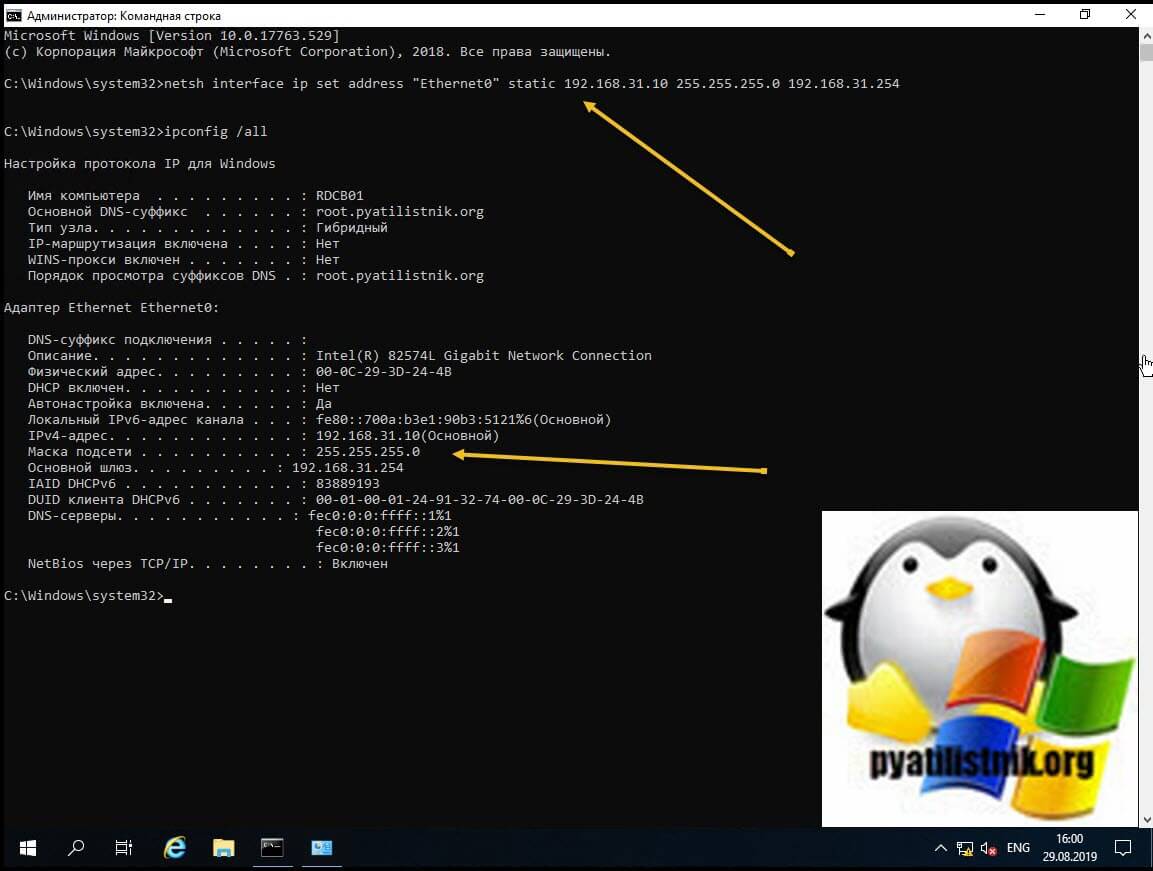
Видим, что команда успешно отработала, можно сразу проверить применение настроек сети через ipconfig. Теперь выполним настройку основного и альтернативного DNS.
netsh interface ipv4 set dnsservers Ethernet0 static 192.168.31.1 primary
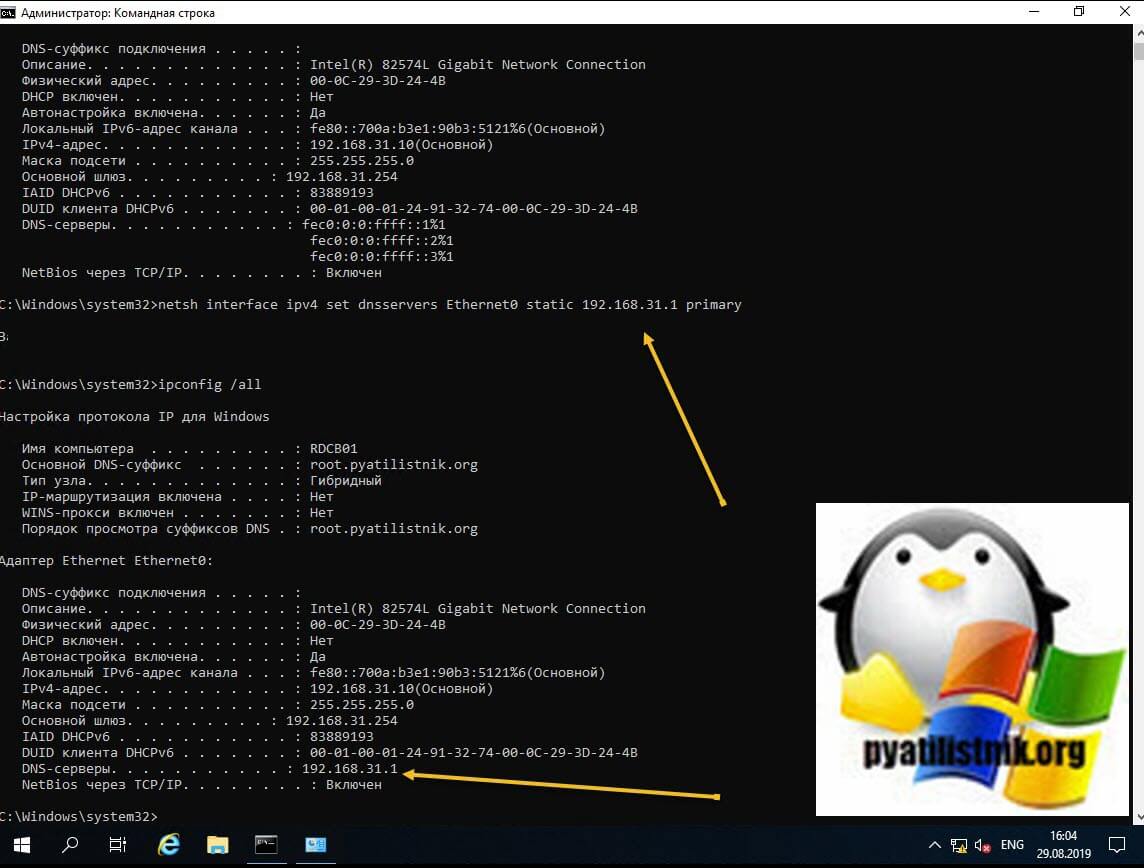
Прописываем альтернативный DNS адрес
netsh interface ipv4 add dnsservers Ethernet0 192.168.31.2 index=2
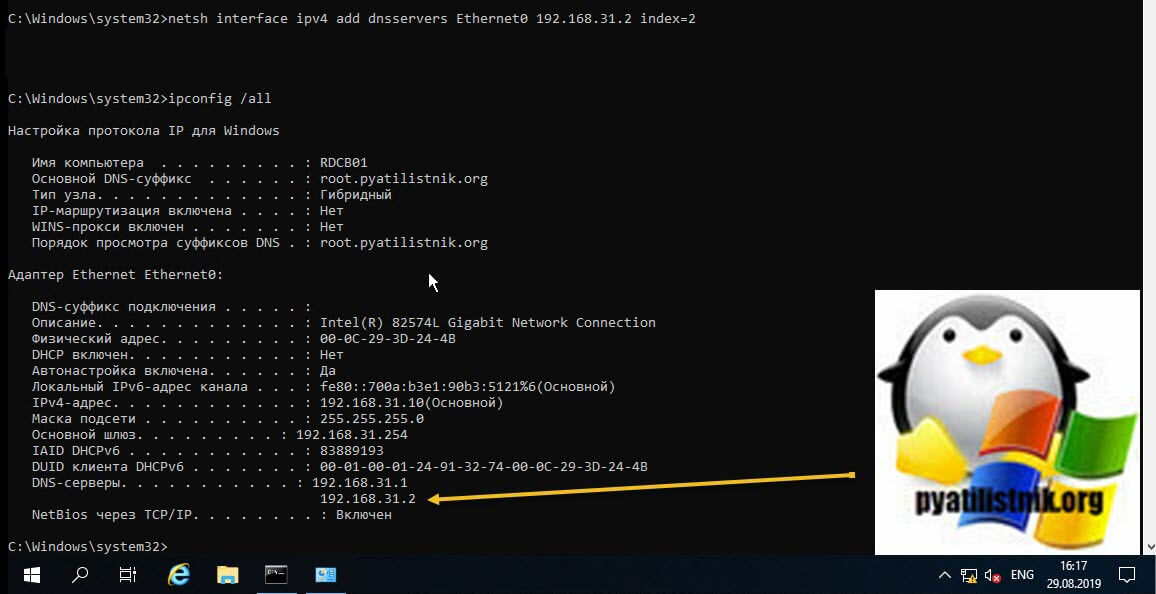
В итоге как видим у нас появился второй адрес DNS сервера на нашем сетевом интерфейсе. Настройка выполнена.
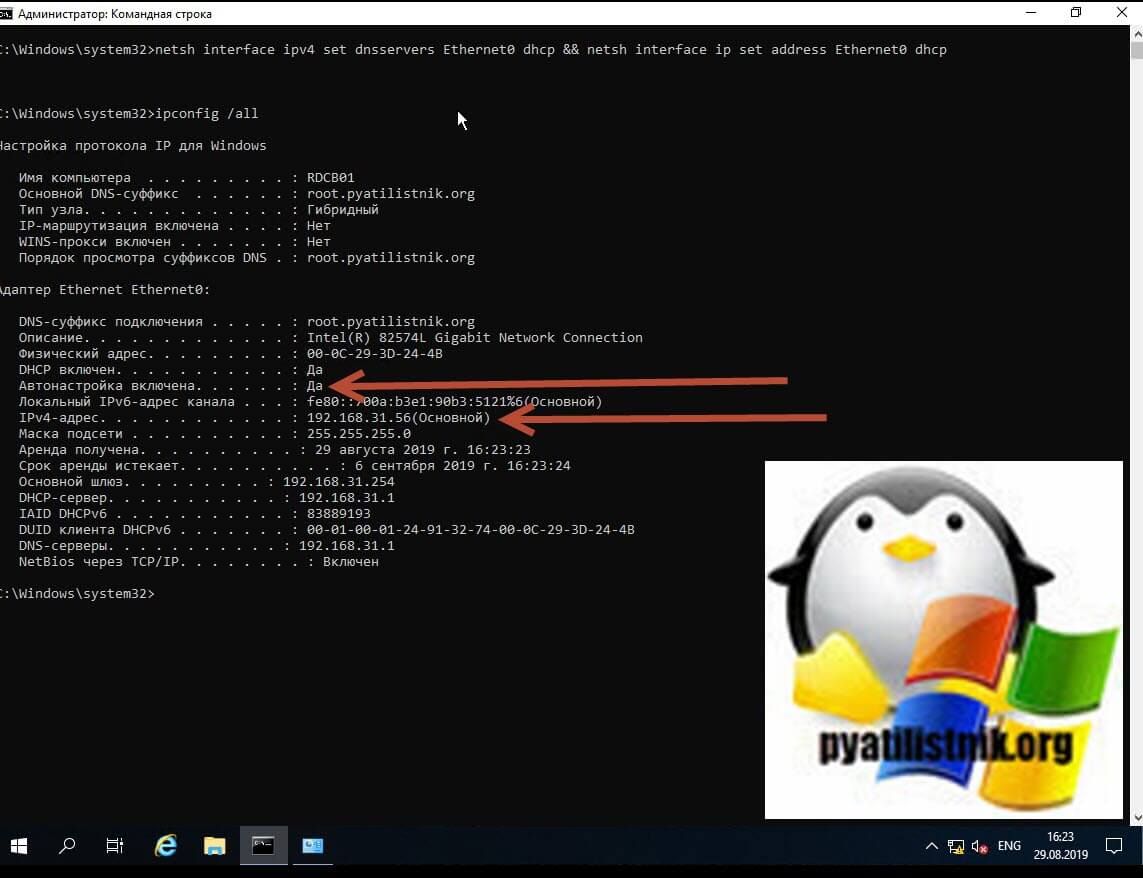
Если вам нужно вернуть сетевые настройки на получение адреса от DHCP сервера, то введите команду:
netsh interface ipv4 set dnsservers Ethernet0 dhcp && netsh interface ip set address Ethernet0 dhcp
Настройка сети через PowerShell
Чтобы настроить статический адрес на сетевом интерфейсе с помощью командлетов, вам необходимо открыть от имени администратора оболочку PowerShell.
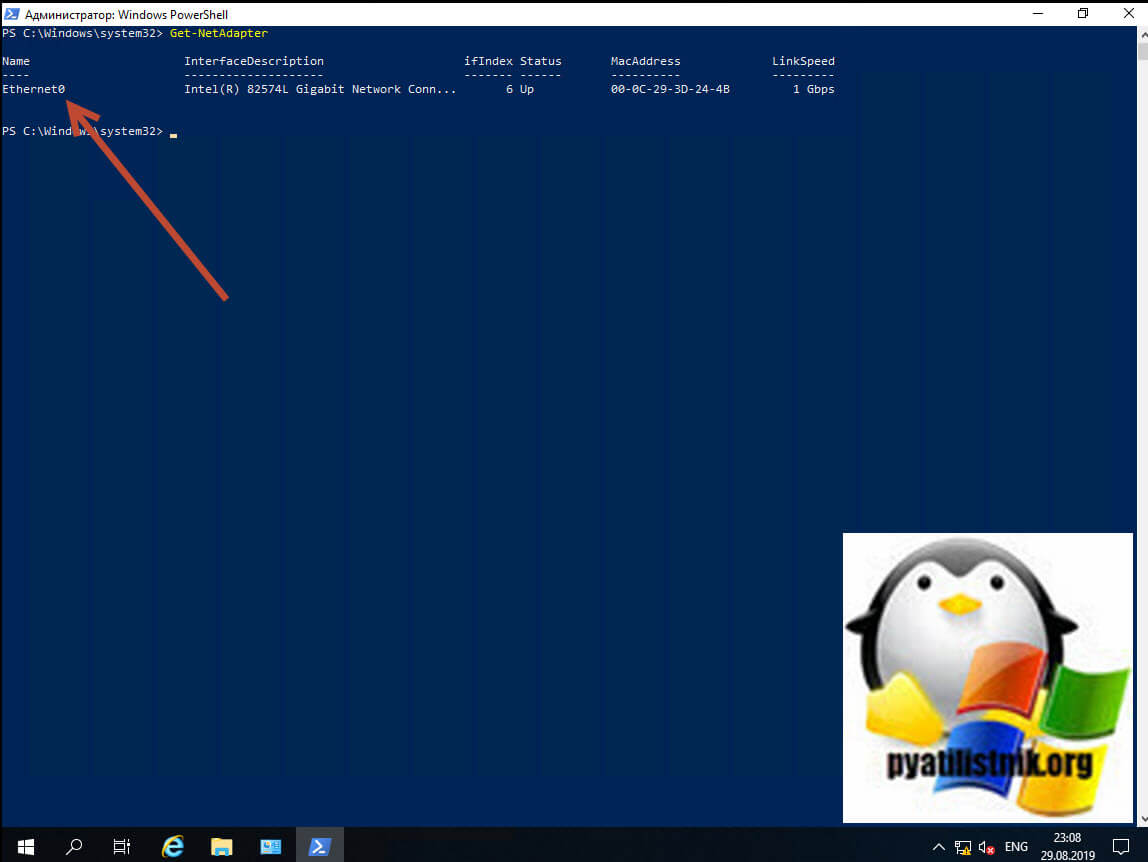
Прежде чем мы начнем настройку сети через PowerShell в нашей Windows Server 2019, нам как и в случае с netsh, нужно выяснить имя сетевого интерфейса. Для этого вводим команду:
В результате я вижу имя интерфейса Ethernet0.
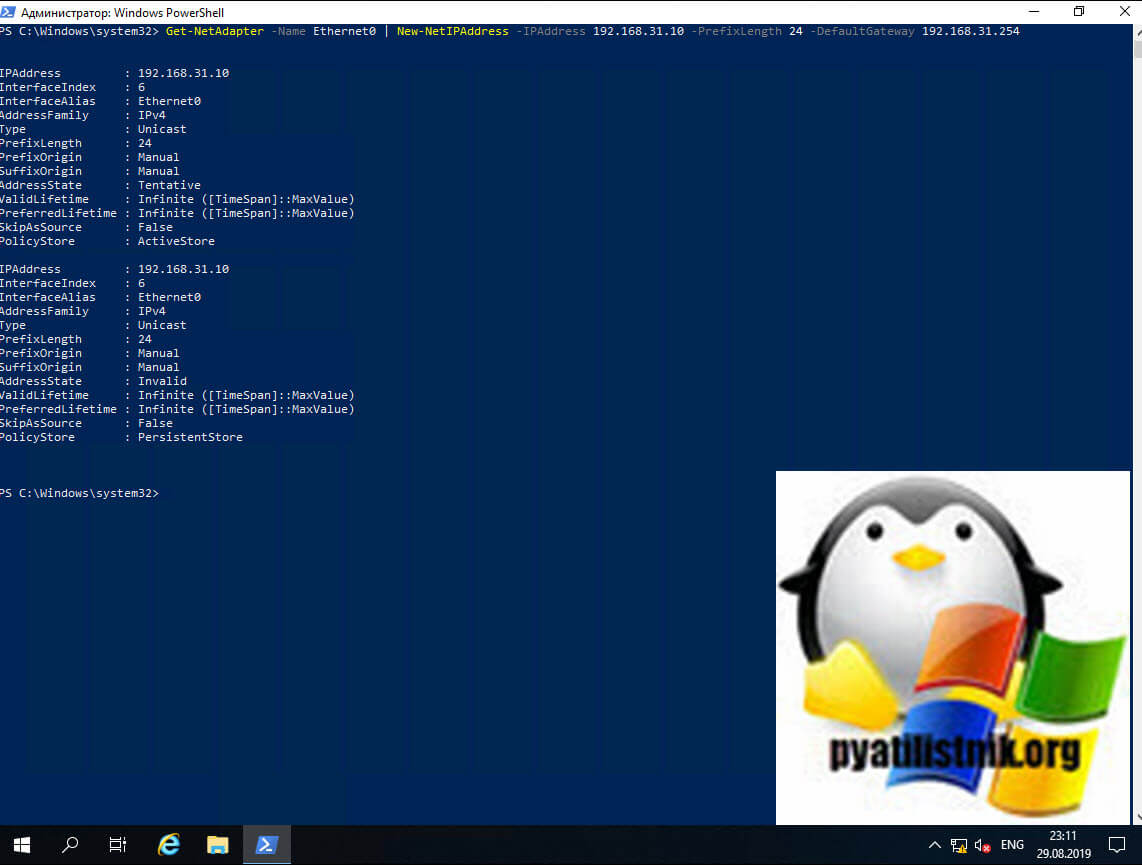
Пишем команду, где обратите внимание префикс сети 255.255.255.0 задается в виде -PrefixLength 24. На выходе вы сразу увидите примененные настройки.
Get-NetAdapter -Name Ethernet0 | New-NetIPAddress -IPAddress 192.168.31.10 -PrefixLength 24 -DefaultGateway 192.168.31.254
Зададим теперь оба DNS-сервера через команду
Get-NetAdapter -Name Ethernet0 | Set-DnsClientServerAddress -ServerAddresses 192.168.31.1, 192.168.31.2
Посмотрим текущие сетевые настройки через команду:
Get-NetIPConfiguration -Detailed
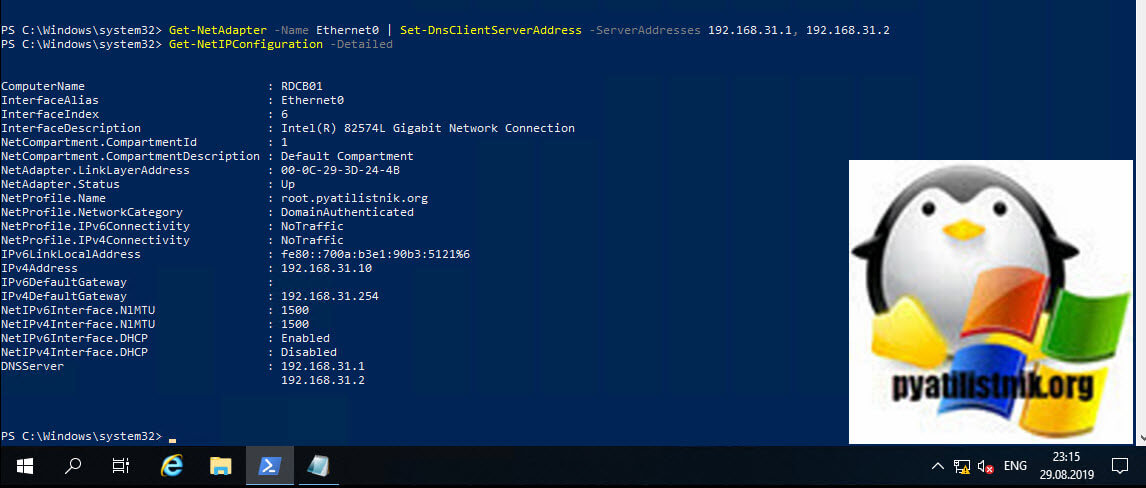
Как видите все сетевые настройки в моем Windows Server 2019 успешно применены.
Удаленная настройка сети
Выше я уже показал вам метод удаленной настройки сети через Windows Admin Center, но существует и еще несколько методов, которые мне были полезны в моей практике. Первое, это использование все того же PowerShell. И так у меня есть компьютер W10-cl01 с Windos 10 и предположим хочу с него настроить сеть на сервере RDCB01.
Хочу отметить, что для этого метода у вас должно быть настроено использование WinRM (Службы удаленного управления Windows)
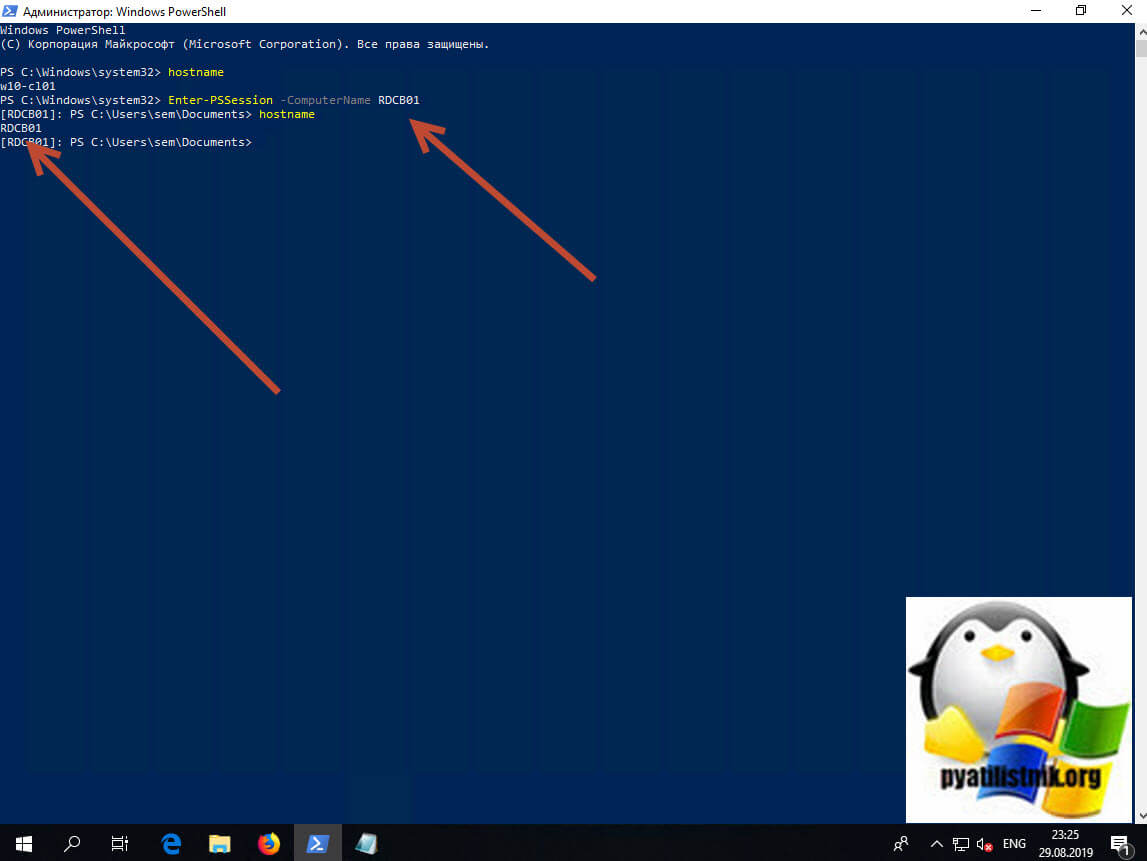
Открываем PowerShell, командой hostname я показываю, что сижу на компьютере W10-cl01. Далее для удаленного подключения вводим команду:
Enter-PSSession -ComputerName RDCB01
Я успешно подключился, теперь повторно введя команду hostname, я вижу, что сижу на компьютере RDCB01, и можно вводить команды описанные выше.
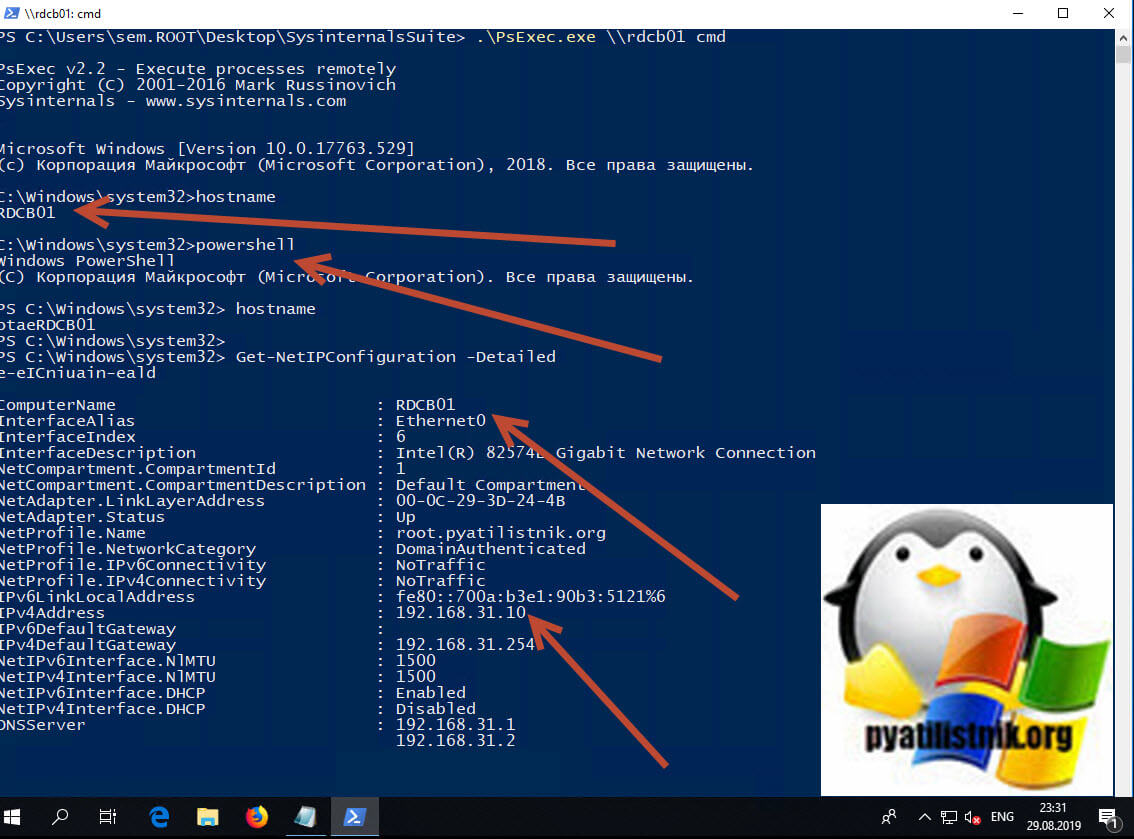
Второй метод удаленной настройки сети на Windows Server 2019, это использование утилиты PsExec.exe, я,о ее настройке и установке рассказывал в статье «Включить RDP Windows удаленно и локально».
Начнется запуск службы на удаленном сервере.

Введя все ту же команду hostname я вижу, что подключен к удаленному серверу RDCB01, при желании вы можете использовать для настройки сети netsh или PowerShell, что нравится больше.
На этом у меня все. Мы с вами рассмотрели локальные и удаленные методы настройки сети в операционной системе Windows Server 2019. С вами был Иван Семин, автор и создатель IT портала Pyatilistnik.org.
Служба Internet Connection Sharing (ICS) в Windows позволяет предоставить общий доступ к интернет подключению на вашем компьютере другим компьютерам в локальной сети (через Wi-Fi или Ethernet). Благодаря этому все компьютеры в локальной сети могут выходить в Интернет через интернет подключение на одном компьютере (компьютер может быть подключен к интернету: через 4G/LTE модем, прямое кабельное подключение через второй сетевой адаптер, спутниковое подключение, PPPoE, VPN подключение и т.д.). В этом случае данный компьютер Windows с двумя сетевыми интерфейсами, подключенными к разным сетям, будет выступать в качестве шлюза для доступа в Интернет других компьютеров. Служба ICS при этом выполняет функции трансляции адресов (NAT) и DHCP сервера.
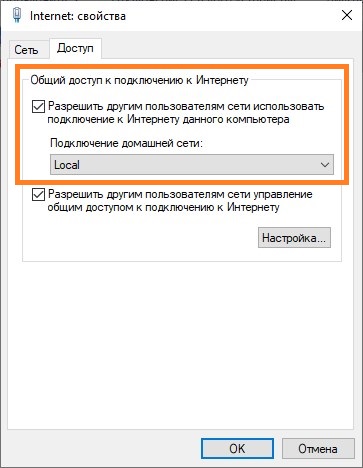
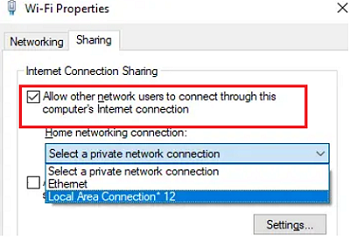
Общий доступ к сетевому подключению в Windows включается в свойствах сетевого адаптера на вкладке Доступ -> Общий доступ к подключению к Интернету -> Разрешить другим пользователям сети использовать подключение к Интернету данного компьютера (Allow other network users to connect through this computer’s Internet connection).

В современных билдах Windows 10 есть один неприятный недостаток – после перезагрузки компьютера с общим сетевым подключением, у других компьютеров в локальной LAN/Wi-Fi сети пропадает доступ в Интернет.
Дело в том, что в современных билдах Windows 10, если через общее сетевое подключение не идет трафик, то служба Internet Connection Sharing отключается через 4 минуты, и не перезапускается автоматически.Чтобы восстановить общий доступ к Интернету, нужно снять и еще повторно включить галку общего доступа в свойства сетевого адаптера, через который Windows подключена к Интернету.
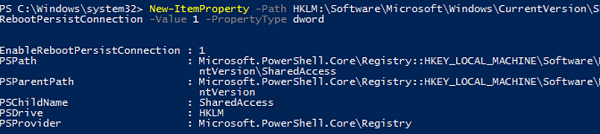
Чтобы служба общего доступа к интернету автоматически включалась после перезагрузки Windows 10, нужно включить специальный параметр реестра EnableRebootPersistConnection типа DWORD в ветке HKEY_LOCAL_MACHINESoftwareMicrosoftWindowsCurrentVersionSharedAccess и значением 1.
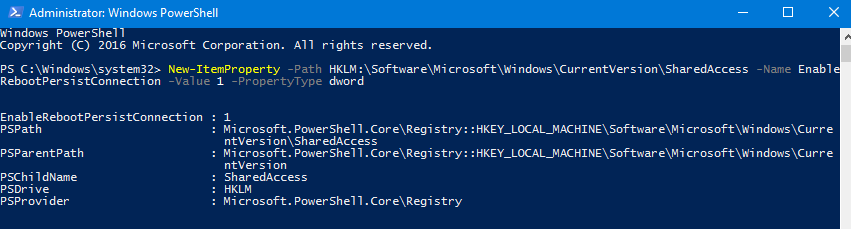
Проще всего создать параметр реестра следующей командой PowerShell:
New-ItemProperty -Path HKLM:SoftwareMicrosoftWindowsCurrentVersionSharedAccess -Name EnableRebootPersistConnection -Value 1 -PropertyType dword
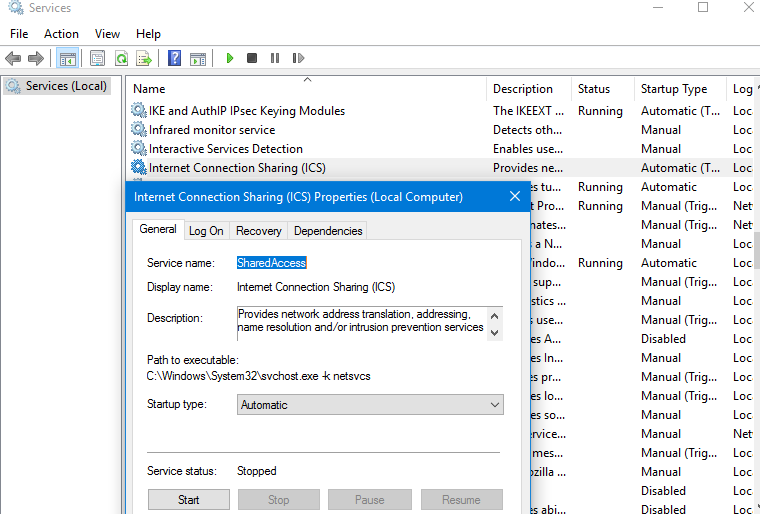
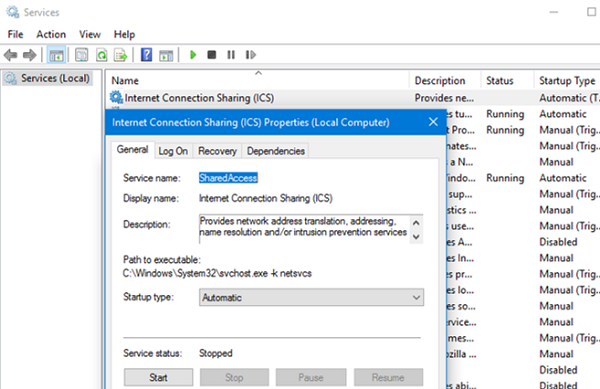
Затем нужно установить автоматический запуск для службы Internet Connection Sharing (
SharedAccess
). Можно изменить тип запуска службы с Manual на Automatic через консоль services.msc или с помощью PowerShell:
Set-Service SharedAccess –startuptype automatic –passthru
Запустите службу:
Start-Service SharedAccess
Также вы можете использовать следующий PowerShell скрипт, который находит на компьютере все сетевые подключения с включенным общим доступом, отключает для них общий доступ и через секунду включает его.
$NetShareObject = New-Object -ComObject HNetCfg.HNetShare
$list = New-Object System.Collections.Generic.List[System.Object]
foreach( $connection in $NetShareObject.EnumEveryConnection ){
$config = $NetShareObject.INetSharingConfigurationForINetConnection( $connection )
if( $config.SharingEnabled -eq 1 ){
$type = $config.SharingConnectionType
$list.Add( @($type,$config) )
$config.DisableSharing( )
}
}
Start-Sleep 1
foreach( $array in $list ){
$array[1].EnableSharing($array[0])
}
Этот PowerShell скрипт можно запускать автоматически через задание планировщика Windows при загрузке компьютера.
- Содержание статьи
- Настройка шлюза
- Настройка клиента
- Дополнительная настройка
- Проброс портов
- Использование статических адресов
- Возможные проблемы
- Отключить использование прокси-сервера.
- Добавить комментарий
Еще с 90ых годов, в операционных системах Windows присутствует возможность предоставления доступа к интернету другим компьютерам. Называется данное решение «Возможность совместного подключения к Интернету» (англ. Internet Connection Sharing или ICS), и было введено в Windows 98 SE. В данной статье мы не будем рассматривать столь старую операционную систему, и попробуем изучить её использование на более современных вариантах Windows — а именно Windows Vista, Windows 7, Windows 8 и Windows 10 — которые в этом плане имеют абсолютно одинаковые настройки.
Настройка шлюза
В данном разделе мы рассмотрим настройку компьютера, который будет выступать в роли шлюза «раздачи интернета». Единственное требование к этому компьютеру — наличие двух и более сетевых интерфейсов, один из которых должен быть иметь доступ к интернету, а другой — к локальной сети. Например:
- Первый интерфейс — VPN соединение, обеспечивающее доступ к интернету, второй интерфейс — подключение к локальной сети, без доступа к интернету;
- Первый интерфейс — Ethernet подключение к сети, с доступом в интернет, второй интерфейс — Ethernet подключение к локальной сети, без доступа к интернету.
Как видно из примеров выше, использовать одно и то же Ethernet подключение для получения и раздачи интернета не получится. Если в компьютере отсутствует вторая сетевая карта, то придется её купить, благо стоят они не дорого.
Давайте рассмотрим самый минимум настроек, который необходимо сделать для предоставления интернет-соединения компьютером-шлюзом.
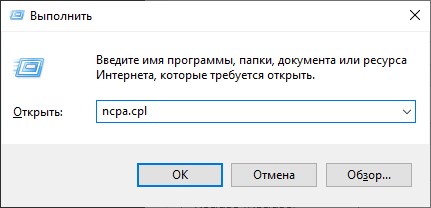
- Для включения раздачи интернета, нужно открыть список сетевых подключений — нажимаем поочередно клавиши Win + R и набираем там команду
ncpa.cplпосле чего нажимаем кнопку «ОК».

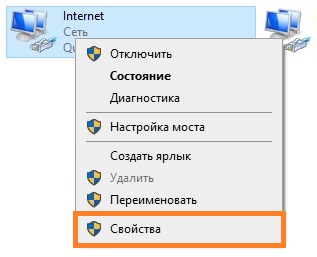
- Откроются сетевые подключения, среди которых нужно найти то, которое имеет доступ к интернету — вычислив такое подключение, нажимаем на нем правой кнопкой мыши, и выбираем пункт контекстного меню «Свойства».

- В окне свойств необходимо перейти на вкладку «Доступ» и отметить галочкой пункт «Разрешить другим пользователям сети управление общим доступом к подключению к Интернету». В поле «Подключение к домашней сети» нужно выбрать подключение к локальной сети, из которой планируется открыть доступ к интернету.

На этом базовая настройка компьютера-шлюза закончена. Дальше нужно перейти к компьютеру, которому нужен доступ в интернет, и настроить его.
Настройка клиента
Фактически, в роли клиента может выступить любое устройство, подключенное к локальной сети — но в данном примере мы рассмотрим компьютер под управлением операционной системы Windows. Для настройки возможности подключения к интернету со стороны компьютера-клиента, на нем необходимо выполнить следующие действия:
- Открываем сетевые подключения, нажав поочередно клавиши Win + R, и введя там команду
ncpa.cpl. Нажимаем ОК, после чего откроются Сетевые подключения.
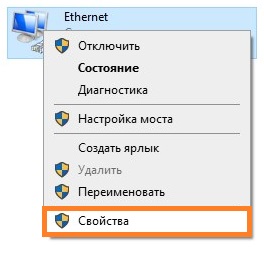
- Находим подключение к локальной сети, нажимаем на нем правой кнопкой мыши и выбираем пункт «Свойства».

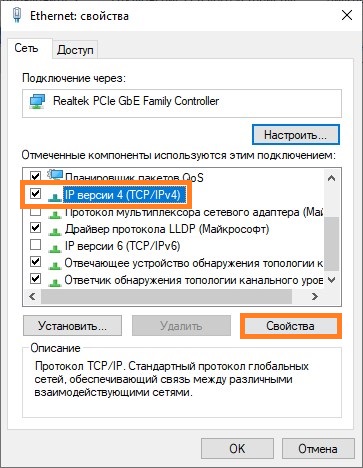
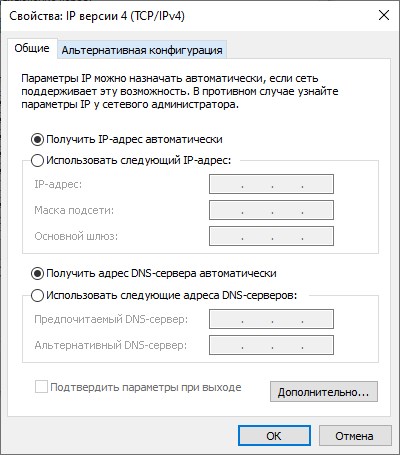
- В свойствах сети ищем пункт «IP версии 4 (TCP/IPv4), выбираем его, после чего нажимаем на кнопку «Свойства».
- В свойствах данного протокола убеждаемся, что выбраны пункты «Получать IP-адрес автоматически» и «Получить адрес DNS-сервера автоматически».

После этого, на данном компьютере должно появится соединение с интернетом, что легко проверить, к примеру через браузер.
Дополнительная настройка
Проброс портов
В Windows так же можно реализовать проброс портов, с интерфейса, который «смотрит в мир» на компьютеры внутри локальной сети — делается это в настройках сетевого интерфейса, с доступом в интернет. Для этого, открываем свойства данного подключения, и переходим на вкладку «Доступ». Там в самом низу будет находится кнопка «Настройка», которую необходимо нажать.

Откроется окно с настройками проброса портов. В нем будет присутствовать уже некоторое количество готовых вариантов, имена которых по каким-то причинам отображается в виде цифровых значений. Посмотреть, что за службы/порты скрываются за этими цифрами, можно открыв каждую из них, или же посмотреть на готовый список ниже:
- 1700 — FTP — порт TCP 21
- 1701 — Telnet — порт TCP 23
- 1702 — SMTP — порт TCP 25
- 1703 — POP3 — порт TCP 110
- 1704 — IMAP3 — порт 220
- 1705 — IMAP — порт 143
- 1706 — HTTP — порт 80
- 1707 — HTTPS — порт 443
- 1708 — RDP — порт 3389
Для добавления своего варианта нужно нажать кнопку «Добавить».

Заполняется окно с пробросом порта следующим образом:
- Описание службы — любое имя, которое поможет идентифицировать в дальнейшем, что за порт и зачем он был проброшен.
- Имя или IP-адрес компьютера вашей сети, на котором располагается эта служба — IP адрес компьютера, на который нужно пробросить порт.
- Номер внешнего порта службы — порт, который доступен извне.
- Номер внутреннего порта службы — порт, на который нужно выполнить проброс — может отличаться от внешнего.
- Так же рядом присутствует выбор протокола — TCP или UDP.
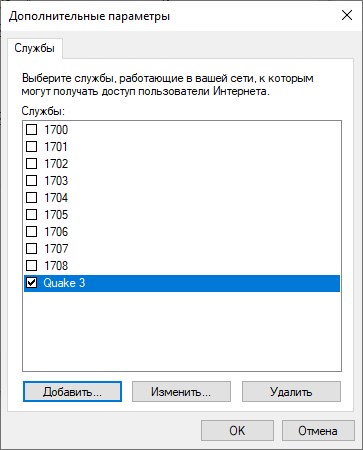
Пример настройки проброса для игрового сервера Quake 3 можно увидеть на картинке ниже.

После нажатия на кнопку «ОК», данный порт появится в списке служб локальной сети, которым предоставлен доступ из интернета.
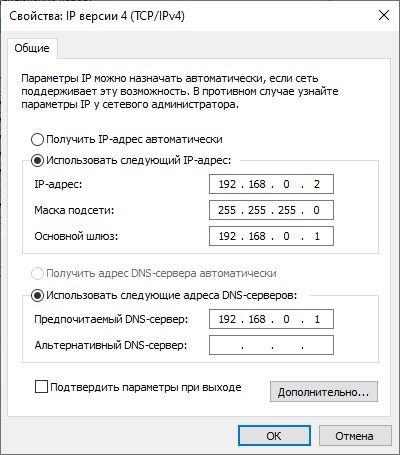
Использование статических адресов
Если Вам не по душе использование встроенного в Windows DHCP сервера, то Вы можете задать свои собственные уникальные сетевые адреса из диапазона 192.168.0.2 – 192.168.0.254 — к сожалению, сам DHCP сервер не отключить, и диапазон адресов не поменять. Сетевой маской будет 255.255.255.0, а сетевым шлюзом — 192.168.0.1. В качестве DNS-сервера так же следует прописать 192.168.0.1. Пример таких сетевых настроек можно увидеть на скриншоте ниже.
Возможные проблемы
В ряде случаев, возможно, что интернет не появится на стороне компьютера-клиента, не смотря на то, что все выше перечисленные настройки были сделаны правильно. В таком случае, следует проверить ряд настроек.
Отключить использование прокси-сервера.
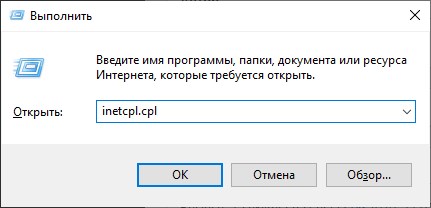
- Нажимаем клавиши Win + R, вводим команду
inetcpl.cplи нажимаем кнопку «ОК».
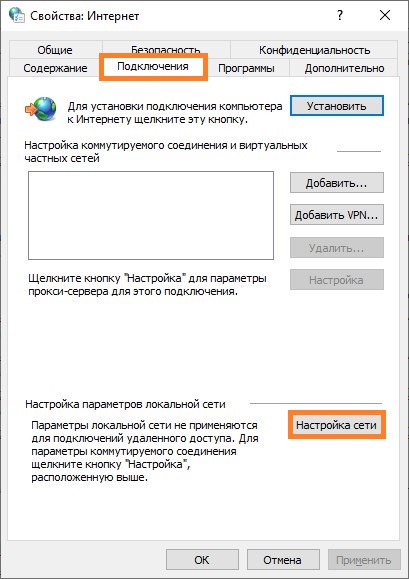
- В открывшемся окне свойств интернета, нужно перейти на вкладку «Подключения» и в самом низу нажать на кнопку «Настройка сети».

- В открывшихся настройках параметров локальной сети нужно убрать все галочки, в том числе с пункта «Автоматическое определение параметров», после чего закрыть все ранее открытые окна кнопками «ОК».
Windows OS Hub / Windows 10 / Internet Connection Sharing (ICS) Stops Working After Reboot in Windows 10
Internet Connection Sharing (ICS) service in Windows allows to share Internet connection on your computer with other devices in your local network (via Wi-Fi or Ethernet). This allows all computers on the local network to access the Internet via an Internet connection on one computer (the computer may be connected to the Internet via 5G/4G/LTE modem, direct cable connection via a second adapter, satellite connection, PPPoE, VPN, etc.). In this case, this Windows computer with two network interfaces connected to different networks will be a network gateway to other devices. ICS is a built-in Windows service that provides network connection sharing, address translation (NAT), and DHCP server functionality.
You can enable shared access to a network connection in Windows in the properties of the network adapter (Sharing tab -> Internet Connection Sharing -> Allow other network users to connect through this computer’s Internet connection).
There is one unpleasant drawback in modern Windows 10 builds: if a computer with a shared network connection is restarted, other computers in a local LAN/Wi-Fi network lose Internet access.
The matter is that in modern Windows 10 builds Internet Connection Sharing service is disabled in 4 minutes and it does not restart automatically if no traffic goes through the shared connection. To restore shared Internet access, you need to uncheck and check the shared access option in the properties of the network adapter Windows is using to connect to the Internet.
To enable Internet Connection Sharing to start automatically after restarting Windows 10, enable a DWORD registry parameter EnableRebootPersistConnection with the value 1 in the reg key HKEY_LOCAL_MACHINESoftwareMicrosoftWindowsCurrentVersionSharedAccess.
It is easier to create a registry parameter using this PowerShell command:
New-ItemProperty -Path HKLM:SoftwareMicrosoftWindowsCurrentVersionSharedAccess -Name EnableRebootPersistConnection -Value 1 -PropertyType dword
Then set the automatic startup for the Internet Connection Sharing service (SharedAccess). You can change the startup type from Manual to Automatic in services.msc or using PowerShell:
Set-Service SharedAccess –startuptype automatic –passthru
Start the service:
Start-Service SharedAccess
You can also use the following PowerShell script to find all network connections with the shared Internet access on the computer, disable shared access and re-enable it again.
$NetShareObject = New-Object -ComObject HNetCfg.HNetShare

$list = New-Object System.Collections.Generic.List[System.Object]

foreach( $connection in $NetShareObject.EnumEveryConnection ){

$config = $NetShareObject.INetSharingConfigurationForINetConnection( $connection )

if( $config.SharingEnabled -eq 1 ){

$type = $config.SharingConnectionType

$list.Add( @($type,$config) )

$config.DisableSharing( )

}

}

Start-Sleep 1

foreach( $array in $list ){

$array[1].EnableSharing($array[0])

}
You can run the PowerShell script automatically using Windows Task Scheduler at the computer startup.
Download PC Repair Tool to quickly find & fix Windows errors automatically
If you want to disable Internet Connection Sharing (ICS) in Windows 11/10, follow this step-by-step guide. As Windows 10 comes with an in-built option, no additional software is required to install to disable this functionality.
ICS or Internet Connection Sharing is a feature that lets you share one computer’s internet connection with multiple computers connected in a Local Area Network or LAN. In other words, it is possible to provide an internet connection to more than one computer from a single IP address via NAT technology.
To disable Internet Connection Sharing (ICS) in Windows 11/10, follow these steps-
- Press Win+R to open the Run prompt.
- Type ncpa.cpl and hit the Enter button.
- Right-click on the network adapter.
- Select the Properties option.
- Switch to the Sharing tab.
- Remove the tick from Allow other network users to connect through this computer’s Internet connection checkbox.
- Click the OK button.
Ppress Win+R to open the Run prompt. Type ncpa.cpl, and hit the Enter button to open the Network Connections window. Alternatively, you can search for “network connections” in the Taskbar search box and click on the respective result. After opening the window, right-click on the desired network adapter and select the Properties option.
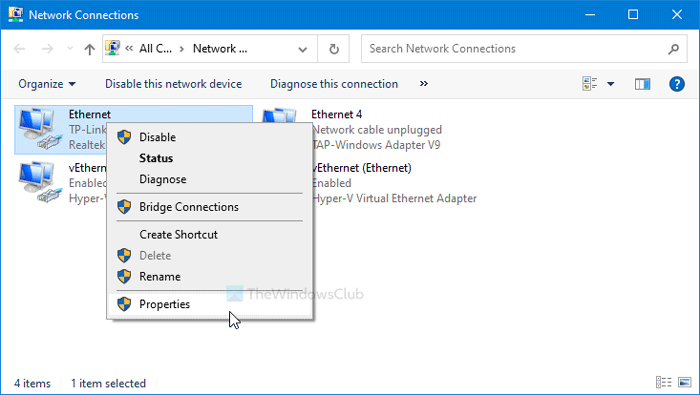
Then, switch to the Sharing tab and remove the tick from the Allow other network users to connect through this computer’s Internet connection checkbox.
 in Windows 10")
Click the OK button to save the change.
This method works per connection source basis. In other words, if you want to disable it for multiple internet sources, you have to repeat the steps for each one of them. However, if you want to disable it altogether, you can use the Services panel.
Related: Internet Connection Sharing not working on Windows.
Turn off Internet Connection Sharing (ICS) using Services
To turn off Internet Connection Sharing (ICS) in Windows 11/10 using Services, follow these steps-
- Search for services in the Taskbar search box.
- Click on the respective result.
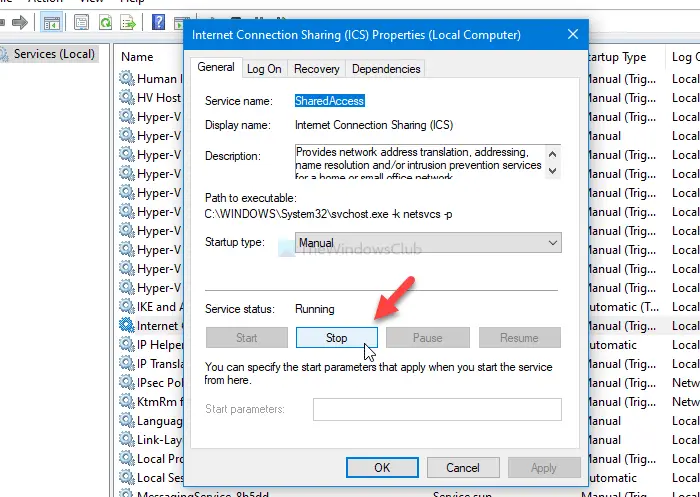
- Double-click on the Internet Connection Sharing (ICS).
- Click the Stop button.
- Choose Disabled from Startup type drop-down list.
- Click on the OK button.
Let’s check out the detailed version of these steps.
To get started, search for services in the Taskbar search box, and click on the corresponding result. Next, find out Internet Connection Sharing (ICS) and double-click on it. Click on the Stop button.
Following that, expand the Startup type drop-down list and choose Disabled.
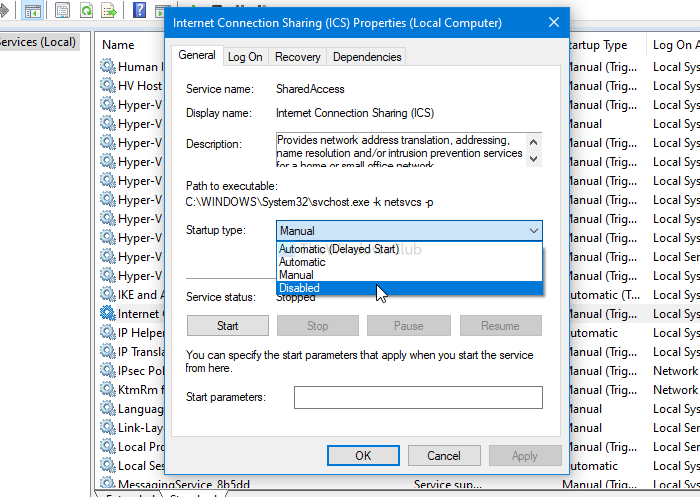
Then, click the OK button to save the change.
I hope it helps.
Read next: An error occurred while Internet Connection Sharing was being enabled.

Anand Khanse is the Admin of TheWindowsClub.com, a 10-year Microsoft MVP (2006-16) & a Windows Insider MVP (2016-2022). Please read the entire post & the comments first, create a System Restore Point before making any changes to your system & be careful about any 3rd-party offers while installing freeware.
A Virtual Private Network (VPN) is used to securely create a tunnel for data between your local computer to a remote server. On Windows Server 2019, you can configure a VPN to provide network access to connected clients and allow connected devices to communicate securely.
This guide explains how to set up a fresh Windows Server 2019 as an L2TP over IPSec, or a PPTP VPN, using the routing and remote access feature. Layer 2 Tunneling Protocol (L2TP) with IPSec offers robust encryption for connections to the server. On the other hand, the Point to Point Tunneling Protocol (PPTP) is simple to deploy but not as secure.
To set up the VPN server, we shall use the built-in Routing and Remote access feature, which offers a graphic interface to configure remote networking features such as Dial-up, LAN routing, NAT, and VPN.
Requirements
-
Deploy a Windows Server 2019 Instance on Vultr
-
Remotely connect to the server and log in as an Administrator
Create a New VPN User
For the VPN service to work well, it must authenticate with a valid user account to the server. So, you need to create a new user on the server.
Click Tools under server manager and select Computer Management from the drop-down list to create a new user.
Once the computer management window pops up, expand Local Users and Groups from the left pane and right-click Users to select New User on the sub-menu.

Under the New User dialog box, enter a username, full name, and password for the VPN user, then click create and close the window.

The new user will now be listed on the list of active server users, right-click on the new user and select properties.
Under the user properties window, navigate to the Dial-in tab and click Allow access under Network Access Permission. Click OK for changes to take effect.

Install the Routing and Remote Access Features
Procedure 1: Through Server Manager
From the Windows start menu, open Server Manager, click Manage, then select Add Roles and Features from the drop-down list.
From the open window, click next and select Role-based or feature based installation, then select your server from the pool. Select Remote Access, Remote Access Administration from the list of server roles.

Next, select DirectAccess and VPN (RAS) and Routing from the features list, then click to Install IIS, which is required for remote access to work well.

Procedure 2: Using Windows PowerShell
You can also install Remote Access from Windows Powershell.
From the Windows start menu, open an Administrative Powershell, then install Remote access by pasting the following code to the console.
Install-WindowsFeature RemoteAccess

Install-WindowsFeature DirectAccess-VPN -IncludeManagementTools

Install-WindowsFeature Routing -IncludeManagementTools


Your output should be similar to:


PS C:UsersAdministrator> Install-WindowsFeature RemoteAccess

>> Install-WindowsFeature DirectAccess-VPN -IncludeManagementTools

>> Install-WindowsFeature Routing -IncludeManagementTools


Success Restart Needed Exit Code      Feature Result

------- -------------- ---------      --------------

True    No             Success        {Remote Access}

True    No             Success        {RAS Connection Manager Administration Kit...

True    No             Success        {Routing}
Configure Routing and Remote Access
Open Server Manager and click Tools on the top toolbar. From the drop-down list, select Remote Access Management.

In the open Routing and Remote Access window, right click on your server name just below Server status, then select Configure and Enable Routing and Remote Access from the drop-down menu.
Now, select Custom configuration to configure remote access manually.

Select VPN Access and NAT as services you want to enable on your server, click next to finish the configuration, and start the service.

Setup a PPTP VPN
Now that Remote Access is running, you can set up your PPTP VPN. To get started, you must assign connected clients** static IP Addresses to avoid possible connection issues. To do this, right-click on your server under the Routing and Remote Access window and select Properties from the drop-down list.

Click IPV4 in the Open Window, then select Static address pool. Now, click Add to craft a new IP Address range from the open pop-up window. In this guide, we use the range 10.0.0.1 to 10.0.0.50, and the server will automatically calculate the number of available addresses.

Click OK to save your static IP Address configuration. You will be prompted to restart Routing and Remote Access for changes to apply; simply click OK.
Configure NAT and enable PPTP
We need to configure Network Address Translation (NAT) for connected clients to use the Internet. On the left pane of the same routing and remote access window, expand the IPv4 options under your server. Right-click on NAT and select New Interface.

Under the open dialog window, select Public interface and enable NAT on the interface.
Next, navigate to Services and Ports and click VPN Gateway (PPTP) from the drop-down list.

Click Edit to set a Private address for the VPN service, change the current address 0.0.0.0 to 127.0.0.1, and click OK to save.

Finally, click OK to save all changes, then right-click on your server from the left pane and click Restart under the All Tasks sub-menu.

This will restart routing and remote access services making your server ready for incoming VPN connections.
Configure Windows Firewall to accept Incoming PPTP VPN Connections
Click Tools from the Windows server manager and select Windows Defender Firewall with Advanced Security from the drop-down list.
Under the open Windows Defender Firewall with Advanced Security window, select Inbound Rules on the left pane, then click New Rule on the right pane.

In the open new Inbound rule wizard, click Predefined and select Routing and Remote Access from the list.

Under predefined rules, choose Routing and Remote Access (PPTP-In), click next to allow the connection, then finish for the new Firewall rule to be applied and test your new PPTP VPN server.

Test your PPTP VPN
Using your personal computer (PC) or Smartphone, go to Networks, Add a new VPN and select PPTP as the VPN type. Then, enter the VPN username and password created earlier to connect.
In this guide, we cover and test the PPTP VPN on a Windows 10 PC. To get started, click the start menu and search for Control Panel, then, click Network and Internet.
Under Network and Internet, open the Network and Sharing Center and click Set up a new connection or network.

Under the open window, select Connect to a workplace and click Use my Internet connection (VPN).
Then, enter your server’s public IP Address (Check your Vultr server dashboard), assign the connection a name, and click create.

Now, on the left pane, click Change adapter settings, then right click your created VPN interface and select Properties.

Under the pop-up, click Security, then choose Point to Point Tunneling Protocol (PPTP) under Type of VPN.
Finally, under Allow these protocols, select CHAP and MS-CHAP v2, then click OK to apply changes.

Your new VPN is configured successfully. Click the network connection icon on the taskbar, select your VPN on the list and click Connect to enter the VPN username and password created earlier to establish a connection to your new PPTP VPN server.

Setup L2TP with IPSEC
Open server manager, click Tools, and open Remote Access Management, then right-click your server on the left pane to select Properties from the drop-down list.
Under server properties, navigate to the Security tab, and click Allow custom IPSec policy for L2TP/IKEv2 connection to enter your new pre-shared key.
In this guide, we use 12345678, choose something stronger, then navigate to IPV4 to set a static address pool and click OK to apply changes.

Keep note of the pre-shared key (PSK) since it will be required for every user establishing a connection to the VPN server.
From the left pane, expand the IPV4 sub-menu and right-click on NAT, then select New Interface. If you set PPTP earlier, click NAT and edit the existing interface you already created.
Navigate to the Services and Ports tab and select VPN Gateway [L2TP/IPSec], then click edit to change the private address from 0.0.0.0 to 127.0.0.1. Click OK to save changes and restart remote access from the left pane under All Tasks.
This will restart Routing and Remote Access, then save the applied L2TP configurations.
Allow L2TP Connections through Windows Firewall
Open Windows Defender with Firewall, select inbound rules and add a new rule. Select Predefined and from the list, choose Routing and remote access.
Under Predefined rules, select Routing and Remote Access [L2TP-In] and click next.

Finally, allow the connection and click Finish to apply the new Firewall rule.
Connect and Test Your L2TP VPN server
In this guide, we test the new L2TP with IPSec VPN on a mac. To get started, open System Preferencesand click Network.
Under the Network Preferences window, click the + sign and select VPN under the Interface dialog box. Then, choose L2TP with IPSec as the VPN Type and assign your connection a name.

Click create, then enter your public server IP Address (server address) and username (Account name). Next, click Authentication Settings to enter your account password and Pre-shared key (Shared secret) created earlier.

Next, click Advanced and select Send all Traffic over VPN Connection, then click Apply, and finally click Connect to establish a connection with your new L2TP VPN server.

Conclusion
You have set up a VPN on your Windows server 2019 instance; you can choose to create both PPTP and L2TP VPNs with different users connecting through your server without any limitations.
For every connected device, they will be able to access the Internet through your server and interact with other connected computers.

Table of Contents
- What is Internet Connection Sharing?
- When you may need Windows 10 Internet Connection Sharing?
- Methods of Internet Connection Sharing Windows 10
- Method 1: Internet Connection Sharing Using the mobile hotspot
- How to disable Mobile Hotspot sharing in Host PC?
- Method 2: Windows 10 Internet Connection Sharing Using netsh command
- Method 3. Windows 10 Internet Connection Sharing Using External Software
- Method 4. Windows 10 Internet Connection Sharing Using Ethernet Cable
What is Internet Connection Sharing?
Internet Connection Sharing ( ICS ) is a service of windows OS which enables one internet-connected computer to share its internet with other electronics device(having wifi adaptor). So, the main computer /laptop/mobile which is providing an internet connection is considered as an ICS host / ICS gateway, and other devices are connected to this host system and all incoming traffic of those devices through the ICS host system.ICS is not a new feature, it was introduced in Windows 98 and exists till now as a preinstalled feature of windows. In general, ICS mostly uses NAT technologies to achieve internet sharing capabilities.
Before moving forward :
- Make sure all client computers (the computer which wants an internet connection ) can connect to the Internet.
- Make sure that the host PC can host an internet connection
- Make sure that the host PC has OS above Windows 98. Today most of us have windows XP, Windows Vista, Windows 7,8,10 and it is ok.
- Make sure that your host PC is connected to Wifi, or Ethernet, or Cellular Data Connection
Must of today’s computer has all these features.
When you may need Windows 10 Internet Connection Sharing?
- Suppose you are in a room where you just have one wired Ethernet Connection and have no wifi available and your friends request the internet. Then you can share your internet connection with your friends.
- Suppose your friend has a low wifi connection and you have the fastest ethernet connection and both are near to each other then you can share your internet connection with your friends.
Methods of Internet Connection Sharing Windows 10
There are various methods of sharing internet connection in windows 10.
Method 1: Internet Connection Sharing Using the mobile hotspot
For this, you don’t need any software. All you may need the administrative level privilege of the system.
1)Press Windows + X shortcut keys to open a quick link menu.
 Then quick link menu will appear at the button left corner as shown below

2)Now click on Network Connections
3)Then the network connection setting will appear as shown below. There look at the left pane, you will find «Mobile Hotspot«.Click on «Mobile Hotspot«.
 4)On your mobile hotspot option, toggle to «on» Share my internet connection with other devices,
5)Then on the same screen, selects «connection your internet connection from» to either wifi or ethernet. Here, In my case, I have selected wifi.
6)You can also choose between sharing your internet connection over Wi-Fi or Bluetooth by checking the appropriate option. In my case, I have selected wifi.
7)Next, click on the edit button, as soon as you press the «edit» button pop-up screen will appear.
 There you enter a network name that users will use to identify in the name field and also Type a password (at least 8 characters) and click on the «Save» button.
Here, for the demo, I have networkname: ourtechroom and password: share111
Now, when the client opens the wifi connection they will find a network that is created just now. In my case, I have «ourtechroom» as networkname.

How to disable Mobile Hotspot sharing in Host PC?
As above, follow the same up to step 3 in Host PC, then on the same screen, toggle switch to «off» in Share my internet connection with other devices.
 Now your internet connection will not be shown to the client.
Method 2: Windows 10 Internet Connection Sharing Using netsh command
If you are a command prompt lover then you can try this. You can do the same in less than a minute.
Netsh command is one of the powerful command-line tools that helps you to modify any network configuration setting.
Hosted Network is one of the features of windows 10 which allows you to turn your pc into a wireless hotspot.
You must do this with administrator privilege otherwise you will not be able to perform the action.
First of all, check whether your system supported Hosted Networks or not for this follow this step:
1 Open Command Prompt with administrator privilege.
1 a) Press the Windows button and you will navigate to the search field at the bottom left corner. There type cmd and you will find a command prompt in the list.
1 b) Just right-click on Command Prompt and select «Run as administrator«.Then a small pop-up will appear. There Click on «Yes«.
 Then will get a command prompt as the black screen as shown below:
 Notice:
You will find your command prompt opened inside the %windir%/system32 path. In my case: C:/windows/system32
Also, look at the title bar of the command prompt, you will find Administrator, which means you have successfully opened a command prompt in admin privilege mode.
2 Check whether your system can host a network
For this type:
netsh wlan show driver
and press enter.
If you get an output as Hosted Network supported: yes then you can move forward.

3 Create a hosted network
Now, the next step is to create a hosted network. For this type below command on the same screen.
NETSH WLAN set hostednetwork mode=allow ssid=Your_SSID key=Your_Password
Replace Your_SSID with your desired name. This is a network name. This name is seen to everyone who wants to connect to your hosted network.
Replace Your_Password with your desired password. This password is required whoever wants to connect to your hosted network.

Here, I have set SSID: Ourtechroom and Password: share111.
If you have done this step properly you will get a message like below:
The hosted network mode has been set to allow.
The SSID of the hosted network has been successfully changed.
The user key passphrase of the hosted network has been successfully changed
You can see this message as shown in the above screen.
4 Activate Hosted Network
NETSH WLAN start hostednetwork
Now, when the user wants to connect to my network they have to enter networkname and password just entered above. In my case: networkname : ourtechroom and password: share111
Method 3. Windows 10 Internet Connection Sharing Using External Software
3.1) Using Connectify
Connectify is a virtual router that lets you share your wifi, ethernet, 3G/4G connections available on your PC to your friends. Follow below the minimal steps to use it.
- First, download Connectify software from this link
- Install and run it
- Give Hotspot Name (SSID) and password
- Then just click on «Start Hotspot» button
- Now any nearby devices can connect to the hotspot with a password provided for the hotspot.
Method 4. Windows 10 Internet Connection Sharing Using Ethernet Cable
You are connected to a broadband connection and want to share large files using wifi then it will be slow and take much time for sharing.So you can use Ethernet for sharing the internet from PC to PC for fast access.
Frequently Asked Questions
Q) How to stop Internet Connection Sharing with other devices in windows 10?
Ans: Suppose you want to stop sharing an internet connection with other devices then you can do it with one line of command as shown below
NETSH WLAN stop hostednetwork
Q) How to disable Internet Connection Sharing using Services.msc?
You can enable and disable Internet Connection Sharing in Windows 10 using services.msc by following steps:
- Goto run and type services.msc and press Enter
- Search for Internet Connection Sharing and right-click on it and then Properties.
- Change the Startup type to Disabled if you want to disable and if you want to enable it just select «Enabled».
Q) How to restart Internet Connection Sharing with other devices in Windows 10 ?
Ans: For this, just use below one line of command
NETSH WLAN start hostednetwork
Q) How to view the current Hosted Network settings?
Ans: In the command prompt type the below command:
NETSH WLAN show hostednetwork
If you want to display the security key as well then type the below command
NETSH WLAN show hostednetwork setting=security

Берем типичную ситуацию. У нас есть сервер с двумя сетевыми интерфейсами. Один подключен к интернету, а другой подключен к локальной сети. Нам бы конечно хотелось что бы локальная сеть тоже была в интернете, например для удаленного доступа на локальную машину или просто нужен интернет (Пикабусики там). Получается сервер у нас выступает шлюзом между двумя сетями которые мы хотим объединить. Для этого настроим NAT.

NAT (от англ. Network Address Translation — «преобразование сетевых адресов») — это механизм в сетях TCP/IP, позволяющий преобразовывать IP-адреса транзитных пакетов. Также имеет названия IP Masquerading, Network Masquerading и Native Address Translation. Преобразование адреса методом NAT может производиться почти любым маршрутизирующим устройством — маршрутизатором, сервером доступа, межсетевым экраном. Наиболее популярным является SNAT, суть механизма которого состоит в замене адреса источника (англ. source) при прохождении пакета в одну сторону и обратной замене адреса назначения (англ. destination) в ответном пакете.
Википедия.
Поехали.
Первым делом нам настроить сетевые интерфейсы. Интерфейс который смотрит в интернет (назовем его INT) может получать настройки и по DHCP. А вот локальный ( LOC ) надо настраивать ручками, мы будем шлюзом для всей локальной сети.
Далее нам потребуется добавить роль «Маршрутизация и удалённый доступ» на сервер.


Теперь переходим к настройке маршрутизации :


Настройка и включение маршрутизации — Особая конфигурация — Переадресация сетевых адресов .
Теперь выбираем на сервере маршрутизации протокол IPv4, заходим в папочку преобразование сетевых адресов. И выбираем интерфейс для которого требуется включить NAT.


Вот и все. Теперь нам доступен интернет из локальной сети.

Ошибка в тексте? Выделите её и нажмите «Ctrl + Enter»