Эта большая инструкция посвящена особенностям установки, настройки и эксплуатации фермы терминальных серверов на базе роли Remote Desktop Services (RDS) в Windows Server. Статья поможет вам развернуть службы удаленных столов на Windows Server 2022, 2019 и 2016 в домене Active Directory.
Содержание:
- Компоненты Remote Desktop Services в Windows Server 2022/2016/2016/2012R2
- Создаем новую конфигурацию Remote Desktop Services в Windows Server
- Создаем коллекции Remote Desktop Services в Windows Server
- Публикация RemoteApp в Remote Desktop Services
- Настройка фермы Remote Desktop services с помощью PowerShell
Компоненты Remote Desktop Services в Windows Server 2022/2016/2016/2012R2
В состав роли RDS в Windows Server входя следующие компоненты:
- Remote Desktop Session Host (RDSH) – узлы сеансов RDS. Основные рабочие лошадки фермы RDS, на которых работают приложения пользователей;
- Remote Desktop Connection Broker (RDCB) – посредник RDS подключений. Используется для управления фермой RDS, распределения нагрузки, обеспечивает переподключение пользователей к своим сеансам, хранит коллекции RDS и опубликованные приложения RemoteApps;
- Remote Desktop Gateway (RDGW) – обеспечивает безопасный доступ к сервисам RDS из Интернета;
- RD Web Access (RDWA) – веб интерфейс для доступа к рабочим столам, программам RemoteApp;
- Remote Desktop Licensing (RD Licensing) — служба лицензирования, управляет RDS лицензиями (CAL) пользователей.
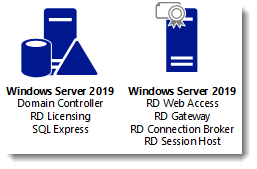
В нашем небольшом стенде будут всего три сервера со следующим распределением ролей
-
msk-rds1.winitpro.ru
— RDSH -
msk-rds2.winitpro.ru
– RDSH -
msk-rdsman.winitpro.ru
– RDSH, RDWA, RDCB, RD License
Предварительные требования, которые нужно выполнить перед созданием RDS фермы:
- Установите одинаковую версию Windows Server на все сервера, настроить их, и добавить в один домен AD;
- Откройте консоль ADUC (
dsa.msc
) и переместите все хосты с ролью RDSH в одну OU в AD. Так будет удобнее применять единые настройки через GPO; - Создайте в домене группу для RDSH серверов (например,
msk-rdsh
) и добавьте в нее все хосты; - Если вы хотите использовать диски User Profile Disk (UPD) для хранения профилей пользователей RDS (или перемещаемые профили), нужно создать на файловом сервере сетевой каталог, в котором они будут хранится (желательно расположить этот каталог на отказоустойчивом файловом кластере Windows Server). Предоставьте права Full Control на этот сетевой каталог для группы
msk-rdsh
.
Создаем новую конфигурацию Remote Desktop Services в Windows Server
Рассмотрим, как создать и настроить RDS конфигурацию с помощью графического интерфейса Server Manager.
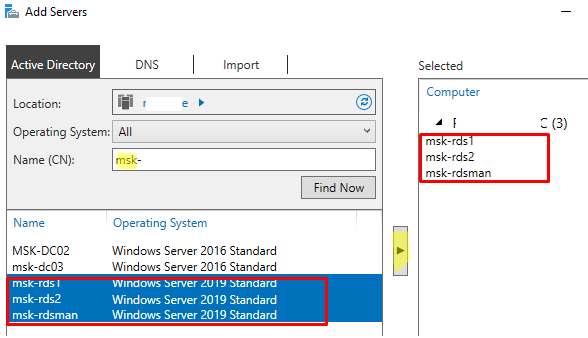
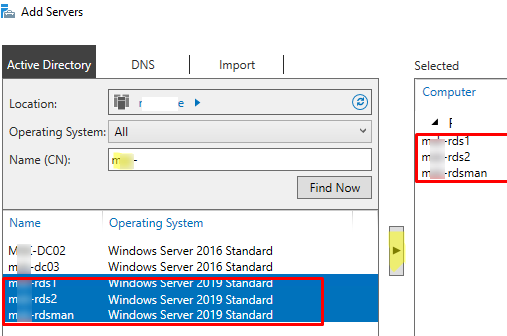
Откройте Server Manager и добавьте все планируемые RDS сервера в консоль. Щелкните All Server -> Add servers.
Теперь в меню Server Manager выберите Add Roles and Features -> Remote Desktop Services installation -> Standard deployment –> Session-based deployment. 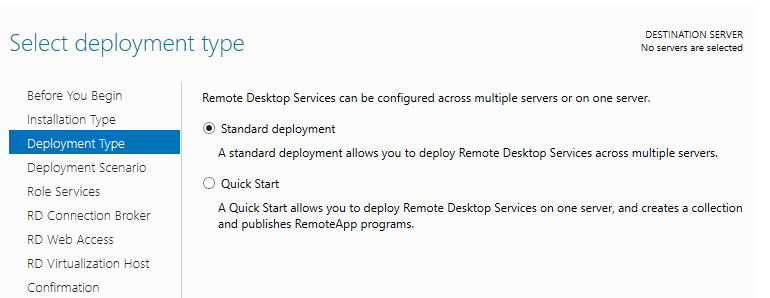
Режим Quick Start используется для развертывания всех компонентов RDS на одном сервере. В RDS ферме минимум может быть один сервер, который совмещает все роли RDS (RD Session Host, RD Web Access и RD Connection broker). Но такая конфигурация не обеспечивает отказоустойчивость и балансировку нагрузки в службах удаленных рабочей столов Windows Server.
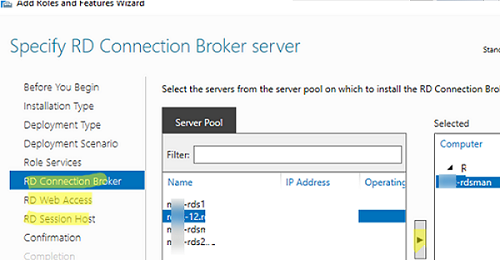
Далее нужно указать, как вы хотите распределить роли RDS по вашим серверам. В мастере построения фермы RDS нужно выбрать сервера для соответствующих ролей. В моем случае я хочу построить такую конфигурацию:
- RD Connection Broker –
msk-rdsman - RD Web Access —
msk-rdsman - RD Session hosts —
msk-rdsman, msk-rds1, msk-rds2
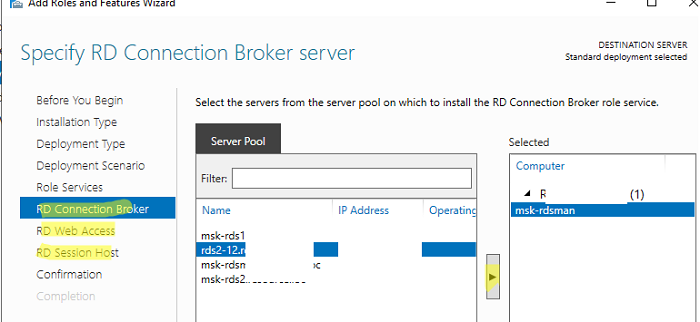
Вы можете распределить RDS роли по серверам в любой другой конфигурации.
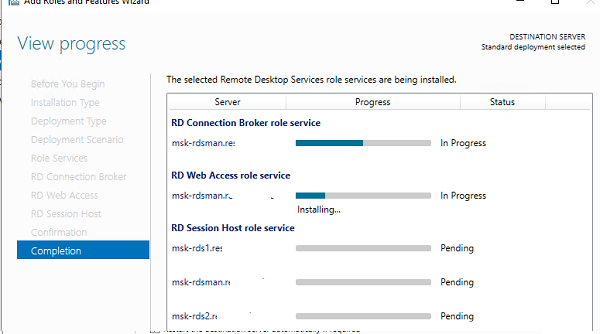
Поставьте галку Restart destination server automatically if required и нажмите кнопку Deploy. Дождитесь установки ролей RDS на всех серверах.
Итак, ваша ферма RDS создана.
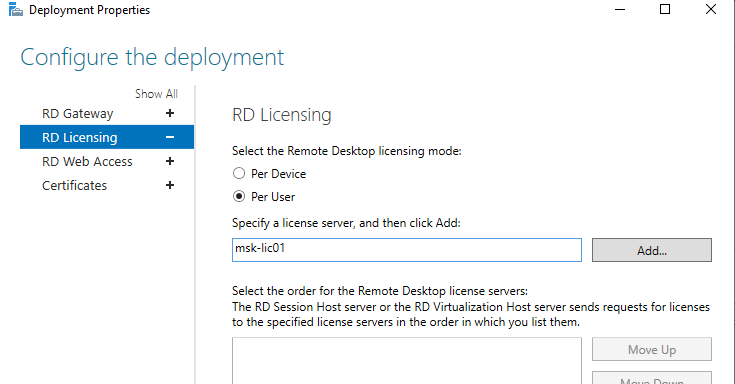
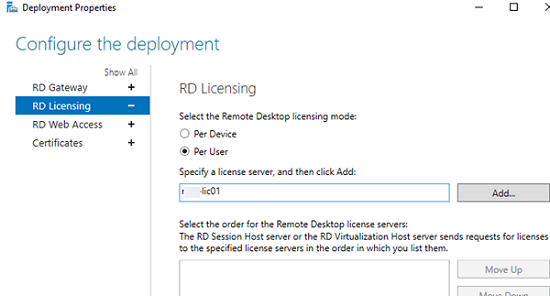
Следующий этап установка и настройка сервера лицензирования RDS. Вы можете установить роль RD Licensing на один из серверов в вашей ферме или использовать существующий в домене сервер лицензирования RDS. Подробная инструкция по установке, настройке и активации роли RD Licensing доступа по ссылке.
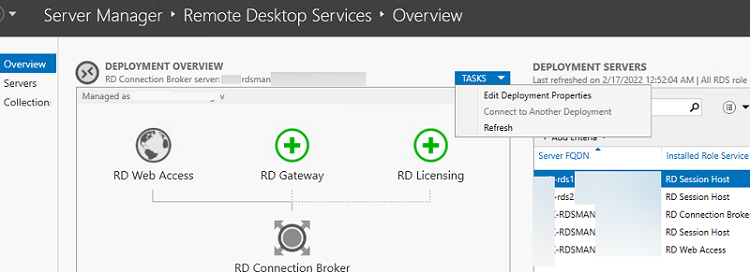
Для управления вашим развертыванием RDS нужно перейти в раздел Server Manager -> Remote Desktop Services. На вкладке Overview показана текущая конфигурация RDS фермы.
Чтобы изменить настройки RDS фермы выберите Tasks -> Edit Deployment Properties в разделе Deployment Overview.
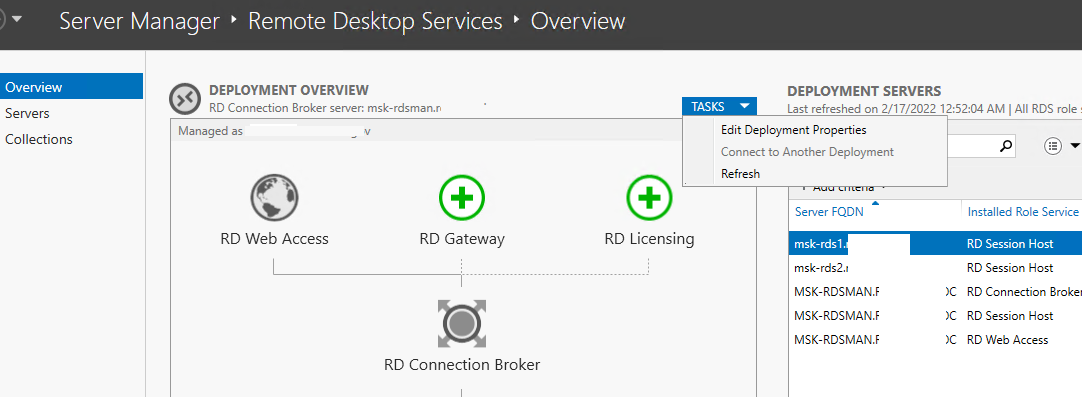
Здесь можно изменить:
- Параметры RD Gateway;
- Адрес сервер сервера лицензирования и тип пользовательских лицензий RDS CAL (per user/per device);
- Посмотреть URL адреса RD Web Access;
- Добавить SSL сертификаты для служб RDS (в инструкции мы пропустим этот пункт).
Для построения отказоустойчивой фермы Remote Desktop Services нужно обеспечить высокую доступность роли RD Connection Broker. Это достигается за счет запуска нескольких экземпляров RDCB (Active/Active) на разных серверах с общей базой данных SQL, в которой хранится конфигурация брокера подключений. Для обеспечения высокой доступности SQL базы RDCB ее можно размесить в группе высокой доступности SQL Server Always On. Ранее мы публиковали подробный гайд по настройке RDS Connection Broker с высокой доступностью.
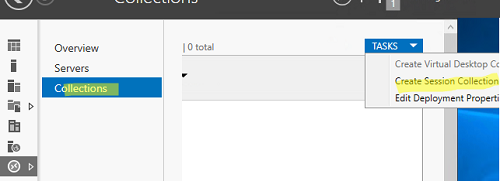
Создаем коллекции Remote Desktop Services в Windows Server
Следующий этап настройки – создание коллекций сеансов RDS. Коллекции Remote Desktop позволяют разделить хосты в ферме RDSH на отдельные группы или создать разный набор настроек и доступных приложений Remote App для разных групп пользователей.
Перейдите в раздел Collections, выберите Edit -> Create Session Collection.
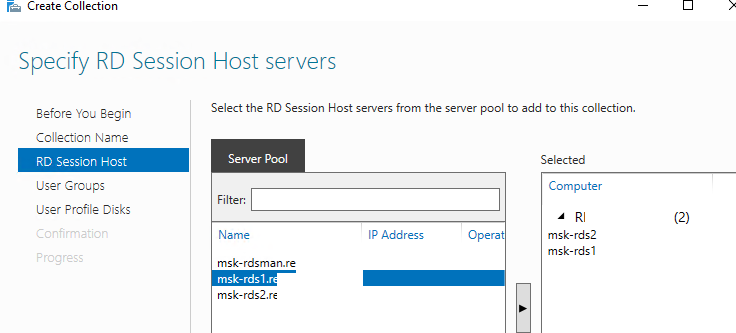
Здесь нужно задать:
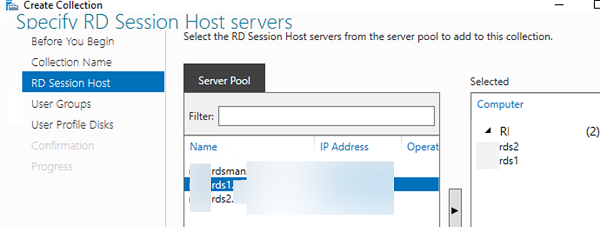
- Имя коллекции RDS:
rds-Msk-Managers - Выберите какие хосты RDSH будут обслуживать пользователей коллекции (один RDSH хост может находиться в одной коллекций; не рекомендуется объединять в одну коллекцию сервера с разными версиями Windows Server);

- На вкладке User Groups указываются группы пользователей, которым разрешено подключаться к коллекции. Уберите из групп Domain users и добавьте вашу группу (msk-Managers);
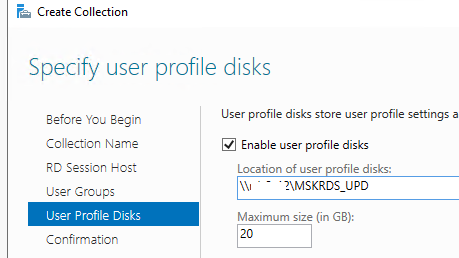
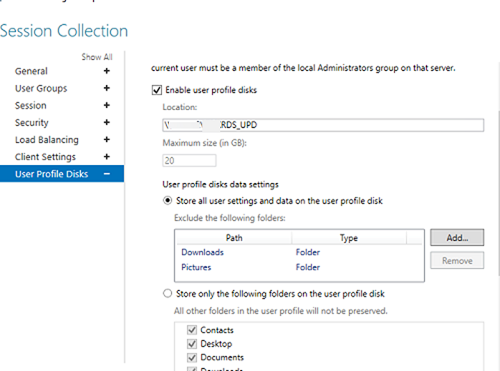
- На вкладке User Profile Disk нужно указать, хотите ли вы использовать формат UPD для хранения профилей пользователей (Enable user profile disks). В поле Location of user profile disks укажите UNC путь к сетевому каталогу(например,
\msk-fs01mskrds_upd
), в котором будут хранится профили пользователей в форматер UPD виртуальных дисков (в этом случае при входе на любой сервер коллекции RDS, пользователь будет всегда загружать свой профиль) и максимальный размер диска (20 Гб по умолчанию); - Нажмите Create чтобы создать новую RDS коллекцию;
- Убедитесь, что в указанном каталоге создался UPD файл с шаблоном профиля пользователя UVHD-template.vhdx.
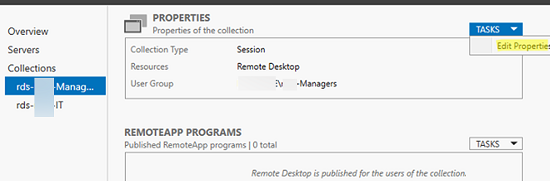
Чтобы задать параметры коллекции RDS, выберите ее и нажмите Tasks -> Edit Properties.
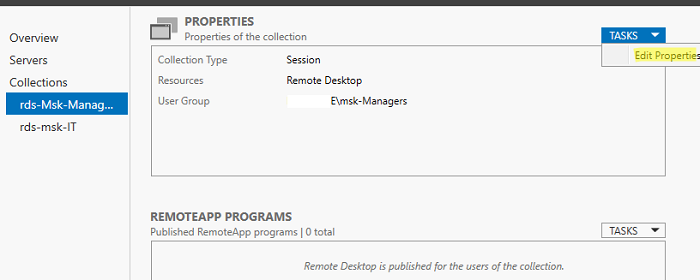
Здесь можно изменить базовые параметры коллекции (имя, описание, группы доступа) и ряд других важных настроек.
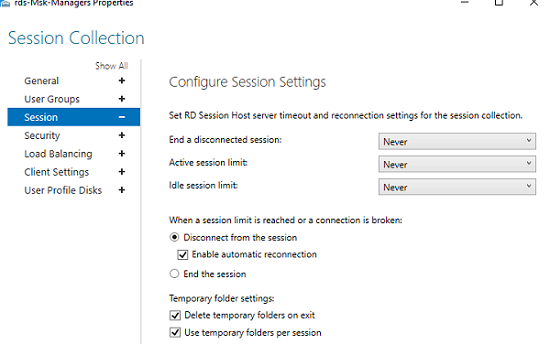
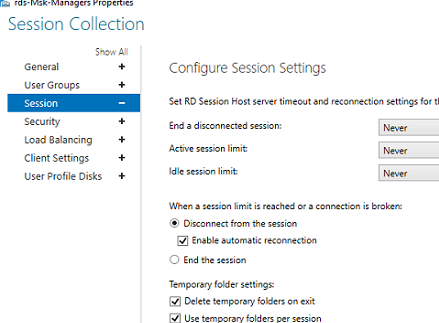
В разделе Session можно задать параметры переподключения/ автоматического отключения простаивающих RDP сессий (подробнее рассматривалось в статье Настройка таймаутов для RDP сессий).
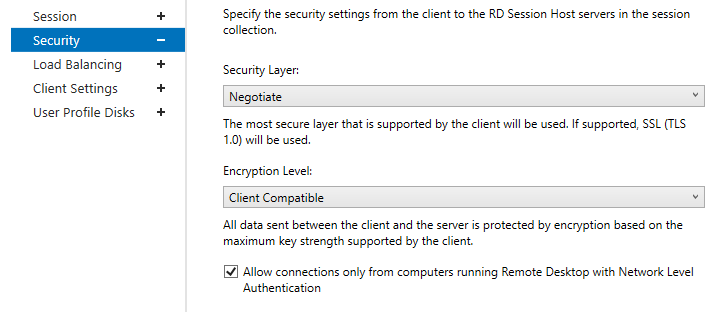
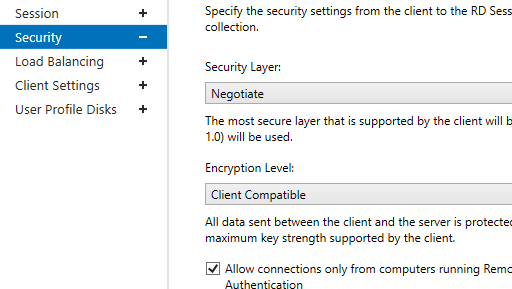
На вкладке Security можно выбрать настройки безопасности (Negotiate, RDP Security level или SSL/TLS) и шифрования (Low, High, Client compatible или FIPS compliant) для сессий RDP. Здесь также можно включить/отключить Network Level Authentication для RDP.
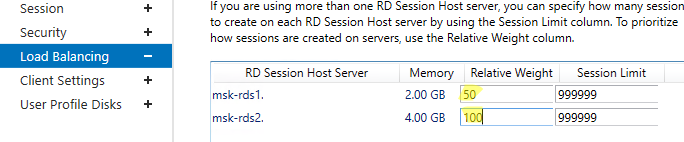
В секции Load Balancing можно изменить веса (
Relative Weight
) RDSH хостов в вашей ферме. Если характеристики серверов (RAM, CPU) в коллекции сильно отличаются, нужно задать меньший вес для менее производительных серверов. В этом случае RDCB будет распределять сессии пользователей по серверам в зависимости от их веса.
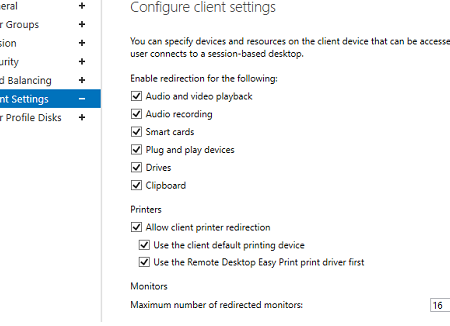
На вкладке Client Settings можно указать, какие устройства пользователям разрешено пробрасывать в RDP сессию. Например, вы можете разрешить/запретить пробрасывать с локального компьютера пользователя в RDS сеанс принтера, сетевые диски, аудио устройства, буфер обмена. 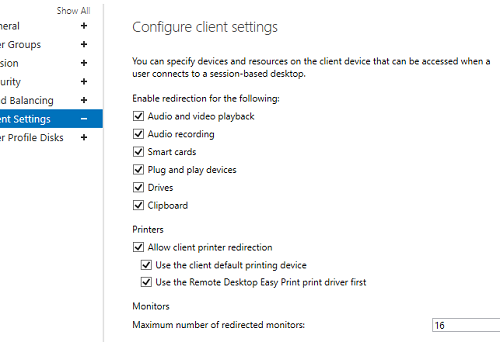
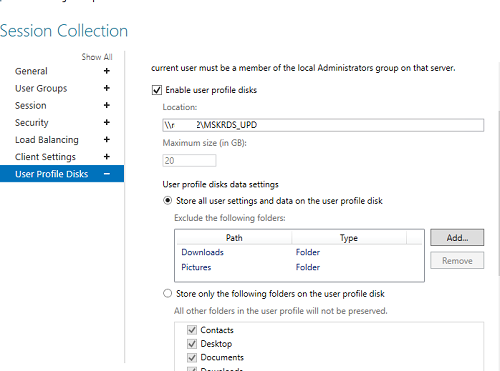
В разделе User Profile Disks можно более тонко настроить параметры UPD профилей пользователей. Можно исключить из синхронизации определенные папки или файлы. Это позволит уменьшить размер профиля UPD в сетевом каталоге и увеличить скорость загрузки профиля (не забывайте, что он загружается по сети из сетевой папки при входе пользователя).
Настройка и эксплуатация UPD обычно гораздо проще, чем использование перемещаемых профилей или folder redirection. Один UPD профиль не может использоваться в разных коллекциях RDS.
Для уменьшения размера UPD диска пользователя можно использовать стандартный PowerShell командлет
Resize-VHD
, используемый для изменения размеров виртуальных VHDX дисков Hyper-V.
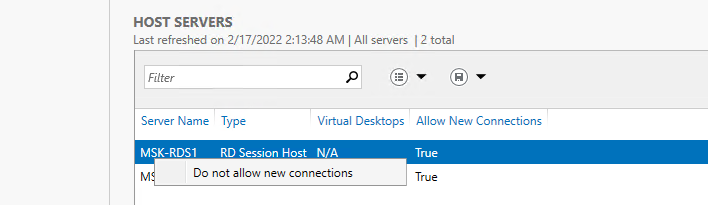
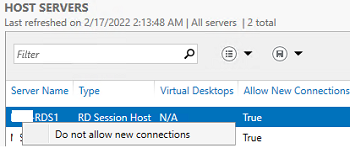
В секции HOST SERVERS коллекции RDS можно перевести любой сервер фермы в режим обслуживания RDSH (Drain Mode). Для этого щелкните по нему и выберите Do not allow new connection. В результате Connection Broker не будет отправлять новые подключения пользователей на этот сервер. В таком режиме вы можете спокойно установить обновления Windows или обновлять на сервере приложения, не затрагивая пользователей.
Здесь же можно добавить/удалить RDS Host из коллекции.
Если RDSH хост вышел из строя и не доступен, его можно корректно удалить из фермы Remote Desktop Services по этой инструкции.
Публикация RemoteApp в Remote Desktop Services
RemoteApps – это опубликованные для пользователей приложения на RDS серверах. Благодаря RemoteApp можно использовать приложения, установленные на терминальном RDSH сервере так, как будто оно запущено непосредственно на компьютере пользователя. Пользователь не видит всего рабочего стола Windows Server RDS и работает только с теми программами, которые опубликовал для него администратор. На компьютере пользователя будет отображаться только окно запущенной на RDS программы.
Если вы не создаете RemoteApp, пользователи будут работать непосредственно на собственных рабочих столах на Windows Server. Поэтому не забудьте скопировать все необходимые пользователю ярлыки приложений в папку C:UsersPublicDesktop. Файлы из этой папки будут отображаться на рабочем столе всех пользователей. Если вы устанавливаете на RDSH пакет MS Office 365, обратите внимание что Office нужно разворачивать в режиме SharedComputerLicensing.
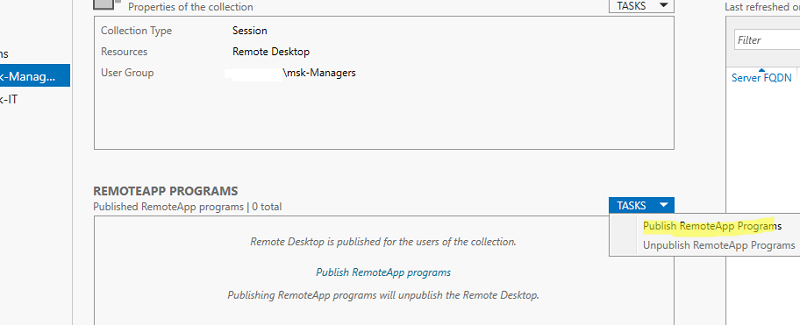
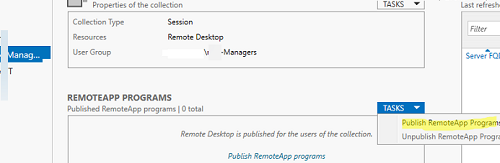
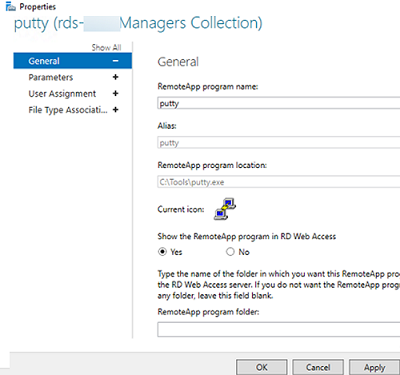
RemoteApp приложения создаются в настройках коллекций RDS. Выберите пункт Tasks -> Publish RemoteApp Programs в секции REMOTEAPP PROGRAMS.
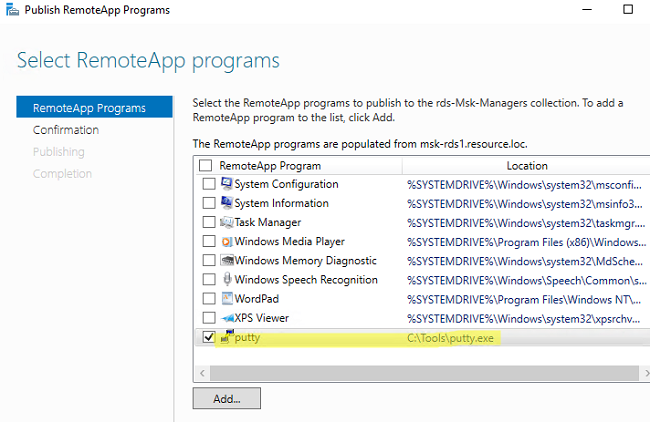
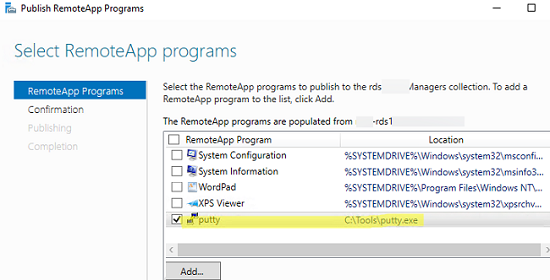
Windows отобразит все приложения, установленные на текущем сервере. Можете выбрать одно из них. Если вашего приложения нет в списке, но оно установлено на других хостах RDS, нажмите кнопку Add и укажите полный путь к исполняемому файлу приложения (exe, bat, cmd и т.д.).
Опубликуйте приложение RemoteApp.
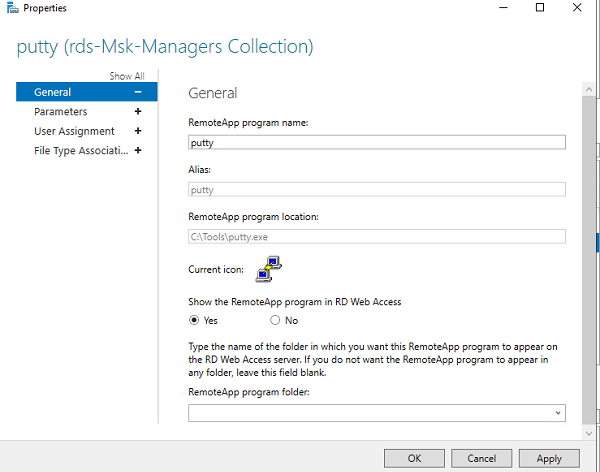
Затем в настройках RemoteApp можно указать дополнительные параметры приложения.
- Нужно ли показывать опубликованное RemoteApp приложение в веб интерфейсе RD Web Access;
- Задать параметры запуска (аргументы) приложения (Command-line Parameters -> Always use the following command-line parameters);
- На вкладке User Assignment можно дополнительно ограничить каким группам пользователей разрешено запускать приложение.
Если вы хотите изменить иконку опубликованного RemoteApp, нужно открыть следующую папку на сервере с ролью RDS Connection Broker:
C:WindowsRemotePackagesCPubFarmsrds-Msk-ManagersCPubRemoteApps
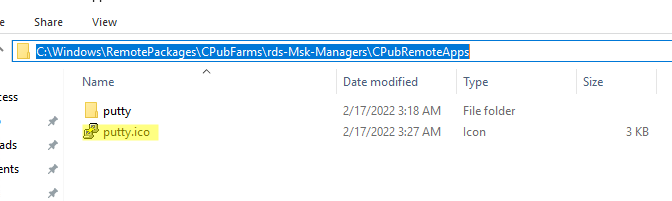
Замените иконку приложения другим ico файлом.
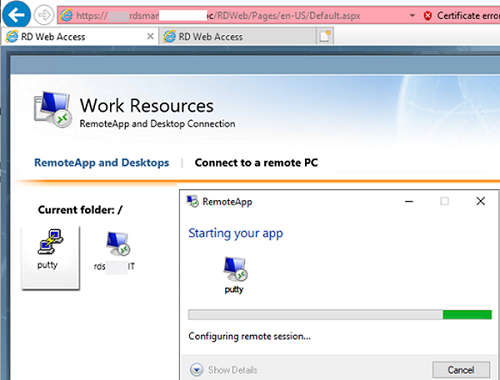
Теперь пользователь может запустить RemoteApp приложение из RD Web Access (
https://msk-rdsman.wintpro.ru/RDWeb
) или с помощью специального RDP файла.
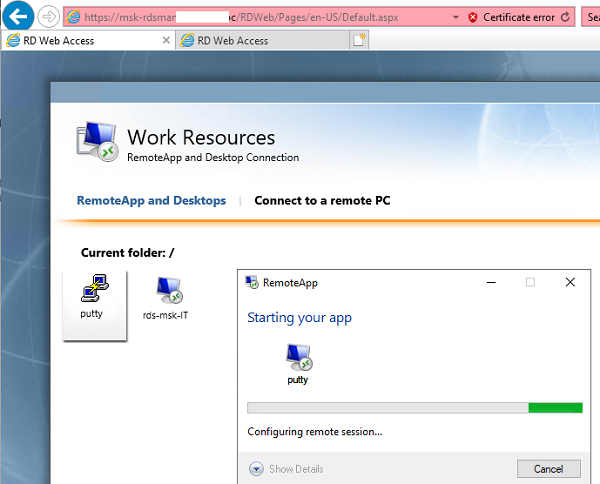
Для запуска опубликованного приложения RemoteApp, нужно добавить в RDP файл такие строки:
remoteapplicationmode:i:1
remoteapplicationname:s:putty
remoteapplicationprogram:s:"C:Toolsputty.exe"
disableremoteappcapscheck:i:1
alternate shell:s:rdpinit.exe
Несколько полезных мелочей для удобной эксплуатации фермы RDS:
- Для роли RDWeb можно настроить поддержку HTML5, это позволит пользователям подключаться к RDS серверам из любого браузера и ОС даже без клиента RDP;
- На веб сервере RD Web Access можно опубликовать ссылку на смену истекшего пароля пользователя (по умолчанию при включенном NLA вы не сможете аутентифицироваться на RDSH с истекшим паролем пользователя Active Directory);
- Инструкция для пользователей по смене пароля в RDP сессии;
- Администратор может использовать теневые подключения RD Session Shadow для подключения/просмотра рабочего стола сеанса пользователя на сервере RDS;
- Чтобы быстро найти, на каких RDS серверах есть сессии определенного пользователя, можно использовать PowerShell:
Import-Module RemoteDesktop
Get-RDUserSession -ConnectionBroker msk-rdsman.winitpro.ru | where {$_.UserName -eq "a.ivanov"} | Select HostServer - Вы можете использовать PowerShell скрипты для просмотра и анализа логов RDP подключений пользователей к серверам RDS;
- Для дополнительной защиты можно настроить двухфакторную аутентификацию (2FA) пользователей на RDS серверах Windows с помощью сторонних средств.
Настройка фермы Remote Desktop services с помощью PowerShell
Если вы четко представляете себе концепцию RDS фермы, вы можете быстро разворачивать RDS конфигурацию с помощью PowerShell.
Следующие PowerShell команды для создания RDS фермы лучше запускать с другого на другом сервера, т.к. управляемые RDS хосты придется перезагружать.
Задайте имена серверов в вашей ферме RDS. В этом примере я установлю роли RDCB и RDS Licensing на отдельный сервер (в дальнейшем рекомендуется настроить отказоустойчивую конфигурацию RDCB).
$RDSH1 = "msk-rds1.winitpro.ru"
$RDSH2 = "msk-rds2.winitpro.ru"
$RDSCB = "msk-rdcb.winitpro.ru"
$RDSGW = "msk-rdsgw.winitpro.ru"
Import-Module RemoteDesktop
Установите RDS роли на сервера:
Add-WindowsFeature –ComputerName $RDSH1, $RDSH2 -Name RDS-RD-Server –IncludeManagementTools
Add-WindowsFeature –ComputerName $RDSCB -Name RDS-Connection-Broker -IncludeManagementTools
Add-WindowsFeature –ComputerName $RDSGW -Name RDS-Web-Access, RDS-Gateway –IncludeManagementTools
Перезагрузите все хосты:
Restart-Computer -ComputerName $RDSH1,$RDSH2,$RDSCB,$RDSGW
Создайте новый инстанс RDSessionDeployment:
New-RDSessionDeployment -ConnectionBroker $RDSCB -SessionHost $RDSH1,$RDSH2 –Verbose
Добавить в ферму сервера RDWA и RDGW:
Add-RDServer -Server $RDSGW -Role RDS-WEB-ACCESS -ConnectionBroker $RDSCB
Add-RDServer -Server $RDSGW -Role RDS-GATEWAY -ConnectionBroker $RDSCB -GatewayExternalFqdn "rds.winitpro.ru"
Текущее распределение RDS ролей по серверам фермы можно вывести так:
Get-RDServer -ConnectionBroker $RDSGW
Установка роли лицензирования RDS:
Add-WindowsFeature –ComputerName $RDSCB -Name RDS-Licensing, RDS-Licensing-UI
Задайте режим лицензирования PerUser:
Invoke-Command -ComputerName $RDSCB -ScriptBlock {Set-RDLicenseConfiguration -Mode PerUser -LicenseServer $RDSCB -ConnectionBroker $RDSCB}
Add-RDServer -Server $RDSCB -Role RDS-LICENSING -ConnectionBroker $RDSCB
Добавить сервер лицензирования в доменную группу с помощью Add-ADGroupMember:
Add-ADGroupMember "Terminal Server License Servers" -Members "msk-rdcb$"
Если у вас есть сертификат для RDS можно его добавить в конфигурацию фермы (можно использовать бесплатный SSL сертификат Let’s Encrypt для вашего RDS хоста):
Path = "C:psRDSCert.pfx"
$Password = ConvertTo-SecureString -String "CertPAssddr0w11-" -AsPlainText -Force
Set-RDCertificate -Role RDGateway -ImportPath $Path -Password $Password -ConnectionBroker $RDSCB -Force
Set-RDCertificate -Role RDWebAccess -ImportPath $Path -Password $Password -ConnectionBroker $RDSCB -Force
Set-RDCertificate -Role RDPublishing -ImportPath $Path -Password $Password -ConnectionBroker $RDSCB -Force
Set-RDCertificate -Role RDRedirector -ImportPath $Path -Password $Password -ConnectionBroker $RDSCB -Force
Информацию об установленных SSL сертификатах можно получить так:
Get-RDCertificate
Теперь можно создать коллекции RDS:
$CollectionName = "DEVdept"
New-RDSessionCollection –CollectionName $CollectionName –SessionHost $RDSH1,$RDSH2 –ConnectionBroker $RDSCB –CollectionDescription “Develovers”
Разрешить доступ к RDS серверам для групп:
$UserGroup [email protected]("WINITPROmsk-developers","WINITPROmsk_devops")
Set-RDSessionCollectionConfiguration -CollectionName $CollectionName -UserGroup $UserGroup
Опубликовать приложение RemoteAPP:
New-RDRemoteapp -Alias GoogleChrome -DisplayName GoogleChrome -FilePath "C:Program Files (x86)GoogleChromeApplicationchrome.exe" -ShowInWebAccess 1 -CollectionName $CollectionName -ConnectionBroker $RDSCB
В статье мы рассмотрели, как установить и настроить ферму Remote Desktop Services на базе Windows Server 2019/2022 с помощью графического интерфейса Server Manager и с помощью PowerShell. За рамками статьи осталось более подробное описание ролей RD Web Access и RD Gateway. Мы рассмотрим настройку этих ролей отдельно в следующих статьях.
This guide shows how to install, configure, and maintain a terminal server farm based on the Remote Desktop Services (RDS) role on Windows Server. The article will help you to deploy Remote Desktop Services on Windows Server 2022, 2019, or 2016 in an Active Directory domain.
Contents:
- Remote Desktop Services (RDS) Components Architecture
- Creating a New RDS Deployment on Windows Server
- Create Remote Desktop Services Collections on Windows Server
- How to Publish RemoteApps in Remote Desktop Services?
- How to Deploy Remote Desktop Services Farm Using PowerShell?
Remote Desktop Services (RDS) Components Architecture
The RDS role in Windows Server includes the following components:
- Remote Desktop Session Host (RDSH) – RDS session hosts. These are the main workhorses of an RDS farm on which user apps run;
- Remote Desktop Connection Broker (RDCB) – an RDS connection broker. It is used to manage an RDS farm, distribute the workload, reconnect users to their sessions, store RDS collection settings, and published RemoteApps;
- Remote Desktop Gateway (RDGW) – provides secure access to the RDS farm from the Internet;
- RD Web Access (RDWA) – a web interface to access remote desktops and RemoteApps;
- Remote Desktop Licensing (RD Licensing) — a licensing service for managing RDS licenses (CALs).
In our small RDS deployment, there are only three Windows Server hosts with the following roles:
mun-rds1.woshub.com— RDSHmun-rds2.woshub.com– RDSHmun-rdsman.woshub.com– RDSH, RDWA, RDCB, and RD Licensing
Prerequisites to create an RDS farm:
- Install the same version of Windows Server on all RDS hosts, configure them, and join the AD domain;
- Open the ADUC console (dsa.msc) and move all hosts with the RDSH role to the same Active Directory OU (Organizational Unit). Thus, it will be easier to apply RDS settings using GPO;
- Create an Active Directory domain security group for RDSH servers (for example, mun-rdsh) and add all hosts to it;
- If you want to use User Profile Disks (UPD) to store RDS user profiles (or roaming profiles), you must create a shared network folder on a file server (it is recommended to place the shared folder on a File Server Failover Cluster running Windows Serveer). Grant Full Control permissions on the shared folder for the mun-rdsh group.
Creating a New RDS Deployment on Windows Server
Let’s see how to create and configure an RDS configuration using the Server Manager GUI.
Open the Server Manager and add all RDS servers you want to the console. Click All Servers -> Add servers.
Click the Server Manager menu and select Add Roles and Features -> Remote Desktop Services installation -> Standard deployment –> Session-based deployment. 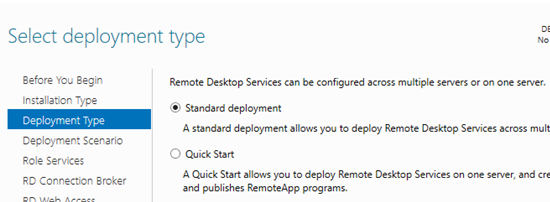
Quick Start mode is used to deploy all RDS roles on a single server. An RDS farm can have only one server running all RDS roles (RD Session Host, RD Web Access, and RD Connection broker). However, this configuration doesn’t provide fault-tolerance and workload balancing in Windows Server Remote Desktop Services.
Then specify which RDS roles you want to assign to your hosts. Select the servers for the corresponding roles in the RDS farm creation wizard. In my case, I want to build the following RDS configuration:
- RD Connection Broker –
mun-rdsman - RD Web Access —
mun-rdsman - RD Session hosts —
mun-rdsman,mun-rds1,mun-rds2
You can distribute RDS roles among servers in any other configuration.
Check Restart destination server automatically if required and click Deploy. Wait until the RDS roles are installed on all servers. 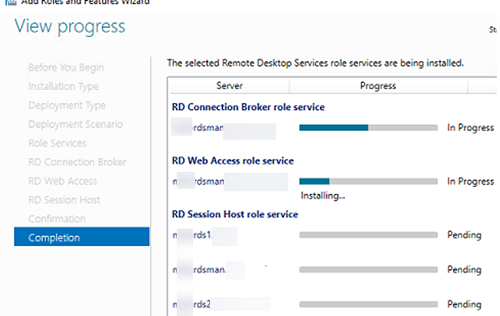
So, your RDS farm is created.
The next step is to install and configure the RDS licensing server. You can install the RD Licensing role on one of the servers on your farm or use an existing RDS licensing server in your domain. Check the detailed guide on how to install, configure and activate the RD Licensing role.
To manage your RDS deployment, open Server Manager -> Remote Desktop Services. The current RDS farm configuration is displayed on the Overview tab.
To change the RDS farm settings, select Tasks -> Edit Deployment Properties in the Deployment Overview section.
Here you can change:
- RD Gateway settings;
- Licensing server address and RDS CAL type (per user/per device);
- View RD Web Access URL;
- Add SSL certificates for RDS (we will skip this step it in the guide).
To build a fault-tolerant Remote Desktop Services farm, you have to provide high availability for the RD Connection Broker role. This is achieved by running multiple RDCB instances (Active/Active) on different servers with a shared SQL Server database that stores the connection broker configuration. You can use the SQL Server Always On high-availability group to make the RDCB SQL database high available. Earlier we published a detailed guide on how to configure a highly available RDS Connection Broker.
Create Remote Desktop Services Collections on Windows Server
The next step is to create collections of RDS sessions. Remote Desktop collections allow to split hosts in an RDS farm into separate groups or create different sets of settings and available Remote Apps for different groups of users.
Go to Collections and select Edit -> Create Session Collection.

Here you need to:
- Specify an RDS collection name:
rds-Mun-Managers; - Select which RDS hosts will serve collection users (one RDSH server may belong to one collection, it is not recommended to have hosts with different Windows Server versions in the same collection);
- In the User Groups tab, specify the groups of users allowed to connect to the collection. Remove the Domain users from the groups and add your group (
mun-Managers); - On the User Profile Disk tab, check Enable user profile disks if you want to use the UPD vhdx file format to store user profiles. In the Location of user profile disks field, specify the UNC path to your shared folder (for example,
\mun-fs01munrds_upd), in which user profile files in the UPD format will be stored and the maximum size of the disk (20 GB by default). When using UPD, if a user logs on to any RDS collection host, the user’s shared profile will always be loaded; - Click Create to create a new RDS collection;
- Make sure that the UPD file (UVHD-template.vhdx) with the user profile template is created in the specified directory.

To configure RDS collection settings, select the collection and click Tasks -> Edit Properties.
Here you can change basic collection options (name, description, access groups), and some other settings.
On the Session tab, you may configure reconnection/automatic disconnection options for inactive (idle) RDP sessions (learn more How to Configure Timeouts for RDP Sessions).
In the Security tab, you may select security (Negotiate, RDP Security level, or SSL/TLS) and encryption (Low, High, Client compatible, or FIPS compliant) settings for RDP sessions. Here you can enable/disable Network Level Authentication (NLA) for RDP.
In the Load Balancing tab, you may change RDS host Relative Weight in your farm. If server characteristics (RAM, CPU) in a collection are very different, you need to set a lower weight for the hosts with lower performance. After that, RDCB will distribute user sessions among RDS hosts depending on their weight.

The Client Settings tab allows you to specify which local devices users are allowed to redirect to their RDP sessions. For example, you may enable or disable the redirection of printers, drives, audio devices, or the clipboard from a local user computer to the RDS session.
In the User Profile Disks tab, you may fine-tune UPD settings. You may exclude certain folders or files from sync. It allows to reduce the UPD profile size in a shared network folder and makes a profile load faster (remember that it is loaded over the network from the shared folder when a user logs on).
It is easier to configure and use UPD than roaming profiles or folder redirection. You cannot use the same UPD profile in more than one RDS collection.
To reduce the size of a user UPD disk, you can use the built-in PowerShell cmdlet Resize-VHD, which is used to resize Hyper-V virtual VHDX disks.
You can put any RDSH server into maintenance mode (RDS Drain Mode) through the HOST SERVERS section of the RDS collection. To do it, click a server and select Do not allow new connection. Then the Connection Broker will not send new user sessions to the RD host. In this mode, you can install Windows updates or update apps on the server without affecting the users.
Here you can also add/remove an RDS host from a collection.
If the RD Session Host server fails, you can properly remove it from your Remote Desktop Services deployment by following this guide.
How to Publish RemoteApps in Remote Desktop Services?
RemoteApps are programs published for users on RDS servers. Thanks to RemoteApps, you may use apps installed on a terminal RDSH server as if they are running on a local user computer. The user doesn’t see the entire Windows Server RDS desktop and works only with those apps an administrator has published for them. Only the window of the program running on RDS will be displayed on the user’s computer.
If you don’t create RemoteApps, users will work directly on the Windows Server desktop. So remember to copy the app shortcuts a user may need to C:UsersPublicDesktop. Files from this folder will be displayed on the desktops of all users. If you want to install an MS Office 365 on your RDSH, note that Office must be deployed in the SharedComputerLicensing mode.
RemoteApps are created in the RDS collection settings. Select Tasks -> Publish RemoteApp Programs in the REMOTEAPP PROGRAMS section.
Windows will list all apps installed on the current RD host. You may select one of them. If there is no app you need in the list, but it is installed on other RDS hosts, click Add and specify the full path to the application’s executable (exe, bat, cmd, etc.).
Publish the RemoteApp.
Then you can specify additional app options in the RemoteApp settings.
- Whether you want to show a published RemoteApp in the RD Web Access web interface;
- Set startup options (arguments) for the app (Command-line Parameters -> Always use the following command-line parameters);
- On the User Assignment tab, you can also set restrictions on whether a user or group may run the app.
If you want to change an icon of the published RemoteApp, open the following folder on the server with the RDS Connection Broker role:
C:WindowsRemotePackagesCPubFarmsrds-Mun-ManagersCPubRemoteApps
![]()
Replace the app icon with another ICO file.
Then a user can run a RemoteApp program from RD Web Access (https://mun-rdsman.woshub.com/RDWeb) or using a special *.RDP file.
To run a published RemoteApp program, you need to add the following lines to the RDP file:
remoteapplicationmode:i:1
remoteapplicationname:s:putty
remoteapplicationprogram:s:"C:Toolsputty.exe"
disableremoteappcapscheck:i:1
alternate shell:s:rdpinit.exe
Some useful tips to use your RDS farm conveniently:
- You can configure HTML5 support for the RDWeb Access role. It allows users to connect to RDS servers using any browser or OS even without an RDP client;
- On the RD Web Access server, you can publish a link to change an expired user password (by default, if NLA is enabled you won’t be able to authenticate on an RDSH with an expired Active Directory user password);
- A user guide on how to change a password in an RDP session;
- An administrator can use RD Session Shadow connections to connect/view the desktop of a user session on an RDS server;
- To quickly find which RDS servers have sessions of a specific user, you can use PowerShell:
Import-Module RemoteDesktop

Get-RDUserSession -ConnectionBroker mun-rdsman.woshub.com | where {$_.UserName -eq "a.muller"} | Select HostServer - You can use PowerShell scripts to view RDP connection logs;
- To provide additional security, you can enable two-factor authentication (2FA) for users on your Windows RDS hosts using third-party tools.
How to Deploy Remote Desktop Services Farm Using PowerShell?
If you clearly see the structure of an RDS farm, you can quickly deploy your RDS configuration using PowerShell.
It is better to run the following PowerShell commands to create an RDS farm on another server since you will have to restart managed RDS hosts.
Set the server names in your RDS farm. In this example, I will install the RDCB and RDS licensing roles on separate servers (later it is recommended to enable a highly available RDCB configuration).
$RDSH1 = "mun-rds1.woshub.com"

$RDSH2 = "mun-rds2.woshub.com"

$RDSCB = "mun-rdcb.woshub.com"

$RDSGW = "mun-rdsgw.woshub.com"

Import-Module RemoteDesktop
Install RDS roles on the servers:
Add-WindowsFeature –ComputerName $RDSH1, $RDSH2 -Name RDS-RD-Server –IncludeManagementTools

Add-WindowsFeature –ComputerName $RDSCB -Name RDS-Connection-Broker -IncludeManagementTools

Add-WindowsFeature –ComputerName $RDSGW -Name RDS-Web-Access, RDS-Gateway –IncludeManagementTools
Restart all hosts:
Restart-Computer -ComputerName $RDSH1,$RDSH2,$RDSCB,$RDSGW
Create a new RDSessionDeployment instance:
New-RDSessionDeployment -ConnectionBroker $RDSCB -SessionHost $RDSH1,$RDSH2 –Verbose
Add RDWA and RDGW servers to your farm:
Add-RDServer -Server $RDSGW -Role RDS-WEB-ACCESS -ConnectionBroker $RDSCB

Add-RDServer -Server $RDSGW -Role RDS-GATEWAY -ConnectionBroker $RDSCB -GatewayExternalFqdn "rds.woshub.com"
You can list the RDS roles and hostnames in your farm:
Get-RDServer -ConnectionBroker $RDSGW
Install the RDS Licensing role using the Add-WindowsFeatures cmdlet:
Add-WindowsFeature –ComputerName $RDSCB -Name RDS-Licensing, RDS-Licensing-UI
Set a PerUser RDS licensing mode:
Invoke-Command -ComputerName $RDSCB -ScriptBlock {Set-RDLicenseConfiguration -Mode PerUser -LicenseServer $RDSCB -ConnectionBroker $RDSCB}

Add-RDServer -Server $RDSCB -Role RDS-LICENSING -ConnectionBroker $RDSCB
Add a licensing server to a domain security group using Add-ADGroupMember:
Add-ADGroupMember "Terminal Server License Servers" -Members "mun-rdcb$"
If you have a certificate for the RDS, you can add it to your farm configuration (you may use the free Let’s Encrypt SSL certificate for your RDS host):
$Path = "C:psRDSCert.pfx"

$Password = ConvertTo-SecureString -String "setCertificPAssw00rd11-" -AsPlainText -Force

Set-RDCertificate -Role RDGateway -ImportPath $Path -Password $Password -ConnectionBroker $RDSCB -Force

Set-RDCertificate -Role RDWebAccess -ImportPath $Path -Password $Password -ConnectionBroker $RDSCB -Force

Set-RDCertificate -Role RDPublishing -ImportPath $Path -Password $Password -ConnectionBroker $RDSCB -Force

Set-RDCertificate -Role RDRedirector -ImportPath $Path -Password $Password -ConnectionBroker $RDSCB -Force
To get information about the installed SSL certificates:
Get-RDCertificate
Then you can create RDS collections:
$CollectionName = "ITdept"

New-RDSessionCollection –CollectionName $CollectionName –SessionHost $RDSH1,$RDSH2 –ConnectionBroker $RDSCB –CollectionDescription “IT department management collection”
To allow access to RDS servers for groups:
$UserGroup =@("WOSHUBmun-admins","WOSHUBmun-devops")

Set-RDSessionCollectionConfiguration -CollectionName $CollectionName -UserGroup $UserGroup
To publish a RemoteApp program:
New-RDRemoteapp -Alias GoogleChrome -DisplayName GoogleChrome -FilePath "C:Program Files (x86)GoogleChromeApplicationchrome.exe" -ShowInWebAccess 1 -CollectionName $CollectionName -ConnectionBroker $RDSCB
In this article, we covered how to install and configure a Remote Desktop Services farm on Windows Server 2019/2022 using the Server Manager graphical interface and PowerShell. The RD Web Access and RD Gateway roles are not described here. We’ll show how to configure these roles in future articles.
Обновлено 23.01.2020
 Добрый день! Уважаемые читатели и гости одного из крупнейших IT блогов по системному администрированию Pyatilistnik.org. В прошлый раз мы с вами разобрались, что такое SSL сертификат, где и как их применяют и какие они бывают. Движемся дальше, в сегодняшней публикации я бы хотел вам рассказать, как вы можете вернуть и запускать в Windows Server 2019 оснастки Tsconfig.msc «Конфигурация узла сеансов удаленных рабочих столов (Remote Desctop Session Host Configuration)» и Tsadmin.msc «Диспетчер служб удаленных рабочих столов» (Remote Desktop Services Manager). Напомню их варианты использования, так как не все застали времена терминальных серверов на Windows Server 2008 R2.
Для чего нужны оснастки Tsconfig.msc и Tsadmin.msc
Бытует мнение, что все что новое оно априори должно быть лучше, в каких-то областях возможно это так, но не в компьютерном мире. Примеров этому очень много, например:
- Windows XP и Windows Vista
- Windows 7 и Windows 10
В случае с терминальными службами ситуация двоякая, с одной стороны Microsot сделала удобную общую оснастку в диспетчере серверов, а с другой лишила пользователей ряда оснасток и графических функция, которые они предоставляли. Microsoft по известной только им причине убрали оснастки из состава инструментов RDS фермы:
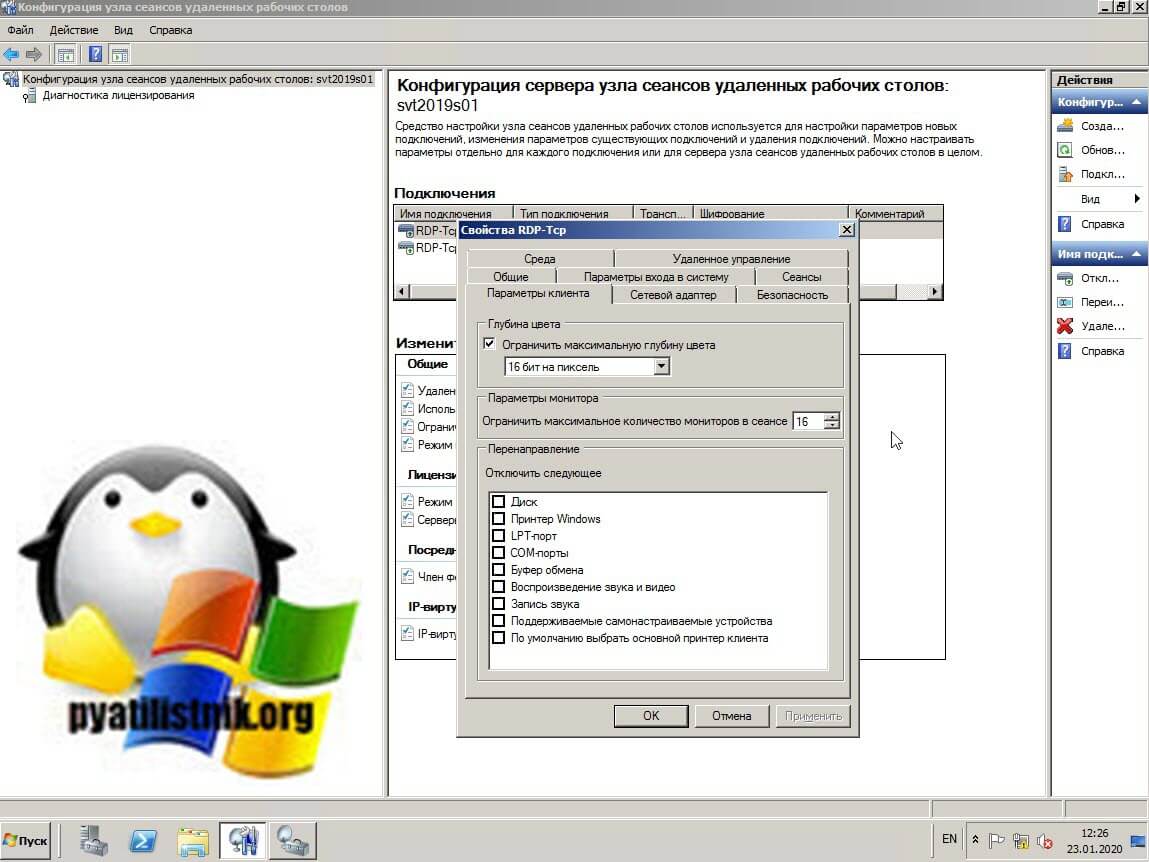
- Tsconfig.msc «Конфигурация узла сеансов удаленных рабочих столов (Remote Desctop Session Host Configuration)» — это оснастка позволяющая вам задавать список серверов лицензирования RDSH хоста, производить настройку уровней безопасности RDP, управлять настройками сеансов, параметрами схода на RDP, параметрами клиента, запрещая или разрешая перенаправление устройств и многое другое. Напоминаю, что благодаря это оснастки я смог настроить права входа на изолированный терминальный стол созданный для подрядчиков. Вот так выглядела эта оснастка, уверен, что начинающие системные администраторы ее даже и не видели.
- Tsadmin.msc «Диспетчер служб удаленных рабочих столов» (Remote Desktop Services Manager) — это оснастка для взаимодействия и управления сессиями пользователей удаленного рабочего стола. Например вы можете удаленно завершить любой процесс пользователя, его разлогинить с терминального сервера, так же можете массово отправить сообщение пользователям RDP, в версиях Windows Server 2012 R2 и выше для этого мы использовали PowerShell, чтобы их оповестить. Сама оснастка выглядит вот так. Так же я бы советовал обратить внимание на утилиту Terminal Services Manager, она бесплатна и может выполнить все, что делает оснастка Tsadmin.msc. Эту утилиту как и делали энтузиасты для боле старших версий операционной системы Windows Server.
Алгоритм запуска TSADMIN.msc и TSCONFIG.msc в Windows Server 2019
Хорошо, что Microsoft не закрыла возможность регистрации и запуска оснасток TSADMIN.msc и TSCONFIG.msc в Windows Server 2012 R2 и выше. Хочу отметить, что данный метод не является официальным, но использовать его все же можно на свой страх и риск.
Суть метода заключается в том, что вам необходимо скопировать определенные библиотеки и сами оснастки Tsconfig.msc и Tsadmin.msc из Windows Server 2008 R2 или скачать их у меня если у вас нет уже в инфраструктуре таких серверов. так же необходимо для них прописать ключи реестра и права на них, это делается через выгрузку веток с 2008 R2 системы или скриптом, оба метода я покажу.
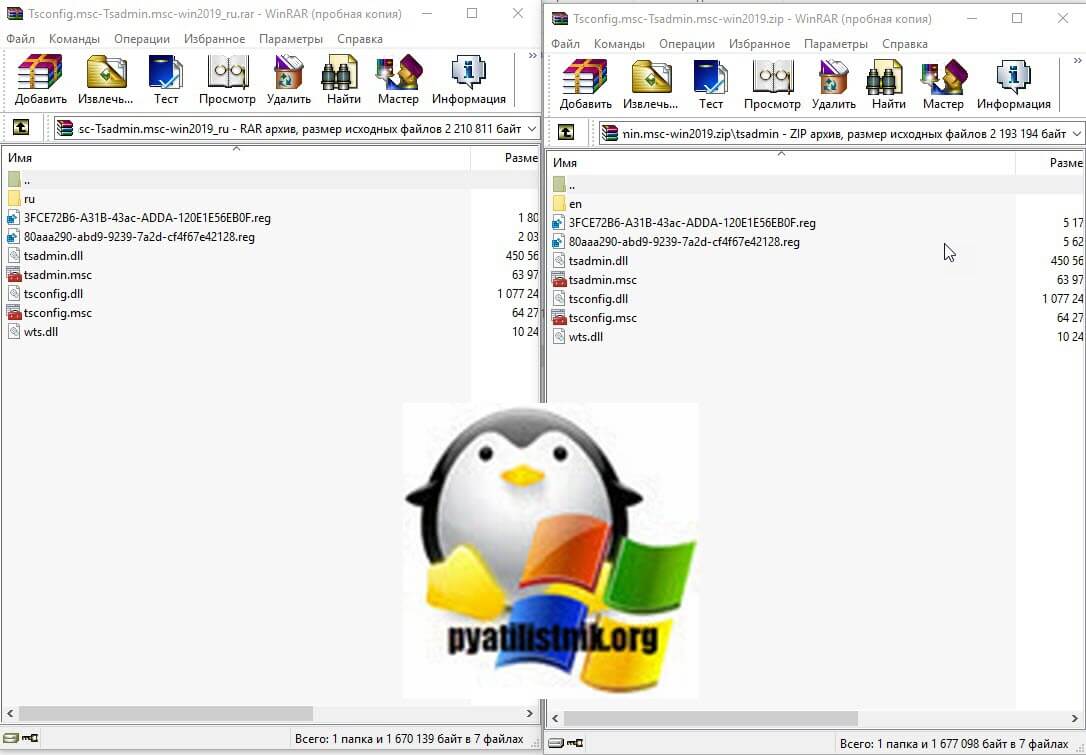
Если вы все скачали у меня, то состав архивов будет такой:
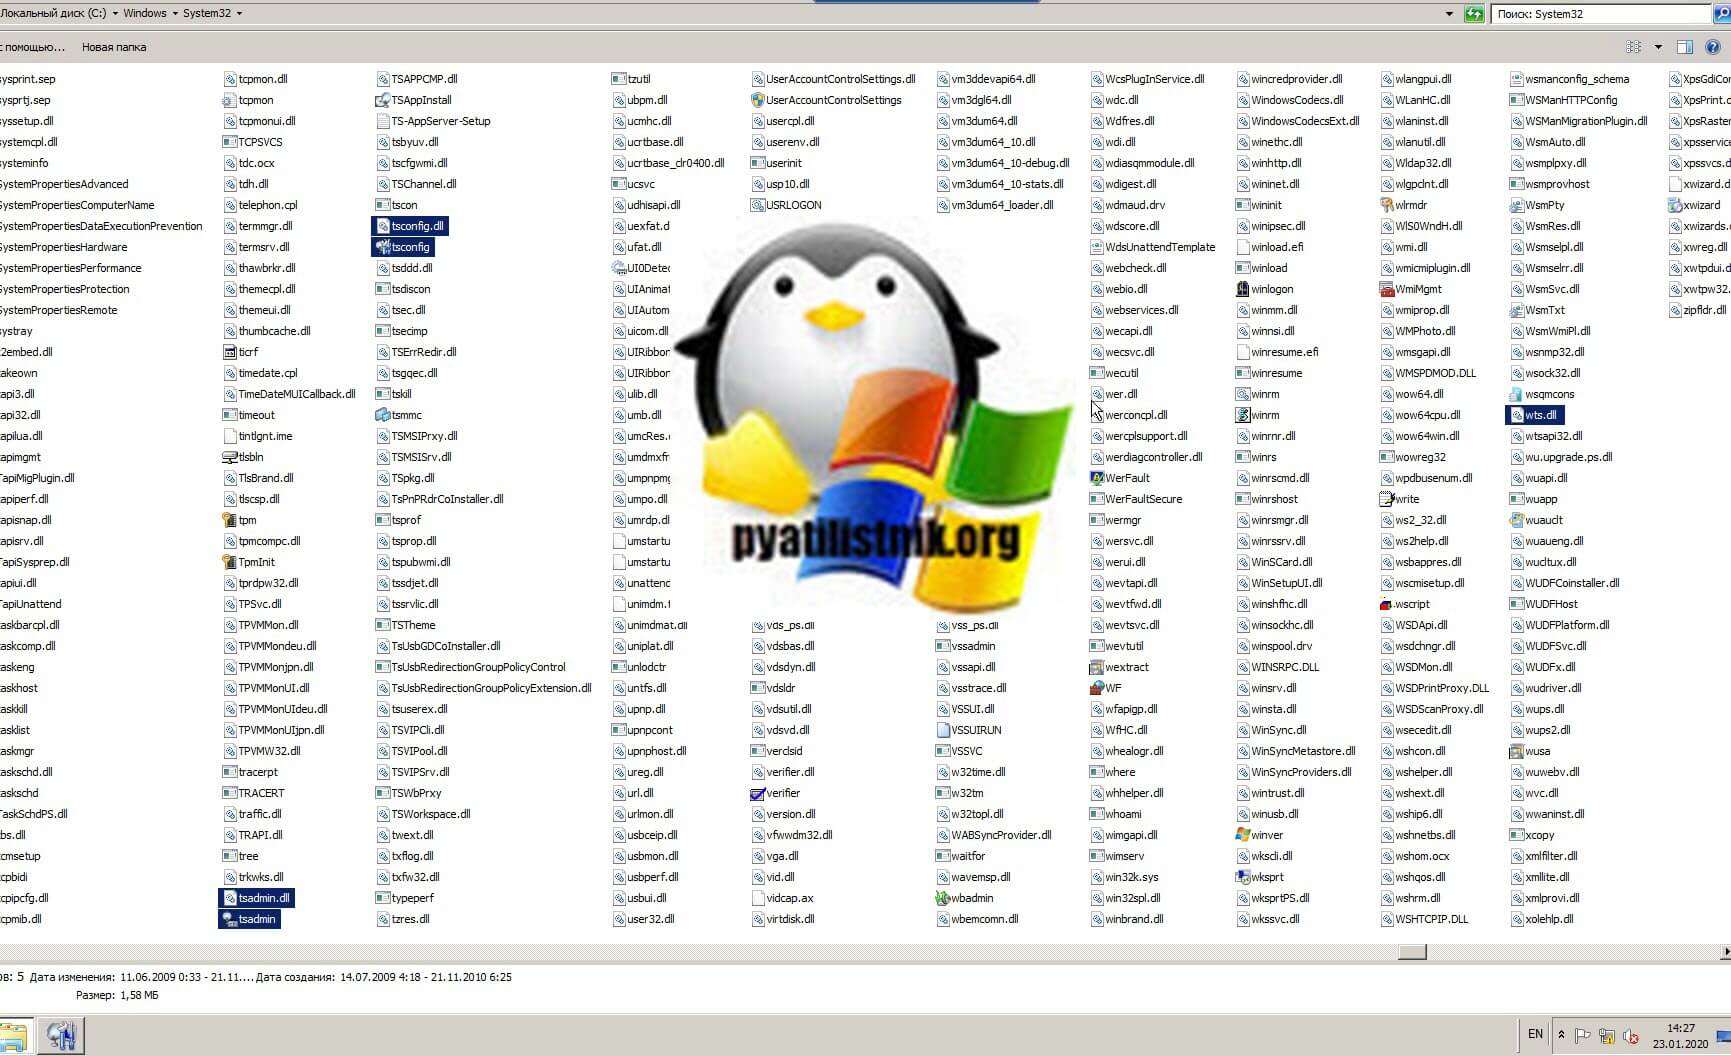
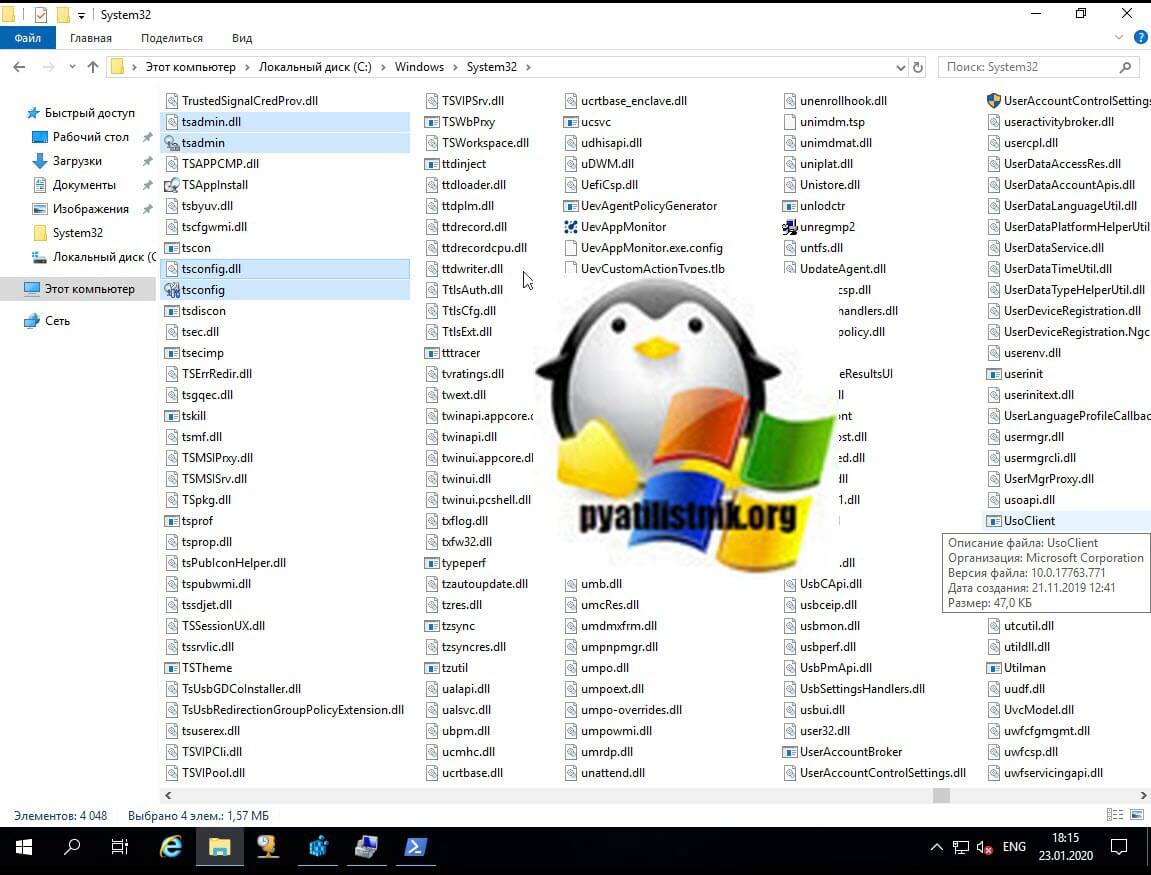
Если у вас есть своя Windows Server 2008 R2 (даже если ее нет вы можете быстро развернуть виртуальную машину), то вам необходимо скопировать вот такой список файлов из каталога C:WindowsSystem32
- c:windowssystem32tsconfig.msc
- c:windowssystem32tsadmin.msc
- c:windowssystem32tsadmin.dll
- c:windowssystem32tsconfig.dll
- c:windowssystem32wts.dll
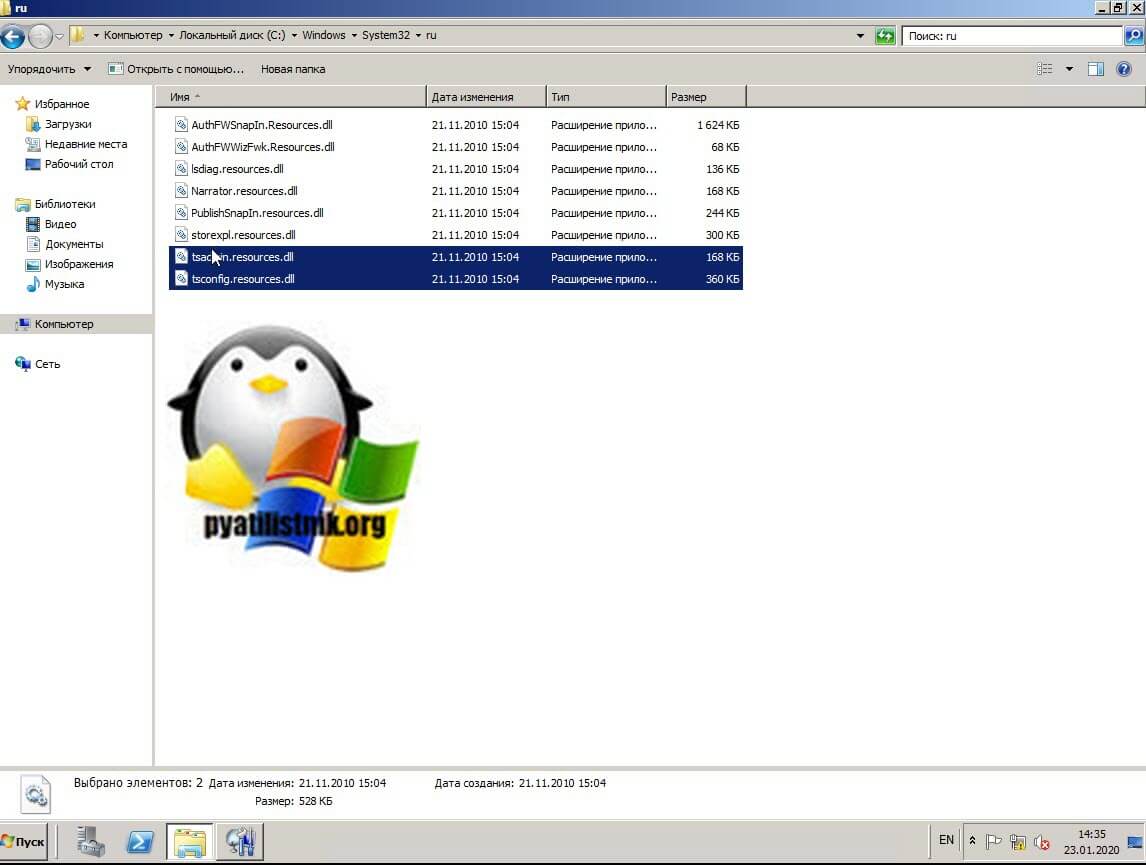
А так же языковые файлы они располагаются по пути C:WindowsSystem32ru или C:WindowsSystem32en в зависимости от языка в системе. В моем примере русская версия поэтому я буду копировать файлы для русской версии. Из каталога мне необходимо скопировать
- c:windowssystem32rutsconfig.resources.dll
- c:windowssystem32rutsadmin.resources.dll
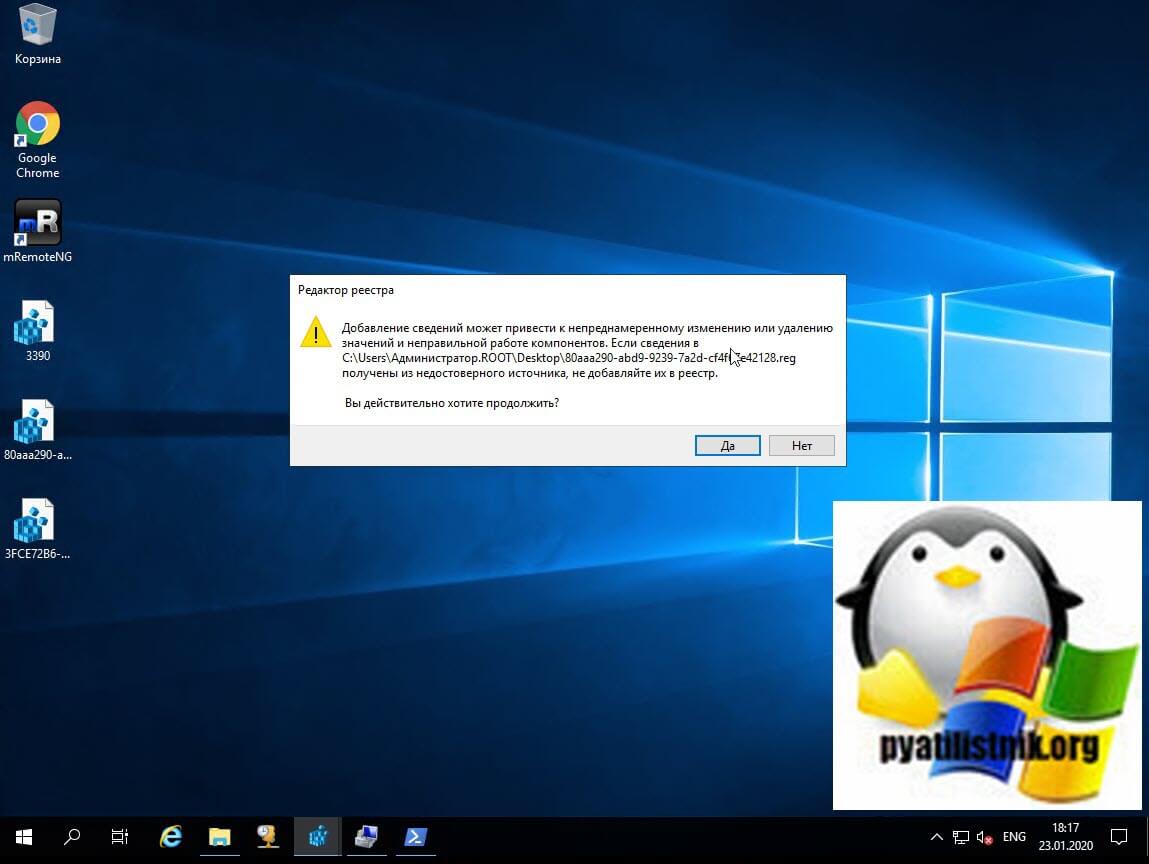
Следующим действием вам необходимо выгрузить две ветки реестра, если не хотите это делать, то их можно создать самому из кода, который я представлю ниже. Запустите редактор реестра Windows из окна выполнить, введя regedit.
Вам нужно найти вот такие ветки реестра и произвести их экспорт:
- HKEY_LOCAL_MACHINESOFTWAREMicrosoft MMCSnapInsFX:{3FCE72B6-A31B-43ac-ADDA-120E1E56EB0F}
- HKEY_LOCAL_MACHINESOFTWAREMicrosoft MMCSnapInsFX:{80aaa290-abd9-9239-7a2d-cf4f67e42128}
Выбираем место сохранения ваших reg файлов. На выходе у вас будет два файла вот с таким содержимым, для оснастки tsconfig (80aaa290-abd9-9239-7a2d-cf4f67e42128)
Windows Registry Editor Version 5.00
[HKEY_LOCAL_MACHINESOFTWAREMicrosoft MMCSnapInsFX:{80aaa290-abd9-9239-7a2d-cf4f67e42128}]
«ApplicationBase»=hex (2):43,00,3a,00,5c,00, 57,00,69,00,6e,00,64,00,6f,00,77,00,
73,00,5c,00,53,00,79,00,73,00,74,00,65,00, 6d,00,33,00,32,00,00,00
«About»=»{00000000-0000-0000-0000-000000000000}»
«VersionStringIndirect»=»@C:\Windows\System32\umcRes.dll,-107»
«ProviderStringIndirect»=hex (2) :40,00,43,00,3a, 00,5c,00,57,00,69,00,6e,00,64,
00,6f,00,77,00,73,00,5c,00,53,00,79,00, 73,00,74,00, 65,00,6d,00,33,00,32,00,
5c,00,75,00,6d,00,63,00,52,00,65,00,73,00, 2e,00,64,00,6c,00,6c,00,2c,00,2d,
00,31,00,30,00,32,00,00,00
«SmallFolderBitmapIndirect»=hex(2) :40,00,43,00, 3a,00,5c,00,57,00,69,00,6e,00,
64,00,6f,00,77,00,73,00,5c,00,53,00,79, 00,73,00,74,00, 65,00,6d,00,33,00,32,
00,5c,00,75,00,6d,00,63,00,52,00,65,00,73,00, 2e,00,64,00,6c,00,6c,00,2c,00,
2d,00,31,00,32,00,30,00,00,00
«NameString»=»Remote Desktop Session Host Configuration»
«HelpTopic»=hex(2):25,00,73,00,79,00,73,00,74,00,65, 00,6d,00,72,00,6f,00,6f,00,
74,00,25,00,5c,00,68,00,65,00,6c,00,70, 00,5c,00,74,00,73,00,63,00,63,00,2e,
00,63,00,68,00,6d,00,00,00
«AssemblyName»=»tsconfig»
«RuntimeVersion»=»v2.0.50215»
«Description»=»Configure Remote Desktop Session Host settings»
«DescriptionStringIndirect»=hex (2) :40,00,43,00,3a, 00,5c,00,57,00,69,00,6e,00,
64,00,6f,00,77,00,73,00,5c,00,53,00,79, 00,73,00,74, 00,65,00,6d,00,33,00,32,
00,5c,00,75,00,6d,00,63,00,52,00,65,00,73,00,2e, 00,64,00,6c,00,6c,00,2c,00,
2d,00,31,00,30,00,31,00,00,00
«LinkedHelpTopics»=»%systemroot%\help\tscc.chm»
«NameStringIndirect»=hex (2) :40,00,43,00,3a,00, 5c,00,57,00,69,00,6e,00,64,00,6f,
00,77,00,73,00,5c,00,53,00,79,00,73,00, 74,00,65, 00,6d,00,33,00,32,00,5c,00,
75,00,6d,00,63,00,52,00,65,00,73,00,2e,00,64, 00,6c,00,6c,00,2c,00,2d,00,31,
00,30,00,30,00,00,00
«IconIndirect»=hex(2):40,00,43,00,3a,00, 5c,00,57,00,69,00,6e,00,64,00,6f,00,77,
00,73,00,5c,00,53,00,79,00,73,00,74,00, 65,00,6d,00,33,00,32,00,5c,00,75,00,
6d,00,63,00,52,00,65,00,73,00,2e,00,64, 00,6c,00,6c,00,2c,00,2d,00,31,00,31,
00,30,00,00,00
«FxVersion»=»2.0.1.7»
«Type»=»Microsoft.TerminalServices.Configuration. SnapIn.TSConfigSnapIn, tsconfig, Version=6.1.0.0, Culture=neutral, PublicKeyToken=31bf3856ad364e35»
«FolderBitmapsColorMask»=dword:00000000
«ModuleName»=»tsconfig.dll»
«Provider»=»Microsoft Corporation»
[HKEY_LOCAL_MACHINESOFTWAREMicrosoft MMCSnapInsFX:{80aaa290-abd9-9239-7a2d-cf4f67e42128}NodeTypes]
[HKEY_LOCAL_MACHINESOFTWAREMicrosoft MMCSnapInsFX:{80aaa290-abd9-9239-7a2d-cf4f67e42128}NodeTypes{f86e6446-aaff-11d0-b944-00c04fd8d5b9}]
[HKEY_LOCAL_MACHINESOFTWAREMicrosoft MMCSnapInsFX:{80aaa290-abd9-9239-7a2d-cf4f67e42128}Standalone]
для оснастки Tsadmin.msc (80aaa290-abd9-9239-7a2d-cf4f67e42128)
Windows Registry Editor Version 5.00
[HKEY_LOCAL_MACHINESOFTWAREMicrosoft MMCSnapInsFX:{80aaa290-abd9-9239-7a2d-cf4f67e42128}]
«ApplicationBase»=hex(2):43,00,3a,00,5c,00,57, 00,69,00,6e,00,64,00,6f,00,77,00,
73,00,5c,00,53,00,79,00,73,00,74,00,65,00,6d,00,33,00,32,00,00,00
«About»=»{00000000-0000-0000-0000-000000000000}»
«VersionStringIndirect»=»@C:\Windows\System32\umcRes.dll,-107»
«ProviderStringIndirect»=hex (2):40,00,43,00, 3a,00,5c,00,57,00,69,00,6e,00,64,
00,6f,00,77,00,73,00,5c,00,53,00,79,00,73, 00,74,00,65,00,6d,00,33,00,32,00,
5c,00,75,00,6d,00,63,00,52,00,65,00,73,00, 2e,00,64,00,6c,00,6c,00,2c,00,2d,
00,31,00,30,00,32,00,00,00
«SmallFolderBitmapIndirect»=hex (2):40,00, 43,00,3a,00,5c,00,57,00,69,00,6e,00,
64,00,6f,00,77,00,73,00,5c,00,53,00,79,00, 73,00,74,00,65,00,6d,00,33,00,32,
00,5c,00,75,00,6d,00,63,00,52,00,65,00,73, 00,2e,00,64,00,6c,00,6c,00,2c,00,
2d,00,31,00,32,00,30,00,00,00
«NameString»=»Remote Desktop Session Host Configuration»
«HelpTopic»=hex(2) :25,00,73,00,79,00,73, 00,74,00,65,00,6d,00,72,00,6f,00,6f,00,
74,00,25,00,5c,00,68,00,65,00,6c,00,70,00, 5c,00,74,00,73,00,63,00,63,00,2e,
00,63,00,68,00,6d,00,00,00
«AssemblyName»=»tsconfig»
«RuntimeVersion»=»v2.0.50215»
«Description»=»Configure Remote Desktop Session Host settings»
«DescriptionStringIndirect»=hex (2):40,00,43,00,3a, 00,5c,00,57,00,69,00,6e,00,
64,00,6f,00,77,00,73,00,5c,00,53,00,79,00,73,00,74, 00,65,00,6d,00,33,00,32,
00,5c,00,75,00,6d,00,63,00,52,00,65,00,73,00,2e, 00,64,00,6c,00,6c,00,2c,00,
2d,00,31,00,30,00,31,00,00,00
«LinkedHelpTopics»=»%systemroot%\help\tscc.chm»
«NameStringIndirect»=hex (2):40,00,43,00,3a,00, 5c,00,57,00,69,00,6e,00,64,00,6f,
00,77,00,73,00,5c,00,53,00,79,00,73,00,74,00,65, 00,6d,00,33,00,32,00,5c,00,
75,00,6d,00,63,00,52,00,65,00,73,00,2e,00,64,00, 6c,00,6c,00,2c,00,2d,00,31,
00,30,00,30,00,00,00
«IconIndirect»=hex (2):40,00,43,00,3a,00,5c,00,57, 00,69,00,6e,00,64,00,6f,00,77,
00,73,00,5c,00,53,00,79,00,73,00,74,00,65,00,6d,00, 33,00,32,00,5c,00,75,00,
6d,00,63,00,52,00,65,00,73,00,2e,00,64,00,6c,00, 6c,00,2c,00,2d,00,31,00,31,
00,30,00,00,00
«FxVersion»=»2.0.1.7»
«Type»=»Microsoft.TerminalServices.Configuration. SnapIn.TSConfigSnapIn, tsconfig, Version=6.1.0.0, Culture=neutral, PublicKeyToken=31bf3856ad364e35»
«FolderBitmapsColorMask»=dword:00000000
«ModuleName»=»tsconfig.dll»
«Provider»=»Microsoft Corporation»
[HKEY_LOCAL_MACHINESOFTWAREMicrosoft MMCSnapInsFX:{80aaa290-abd9-9239-7a2d-cf4f67e42128}NodeTypes]
[HKEY_LOCAL_MACHINESOFTWAREMicrosoft MMCSnapInsFX:{80aaa290-abd9-9239-7a2d-cf4f67e42128}NodeTypes{f86e6446-aaff-11d0-b944-00c04fd8d5b9}]
[HKEY_LOCAL_MACHINESOFTWAREMicrosoft MMCSnapInsFX:{80aaa290-abd9-9239-7a2d-cf4f67e42128}Standalone]
напоминаю, что вы их можете создать вручную в виде обычного txt, вставить содержимое, а потом изменить тип файла на reg.
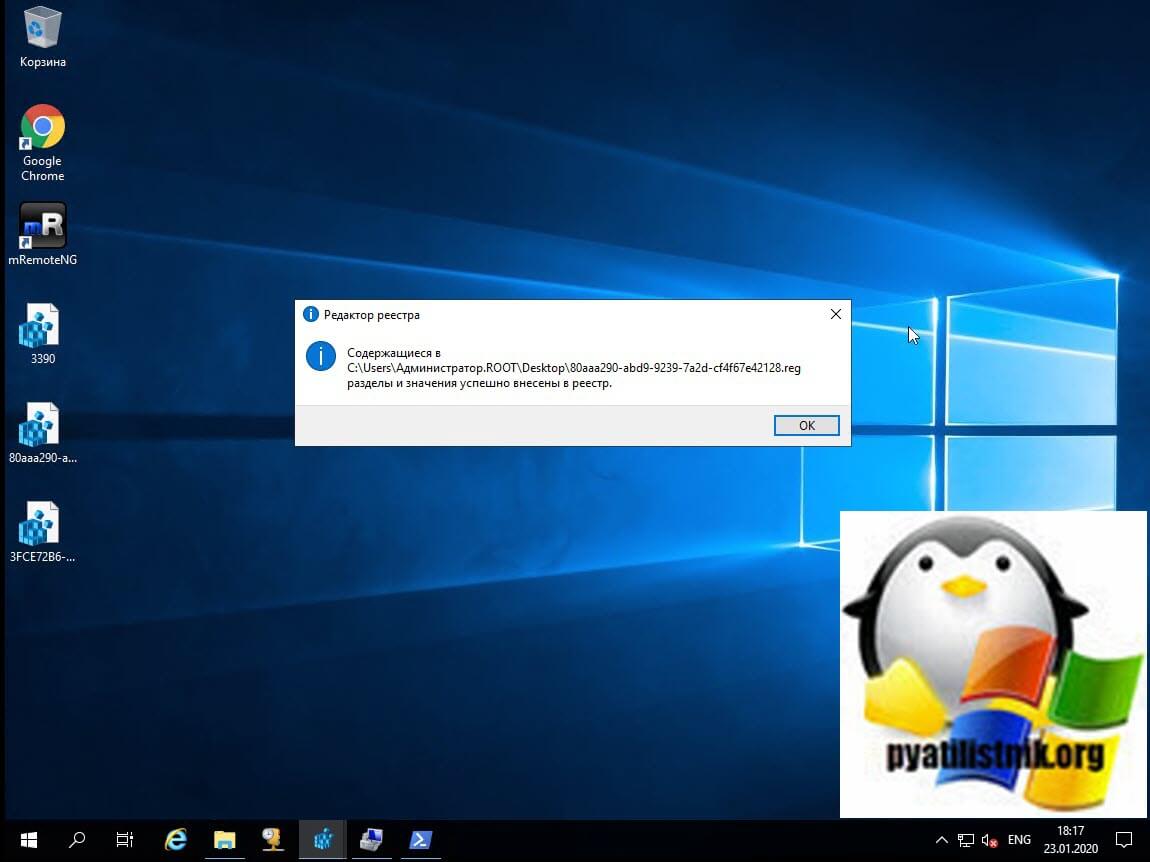
Регистрация оснасток Tsconfig.msc и Tsadmin.msc в Windows Server 2019
Теперь когда у вас есть все файлы необходимые для запуска и установки оснасток Tsconfig.msc и Tsadmin.msc, вы должны распаковать архив и положить файлы по тем же путям, приведу их сюда еще раз:
- c:windowssystem32tsadmin.dll
- c:windowssystem32tsconfig.dll
- c:windowssystem32wts.dll
- c:windowssystem32tsconfig.msc
- c:windowssystem32tsadmin.msc
- c:windowssystem32rutsconfig.resources.dll
- c:windowssystem32rutsadmin.resources.dll
Далее вам необходимо на вашем сервере Windows Server 2019 запустить два ключа реестра, которые мы выгружали. При их запуске будет предупреждение, говорим «Да«.
Файлы должны успешно импортироваться в реестр Windows.
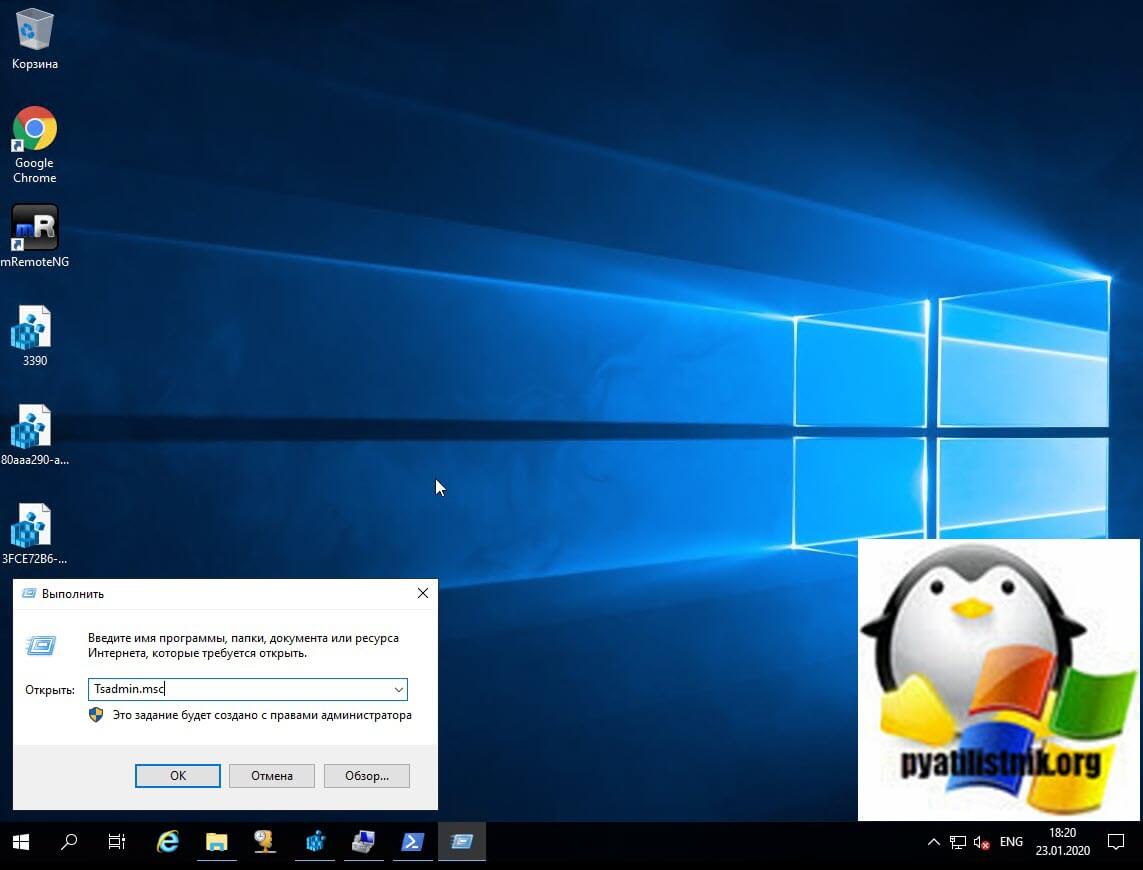
Проверяем работу диспетчера служб удаленных рабочих столов
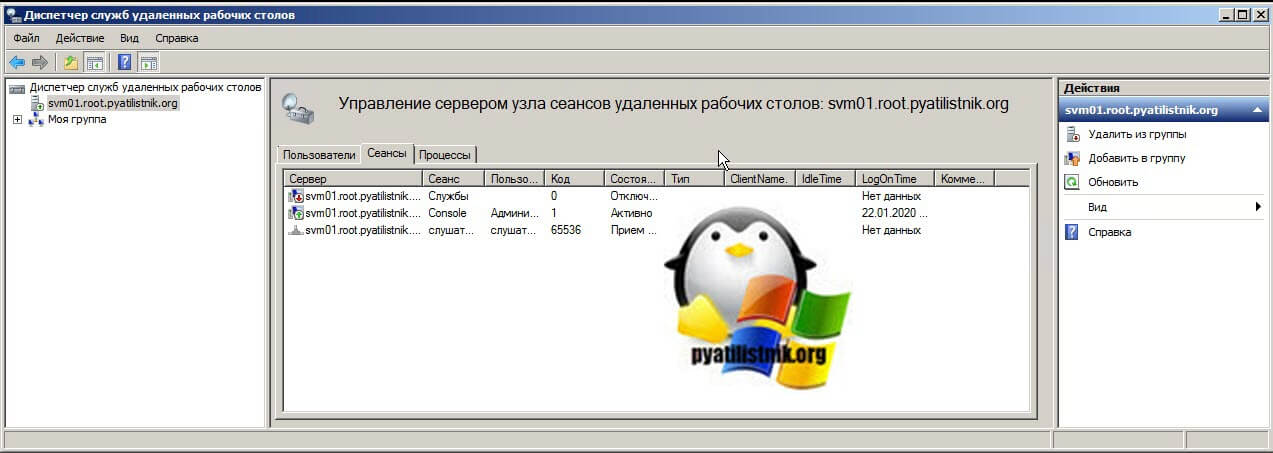
Попробуем запустить наши оснастки. Первой давайте запустим Tsadmin.msc. Для этого откройте окно выполнить и введите Tsadmin.msc. В итоге у нас запуститься «Диспетчер служб удаленных рабочих столов» (Remote Desktop Services Manager).
Работающие функции:
- отключение сеанса
- отправка сообщения
- сброс сессии
- статус сеанса
- регистрация сессии
- завершение процесса на вкладке процессов (одна из самых простых и важных функций инструмента)
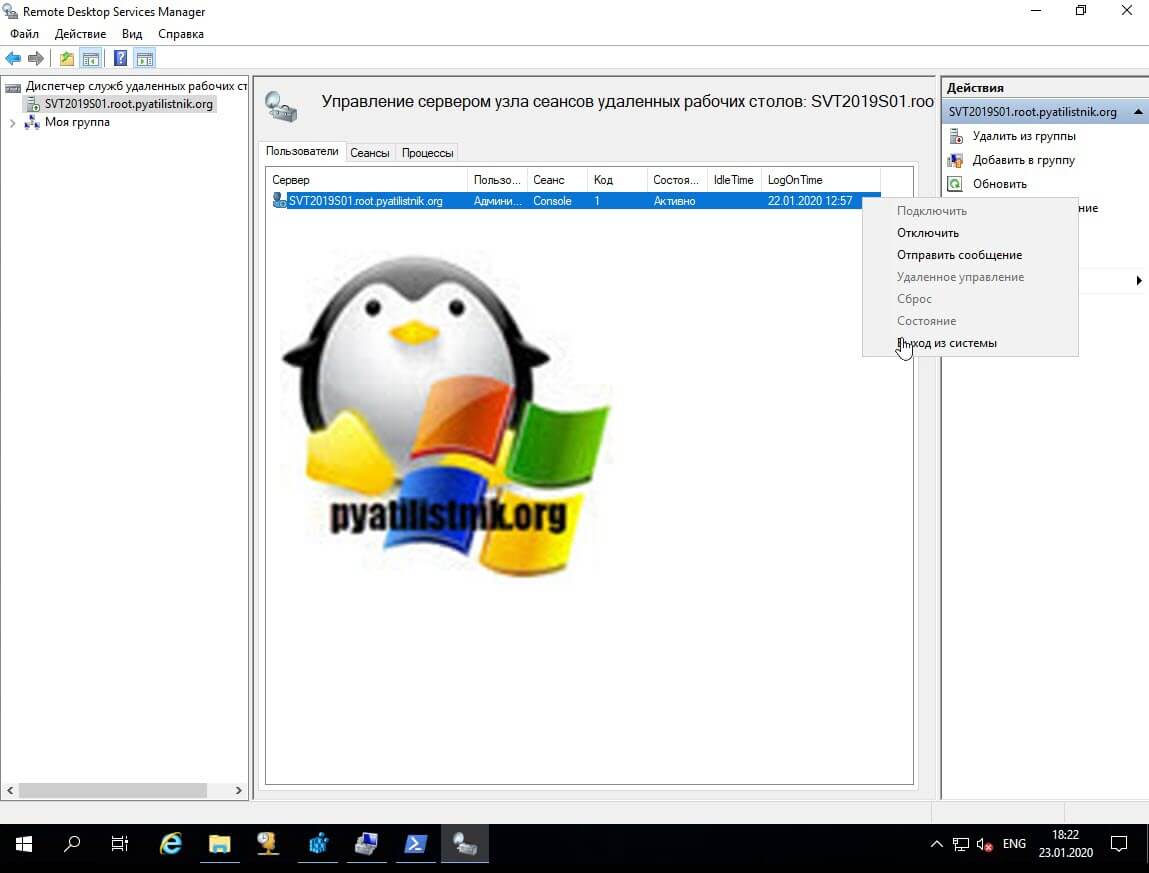
Так же хочу порекомендовать бесплатную утилиту Terminal Services Manager, о которой я подробно рассказывал, советую посмотреть, это аналог оснасток Tsadmin.msc для некого управления RDS фермой, делает все то же самое.
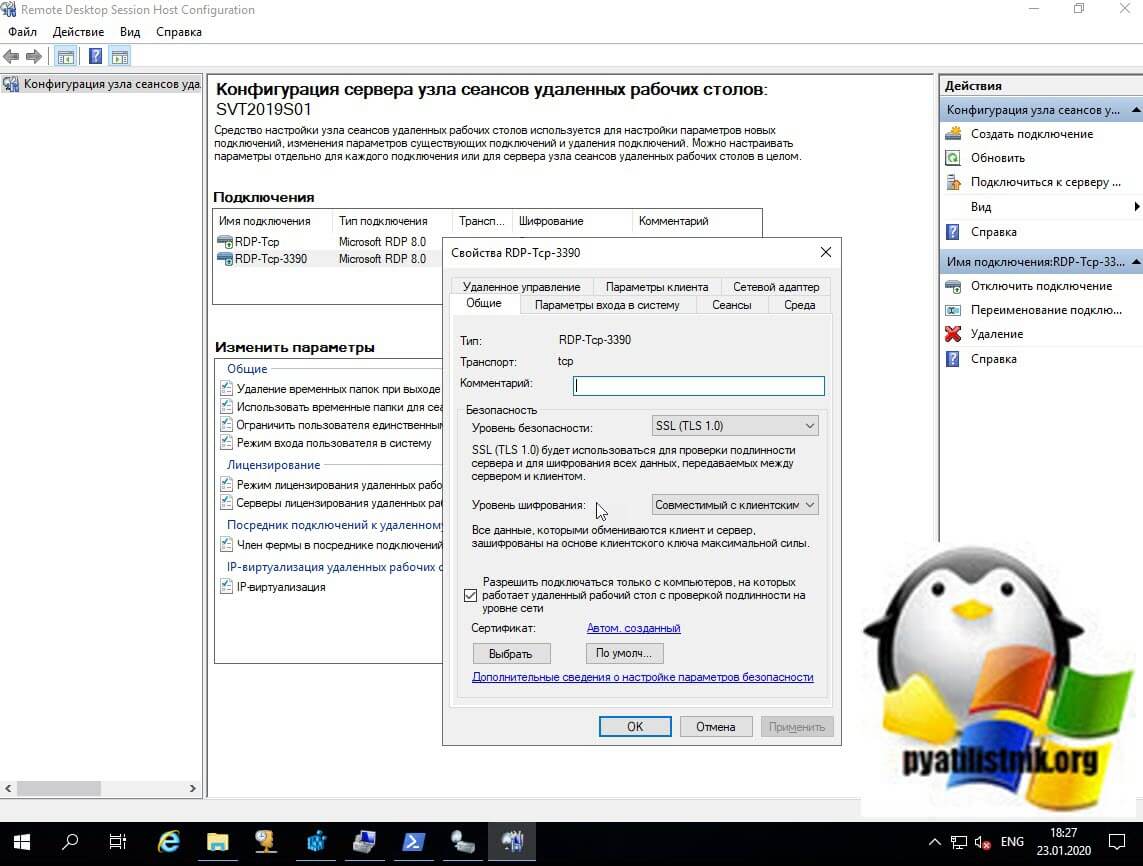
Проверяем работу конфигурации узла сеансов удаленных рабочих столов
Запустите через окно выполнить Tsconfig.msc.

У вас откроется оснастка «Конфигурация узла сеансов удаленных рабочих столов (Remote Desctop Session Host Configuration)». Тут вы увидите все привычные вкладки для настройки RDP подключения, кроме вкладки «Безопасность», которая доступна только в Windows Server 2008 R2, что весьма и весьма прискорбно, так как это была хорошая плюшка для тонкой настройки доступа по RDP.
На этом у меня все, с вами был Иван Семин, автор и создатель IT портала Pyatilistnik.org. Остались вопросы, пожелания или просто хотите поделиться опытом, то жду вас в комментариях.
A step by step guide to build a Windows Server 2019 Remote Desktop Services deployment.
I posted this before based on Windows Server 2012 R2 RDS and thought it was high time to update this post to a more modern OS version.
I will provide all the steps necessary for deploying a single server solution using the GUI tools.
Although it is called a single server installation, we will need 2 servers as shown below.
Software used in this guide:
Windows Server 2019 ISO (evaluation can be downloaded here: https://www.microsoft.com/en-us/evalcenter/evaluate-windows-server-2019).
SQL Server 2017 Express x64 (free version can be downloaded here: https://www.microsoft.com/en-us/download/details.aspx?id=55994).
SQL Server 2016 Native Client (free version can be downloaded here: https://www.microsoft.com/en-us/download/details.aspx?id=52676. After clicking the download button select ENUx64sqlncli.msi). Although I’m installing SQL Express 2017, there are no newer client tools available.
SQL Server Management Studio (free, and can be downloaded here: https://docs.microsoft.com/en-us/sql/ssms/download-sql-server-management-studio-ssms).
And a certificate. I got mine for free from https://www.sslforfree.com/. This certificate needs to contain the FQDN you will use as the RD Web Access URL (mine is rds.it-worxx.nl in this guide). It needs to be in .pfx format and you need to have the private key in it.
This guide will not focus on building a domain using a single domain controller and adding the second server as a member server to this domain.
Also some basic knowledge is assumed in this guide. I will not detail how to create a Security Group and adding a computer account to it. I will also not detail how to install SQL Express, or adding logins to a SQL Server Instance security context. If you need extra help with this, Bing it or drop me a mail with details, and I will provide steps to continue.
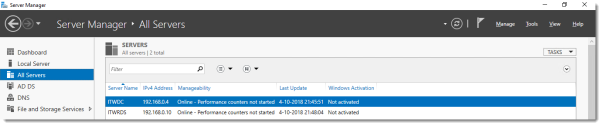
I will be using Hyper-V on my Windows 10 1809 laptop and I have prepared 2 servers:
ITWDC (1 vCPU, 1024MB memory, dynamic, 60GB Harddisk)
Installed Windows
IPv4 192.168.0.4/24
Added .NET Framework 3.5 as a feature
Added Active Directory Domain Services as a role
Configured this server as a Domain Controller in a new forest: it-worxx.lab
ITWRDS (1 vCPU, 1024MB memory, dynamic, 60GB Harddisk)
Installed Windows
Added .NET Framework 3.5 as a feature
IPv4 192.168.0.10/24, DNS server 192.168.0.4
Configured it as a member server in the it-worxx.lab domain
Installing the Remote Desktop Services Roles
Log on to the Domain Controller, and in Server Manager right-click the All Servers node and add the second server using the Add Servers command (or select the All Servers node, click Manage and click Add Servers).
Now that all servers needed in this deployment scenario are present, click Manage, and click Add Roles & Features.
Before you begin
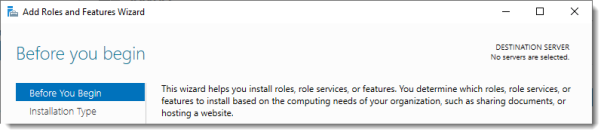
Click Next.
Select Installation Type
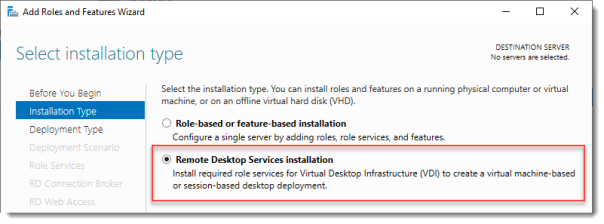
Select Remote Desktop Services installation.
Click Next.
Select Deployment Type

Although Quick Start might be a valid option for a single server deployment, leave the default selected. This will explain the steps necessary to install Remote Desktop Services in greater detail.
Click Next.
Select Deployment Scenario
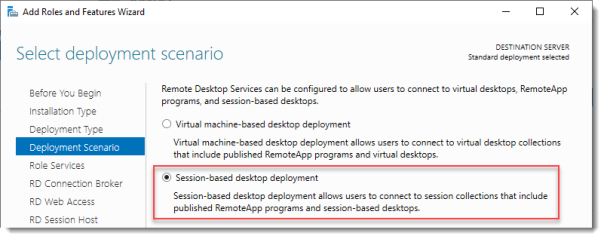
Select Session-based desktop deployment.
Click Next.
Review Role Services

Review the services that will be installed.
Click Next.
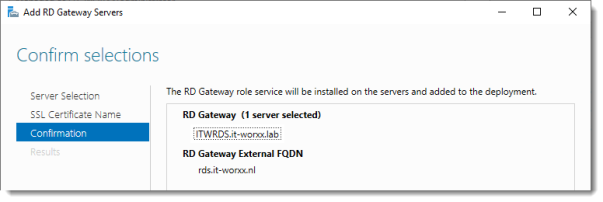
Specify RD Connection Broker server
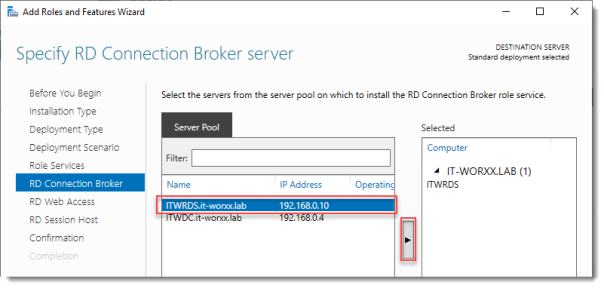
Click the member server and click the Add button.
Click Next.
Specify RD Web Access server
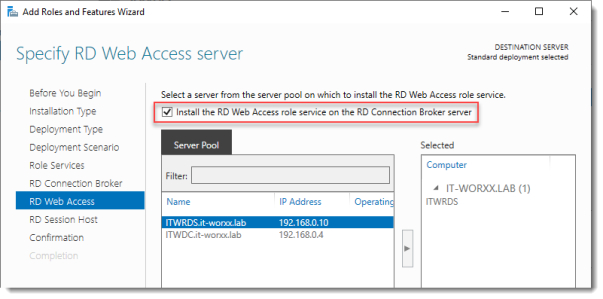
Check Install the RD Web Access role on the RD Connection Broker server.
Click Next.
Specify RD Session Host server
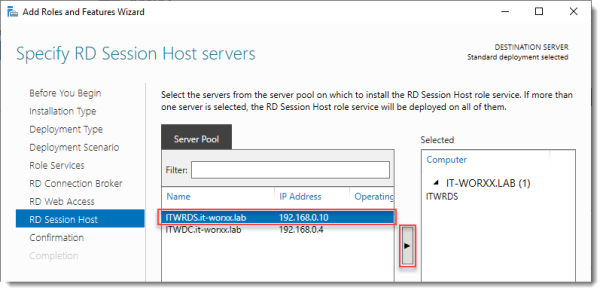
Click the member server and click the Add button.
Click Next.
Confirm selections
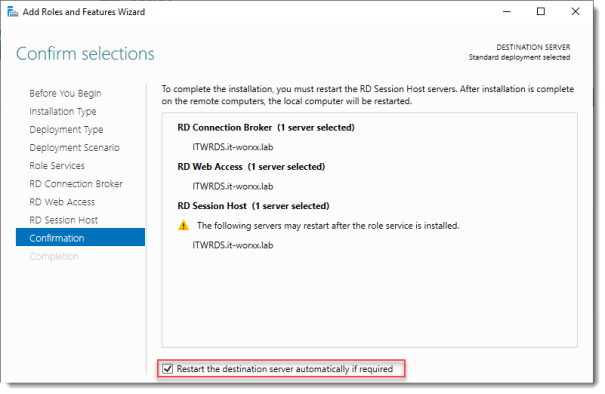
Check Restart the destination server automatically if required.
Click Deploy.
View progress
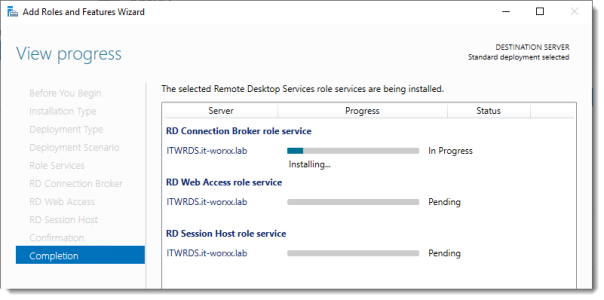
Wait until all role services are deployed and the member server has restarted.
Click Close.
In Server Manager click Remote Desktop Services and scroll down to the overview.
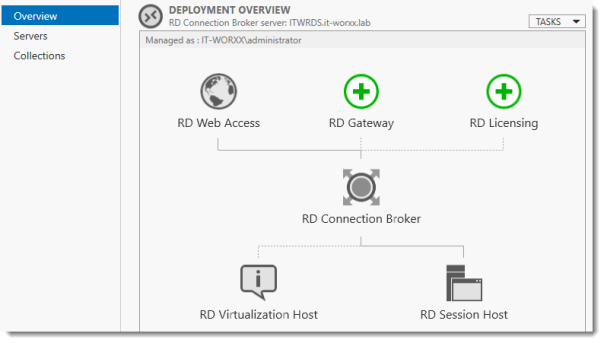
As you can see the deployment is missing a RD Gateway server and a RD Licensing server.
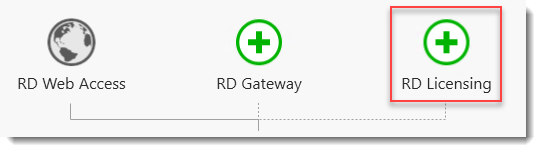
Click the Add RD Licensing server button.
Select a server
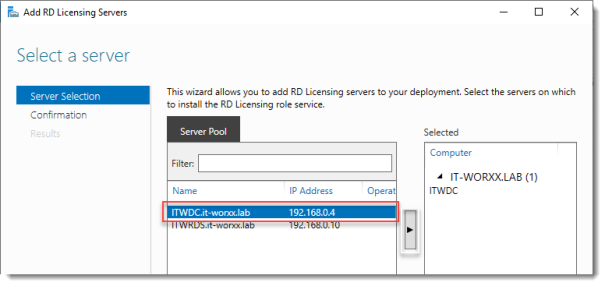
Click the domain controller and click the Add button.
Click Next.
Confirm selections
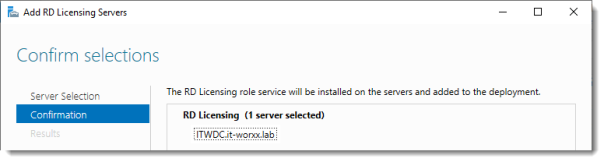
Click Add.
View progress
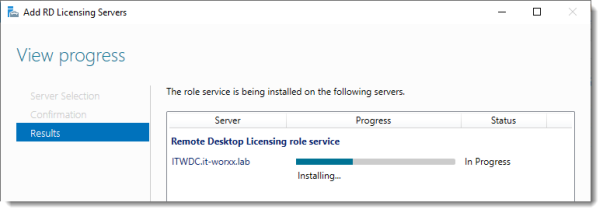
Wait until the role service is deployed. No restart is needed.
Click Close.
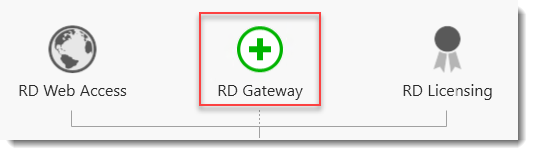
Click the Add RD Gateway server button.
Select a server
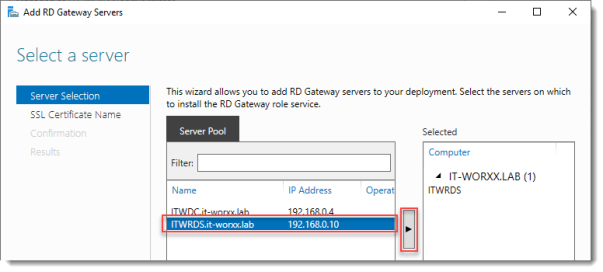
Click the member server and click the Add button.
Click Next.
Name the self-signed SSL certificate
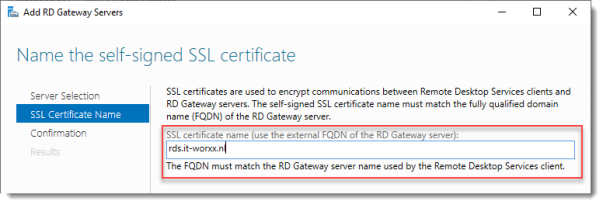
The wizard creates a self-signed certificate. We will deal with certificates in this deployment in a little bit. We will replace the self-signed certificate.
Enter the external Fully Qualified Domain Name which you will also use for the Web Access URL. In my case, for lack of a better name, I used “rds.it-worxx.nl”. I didn’t want to use “remote.it-worxx.nl” or “desktop.it-worxx.nl” or anything else.
Click Next.
Confirm selections
Click Add.
View progress
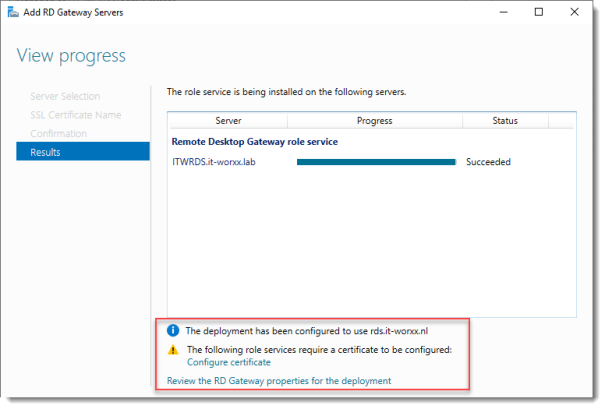
Wait until the role service is deployed. Again, no restart is needed.
Notice that “rds.it-worxx.nl” was configured for the deployment.
Also notice that even more certificate configuring is needed, but we’ll get to that later. Pay no attention to it for now. The same goes for the RD Gateway properties for the deployment. We’ll get to that later.
Click Close.
Review role installation and setting License Mode
Let’s have a quick look at the configuration we have so far.
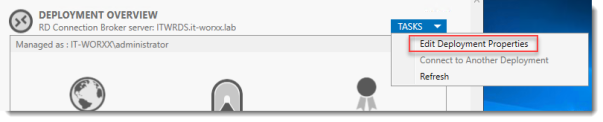
In Server Manager, Remote Desktop Services, Overview, click Tasks and click Edit Deployment Properties.
Configure the deployment
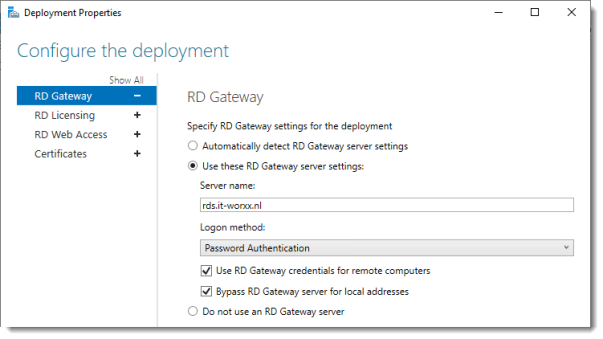
Review the RD Gateway settings and notice what settings are available.
Click RD Licensing.
Configure the deployment
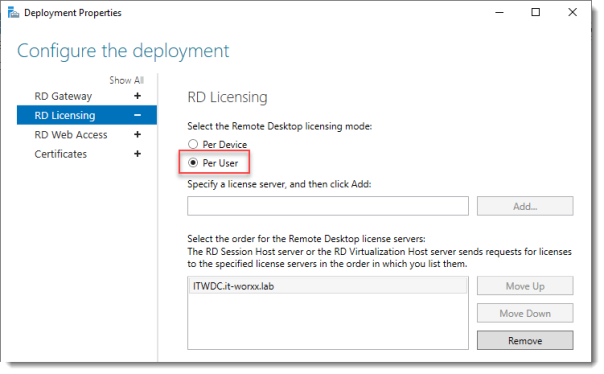
Notice that an RD License server is available, but no license type is selected yet.
I selected Per User, but since this is just a guide setup, it really doesn’t matter.
Click RD Web Access.
Configure the deployment
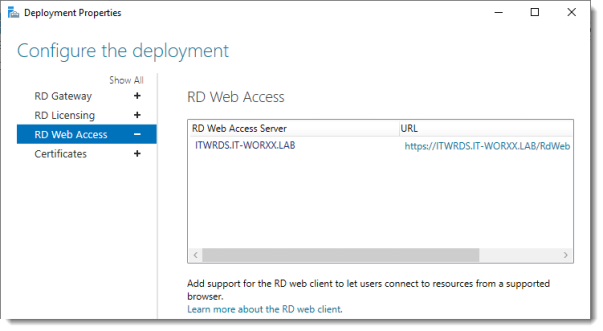
By default the RD Web Access IIS application is installed in /RdWeb.
If you want to know how to change this, check another post: https://msfreaks.wordpress.com/2013/12/07/redirect-to-the-remote-web-access-pages-rdweb/
This is for Windows Server 2012 R2 RDS, but it also works for Windows Server 2019 RDS.
Click Certificates.
Configure the deployment
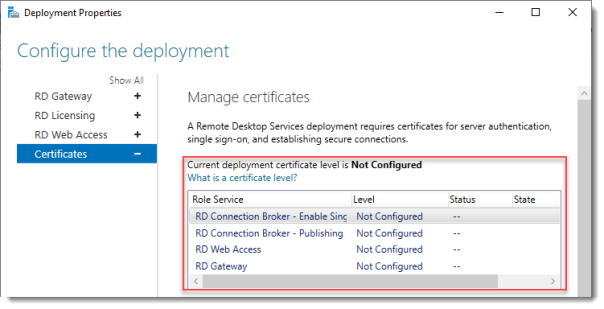
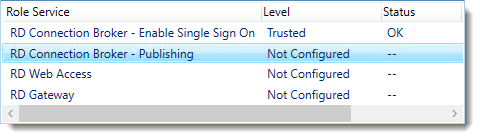
Notice that the certificate level currently has a status of Not Configured.
As you can see, certificates are used for different goals within the deployment.
The RD Gateway certificate is used for Client to gateway communication and needs to be trusted by the clients. Either install the self-signed certificate on all clients, or use a certificate for which the complete certificate chain is already trusted by all clients. As it said in the wizard, the external FQDN should be on the certificate.
The RD Web Access certificate is used by IIS to provide a server identity to the browser clients.
The RD Connection Broker actually has two goals for which it needs certificates. To enable single sign on (server to server authentication), and for publishing (signing RDP files). If you look in the deployment you’ll see that the Connection Broker is now configured to use “itwrds.it-worxx.lab”, so we have to change it to use an external FQDN as well.
If we use the same FQDN for all goals described above, we need only 1 certificate, and only 1 external IP address.
We’ll come back to this wizard later to assign the certificate. First order of business is to change the internal FQDN for the Connection Broker to an external FQDN.
Click OK (no reason why we shouldn’t commit the change we made on the licensing tab, remember?)
Changing the Connection Broker FQDN to an externally resolvable FQDN
Open DNS Manager on the domain controller and browse to Forward Lookup Zones.
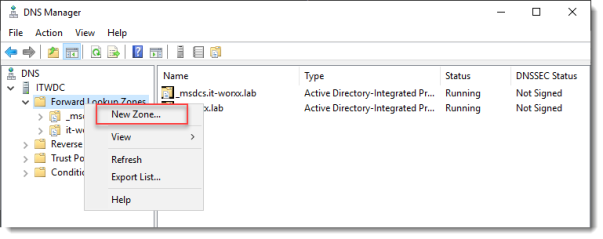
Right click Forward Lookup Zones and click New Zone… Go through this wizard accepting the defaults until you have to enter a Zone Name.
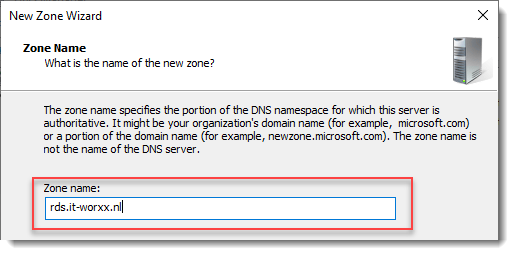
Enter the external FQDN which will also be used by the Connection Broker.
Finish the rest of the wizard accepting the defaults.
Browse to the newly created zone.
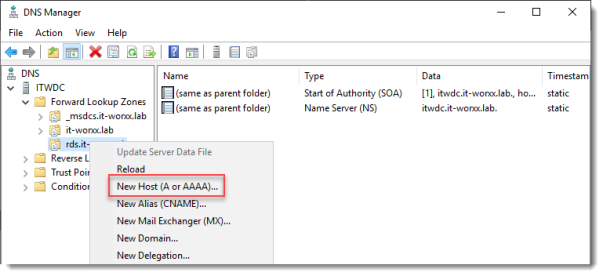
Right click the newly created zone and click New Host (A or AAAA)…
New Host
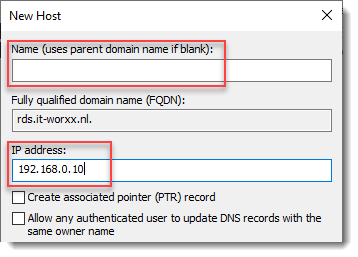
Leave the Name field blank, but enter the member server’s (holding the RD Connection Broker role) IPv4 address.
Click Add Host.
Now the configuration will be able to resolve “rds.it-worxx.nl” to the server holding the Connection Broker role, and this will work because “rds.it-worxx.nl” is also on the certificate that we will configure later.
Create a new Global Security Group called “RD Connection Brokers” and add the computer account for the member server to it as a group member.
We need this group to be able to convert the RD Connection Broker to a highly available RD Connection Broker. You’ll see why we need to do this in a few steps.
Reboot the member server to let it know it’s a member of the RDS Connection Brokers security group.
The next steps in re-configuring the RD Connection Broker depend on an SQL database shared by all Connection Brokers in the deployment. Without this configuration the RD Connection Broker will rely on the Windows Internal Database that was created during the initial deployment of the roles.
Install SQL Express on the Domain Controller (or use an existing SQL Server if you already have one).
It’s not best practice to install SQL onto a Domain Controller, but it’ll do for this guide.
Here’s a list of needed features:

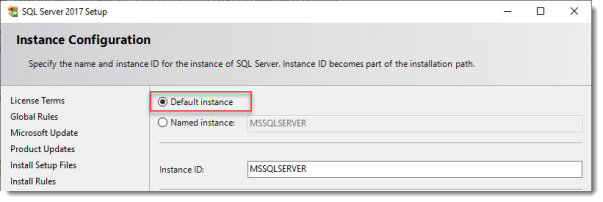
Use the Default Instance (so click Default, and do not leave the wizard’s selection on Named instance: SQLEXPRESS).
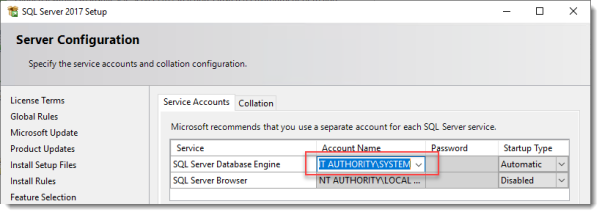
Set the SQL Service to start using SYSTEM because the default account of SQLSERVER cannot be used on a Domain Controller.
When the installation is done open SQL Configuration manager and browse to Client Protocols under SQL Native Client 11.0 Configuration.
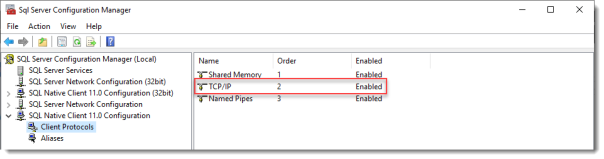
Check if TCP/IP is enabled under Client Protocols. SQL Express install enables this by default, but check it just to be sure, especially if you use an existing SQL Server.
Browse to Protocols for MSSQLSERVER under SQL Server Network Configuration.
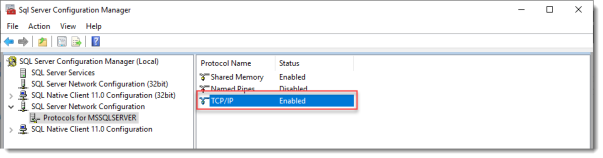
Enable TCP/IP. If this is a new SQL installation, this will be disabled by default.
Restart the SQL Server service if you changed this setting.
On the SQL Server, make sure port 1433 is not being blocked by Windows Firewall.

I added the SQL Server executable to the exception list to allow all inbound traffic, but TCP 1433 inbound should suffice.
If you installed SQL Server using the default folder locations, the sqlservr.exe executable is found in “C:Program FilesMicrosoft SQL ServerMSSQL14.MSSQLSERVERMSSQLBinn”.
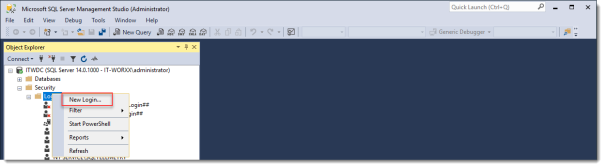
Open SQL Server Management Studio, connect to the default instance on the Domain Controller and browse to Logins under Security.
Remember the Management Studio is no longer available with the SQL Server download, but is a different download.
Right click Logins and click New Login…
Login – New
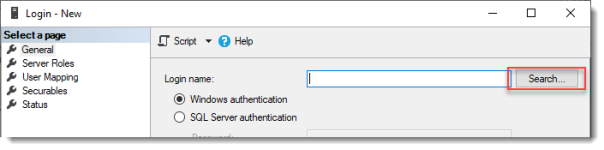
Click Search…
Select User, Service Account, or Group
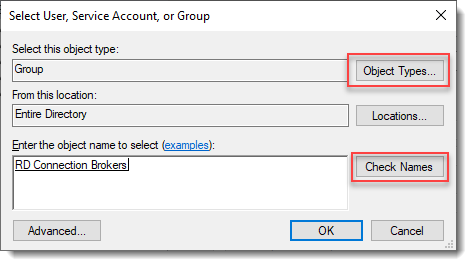
Click Object Types… and select Group.
Type the RDS Connection Brokers security group name and click Check Names.
Click OK.
Login – New
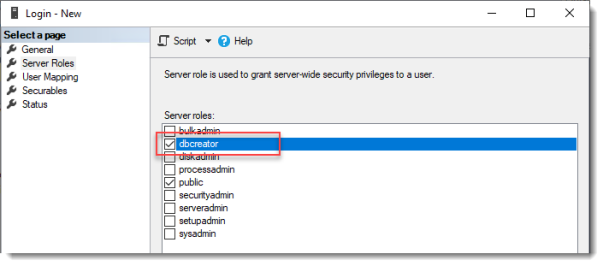
Click Server Roles and select dbcreator.
Click OK.
We have just effectively granted the RDS Connection Broker server the right to create databases.
We need this because the RDS Connection Broker service will try to migrate from WID (Windows Internal Database to a (high available) SQL Server instance when we convert the Broker to a high available broker.
Install the SQL Native Client on the member server (Client Components only). If you used the member server in this setup to install the SQL Management Studio, you can skip this step because the Native Client was installed with installing the Management Studio.
Everything we need is in place to convert the RD Connection Broker, so let’s do just that.
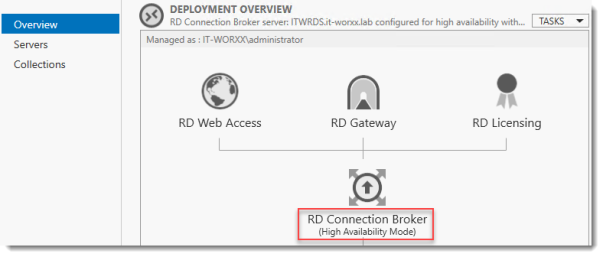
In Server Manager click Remote Desktop Services and scroll down to the overview.
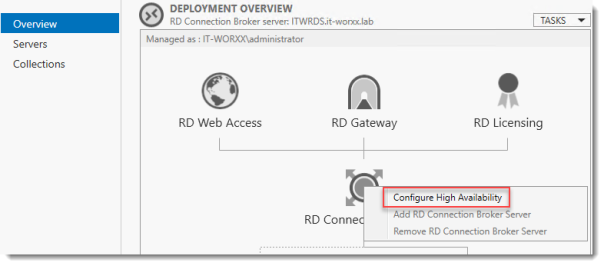
Right click RD Connection Broker and click Configure High Availability.
Before you begin
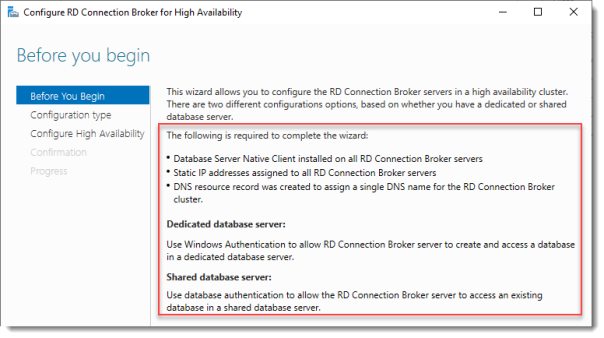
So we’re building a single node cluster here 
Look at the pre-requisites.
If you have more than one RD Connection Broker they need to be configured using DNS Round Robin.
Click Next.
Configure RD Connection Broker for High Availability
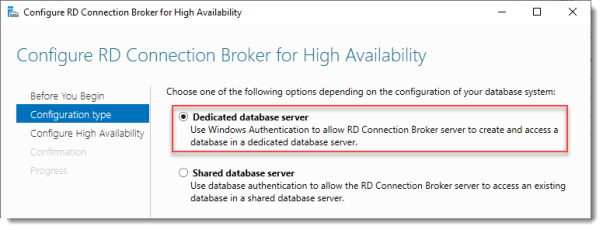
Since we just installed an SQL Server for this, leave the default selected. You’d use the other option for instance if you’d like to use Azure SQL for this deployment.
Click Next.
Configure RD Connection Broker for High Availability
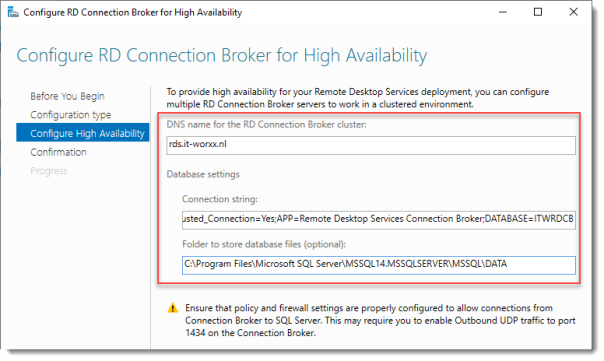
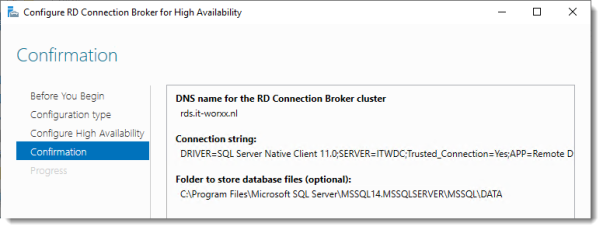
DNS name for the RD Connection Broker cluster:
The DNS Zone name we configured in DNS earlier: rds.it-worxx.nl
Connection string:
DRIVER=SQL Server Native Client 11.0;SERVER=ITWDC;Trusted_Connection=Yes;APP=Remote Desktop Services Connection Broker;DATABASE=ITWRDCB
Folder to store database files:
C:Program FilesMicrosoft SQL ServerMSSQL14.MSSQLSERVERMSSQLDATA
I used the instance default folder.
Click Next.
Confirmation
If you get an error before this page:
- Check if TCP/IP is enabled in client protocols and for your instance
- Check if you can reach port 1433 on the SQL Server from the member server
Click Configure.
Progress
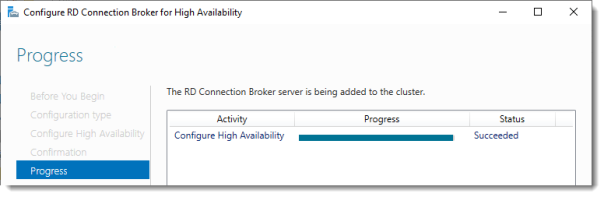
If you get an error on this page:
- Check SQL permissions for the security group
- Check if the database path you entered is correct
Click Close.
The RD Connection Broker is now in High Availability Mode, and configured as “rds.it-worxx.nl” and we are finally ready to complete the configuration.
Configuring Certificates

In Server Manager, Remote Desktop Services, Overview, click Tasks and click Edit Deployment Properties, then click Certificates.
Configure the deployment

Click RD Connection Broker – Enable Single Sign On and click Select Existing certificate.
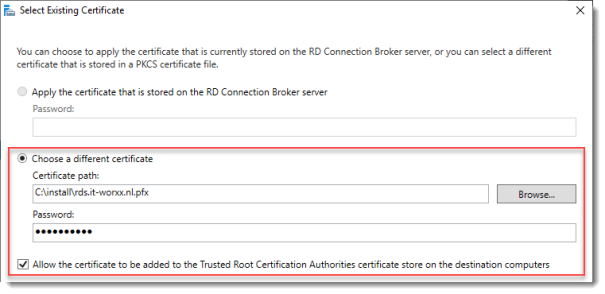
Browse to the .pfx file, enter its password, and check Allow the certificate..
Click OK.

So click Apply. This takes a little while, be patient.
Configure the deployment
Click RD Connection Broker – Publishing and click Select Existing certificate.
Browse to the .pfx file, enter its password, and check Allow the certificate..
Click OK.
Click Apply. This again takes a little while, be a little more patient.
Configure the deployment
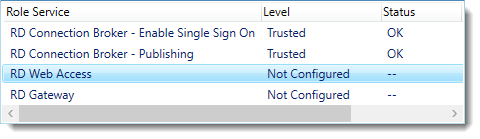
Click RD Web Access and click Select Existing certificate.

Note: Did you notice the warning when you select RD Web Access?
Browse to the .pfx file, enter its password, and check Allow the certificate..
Click OK.
Click Apply again. This takes another little while longer, be slightly more patient.
Configure the deployment
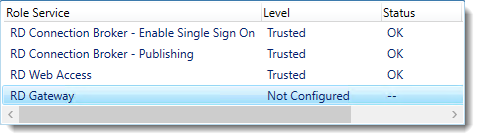
Last one. Click RD Gateway and click Select Existing certificate.
Browse to the .pfx file, enter its password, and check Allow the certificate..
Click OK.
Click OK to apply the final certificate step.
Configured all servers, configured certificates..
One thing left to do: Tell our RDS environment exactly what to publish.
Publishing resources to your users
In fact you can use this setup to either provide full desktop sessions on the Session Host, or you can choose to publish only applications on the Session Host.
Let’s publish full desktop sessions.

In Server Manager, Remote Desktop Services, Session Collections, click Tasks and click Create Session Collection.
Before you begin

Review the requirements. This won’t be an issue in this setup, but you could restrict access to this collection by selecting a select group of people.
Click Next.
Name the collection
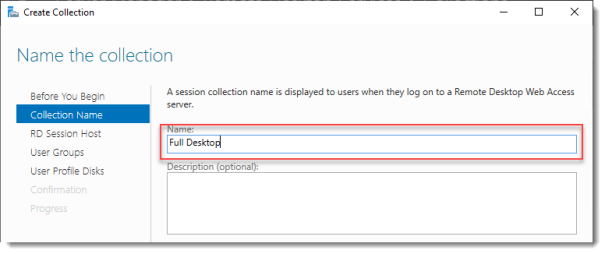
Enter a descriptive name. This name will be displayed under its icon in the Web Access interface.
Click Next.
Specify RD Session Host servers

Click the member server and click the Add button.
Click Next.
Specify user groups
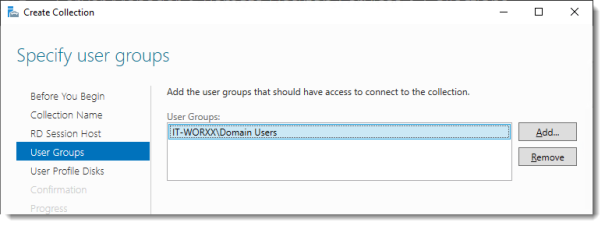
You can limit access to the resource here if you want. Add one or more groups to restrict access to these groups only. In this setup the default selection of Domain Users will do fine. Groups you specify here will be added to the list of groups of users that are allowed to connect using RDP to the Session Host server(s).
Click Next.
Specify user profile disks
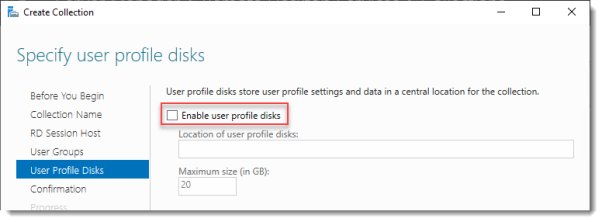
User profile disks are not in focus in this guide. Since I have no file shares configured in this setup, uncheck Enable user profile disks for now.
Click Next.
Confirm selections
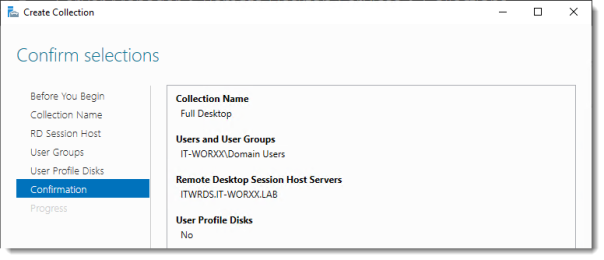
Review the information and click Create.
View Progress
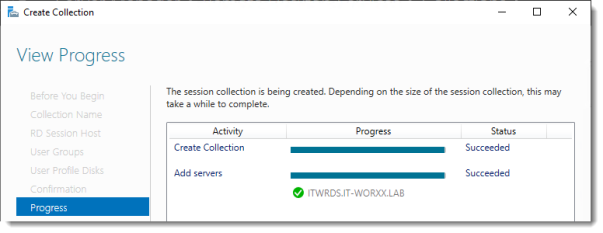
Wait until the collection is created and the server is added to the collection.
Click Close.
Time to test the setup!
Testing the setup
On a machine that has access to your test setup (you may have to add the external FQDN to your hosts file if you didn’t publish it to the internet) open https://rds.it-worxx.nl/rdweb
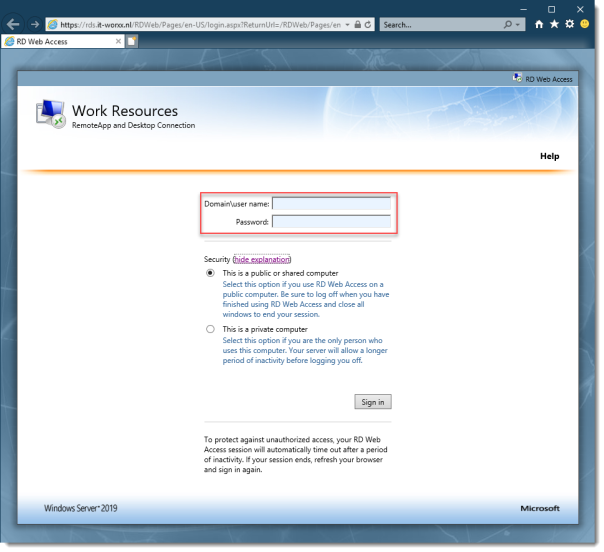
Hey! At least the RD Web Access application works 
Enter a valid username and password (IT-WORXXusername or username@it-worxx.lab).
Create a user for this, or simply use the domain admin account.
Click Sign in.
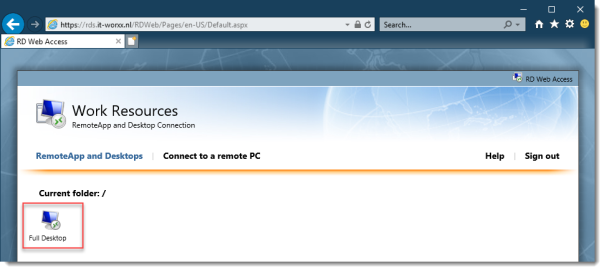
After logging in you are presented with the full desktop session collection we created.
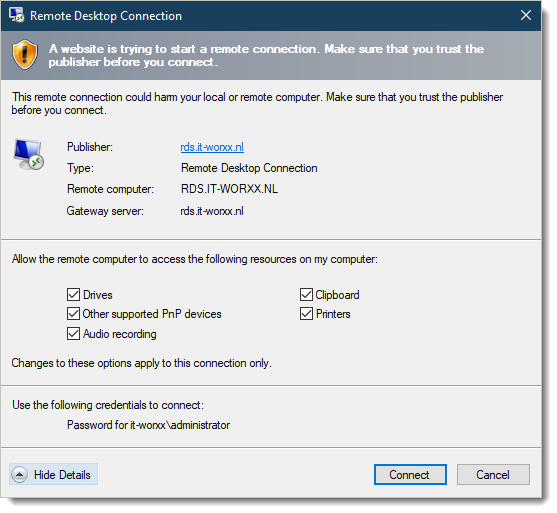
After clicking the Full Desktop icon you get the warning that devices are going to be redirected.
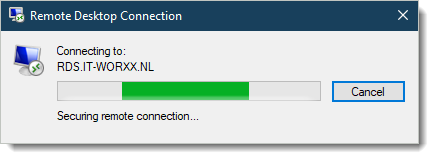
And when you click Connect, you connect
Enjoy.
Arjan
Содержание
- Terminal services manager windows server 2019
- Для чего нужны оснастки Tsconfig.msc и Tsadmin.msc
- Алгоритм запуска TSADMIN.msc и TSCONFIG.msc в Windows Server 2019
- Регистрация оснасток Tsconfig.msc и Tsadmin.msc в Windows Server 2019
- Проверяем работу диспетчера служб удаленных рабочих столов
- Проверяем работу конфигурации узла сеансов удаленных рабочих столов
- Terminal services manager windows server 2019
- Что такое Terminal Services Manager
- Где скачать Terminal Services Manager
- Управление пользователями:
- Установка Terminal Services Manager
- Настройка бесплатной лицензии Terminal Services Manager
- Настройка Terminal Services Manager 3.4
- Минусы Terminal Services Manager
- Использование TSADMIN.msc и TSCONFIG.msc для управления RDS в Windows Server 2019/2016/2012R2
Terminal services manager windows server 2019
Добрый день! Уважаемые читатели и гости одного из крупнейших IT блогов по системному администрированию Pyatilistnik.org. В прошлый раз мы с вами разобрались, что такое SSL сертификат, где и как их применяют и какие они бывают. Движемся дальше, в сегодняшней публикации я бы хотел вам рассказать, как вы можете вернуть и запускать в Windows Server 2019 оснастки Tsconfig.msc «Конфигурация узла сеансов удаленных рабочих столов (Remote Desctop Session Host Configuration)» и Tsadmin.msc «Диспетчер служб удаленных рабочих столов» (Remote Desktop Services Manager). Напомню их варианты использования, так как не все застали времена терминальных серверов на Windows Server 2008 R2.
Для чего нужны оснастки Tsconfig.msc и Tsadmin.msc
Бытует мнение, что все что новое оно априори должно быть лучше, в каких-то областях возможно это так, но не в компьютерном мире. Примеров этому очень много, например:
В случае с терминальными службами ситуация двоякая, с одной стороны Microsot сделала удобную общую оснастку в диспетчере серверов, а с другой лишила пользователей ряда оснасток и графических функция, которые они предоставляли. Microsoft по известной только им причине убрали оснастки из состава инструментов RDS фермы:
Алгоритм запуска TSADMIN.msc и TSCONFIG.msc в Windows Server 2019
Хорошо, что Microsoft не закрыла возможность регистрации и запуска оснасток TSADMIN.msc и TSCONFIG.msc в Windows Server 2012 R2 и выше. Хочу отметить, что данный метод не является официальным, но использовать его все же можно на свой страх и риск.
Суть метода заключается в том, что вам необходимо скопировать определенные библиотеки и сами оснастки Tsconfig.msc и Tsadmin.msc из Windows Server 2008 R2 или скачать их у меня если у вас нет уже в инфраструктуре таких серверов. так же необходимо для них прописать ключи реестра и права на них, это делается через выгрузку веток с 2008 R2 системы или скриптом, оба метода я покажу.
Если вы все скачали у меня, то состав архивов будет такой:
Если у вас есть своя Windows Server 2008 R2 (даже если ее нет вы можете быстро развернуть виртуальную машину), то вам необходимо скопировать вот такой список файлов из каталога C:WindowsSystem32
А так же языковые файлы они располагаются по пути C:WindowsSystem32ru или C:WindowsSystem32en в зависимости от языка в системе. В моем примере русская версия поэтому я буду копировать файлы для русской версии. Из каталога мне необходимо скопировать
Следующим действием вам необходимо выгрузить две ветки реестра, если не хотите это делать, то их можно создать самому из кода, который я представлю ниже. Запустите редактор реестра Windows из окна выполнить, введя regedit.
Вам нужно найти вот такие ветки реестра и произвести их экспорт:
Выбираем место сохранения ваших reg файлов. На выходе у вас будет два файла вот с таким содержимым, для оснастки tsconfig (80aaa290-abd9-9239-7a2d-cf4f67e42128)
[HKEY_LOCAL_MACHINESOFTWAREMicrosoft MMCSnapInsFX:<80aaa290-abd9-9239-7a2d-cf4f67e42128>]
«ApplicationBase»=hex (2):43,00,3a,00,5c,00, 57,00,69,00,6e,00,64,00,6f,00,77,00,
73,00,5c,00,53,00,79,00,73,00,74,00,65,00, 6d,00,33,00,32,00,00,00
«About»=»<00000000-0000-0000-0000-000000000000>»
«VersionStringIndirect»=»@C:\Windows\System32\umcRes.dll,-107»
«ProviderStringIndirect»=hex (2) :40,00,43,00,3a, 00,5c,00,57,00,69,00,6e,00,64,
00,6f,00,77,00,73,00,5c,00,53,00,79,00, 73,00,74,00, 65,00,6d,00,33,00,32,00,
5c,00,75,00,6d,00,63,00,52,00,65,00,73,00, 2e,00,64,00,6c,00,6c,00,2c,00,2d,
00,31,00,30,00,32,00,00,00
«SmallFolderBitmapIndirect»=hex(2) :40,00,43,00, 3a,00,5c,00,57,00,69,00,6e,00,
64,00,6f,00,77,00,73,00,5c,00,53,00,79, 00,73,00,74,00, 65,00,6d,00,33,00,32,
00,5c,00,75,00,6d,00,63,00,52,00,65,00,73,00, 2e,00,64,00,6c,00,6c,00,2c,00,
2d,00,31,00,32,00,30,00,00,00
«NameString»=»Remote Desktop Session Host Configuration»
«HelpTopic»=hex(2):25,00,73,00,79,00,73,00,74,00,65, 00,6d,00,72,00,6f,00,6f,00,
74,00,25,00,5c,00,68,00,65,00,6c,00,70, 00,5c,00,74,00,73,00,63,00,63,00,2e,
00,63,00,68,00,6d,00,00,00
«AssemblyName»=»tsconfig»
«RuntimeVersion»=»v2.0.50215»
«Description»=»Configure Remote Desktop Session Host settings»
«DescriptionStringIndirect»=hex (2) :40,00,43,00,3a, 00,5c,00,57,00,69,00,6e,00,
64,00,6f,00,77,00,73,00,5c,00,53,00,79, 00,73,00,74, 00,65,00,6d,00,33,00,32,
00,5c,00,75,00,6d,00,63,00,52,00,65,00,73,00,2e, 00,64,00,6c,00,6c,00,2c,00,
2d,00,31,00,30,00,31,00,00,00
«LinkedHelpTopics»=»%systemroot%\help\tscc.chm»
«NameStringIndirect»=hex (2) :40,00,43,00,3a,00, 5c,00,57,00,69,00,6e,00,64,00,6f,
00,77,00,73,00,5c,00,53,00,79,00,73,00, 74,00,65, 00,6d,00,33,00,32,00,5c,00,
75,00,6d,00,63,00,52,00,65,00,73,00,2e,00,64, 00,6c,00,6c,00,2c,00,2d,00,31,
00,30,00,30,00,00,00
«IconIndirect»=hex(2):40,00,43,00,3a,00, 5c,00,57,00,69,00,6e,00,64,00,6f,00,77,
00,73,00,5c,00,53,00,79,00,73,00,74,00, 65,00,6d,00,33,00,32,00,5c,00,75,00,
6d,00,63,00,52,00,65,00,73,00,2e,00,64, 00,6c,00,6c,00,2c,00,2d,00,31,00,31,
00,30,00,00,00
«FxVersion»=»2.0.1.7»
«Type»=»Microsoft.TerminalServices.Configuration. SnapIn.TSConfigSnapIn, tsconfig, Version=6.1.0.0, Culture=neutral, PublicKeyToken=31bf3856ad364e35»
«FolderBitmapsColorMask»=dword:00000000
«ModuleName»=»tsconfig.dll»
«Provider»=»Microsoft Corporation»
для оснастки Tsadmin.msc (80aaa290-abd9-9239-7a2d-cf4f67e42128)
[HKEY_LOCAL_MACHINESOFTWAREMicrosoft MMCSnapInsFX:<80aaa290-abd9-9239-7a2d-cf4f67e42128>]
«ApplicationBase»=hex(2):43,00,3a,00,5c,00,57, 00,69,00,6e,00,64,00,6f,00,77,00,
73,00,5c,00,53,00,79,00,73,00,74,00,65,00,6d,00,33,00,32,00,00,00
«About»=»<00000000-0000-0000-0000-000000000000>»
«VersionStringIndirect»=»@C:\Windows\System32\umcRes.dll,-107»
«ProviderStringIndirect»=hex (2):40,00,43,00, 3a,00,5c,00,57,00,69,00,6e,00,64,
00,6f,00,77,00,73,00,5c,00,53,00,79,00,73, 00,74,00,65,00,6d,00,33,00,32,00,
5c,00,75,00,6d,00,63,00,52,00,65,00,73,00, 2e,00,64,00,6c,00,6c,00,2c,00,2d,
00,31,00,30,00,32,00,00,00
«SmallFolderBitmapIndirect»=hex (2):40,00, 43,00,3a,00,5c,00,57,00,69,00,6e,00,
64,00,6f,00,77,00,73,00,5c,00,53,00,79,00, 73,00,74,00,65,00,6d,00,33,00,32,
00,5c,00,75,00,6d,00,63,00,52,00,65,00,73, 00,2e,00,64,00,6c,00,6c,00,2c,00,
2d,00,31,00,32,00,30,00,00,00
«NameString»=»Remote Desktop Session Host Configuration»
«HelpTopic»=hex(2) :25,00,73,00,79,00,73, 00,74,00,65,00,6d,00,72,00,6f,00,6f,00,
74,00,25,00,5c,00,68,00,65,00,6c,00,70,00, 5c,00,74,00,73,00,63,00,63,00,2e,
00,63,00,68,00,6d,00,00,00
«AssemblyName»=»tsconfig»
«RuntimeVersion»=»v2.0.50215»
«Description»=»Configure Remote Desktop Session Host settings»
«DescriptionStringIndirect»=hex (2):40,00,43,00,3a, 00,5c,00,57,00,69,00,6e,00,
64,00,6f,00,77,00,73,00,5c,00,53,00,79,00,73,00,74, 00,65,00,6d,00,33,00,32,
00,5c,00,75,00,6d,00,63,00,52,00,65,00,73,00,2e, 00,64,00,6c,00,6c,00,2c,00,
2d,00,31,00,30,00,31,00,00,00
«LinkedHelpTopics»=»%systemroot%\help\tscc.chm»
«NameStringIndirect»=hex (2):40,00,43,00,3a,00, 5c,00,57,00,69,00,6e,00,64,00,6f,
00,77,00,73,00,5c,00,53,00,79,00,73,00,74,00,65, 00,6d,00,33,00,32,00,5c,00,
75,00,6d,00,63,00,52,00,65,00,73,00,2e,00,64,00, 6c,00,6c,00,2c,00,2d,00,31,
00,30,00,30,00,00,00
«IconIndirect»=hex (2):40,00,43,00,3a,00,5c,00,57, 00,69,00,6e,00,64,00,6f,00,77,
00,73,00,5c,00,53,00,79,00,73,00,74,00,65,00,6d,00, 33,00,32,00,5c,00,75,00,
6d,00,63,00,52,00,65,00,73,00,2e,00,64,00,6c,00, 6c,00,2c,00,2d,00,31,00,31,
00,30,00,00,00
«FxVersion»=»2.0.1.7»
«Type»=»Microsoft.TerminalServices.Configuration. SnapIn.TSConfigSnapIn, tsconfig, Version=6.1.0.0, Culture=neutral, PublicKeyToken=31bf3856ad364e35»
«FolderBitmapsColorMask»=dword:00000000
«ModuleName»=»tsconfig.dll»
«Provider»=»Microsoft Corporation»
напоминаю, что вы их можете создать вручную в виде обычного txt, вставить содержимое, а потом изменить тип файла на reg.
Регистрация оснасток Tsconfig.msc и Tsadmin.msc в Windows Server 2019
Теперь когда у вас есть все файлы необходимые для запуска и установки оснасток Tsconfig.msc и Tsadmin.msc, вы должны распаковать архив и положить файлы по тем же путям, приведу их сюда еще раз:
Далее вам необходимо на вашем сервере Windows Server 2019 запустить два ключа реестра, которые мы выгружали. При их запуске будет предупреждение, говорим «Да«.
Файлы должны успешно импортироваться в реестр Windows.
Проверяем работу диспетчера служб удаленных рабочих столов
Попробуем запустить наши оснастки. Первой давайте запустим Tsadmin.msc. Для этого откройте окно выполнить и введите Tsadmin.msc. В итоге у нас запуститься «Диспетчер служб удаленных рабочих столов» (Remote Desktop Services Manager).
Так же хочу порекомендовать бесплатную утилиту Terminal Services Manager, о которой я подробно рассказывал, советую посмотреть, это аналог оснасток Tsadmin.msc для некого управления RDS фермой, делает все то же самое.
Проверяем работу конфигурации узла сеансов удаленных рабочих столов
Запустите через окно выполнить Tsconfig.msc.
У вас откроется оснастка «Конфигурация узла сеансов удаленных рабочих столов (Remote Desctop Session Host Configuration)». Тут вы увидите все привычные вкладки для настройки RDP подключения, кроме вкладки «Безопасность», которая доступна только в Windows Server 2008 R2, что весьма и весьма прискорбно, так как это была хорошая плюшка для тонкой настройки доступа по RDP.
Источник
Terminal services manager windows server 2019
Добрый день! Уважаемые читатели и гости одного из крупнейших IT блогов для системных администраторов Pyatilistnik.org. В прошлый раз мы с вами подробно рассматривали методы, как отформатировать флешку под разного рода задачи. Сегодня я вам хочу показать еще одну утилиту из моего инструментария, которая помогает вам легко управлять пользовательскими сессиями на терминальных серверах RDS фермы. Речь пойдет, о бесплатной утилите Terminal Services Manager. После того, как вы узнаете ее возможности и простоту использования, то вы обязательно будите ее использовать.
Что такое Terminal Services Manager
После появления операционной системы Windows Server 2012 R2 концепция по управлению терминальными столами претерпела изменения. Появилось такое понятие, как RDS ферма, которая пришла на замену серверу терминалов.
С одной стороны данная концепция принесла плюсы, например удобный ввод RDSH хоста в режим стока (drain mode), но не обошлось и без минусов. Так оснастка по управлению RDS фермой лишилась ряда удобный функций, например массовому отправлению сообщений пользователям в их терминальную сессию, сейчас уже просто нельзя выбрать несколько человек, как это было в оснастке «Диспетчер служб удаленных рабочих столов» или удобной настройке списка серверов лицензирования, как в оснастке «Конфигурация сервера узла сеансов удаленных рабочих столов«.
В старых оснастках Tsconfig.msc и Tsadmin.msc вы легко могли отключать отдельные процессы пользователей, смотреть потребление ресурсов, удобно их разлогинивать, понятно. что все это можете делать через утилиты qwinsta или rwinsta, но кому-то командная строка может показаться сложной. Все эти задачи легко решает Terminal Services Manager, это прекрасная утилита для серверов на базе WindowsServer 2012 R2 и выше.
Где скачать Terminal Services Manager
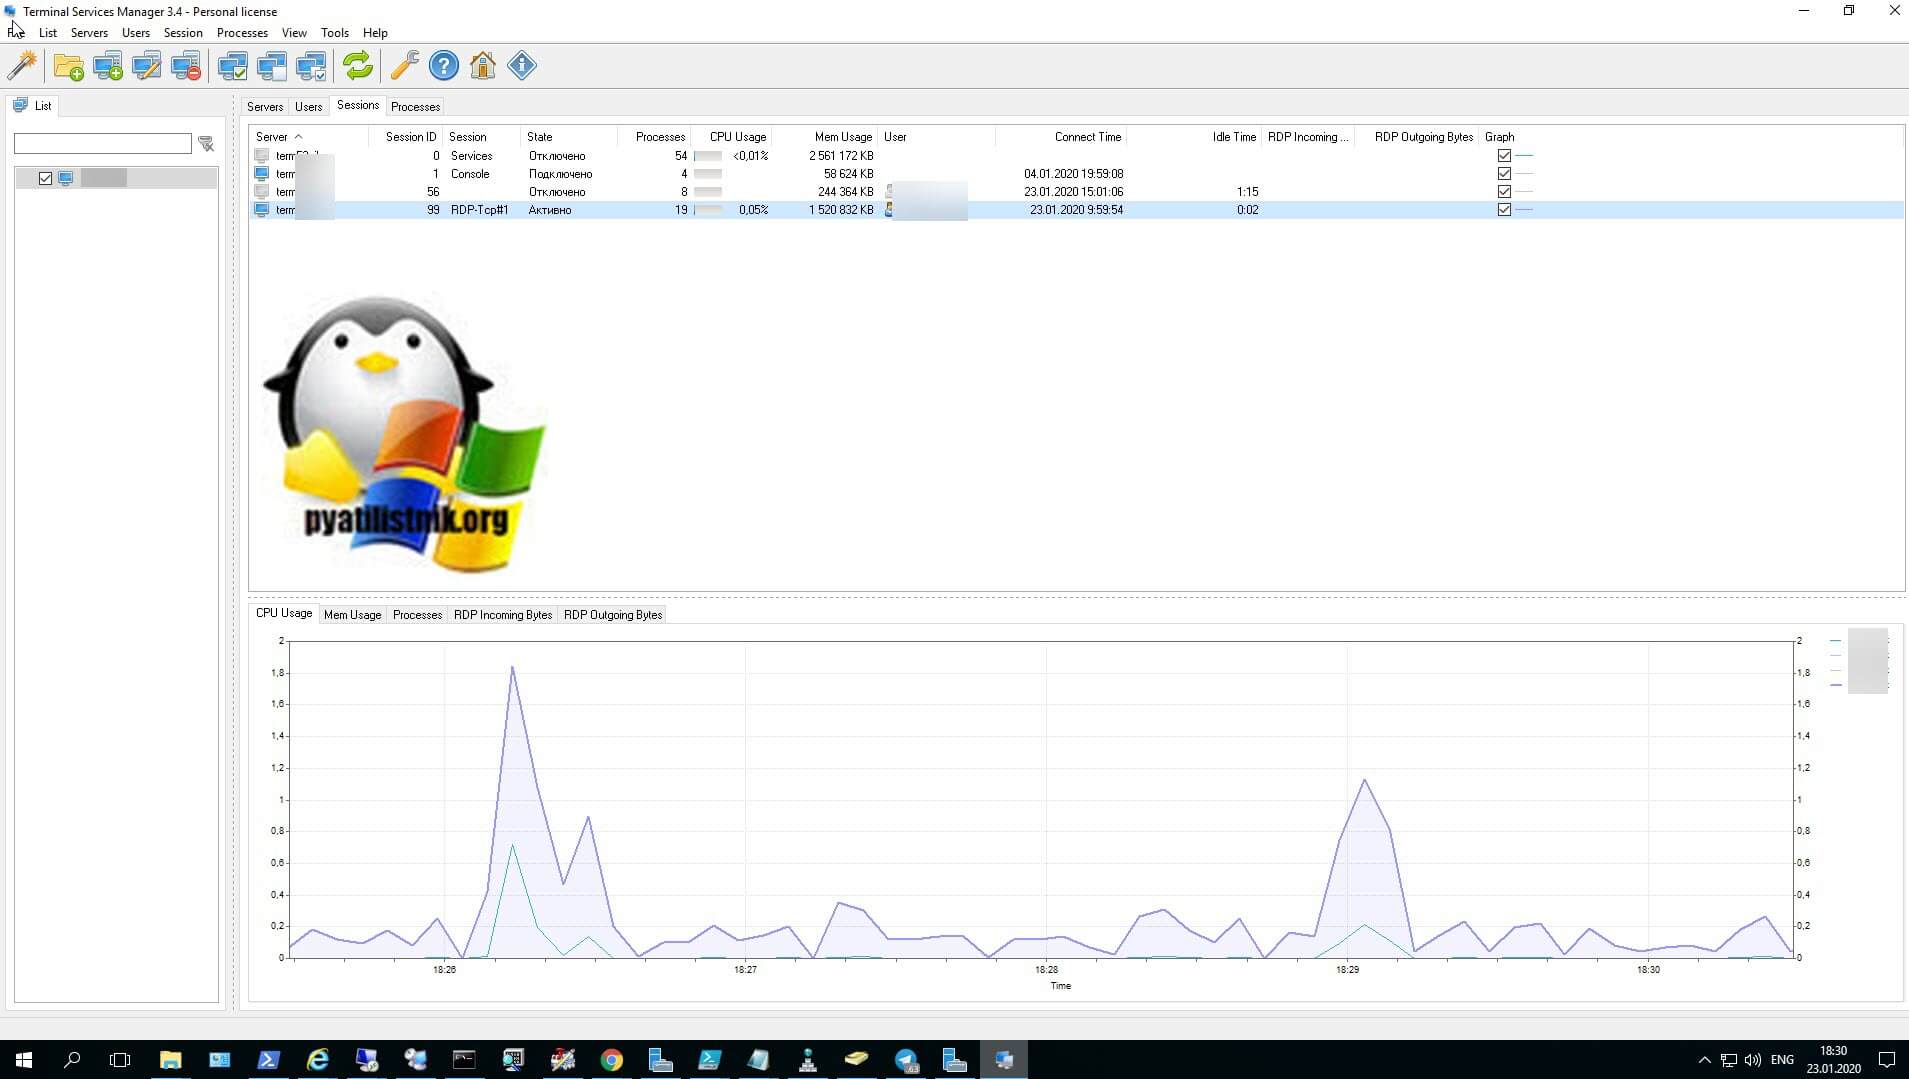
Terminal Services Manager показывает, какой пользователь подключен к удаленному хосту, какие процессы он выполняет и сколько ресурсов сервера (процессор и память) он использует. Вы можете отправлять пользователям сообщения, отключать их от сервера или подключаться к их сеансам удаленно. С помощью Terminal Services Manager вы можете отправлять массовые сообщения пользователям, отключать незанятых пользователей и завершать сеансы нескольких отключенных пользователей одновременно. Terminal Services Manager позволяет работать с несколькими хостами одновременно. Диспетчер служб терминалов отображает информацию как в виде таблицы, так и путем построения графиков использования ЦП, памяти и других ресурсов для каждого сервера, сеанса и пользователя.
Управление пользователями:

На выходе у вас будет исполняемый файл tsmanager_setup_3.4.0.251.exe.
Установка Terminal Services Manager
Запускаем исполняемый файл, я это делаю на своей тестовой виртуальной машине с Windows Server 2019. Первое что вас спросят, это в каком режиме вы решили установить утилиту TSM. На выбор будет два варианта:

Далее вам нужно принять лицензионное соглашение, выбрав пункт «I accept the agreement» и нажать «next«.

На следующем шаге вы можете изменить каталог установки TSM, я оставлю все по умолчанию.

Оставьте галку на пункте «Create a desktop shortcut«, чтобы у вас был создан ярлык на рабочем столе.

Для завершения инсталляции Terminal Services Manager нажмите кнопку «Install«.

Запускаем Terminal Services Manager.

Настройка бесплатной лицензии Terminal Services Manager
После того, как вы войдете в утилиту у вас появится окно «This is unregistered evaluation version of TSM». Для получения бесплатной лицензии нажмите «Get license key«.

Нам нужна персональная лицензия (personal License Free), нажмите кнопку «Get License«.

Заполните все поля регистрационной формы, учтите, что почту нужно указывать существующую, на нее придет лицензия.

Проверьте свою почту, вам должно прийти вот такое письмо «Free license code for Terminal Services Manager Personal License«, там будет лицензионный ключ.

Далее копируем код и нажимаем в TSM 3.4 кнопку «Enter license key».

Заполните поля «License to» и «License Key«. Terminal Services Manager будет активирован.

Настройка Terminal Services Manager 3.4
Далее у вас появится окно мастера по поиску компьютеров, вы можете воспользоваться мастером, но я предпочитаю добавлять все в ручную, но для полноты статьи я покажу работу мастера.

В окне «Add Computers Wizard» вы можете выбрать 4 уровня поиска:


Я закрою мастер по поиску серверов и сделаю все вручную, я так предпочитаю больше. Давайте посмотрим основные функции Terminal Services Manager, пробежимся по значкам:

Первым делом я создам группу серверов по имени RDS.

Далее вы добавляете новый компьютер через кнопку сверху или же через правый клик по группе.


После того, как сервер добавлен в группу, вы в режиме реального времени начинаете получать различную полезную информацию и взаимодействовать с ним. Первая вкладка у сервера в Terminal Services Manager будет «Servers«. Она покажет вам:

Если вы кликните по нужному серверу правым кликом, то в контекстном меню вы увидите огромное количество пунктов, позволяющих вам его администрировать:


График показывает данные в режиме реального времени по процессору, памяти, пользователям, сессиям, процессам. Переходим на вкладку «Users». Тут Terminal Services Manager подробно вам покажет данные:

Если вы щелкните правым кликом по нужному пользователю или пользователям, то сможете произвести с ними вот такие действия:


Переходим на вкладку процессов «Processes«, Terminal Services Manager действительно великолепный инструмент и позволяет тут в удобном виде отобразить все процессы терминального сервера по каждому пользователю. Тут вы легко можете построить по ним график, или произвести поиск по многим критериям.

Если вы выберете один или несколько процессов. то через правый клик вы сможете их легко завершить.

Не забывайте делать резервную копию ваших добавленных компьютеров, через File-Export-Computer List

Вот пример RDS фермы из 23 хостов.

Минусы Terminal Services Manager
Хотя программа обладает огромным списком полезных функций, она не лишена недочетов:
Источник
Использование TSADMIN.msc и TSCONFIG.msc для управления RDS в Windows Server 2019/2016/2012R2
Большинство администраторов терминальных серверов Windows заметили, что начиная с Windows Server 2012, на RDS серверах пропали оснастки управления tsadmin.msc (Remote Desktop Services Manager — Диспетчер служб удаленных рабочих столов) и tsconfig.msc (Remote Desktop Session Host Configuration — Конфигурация узла сеансов удаленных рабочих столов). Разработчики Microsoft решили, что большинством параметров сервера RDS можно управлять через Server Manager, консоль редактора групповых политик (gpedit.msc) или в настройках RDS коллекций. Однако все эти инструменты не настолько просты и удобны как старые остатки.
Разберёмся, как можно вернуть оснастки tsadmin.msc и tsconfig.msc на RDS серверах под управлением Windows Server 2016 (инструкция также к Windows Server 2019 и 2012 R2 окружению).

Для этого нам понадобится скопировать 6 файлов и 2 ветки реестра с любого сервера под управлением Windows Server 2008 R2 в аналогичный каталог C:WindowsSystem32 на Windows Server 2016. Скопируйте следующие 7 файлов:

Затем на Windows Server 2008 R2 с помощью редактора regedit нужно экспортировать в файлы reg две ветки реестра:
И по очереди импортировать эти ветки в реестр Windows Server 2016. Достаточно дважды щелкнуть по reg файлу и согласится с внесением изменений в реестр.

Осталось скопировать dll и msc файлы в каталог C:WindowsSystem32 на хосте с Windows Server 2016. Регистрировать файлы dll библиотек не обязательно.
После этого попробуйте запустить нужную оснастку командами tsadmin.msc :

В этой консоли вы можете удобно управлять сессиями пользователей – можно отключить нужную сессию, отправить сообщение, инициировать корректный logoff и т.д. Оснастка tsadmin позволяет выбрать сразу нескольких пользователей и выполнить нужное действие сразу со всеми.
Можно запустить консоль tsconfig.msc :

В консоли tsconfig.msc можно гораздо проще и удобнее настроить базовые параметры RDS хоста: задать сервер лицензирования и тип RDS лицензий, добавить хост в ферму RD Connection Broker (настроить вес хоста в ферме), настроить уровни шифрования RDP, настроить автозапуск программы при входе пользователя в сеанс, настроить таймауты отключения неактивных сессий пользователей на отдельно стоящем RDS хосте и т.д.
Обратите внимание, что не обязательно ставить эти консоли на все RDS хосты. С помощью опции Connect to Remote Desktop Session Host Server вы можете подключится к любому другому RDS хосту в вашей сети.

Отметим, что с помощью консоли tsadmin.msc не получится подключиться к терминальной сессии пользователя (Ошибка: Access is denied). Подключение к RDS сессиям пользователей возможно по сценарию, описанному в статье RDS Shadow в Windows Server. Также в консоли tsconfig.msc в свойствах подключения RDP-Tcp отсутствует вкладка Security, через которую было удобно раздавать права группам сопровождения (без права администраторов) на подключение и управление RDP сессиями пользователей. Я использую следующую команду для предоставления определенной группе полные права на управления сессиями на сервере:
wmic /namespace:\rootCIMV2TerminalServices PATH Win32_TSPermissionsSetting WHERE (TerminalName =»RDP-Tcp») CALL AddAccount «domainsupport_rds»,2
Для просмотра текущий разрешений можно использовать PowerShell:
Источник
Remote Desktop Services Overview
Remote Desktop Services (RDS), known as Terminal Services in Windows Server 2008 and earlier, is one of the components of Microsoft Windows that allow a user to take control of a remote computer or virtual machine over a network connection. RDS is Microsoft‘s implementation of thin client, where Windows software, and the entire desktop of the computer running RDS, are made accessible to a remote client machine that supports Remote Desktop Protocol (RDP). With RDS, only software user interfaces are transferred to the client system. All input from the client system is transmitted to the server, where software execution takes place.
This blog post shows how to install and configure Remote Desktop Services.
This same step applies to Windows Server 2012, Windows Server 2012 R2, Windows Server 2016, Windows Server 2019
Install Remote Desktop Gateway Service Role
In Server Manager, click Manage, and then click Add Roles and Features. The Add Roles and Features Wizard opens.

In Before You Begin, click Next.

In Select Installation Type, ensure that Role-Based or feature-based installation is selected, and then click Next.

In Select destination server, ensure that Select a server from the server pool is selected. In Server Pool, ensure that the local computer is selected. Click Next.

In Select Server Roles, in Roles, select Remote Desktop Services. then click Next.

In Select features, click Next.

In Remote Desktop, click Next.

In Select Server Roles, in Roles, select Remote Desktop Gateway. When you are prompted to add required features, click Add Features, and then click Next.

In Network Policy and Access Services, click Next.

In Web Server Role (IIS), click Next. 
In Select role services, click Next.

Select Install on the Confirmation pane of the Add Roles and Features Wizard to begin Remote Desktop Gateway Role service installation. Selecting the Restart, the destination server automatically if required option in the Confirmation pane will force a restart of the computer after installation is complete.

Click Close 
In Server manager select Tools then Remote desktop services then click Remote Desktop Gateway Manager

In RD Gateway Manager, Click View or modify certificate properties to
select Certificate.

In Import Certificate, select your Certificate and Click Import

Click Apply and OK

Create the Connection Authorization Policy and the Resource Authorization Policy
In the left pane, navigate to Policies, click on Connection Authorization Policies. On the Actions pane on the right, right click Create New Policy, and select Wizard.

Select Create a RD CAP and a RD RAP (recommended) and click Next

Give the policy a name. click Next

Click Add Group

I will select the Domain Admins group. Normally you would create another user group which you add users that you want to allow to use the Remote Desktop Gateway.

This option lets you allow connection based on computers that clients are connecting from. These computers need to be domain joined and that domain is in some ways related to the domain that the remote desktop gateway is a part of. Click Next.

Accept the default setting for device redirection, and click Next.

Enter the timeout values as per below. Click Next.

After you verify the information on the RD CAP Settings Summary page, then click Install.

Give the policy a name. click Next

I will select the Domain Admins group as I have already selected Domain Admins as the group which can use the Remote Desktop Gateway. Then click Next.

Select Allow users to connect to any network resource (Computer) then click next.

If the remote desktop port on the servers were changed from the default, use this screen to specify the port. Otherwise, select Allow connections only to port 3389. Click Next.

Review RD RAP Summary, then Click Finish

Click Close

Policy Successfully Created

Installing Remote Desktop Services (RDS) on Windows Server 2019 appears to take many steps, but in reality is quite easy. In this article, we dive into how to install these services in a domain environment that requires two servers.
Prerequisites
There are only two necessary steps before we embark on installing RDS. Those are:
- All servers are domain joined
- There are at least two available servers
The reason that we need two servers is that the RD Licensing role will go on the second server rather than all on one, as this is considered a Microsoft best practice. In this tutorial, we use the Domain Controller as the RD License server which would not be considered best practice. The reason for doing this in this tutorial is to keep the installation simple.
Installation of Remote Desktop Services base roles
In this first installation series, we are going to add the following roles to our primary RDS server:
- RD Connection Broker
- RD Web Access
- RD Session Host
Installation steps
- Within Server Manager on the primary RDS server that we are installing, open the Add Roles and Features Wizardand select Remote Desktop Services installation.

2. For this tutorial we are going to choose Quick Start, but if you need further control over the installation process, you can use the Standard Deployment to modify more options during installation.

3. Next, we will choose Session-based desktop deployment, as this is a common RemoteApp and desktop session model that is commonly used in more traditional RDS deployments.

4. In the Server Selection, choose the server where we are installing RDS.

5. Choose Restart the destination server automatically if required and click on Deploy to start the installation.

6. Verify that all roles have succeeded in installation before moving on to the next steps.

Add secondary server
For this tutorial, we are going to use the Domain Server as our RD Licensing server, but to easily install that role, we can add an additional server to the Server Manager.
- Add the secondary server by right-clicking on the All Servers, choosing Add Servers, and then picking the server from Active Directory.


2. Navigate to Remote Desktop Services and click on the green plus for RD Licensing.

3. The Add RD Licensing Servers screen will appear and that will let you add the secondary server as a target for the RD Licensing role.

4. Click on Add to install the role on the secondary server.

5. Verify that the installation is complete by seeing the green plus replaced by the proper icon in RD Licensing.

Add RD Gateway Role
Finally, we need to add the RD Gateway Role to our primary RDS server.
- Under the Remote Desktop Services screen, click on the green plus over RD Gateway.
- Select the primary RDS server to use for the installation of this role.

3. Name the self-signed SSL certificate with a Fully-Qualified Domain Name.

4. Click on Next and then Add to install the role to our primary RDS server.
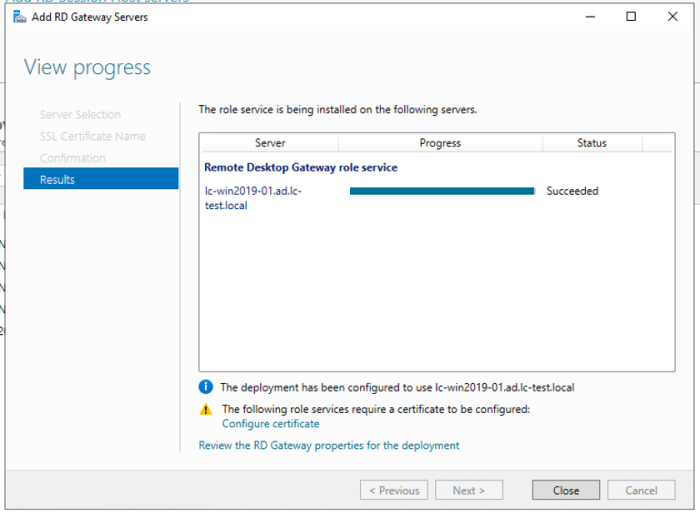
Configure deployment properties
Now that all the roles have been installed, we can configure the actual deployment properties.
- Navigate to the Remote Desktop Services screen and under the Tasks dropdown, click on Edit Deployment Properties.

2. Leave the default settings on the RD Gateway screen and click on the RD Licensing menu item.

3. Choose Per User at the RD Licensing screen. You can choose either, but for the purposes of this tutorial, we want Per User.

4. Note the URL of the RD Web Access screen as this will be used later to access the applications deployed.

5. For the purposes of testing, you can leave the certificates Not Configured, and finally click on OK to save the deployment configuration.

If you do want to configure a certificate, you will have to do this for each and every role service individually
By default, a QuickSessionCollection was created upon installation that contains Calculator, WordPad, and Paint as RemoteApps. This can be used to test the RDP deployment.
- Navigate to the IIS URL originally located in RD Web Access, or you can use https://localhost/rdweb/ if you are located on the RDP server itself, to test IIS.

2. Log into the IIS RDS session using domain credentials.

3. Finally, launch a remote connection, either one you have defined or a default RemoteApp.

Remote Desktop Services may have a lot of steps to deploy, but once setup, it is easy to configure and use. RemoteApps offer a lot of flexibility as does the ability to define collections of RDP connections that can be offered to users.
Additional resources:
Windows and Physical Servers Backup Best Practices: Read this white paper to learn more about best practices when protecting Windows Server operating systems!
![]()
Adam Bertram
Adam Bertram is a 20-year veteran of IT and an experienced online business professional. He’s a consultant, Microsoft MVP, blogger, trainer, author and content marketing writer for multiple technology companies.
Catch up on Adam’s articles at adamtheautomator.com, connect on LinkedIn, or follow him on Twitter at @adbertram.
More about author
- Prerequisites
- Installation of Remote Desktop Services base roles
- Installation steps
- Add secondary server
- Add RD Gateway Role
- Configure deployment properties
- Verify Remote Desktop Services
![]()
Cheers for trusting us with the spot in your mailbox!
Now you’re less likely to miss what’s been brewing in our blog with this weekly digest.
OK

Eliminate Data Loss
Eliminate Ransomware
#1 Backup and Recovery

- Remove From My Forums
-
Вопрос
-
I am using windows server 2019 terminal server and can’t find remote desktop service manager mmc to manage active session. If it is discontinued, is there any other tools I can use to manage sessions on terminal servers.
Все ответы
-
Hi,
As of today the Microsoft has not provided any official replacement for this handy tool.
You can TSADMIN.msc back to Windows. Just search the Remote Desktop Services Manager 2016 — LemonBits
to get the method in Google.Best regards,
Jeffrey
MSDN Community Support
Please remember to click «Mark as Answer» the responses that resolved your issue, and to click «Unmark as Answer» if not. This can be beneficial to other community members reading this thread. If you have any compliments or complaints to
MSDN Support, feel free to contact MSDNFSF@microsoft.com.