Windows Server
- 01.01.2021
- 37 044
- 0
- 43
- 43
- 0
- Содержание статьи
- Описание проблемы
- Сброс пробного периода
- Добавить комментарий
Описание проблемы
Описанный ниже способ является нарушением лицензионного соглашения! Используйте его на свой страх и риск!
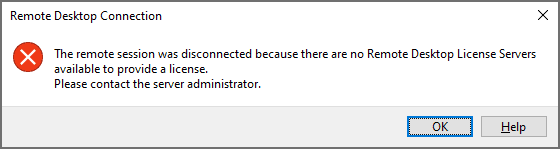
Основанные на Windows терминальные сервера (сервера удаленных рабочих столов, и т. д.) требуют приобретения дополнительных лицензий, в противном случае терминальный сервер будет работать с пробном режиме — без каких-либо ограничений по функционалу, но только первые 180 дней. После того, как пройдут 180 дней, подключится к такому серверу пользователям не получится, поскольку он будет ругаться на отсутствие лицензий.
Сброс пробного периода
Поскольку при подключении удаленно к такому серверу будет появлятся ошибка об отсутствии лицензий на подключения к серверу, подключаться к нему будет возможно только через консольный сеанс — для этого, необходимо выполнить команду mstsc /admin.
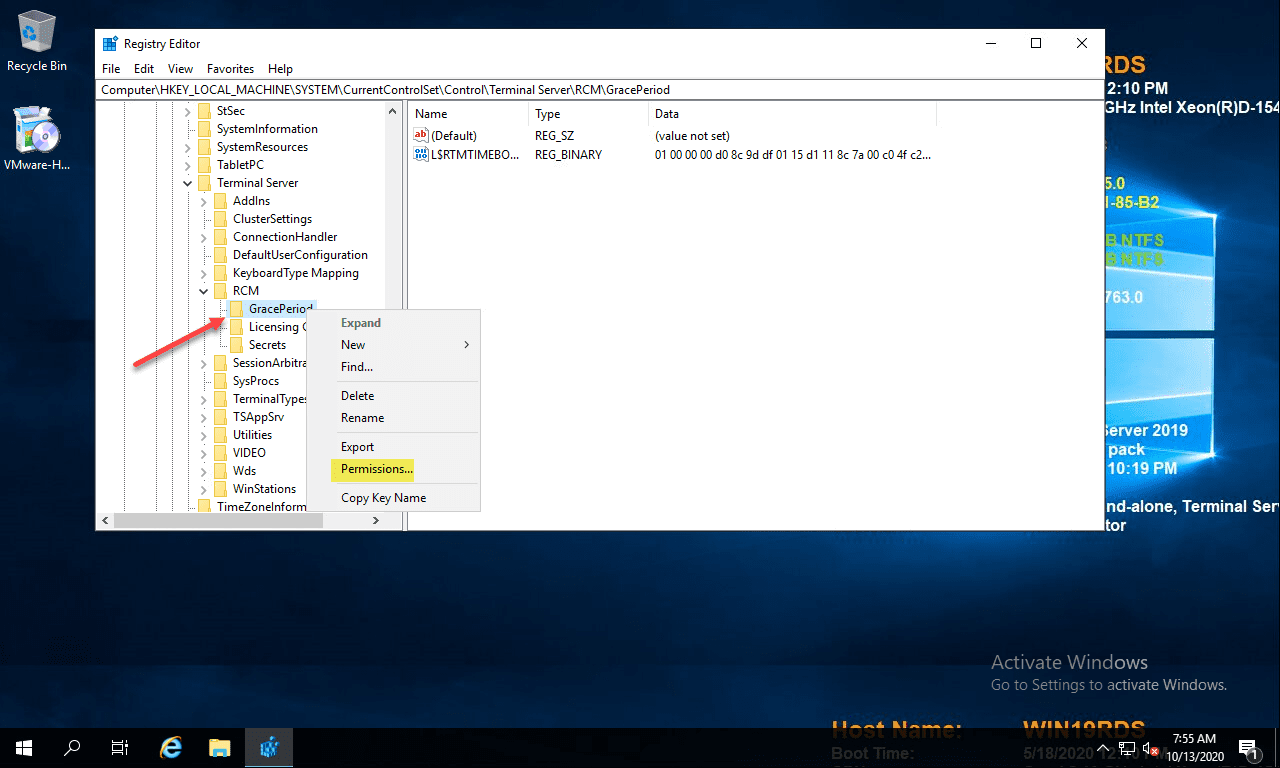
Однако, можно без проблем сбросить пробный период терминального сервера, достаточно выполнить несколько манипуляций в реестре Windows. Для этого, запускаем редактор реестра, и переходим в следующий раздел реестра:
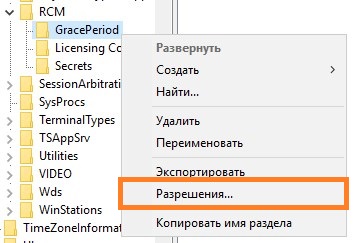
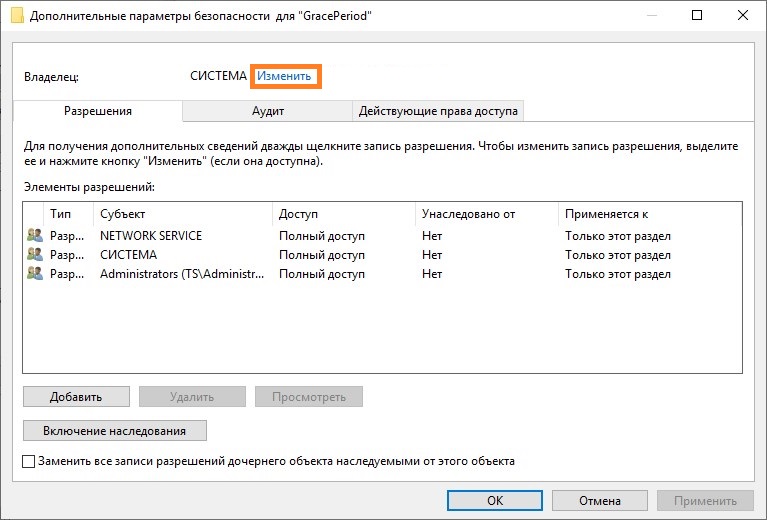
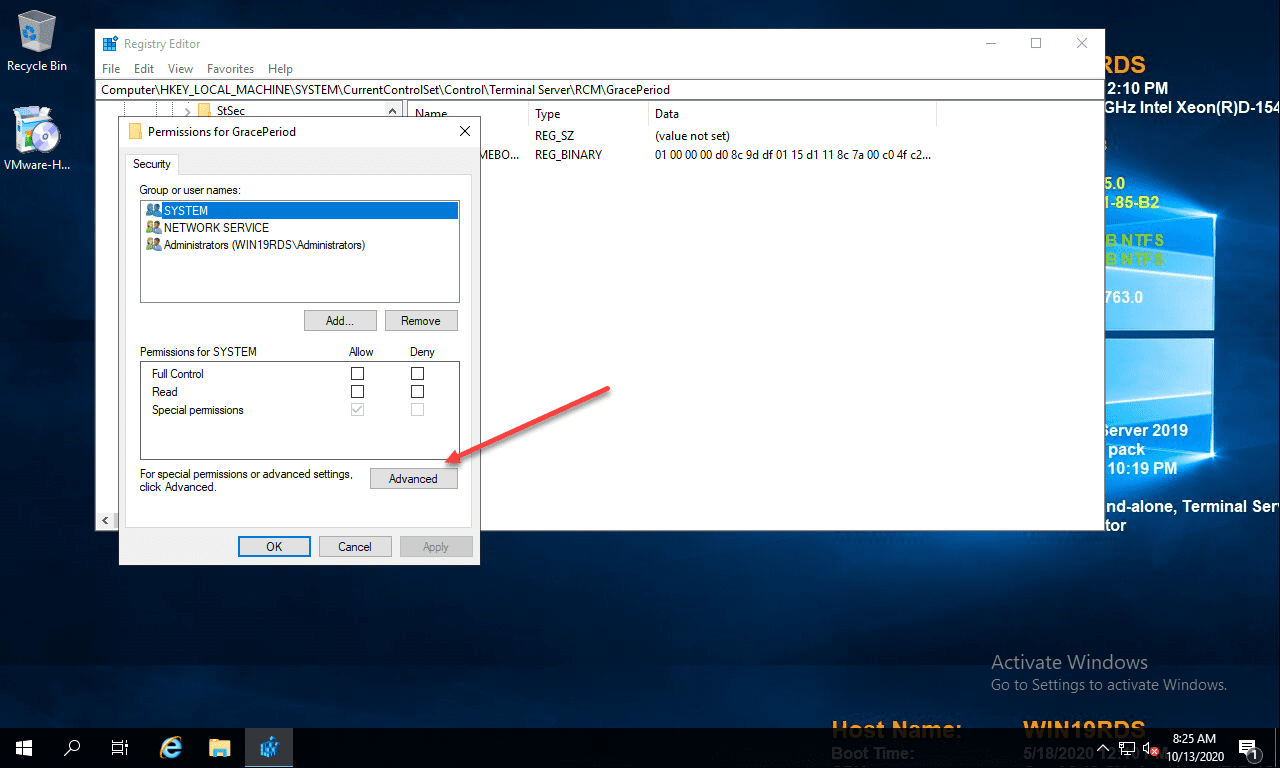
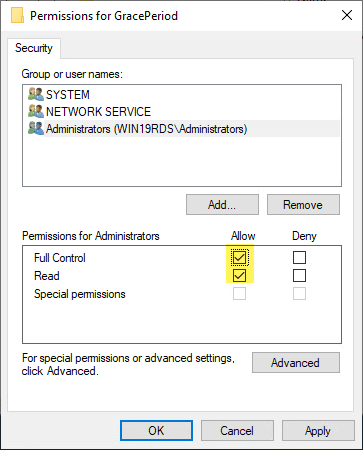
HKEY_LOCAL_MACHINESYSTEMCurrentControlSetControlTerminal ServerRCMGracePeriodВ данном разделе реестра необходимо удалить значение реестра с названием начинающимся на L$RTMTIMEBOMB..., однако, скорее всего ничего не выйдет, поскольку по умолчанию у пользователей компьютера нет прав на внесение изменений в данном разделе. Для исправления данного недоразумения, необходимо открыть разрешения данного раздела, и сменить его владельца на Администраторы.
Делается это следующим образом:
- На нужном разделе реестра нужно нажать правой кнопкой мыши, и в появившемся меню выбрать пункт «Разрешения».

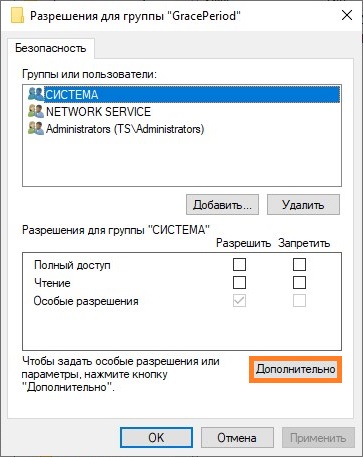
- Откроется список разрешений. В нем нужно нажать на кнопку «Дополнительно».

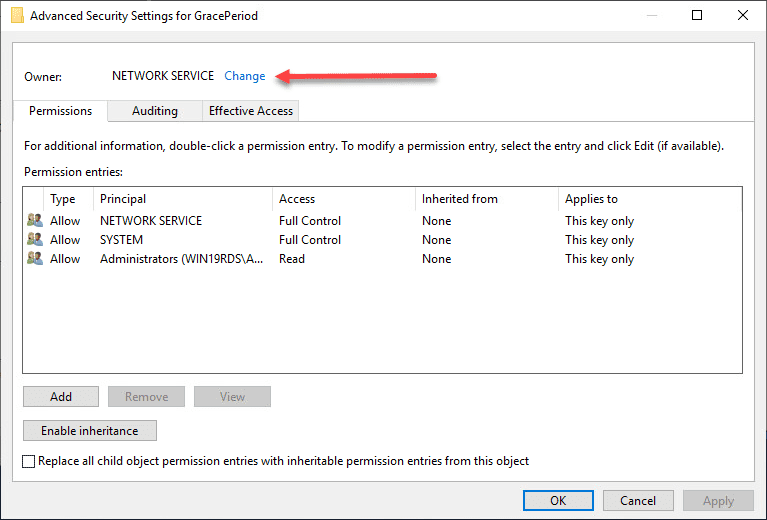
- Откроются дополнительные параметры, где в самом верху будет написан владелец, а рядом будет кнопка «Изменить». Нажимаем на неё.

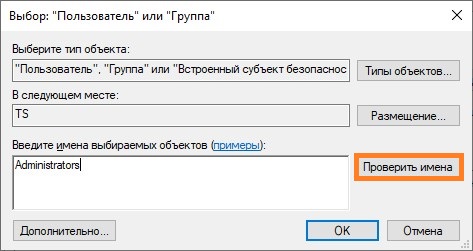
- Откроется окошко, где нужно будет ввести имя группы администраторов — например «Administrators». Для корректировки названия в понятный системе формат следует нажать на кнопку «Проверить имена».

Если все будет правильно, система подчеркнет название группы, после чего остается только выйти из всех ранее открытых окон, нажимая кнопки «ОК» (для применения новых разрешений).
После этого, остается только удалить значение реестра с названием L$RTMTIMEBOMB..., после чего перезагрузить сервер. Если все было сделано правильно, то пробный период будет активирован по новой, и пользователи смогут работать на данном сервере как раньше.

If you have a home lab environment or other lab that you continually test various solutions, licensing and trial expiration is a challenge that you constantly tend to run into. It is just part of the fun of lab environments. While most trials are fairly “hard and fast” and don’t allow you to reset the trial expiration, if you work with Microsoft Windows Server and Remote Desktop Services (RDS), there is a “hack” that allows you to effectively reset the expiration of Remote Desktop Services grace period where you can essentially rewind the clock on your RDS licensing if you are making use of this role inside your lab environment. In my lab environment, I am making use of Windows Server 2019 for my Windows workloads. In this post, I will show how to reset 120 day RDS Grace period on 2016 and 2019 Windows Server. Let’s see.
Remote Desktop Services RDS Licensing
When you install Windows Server 2016 or 2019 as with previous Windows versions, you get the normal ability to have the two sessions that you generally have available for administering. However, when you install the true Remote Desktop Services role, you have the ability to have multiple sessions to your server.
When you install the role, by default, you have a 120-day grace period that Microsoft gives you to properly license the server for use as an RDS installation. If you are using a server in a lab environment, most likely, you are not going to license this type of server outside of production.
Once the 120 day grace period has expired, you will see the following error when you attempt to RDP to the server:

You can either redeploy your Windows Server which will allow you to spin up a new 120 day grace period, or you can actually reset the grace period. If you are like me, the latter is certainly the path of least resistance and work involved. Let’s take a look at how to reset the 120 day RDS grace period.
You can take a closer look at the official licensing documentation for Remote Desktop Services here:
- https://docs.microsoft.com/en-us/windows-server/remote/remote-desktop-services/rds-client-access-license
For the exercise of resetting the 120 day grace period for the RDS role, the registry editor is your friend and makes this process easy. Before we begin, there are a couple of disclaimers to make here. Editing the registry can result in totally destroying a Windows system, so proceed with any low-level registry edits with caution. If you are working with a virtual machine, it is always a good practice to create a quick snapshot of the Windows virtual machine before you begin.
Additionally, for production systems, resetting the 120 day grace period should only be done for systems that are not in production as you should have proper licensing installed for production use.
To reset the grace period, there are actually just 3 steps involved:
- Change permissions on the RCM > GracePeriod key
- Delete the “Timebomb” registry entry
- Reboot the server
Now that we have level-set, once you have your snapshot or other backup created, you need to navigate to the following location on your RDS server:
ComputerHKEY_LOCAL_MACHINESYSTEMCurrentControlSetControlTerminal ServerRCMGracePeriod
Change Permissions on the RDS GracePeriod key and delete the key
After you have navigated to the key documented above, right-click GracePeriod and select Permissions.
For obvious reasons, there are no default permissions on this key for even Administrators. So you have to first take ownership of the key before you can delete the timebomb value. Click the Advanced button on the permissions dialog box.
Click the Change button next to the Owner.
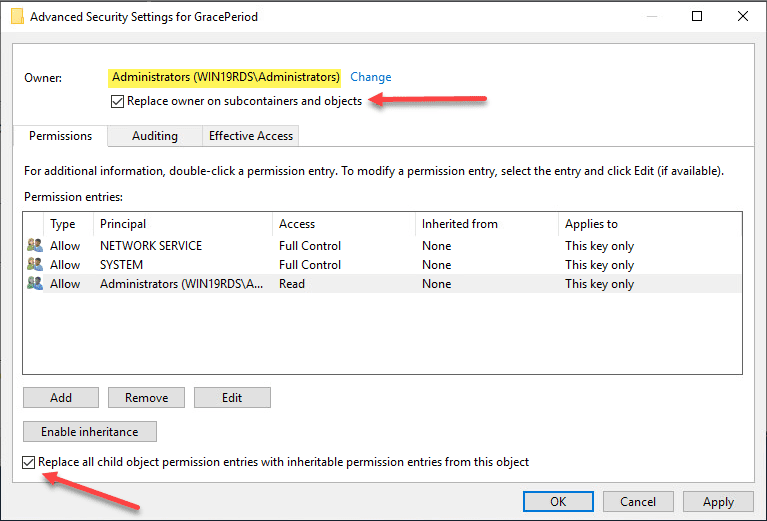
Here I have selected local administrators group as the owner of the key. However, you will want to choose whichever user/group that you want to use to delete the registry key. Select the options to replace owners and replace all child object permissions.
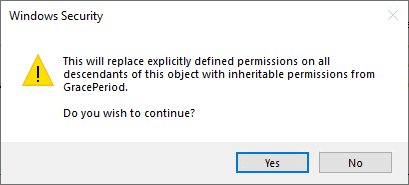
Confirm the replacement of permissions on the registry key.
Now that we have changed ownership on the key, we can actually set permissions without getting permissions errors. Here I am granting administrators full control on the key.
Now, with permissions set, right-click the timebomb value in the GracePeriod key and Delete.
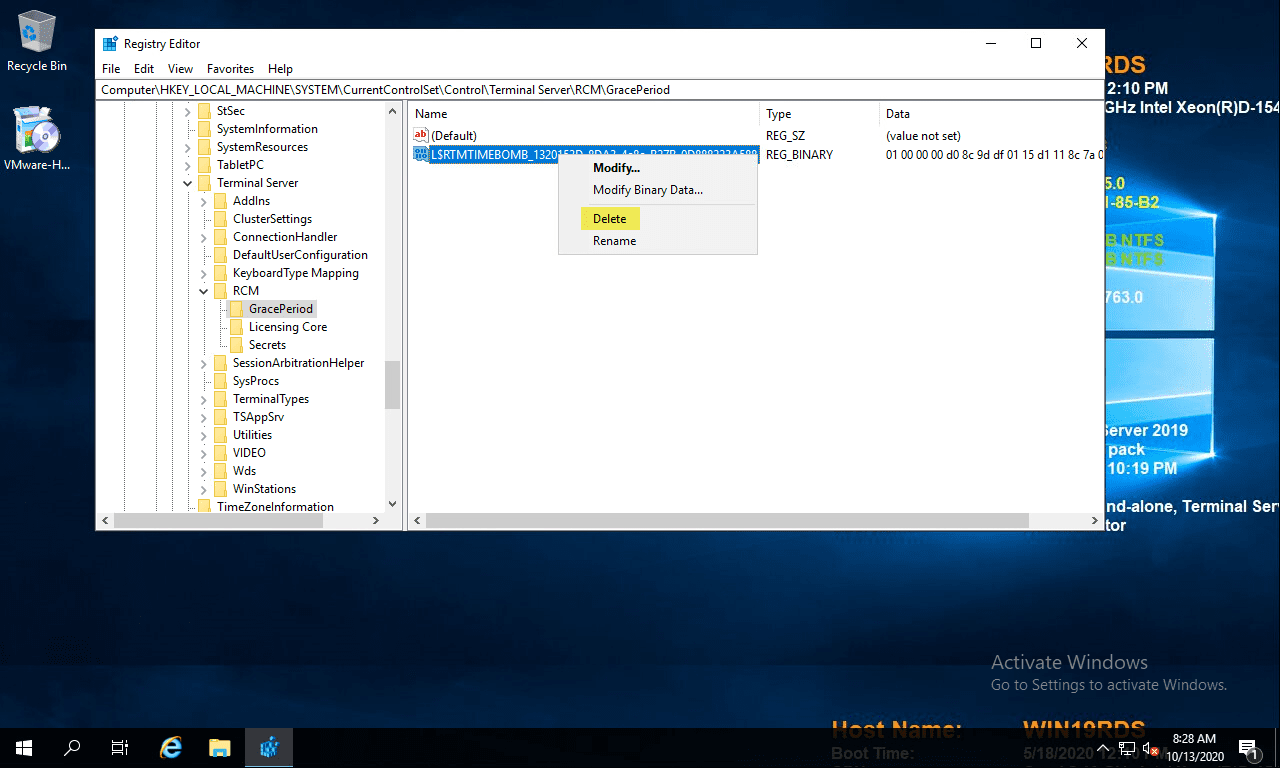
Confirm the deletion of the registry entry.

Next, the only thing left to do is reboot your server. Once the server is rebooted, you can enjoy once again having the full 120 day grace period for your RDS server in the lab environment.
Video Overview of the Process
If you want to take a look at a video of the process, you can watch the video walkthrough below.
https://www.youtube.com/watch?v=zQ_GrVAfK6Q
Concluding Thoughts
The process to reset 120 day RDS Grace period on 2016 and 2019 Windows Servers as well as older server versions such as Windows Server 2012 and 2012 R2 is very straightforward using this process to delete the timebomb registry key.
Keep in mind this is not supported and certainly not a process for running in production. However, it is very handy for lab environments to keep from having to redeploy Windows Server virtual machines simply to have a fresh 120 day grace period.
In this blog post I will show you how to extend your trial period to three years. The evaluation version of Windows Server 2016 / 2022 is valid for 180 days and you can convert your trial version to retail.
After installing, you can try it out for 180 days. After 180 days you and your system will run into troubles for sure. But the good news is: You can extend the period to another 180 days up to 3 years.
Extending the Trial Period
First, take a look at your desktop. You should see the countdown in the corner down right.

Or start PowerShell and run slmgr.
slmgr -dlvPay attention to the Timebased activation expiration and the Remaining Windows rearm count. You can rearm the period 6 times. (180 days * 6 = 3 years).
When the period comes to an end, run slmgr -rearm to extend it by another 180 days.
slmgr -rearm
Next restart your computer.
Restart-ComputerOnce restarted, open PowerShell and check your settings.
slmgr -dli
Important Note
The evaluation version may not be used for commercial purposes. Have fun playing with the Windows Server 2016 Evaluation Version!
By the way: You can do the same with Windows 10711. But the Windows 10/11 Evaluation Version can be used only for 180 days in total.


![]()
Published by Patrick Gruenauer
Microsoft MVP on PowerShell [2018-2023], IT-Trainer, IT-Consultant, MCSE: Cloud Platform and Infrastructure, Cisco Certified Academy Instructor.
View all posts by Patrick Gruenauer

![]()
Срок действия пробного периода в любой версии Windows можно продлить, сбросив лицензионное состояние компьютера. Например, срок действия пробного периода Windows Server 2019 составляет 180 дней. После истечения срока выполняем команду:
slmgr /rearm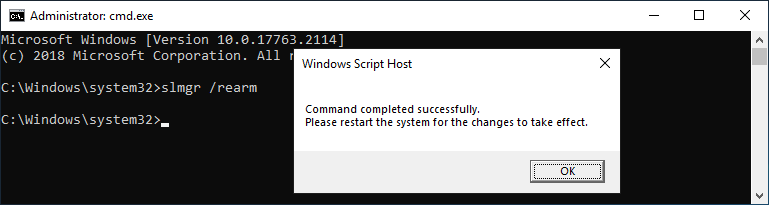
Перезагружаем компьютер.
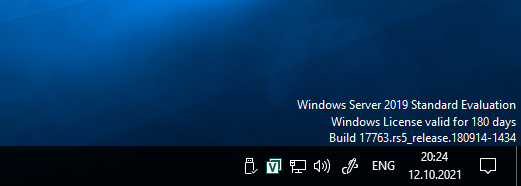
И снова у нас есть 180 дней пробного периода.
Сделать так можно 5 раз, после этого придётся активировать Windows. А это на серверной системе — 900 дней. Оставшееся количество сбросов можно узнать командой:
slmgr /dlv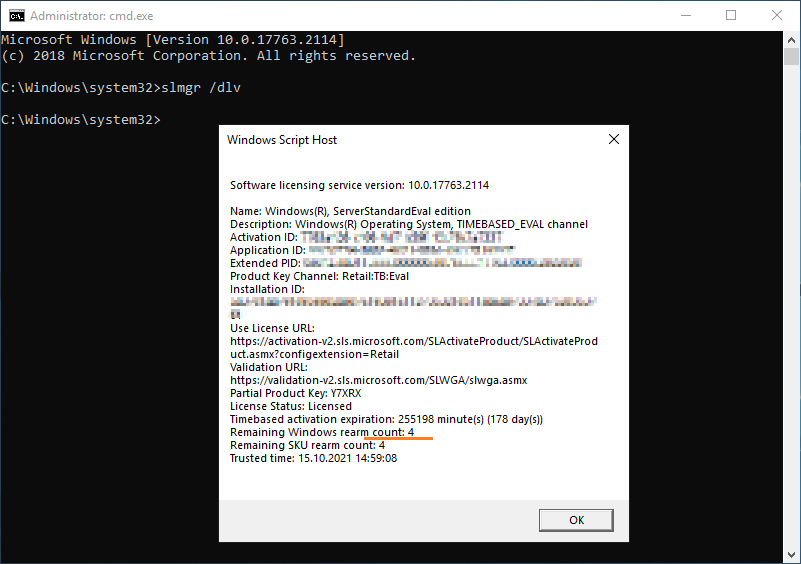
Здесь же выводится информация об оставшемся сроке пробного периода, её также можно узнать командой:
slmgr /dli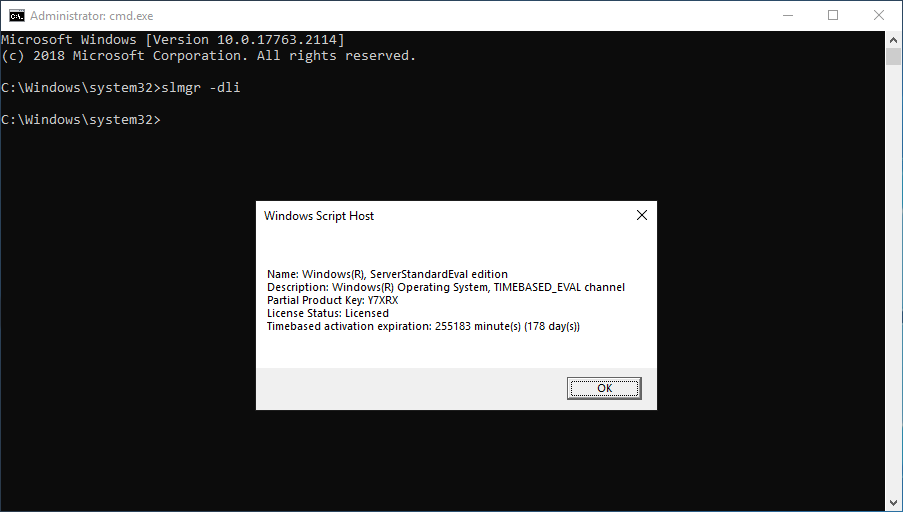
Дату истечения пробного периода покажет команда:
slmgr /xpr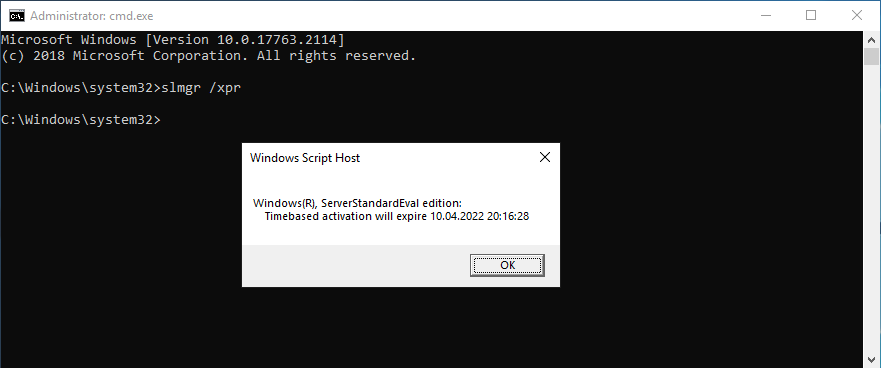
Пробный период у обычных версий Windows (7, 8, 8.1) составляет 30 дней, продлять его можно 3 раза.
В Windows 10 Enterprise и Enterprise LTSB пробный период составляет 90 дней, продлять его можно 3 раза.
Пробный период в Windows 10 Pro, Home, Education и Pro for WorkStations составляет 30 дней, продлять его можно 3 раза.
- 23.12.2019
Для знакомства с возможностями Windows Server, будь то 2016 или 2019 есть специальная версия Evaluation, она может быть Windows Server 2016/2019 StandardEvaluation или DatacenterEvaluation. После установки у Вас есть 180 дней для теста всех ее возможностей, в течении всего триального времени Вам доступен полный функционал системы. После 180 дней система будет требовать активации и начнет каждый час отключаться, а так же на рабочем столе будет уведомление «Windows Licenses is expired«. Но если Вы уже запустили все продуктивные задачи для дальнейшей работы и хотите ее активировать в полноценную Windows Server с сохранением данных без переустановки, то просто активировать лицензионным ключом просто так не получится — Вам потребуется конвертация, в этой статье рассмотрим как это сделать.
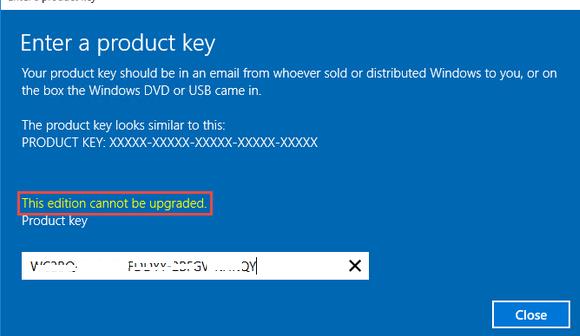
Если в Evaluation версии попытаться указать KMS ключ или ключ Retail/MAK ключ активации для RTM версии, будет выдаваться предупреждение “This edition cannot be upgraded, т.к. апгрейд данной редакции не возможен.
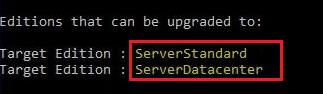
1) Запускаем коммандную строку от имени администратора и вбиваем команду: DISM /online /Get-TargetEditions
Мы получим сообщение в какую версию возможно конвертировать Вашу ОС, выйти должно примерно следующее:
С помощью общедоступных KMS ключей для Windows Server 2016/2019 вы можете выполнить конвертацию (Внимание: эти ключи только для апгрейда/конвертации и установки Windows Server, для корректной активации самой системы Вам потребуется Retail ключ, приобрести Вы их можете в нашем интернет-магазине на следующей странице.)
KMS ключи:
Windows Server 2016 Standard: WC2BQ-8NRM3-FDDYY-2BFGV-KHKQY
Windows Server 2016 Datacenter: CB7KF-BWN84-R7R2Y-793K2-8XDDG
Windows Server 2019 Standard: N69G4-B89J2-4G8F4-WWYCC-J464C
Windows Server 2019 Datacenter: WMDGN-G9PQG-XVVXX-R3X43-63DFG
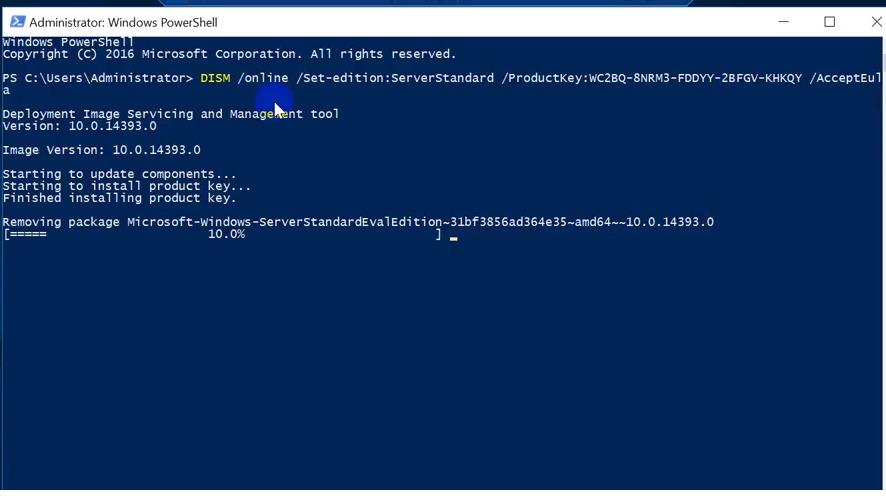
2) В PowerShell запускаем комманду:
dism /online /set-edition:ServerStandard /productkey:WC2BQ-8NRM3-FDDYY-2BFGV-KHKQY /accepteula (После «productkey» вставьте нужный ключ под Вашу операционную систему)
3) После перезагружаетесь и смотрите, установлена ли у Вас теперь полноценная версия Windows Server без приписки «Evaluation».