| title | description | author | ms.author | ms.date | ms.service | ms.subservice | ms.topic | ms.custom | monikerRange |
|---|---|---|---|---|---|---|---|---|---|
|
Install SQL Server on Server Core |
You can install SQL Server on a Server Core installation. The Server Core installation option provides a minimal environment for running specific server roles. |
rwestMSFT |
randolphwest |
09/16/2021 |
sql |
install |
conceptual |
intro-installation |
>=sql-server-2016 |
[!INCLUDE SQL Server -Windows Only]
You can install [!INCLUDEssNoVersion] on a Server Core installation.
The Server Core installation option provides a minimal environment for running specific server roles. This helps to reduce maintenance and management requirements and the attack surface for those server roles.
For a list of currently supported operating systems, see Hardware and Software Requirements for Installing SQL Server.
Prerequisites
| Requirement | How to install |
|---|---|
| [!INCLUDEdnprdnshort] 4.6.1 | For all editions of [!INCLUDEssnoversion] except [!INCLUDEssExpress], Setup requires the [!INCLUDEdnprdnshort] 4.6.1 Server Core Profile. SQL Server Setup will automatically install this if it is not already installed. Installation requires a reboot. You can install [!INCLUDEdnprdnshort] before you run setup to avoid a reboot. |
| Windows Installer 4.5 | Shipped with Server Core installation. |
| Windows PowerShell | Shipped with Server Core installation. |
| Java Runtime | In order to use PolyBase, you need to install the appropriate Java Runtime. For more information, see PolyBase installation. |
Supported Features
Use the following table to find which features are supported in [!INCLUDEssnoversion] on a Server Core installation .
| Feature | Supported | Additional Information |
|---|---|---|
| [!INCLUDEssDE] Services | Yes | |
| [!INCLUDEssNoVersion] Replication | Yes | |
| Full Text Search | Yes | |
| [!INCLUDEssASnoversion] | Yes | |
| [!INCLUDErsql_productname_md] | Yes | |
| [!INCLUDEssRSnoversion] | No | |
| [!INCLUDEssNoVersion] Data Tools (SSDT) | No | |
| Client Tools Connectivity | Yes | |
| Integration Services Server | Yes | |
| Client Tools Backward Compatibility | No | |
| Client Tools SDK | No | |
| [!INCLUDEssNoVersion] Books Online | No | |
| Management Tools — Basic | Remote Only | Installation of these features on Server Core is not supported. These components can be installed on a different server that is not Server Core and connected to the [!INCLUDEssDE] services installed on Server Core. |
| Management Tools — Complete | Remote Only | Installation of these features on Server Core is not supported. These components can be installed on a different server that is not Server Core and connected to the [!INCLUDEssDE] services installed on Server Core. |
| Distributed Replay Controller | No | |
| Distributed Replay Client | Remote Only | Installation of these features on Server Core is not supported. These components can be installed on a different server that is not Server Core , and connected to the [!INCLUDEssDE] services installed on Server Core. |
| SQL Client Connectivity SDK | Yes | |
| Microsoft Sync Framework | Yes | Microsoft Sync Framework is not included in the [!INCLUDEssnoversion] installation package. You can download the appropriate version of Sync Framework from this Microsoft Download Center (https://go.microsoft.com/fwlink/?LinkId=221788) page and install it on a computer that is running Server Core. |
| [!INCLUDEssMDSshort] | No | |
| [!INCLUDEssDQSnoversion] | No |
Supported scenarios
The following table shows the supported scenario matrix for installing [!INCLUDEssnoversion] on a Server Core.
| Installation | Valid target |
|---|---|
| [!INCLUDEssNoVersion] editions | All [!INCLUDEssnoversion] 64-bit editions |
| [!INCLUDEssNoVersion] language | All languages |
| [!INCLUDEssNoVersion] language on OS language/locale (combination) | ENG [!INCLUDEssNoVersion] on JPN (Japanese) Windows
ENG [!INCLUDEssNoVersion] on GER (German) Windows ENG [!INCLUDEssNoVersion] on CHS (Chinese-China) Windows ENG [!INCLUDEssNoVersion] on ARA (Arabic (SA)) Windows ENG [!INCLUDEssNoVersion] on THA (Thai) Windows ENG [!INCLUDEssNoVersion] on TRK (Turkish) Windows ENG [!INCLUDEssNoVersion] on pt-PT (Portuguese Portugal) Windows ENG [!INCLUDEssNoVersion] on ENG (English) Windows |
| Windows edition | Windows Server 2022 Datacenter
Windows Server 2022 Datacenter: Azure edition Windows Server 2022 Standard Windows Server 2019 Datacenter Windows Server 2019 Standard [!INCLUDEwinserver2016_datacenter_md] [!INCLUDEwinserver2016_standard_md] |
Upgrade
On Server Core installations, upgrading from [!INCLUDEssSQL14] to [!INCLUDEsssql16-md] is supported.
Install
[!INCLUDEssnoversion] does not support setup by using the installation wizard on the Server Core operating system. When installing on Server Core, [!INCLUDEssNoVersion] Setup supports full quiet mode by using the /Q parameter, or Quiet Simple mode by using the /QS parameter. For more information, see Install SQL Server from the Command Prompt.
Regardless of the installation method, you are required to confirm acceptance of the software license terms as an individual or on behalf of an entity, unless your use of the software is governed by a separate agreement such as a [!INCLUDEmsCoName] volume licensing agreement or a third-party agreement with an ISV or OEM.
The license terms are displayed for review and acceptance in the Setup user interface. Unattended installations (using the /Q or /QS parameters) must include the /IACCEPTSQLSERVERLICENSETERMS parameter. You can review the license terms separately at Microsoft Software License Terms.
[!INCLUDE sql-eula-link]
[!NOTE]
Depending on how you received the software (for example, through [!INCLUDEmsCoName] volume licensing), your use of the software may be subject to additional terms and conditions.
To install specific features, use the /FEATURES parameter and specify the parent feature or feature values. For more information about feature parameters and their use, see the following sections.
Feature parameters
| Feature parameter | Description |
|---|---|
| SQLENGINE | Installs only the [!INCLUDEssDE]. |
| REPLICATION | Installs the Replication component along with [!INCLUDEssDE]. |
| FULLTEXT | Installs the FullText component along with [!INCLUDEssDE]. |
| AS | Installs all [!INCLUDEssASnoversion] components. |
| IS | Installs all [!INCLUDEssISnoversion] components. |
| CONN | Installs the connectivity components. |
| ADVANCEDANALYTICS | Installs R Services, requires the database engine. Unattended installations require /IACCEPTROPENLICENSETERMS parameter. |
See the following examples of the usage of feature parameters:
| Parameter and values | Description |
|---|---|
| /FEATURES=SQLEngine | Installs only the [!INCLUDEssDE]. |
| /FEATURES=SQLEngine,FullText | Installs the [!INCLUDEssDE] and full-text. |
| /FEATURES=SQLEngine,Conn | Installs the [!INCLUDEssDE] and the connectivity components. |
| /FEATURES=SQLEngine,AS,IS,Conn | Installs the [!INCLUDEssDE], [!INCLUDEssASnoversion], [!INCLUDEssISnoversion], and the connectivity components. |
| /FEATURES=SQLENGINE,ADVANCEDANALYTICS /IACCEPTROPENLICENSETERMS | Installs the [!INCLUDEssDE] and [!INCLUDErsql_productname_md]. |
Installation options
The Setup supports the following installation options while installing [!INCLUDEssnoversion] on a Server Core operating system:
-
Installation from Command Line
To install specific features using the command prompt installation option, use the /FEATURES parameter and specify the parent feature or feature values. The following is an example of using the parameters from the command line:
Setup.exe /qs /ACTION=Install /FEATURES=SQLEngine,Replication /INSTANCENAME=MSSQLSERVER /SQLSVCACCOUNT="<DomainNameUserName>" /SQLSVCPASSWORD="<StrongPassword>" /SQLSYSADMINACCOUNTS="<DomainNameUserName>" /AGTSVCACCOUNT="NT AUTHORITYNetwork Service" /TCPENABLED=1 /IACCEPTSQLSERVERLICENSETERMS -
Installation using Configuration File
Setup supports the use of the configuration file only through the command prompt. The configuration file is a text file with the basic structure of a parameter (name/value pair) and a descriptive comment. The configuration file specified at the command prompt should have an .INI file name extension. See the following examples of ConfigurationFile.INI:
- Installing [!INCLUDEssDE].
The following example shows how to install a new stand-alone instance that includes [!INCLUDEssNoVersion] [!INCLUDEssDE]:
; SQL Server Configuration File
[OPTIONS]

; Specifies a Setup work flow, like INSTALL, UNINSTALL, or UPGRADE. This is a required parameter.

ACTION="Install"

; Specifies features to install, uninstall, or upgrade. The lists of features include SQLEngine, FullText, Replication, AS, IS, and Conn.

FEATURES=SQLENGINE

; Specify a default or named instance. MSSQLSERVER is the default instance for non-Express editions and SQLExpress for Express editions. This parameter is required when installing the ssNoVersion Database Engine, and Analysis Services (AS).

INSTANCENAME="MSSQLSERVER"

; Specify the Instance ID for the ssNoVersion features you have specified. ssNoVersion directory structure, registry structure, and service names will incorporate the instance ID of the ssNoVersion instance.

INSTANCEID="MSSQLSERVER"

; Account for ssNoVersion service: DomainUser or system account.

SQLSVCACCOUNT="NT ServiceMSSQLSERVER"

; Windows account(s) to provision as ssNoVersion system administrators.

SQLSYSADMINACCOUNTS="<DomainNameUserName>"

; Accept the License agreement to continue with Installation

IAcceptSQLServerLicenseTerms="True"
-
Installing connectivity components. The following example shows how to install the connectivity components:
; SQL Server Configuration File
[OPTIONS]

; Specifies a Setup work flow, like INSTALL, UNINSTALL, or UPGRADE. This is a required parameter.

ACTION="Install"

; Specifies features to install, uninstall, or upgrade. The lists of features include SQLEngine, FullText, Replication, AS, IS, and Conn.

FEATURES=Conn

; Specifies acceptance of License Terms

IAcceptSQLServerLicenseTerms="True
-
Installing all supported features
The following example shows how to install all supported features of [!INCLUDEssnoversion] on Server Core:
; SQL Server Configuration File
[OPTIONS]
; Specifies a Setup work flow, like INSTALL, UNINSTALL, or UPGRADE. This is a required parameter.

ACTION="Install"

; Specifies features to install, uninstall, or upgrade. The lists of features include SQLEngine, FullText, Replication, AS, IS, and Conn.

FEATURES=SQLENGINE,FullText,Replication,AS,IS,Conn

; Specify a default or named instance. MSSQLSERVER is the default instance for non-Express editions and SQLExpress for Express editions. This parameter is required when installing the ssNoVersion Database Engine (SQL), or Analysis Services (AS).

INSTANCENAME="MSSQLSERVER"

; Specify the Instance ID for the ssNoVersion features you have specified. ssNoVersion directory structure, registry structure, and service names will incorporate the instance ID of the ssNoVersion instance.

INSTANCEID="MSSQLSERVER"

; Account for ssNoVersion service: DomainUser or system account.

SQLSVCACCOUNT="NT ServiceMSSQLSERVER"

; Windows account(s) to provision as ssNoVersion system administrators.

SQLSYSADMINACCOUNTS="<DomainNameUserName>"

; The name of the account that the Analysis Services service runs under.

ASSVCACCOUNT= "NT ServiceMSSQLServerOLAPService"

; Specifies the list of administrator accounts that need to be provisioned.

ASSYSADMINACCOUNTS="<DomainNameUserName>"

; Specifies the server mode of the Analysis Services instance. Valid values are MULTIDIMENSIONAL, POWERPIVOT or TABULAR. ASSERVERMODE is case-sensitive. All values must be expressed in upper case.

ASSERVERMODE="MULTIDIMENSIONAL"

; Optional value, which specifies the state of the TCP protocol for the ssNoVersion service. Supported values are: 0 to disable the TCP protocol, and 1 to enable the TCP protocol.

TCPENABLED=1

;Specifies acceptance of License Terms

IAcceptSQLServerLicenseTerms="True"
The following shows how you can launch Setup using a custom or default configuration file:
-
Launch setup using a custom configuration file:
To specify the configuration file at the command prompt:
Setup.exe /QS /ConfigurationFile=MyConfigurationFile.INITo specify passwords at the command prompt instead of in the configuration file:
Setup.exe /QS /SQLSVCPASSWORD="************" /ASSVCPASSWORD="************" /ConfigurationFile=MyConfigurationFile.INI -
Launch setup using DefaultSetup.ini:
If you have the DefaultSetup.ini file in the x86 and x64 folders at the root level of the [!INCLUDEssNoVersion] source media, open the DefaultSetup.ini file, and then add the Features parameter to the file.
If the DefaultSetup.ini file does not exist, you can create it and copy it to the x86 and x64 folders at the root level of the [!INCLUDEssNoVersion] source media.
Configure remote access of [!INCLUDEssNoVersion] on Server Core
Perform the actions described below to configure remote access of a [!INCLUDEssnoversion] instance that is running on Server Core.
Enable remote connections on the instance of [!INCLUDEssNoVersion]
To enable remote connections, use SQLCMD.exe locally and execute the following statements against the Server Core instance:
EXEC sys.sp_configure N'remote access', N'1'
GO
RECONFIGURE WITH OVERRIDE
GO
Enable and start the [!INCLUDEssNoVersion] browser service
By default, the Browser service is disabled. If it is disabled on an instance of [!INCLUDEssNoVersion] running on Server Core, run the following command from the command prompt to enable it:
Set-service sqlbrowser -StartupType Auto
After it is enabled, run the following command from the command prompt to start the service:
Start-service sqlbrowser
Create exceptions in Windows Firewall
To create exceptions for [!INCLUDEssNoVersion] access in Windows Firewall, follow the steps specified in Configure the Windows Firewall to Allow SQL Server Access.
Enable TCP/IP on the instance of [!INCLUDEssNoVersion]
The TCP/IP protocol can be enabled through Windows PowerShell for an instance of [!INCLUDEssNoVersion] on Server Core. Follow these steps:
-
In PowerShell: Import-Module SQLPS.
-
In the Microsoft [!INCLUDEssNoVersion] Powershell window, run the following script to enable the TCP/IP protocol:
$smo = 'Microsoft.SqlServer.Management.Smo.'
$wmi = new-object ($smo + 'Wmi.ManagedComputer')
# Enable the TCP protocol on the default instance.  If the instance is named, replace MSSQLSERVER with the instance name in the following line.
$uri = "ManagedComputer[@Name='" + (get-item env:computername).Value + "']/ServerInstance[@Name='MSSQLSERVER']/ServerProtocol[@Name='Tcp']"
$Tcp = $wmi.GetSmoObject($uri)
$Tcp.IsEnabled = $true
$Tcp.Alter()
$Tcp
Uninstall
After you log on to a computer that is running Server Core, you have a limited desktop environment with an Administrator command prompt. You can use this command prompt to launch the uninstall an of [!INCLUDEssnoversion]. To uninstall an instance of [!INCLUDEssnoversion], launch the uninstallation from the command prompt in full quiet mode by using the /Q parameter, or quiet simple mode by using the /QS parameter. The /QS parameter shows progress through the UI, but does not accept any input. /Q runs in a quiet mode without any user interface.
To uninstall an existing instance of [!INCLUDEssNoVersion]:
Setup.exe /Q /Action=Uninstall /FEATURES=SQLEngine,AS,IS /INSTANCENAME=MSSQLSERVER
To remove a named instance, specify the name of the instance instead of MSSQLSERVER in the preceding example.
Start a new command prompt
If you accidentally close the command prompt, you can start a new command prompt by following these steps:
- Press Ctrl+Shift+Esc to display Task Manager.
- On the Applications tab, click New Task.
- In the Create New Task dialog box, type cmd in the Open field and then select OK.
See also
Install SQL Server Using a Configuration File
Install SQL Server from the Command Prompt
Editions and supported features of SQL Server 2017
Install Server Core
Configure a Server Core installation of Windows Server 2016 with Sconfig.cmd
Failover Cluster Cmdlets in Windows PowerShell
Microsoft recommends Windows Server Core for most infrastructure services and for applications such as Exchange 2019. You can also run SQL Server on Server Core. However, the installation requires a few steps from the command line.
Contents
- Minimal installer for the GUI
- GUI wizard does not work
- Installation from the command line
- Completing the installation
- Allow remote administration for SQL Server
- Configuring the firewall
- Author
- Recent Posts

Wolfgang Sommergut has over 20 years of experience in IT journalism. He has also worked as a system administrator and as a tech consultant. Today he runs the German publication WindowsPro.de.
Even if Server Core does not support all SQL Server services, such as reporting, master data, or data quality services, such a setup should still be sufficient for most tasks. This is especially true for the typical applications of the Express Edition.
Minimal installer for the GUI
The installation has not changed since SQL Server 2017, so the following instructions apply equally to both versions. It starts by fetching an installer smaller than 6 MB from the SQL Server 2019 download page, which in turn will request the required files from the internet.
The tool also starts with a graphical interface under Server Core and offers three options: Basic, Custom, and Download Media.
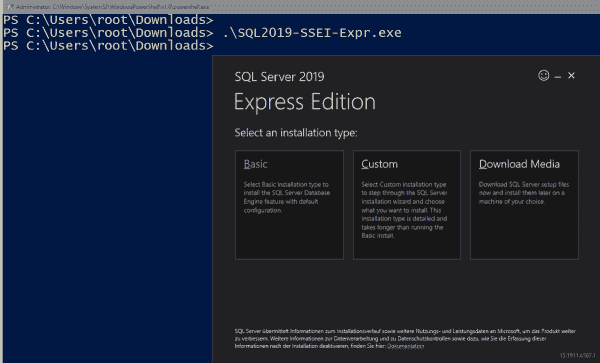
Installation options in the graphical setup for SQL Server 2019
The first variant is straightforward: after you confirm the end-user license agreement (EULA) and select the target directory, the installer sets up SQL Server with the default values. This setup is limited to the database engine only.
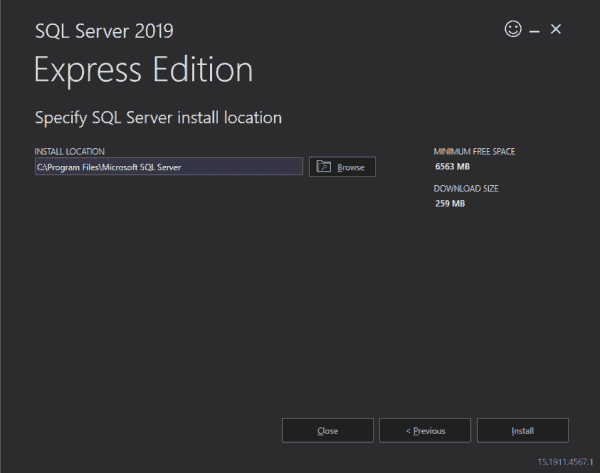
After selecting the installation directory, the standard setup will start
If you choose the user-defined installation, the program downloads the installation files and then opens the actual SQL Server setup. Here you can select the various options and components with the help of a wizard.
GUI wizard does not work
The download of the complete installation media will be the preferred option if the database server does not have access to the internet. You can download the files to a workstation and then transfer them to the target system.

Download the installation media for SQL Server
Executing the .exe file then unpacks the archive into a subdirectory from where you can run setup.exe.
The command below opens the same GUI you get during the user-defined installation.
.setup.exe /UIMODE=EnableUIOnServerCore

The wizard led installation of SQL Server does not work under Server Core
In both cases, this proves to be unusable under Server Core. In both Server 2016 and Server 2019 with Core App Compatibility installed, clicks on various options yielded no effect in my lab.
Installation from the command line
So if you don’t want to use the standard installation, the only other option is to set up SQL Server from the command line. The setup provides a silent mode for this, which you can activate with the /Q switch.
Installing the SQL engine requires the Action parameter (with the possible values install, uninstall, or upgrade) and IAcceptSQLServerLicenseTerms. Also, you must pass values for Features to the setup. Possible values are SQLENGINE, FullText, Replication, AS, IS, and Conn. If you specify several of them, you need to separate them with a comma.
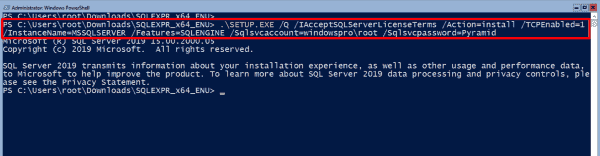
Running setup.exe to install SQL Server 2019 Express
Other mandatory parameters include Instanceid and Instancename (both have the default value MSSQLSERVER) as well as Sqlsvcaccount and Sqlsvcpassword, with which you specify the account or its password under which SQL Server will run.
You can install the Express Edition based on these parameters, but the full version also requires that you assign the sysadmin role to certain users with Sqlsysadminaccounts. Complete documentation of all setup parameters is here on Microsoft Docs.
Completing the installation
If you plan to manage SQL Server remotely, you should add this parameter when installing on Server Core:
TCPEnabled=1
Otherwise you may have to grapple with Windows Management Instrumentation (WMI) and the PowerShell module sqlserver to activate this protocol afterward.
After the installation is finished, you can run this PowerShell command to verify whether the setup was successful:
Get-CimInstance Win32_product | ? Name -Like *SQL* | select Name, Caption
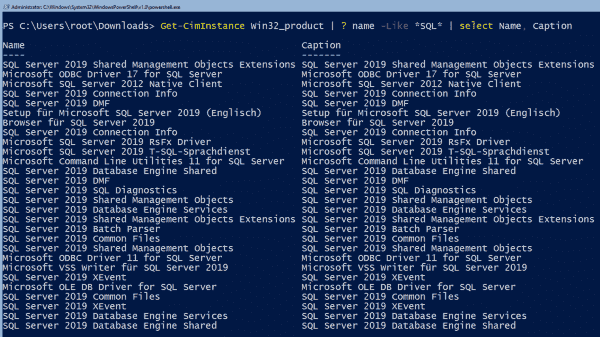
Subsequent verification of SQL Server installation with PowerShell
If you need the browser service, set its startup type to automatic using PowerShell, and start the service:
Set-Service -Name SQLBrowser -StartupType Automatic
Start-Service -Name SQLBrowser
Allow remote administration for SQL Server
In the next step, you open SQL Server for remote management using the command-line tool sqlcmd.exe installed alongside the database. If you chose the default installation at the beginning of the GUI installer, you can click the Connect button to start the program instead of launching it manually. Then enter the following commands:
EXEC sys.sp_configure N'remote access', N'1'
GO
RECONFIGURE WITH OVERRIDE
GO
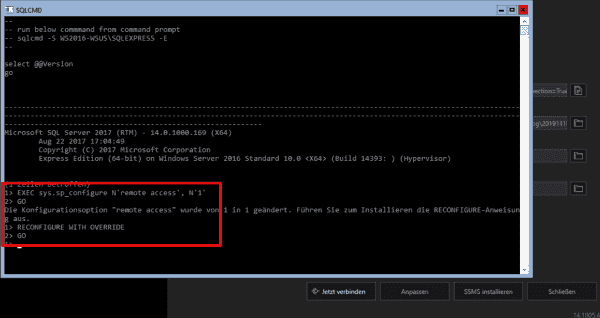
Configuring SQL Server for remote access with sqlcmd.exe
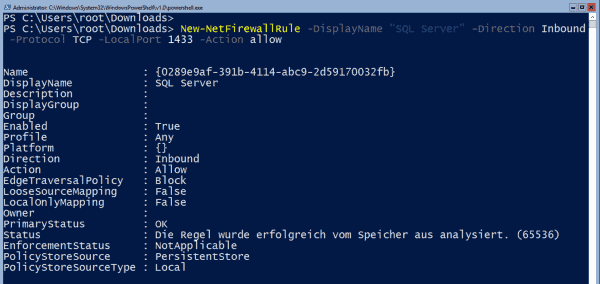
Configuring the firewall
Finally, it is necessary to open the firewall for managing SQL Server remotely. You can do this via PowerShell:
New-NetFirewallRule -DisplayName "SQL Server" -Direction Inbound -Protocol TCP -LocalPort 1433 -Action allow
If you have installed other services in addition to the SQL engine, you can configure the firewall for them using this script by Ryan Mangan.
Opening a firewall port for SQL Server management
Now the path should be clear for the remote management of SQL Server. With SQL Management Studio, Microsoft offers a powerful tool for this purpose. It is currently available in version 18.4 and can also manage SQL Server 2019.
Subscribe to 4sysops newsletter!
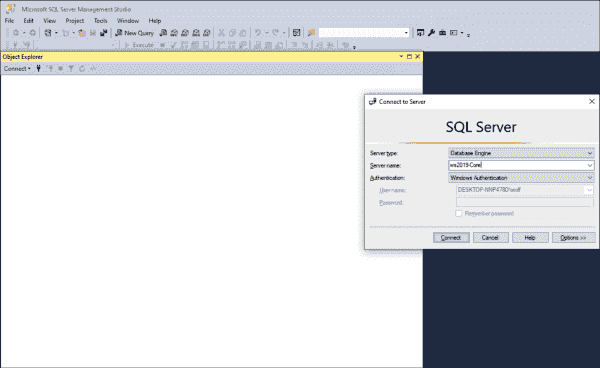
Logging on to SQL Server using SQL Management Studio
Log in with the account and the authentication method you previously specified during setup.
Posted by Florent Appointaire on
October 21, 2016
Because I have a small server at home, I try to win a maximum of space, for the storage and for the memory, by installing VM in Server Core. To note, it is very good for security/patches management.
It’s why, after installing my Hyper-V host and my first domain controller, on Windows Server 2016, I tried to install the SQL on a Server Core.
To start, I installed the VM and I added a second volume to store databases, logs and TempDb.
StarWind HyperConverged Appliance is a turnkey hyper-converged hardware platform fitted into a small two-node footprint. You don’t need anything else to build a budget-friendly new IT infrastructure or upgrade an existing one. All your systems will be “babysitted” by StarWind 24/7/365, troubleshooting any concerns without your involvement. Everything’s operated through a neat web UI. We’ll also migrate your workloads at no extra cost.
Dramatically decrease your CapEx, OpEx, and IT management costs, while visibly increasing return on investment (ROI) with hyperconvergence for ROBO, SMB & Edge from StarWind.
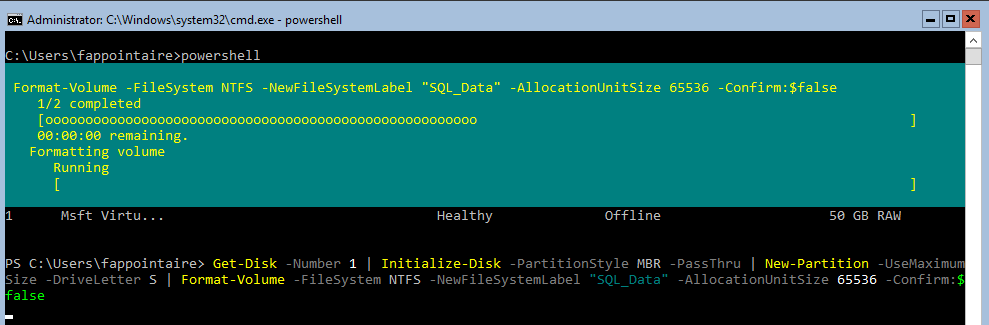
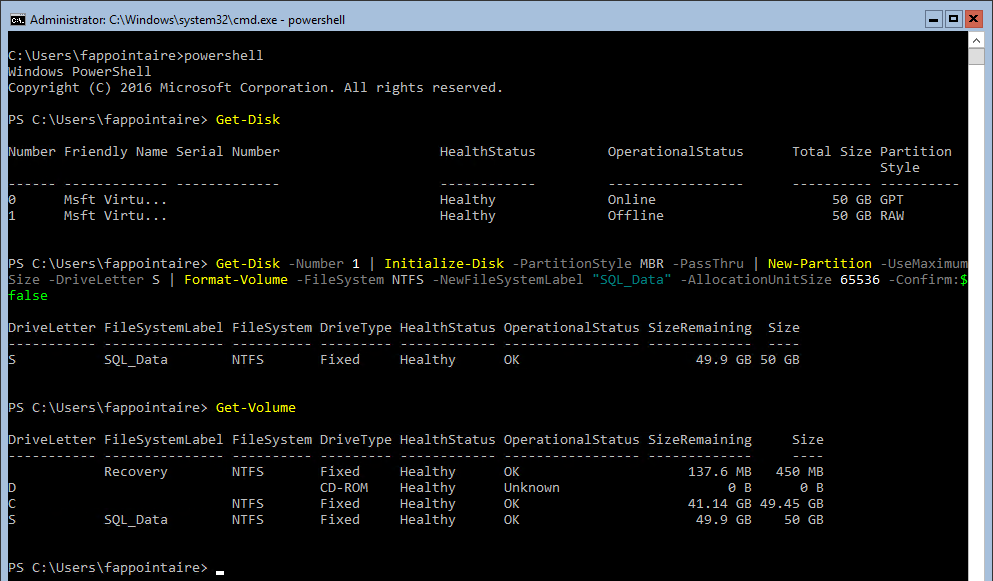
Use the Get-Disk command to see your second disks with his number, that will help you to format the volume:
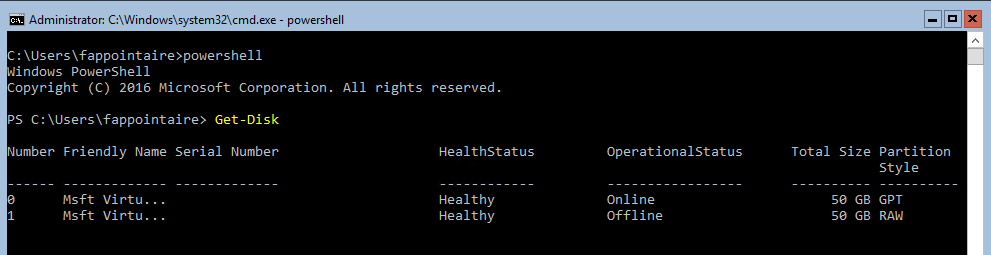
To format and mount the volume, used the following command:
|
Get—Disk —Number 1 | Initialize—Disk —PartitionStyle MBR —PassThru | New—Partition —UseMaximumSize —DriveLetter S | Format—Volume —FileSystem NTFS —NewFileSystemLabel «SQL_Data» —AllocationUnitSize 65536 —Confirm:$false |
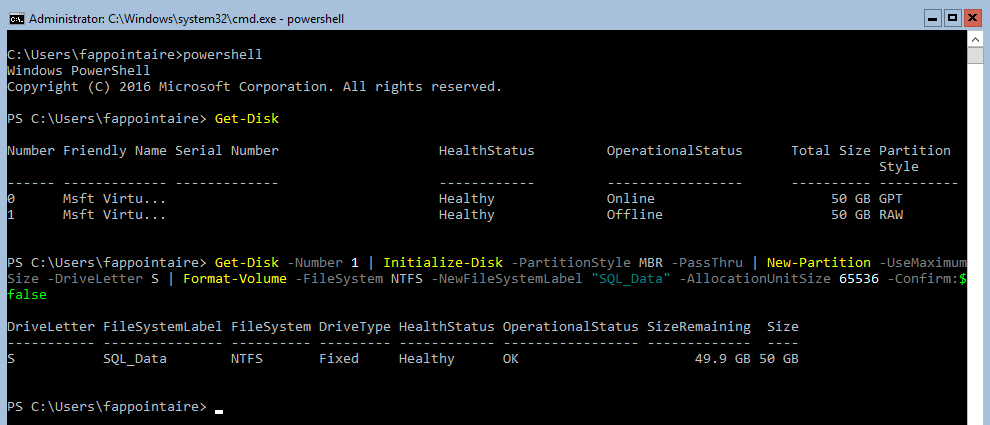
I can now see my volume SQL_Data :
We can start the installation for SQL Server, in command line. You need to adapt this command with your values. To note that I’ll use this SQL for my System Center environment, it’s why, by installing my products in English, I used the SQL_Latin1_General_CP1_CI_AS collation:
|
.Setup.exe /QS /ACTION=Install /FEATURES=SQL /INSTANCENAME=SC /SQLSVCACCOUNT=FLORENTAPPOINTAsvc—sqldb /SQLSVCPASSWORD=«P@ssword!123» /AGTSVCACCOUNT=FLORENTAPPOINTAsvc—sqlagent /AGTSVCPASSWORD=«P@ssword!123» /RSSVCACCOUNT=FLORENTAPPOINTAsvc—sqlreporting /RSSVCPASSWORD=«P@ssword!123» /SQLSYSADMINACCOUNTS=FLORENTAPPOINTASQLAdmins /TCPENABLED=1 /IACCEPTSQLSERVERLICENSETERMS=1 /UPDATEENABLED=True /SECURITYMODE=SQL /SAPWD=«P@ssword!123» /SQLTEMPDBDIR=«S:TempDB» /SQLUSERDBDIR=»S:Data« /SQLUSERDBLOGDIR=«S:Logs» /SQLBACKUPDIR=»S:Backup« /SQLCOLLATION=«SQL_Latin1_General_CP1_CI_AS» |
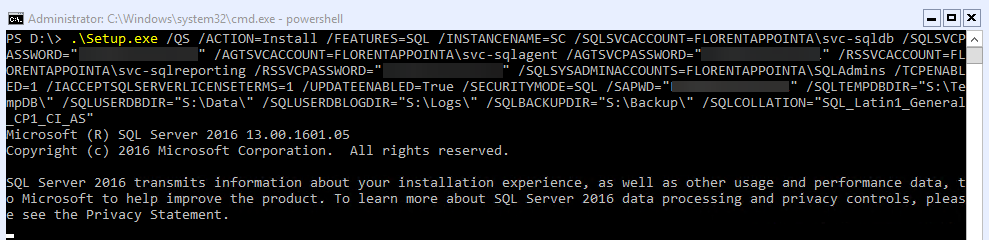
I noted that the reporting services can’t be installed on a Server Core. The installation was faster than in GUI 🙂
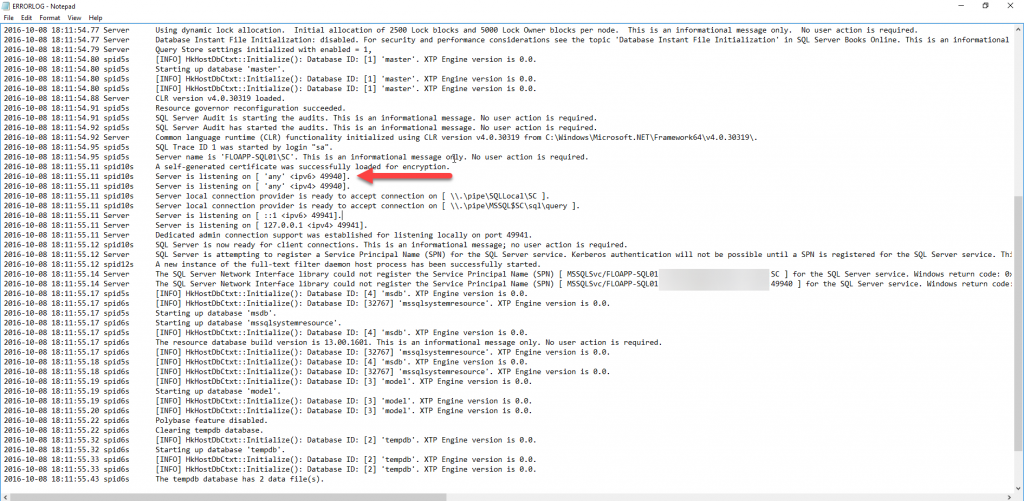
From my laptop, I opened the ERRORLOG file on the SQL Server, to see the port used by SQL Server, to open it in the firewall :
|
FLOAPP—SQL01.domain.localC$Program FilesMicrosoft SQL ServerMSSQL13.SCMSSQLLog |
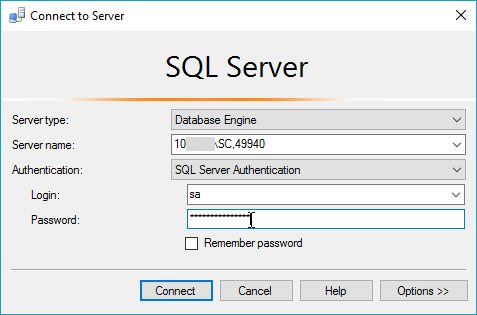
For me, I opened the port, with a GPO and I’ve done a gpupdate /force. I tested the connection from my laptop, where I installed SQL Server Management Studio :

Enjoy 🙂
- The High Availability Features in SQL Server 2016 Standard Edition
- Microsoft SQL Server deployment price reduced by 3 times with VSAN from StarWind
Filed under:
Software by Florent Appointaire
10/1/2018
Installing Microsoft SQL Server on Windows Server Core for any of your enviornments should not be a daunting task, even for a developer that doesn’t have an IT Team. Let’s go through the simple steps you need to follow to get the installer on the server installing it. Once installed we can make sure we have our Azure Firewall configured correctly if it is a development server.
Limitations
Windows Server Core doesn’t support all the same features that Windows Server does for MS SQL Server. You will need to decide if the limitations are acceptable for your needs or not.
Not Supported Features
- Reporting Services
- SQL Server Data Tools (SSDT)
- Client Tools Backwards Compatibility
- Client Tools SDK
- SQL Server Books Online
- Distributed Relay Controller
- Master Data Services
- Data Quality Services
To see the most up to date list check out the Microsoft Docs
Pre-Reqs
Let’s assume you created a new Windows Server Core 2016 instance from Windows Azure.
- Windows Server Core
- SQL Server 2016 Disk Image
- FTP Server, File Share or Azure Blob Storage
- Patience
Server Memory Allocation
When we went through the steps in this walkthrough we tried it on the lowest resource Azure Server which allocated 1GB of Memroy. The installation process ran out of memory so we used 2 GB to install and swapped it back to 1 GB of memory after the install.
We are using such low resources because this is a development enviornment that doesn’t need anything more. Our philosophy with Windows Server Core is only use what you need and if you can get away with low resources do it.
Transfer the Disk Image
To get started we will need to get the ISO or Disk Image onto the Server so we can run the installer. There are various ways to go about this, we decided to quickly create an Azure Storage Blob and transfer the files there that we can then download from the server via powershell commands.
- Start off by compressing the .iso file into a .zip file. This step is required, we ran into iso corruption issues when using powershell to download the file
- Copy the file to some file share, ftp server or Azure Blob Storage account that you can access from the server
Let’s assume we have access to your compressed installer at http://your.file.store/sql_server_2016.zip. RDP into your Windows Server and open powershell, then enter the following commands:
$webclient = New-Object System.Net.WebClient
$webclient.DownloadFile("http://your.file.store/sql_server_2016.zip", "C:sql_server_2016.zip")
Once the file is downloaded we can begin extracting the ISO
Expand-Archive C:sql_server_2016.zip .
This will copy the iso we compressed into the current directory. Once this command completes we can begin the installation process
Mount the Disk Image
The Disk Image or ISO should be available on your server and we are ready to mount the image and begin the installer. The commands to accomplish this are slightly different from how you would do this in the desktop enviornment because you are running powershell commands. Earlier we extracted our iso to C:sql_server_2016.iso, the command expects the full path so let’s be sure to specify it.
Mount-DiskImage -ImagePath C:sql_server_2016.iso
If the command runs successful there will be no errors and we can navigate to our newly mounted drive. You will need to figure out what drive letter was mounted you can easily guess the next drive letter, in our case it is the E: Drive
Navigate to the E: Drive by entering in the following command
E:
The easiest way to determine if you are in the correct mounted drive is typing ls as your command and inspecting the drive contents
Install SQL Server
There are many ways to use the command line to install SQL Server and there is an overwhelming amount of information available at the Microsoft Docs. This tutorial is focused at developers and one time installations so we are going to utilize the UI on Windows Server Core.
Wait One Second, you said we are using Windows Server Core without a Desktop Enviornment
Even though we are using Windows Server Core certain installers and applications will still work with their desktop enviornment if you specify it. For example Install Shield installers will work as you would expect. In our case the installer process doesn’t work exactly how we expect so we need to specify some flags, but once we do that it works just like you would expect.
./setup.exe /UIMODE=EnableUIOnServerCore /ACTION=INSTALL
The installer UI will open up and you can follow the steps like you usually do
An easy way to verify if your SQL Server installed correctly is check the list of running Windows Services. You can do that by running the Get-Service command
Troubleshooting
No guide is foolproof and sometimes it won’t work on the first try. My best piece of advice if you have a bad installation is just uninstall SQL Server, reboot and try again. To uninstall execute the following command
./setup.exe /UIMODE=EnableUIOnServerCore /ACTION=UNINSTALL
Firewall & Remote Access
Our SQL Server is installed and running but we can’t access it, you need to open up the correct firewall ports on both the Server and Azure (or your network or other cloud provider). Still on the server in powershell enter the following command:
netsh advfirewall firewall add rule name="MS SQL Server DB Remote Management" dir=in action=allow protocol=TCP localport=1433
This command will open up the port just at the server firewall level. If you are connecting from within the network you are all set, but if you need to connect from outside of the network then you need to continue to open up port 1433
Share
Tags
Windows Server CoreSQLSQL Server
Contents
Configure and Manage Server Core on Windows Server.
1
Install SQL Server Updates.
2
Start/Stop SQL Server Service.
3
Enable AlwaysOn Availability Groups.
3
Configuring Remote Access of SQL Server Running on Server Core.
5
SQL Server Profiler.
6
SQL Server Auditing.
6
Command Prompt Utilities.
6
Use troubleshooting tools.
8
Configure and Manage Server Core on Windows Server
The section provides references to the topics that help configure and manage a Server Core installation.
Not all features of SQL Server 2012 are supported in Server Core mode. Some of these features
can be installed on a client computer or a different server that is not running Server Core, and connected to the Database Engine services installed on Server Core.
For more information about configuring and managing a Server Core installation remotely, see the following topics:
·
Windows Server 2008 R2: Best Practices for Server Core Deployments
·
Configuring a Server Core installation: Overview
·
Configuring a Server Core installation of Windows Server 2008 R2 with Sconfig.cmd
·
Installing a server role on a server running a Server Core installation of Windows Server 2008 R2: Overview
·
Installing Windows Features on a server running a Server Core installation of Windows Server 2008 R2: Overview
·
Managing a Server Core installation: Overview
·
Administering a Server Core installation
Install SQL Server Updates
This section provides information about installing updates for SQL Server 2012 on a Windows Server Core machine. We recommend that customers evaluate and install latest SQL Server updates in a timely manner to make sure that systems are
up-to-date with the most recent security updates. For more information about installing SQL Server 2012 on a Windows Server Core machine, see
Install SQL Server 2012 on Server Core.
The following are the two scenarios for installing product updates:
- Installing updates for SQL Server 2012 during a new installation
- Installing updates for SQL Server 2012 after it has already been installed
Installing
Updates for SQL Server 2012 during a new installation
SQL Server setup integrates the latest product updates with the main product installation so that the main product and its applicable updates are installed at the same time. For more information on Product Updates, see
Product Updates in SQL Server 2012 Installation.
After Setup finds the latest versions of the applicable updates, it downloads and integrates them with the current SQL Server setup process. Product Update can pull in a cumulative update, service pack, or service pack plus cumulative update.
Specify the UpdateEnabled, and UpdateSource parameters to include the latest product updates with the main product installation. Refer the following example to enable product updates during the SQL Server Setup:
Setup.exe /qs /ACTION=Install /FEATURES=SQLEngine,Replication /INSTANCENAME=MSSQLSERVER /SQLSVCACCOUNT=»<DomainNameUserName>» /SQLSVCPASSWORD=»<StrongPassword>» /SQLSYSADMINACCOUNTS=»<DomainNameUserName>»
/AGTSVCACCOUNT=»NT AUTHORITYNetwork Service» /UpdateEnabled=True /UpdateSource=”<SourcePath>” /IACCEPTSQLSERVERLICENSETERMS
Installing
Updates for SQL Server 2012 after it has already been installed
On an installed instance of SQL Server 2012, we recommend that you apply the latest security updates and critical updates including General Distribution Releases (GDRs), and Service Packs (SPs). Individual Cumulative updates and security
updates should be adopted on a case-by-case, «as-needed» basis. Evaluate the update; if it’s needed, then apply it.
Apply an update at a command prompt, replacing <package_name> with the name of your update package:
·
Update a single instance of SQL Server and all shared components. You can specify the instance either by using the InstanceName parameter or the InstanceID parameter.
<package_name>.exe /qs /IAcceptSQLServerLicenseTerms /Action=Patch /InstanceName=MyInstance
·
Update SQL Server shared components only:
<package_name>.exe /qs /IAcceptSQLServerLicenseTerms /Action=Patch
·
Update all instances of SQL Server on the computer and all shared components: <package_name>.exe /qs /IAcceptSQLServerLicenseTerms /Action=Patch /AllInstances
Start/Stop SQL Server Service
The
sqlservr application starts, stops, pauses, and continues an instance of Microsoft SQL Server from a command prompt.
Enable AlwaysOn Availability Groups
Being enabled for AlwaysOn Availability Groups is a prerequisite for a server instance to use availability groups as a high availability and disaster recovery solution. For more information about managing the AlwaysOn Availability Groups,
see Enable and Disable AlwaysOn Availability Groups (SQL Server).
Using SQL Server Configuration Manager remotely
These steps are meant to be performed on a PC running the client edition of Windows 7 or later, or another server that has the Server Graphical Shell installed (i.e. a full installation of Windows Server 2008 R2 or a Windows Server 8 installation
with the Server Graphical Shell feature enabled).
1.
Open Computer Management. To open Computer Management do one of the following:
a.
On Windows 7, Windows Server 2008, or Windows Server 2008 R2:
i.
Click Start, click All Programs, click
Administrative Tools, and then click Computer Management.
ii.
Click Start, click Run, type
COMPMGMT.MSC, and then click OK.
b.
On Windows 8 with Server Graphical Shell enabled:
i.
Move your mouse to the bottom-left corner of the screen and right-click when you see the Start overlay.
ii.
Select Computer Management from the context menu.
2.
3.
In the console tree, right-click Computer Management, and then click
Connect to another computer.
4.
In the Select Computer dialog box, type the name of the Server Core machine that you want to manage, or click
Browse to find it, and then click
OK.
5.
In the console tree, under Computer Management of the Server Core machine, click
Services and Applications.
6.
You will see SQL Server Configuration Manager, double-click on this. The opens
the SQL Server Configuration Manager.
7.
In SQL Server Configuration Manager, click
SQL Server Services, right-click SQL Server (<instance name>), where
<instance name> is the name of a local server instance for which you want to enable AlwaysOn Availability Groups, and click
Properties.
8.
Select the AlwaysOn High Availability tab.
9.
Verify that Windows failover cluster name field contains the name of the local failover cluster node. If this field is blank, this server instance currently does not support AlwaysOn Availability Groups. Either the local computer
is not a cluster node, the WSFC cluster has been shut down, or this edition of SQL Server 2012 that does not support AlwaysOn Availability Groups.
10.
Select the Enable AlwaysOn Availability Groups check box, and click
OK.
11.
SQL Server Configuration Manager saves your change. Then, you must manually restart the SQL Server service. This enables you to choose a restart time that is best for your business requirements. When the SQL Server service restarts, AlwaysOn will
be enabled, and the IsHadrEnabled server property will be set to 1.
Notes
·
You must have the appropriate user rights or you must have been delegated the appropriate authority on the target computer to connect to that computer.
·
The name of the computer that you are managing appears in parentheses next to Computer Management in the console tree.
Using PowerShell Cmdlets to enable AlwaysOn Availability Groups
The PowerShell Cmdlet, Enable-SqlAlwaysOn, is used to enable
AlwaysOn Availability Group on an instance of SQL Server. If AlwaysOn Availability Groups is enable while the SQL Server service is running, the Database Engine service must be restarted for the change to complete. Unless you specify the
-Force parameter, the cmdlet prompts you to ask whether you wish to restart the service; if cancelled, no operation occurs.
You must have Administrator permissions to execute this cmdlet.
You can use one of the following syntaxes to enable AlwaysOn Availability Groups for an instance of SQL Server:
·
Enable-SqlAlwaysOn [-Path <string>] [-Credential <PSCredential>] [-Force] [-NoServiceRestart] [-Confirm] [-WhatIf] [<Commom Parameters>]
·
Enable-SqlAlwaysOn -InputObject <Server> [-Credential <PSCredential>] [-Force] [-NoServiceRestart] [-Confirm] [-WhatIf] [<Commom Parameters>]
·
Enable-SqlAlwaysOn [-ServerInstance <string>] [-Credential <PSCredential>] [-Force] [-NoServiceRestart] [-Confirm] [-WhatIf] [<Commom Parameters>]
The following PowerShell command enables AlwaysOn Availability Groups on an instance of SQL Server (MachineInstance):
Enable-SqlAlwaysOn -Path SQLSERVER:SQLMachineInstance
Configuring Remote Access of SQL Server Running on Server Core
Perform the actions described below to configure remote access of a SQL Server 2012 instance that is running on Server Core.
Enable remote connections on the instance of SQL Server
To enable remote connections, use SQLCMD.exe locally and execute the following statements against the Server Core instance:
- EXEC sys.sp_configure N’remote access’, N’1′
GO
- RECONFIGURE WITH OVERRIDE
GO
Enable and start the SQL Server Browser service
By default, the Browser service is disabled. If it is disabled on an instance of SQL Server running on Server Core, run the following command from the command prompt to enable it:
sc config SQLBROWSER start= auto
After it is enabled, run the following command from the command prompt to start the service:
net start SQLBROWSER
Create exceptions in Windows Firewall
Enable TCP/IP on the instance of SQL Server
The TCP/IP protocol can be enabled through Windows PowerShell for an instance of SQL Server on Server Core. Follow these steps:
- On the computer that is running Windows Server 2008 R2 Server Core SP1, launch Task Manager.
- On the Applications tab, click
New Task. - In the Create New Task dialog box, type
sqlps.exe in the Open field and then click
OK. This opens the Microsoft SQL Server Powershell window. - In the Microsoft SQL Server Powershell window, run the following script to enable the TCP/IP protocol:
$smo = ‘Microsoft.SqlServer.Management.Smo.’
$wmi = new-object ($smo + ‘Wmi.ManagedComputer’)
# Enable the TCP protocol on the default instance.
If the instance is named, replace MSSQLSERVER with the instance name in the following line.
$uri = «ManagedComputer[@Name='» + (get-item env:computername).Value + «‘]/ServerInstance[@Name=’MSSQLSERVER’]/ServerProtocol[@Name=’Tcp’]»
$Tcp = $wmi.GetSmoObject($uri)
$Tcp.IsEnabled = $true
$Tcp.Alter()
$Tcp
SQL Server Profiler
On a remote machine, start SQL Server Profiler and select
New Trace from the File menu, the application displays a
Connect to Server dialog box where you can specify the SQL Server instance, residing on the Server Core machine, to which you want to connect. For more information, see
Start SQL Server Profiler.
SQL Server Auditing
You can use SQL Server Management Studio or Transact-SQL remotely to define an audit. After the audit is created and enabled, the target will receive entries. For more information about creating and managing SQL Server audits, see:
·
Creating and Managing Audits with SQL Server Management Studio
·
Creating and Managing Audits with Transact-SQL
The
SQL Server Audit How-to Topics topic provides SQL Server Management Studio and Transact-SQL examples for using the auditing feature.
Command Prompt Utilities
You can use the following command prompt utilities that enable you to script SQL Server operations on a Server Core machine. The following table contains a list of command prompt utilities that ship with SQL Server for Server Core:
|
Utility |
Description |
Installed in |
|
bcp Utility |
Used to copy data between an instance of Microsoft SQL Server and a data file in a user-specified format. |
<drive>:Program FilesMicrosoft SQL Server110ToolsBinn |
|
dtexec Utility |
Used to configure and execute an Integration Services package. A user interface version of this command prompt utility is called |
<drive>:Program FilesMicrosoft SQL Server110DTSBinn |
|
dtutil Utility |
Used to manage SSIS packages. |
<drive>:Program FilesMicrosoft SQL Server110DTSBinn |
|
osql Utility |
Allows you to enter Transact-SQL statements, system procedures, and script files at the command prompt. |
<drive>:Program FilesMicrosoft SQL Server110ToolsBinn |
|
sqlagent |
Used to start SQL Server Agent from a command prompt. |
<drive>:Program FilesMicrosoft SQL Server<instance_name>MSSQLBinn |
|
sqlcmd Utility |
Allows you to enter Transact-SQL statements, system procedures, and script files at the command prompt. |
<drive>:Program FilesMicrosoft SQL Server110ToolsBinn |
|
SQLdiag Utility |
Used to collect diagnostic information for Microsoft Customer Service and Support. |
<drive>:Program FilesMicrosoft SQL Server110ToolsBinn |
|
sqlmaint Utility |
Used to execute database maintenance plans created in previous versions of SQL Server. |
<drive>:Program FilesMicrosoft SQL ServerMSSQL11.MSSQLSERVERMSSQLBinn |
|
sqlps Utility |
Used to run PowerShell commands and scripts. Loads and registers the SQL Server PowerShell provider and cmdlets. |
<drive>:Program FilesMicrosoft SQL Server110ToolsBinn |
|
sqlservr Application |
Used to start and stop an instance of Database Engine from the command prompt for troubleshooting. |
<drive>:Program FilesMicrosoft SQL ServerMSSQL11.MSSQLSERVERMSSQLBinn |
Use troubleshooting tools
You can use
SQLdiag to collect logs and data files from SQL Server and other types of servers, and use it to monitor your servers over time or troubleshoot specific problems with your servers.
SQLdiag is intended to expedite and simplify diagnostic information gathering for Microsoft Customer Support Services.
You can launch the utility on the administrator command prompt on the Server Core, using the syntax specified in the topic:
SQLdiag Utility.
See Also
- PowerShell Portal
- Wiki: Portal of TechNet Wiki Portals
В этой статье мы пошагово рассмотрим установку Microsoft SQL Server 2019 с описанием всех опций, компонентов, актуальных рекомендаций и best practice.
MS SQL Server это лидирующая РСУБД (Реляционная система управления базами данных) а также главный конкурент Oracle Database в корпоративном сегменте. В СНГ MSSQL чаще всего применяется для собственных разработок прикладного ПО и для 1С.
Содержание:
- Редакции MS SQL Server 2019
- Особенности лицензирования SQL Server
- Начало установки SQL Server
- Параметры обновлений SQL Server при установке
- Тип инсталляции SQL Server
- Компоненты SQL Server 2019: для чего нужны, какие нужно установить
- Настройка именования экземпляра SQL Server
- Настройка параметров служб SQL Server, кодировка
- Настройка Database Engine в SQL Server
Редакции MS SQL Server 2019
Всего есть 6 выпусков (редакций) MSSQL 2019:
- Express является бесплатной для использования редакцией. Функционал довольно ограничен, самое ощутимое ограничение экспресс версии — максимальный размер базы 10 ГБ. Эта редакция подойдет для небольших проектов, например, студенческих работ или для обучения SQL/T-SQL.
- Standard это полноценная платная редакция, но многих функций всё еще нет. Максимальный объём оперативной памяти, который сможет использовать SQL Server – 128 ГБ, также отсутствуют группы доступности AlwaysOn и другие компоненты. Standard предназначен для приложений в небольших организациях.
- Enterprise включает в себя все возможные функции и компоненты, никаких ограничений нет. Корпоративная редакция обычно используется крупными корпорациями или компаниями, которым необходим функционал этой версии.
- Developer редакция так же как и Enterprise не имеет никаких ограничений и её можно использовать бесплатно, но она может использоваться только для разработки и тестирования приложений.
- Web редакция почти ничем не отличается от standard, кроме как более сильными ограничениями в функционале и соответственно более низкой стоимости лицензирования;
- Evaluation — ознакомительная редакция SQL Server, которая предоставляет полный функционал Enterprise и работает в течении 180 дней (может быть обновлена до полноценной версии).
Особенности лицензирования SQL Server
MS SQL Server лицензируется по 2 моделям:
- PER CORE — лицензирует MSSQL по ядрам сервера
- SERVER + CAL — лицензия целиком на сервер и на каждого пользователя, который будет работать с сервером
Enterprise редакция может быть лицензирована только по типу PER CORE
Также в MSSQL Server 2019 появилась новая возможность для лицензирования контейнеров, виртуальных машин и Big Data Clusters.
Более подробная информация по лицензирования SQL Server представлена в отдельной статье.
Начало установки SQL Server
В этой статье мы будем устанавливать MS SQL Server 2019 Enterprise Edition на Windows Server 2019.
Примечание. В SQL Server 2019 появилась полноценная поддержка Linux, а соответственно Docker и Kubernetes.
- Скачайте и распакуйте установочный образ SQL Server 2019. Запустите setup.exe;
- Так как в этой статье мы будем устанавливать обычный изолированный экземпляр, во вкладке Installation выберите “New SQL Server stand-alone installation”.
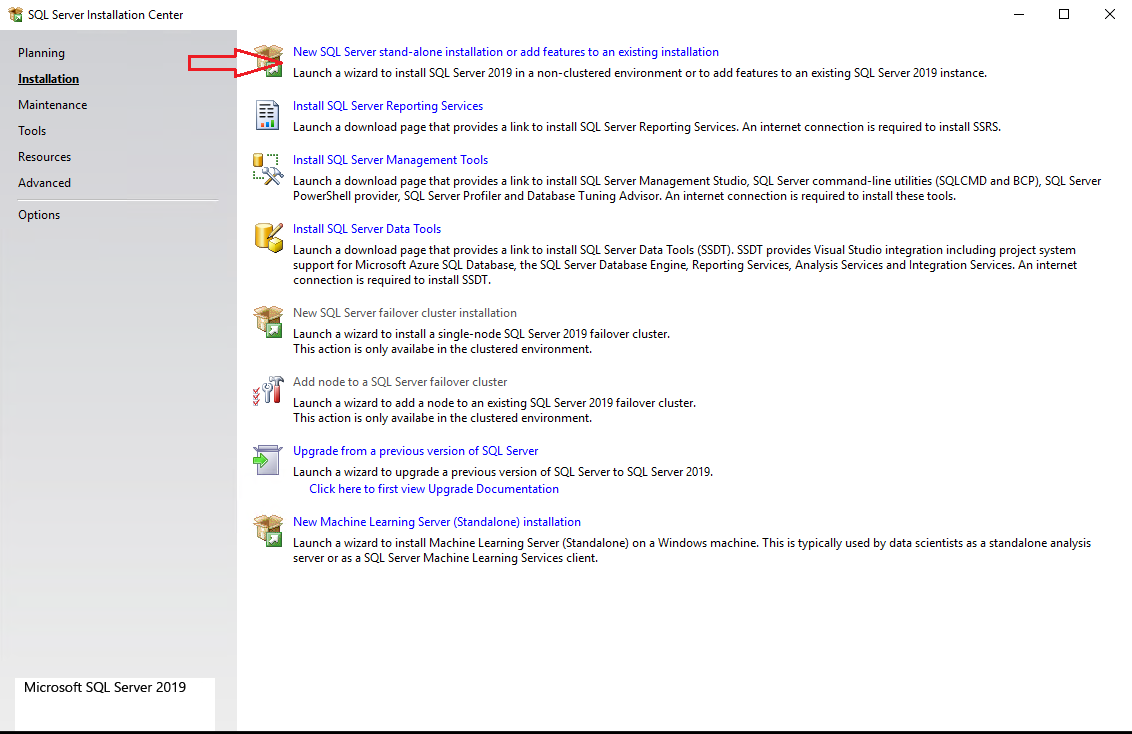
В инсталляторе SQL Server можно выполнить много других действий: обновить старый экземпляр, починить сломанный и некоторые другие вещи.
Параметры обновлений SQL Server при установке
На этом шаге вы можете включить поиск обновлений через Windows Update. Включать эту опцию или нет, решать вам. Всё зависит от вашей планировки обновлений и от требований к отказоустойчивости сервера. Если у вас нет четкого плана обновлений ваших серверов, лучше оставьте этот параметр включенным.
Нажмите Next.
Шаг Install Setup Files произойдет автоматически. Он подготовит файлы для установки.
Install Rules так же пройдет автоматически, если установщик не обнаружит проблем, которые необходимо решить перед установкой MSSQL (например, перезагрузить компьютер или несовместимость вашей версии Windows с версией SQL Server).
Тип инсталляции SQL Server
На этом шаге вы можете выбрать установку нового экземпляра или добавление функционала в уже установленный экземпляр. В нашем случае выбираем “Perform a new installation”. 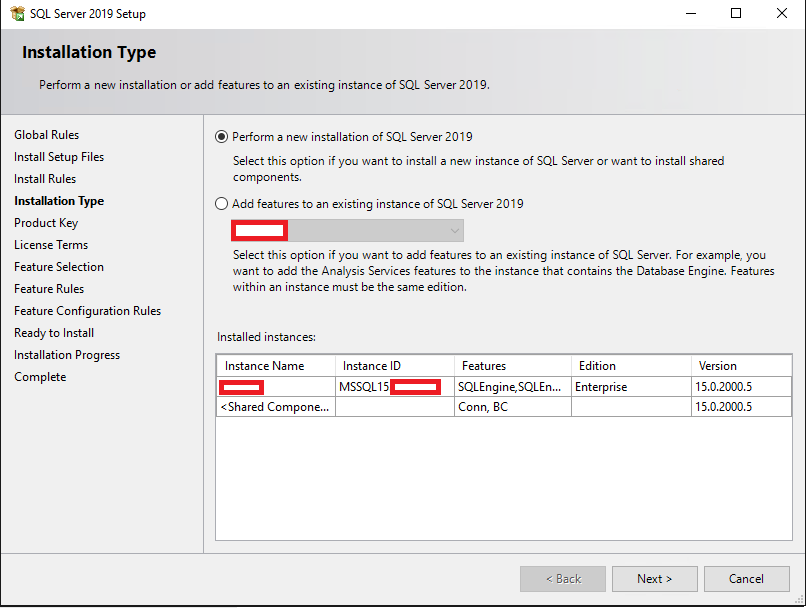
Теперь нужно ввести ключ продукта. Если нет ключа, выбирайте Free edition (например, Developer), но имейте в виду, что с редакцией Developer вы имеете право только разрабатывать и тестировать ПО, но не использовать сервер в продуктивной среде. 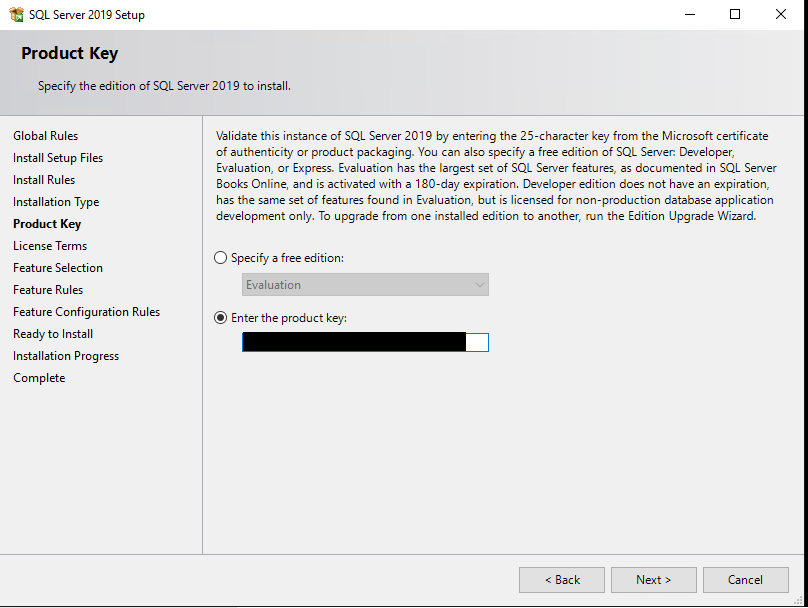
На шаге License Terms принимаем лицензионное соглашение.
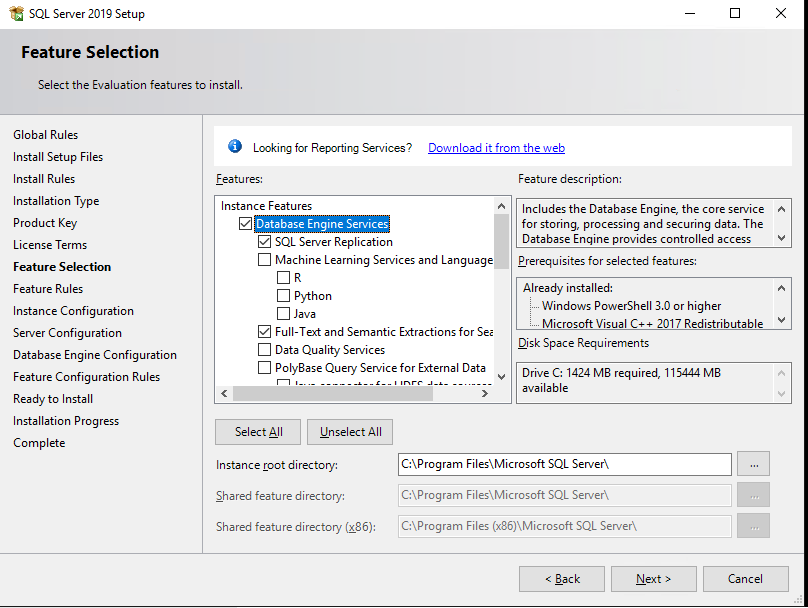
Компоненты SQL Server 2019: для чего нужны, какие нужно установить
На этом этапе вам предлагают установить различные компоненты SQL Server. Пройдемся по ним подробнее, посмотрим какие нужно ставить в различных ситуациях:
- Database Engine Services – это основной движок SQL Server. Обязателен к установке.
- SQL Server Replication – службы репликации. Компонент довольно часто используются, поэтому если вы не уверены нужны ли они вам, то лучше отмечайте для установки.
- Machine Learning Services and Language Extensions – службы для выполнения R/Python/Java кода в контексте SQL Server. Необходимо, если вы собираетесь заниматься Machine Learning.
- Full-Text and Semantic Extractions for Search – компонент необходим, если вам нужна полнотекстовая технология поиска или семантический поиск в документах (например docx). В случае семантического поиска по документам, вам также понадобиться FILESTREAM, о нём ниже.
- Data Quality Services – службы для коррекции и валидации данных. Если вы не уверены нужен ли вам DQS, то лучше не устанавливайте его.
- PolyBase Query Service For External Data – технология для доступа к внешним данным, например на другом SQL Server или в Oracle Database. Java connector for HDFS data sources относиться к PolyBase технологии и нужен в случае если вы хотите работать с HDFS технологией.
- Analysis Services – также известен как SSAS. Технология для бизнес-отчетов (BI) и работы с OLAP. Используется в крупных компаниях для отчетности.
Дальше переходим к списку Shared Features (функций, распространяющихся на весь сервер, а не на конкретный экземпляр).
- Machine Learning Server (Standalone) – то же самое что и Machine Learning Services and Language Extensions, но с возможностью установки без самого движка SQL Server.
- Data Quality Client – то же самое что и DQS, только standalone.
- Client Tools Connectivity – библиотеки ODBC, OLE DB и некоторые другие. Рекомендем ставить обязательно.
- Integration Services – службы интеграции данных, известны также как SSIS. Технология для ETL (Extract, Transform, Load) данных. SSIS нужны, если вы хотите автоматизировать импорт данных и менять их в процессе импорта. Scale Out Master/Worker нужны для масштабирования работы SSIS. Если вы не уверены нужны ли они вам, то не отмечайте их.
- Client Tools Backwards Compatibility – устаревшие DMV и системные процедуры. Рекомендую ставить.
- Client Tools SDK – пакет с ресурсами для разработчиков. Можно не ставить, если не уверены, нужен ли он вам.
- Distributed Replay Controller/Client – повторяют и улучшают функционал SQL Server Profiler. Службы Distributed Replay нужны для моделирования нагрузки и для различного рода тестирования производительности.
- SQL Client Connectivity SDK – ODBC/OLE DB SDK для разработчиков.
- Master Data Services – компонент из Microsoft Power BI. Нужен для анализа, валидации, интеграции и коррекции данных.
Некоторые из этих компонентов (например, Java connector for HDFS data sources) могут отсутствовать в более старых версиях SQL Server.
Чуть ниже, на этом же шаге, вы можете указать директорию для файлов SQL Server’a. Если у вас нет весомых причин менять её, то оставьте стандартную (C:Program FilesMicrosoft SQL Server).
После того как вы выбрали нужные вам компоненты MSSQL, инсталлятор проверяет совместимость компонентов с вашей системой, и, если проблем нет, этот шаг пройдет автоматически.
Настройка именования экземпляра SQL Server
Вы можете оставить параметр Default Instance, в таком случае имя вашего экземпляра будет MSSQLSERVER. При выборе Named Instance вы сами указываете имя экземпляра SQL Server. В моём случае я назову экземпляр DEV. Instance ID рекомендуется ставить такой же, как и имя экземпляра, во избежание путаницы.
В Installed instances отображаются установленные на сервере экземпляры MSSQL, у меня уже есть один.
Настройка параметров служб SQL Server, кодировка
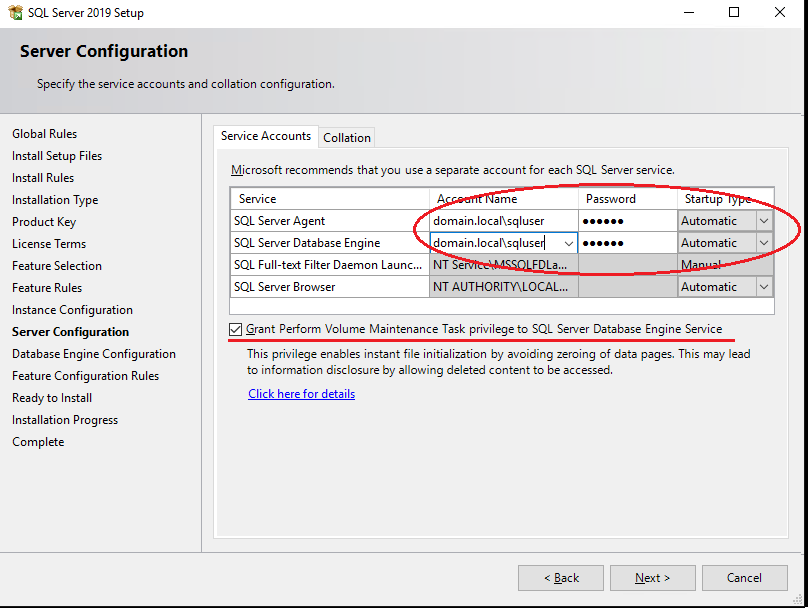
Во вкладке Service Accounts укажите аккаунты из-под которых будут работать службы SQL Server на хосте. Хорошей практикой считается использование MSA (Managed Service Accounts) и gMSA (Group Managed Service Accounts) технологий, как самых надежных в плане безопасности. Я буду использовать обычный доменный аккаунт.
Выставьте у SQL Server Agent поле Startup Type в Automatic, иначе агент придется запускать вручную.
Также начиная с SQL Server 2016 появилась возможность выставлять параметр IFI (Instant File Initialization) при установке сервера. В инсталляторе он называется “Grant Perform Volume Maintenance Task privilege to SQL Server Database Engine”. Его включение означает, что старые данные не будут перезаписываться нулями при:
- Создании базы данных;
- Добавлении данных в файлы данных или лог файлы;
- Увеличении размера существующих файлов (включая операции авто увеличения);
- Восстановлении базы данных/файловой группы.
Это ускоряет процесс инициализации файлов, но уменьшает безопасность, потом что старые данные не затираются нулями, поэтому старая информация, которая содержалась в этих файлах, может быть частична доступна.
Рекомендую включать этот параметр, если опасность утечки данных несущественна.
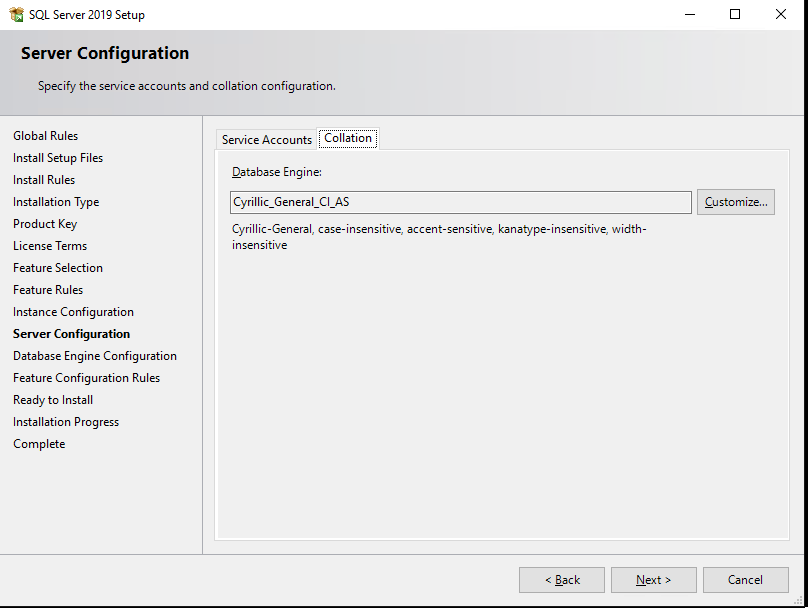
На следующем шаге вы должны выбрать Collation.
Грубо говоря, Collation это настройка кодировки SQL Server. Этот параметр устанавливает кодировку страниц, правила сортировки, кодировку для char/varchar и другие языковые настройки.
При установке сервера вы выбираете Collation для всего SQL Server. После установки можно будет поменять этот параметр, но сделать это будет непросто, поэтому нужно сразу выбрать подходящий для ваших задач Collation.
Для СНГ рекомендуется выбирать Cyrillic_General_CI_AS. Если данные будут только на английском, можно выбирать SQL_Latin1_General_CP1_CI_AS.
Если вы планируете использовать SQL Server в боевых условиях, ознакомьтесь с документацией по выбору Collation, так как это важный параметр, хоть он и может быть задан для конкретной базы данных.
Настройка Database Engine в SQL Server
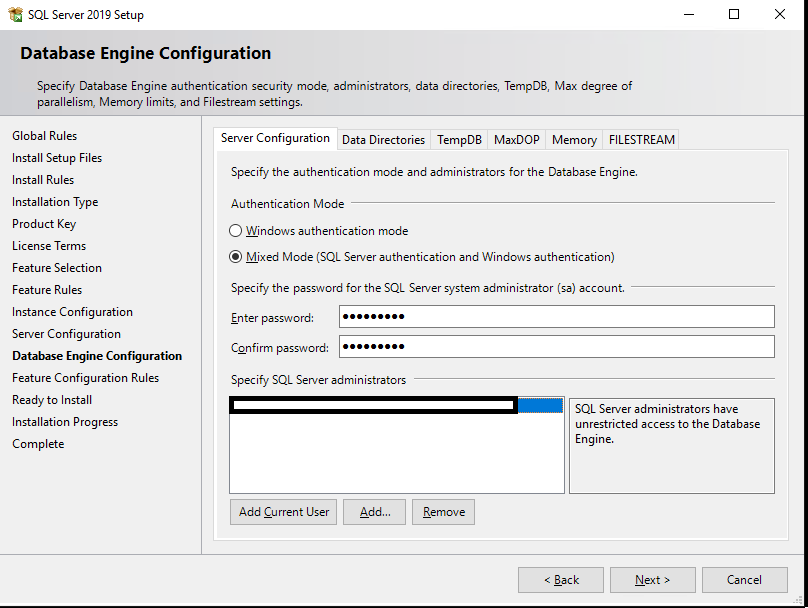
На шаге Database Engine Configuration доступны 6 вкладок, начнем по порядку:
В Server Configuration вы должны выбрать Authentication Mode и указать аккаунт для администратора SQL Server’a.
У вас на выбор есть 2 режима: Windows authentication mode и Mixed mode.
- С Windows аутентификацией авторизоваться смогут только пользователи вашего домена или компьютера под управлением Windows.
- В Mixed mode помимо windows авторизации станет доступна авторизация по учетным данным самого SQL Server’a.
Майкрософт рекомендует использовать Windows Authentication как самый безопасный, но на практике скорее всего вам нужно будет логиниться на сервер из других приложений. Например, написанных на java, и в таком случае без аутентификации SQL сервера не обойтись.
Если вы уверены, что ваши пользователи будут логиниться только с Windows компьютеров и приложений, поддерживающих Windows аутентификацию, то выбирайте Windows authentication mode.
В моём случае я ставлю Mixed mode. В этом режиме вам нужно будет прописать пароль от пользователя sa и выбрать Windows аккаунт, который будет обладать административными правами.
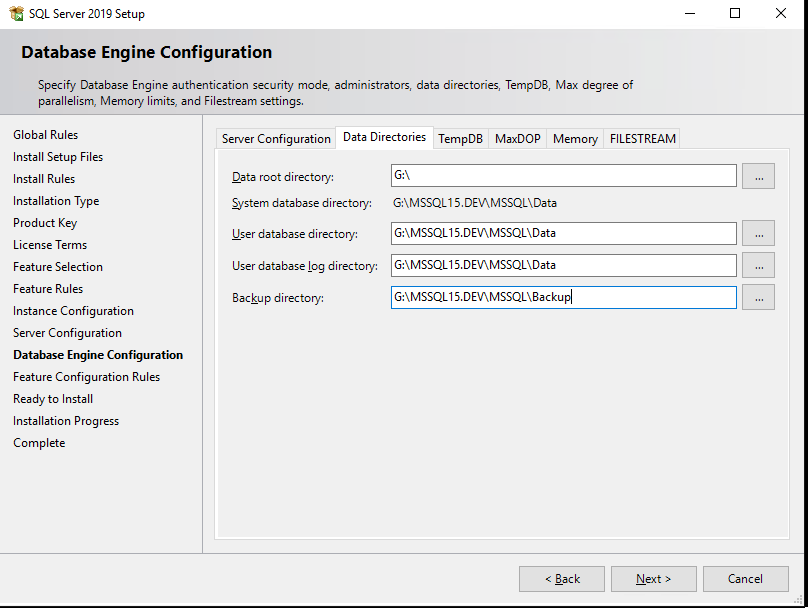
На вкладке Data Directories вы должны выбрать каталог, в которой SQL Server будет хранить базу данных и транзакционные логи.
Для данных лучше всего выделить отдельный RAID массив. Дисковая подсистема критически важна для производительности SQL Server’а, поэтому необходимо выбрать самый хороший из доступных вам вариант хранения данных, будь то NAS или локальный RAID из быстрых дисков.
Хорошей практикой считается разнесение всех директорий (системных баз данных, пользовательских баз данных, логов пользовательских баз данных, резервных копий) на разные хранилища. Таким образом вы добьетесь максимальной производительности от SQL Server’а на уровне работы с хранением данных.
В моём случае я укажу отдельный диск с RAID 1 для всех директорий.
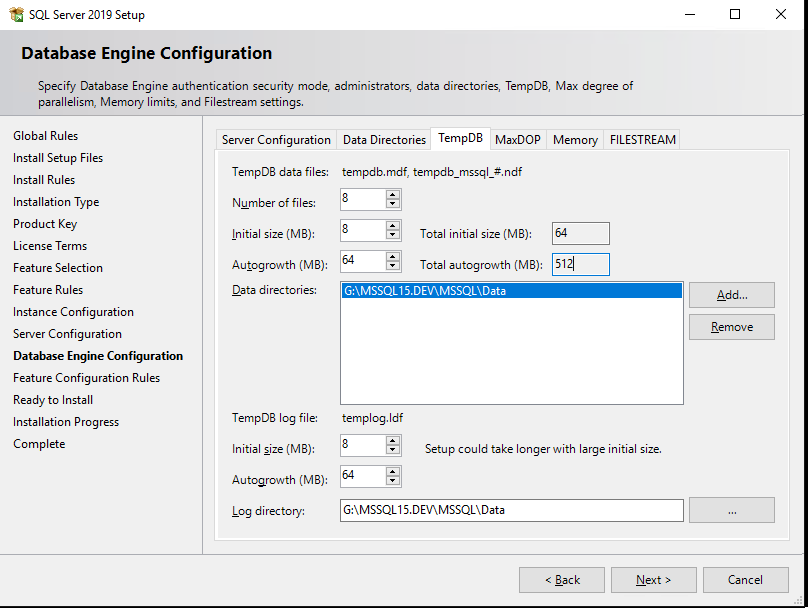
На вкладке TempDB настраиваются параметры для базы tempdb. Её правильная конфигурация важна для производительности сервера, так как эта база участвует практически во всех операциях с данными.
- Number of files – количество файлов данных для tempdb. Вам нужно указать количество файлов в зависимости от ядер процессора. Хорошей практикой считается выставлять количество файлов равным количеству ядер процессора поделенных на 2. То есть на 32 ядра вашего сервера рекомендуется 16 файлов. Также независимо от количества ядер не рекомендуется ставить меньше 8 файлов, это необходимо, чтобы избежать проблем, описанных здесь https://support.microsoft.com/en-us/kb/2154845 .
- Initial size – начальный размер файлов данных tempdb. При каждой перезагрузке сервера, размер tempdb будет сбрасываться до начального размера. Рекомендуется указывать размер файлов данных в зависимости от планируемой нагрузки. Если вы не можете спланировать будущую нагрузку, то оставьте 8 MB. Если вы выделите отдельный массив/диск под файлы tempdb (об этом ниже), то лучше всего будет указать такой размер файлов, который бы полностью заполнил диск, чтобы избежать постоянных операций увеличения файла.
- Autogrowth – шаг увеличения файлов tempdb. Размер нужно ставить в зависимости от начального размера. Оставьте 64 МB, если не можете спланировать нагрузку. Имейте в виду, если включен IFI (Instant File Initialization) то ожидание блокировок на расширение файла будет намного меньше. Не рекомендуется ставить размер шага слишком большим, так как это вызовет существенные задержки при увеличении размера файла.
- Data Directories – директории для размещения файлов данных tempdb. Если вы укажите несколько директорий, файлы будут размещаться по алгоритму Round-robin, то есть циклически. Грубо говоря при указании, например, 4 директорий, файлы данных распределятся по всем директориям в равной степени. Хорошей практикой будет добавить разные дисковые массивы для файлов данных.
- TempDb Log file: Initial size / Autogrowth – настройка начального размера и шага увеличения файла лога tempdb. Стоит придерживаться таких же правил, как и для файлов данных tempdb.
- Log Directory – директория для хранения лог файла tempdb. Лог файл всего 1, независимо от количества файлов данных, указывается всего 1 директория. Если есть возможность, лог файлу также выделите отдельный массив.
Вкладка MaxDOP.
MaxDOP это параметр SQL Server’а который отвечает за параллельное выполнение запросов и соответственно степень параллелизма. Для того чтобы SQL Server использовал все ядра процессора для обработки параллельных планов, установите 0 в качестве значения MaxDOP. Если по каким-то причинам вы хотите отключить параллельное выполнение запросов, установите 1 в качестве значения. Для максимальной производительности настройте MaxDOP согласно правилам в таблице (https://go.microsoft.com/fwlink/?linkid=2084761):
| Сервер с одним узлом NUMA | Не более 8 логических процессоров | Значение параметра MAXDOP не должно превышать количество логических процессоров |
| Сервер с одним узлом NUMA | Больше 8 логических процессоров | Значение параметра MAXDOP должно быть равно 8 |
| Сервер с несколькими узлами NUMA | Не более 16 логических процессоров на узел NUMA | Значение параметра MAXDOP не должно превышать количество логических процессоров на каждый узел NUMA |
| Сервер с несколькими узлами NUMA | Больше 16 логических процессоров на каждый узел NUMA | Значение MAXDOP должно быть равно половине количества логических процессоров на узел NUMA со значением MAX, равным 16 |
В моём случае я поставлю 0. Это даст наибольшую производительность для выполнения планов параллельных запросов, но это может вызвать задержки, так как другие запросы должны будут дождаться завершения выполнения текущего запроса, потому что все ядра процессора будут заняты выполнением текущего запроса.
Для “боевого” сервера я всё же рекомендую следовать правилам из таблицы, а также ознакомиться с документацией по ссылке выше.
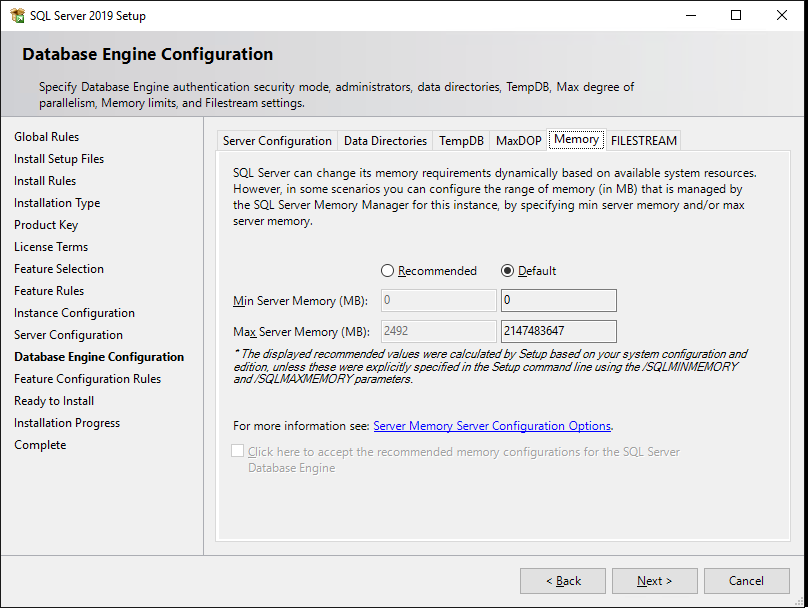
Вкладка Memory – нужно указать минимальный и максимальный объем оперативной памяти, который будет использовать SQL Server. Так как спрогнозировать нужный объём для сервера довольно сложно, рекомендуется выделить SQL Server’у 80-85% от всего объёма оперативной памяти сервера. Для того чтобы узнать реальный объём используемой оперативной памяти, нужно круглосуточно мониторить потребление оперативной памяти через специальные DMV (Dynamic Management View) и отслеживать пики потребления RAM. Только с наличием этой информации можно спрогнозировать реальный объем потребления оперативки.
Я оставлю Default значения (min 0 и max 2147483647 MB).
Вкладка FILESTREAM – включение технологии FILESTREAM. Она позволяет хранить бинарные файлы на файловой системе и обеспечивает доступ к ним через SQL. Если вы не уверены, что хотите работать с бинарными данными на уровне SQL, то тогда оставьте FILESTREAM выключенным.
Шаг Feature Configuration Rules пройдет автоматически. Ознакомьтесь со сводкой в Ready to Install и жмите Install.
На этом базовая установка SQL Server 2019 Enterprise завершена. В следующей статье мы посмотрим на основные способы анализа производительности и проблем в SQL Server.
Примечание. На более старых версиях ( SQL Server 2014, 2016) некоторых вкладок и параметров может не быть.