VMware Tools is suite of the drivers which is installed in the guest os running on ESXi host. VMware tools provides many benefits for the guest OS. It is always recommended to install VMware tools in each of your virtual machine. In this post we will see on How to Install VMware Tools in Windows Server Core.
Featured Sponsor 
VMware Tools is a suite of utilities that enhances the performance of the virtual machines guest operating system and improves management of the virtual machine. Without VMware Tools installed in your guest operating system, guest performance lacks important functionality. Installing VMware Tools eliminates or improves these issues:
- Low video resolution
- Inadequate color depth
- Incorrect display of network speed
- Restricted movement of the mouse
- Inability to copy and paste and drag-and-drop files
- Missing sound
- Provides the ability to take quiesced snapshots of the guest OS
- Synchronizes the time in the guest operating system with the time on the host
VMware Tools includes these components:
- VMware Tools service
- VMware device drivers
- VMware user process
- VMware Tools control panel
So you must have VMware Tools in each of your guest operating system so that you get all benefits & your guest os runs smoothly.
So let’s see How to Install VMware Tools in Windows Server Core Step by Step:
Step 1:
In vCenter Server you will see warning that VMware Tools is not installed in virtual machine.
To Install VMware Tools we need to mount the ISO of VMware Tools.
You can simply click on Install VMware Tools.
Step 2:
You will be asked to mount the ISO of VMware Tools to the server.
Click on Mount.
Step 3:
Login to your windows server core.
Change the directory from C to D or E where VMware tools is mounted.
You can simply try first with D directory & than later go ahead.
Because default is the D directory.
Step 4:
Now run command “dir” to list the files of that directory.
You can see that VMware Tools ISO files are listed.

Step 5:
Now type & run “setup64.exe” to start VMware Tools installation.
If your server is 32bit than you can use “setup.exe”
Step 6:
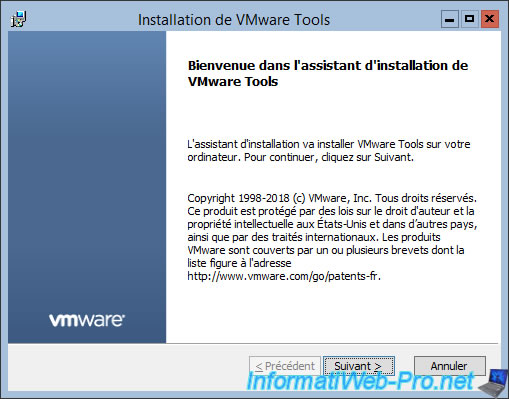
You will get the VMware Tools installation wizard.
Click Next to continue.
Step 7:
Here you can choose the installation type.
Select the installation type which is required for your environment.
Click Next to continue.
Step 8:
Click Install to start the installation of VMware tools in Windows Server core.
Step 9:
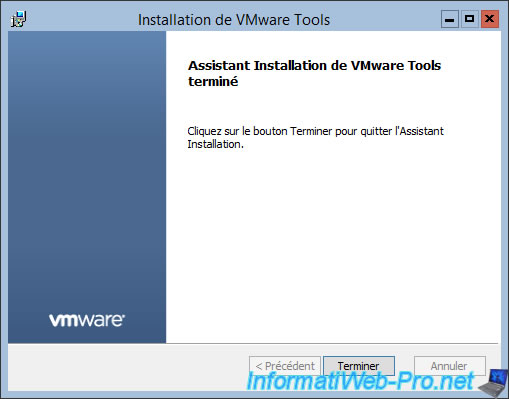
Once the installation is finished.
You can click Finish to close the installation wizard.
Step 10:
VMware Tools requires server restart.
So click Yes to restart your windows server core.
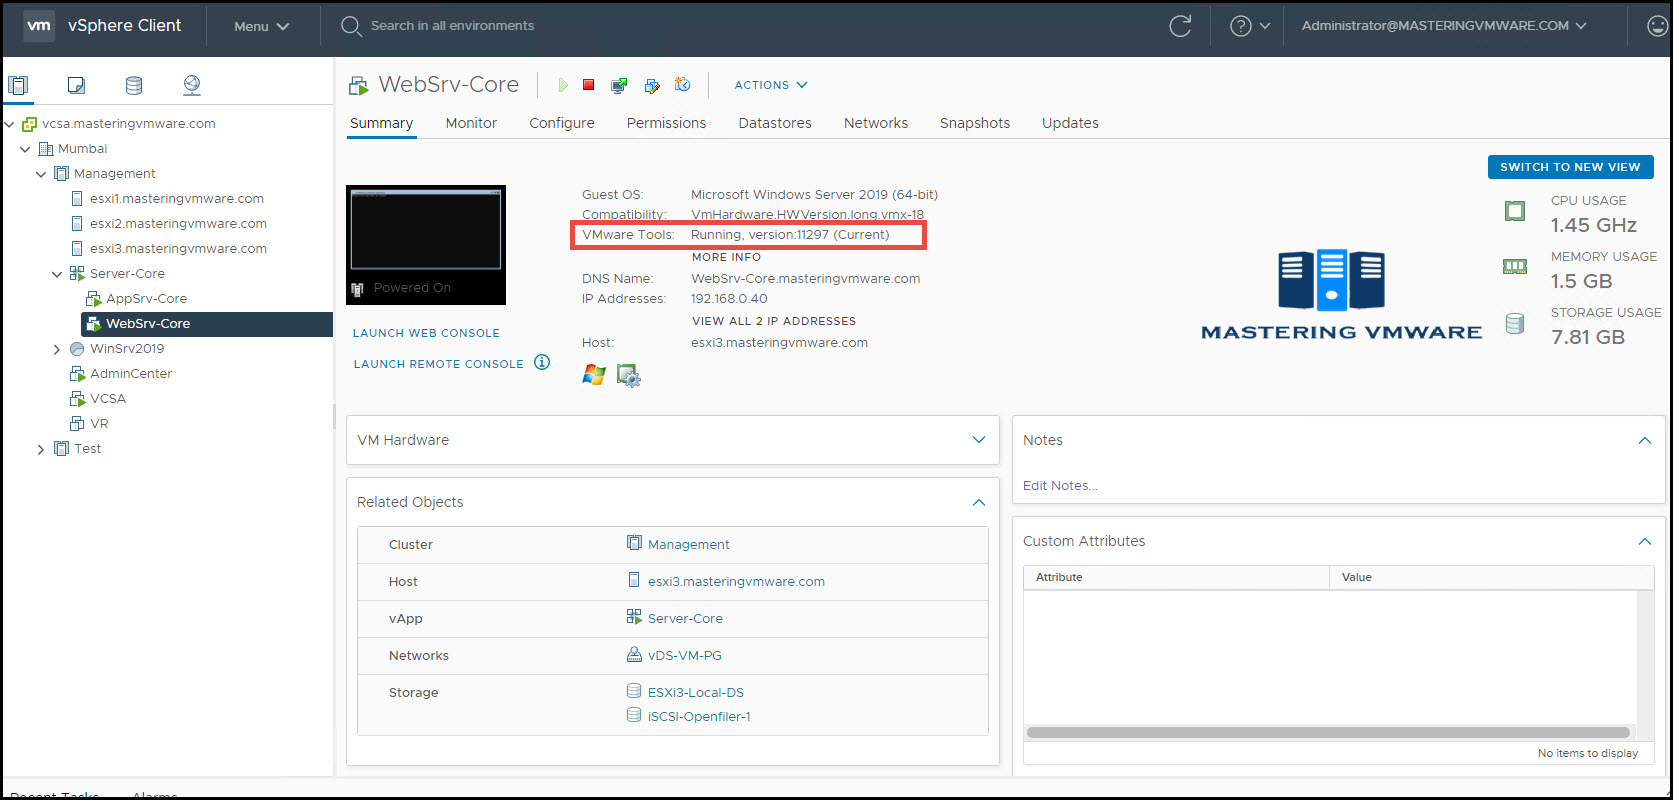
Now you can see that VMware Tools is installed & running in the server core.
That’s it, Using this way you can easily install VMware Tools in Windows server core. VMware Tools provides many benefits for guest OS. So it is must have installation for your VMware environment.
Note: In this post we have used Windows Server 2019 core edition.
Checkout our post on Windows Server 2019 Core Installation:
How to Install Windows Server 2019 Core Step by Step ?
That’s it for Today Friends. I Hope you liked reading this post & If you find anything more to be added or removed feel free to write it in our comments. If you find it useful You are Feel free to share this on social media to help others & spread knowledge.
If you have any query on any thing you are free to write it in our comments section & we will make sure to provide you the better solution as soon as possible.
Join Our LinkedIn Group to get Fast updates about our posts : Mastering VMware.
Checkout our Facebook Group for discussions & more.
You can also Like & Share our Facebook Page for Latest Updates.
Hi I am Mayur Parmar. Independent Author & Founder of Mastering VMware. I am working in IT industry for more than 4 Years with knowledge of VMware , Microsoft Server’s, Linux Server’s.
Установка VMware Tools Windows Server + Core Edition
При установке операционной системы Windows с установочного диска для её корректной работы в среде VMware необходимо установить ПО VMware Tools. Данное ПО содержит актуальные драйвера для ОС, а также обеспечивает выполнение мониторинга и базовых функций ОС, например, функцию «Shutdown Guest OS» (выключение ОС).
Для начала необходимо подключить к ОС установочный диск VMware Tools. Как это сделать, можно узнать из следующей инструкции: Создание сервера из ISO-образа в vCloud Director 10
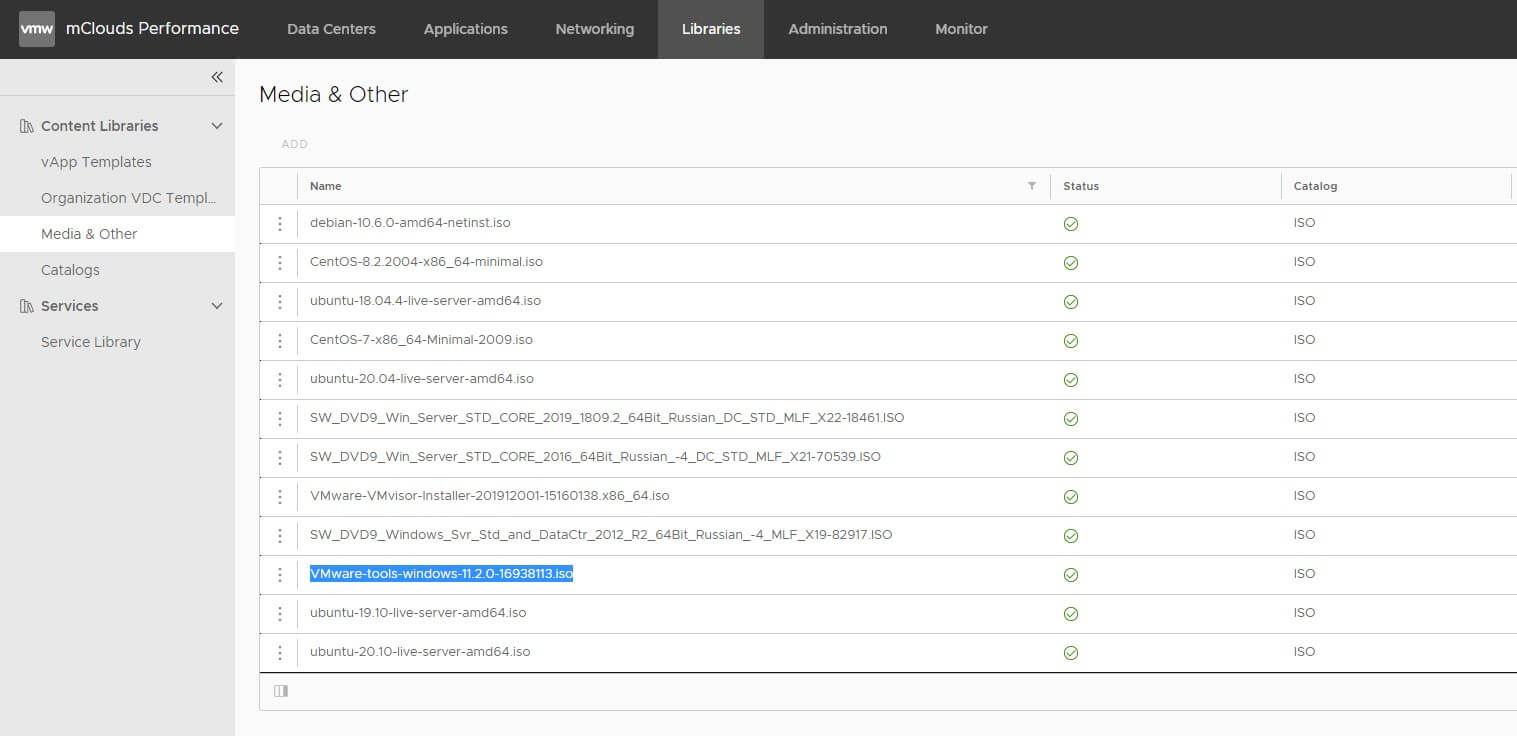
В большинстве случаев, самую актуальную версию установочного диска можно найти в нашей библиотеке ISO образов (Libraries – Media & Other). Установочный диск имеет название типа: VMware-Tools-windows-ХХ..Х.iso
Следует учитывать, что без установки ПО VMware Tools возможности управления виртуальной машиной через консоль ограничены. Например, не работает устройство ввода «мышь».
Для Windows Server с GUI рабочего стола
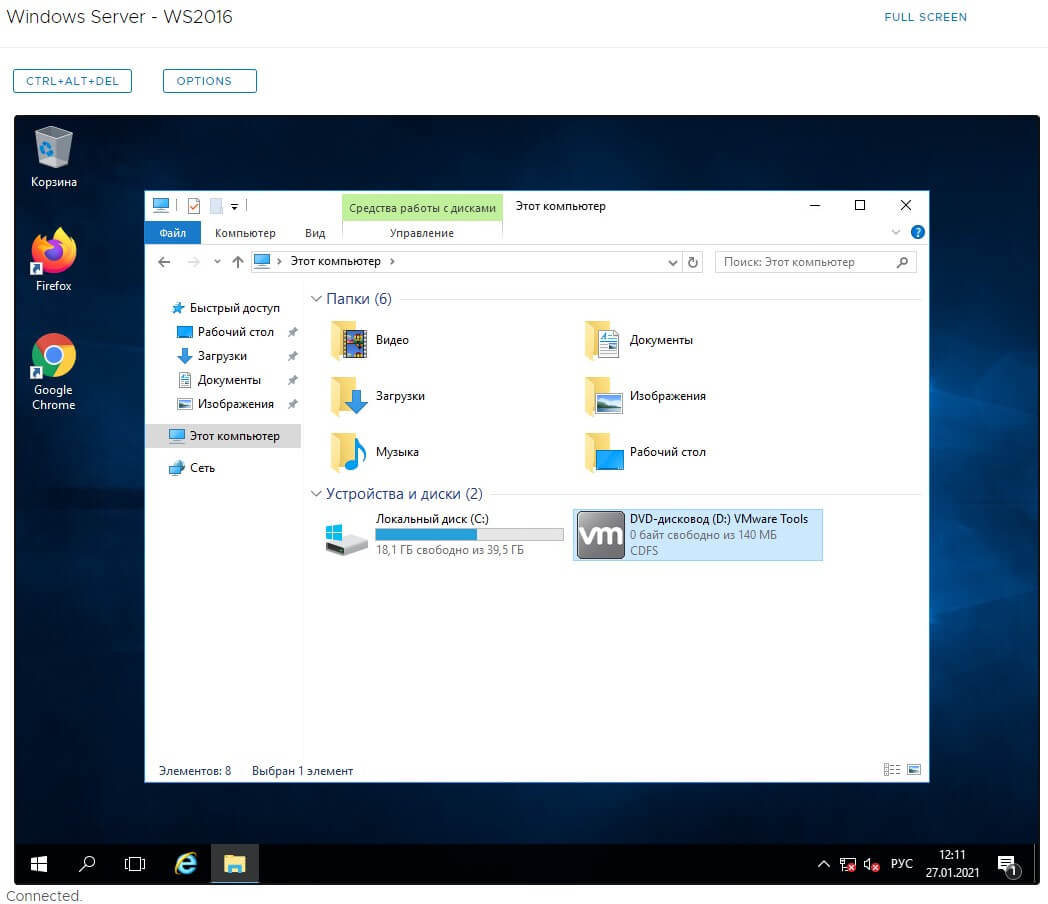
После входа в систему через консоль выберите необходимый вам диск (в данном случае диск D:)
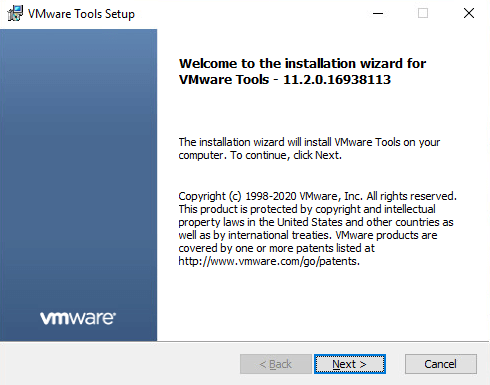
В итоге автоматически запустится программа установки ПО VMware Tools, нажмите кнопку «Next»
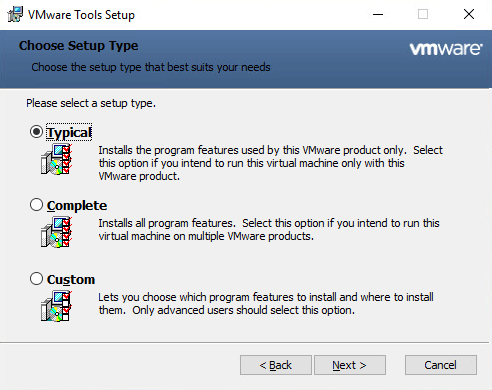
В следующем окне выберите «Typical» для установки конкретно под данный продукт виртуализации или «Complete», чтобы установить все возможные компоненты. Нажмите «Next» и «Install» в следующем окне.
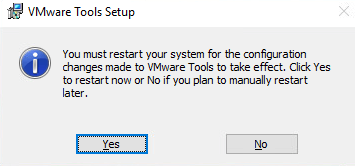
По завершении установки выберите «Finish» и ответьте утвердительно на запрос перезагрузки ОС – это необходимо для корректной работы ОС и ПО.
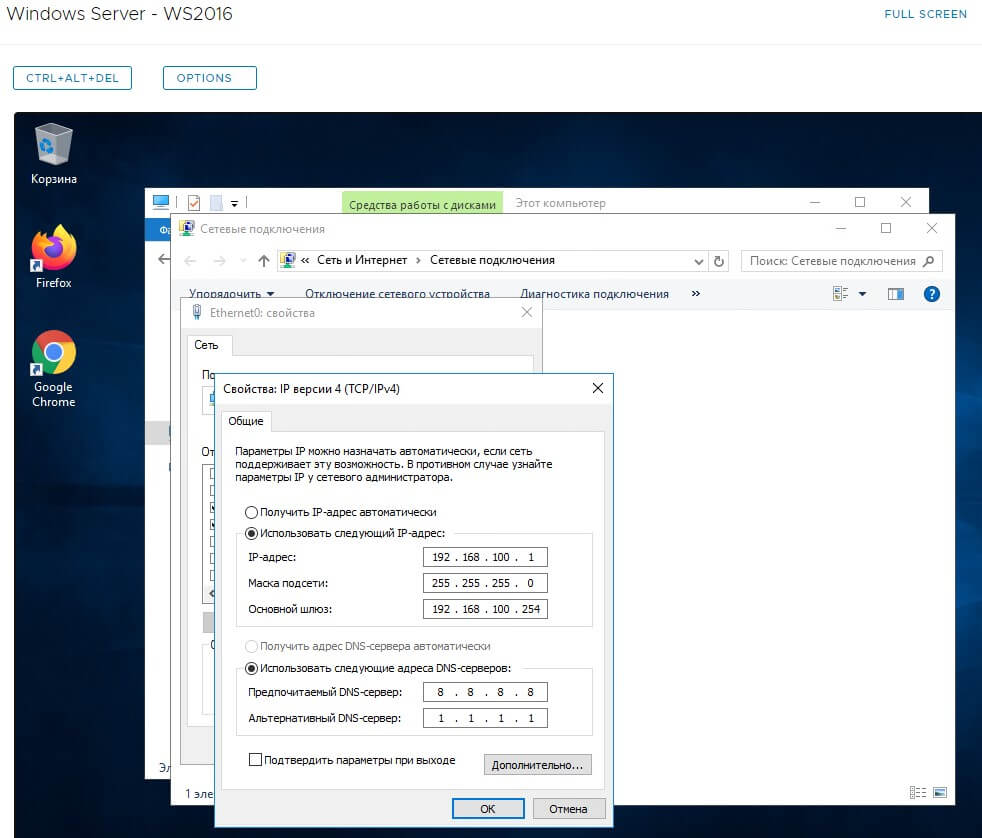
После перезагрузки мы видим, что средство ввода «мышь» работает корректно и определился сетевой адаптер ОС, осталось только ввести его сетевые настройки:
Панель управления – Сеть и Интернет – Центр управления сетями и общим доступом – Изменение параметров адаптера – Свойства – IPv4 – вводим сетевые настройки, соответствующие нашей ВМ
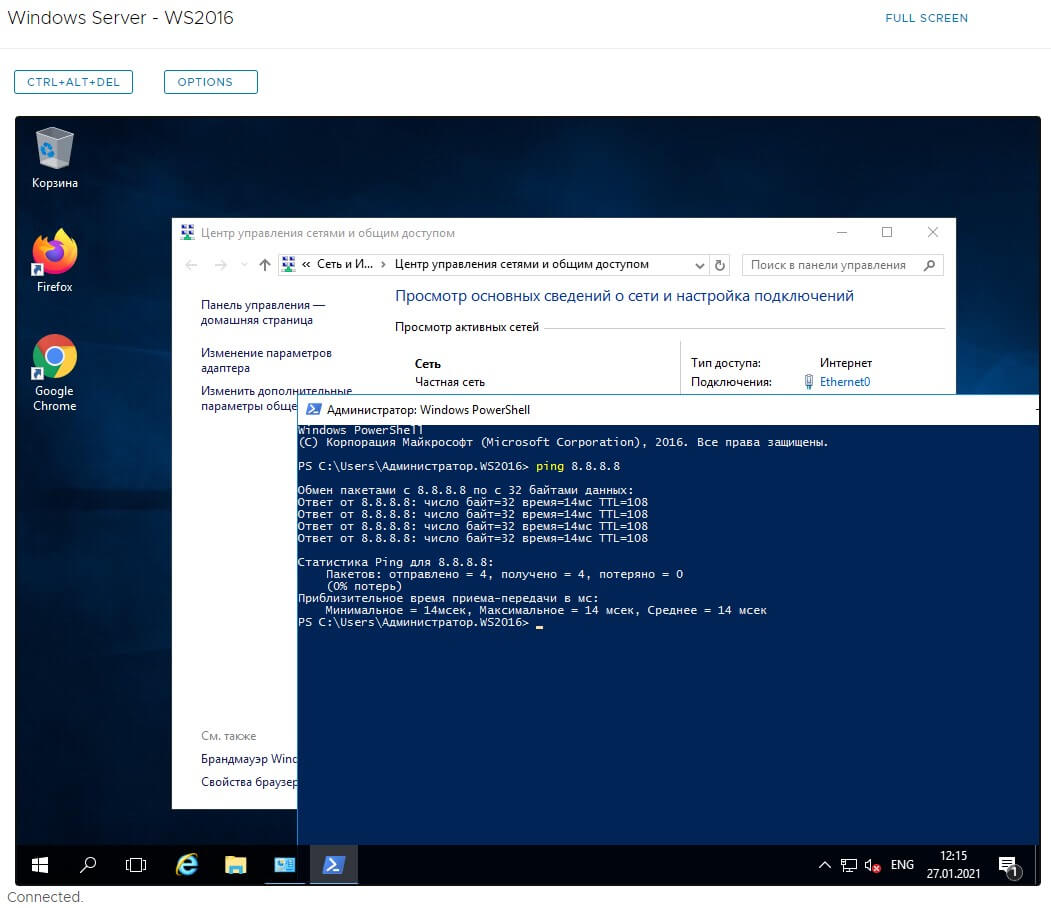
После нажатия «Ок» и корректной настройке правил NAT и Firewall на виртуальном Edge маршрутизаторе видим активность сетевого подключения.
Для Windows Server Core – без возможностей удаленного рабочего стола
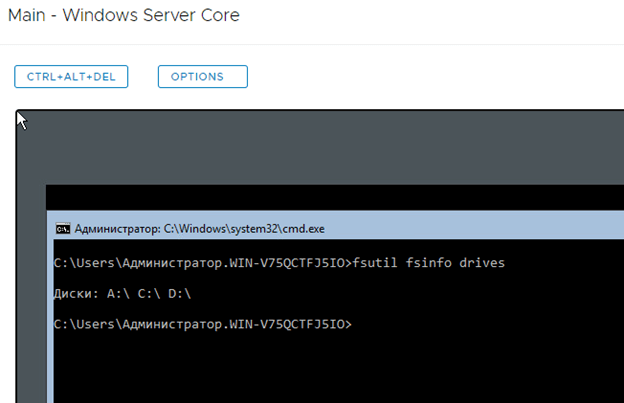
После подключения образа установочного диска определите букву диска, под которым диск был подключен. Для этого введите команду:
fsutil fsinfo drives
Вывод команды покажет все буквы подключенных к ОС дисков:
В нашем случае нужный нам – диск D:
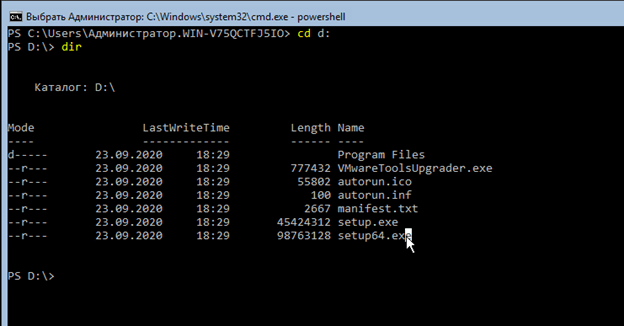
Входим в интерфейс управления PowerShell, переходим на указанный диск и проверяем содержимое директории командами:
powershell
cd D:
dir
Все верно, выполняем следующую команду для автоматической установки ПО VMware Tools:
.setup64.exe /s /v /qn
После успешной установки система должна перезагрузиться самостоятельно. В случае, если в консоли вы можете передвинуть окно с помощью мыши, установка была завершена успешно.
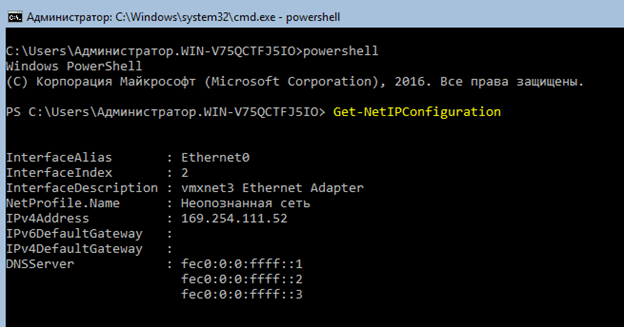
Далее проверяем сетевые настройки через PowerShell:
powershellGet-NetIPConfiguration
Здесь мы видим, что сетевой адаптер определился, однако ip-адресация не настроена и сервер назначил сетевому интерфейсу адрес типа APIPA. Запоминаем показатель InterfaceIndex.
Назначим сетевому адаптеру статический ip адрес, соответствующий нашей ВМ.
IndexInterface мы знаем из предыдущего шага:
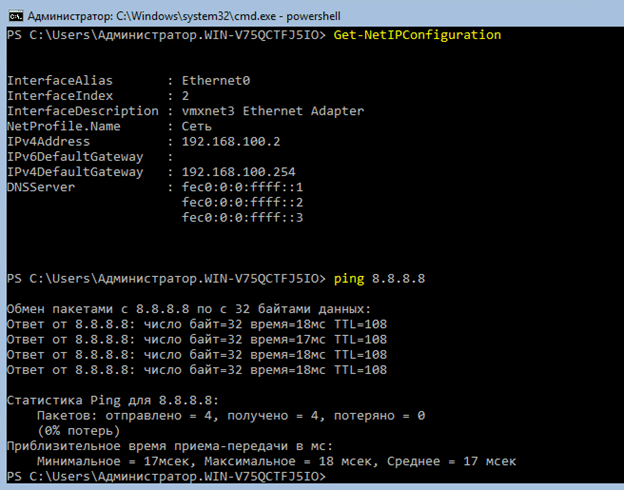
New-NetIPAddress -InterfaceIndex 2 -IPAddress 192.168.100.2 -PrefixLength 24 -DefaultGateway 192.168.100.254
При корректной настройке правил NAT и Firewall на виртуальном Edge маршрутизаторе видим активность сетевого подключения:
Для настройки DNS серверов необходимо ввести следующую команду:
Set-DNSClientServerAddress –InterfaceIndex 2 -ServerAddresses 8.8.8.8,1.1.1.1
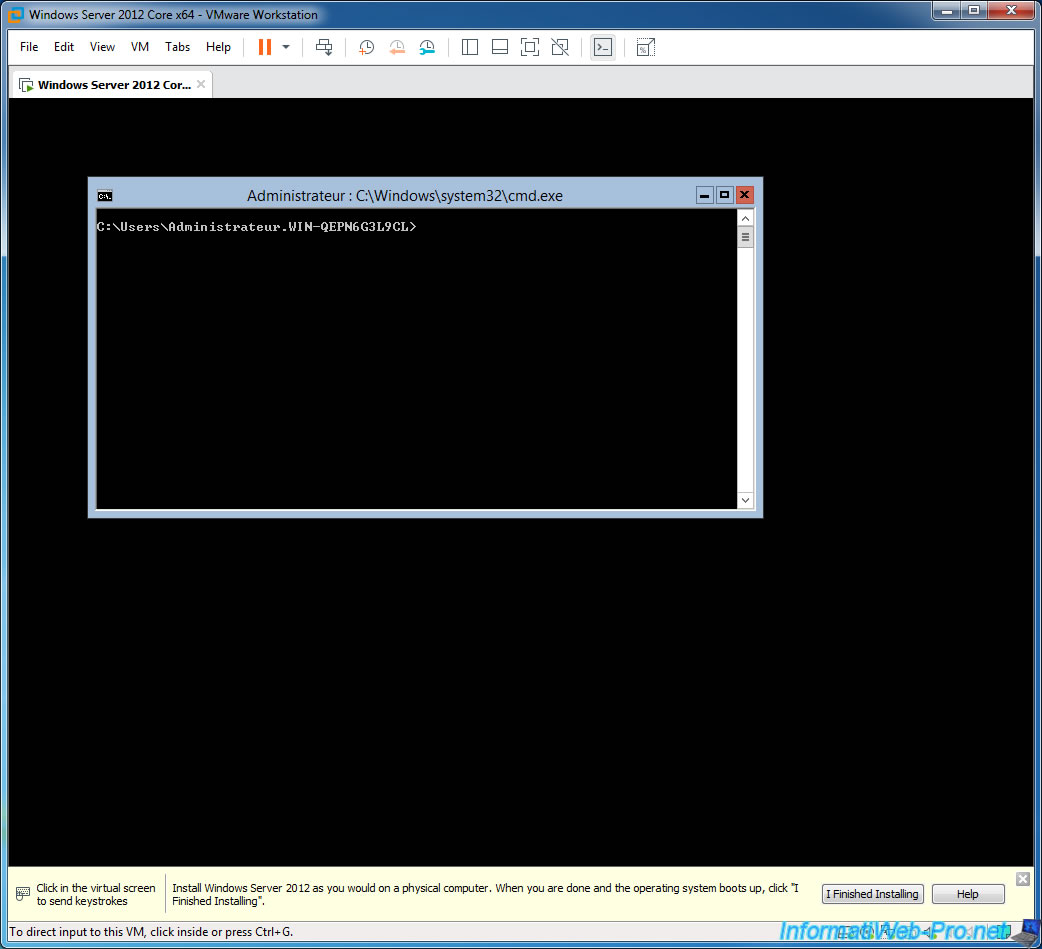
As you already know, the advantage of a minimal installation of Windows Server is that it’s lighter and it only offers a command prompt.
Nevertheless, installing VMware Tools on Windows Server Core (no matter the version) is much simpler than it seems.
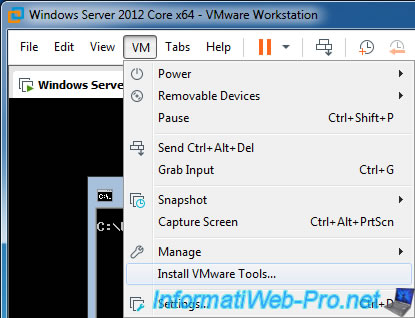
To begin, click : VM -> Install VMware Tools.
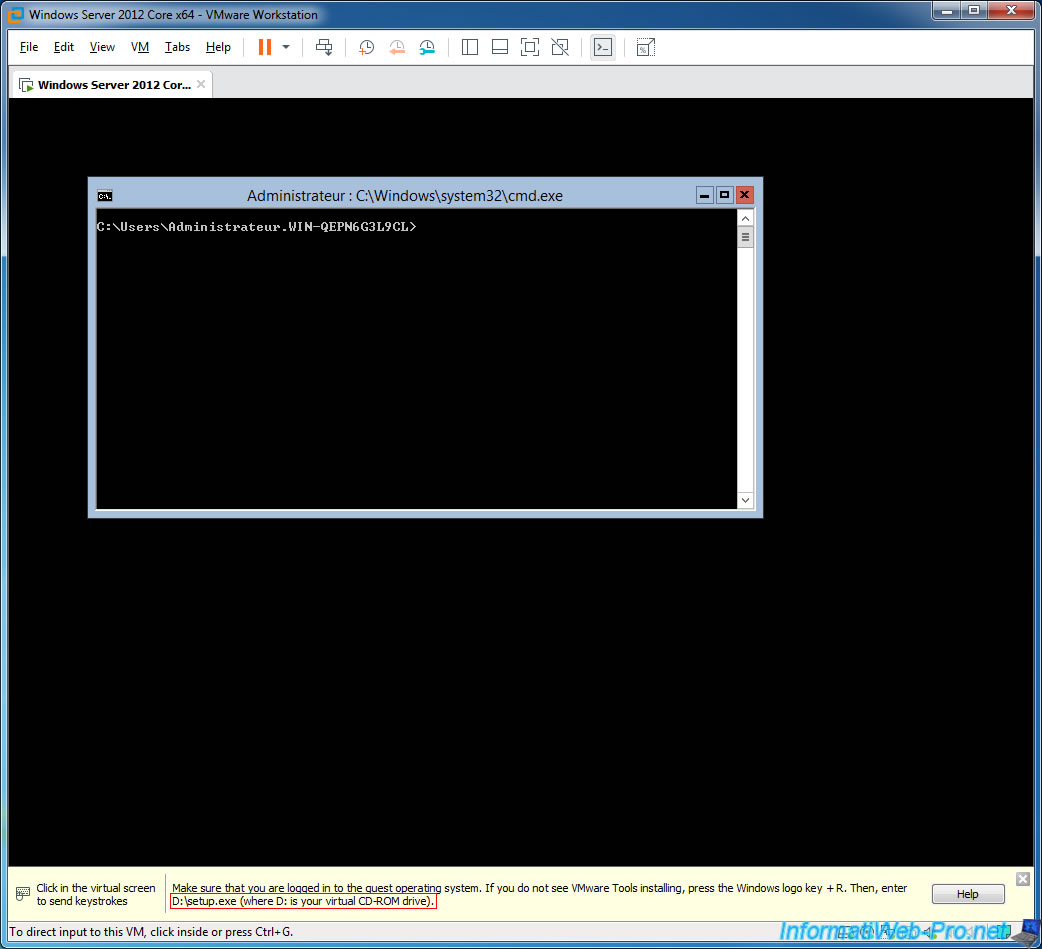
At the bottom of the VMware Workstation window, you will see a message with the location of the «setup.exe» file in the guest OS.
In this case, VMware Workstation tells us that we need to run the «D:setup.exe» file.
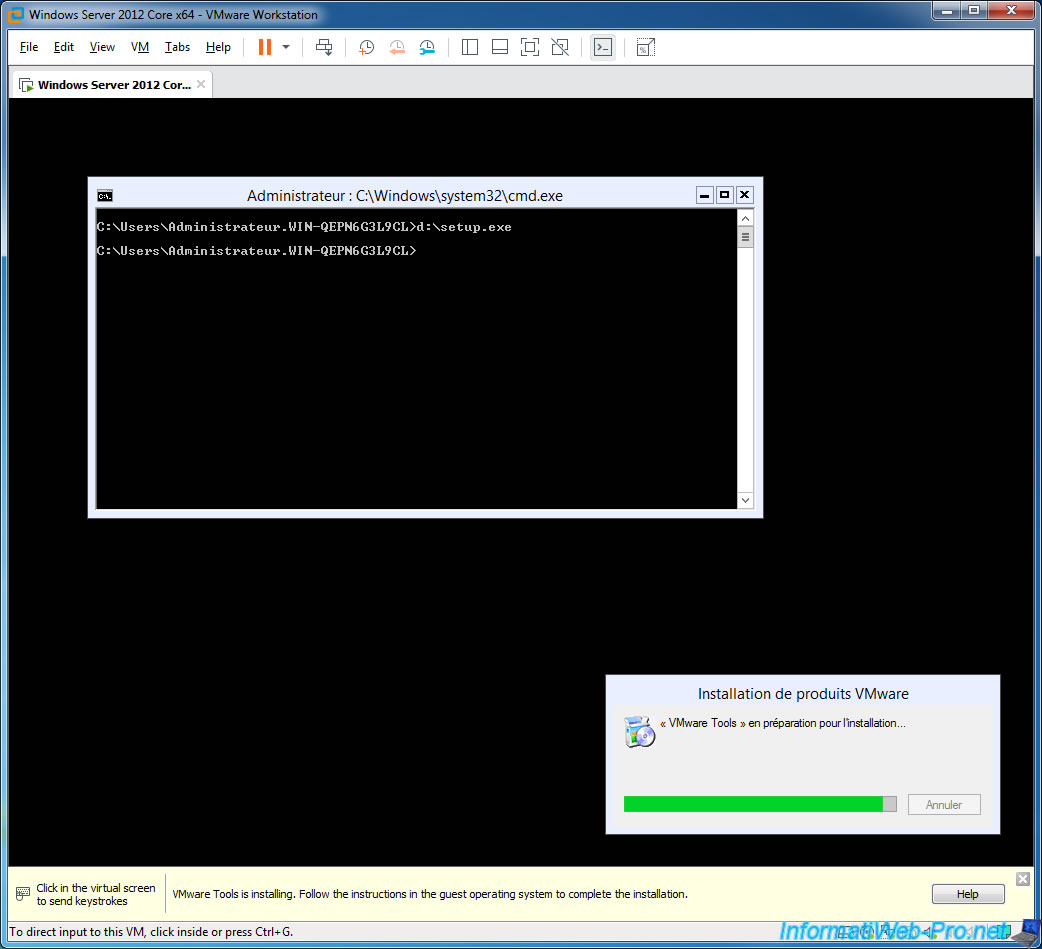
To launch it, just type this path in the command prompt.
Batch
D:setup.exe
A small «VMware Product Installation» window will appear at the bottom right.
Then, a «VMware Tools Setup» window will appear.
Click Next, Typical Installation, … as you would with a typical Windows version.
And now, VMware Tools will work in the background (after restarting the virtual machine) and you will be able to use the features offered by VMware Workstation : drag and drop, VMware shared folders, …
How to Install VMware Tools on Linux, Windows, MacOS, FreeBSD, and Solaris
If you have ever deployed a VMware VM on VMware ESXi, VMware Workstation, VMware Player, or VMware Fusion, you’ve probably noticed that after installing a guest operating system (OS), the VMware hypervisor asks you to install VMware Tools. Today’s blog post covers VMWare Tools and the VMware Tools installation process on different operating systems including Linux, Windows, macOS, FreeBSD, and Solaris.
The blog post consists of the following main parts:
- What is VMware Tools?
- Requirements
- How to Install VMware Tools on Linux
- Installing VMware Tools on Linux automatically
- Drag & Drop troubleshooting
- How to enable shared clipboard on ESXi VMs
- How to install VMware Tools on FreeBSD
- How to install VMware Tools on Solaris
- How to install VMware Tools on Windows
- How to install VMware Tools on macOS
What Is VMware Tools?
VMware Tools is a set of drivers and utilities that are installed on a guest operating system (OS) and can improve the performance of the guest OS, synchronize time between a host and guest, and improve the user experience. This is achieved through offering better mouse performance (no lags with a mouse pointer), higher graphics performance, shared clipboard, the ability to drag & drop files, in addition to scripting to automate tasks inside a VM. As you may recall, when you create a VM, you should select the hardware version. Each hardware version uses the appropriate emulated hardware, drivers which are installed with VMware Tools. A VM can work without VMware Tools, but most features and advantages of using VMs are not available without the VMware Tools functionality. It is highly recommended that you install VMware Tools on guest OSs running on VMware virtual machines (VMs).
A set of features available after installing VMware Tools is not the same for different operating systems. For example, some features enabled for Windows guests are not available for Linux guests. The Unity mode is not available for Linux guests in the latest versions of VMware desktop hypervisors. Shared clipboard is limited for VMs running on ESXi hosts. You also need to install VMware Tools after P2V migration (if you convert a physical server to a virtual machine).
Requirements
There are some requirements to install VMware Tools:
- A guest OS must be on the list of supported operating systems.
- A VM must be in the running state to start the VMware Tools installation, and a guest OS must be booted.
In some Linux distributions, you may need to manually install the packages required for VMware Tools installation (such as kernel headers and tools that are needed to compile VMware Tools during installation). In Debian-based distributions, you can install the necessary packages with the command:
apt-get install binutils cpp gcc make psmisc linux-headers-$(uname -r)
In other Linux distributions, use the appropriate package managers such as zypper in SUSE and yum in Red Hat based distributions.
The algorithm for installing VMware Tools is similar for VMs running on VMware ESXi, VMware Workstation, VMware Player and VMware Fusion. Let’s review how to install VMware Tools on a VM running Ubuntu 18; ESXi 6.5 and VMware Workstation 15 are used in our lab for writing today’s blog post.
The legacy method to install VMware Tools
The idea of this method is to insert a virtual ISO disk image that contains the VMware Tools installer to a virtual DVD drive of the VM, run the executable file of the standalone installer, and install VMware Tools. The legacy method can be useful when you need to install VMware Tools on older versions of Linux.
ISO images for different guest operating systems are stored in the following locations:
- /vmimages/tools-isoimages/ on ESXi.
- «C:Program Files (x86)VMwareVMware Workstation» is the default location on Windows. ISO images are stored in the installation directory of VMware Workstation on Windows.
- /usr/lib/vmware/isoimages/ on Linux.
If ISO images with VMware Tools are missing on the machine running a VMware hypervisor, you can download the necessary ISO image with VMware Tools from VMware’s web site.
In order to install VMware Tools on Linux, perform the following actions.
1. Insert the virtual DVD image that contains the VMware Tools installer.
If your VM is running on VMware ESXi managed by vCenter, open VMware HTML5 vSphere Client, and select your VM in Host and Clusters. If VMware Tools are not installed on that VM, you can see a notification and a clickable button Install VMware Tools. You can also start the VMware Tools installation manually by clicking Actions > Guest OS > Install VMware Tools (see the screenshot below).
After that, VMware vSphere Client notifies you that a VM with a guest OS must be running in order to mount the ISO image and install VMware Tools on the guest OS. If a guest OS is not running, you should start a VM first, wait until a guest OS is booted, and then mount the ISO image with VMware Tools installed. Click Mount when ready.
If your VM is running on VMware Workstation or on an ESXi host, but you manage a VM running on ESXi by using VMware Workstation, insert the VMware Tools installation ISO disk image.
a) Select your running VM, on which VMware Tools must be installed.
b) Click VM > Install VMware Tools.
Note: if you have two guest operating systems installed on a VM, you should install VMware Tools on both operating systems.
2. Now the disk image that contains the VMware Tools installer is inserted in the virtual CD/DVD drive. In Ubuntu 18, the virtual DVD disc is mounted automatically and you can see its shortcut on the Desktop. Right click the shortcut and hit Open in Terminal.
Note: If the DVD disc is not mounted automatically on your Linux distribution, you can mount the disc manually.
Go to the /mnt/ directory:
cd /mnt/
Create the /mnt/cdrom/ directory if this directory doesn’t exist:
mkdir cdrom
Mount your CD-ROM to the /mnt/cdrom/ directory:
mount /dev/cdrom /mnt/cdrom
Go to the /tmp/ directory:
cd /tmp/
Extract files from the VMware Tools installation archive (the number of your version may be different):
tar zxvf /mnt/cdrom/VMwareTools-10.1.0-4449150.tar.gz
Unmount the CD-ROM device:
umount /dev/cdrom
3. Make sure that the ifconfig command is available in the console. Otherwise, install net-tools that include the ifconfig tool manually before installing VMware Tools on your Ubuntu guest.
apt-get install net-tools
4. After opening a shortcut in Terminal, you can see a directory of the virtual DVD disc image that is the current directory in the console now. In our case, the content of the VMware Tools installation virtual DVD disc is available in /media/user1/VMware Tools/.
Where user1 is the name of our user account in Linux.
You can list the content of this directory and see the archive with the VMware Tools installer for Linux.
ls -al
The archive’s name is VMwareTools-10.1.0-4449150.tar.gz in this case.
Copy the archive to the directory for which you have write permissions, for example, to the ~/Downloads/ directory. As an alternative, you can use the /tmp/ directory.
cp VMwareTools-10.1.0-4449150.tar.gz ~/Downloads
5. Go to the directory to which you have copied the archive with VMware Tools:
cd ~/Downloads
6. Unpack the installer files from the archive:
tar -zxvf VMwareTools-10.1.0-4449150.tar.gz
7. Go to the vmware-tools-distrib directory that contains the executable installer file.
cd vmware-tools-distrib/
8. Run the installer file as root:
sudo ./vmware-install.pl
The installer is written on Perl. After running the VMware Tools installer, you should answer the questions in the console. Press Enter to use the default value that is shown in brackets. You can use the default value for the majority of options. Be attentive when you see the questions about enabling shared folders and drag & drop (see the screenshot below). Enter Y (yes) to enable those features, as the default answer is [no].
If VMware Tools have been installed successfully, you can see a message like the message displayed on the screenshot. You may need to restart your guest Linux to apply all system changes after installing VMware Tools.
9. Once you have installed VMware Tools on Linux, you can check the version of VMware Tools installed with the command:
vmware-toolbox-cmd -v
Note: In OpenSuSE Linux, you can download the fresh VMware Tools (Open VM Tools) installation package in the ymp format (YaST meta package) or directly download the binary packages in the rpm format from the OpenSUSE web site.
Installing VMware Tools using software repositories (recommended)
VMware recommends you to install VMware Tools for Linux from online software repositories by using the Linux package manager. The advantage of this method is that you always get the latest version of VMware Tools and the installation process is faster and easier since you don’t need to copy installation files and perform configuration manually. VMware has made open-source VMware Tools for Linux that are called Open VM Tools (you can find source code here). Let’s review how to install VMware Tools on Linux from online repositories on an example of Ubuntu 18. The clear installation of Ubuntu 18.04 is used to explain the process of installing VMware Tools (Open VM Tools) in each example.
Note: The installation principle for other Linux distributions is the same.
1. Update the list of packages available in software repositories for your package manager.
apt-get update
2. If you use Linux without a graphical user interface (GUI) that has only the command line interface, then install VMware Tools with the command:
apt-get install open-vm-tools
If you use Linux with the GUI, then install VMware Tools that are optimized for desktop experience and provide features such as Shared Folders, Shared Clipboard and Drag & Drop.
apt-get install open-vm-tools-desktop
Note: There are also two alternative packages of Open VM Tools that can be installed from online software repositories.
open-vm-tools-devel is an extended package of open-vm-tools that contains additional user space libraries for applications development.
open-vm-tools-debuginfo is an alternative package with binaries and source code that can be used to debug open-vm-tools.
3. Now you can check the version of VMware Tools installed.
vmware-toolbox-cmd -v
Installing VMware Tools on Linux Automatically
VMware Tools can be installed automatically if you are installing Ubuntu 19. Even if you select Minimal installation in the Ubuntu installation wizard (Updates and other software), VMware Tools (open-vm-tools-desktop) will be downloaded and installed automatically from online software repositories (Internet connection is required). You may need to configure Drag & Drop after that. Thus, you can save time spent on installing VMware Tools and system updates. Ubuntu 19 becomes more user-friendly for VMware virtual environment. If you have already installed Linux on a VM, use one of the methods explained above and install VMware Tools or Open VM Tools.
Note: If you install the latest versions of OpenSUSE Linux with enabled Internet connection and activate online repositories, Open VM Tools are installed automatically.
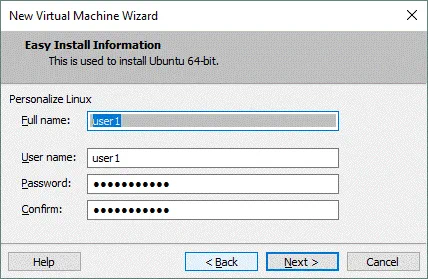
If you use VMware Easy Install to create a Linux VM, VMware Tools are installed automatically, but manual Linux installation with the “installing updates” option is preferable as you can configure more parameters in this case.
Drag & Drop Troubleshooting
If you run a Linux VM with installed VMware Tools on VMware Workstation/Player, and Drag & Drop doesn’t work, check the following settings when a VM is powered off.
Go to VM > Settings, click the Options tab, then select Guest Isolation. Make sure that these two options are enabled:
- Enable drag and drop
- Enable copy and paste
If these settings don’t help you and Drag & Drop still doesn’t work, try to run the commands in your guest Linux as shown below.
1. Check the process related to VMware Tools (Open VM Tools are used in this example).
ps -ef | grep tools
Remember the process ID of the /usr/bin/vmtoolsd -n vmusr —blockFd 3
In this example, the PID is 1891.
2. List open files related to that process (1891).
lsof -p 1891 | grep -i plugins
3. Enable the VMware vmblock fuse mount service required to use drag and drop.
systemctl enable run-vmblock\x2dfuse.mount
4. Check the status of the service.
systemctl status -l run-vmblock\x2dfuse.mount
Be aware that Drag & Drop is disabled for VMs running on ESXi, but you can try to configure shared clipboard. See how to do this below.
How to Enable Shared Clipboard on ESXi VMs
By default, shared clipboard is disabled on VMs running on ESXi hosts even if VMware Tools are installed. This is for security reasons. You can enable shared clipboard for ESXi VMs manually.
To do this, you should edit the virtual machine configuration. You can do it in the interface of VMware vSphere Client or manually by editing the VMX file of the VM in the datastore. Let’s edit the VMX configuration file manually by using SSH access to the ESXi server on which our VM resides.
1. Power off the VM which configuration you are going to edit.
2. Connect to the ESXi host on which a VM is residing with an SSH client. SSH access must be enabled on your ESXi host. Go to the directory on a datastore where the files of your Linux virtual machine are stored. In this example, we go to the directory:
cd /vmfs/volumes/SSD2/Ubuntu-VMT/
3. In our case, we have to edit the Ubuntu-VMT.vmx that is located in the virtual machine directory. You can make a backup of the VM configuration file before editing. Add the following two strings in the end of the file.
isolation.tools.copy.disable = «FALSE»
isolation.tools.paste.disable = «FALSE»
These settings override the settings made with VMware Tools inside a VM.
There are limitations to using shared clipboard for ESXi VMs: 64 KB of plain text is the limit for the Copy/Paste feature, and you cannot copy and paste images, audio, and other content copied to clipboard, or copy and paste files including text files.
Data Protection with NAKIVO Backup & Replication
NAKIVO Backup & Replication delivers high-end data protection for SMBs and enterprises with multiple backup, replication and recovery features, including VMware Backup, Hyper-V Backup, Office 365 Backup and more. Get the Free Trial now!
How to Install VMware Tools on FreeBSD
Similarly to Linux, the latest versions of VMware Tools are distributed only as Open VM Tools, which is an open source implementation of VMware Tools intended to improve the installation process and make it possible to update VMware Tools when upgrading an operating system.
It is recommended that you install Open VM Tools from online software repositories (not VMware Tools from standalone installers included into the ISO images) on FreeBSD version 10.x and newer. The latest version of VMware Tools for FreeBSD to be distributed as the ISO image is 10.1.15. For this reason, only the modern method of installing VMware Tools (Open VM Tools) from repositories is explained in today’s blog post. If you want to install the latest version of Open VM Tools, but you have installed VMware Tools from the ISO image, you must uninstall that old version of VMware Tools before installing Open VM Tools.
Method 1 – using the package manager
You can install VMware Tools on FreeBSD with the VMware package manager.
1. First, search the packets that are available for your system.
# pkg search open-vm
In our case, these two packets are available:
open-vm-tools-10.3.0_1,2 Open VMware tools for FreeBSD VMware guests
open-vm-tools-nox11-10.3.0_1,2 Open VMware tools for FreeBSD VMware guests
2. As FreeBSD used in the current example doesn’t have the graphical user interface, the “nox” type of VMware Tools is installed.
# pkg install open-vm-tools-nox11-10.3.0_1,2
The system notifies that some additional packages must be installed. Proceed with this action — type Y and press Enter to continue.
There is a message that a fuse kernel module must be installed to use fusefs-libs.
This kernel module can be installed with the commands:
Install the port: cd /usr/ports/sysutils/fusefs-libs3/ && make install clean
Install the package: pkg install fusefs-libs3
3. After installing VMware Tools (Open VM Tools), reboot the VM running FreeBSD.
shutdown -r now
Method 2 – installing VMware Tools from ports
You can also install VMware Tools on FreeBSD from ports.
1. Go to the ports directory:
cd /usr/ports/emulators/open-vm-tools
2. Install Open VM Tools:
make install clean
rehash
3. Reboot the VM running FreeBSD:
shutdown -r now
Note: If you are using FreeBSD without the X Window System (without a GUI), in step 1 go to the directory:
cd /usr/ports/emulators/open-vm-tools-nox11
How to Install VMware Tools on Solaris
Another operating system supported by VMware as a guest operating system is Oracle Solaris (also known as SunOS) and much like the operating systems considered above, it is highly recommended to install VMware Tools on Solaris. The process of installing VMware Tools on Solaris is similar to installing VMware Tools on Linux and FreeBSD from the ISO installation disk image. Let’s review how to install VMware Tools on Solaris 11.4.
1. Mount the ISO image with the installer of VMware Tools to the VM running Solaris similarly as shown for Linux VMs above. If the image cannot be mounted automatically, download and mount the installation ISO image for Solaris to the VM manually.
Wait a moment for the auto-mounting of the image to the CD-ROM in the guest operating system.
2. Once you have mounted the ISO image to the virtual CD/DVD drive of the VM, view the files on that disc.
ls -al /cdrom
Note: If the CD-ROM is not mounted under /cdrom/vmwaretools/, try to restart the volume manager:
/etc/init.d/volmgt stop
/etc/init.d/volmgt start
3. Copy the archive with the VMware Tools installer to the temporary directory, for example, to /tmp/
cp /cdrom/vmwaretools/vmware-solaris-tools.tar.gz /tmp
4. Go to the /tmp/ directory:
cd /tmp
5. Unzip files from the archive
gunzip vmware-solaris-tools.tar.gz
6. Untar files
tar xvf vmware-solaris-tools.tar
7. Check that files are extracted
ls -al
As you can see, the files are extracted to the vmware-tools-distrib subdirectory
8. Go to that subdirectory
cd vmware-tools-distrib/
Now you are in the /tmp/vmware-tools-distrib/ directory.
9. Run the vmware-install.pl file to run the installer and install VMware Tools on Solaris.
./vmware-install.pl
Note: The VMware Tools installer is written on Perl. Perl must be installed in your operating system to run the installer successfully.
Answer the questions provided by the VMware Tools installer. You can use default settings in most cases. Pay close attention to questions about the VMware Host-Guest Filesystem and vmblock to enable shared folders, shared clipboard, and drag & drop features.
10. Reboot your Solaris VM to make changes take effect.
init 6
11. Check the status of VMware Tools after rebooting.
/etc/init.d/vmware-tools status
If everything is OK, the output should look like this:
vmtoolsd is running
How to Install VMware Tools on Windows
Installing VMware Tools on Windows is not a difficult task.
1. Insert a virtual ISO disk image that contains the VMware Tools installer into a virtual DVD drive of a VM. In the current example, Windows Server 2008 R2 (x64) is running on the VM on which VMware Tools will be installed.
If your VM is running on an ESXi host and you use vCenter to manage ESXi hosts, open VMware vSphere Client, select your VM in the Hosts and Clusters menu, then click Actions > Guest OS > Install VMware Tools.
As you recall, ISO images with VMware Tools installers are located on an ESXi host in the /vmimages/tools-isoimages/ directory. If ISO images are missing on your ESXi host, you can download and install VMware Tools Offline VIB Bundle on your ESXi host. This bundle contains a new release of VMware Tools for supported guest operating systems. You can also copy ISO images from your local computer to that directory on the ESXi host by using an SCP client manually.
If you use VMware Workstation for managing a VM running on your local machine or on a remote ESXi host, click VM > Install VMware Tools.
After that, a virtual ISO disk image containing the VMware Tools installer is mounted to a guest operating system. By default, the VMware Tools installation ISO images are located in the directory where VMware Workstation is installed. In our case, this directory on a Windows computer is:
«C:Program Files (x86)VMwareVMware Workstation»
The names of ISO files are:
windows.iso – the image for the latest Windows versions since Vista.
winPre2k.iso – the image for old Windows versions released before Windows 2000.
winPreVista.iso – the image for Windows versions older than Windows Vista (Windows 2000, 2000 Server, XP, XP x64).
If, for some reason, these ISO images are missing, you can download the VMware Tools installer for Windows from the VMware’s web site.
2. If autorun is enabled on a guest Windows system, you will see the AutoPlay window with a suggestion to run setup64.exe (because a 64-bit version of Windows is used as a guest OS).
If autorun is disabled, open the optical disc drive to which the virtual ISO disk image is inserted in your Windows guest, then select the appropriate installer file – setup.exe for 32-bit operating systems or setup64.exe for 64-bit operating systems. Run the installer as Administrator.
3. The VMware Tools Setup Wizard is opened.
1) On the first screen, read the introduction. Click Next to continue.
2) Choose Setup Type. Typical is enough in most cases. You can select this type and continue installation.
3) Ready to Install. If you want to change the installation type, hit Back. If everything is correct, hit Install to start the installation process. Wait for a while until VMware Tools are installed.
4) Completed the VMware Tools Setup Wizard. If VMware Tools have been installed successfully, you should see this screen. Hit Finish to close the window.
5) Once you have installed VMware Tools on your Windows guest, you must restart your system for the configuration changes made to VMware Tools to take effect. In the displayed window click Yes to restart now.
Now you can use features that became available after installing VMware Tools.
Installing VMware Tools on Windows Server Core in PowerShell
If you use Windows Server Core which has only the command line interface and doesn’t have the graphical user interface, the principle of VMware Tools installation is similar. You can run the VMware Tools installer in PowerShell.
1. Insert the virtual ISO disk image that contains the VMware Tools installer into a virtual DVD-ROM of the VM.
VM > Install VMware Tools
2. In PowerShell, run the command to see the letter of the optical drive assigned in your Windows running on the VM.
Get-Psdrive
3. Go to that drive (in this example, D: is the optical drive used by the Windows VM).
d:
4. Run the installer
.setup64.exe
5. Follow the steps of the installation wizard to complete the VMware Tools installation.
6. Restart your Windows VM
shutdown -r -t 0
How to Install VMware Tools on MacOS
MacOS can be installed on VMs running on VMware Workstation/Player, VMware Fusion, and VMware ESXi. Installing macOS on VMware Workstation and ESXi needs some fine-tuning. Read how to install macOS on a VMware VM in the blog post. Installing VMware Tools on macOS is different from installing VMware Tools on other operating systems, but you must have the ISO image with the VMware Tools installer and mount the ISO image to a virtual DVD drive of the VM as a DVD disc. Let’s review how to install VMware Tools on macOS Mojave (Mac OS X 10.14).
1. Download the archive that contains the needed ISO image. Select VMware Tools packages for Solaris and OS X. You can download a zip or tar.gz archive. At the time of writing this blog post, the newest VMware Tools release is VMware Tools 10.3.2.
2. Extract the archive. You need the darwin.iso file. You can copy darwin.iso to the directory where other ISO images with VMware Tools are stored. If you use VMware Workstation, this directory is the VMware Workstation installation directory on Windows and /usr/lib/vmware/isoimages/ on Linux (Ubuntu). The directory to store ISO images with VMware Tools on ESXi is /vmimages/tools-isoimages/
3. Mount the ISO image with VMware Tools to the virtual DVD drive of the VM (if the VMware Tools image is copied to the standard VMware Tools directory and you manage the VM in VMware Workstation, you can click VM > Install VMware Tools when a VM is running). Don’t forget to eject the disc previously used from the virtual DVD drive (for example, the macOS installation medium).
However, you can always mount the ISO image with VMware Tools manually in the VM settings when a VM is powered off.
4. Now you can see the icon of DVD-ROM with the VMware Tools disc inserted in a running macOS. By default, autorun is enabled and you should see two options in the opened window – Install VMware Tools and Uninstall VMware Tools. Hit Install VMware Tools.
5. The VMware Tools Installation wizard for macOS is opened.
Introduction. Read the information and click Next to continue.
Destination select. If there are multiple macOS users in the guest operating system, you can opt to install VMware Tools for all users or only for you (the current user).
Installation Type. At this step, you can change the install location if need be. When all settings are configured, hit the Install button. In the popup notification window, click Continue Installation and enter your login and password to install software.
Installation. Wait for a while until all necessary packages are installed.
After unpacking VMware Tools files, you will see the System Extension Blocked warning in the popup window of macOS Mojave. Click Open Security Preferences and edit settings (do not click OK).
The Security & Privacy window is now opened. In the General tab, you can see a notification: System software from developer “VMware, Inc.” was blocked from loading.
Click the Allow button to unblock VMware Tools in macOS. After that, you can close the window.
If a popup system extension warning message is displayed, click OK.
Summary. In the Install VMware Tools wizard, you can now see that the installation has been successful. Hit the Restart button and restart the virtual machine running macOS.
6. Once macOS has been rebooted, a new pop-up window is opened and a notification is displayed: System Extension Blocked. You should recall seeing the same notification during the process of installing VMware Tools. Click Open Security Preferences as you have done before.
The notification in the Security & Privacy window is also the same: System software from developer “VMware, Inc.” was blocked from loading. Click Allow to unblock VMware extensions.
Click OK if the System Extension Warning message is displayed.
Now you can verify whether features related to VMware Tools are working properly. Try to copy and paste the text, drag and drop files, and enter a full screen mode. (Note that there may be limitations to drag and drop files if your VM with macOS is running on an ESXi host).
7. Once you try to drag and drop files from your host machine on which a VMware Workstation, VMware Player or VMware Fusion is installed, you will see the accessibility access warning: “vmware-tools-daemon” would like to control this computer using accessibility features. Hit the Open System Preferences button to edit settings.
The Security & Privacy window is opened again, but you see the Privacy tab now. You need to tick the checkbox at the vmware-tools-daemon string, but now this string is inactive. In the left bottom corner of the window, click the lock to make changes.
Enter your login and password to confirm. Now the settings are editable. Click the vmware-tools-daemon checkbox.
Now everything should be OK and the features depending on VMware Tools should work on your guest macOS. If the advanced features you require after installing VMware Tools don’t work on your macOS VM, try to reinstall VMware Tools.
Conclusion
Today’s blog post has covered the VMware Tools installation process for Linux, FreeBSD, Solaris, Windows, and macOS guest operating systems. The principle of installing VMware Tools is quite similar on Linux, Free BSD and Solaris. Moreover, you can install Open VM Tools, which is an open-source implementation of VMware Tools on Linux and FreeBSD from online repositories with a package manager available in your operating system. Open VM Tools allow you to always get the latest version from online repositories in addition to updating the current version of Open VM Tools installed on your guest OS when you update the operating system. If you decide to use a standalone installer distributed in an ISO image, be aware that new versions of VMware Tools for Linux have not yet been released at the time of this writing, and Perl must be installed on a guest OS to run the installer script. As for Windows, you should mount the ISO image with VMware Tools compatible with your version of Windows and run the EXE installer. If you want to install VMware Tools on macOS, you also have to mount the ISO image (darwin.iso) to the VM and run the installer; don’t forget to unblock VMware Tools in security settings of the operating system if you use the latest versions of Mac OS X.
VMware Tools should be installed on a VM to take a snapshot of the running VM, quiesce the file system in the VM to make the state of the VM suitable for backups, and keep the VM data consistent. VM snapshots are also used to perform incremental backup and replication of VMs. Now that you know the importance of VMware Tools, don’t forget to protect your data. NAKIVO Backup & Replication is an all-in-one data protection solution that supports incremental backup and replication of VMware vSphere VMs on a host level by using VMware APIs. Download NAKIVO Backup & Replication and try to back up running VMs with VMware Tools installed.
You can take the case I described in this post as an example of what it means to rip off the graphical user interface of an operating system that was not really designed to be managed on the command prompt. You will also get an idea of how to configure Server Core settings which can’t be changed on the command prompt.
- Author
- Recent Posts
Michael Pietroforte is the founder and editor in chief of 4sysops. He has more than 35 years of experience in IT management and system administration.
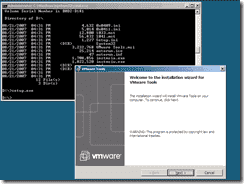

I am running VMware Workstation on a server and I usually access its console via RDP. This works fine except that the mouse pointer is quite jerky then. Gianni explained in a comment how to solve this problem with Windows Server 2008 as guest OS and I outlined the same for Windows XP and Windows Server 2003. Basically, one has to disable the shadow of the mouse pointer and set “hardware acceleration” for the display adaptor to “full”. But how can you do that if you have no graphical user interface?
Well, you have to mess around with the Registry. You can launch the Registry editor on the command prompt by typing “regedit”. Then you navigate to
HKEY_LOCAL_MACHINESYSTEMCurrentControlSetControlVideo{81E0A29D-B654-4848-9421-BEA1C8A6F938}000
The long number is a GUID and it will be different on your system. You will find several such long numbers in the Video folder. However in my case there was only one which contains the Acceleration.Level key in the 0000 folder. You have to set the Acceleration.Level key value to 0.
Next you can disable the mouse pointer shadow. To do so, navigate to
HKEY_CURRENT_USERControl PanelDesktop
and change the UserPreferencesMask key value to 90 12 03 80 10 00 00. Now you have to reboot Server Core (shutdown -r on the command prompt). Note that this only works if you already installed the VMware tools.
Subscribe to 4sysops newsletter!
I think, Registry hacking will become quite popular under Server Core. One way to find the Registry keys to change a certain setting under Server Core is to monitor a standard Windows Server 2008 installation with Microsoft’s Process Monitor. You have to set the filter to “Operation contains RegSetValue”, so only Registry changes will be displayed. Then, you configure the setting using the Windows Server 2008 GUI. I suppose that in most cases those settings will also work on Server Core.
- Remove From My Forums
-
Question
-
I need to install VmWare tools extentions on Windows Server 2008 R2 Server Core. How would I do this on the command line?
Answers
-
Hi,
First of all, it is recommend that you contact VMware to ensure that the core installation of Windows Server 2008 R2 is supported on the VMware product
you used.By the way, the issue seems to be related to VMware. As we mainly focus on the Server Core question about Windows Server system and here is not the best
support resource for VMware, it is recommend you to get further support in the VMware community so that you can get the most qualified pool of respondents. Thanks for your understanding.Best Regards,
Vincent Hu
-
Marked as answer by
Monday, November 1, 2010 6:28 AM
-
Marked as answer by


