Computers that are configured to automatically obtain an IP addresses from a DHCP (Dynamic Host Configuration Protocol) server receive an IP address not for permanent use, but for a fixed period of time. This time period is called the DHCP Lease Time. Upon expiration of the lease, this IP address is considered free and can be assigned to another device in the network.
After half (1/2) of the lease time of the IP address has passed, the client tries to extend the lease of the given IP address on the DHCP server. In order to do this, the client sends a DHCPREQUEST request to the server. If the DHCP server can extend the IP address lease, it sends a DHCPACK message with the new lease time and TCP/IP configuration parameters. After receiving confirmation, the DHCP client updates its network configuration. If renewing the IP address lease fails, the DHCP client will try to do it again.
After 87.5% (7/8) of the lease time will expire, the client will send a broadcast DHCPREQUEST packet to communicate with any available DHCP server in the network.
When the lease expires or a DHCPNACK message is received, the DHCP client should immediately release this IP address. After that, he can resume the lease process to obtain a new IP address.
On a Windows device, you can get the current lease time for the assigned IP addresses using the command:
ipconfig /all

You will see the date of obtaining an IP address, and the expiration time:
Lease Obtained. . . . . . . . . . : Friday, July 5, 2019 4:57:31 PM
Lease Expires . . . . . . . . . . : Saturday, July 13, 2019 4:57:31 PM
How to Change DHCP Lease Time in Windows Server?
By default, the DHCP server on Windows Server uses a lease time—8 days. In most cases, this is the optimal value. However, if there are few free addresses in your IP subnet, you can decrease the Lease Time value so that unused IP addresses are released faster.
Optimal values DHCP lease time for different network types:
- For wired Ethernet networks – 8 days;
- For wireless networks – 1 day;
- For guest Wi-Fi networks – 2-8 hours;
You can change lease time settings for each scope on the DHCP server. In this example, we will show how to reduce DHCP Lease Time from 8 to 2 days on Windows Server 2012 R2.
- Run the DHCP management console—dhcpmgmt.msc;
- Open the properties of the DHCP scope for which you want to reduce the lease time;
- On the “General” tab in the “Lease Duration for DHCP clients” section, in the “Limited to” field, specify a new lease time for clients of this scope (you can even completely disable the lease time, in this case, the IP addresses will be issued to devices permanently);

- Save your changes by clicking OK.

New DHCP lease time settings will apply for DHCP requests from new clients of the DHCP server and on the next renewal of the IP address by old clients.
You can also change the DHCP Lease time for a specific scope using the Set-DHCPServerv4Scope PowerShell cmdlet:
Set-DHCPServerv4Scope ScopeID 10.1.1.0 -LeaseDuration 2.00:00:00
After changing the DHCP scope settings, you can get the current properties with the Get-DHCPServerv4Scope command.
- About
- Latest Posts

I enjoy technology and developing websites. Since 2012 I’m running a few of my own websites, and share useful content on gadgets, PC administration and website promotion.
Привет, посетитель сайта ZametkiNaPolyah.ru! Продолжаем изучать основы работы компьютерных сетей. Продолжаем рассматривать и разбирать протокол DHCP, на этот раз мы рассмотрим срок аренды IP-адреса в DHCP, который передается при помощи опции 51 (Option 51 IP Address Lease Time). В общем, нам нужно понять зачем нужно время аренды и как правильно настроить этот параметр в своей компьютерной сети.
9.4.1 Введение
Содержание статьи:
- 9.4.1 Введение
- 9.3.2 Зачем нужен срок аренды в DHCP и как его правильно выбрать?
- 9.3.2.1 Зачем нужно время аренды IP-адреса в DHCP?
- 9.3.2.2 Рекомендации по выбору и настройки времени аренды в DHCP
- 9.3.3 Истечение срока аренды IP-адреса или как DHCP-клиент делает повторный запрос?
- 9.3.3.1 Ключевые особенности времени аренды
- 9.3.3.2 Option 51 IP Address Lease Time
- 9.3.3.3 Как клиент продлевает время аренды IP-адреса
- 9.3.4 Освобождение IP-адреса и получение нового адреса в ОС Windows
- 9.3.5 Выводы
Сразу скажу, что в DHCP-клиенты получают IP-адреса не насовсем, а на строго определенное время, которое задается на сервере, это время называется временем аренды IP-адреса или lease time. Такой механизм в DHCP необходим, поскольку было бы глупо заставлять сервер постоянно проверять: а пользуется ли клиент выданным IP-адресом? Во-первых, у сервера может быть несколько тысяч или десятков тысяч клиентов, а его ресурсы не бесконечны, во-вторых, представьте, как не экономно расходовалась бы полоса пропускания, если бы сервер проверял доступность клиентов.
В конце концов у клиента могли бы быть написаны правила безопасности, запрещающие отвечать на всевозможные проверки, например, на ping. И что тогда, сервер бы забирал ранее выданный IP-адрес и отдавал его другому клиенту? Тогда были бы конфликты IP-адресов, что не есть хорошо. Разработчики протокола DHCP решили по-другому, придумали более гибкий и в то же время надежный подход, они решили, что клиент должен получать IP-адрес на определенное время и при необходимости продлевать это время, сервер же в свою очередь, не должен выдавать IP-адрес никому другому, пока длится время аренды, как только оно закончится и не будет продлено, сервер будет вправе освободить адрес, а затем выдать его другому клиенту.
9.3.2 Зачем нужен срок аренды в DHCP и как его правильно выбрать?
Давайте начнем с того, что поговорим: зачем в протоколе DHCP нужно время аренды IP-адреса и как его правильно выбрать. А затем посмотрим на практике, как это всё работает.
9.3.2.1 Зачем нужно время аренды IP-адреса в DHCP?
Разберемся с первой частью вопроса. Все мы прекрасно понимаем, что количество IP-адресов в мире ограничено, особенно, если речь идет о протоколе IPv4. Если же говорить про локальную сеть, то здесь IP-адресов еще меньше, это будет не совсем точно, но можно сказать, что количество IP-адресов в локальной сети ограничено количеством частных IP-адресов. Кроме того, не стоит забывать и том, что мы должны выделить DHCP-серверу пул IP-адресов, чтобы сервер начал их раздавать клиентам, этот пул тоже не бесконечен.
Думаю, приведенных выше аргументов достаточно, чтобы понять важность опции время аренды в DHCP. Эта опция нужна, чтобы клиент не владел адресом до бесконечности. Ведь может возникнуть такая ситуация в сети, при которой клиента уже в ней нет, а DHCP-сервер держит ранее выданный IP-адрес за этим клиентом и никому другому его не отдает, хотя легко мог бы это сделать, и никакого конфликта бы не произошло. Как-то не экономнененько получается с учетом дефицита IP-адресов. Заставлять DHCP-сервер опрашивать своих клиентов – затея так себе, об этом я написал выше. Значит, надо сделать так, чтобы клиент не навсегда получал адрес, а на определенное время, как я уже говорил, это время называется lease time, но не подумайте, клиент ничего серверу не платит за то, чтобы получить IP-адрес, просто надо было как-то это дело назвать.
Когда время аренды будет истекать, клиент будет вправе продлить время пользования IP-адресом, а сервер может даже ему в этом отказать в некоторых случаях. Если время аренды истекло, то клиент будет обязан прекратить использование IP-адреса, дабы чего не произошло. Также клиент вправе в любой момент времени отказать от полученного IP-адреса, для этого есть специальное DHCP-сообщение DHCPREALEASE.
Бывают такие ситуации, при которых клиент отключается от сети, проходит какое-то время, за это время срок аренды истекает, а клиент вновь подключается к сети, в таком случае он попытается запросить у сервера тот IP-адрес, который был получен ранее и если этот IP-адрес будет свободен, то сервер его выдаст, если нет, то клиент получит другой IP-адрес.
В противовес бывают обратные ситуации. Клиент отключился от сети и подключился вновь, но время аренды еще не истекло, естественно, клиент сперва попытается достучаться до сервера, чтобы выполнить продление IP-адреса, если это сделать не удается, то клиент будет использовать старый IP-адрес до тех пор, пока время аренды не истечет.
В DHCP есть одно интересное сообщение, которое нигде не реализовано, его посылает сервер клиенту и называется оно DHCPFORCERENEW, этим сообщением сервер может заставить клиента отказаться от IP-адреса до истечения срока аренды, это сообщение очень сомнительно по своему функционалу, поэтому и не реализовано.
9.3.2.2 Рекомендации по выбору и настройки времени аренды в DHCP
Тут можно сказать, что рекомендаций нет и всё зависит от того, как долго клиент находится в сети, а можно сказать, что есть одна универсальная рекомендация: настраивайте время аренды IP-адреса в соответствие с потребностями пользователей вашей сети. Все станет понятно тогда, когда мы разберем с вами несколько примеров.
Для начала представим, что под нашим управлением находится ресторан быстрого питания с суточной пропускной способностью в тысячу человек человек, среднее время, которое посетитель находится в ресторане, составляет не больше 20 минут, да и не каждый посетитель хочет подключаться к нашей сети, чтобы воспользоваться халявным Интернетом. Тогда мы легко можем прийти к выводу, что для того, чтобы все были довольны, нам хватит сети с маской /25, а время аренды IP-адреса должно быть не более 20 минут, если посетитель будет пользоваться нашей сетью дольше 20 минут, то для него ничего страшного не произойдет, его устройство просто продлит время аренды.
Следующий пример. У нас есть офисная сеть с нормальным офисным планктоном, который работает пять дней в неделю по 8 часов. В нашей сети 50 сотрудников, которые раз в год уходят в отпуск на месяц и иногда болеют, все остальное время они работают. Вообще, тут напрашивается статика, но это очень лень, когда есть DHCP-сервер, поэтому смело выставляем время аренды несколько больше, чем 30 дней и берем сеть с маской /26. Все довольны.
И третий пример с выбором времени аренды. Представим себе, что мы администрируем сеть гостинцы, которая для поддержания статуса проводит в своих помещениях выставки и конференции. Первым делом нужно для себя определить следующее: посетители в гостинице есть всегда, а вот выставки – акция разовая. Поэтому будет логично иметь на DHCP-сервере, как минимум, два пула IP-адресов, один для посетителей (хотя тут вопрос спорный, можно создать по пулу на каждый этаж гостиницы), а другой пул для разовых акций, им будут пользоваться участники конференции. Размер первого пула должен быть чуть больше, чем среднее число постояльцев, это на тот случай, если будут гости, а время аренды выставлять дольше, чем на два часа не имеет смысла, поскольку посетитель в гостинице не живет постоянно. Размер второго пула зависит от числа участников, а время аренды ставить больше, чем на час, и не стоит.
Ну а что делать, если в гостинице есть важные клиенты, которые в любом случае должны иметь доступ к сети, в этом случае для таких гостей можно зарезервировать IP-адрес и не париться. Заметили, что я все время указывал сравнительно небольшие сетки, которые должен раздавать DHCP-сервер? Почему не стоит создавать большие пулы IP-адресов, даже скажу так: почему не стоит создавать пул больше, чем /24? Дело все в том, что и клиент, и сервер обычно находятся в одной канальной среде, что будет, если клиента заштормит или случится какая другая оказия, правильно, всем остальным клиентам тоже будет плохо, и они не смогут работать, а нас это не устраивает, ведь так? У нас все должны работать. А теперь представьте – каково это – искать заглючившую железку в огромной сети.
9.3.3 Истечение срока аренды IP-адреса или как DHCP-клиент делает повторный запрос?
К сожалению, тут я ничего продемонстрировать на практике не смогу, кроме опции, в которой сервер сообщает клиенту время аренды, поэтому поверьте на слово или попробуйте самостоятельно провести эксперимент на основе моего описания.
9.3.3.1 Ключевые особенности времени аренды
Ключевые особенности протокола DHCP, связанные с временем аренды мы уже перечислили ранее, но сделали это размыто, сейчас мы просто акцентируем внимание.
- любой клиент воспринимает IP-адрес, полученный по DHCP, как временный;
- срок аренды задается на DHCP-сервере администратором, не ждите, что я вам скажу какой срок используется по умолчанию, то всё зависит от желания разработчиков;
- как только срок аренды истек, клиент обязан прекратить использовать арендованный IP-адрес, ему нужно либо продлить аренду текущего, либо получить новый, но пока это происходит, старым адресом пользоваться нельзя;
- клиент вправе продлить время аренды, о том как он это может сделать, мы поговорим ниже;
- клиент может в любой момент прекратить пользоваться арендованным адресом, при этом он может сообщить об этом серверу при помощи специального сообщения (в этом случае сервер сразу же освободит IP-адрес), а может и не сообщать, тогда адрес будет освобожден сразу после окончания срока аренды;
- в DHCP есть механизм, который позволяет серверу заставить клиента освободить уже занимаемый IP-адрес, для этих целей используется сообщение DHCPFORCERENEW, но я не встречал таких реализаций;
- сервер вправе отклонить запрос клиента на продление IP-адреса, в этом случае он обязан будет послать сообщение DHCPNACK.
Эти особенности стоит помнить, при использовании протокола DHCP.
9.3.3.2 Option 51 IP Address Lease Time
Время аренды сообщает сервер клиенту, это тот процесс, за который отвечает сервер, администратор может изменить время аренды IP-адреса в любой момент. Для того, чтобы DHCP-сервер мог сообщить клиенту время аренды используется Option 51 (IP Address Lease Time). Если я всё правильно помню, то в качестве единиц измерения всегда используются секунды, ниже вы видите фрагмент дампа с сообщением DHCPOFFER, в котором сервер сообщает клиенту время, после которого IP-адрес должен быть освобожден.

9.4.1 Option 51. Сервер сообщает клиенту время аренды IP-адреса в сообщение DHCPOFFER
Тут стоит заметить, что клиент начинает отсчет времени сразу после того, как получит подтверждение от сервера, а сервер начинает отсчет после того, как зарезервирует IP-адрес за клиентом. При этом клиенту нужно заботиться только о себе любимом, а серверу приходится следить и помнить время каждого клиента.
9.3.3.3 Как клиент продлевает время аренды IP-адреса
Срок аренды IP-адреса обычно обозначается буквой Т, но мы для ясности будем считать, что клиент арендовал адрес на 100 секунд, как только он получил этот адрес, пошел отсчет: 100, 99, 98, 97… Но что если клиенту мало 100 секунд, может он хочет побыть в сети немного подольше, снова проходить весь процесс получения IP-адреса, это долго и это broadcast, то есть неудобно. Поэтому клиент сделает попытку продлить IP-адрес, у него есть на это право по истечению половины периода времени аренды, это у нас время равное T/2 или 50 секунд для нашего случая.
Клиент будет пытаться продлить IP-адрес при помощи сообщения DHCPREQUEST, но в отличие от получения, продление отправляется как unicast с использованием IP-адреса того сервера, у которого клиент получил IP-адрес. Если DHCPREQUEST таки дошел до сервера, то он отправит в ответ DHCPACK тоже юникастом, так он сообщает клиенту, что запрос получил и с ним согласен, можно снова начинать отсчет, начиная со 100 секунд.
А что если выдавший IP-адрес сервер вышел из строя, но есть резервный сервер, как поступит клиент? Клиент в этом случае отправит еще одно unicast сообщение на основной сервер на 75-ой секунде (это для нашего случая, а вообще, попытка будет сделана по истечению половины оставшегося времени) при этом, если половина оставшегося времени от времени аренды, это позже, чем 7/8Т, то есть 87.5% времени аренды или 87.5 секунд для нашей ситуации, то следующая попытка продления IP-адреса будет широковещательная.
Как только истекло 87.5 секунд, клиент начнет отправлять DHCPREQUEST в сеть, используя broadcast адрес, чтобы его слышали все, в том числе и резервный DHCP-сервер, если он, конечно, есть. Если резервный сервер есть, то он может продлить аренду клиенту, в этом случае клиент получит DHCPACK, а может отказать клиенту в продлении, например, если у резервного сервера нет пула IP-адресов, в который попадает IP-адрес клиента. Тогда сервер отправит клиенту DHCPNACK, а клиент поймет, что нужно просить другой адрес.
Как только срок аренды IP-адреса истек, клиент обязан перестать его использовать и пытаться получить новый IP-адрес, либо запустить механизм APIPA и придумать сам себе случайный IP в надежде, что он будет такой не один.
9.3.4 Освобождение IP-адреса и получение нового адреса в ОС Windows
В завершении разговора поговорим о том, как происходит освобождения IP-адреса до истечения времени аренды и получение нового IP на компьютерах под управлением Windows 10. Для этого нам потребуется Wireshark, командная строка или эмулятор терминала и стандартная сетевая утилита ipconfig. Запускаем командую строку и для начала выполним команду ipconfig.
|
Адаптер беспроводной локальной сети Беспроводная сеть: DNS—суффикс подключения . . . . . : Локальный IPv6—адрес канала . . . : fe80::d86b:69ce:ccc4:d47f%10 IPv4—адрес. . . . . . . . . . . . : 192.168.0.100 Маска подсети . . . . . . . . . . : 255.255.255.0 Основной шлюз. . . . . . . . . : fe80::ccfc:a4ff:fee9:44d%10 192.168.0.1 |
Вывод команды может быть большим, как простыня, все зависит от количества сетевых интерфейсов. Выше вы видите настройки интерфейса моего ПК, который получает IP-адрес от роутера по Wi-Fi. Обратите внимание на адрес и маску подсети.
Следующим шагом нужно будет запустить Wireshark и указать интерфейс, с которого будем снимать дамп трафика. В моем случае он называется «Беспроводная сеть». С него я и получил нужную информацию. Теперь в командной строке напишем ipconfig /release и посмотрим в Wireshark.
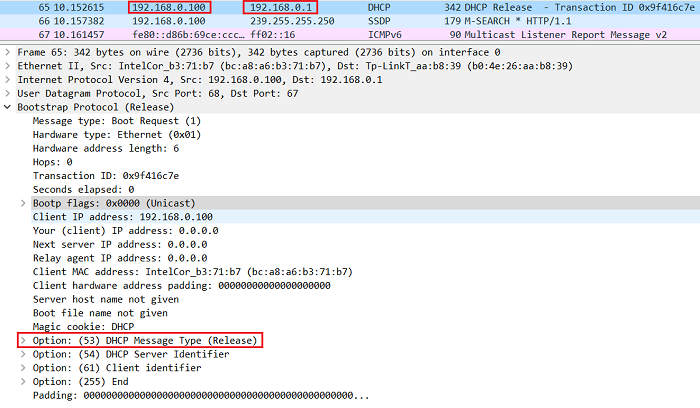
9.4.2 Сообщение DHCPREALEASE, которое отправил клиент, чтобы освободить IP-адрес
Само сообщение ничем особо не примечательно, лишь стоит выделить два момента:
- Это сообщение клиент отправляет серверу адресно, а не как он это делал с другими сообщениями – при помощи broadcast.
- О том, что это сообщение вынуждает сервер высвободить IP-адрес говорит нам опция 53, вернее ее содержимое.
Обратите внимание на вывод команды ipconfig ниже, после того, как я освободил IP-адрес, сработал механизм, называемый APIPA, и мой компьютер назначил сам себе IP-адрес, начинающийся на 169, сделал он это в надежде на то, что в этой подсети есть и другие устройства. То есть после ручного освобождения IP-адреса, компьютер не делает повторный запрос к DHCP-серверу.
|
Адаптер беспроводной локальной сети Беспроводная сеть: DNS—суффикс подключения . . . . . : Локальный IPv6—адрес канала . . . : fe80::d86b:69ce:ccc4:d47f%10 Автонастройка IPv4—адреса . . . . : 169.254.212.127 Маска подсети . . . . . . . . . . : 255.255.0.0 Основной шлюз. . . . . . . . . : fe80::ccfc:a4ff:fee9:44d%10 |
Теперь мы хотим, чтобы клиент вновь получил IP-адрес. Нас ведь не устраивает тот, что выдал нам APIPA. Для этого напишем команду ipconfig /renew. И сразу лезем в дамп Wireshark. Тут нам уже всё знакомо.
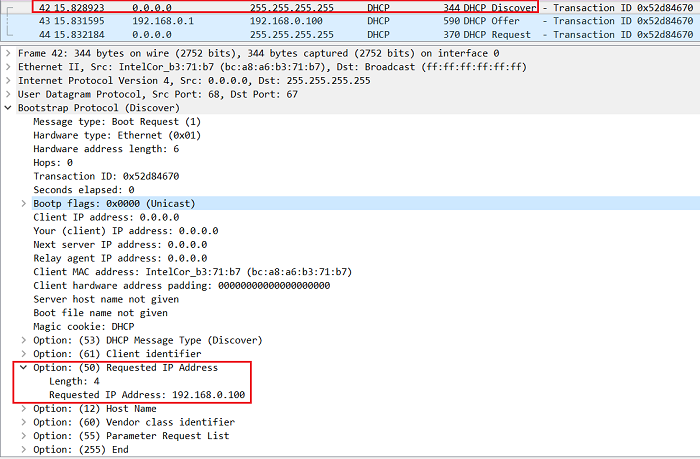
9.4.3 При повторном получение клиент запрашивает у сервера тот IP-адрес, который у него был ранее
Обратите внимание: никаких специальных сообщений для повторного получения IP-адреса нет, вся нужная информация находится в запросе DHCPDISCOVER, клиент с помощью 50 опции сообщает серверу о том, что он раньше брал IP-адрес 192.168.0.100 и хотел бы его взять снова, в данном случае сервер выдал клиенту этот адрес, так как он был свободен.
Вы должны были обратить внимание на то, что в дампе не было подтверждения от сервера о том, что он получил сообщение RELEASE, такого подтверждения просто нет в природе, так как оно и не нужно, даже если по каким-то причинам DHCPRELEASE не дойдет до сервера, клиент все равно освободит IP-адрес, ему на это разрешений не нужно, ведь такое действие не приведет к конфликту, и при этом ничего страшного не произойдет, если сервер не получит RELEASE от клиента, он просто освободит IP-адрес после того, как истечет срок аренды.
9.3.5 Выводы
Как видите, мы в принципе ничего не настраивали, не экспериментировали, но зато вскрыли целый пласт особенностей работы протокола DHCP, связанных со сроком аренды IP-адреса.
Данная статья описывает процедуру установки и настройки DHCP сервера на базе Windows Server 2019. В статье описаны особенности установки и настройки DHCP роли, создания областей DHCP, настройки их параметров и резервации статических адресов. Мы рассмотрим как привычный способ настройки параметров DHCP сервера через графическую консоль, так и настройку DHCP из командной строки PowerShell.
Протокол DHCP (Dynamic Host Configuration Protocol) используется для автоматического назначения сетевых настроек (IP адрес, маска подсети, шлюз, DNS сервера и т.д.) устройствам в вашей сети (компьютеры, ноутбуки, сканеры, принтеры и т.д.). Также DHCP сервер позволяет более эффективно использовать адресное пространство, избегать конфликта IP адресов в сети и централизованно управлять сетевыми параметрами на клиентских устройствах.
Содержание:
- Установка роли DHCP сервера в Windows Server 2019/2016
- Настройка DHCP областей в Windows Server
- Резервация IP адресов на DHCP сервере
- Настройка и управление DHCP сервером с помощью PowerShell
Установка роли DHCP сервера в Windows Server 2019/2016
В этом примере мы установим DHCP сервер на хосте с Windows Server 2019 и IP адресом 192.168.13.4. Вы можете использовать как Server Core версию, так и Full GUI. В маленькой инфраструктуре допустимо устанавливать DHCP сервер на сервер с ролью контроллера домена Active Directory.
Обязательно назначьте статический IP адрес серверу с ролью DHCP сервер. При установке роли DHCP из консоли PowerShell на сервере с автоматическим получением IP адреса появляется предупреждение:
Configure at least one static IP address on your computer before installing DHCP.
WARNING: The following recommended condition is not met for DHCP: No static IP addresses were found on this computer. If the IP address changes, clients might not be able to contact this server. Please configure a static IP address before installing DHCP Server.
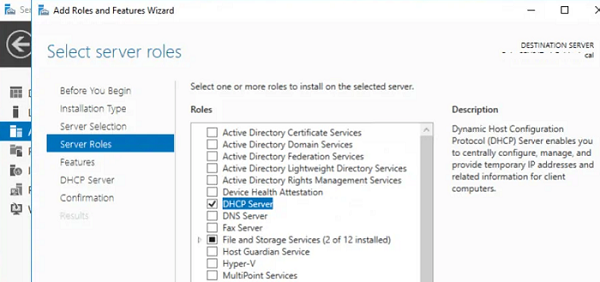
Установить роль DHCP Server можно из консоли Server Manager (Add Roles and Features -> Server Roles).
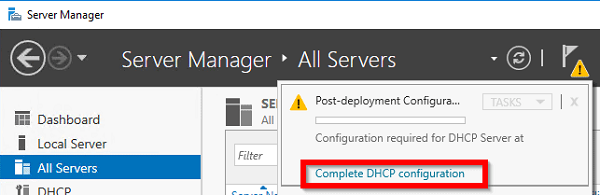
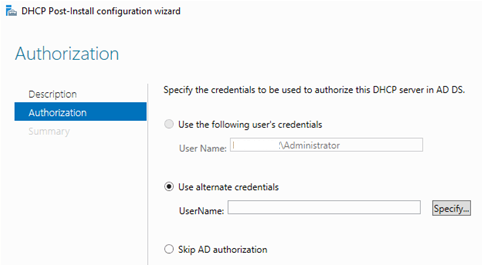
После установки роли DHCP роли нужно выполнить Post-Deployment Configuration. Для этого в консоли Server Manager щелкните по уведомлению и выберите Complete DHCP configuration.
Вам будет предложено аутентифицировать новый DHCP сервер в Active Directory (экран Authorization). Для авторизации DHCP сервера в AD учетная запись должна состоять в доменной группе Enterprise Admins.
Если у вас нет прав на авторизацию DHCP в AD, вы можете указать, чтобы ваш DHCP сервер запускался без проверки авторизации в домене:
Set-ItemProperty -Path "HKLM:SYSTEMCurrentControlSetServicesDHCPServerParameters" -Name DisableRogueDetection -Value 1 -Force
Также вы можете установить и настроить DHCP роль в Windows Server из консоли PowerShell.
Установка роли DHCP:
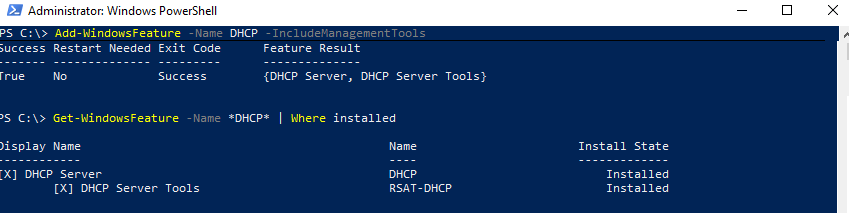
Install-WindowsFeature DHCP –IncludeManagementTools
Проверьте, что роль и инструменты управления RSAT-DHCP установлены:
Get-WindowsFeature -Name *DHCP*| Where Installed
Авторизуйте DHCP сервер в Active Directory (укажите DNS имя сервера и IP адрес, который будет использоваться DHCP клиентами):
Add-DhcpServerInDC -DnsName hq-dc01.contoso.com -IPAddress 192.168.13.4
Создайте локальные группы безопасности DHCP сервера:
Add-DhcpServerSecurityGroup
Чтобы Server Manager перестал показывать уведомление о том, что DHCP роль требует настройки, выполните команду:
Set-ItemProperty -Path HKLM:SOFTWAREMicrosoftServerManagerRoles12 -Name ConfigurationState -Value 2
Перезапустите службу DHCPServer:
Restart-Service -Name DHCPServer -Force
База данных и логи DHCP сервера находятся в каталоге
%systemroot%system32dhcp
.
- dhcp.mdb — файл базы данных сервера DHCP’;
- j50.log – транзакционный журнал (используется при восстановлении конфигурации DHCP);
- j50.chk — файл контрольной точки;
- tmp.edb — временный рабочий файл DHCP-сервера.
Настройка DHCP областей в Windows Server
После установки роли DHCP вам нужно создать DHCP области (Scopes), которые описывают диапазоны IP адресов и другие настройки, выдающиеся сервером клиентам.
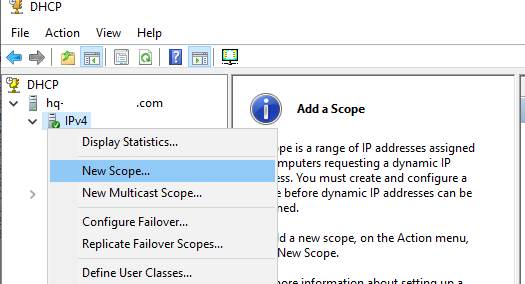
Для управления сервером DHCP используется консоль dhcpmgmt.msc (вы можете управлять DHCP сервером локально или с удаленного компьютера с установленным RSAT). Запустите консоль DHCP, разверните ваш сервер -> IPv4.
Чтобы создать новую область выберите New Scope.
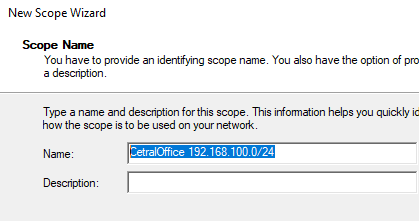
Укажите название DHCP области.
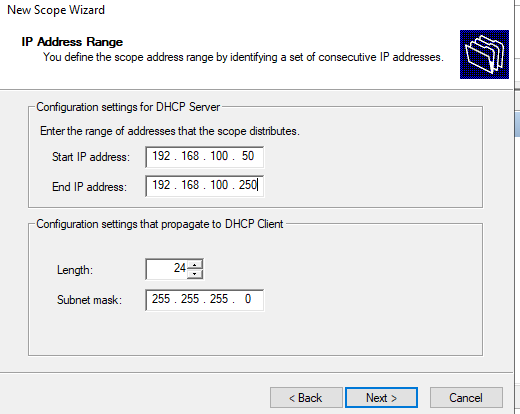
Укажите диапазон IP адресов, который будет выдаваться этой областью и маску сети. В этом примере я хочу использовать эту DHCP область для обслуживания подсети 192.168.100.0/24. В рамках этой сети DHCP сервером будет назначаться динамические IP адреса из диапазона 192.168.100.50 — 192.168.100.250. В следующем окне можно добавить исключения в этот диапазон (Add Exclusions and Delay).
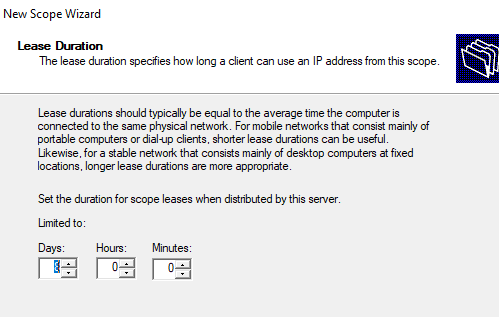
Далее нужно указать длительность аренды (Lease Duration) IP адреса DHCP клиентом (по умолчанию 8 дней, менять без особой необходимости не нужно).
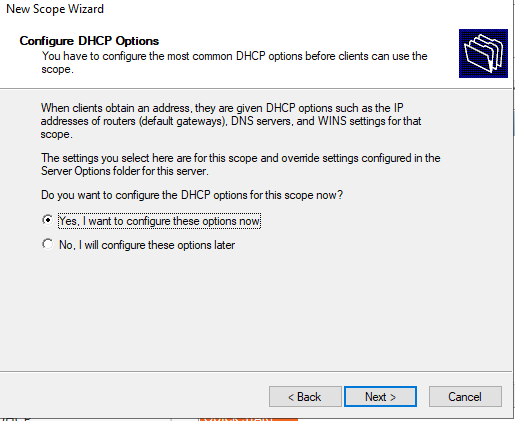
Укажите, что вы хотите настроить дополнительный параметры DHCP области.
 .
.
Укажите IP адрес шлюза в подсети, который должен назначаться клиентам (в нашем примере это 192.168.100.1).

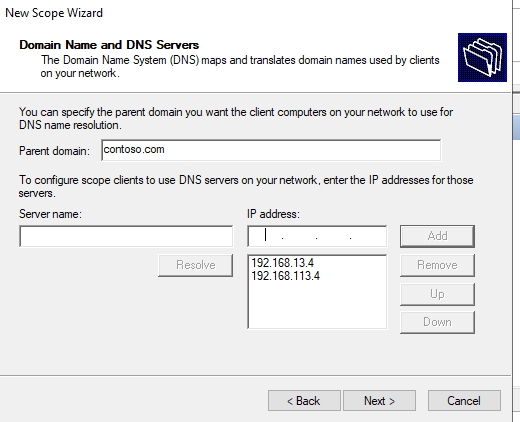
Затем укажите имя домена и адреса DNS серверов, которые будут назначены клиентам DHCP.
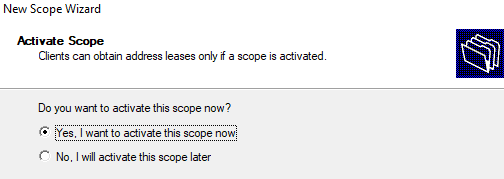
Осталось активировать DHCP область (разрешить ей обслуживать клиентов).
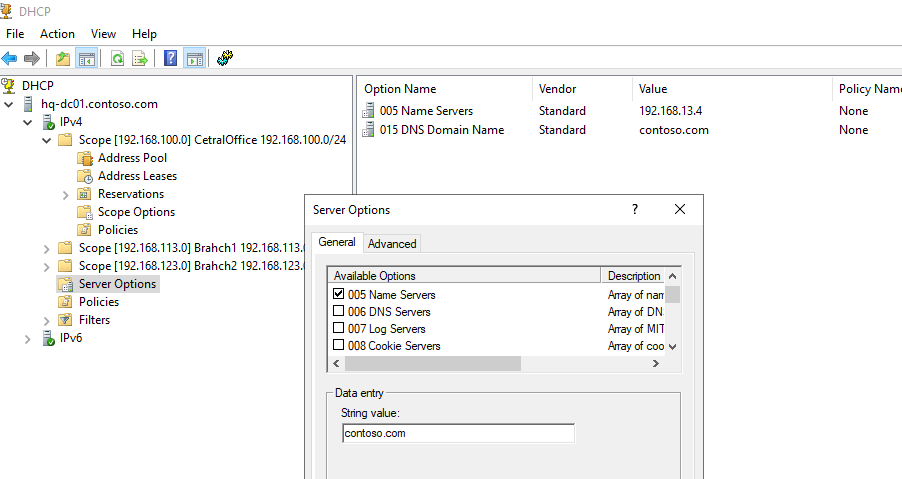
DHCP сервер может выдавать клиентам различный настройки (кроме IP адреса). Для этого используются Scope Options.
В Windows Server DHCP можно настроить глобальные настройки области или Scope Options для каждой области.

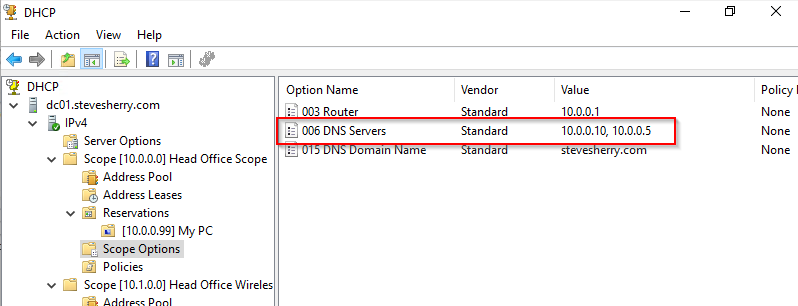
Ранее мы уже настроили три опции области:
-
003 Router -
006 DNS Server -
015 DNS Domain Name
Можно добавить и другие опции (NTP сервера, PXE и т.д.).
В разделе Server Options DHCP сервера можно настроить глобальные опции, которые будут наследуются всеми областями. Но вы можете переопределить глобальные настройки в настройках каждой области (опции области имеют приоритет над опциями сервера).
Один DHCP сервер может обслуживать сотни удаленных подсетей и VLAN. Поэтому вы можете создать на нем несколько областей. Главное, чтобы в каждой из подсетей был настроен ретранслятор (DHCP relay agent), который пересылает широковещательные DHCP-запросы на указанный DHCP сервер. В терминах Cisco DHCP ретранслятор называется ip helper. Вы можете настроить DHCP Relay даже на Windows Server.
Протокол DHCP в качестве транспорта использует протокол UDP. Пакеты от клиента к серверу передаются по порту 67 UDP, обратно через UDP 68
Резервация IP адресов на DHCP сервере
По умолчанию DCHP сервер выдает клиентам динамические адреса. Это означает что IP адрес у любого клиента может меняться. Если вы хотите, чтобы определенные устройства всегда получали от DHCP сервера один и тот же адрес, вы можете его зарезервировать (например, для сетевых принтеров, которые настроены у пользователей).
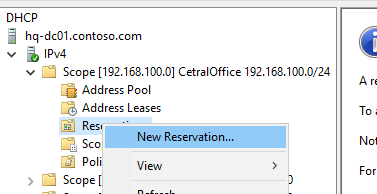
Для DHCP резервации выберите область и перейдите в секции Reservation. В меню выберите New Reservation.
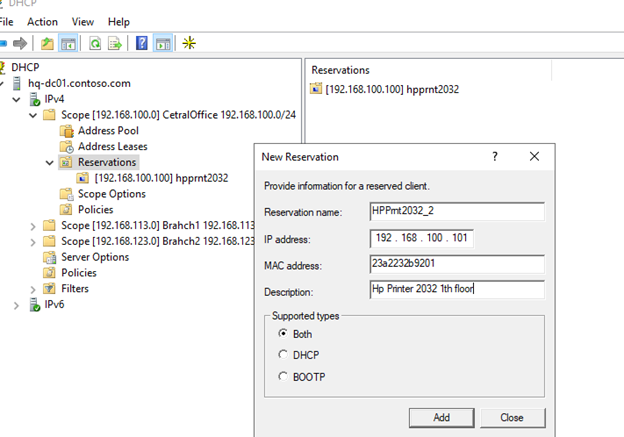
При создании резервации нужно указать IP адрес, который нужно сохранить за клиентом и его MAC адрес (уникальное значение). MAC адрес в Windows можно получить из результатов команды
ipconfig /all
или с помощью PowerShell
get-netadapter|select name,macaddress
). Опционально можно указать имя и описание устройства.
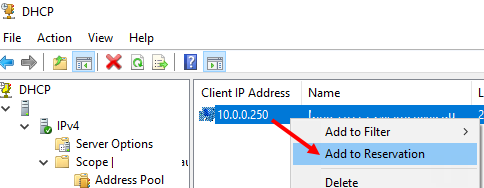
Также вы можете зарезервировать текущий динамический адрес за устройством, найдя его в разделе Address Leases. Щелкните по устройству и выберите Add to Reservation.
Настройка и управление DHCP сервером с помощью PowerShell
Все операции по настройке и управлению DHCP сервером на Windows Server 2019/2016 можно выполнять из консоли PowerShell. Рассмотрим основные команды управления DHCP. Для этого используется модуль DHCPServer. Импортируйте модуль в сессию:
Import-Module DHCPServer
Вывести полный список командлетов в моделе DHCP можно так:
Get-Command -Module DHCPServer

Следующая команда выведет список авторизованных DHCP серверов в Active Directory:
Get-DhcpServerInDC

Вывести список DHCP областей на указанном сервере:
Get-DhcpServerv4Scope –ComputerName msk-dhcp1
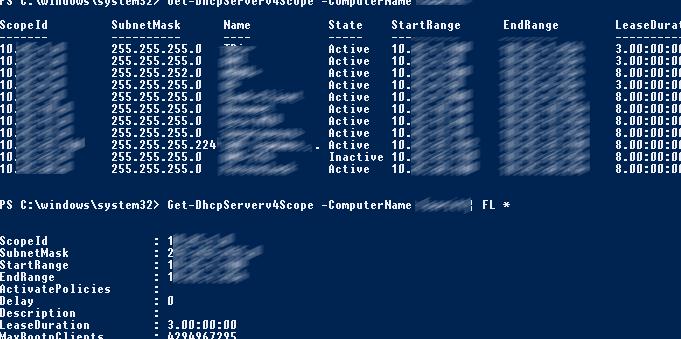
Если нужно показать все параметры области (Delay, Description, Name и т.д.):
Get-DhcpServerv4Scope –ComputerName msk-dhcp1| FL *
Если нужно отобразить данные о IPv6 областях:
Get-DHCPServerv6Scope
Получить настройки для конкретной области:
Get-DhcpServerv4Scope –ComputerName msk-dhcp1 –ScopeID 10.10.1.0
Создадим новую (неактивную) область с диапазоном адресов с 192.168.113.50 до 192.168.113.250:
Add-DhcpServerv4Scope -Name “Brahch1 192.168.113.0” -StartRange 192.168.113.50 -EndRange 192.168.113.250 -SubnetMask 255.255.255.0 -State InActive
Настроить следующие параметры DHCP сервера: DNS сервер, домен и адрес шлюза по-умолчанию:
Set-DhcpServerv4OptionValue -ScopeID 192.168.113.0 -DnsDomain contoso.com -DnsServer 192.168.13.4 -Router 192.168.113.1
Добавить исключения в DHCP область:
Add-DhcpServerv4ExclusionRange -ScopeID 192.168.113.0 -StartRange 192.168.113.90 -EndRange 192.168.113.100
Активировать DHCP область:
Set-DhcpServerv4Scope -ScopeID 192.168.113.0 -State Active

Для удобства можно использовать такую команду PowerShell при создании новой области:
$HashArgs = @{
'Name' = 'EKB Office Scope';
'Description' = 'workstations';
'StartRange' = '192.168.140.10';
'EndRange' = '192.168.140.200';
'SubnetMask' = '255.255.255.0';
'State' = 'Active';
'LeaseDuration' = '1.00:00:00';
}
Add-DhcpServerv4Scope @HashArgs
Опции для DHCP сервера добавляется так (к примеру, WPAD):
Add-DhcpServerv4OptionDefinition -ComputerName msk-dhcp1 -Name WPAD -OptionId 252 -Type String
Вывести список настроенных опций DHCP сервера можно так:
Get-DHCPServerv4OptionValue -ComputerName msk-dhcp1 | Format-List
Выведем список настроенных параметров зоны:
Get-DHCPServerv4OptionValue -ComputerName msk-dhcp1 -ScopeId 10.10.1.0 | Format-List
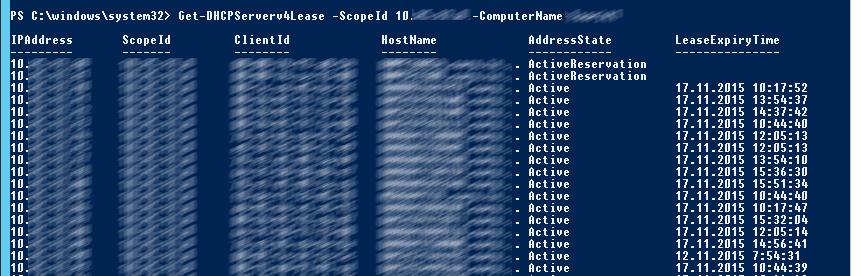
Показать текущий список арендованных адресов для области 10.10.1.0:
Get-DHCPServerv4Lease -ScopeId 10.10.1.0 -ComputerName msk-dhcp1
Создать DHCP резервацию для клиента, которому назначен динамический IP адрес 10.10.1.88 (конвертировать выданный адрес в зарезервированный):
Get-DhcpServerv4Lease -ComputerName msk-dhcp1 -IPAddress 10.10.1.88| Add-DhcpServerv4Reservation -ComputerName msk-dhcp1
Можно массово зарезервировать IP адреса для компьютеров по списку из csv файла. Для этого создайте текстовый файл в формате:
ScopeId,IPAddress,Name,ClientId,Description
10.10.1.0,10.10.1.88,Client1,ba-ab-5c-3d-4e-6f,Reservation PC-msk-s1
10.10.1.0,10.10.1.89,Client2,ba-ab-5c-5d-2e-3f,Reservation PC-msk-s2
Сохраните файл с именем
c:dhcpDHCPReservations.csv
и запустите следующую команду, которая импортирует данные из csv файла и создаст DHCP резервации для клиентов:
Import-Csv –Path c:dhcpDHCPReservations.csv | Add-DhcpServerv4Reservation -ComputerName msk-dhcp1
Отключить область на DHCP сервере:
Set-DhcpServerv4Scope -ComputerName msk-dhcp1-ScopeId 10.10.1.0-State InActive
Удалить область с DHCP сервера:
Remove-DHCPServerv4Scope -ComputerName msk-dhcp1-ScopeId 10.10.1.0 -Force
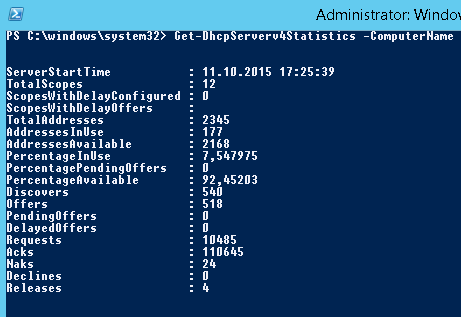
Возможно получить статистику DHCP сервера (количество областей, резерваций, процент использования адресов и пр.).
Get-DhcpServerv4Statistics -ComputerName msk-dhcp1
Аналогичная информация для конкретной области может быть получена с помощью командлета Get-DhcpServerv4ScopeStatistics.
Конфигурацию DHCP сервера можно экспортировать в указанный XML файл с помощью команды:
Export-DHCPServer -ComputerName msk-dhcp1 -File C:dhcpdhcp-export.xml
Совет. Заданием с такой командой в планировщике задач можно реализовать регулярное резервное копирование конфигурации DHCP сервера.
В дальнейшем эти настройки DHCP сервера можно импортировать (перенести) на другой DHCP сервер:
Import-DHCPServer -ComputerName msk-dhcp2 -File C:dhcpdhcp-export.xml -BackupPath C:dhcpbackup
If you wonder how basic network configuration is managed across your environment, today is your lucky day. You’ll learn how to connect to your Microsoft DHCP server and manage all of the common components from DHCP scopes, DHCP policies, DHCP reservations, and DHCP leases!
Not a reader? Watch this related video tutorial!
Not seeing the video? Make sure your ad blocker is disabled.
Prerequisites
This article is a tutorial. If you plan on following along step-by-step, you will need the following:
- A Microsoft DHCP Server in an Active Directory environment- This tutorial uses Windows Server 2019, but any server from 2008R2 onwards would work. The server is called dc01.stevesherry.com.
- An Active Directory account that is a member of the DHCP Administrators group or equivalent.
DHCP Scopes
At its simplest, a Microsoft DHCP server is a machine on a network that hands out IP addresses to clients. It ensures all clients receive IP addresses so they can communicate on the network. It does this through DHCP scopes.
A DHCP scope represents contains various components such as:
- Assignable IP addresses for a particular group of devices (address pools)
- A client’s DNS server and default gateway
- IPs to only assign to certain devices (DHCP reservations)
- Address pools (groups of assignable IP addresses)
The DHCP scope is a core element on a network and that allows you to configure network settings common to all of the clients on that network.
Creating a DHCP Scope via Server Manager
Let’s kick off this tutorial by learning how to add DHCP scopes to an existing DHCP server. For this first demo, you’re going to learn how to set up a DHCP scope via the Windows Server Manager.
Assuming you’re at the Windows desktop of a test DHCP server:
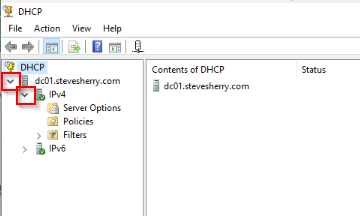
1. Click on your Start menu and type dhcpmgmt.msc to open the DHCP Microsoft Management Console (MMC).
2. Once the DHCP MMC opens, click on the dropdown to the left of the server name and then on IPV4.
Microsoft DHCP Server supports both IPv4 and IPv6 address allocation to clients. This tutorial will only focus on IPv4 scopes.
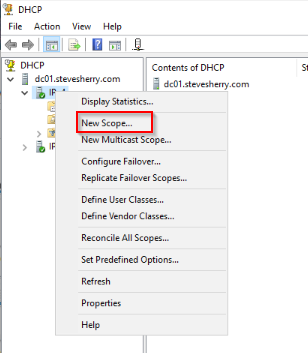
3. Right click on IPv4 and select New Scope to start the New Scope Wizard, and click Next on the introduction screen.
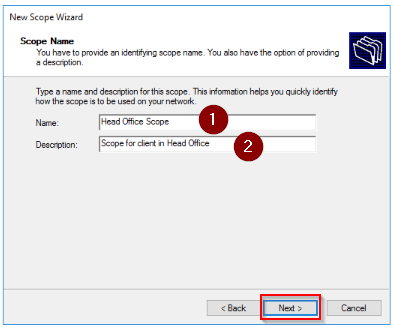
4. Provide a name of your choice for the Name and Description. This tutorial will create a scope for the company’s head office. Click Next when complete.
Scopes are commonly assigned to physical buildings or sometimes IP subnets.
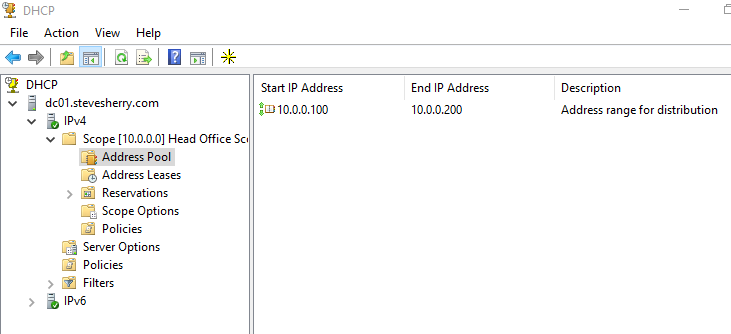
5. Next, define an IP Address Range indicating the IP address range you’d like to assign to the DHCP server’s clients. The tutorial will ensure the first IP address allocated to clients will be 10.0.0.100 and the last IP address will be 10.0.0.200. These start and end IP addresses create the scope’s address pool which you’ll learn about later.
Also on this screen, enter a CIDR Length or Subnet mask which will be assigned to all clients.
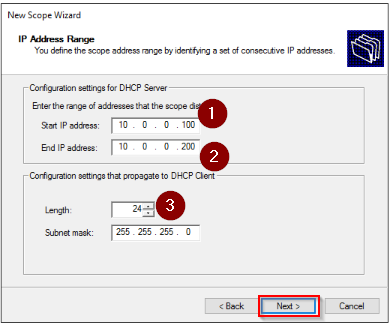
It is common to deliberately leave the beginning and end of the address pool free to allow for any statically assigned addresses.
6. Click Next to skip past the Add Exclusions and Delay step.
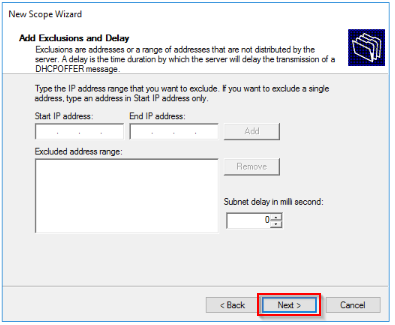
If you know of one or more IP addresses that are already in use within the defined address range, an exclusion prevents the DHCP server from attempting to assign a particular IP address in its address pool.
7. For now, click Next to accept the default Lease Duration. You’ll learn a lot about DHCP leases later in this tutorial.

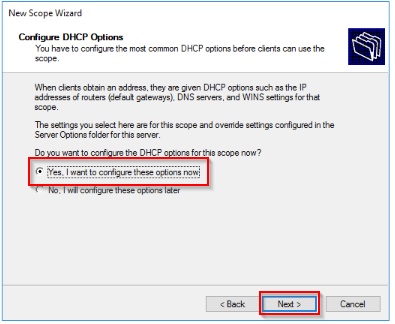
8. Leave the default setting of Yes, I want to configure these options now and click Next on the Configure DHCP Options step. You will configure various scope options shortly in this tutorial.
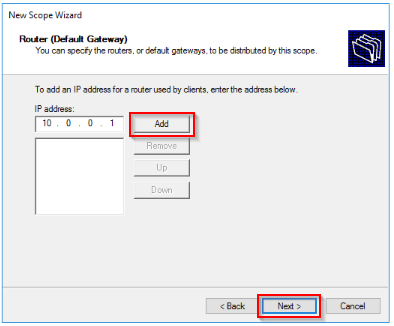
9. Next, provide an IP address of 10.0.0.1 for the Router (Default Gateway). Once the DHCP scope is available to clients, the DHCP server will hand out this IP address as the clients’ default gateway. The default gateway is the primary way clients can communicate with other networks or the Internet in general.
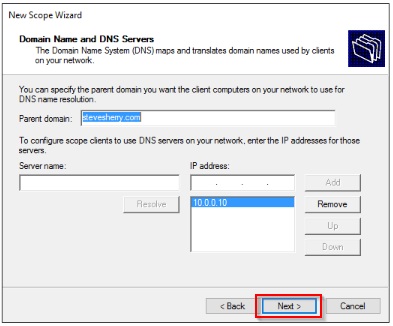
10. Since this tutorial is using an environment that has a DNS server located at 10.0.0.10, provide the IP address on the Domain name and DNS Servers step. This IP address will be handed out as the DNS client for DHCP clients to translate names into IP addresses.
The Parent domain should automatically populate based on the Active Directory domain the DHCP server is a member of.
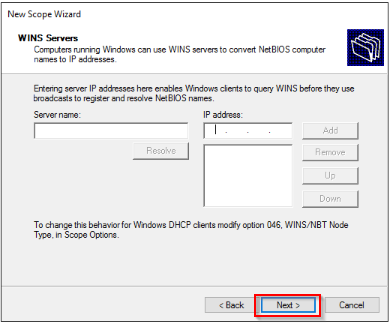
11. If your environment still uses a WINS server, provide its IP address on the WINS Server step. This tutorial does not use one, so click Next to continue.
12. Finally, activate the new DHCP scope and make it available to clients by ensuring that Yes, I want to activate this scope now is selected. Then click Next to continue.

Once all of the above steps are followed, you should now see the new scope under IPv4 as shown below.
Creating a DHCP Scope with PowerShell
If you’re not a fan of the GUI or simply need to automate DHCP tasks, look no further than PowerShell. Let’s now cover the same process as just performed via the Server Manager, only this time with PowerShell.
Assuming you’re at the Windows desktop of a test DHCP server:
1. Open Windows PowerShell as administrator.
2. Run the Get-DhcpServerv4Scope cmdlet to find all existing DHCP scopes.
As you’ll see in the below example, this server only has the scope that you’ve created using the GUI in the previous steps.

3. Run the Add-DhcpServerv4Scope cmdlet to create a new DHCP scope. Since this cmdlet has many parameters, save time by defining each parameter in a PowerShell hashtable and using splatting to pass all parameters to the cmdlet.
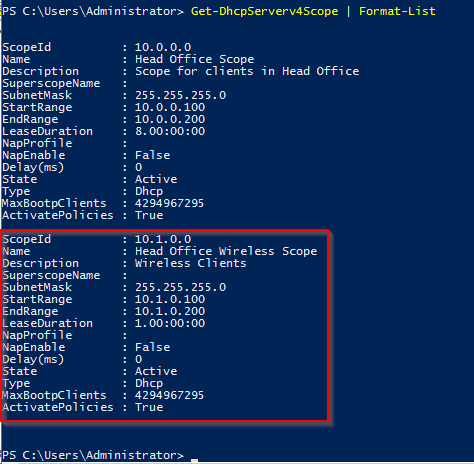
This cmdlet will create a DHCP scope called Head Office Wireless Scope that, when activated, will hand out IP addresses 10.1.0.100 – 10.1.0.200 with a subnet mask of 255.255.255.0 with a lease that expires after one day (day.hrs:mins:secs).
# Create an IPv4 DHCP Server Scope
 $HashArgs = @{
     'Name' = 'Head Office Wireless Scope';  # This sets the name of the wireless scope
     'Description' = 'Wireless Clients';     # This is the human-readable description of the scope
     'StartRange' = '10.1.0.100';            # Specifies the starting IP address in the scope
     'EndRange' = '10.1.0.200';              # Specifies the end IP address in the scope
     'SubnetMask' = '255.255.255.0';         # Specifies the subnet mask of the scope
     'State' = 'Active';                     # Activates the scope
     'LeaseDuration' = '1.00:00:00';         # Specifies the length of the lease duration
 }
 Add-DhcpServerv4Scope @HashArgs
4. Now, run Get-DhcpServerv4Scope again to verify PowerShell successfully created the DHCP scope.
Piping output to the
Format-ListPowerShell cmdlet allows you to see each property name and it’s value rather than a truncated row.
Managing Scope Options
Once you’ve created a scope, you can modify any attribute you’d like. Microsoft DHCP has an area specifically called Scope Options which allows you to change some common DHCP attributes sent to DHCP clients.
Let’s now walk through the available scope options and cover their affect on your clients.
While in the DHCP MMC:
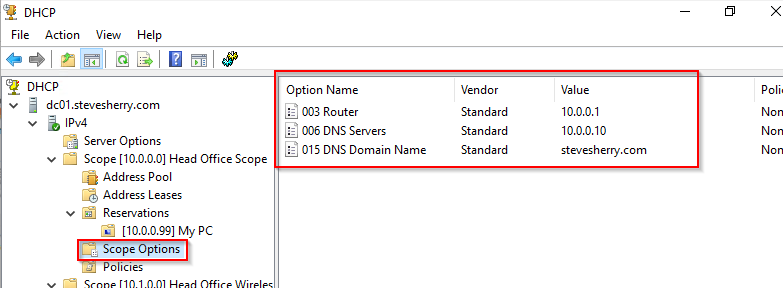
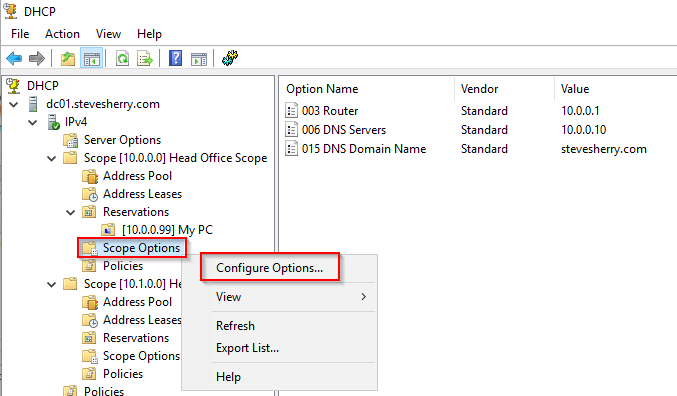
- Click on Scope Options under <server name> —> IPv4 —> Scope [X.X.X.X]. In the screenshot below, you can see the scope previously created. Here you can see the Router, DNS Servers, and DNS Domain Name that this scope will hand out to DHCP clients.
2. Right click on Scope Options and choose Configure Options to navigate to the Scope Options box to change these options.
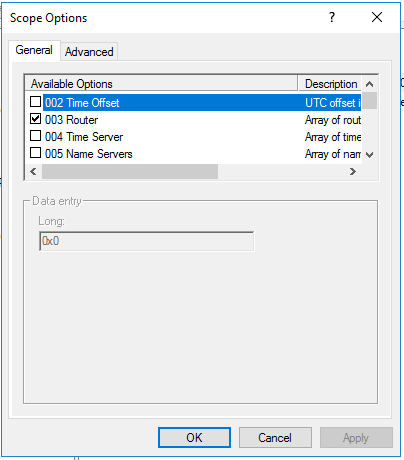
3. Scroll down the available options under the General tab. You’ll see dozens of options that the DHCP server can assign to clients.
If you have a specific setting that is not available to you by default, you’ll need to follow the vendor’s specific information using the Advanced tab to create a custom Option.
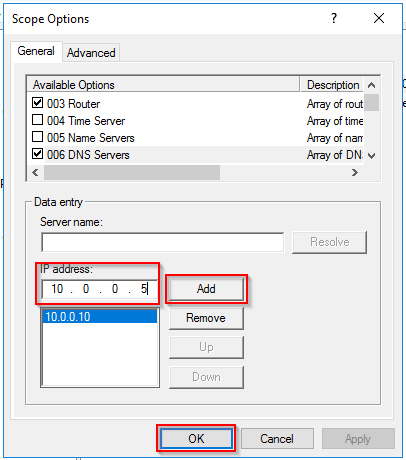
4. Perhaps you forgot to add one of your DNS servers. Find the 006 DNS Servers option, enter it’s IP address, click Add, and OK. This tutorial will be using the IP address of 10.0.0.5.
Once you click OK, Windows will then validate if DNS services are available on your provided IP address.
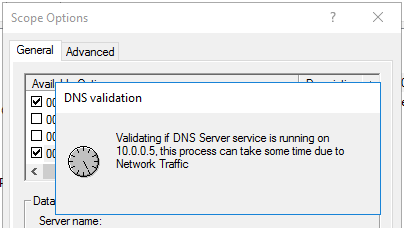
5. Return to the main screen and review the Options pane. You’ll now see two IP addresses listed under 006 DNS Servers.
DHCP Leases
An important part of DHCP is the lease. A device is known to “lease” an IP address from a DHCP server for a certain period of time (lease time).
Network administrators typically configure DHCP servers to lease IP addresses based on different use cases. For example, for devices on a wired connection that rarely leave the network, administrators may assign a longer lease time like eight days. If the device never leaves the network, it’s not efficient to go through the lease renewal process.
On the other hand, if a wireless device roams on and off the network several times a week, administrators may assign a shorter lease period (12-24 hours) to save available IP addresses for other devices.
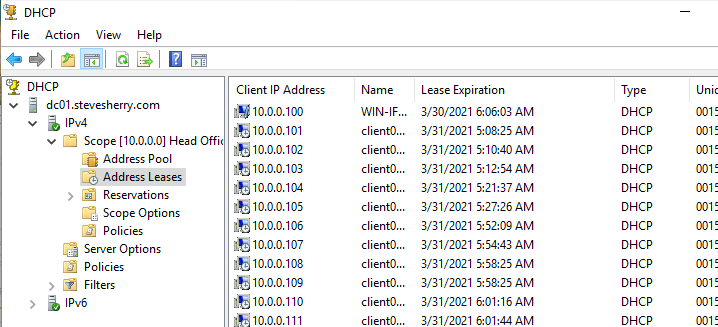
While in the DHCP console, you can find all current leases in <server name> —> IPv4 —> Scope [X.X.X.X] —> Address Leases as shown below.
Once on the Address Leases window, you’ll see each IP address that the DHCP server has assigned along with the Lease Expiration date.
Setting the Microsoft DHCP Lease Period
Let’s now discover how to set the DHCP lease period at the server level for DHCP clients.
While still in the DHCP console on the DHCP server:
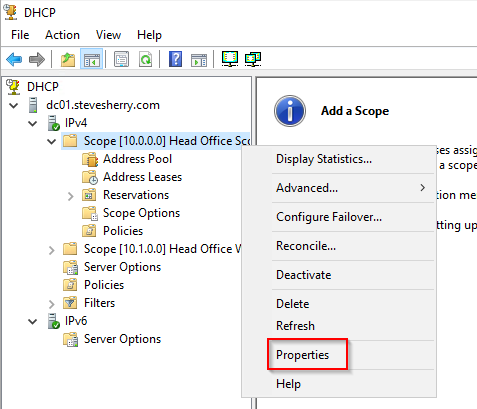
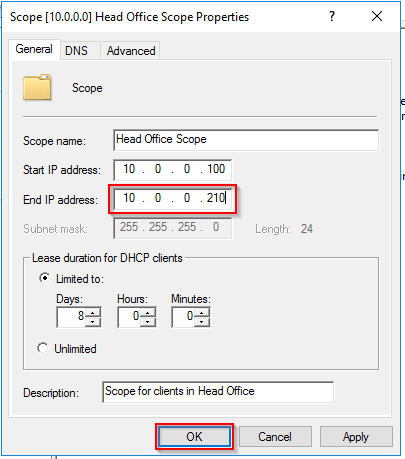
1. Find the scope containing the IP address pool you’d like to look at, right-click on the scope name, and select Properties.

2. Within the Properties window, you’ll now see a Lease duration for DHCP clients. This setting is the DHCP lease time for all IP addresses in that scope.
The default DHCP lease period on Microsoft DHCP servers is eight days, but it can be updated to any period of time to suit the business needs.
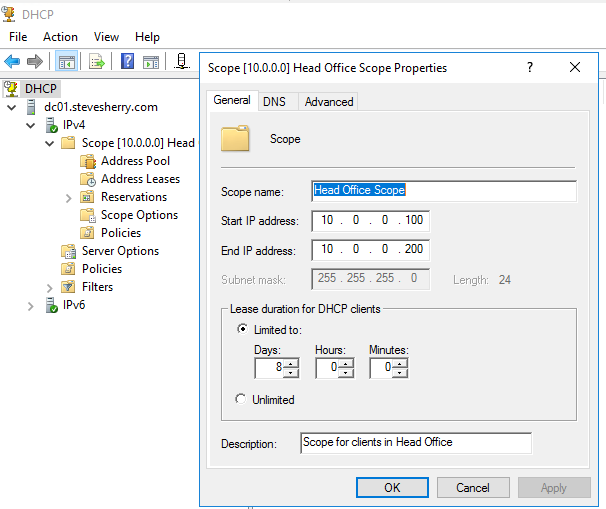
3. Click Cancel to close the Properties box.
Finding Assigned DHCP Lease Times
DHCP services can only assign one IP address per device. How does the DHCP server know when it can re-use an IP address in the pool? The DHCP lease time.
If a device doesn’t renew its dynamically assigned IP address within the lease time, the lease expires and is available to other devices to lease.
How do you actually discover the lease time on a device? Unfortunately, each operating system (OS) has a different way of exposing the DHCP lease time. This tutorial will cover how to determine lease time on Windows 10.
In Windows 10, you see your DHCP lease time on the command-line either with the command prompt (cmd.exe) or PowerShell. This tutorial assumes you are an IT pro so let’s use PowerShell.
To find a Windows DHCP client’s lease time, on the Windows client console, open Windows PowerShell and run the ipconfig /all command.

You’ll see the time the lease was made (Lease Obtained) and when it expires (Lease Expires). The Lease Obtained field is the exact time the DHCP server assigned the IP address to this device. The Lease Expires field indicates the time the device will ask the DHCP server to renew its lease.
Subtract the Lease Expires value from the Lease Obtained value and you have your DHCP lease time.
DHCP Address Pools
Once you’ve configured the scope, you already have an address pool. The address pool is the range of IP addresses the DHCP server will assign to clients in a lease. Let’s navigate through the address pool already set up.
Updating the Address Pool
IP address scopes are not fixed in stone. It’s inevitable that after some time you’ll need to expand the address pool to allow more devices to connect to your network. Rather than creating a new address pool, it’s often easier to expand an existing pool. To do that:
1. Right click on <server name> —> IPv4 —> Scope [X.X.X.X] and click on Properties to open the Scope Properties configuration wizard.
2. Update the fields to increase the range of IP addresses for your existing address pool so that more addresses are available for any future allocation. Once complete, click OK.
3. Click on <server name> —> IPv4 —> Scope [X.X.X.X] —> Address Pool to bring up the address pool. Notice below that it now shows the expanded Address Pool in the scope.

Adding Exclusion Ranges to the Address Pool
Imagine that you need to create a small list of IP addresses within the address pool that are not assigned to any new devices on the network. Exclusion ranges are how you’d achieve this.
Assuming that you still have the DHCP console open:
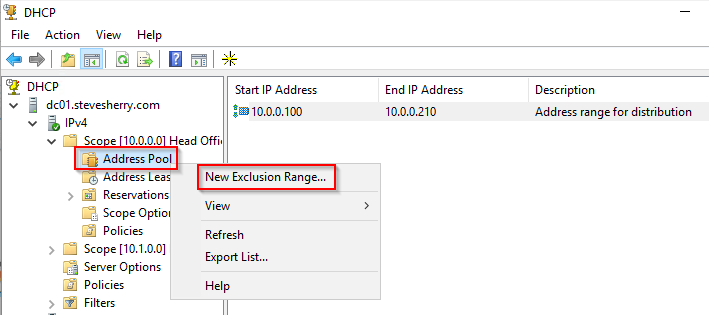
1. Click on <server name> —> IPv4 —> Scope [X.X.X.X] —> Address Pool to bring up the address pool.

2. Right-click on Address Pool and click on New Exclusion Range to open the Add Exclusion wizard.
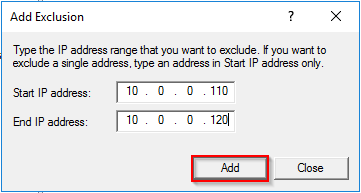
3. Complete the fields to create a small range of IP addresses within your existing address pool that will not be included in any future allocation of leases. Once complete, click Add.
4. Back on the DHCP console, refresh the screen and note that the exclusion is now in place.
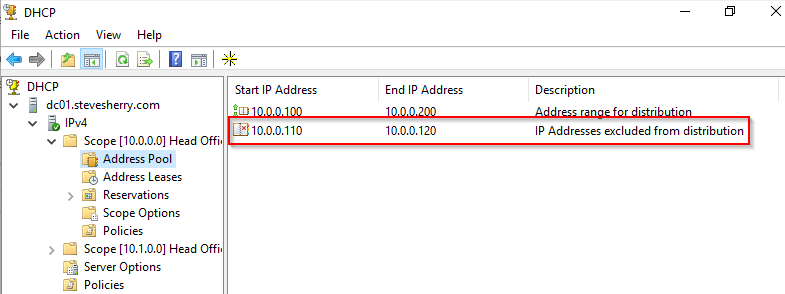
At this point, whenever a new device connects to the network, your DHCP server will not lease an address from within this exclusion range.
DHCP Reservations
IP addresses are, by their nature, dynamic. Most of the time this is OK as you typically don’t care what the IP address of your PC is. Occasionally you’ll need to manually specify the address of a device such as an admin laptop or a printer.
When you need to statically assign an IP address to a particular device, use a DHCP reservation.
Adding Reservations
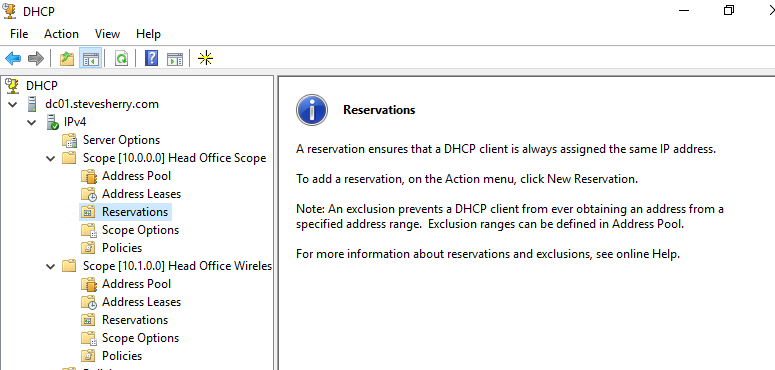
Let’s start out by adding a reservation to a scope previously created. While in the DHCP console on the DHCP server:
1. Select <server name> —> IPv4 —> Scope [X.X.X.X] —> Reservations to open the Reservations window. You’ll see no reservations exist.
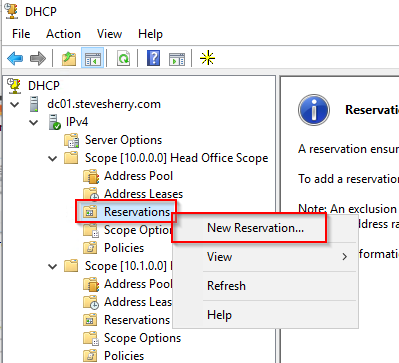
2. Right-click on Reservations and then choose New Reservation to open the New Reservation input box.
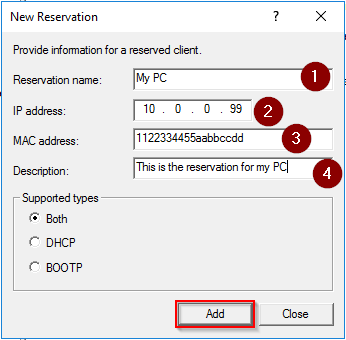
3. Complete the fields with details that are relevant to a device you’d like to assign a “static” IP address to.
- The Reservation name – This name is commonly as a hostname for the device or other identifying attribute.
- The IP address to reserve for the device.
- The MAC address of the device
Find the MAC address of a device from either the label that is on the back, or by using these methods.
- The Description – Be sure to make sense here so that other administrators can understand what this reservation is for.
Once complete, click Add.
4. Back on the DHCP console, refresh the screen and note that the reservation is now in place.
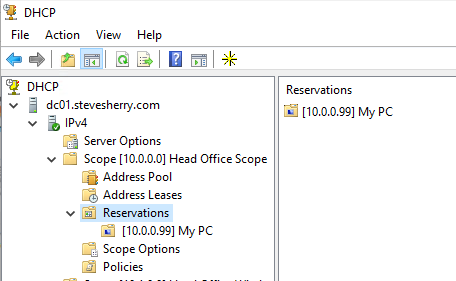
At this point, when the device that has the MAC address you’ve provided in the reservation goes through its DHCP lifecycle, it will be assigned the expected reserved IP address.
Removing Reservations
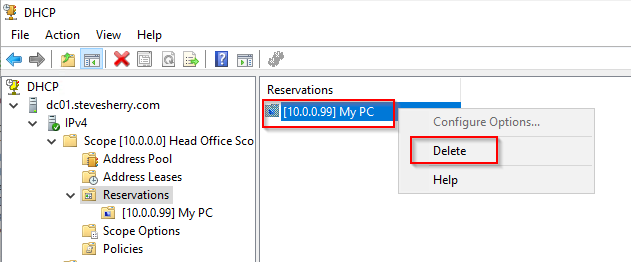
As part of the general lifecycle of devices within your organization, you’ll occasionally have to retire old devices, some of which will have DHCP reservations.
Assuming you’re still in the DHCP console, removing DHCP reservation requires a right click on the reservation and clicking Delete.
DHCP Policies
Previously, you learned how to set reservations by MAC address. Although reservations are useful, they don’t allow you to assign addresses or specific scope options based on other criteria. Using a DHCP policy, you can define various conditions a client must meet to assign an IP address.
Using a DHCP policy, you can assign a specific category of devices a different DNS server, default gateway, or TFTP server, for example.
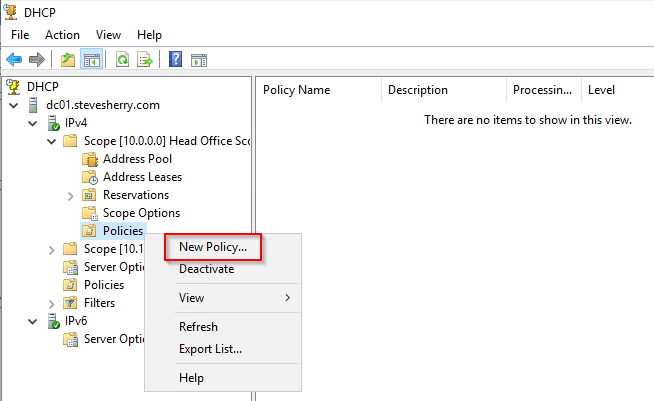
To create a DHCP policy:
1. Right click <server name> —> IPv4 —> Scope [X.X.X.X] —> Policies and click on New Policy to open the Policy configuration window.
2. Complete the fields with details of the Policy Name and a Description for the policy. Click Next, once complete.

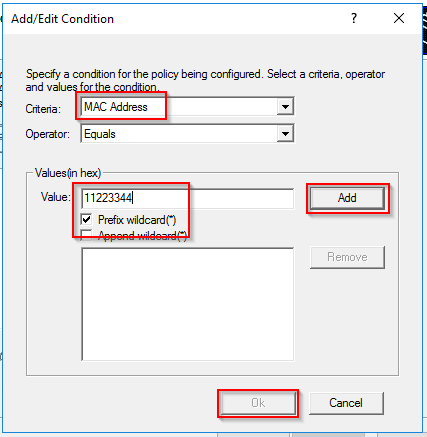
3. Click on the Criteria dropdown and notice the many conditions you can check for on a client. For this tutorial, select MAC Address and add a relevant Value, selecting Wildcard.
Click Add, and then OK to move along.
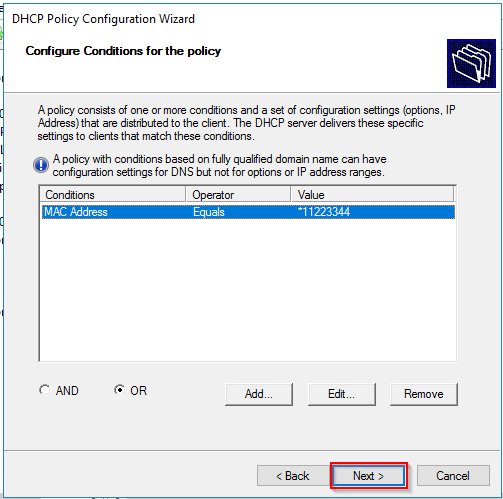
4. Either Add another condition for the policy or click Next to continue.
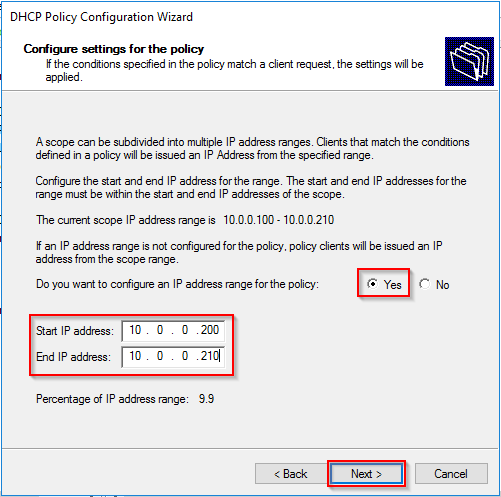
5. Next, add a subset of IP addresses from within your existing range. The DHCP server will assign devices matching the conditions defined earlier an IP address from this range. Once complete, click Next.
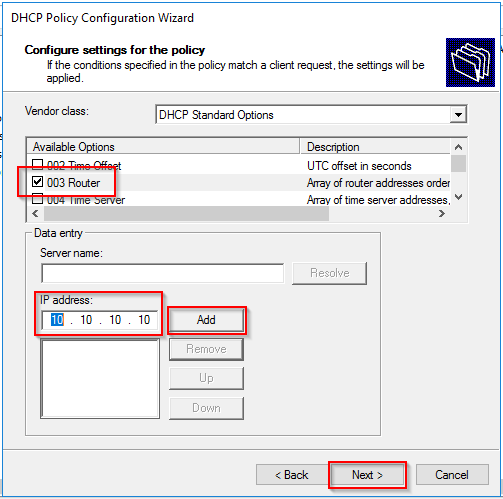
6. Now it’s time to define the options the client will receive if it meets the condition. For this tutorial, select 003 Router to modify the default gateway clients matching the condition will receive.
Enter an IP address for the new gateway, click Add and then Next.
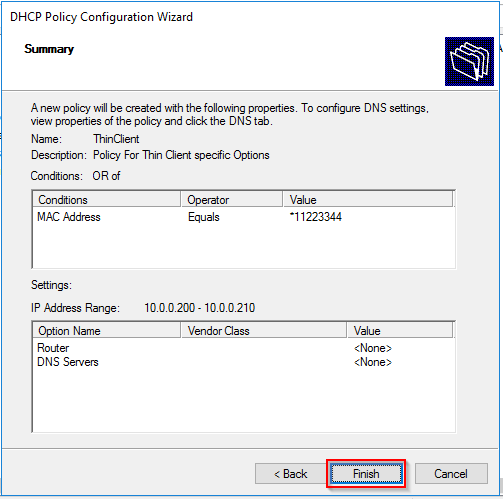
7. Review the screen and confirm that the details are correct. Click Finish to close the wizard.
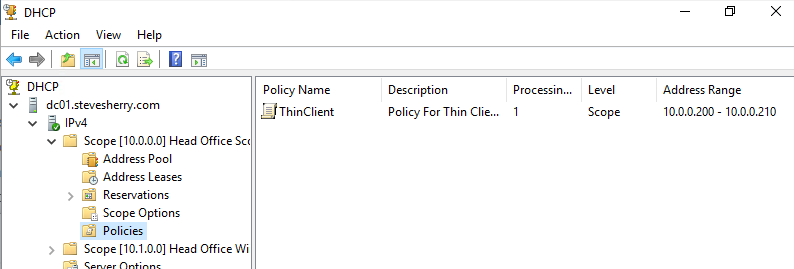
8. Refresh the screen to confirm that the new policy is in place.
Conclusion
In this article, you’ve covered a lot of ground when it comes to DHCP. You’ve learned how to set up DHCP scopes and everything that comes with them. You also learned how DHCP assigns IP addresses and other information to clients.
Armed with all of this new information, you can now confidently tackle DHCP like a champion. How are you planning on using this knowledge?
Table of Contents
- Summary
- Objective
- Installation Procedure
- Install using PowerShell
- Install Using GUI
- DORA (Discover, Offer, Request Acknowledgment)
Summary
This article is about Dynamic Host Configuration Protocol (DHCP) is to assign network settings automatically to every workstation in the network by a central server rather than configuring them locally on each. A host configured
to use DHCP is enabled to configure itself completely and automatically according to directions from the server.
Objective
Main Functionality of DHCP server is to provide clients auto IP Address, Subnet mask, DNS Address and Gateway Address whenever clients request in the network in auto-configure mode. This document provides information on How to
install & Configure DHCP Server.
Installation Procedure
There are two methods of installation DHCP Server feature in the server manager.
- Install using PowerShell
- Role & Feature-based Installation
Install using PowerShell
DHCP role can be installed using the PowerShell. It is a command line interface for running command to perform the installation with minimal resources, the same installation which can be done in GUI based environment can be done
in PowerShell.
Follow the below instructions. Click the Windows button, then Windows PowerShell folder and Windows PowerShell as shown in the diagram.

The other way to open PowerShell is to click Windows button, then Server Manager and from the Server Manager window click the tools and select Windows PowerShell.

Write down the command add-WindowsFeature –IncludeManagementTools dhcp This will install the DHCP role with the following output.

Install Using GUI
To install the DHCP role in a GUI environment using the following instructions.
To start installation first click the Windows button and then Server Manager.

OIn the Server Manager window click Dashboard and then click Add roles and features.

In the Add roles and features Wizard, click Next.

Note: Read out the information on the screen that is relevant to the installation of roles and windows sever requirements.
First Select the installation type as role-based or feature-based installation as shown in the following diagram then click on Next.

Select the server from the server pool on which you are going to install the role as shown in following window then click Next.

In next screen you can select multiple roles here we will Click on DHCP Server then a new window appears which show that required tools to be added click on Add Feature.

Click Next to go to next step.

Click Next.

First click on the checkbox. Restart the destination server automatically if required, then click Yes and in the last click Install to start the installation process.

When the feature installation succeeded message shown under the progress bar Then click on Close to exit from the wizard.

After installation of the DHCP role, the next section is configuration, how and what IP addresses range to use, which gateway router and DNS server may be used and for how much time it should be used. Now to open DHCP Console
go to Window Button on the taskbar then click Server Manager.

In the server manager window Click on Tools then DHCP to open the DHCP configuration console.

DHCP scope has a valid range of IP addresses pool to be given to clients by leasing, the mac address reservation, exclusion and other scope option can be done. Further information is shared as follows with stepwise actions. In
the DHCP console right click on IPV4 then click on New Scope…to create a new scope.

The new scope wizard helps you set up scope for distributing IP addresses to network computers in the network. To continue further Click Next.

Here we define the scope name that will identify the scope. First, enter the Name of the scope the click Next.

Enter the range of IP address that client will have assigned as in the following diagram. The Length and Subnet mask can be customized also according to requirements. Click Next.

If there is an IP address that comes in the range of IP address given in DHCP server can be excluded by adding the range of IP addresses. Click Next.

The lease duration specifies how long a client can use an IP address from this scope. The default is 8 days time for leasing one IP address, this time is customization. Set the lease duration time then click Next.

If you have some other options like DNS servers WiNS you can add it here by choosing Yes radio button. Then click Next.

Here we can specify the routers, default gateways to be distributed by this scope. Enter the IP address of the Router or Gateway by typing the IP address in a text box, then click the Add button.

Now the IP address is added now click Next to continue to next step.

Enter the DNS server IP addresses according to set up that we want our client to use. Then click Next.

If there is no DNS server in the network the WINS server can be used, which convert the NetBIOS computer name to IP address. Enter the WINS server IP addresses according to your setup. Then click Next.

After almost creation of the scope at this step, the scope needs to be activated that clients can obtain address leases only if a scope is activated. Chose Yes, I want to activate this scope now then click Next to go to the last step.

The completing the new scope wizard show you have successfully completed the new wizard scope On successful configuration of scope click Finish.

The Scope is created and activated as well as shown in the following diagram.

DORA (Discover, Offer, Request Acknowledgment)
The process of obtaining automatic IP address on DHCP client.
- DHCPDiscover: whenever the computer turned on connected to LAN send a broadcast message and look for the DHCP server.
- DHCPOffer: when the DHCP server receives the Discover message, the DHCP server sends a broadcast message to the client that I have an offer(TCP/IP configuration) for you.
- DHCPRequest: when the client receives the offer broadcast then it sends a request that I am ready to accept the offer (TCP/IP configuration).
- DHCPACK: the request is entertained by DHCP server and sends an acknowledgment broadcast that you got it (TCP/IP configuration) but it will be with lease duration. The default lease duration is 8 days when 50%
of the time is consumed the DHCP client request DHCP server unicast the to renew the lease duration.
Further readings:-https://docs.microsoft.com/en-us/windows-server/networking/technologies/dhcp/dhcp-top
It is never easy to understand the working of network proxy in windows and especially the IP addresses. You should have deep knowledge about networking if you want to play with IPs. However, we are going to be discussing a very important and popular topic which will surely help you with numerous things. We are going to know how to change DHCP lease time in Windows.
We will know how you can check your DHCP time and how to modify it. This concept can be pretty helpful for anyone who is a hardcore internet user and do various kinds of browsing, gaming, and downloading tasks.
If you are someone who needs constant internet access from a single IP, this article is going to help you with the same.
DHCP is a popular IP assigning technology for dynamic assigning. It means that once you get an IP assigned from your ISP, it will get changes after some time. And the time it will take to get changes is called DHCP Lease time.
So, it could be a very important thing when you want to connect your computer to the internet with the same IP address for long periods of time.
But, unfortunately, most of us are not aware of how to do the same. You might think that it will be working fine with the help of your computer itself. But, it’s not true. Your computer has nothing to do with the internet IPs.
In fact, you will have to play with the router configurations to do the same. If you are aware of the process, you may get nothing more than that in this article.
However, we will be discussing some other topics here which you may find interesting to read.
You are going to know how to check the IP assignment and expiry time using the command prompt. Also, at the end of this article, you will get information to easily modify that time to your desired time frames.
We will be going to know about other things like the benefits and different processes.
So, it will be a good thing if you keep reading this article until the end. We will make sure to cover as much as possible.
What is the DHCP Lease Time?
DHCP (Dynamic Host Configuration Protocol) is a service used by most of the networks to assign IP addresses automatically to the devices. This technology uses dynamic systems. So, any IP assigned to your computer, smartphone, scanning printer, or any other device will never be permanent.
Because each device will need an IP address to connect to the internet or with each other, it becomes an important part of any network. But, if we talk about the DHCP lease time, you can imagine its meaning just by its name.
Whenever you get a new IP assigned for your device, it will stay the same for some time. And the time between the assignment and expiry is known as the DHCP lease time.
If the lease time is very low, your internet will disconnect after some time when the ISP is assigning it a new IP.
This is the reason why this is an important factor when you are working with processes where continuous access to the data is required. However, if you want, you can easily change this time and also check the current time frame. This is all we are going to discuss further.
The best lease time for DHCP (What’s the timeout configuration)?
The best DHCP lease time will depend on your specific requirements. So, if you are looking to have a constant internet connection for heavy downloading or gaming, etc, you will surely need a good amount of lease time.
However, if you are a normal internet user, you will have no need to worry about this concept. In fact, most of us are never aware of the fact that there is a DHCP time which will matter when you use the internet.
But, if we consider the home networks, having the default 24 hours lease time is good.
If you are connecting three or four devices at the same time to a network, there are no issues with this amount of lease time.
Some users may want much more lease time duration, so they can set a limit of multiple days if they want.
So, just understand your needs before you finalize any specific lease time frame for your network connection.
How to find the default DHCP Lease Time in Windows?
As we have discussed earlier, you can easily check your lease time with the help of a command prompt. In fact, the command which we are going to use for the same will give various other information. But, we are going to simply use it for the process we are here.
The process is very simple to follow and anyone can perform this method. You just have to open the Command prompt and run this single command.
Let’s see how you can do it.
- Press Windows + R keys together on your keyboard and type cmd and then hit Enter
- Inside the Command Prompt window, enter this command ipconfig/all and hit Enter
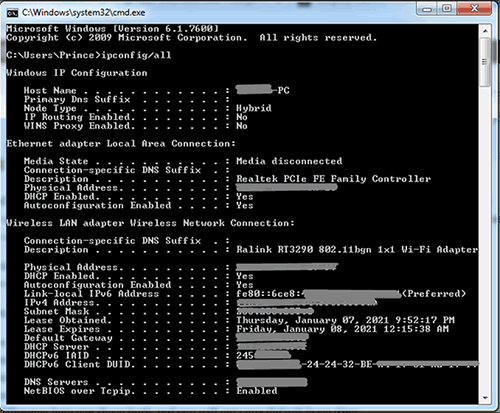
- You will get lots of information about your connection and IP
- Find the section which says Lease Obtained and Lease Expired
- Calculate the difference between these both and you will get your default lease time
You will notice that you are actually seeing the time when you got your IP address assigned and when it is going to be expired.
It can be less than 24 hours or more as per your network. But, this is to help you easily identify how you can check that out.
How to renew the lease time on Windows 10?
Suppose you have got your IP assigned yesterday and your expiry time is going to be after one hour. Now, if you want, you can renew your lease time now and start the new timing from now.
In this way, you have got something important to do, you have enough time to spend on that. So, it could be a very helpful thing to do and make your reassigning task pretty easy and effective.
Fortunately, this can be done using a couple of commands. Just like the above step, we are going to use the command prompt in order to reset your lease time and get a new one.
Let’s see how you can do that.
- Run Command Prompt using the same process we discussed above
- Now, enter this command first of all and hit Enter
ipconfig/release
- After this, run this command:
ipconfig/renew
- Now, you can follow the same procedure to check your new lease obtained and lease expires time
So, this was the process of renewing your DHCP time and get a new time to work with.
What happens when the DHCP lease time expires?
From our previous conversations, you might be aware that when the lease time expires, you are going to have a new IP assigned by your router. In fact, this is actually what happens at that time.
So, when that expiry moment arrives, your system or device will ask your router to provide a new IP.
At the same time, it will release the earlier IP it was using with the same connection.
If the router agrees, you will get a new IP and this all will happen within seconds. So, you might not see that happening anywhere.
Except you can observe it using your command palette. But, this process is being done by DHCP so you will get any random IP that is available at that time.
So, if you have set a custom time frame for your lease time to expire, it will expire at the same time and you will get a new IP at that time as well.
You can use two different methods to change your DHCP time. The first method is by using your router configuration panel and the second one is with the help of a DHCP server. We are going to cover both the steps here one by one.
However, the method which uses the router is the best one for sure. So, before starting with that one first, we need to know why to change DHCP lease time.
Why do you want to change your DHCP lease time?
Your IP address plays a very important role in order to make your internet connection working appropriately for your desired tasks. In fact, you would need a constant IP address configuration if you want to play games properly.
Also, if you are downloading a file with non-resuming capability, you would need a connection that isn’t changing over time.
There are various other things and situations where you may feel the need for a constant IP address and a good lease time.
Sometimes, with a very short DHCP lease time, you can lose your files or get locked out if you are working on some specific websites or software.
We can say that it is always better to have a good amount of lease time so that you can ensure proper reception and delivery of your desired contents.
If you want to do the same and change your DHCP time, we are going to help you with that as well. Let’s get started.
1. Using the Router settings
There are various types of routers available in the market. So, you might be using any of those. However, the settings will surely be pretty much identical to the ones we are going to discuss here.
We are going to take the example of an Asus router. So, if you also have this type of router, you are at the good end. However, you can imitate the same settings on your available router and they will work fine.
Once you have reached that interface, you have the freedom to set that limit to your desired values.
Also, you can change them later on if you want. Now, without any further discussions, let’s get started.
- Login to your router dashboard using its address
- Enter your credentials and log in to the dashboard
- Inside the interface, go to the LAN option
- Under the LAN menu, select the DHCP Server tab
- Inside this menu, find an option named Lease time
- Change that time to your desired time frame which you want to set as your DHCP lease time
- It will ask for the time in seconds. So, keep that thing in mind
- Now, save the settings and quit that session
Now, once all these settings are done, it is important to restart your router to save the settings. Once it is rebooted, you can run the command prompt and enter ipconfig/all to check your current DHCP lease time.
You will surely be able to see the new time you have currently set.
What is Max lease time in the router?
By default, all the routers will come along with a standard lease time of 24 hours. But, if we talk about the DHCP guidelines, we can set a lease time of up to 46, 710 days.
So, you can use the same IP for this amount of time as per the router configurations. Of course, various other factors will work together to make this happen and because of some other things, you might have to get a new IP assigned.
If we talk about the general rules, these are the specific time frames you can set on any router. So, if your router is allowing you to do so, you can set multiple days and even weeks as your DHCP lease time.
Most of us will never set that maximum time frame as our lease time but you may need some days and you can do the same without any issues.
However, you will surely be looking to know how to do it and we will surely discuss it below.
2. Changing the lease time using DHCP Server
If you have got a dedicated DHCP server, you can use it to change your lease time as well. Most of the users may not have access to it but it can be a very helpful method to change your lease time.
Although the above method will work for most of the home users, this one will be suitable for large corporations where they have their own DHCP servers assigned to them. As a DHCP client, you can easily change that time and get your desired set of times when you will get a new IP address.
The process can be a little bit tough as compared to the previous one. But, let’s get started with the same below.
- Press Windows + R keys together to open the Run dialog
- Now, enter dhcpmgmt.msc and hit Enter
- Find the DHCP scope for which you want to change your lease time
- Now, find the Lease Duration for DHCP clients option
- Enter the lease time you want to use in the Limited to field
- Save the changes and restart your computer
After doing this, you should be able to change your lease time without any hassles directly from your DHCP server. This is perhaps the most reliable way to do this thing.
How do I remove a bad IP from a DHCP server?
This is another important and big question that comes along with the one we have discussed here. In fact, you might feel the need of removing various IP addresses at various instances. So, you should be aware of the process of doing the same.
This can happen various times. It is possible that you are facing various issues with a certain IP. The most common problem is slow speed and lots of traffic.
So, if you want, you can easily delete that IP and get a newly assigned network. And, this will work very fine.
You will be able to use the internet in a proper manner in the way you want. So, you should know the whole process of doing the same.
We are going to do this here. So, let’s get started.
- Get inside your DHCP manager and select the Addresses tab
- Now, select the IP addresses network
- Choose one or more IP you want to delete from the list
- Go to the edit menu and select the delete option
- You can also delete the hostnames from the host table if you want
- Once everything is done, press enter
This was all about removing the bad IPs from the list of addresses. However, you should pay close attention to the IPs you want to change using this method.
It is good to confirm twice whether you want to change a certain IP or not.
Is DHCP lease time important in-home networks?
When you are using the internet for general purposes like surfing the internet, social media, streaming, etc, DHCP lease time doesn’t matter so much.
Because you can do all these things even with continuously changing IP addresses, you are going to be good with that. You can imagine using the internet on your smartphone using your sim card.
Those IP addresses change very frequently. In fact, they can change multiple times within an hour.
So, you hardly face any kind of issues with that. But, surely it will show its impacts when you are downloading files or doing any other important tasks which require the same IP for a longer period of time.
Gamers, content creators, network administrators, and various other people are are there who will need long lease times and they must have proper preparation for the same.
Changing that time frame is not enough. You must have a proper ISP that supports the same for you.
So, keep all these things in mind when you have an advanced application for which a long lease time is required.
When you should connect with a professional?
If you have followed the whole procedure properly and you are still not seeing any change to your DHCP lease time, you should surely get in touch with a network expert who can look deeply into this matter.
You can get in touch with your ISP and let them know about your needs. They can help you better with the same in a better way. You can call their customer support and let them know about your IP requirements.
Also, if you are facing some issues after changing those preferences, you will have to get in touch with an expert again. So, if you do not want to do anything by yourself and you have got free customer support with your internet connection, just let them know about it and they will provide you with the support you are looking for.
Final Verdict
Do we hope you are now aware of how to change DHCP lease time in Windows 10? We have covered all the steps in detail and provide you with everything you will need to get this done. However, we suggest you follow these procedures properly so that you face no hassles at all.
Doing all these steps is very easy and anyone can do it. But, if you are stuck at any step, just leave that right there. We know all routers are not the same and we can’t cover the steps for everyone in a single article.
But, you can search the internet and you will find the help you need.
If you have liked this article, make sure to share it with others as well. Also, consider giving us your valuable feedback in the comment section. We will surely love to hear from your side.
You can give us suggestions about any improvement, complaint, or query related to our content. We will make sure to help you with everything we can.
If you want to write to us on any specific topic, please let us know. We keep coming with regular articles on various technology and software topics.
So, stay connected with us for more.
Когда вы подключаетесь к локальной сети через Wi-Fi или кабель Ethernet, сервер DHCP (протокол динамической конфигурации хоста) на вашем сетевом маршрутизаторе выдаст вашему устройству айпи адрес. Это дает вашему устройству идентификатор, который позволяет другим устройствам обнаруживать его и подключаться к нему. Генерируемый IP-адрес обычно длится около 24 часов до истечения срока его действия.
Это связано с Срок аренды DHCP. который позволяет локальной сети перераспределять IP-адреса с устройств, которые были отключены от сети некоторое время назад, на другие устройства, освобождая IP-адреса для других устройств, которые могут подключаться (если вы не дадите им Статический IP).
Если не указано иное, обычный сетевой маршрутизатор предполагает, что любое подключение к нему является временным. IP-адрес вашего устройства был назначен DHCP-сервером с указанием срока аренды. Если ваше устройство не отображается по истечении этого периода, срок аренды истекает, и IP-адрес освобождается для использования другими устройствами.
Срок аренды DHCP — это время, в течение которого арендованный IP-адрес остается активным до истечения срока его действия. Как уже упоминалось, 24 часа — это типичное время аренды, которое сети выдают подключенным устройствам, но это стандартное значение может не подходить для вашей сети.
Однако вы можете изменить это значение. Если вы используете открытую или общедоступную сеть, к которой могут подключаться другие пользователи, вы можете ожидать большого количества соединений ближнего действия. Именно здесь имеет смысл сократить срок аренды, сохраняя пул доступных IP-адресов свежим и позволяя подключаться новым устройствам.
Срок аренды зависит от ваших конкретных потребностей. Например, вы можете использовать час для Wi-Fi в ресторане и 12 часов для офисной сети, доступной для гостей.
Вам потребуется административный доступ к вашему сетевому маршрутизатору, чтобы иметь возможность изменять эти настройки. Хотя вы можете просмотреть текущий срок аренды DHCP на Windows или Mac, для его изменения потребуется доступ к вашему маршрутизатору.
Как просмотреть срок аренды DHCP в Windows 10
Вы можете просмотреть продолжительность аренды DHCP для ПК с Windows с помощью Windows PowerShell, альтернативы командной строке в Windows 10.
Чтобы открыть окно PowerShell, щелкните правой кнопкой мыши меню «Пуск» Windows и нажмите Windows PowerShell (английский). Это запустит станцию PowerShell с правами администратора.
В окне PowerShell введите IPCONFIG / все. В нем будет перечислена вся необходимая информация о ваших текущих сетевых подключениях, включая проблему аренды DHCP и дату истечения срока действия. Для сетевого адаптера найдите значения Аренда получена و Срок аренды истекает.
По этой информации вы можете определить срок аренды. В приведенном выше примере срок истечения срока аренды составляет ровно 24 часа после того, как аренда была впервые оформлена. Этот период может быть короче или дольше для вашего подключения, в зависимости от конфигурации вашей сети.
Как просмотреть срок аренды DHCP в macOS
На Mac вы можете просмотреть продолжительность аренды DHCP с помощью встроенного приложения «Терминал».
Вы можете запустить приложение «Терминал», щелкнув Launchpad -> Other -> Terminal из Dock внизу экрана.
Вам нужно будет знать имя устройства вашего сетевого компонента в macOS. Для этого введите список сетевых настроек В окне Терминала нажмите Enter. В нем будут перечислены имена и MAC-адреса всех сетевых устройств.
Когда у вас есть имя устройства, вы можете найти текущий срок аренды DHCP, набрав ipconfig getpacket en0 , заменять en0 от имени вашего устройства. В нем будет перечислена различная информация о вашем подключении. Срок аренды DHCP будет указан рядом с опцией. аренда_время (uint32).
Срок аренды DHCP будет показан здесь в виде шестнадцатеричного значения с основанием 16. Вам понадобится Преобразуйте эти значения к стандартному десятичному числу. Например, указанное выше соединение имеет шестнадцатеричный срок аренды DHCP 0x15180. Его можно преобразовать в 86400, продолжительность периода аренды в секундах, что эквивалентно 24 часам.
Изменение продолжительности аренды DHCP в локальной сети
Продолжительность аренды DHCP не может быть изменена с помощью сетевых настроек на вашем устройстве, так как она контролируется DHCP-сервером, назначающим IP-адреса, которым обычно является сетевой маршрутизатор. Для изменения настроек вам потребуется доступ к роутеру.
Обычно вы можете подключиться к сетевому маршрутизатору, набрав http://192.168.1.1 или же http://192.168.0.1 в веб-браузере при подключении к сети. Возможно, вам придется проверить руководство Маршрутизатор свою учетную запись, чтобы определить, является ли это правильный способ подключения, а также укажите имя пользователя и пароль администратора для входа в систему (в основном Администратор для обоих).
После входа в систему вам нужно будет найти соответствующие настройки сети / LAN или настройки DHCP в меню настроек маршрутизатора. Если вы не можете его найти, см. Дополнительные советы в руководстве пользователя.
Стоимость аренды DHCP называется по-разному. Например, на роутере TP-Link это значение называется параметром аренды адреса. Вы можете установить его в минутах для этого типа роутера, максимум 2880 (эквивалент 48 часов). У других маршрутизаторов максимальный срок аренды будет длиннее или короче.
Измените значение соответствующим образом, затем сохраните настройки. Как только вы измените значение аренды DHCP, новое время аренды для ваших устройств будет выдано соответствующим образом.
Как продлить аренду DHCP
Если вы изменили продолжительность аренды DHCP, вы можете заставить любые подключенные устройства освободить и продлить существующую аренду IP-адреса. Это позволит немедленно применить любые изменения в информации об аренде DHCP.
Для этого на ПК с Windows 10 откройте окно Windows PowerShell, щелкнув правой кнопкой мыши меню Пуск и нажав Windows PowerShell (английский).
В открытом окне PowerShell введите IPCONFIG / выпуск. Это освободит текущий IP-адрес в аренду и отключится.
Тип IPCONFIG / обновить чтобы восстановить соединение. На этом этапе сетевой DHCP-сервер выдаст новый IP-адрес.
В macOS это можно сделать из меню «Системные настройки». Щелкните значок Apple
в строке меню, затем коснитесь Системные настройки.
В меню Системные настройки коснитесь сеть. Выберите сетевую службу, которой требуется обновленный IP-адрес, в левом меню, затем нажмите Расширенные настройки.
В расширенном меню коснитесь вкладки TCP / IP. Затем нажмите на Продление аренды DHCP Для автоматического освобождения и продления аренды вашего IP-адреса.
Этот процесс займет несколько секунд. После этого ваш IP-адрес будет обновлен, чтобы подтвердить свой IP-адрес, вам нужно будет запустить команду ipconfig getpacket en0 (заменяя en0 на имя вашего подключения) в Терминале, чтобы проверить текущий срок аренды.
Правильное управление сетью в Windows 10
Срок аренды DHCP для устройств в вашей сети является важным компонентом работы вашей сети. Если вы страдаете от Конфликт IP-адресов Вы можете найти это лучше Установите статический IP-адрес Для устройств, которыми вы пользуетесь регулярно.
Многие из этих параметров необходимо настроить на вашем сетевом маршрутизаторе, но Windows позволяет вам изменить настройка сети Самостоятельно — будьте готовы к конфликтам, если ваши настройки не соответствуют вашему роутеру. Это может помешать вам видеть другие компьютеры в вашей сети, поэтому не забудьте сначала дважды проверить все изменяемые вами настройки.
This is the ultimate guide to Windows DHCP best practices and tips.
If you have any best practices or tips please post them in the comments below.
In this guide, I’ll share the following DHCP best practices and tips.
Table of contents:
- Don’t put DHCP on Your Domain Controller
- Use DHCP Failover
- Central vs Distributed DHCP Server
- Avoid static IP assignments and use DHCP reservations
- Exclude IPs from the DHCP scope
- Learn PowerShell DHCP Commands
- Subnetting and benefits of network segmentation
- DHCP Lease Duration Tips
- Use IP conflict detection only when it is needed
- Run DHCP Best Practice Analyzer
- Document IP addresses or us an IPAM
- Set DHCP Server Options
- Use DHCP Relay Agents
- Prevent Rogue DHCP Servers
- Backup DHCP Server
- DHCP MAC Address Filtering
Don’t Put DHCP on Your Domain Controller
The general recommendation is to not run any additional roles on your domain controller other than DNS. Your domain controller should be a domain controller/DNS and that is it. It is common for small organizations to install additional roles and 3rd party software on their domain controllers. It is recommended to avoid this if you can.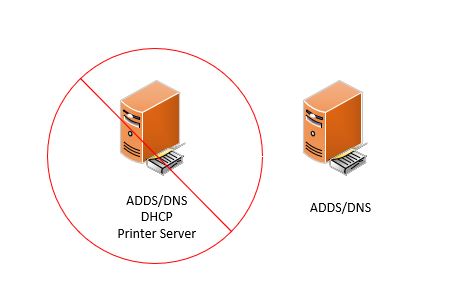
What is the issue?
Installing additional services on your DC increases the attack surface, makes it difficult to manage and can lead to performance issues.
Issue #1. Manage DC with multiple roles
Domain Controllers with multiple roles installed are difficult to manage. This can often lead to instability and disruption of services.
For example, say you are having issues with DHCP or installed a security patch that requires a reboot. Rebooting a server with Active Directory Domain Services role on it could cause major disruption to your organization. This can affect authentication, replication, group policy, and DNS. Your users will not be able to access anything if DNS is down.
If you have multiple domain controllers and it’s properly configured then these issues can be avoided but why risk it?
If DHCP was installed on its own server you could reboot the DCHP server with no worries of affecting the services on the Domain Controller.
Issue #2. Security
- The more software/services you install the bigger your attack survivance. If DHCP is installed on the DC and a new vulnerability was discovered in the DHCP service your DC server is now at risk.
- Do you have guest wifi? How do you feel about these unmanaged devices being connected to your DHCP/DC server? I’m not a fan of using an internal DHCP server to provide IP addresses for the public. Then to add that these public devices are also connecting to the domain controller…. yikes my security alarms are going off.
- When DHCP is installed on a domain controller the DHCP service inherits the security permissions of the DC computer account. This violates the principle of least privilege. Now your DHCP server is running with privileges it doesn’t need to perform a task which it was designed for. Yes, this can be corrected but why add this risk.
Installing DHCP on its own member server will reduce the attack surface of your DC.
Issue #3. Performance
Generally, I’ve seen DHCP servers run very efficiently and not require a lot of system resources such as CPU or memory.
But…
Say you just learned about a new DHCP option such as conflict detection and you turn it on for all scopes.
Uh oh… Now the CPU usage skyrockets and the domain services are slow, users can’t log in and DNS requests are painfully slow.
Maybe you install an IPAM to keep tracking of available IP addresses and it takes up CPU and memory… again taking away resources from the domain services.
I could go on and on… point being the more software/services you install on your domain controller the more it can affect performance and lead to disruption in services.
Summary
Your domain controller is one of the most critical services in a Windows domain environment, it’s your baby and deserves its on server. A Domain Controller is a Domain Controller is a Domain Controller is a Domain Controller. Nothing else.
Use DHCP Failover
DHCP failover is a feature for ensuring the high availability of a DHCP server. With DHCP failover two DHCP servers share DHCP information so that if one goes down the other server can still provide DHCP leases to clients.
The DHCP failover option is built into the Windows server operating system. The picture below shows the setup of two DHCP servers configured with load balance failure mode. If one server fails the other server is still active and takes over all DCHP requests.
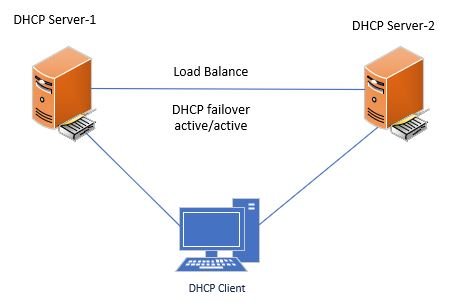
There are two failover design options:
Hot standby design
When using hot standby mode one server is the active server and the other is a standby. The active server is the primary server and handles all DHCP requests. If the active server goes down the standby server takes over the DHCP requests.
This option is commonly used with the standby unit being at a physically different location than the active.
Load balance design
In load balance mode both servers work in an active-active mode to handle DHCP requests. The requests are load balanced and shared among the two DHCP servers. If one of the servers loses contact with its failover partner it will begin granting leases to all DHCP clients.
Summary
You will need to determine which failover design is best for your environment. It’s a free built in option so take advantage of it and make your DHCP servers are fault tolerate.
Sources:
- DHCP Failover Architecture
Central vs Distributed DHCP Server
Do you have a large network with branch offices at multiple locations?
The question is do you install a DHCP server at these branch offices or have them tunnel back to a centralized DHCP server?
Centralized DHCP Server
A centralized DHCP server is placed at a centralized location that the remote offices connect to for DHCP. This is typically located at one of the main datacenters. In this design there are no local DHCP servers, all requests go back to the centralized server.
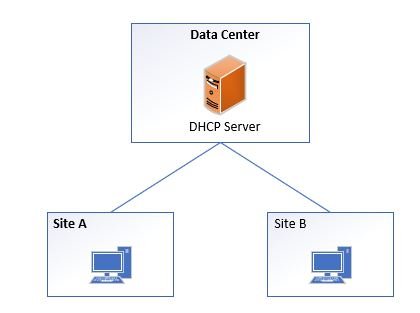
Distributed DHCP Server
In a distributed DHCP model there are DHCP servers at the local branch office. This model the clients get IP addresses from the local DHCP server.
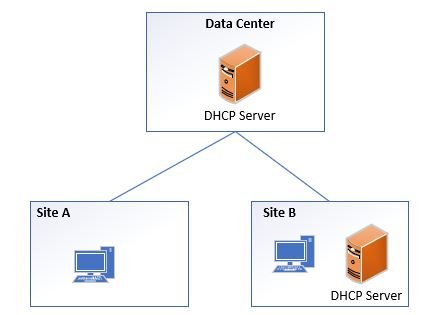
So which option is best?
This can be answered by one simple question?
Can the branch office work entirely by itself with no connection back to the data center? If yes then it makes sense for there to be a local DHCP and DNS server.
If the branch office tunnels back to the data center for the internet, Active Directory, DNS, and so on then there is no point in putting DHCP locally.
I work for a company that has offices throughout the state and I use a centralized DHCP model. We have reliable fast connections so it makes sense for us to use a centralized DHCP server.
One thing to consider is how many employees are at the branch office. If you have a very large branch office with thousands of employees then having local resources like Active Directory, DNS and DHCP can be helpful. That will be a lot of traffic going across the WAN link and if the link goes down it would take all those employees offline.
Summary
Choosing between centralized or distributed DHCP can often be answered with the following question “Can the branch office work with no connection back to the data center. Size of the remote office and connection speed back to the datacenter can also be a factor.
Sources:
- Multi-Site deployment topologies for DHCP Failover
- Distributed vs centralized DHCP
Avoid static IP assignments and use DHCP reservations
Assigning static IP addresses to computers, printers, phones, or any other end user device is a pain.
Here is what happens when you statistically assign an IP address.
- Helpdesk replaces the device not aware of the static IP
- Now the device lost connection completely or partially
- Helpdesk sends tickets to network team to fix the issue
- The network team sends ticket back to helpdesk with the static IP
- Helpdesk now has to go to the device and assign the IP
I’ve been in the above situation plenty of times and like I said it’s a pain. To avoid all of this just use DHCP reservations instead of static IP assignments.
For anything that needs a fixed IP address, I use DHCP reservations. The one exception is infrastructure devices like routers and switches, those that get static IPs.
Screenshot of DHCP reservations for printers.
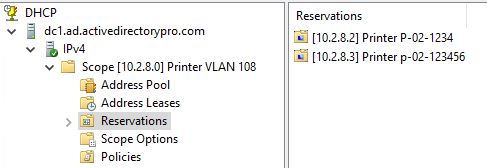
WIth DHCP reservations all you need to do is update the MAC address when devices are replaced and the IP is auto assigned back to the device. It also provides a quick view of everything that his been assigned an IP, instead of manually tracking everything in a spreadsheet.
Exclude IPs from the DHCP scope
When creating a DHCP scope I recommend excluding a small range for static IP assignments. Yes, I know in the previous tip I said don’t use static assignments but you will need it for infrastructure equipment.
Your networks will have a default route that will be a router so you definitely want that excluded from the DHCP pool. You may also run into other equipment that requires a static IP so it’s good to have a small range of IPs excluded from the DHCP pool for these devices. For example, I’ve seen various alarms and security devices that need a static IP so I just provide an IP from the exclusion range.
Here is a screenshot of a data VLAN used for workstations and laptops with the exclusion of 10.2.10.1 to 10.2.10.10.

Learn PowerShell DHCP Commands
There is nothing wrong with using the DHCP console (dhcpmgmt.ms) but PowerShell is awesome and simplifies many tasks. If you have a large network with hundreds of DHCP scopes then using PowerShell is a huge time saver.
Here are a few commands to get you started.
Install DHCP Role
Install-WindowsFeature -IncludeManagementTools DHCP
Backup DHCP Server
Backup-DhcpServer -ComputerName "dhcp1.ad.activedirectorypro.com" -Path "C:Windowssystem32dhcpbackup"
View DHCP leases
Get-DhcpServerv4Scope | Get-DhcpServerv4Lease
Find DHCP Lease from MAC Address
Get-DhcpServerv4Scope |Get-DhcpServerv4Lease |where {$_.ClientId -like “b4-b6-86-b4-**-**” }
Add DHCP Scope
Add-DHCPServerv4Scope -EndRange 10.2.1.254 -Name Vlan110 -StartRange 10.2.1.1 -SubnetMask 255.255.255.0 -State Active
Get all active ipv4 scopes
Get-DHCPServerv4Scope
Get all DHCP reservations for a scope
Get-DHCPServerv4Lease -ScopeId 10.2.1.0
Create a DHCP reservation
Get-DhcpServerv4Lease -ComputerName dhcpserver1 -IPAddress 10.2.1.8 | Add-DhcpServerv4Reservation -ComputerName server1
That is just scratching the server of managing DHCP with PowerShell. I’ve added a few links below to some additional resources for using Powershell.
Sources:
- DhcpServer PowerShell cmdlet
- Active Directory PowerShell Commands
Subnetting and benefits of network segmentation
I’m not going to deep dive into subnetting because there are plenty of resources for that.
But… it helps to have some basic understanding of network when configuring DHCP scopes.
You don’t want to have just one big DHCP pool for all your devices, you should segment devices into separate networks. This also depends on the size of your network, if you have a small network then network segmentation is not as important.
Benefits of network segmentation
Security
By keeping devices on separate networks you have better control of the network. Do your printers need access to the internet? Probably not. Do computers in the finance department need to talk directly to computers in HR, absolutely NOT. By separating devices into their own network you have much better control of their access.
Limiting lateral movement in the network can really slow down attackers and viruses. It is important to enable firewalls or access control lists at the network level to limit lateral movement in your network.
Network performance
Putting everything on one big network will create a giant broadcast domain. This can lead to all sorts of issues, like spanning tree loops, broadcast and multicast storms. Segmenting your networks will break up the broadcast domains and reduce possible performance issues.
Control visitor/guest access
You don’t want your guest network to have access to your secure network. Separating this traffic to its own network allows you to filter this traffic and block access to your internal network. I also use the guest network for IOT type devices that just need an internet connection.
Below is an example of how I segment network traffic.
- Computers = 10.2.10.0/24 VLAN 110
- Printers = 10.2.8.0/24 VLAN 108
- Voice = 10.2.6.0/24 VLAN 106
- Video Surveillance = 10.2.4.0/24 VLAN 104
- Server = 10.2.2.0/24 = VLAN 102
- Guest = 10.16.0.0/23 = VLAN 116
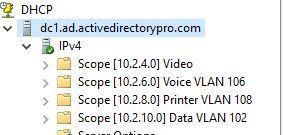
In addition to network segmentation try and keep your IP scheme simple, it really simplifies managing DHCP scopes.
DHCP Lease Duration Tips
A DHCP lease is the time period a DHCP server assigns an IP address to a client. The default DHCP lease time for DHCP scopes is 8 days.
Tip#1 increase lease time for fixed devices
For small networks, you can leave the lease time to the default setting of 8 hours.
For large networks, consider changing the DHCP scopes for fixed devices (workstations) to 16 days. This can reduce DHCP related network traffic. Workstations don’t move very often so they don’t need to go through the whole DHCP dance as often to obtain an IP address.
Tip#2 reduce the lease time for guest/mobile devices
If you provide guest wifi these DHCP scopes can become exhausted of available IPs very quickly. These devices most likely just need temporary access such as a few hours. For these scopes consider adjusting the DHCP lease time to 1 hour. If the device is still active it will renew but if the device disconnected it will free up an IP address. This should help with available IPs on your guest scopes.
This can also be the case with mobile devices, this one can be tricky though with more and more users having laptops. The default of 8 days may be sufficient but if you know of mobile devices that move around a lot you may consider reducing the lease time.
Summary
If you have DHCP scopes that serve specific devices such as workstations only then consider adjusting the DHCP lease times.
Use IP conflict detection only when it is needed
When two devices on the same LAN have the same IP address an IP address conflict occurs. This leads to one or both of the devices having issues communicating on the network.
The DHCP server has an option to help reduce IP conflicts. The conflict detection option on the DHCP server will first check if an IP is in use before assigning it to a device.
By default, this is disabled on all DHCP scopes.
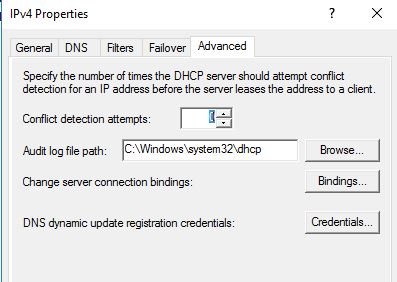
Microsoft’s recommendation is to use this only when it is needed. DO NOT enable this for every scope. If you stay away from static IP assignments then you probably will never need to turn this on.
If you do turn this on set the detection attempts to 1 or 2.
Sources:
- Microsoft DHCP Best Practices
Run DHCP Best Practice Analyzer
Microsoft’s best practice analyzer is a tool that checks the DHCP configuration against Microsoft guidelines. The best practice analyzer is built into Windows Server and is available on the server management tool.
Steps to run the tool.
Step 1: Open Server Manager
Step 2: Click on DHCP
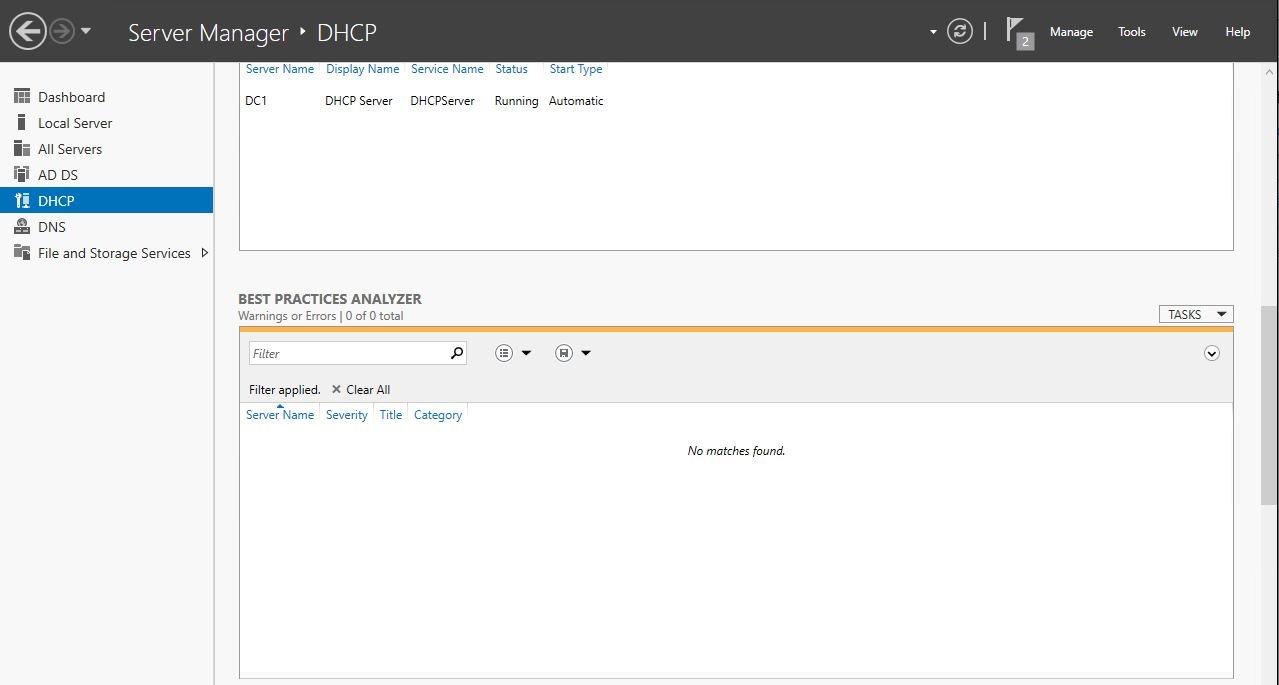
Step 3: Start a BPA scan
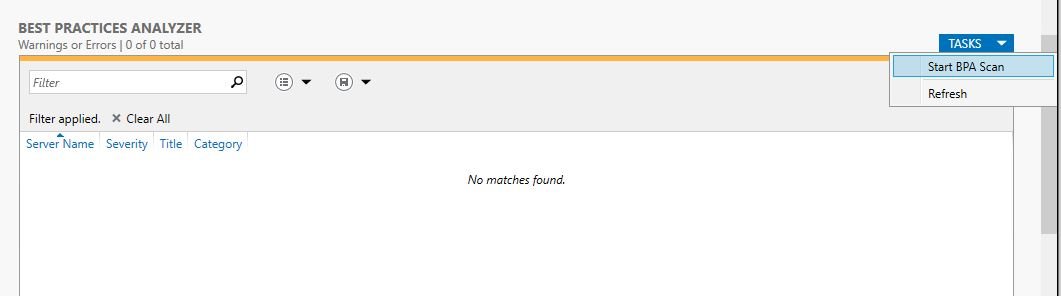
The results will display when the scan is complete
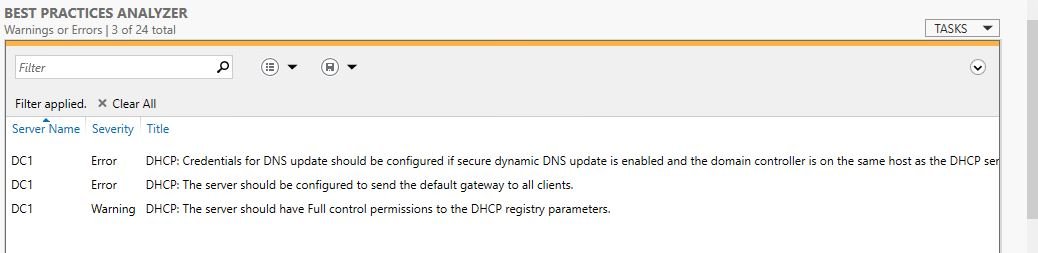
The BPA scanner should help discover any basic misconfigurations. Review your results and make any changes you feel are necessary for your environment.
Document IP addresses or us an IPAM
Document your IP scheme, VLANs, and static IP assignments.
For small networks, an excel spreadsheet may be sufficient.
For larger networks, I recommend an IP address management tool. For years I used an excel spreadsheet and as the network grew the spreadsheet became a nightmare. I eventually moved all the spreadsheets to SolarWinds IPAM and no longer worry about IP management. SolarWinds IPAM takes care of everything for me and best of all I can quickly search the entire database.
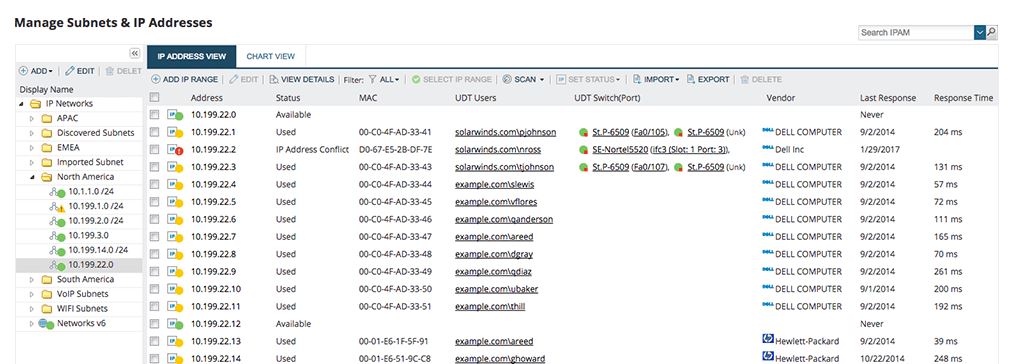
IPAM Benefits
- Automatic IP address tracking
- Can integrate with DHCP/DNS to track dhcp scope usage
- Alerting and reporting of scope usage
- Search IP addresses, comments, hostnames, etc. It is so nice being able to quickly search by a keyword to see what a device’s IP address it.
SolarWinds has a free version of their IPAM, it can track up to 254 addresses. The paid version allows you to manage all IP addresses.
Download a FREE copy here
Set DHCP Server Options
DHCP scope options allow you to auto configure additional TCP/IP settings on the client devices.
DHCP options can be configured at two different levels, at the server or per each DHCP scope.
I prefer at each scope, it’s more work but I may have scopes such as guest wifi that I don’t want using the internal DNS. Sometimes VOIP phones need special options to configure and I don’t want that at the server level.
The most common options used are:
003 Router
006 DNS servers
015 DNS Domain Name
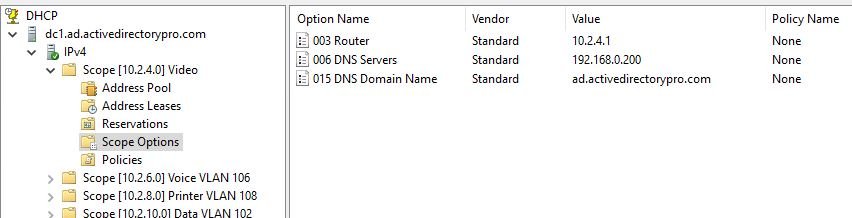
Take advantage of the scope options so you can auto configure the IP settings on all devices.
DHCP Relay Agents
If you have a centralized DHCP server with multiple networks then you will need to use a DHCP relay agent.
DHCP messages are broadcasted and routers do not forward broadcast packets. To fix this issue you can enable the DHCP relay agent function on your router/switch to allow the DHCP broadcast packets to reach the device.
You will need to check with your router documentation for the commands to enable the relay agent.
Sources:
- Cisco Configyure DHCP Relay Agent
- HP Configure DHCP Relay
Prevent Rogue DHCP Servers
Have you ever had a user or someone in your own IT department plug a switch/router into an available port on the wall? Then the helpdesk phone starts blowing up because users can’t connect to the internet or other resources.
Rogue DHCP servers are a headache. In addition, they can be a security risk and used for various attacks.
The best way to block rogue DHCP servers is at the network switch. This can be done with an option called DHCP snooping or 802.1x port based network access.
DHCP Snooping
DHCP snooping is a layer 2 switch feature that blocks unauthorized (rogue) DHCP servers from dishing out IP addresses to devices.
DHCP works by categorizing switchports as either trusted or untrusted ports. A trusted port allows DHCP messages an untrusted port blocks DHCP messages.
You want your devices (computers, printers, phones) on an untrusted port so a rogue DHCP server cannot be plugged in.
802.1x port based network access
802.1x is an IEEE standard for port based network access control. It is a mechanism that can require devices to authenticate before providing them network access.
It’s not only good for rogue DHCP servers but for controlling network access to anything.
802.1x is typically configured at the switch level and requires a client and authentication server.
Backup DHCP Server
Your DHCP servers are critical to providing IP settings to your clients. In the event of a system crash you need to recover this server as soon as possible.
Did you know by default, Windows will back up the DHCP configuration every 60 minutes to this folder %SystemRoot%System32DHCPbackup.
This is great but does you no good if the server crashes and you can’t access the folder.
If you don’t have any offsite replication in place then you would need to copy the backup folder to another location on a regular schedule.
This can be done with a script that copies the folder to another location or uses PowerShell to specify a remote location.
Backup-DhcpServer -ComputerName “DC01” -Path “C:DHCPBackup”
You can read more on this in my article Backup and Restore Windows DHCP Server
DHCP MAC Address Filtering
The DHCP MAC address filtering feature allows you to block or allow IP address assignment based on MAC addresses.
This is useful if you want to have a DHCP scope provide IP addresses to an explicit list of devices. It’s also useful if you have unwanted devices on a VLAN getting an IP address.
For example, you have users putting BYOD devices on your secure VLAN. You could add these devices to the deny filter. The DHCP MAC filtering is a quick and simple way to control access to the network. If you have the time and resources the better option is to use 802.1x.
Conclusion
I’ve been using these tips for years when managing DHCP servers. When configured correctly DHCP can be a set and forget server with little or no issues. I hope you find these tips useful and please post any DHCP tips or best practices you have in the comments below.