| title | ms.author | manager | ms.topic | author | ms.date | description |
|---|---|---|---|---|---|---|
|
File Server Resource Manager (FSRM) overview |
jgerend |
brianlic |
article |
jasongerend |
5/14/2018 |
File Server Resource Manager (FSRM) is a tool that enables you to manage and classify data on a Windows Server file server. |
File Server Resource Manager (FSRM) overview
Applies to: Windows Server 2022, Windows Server 2019, Windows Server 2016, Windows Server 2012 R2, Windows Server 2012, Windows Server 2008 R2
File Server Resource Manager (FSRM) is a role service in Windows Server that enables you to manage and classify data stored on file servers. You can use File Server Resource Manager to automatically classify files, perform tasks based on these classifications, set quotas on folders, and create reports monitoring storage usage.
It’s a small point, but we also added the ability to disable change journals in Windows Server, version 1803.
Features
File Server Resource Manager includes the following features:
- Quota management allows you to limit the space that is allowed for a volume or folder, and they can be automatically applied to new folders that are created on a volume. You can also define quota templates that can be applied to new volumes or folders.
- File Classification Infrastructure provides insight into your data by automating classification processes so that you can manage your data more effectively. You can classify files and apply policies based on this classification. Example policies include dynamic access control for restricting access to files, file encryption, and file expiration. Files can be classified automatically by using file classification rules or manually by modifying the properties of a selected file or folder.
- File Management Tasks enables you to apply a conditional policy or action to files based on their classification. The conditions of a file management task include the file location, the classification properties, the date the file was created, the last modified date of the file, or the last time the file was accessed. The actions that a file management task can take include the ability to expire files, encrypt files, or run a custom command.
- File screening management helps you control the types of files that user can store on a file server. You can limit the extension that can be stored on your shared files. For example, you can create a file screen that does not allow files with an MP3 extension to be stored in personal shared folders on a file server.
- Storage reports help you identify trends in disk usage and how your data is classified. You can also monitor a selected group of users for attempts to save unauthorized files.
The features included with File Server Resource Manager can be configured and managed by using the File Server Resource Manager app or by using Windows PowerShell.
[!IMPORTANT]
File Server Resource Manager supports volumes formatted with the NTFS file system only. The Resilient File System isn’t supported.
Practical applications
Some practical applications for File Server Resource Manager include:
-
Use File Classification Infrastructure with the Dynamic Access Control scenario to create a policy that grants access to files and folders based on the way files are classified on the file server.
-
Create a file classification rule that tags any file that contains at least 10 social security numbers as having personally identifiable information.
-
Expire any file that has not been modified in the last 10 years.
-
Create a 200 megabyte quota for each user’s home directory and notify them when they are using 180 megabytes.
-
Do not allow any music files to be stored in personal shared folders.
-
Schedule a report that runs every Sunday night at midnight that generates a list of the most recently accessed files from the previous two days. This can help you determine the weekend storage activity and plan your server downtime accordingly.
What’s new — prevent FSRM from creating change journals
Starting with Windows Server, version 1803, you can now prevent the File Server Resource Manager service from creating a change journal (also known as a USN journal) on volumes when the service starts. This can conserve a little bit of space on each volume, but will disable real-time file classification.
For older new features, see What’s New in File Server Resource Manager.
To prevent File Server Resource Manager from creating a change journal on some or all volumes when the service starts, use the following steps:
-
Stop the SRMSVC service. For example, open a PowerShell session as an administrator and enter
Stop-Service SrmSvc. -
Delete the USN journal for the volumes you want to conserve space on by using the fsutil command:
fsutil usn deletejournal /d <VolumeName>For example:
fsutil usn deletejournal /d c: -
Open Registry Editor, for example, by typing
regeditin the same PowerShell session. -
Navigate to the following key: HKEY_LOCAL_MACHINESYSTEMCurrentControlSetServicesSrmSvcSettings
-
To optionally skip change journal creation for the entire server (skip this step if you want to disable it only on specific volumes):
- Right-click the Settings key and then select New > DWORD (32-bit) Value.
- Name the value
SkipUSNCreationForSystem. - Set the value to 1 (in hexidecimal).
-
To optionally skip change journal creation for specific volumes:
-
Get the volume paths you want to skip by using the
fsutil volume listcommand or the following PowerShell command:Get-Volume | Format-Table DriveLetter,FileSystemLabel,Path
Here’s an example output:
DriveLetter FileSystemLabel Path ----------- --------------- ---- System Reserved \?Volume{8d3c9e8a-0000-0000-0000-100000000000} C \?Volume{8d3c9e8a-0000-0000-0000-501f00000000} -
Back in Registry Editor, right-click the HKEY_LOCAL_MACHINESYSTEMCurrentControlSetServicesSrmSvcSettings key and then select New > Multi-String Value.
-
Name the value
SkipUSNCreationForVolumes. -
Enter the path of each volume on which you skip creating a change journal, placing each path on a separate line. For example:
\?Volume{8d3c9e8a-0000-0000-0000-100000000000}
\?Volume{8d3c9e8a-0000-0000-0000-501f00000000}
[!NOTE]
Registry Editor might tell you that it removed empty strings, displaying this warning that you can safely disregard: Data of type REG_MULTI_SZ cannot contain empty strings. Registry Editor will remove all empty strings found.
-
-
Start the SRMSVC service. For example, in a PowerShell session enter
Start-Service SrmSvc.
Additional References
- Dynamic Access Control
В этой статье мы разберем методику использования функционала File Server Resource Manager (FSRM) на файловом сервере Windows Server 2012 R2 для детектировании и блокировки работы вирусов-шифровальщиков (троянов-энкодеров, Ransomware или CryptoLocker). В частности, разберемся, как установить службу FSRM, настроить детектирование определенных типов файлов и, в случае детектирования таких файлов, заблокировать доступ пользователя к каталогу на файловом сервере.
Содержание:
- Детектирование шифровальщиков с помощью FSRM
- Настройка SMTP параметров FSRM для отправки email уведомлений
- Создание группы расширений файлов, создаваемых шифровальщиками
- Настройка File Screen Templates
- Применение шаблона File Screen к диску или папке
- Автоматическая блокировка доступа пользователя, зараженного шифровальщиком
- Тестирование защиты FSRM
Детектирование шифровальщиков с помощью FSRM
Если компонент File Server Resource Manager еще не установлен на сервере, его можно установить с помощью графической консоли Server Manager или из командной строки PowerShell:
Install-WindowsFeature FS-Resource-Manager -IncludeManagementTools
Проверим, что роль установилась:
Get-WindowsFeature -Name FS-Resource-Manager
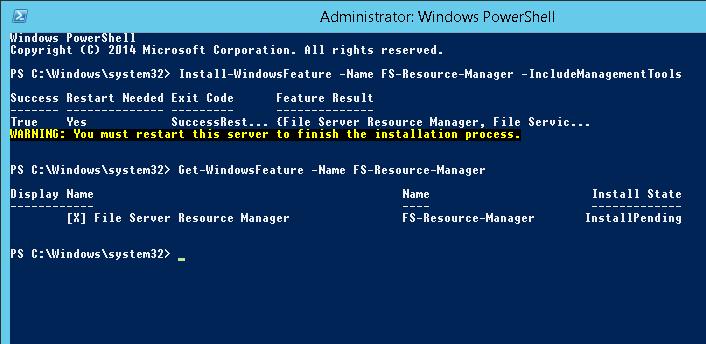 После установки компонента сервер нужно перезагрузить.
Настройка SMTP параметров FSRM для отправки email уведомлений
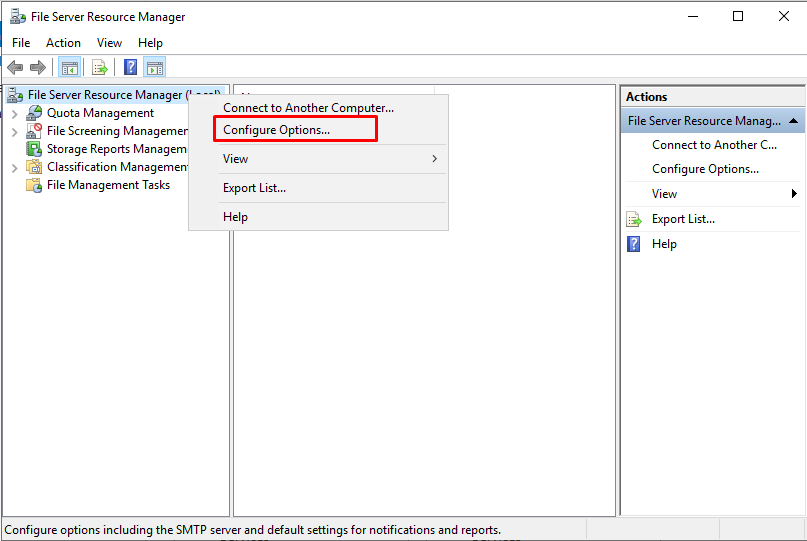
Следующий этап — конфигурация SMTP параметров службы FSRM, благодаря которым администратор может настроить отправку email уведомлений на свой ящик. Для этого запустите консоль fsrm.msc, щелкните ПКМ по корню консоли File Server Resource Manager и выберите пункт Configure Options.
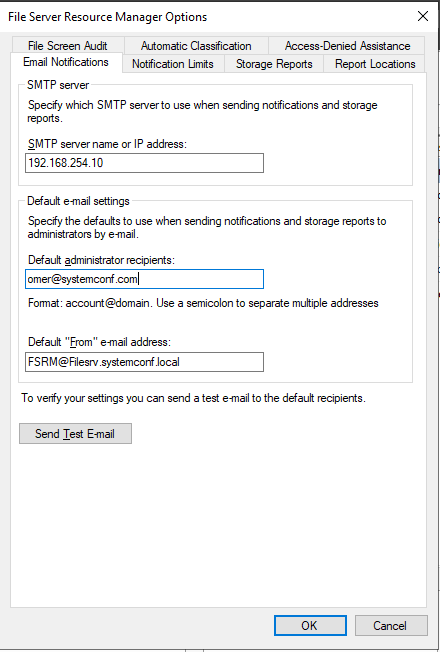
Укажите адрес SMTP сервера, почтовый ящик администратора и имя отправителя.
Совет. Если у вас отсутствует внутренний почтовый сервер, можно настроить пересылку через SMTP релей на внешние ящики.
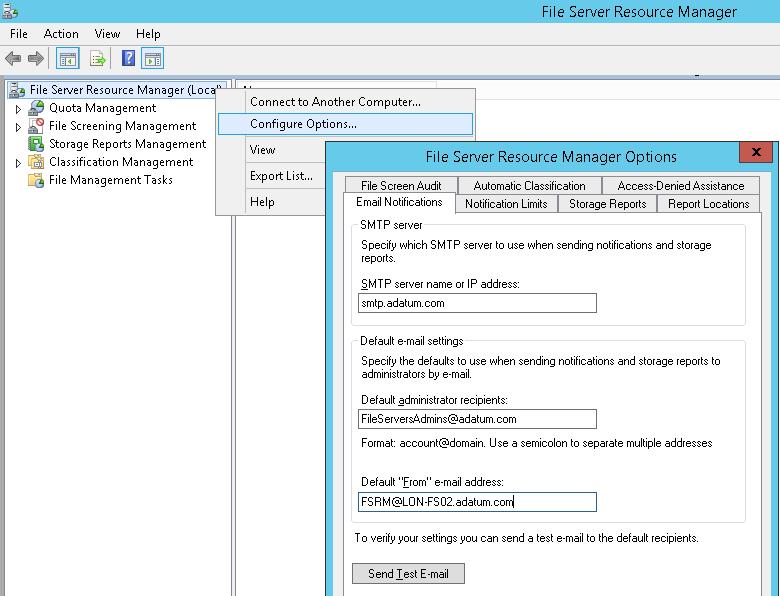
Проверить корректность настройки SMTP сервера можно, отправив тестовое письмо с помощью кнопки Send Test E-mail.
Настроить параметры SMTP службы FSRM также можно выполнить с помощью Powershell:
Set-FsrmSetting -AdminEmailAddress "[email protected]" –smtpserver smtp.adatum.com –FromEmailAddress "[email protected]"
Создание группы расширений файлов, создаваемых шифровальщиками
Следующий шаг – создать группу файлов, в которой будут содержаться известные расширения и имена файлов, которые создают шифровальщики в процессе работы.
Этот список можно задать из консоли FSRM. Для этого разверните раздел File Screening Management -> File Groups и в меню выберите Create File Group.
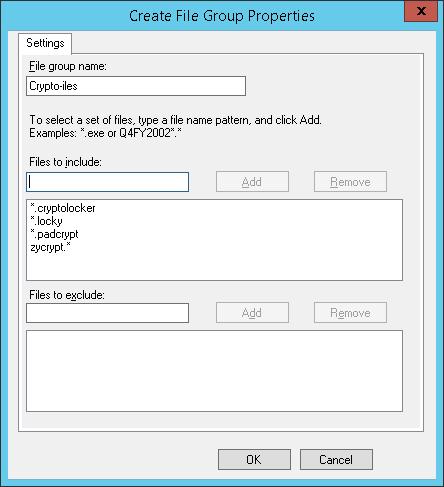
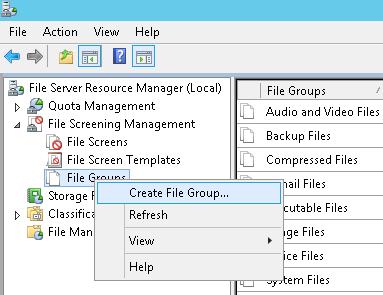 Нужно указать имя группы (к примеру, Crypto-files) и внести все известные расширения в список с помощью поля Files to include.
 Список известных расширений файлов, создаваемых шифровальщиками довольно большой, поэтому намного проще создать его с помощью PowerShell.
В Windows Server 2012 создать группу файлов с помощью PowerShell можно так:
New-FsrmFileGroup -Name "Crypto-files" –IncludePattern @("_Locky_recover_instructions.txt","DECRYPT_INSTRUCTIONS.TXT", "DECRYPT_INSTRUCTION.TXT", "HELP_DECRYPT.TXT", "HELP_DECRYPT.HTML", "DecryptAllFiles.txt", "enc_files.txt", "HowDecrypt.txt", "How_Decrypt.txt", "How_Decrypt.html", "HELP_RESTORE_FILES.txt", , "restore_files*.txt", "restore_files.txt", "RECOVERY_KEY.TXT", "how to decrypt aes files.lnk", "HELP_DECRYPT.PNG", "HELP_DECRYPT.lnk", "DecryptAllFiles*.txt", "Decrypt.exe", "AllFilesAreLocked*.bmp", "MESSAGE.txt","*.locky","*.ezz", "*.ecc", "*.exx", "*.7z.encrypted", "*.ctbl", "*.encrypted", "*.aaa", "*.xtbl", "*.abc", "*.JUST", "*.EnCiPhErEd", "*.cryptolocker","*.micro","*.vvv")
В Windows Server 2008 R2 придется воспользоваться утилитой filescrn.exe:
filescrn.exe filegroup add /filegroup:"Crypto-files" /members:"DECRYPT_INSTRUCTIONS.TXT|DECRYPT_INSTRUCTION.TXT| DecryptAllFiles.txt|enc_files.txt|HowDecrypt.txt|How_Decrypt.txt| How_Decrypt.html|HELP_TO_DECRYPT_YOUR_FILES.txt|HELP_RESTORE_FILES.txt| HELP_TO_SAVE_FILES.txt|restore_files*.txt| restore_files.txt|RECOVERY_KEY.TXT|HELP_DECRYPT.PNG|HELP_DECRYPT.lnk| DecryptAllFiles*.txt|Decrypt.exe|ATTENTION!!!.txt|AllFilesAreLocked*.bmp| MESSAGE.txt|*.locky|*.ezz|*.ecc|*.exx|*.7z.encrypted|*.ctbl| *.encrypted|*.aaa|*.xtbl|*.EnCiPhErEd|*.cryptolocker|*.micro|*.vvv| *.ecc|*.ezz|*.exx|*.zzz|*.xyz|*.aaa|*.abc|*.ccc|*.vvv|*.xxx| *.ttt|*.micro|*.encrypted|*.locked|*.crypto|*_crypt|*.crinf| *.r5a|*.XRNT|*.XTBL|*.crypt|*.R16M01D05|*.pzdc|*.good| *.LOL!|*.OMG!|*.RDM|*.RRK|*.encryptedRSA|*.crjoker| *.LeChiffre|*[email protected]_com|*.0x0|*.bleep|*.1999| *.vault|*.HA3|*.toxcrypt|*.magic|*.SUPERCRYPT|*.CTBL|*.CTB2|*.locky"
Совет. Список известных расширений файлов различных шифровальщиков можно составить самостоятельно, или воспользоваться готовыми периодически обновляемым списками, ведущимися энтузиастами:
https://www.bleib-virenfrei.de/ransomware/
https://fsrm.experiant.ca/api/v1/combined
Во втором случае актуальный список расширений файлов для FSRM можно грузить прямо с веб сервера с помощью Invoke-WebRequest
new-FsrmFileGroup -name "Anti-Ransomware File Groups" -IncludePattern @((Invoke-WebRequest -Uri "https://fsrm.experiant.ca/api/v1/combined").content | convertfrom-json | % {$_.filters})
Либо воспользоваться готовым файлом: crypto_extensions.txt. Данный файл можно сохранить на диск и обновить с его помощью созданную группу файлов FSRM:
$ext_list = Get-Content .crypto_extensions.txt
Set-FsrmFileGroup -Name "Crypto-files" -IncludePattern ($ext_list)
Настройка File Screen Templates
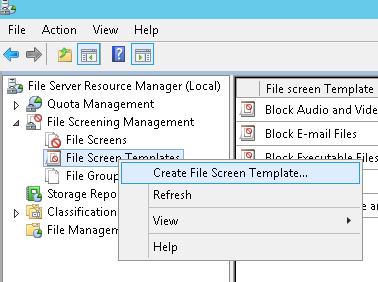
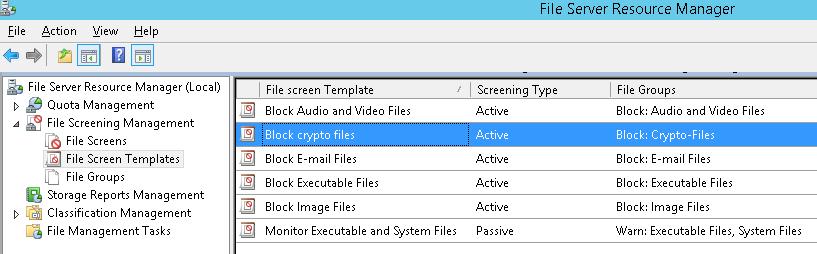
Создадим новый шаблон File Screen Template, в котором определяются действия, которые FSRM должен выполнить при обнаружении указанных файлов. Для этого в консоли FSRM перейдите в раздел File Screen Management -> File Screen Templates. Создадим новый шаблон Create File Screen Template.
 На вкладке настроек укажем имя шаблона “Block_crypto_files”, тип скрининга – Active screening (запрещается создавать указанные типы файлов) и в списке групп файлов выбрать Crypto-Files.
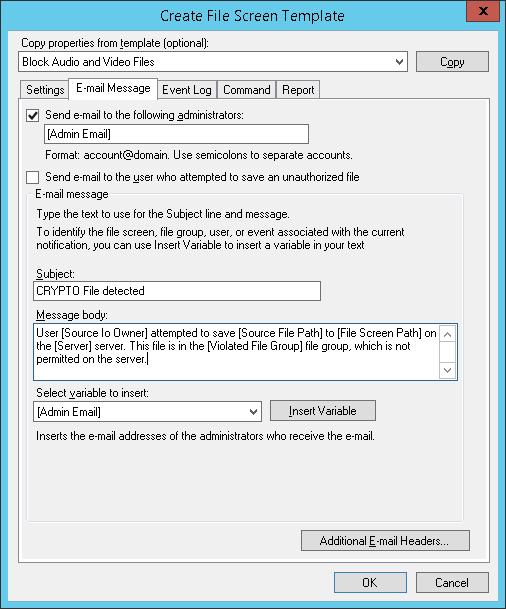
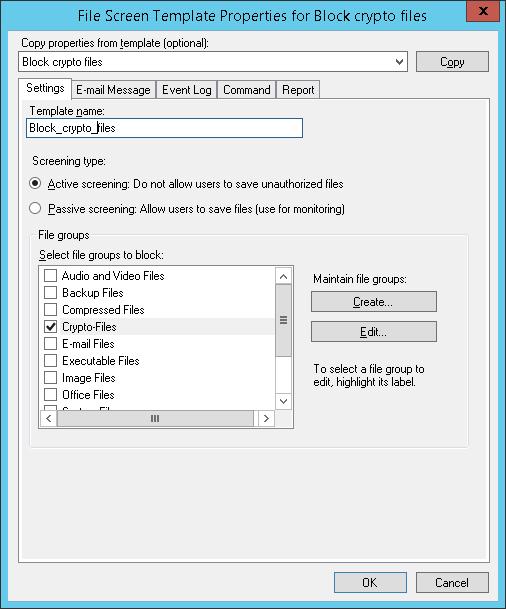 На вкладке E-mail Message включим отправку почтовых уведомлений, настроив текст оповещения по-своему вкусу.
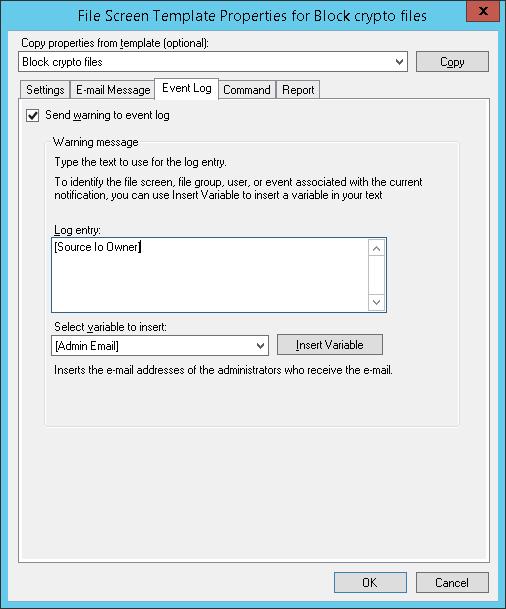
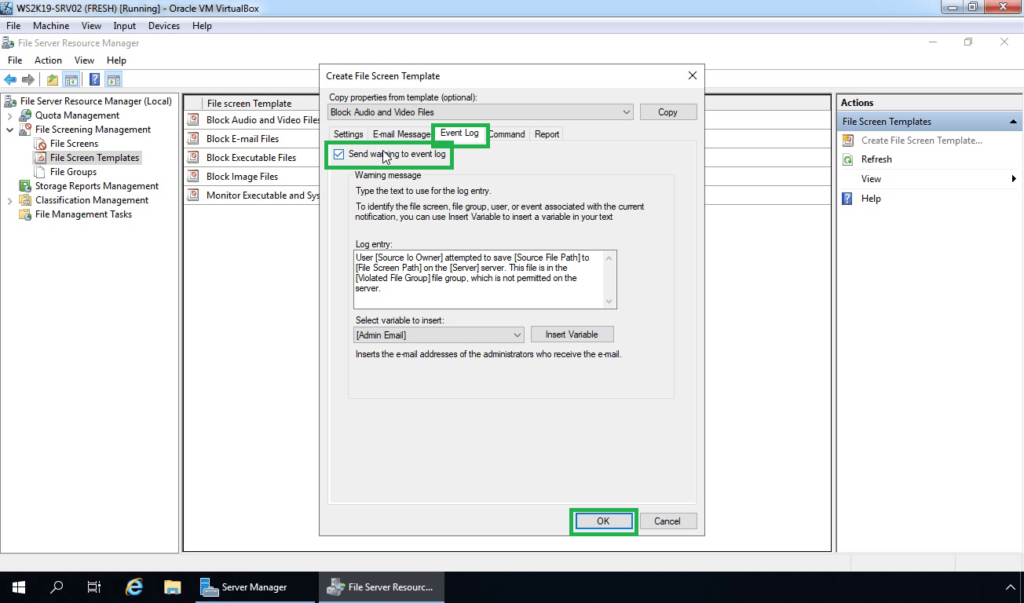
 На вкладке Event Log включим запись события в системный журнал. С указанием записывать только имя пользователя: [Source Io Owner]
На вкладке Command можно указать действие, которое нужно выполнить при обнаружении такого типа файла. Об этом чуть ниже.
Сохраните изменения. В списке шаблонов должен появится еще один.
Применение шаблона File Screen к диску или папке
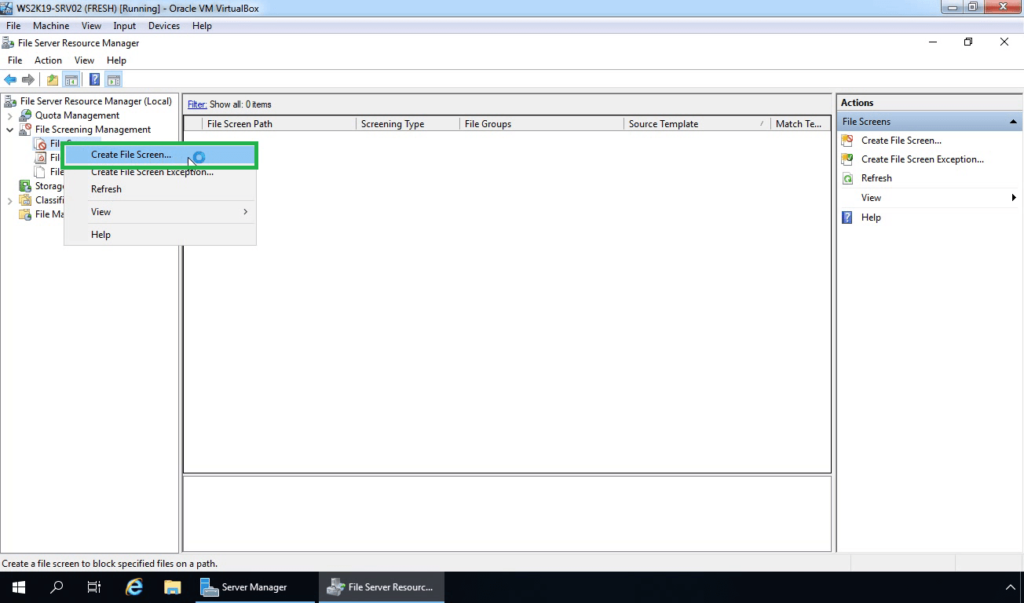
Осталось назначить созданный шаблон к диску или сетевой папке на сервере. В консоли FSRM создадим новое правило Create File Screen.
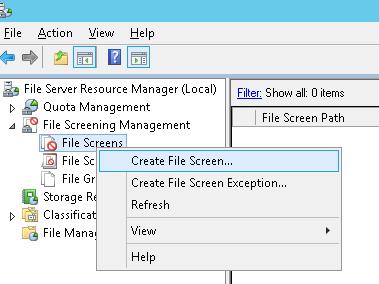 В поле File screen path нужно указать локальный диск или путь к каталогу, для которого мы хотим включить систему защиты от шифровальщика, а в списке шаблонов выбрать созданный ранее шаблон Block_crypto_files.
Автоматическая блокировка доступа пользователя, зараженного шифровальщиком
Осталось настроить действие, которое FSRM будет выполнять при обнаружении файлов, созданных шифровальщиками. Мы воспользуемся готовым скриптом: Protect your File Server against Ransomware by using FSRM and Powershell (https://gallery.technet.microsoft.com/scriptcenter/Protect-your-File-Server-f3722fce). Что делает этот скрипт? При попытке записать «запрещенный» тип файла в сетевой каталог, FSRM запускает данный скрипт, который анализирует журнал событий и на уровне шары запрещает запись пользователю, из-под осуществлялась попытка записать запрещенный тип файла. Таким образом, мы заблокируем доступ зараженного пользователя к сетевой папке.
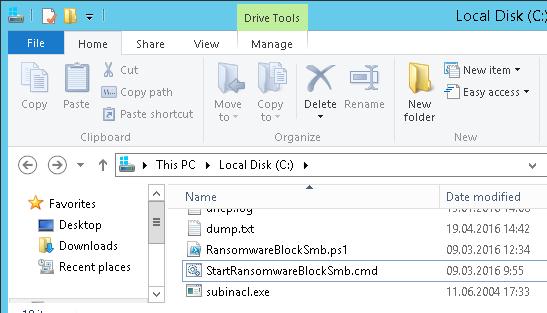
Скачайте указанный скрипт и распакуйте его в корень каталога C: на файловом сервере. В эту же папку скопируйте утилиту SubInACL (нужна для изменения разрешений на сетевой каталог). В каталоге должны оказаться следующие файлы:
- RansomwareBlockSmb.ps1
- StartRansomwareBlockSmb.cmd
- subinacl.exe
Примечание. В PS скрипте пришлось изменить строки:
$SubinaclCmd = "C:subinacl /verbose=1 /share \127.0.0.1" + "$SharePart" + " /deny=" + "$BadUser"
и
if ($Rule -match "Crypto-Files")
Осталось в настройках шаблона “Block crypto files” на вкладке Command указать, что должна запуститься командная строка с аргументом StartRansomwareBlockSmb.cmd:
Run this command or script:
c:windowssystem32cmd.exe
Command arguments:
/c “c:StartRansomwareBlockSmb.cmd”
Команда должна выполняться с правами локальной системы (Local System).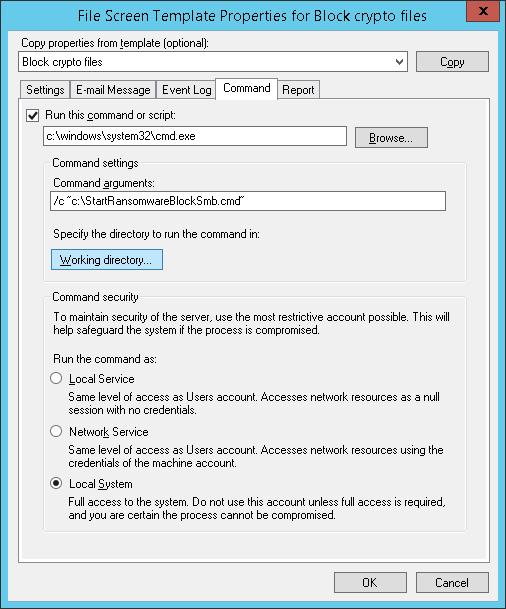
Тестирование защиты FSRM
Протестируем, как работает защита FSRM от шифровальщиков. Для чего в защищаемом каталоге создадим файл с произвольным расширением, и попробуем изменить его на запрещенное .locky.
При попытке сохранить запрещенный файл FSRM запишет в журнал событие:
Event ID: 8215
Source: SRMSVC
Скрипт RansomwareBlockSmb.ps1на основании данных из события запретит текущему пользователю доступ к данному каталогу, выставив в разрешениях на шару персональный deny:
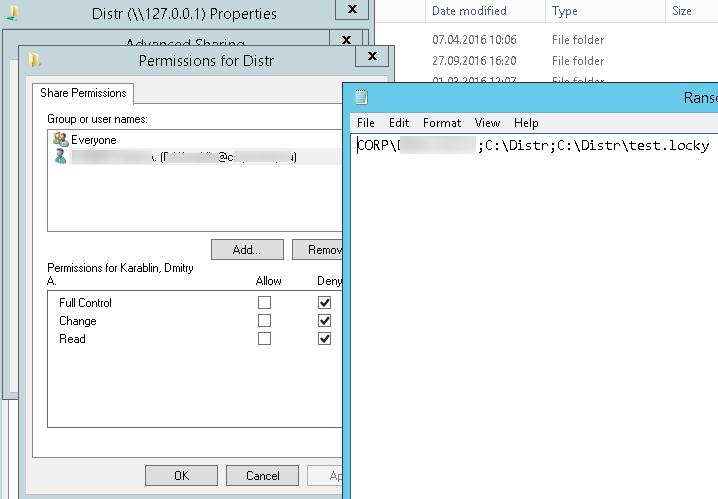 Защита работает! В корне диска в логе можно посмотреть каталог и пользователя, из-под которого пытался запустится шифровальщик.
Если нужно обеспечить еще более высокий уровень зашиты, можно перейти от черного списка файлов к белому, когда на файловом сервере можно сохранять только файлы разрешенных типов.
Итак, мы рассмотрели, как с помощью FSRM автоматически блокировать доступ к сетевым каталогам пользователям, компьютеры которых заражены вирусом-шифровальщиком. Естественно, использование FSRM в таком режиме не может дать 100% гарантию защиты файлов на серверах от этого класса вирусов, но как один из эшелонов защиты, методика вполне себе пригодна. В следующих статьях мы рассмотрим еще несколько вариантов противодействия вирусам-шифровальщикам:
- Как восстановить файлы пользователя из снимков VSS после заражения шифровальщиком
- Блокировка вирусов и шифровальщиков с помощью Software Restriction Policies
The File Server Resource Manager (FSRM) is a part of the File Services Role in Windows Server that gives you greater control over the data stored on your file servers. In this part, I’ll show you how to install the FSRM with both PowerShell and the GUI on Windows Server 2008 R2 and Windows Server 2012.
Contents
- Install FSRM on Windows Server 2012 with PowerShell
- Install FSRM on Server 2008 R2 using PowerShell
- Install FSRM on Server 2012 using Server Manager
- Install FSRM on Server 2008 R2 using Server Manager
- Author
- Recent Posts

Kyle Beckman works as a systems administrator in Atlanta, GA supporting Office 365 in higher education. He has 17+ years of systems administration experience.
If you’re running file servers, I highly recommend running FSRM. I’m always surprised at how many people either haven’t heard of FSRM or have never used it and complain about several of the problems it can help you solve. The FSRM gives you greater control over folder quotas, let’s you block file types (file screening), and generate storage reports just to name a few things it can do. So, let’s get started by installing the File Server Resource Manager on a file server.
Install FSRM on Windows Server 2012 with PowerShell
Installing the FSRM on Server 2012 with the Install-WindowsFeature cmdlet is definitely the fastest way to get up and going. With Administrator rights, run the following PowerShell command and you’re done:
Install-WindowsFeature –Name FS-Resource-Manager –IncludeManagementTools

Install FSRM on Server 2008 R2 using PowerShell
Installing FSRM on Server 2008 R2 with PowerShell takes slightly more work, but is still much faster than with the GUI. With Administrator rights, run the following PowerShell command:
Import-Module Servermanager
Add-WindowsFeature FS-FileServer,FS-Resource-Manager

Install FSRM on Server 2012 using Server Manager
Installing FSRM from the GUI is slightly more involved. First, start off in the Server Manager and go to Manage, then Add Roles and Features.

Click through the Before you begin dialog and the installation type since we won’t be setting up Remote Desktop Services.


Depending on how many servers you are managing in your Server Manager, you may see multiple servers. Select your file server and click Next.

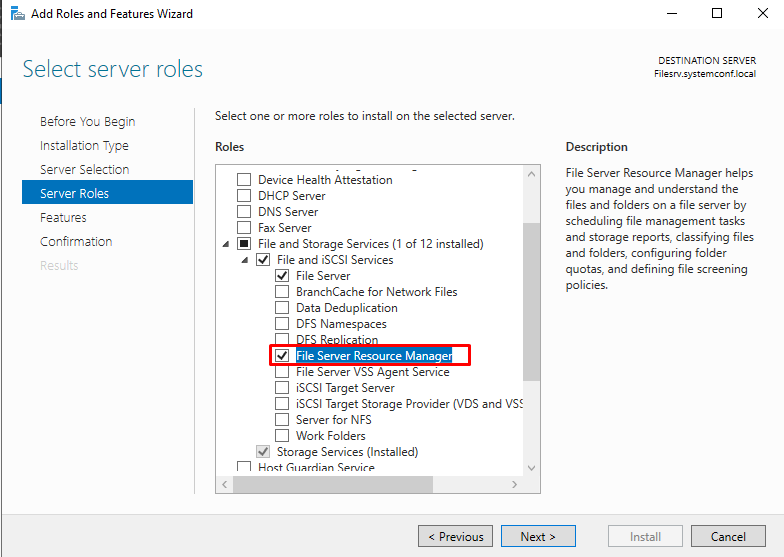
When you get to the Select server roles screen, scroll down to the File And Storage Services area and check File Server Resource Manager. When you do this, you’ll be prompted to add additional features that are necessary for the FSRM… namely the File Server role and the management tools (which you’ll definitely need if they’re not already installed). After clicking Add Features, you’ll be taken back to the Select server rolls screen and you should see that File Server and File Server Resource Manager are both checked now. Click Next to move on.


On the Select features screen, there is nothing to change. However, if you scroll down, you should see that the File Services Tools option has been checked under Remote Server Administration Tools, Role Administration Tools. Click Next to move on.

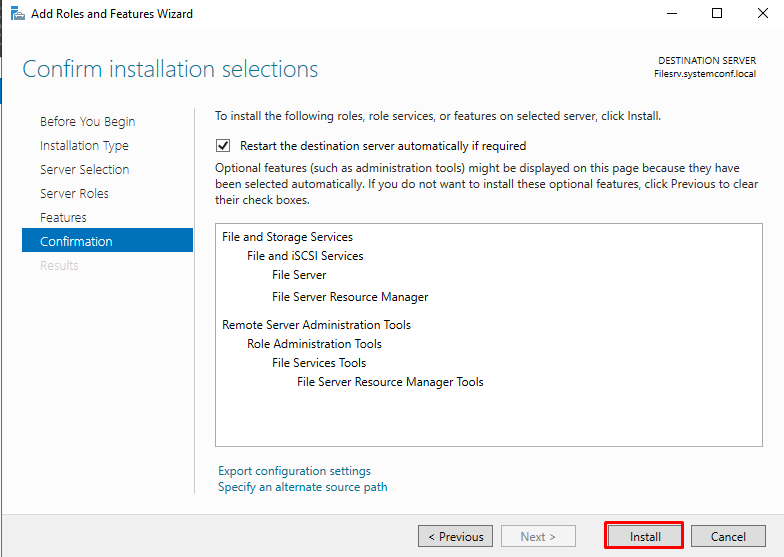
On the Confirmation installation selections screen, you can click Install. Now you can sit back and wait for FSRM to install.


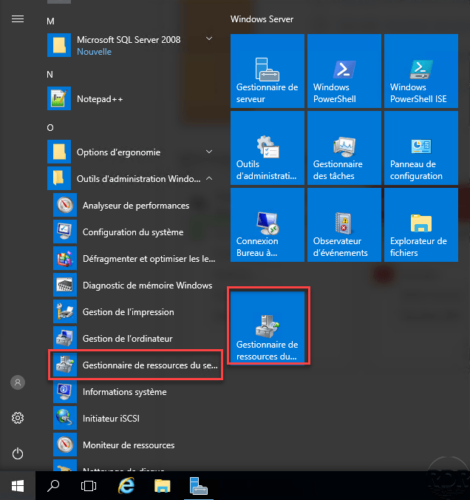
If you were installing directly on the server console, the File Server Resource Manager administrative tool should now be on the Start screen.

Install FSRM on Server 2008 R2 using Server Manager
To install the File Server Resource Manager in Windows Server 2008 R2, click on Roles in the Server Manager and then click on Add Roles. Click through the Before You Begin dialog.


In the Server Roles screen, click File Services and then Next.

In the File Services screen, click Next. In the ‘Role Services’ screen that comes up next, you’ll want to check File Server Resource Manager and then click Next. For now, we’ll skip configuring FRSM and click Next to bypass Configure Storage Usage Monitoring.


On the Confirm Installation Selections, click Install and wait for the installation to finish.


The File Server Resource Manager administrative tool should now be available on the Start menu.

In my next post I will outline the initial FSRM configuration.
The File Server Role, which has been in our lives since Windows Server 2008, continues with Windows Server 2019. It is used for assigning sharing quotas to our users in our environments, preventing unnecessary content from being copied to these areas or adding only allowed content, receiving reports, seeing the event log in case of violations here, receiving e-mail related to the situations.
We can start the steps to add roles by using one of the Manage menu on Server Manager or the area shown by the picture below.
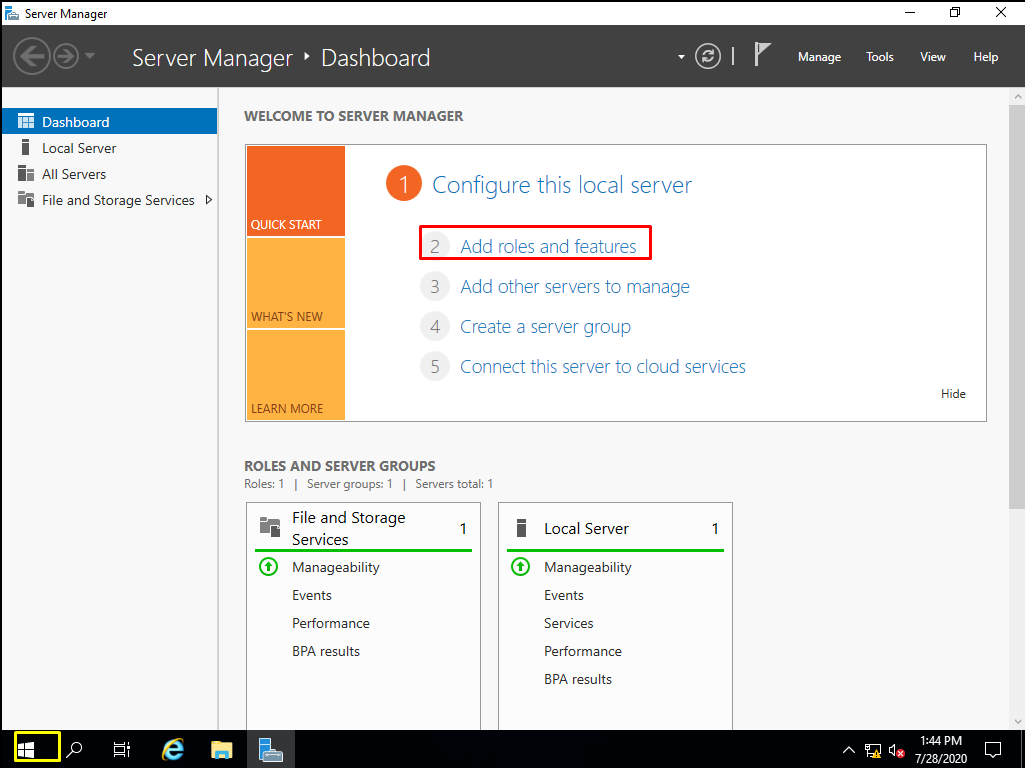
On the screen that opens, information is given on what we can do with the wizard. With the “Next” button, we can proceed to our next screen.

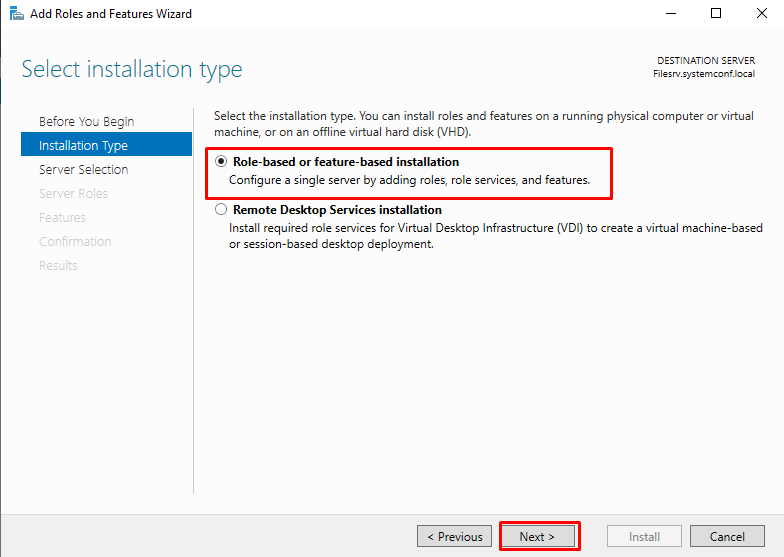
There are two options on our screen that opens. The first one is;
Role-based or feature-based installation: Allows to add and install on role and feature basis. According to the version we have in Windows Server 2016, we can add and remove the roles and features we need.
Remote Desktop Services installation: In the old days called Terminal Service and now we can make RDS (Remote Desktop Services) remote desktop configuration fast and as standard here.
For this reason, we will proceed with the Next button by choosing Role-based or feature-based installation since we will not do RDS installation and configuration.
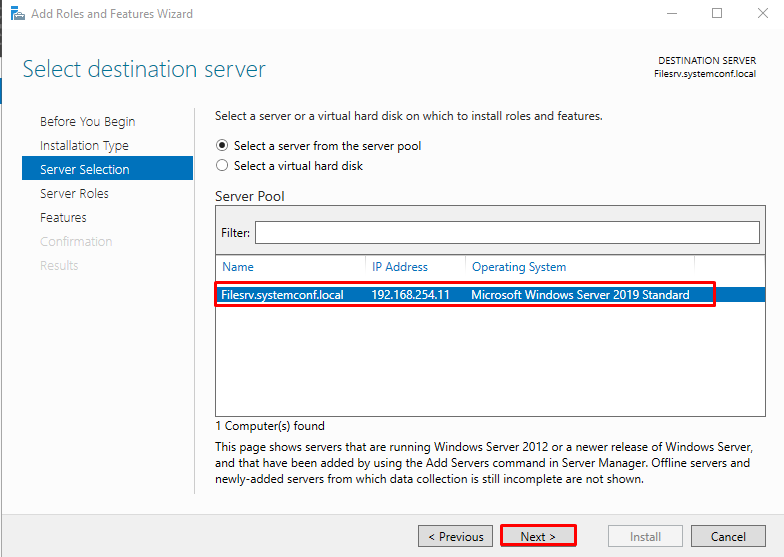
By creating a server cluster with Windows Server 2008 and 2012, it was able to add and remove Roles and Features on this cluster collectively and over a different server. Of course, this process can be done directly on Windows Server 2012, while we had to add some features to Windows Server 2008. Since we have a single server in our environment and we will install the Resources Manager feature of the File Server role on this server, we proceed with the “Next” button by selecting our server whose Name, IP address and version information are provided.
We select and expand the File and Storage Services role for the feature that we will install from the screen we see.

We select the File Server Resource Manager feature.
After selecting this feature, the screen of the components required to install this feature is displayed. Since we want it to be installed automatically on these components, we click on the Add Features button.

After our selections are completed, we proceed to the next screen with the “Next” button.
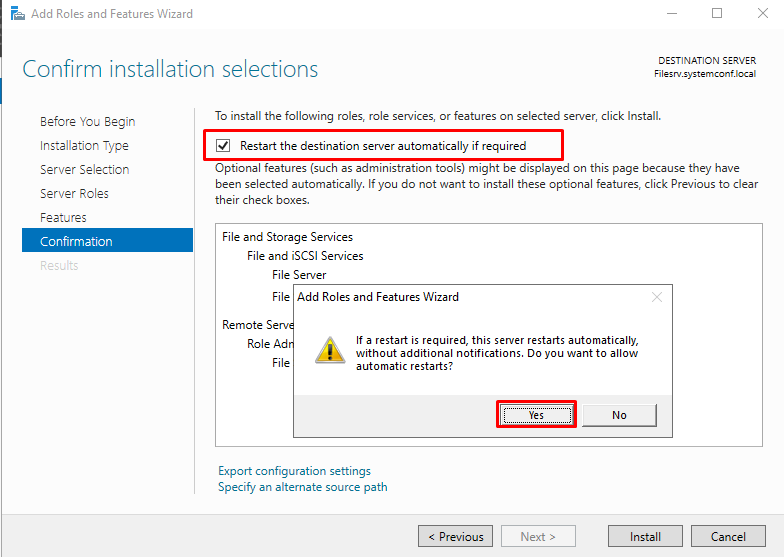
By selecting “Restart the destination server automatically if required”, we can ensure that this process happens automatically if a reboot is required after installing the roles. Let’s click the YES button on the problem screen that comes to our mix and let us state that we give consent to start again.
On this screen, we can start our installation process by clicking our Install button.
File Server Installation has started and continues.
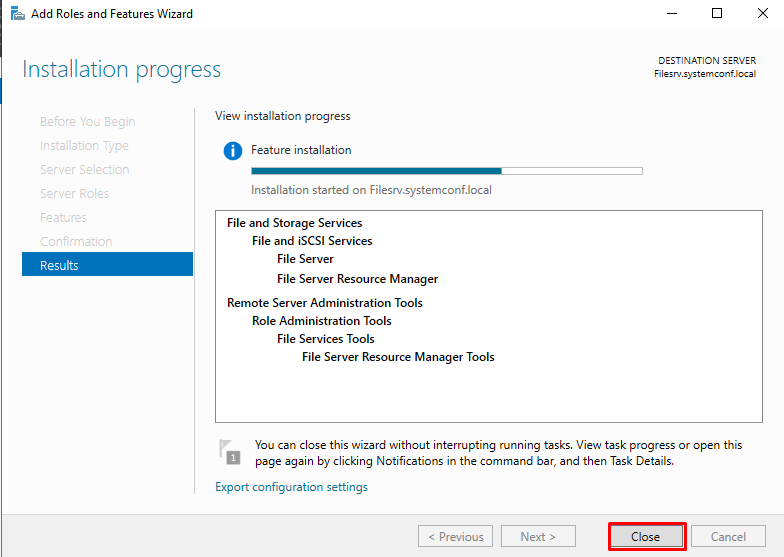
Role feature setup is complete. We can close our screen with the “Close” button.
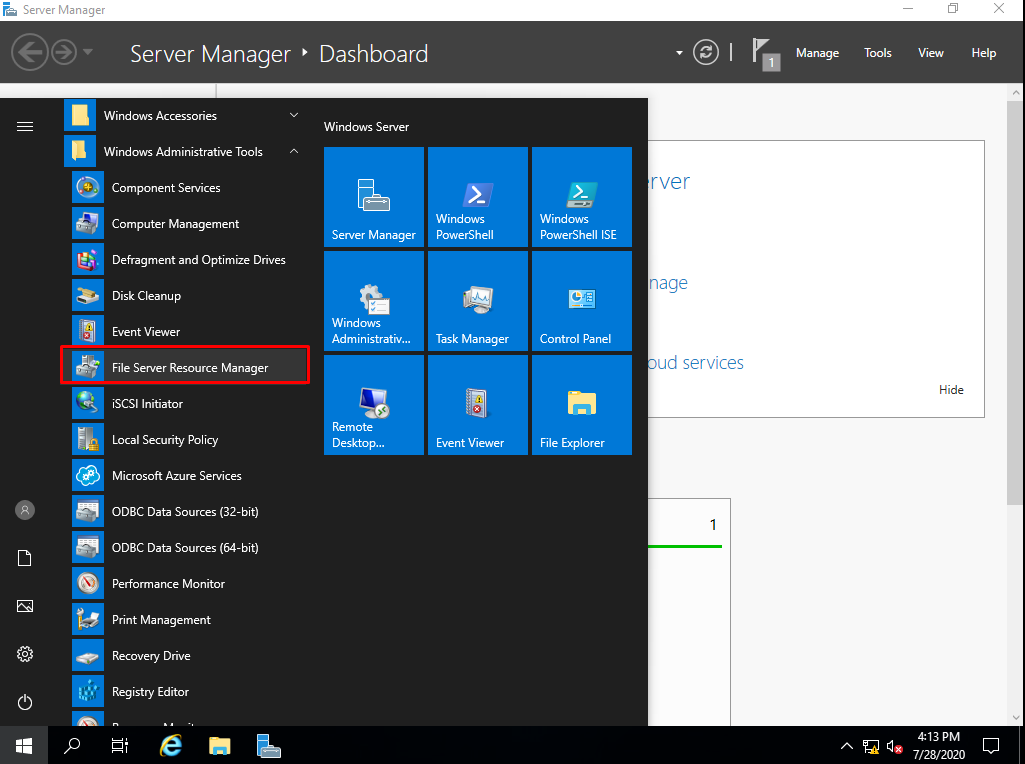
A shortcut of our File Server Resource Manager feature has occurred on the start menu. We can open our console by clicking here.
Our console is opened. A screen that is simple to use and manage welcomes us.
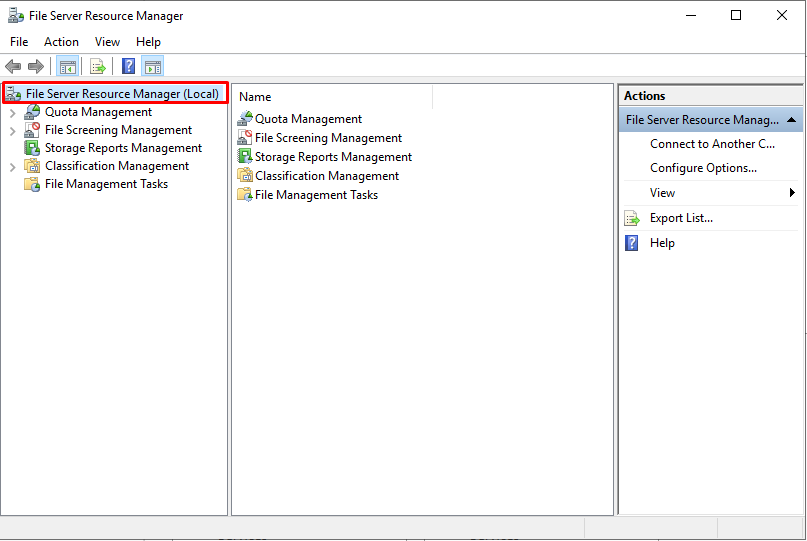
First, let’s right-click on the console main menu and click on “Configure Options…” to configure our main settings.
We just need to make a few settings on our screen in general. One of them will be notifications by mail when there is a violation or report situation. Therefore, first of all, let us enter an SMTP server information in our environment or outside in the Email Notifications section. Then we can enter the address information that will send and receive mail.
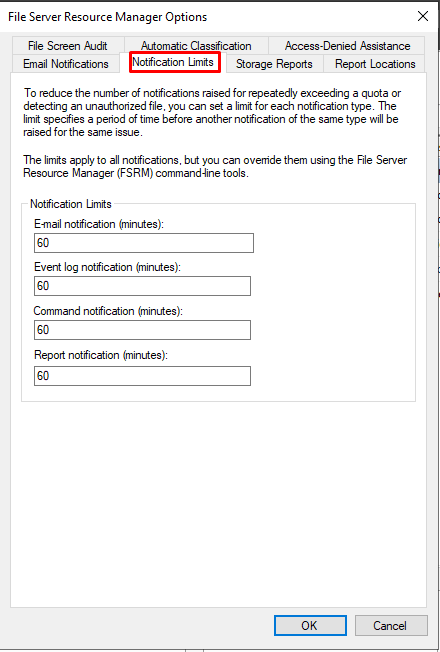
In the Notifications Limits section, we can edit the values or leave them as is.
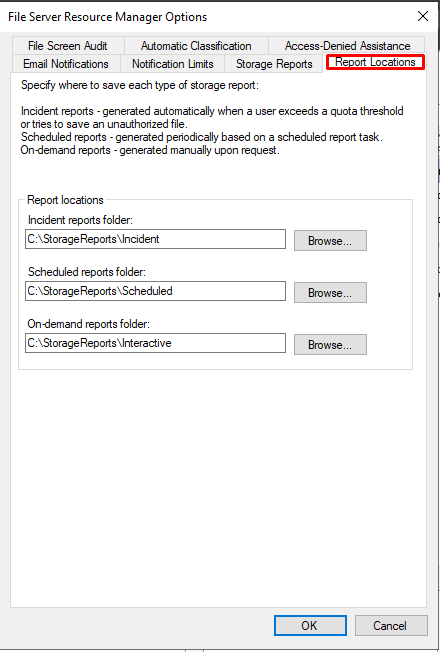
In the Reports Locations section, we can change the area where the reports are stored or leave them as is.
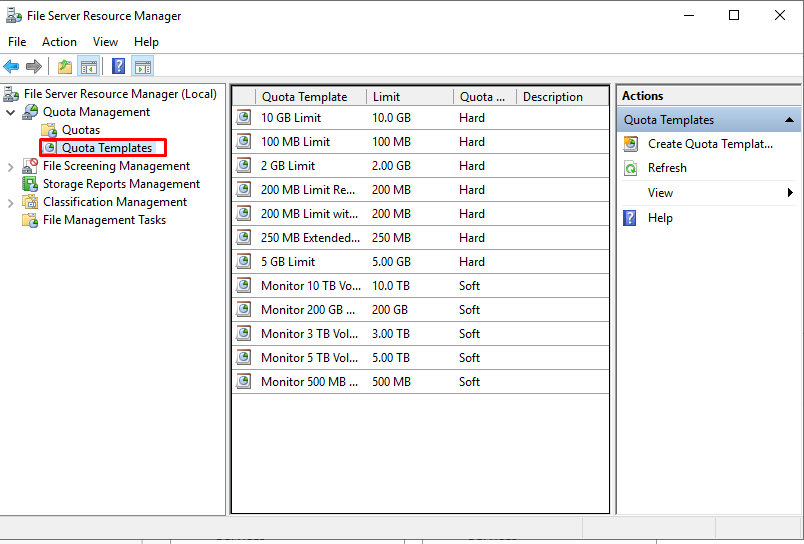
Finally, let’s start our settings after general settings. When we first look at the QUOTA Templates section, we can see ready templates prepared in MB, GB and TB.
Installing the FSRM role
In this ‘how to’ tutorial, we will see how to install the File Server Resource Manager role which provides additional functionality to file management such as:
– Quota
– Storage report
– Classification
– …
Open the wizard for adding roles and features

From the server manager, click on Add roles and features.
Skip the “Before you begin” section

Click on Next at the first wizard window.
Installation type: Role-based or feature-based installation

Choose Role-based or feature-based installation and click Next.
Server selection: choose the server where to install the FSRM role

Choose the option Select a server from the server pool, click on the server in the pool and click on Next.
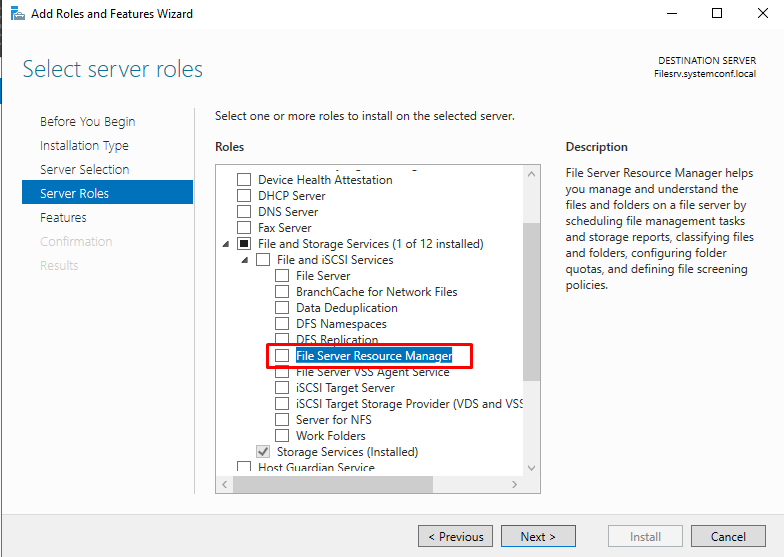
Server roles: check File server resource manager
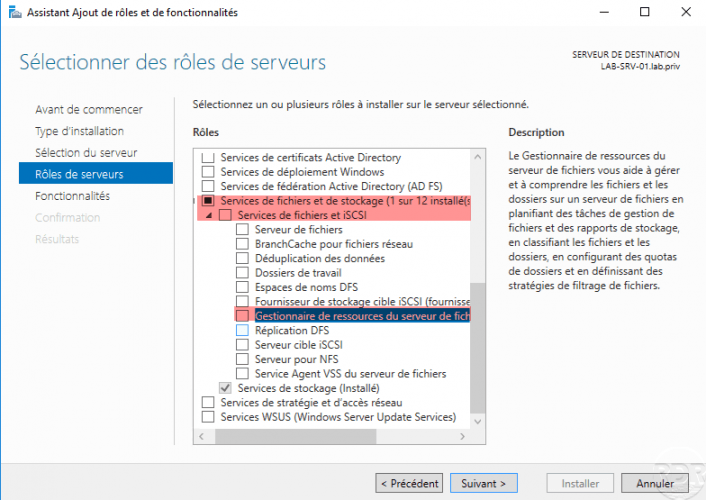
Unfold File and Storage Services then File and iSCSI Services and check the File Server Resource Manager box.
Validate the addition of required additional features
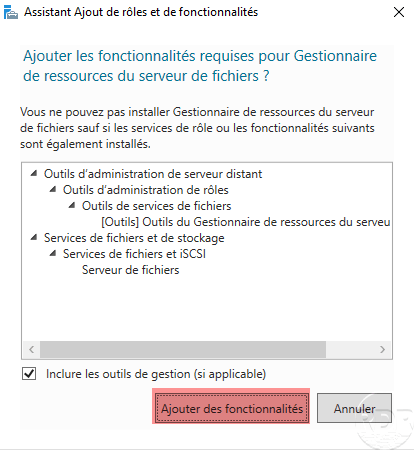
Click on the Add Features button.
Validate role selection

The role is selected, click on Next.
Features: click on Next

Skip the list of features by clicking Next.
Confirm installation

Click on the Install button.
Wait during installation

Wait while the role is installed …
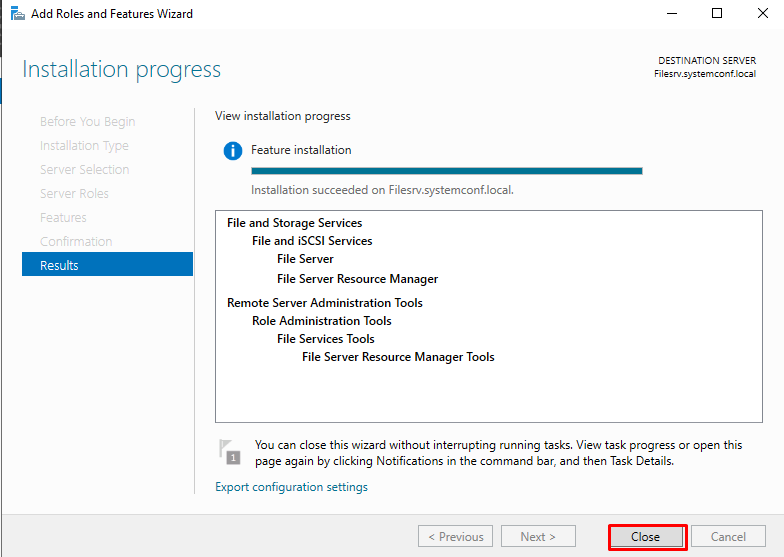
Close the wizard once the installation is complete

Once the installation is complete, click on Close to exit the wizard.
The administration console is available in the start menu.
Tutorials are available on the site with the #frsm tag.
In this post, you will be learning about How to Install and Configure File Screening using File Server Resource Manager (FSRM) on Windows Server 2019.
Why File Screening?
File screening management is a feature that allows you to control the type of files that users can save and send notifications when users try to save a blocked file.
Test lab setup:
- WS2K19-DC01: Domain Controller and DNS.
- WS2K19-FS01: File Server.
- WS10-CLI01: Windows 10 Client Machine.
Install FSRM role on the file server:
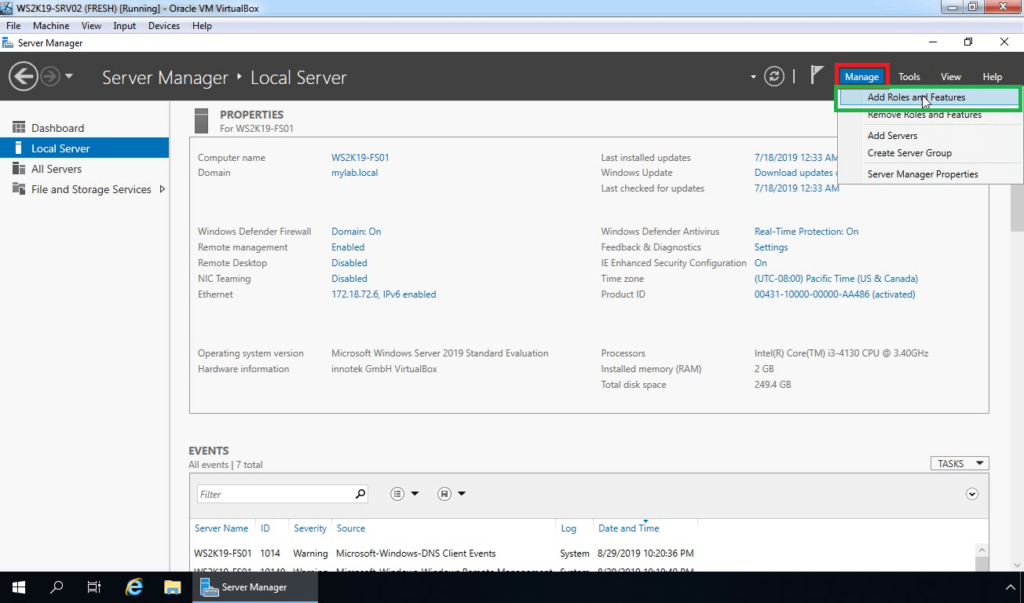
1. Open Server Manager Console.
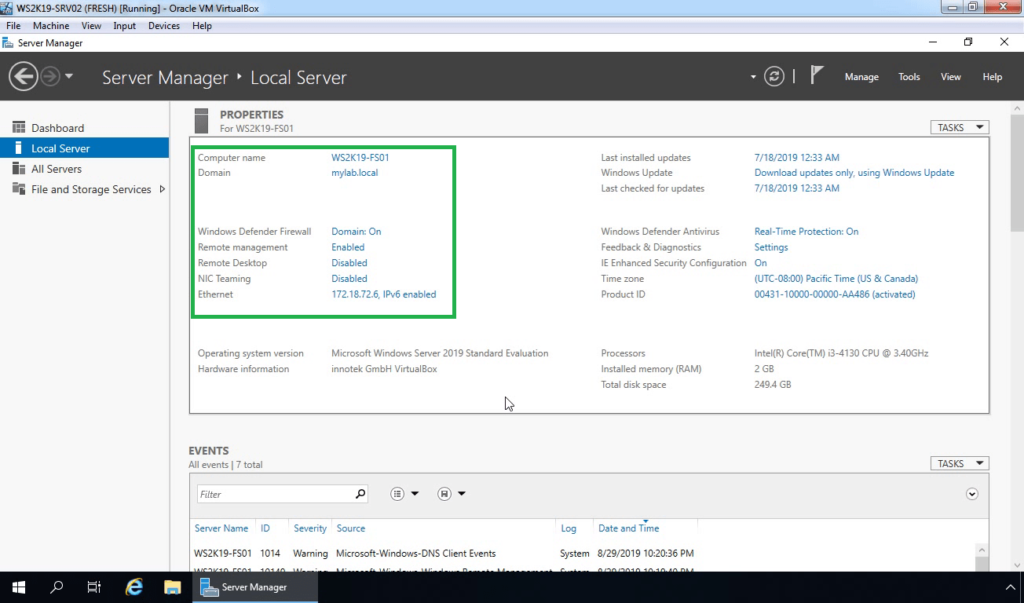
2. On Server Manager dashboard, click on Manage and select Add Roles and Features.
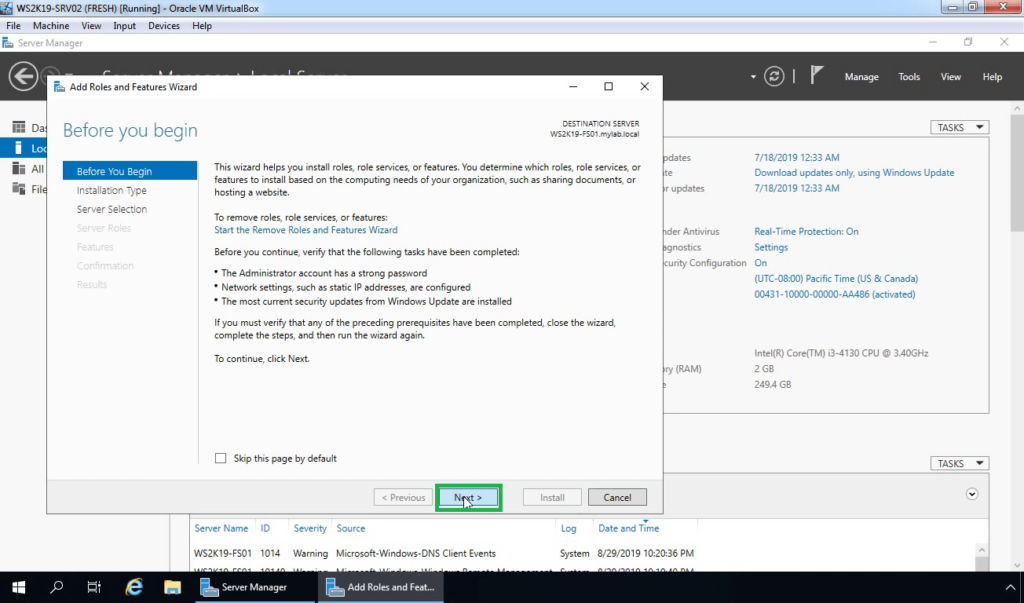
3. On the Before you begin page, click Next.
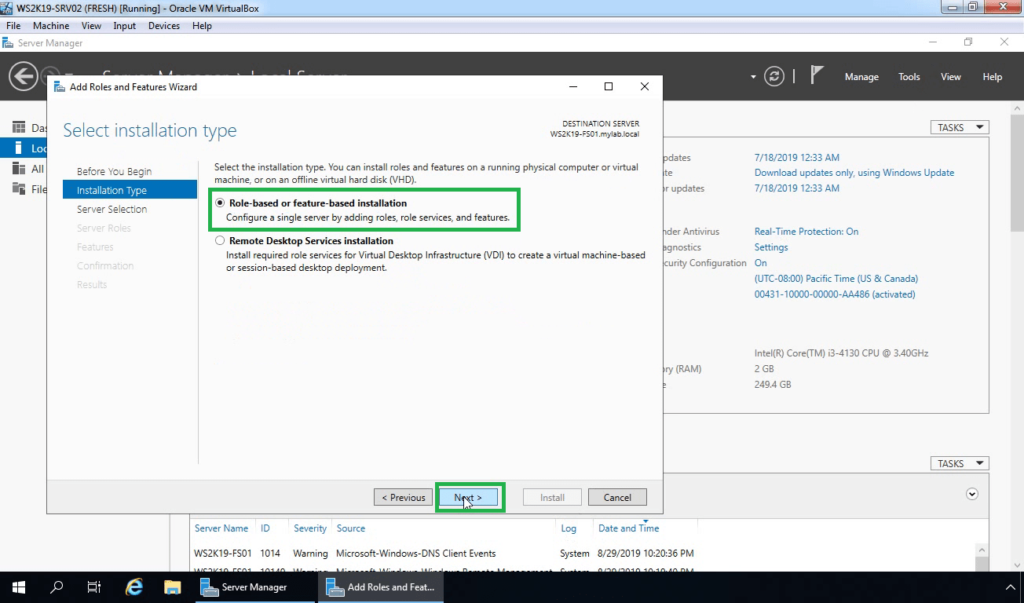
4. Select Role-based or feature-based installation and then click Next.
5. Select a server from the server pool to install FSRM to, and then click Next.
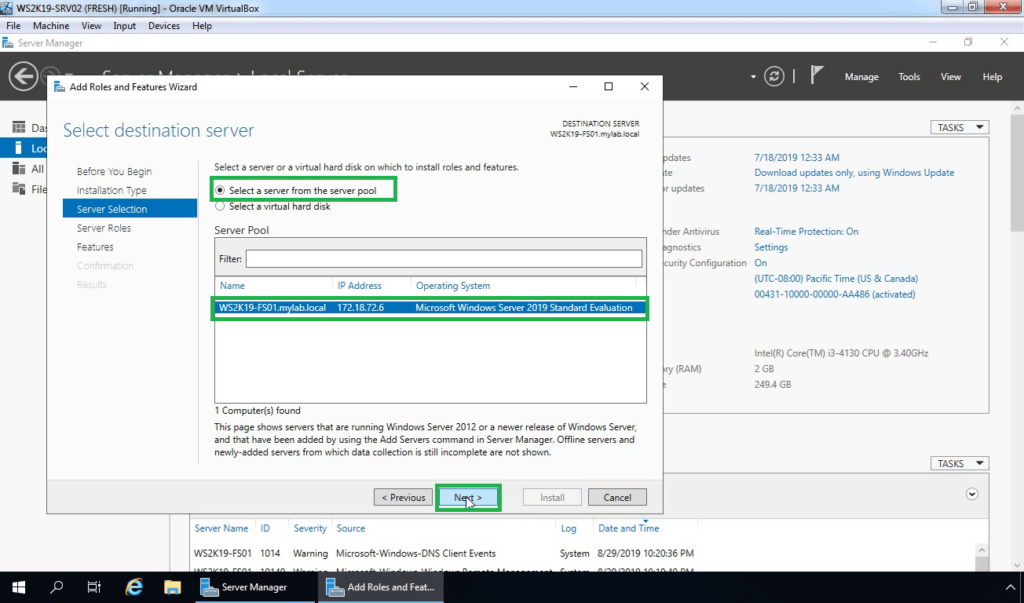
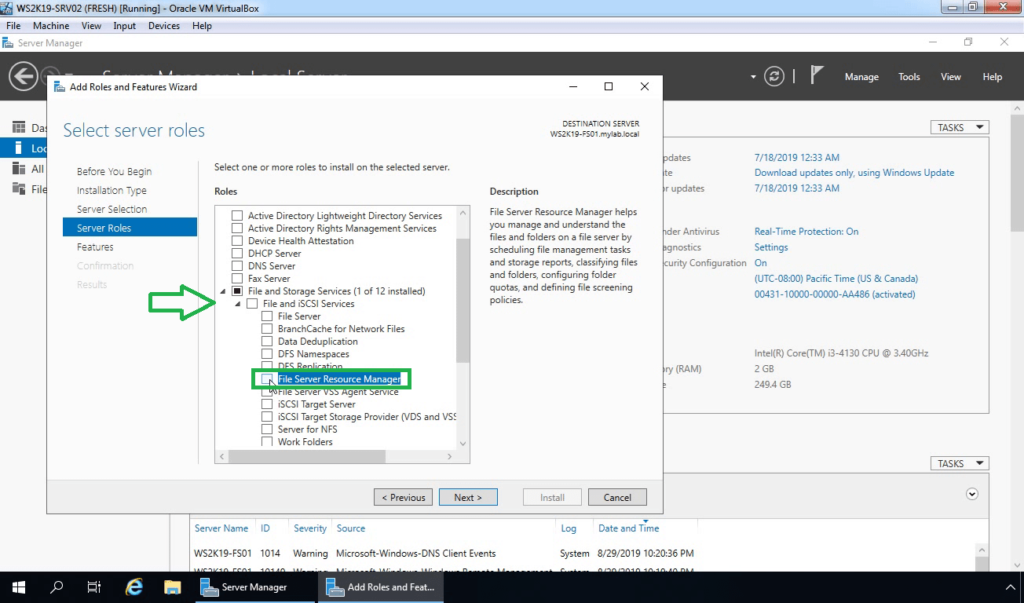
6. Expand File and Storage Services and expand the File and iSCSI Services. Select File Server Resource Manager.
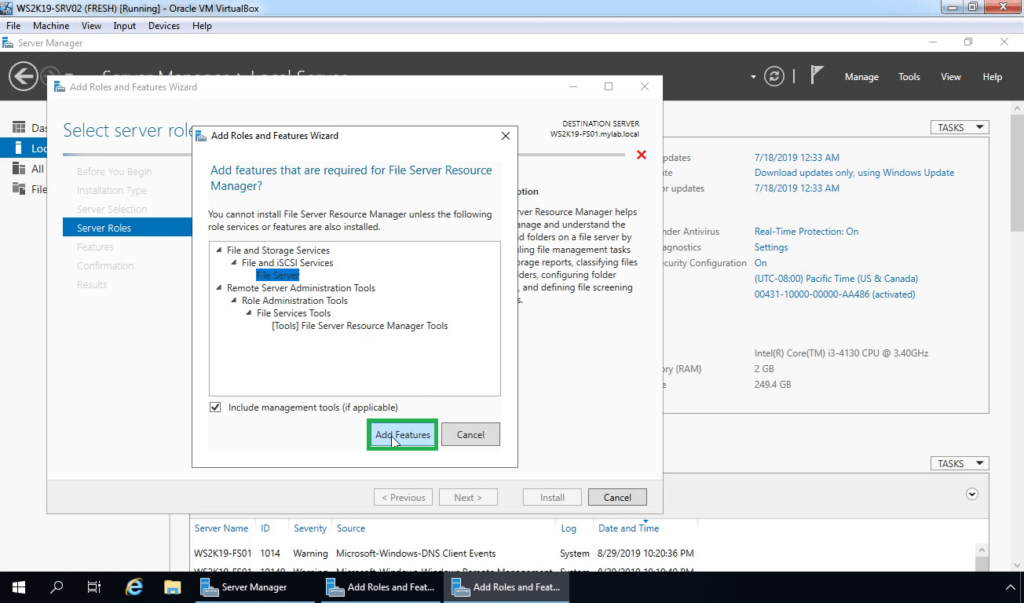
7. A new window will pop up, click on Add Features to include required features and management tools.
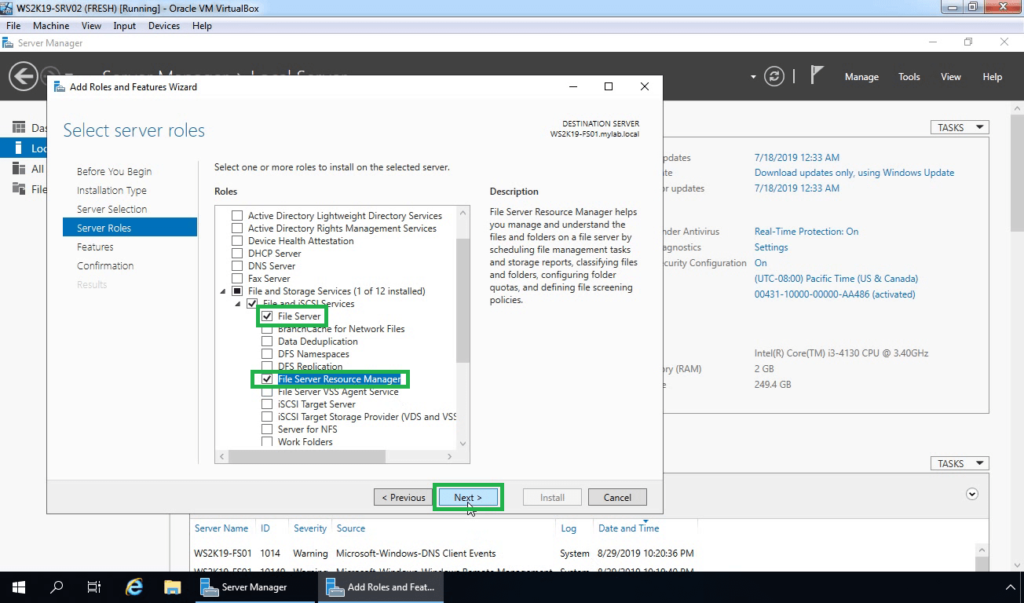
8. Make sure that File Server and File Server Resource Manager server role are selected. Click on Next.
9. On select features page, click Next.
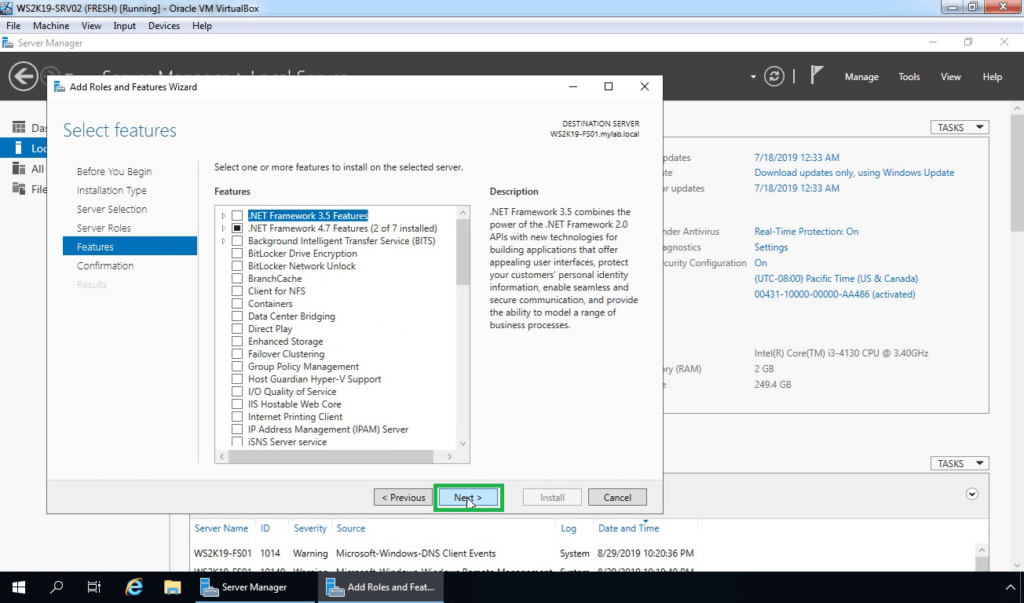
10. Click on Install to start the installation process.

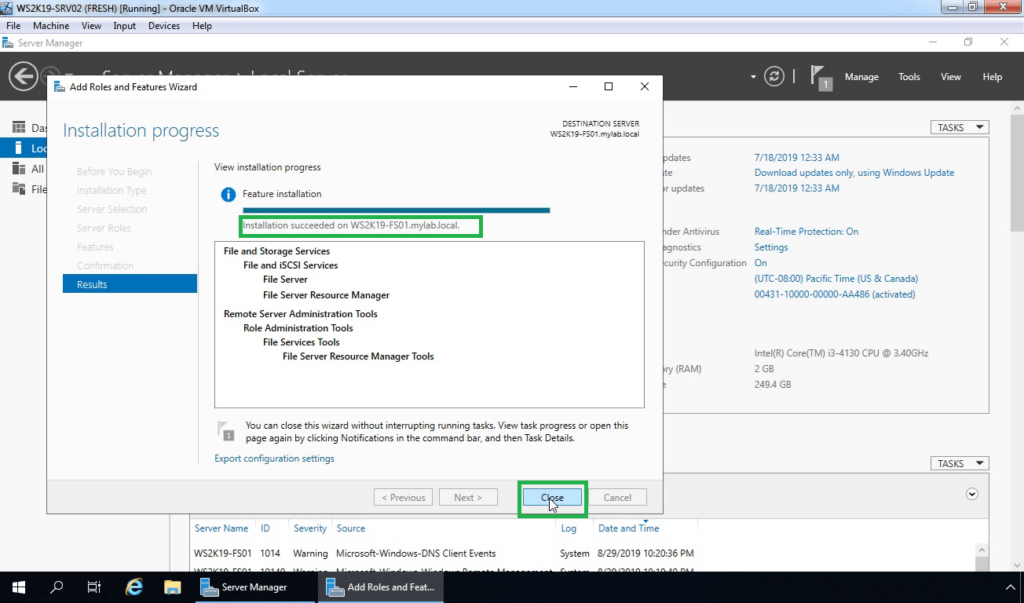
11. When the installation is complete, click the Close button.
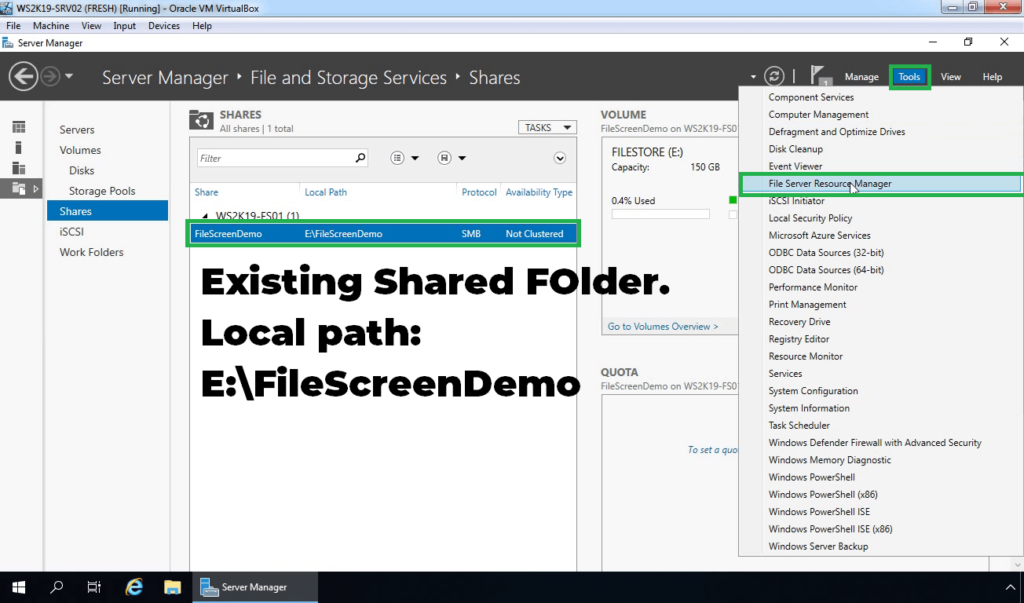
Note: Already I have created one shared folder on our file server for the testing purpose. We will apply File Screening on that shared folder.
Create a File Screen Template:
12. Click on Tools and select the File Server Resource Manager.
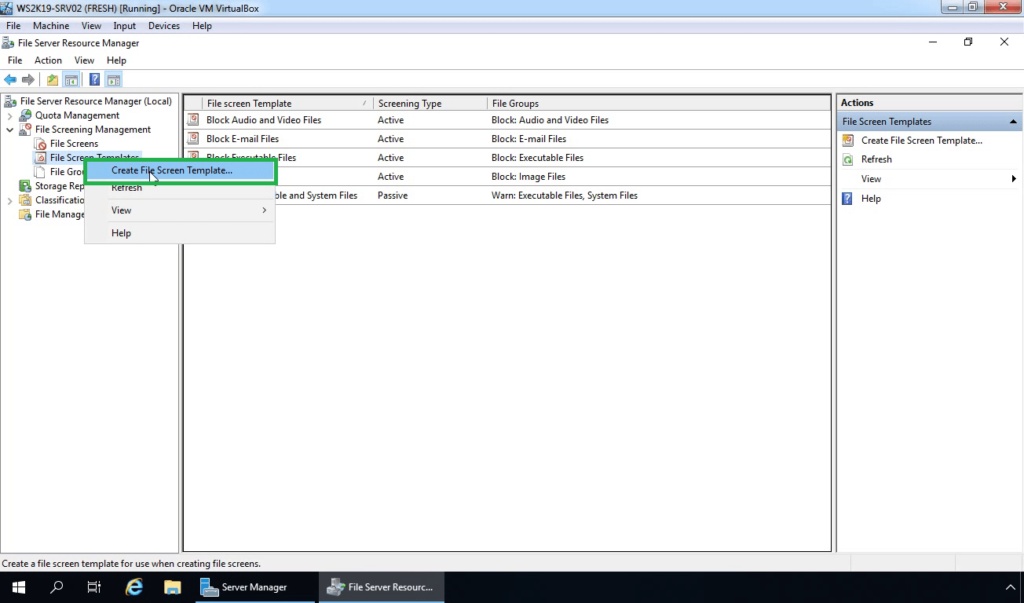
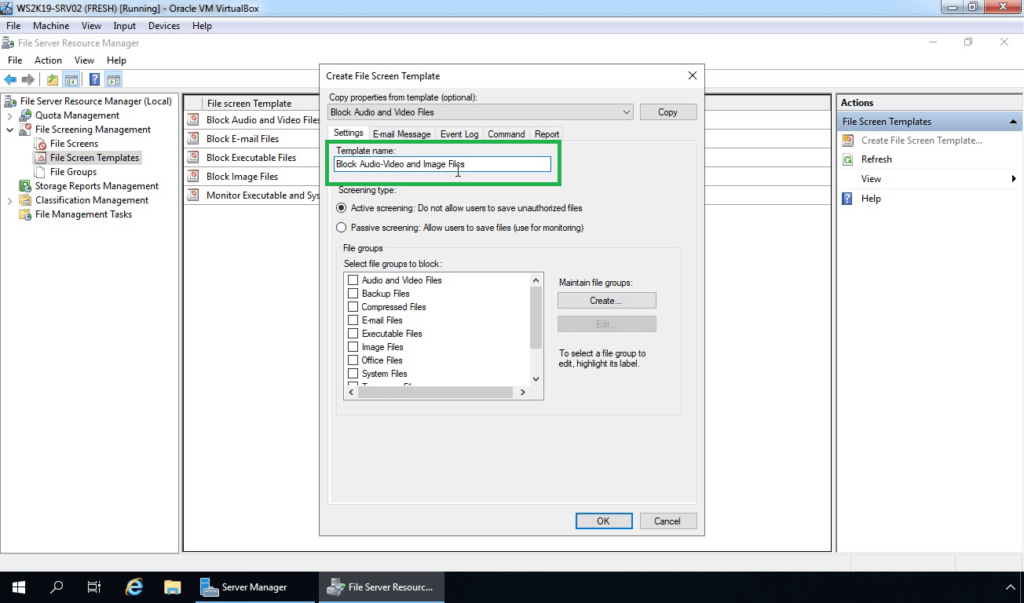
13. On File Server Resource Manager console, expand File Screen Management. Right-click File Screen Template and select Create File Screen Template.
14. In the Template name text box, type a name for a new file screen template.
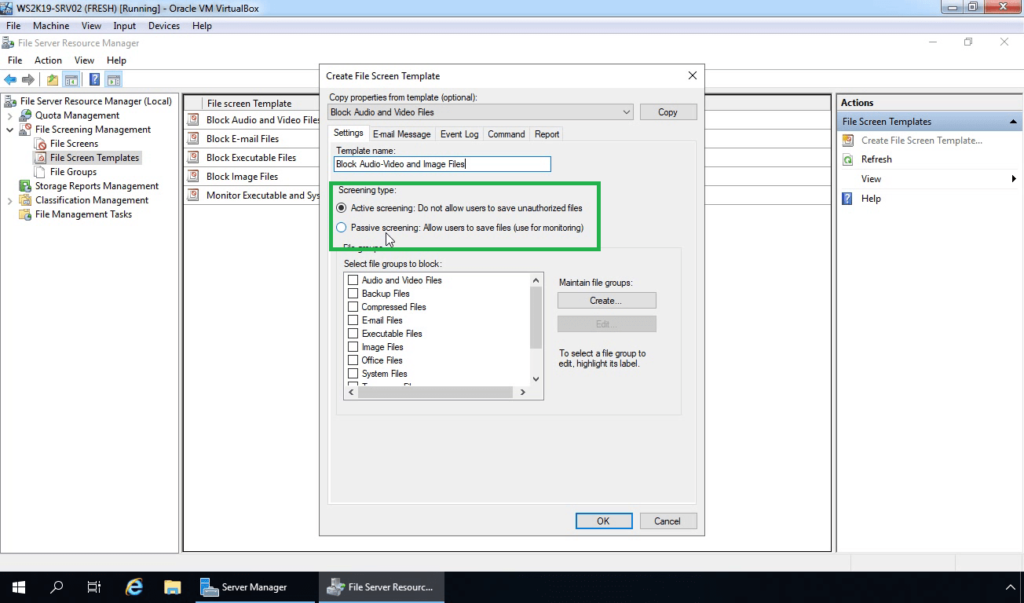
15. Under Screening type, click the Active screening or Passive screening option.
- Active screening prevents users from saving files that are members of blocked file groups and generates notifications when users try to save unauthorized files.
- Passive screening sends configured notifications, but it does not prevent users from saving files.
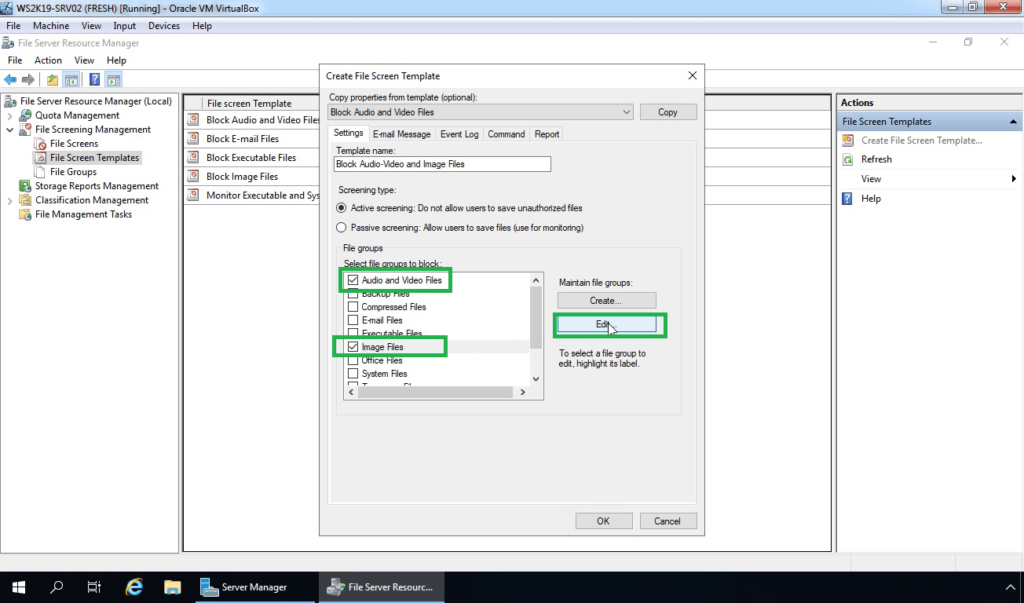
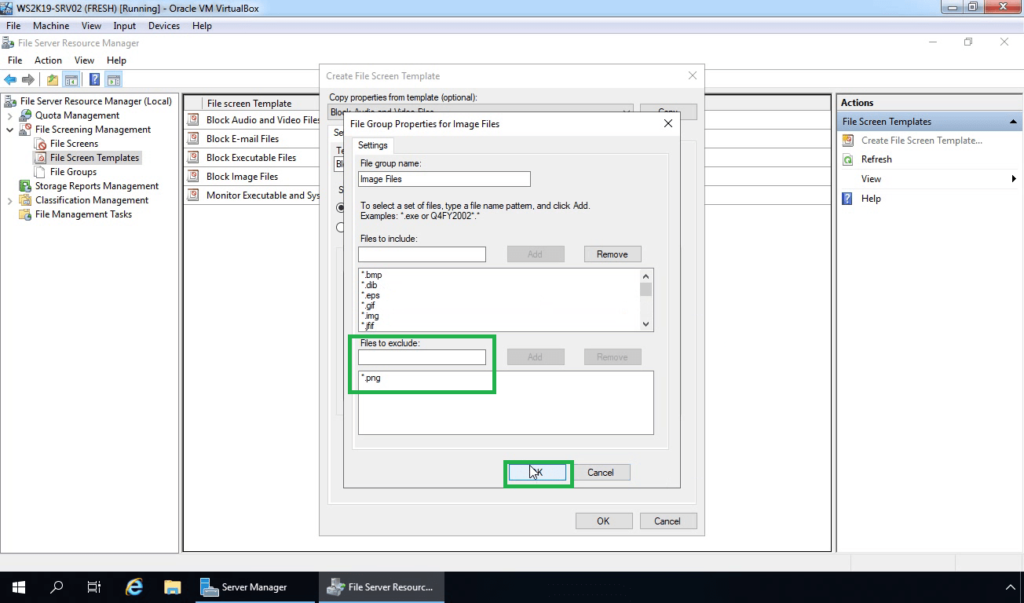
16. Select Audio and Video Files. Select Image Files and click on the edit button. We want to exclude .png file, so users can save only .png files.
17. Under Files to exclude, type *.png and click on Add button. Once you are ready, Click OK.
18. Click on Event Log tab, select the Send warning to event log checkbox. Click OK.
Creating File Screen in Windows Server 2019:
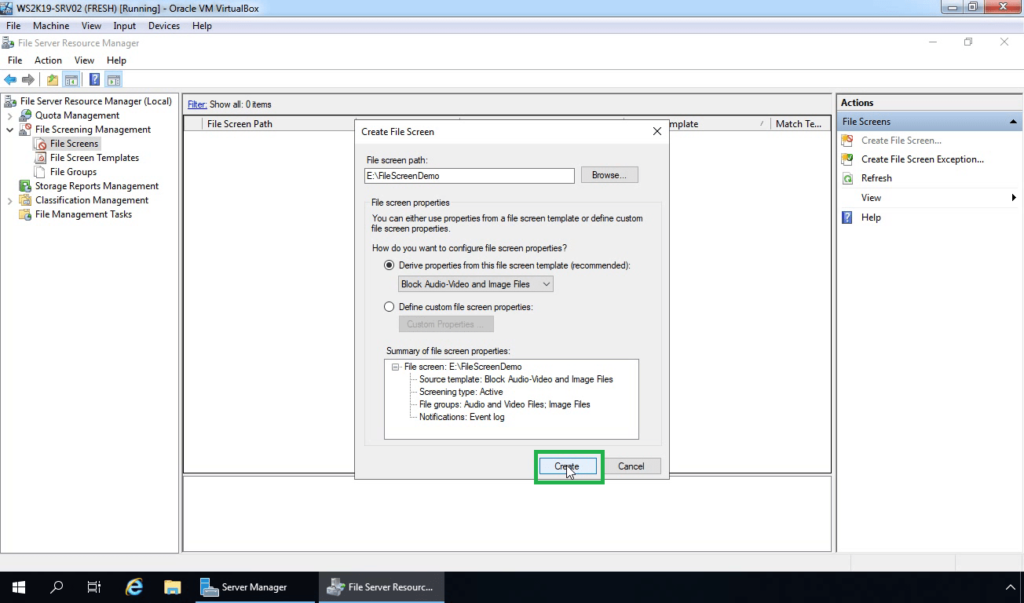
19. Right-click on File Screen and select Create File Screen.
20. Browse the path of the shared folder.
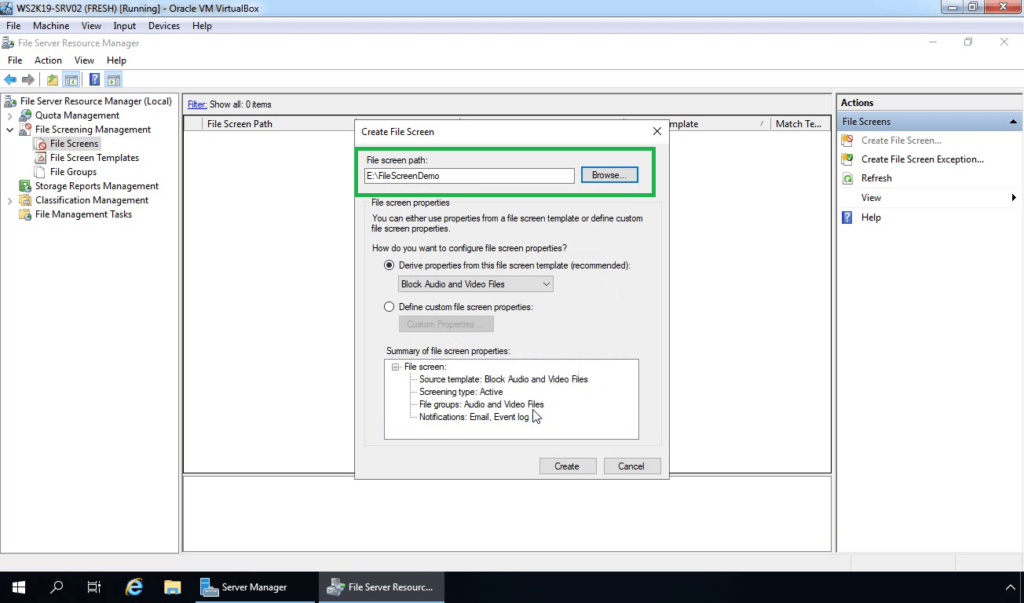
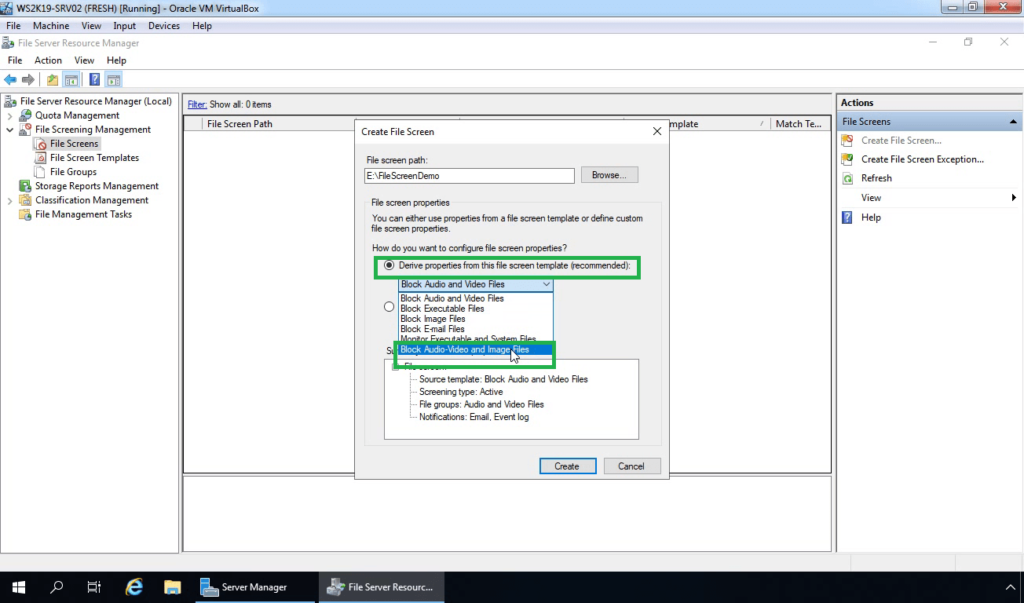
21. Choose the option, Derive properties from this file screen template (recommended). Select the File Screen Template which we have created earlier.
22. Click on Create.
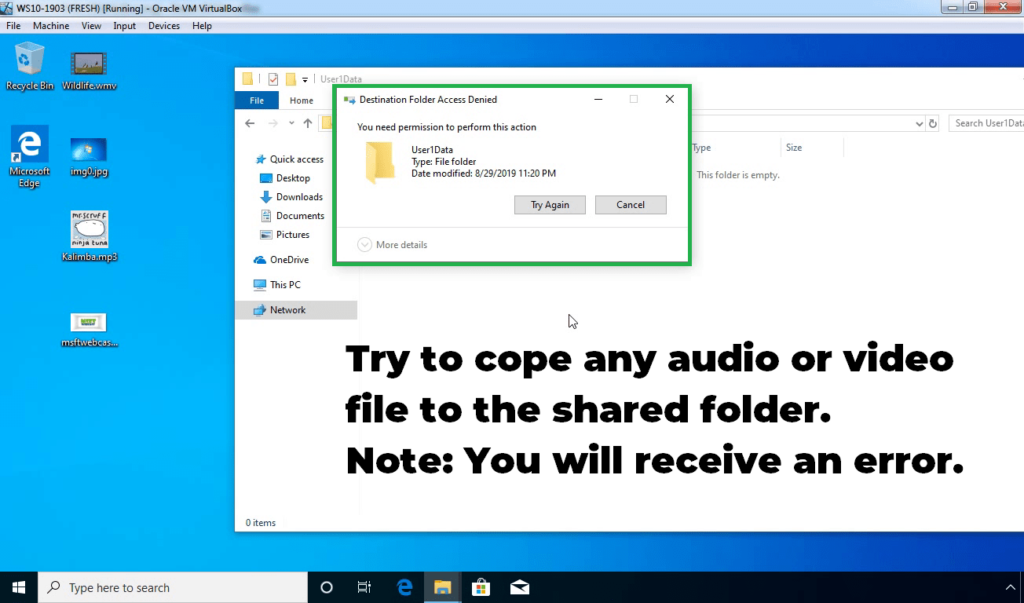
How to test File Screening:
23. On Windows 10 client machine, access the shared folder. Try to copy any audio or video file to the folder for testing purposes.
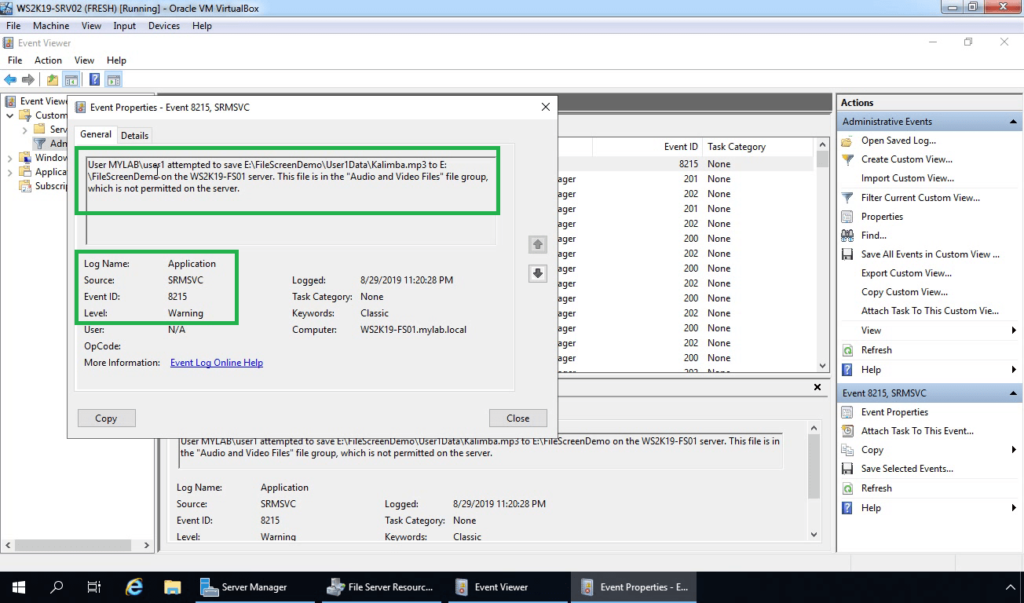
24. On a File server, open event viewer. Look for the event ID 8215.
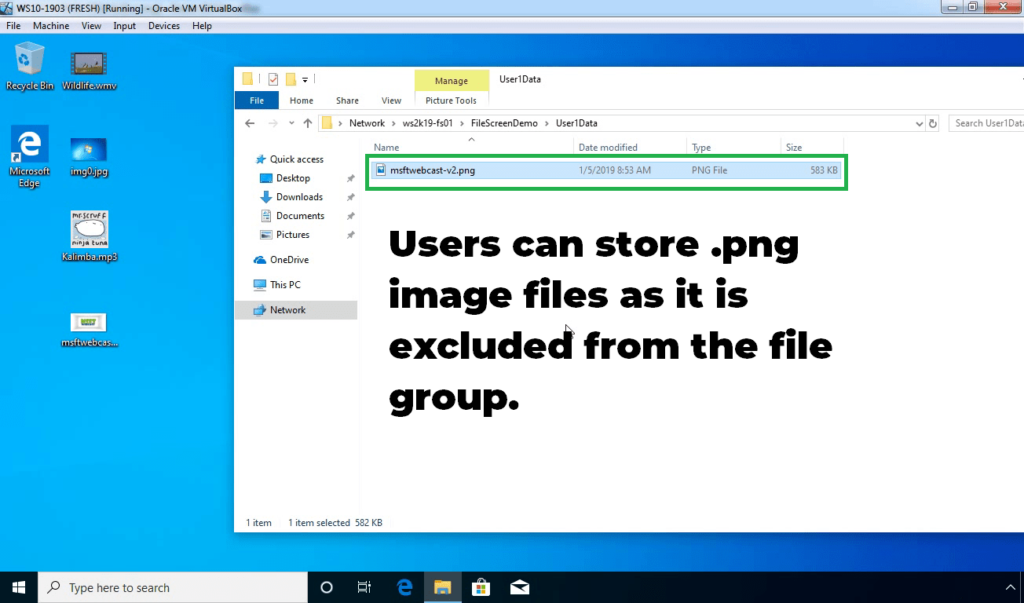
25. If a user tries to save any .png image file then it is allowed as we have added the exclusion entry for .png file.
In this post, we have learned the steps to configure File Screening using file server resource manager in Windows Server 2019.
Hope this will be helpful. Thank you for reading.
Related Articles:
- Install and Configure DFS Namespace on Windows Server 2019
- How to configure DFS Replication in Windows Server 2019
- Configure Disk Quota with File Server Resource Manager (FSRM)
Post Views: 2,408