Доброго времени суток!
Сегодня хотелось бы немного поговорить о новой фиче в Windows Server 2012 — Storage Spaces или Пространства Данных.
По сути это некоторый механизм виртуализации дисковой подсистемы, который абстрагирует нас от физического уровня дисковой подсистемы. Однако, более интересным вариантом реализации данного механизма являются Кластеризованные Пространства Данных (Clustered Storage Spaces). Давайте более подробно рассмотрим способ настройки данного механизма.
Предварительные Требования
Для начала разберемся с теми необходимыми условиями нашего «дано» для осуществления процесса настройки.
Итак:
1) Для создания Storage Spaces в режиме Failover Cluster необходимо минимум 3 физических диска, объем которых не менее 4 Гб для каждого диска.
2) Все диски внутри Storage Pools должны обязательно быть Serial Attached SCSI (SAS) — независимого от того, будут ли эти диски напрямую подключены к системе, есть ли между ОС и дисками какая-либо прослойка в виде RAID-контроллеров и прочих дисковых подсистем или нет.
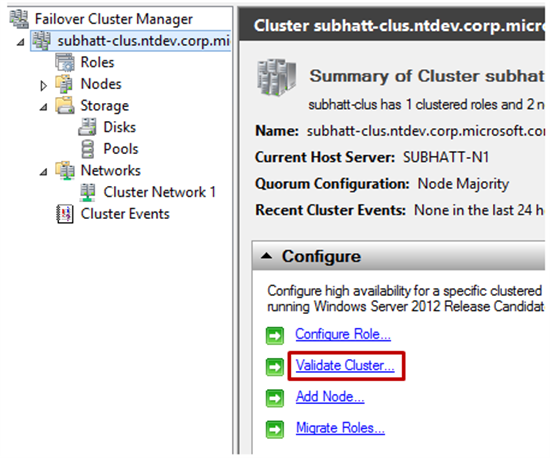
3) Все физические диски, которые будут состоять в кластеризованном пуле должны успешно пройти тест на валидацию в Failover Clustering. Для того чтобы это сделать необходимо открыть Failover Cluster Manager — cluadmin.msc и выбрать опцию Validate Cluster.
4) Кластеризованное пространство данных должно использовать фиксированный тип предоставления ресурсов (речь идет о типе vhd(x)-диска, который используется для Storage Spaces).
5) Поддерживаются простые (simple) и зеркальные (mirror) типы Storage Spaces — тип с контролем честности (parity) не поддерживается.
6) Диски которые используются в отказоустойчивом пуле должны быть выделенными. Это значит что они не могут быть использованы в составе других пулов, только в одном-единственном.
7) Storage spaces которые отформатированы в формате ReFS не могут быть добавлены в общий том кластера (CSV).
Как настроить — пошаговая инструкция
1) Добавьте роль File Services и инструментарий File Services Role Administration Tools на все узлы кластера в Failover Cluster.
2) Откройте консоль управления Failover Cluster Manager (cluadmin.msc).
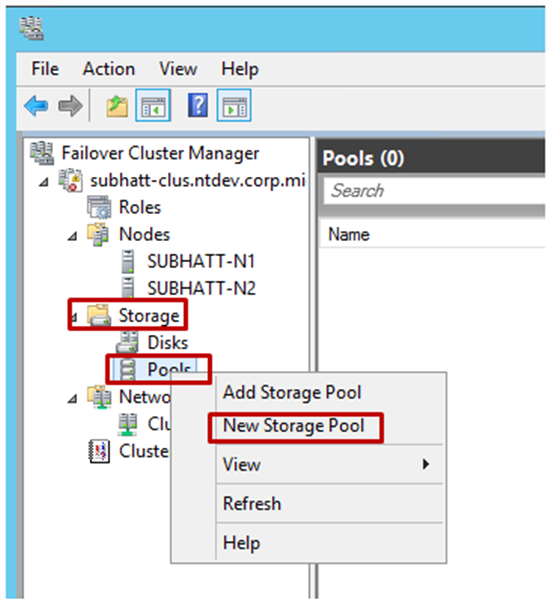
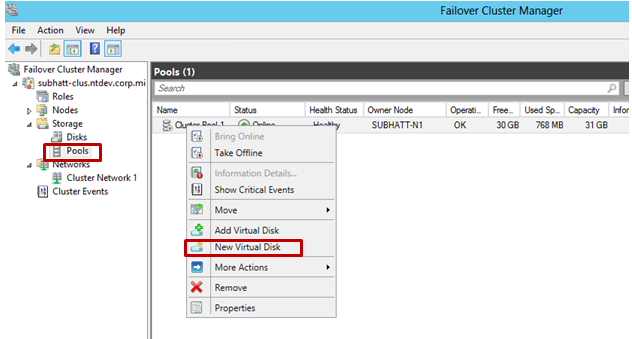
3) В левой части панели раскройте пункт Storage, правый щелчок по Pools и выберите пункт создания нового пула New Storage Pool. Далее вы увидите мастер настройки New Storage Pool Wizard.
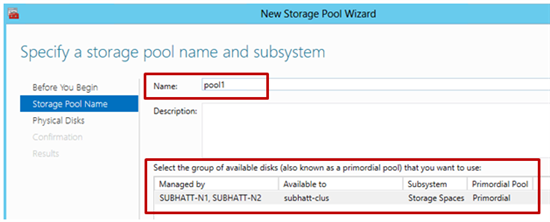
4) Задайте имя для Storage Pool и выберите дисковую подсистему доступную для кластера и нажмите Next.
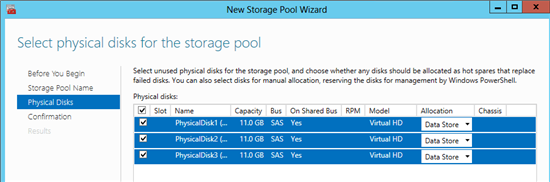
5) Выберите физические диски в разделе Physical Disks для нового пула (помните про требования!!!) и подтвердите создание пула. Пул будет добавлен в кластер переведен в активное состояние (Online).
6) Следующий шаг — создание виртуального диска или пространства данных, который будет проассоциирован с нашим пулом. В Failover Cluster Manager выберите интересующий storage pool, который будет обеспечивать виртуальный диск. Правый щелчок и пункт New Virtual Disk — наш выбор!
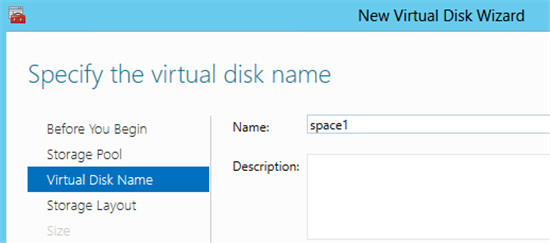
7) Далее будет запущен мастер создания виртуального жесткого диска New Virtual Disk Wizard. Выберите сервер и пул для виртуального диска и нажмите Next. Обратите внимание на то, что в списке серверов будет указан узел, который размещает пул.

 Укажите имя виртуального диска и его описание. Нажмите Next.
9) Выберите тип дисковый подсистемы — Простой (Simple) или Зеркальный (Mirror). Помним, что вариант Четность (Parity) не поддерживается для кластерной реализации.

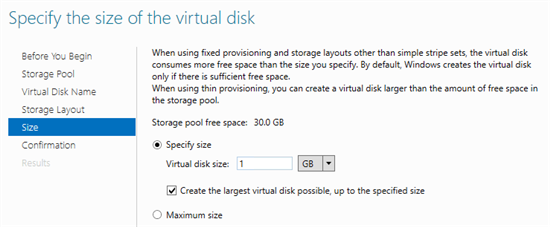
10) Укажите размер виртуального диска и нажмите Next. После подтверждения, диск будет создан. Если вы не сняли галочку с чек-бокса, то далее будет запущен мастер создания тома (New Volume Wizard).
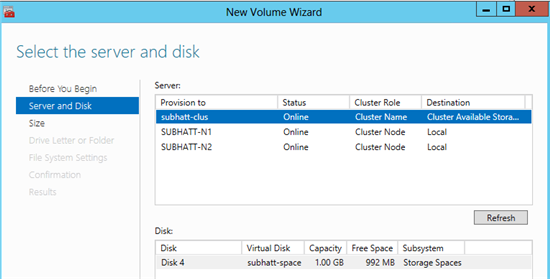
11) Задайте правильную связку «Сервер-Диск» для вашей конфигурации и нажмите Next.
12) Укажите размер тома и нажмите Next.

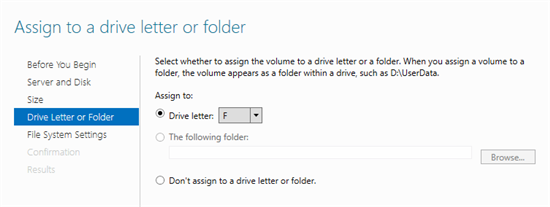
13) Также вы можете назначить букву для нового тома — далее нажмите Next.
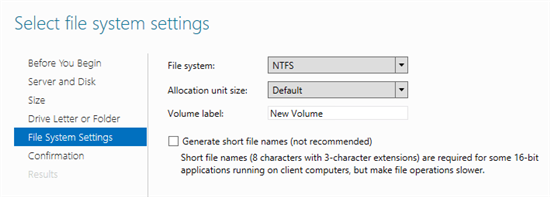
14) Выберите тип файловой системы (мы помним что для нашей задачи подходит только NTFS) и нажмите Next для подтверждения параметров. Новый том будет создан поверх виртуального диска и предоставлен кластеру во владение.
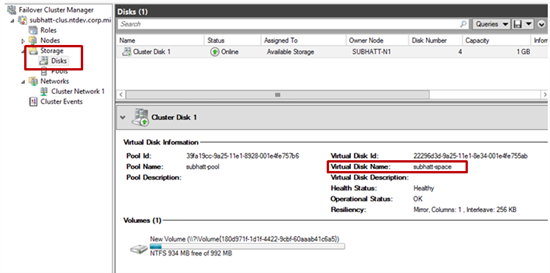
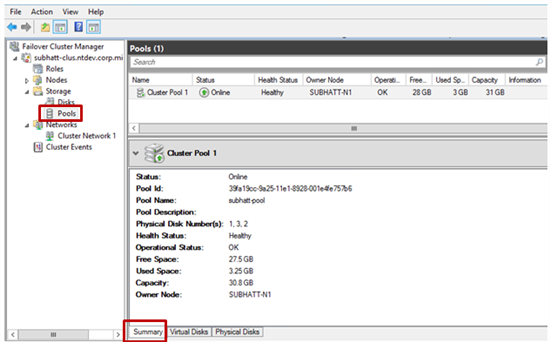
15) Ну что же, наше кластерное пространство успешно создано! Теперь поверх него можно размещать кластеризованные нагрузки. Для того чтобы просмотреть свойства пула зайдите в Failover Cluster Manager.
Любителям PowerShell
Ну и на последок.
Все то же самое, но без GUI)))
1. Создать нового пространства
a. Выбрать физические диски и добавить в пул
$phydisk = Get-PhysicalDisk –CanPool $true | Where BusType -eq «SAS”
b. Получение дисковой подсистемы для пула
$stsubsys = Get-StorageSubsystem
c. Создание нового пула
$pool = New-StoragePool -FriendlyName TestPool -StorageSubsystemFriendlyName $stsubsys.FriendlyName -PhysicalDisks $phydisk -ProvisioningTypeDefault Fixed
d. Добавление диска для горячей замены (Hot Spare)
$hotSpareDisk = Get-PhysicalDisk –CanPool $true |Out-GridView -PassThru
Add-PhysicalDisk -StoragePoolFriendlyName TestPool -PhysicalDisks $hotSpareDisk -Usage HotSpare
2. Создание пространства данных поверх ранее созданного пула
a. $newSpace = New-VirtualDisk –StoragePoolFriendlyName TestPool –FriendlyName space1 -Size (1GB) -ResiliencySettingName Mirror
3. Инициализация, разметка и форматирование ранее созданного пространства данных
a. $spaceDisk = $newSpace | Get-Disk
b. Initialize-Disk -Number $spaceDisk.Number -PartitionStyle GPT
c. $partition = New-Partition -DiskNumber $spaceDisk.Number -DriveLetter $driveletter -size $spaceDisk.LargestFreeExtent
d. Format-Volume -Partition $partition -FileSystem NTFS
4. Добавление пространства данных в кластер
a. $space = Get-VirtualDisk -FriendlyName space1
b. Add-ClusterDisk $space
На этом вроде бы все. Остается добавить, что если вы хотите узнать побольше про новые возможности Windows Server 2012, то мы приглашаем всех на IT Camps, которые будут проходить в Москве. Расписание вы найдетездесь.
И не забывайте про очень полезный ресурс — виртуальную академию Майкрософт
Веселых ИТ-приключений!
С уважением,
Георгий А. Гаджиев
Эксперт по информационной инфраструктуре
Корпорация Майкрософт
| title | description | ms.topic | author | ms.author | ms.date |
|---|---|---|---|---|---|
|
Deploy Storage Spaces on a stand-alone server |
Describes how to deploy Storage Spaces on a stand-alone Windows Server 2012-based server. |
article |
JasonGerend |
jgerend |
07/09/2018 |
Deploy Storage Spaces on a stand-alone server
Applies to: Windows Server 2022, Windows Server 2019, Windows Server 2016, Windows Server 2012 R2, Windows Server 2012
This topic describes how to deploy Storage Spaces on a stand-alone server. For information about how to create a clustered storage space, see Deploy a Storage Spaces cluster on Windows Server 2012 R2.
To create a storage space, you must first create one or more storage pools. A storage pool is a collection of physical disks. A storage pool enables storage aggregation, elastic capacity expansion, and delegated administration.
From a storage pool, you can create one or more virtual disks. These virtual disks are also referred to as storage spaces. A storage space appears to the Windows operating system as a regular disk from which you can create formatted volumes. When you create a virtual disk through the File and Storage Services user interface, you can configure the resiliency type (simple, mirror, or parity), the provisioning type (thin or fixed), and the size. Through Windows PowerShell, you can set additional parameters such as the number of columns, the interleave value, and which physical disks in the pool to use. For information about these additional parameters, see New-VirtualDisk and the Windows Server storage forum.
[!NOTE]
You can’t use a storage space to host the Windows operating system.
From a virtual disk, you can create one or more volumes. When you create a volume, you can configure the size, drive letter or folder, file system (NTFS file system or Resilient File System (ReFS)), allocation unit size, and an optional volume label.
The following figure illustrates the Storage Spaces workflow.

Figure 1: Storage Spaces workflow
[!NOTE]
This topic includes sample Windows PowerShell cmdlets that you can use to automate some of the procedures described. For more information, see PowerShell.
Prerequisites
To use Storage Spaces on a stand-alone Windows Server 2012−based server, make sure that the physical disks that you want to use meet the following prerequisites.
[!IMPORTANT]
If you want to learn how to deploy Storage Spaces on a failover cluster, see Deploy a Storage Spaces cluster on Windows Server 2012 R2. A failover cluster deployment has different prerequisites, such as supported disk bus types, supported resiliency types, and the required minimum number of disks.
| Area | Requirement | Notes |
|---|---|---|
| Disk bus types | — Serial Attached SCSI (SAS) — Serial Advanced Technology Attachment (SATA) — iSCSI and Fibre Channel Controllers. |
You can also use USB drives. However, it’s not optimal to use USB drives in a server environment. Storage Spaces is supported on iSCSI and Fibre Channel (FC) controllers as long as the virtual disks created on top of them are non-resilient (Simple with any number of columns). |
| Disk configuration | — Physical disks must be at least 4 GB — Disks must be blank and not formatted. Do not create volumes. |
|
| HBA considerations | — Simple host bus adapters (HBAs) that do not support RAID functionality are recommended — If RAID-capable, HBAs must be in non-RAID mode with all RAID functionality disabled — Adapters must not abstract the physical disks, cache data, or obscure any attached devices. This includes enclosure services that are provided by attached just-a-bunch-of-disks (JBOD) devices. |
Storage Spaces is compatible only with HBAs where you can completely disable all RAID functionality. |
| JBOD enclosures | — JBOD enclosures are optional — Recommended to use Storage Spaces certified enclosures listed on the Windows Server Catalog — If you’re using a JBOD enclosure, verify with your storage vendor that the enclosure supports Storage Spaces to ensure full functionality — To determine whether the JBOD enclosure supports enclosure and slot identification, run the following Windows PowerShell cmdlet: Get-PhysicalDisk | ? {$_.BusType –eq «SAS»} | fc |
If the EnclosureNumber and SlotNumber fields contain values, then the enclosure supports these features. |
To plan for the number of physical disks and the desired resiliency type for a stand-alone server deployment, use the following guidelines.
| Resiliency type | Disk requirements | When to use |
|---|---|---|
| Simple
— Stripes data across physical disks |
Requires at least one physical disk. | Do not use to host irreplaceable data. Simple spaces do not protect against disk failure.
Use to host temporary or easily recreated data at a reduced cost. Suited for high-performance workloads where resiliency is not required or is already provided by the application. |
| Mirror
— Stores two or three copies of the data across the set of physical disks |
Requires at least two physical disks to protect from single disk failure.
Requires at least five physical disks to protect from two simultaneous disk failures. |
Use for most deployments. For example, mirror spaces are suited for a general-purpose file share or a virtual hard disk (VHD) library. |
| Parity
— Stripes data and parity information across physical disks |
Requires at least three physical disks to protect from single disk failure. | Use for workloads that are highly sequential, such as archive or backup. |
Step 1: Create a storage pool
You must first group available physical disks into one or more storage pools.
-
In the Server Manager navigation pane, select File and Storage Services.
-
In the navigation pane, select the Storage Pools page.
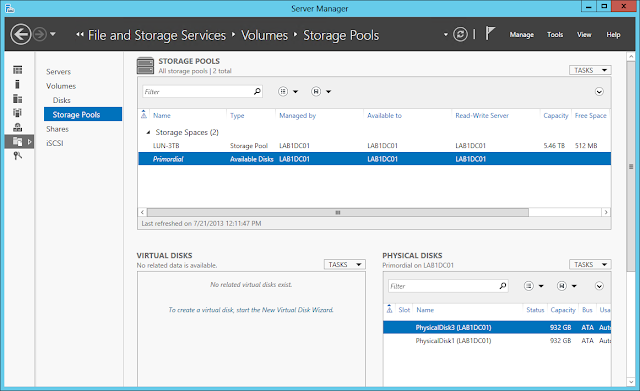
By default, available disks are included in a pool that is named the primordial pool. If no primordial pool is listed under STORAGE POOLS, this indicates that the storage does not meet the requirements for Storage Spaces. Make sure that the disks meet the requirements that are outlined in the Prerequisites section.
[!TIP]
If you select the Primordial storage pool, the available physical disks are listed under PHYSICAL DISKS. -
Under STORAGE POOLS, select the TASKS list, and then select New Storage Pool. The New Storage Pool Wizard will open.
-
On the Before you begin page, select Next.
-
On the Specify a storage pool name and subsystem page, enter a name and optional description for the storage pool, select the group of available physical disks that you want to use, and then select Next.
-
On the Select physical disks for the storage pool page, do the following, and then select Next:
-
Select the check box next to each physical disk that you want to include in the storage pool.
-
If you want to designate one or more disks as hot spares, under Allocation, select the drop-down arrow, then select Hot Spare.
-
-
On the Confirm selections page, verify that the settings are correct, and then select Create.
-
On the View results page, verify that all tasks completed, and then select Close.
[!NOTE]
Optionally, to continue directly to the next step, you can select the Create a virtual disk when this wizard closes check box. -
Under STORAGE POOLS, verify that the new storage pool is listed.
Windows PowerShell equivalent commands for creating storage pools
The following Windows PowerShell cmdlet or cmdlets perform the same function as the preceding procedure. Enter each cmdlet on a single line, even though they may appear word-wrapped across several lines here because of formatting constraints.
The following example shows which physical disks are available in the primordial pool.
Get-StoragePool -IsPrimordial $true | Get-PhysicalDisk -CanPool $True
The following example creates a new storage pool named StoragePool1 that uses all available disks.
New-StoragePool –FriendlyName StoragePool1 –StorageSubsystemFriendlyName "Windows Storage*" –PhysicalDisks (Get-PhysicalDisk –CanPool $True)
The following example creates a new storage pool, StoragePool1, that uses four of the available disks.
New-StoragePool –FriendlyName StoragePool1 –StorageSubsystemFriendlyName "Windows Storage*" –PhysicalDisks (Get-PhysicalDisk PhysicalDisk1, PhysicalDisk2, PhysicalDisk3, PhysicalDisk4)
The following example sequence of cmdlets shows how to add an available physical disk PhysicalDisk5 as a hot spare to the storage pool StoragePool1.
$PDToAdd = Get-PhysicalDisk –FriendlyName PhysicalDisk5
Add-PhysicalDisk –StoragePoolFriendlyName StoragePool1 –PhysicalDisks $PDToAdd –Usage HotSpare
Step 2: Create a virtual disk
Next, you must create one or more virtual disks from the storage pool. When you create a virtual disk, you can select how the data is laid out across the physical disks. This affects both reliability and performance. You can also select whether to create thin- or fixed-provisioned disks.
-
If the New Virtual Disk Wizard is not already open, on the Storage Pools page in Server Manager, under STORAGE POOLS, make sure that the desired storage pool is selected.
-
Under VIRTUAL DISKS, select the TASKS list, and then select New Virtual Disk. The New Virtual Disk Wizard will open.
-
On the Before you begin page, select Next.
-
On the Select the storage pool page, select the desired storage pool, and then select Next.
-
On the Specify the virtual disk name page, enter a name and optional description, then select Next.
-
On the Select the storage layout page, select the desired layout, then select Next.
[!NOTE]
If you select a layout where you do not have enough physical disks, you will receive an error message when you select Next. For information about which layout to use and the disk requirements, see Prerequisites). -
If you selected Mirror as the storage layout, and you have five or more disks in the pool, the Configure the resiliency settings page will appear. Select one of the following options:
- Two-way mirror
- Three-way mirror
-
On the Specify the provisioning type page, select one of the following options, then select Next.
-
Thin
With thin provisioning, space is allocated on an as-needed basis. This optimizes the usage of available storage. However, because this enables you to over-allocate storage, you must carefully monitor how much disk space is available.
-
Fixed
With fixed provisioning, the storage capacity is allocated immediately, at the time a virtual disk is created. Therefore, fixed provisioning uses space from the storage pool that is equal to the virtual disk size.
[!TIP]
With Storage Spaces, you can create both thin- and fixed-provisioned virtual disks in the same storage pool. For example, you could use a thin-provisioned virtual disk to host a database and a fixed-provisioned virtual disk to host the associated log files.
-
-
On the Specify the size of the virtual disk page, do the following:
If you selected thin provisioning in the previous step, in the Virtual disk size box, enter a virtual disk size, select the units (MB, GB, or TB), then select Next.
If you selected fixed provisioning in the previous step, select one of the following:
-
Specify size
To specify a size, enter a value in the Virtual disk size box, then select the units (MB, GB, or TB).
If you use a storage layout other than simple, the virtual disk uses more free space than the size that you specify. To avoid a potential error where the size of the volume exceeds the storage pool free space, you can select the Create the largest virtual disk possible, up to the specified size check box.
-
Maximum size
Select this option to create a virtual disk that uses the maximum capacity of the storage pool.
-
-
On the Confirm selections page, verify that the settings are correct, and then select Create.
-
On the View results page, verify that all tasks completed, and then select Close.
[!TIP]
By default, the Create a volume when this wizard closes check box is selected. This takes you directly to the next step.
Windows PowerShell equivalent commands for creating virtual disks
The following Windows PowerShell cmdlet or cmdlets perform the same function as the preceding procedure. Enter each cmdlet on a single line, even though they may appear word-wrapped across several lines here because of formatting constraints.
The following example creates a 50 GB virtual disk named VirtualDisk1 on a storage pool named StoragePool1.
New-VirtualDisk –StoragePoolFriendlyName StoragePool1 –FriendlyName VirtualDisk1 –Size (50GB)
The following example creates a mirrored virtual disk named VirtualDisk1 on a storage pool named StoragePool1. The disk uses the storage pool’s maximum storage capacity.
New-VirtualDisk –StoragePoolFriendlyName StoragePool1 –FriendlyName VirtualDisk1 –ResiliencySettingName Mirror –UseMaximumSize
The following example creates a 50 GB virtual disk named VirtualDisk1 on a storage pool that is named StoragePool1. The disk uses the thin provisioning type.
New-VirtualDisk –StoragePoolFriendlyName StoragePool1 –FriendlyName VirtualDisk1 –Size (50GB) –ProvisioningType Thin
The following example creates a virtual disk named VirtualDisk1 on a storage pool named StoragePool1. The virtual disk uses three-way mirroring and is a fixed size of 20 GB.
[!NOTE]
You must have at least five physical disks in the storage pool for this cmdlet to work. (This does not include any disks that are allocated as hot spares.)
New-VirtualDisk -StoragePoolFriendlyName StoragePool1 -FriendlyName VirtualDisk1 -ResiliencySettingName Mirror -NumberOfDataCopies 3 -Size 20GB -ProvisioningType Fixed
Step 3: Create a volume
Next, you must create a volume from the virtual disk. You can assign an optional drive letter or folder, then format the volume with a file system.
-
If the New Volume Wizard is not already open, on the Storage Pools page in Server Manager, under VIRTUAL DISKS, right-click the desired virtual disk, and then select New Volume.
The New Volume Wizard opens.
-
On the Before you begin page, select Next.
-
On the Select the server and disk page, do the following, and then select Next.
-
In the Server area, select the server on which you want to provision the volume.
-
In the Disk area, select the virtual disk on which you want to create the volume.
-
-
On the Specify the size of the volume page, enter a volume size, specify the units (MB, GB, or TB), and then select Next.
-
On the Assign to a drive letter or folder page, configure the desired option, and then select Next.
-
On the Select file system settings page, do the following, and then select Next.
-
In the File system list, select either NTFS or ReFS.
-
In the Allocation unit size list, either leave the setting at Default or set the allocation unit size.
[!NOTE]
For more information about allocation unit size, see Default cluster size for NTFS, FAT, and exFAT. -
Optionally, in the Volume label box, enter a volume label name, for example HR Data.
-
-
On the Confirm selections page, verify that the settings are correct, and then select Create.
-
On the View results page, verify that all tasks completed, and then select Close.
-
To verify that the volume was created, in Server Manager, select the Volumes page. The volume is listed under the server where it was created. You can also verify that the volume is in Windows Explorer.
Windows PowerShell equivalent commands for creating volumes
The following Windows PowerShell cmdlet performs the same function as the previous procedure. Enter the command on a single line.
The following example initializes the disks for virtual disk VirtualDisk1, creates a partition with an assigned drive letter, and then formats the volume with the default NTFS file system.
Get-VirtualDisk –FriendlyName VirtualDisk1 | Get-Disk | Initialize-Disk –Passthru | New-Partition –AssignDriveLetter –UseMaximumSize | Format-Volume
Additional information
- Storage Spaces
- Storage Cmdlets in Windows PowerShell
- Deploy Clustered Storage Spaces
- Windows Server storage forum
Пользовательский интерфейс Storage Spaces and Pools реализован в программе Storage Spaces панели управления (в Windows и в Server Manager (в Server 2012); также можно использовать команды PowerShell (в обеих операционных системах). По большей части эта статья относится к интерфейсу Server Manager. Версия клиента Windows 8 упрощена и заметно отличается по внешнему виду. Однако базовая технология везде одинаковая.
Новые версии Windows располагают расширенными возможностями хранения данных. В Windows Server 2012 и Windows 8 появилась функция под названием Storage Spaces and Pools, обеспечивающая пользователям ряд новых возможностей, в том числе:
- метод построения виртуальных хранилищ данных;
- функциональность RAID, ранее доступная только в дорогостоящем оборудовании;
- тонкая подготовка;
- управление с использованием сценариев через PowerShell;
- избыточные копии данных, которые можно применять для устранения неполадок файловой системы;
- интеграция с общими томами кластера (CSV).
Поддерживаемые хранилища данных
Storage Spaces and Pools можно разместить на разнообразных аппаратных средствах. Поддерживаемые типы шин: Universal Serial Bus (USB), Serial ATA (SATA) и Serial Attached SCSI (SAS).
Storage Spaces and Pools можно использовать в сочетании с логическими устройствами (LUN) через канал Fibre Channel или iSCSI, однако такая конфигурация не поддерживается. Пользователям высокоуровневых решений хранения данных следует обратиться к соответствующим поставщикам, чтобы в полном объеме задействовать имеющуюся функциональность. Компонент Storage Spaces and Pools ориентирован на менее дорогостоящие решения, чтобы предоставить функциональность, недоступную иными способами.
Создание пула и дискового пространства
Пул — просто логическая группа физических дисков, а дисковое пространство (storage space) — виртуальный диск, который можно использовать как физический. Поэтому создание дискового пространства с помощью Storage Spaces and Pools — двухэтапный процесс. Сначала создается пул; затем выделяется дисковое пространство, именуемое виртуальным диском в Windows Server. Не путайте виртуальные диски Storage Spaces and Pools с файлами Virtual Hard Disk (VHD) или VHDX. Термины похожи, но сами компоненты не имеют между собой ничего общего.
С помощью интерфейса Server Manager можно создать работоспособный пул. Отправной точкой становится пул по умолчанию, называемый исходным пулом, представляющий собой просто список физических дисков, присоединенных к компьютеру, которые могут быть объединены в пул. Исходный пул не считается работоспособным. Мастер запрашивает имя пула и добавляемые физические диски. Созданный пул отображается в интерфейсе Server Manager. Обратите внимание, что хотя в Windows можно сформировать множество пулов, не рекомендуется создавать больше четырех. Для выполнения этой же операции предназначен сценарий PowerShell из трех строк:
   $stsubsys = (Get-StorageSubsystem)
   $physd = (Get-PhysicalDisk PhysicalDisk1, PhysicalDisk2, PhysicalDisk3, PhysicalDisk4)
   New-StoragePool -FriendlyName MyPool1 -StorageSubsystemFriendlyName $stsubs.FriendlyName -PhysicalDisks $physd
Подготовив пул, можно создать виртуальный диск (называемый дисковым пространством в Windows 8). Мастер запрашивает имя пула хранения, имя виртуального диска, тип структуры хранилища, тип подготовки (тонкая или фиксированная) и размер виртуального диска. Подробнее это будет рассмотрено в следующем разделе, но после завершения работы мастера вы увидите виртуальный диск, показанный на приведенном экране. Для выполнения этой же операции предназначен следующий сценарий PowerShell:
   New-VirtualDisk -StoragePoolFriendlyName MyPool1 -FriendlyName MyVirtualDisk
   -ResiliencySettingName Mirror -UseMaximumSize
·
 |
| Экран. Создание виртуальных дисков |
Данный виртуальный диск можно использовать точно так же, как физический. Его можно настроить как раздел Master Boot Record (MBR) или GUID Partition Table (GPT).
Правила выбора
При создании виртуального диска нужно определить три основные характеристики: тип структуры хранилища (простая, зеркальная, с контролем по четности), тип подготовки (тонкий или фиксированный) и размер виртуального диска. Другие параметры, например имя пула или имя виртуального диска, произвольны.
Структура. Структура хранилища — это всего лишь тип RAID, который предстоит использовать. Можно выбрать Simple (RAID 0 или чередующийся набор без контроля четности), Mirror (RAID 1) или Parity (RAID 5 или чередующийся набор с контролем четности). Можно создать простой набор из одного или нескольких физических дисков пула. Для наборов с контролем четности требуется не менее трех дисков в пуле. Наконец, зеркальные наборы можно создать с использованием не менее двух физических дисков для двустороннего зеркалирования и не менее пяти физических дисков для трехстороннего зеркалирования.
Тип подготовки. Выбор между тонкой и фиксированной подготовкой определяет, нужно ли заранее выделять все сектора, задействованные в виртуальном диске, или следует сопоставлять их с физическими секторами в зависимости от меняющихся со временем потребностей. Размер виртуального диска в режиме фиксированной подготовки ограничивается величиной доступных физических дисков в пуле. Но если выбрать тонкую подготовку, можно указать больший размер физически доступного пространства. По мере необходимости можно пополнять пул физическими дисками.
Размер виртуального диска. Размер виртуального диска зависит от выбранного типа подготовки, структуры хранилища и размера используемых физических дисков. Если планируется создать всего один виртуальный диск в пуле, можно просто выбрать параметр Maximum size (максимальный размер). Обратите внимание, что параметр Maximum size затенен, если выбрана тонкая подготовка.
Дополнительные сведения о тонкой подготовке
Тонкая подготовка — технология своевременного выделения блоков памяти по мере необходимости. При фиксированной подготовке физические блоки выделяются виртуальному диску независимо от того, будут они использованы или нет. При тонкой подготовке только используемые блоки сопоставляются с физическими блоками. Это позволяет подготовить виртуальный диск гораздо большего размера, чем в фиксированном варианте. Если виртуальный диск подходит к пределу сопоставления физических блоков, можно добавить новые физические диски.
Преимущество тонкой подготовки — гибкость дискового пространства. Если вам нужен виртуальный диск на 10 Тбайт, не обязательно заранее обеспечивать для него физическое пространство. Можно подготовить тонкий виртуальный диск размером 10 Тбайт и добавлять физические диски по мере надобности. Эффективность этого подхода еще более повышается благодаря усовершенствованиям NTFS, обеспечивающим восстановление пространства после удаления или оптимизации файлов. Windows также оптимизирована для более эффективной работы с решениями хранения данных высокого уровня, располагающих функциями тонкой подготовки. В частности, это возможность задействовать неиспользуемые сектора, как это делает Storage Spaces and Pools.
Принципы архитектуры
Рассмотрим, что происходит во внутренних механизмах, чтобы получить описанные результаты. На рисунке 1 показан стек хранилища Windows. Драйвер SSP (SpacePort.sys) подключается непосредственно выше Partition Manager (Partmgr.sys). Когда в пул вводится физический диск, на нем создается раздел и физический диск скрывается из интерфейса пользователя. На следующем шаге из пула вырезается виртуальный диск, затем этот виртуальный диск вновь представляется в интерфейсе пользователя как логический диск. Физические диски по-прежнему видны в диспетчере устройств, но новое устройство Microsoft Storage Space Device также указано для каждого созданного виртуального диска.
|
|
| Рисунок 1. Стек хранилища Windows |
На рисунке 2 показано, как будут выглядеть разделы на физических дисках (как унаследованные MBR-диски, так и диски с использованием схемы GPT.) Небольшая область раздела будет выделена для хранения метаданных для Storage Spaces and Pools. Основная часть раздела будет использоваться для хранения данных файлов. После того, как создан виртуальный диск, его можно настроить как MBR или GPT, а затем использовать как обычный физический диск. Его можно представить в формате NTFS или новой системы Resilient File System (ReFS) компании Microsoft.
|
|
| Рисунок 2. Вид разделов на физических дисках |
Дополнительные параметры
В целях повышения производительности можно выполнить более глубокую настройку Storage Spaces and Pools. Полезно изучать эти настройки, добавляя физические диски к существующему виртуальному диску. В частности, функция Storage Spaces and Pools в Windows 8 отличается простотой использования, но если вы хотите расширить возможности управления хранением данных, то в Storage Spaces and Pools для этого есть все необходимое.
Доступ к большинству углубленных настроек можно получить через команду PowerShell под названием New-VirtualDisk. Интерес представляют элементы NumberOfColumns (указывает число создаваемых столбцов), NumberOfDataCopies (указывает число создаваемых копий данных) и ResiliencySettingName (указывает имя требуемого параметра устойчивости — например, Simple, Mirror или Parity).
Число столбцов. На рисунке 3 показана диаграмма, состоящая из трех дисков. Диски делятся на блоки. При чередовании между дисками можно выполнять запись на каждый диск одновременно. В технологии RAID этот метод известен как чередующийся набор без контроля четности. Приблизительно это и происходит на виртуальном диске с «простой» структурой.
Каждый физический диск — столбец в виртуальном диске. Чем больше физических дисков доступно при создании виртуального диска, тем больше будет столбцов и возможных одновременных операций записи. Аналогичная ситуация с наборами с контролем четности. Чем больше физических дисков в начальный момент, тем больше столбцов в виртуальном диске. Единственное различие заключается в потере части пространства, отводимого для хранения разрядов четности. Благодаря возможностям масштабирования Windows можно использовать до восьми столбцов при создании виртуального диска (даже если это делается с использованием PowerShell).
Элемент, используемый для управления столбцами — NumberOfColumns. Ниже приводится пример ручного управления этим элементом и элементом ResiliencySettingName. Следующая команда формирует виртуальный диск с тремя столбцами:
   New-VirtualDisk -FriendlyName NewVDisk -StoragePoolFriendlyName MyPool
   -NumberOfColumns 3 -ResiliencySettingName simple -UseMaximumSize
·
|
|
| Рисунок 3. Простая структура |
Объединение столбцов с копиями данных. Копия данных — это именно копия данных. Если избыточность существует в виде автономного экземпляра, то у вас будет больше одной копии данных. В противном случае копия единственная.
* Простое пространство с единственной копией.
* Зеркальные пространства с двумя или тремя копиями.
* Пространства с контролем четности имеют всего одну копию.
Только зеркальное пространство имеет полную копию экземпляра данных, как показано на рисунке 4. Отказоустойчивость пространства с контролем четности достигается за счет того, что не используется полностью отдельный экземпляр данных. Поэтому имеется лишь единственная копия данных. В трехстороннем зеркале существует три копии данных. Недостаток дополнительной копии данных заключается в необходимости выполнять запись несколько раз. В результате зеркальные пространства работают медленнее при выполнении записи. Один из недостатков зеркалирования — увеличение времени записи из-за необходимости записывать одни и те же данные несколько раз.
|
|
| Рисунок 4. Различия между простой структурой, зеркальной и?структурой с проверкой четкости |
При наличии достаточного дискового пространства можно отчасти компенсировать снижение скорости записи, применяя чередование внутри каждой копии данных. В примере на рисунке 5 четыре физических диска используются для формирования зеркального пространства. Поэтому внутри каждой копии данных можно вести запись одновременно на два диска. Число столбцов в зеркальных пространствах, созданных в графическом интерфейсе, может достигать четырех (на копию данных), но в зеркальных пространствах, созданных с использованием PowerShell, может быть больше четырех столбцов (обратите внимание, что приведено только число столбцов для каждой копии данных).
|
|
| Рисунок 5. Четыре физических диска, использованные для?создания зеркального пространства |
Можно использовать элемент New-VirtualDisk (NumberOfDataCopies), чтобы задать число копий данных. В качестве примера взгляните на следующую команду PowerShell, которая создает двухстороннее зеркальное пространство с шестью столбцами, как на рисунке 6.
|
|
| Рисунок 6. Двухстороннее зеркальное пространство с шестью столбцами |
   New-VirtualDisk -FriendlyName NewVDisk -StoragePoolFriendlyName MyPool
   -NumberOfColumns 6 -NumberOfDataCopies 2 -ResiliencySettingName mirror
   -UseMaximumSize
Дополнительные сведения о столбцах
Число столбцов в дисковых пространствах обычно соответствует числу физических дисков, имеющихся при создании виртуального диска. Число столбцов может быть меньше числа дисков, но не больше. Столбцы важны, так как показывают число дисков, к которым можно обратиться одновременно. Например, на рисунке 7 мы видим два простых пространства. В обоих используется два диска, но в левом используется один столбец, а в правом — два. Для простого пространства справа можно одновременно выполнять операции ввода-вывода, теоретически увеличивая скорость вдвое.
|
|
| Рисунок 7. Два простых пространства |
Число столбцов, используемое в дисковом пространстве, задается при создании пространства. В графическом интерфейсе назначается максимально возможное число столбцов. Здесь действует следующая логика:
* если пространство создано с помощью интерфейса пользователя, максимальное число столбцов — восемь;
* при использовании команды New-VirtualDisk можно установить значение NumberOfColumns больше восьми;
* в пространствах с контролем четности больше восьми столбцов (даже при использовании PowerShell).
Добавление пространства
Добавление дискового пространства к уже существующему может быть делом нелегким. На рисунке 8 было создано простое пространство с использованием двух физических дисков. Если нужно расширить виртуальный диск, необходимо сначала добавить физический диск к пулу носителей, если таковой был недоступен. Но если попытаться расширить виртуальный диск после того, как диск добавлен, вы потерпите неудачу. Ошибка указывает, что не существует физических ресурсов, обеспечивающих добавление пространства к виртуальному диску, даже если пул дополнен новым чистым диском.
|
|
| Рисунок 8. Одно простое пространство, созданное с двумя физическими дисками |
Проблема заключается в количестве столбцов. Windows должна придерживаться той же модели чередования, которая использовалась при создании пространства. Нельзя просто добавить столбец. Если бы такое было возможно, терялись бы все преимущества чередования, когда заполняются два первоначальных диска. Кроме того, нельзя пристроить новый диск к одному из имеющихся столбцов снизу (в сущности, по тем же причинам). Для расширения виртуального диска нужно добавить столько дисков, чтобы их число равнялось или превышало число столбцов в указанном виртуальном диске. В результате чередование продолжается первоначально заданным способом. То же относится к простым пространствам и пространствам с контролем четности. Число добавляемых дисков должно быть равным или больше числа столбцов в виртуальном диске.
Работая с зеркальными пространствами, необходимо принимать во внимание как число столбцов, так и число копий данных. Например, двухстороннее зеркало, созданное с использованием четырех физических дисков, будет выглядеть так, как показано на рисунке 9. NumberOfDataCopies равен 2, и NumberOfColumns равен 2. Число дисков, необходимое для расширения этого виртуального диска вычисляется по следующей формуле:
NumberOfDataCopies * NumberOfColumns
2 * 2 = 4
|
|
| Рисунок 9. Двухстороннее зеркало с четырьмя физическими дисками |
Четыре физических диска необходимо для расширения тестового пространства, см. рисунок 10. Ту же формулу можно использовать для простых пространств и пространств с контролем четности. Однако значение NumberOfDataCopies всегда равно 1 для обеих структур.
|
|
| Рисунок 10. Четыре физических диска, расширяющих тестовое пространство |
Определение числа копий данных и столбцов
Если неизвестно число копий данных и/или столбцов, имеющихся в виртуальном диске, то несложно найти ответ, выяснив значения NumberOfColumns и NumberOfDataCopies с помощью графического интерфейса. Команда PowerShell принесет ту же информацию:
   Get-VirtualDisk -FriendlyName MyVirtualDisk | ft FriendlyName, NumberOfColumns, NumberOfDataCopies
   ReFS на зеркале
· Отметим дополнительное преимущество зеркал Storage Spaces and Pools. В данной статье уже упоминалось о новой файловой системе Microsoft, ReFS. В случае порчи файлов или метаданных в ReFS операционная система может использовать избыточную копию с другой стороны зеркала для устранения ошибок. Это возможно отчасти благодаря контрольным суммам как данных, так и метаданных в ReFS.
Мощная функциональность хранения данных
Благодаря Storage Spaces and Pools в распоряжение обладателей систем хранения данных начального и среднего уровня предоставляется функциональность, которая в противном случае была бы недоступна. Ее легко настроить; возможна углубленная настройка для желающих задействовать дополнительные параметры, а файловая система ReFS приобретает дополнительную устойчивость. Storage Spaces and Pools обеспечивает тонкую подготовку, и как большинство компонентов Server 2012 и Windows 8, может управляться сценариями с использованием PowerShell. Думаю, это будет самое востребованное из всех новшеств Windows, относящихся к хранению данных.
Summary
Please provide questions/feedback on this guide and scripts to
spaces_deploy@microsoft.com.
This guide will instruct you on how to create and test a new
Storage Spaces deployment using a set of automated PowerShell scripts. The tools provided here are very generic and can be used with many different hardware configurations to create virtual disks or other storage for your enterprise workloads. While the
tools are available to the general public, we strongly recommend working with an approved OEM partner when planning and configuring Storage Spaces because they can provide a higher level of IT support.
Before using these scripts, be certain to review the
Storage Spaces Planning and Design guide to ensure that you use acquire hardware that will meet your needs.
Workflow — brief overview
- Selecting and installing physical hardware
- Validate hardware performance and health using ValidateStorageHardware.ps1
- Create storage pools and virtual disks using ProvisionStorageConfiguration.ps1
- Create a Failover Cluster with all of the storage nodes
- Add all of the shared drives to Cluster Shared Volumes
- (optional) Test performance of the cluster using TestStorageConfigurationPerf.ps1
Workflow – detailed
Select and Install Physical Hardware
Hardware selection
When choosing an initial hardware configuration, please refer to the Storage Spaces design and planning document. In most cases, the number and type of physical drives you choose will determine the maximum IOPS and throughput you will see from the system.
This will have a direct impact on workload performance.
In general we recommend the following guidelines for Storage Spaces deployments:
- All hardware should be uniform. Select only 1 model of JBOD, 1 model of SAS HBA, and try to limit the number of drive models to 2.
- Ensure that all hardware (drives, servers, NICs, and controllers) has the latest available firmware version.
Again, we highly recommend working with an OEM when building a Storage Spaces solution because they can provide more support and expertise.
Physical Drive Placement
- Each JBOD should have the same number of SSDs and HDDs
- SSDs and HDDs should be placed within each enclosure according to manufacture recommendations (performance, thermal ratings, etc.)
SAS Fabric configuration
For best performance, each SOFS node should have at least 2 direct SAS connection to each JBOD. Be certain to choose SAS HBAs with enough ports to support the number of enclosures that you will need.
Finishing up
At the end of this step, you will have properly configured the physical hardware and infrastructure needed for a Storage Spaces deployment. You are now ready to begin testing the storage hardware to ensure that it will be performant enough to meet your needs.
For more information on how to size and configure hardware for Storage Spaces, see the
Storage Spaces Planning and Design guide.
ValidateStorarageHardware.ps1
For a 240 disk deployment, you can expect this script to take about 8 hours.
Workflow
Prior to running the script, the node must have the following programs installed to the same directory where
ValidateStorageHardware.ps1 is contained:
- diskspd.exe:
https://gallery.technet.microsoft.com/DiskSpd-a-robust-storage-6cd2f223 - dskcache.exe: https://support.microsoft.com/en-us/kb/8113932
For example, you can put ValidateStorageHardware.ps1, diskspd.exe, and dskcache.exe in the C:UsersUser1Desktop folder.
To run the program, use either of the following:
PS>> .ValidateStorageHardware.ps1
PS>> .ValidateStorageHardware.ps1 [-OutputPath <string>]
This will run the hardware testing tool and identify any drives that might be unhealthy or need replacement. Read through the output to make sure that all (or most) of the physical disks have been given the PASS rating. If there are a few outliers, then
you may want to consider replacing the FAIL or WARN drives. If many physical disks are rated as FAIL or WARN due to IO latency, you might want to consider if the drive models you have chosen will meet your needs. If you believe that the drives will still be
able to meet your workload requirements, you can safely continue. Talk to your OEM for guidance if you are unsure of how to proceed.
Notes
The script has code in place to support firmware blacklists, but the lists are all currently empty. If you discover Spaces-incompatible firmware, please contact
spaces_deploy@microsoft.com to update the script.
Finishing up
Now that you’ve finished this step, you’ve validated that the drives are performant enough to meet your needs and you’re ready to begin provisioning Storage Spaces.
For more information, see
Storage Spaces – Designing for Performance and
Determining disk health using Windows Powershell.
ProvisionStorageConfiguration.ps1
PS>> .ProvisionStorageConfiguration.ps1
PS>> .ProvisionStorageConfiguration.ps1 -Automated
PS>> .ProvisionStorageConfiguration.ps1 –PhysicalDisks <physical disk objects>
The first option is recommended and will add all of the SAS disks to the storage pool. If you want to use a different set of disks (ie. You want to exclude some disks from your configuration because they will not be clusterable), pass in a different set
of disks via the command-line argument.
The –automated flag will create storage pools without any user input. The default configuration uses 2 physical disk redundancy and reserves 30% of the HDD tier capacity for backup workloads.
You can expect this script to take about 30 minutes to run for a 240 disk deployment.
During execution (if
–automated is not used), the script will ask for 2 pieces of information from the user:
- Desired physical disk redundancy
- % capacity of the HDD storage to reserve for backup
The fraction of storage allocated for backup will be used to create parity storage spaces, while the rest will be allocated as mirrored spaces.
You should provide these numbers after carefully considering your final workload. To make this decision easier, you should use the
Software-Defined Storage Design Calculator. After you provide these numbers to the script, you will be presented with the calculated deployment. You will be given the option to cancel the operation so you can
choose different parameters if you don’t think the proposed configuration will work for you.
Finishing up
When the script has finished running, all of the available physical drives passed in will have been added to storage pools, and each pool will have been carved up into several virtual disks.
Cluster Storage Nodes
The next step is to create cluster from all the storage nodes which have a direct connection to the physical disks. This can be done using PowerShell or the Failover Cluster Manager UI.
Powershell
PS>> New-Cluster –Name <string> -Node <StringCollection>
PS>> Test-Cluster
Failover Cluster Manager UI
Launch Failover Cluster Manager and click “create cluster”. During the wizard, be sure to run all of the cluster validation tests.
Finishing up
At the end of this step, you will have created a cluster to ensure greater availability for the Storage.
Add storage to Cluster Shared Volumes
In this step, the virtual disks created by ProvisionStorageConfiguration.ps1 will be added to
Cluster Shared Volumes to allow all the nodes to have simultaneous access to the shared storage resources. This step can also be done using PowerShell or Failover Cluster Manager.
Be sure that the cluster quorum disk is not being used as part of the storage pools. If it is, you will need to change the quorum settings. See
Steps for changing quorum configuration for more info about changing the quorum settings.
PowerShell
One line, which can be run from any node.
>> Get-ClusterResource *disk* | Add-ClusterSharedVolume
Failover Cluster Manager UI
Select all the available disks, right click, and choose “Add to Cluster Shared Volumes”.
Finishing up
At the end of this step, you will have added all of the virtual disks to the cluster shared volumes. You are now ready to begin running workloads on the shared storage resources.
TestStorageConfigurationPerf.ps1
https://gallery.technet.microsoft.com/scriptcenter/Storage-Spaces-Performance-e6952a46
The final step in this guide tests the performance of the Storage Spaces deployment and outputs benchmark performance from synthetic IO tests. The benchmarks should be treated as theoretical maximums. The performance benchmarks simulate generalized workloads
for the mirrored and parity spaces. The workloads we use are generalized diskspd runs and might not represent the performance you will see from your system under your specific workload. The performance test validation done here is
not a substitute for a complete validation under your unique workload.
This takes about 10 hours to complete on a 240 disk system.
Workflow
Before running this script, each storage node must have its own copy of diskspd.exe on its local volume. The path to diskspd must be identical on each node.
PS>> .TestStorageConfigurationPerf.ps1 -pathToDiskspd C:UsersUser1desktop
When the script has completed, output will be visible on the console. Review the output to make sure that the theoretical performance you see is similar to the performance you had planned for.
For more information on Storage Spaces performance, see the
Designing for Performance TechNet article.
Finishing up
Congratulations! You have finished deploying and validating a Storage Spaces configuration. You are ready to begin running real workloads with your new environment.
6 minute read
_using_PowerShell/Top-10-Cloud-Storage-Services-in-2013__371380604__-200x200.png) In my previous posts I talked about how to use NFS and iSCSI technologies hosted on Windows Server 2012 and how to deploy those to my Home Lab ESXi servers.
In my previous posts I talked about how to use NFS and iSCSI technologies hosted on Windows Server 2012 and how to deploy those to my Home Lab ESXi servers.
-
WS2012 Storage — iSCSI Target Server — Create an iSCSI target using PowerShell
-
WS2012 Storage — iSCSI Target Server — Configuring an iSCSI Initiator on VMware vSphere 5.1
-
WS2012 Storage — NFS Server — Configure NFS for VMware vSphere 5.1
One point I did not covered was: How to do the Initial setup with the physical disk, Storage pooling and the creating the Virtual Disk(s) ?
The cost to acquire and manage highly available and reliable storage can represent a significant part of the IT budget. Windows Server 2012 addresses this issue by delivering a sophisticated virtualized storage feature called Storage Spaces as part of the WS2012 Storage platform. This provides an alternative option for companies that require advanced storage capabilities at lower price point.
Overview
-
Terminology
-
Storage Virtualization Concept
-
Deployment Model of a Storage Space
-
Quick look at Storage Management under Windows Server 2012
-
Server Manager — Volumes
-
PowerShell — Module Storage
-
Identifying the physical disk(s)
-
Creating the Storage Pool
-
Creating the Virtual Disk
-
Initializing the Virtual Disk
-
Partitioning and Formating
Terminology
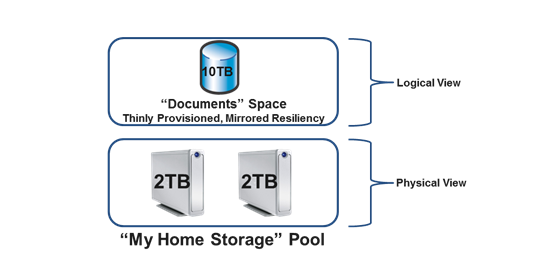
Storage Pool:Abstraction of multiple physical disks into a logical construct with specified capacity
Group of physical disks into a container, the so-called storage pool, such that the total capacity collectively presented by those associated physical disks can appear and become manageable as a single and seemingly continuous space.
There are two primary types of pools which are used in conjunction with Storage Spaces, as well as the management API in Windows Server 2012: Primordial Pool and Concrete Pool.
Primordial Pool:The Primordial pool represents all of the disks that Storage Spaces is able to enumerate, regardless of whether they are currently being used for a concrete pool. Physical Disks in the Primordial pool have a property named CanPool equal to “True” when they meet the requirements to create a concrete pool.
Concrete Pool:A Concrete pool is a specific collection of Physical Disks that was formed by the user to allow creating Storage Spaces (aka Virtual Disks).
Storage Space:Virtual disks with associated attibutes that include a desired level of resiliency, thin of fixed provisioning, automatic or controlled allocation on diverse storage media, and precise administrative control.
Storage Virtualization Concept
This diagram from Yung Chou shows nicely how the different parts of Windows Server 2012 Storage work together.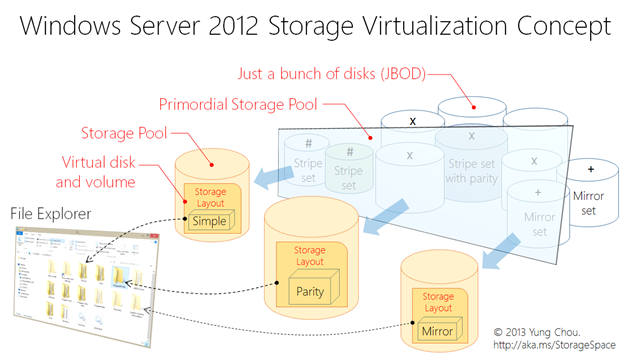.png)
### Deployment Model of a Storage Space (Virtual Disk)
In order to understand the deployment model of a Storage Space, I created the following diagram. Hopefully helpful!
_using_PowerShell/WS2012_Storage_Workflow__849051994__-450x640.png)
###
### Quick look at the Storage Management on WS2012
Using The GUI
With the conventional Server Manager, under File and Storage Services, youcan browse our Volumes, Physical disks, Storage Pool and Virtual Disk. This is just to show you where to go if you need to use the GUI, this post will not cover this part.
Using PowerShell — Module Storage
Microsoft Windows Server 2012 is delivered with a really awesome PowerShell Storage module.
Use the Cmdlet Get-Command to retrieve the full list of Cmdlets available in this module.
«`
Get-Command -Module Storage | Select-Object Name
«`
Note: You need to import the Storage module in order to be able those. If it’s not the case, juste use Import-Module.
«`
Import-Module Storage
«`
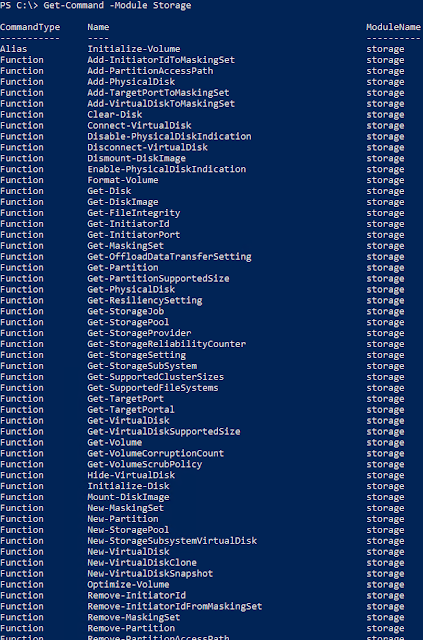
Here is the full list of Cmdlets for the Storage Module.
«`
Get-Command -Module Storage | Select-Object Name
«`
Name
----
Initialize-Volume
Add-InitiatorIdToMaskingSet
Add-PartitionAccessPath
Add-PhysicalDisk
Add-TargetPortToMaskingSet
Add-VirtualDiskToMaskingSet
Clear-Disk
Connect-VirtualDisk
Disable-PhysicalDiskIndication
Disconnect-VirtualDisk
Dismount-DiskImage
Enable-PhysicalDiskIndication
Format-Volume
Get-Disk
Get-DiskImage
Get-FileIntegrity
Get-InitiatorId
Get-InitiatorPort
Get-MaskingSet
Get-OffloadDataTransferSetting
Get-Partition
Get-PartitionSupportedSize
Get-PhysicalDisk
Get-ResiliencySetting
Get-StorageJob
Get-StoragePool
Get-StorageProvider
Get-StorageReliabilityCounter
Get-StorageSetting
Get-StorageSubSystem
Get-SupportedClusterSizes
Get-SupportedFileSystems
Get-TargetPort
Get-TargetPortal
Get-VirtualDisk
Get-VirtualDiskSupportedSize
Get-Volume
Get-VolumeCorruptionCount
Get-VolumeScrubPolicy
Hide-VirtualDisk
Initialize-Disk
Mount-DiskImage
New-MaskingSet
New-Partition
New-StoragePool
New-StorageSubsystemVirtualDisk
New-VirtualDisk
New-VirtualDiskClone
New-VirtualDiskSnapshot
Optimize-Volume
Remove-InitiatorId
Remove-InitiatorIdFromMaskingSet
Remove-MaskingSet
Remove-Partition
Remove-PartitionAccessPath
Remove-PhysicalDisk
Remove-StoragePool
Remove-TargetPortFromMaskingSet
Remove-VirtualDisk
Remove-VirtualDiskFromMaskingSet
Rename-MaskingSet
Repair-FileIntegrity
Repair-VirtualDisk
Repair-Volume
Reset-PhysicalDisk
Reset-StorageReliabilityCounter
Resize-Partition
Resize-VirtualDisk
Set-Disk
Set-FileIntegrity
Set-InitiatorPort
Set-Partition
Set-PhysicalDisk
Set-ResiliencySetting
Set-StoragePool
Set-StorageSetting
Set-StorageSubSystem
Set-VirtualDisk
Set-Volume
Set-VolumeScrubPolicy
Show-VirtualDisk
Update-Disk
Update-HostStorageCache
Update-StorageProviderCache
```
### Identifying the physical disk(s)
The first thing we will need is to identify which physical disk I will be using for my Storage Pool(s).
 In the example below, I'm using the Get-PhysicalDisk cmdlet to list all of the Physical Disks that are present on the system:
```
Get-PhysicalDisk -CanPool $true
```
### Creating the Storage Pool
In the example below I use New-StoragePool Cmdlet to show the creation of a Storage Pool named "LUN-1TB", using all of the Physical Disks which are currently available for pooling.
```
New-StoragePool -FriendlyName "LUN-1TB" `
-StorageSubSystemUniqueId (Get-StorageSubSystem -FriendlyName "*Space*").uniqueID `
-PhysicalDisks (Get-PhysicalDisk -CanPool $true)
```
### Creating the Virtual Disk (aka LUN/Storage Space)
A Storage Space is created from an existing Storage pool. The Storage Space (also known as a Virtual Disk) is also exposed as a Windows disk, visible in Windows applications. Additionally, Storage Spaces may be configured in a variety of methods to provide either increased performance or resilient configurations (or combinations of both).
Creating a Storage Space requires the following information:
* The Name, UniqueID or FriendlyName</b>of the Storage Pool that was created, here "LUN-1TB"
* A FriendlyName</b> to use for the Storage Space to create
* The Size</b> of the Storage Space to create (you can also use the -UseMaximumSize parameter)
* (Optionally) Use of advanced settings when creating the Storage Space, such as
* Number of Physical Disks to use for a specific Storage Space,
* Utilizing specific resiliency setting
* Provisioning Type.
For more information on using advanced settings for the creation of a Storage Space, please refer to the New-VirtualDisk help using Get-Help or on the TechNet page online.
The following example shows the creation of a Storage Space that is 200GB in size, named "DataStore01", using the pool named "LUN-1TB"
```
New-VirtualDisk -FriendlyName "Datastore01" `
-StoragePoolFriendlyName "LUN-1TB" -Size 200GB `
-ProvisioningType Thin -ResiliencySettingName Mirror
```
In the example below, I'm using the Get-PhysicalDisk cmdlet to list all of the Physical Disks that are present on the system:
```
Get-PhysicalDisk -CanPool $true
```
### Creating the Storage Pool
In the example below I use New-StoragePool Cmdlet to show the creation of a Storage Pool named "LUN-1TB", using all of the Physical Disks which are currently available for pooling.
```
New-StoragePool -FriendlyName "LUN-1TB" `
-StorageSubSystemUniqueId (Get-StorageSubSystem -FriendlyName "*Space*").uniqueID `
-PhysicalDisks (Get-PhysicalDisk -CanPool $true)
```
### Creating the Virtual Disk (aka LUN/Storage Space)
A Storage Space is created from an existing Storage pool. The Storage Space (also known as a Virtual Disk) is also exposed as a Windows disk, visible in Windows applications. Additionally, Storage Spaces may be configured in a variety of methods to provide either increased performance or resilient configurations (or combinations of both).
Creating a Storage Space requires the following information:
* The Name, UniqueID or FriendlyName</b>of the Storage Pool that was created, here "LUN-1TB"
* A FriendlyName</b> to use for the Storage Space to create
* The Size</b> of the Storage Space to create (you can also use the -UseMaximumSize parameter)
* (Optionally) Use of advanced settings when creating the Storage Space, such as
* Number of Physical Disks to use for a specific Storage Space,
* Utilizing specific resiliency setting
* Provisioning Type.
For more information on using advanced settings for the creation of a Storage Space, please refer to the New-VirtualDisk help using Get-Help or on the TechNet page online.
The following example shows the creation of a Storage Space that is 200GB in size, named "DataStore01", using the pool named "LUN-1TB"
```
New-VirtualDisk -FriendlyName "Datastore01" `
-StoragePoolFriendlyName "LUN-1TB" -Size 200GB `
-ProvisioningType Thin -ResiliencySettingName Mirror
```
Another example using -UseMaximumSize
New-VirtualDisk -FriendlyName "Datastore01" `-StoragePoolFriendlyName "LUN-1TB" -UseMaximumSize `-ProvisioningType Thin -ResiliencySettingName Mirror
### Initializing the Virtual Disk
### Now the Storage Space (Virtual Disk) is created, we need to locate the disk that corresponds with the Storage Space named "DataStore01" and initialize it:
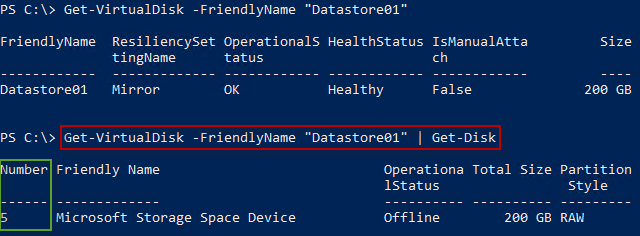
### Locating the disk, this can be done by Get-VirtualDisk and Get-Disk cmdlets as shown below:
```
Get-VirtualDisk -FriendlyName "Datastore01" | Get-Disk
```
###
As you can see my virtual disk has the Number 5
The next step is to use the Initialize-Disk cmdlet to initialize the disk:
In the preceding example, we determined that the disk we need to initialize is disk number 5, so I would use the Initialize-Disk cmdlet as shown below:
### Partitioningand Formating
Now that disk 5 is initialized, the next step is to create a partition on the Storage Space, which can be done via the New-Partition cmdlet.
```
New-Partition -DiskNumber 5 -UseMaximumSize -AssignDriveLetter
```
```
```
To create a volume on the Storage Space, I will now format the volume associated with DriveLetter D which was assigned in the previous step.
```
Format-Volume -DriveLetter D -FileSystem NTFS -NewFileSystemLabel "DataStore01"
```
_using_PowerShell/Drawing2__2105661421__-332x140.png) In the example below, I'm using the Get-PhysicalDisk cmdlet to list all of the Physical Disks that are present on the system:
```
Get-PhysicalDisk -CanPool $true
```
In the example below, I'm using the Get-PhysicalDisk cmdlet to list all of the Physical Disks that are present on the system:
```
Get-PhysicalDisk -CanPool $true
```
 ###
### _using_PowerShell/Drawing2_2__212364170__-332x140.png) ```
New-StoragePool -FriendlyName "LUN-1TB" `
-StorageSubSystemUniqueId (Get-StorageSubSystem -FriendlyName "*Space*").uniqueID `
-PhysicalDisks (Get-PhysicalDisk -CanPool $true)
```
```
New-StoragePool -FriendlyName "LUN-1TB" `
-StorageSubSystemUniqueId (Get-StorageSubSystem -FriendlyName "*Space*").uniqueID `
-PhysicalDisks (Get-PhysicalDisk -CanPool $true)
```
 ###
### 
 ###
### 

Storage Spaces Direct (S2D) – новая технология распределенного хранения данных, представленная в Windows Server 2016. Благодаря использованию Storage Spaces Direct локальные диски нескольких серверов можно организовать в отказоустойчивое, масштабируемое хранилище, защищенное от выхода из строя как отдельных дисков, так и целых серверов. Цена такого «программного» хранилища получается значительно меньше, чем стоимость организации полноценного SAN или NAS, а за счет простого масштабирования (до 16 серверов и 400 дисков) и возможности использовать различных накопителей (в том числе SSD и NVMe) можно обеспечить значительную производительность.
Содержание:
- Что такое Storage Spaces Direct (S2D)
- Требования к Storage Spaces Direct
- Включаем Storage Spaces Direct
Что такое Storage Spaces Direct (S2D)
S2D является дальнейшим развитием технологии Storage Spaces и позволяет объединить локальные диски узлов (серверов) кластер Hyper-V в пулы хранения (Storage Pool). На данных пулах можно создать виртуальные тома (диски) и использовать их в качестве общего тома кластера Cluster Shared Volume (CSV) для хранения файлов виртуальных машин Hyper-V и файловых шар SOFS-серверов. При необходимости расширить размер хранилища достаточно добавить в S2D новый сервер или накопитель. По сути, технология Storage Spaces Direct является ответом Microsoft на VMware vSAN.
Требования к Storage Spaces Direct
В S2D поддерживаются следующие типы устройств хранения:
- Обычные HDD диски (SAS)
- SATA / SAS SSD диски
- NVMe (Non-Volatile Memory Express) — SSD диски, подключенные не через классический интерфейс SATA/SAS, а через более скоростную шину PCI Express
В дальнейшем разные типы дисков можно комбинировать в различные массивы (по скорости и емкости), например, логично расположить кэш и транзакционные логи приложений на скоростных NVMe SSD, медленные и недорогие диски лучше использовать для хранения больших файлов, доступ к которым не требует повышенной производительности и т.д.
Для работы S2D нужно организовать отказоустойчивый кластер, к узлам которого выдвигаются следующие требования:
Требования к узлам кластера S2D
- Редакция Windows Server 2016 — DataCenter
- На серверах нужно установить следующие компоненты: роли Hyper-V, File Services и фичу Failover Clustering
Примечание. Не забудьте отключить SMB 1:
Remove-WindowsFeature –Name FS-SMB1 -Verbose -Restart - Как минимум два сервера в кластере (в идеале не менее 4 для обеспечения высокой отказоустойчивости)
- Наличие дисков. Помимо системного должен иметь как минимум один физический диск на каждом узле. Все диски, которые планируется добавить в хранилище Storage Spaces Direct должны быть не размечены (не должны быть разбиты и не содержать таблицы разделов)
Итак, предполагаем, что у нас уже собран отказоустойчивый кластер из двух серверов с Windows Server 2016 (можно собрать такой кластер даже в рабочей группе).
Примечание. Если в кластере четное число серверов, придется настроить ресурс-свидетель. Если количество узлов нечетное – свидетель не нужен.
Перед тем, как включить Storage Spaces Direct, проверьте, что ваши диски можно объединить в такой пул.
Get-PhysicalDisk –CanPool $True | Sort Model

Включаем Storage Spaces Direct
Активируем S2D с помощью командлета:
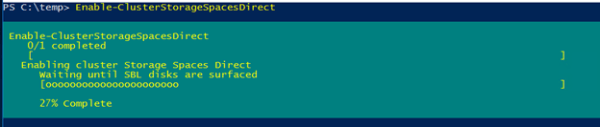
Enable-ClusterStorageSpacesDirect
Командлет отрабатывает довольно долго (около 10 минут), в течении которых будет проанализированы все доступные диски и их производительность, и автоматически создан кластерный пул. Также автоматически создаются два тира: Performance и Capacity с разным типом отказоустойчивости хранения: mirror и parity соответственно.
Всего поддерживаются 3 типа организации отказоустойчивого хранения данных:
- Mirrored (3) – данные синхронно реплицируются между 3 (или 2 в минимальной конфигурации) узлами. Высокая скорость чтения обеспечивается распределением операции между всеми серверами.
- Parity (2) – данные с хранением четности распределены между разными дисками. Данные хранятся более эффективно, т.к. не надо как в первом случае хранить несколько копий одних и тех же данных.
- Tiered (1) – используется комбинация обоих техник.
Примечание 1. В том случае, если при выполнении команды Enable-ClusterS2D появится ошибка «no disks with supported bus types found to be used for S2D», скорее всего тип шины (BusType) ваших дисков – RAID (что с точки зрения S2D – неподдерживаемая конфигурация). Проверим тип шины
Get-Disk | select Number, FriendlyName, OperationalStatus, Size, PartitionStyle, BusType | sort Number | ft -AutoSize
 Так и есть – во всех случаях это RAID. Решение — обновить драйверы/ firmware контроллеров (в случае серверов HP установить последний HPE Support Pack). Проверим тип BusType еще раз (теперь он сменился на SAS).
 Кроме того, есть небольшой трюк позволяющий в реестре изменить тип шины на SATA для нужного типа контроллера:HKEY_LOCAL_MACHINESYSTEMCurrentControlSetServicesarcsasParameters
«BusType»=dword:0000000b (вместо 00000008)Другие примеры использования командлетов PowerShell для управления локальными дисками приведены в статье Управление дисками и разделами из PowerShell.
Примечание 2. Если в массиве обнаружен диск типа дисков SSD, NVMe, он автоматически используется в качестве диска для хранения кэша. Если таких дисков нет, в процессе создания S2D будут появляться предупреждения. Можно отключить кэш с помощью параметра
-CacheState Disabled
.
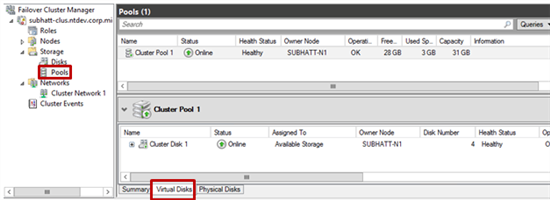
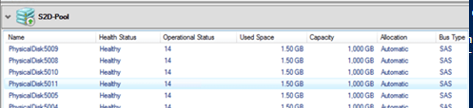
Откроем консоль управления кластером и убедимся, что в разделе Storage новый появился Cluster Pool 1.

Выбрав пул, можно увидеть из каких дисков он состоит.
В случае необходимости, имя пула можно изменить:
Set-StoragePool –FriendlyName “Cluster Pool 1” –NewFriendlyName “S2D”
Если нужно создать том из определенных дисков, можно воспользоваться к примеру, такой командой. Сначала выбираем все диски с LUN 3, а затем собираем из них пул.
$HDDs = Get-PhysicalDisk | ? PhysicalLocation -like "*LUN 3"
New-StoragePool -StorageSubSystemFriendlyName *Cluster* -FriendlyName S2DPool -ProvisioningTypeDefault Fixed -PhysicalDisk $HDDs
Вывести список дисков в пуле:
Get-StoragePool -FriendlyName S2D | Get-PhysicalDisk | ft PhysicalLocation

Добавить в пул новый диск:
$HDDs = Get-PhysicalDisk | ? PhysicalLocation -like "*LUN 4"
Add-PhysicalDisk -PhysicalDisks $HDDs -StoragePoolFriendlyName S2D
Диски, помеченные как S2D, в консоли управления дисками более не отображаются, это нормально.
При наличии разнородных накопителей можно использовать тиринг (не обязательно). Тир типа зеркало из SSD дисков создается так:
New-StorageTier -StoragePoolFriendlyName S2D -FriendlyName "Mirror_Tier" -MediaType SSD -ResiliencySettingName Mirror
Тир из обычных HDD с хранением четности:
New-StorageTier -StoragePoolFriendlyName S2D -FriendlyName "Parity_Tier" -MediaType HDD -ResiliencySettingName Parity
Теперь можно создать том CSV (Cluster Shared Volume):
New-Volume –StoragePoolFriendlyName S2D –FriendlyName CSV001 –PhysicalDiskRedudancy 2 -FileSystem CSVFS_ReFS -Size 200GB
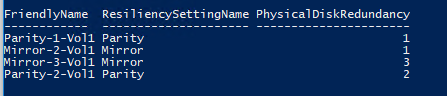
Список томов и типом избыточности можно вывести так
Get-VirtualDisk | ft FriendlyName, ResiliencySettingName, PhysicalDiskRedundancy
Новый CSV том появится в консоли управления дисками.

Данный том можно использовать для размещения виртуальных машин Hyper-V или сетевого хранилища Scale-out File Server.
Итак, при использовании Storage Spaces Direct из нескольких серверов с локальными дисками можно с легкостью создать программное сетевое хранилище данных. За счет технологии S2D обеспечивается как защита от одновременного выхода из строя любых двух дисков или двух серверов (4+ нодовый кластер). Кластер S2D автоматически запускает процесс перераспределения данных между оставшимися устройствами в случае обнаружения неполадок с дисками или серверами. В тестовой среде можно убедится, что при отключении двух любых дисков хранилище продолжает быть доступным, а ВМ, запущенные на нем штатно работают. Процедура замены неисправного диска в хранилище S2D описана в следующей статье.
In this blog post we will continue our step by step series on Microsoft Storage Spaces, if you missed the previous post on How To Replace A Faulty Disk In Two-Way Mirrored Storage Tiered Space, then make sure you check it here.
In today’s post I will walkthrough how to create a Two-way mirror Storage Space via PowerShell.
So without further ado, let’s get started.
First we will check the available physical disks in the system:
PS C:>Get-PhysicalDisk

Simple Steps to Enable Azure File S…
Please enable JavaScript
Next we will list the physical disks that can be pooled into our Storage Pool filtered by Friendly Name, Operation Status, Size and Media Type.
PS C:>Get-PhysicalDisk –CanPool $True | ft FriendlyName,OperationalStatus,Size,MediaType

As you can see we have 4 disks that can be pooled (2X136GB and 2X418GB).
We will store all physical disks that can be pooled into a variable, $Pooldisks
PS C:>$Pooldisks = Get-Physicaldisk | ? {$_.canpool -eq $true}
Next we will create a new Storage Pool using the disks in variable $Pooldisks with a name of “DCHV-StoragePool1”
PS C:>New-StoragePool -PhysicalDisks $Pooldisks –StorageSubSystemFriendlyName “Storage Spaces*” -FriendlyName “DCHV-StoragePool1”

Here is the result in the UI:

Now let’s view the disks in the Storage Pool that we just created.
PS C:>Get-StoragePool -FriendlyName “DCHV-StoragePool1” | Get-PhysicalDisk | Select FriendlyName, MediaType

As you can see the MediaType is shown as UnSpecified, so before we continue we must set the MediaType properly.
And since I am using only Normal Hard Drives in this demonstration, we will set the MediaType to HDD, and if you are creating a tiered Storage Space, then make sure to set each type properly (HDD / SSD).
PS C:>Get-StoragePool DCHV-StoragePool1 | Get-PhysicalDisk | Set-PhysicalDisk -MediaType HDD

Let’s view the disks in the Storage Pool after we specified the media type to HDD:
PS C:>Get-StoragePool -FriendlyName “DCHV-StoragePool1” | Get-PhysicalDisk | Select FriendlyName, MediaType

Last but not least, we will create a New-VirtualDisk with ResiliencySettingName Mirror, then the NumberOfDataCopies is equal to (2=Two-way mirror Space, 3=Three-way mirror Space). In this demo we can only create Two-way mirror space since we have only 4 disks, however for Three-way mirror we need 5 disks. A two-way mirror will allow you to suffer the loss of a single disk with no problems while a three-way mirror will allow you to lose two disks.
Next we move to choose the ProvisioningType (Fixed or Thin), we will choose Fixed instead of Thin provisioning, and then we specify Maximum disk size. It’s very important to mention that thin provisioning will not prevent storage shortages. Applications will break if storage is not added to the thinly provisioned volumes in time.
The final and confused parameters are the NumberOfColumns and the Interleave.
The more columns means more performance because multiple disks will be engaged at once in Read/Write operations, but it’s also limited in flexibility with expanding existing virtual disks, especially in tiered scenarios. So what’s the best size for columns for Two-way mirror Storage Space?
Typically the column count will be equal to the number of physical disks of the storage space (for simple spaces) or half of the number of disks (for mirror spaces). The column count can be lower than the number of physical disks but never higher.
The more is better in terms of performance, but the less is better in terms of flexibility for future expansion. There is no simple answer here, so it depends!
Here is a Two-way mirror virtual disk with Number of Columns=1.
PS C:>New-VirtualDisk -StoragePoolFriendlyName DCHV-StoragePool1 -FriendlyName DCHV01-vDisk1 -ResiliencySettingName Mirror -NumberOfDataCopies 2 -ProvisioningType Fixed -UseMaximumSize -NumberOfColumns 1 -Verbose

Here is a Two-way mirror virtual disk with Number of Columns=2.
PS C:>New-VirtualDisk -StoragePoolFriendlyName DCHV-StoragePool1 -FriendlyName DCHV01-vDisk1 -ResiliencySettingName Mirror -NumberOfDataCopies 2 -ProvisioningType Fixed -UseMaximumSize -NumberOfColumns 2 -Verbose

As you can see with Column#1, we have more capacity space than Column#2. If you use 1 column, your space will only be as fast as one individual disk.
The Interleave parameter represents the amount of data written to a single column per stripe. The default Interleave value is 262,144 bytes (256 KB).
The final step is to initialize the volume and create the new partition.
PS C:>Get-VirtualDisk DCHV01-vDisk1 | Get-Disk | Set-Disk -IsReadOnly 0
PS C:>Get-VirtualDisk DCHV01-vDisk1 | Get-Disk | Set-Disk -IsOffline 0
PS C:>Get-VirtualDisk DCHV01-vDisk1 | Get-Disk | Initialize-Disk -PartitionStyle GPT
PS C:>Get-VirtualDisk DCHV01-vDisk1 | Get-Disk | New-Partition -DriveLetter “D” -UseMaximumSize
PS C:>Initialize-Volume -DriveLetter “D” -FileSystem NTFS -Confirm:$false -NewFileSystemLabel “Hyper-V”
Microsoft has a great Storage Space performance paper which goes in more detail and is worth a read.
Until then… N’joy your day!
/Charbel