В этой статье мы покажем, как настроить тегированный сетевой интерфейс с VLAN в Windows 10/11 и Windows Server 2019 (2022/2016/2012R2). Стандарт VLAN (Virtual LAN) описан в 802.1Q и предполагает маркировку трафика с помощью тегов (vlanid), необходимую для отнесения сетевого пакета к той или иной виртуальной сети. VLAN используются для разделения и сегментирования сетей, ограничения широковещательных доменов и изоляции сегментов сети для повышения безопасности. В Windows вы можете настроить несколько логических сетевых интерфейсов с разными номерами VLAN на одном физическом интерфейсе несколькими способами.
Содержание:
- Настройка VLAN интерфейсов в Windows 10 и 11
- Добавить несколько VLAN ID в Windows Server 2019/2016
- Как создать несколько VLAN в Windows Hyper-V?
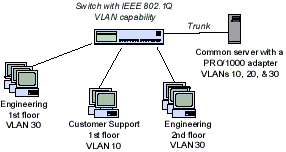
Для использования VLAN необходимо соответствующим образом перенастроить порт коммутатора, куда подключен ваш компьютер/сервер. Порт должен быть переведен из режима access в режим транк. По умолчанию на транк порту разрешены все VLAN, но вы можете указать список номеров разрешенных VLAN(от 1до 4094), которые доступны на данном порту коммутатора Ethernet.
Настройка VLAN интерфейсов в Windows 10 и 11
В десктопных версиях Windows нет встроенный поддержки VLAN. По умолчанию драйвера большинства сетевых адаптеров обрезают в пакетах все VLAN-тэги и внешние VLAN становиться недоступными.
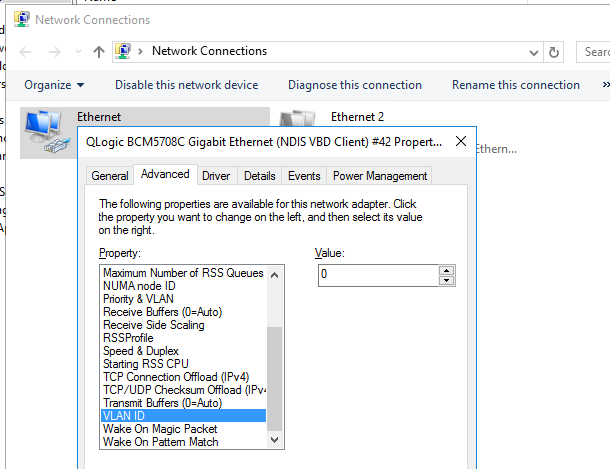
Для некоторых сетевых адаптеров вы можете задать номер VLAN в настройках драйвера:
- Запустите консоль диспетчера устройств (
devmgmt.msc
); - Разверните секцию Network adapters и откройте свойства вашего сетевого адаптера;
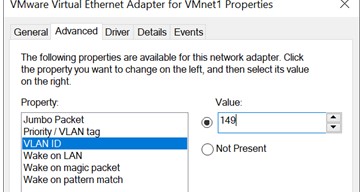
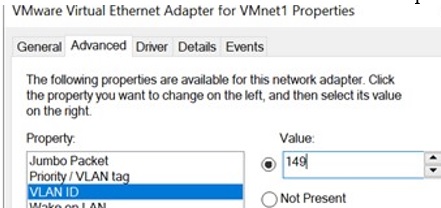
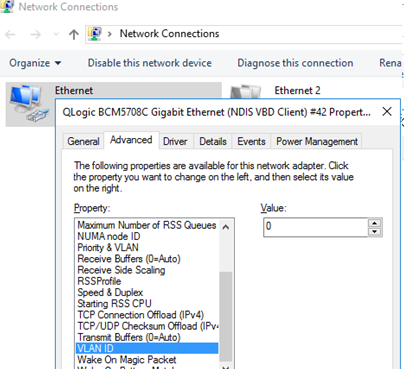
- Перейдите на вкладку Advanced и найдите опцию VLAN ID;
- Здесь вы можете задать номер VLAN;
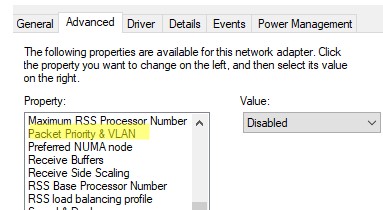
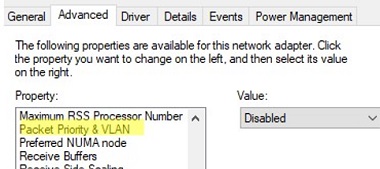
- У некоторых сетевых карт сначала нужно включить опцию Packet Priority and VLAN.
В современных версиях Windows 10 и 11 вы можете задать один тег VLAN для вашего сетевого интерфейса. Для этого используется командлет PowerShell для управления сетевыми настройками. Например, вы хотите задать VLAN 50 для вашего сетевого интерфейса с именем Ethernet1:
Set-NetAdapter –Name "Ethernet1" -VlanID 50
Для некоторых сетевых карт (Intel, Broadcom, HP, Realtek) доступны специальные утилиты, позволяющие создать в Windows виртуальный сетевой интерфейс с VLAN ID. Для этого на компьютере нужно установить специальный драйвер с поддержкой тегированного трафика 802.1Q и официальную утилиту от вендора.
Создаем VLAN интерфейсы в Windows 10/11 на сетевой карте Realtek
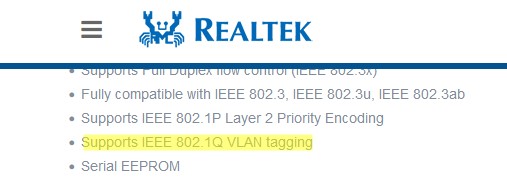
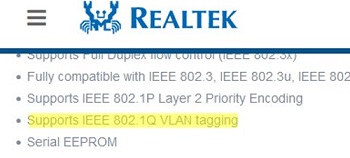
Для сетевых карт Realtek вы можете настроить несколько виртуальных сетевых адаптеров с различными VLAN с помощью утилиты Realtek Ethernet Diagnostic Utility. Найдите описание вашего сетевого контролера Realtek на сайте вендора, и проверьте что эта модель поддерживает VLAN. Например, в спецификации сетевого контроллера RTL8169SC(L) присутствует строка:
Supports IEEE 802.1Q VLAN tagging
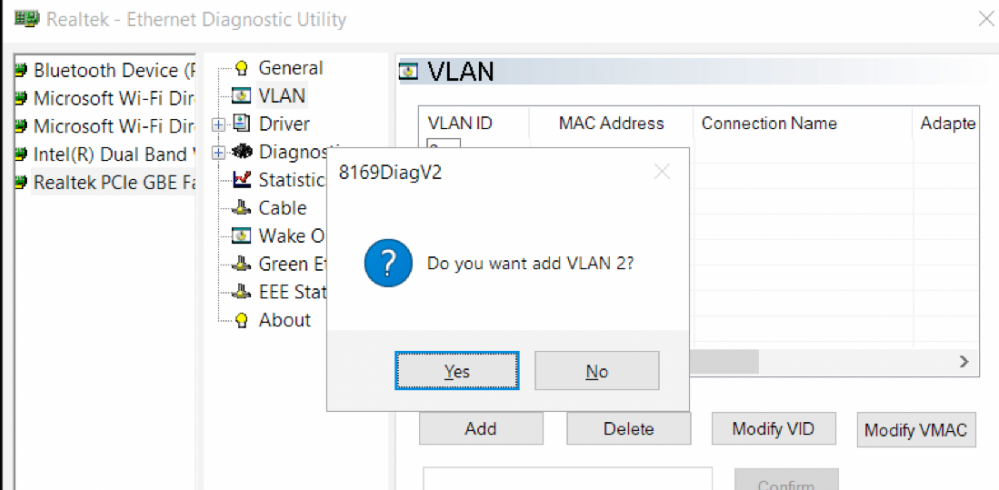
Скачайте и установите последнюю версию сетевого драйвера для вашего адаптера Realtek и запустите утилиту Realtec Ethernet Diagnostic Utility (Diagnostic Program for Win7/Win8/Win10/Win11).
Перейдите в раздел VLAN, нажмите кнопку Add и добавьте нужный VLAN ID. После этого в Windows появится новый сетевой интерфейс.
После того, как вы создали сетевые интерфейсы для ваших VLAN, вы можете задать на них нужный IP из соответствующей подсети.
Добавляем VLAN интерфейсы на сетевом адаптере Intel Ethernet
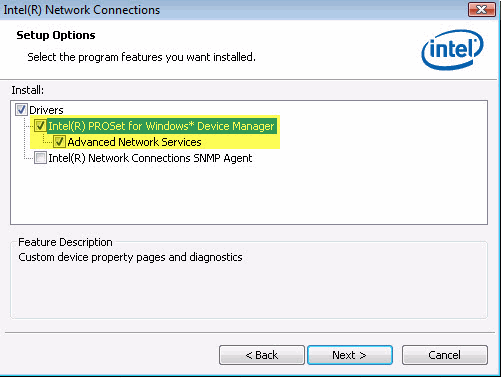
У Intel для настройки VLAN есть собственная утилита Intel Advanced Network Services (Intel® ANS) VLAN. Ваша модель сетевого адаптера, естественно, должна поддерживать технологию VLAN (например, VLAN не поддерживаются для карт Intel PRO/100 и PRO/1000). При установке драйвера выбейте опции Intel PROSet for Windows Device Manager и Advanced Network Services.
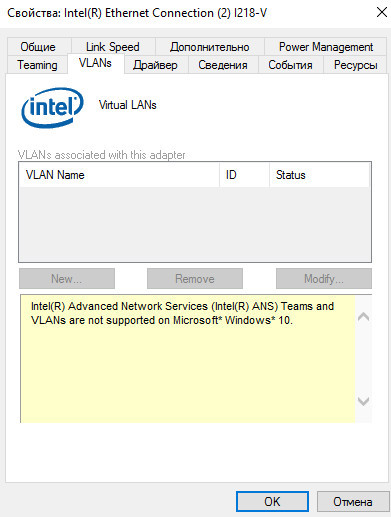
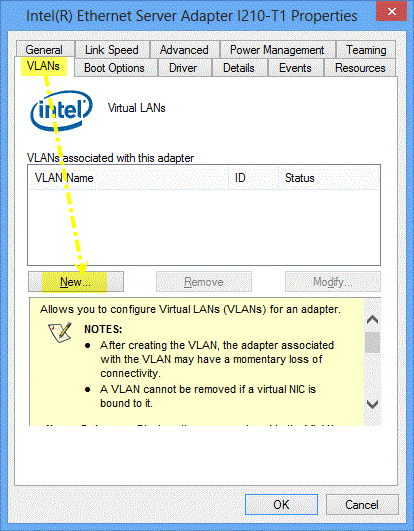
После этого в свойствах физического сетевого адаптера Intel появляется отдельная вкладка VLANs, где вы можете добавить несколько VLAN интерфейсов.
Однако этот способ работает во всех предыдущих версиях Windows (до Windows 10 1809). В последних версиях Windows на этой вкладке присутствует надпись:
Intel(R) Advanced Network (Intel(R) ANS) Teams and VLANs are not supported on Microsoft Windows 10.
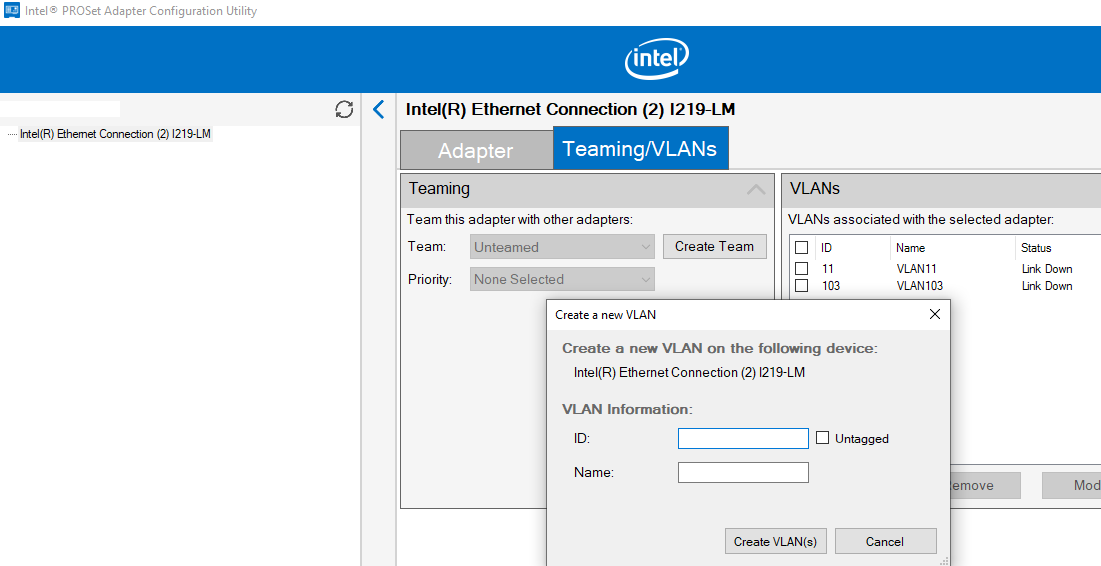
Intel недавно выпустила обновленные драйвера сетевых адаптеров и утилиту Intel PROSet Adapter Configuration Utility для последних версий Windows 10 и 11. Скачайте и установите последнюю версию драйвера Intel и утилиту Intel PROset.
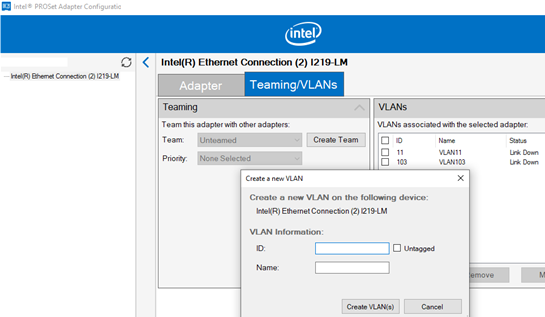
Запустите утилиту, перейдите на вкладку Teaming/VLANs, нажмите кнопку New, и укажите имя сетевого интерфейса и его VLANID.
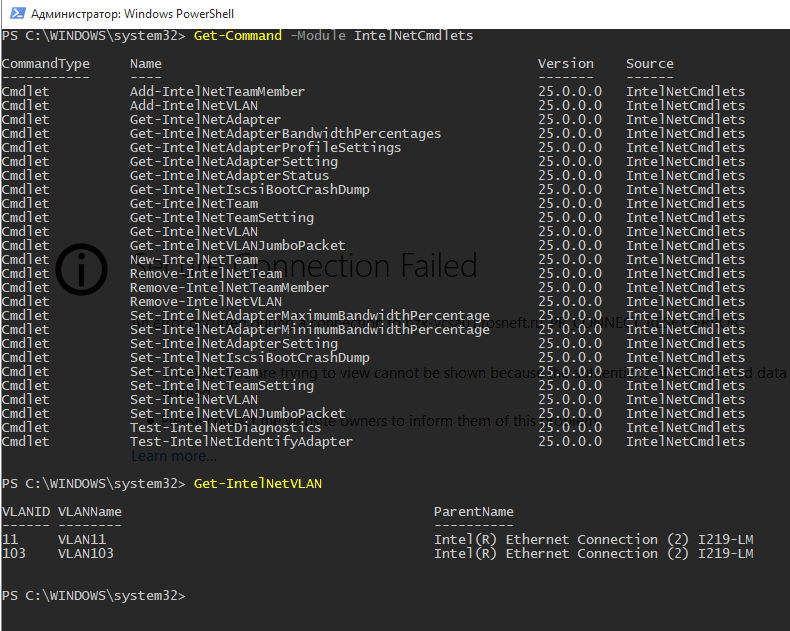
Кроме того, вы можете добавить/удалить/просмотреть список VLAN на сетевых картах Intel с помощью специальных PowerShell командлетов из модуля IntelNetCmdlets. Импортируйте модуль в свою PowerShell сессию:
Import-Module -Name "C:Program FilesIntelWired NetworkingIntelNetCmdletsIntelNetCmdlets" -Scope Local
Вы можете создать нетегированный виртуальный сетевой адаптер (обычно используется с native-vlan-id):
Add-IntelNetVLAN -ParentName "Intel(R) Ethernet Connection I219-LM" -VLANID 0
Чтобы создать сетевой адаптер Intel с конкретным номером VLAN:
Add-IntelNetVLAN -ParentName "Intel(R) Ethernet Connection I219-LM" -VLANID 11
Чтобы вывести список всех виртуальных сетевых адаптеров Intel:
Get-NetAdapter
Удалить VLAN адаптер:
Remove-IntelNetVLAN -ParentName "Intel(R) Ethernet Connection I219-LM" -VLANID 11
Для сетевых карт Broadcom вы можете создавать группы виртуальных сетевых интерфейсов и назначать им VLAN ID с помощью утилиты Broadcom Advanced Control Suite.
Добавить несколько VLAN ID в Windows Server 2019/2016
В Windows Server 2022/2019/2016/2012R2 вы можете настроить несколько VLAN на одном сетевом интерфейсе с помощью встроенных средств (без установки специальных драйверов или утилит). Попробуем настроить несколько разных VLAN на одной физической сетевой карте в Windows Server 2019 с помощью NIC Teaming.
Обязательно убедитесь, что в настройках параметров дополнительных свойств сетевого адаптера не задана VLAN (значение VLAN ID = 0).
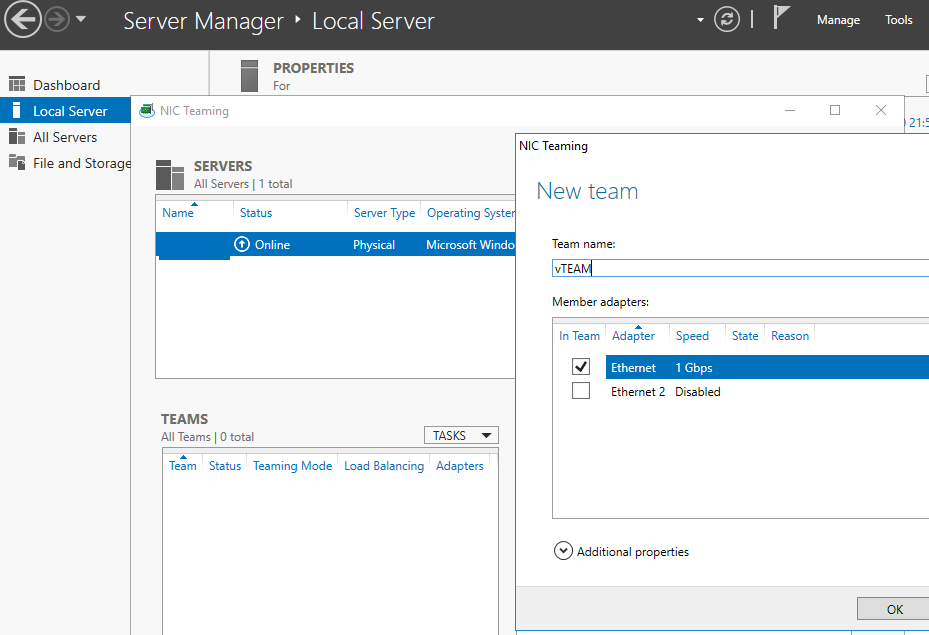
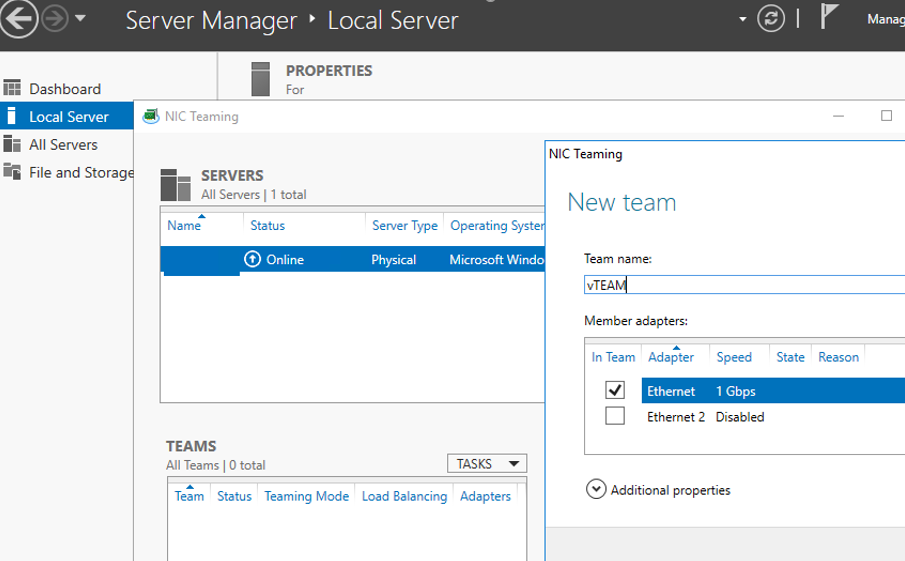
- Запустите Server Manager -> Local и нажмите на ссылку «NIC Teaming«;
- В секции Teams нажмите Task -> New Team. Укажите имя группы и выберите сетевые адаптеры, которые нужно в нее добавить;
Можно создать группу NIC Teaming с помощью PowerShell:
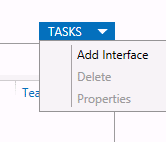
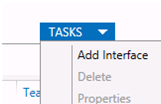
New-NetLbfoTeam -Name vTeam -TeamMembers "Ethernet1","Ethernet2" -TeamingMode SwitchIndependent -LoadBalancingAlgorithm Dynamic - Теперь в секции «Adapter and Interfaces» можно добавить виртуальные сетевые интерфейсы. Нажмите Tasks -> Add Interface;
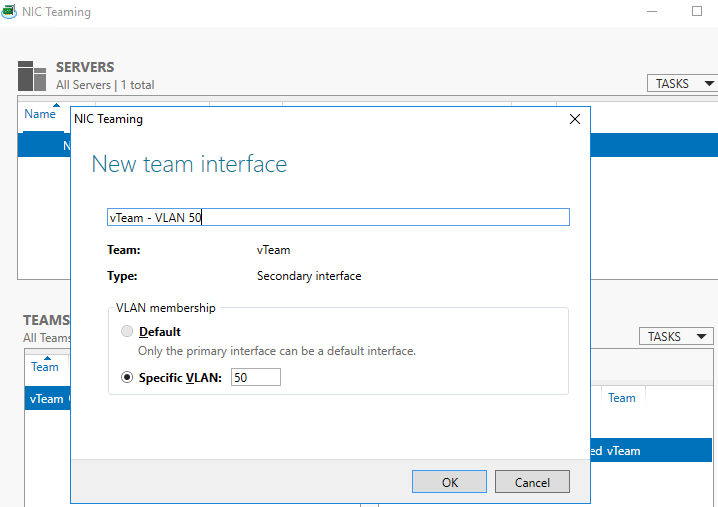
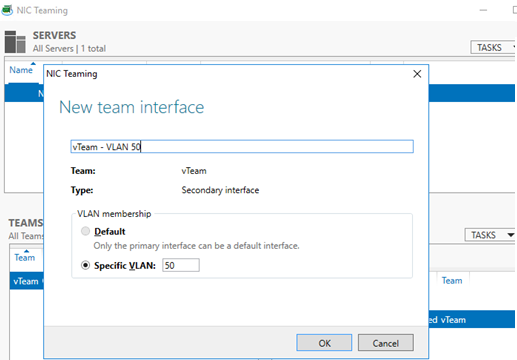
- Укажите имя создаваемого интерфейса и номер VLAN;
Из PowerShell добавить сетевой интерфейс и задать ему VLAN можно так:
Add-NetLbfoTeamNic -Team vTeam -VlanID 50 -Name VLAN50 - Аналогичным образом можно добавить столько сетевых интерфейсов VLAN, сколько нужно;
Обратите внимание, что в Windows Server 2022/2019/2016 поддерживает не более 32 сетевых адаптеров (и соответственно уникальных VLAN) для одной группы NIC Teaming.
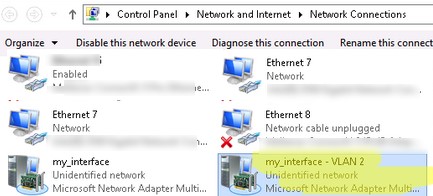
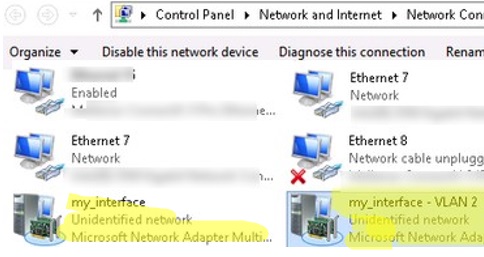
- Для каждого сетевого интерфейса в панели управления сетевыми адаптерами (ncpa.cpl) появится отдельная виртуальная сетевая карта;
- Теперь вы можете настроить IP параметры всех созданных виртуальных VALN сетевых интерфейсов вручную в свойствах адаптера или с помощью PowerShell командлетов New-NetIPAddress и Set-DnsClientServerAddress:
New-NetIPAddress -InterfaceAlias my_VLAN_interface -IPAddress 192.168.30.30 -PrefixLength 24 -DefaultGateway 192.168.30.1
Set-DnsClientServerAddress -InterfaceAlias my_VLAN_interface -ServerAddresses 192.168.1.10
Как создать несколько VLAN в Windows Hyper-V?
Вы можете программно обрабатывать VLANы в Windows через через подсистему Hyper-V (доступно как в Windows Server, так и десктопных Windows 10/11 Pro и Enterprise редакциях). Вы можете создать виртуальный свитч с сетевым адаптером в определённом VLAN.
Для этого нужно установить компоненты Hyper-V:
Enable-WindowsOptionalFeature -Online -FeatureName:Microsoft-Hyper-V -All
Создайте новый виртуальный коммутатор через Hyper-V Manager или с помощью команд PowerShell (см. пример в статье о настройке Hyper-V Server).
Затем для каждого VLAN, который нужно создать, выполнить команды:
Add-VMNetworkAdapter -ManagementOS -Name VLAN50 -StaticMacAddress "11-22-33-44-55-AA" -SwitchName VLAN50Switch
Set-VMNetworkAdapterVlan -ManagementOS -VMNetworkAdapterName VLAN50 -Access -VlanId 50
В результате у вас в системе появится сетевой адаптер с нужным тегом VLAN.
Если на вашем Hyper-V сервере запущены ВМ, вы можете поместить их в разные VALN. Чтобы переключить виртуальны сетевой адаптер ВМ на Hyper-V в режим Access и разрешить получать трафик только с определенным VLAN ID, используется команда:
Set-VMNetworkAdapterVlan -VMName Test1 -Access -VlanId 21
Вывести список ВМ и назначенных им VLAN:
Get-VMNetworkAdapterVLAN
В Windows Server 2022 с ролью Hyper-V вы не сможете привязать виртуальный свитч к такому тиминг-интерфейсу. Дело в том, что что LBFO NIC Teaming устарел (https://aka.ms/lbfodeprecation) и в Windows Server 2022 предлагается использовать Switch Embedded Teaming (SET).
Рассмотрим, как создать виртуальный адаптер и назначить ему VLAN в Windows Server 2022 Hyper-V с помощью SET.
Создайте виртуальный свитч, подключённый к сетевым адаптерам хоста:
New-VMSwitch -Name "HVSwitch1" -NetAdapterName "Ethernet3","Ethernet4" -EnableEmbeddedTeaming $true
Теперь создайте виртуальны адаптер, подключенный к виртуальному свитчу:
Add-VMNetworkAdapter -ManagementOS -Name "VLAN11" -StaticMacAddress "XX-XX-XX-XX-XX-XX" -SwitchName "HVSwitch1"
Назначьте тег VLAN для вашего виртуального адаптера:
Set-VMNetworkAdapterVlan -ManagementOS -VMNetworkAdapterName "VLAN11" -Access -VlanId 11
Если нужно, чтобы виртуальный адаптер Hyper-V мог принимать пакеты из нескольких VLAN, можно использовать такую команду:
Get-VMNetworkAdapter -Name youradaptername | Set-VMNetworkAdapterVlan -Trunk -AllowedVlanIdList 50-59 -NativeVlanId 0
Параметр -NativeVlanId 0 обязателен. В этом случае мы указываем Hyper-V, что VLAN:0 используется в качестве нативного для нетегированного трафика.
In this article, we’ll show how to configure a tagged VLAN interface on Windows 10/11 and Windows Server 2019 (2022/2016/2012R2). The VLAN (Virtual LAN) specification is described in the IEEE 802.1Q standard and involves marking traffic with tags (vlanid) so that a network packet may be referred to a particular virtual network. VLANs are used to separate and segment networks, restrict broadcast domains, and isolate network segments to improve security. On Windows, you can configure multiple logical network interfaces with different VLAN ID on a single physical NIC using different tools.
Contents:
- Creating Multiple VLAN Interfaces on Windows 10 and 11
- How to Configure Multiple VLANs on Windows Server 2022/2019/2016?
- Create Multiple VLANs with Windows Hyper-V Role
In order to use VLAN on Windows, you need to reconfigure the physical switch port to which your computer/server is connected to. The port must be switched from access mode to trunk mode. By default, all VLANs are allowed on a trunk port, but you can set the list of allowed VLAN numbers (1 to 4094) available at this Ethernet switch port.
Creating Multiple VLAN Interfaces on Windows 10 and 11
Windows desktop editions don’t natively support VLAN tagging. By default, most network adapter drivers ignore all VLAN tags in network packets and external VLANs become inaccessible.
For some network adapters, you can set the VLAN number in the driver properties:
- Run the Device Manager (
devmgmt.msc); - Expand the Network adapters section and open the properties of your network adapter;
- Go to the Advanced tab and find the VLAN ID option;
- You can set the VLAN number here;
- For some NICs, you first need to enable the Packet Priority and VLAN option.
In modern versions of Windows 10 and 11, you can set one VLAN tag for a network interface adapter. You can use PowerShell to manage network settings. For example, you want to set VLAN ID 24 for your network interface named Ethernet0:
Set-NetAdapter –Name "Ethernet0" -VlanID 24
For some NICs (from Intel, Broadcom, HP, Realtek), special tools are available that allow you to create a virtual network interface in Windows with a VLAN ID. To do this, you need to install a special driver on your computer that supports 802.1Q tagged traffic and the official configuration tool from the vendor.
Create Multiple VLANs on a Realtek NIC in Windows 10 or 11
For Realtek NICs, you can configure multiple virtual NICs with different VLANs using the Realtek Ethernet Diagnostic Utility. Find the description of your Realtek network controller on the vendor’s website, and check that this model supports VLAN. For example, the specification for the RTL8169SC(L) network controller has this option:
Supports IEEE 802.1Q VLAN tagging
Download and install the latest network driver for your Realtek adapter and run the Realtek Ethernet Diagnostic Utility (Diagnostic Program for Win7/Win8/Win10/Win11).
Go to the VLAN section, click Add and add the required VLAN ID. After that, a new network interface will appear in Windows.
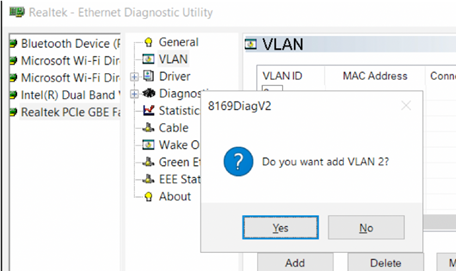
After creating network interfaces for your VLANs, you can assign the IP addresses from the corresponding IP network.
How to Setup VLAN on an Intel Ethernet Network Adapter?
Intel has its own Intel Advanced Network Services (Intel® ANS) tool for configuring VLAN interfaces. Your network adapter model, of course, must support VLAN (for example, VLAN is not supported for NICs such as Intel PRO/100 or PRO/1000). When installing the driver, select the Intel PROSet for Windows Device Manager and Advanced Network Services options.
Then a separate VLANs tab appears in the properties of your physical Intel network adapter, where you can create multiple VLAN interfaces.
However, this method works on all previous versions of Windows (up to Windows 10 1809). In modern Windows 10/11 builds, the following message is displayed in the VLANs tab:
Intel(R) Advanced Network (Intel(R) ANS) Teams and VLANs are not supported on Microsoft Windows 10.
Intel recently released new network adapter drivers and the Intel PROSet adapter configuration tool for the latest builds of Windows 10 and 11. Download and install the latest Intel driver and Intel PROset utility.
Run the configuration tool, go to the Teaming/VLANs tab, click the New button, and specify the name of the network interface and its VLANID.
In addition, you can add/remove/view the list of VLANs on Intel NICs using the PowerShell cmdlets from the IntelNetCmdlets module. Import the module into your PowerShell session:
Import-Module -Name "C:Program FilesIntelWired NetworkingIntelNetCmdletsIntelNetCmdlets" -Scope Local
You can create an untagged virtual network adapter (usually used with native-vlan-id):
Add-IntelNetVLAN -ParentName "Intel(R) Ethernet Connection I219-LM" -VLANID 0
To create an Intel NIC with a specific VLAN number:
Add-IntelNetVLAN -ParentName "Intel(R) Ethernet Connection I219-LM" -VLANID 103
To list all virtual Intel network adapters:
Get-NetAdapter
Remove VLAN interface:
Remove-IntelNetVLAN -ParentName "Intel(R) Ethernet Connection I219-LM" -VLANID 103
For Broadcom NICs, you can create groups of virtual network interfaces and assign VLAN IDs using the Broadcom Advanced Control Suite tool.
How to Configure Multiple VLANs on Windows Server 2022/2019/2016?
In Windows Server 2022/2019/2016/2012R2, you can configure multiple VLANs on the same network interface using built-in tools (without installing third-party drivers and tools). Let’s try to configure multiple VLANs on the same physical NIC in Windows Server 2019 using NIC Teaming.
Make sure that no VLAN number is set in the network adapter advanced settings (VLAN ID = 0).
- Open the Server Manager -> Local and click the NIC Teaming link;
- In the Teams section, click Task -> New Team. Specify the group name and select network adapters to add;
You can create a NIC Teaming group using PowerShell:
New-NetLbfoTeam -Name vTeam -TeamMembers "Ethernet1","Ethernet2" -TeamingMode SwitchIndependent -LoadBalancingAlgorithm Dynamic - Then in the “Adapter and Interfaces” section, add virtual network interfaces. Click Tasks -> Add Interface;
- Enter the name of the interface you are going to create and a VLAN number;
You can add a network interface and set a VLAN for it in PowerShell:
Add-NetLbfoTeamNic -Team vTeam -VlanID 24 -Name VLAN24 - In the same way, you can add as many VLAN network interfaces as you need;
Please note that Windows Server 2022/2019/2016 supports a maximum of 32 NICs (and unique VLANs) per NIC Teaming group.
- A separate virtual network adapter will appear in the list of network connections in
ncpa.cpl; - Now you can configure the IP settings for each VLAN interface in the properties of the network adapter or using PowerShell cmdlets:
New-NetIPAddress -InterfaceAlias your_VLAN_interface -IPAddress 192.168.10.10 -PrefixLength 24 -DefaultGateway 192.168.10.1

Set-DnsClientServerAddress -InterfaceAlias your_VLAN_interface -ServerAddresses 192.168.100.12
Create Multiple VLANs with Windows Hyper-V Role
You can programmatically handle multiple VLANs in Windows through the Hyper-V subsystem (available in both Windows Server and desktop Windows 10/11 Pro and Enterprise editions). You can create a virtual switch with a network adapter in a specific VLAN.
To do this, you need to install Hyper-V components:
Enable-WindowsOptionalFeature -Online -FeatureName:Microsoft-Hyper-V -All
Create a new virtual switch through Hyper-V Manager or using PowerShell commands (see an example in the article on how to configure Hyper-V Server).
Then run the following commands for each VLAN you want to create:
Add-VMNetworkAdapter -ManagementOS -Name VLAN24 -StaticMacAddress "11-11-AA-BB-CC-DD" -SwitchName vSwitch2

Set-VMNetworkAdapterVlan -ManagementOS -VMNetworkAdapterName VLAN24 -Access -VlanId 24
So a network adapter with the VLAN you want will appear in Windows.
If you have VMs running on your Hyper-V server, you can put them in different VLANs. To switch the virtual network adapter of a VM on Hyper-V to Access mode and allow it to receive traffic only with a specific VLAN ID, use the command:
Set-VMNetworkAdapterVlan -VMName MyVMName1 -Access -VlanId 30
Display a list of VMs and their assigned VLANs:
Get-VMNetworkAdapterVLAN
In Windows Server 2022 with the Hyper-V role, you won’t be able to bind a virtual switch to such a teaming interface. The fact is that LBFO NIC Teaming is a deprecated feature on Windows Server 2022 (https://aka.ms/lbfodeprecation). Instead of NIC Teaming, it is proposed to use Switch Embedded Teaming (SET).
Let’s create a virtual adapter and assign a VLAN to it on Windows Server 2022 Hyper-V using SET.
Create a virtual switch connected to the host’s physical adapters:
New-VMSwitch -Name HVVLANSwitch1 -NetAdapterName "Ethernet3","Ethernet4" -EnableEmbeddedTeaming $true
Now create a virtual adapter connected to the virtual switch:
Add-VMNetworkAdapter -ManagementOS -Name "VLAN22" -StaticMacAddress "XX-XX-XX-XX-XX-XX" -SwitchName HVVLANSwitch1
Assign a VLAN tag to your virtual adapter:
Set-VMNetworkAdapterVlan -ManagementOS -VMNetworkAdapterName "VLAN22" -Access -VlanId 22
You can enable the virtual Hyper-V adapter to receive packets from multiple VLANs using the command:
Get-VMNetworkAdapter -Name youradaptername | Set-VMNetworkAdapterVlan -Trunk -AllowedVlanIdList 40-69 -NativeVlanId 0
The -NativeVlanId 0 parameter is required. In this case, we tell Hyper-V that VLAN:0 is used as native for untagged traffic.
Network segmentation is a great way to compartmentalize the various networks you need to run in your environment. This provides many benefits from both a management and security perspective. When segmenting your networks, one of the things that you have to consider and take care of is IP addressing. Dynamic Host Configuration Protocol (DHCP) is an age-old standard that has been used in the enterprise for handing out IP addresses to clients on the network. DHCP requires its own broadcast domain, which in turn requires VLANs. Many organizations are using Windows Server for DHCP on their networks. In this post, we will take a look at Windows Server DHCP VLAN configuration. These steps work for Windows Server 2012, 2016, 2019, and Windows Server 2022.wind
Why are VLANs needed for DHCP?
When a client is provisioned on a network segment and is set up to have IP addressing configured automatically using DHCP, the client makes broadcast queries on the network segment to notify the DHCP server configured that it needs an IP address. The DHCP server responds with the appropriate IP address for the network segment and the additional configuration for network connectivity on the segment.
VLANs (Virtual Local Area Networks) allow taking a physical network switch and logically segmenting the physical network environment into multiple network segments. This makes much more efficient use of network hardware since additional segments do not require additional physical network switches. By introducing VLANs, you can provision multiple network segments on the same switch.
When you spin up a new network segment IP address range, you want to pair this with a new VLAN or logical network segment. VLANs control broadcast ranges. Within each VLAN, clients can initiate the broadcast for a network IP address from a DHCP server. There are many different ways to have a Windows Server participate in a VLAN network segment. Before we look at the specifics related to DHCP VLAN configuration, let’s take a look at the multiple options for connecting the Windows host into a VLAN-backed network.

Connecting Windows Server to Multiple VLANs
There are many different ways to connect Windows Server to multiple VLANs. This includes the following:
- Additional network interfaces Untagged for VLAN traffic
- A single network interface with Tagged VLAN frames
- Routed Layer 3 connectivity to VLAN-backed subnets
Additional network interfaces Untagged for VLAN traffic
With VLANs, you hear two different terms tossed out there related to the VLAN you are working with – untagged, and tagged. When you talk about untagged frames, this means the Windows host is not tagging the Ethernet frames originating from the host with VLAN information. Instead, it is relying on the upstream switch it is plumbed into to handle that configuration.
So, essentially, the Windows Server is unaware of the VLAN and doesn’t care. It simply relies on its physical uplink to do any VLAN tagging for it to communicate appropriately. However, this means that if you want to have a Windows Server to be a part of multiple VLANs, it means you need a physical uplink for each separate VLAN, since it is relying on the switch to tag the traffic appropriately for a specific VLAN.
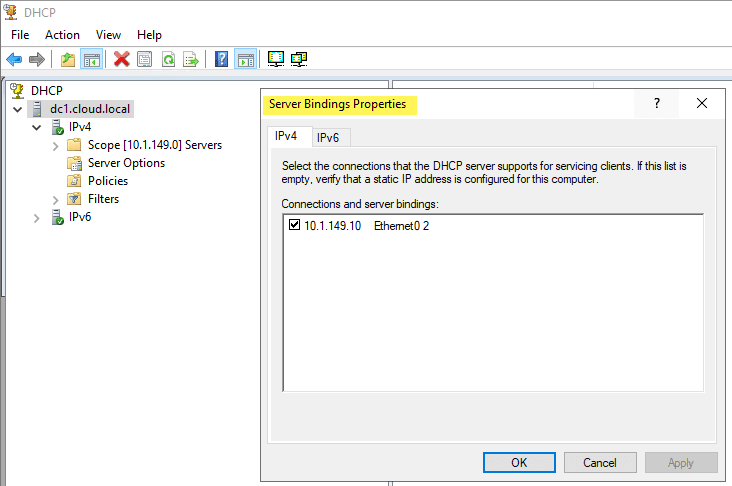
As shown below on a Windows Server 2019 server, you can specify the Bindings for the Windows DHCP Server so that it knows which interfaces to “listen” for DHCP on.
A single network interface with Tagged VLAN frames
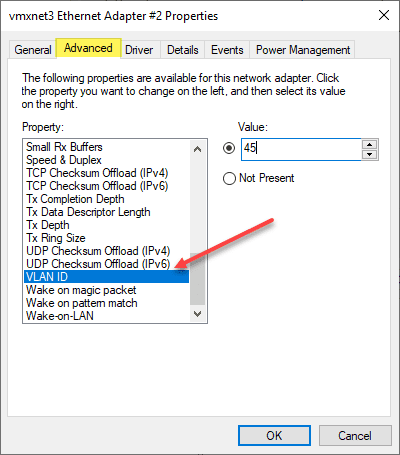
While there may be reasons that you use multiple physical uplinks with untagged frames for communicating with different VLANs, a more efficient approach is to use Tagged VLAN frames on a single network connection. When you use tagged frames, the Windows Server tags the frames appropriately for each VLAN it is associated with. The ability to Tag frames generally needs vendor-specific driver sets to be loaded, such as the Intel Pro Set drivers using Intel-based cards.
Routed Layer 3 connectivity to VLAN-backed subnets
The third option is simply relying on routing to take care of connectivity to the VLAN-backed subnets they need to communicate with. This technically does not connect the Windows Server into the VLAN as that would mean it would have the ability to be in the broadcast domain which is a Layer 2 VLAN construct. Instead, you are relying on Layer 3 connectivity to IP addresses. For many type of communication, including Windows Server 2012 DHCP VLAN configuration, this is all that is needed.
You can use all three of the methods above for Windows Server 2012, 2016, 2019, and Windows Server 2022 DHCP VLAN configuration. You can add multiple network adapters to each VLAN and have each scope listen on that specific network interface for DHCP requests. You can also use the tagging method listed above that allows adding multiple VLANs to a single network interface which allows keeping a single network adapter and connecting that physical network uplink to multiple VLANs.
You might assume the third option, since it is not connecting the uplink to the physical broadcast domain, would not be able to answer the broadcast DHCP request from the client on a specific VLAN. However, even though the DHCP server is not on the same broadcast domain/VLAN, there are really only two pieces of information the DHCP servers need to know to allocate an IP address on a particular subnet. This includes:
- Source subnet of the client
- MAC address of the client
You will note that the Windows Server DHCP server being a part of the VLAN is not a requirement for a successful DHCP request being made to the Windows Server. The third option is typically the option that I steer towards unless there are requirements for multiple physical uplinks for compliance or other security-based reasons. So, how does the Windows DHCP Server respond to a DHCP broadcast request if it is not on the same VLAN to take part in the broadcast traffic?
IP Helper Address, DHCP Relay, DHCP Proxy Address
This is made possible by the IP Helper Address which is sometimes referred to as DHCP Relay, or DHCP proxy address. Using an IP helper address, DHCP Relay, or DHCP proxy address allows the special DHCP broadcast messages to be forwarded from VLAN they originated from and forwarded to the DHCP server. This role is typically handled by a firewall or router device that is able to take the DHCP broadcast message and forward these to the DHCP server.
How does this work? When the DHCP client issues the DHCP broadcast request packet, is as of yet has no IP address configured. This being the case, it uses a broadcast with an all zero source address – 0.0.0.0. It also has no way to get to the DHCP Server with the lack of IP configuration. With this being the case, the client uses a general broadcast address of 255.255.255.255 as the destination with the DHCP request packet.
The device handling the DHCP proxy functionality receives the DHCP request packet from the client, replaces the destination address of 255.255.255.255 with the configured address of the server that was configured in the IP helper-address configuration. The client’s MAC address is included in the DHCP request so the receiving DHCP server knows the required MAC address of the client. This information is then forwarded to the DHCP server from the router, firewall, or another device in the role of the DHCP proxy.
The DHCP server issues an address now that it knows the subnet the client resides on along with the MAC address. It sends the DHCP response back to the DHCP Proxy device. The DHCP Proxy device then forwards the response to the correct MAC address of the requesting client and it is able to be configured with the IP address allowing network communication on the subnet.
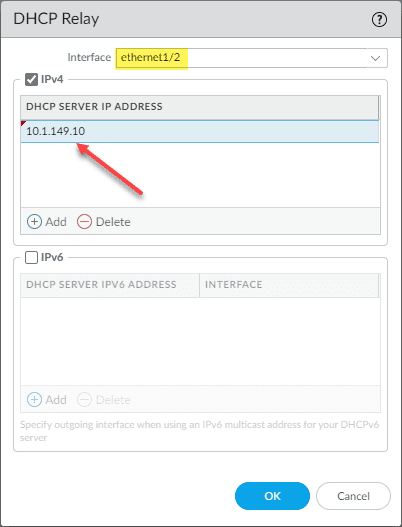
The configuration of DHCP Relay is generally simple but can vary depending on the vendor of router, firewall, or other device you might be using to perform this function. Below is the configuration of DHCP Relay on a Palo Alto firewall. You simply have to select the Interface and the DHCP Server IP Address you want to use for the target of DHCP requests.
Windows Server DHCP VLAN configuration for Virtual Machine DHCP servers
The principles still apply to Windows Server DHCP servers running inside a Windows Server virtual machine. The one method that is more difficult is the tagging of a single interface with multiple VLANs as this is not a feature that you can carry out with VMware Tools drivers that I am aware of. You can add multiple virtual NICs to a single VM and connect the virtual machine to different VLAN-backed port groups for each connection.
This will essentially place the Windows Server virtual machine on the same network segments as the clients that need addresses. Or, you can use the preferred method of using an IP Helper Address to forward the DHCP requests from all the other VLAN-backed subnets to the DHCP server and have the addresses issued by the server using only the single network connection.
Creating a Windows Server DHCP scope for a different VLAN
As detailed by the explanation above, the actual work of the Windows Server DHCP VLAN configuration takes place with the IP Helper Address/DHCP proxy device. Creating a Windows Server DHCP scope for a different VLAN is the same as creating a scope for the native VLAN network where the DHCP Server itself is located. Non-intuitively, you won’t see any part of the scope creation wizard that has you define the VLAN configuration. However, this is not needed in any of the configurations mentioned. With IP Helper Address, the packets are forwarded by the DHCP proxy to the DHCP server. If you are using different interfaces or tagged interfaces, the DHCP server will receive the DHCP broadcasts as normal.
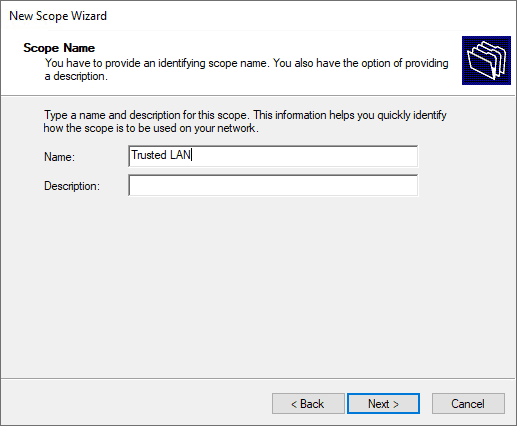
Set the name and description (optional) of the new DHCP scope.
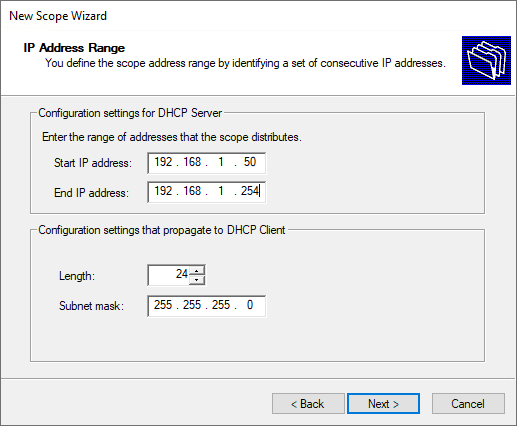
Specify the new DHCP address range.
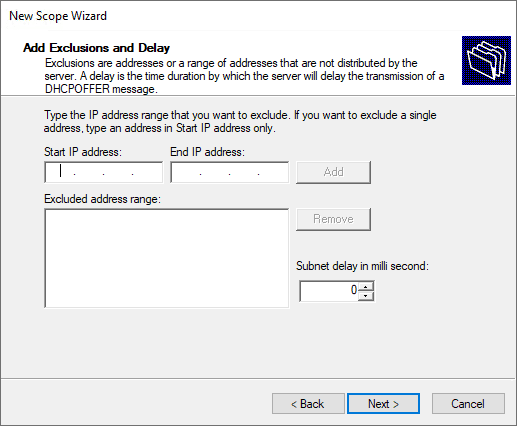
Set the exclusion range for the DHCP scope.
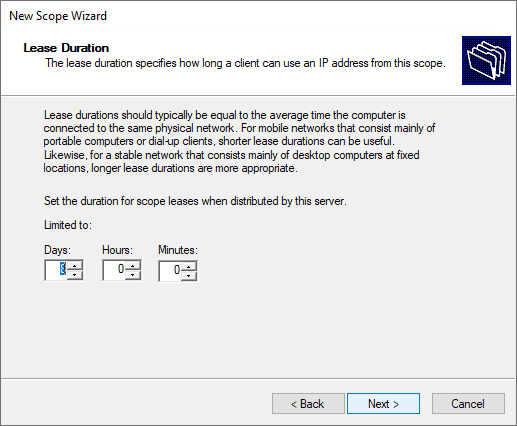
Specify the lease duration.
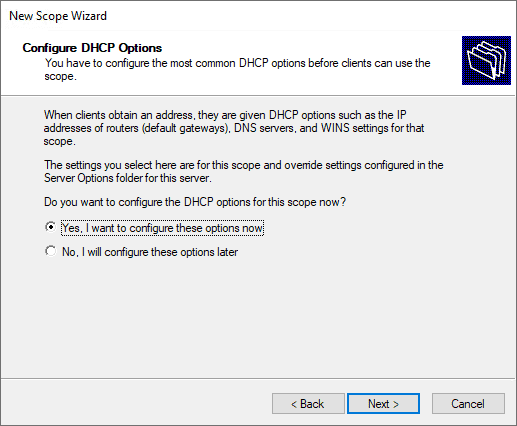
Configure the DHCP options for the new DHCP scope.
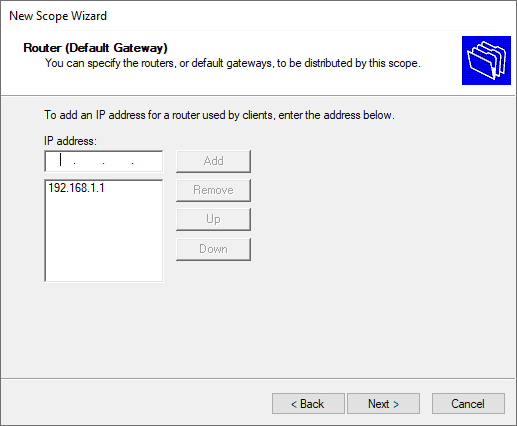
Define the default gateway of the new Windows Server DHCP VLAN configuration.
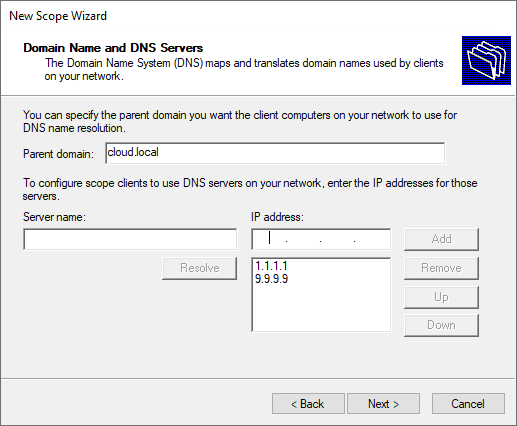
Configure domain name and DNS servers.
Setup any WINS server addresses.
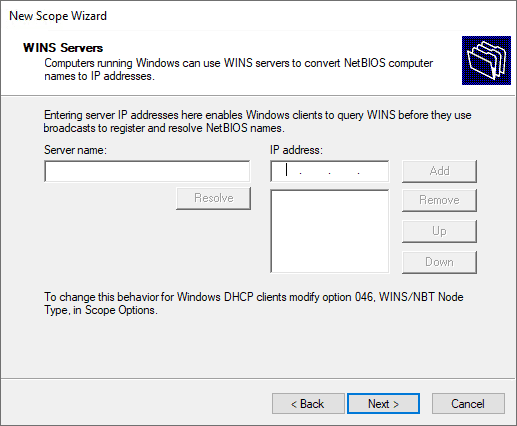
Activate the new DHCP scope.
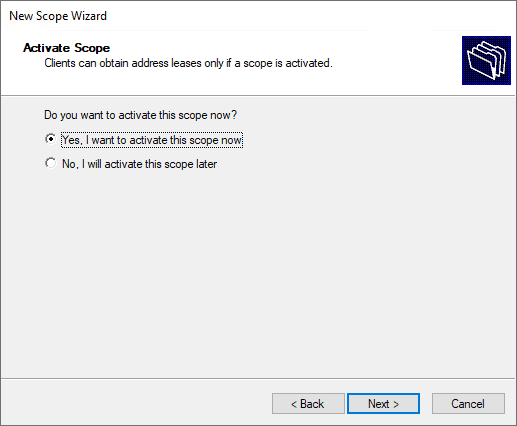
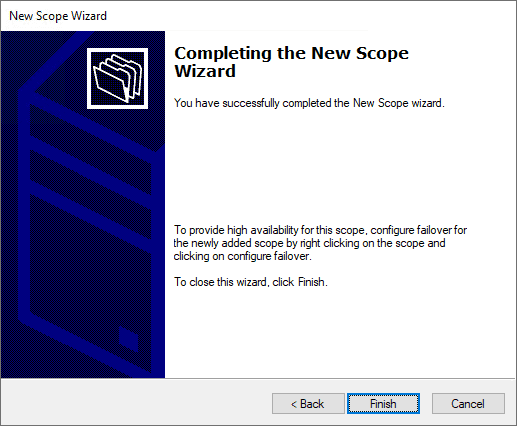
Complete the new DHCP scope wizard.
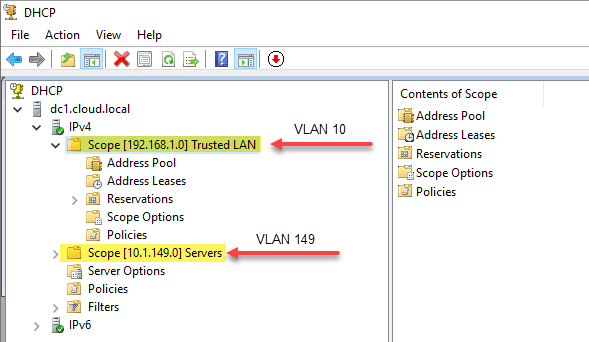
Below is an example of how my DHCP server looks after creating two different scopes for address leasing.
- 192.168.1.0/24 – associated with VLAN 10, which is not where the Windows Server DHCP server resides.
- 10.1.149.0/24 – associated with VLAN 149. This is the VLAN where the DHCP server resides.
Wrapping Up
Hopefully, this Windows Server DHCP VLAN Configuration: Detailed Guide will help any who may be trying to wrap their heads around the configuration of DHCP services for different VLANs and network segments in their network. By understanding the different means you have available to hand out IP addresses from a Windows DHCP Server you can effectively segment your network and easily handle IP addressing for all clients in the network, regardless of the VLAN they reside on.
Если вы пытались работать с VLAN под Windows, особенно при попытке получить доступ к VLAN на физическом оборудовании из виртуальных машин под Hyper-V или VMware, у вас, скорее всего, ничего не получилось.
Всё дело в том, что раньше Windows не имел встроенного механизма работы с VLAN, но в последних версиях Windows Server он появился.
Драйвера сетевых адаптеров, по умолчанию, обрезают в пакетах все VLAN-тэги и внешние VLAN становиться недоступными.
В этой статье мы рассмотрим, как настроить windows 10 таким образом, чтобы адаптер не обрезал VLAN-тэги у пакетов, приходящих на заданный интерфейс.
В Windows 10 есть возможность указать VLAN в настройках адаптера, но это вариант, для отдельных случаев и нам он не подходит, если мы работаем с эмуляторами ЛВС, например, GNS3. У нас может быть сколько угодно виртуальных сетей с разными VLANID и каждый раз менять в настройках адаптера VLAN нам не подходит.
В Wireshark эта проблема давно известна, и они создали в своей wiki страницу, на которой описали варианты решения проблемы для нескольких производителей чипов для сетевых адаптеров.
Я использую адаптер — D-Link DUB-E100 USB2.0, и всё описанное ниже, помогло заставить работать VLAN в GNS3.
Настройка адаптера
Сперва нам нужно узнать GUID нашего адаптера, в моем случае это USB-адаптер, для этого запускаем PowerShell с правами админа и запускаем команду:
PS C:WINDOWSsystem32> Get-NetAdapter

Name                      InterfaceDescription                    ifIndex Status       MacAddress             LinkSpeed
----                      --------------------                    ------- ------       ----------             ---------
Ethernet 2                D-Link DUB-E100 USB2.0 to Fast Ether...      14 Up           C8-22-19-11-8D-CB       100 Mbps
Ethernet                  Realtek PCIe GBE Family Controller            8 Up           70-85-44-22-94-82         1 Gbps
VMware Network Adapte...8 VMware Virtual Ethernet Adapter for ...       7 Up           00-50-56-C0-00-08       100 Mbps
VMware Network Adapte...1 VMware Virtual Ethernet Adapter for ...       4 Up           00-50-56-C0-00-01       100 Mbps
Смотрим ifIndex нужного устройства, у меня он равен 8.
Запускаем regedit с правами администратора.
Откройте в нём следующий путь (просто вставьте в строку поиска на самом верху и нажмите Enter):
HKLMSYSTEMCurrentControlSetControlClass{4D36E972-E325-11CE-BFC1-08002bE10318}В списке справа найдите раздел с номером своего адаптера, в моем случае это 008.
Всё что нам осталось это изменить значения нескольких значений:
MonitorModeEnabled - 1
MonitorMode - 1
*PriorityVLANTag - 0
SkDisableVlanStrip - 1
Как показано на рисунке:
После этого обязательно перезагрузите ПК.
Вот и всё, после загрузки ПК у вас должен заработать VLAN, например, в GNS3.
Единственным недостатком можно назвать появление «мусора» в дампе Wireshark на настроенном интерфейсе, например, такого:
147231	114.119306	172.16.1.253	172.16.1.254	HTTP	1514	[TCP Spurious Retransmission] Continuation
147232	114.122191	172.16.1.254	172.16.1.253	TCP	60	[TCP ACKed unseen segment] 51752 → 3080 [ACK] Seq=433 Ack=400568275 Win=1051136 Len=0
147233	114.122235	172.16.1.254	172.16.1.253	TCP	60	[TCP ACKed unseen segment] 51752 → 3080 [ACK] Seq=433 Ack=400571195 Win=1051136 Len=0
147234	114.122252	172.16.1.254	172.16.1.253	TCP	60	[TCP ACKed unseen segment] 51752 → 3080 [ACK] Seq=433 Ack=400574115 Win=1051136 Len=0
147235	114.122265	172.16.1.254	172.16.1.253	TCP	60	[TCP ACKed unseen segment] 51752 → 3080 [ACK] Seq=433 Ack=400577035 Win=1051136 Len=0
147236	114.122275	172.16.1.254	172.16.1.253	TCP	60	[TCP ACKed unseen segment] 51752 → 3080 [ACK] Seq=433 Ack=400579955 Win=1051136 Len=0
147237	114.122284	172.16.1.254	172.16.1.253	TCP	60	[TCP ACKed unseen segment] 51752 → 3080 [ACK] Seq=433 Ack=400582875 Win=1051136 Len=0
147238	114.122298	172.16.1.254	172.16.1.253	TCP	60	[TCP ACKed unseen segment] 51752 → 3080 [ACK] Seq=433 Ack=400585795 Win=1051136 Len=0
147239	114.122310	172.16.1.254	172.16.1.253	TCP	60	[TCP ACKed unseen segment] 51752 → 3080 [ACK] Seq=433 Ack=400588715 Win=1051136 Len=0
147240	114.122319	172.16.1.254	172.16.1.253	TCP	60	[TCP ACKed unseen segment] 51752 → 3080 [ACK] Seq=433 Ack=400591635 Win=1051136 Len=0
147241	114.122330	172.16.1.254	172.16.1.253	TCP	60	[TCP ACKed unseen segment] 51752 → 3080 [ACK] Seq=433 Ack=400594555 Win=1051136 Len=0
147242	114.122345	172.16.1.254	172.16.1.253	TCP	60	[TCP ACKed unseen segment] 51752 → 3080 [ACK] Seq=433 Ack=400597475 Win=1051136 Len=0
Но его можно и отфильтровать, так что это не такая большая проблема. Именно поэтому я и использую сетевой usb-адаптер, чтобы эксперименты не вредили реальной ЛВС.
Если вы знаете способ избавиться от этой проблемы – пишите в комментариях.
Заключение
Сегодня мы рассмотрели настройку Windows с целью разрешить доступ к физическим VLAN из виртуальных серверов.
Мы узнали Id нашего адаптера и внесли изменения в реестр Windows.
После перезагрузки Windows доступ к VLAN появился.
Webmasters can easily configure VLAN Interfaces on Windows Server 2016 using the built-in tools.
As a part of our Server Management Services, we help our Customers with Windows related requests regularly.
Let us today discuss the steps to configure VLAN on Windows Server 2016.
Why do we need to configure VLAN interfaces in Windows Server 2016?
The VLAN (Virtual LAN) standard implies traffic tagging (vlanid) that allows us to refer a network packet to a particular virtual network.
VLANs help us to separate and segment networks, restrict broadcast domains, and isolate network segments. This thus helps us to improve security.
In Windows, we can configure several different logical network interfaces with different VLANID in a single physical interface.
How to Configure Multiple VLAN interfaces in Windows Server 2016?
In Windows Server 2016, we can configure VLAN using built-in tools, we do not need to install any special drivers or utilities.
Our support engineers configure different VLANs on a single physical network adapter using NIC Teaming.
First, from the network connection section, we will make sure that no VLAN number is set in the network adapter advanced settings (VLAN ID = 0).
Now, we will open the NIC Teaming link from the Local section in the Server Manager. We will then go for the New Team from the Task option in the Teams section. Here, we can specify the group name and then select the network adapters to add.
We also use PowerShell to create a NIC Teaming group:
New-NetLbfoTeam -Name vTeam -TeamMembers "Ethernet1","Ethernet2" -TeamingMode SwitchIndependent -LoadBalancingAlgorithm DynamicThen, we will add virtual network interfaces in the “Adapter and Interfaces” section. For this, use the Add interface option in Tasks.
Here, enter the name of the interface and a VLAN number
We can add a network interface and set a VLAN for it in PowerShell:
Add-NetLbfoTeamNic -Team vTeam -VlanID 24 -Name VLAN24We will then configure the IP settings of all virtual network interfaces created in ncpa.cpl.
[Need any assistance to configure VLAN in Windows Server 2016? – We’re available 24*7]
Conclusion
In short, VLANs help us to separate and segment networks, restrict broadcast domains, isolate network segments, and thereby helps us to improve security. Today, we saw how our Support Engineers fix this error.
PREVENT YOUR SERVER FROM CRASHING!
Never again lose customers to poor server speed! Let us help you.
Our server experts will monitor & maintain your server 24/7 so that it remains lightning fast and secure.
GET STARTED
var google_conversion_label = «owonCMyG5nEQ0aD71QM»;
The browser version you are using is not recommended for this site.
Please consider upgrading to the latest version of your browser by clicking one of the following links.
- Safari
- Chrome
- Edge
- Firefox
Intel® Advanced Network Services VLANs
Documentation
Content Type
Install & Setup
Article ID
000005677
Last Reviewed
07/28/2022
| Note |
Windows Server 2016* and later has built-in options for Virtual Local Area Network (VLAN). This process also works in Windows Server 2012 R2*. See information on VLANs for these operating systems:
|
Virtual Local Area Network (VLAN) is a logical grouping of hosts. The grouping allows hosts to communicate as if they were on the same LAN, regardless of the physical topology of the network.
VLANs can group computers together into logical work groups. Connecting clients to geographically dispersed servers simplifies network administration.
Typically, VLANs consist of coworkers in the same department who are located in different places. They can also consist of cross-functional teams working on a joint project.
Software downloads
Drivers and software for Intel® Ethernet Adapters
Advantages of VLANs
- Improve network performance
- Limit broadcast storms
- Improve LAN configuration updates (adds, moves, and changes)
- Minimize security problems
- Ease management tasks
Two basic VLAN types
- Tagged VLANs are based on the IEEE 802.1Q specification. Each packet has a 4-byte tag added to the packet header. The switch must support IEEE 802.1Q tagging and you must ensure proper configuration. Check your switch documentation for the correct switch configuration.
- Untagged or Port-based VLANs are statically configured on the switch. They are transparent to connected devices.
Implementation considerations
- Intel® software supports a maximum of 64 VLANs per network port or team.
- To set up IEEE VLAN membership (multiple VLANs), you must attach the adapter to a switch with IEEE 802.1Q VLAN capability.
- VLANs can co-exist with teaming (if the adapter supports both). Define the team first, and then you can set up your VLAN.
- You can set up only one untagged VLAN per port or team. You must have at least one tagged VLAN before you can set up an untagged VLAN.
- After creating the VLAN, the adapter associated with the VLAN can have a momentary loss of connectivity.
- You can’t remove a VLAN if it’s bound to a virtual NIC.
- When you assign VLANs to an adapter, it enables the Priority & VLANs option on the Advanced properties tab. You can’t disable it until you remove all VLANs from the adapter.
- If you change a setting under the Advanced tab for one VLAN, it changes the settings for all VLANs using that port.
- Adapters and teams with VMQ enabled don’t support Intel® Advanced Network Services (Intel® ANS) VLANs.
- The Microsoft Hyper-V* VLAN interface supports VLAN filtering with VMQ. See Microsoft Hyper-V virtual NICs on teams and VLANs in the adapter user guide.
- You can have different VLAN tags on a child partition and its parent. Settings are separate and can be different or identical. The VLAN tag on the parent and child must be the same if you want the partitions to be able to communicate through that VLAN. For more information, see Microsoft Hyper-V virtual NICs on teams and VLANs in the adapter user guide.
Windows Server 2012* NIC teaming
Windows Server 2012* adds support for NIC teaming, also known as Load Balancing and Failover (LBFO). Intel ANS teaming and VLANs aren’t compatible with Microsoft LBFO teams. Intel® PROSet blocks the addition of an LBFO team member to an Intel ANS team or VLAN. You shouldn’t add a port that is already part of an Intel ANS team or VLAN to an LBFO team. Adding a port can cause system instability.
Supported adapters
Intel® Ethernet Adapters supports configuring VLANs in any version of Windows where full software support is available for that adapter.
Based on your operating system, see if your adapter has full support.
Intel® PRO/100 and PRO/1000 adapters that plug into PCI* or PCI-X* slots don’t support Intel ANS VLANs in any version of Windows* after Windows Vista* and Windows Server 2008*. After these versions, only the Windows inbox driver from Microsoft is available.
Installing Intel ANS support for VLAN configuration in Windows*
You must install Intel® PROSet and Intel ANS to enable VLAN configuration on Intel® Ethernet devices. You cannot configure VLANs if you only have the base drivers installed. Installation of both Intel PROSet and Intel ANS is enabled by default when you install Intel® Network Connections software.
Using the installation wizard, select both Intel® PROSet for Windows* Device Manager and Advanced Network Services on the Setup Options screen.
Configuring VLANs using PowerShell
How-to Video: Create VLANs in Windows® 10 Using PowerShell*
Configuring VLANs use for Intel® PROSet for Windows* Device Manager
Configuring VLANs
- Go to Windows Device Manager.
- Open the properties of the port where you want to configure the VLAN.
- Go to the VLAN tab.
- Click the New button.
- Type the VLAN ID number into the VLAN ID box. The IDs configured on the port must also be configured on the switch.
- Accept the VLAN name entered by default or type in a new name.
- Click OK.

