From Wikipedia, the free encyclopedia
| Developer(s) | Microsoft |
|---|---|
| Initial release | October 2001; 21 years ago |
| Stable release |
10.3 |
| Operating system | Microsoft Windows |
| Type | Download manager |
| License | Proprietary commercial software |
| Website | docs.microsoft.com/en-us/windows/win32/bits/background-intelligent-transfer-service-portal |
Background Intelligent Transfer Service (BITS) is a component of Microsoft Windows XP and later iterations of the operating systems, which facilitates asynchronous, prioritized, and throttled transfer of files between machines using idle network bandwidth. It is most commonly used by recent versions of Windows Update, Microsoft Update, Windows Server Update Services, and System Center Configuration Manager to deliver software updates to clients, Microsoft’s anti-virus scanner Microsoft Security Essentials (a later version of Windows Defender) to fetch signature updates, and is also used by Microsoft’s instant messaging products to transfer files. BITS is exposed through the Component Object Model (COM).
Technology[edit]
BITS uses idle bandwidth to transfer data. Normally, BITS transfers data in the background, i.e., BITS will only transfer data whenever there is bandwidth which is not being used by other applications. BITS also supports resuming transfers in case of disruptions.
BITS version 1.0 supports only downloads. From version 1.5, BITS supports both downloads and uploads. Uploads require the IIS web server, with BITS server extension, on the receiving side.
Transfers[edit]
BITS transfers files on behalf of requesting applications asynchronously, i.e., once an application requests the BITS service for a transfer, it will be free to do any other task, or even terminate. The transfer will continue in the background as long as the network connection is there and the job owner is logged in. BITS jobs do not transfer when the job owner is not signed in.
BITS suspends any ongoing transfer when the network connection is lost or the operating system is shut down. It resumes the transfer from where it left off when (the computer is turned on later and) the network connection is restored. BITS supports transfers over SMB, HTTP and HTTPS.
Bandwidth[edit]
BITS attempts to use only spare bandwidth. For example, when applications use 80% of the available bandwidth, BITS will use only the remaining 20%. BITS constantly monitors network traffic for any increase or decrease in network traffic and throttles its own transfers to ensure that other foreground applications (such as a web browser) get the bandwidth they need.
Note that BITS does not necessarily measure the actual bandwidth. BITS versions 3.0 and up will use Internet Gateway Device counters, if available, to more accurately calculate available bandwidth. Otherwise, BITS will use the speed as reported by the NIC to calculate bandwidth. This can lead to bandwidth calculation errors, for example when a fast network adapter (10 Mbit/s) is connected to the network via a slow link (56 kbit/s).[1]
Jobs[edit]
BITS uses a queue to manage file transfers. A BITS session has to be started from an application by creating a Job. A job is a container, which has one or more files to transfer. A newly created job is empty. Files must be added, specifying both the source and destination URIs. While a download job can have any number of files, upload jobs can have only one. Properties can be set for individual files. Jobs inherit the security context of the application that creates them.
BITS provides API access to control jobs. A job can be programmatically started, stopped, paused, resumed, and queried for status. Before starting a job, a priority has to be set for it to specify when the job is processed relative to other jobs in the transfer queue. By default, all jobs are of Normal priority. Jobs can optionally be set to High, Low, or Foreground priority. Background transfers are optimized by BITS,1 which increases and decreases (or throttles) the rate of transfer based on the amount of idle network bandwidth that is available. If a network application begins to consume more bandwidth, BITS decreases its transfer rate to preserve the user’s interactive experience, except for Foreground priority downloads.
Scheduling[edit]
BITS schedules each job to receive only a finite time slice, for which only that job is allowed to transfer, before it is temporarily paused to give another job a chance to transfer. Higher priority jobs get a higher chunk of time slice. BITS uses round-robin scheduling to process jobs in the same priority and to prevent a large transfer job from blocking smaller jobs.
When a job is newly created, it is automatically suspended (or paused). It has to be explicitly resumed to be activated. Resuming moves the job to the queued state. On its turn to transfer data, it first connects to the remote server and then starts transferring. After the job’s time slice expires, the transfer is temporarily paused, and the job is moved back to the queued state. When the job gets another time slice, it has to connect again before it can transfer. When the job is complete, BITS transfers ownership of the job to the application that created it.
BITS includes a built-in mechanism for error handling and recovery attempts. Errors can be either fatal or transient; either moves a job to the respective state. A transient error is a temporary error that resolves itself after some time. For a transient error, BITS waits for some time and then retries. For fatal errors, BITS transfers control of the job to the creating application, with as much information regarding the error as it can provide.
Command-line interface tools[edit]
BITSAdmin command[edit]
| Developer(s) | Microsoft |
|---|---|
| Stable release |
3.0 |
| Operating system | Microsoft Windows |
| Type | Command |
| License | Proprietary commercial software |
| Website | docs.microsoft.com/en-us/windows-server/administration/windows-commands/bitsadmin |
Microsoft provides a BITS Administration Utility (BITSAdmin) command-line utility to manage BITS jobs. The utility is part of Windows Vista and later.[2][3] It is also available as a part of the Windows XP Service Pack 2 Support Tools[4] or Windows Server 2003 Service Pack 1 Support Tools.[5]
Usage example:
C:>bitsadmin /transfer myDownloadJob /download /priority normal https://example.com/file.zip C:file.zip
PowerShell BitsTransfer[edit]
In Windows 7, the BITSAdmin utility is deprecated in favor of Windows PowerShell cmdlets.[6] The BitsTransfer PowerShell module provides eight cmdlets with which to manage BITS jobs.[7]
The following example is the equivalent of the BITSAdmin example above:
PS C:> Start-BitsTransfer -Source "https://example.com/file.zip" -Destination "C:file.zip" -DisplayName "myDownloadJob"
List of non-Microsoft applications that use BITS[edit]
- AppSense – Uses BITS to install Packages on clients.
- BITS Download Manager – A download manager for Windows that creates BITS Jobs.[8]
- BITSync – An open source utility that uses BITS to perform file synchronization on Server Message Block network shares.[9]
- Civilization V – Uses BITS to download mod packages.
- Endless OS installer for Windows – Uses BITS to download OS images.[10]
- Eve Online – Uses BITS to download all the patches post-Apocrypha (March 10, 2009). It is also now used in the client repair tool.
- Some Google services including Chrome, Gears, Pack, Flutter updater and YouTube Uploader used BITS.[citation needed]
- Firefox (since version 68) for updates.[11]
- KBOX Systems Management Appliance – A systems management appliance that can use BITS to deliver files to Windows systems.
- RSS Bandit – Uses BITS to download attachments in web feeds.
- Oxygen media platform – Uses BITS to distribute Media Content and Software Updates.[12]
- SharpBITS – An open source download manager for Windows that handles BITS jobs.[13]
- WinBITS – An open source Downloader for Windows that downloads files by creating BITS Jobs.[14]
- Novell ZENworks Desktop Management – A systems management software that can use BITS to deliver application files to workstations.[15]
- Specops Deploy/App – A systems management software that (when available) uses BITS for delivering packages to the clients in the background.[16]
See also[edit]
- List of Microsoft Windows components
- Protocols for file transfer
References[edit]
- ^ «MSDN BITS Network Bandwidth». Archived from the original on 2017-04-19. Retrieved 2015-05-01.
- ^ Satran, Michael; Smith, Peter (5 March 2019). «BITSAdmin tool». Windows Dev Center. Microsoft. Archived from the original on 18 April 2020. Retrieved 28 April 2020.
- ^ Ross, Elizabeth; White, Steven; Poggemeyer, Liza; Lee, Thomas; Plett, Corey (16 October 2017). «bitsadmin». Windows IT Pro Center. Microsoft. Archived from the original on 30 April 2019. Retrieved 9 June 2019.
- ^ «Windows XP Service Pack 2 Support Tools». Download Center. Microsoft. 10 August 2004. Archived from the original on 29 April 2020. Retrieved 28 April 2020.
- ^ «Windows Server 2003 Service Pack 1 32-bit Support Tools». Download Center. Microsoft. 30 March 2005. Archived from the original on 21 July 2020. Retrieved 28 April 2020.
- ^ «Manage BITS (Background Intelligent Transfer Service) with Windows PowerShell». TechNet Magazine. Microsoft. Archived from the original on 22 August 2020. Retrieved 25 September 2015.
- ^ «BitsTransfer». Windows IT Pro Center. Microsoft. Archived from the original on 11 November 2020. Retrieved 28 April 2020.
- ^ «BITS Download Manager». Archived from the original on 2020-08-15. Retrieved 2010-01-07.
- ^ «BITSync». Archived from the original on 2009-01-24. Retrieved 2008-12-31.
- ^ Endless Installer for Windows DownloadManager class
- ^ «Firefox 68.0, See All New Features, Updates and Fixes». Mozilla. Archived from the original on 2019-07-11. Retrieved 2019-07-09.
- ^ Oxygen media platform
- ^ «SharpBITS». Archived from the original on 2018-01-22. Retrieved 2021-03-31.
- ^ «WinBITS». Archived from the original on 2019-05-18. Retrieved 2007-11-19.
- ^ «Zenworks 7». Archived from the original on 2009-02-12. Retrieved 2021-03-31.
- ^ «Specops Deploy/App». Archived from the original on 2020-12-20. Retrieved 2021-03-31.
External links[edit]
- Background Intelligent Transfer Service in Windows Server 2008
- Fix Background Intelligent Transfer Service in Windows 10
- BITS version history
- bitsadmin | Microsoft Docs
Вы все еще не знаете, как лучше организовать передачу файлов по сети на компьютеры под управлением Windows? Тогда вам сюда!
Background Intelligent Transfer Service (BITS) – служба ОС Windows, которая может передавать файлы в фоновом режиме. Она используется, в основном, для Windows Update.
Какой же интерес BITS представляет для разработчиков?
1. Возможность закачки файлов в фоновом режиме, незаметно для пользователя
2. Высокий уровень отказоустойчивости. Если сетевой кабель перерубят, или комп выпадет в «синий экран», то BITS докачает файлы, как только это станет возможно.
3. Intelligent сказано не зря. Если пользователь в данный момент ничего не качает и комп простаивает, BITS воспользуется освободившимися ресурсами. Эту фичу можно использовать, назначая различные приоритеты закачек.
Работать с BITS можно через специальный API
В своем проекте я использовал удобную, вполне рабочую «обертку» для .NET. Так же существует еще одна.
Ключевым объектом BITS является Job (не надо дословного перевода, назовем это «закачкой»).
Жизненный цикл «закачки» следующий:
1. Создание Job. Указываем название, описание, тип (UploadDownload) и приоритет
2. Добавление файлов. Job может содержать несколько файлов, если выбран тип Download.
3. Подписываемся на события закачки, если необходимо отслеживать прогресс в реальном времени.
4. Запуск закачки. Далее BITS все делает сам.
Важной особенностью BITS является то, что создать закачку может только пользователь, совершивший вход в систему, либо системная учетная запись. Тем, кто собирается использовать BITS, советую не забывать об этом.
Я сознательно не привожу примеров кода, они есть здесь и здесь.
Для дополнительного ознакомления есть замечательная статья на английском.
About BITS and downloading and uploading files
Programs nowadays often need to download files and data from the internet – maybe they need new content, new configurations, or the latest updates. The Windows Background Intelligent Transfer Service (BITS) is an easy way for programs to ask Windows to download files from or upload files to a remote HTTP or SMB file server. BITS will handle problems like network outages, expensive networks (when your user is on a cell plan and is roaming), and more.
In this blog post I’ll show how you can easily use BITS from a C# or other .NET language program. To use BITS from C++ using its native COM interface, see the GitHub sample at https://github.com/Microsoft/Windows-classic-samples/tree/master/Samples/BacgroundIntelligenceTransferServicePolicy. Your program can create new downloads from and uploads to HTTP web servers and SMB file servers. Your program can also monitor BITS downloads and uploads. If your program runs as admin, you can monitor all the BITS traffic on a machine. If you run just as a user, you can only monitor your own BITS traffic.
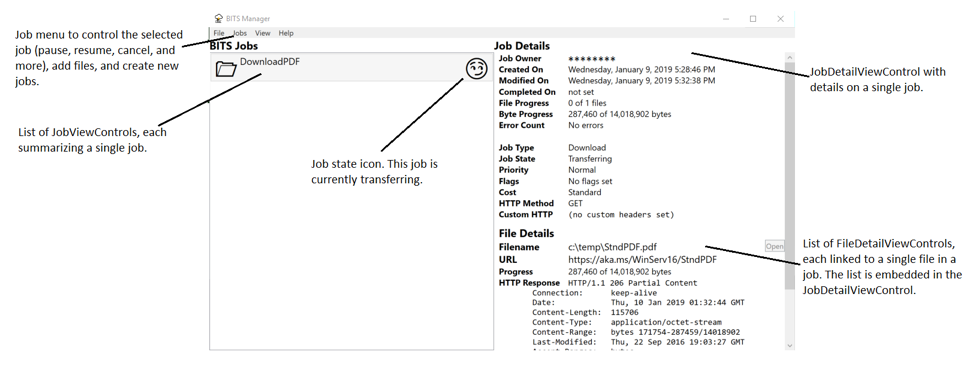
The companion program from this blog post, the BITS Manager program, is available both as source code on GitHub at https://github.com/Microsoft/BITS-Manager and as a ready-to-run executable at https://github.com/Microsoft/BITS-Manager/releases.
What all can BITS do?
The most common use of BITS is to download files from the internet. But dig beneath the covers and you’ll find that the “Intelligent” in BITS is well earned!
BITS is careful about the user’s experience
Many downloads (and uploads) need to make forward progress, but also want to be nice to the user and not interfere with the user’s other work. BITS works to make sure that downloads and uploads don’t happen on costed networks and that the background downloads and uploads don’t hurt the user’s foreground experience. BITS does this by looking at both the computer’s available network bandwidth and information about the local network. For uploads BITS will enable LEDBAT (when available). LEDBAT is a new congestion control algorithm that’s built into newer versions of Windows and Windows Server. You can also set different priorities for your transfers so that the more important downloads and uploads happen first.
BITS gives you control over transfer operations. You can specify what your cost requirements are to enable transfers on expensive (roaming) networks and the priority of each download or upload. You can set a transfer to be a foreground priority transfer and have the transfer happen right away or set your transfer to be a low priority transfer and be extra nice to your user. See https://docs.microsoft.com/en-us/windows/desktop/Bits/best-practices-when-using-bits for BITS best practices.
BITS can be managed by an IT department
An enterprise IT department might have a preference about how much bandwidth to allocate to background transfers at different times of the day or might want to control how long a transfer is allowed to take. BITS has rich Group Policy and MDM policies for just these scenarios. See https://docs.microsoft.com/en-us/windows/client-management/mdm/policy-csp-bits for more details on controlling BITS with MDM and https://docs.microsoft.com/en-us/windows/desktop/Bits/group-policies for the available Group Policies.
Quick start: download a file from the web
To download a file from the web using the BITS Manager sample program, select JobsàQuick File Download. The file download dialog pops up:
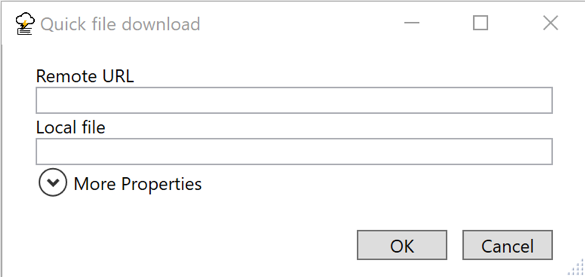
Type in a URL to download. The Local file field will be automatically updated with a potential download filename taken from the segments portion of the URL. When you tap OK, a BITS job will be created, the remote URL and local file will be added to the job, and the job will be resumed. The job will then automatically download as appropriate and will be switched to a final state at the end.
To have your program download a file with BITS, you need to create a BITS manager, create a job, add the URL and the local file names, and then resume the job. Then you need to wait until the file is done transferring and then complete the job. These steps are shown in this snippet.
In addition to this code, a version 1.5 BITSReference DLL has been added to the C# project’s references, and a using directive added to the C# file.
Sample Code
[code lang=”csharp”]
private BITS.IBackgroundCopyJob DownloadFile(string URL, string filename)
{
// The _mgr value is set like this: _mgr = new BITS.BackgroundCopyManager1_5();
if (_mgr == null)
{
return null;
}
BITS.GUID jobGuid;
BITS.IBackgroundCopyJob job;
_mgr.CreateJob(«Quick download», BITS.BG_JOB_TYPE.BG_JOB_TYPE_DOWNLOAD,
out jobGuid, out job);
try
{
job.AddFile(URL, filename);
}
catch (System.Runtime.InteropServices.COMException ex)
{
MessageBox.Show(
String.Format(Properties.Resources.ErrorBitsException,
ex.HResult,
ex.Message),
Properties.Resources.ErrorTitle
);
job.Cancel();
return job;
}
catch (System.UnauthorizedAccessException)
{
MessageBox.Show(Properties.Resources.ErrorUnauthorizedAccessMessage,
Properties.Resources.ErrorUnauthorizedAccessTitle);
job.Cancel();
return job;
}
catch (System.ArgumentException ex)
{
MessageBox.Show(
String.Format(Properties.Resources.ErrorMessage, ex.Message),
Properties.Resources.ErrorTitle
);
job.Cancel();
return job;
}
try
{
SetJobProperties(job); // Set job properties as needed
job.SetNotifyFlags(
(UInt32)BitsNotifyFlags.JOB_TRANSFERRED
+ (UInt32)BitsNotifyFlags.JOB_ERROR);
job.SetNotifyInterface(this);
// Will call JobTransferred, JobError, JobModification based on notify flags
job.Resume();
}
catch (System.Runtime.InteropServices.COMException ex)
{
MessageBox.Show(
String.Format(
Properties.Resources.ErrorBitsException,
ex.HResult,
ex.Message),
Properties.Resources.ErrorTitle
);
job.Cancel();
}
// Unless there was an error, the job is now running. We can exit
// and it will continue automatically.
return job; // Return the job that was created
}
public void JobTransferred(BITS.IBackgroundCopyJob pJob)
{
pJob.Complete();
}
public void JobError(BITS.IBackgroundCopyJob pJob, BITS.IBackgroundCopyError pError)
{
pJob.Cancel();
}
public void JobModification(BITS.IBackgroundCopyJob pJob, uint dwReserved)
{
// JobModification has to exist to satisfy the interface. But unless
// the call to SetNotifyInterface includes the BG_NOTIFY_JOB_MODIFICATION flag,
// this method won’t be called.
}
[/code]
You have to resume the job at the start because all jobs start off suspended, and you have to complete the job so that BITS removes it from its internal database of jobs. The full life cycle of a BITS job is explained at https://docs.microsoft.com/en-us/windows/desktop/Bits/life-cycle-of-a-bits-job.
Using BITS from C#
Connecting COM-oriented BITS and .NET
In this sample, the .NET code uses .NET wrappers for the BITS COM interfaces. The wrappers are in the generated BITSReference DLL files. The BITSReference DLL files are created using the MIDL and TLBIMP tools on the BITS IDL (Interface Definition Language) files. The IDL files, MIDL and TLBIMP are all part of the Windows SDK. The steps are fully defined in the BITS documentation at https://docs.microsoft.com/en-us/windows/desktop/Bits/bits-dot-net.
The automatically defined wrapper classes can be recreated at any time so that you can easily make use of the latest updates to the BITS APIs without depending on a third-party wrapper library.
The sample uses several different versions of the BITSReference DLL files. As the numbers increase, more features are available. The 1_5 version is suitable for running on Windows 7 SP1; the 5_0 version is usable in all versions of Windows 10.
If you don’t want to build your own reference DLL file, you can use the ones that were used to build the sample. They are copied over when you install the sample program and will be in the same directory as the sample EXE.
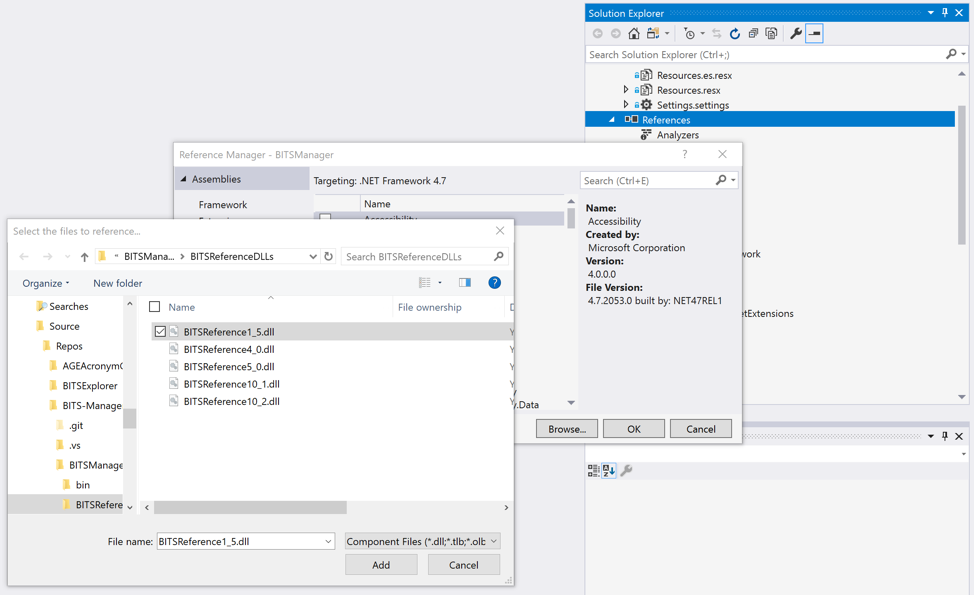
Add the BITSReference DLLs as references
In Visual Studio 2017, in the Solution Explorer:
- Right-click References and click “Add Reference …”
- In the Reference Manager dialog that pops up, click the “Browse…” button on the bottom-right of the dialog.
- In the “Select the files to reference…” file picker that pops up, navigate to the DLL (BITSReference1_5.dll) and click “Add.” The file picker dialog will close.
- In the “Reference Manager” dialog box, the DLL should be added to the list of possible references and will be checked. Click OK to add the reference.
Keep adding until you’ve added all the reference DLLs that you’ll be using.
Add using directives
In your code it’s best to add a set of using directives to your C# file. Once you do this, switching to a new version of BITS becomes much easier. The sample has four different using directives for different versions of BITS. BITS 1.5 is usable even on Windows 7 machines and has many of the basic BITS features, so that’s a good starting point for your code. The BITS What’s New documentation at https://docs.microsoft.com/en-us/windows/desktop/Bits/what-s-new contains a list of the changes to BITS. In the BITS Manager sample program, BITS4 is used for the HTTP options, BITS5 is used for job options like Dynamic and cost flags, and BITS10_2 is used for the custom HTTP verb setting.
[code lang=”csharp”]
// Set up the BITS namespaces
using BITS = BITSReference1_5;
using BITS4 = BITSReference4_0;
using BITS5 = BITSReference5_0;
using BITS10_2 = BITSReference10_2;
[/code]
Make a BITS IBackgroundCopyManager
The BITS IBackgroundCopyManager interface is the universal entry point into all the BITS classes like the BITS jobs and files. In the sample BITS Manager program, a single _mgr object is created when the main window loads in MainWindow.xaml.cs.
[code lang=”csharp”]
_mgr = new BITS.BackgroundCopyManager1_5();
[/code]
The _mgr object type is an IBackgroundCopyManager interface; that interface is implemented by the BackgroundCopyManager1_5 class. Each of the different BITS reference DLL versions have classes whose name includes a version number. For example, the BITS 10.2 reference DLL calls the class BackgroundCopyManager10_2. Only the class names are changed; the interface names are the same.
Create a job and add a file to a job
Create a new BITS job using the IBackgroundCopyManager interface and the CreateJob() method. The CreateJob() method takes in a string of the job name (it doesn’t have to be unique) and returns a filled-in BITS Job GUID as the unique identifier and a filled in IBackgroundCopyJob object. All versions of the manager will make the original BITS 1.0 version of the job. If you need a new version of the job object, see the section on “Using newer BITS features” (hint: it’s just a cast).
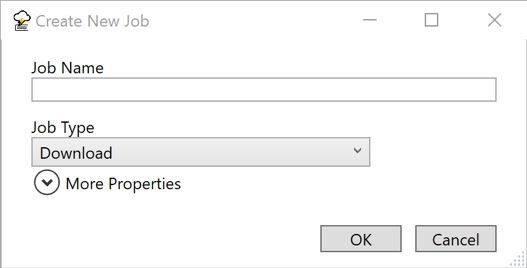
In the sample code, jobs are created in the MainWindow.xaml.cs file in the OnMenuCreateNewJob() method (it’s called when you use the New Job menu entry) and in the QuickFileDownloadWindow.xaml.cs file. Since we’ve already seen the quick file download code earlier, here’s the code that’s called when you use the “New Job” menu:
[code lang=”csharp”]
BITS.GUID jobId;
BITS.IBackgroundCopyJob job;
_mgr.CreateJob(jobName, jobType, out jobId, out job);
try
{
dlg.SetJobProperties(job);
}
catch (System.Runtime.InteropServices.COMException ex)
{
// No need to cancel; the job will show up in the job list and
// will be selected. The user should deal with it as they see fit.
MessageBox.Show(
String.Format(Properties.Resources.ErrorBitsException,
ex.HResult,
ex.Message),
Properties.Resources.ErrorTitle
);
}
RefreshJobList();
[/code]
In the code, the dlg variable is a CreateNewJobWindow dialog that pops up a window that lets you enter in the job name and job properties. Once a job is created (with _mgr.CreateJob), the dialog has a SetJobProperties method to fill in the job property values. You must specify in the code that jobId and job are both out parameters.
Jobs are always created without any files and in a suspended state.
BITS jobs are always on a per-account basis; this means that when a single user has several programs that all use BITS, all of the jobs from all of the programs will be displayed. If you need to write a program that makes some BITS jobs and sometime later modifies them (for example, to complete them), you should keep track of the job GUID values.
To add a file to a job, call Job.AddFile(remoteUri, localFile) where the remoteUri is a string with the remote filename, and the localFile is a string with the local file. To start a transfer, call job.Resume(). BITS will then decide when it’s appropriate to start the job.
Enumerating Jobs and Files
The BITS interfaces to enumerate (list) jobs and files can be tricky the first time you use them. The key is that you first make an enumerator object and then you keep calling Next() on it until you don’t get a job or file out. The example makes an enumerator for just the user’s BITS jobs; the complete code is below. The _mgr object is an instance of the IBackgroundCopyManager interface.
[code lang=”csharp”]
BITS.IEnumBackgroundCopyJobs jobsEnum = null;
uint njobFetched = 0;
BITS.IBackgroundCopyJob job = null;
_mgr.EnumJobs(0, out jobsEnum); // The 0 means get just the user’s jobs
do
{
jobsEnum.Next(1, out job, ref njobFetched);
if (njobFetched > 0)
{
// Do something with the job
}
}
while (njobFetched > 0);
[/code]
Listing files is very similar but uses a job’s EnumFiles() to get the enumerator. The EnumFiles() method just takes in the IBackgroundCopyFile object; there aren’t any additional settings.
Be notified when a job is modified or completed
BITS has several ways to let you know when a job is modified or complete. The easiest notification mechanism is to call Job.SetNotifyInterface(IBackgroundCopyCallback callback). The callback object needs to implement the IBackgroundCopyCallback interface; that interface has three methods that you will need to implement.
You must first declare that your class implements the callback:
[code lang=”csharp”]
public partial class QuickFileDownloadWindow : Window, BITS.IBackgroundCopyCallback
[/code]
After you make the job, call SetNotifyFlags and SetNotifyInterface:
[code lang=”csharp”]
job.SetNotifyFlags(
(UInt32)BitsNotifyFlags.JOB_TRANSFERRED
+ (UInt32)BitsNotifyFlags.JOB_ERROR);
job.SetNotifyInterface(this);
// Will call JobTransferred, JobError, JobModification based on the notify flags
[/code]
You will also need to implement the callback. The JobTransferred and JobError callbacks are set up to call the job.Complete and job.Cancel methods to move the job into a final state.
[code lang=”csharp”]
public void JobTransferred(BITS.IBackgroundCopyJob pJob)
{
pJob.Complete();
}
public void JobError(BITS.IBackgroundCopyJob pJob, BITS.IBackgroundCopyError pError)
{
pJob.Cancel();
}
public void JobModification(BITS.IBackgroundCopyJob pJob, uint dwReserved)
{
// JobModification has to exist to satisfy the interface. But unless
// the call to SetNotifyInterface includes the BG_NOTIFY_JOB_MODIFICATION flag,
// this method won’t be called.
}
[/code]
In the sample code, the QuickFileDownloadWindow.xaml.cs file demonstrates how to use the IBackgroundCopyCallback interface. The UI of the sample code is updated by the main polling loop but could have been updated by the callbacks.
You can also register a command line for BITS to execute when the file is transferred. This lets you re-run your program after the transfer is complete. See the BITS IBackgroundCopyJob2::SetNotifyCmdLine() method for more information.
Use a downloaded file
Once you’ve got a file downloaded, the next thing you’ll want to do is use it. The IBackgroundCopyFile’s GetLocalName(string) method is how you get the path of the downloaded file. Before you can use it, the job must be in the ACKNOWLEDGED final state. If the job is in the CANCELLED final state, the result file won’t exist. Alternately, if you set the job as a high performance job (using the IBackgroundCopyJob5.SetProperty() method), the file will be available while it’s being downloaded, or you can access the temporary file by looking at the result from a call to the file’s GetTemporaryName() method. In all cases, if BITS isn’t done with the file, you must open it with a file share Write flag.
In the sample code, the FileDetailViewControl.xaml.cs OnOpenFile() method gets the local name of the file and then uses the .NET System.Diagnostics.Process.Start() method to have the operating system open the file with the appropriate program.
[code lang=”csharp”]
string Filename;
_file.GetLocalName(out Filename);
try
{
System.Diagnostics.Process.Start(Filename);
}
catch (System.ComponentModel.Win32Exception ex)
{
MessageBox.Show(String.Format(Properties.Resources.ErrorMessage, ex.Message),
Properties.Resources.ErrorTitle);
}
[/code]
Using newer BITS features
You’ll find that you often have a BITS 1.0 version of an object and need a more recent one to use more recent BITS features.
For example, when you make a job object with the IBackgroundCopyManager.CreateJob() method, the resulting job is always a version 1.0 job. To make a newer version, use a .NET cast to convert from an older type object to a newer type object. The cast will automatically call a COM QueryInterface as appropriate.
In this example, there’s a BITS IBackgroundCopyJob object named “job”, and we want to convert it to an IBackgroundCopyJob5 object named “job5″ so that we can call the BITS 5.0 GetProperty method. We just cast to the IBackgroundCopyJob5 type like this:
[code lang=”csharp”]
var job5 = job as BITS5.IBackgroundCopyJob5;
[/code]
The job5 variable will be initialized by .NET by using the correct QueryInterface. It’s important to note that .NET doesn’t know about the real relationship between the BITS interfaces. If you ask for the wrong kind of interface, .NET will try to make it for you and fail, and set job5 to null.
Try it out yourself today!
There are plenty more features of BITS for you to use. Complete details are in the docs.microsoft.com documentation. The BITS Manager sample is available as a downloadable executable in the releases link on GitHub. The complete source code is also available including the BITSReferenceDLL files that it uses. Help for using the BITS Manager and to explain the source code organization is in the BITS-Manager GitHub Wiki.
If you prefer coding in C or C++, the documentation will point you to the existing samples.
Good luck, and happy Background File Transfers!
В свое время я написал статью о том, что служба BITS (Background Intelligent Transfer Service) не запускается, и как можно решить эту проблему. Без этой службы, работающей в фоновом режиме, вы не сможете загружать обновления Windows. Это также вызывает множество других проблем, но основная проблема, которая затрагивает большинство людей, заключается в том, что они не могут загрузить обновления.
По большей части, моя предыдущая статья помогла мне несколько раз за последние 5 лет. Только несколько дней назад я столкнулся с проблемой с BITS, когда статья не помогла. В этом случае на одном из моих компьютеров был обнаружен вредоносный вирус, и в процессе его очистки служба BITS просто исчезла из списка служб. Любая команда, которую я пытался запустить, чтобы перезапустить службу или перерегистрировать ее, просто не будет работать.
В конце концов я узнал, что мне нужно было заново создать сервис BITS! В этот момент я мог бы снова зарегистрировать его в Windows, а затем перейти в Службы и запустить его оттуда. В этой статье я расскажу вам, как создать службу BITS вручную, а затем зарегистрировать ее в Windows.
Первое, что вы можете попытаться сделать, это восстановить сервис BITS. Вы можете сделать это, открыв административную командную строку, скопировав и вставив следующую команду:
sc create BITS type = share start = delayed-auto binPath = «C: Windows System32 svchost.exe -k netsvcs» tag = no DisplayName = «Фоновая интеллектуальная служба передачи»
Вы можете открыть административную командную строку, нажав «Пуск», введя CMD, а затем щелкните правой кнопкой мыши командную строку и выберите «Запуск от имени администратора».
Если по какой-либо причине вы не можете заставить вышеуказанную команду работать должным образом, вы можете также попробовать приведенную ниже команду, которая является только сокращенной версией. Если вы можете, попробуйте скопировать и вставить, потому что вы заметите, что после знака = в нескольких местах, сразу после них есть пробел. Это не случайно, вам нужно это место, иначе команда не будет работать.
sc create BITS binpath = «c: windows system32 svchost.exe -k netsvcs» start = задержка-авто
После того, как служба BITS установлена, мы должны убедиться, что она зарегистрирована правильно. Если нет, вы можете попробовать запустить его с панели «Службы», но, вероятно, вы получите сообщение об ошибке:
«Windows не удалось запустить службу BITS на локальном компьютере. Ошибка 2: система не может найти указанный файл»
Регистрация BITS Сервис
Чтобы зарегистрировать службу BITS, вы должны создать пакетный файл, а затем запустить его. Звучит страшно и технично, но довольно просто. Сначала откройте Блокнот, а затем вставьте следующее в зависимости от вашей операционной системы.
Windows 2000, Windows XP, Windows Server 2003
REGSVR32 WUPS2.DLL / S
REGSVR32 WUPS.DLL / S
REGSVR32 WUAUENG.DLL / S
REGSVR32 WUAPI.DLL / S
REGSVR32 MUCLTUI.DLL / S
REGSVR32 WUCLTUI.DLL / S
REGSVR32 WUWEB.DLL / S
REGSVR32 MUWEB.DLL / S
REGSVR32 QMGR.DLL / S
REGSVR32 QMGRPRXY.DLL / S
Windows Vista, Windows 7, Windows Server 2008
REGSVR32 WUPS2.DLL / S
REGSVR32 WUPS.DLL / S
REGSVR32 WUAUENG.DLL / S
REGSVR32 WUAPI.DLL / S
REGSVR32 WUCLTUX.DLL / S
REGSVR32 WUWEBV.DLL / S
REGSVR32 JSCRIPT.DLL / S
REGSVR32 MSXML3.DLL / S
Если у вас возникла проблема с битами в Windows 8 или Windows 10, вам нужно выполнить еще несколько команд regsvr32. Проверьте это статья от Microsoft и следуйте инструкциям.
В блокноте нажмите Файл, а затем Сохранить как. Назовите свой файл bits.bat, затем выберите «Все файлы» в поле «Сохранить как тип» и сохраните его на рабочем столе.
Теперь просто щелкните правой кнопкой мыши файл BAT на рабочем столе и выберите «Запуск от имени администратора». На этом этапе вам следует перезагрузить компьютер и посмотреть, сможете ли вы сделать то, что пытались сделать ранее, т.е. установить обновления и т. Д.
Если BITS по-прежнему не отображается в списке служб Windows или вы не можете запустить службу BITS, вы можете попробовать загрузить этот файл реестра и запустить его. Он в основном пытается исправить все записи реестра, связанные со службой BITS. Если вышеупомянутые команды также не сработали, вы можете попробовать запустить этот файл реестра, а затем еще раз попробовать выполнить команду. Тем не менее, вы должны сначала перезагрузить компьютер после запуска файла реестра.
http://download.bleepingcomputer.com/win-services/7/BITS.reg
Обратите внимание, что это файл .REG, который добавляет ключи и значения в ваш реестр. При загрузке вы можете получить сообщение о том, что этот файл может быть опасным, однако это не значит, что вам не о чем беспокоиться. Если вы получите сообщение об ошибке при попытке запустить этот REG-файл, вы также можете перезагрузить компьютер в безопасном режиме, а затем попытаться запустить его. Иногда запущенный процесс препятствует добавлению некоторых значений в реестр.
Если у вас по-прежнему возникают проблемы со службой BITS, которая не отображается должным образом, сообщите нам о том, что вы пробовали, и какова ваша конкретная ситуация, и мы постараемся помочь. Наслаждайтесь!
On Windows 10, Background Intelligent Transfer Service (BITS) is an essential component responsible for assisting the system and applications during foreground or background downloads and uploads between the device and a remote server, without impacting the network experience. It does this by intelligently handling prioritization and throttling, and by pausing and resuming data transfers automatically.
BITS also plays a significant role when downloading files from the Microsoft servers or peers to install updates on Windows 10.
Although it’s an intelligent feature, occasionally, the service will suddenly stop working, preventing Windows Update, Microsoft Store, and other services from operating correctly.
If your Windows 10 installation is having issues with this component, you can use the Background Intelligent Transfer Service troubleshooter, Windows Update Standalone Installer (WUSA), and command line tools, such as System File Checker (SFC) and Deployment Image Servicing and Management (DISM) to resolve most common problems.
In this Windows 10 guide, we walk you through three ways to troubleshoot and fix common problems when BITS isn’t working correctly.
- How to fix BITS problems via Troubleshooter
- How to fix BITS problems using SFC and DISM
- How to fix BITS problems using manual update
How to fix BITS problems via Troubleshooter
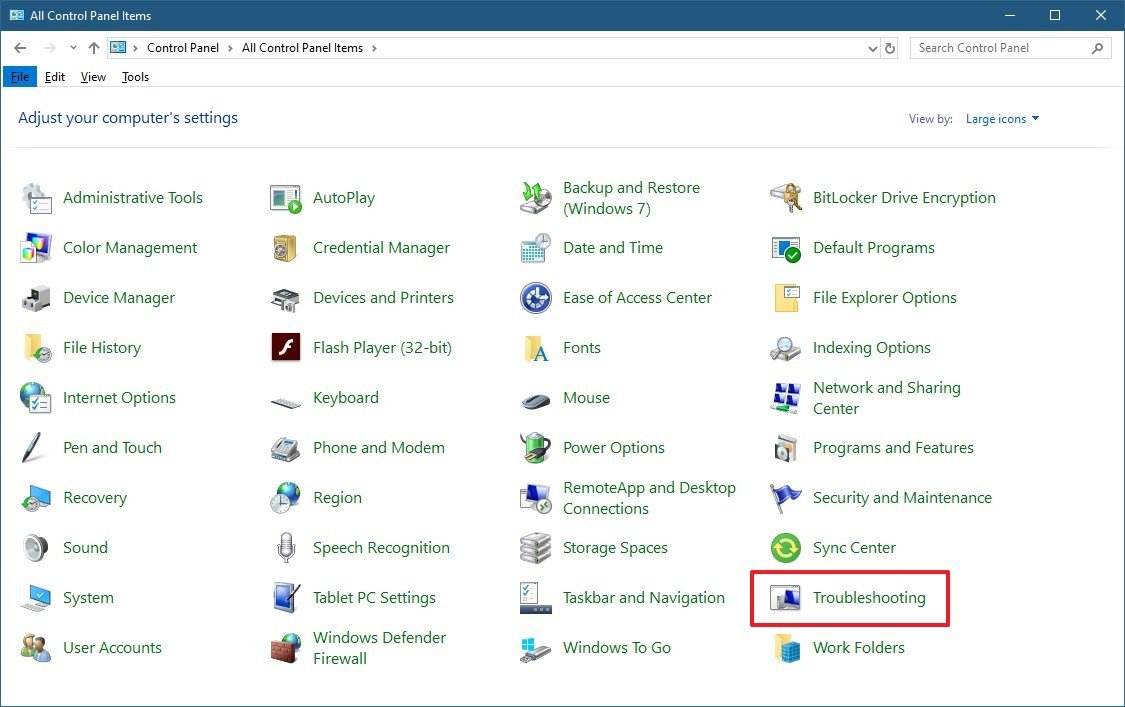
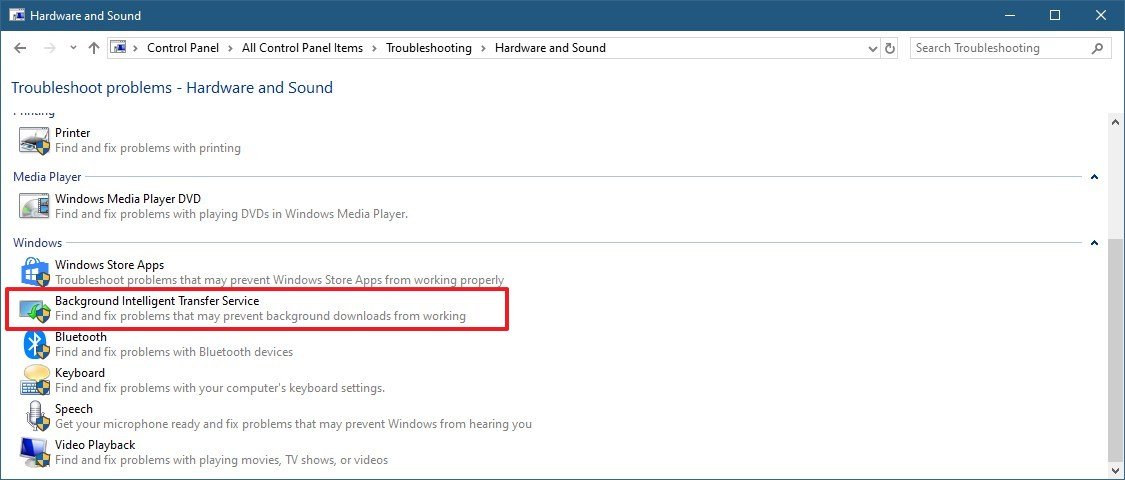
To fix common problems with the BITS on Windows 10, use these steps:
- Open Control Panel.
- Use the «View by» drop-down menu, in the top-right, and select the Large icons option.
- Click the Troubleshooting option.
- Click the Hardware and Sound option.
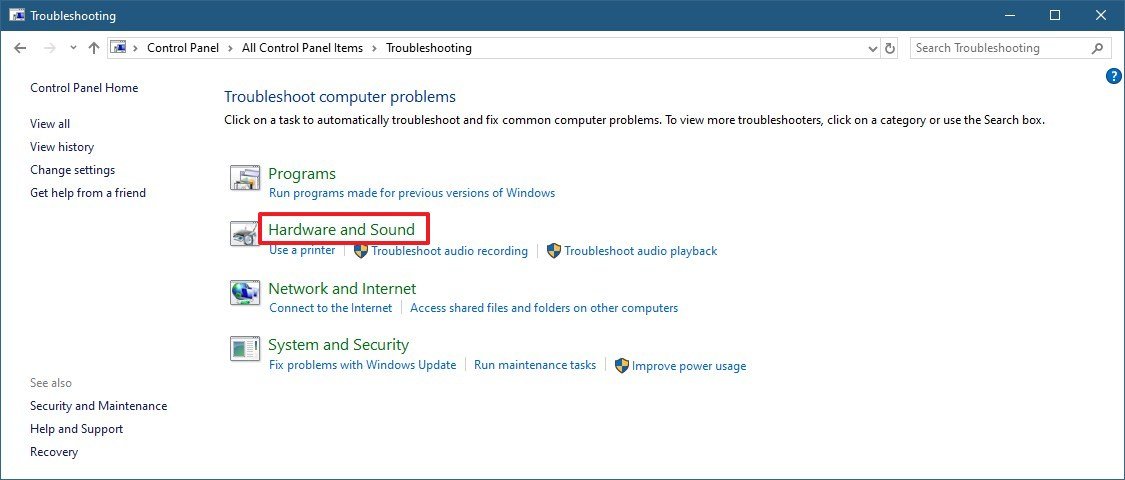
- Under the «Windows» section, click the Background Intelligent Transfer Service troubleshooter.Quick tip: If you can’t find the option, you can also download the troubleshooter for Windows 10 from Microsoft with this link (opens in new tab).
- Click the Advanced option.
- Select the Apply repairs automatically option.
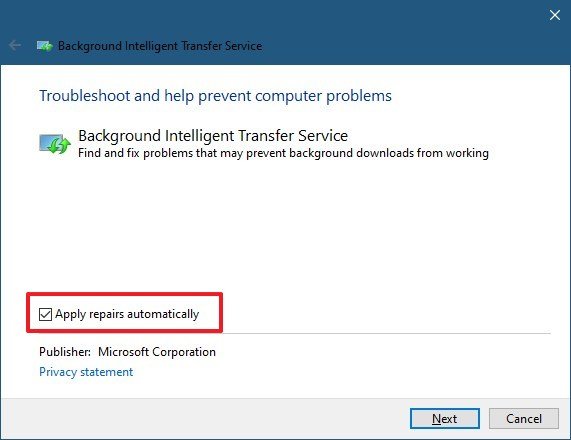
- Click the Next button.
- Click the View detailed information option.
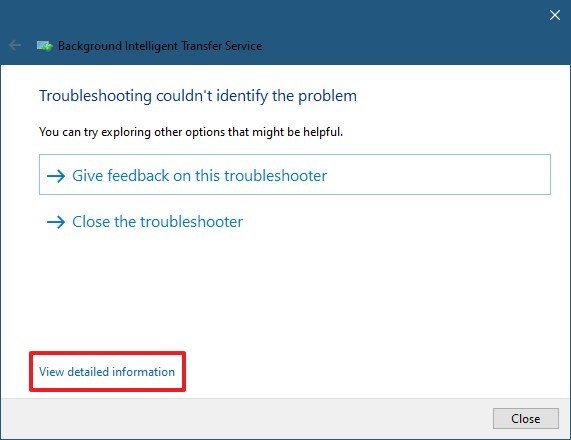
- Review the Detection details.

- Click the Next button.
- Click the Close button.
Once you complete these steps, the troubleshooter will scan, detect, and fix any problems (including restarting the service as necessary) that may be preventing the BITS from working correctly.
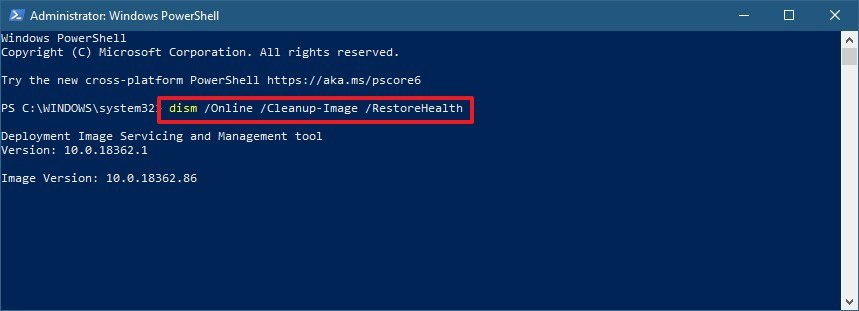
How to fix BITS problems using SFC and DISM
If you’re still having issues as a result of problems with the Windows 10 installation, you can use the SFC and DISM command line tool to try fixing the problem with BITS.
To use DISM and SFC to fix problems with BITS, use these steps:
- Open Start.
- Search for Command Prompt, right-click the top result, and select the Run as administrator option.
- Type the following command to scan and repair any system file corruption and press Enter:
dism /Online /Cleanup-Image /RestoreHealth
- Type the following command to run the tool and press Enter:
sfc /scannow
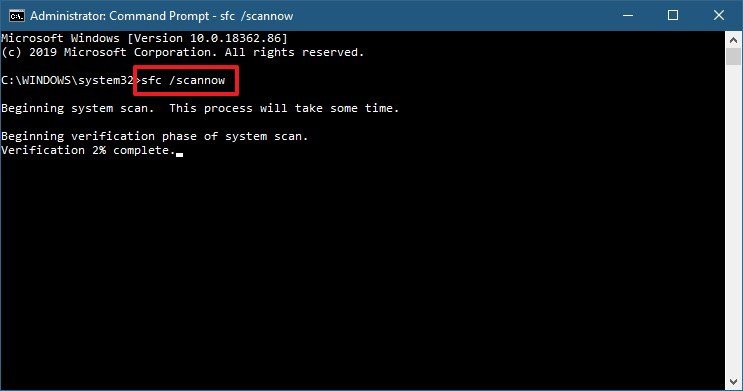
After you complete the steps, the DISM will scan and repair system files, and the SFC tool will scan and try to resolve common issues with your Windows 10 installation, which can also help to fix the system download manager.
How to fix BITS problems using latest update
If none of the above recommendations helped to fix BITS, it could be a problem with Windows 10, which you may be able to fix by installing the latest quality update from the Microsoft Update Catalog website manually.
To install the latest update, use these steps:
Determine latest update
Before you can download the latest quality update, you need to determine its knowledge base (KB) reference name, which you can find in the Windows 10 Update History website (opens in new tab).
Determine system type
To find out whether your device needs a 32-bit or 64-bit version of an update, use these steps:
- Open Settings.
- Click on System.
- Click on About.
- Under the Device specifications section, check the System type information.
- Confirm whether you need 32-bit or 64-bit updates.

Downloading latest update
To download a Windows update manually, use these steps:
- Open the the Microsoft Update Catalog (opens in new tab) website.
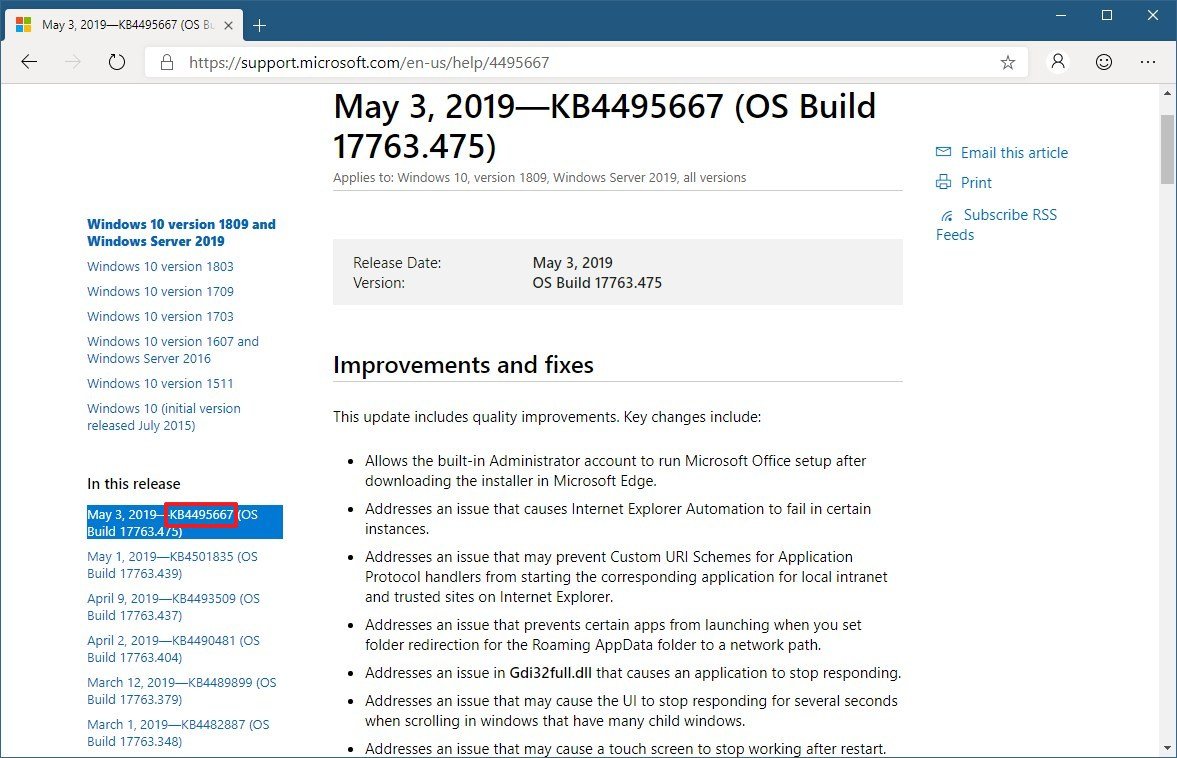
- Search for the update using the most relevant KB number. For example, KB4495667.
- Click the Download button for the 64-bit or 32-bit version of the update.
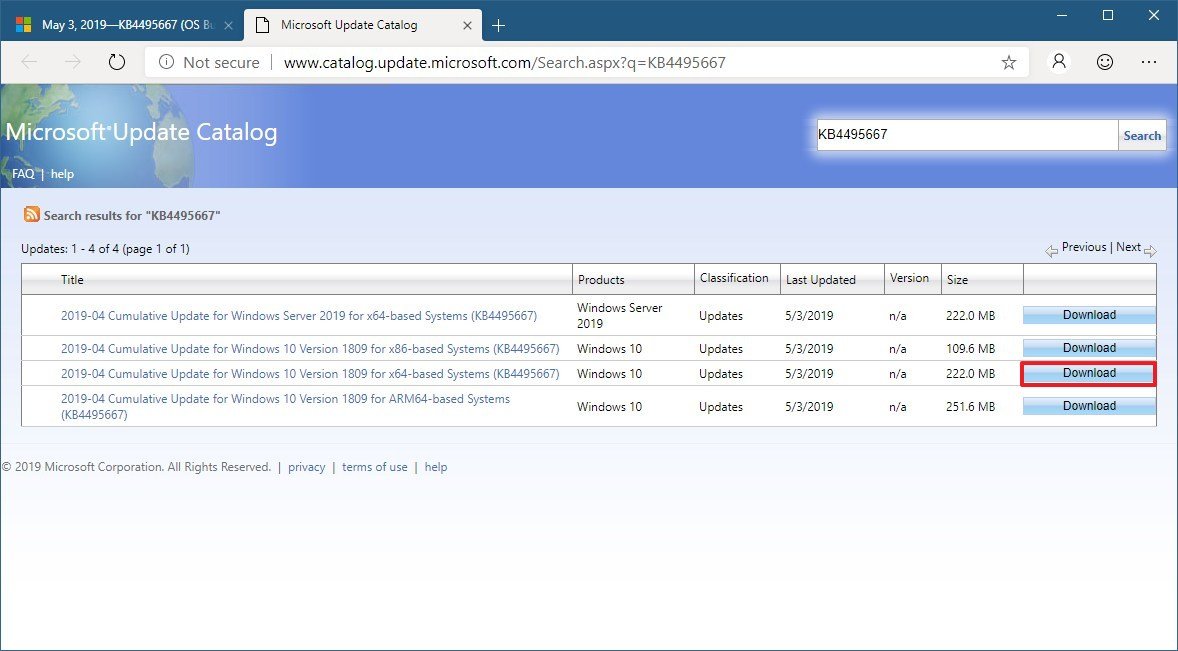
- Click the .msu link.
Installing update manually
To install the latest patch, simply double-click the .msu file, or use these steps:
- Open Start.
- Search for Command Prompt, right-click the top result, and select the Run as administrator option.
- Type the following command to run the tool and press Enter:
wusa C:FOLDER-PATHUPDATE-NAME.msu /quiet /norestartIn the command, make sure to update the path and name of the update to successfully run the command.
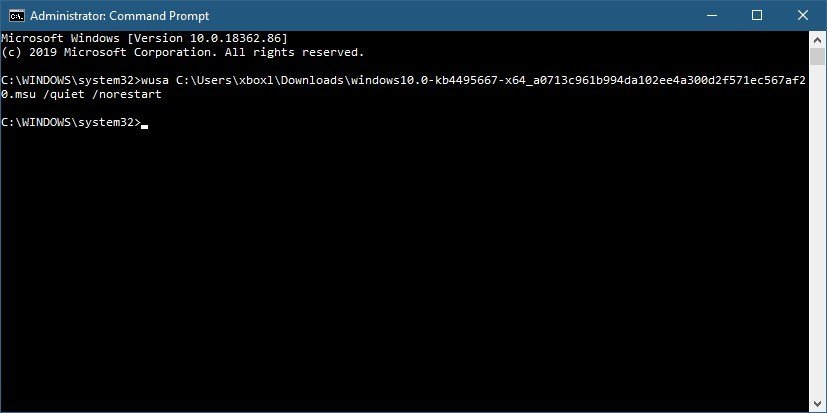
After completing these steps, restart your computer, and the system download manager service should start working again.
This guide is focused on Windows 10, but you can also refer to these steps to fix problems with the Background Intelligent Transfer Service on Windows 8.1 and Windows 7.
Mauro recommends all these affordable accessories
Hi, I’m Mauro Huculak, Windows Central’s help and how-to guru. I wrote the post you’re reading now, and I know the Windows OS inside and out. But I’m also a bit of a hardware geek. These are some of the affordable gadgets on my desk today.

Logitech MX Master Wireless Mouse (opens in new tab) ($72 at Amazon)
I know mice, and this is the one I use every day. The MX Master is a wireless high-precision mouse that’s very comfortable to use and has many great features, including the ability to connect with multiple devices, an infinite scroll wheel, back and forward buttons, all of which you can customize.

Ktrio Extended Gaming Mouse Pad (opens in new tab) ($12 at Amazon)
If you spend a lot of time typing, your palms and mouse will leave tracks on your desk. My solution was to start using gaming mouse pads, which are big enough for you to use the keyboard and the mouse comfortably. This is the one I use and recommend.

Supernight LED light strip (opens in new tab) ($20 at Amazon)
You could just use a regular light bulb in your office, but if you want to add some ambient lighting with different colors, an RGB LED strip is the way to go. This one is Mauro-approved.
Get the best of Windows Central in in your inbox, every day!
Mauro Huculak is technical writer for WindowsCentral.com. His primary focus is to write comprehensive how-tos to help users get the most out of Windows 10 and its many related technologies. He has an IT background with professional certifications from Microsoft, Cisco, and CompTIA, and he’s a recognized member of the Microsoft MVP community.
В локальных (да и глобальных) сетях файлы между системами обычно передаются с помощью протоколов SMB, FTP или HTTP. Проблема всех этих протоколов – сложности с докачкой больших файлов, которые могут усугубляться проблемами передачи данных по медленному или нестабильному каналу. При копировании файлов по этим протоколам обычно задействуется вся доступная пропускная способность канала связи между сервером и получателем, что может негативно сказаться на производительности сети и работе других приложения (не всегда возможно настроить корректные политики QoS на уровне сетевого оборудования). В этой статье мы рассмотрим возможность использования протокола BITS и командлетов PowerShell для копирования больших файлов через сеть по нестабильному или медленному каналу.
Содержание:
- Протокол BITS
- BITS: требования к ОС и версии PowerShell
- Как скачать файл по протоколу BITS с помощью PowerShell
- Синхронная передача файлов между компьютерами с помощью BITS
- Используем BITS для асинхронного копирования больших файлов по сети
- Копирование всего содержимого общей сетевой папки через BITS
- Загрузка файла на HTTP сервер с помощью PowerShell и BITS
Протокол BITS
BITS или Background Intelligent Transfer service — (Фоновая интеллектуальная служба передачи) – это служба Windows, которая используется для передачи файлов между системами. С помощью протокола BITS можно передавать как скачивать, так и закачивать файлы. Именно по этому протоколу компьютеры скачивают файлы с серверов при выполнении автоматического обновлении Windows (в т.ч. при скачивании обновлений со WSUS сервера), при получении программ с SCCM точек распространения и т.д.
Преимущества протокола BITS:
- BITS — интеллектуальный протокол, который при работе способен регулировать используемую полосу канала связи, чтобы не оказывать влияния на другие сетевые приложения и сервисы. BITS может использовать только незанятую полосу пропускания канала и динамически изменять скорость передачи данных в процессе работы (если другие приложения увеличат нагрузку на сеть, BITS может уменьшить скорость передачи данных по сети);
- Загрузка файла может идти в фоновом режиме, незаметно для пользователя;
- Задание BITS в режиме докачки будет автоматически продолжено даже в случае обрыва канали связи между компьютером и клиентом, или после перезагрузки компьютера;
- В любой момент вы можете приостановить или возобновить загрузку по BITS без потери данных;
На заметку. Возможность перезапуска процедуры копирования файлов по сети имеется также и в утилите robocopy.exe, позволяющей возобновить закачку файла в случае обрыва соединения.
- BITS позволяет управлять приоритетами задач загрузки;
- Передача файлов между компьютерами происходит по портам 80 (HTTP) или 443 (HTTPS), поэтому вам не придется открывать дополнительных портов на межсетевых экранах. Например, 445 порта, по которому идет копирование при использовании протокола SMB (не забудьте, что в старых версиях протокола SMB 1.0 много уязвимостей);
- На стороне получателя и сервера не обязательно требуется наличие развернутого IIS сервера.
Таким образом, BITS является оптимальным протоколом для передачи больших файлов по медленным и нестабильным сетям (спутниковый канал, GPRS соединение и т.д.).
BITS: требования к ОС и версии PowerShell
Протокол BITS впервые был представлен еще в Windows XP, для управления заданиями BITS в которой можно было использовать утилиту bitsadmin.exe. Утилита все еще поддерживается, однако считается устаревшей. Для управления заданиями BITS предпочтительно использовать специальные командлеты PowerShell.
Для работы по рассматриваемому сценарию нам потребуется ОС не ниже Windows Vista или Windows Server 2008, и PowerShell не ниже версии 2.0. Современные версии Windows 10 и Windows Server 2016 / 2012 R2 протокол BITS полностью поддерживают.
Совет. Возможно использовать и Windows Server 2003. В этом случае придется установить специальное обновлений KB 923845 и PowerShell V2.0.
Поддержка BITS требуется как на стороне клиента, так и сервера.
Как скачать файл по протоколу BITS с помощью PowerShell
Предположим вы хотите скачать большой ISO файл, хранящийся на HTTP сервере IIS (_http://10.2.2.148/erd65_32.iso).
Предполагается, что к данному URL адресу разрешен анонимный доступ (в дальнейшем мы рассмотрим доступ к URL адресу с аутентификацией).
В первую очередь загрузите в сессию PowerShell модуль поддержки BITS:
Import-Module BitsTransfer
После загрузки модуля, вы можете вывести список всех доступных команд модуля BitsTransfer:
get-command *-BITS*
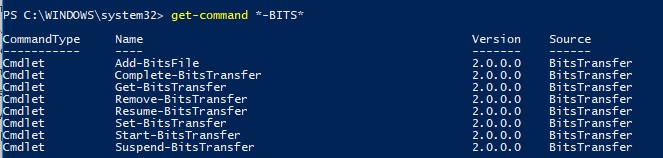
Как вы видите, доступно всего 8 командлетов:
- Add-BitsFile
- Complete-BitsTransfer
- Get-BitsTransfer
- Remove-BitsTransfer
- Resume-BitsTransfer
- Set-BitsTransfer
- Start-BitsTransfer
- Suspend-BitsTransfer
Синхронная передача файлов между компьютерами с помощью BITS
Командлет Start-BitsTransfer позволяет скачивать файлы по HTTP(s) (как и комадндет Invoke-WebRequest), так и из общих сетевых папок (по SMB). Чтобы скачать файл с указанного URL адреса по протоколу BITS и сохранить его в локальный каталог C:Temp, воспользуйтесь командой:
Start-BitsTransfer –source _http://10.2.2.148/erd65_32.iso -destination c:temp

Сообщение This is a file transfer that uses the Background Intelligent Transfer service (BITS) говорит о том, что начато скачивание указанного файла по протоколу BITS.
В данном примере командлет выполняет загрузку файла в синхронном режиме. Закачка файла напоминает обычную процедуру копирования через проводник или с помощью PowerShell командлета Copy-Item. При это на экран выводится прогресс бар, отображающий статус выполнения закачки. При перезагрузке компьютера, закачка возобновлена не будет (вам заново скачивать весь файл).
Используем BITS для асинхронного копирования больших файлов по сети
Процесс загрузки файлов через BITS можно запустить и в асинхронном режиме, для этого к рассмотренной выше команде нужно добавить параметр –asynchronous. В этом режиме, если что-то случится в процессе загрузки файла (перезагрузка сервера, клиента, обрыв канала связи и пр.), задание автоматически продолжится после восстановления доступности источника и загрузка файла продолжится с момента прерывания связи.
Start-BitsTransfer -source _http://10.2.2.148/erd65_32.iso -destination c:temp -asynchronous

Важно. По умолчанию Start-BitsTransfer работает с приоритетом Foreground (наивысший из возможных). Предполагается, что загрузка файла, запущенная в этом режиме будет соревноваться с другими процессами за полосу пропускания канала. Чтобы избежать этого, нужно явно указать в качестве аргумента команды любой другой приоритет, например, -Priority low:
Start-BitsTransfer -source _http://10.2.2.148/erd65_32.iso -destination c:temp -asynchronous -Priority low
Асинхронное задание BITS выполняется в фоновом режиме, а на экран не выводится процесс выполнения команды загрузки файла. Статус задания BITS можно получить из консоли PowerShell с помощью команды Get-BitsTransfer:
Get-BitsTransfer | fl
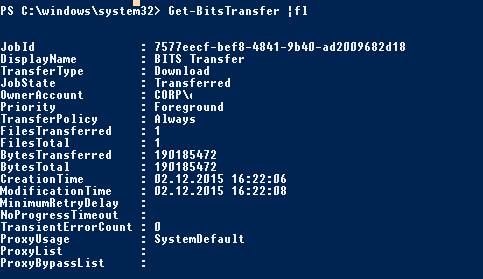
Команда возвращает статус передачи (в данном случае видно, что передача окончена -Transferred), информацию о количестве переданных байт, общем размере файла, времени создания и завершения задания BITS.
Вы можете просмотреть статус всех заданий BITS, запущенных на компьютере, в табличной форме:
Get-BitsTransfer | select DisplayName, BytesTotal, BytesTransferred, JobState | Format-Table -AutoSize
При использовании асинхронного режима передачи, в целевом каталоге создается временный файл с расширением TMP (по умолчанию скрыт в проводнике). Чтобы конвертировать его в исходный тип файла (который хранится на сервере-источнике), нужно выполнить команду Complete-BitsTransfer:
Get-BitsTransfer | Complete-BitsTransfer

Задание загрузки BITS после этого считается завершенным и пропадает из списка заданий.
Вы можете загрузить локальный файл в общую сетевую папку на удаленном сервере. Для этого используется следующая команда (для удобства можно указать имя задания копирования):
Start-BitsTransfer -Source C:isow101809.iso -Destination \ekt-fs1iso -Asynchronous -DisplayName CopyISOtoEKT
Чтобы временно приостановить задание BITS, выполните:
Get-BitsTransfer -Name CopyISOtoEKT | Suspend-BitsTransfer
Для продолжения задания используется командлет Resume-BitsTransfer:
Get-BitsTransfer -Name CopyISOtoEKT | Resume-BitsTransfer -Asynchronous
Вы можете добавить в задание BITS дополнительные файлы с помощью командлета Add-BitsFile:
Get-BitsTransfer -Name CopyISOtoEKT | Add-BitsFile -Source C:isow10msu* -Destination \ekt-fs1iso -Asynchronous
Чтобы удалить все задания загрузки BITS на компьютере (в том числе запущенные другими пользователями), выполните команду:
Get-BitsTransfer -Allusers|Remove-BitsTransfer
Вы не сможете отменить задания BITS, запущенные из-под System (ошибка 0x80070005 Unable to cancel job). Для отмены такого задания нужно выполнить команду Remove-BitsTransfer из-под SYSTEM.
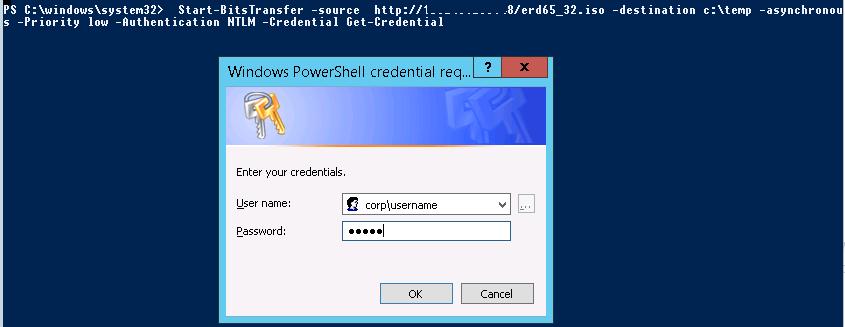
Если сервер, на котором хранится файл, требует аутентификации пользователя, вы можете вызвать окно, в котором нужно указаны учетные данные для доступа к ресурсу:
Start-BitsTransfer -source _http://10.2.2.148/erd65_32.iso -destination c:temp -asynchronous -Priority low -Authentication NTLM -Credential Get-Credential
Чтобы было удобнее отслеживать результаты выполнения задания BITS, можно воспользоваться простым скриптом, который отслеживает выполнение задания и раз в несколько секунд выводит процент выполнения загрузки на экран. По окончании загрузки файла, скрипт автоматически преобразует TMP файл в исходный формат:
Import-Module BitsTransfer
$job = Start-BitsTransfer -Source _http://10.2.2.148/erd65_32.iso -Destination c:temp -Asynchronous
while( ($job.JobState.ToString() -eq 'Transferring') -or ($job.JobState.ToString() -eq 'Connecting') )
{
Write-host $Job.JobState.ToString()
$Pro = ($job.BytesTransferred / $job.BytesTotal) * 100
Write-Host $Pro “%”
Sleep 3
}
Complete-BitsTransfer -BitsJob $job
Копирование всего содержимого общей сетевой папки через BITS
Как мы уже говорили, для работы BITS не нужен Web сервер, это означает, что вы можем скопировать файлы непосредственно с других Windows-компьютеров или общих сетевых папок:
Start-BitsTransfer -Source \msk-rep01osrhel-server-7.0-x86_64-dvd.iso -Destination c:temp -Asynchronous
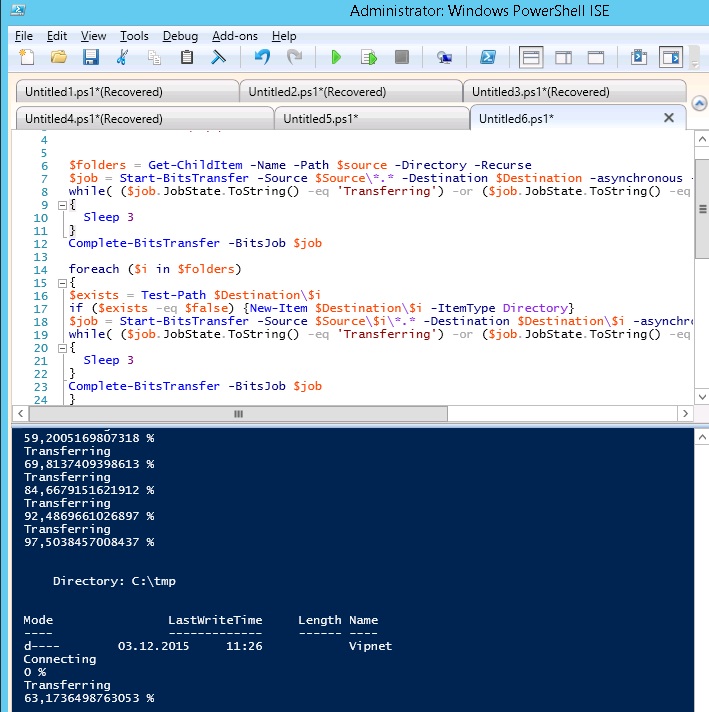
Командлеты модуля BitsTransfer не умеют рекурсивно копировать все файлы и папки из определённой директории, или файлы, которые используются другими программами. Чтобы из указанной сетевой папки скопировать все файлы с подкаталогами, воспользуемся такой функцией (можно предварительно проверить, существует ли целевой каталог и создать его):
Import-Module BitsTransfer
$Source="\msk-rep01os"
$Destination="c:tmp"
if ( -Not (Test-Path $Destination))
{
$null = New-Item -Path $Destination -ItemType Directory
}
$folders = Get-ChildItem -Name -Path $source -Directory -Recurse
$job = Start-BitsTransfer -Source $Source*.* -Destination $Destination -asynchronous -Priority low
while( ($job.JobState.ToString() -eq 'Transferring') -or ($job.JobState.ToString() -eq 'Connecting') )
{
Sleep 3
}
Complete-BitsTransfer -BitsJob $job
foreach ($i in $folders)
{
$exists = Test-Path $Destination$i
if ($exists -eq $false) {New-Item $Destination$i -ItemType Directory}
$job = Start-BitsTransfer -Source $Source$i*.* -Destination $Destination$i -asynchronous -Priority low
while( ($job.JobState.ToString() -eq 'Transferring') -or ($job.JobState.ToString() -eq 'Connecting') )
{
Sleep 3
}
Complete-BitsTransfer -BitsJob $job
}
Загрузка файла на HTTP сервер с помощью PowerShell и BITS
С помощью BITS вы можете не только скачать файл с HTTP сервера, но и загрузить его на удаленный веб сервер. Для этого на стороне получателя должен быть установлен веб сервер IIS с установленным компонентом Bits Server Extension. В настройках виртуального каталога IIS в секции Bits Uploads нужно включить опцию «Allow clients to uploads files».
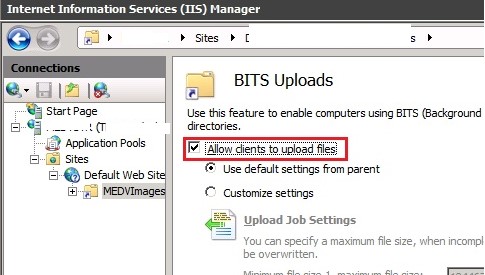
Если вы используете анонимную авторизацию, необходимо разрешить анонимным пользователям запись в каталог на уровне NTFS. Если загрузка файлов выполняется под авторизованными пользователями, им необходимо предоставить RW разрешения на папку загрузки.
Чтобы загрузить файл на HTTP сервер с помощью протокола BITS, выполните команду:
Start-bits –source c:isowin2016.iso -destination http://10.10.1.200/MEDVImages/win2016.iso –Transfertype Upload
Обратите внимание, что по-умолчанию IIS позволяет загружать файлы до 30 Мб. Чтобы разрешить загружать большие файлы, нужно в файле web.config изменить значение в параметре maxAllowContentLength.
Таким образом, использование возможностей BITS представляет собой отличную альтернативу традиционному копированию файлов по сети по протоколу SMB. В отличии от последнего, задание копирования файлов BITS выполняется несмотря на разрывы связи и перезагрузки компьютеров, и не так загружает канал связи, не мешая работе других сетевых приложений и пользователей. Протокол BITS может быть оптимальным решением для передачи по WAN сети больших файлов ISO образов и файлов виртуальных машин (vmdk, vhdx).