Содержание
- Способ 1: Общие рекомендации
- Способ 2: Проверка оперативной памяти
- Способ 3: Повторное создание загрузочной флешки или диска
- Вопросы и ответы

Следующие инструкции актуальны для всех поддерживаемых версий Windows, поэтому вы можете использовать их вне зависимости от того, какую сборку выбрали. Для начала рекомендуем ознакомиться с общими советами, а если это не поможет, переходить к методам, направленным конкретно на решение сложившейся ситуации.
Способ 1: Общие рекомендации
Есть несколько простых действий, выполнение которых иногда положительно сказывается на исправлении проблемы «Windows не удается установить необходимые файлы» во время установки операционной системы. Их осуществление не займет много времени, однако может помочь максимально быстро отыскать причину неполадки, исправить ее и завершить установку ОС.
- Отключение периферийных устройств. Если во время инсталляции ОС к компьютеру подключены не использующиеся сейчас периферийные устройства — веб-камера, принтер, клавиатура или флешка — рекомендуем отключить это все на время установки Windows. Сделать это не так сложно, поскольку понадобится только вытащить провода из разъемов. В случае когда это не принесло должного результата, не спешите обратно подключать это оборудование, а попробуйте следующие советы.
- Отключение второго жесткого диска. Многие пользователи сейчас устанавливают в свой компьютер два или больше накопителя, на один из которых загружаются компоненты операционной системы. Во время ее установки отключите диск с пользовательскими файлами, чтобы у установщика не возникало конфликтов с выбором необходимого HDD или SSD. Если ранее вы не сталкивались с отключением жесткого диска, ознакомьтесь с первой частью инструкции по следующей ссылке.
Подробнее: Как отключить жесткий диск
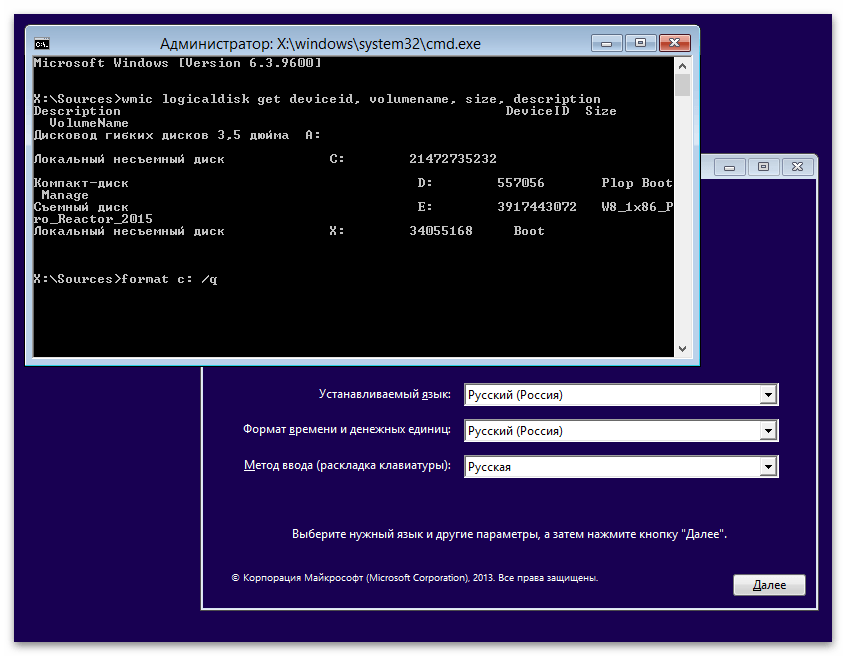
- Форматирование жесткого диска. При попытке установить новую ОС на жесткий диск, где ранее уже присутствовала Windows, перед началом основного процесса рекомендуется форматировать накопитель, избавившись тем самым от старых файлов. Учитывайте, что делать это стоит только когда на носителе уже нет важной для вас информации и вы готовы расстаться с тем, что на нем хранится.
Подробнее: Форматирование жесткого диска перед установкой ОС
Это были самые простые и очевидные действия, которые иногда позволяют избавиться от сообщения «Windows не удается установить необходимые файлы». Если ни одна рекомендация не оказалась полезной, воспользуйтесь следующими методами решения данной ситуации.
Способ 2: Проверка оперативной памяти
Появление рассматриваемой проблемы нередко свидетельствует о проблемах с оперативной памятью, поэтому для начала вытащите планки и поменяйте их местами или используйте другие свободные разъемы. Если после таких манипуляций ошибка осталась, лучше проверять ОЗУ на работоспособность. Делается это при помощи специальных программ, открывающихся с загрузочной флешки или непосредственно в ОС (при условии, если старая Windows у вас запускается нормально). Детальнее об этой теме написано в другой статье на нашем сайте по следующей ссылке.
Подробнее: Как проверить оперативную память на работоспособность
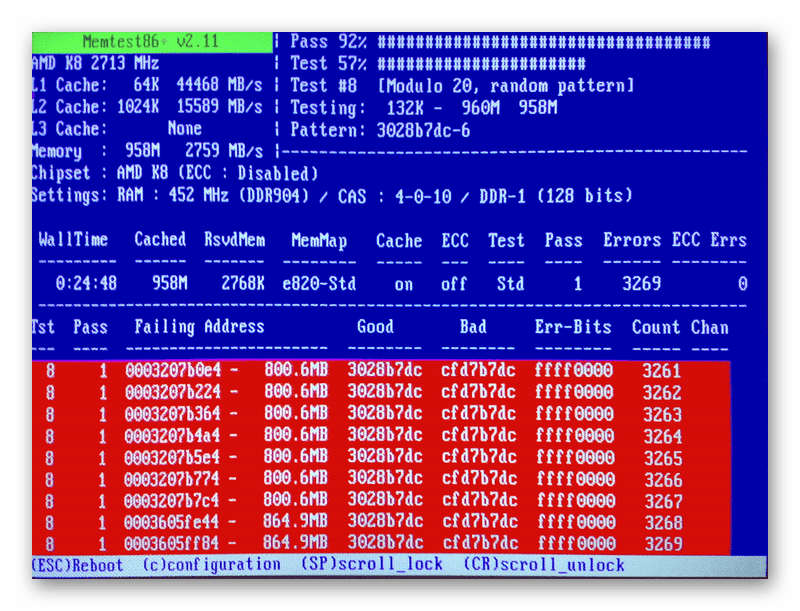
Особое внимание обратите на софт под названием MemTest86+. Его преимущество заключается в том, что он запускается из-под BIOS или UEFI, что позволяет проверить оперативную память даже без наличия операционной системы. Развернутые инструкции о том, как осуществляется взаимодействие с данной утилитой, читайте в материале от другого нашего автора.
Подробнее: Как протестировать оперативную память при помощи программы MemTest86+
Способ 3: Повторное создание загрузочной флешки или диска
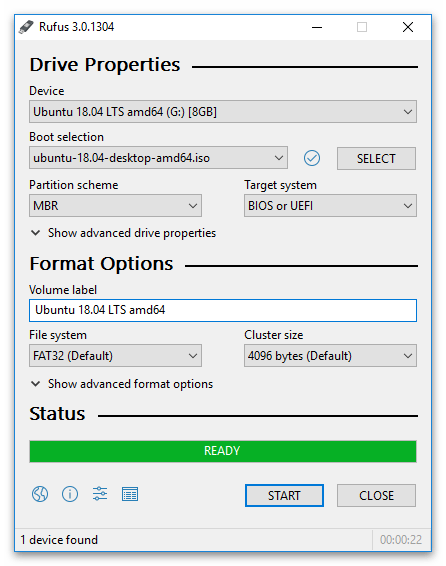
Иногда запись образа с ОС на флешку или диск проходит не совсем корректно или какие-то ошибки допустил сам пользователь на стадии создания накопителя. Ошибки с загрузкой файлов приводят к появлению различных ошибок, в том числе и к отображению на экране сообщения «Windows не удается установить необходимые файлы». Принцип создания загрузочных флешек с разными версиями Windows практически не отличается, но есть особенности, которые нужно учитывать при записи в зависимости от выбранного ПО. Общие инструкции по этой теме вы найдете, нажав по следующему заголовку.
Подробнее: Инструкция по созданию загрузочной флешки на Windows

Еще статьи по данной теме:
Помогла ли Вам статья?
Attaching your hard drive to a different SATA port might solve this issue
by Milan Stanojevic
Milan has been enthusiastic about technology ever since his childhood days, and this led him to take interest in all PC-related technologies. He’s a PC enthusiast and he… read more
Updated on January 13, 2023
Reviewed by
Alex Serban

After moving away from the corporate work-style, Alex has found rewards in a lifestyle of constant analysis, team coordination and pestering his colleagues. Holding an MCSA Windows Server… read more
- Windows always had a rather easy installation process. However, during the installation, errors can occur and interrupt the process, stopping you from ever completing it.
- Reset your computer to default values, and check your HDD, SSD, and RAM. Double-check the physical DVD used or make sure the iso file is undamaged.
XINSTALL BY CLICKING THE DOWNLOAD FILE
This software will keep your drivers up and running, thus keeping you safe from common computer errors and hardware failure. Check all your drivers now in 3 easy steps:
- Download DriverFix (verified download file).
- Click Start Scan to find all problematic drivers.
- Click Update Drivers to get new versions and avoid system malfunctionings.
- DriverFix has been downloaded by 0 readers this month.
Installing Windows can be a tedious process, and sometimes errors such as Windows cannot install required files can appear and interrupt your installation. This is a big problem, and today we’ll show you how to fix it.
Windows cannot install required files error while installing Windows, how to fix it?
- Make sure that your DVD drive is clean
- Remove overclock settings
- Attach your hard drive to a different SATA port
- Make sure that you’re installing the correct version of Windows
- Disable Execute Disable Bit option in BIOS
- Make sure that you’re not installing Windows on a large partition
- Change the hard drive type to IDE
- Check your hardware
1. Make sure that your DVD drive is clean
If you’re installing Windows from a DVD or a CD, you might encounter Windows cannot install required files message if your lens is dirty. To fix this problem, it’s advised that you clean your DVD drive lens and check if that solves the problem.
There are several methods to do this, and you can a disc with a brush to clean your drive. Alternatively, you can open your DVD drive and clean it, however this may void your warranty. If you’re not careful you can even damage your DVD drive, so if you don’t know what you’re doing, we advise you to stay away from this method.
After cleaning your drive check if the problem is resolved. If you don’t have the necessary tools to clean your drive, make sure that your DVD disc doesn’t have any scratches on it. If your disc is scratched, we advise you to create a new installation disc and try using it instead.
2. Remove overclock settings
Many users tend to overclock their hardware in order to achieve enhanced performance. By overclocking your hardware you put extra stress on it, and sometimes overclock settings can prevent you from installing Windows.
Several users reported Windows cannot install required files message while trying to install Windows on overclocked PC. According to them, the only way to fix this problem was to enter BIOS and remove overclock settings. After disabling overclock settings, try to install Windows again and check if the problem is still there.
3. Attach your hard drive to a different SATA port
If you keep getting Windows cannot install required files message, the problem might be your SATA port. It seems that certain glitches can occur, but several users claim that they fixed the problem simply by connecting their hard drive to a different SATA port.
To do that, you’ll need to power down your PC, disconnect it from the power outlet, open the case, and connect the SATA cable that goes to your hard drive to a different SATA port on your motherboard. If you’re installing Windows from an optical media, you can also connect your DVD drive to a different SATA port and check if that helps.
Bear in mind that opening your computer case will void your warranty if you purchased a prebuilt PC.
4. Make sure that you’re installing the correct version of Windows
As you may know, there are two types of Windows available, 32-bit and 64-bit. While 32-bit is almost completely replaced by a 64-bit version, but some users might still use 32-bit hardware. Bear in mind that you can’t install a 64-bit version of Windows on 32-bit hardware, and if you try to do so, you might get Windows cannot install required files.
Therefore, before you try to install Windows 10, check what type of motherboard and CPU are you using. Almost all new hardware is using 64-bit architecture, so if you purchased a new PC, it’s rather likely that you have a 64-bit CPU. However, you can always visit the manufacturer’s website and double-check it just in case.
- Fix: Windows installation has failed on Windows 10/11
- Windows installation error 0x80070017 [Fixed]
5. Disable Execute Disable Bit option in BIOS
Some PC issues are hard to tackle, especially when it comes to corrupted repositories or missing Windows files. If you are having troubles fixing an error, your system may be partially broken.
We recommend installing Restoro, a tool that will scan your machine and identify what the fault is.
Click here to download and start repairing.
According to users, sometimes Windows cannot install required files message can appear due to certain settings in BIOS. According to users, it seems that Execute Disable Bit setting was causing this issue in BIOS.
To fix the problem, enter BIOS, locate this setting and disable it. To see how to access BIOS and disable this setting on your PC, be sure to check the motherboard manual for detailed instructions. Once you disable this feature, check if the problem is still there.
6. Make sure that you’re not installing Windows on a large partition
Windows cannot install required files message can sometimes appear if you’re trying to install Windows 10 on a large SSD. Few users reported this issue while trying to install Windows 10 on an SSD drive that had a single large partition.
According to users, they had to create two partitions on their SSD drive, and after doing that, the problem was resolved and Windows was installed without any issues. We’re not certain how and why this problem occurs, but if you’re trying to install Windows 10 on a single partition SSD, be sure to try this solution.
7. Change the hard drive type to IDE
If you’re getting Windows cannot install required files while trying to install Windows 10, perhaps the issue is your BIOS configuration. According to users, sometimes this problem can occur if your hard drive is set to work as an AHCI device.
To fix the problem, simply enter BIOS and change the hard drive type to IDE. Once you do that, you should be able to install Windows without any issues. After you install Windows, you can switch back to AHCI mode and everything should work without any problems.
8. Check your hardware
In certain instances, your hardware can lead to this and many other problems. If you keep getting Windows cannot install required files message, it’s advised that you inspect your hardware and ensure that it’s working properly.
The most common cause for this problem is your RAM, and in order to test your RAM, we advise you to try removing additional RAM modules and try installing Windows with only one RAM module in your computer.
If you want to be sure that your RAM is the problem, we advise you to use the MemTest86+ tool and use it to test your RAM. Simply start this application from a flash drive and let it run for a couple of hours. If it gives you any errors, it’s certain that one of your modules is damaged.
To find out which module is the problem, you can test them individually with MemTest86+, but that might take a while. If your RAM isn’t the problem, perhaps you should inspect other components and check if they are working properly.
Windows cannot install required files message can prevent you from installing Windows, but you should be able to fix this problem by using one of our solutions.
Here are some similar problems that users reported:
- Windows cannot install required files Windows 10 0x80070570, 0x8007045d, 0x80070003, 0x80070002, 0x8007025d – This issue can occur if your installation media is damaged. Be sure that your DVD disc isn’t damaged or create an installation media on USB flash drive and try to install Windows again.
- Windows cannot install required files network problems may be preventing, the file may be corrupt, the file does not exist, may be corrupt or missing – These are various problems that can appear, but you should be able to fix most of them using the solutions from this article.
- Windows cannot install required files. make sure all files required for installation are available – This error message usually occurs when there is a problem with the installation disk or flash drive.
- Windows 10 setup cannot continue due to a corrupted installation file – This usually happens with files downloaded over the Internet, and one of the solutions from this article should help.
- 0x80070022 windows cannot install required files Windows 10 – If using the official Media Creation Tool gives this error, switching to Rufus to burn the ISO to the flash drive should fix the issue.
- Windows encountered a problem installing the driver the system cannot find the file specified – Use chkdsk first and then manually download the appropriate driver to fix this issue.
Still having issues? Fix them with this tool:
SPONSORED
If the advices above haven’t solved your issue, your PC may experience deeper Windows problems. We recommend downloading this PC Repair tool (rated Great on TrustPilot.com) to easily address them. After installation, simply click the Start Scan button and then press on Repair All.
![]()
Newsletter

Во время обновления Windows 10 до Creators Update, моргнул свет и отключился компьютер, после чего вышла ошибка:
The computer restarted unexpectedly or encountered an unexpected error. Windows installation cannot proceed. To install Windows, click “OK” to restart the computer, and then restart the installation.

Дословно текст ошибки можно перевести так:
Компьютер неожиданно перезапускается или возникла непредвиденная ошибка. Невозможно продолжить установку Windows. Чтобы установить Windows, нажмите кнопку “ОК” для перезагрузки компьютера, а затем перезапустите установку.
Не забудьте подписаться на наш Дзен
В следствие чего машина ушла в циклическую перезагрузку и не стартовала. Для решения проблемы, можно поковырять реестр, предварительно сделав его копию, через «Файл»-«Экспорт».
Замена значения в реестре
- после появления ошибки жмите Shift + F10 (если ноутбук, возможно дополнительно нужно нажать Fn), откроется командная строка;
- в командной строке введите «regedit» (без кавычек) и нажмите ввод, откроется редактор реестра;
- сделайте копию реестра;
- в редакторе реестра проходим по ветке HKEY_LOCAL_MACHINESYSTEMSetupStatusChildCompletion;
- в правой части окна дважды кликните на setup.exe, значение 1 изменяем на 3;
- закрывайте редактор реестра, закрывайте командную строку, кликайте на кнопку «OK» в окне ошибки;
- после перезагрузки установка должна продолжиться.

Способ работает с Windows 7, 8 и 10. В комментариях пишите помог ли способ, если нет, попытаюсь помочь советом.
Не удалось завершить процесс установки.
Windows не удалось завершить процесс установки. Всем привет, в этой статье мы попробуем исправить проблему инсталляции Windows 10 на физический компьютер. Её признаки заключаются в том, что та при попытке её установить или обновить отказывается это сделать, показывая ошибку типа
Не удалось завершить процесс установки. Чтобы установить Windows, перезапустите процесс установки.

Наиболее частой причиной такой ошибки является невозможность для Windows выйти из режима аудита. Её решение изначально и описывалось в статье Наиболее частые ошибки Sysprep . Однако проблема иногда подстерегает пользователей и при переходе с Windows 7 на Windows 10. Так что есть смысл вынести решение проблемы в отдельную статью.
Не удалось завершить процесс установки: какие варианты решения у нас есть?
Итак, пользователь может столкнуться с ошибкой на этапе формирования учётной записи. И, как уже указывалось, иногда так происходит при обновлении Windows 7 или Windows 8 до Windows 10. А иногда и при переходе Windows 10 на новую сборку. Однажды мне пожаловались на ошибку при попытке сбросить настройки Windows до заводских через консоль восстановления. Исходя из этого можно было бы попытаться решить проблему такими способами:
Запускаем восстановление запуска…
…если проблема вас подстерегла именно в момент обновления Windows 10. При появлении окна с ошибкой можете перейти в меню дополнительных опций Windows. До него легко добраться, выбрав Перезагрузку с кнопки Пуск, зажав при этом клавишу Shift:


выберите Автоматическое восстановление
Активируем учётку Администратора
- запускаем консоль команд cmd, набрав Shift + F10
- набираем команду mmc, вызвав консоль MMC
- в панели действий выбираем Файл – Добавить или удалить оснастку…
- выберем последовательно Управление компьютером – Локальным компьютером
- Согласитесь с выбираемым и ждите появления пункта Управление компьютером (локальным). Выбрав его, проходим далее по пути
Служебные программы – Локальные пользователи и группы – Пользователи
выбирая справа Администратора.
Убедитесь, что чек-бокс у пункта Отключить учётную запись снят . Если это не так, снимите, затем нажмите ОК и по выходу из окна задайте пароль , проходя через диалоговые окна с предупреждениями:
Консоль можно закрыть и после перезагрузки проверить решена ли проблема. Если нет, продолжаем.
Ещё одна учётная запись
Если ошибка Не удалось завершить процесс установки снова здесь, опять запускаем консоль cmd клавишами Shift + F10 и вводим последовательно две команды
Запустится установщик создания учётной записи Windows. Пройдите все этапы, включая создание пароля. Вполне вероятно, что вам понадобится информация по активации Windows. Перезагружайте Windows и проверяйте.
Не удалось завершить процесс установки: слабый пароль учётной записи.
Нередко причиной появления ошибки является неприемлемый с точки зрения настроек домена пароль к учётке. Так происходит нередко при присоединении к домену в работе в режиме Аудита. Виной тому настройки локальных политик. Повторим процедуру запуска командной строки через Shift + F10. На этот раз введём команду
и выйдем на настройки Локальной политики безопасности по пути
Политики учётных записей – Политика пароля
Сбросьте настройки требований к паролю как у меня на рисунке (или удостоверьтесь, что у вас аналогичные):
Если вы что-то изменили в описанных настройках, перезагрузите компьютер и проверьте сделанное.
Настройки реестра: что там делает Sysprep?
Ну… вы поняли: Shift + F10 с выходом на консоль cmd. Теперь запускаем редактор реестра regedit.exe с выходом на ключ и его разделы, выставляя параметры как указано ниже. Если какой-то из параметров отсутствует, проходите мимо к следующему:
Audit: 0
HKEY_LOCAL_MACHINESYSTEMSetupStatusChildCompletion
setup.exe: 3
HKEY_LOCAL_MACHINESYSTEMSetupStatusChildCompletion
audit.exe: 0
HKEY_LOCAL_MACHINESYSTEMSetupStatusSysprepStatus
CleanupState: 2
HKEY_LOCAL_MACHINESYSTEMSetupStatusSysprepStatus
GeneralizationState: 7
HKEY_LOCAL_MACHINESYSTEMSetupStatusUnattendPasses
auditSystem: 0

Нужно выйти из режима Аудита
Затёртые до мозолей пальцы снова зажимают Shift + F10, вызывая консоль cmd. Оттуда мы покидаем режим Аудита принудительно:
Если после перезагрузки Windows окно с ошибкой снова появилось удалите в реестре через редактор regedit.exe параметр ImageState в разделе
Перезагружайтесь. Теперь, думаю, всё. Успехов.
Источник
Ошибка «Windows could not complete the installation. To install Windows on this computer restart the installation» при запуске клонированной виртуальной машины Hyper-V с Windows Server 2012 R2
 Это первая часть очередной истории о том, как можно наступить на грабли, там, где обычно этого не ожидаешь. Началось всё с того, что для очередного развёртывания нескольких однотипных виртуальных машин Hyper-V с гостевой ОС Windows Server 2012 R2 был подготовлен эталонный образ виртуального диска с установленной ОС. В эталонный образ были включены все актуальные обновления, после чего для уменьшения размера диска был применён метод очистки хранилища компонент Windows в каталоге WinSxS, а логический том системного диска по своему объему был усечён таким образом, что на нём оставалось около 5GB свободного пространства. Перед отключением ВМ в эталонной гостевой ОС по законам жанра была выполнена утилита sysprep. В дальнейшем с этого образа было успешно развёрнуто несколько ВМ, имеющих конфигурацию ВМ, сопоставимую с эталонной ВМ. Спустя некоторое время после всей этой истории с пониманием того, что ранее несколько развёртываний с образа прошли успешно, была предпринята попытка развернуть ещё пару ВМ с этого же образа.
К нашему удивлению при первом же запуске новой ВМ гостевая ОС отказалась загружаться с сообщением об ошибке » Windows Setup could not configure Windows to run onthis computer’s hardware » на этапе первичной инициализации.
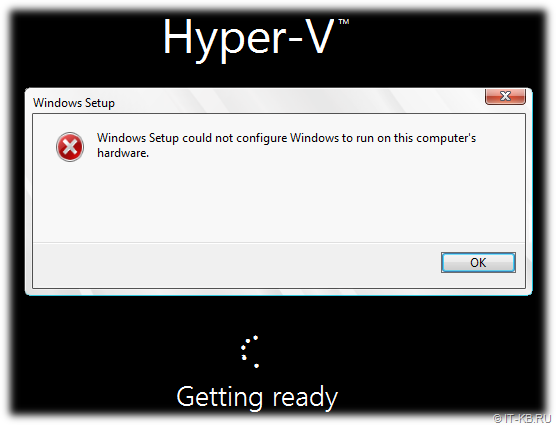
Аналогичная ситуация повторилась и на второй новой ВМ, которую мы попытались развернуть с этого же образа. Попытка повторного перезапуска на обеих ВМ привела к другому сообщению об ошибке » Windows could not complete the installation. To install Windows on this computer restart the installation «
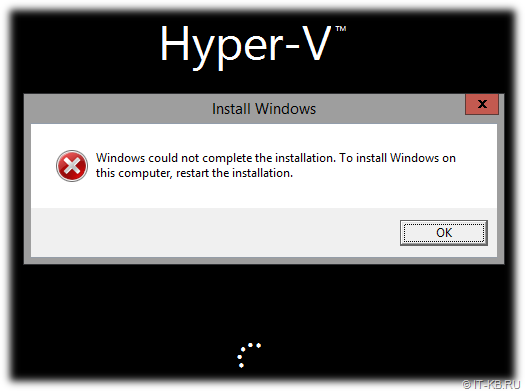
Далее после нажатия кнопки «OK» система отправлялась в перезагрузку и при следующей загрузке ситуация со второй ошибкой повторялась.
В попытках понять суть происходящего, в момент возникновения последней ошибки (не нажимая кнопки «OK» в окне сообщения об ошибке) жмём волшебную комбинацию клавиш Shift+F10 и попадаем в окно командной строки, выполняемое в контексте прав Администратора. Выполняем листинг содержимого файлов на системном диске C: …
…и обнаруживаем, что свободного места на диске практически нет. При этом размер файла подкачки pagefile.sys , размещаемого по умолчанию в корне этого диска имеет внушительный размер.
И здесь мы вспоминаем про то, что предыдущие успешные развёртывания с данного образа виртуального диска выполнялись на виртуальные машины, имеющие небольшой объём ОЗУ, а последние две ВМ, где мы столкнулись с проблемой, при создании были сконфигурированы на использование большого объема ОЗУ. И предположительно, причиной невозможности корректной первичной инициализации системы стал раздутый файл подкачки.
В такой ситуации можно попробовать умерить аппетиты гостевой ОС на расширение файла подкачки, установив на время ограниченный максимальный размер файла. Для этого из уже открытой командной строки можем вызвать апплет управления свойствами системы sysdm.cpl. В открывшейся форме переходим на закладку управления расширенными настройками Advanced и в блоке Performance нажимаем кнопку Settings. В дополнительно открывшейся форме переходим на вкладку Advanced и в разделе Virtual memory используем кнопку Change чтобы изменить параметры файла подкачки.
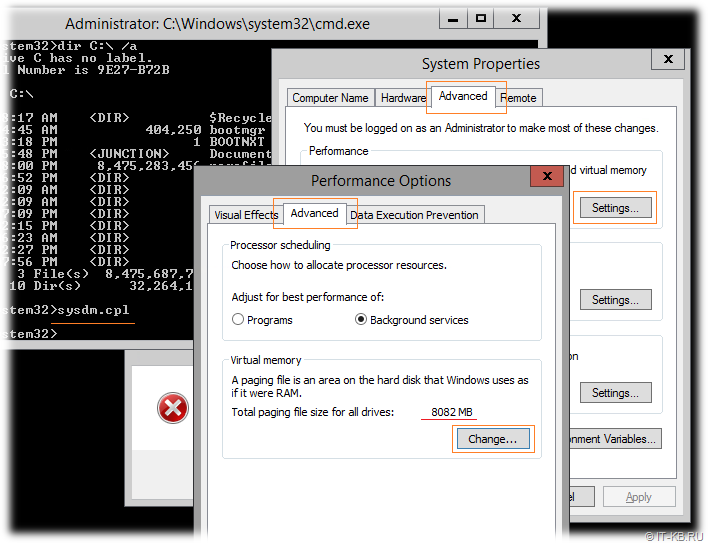
Отключим используемое по умолчанию автоматическое определение размера файла подкачки, укажем первичный и максимально допустимый размеры файла через опцию Custom size (например, от 512MB, но не больше 2GB) и нажмём Set, затем OK.

Теперь можно попробовать перезагрузить виртуальную машину, и при следующей загрузке гостевой ОС свободного места на системном диске должно быть достаточно для нормальной первичной инициализации системы. В нашем случае одна из ВМ загрузилась успешно, а вторая ВМ, не смотря на доступность места на диске продолжила выдавать ошибку » Windows could not complete the installation… «. Вероятно, в процессе первого запуска ОС с наличием проблемы с нехваткой свободного места на диске с механизмом OOBE (Out-of-Box Experience) что-то пошло не так.
На фоне сообщения об ошибке жмём уже знакомую комбинацию клавиш Shift+F10 и, попав в командную строку, перемещаемся в каталог C:WindowsSystem32oobe , где выполняем ручной запуск утилиты msoobe.exe
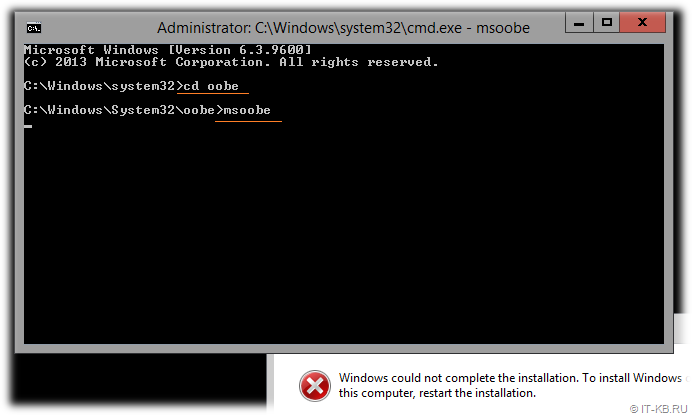
В случае успешного вызова этой утилиты перед нами должно появиться стандартное окно первичной настройки параметров системы, которое появляется при первом запуске ранее sysprep-нутой системы.
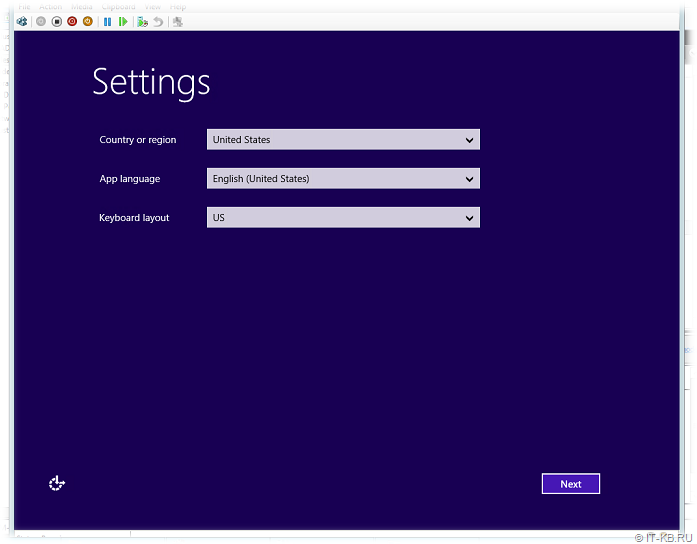
После того, как определим языковые параметры, и на следующих двух экранах примем лицензионное соглашение и укажем учётные данные администратора, мастер первичной инициализации закроется и мы снова вернёмся на первоначальный чёрный экран с открытой командной строкой, в которой вызовем команду штатной перезагрузки гостевой системы:
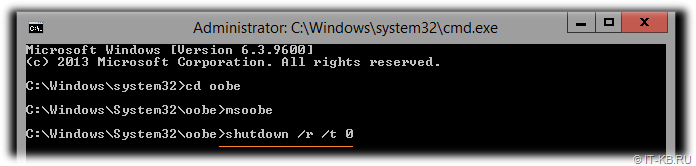
В нашем случае после перезагрузки гостевая система успешно загрузилась.

Если ранее установили небольшой фиксированный файл подкачки, то не забываем его вернуть обратно в автоматический режим, либо указываем другой устраивающий нас размер.
Делаем вывод, что если нам заранее известно то, что внутри шаблонного виртуального диска на системном томе гостевой ОС немного свободного места, то перед первым запуском ВМ лучше установить минимальный объём ОЗУ, исходя из которого система не будет пытаться создать файл подкачки большого размера. А уже после окончания процесса первичной инициализации можно будет увеличить размер ОЗУ ВМ до нужного объёма. Ну или же при создании эталонного диска можно устанавливать небольшой фиксированный размер файла подкачки, который, возможно, потребуется после первичной инициализации новой гостевой ОС, выставлять обратно в автоматический режим либо увеличивать под свои нужды.
С другой стороны, если Вам критична стабильность и предсказуемость работы развёрнутой из шаблона гостевой ОС и Вы испытали проблемы в ходе первичной инициализации OOBE, то лучше пытаться выполнять развёртывание повторно до тех пор, пока оно не отработает штатно. То есть лучше безжалостно удалять виртуальный диск, где первичная инициализация ОС прошла с ошибками и цеплять шаблонный диск к новой ВМ повторно для получения нужного результата. В противном случае с такой «кое-как взлетевшей» системой может случиться ещё несколько историй в духе «О сколько нам открытий чудных …». Одной из таких дивных историй я поделюсь в следующей заметке.
Источник
Windows can not start the installation process
Windows can not start the installation process = O windows não pode iniciar o processo de instalação
I’m desperate, I asked in several forums and nobody can solve this problem.
I already researched Google just that I do not find anything about this error, both in English and in Portuguese, only similar installation errors appear but they are not exactly the same.
I have tried to go in windows / system32 / obbe and run msoobe.exe only that there is no file called msoobe.exe.
I was using Windows 10 when I decided to go back to 7. I installed using setup.exe from the image and had never experienced this problem before
Replies (8)
![]()
Unable to start Windows 7 installation process could be due to some software conflicts or system file issues.
We would like to know some information to better isolate the problem.
- Are you trying to rollback to Windows 7?
- What Windows 7 service pack are you trying to install?
- Does your computer came up with pre-installed Windows 7 OS?
In the meantime, you can check this article about going back to older Windows OS version.
We will wait for your response.
1 person was helped by this reply
Did this solve your problem?
Sorry this didn’t help.
Great! Thanks for marking this as the answer.
How satisfied are you with this reply?
Thanks for your feedback, it helps us improve the site.
How satisfied are you with this response?
Thanks for your feedback.
If you have your Windows 7 install disc or USB, configure your BIOS to boot from it then perform a custom install.
See the Windows 7 section of the following article how to do that:
2 people were helped by this reply
Did this solve your problem?
Sorry this didn’t help.
Great! Thanks for marking this as the answer.
How satisfied are you with this reply?
Thanks for your feedback, it helps us improve the site.
How satisfied are you with this response?
Thanks for your feedback.
Unable to start Windows 7 installation process could be due to some software conflicts or system file issues.
We would like to know some information to better isolate the problem.
- Are you trying to rollback to Windows 7?
- What Windows 7 service pack are you trying to install?
- Does your computer came up with pre-installed Windows 7 OS?
In the meantime, you can check this article about going back to older Windows OS version.
We will wait for your response.
1. Yes
2. Windows 7 Ultimate SP1
Did this solve your problem?
Sorry this didn’t help.
Great! Thanks for marking this as the answer.
How satisfied are you with this reply?
Thanks for your feedback, it helps us improve the site.
How satisfied are you with this response?
Thanks for your feedback.
![]()
We would like to clarify, what specific task are you trying to accomplish? What troubleshooting steps have you tried so far? Have you tried to follow the suggested workaround by Andre Da Costa from the post above? If not yet, we recommend that you do as that can help us to resolve the issue.
We look forward to your response.
Did this solve your problem?
Sorry this didn’t help.
Great! Thanks for marking this as the answer.
How satisfied are you with this reply?
Thanks for your feedback, it helps us improve the site.
How satisfied are you with this response?
Thanks for your feedback.
We would like to clarify, what specific task are you trying to accomplish? What troubleshooting steps have you tried so far? Have you tried to follow the suggested workaround by Andre Da Costa from the post above? If not yet, we recommend that you do as that can help us to resolve the issue.
We look forward to your response.
I tried, but nothing happened.
Did this solve your problem?
Sorry this didn’t help.
Great! Thanks for marking this as the answer.
How satisfied are you with this reply?
Thanks for your feedback, it helps us improve the site.
How satisfied are you with this response?
Thanks for your feedback.
![]()
We would appreciate if you provide answers to the questions that we asked in our previous post. This is for us to determine the solution appropriate for the issue that you’re experiencing.
We look forward to your updates.
Did this solve your problem?
Sorry this didn’t help.
Great! Thanks for marking this as the answer.
How satisfied are you with this reply?
Thanks for your feedback, it helps us improve the site.
How satisfied are you with this response?
Thanks for your feedback.
We would appreciate if you provide answers to the questions that we asked in our previous post. This is for us to determine the solution appropriate for the issue that you’re experiencing.
We look forward to your updates.
1 person was helped by this reply
Did this solve your problem?
Sorry this didn’t help.
Great! Thanks for marking this as the answer.
How satisfied are you with this reply?
Thanks for your feedback, it helps us improve the site.
How satisfied are you with this response?
Thanks for your feedback.
![]()
We are sorry if we took long to provide a reply as we are thoroughly checking this case.
We would like to verify some details again for us to narrow down the issue. Kindly answer the following questions:
- How did you obtain Windows 7? Did it come pre-installed on your computer or you purchased it separately?
- How are you trying to install Windows 7, through installation CD or using an ISO file?
- Which Windows 7 edition (Starter, Home Basic, Home Premium, Professional, Ultimate, Enterprise) do you have?
- Is your Windows 7 a personal or organization/company-provided program?
We appreciate your patience. Looking forward to your response.
Did this solve your problem?
Sorry this didn’t help.
Great! Thanks for marking this as the answer.
How satisfied are you with this reply?
Thanks for your feedback, it helps us improve the site.
Источник
If you get Windows cannot install required files message with error code 0x80070001 while installing Windows 11/10 on your computer, you can follow these tips to troubleshoot the issue. We have discussed almost all the possible causes and solutions in this article so that you can get rid of the problem. The entire error message looks something like this:
Windows cannot install required files. Make sure all files required for the installation are available, and restart the installation. Error code: 0x80070001
The main reason why your computer displays such a message is file corruption. If the bootable USB drive or DVD is corrupted, you can encounter this issue while doing a fresh installation of Windows OS.
To fix Windows cannot install required files error, follow these steps:
- Remove external devices
- Re-create bootable installation media
- Assign less disk space for the C drive
- Change setting in Registry
- Reset BIOS
To learn more about these solutions, continue reading.
1] Remove external devices
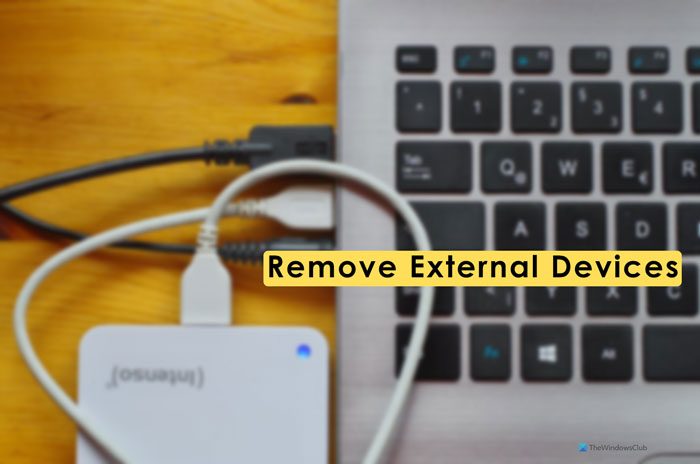
If you have connected any additional external devices such as an external hard drive, Bluetooth devices, printers, scanners, etc., it would be better to unplug them. At times, those devices might create conflicts and interrupt your installation. As a result, you can find the aforementioned error with various error codes. That is why it is recommended to remove all the external devices before restarting the installation process.
2] Re-create bootable installation media
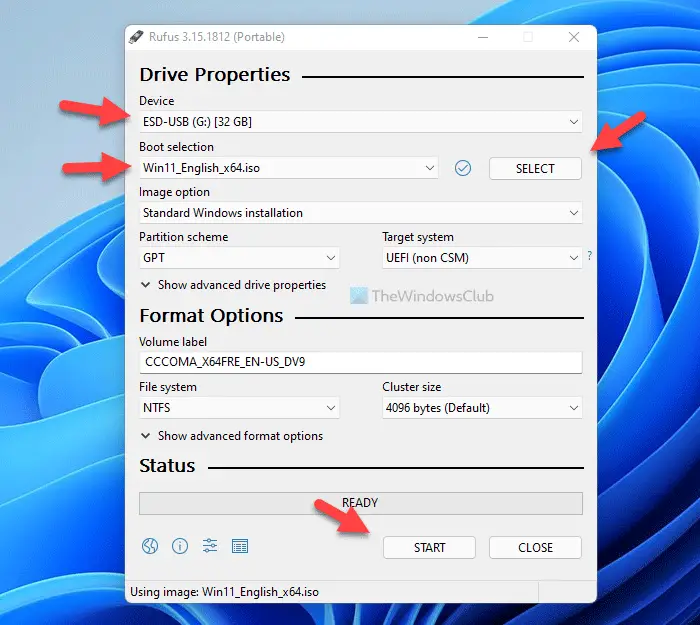
As mentioned earlier, a corrupted ISO causes this issue in most cases. If you have faced this problem while installing Windows OS, it is time to re-create the bootable installation media. However, if you have already formatted your computer, you won’t be able to use the same to create the installation media. In that case, you need to use another computer.
To create Windows 11 bootable installation media, you can follow this step-by-step guide. For your information, you must re-download Windows 11 ISO as well.
3] Assign less disk space for the C drive
Many times, your computer might not process the entire disk space as the system drive if you have old hardware. That is the reason why we are asking you to assign less disk space for the C drive or system drive. For that, you must delete all the partitions and re-create the C drive.
4] Change setting in Registry
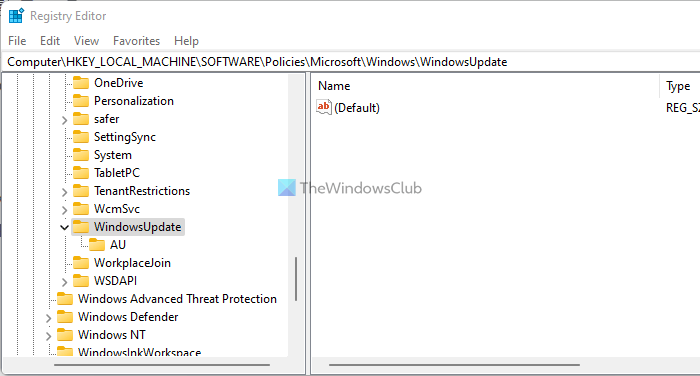
In case you are trying to install the same version of OS on your computer, there is a chance of getting this error because of some old Registry files. That is why you can verify them using these steps:
Press Shift+F10 to open the Command Prompt.
Type regedit and hit the Enter button.
Navigate to this path:
HKEY_LOCAL_MACHINESOFTWAREPoliciesMicrosoftWindowsWindowsUpdate
Find WUServer and WIStatusServer.
Right-click on each of them and choose the Delete option.
Then, close all windows and restart the installation.
5] Reset BIOS
Changing the wrong settings in the BIOS could also cause this problem on your computer. That is why you can try resetting it to get rid of the problem. If you don’t know the process, you can follow this guide to reset BIOS settings to factory defaults.
What is error code 0x8007001?
You can find two error messages with the same error code. If it says Windows cannot install required files, you need to follow the aforementioned solutions. However, if it says Installation disk is not working properly or something else, you need to check your hard drive and re-create the bootable installation media.
Read: Windows cannot install required files, Error Code 0x8007025D.
How do I fix Windows unable to install?
There are a lot of things you can do to fix this problem on your computer. For that, you can delete the temporary files, disable firewall software, check Windows Update Services status, clear BITS queue, run Windows Module Installer, etc. However, the solutions are slightly different for different situations. That is why you can follow this guide if Windows Update fails to install.
That’s all! Hope this guide helped
It is quite troublesome for users, especially inexperienced users, to finish Windows installation alone. This is actually a tedious process for them and many problems may occur during this process. For instance, Windows cannot install required files. I’m going to help you fix this problem in different situations.
Microsoft Windows has released a series of graphical operating system families, which cater to different people. Microsoft attracts more and more people by optimizing the system over and over again.
However, the installation processes of Windows, apps, and files are not always smooth. On the contrary, errors occur frequently on a Windows computer. Windows cannot install required files is one of the popular errors show up on Windows PC when you reinstall or update your system.
I advise you to get help from MiniTool Solution so as to safeguard your data and optimize the computer performance.
Note: In addition to the Windows installation error, you may also encounter Windows activation error. Please take actions immediately when that really happens to you!
Windows Cannot Install Required Files Error Codes
Fix Windows Cannot Install Required Files
If you run into the Windows cannot install required files error when you update or install Windows 10, you should suspect the BIOS configuration triggers this problem. Besides, the Windows installation file error can also be caused by a bad RAM or the damaged Windows files. There’re useful solutions to fix the install problem on Windows 10/8/7.
How to recover if data get lost from Windows.old folder after reinstalling Windows 10:
In this part, I’ll show 2 different situations of this error and list some of the popular error codes indicating Windows 10 cannot
Situation one: Windows cannot install required files Windows 10.
- 0x80070570
- 0x80070002
- 0x80070003
- 0x8007025D
- …
If you see error messages like this, you should note that the storage media you’ve selected for installation is damaged. You need to check your DVD/CD or create new installation media on a USB flash drive and try the installation again.
Situation two: Windows cannot install required files.
- Network problems may be preventing
- The file may be corrupt
- The file does not exist, may be corrupt or missing (recover corrupt files).
- …
This series of problems also appear often, indicating that something is wrong with your computer. So you should try to fix them by using the solutions that will be mentioned in the next part.
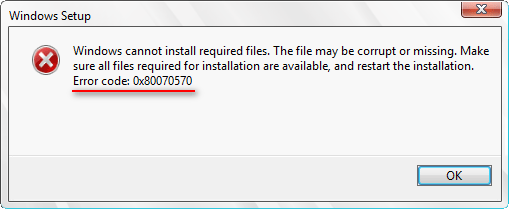
Windows Cannot Install Required Files 0x80070570
Many users are familiar with this error message: Windows cannot install required files. The file may be corrupt or missing. Make sure all files required for installation are available, and restart the installation. Error code: 0x80070570. There are 4 causes of error code 0x80070570.
- RAM failure
- File system error
- Windows installation file error
- Hard drive damage
Cause 1: RAM (Random-access memory) failure.
The RAM check utility is built-in Windows since Windows Vista. The using of this tool doesn’t require any professional knowledge. One of the most obvious features of the RAM check tool is: the analysis process is very slow. Therefore, I advise you to check one memory slot at a time.

If any errors are detected by the RAM check utility, you should try to fix them by:
- Trying different slots
- Wiping the straps with a dry cloth
- Performing the test with different configurations
- …
If all these fail to help, you should buy new RAM.
Cause 2: File system error.
The file system is also very important in a PC; it decides how files are stored and retrieved. A new drive can only be used to save data after proper formatting. If any problems are caused by the file system failure, you should try to reformat the drive.
If you have finished formatting a hard drive only to find there are still some valuable data, please recover them ASAP:
Cause 3: Windows installation file error.
You may need to write the boot file once again after reinstalling the OS: copy the important files from your PC and save it to a safe place. If any of the files are corrupted, you must recover them at once with data recovery software.
Cause 4: Hard drive damage.
The hard drive is one of the most important components in a PC/laptop. If the hard drive is damaged somehow, it will lead to a lot of problems definitely. For instance,
- The request failed due to a fatal device hardware error.
- Windows was unable to repair the drive.
- The hard drive is clicking.
You can try to fix the problem if the error is caused by some logical issues; yet, you’ll have no choice but to replace the hard drive with a new one if serious physical damage is found on it.
Other possible reasons could be virus or malware attack, permission issues, and corrupted registry.
Windows Cannot Install Required Files 0x80070002
You tend to see the 0x80070002 error code when installing Windows on an empty hard drive (the new hardware). It can also display as Windows cannot install required files 0x80070003 or 80070003 during the system clean install.
Two of the most possible causes of this error are:
- The driver faulty issue
- Corrupted or missing important files
Windows Cannot Install Required Files 0x8007025D
What does 0x8007025D mean?
In fact, it equals to ERROR_BAD_COMPRESSION_BUFFER, which means the specified buffer contains ill-formed data. The asynchronous handling of data transfer is an important feature of the new MSI system; a buffer is required during the process so that data can be streamed at high data rates (SuperSpeed) and decoded by the system.
The error 0x8007025D occurs once bad or corrupted data are sent to the buffers by PNY devices; the buffer will be choked and the data can’t be decoded.
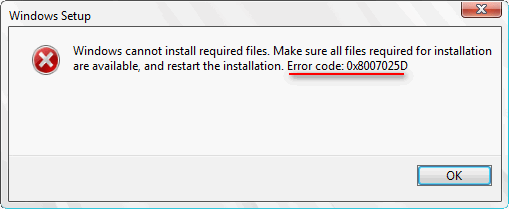
Two direct causes of error code 0x8007025D are:
- Corrupt or bad RAM
- Bad HDD or SSD space
Click to Tweet
Windows 10 Cannot Install Required Files: Data Recovery
The first step is to secure your data saved on the PC where the Windows installation error appears.
How to recover corrupted or missing files from Windows 10 (recover missing files Windows 10).
Step one: get MiniTool Power Data Recovery and install it on the local drive if your PC can start properly. Then, launch the file and folder recovery software.
Free Download
Step two: select a proper module from the left pane of the software. Then, specify the drive that contains the corrupted or missing files.
Step three: click on the Scan button to perform a sector by sector scan on the drive you’ve selected. (You can set the software to scan only certain types of files by clicking Settings on the left side of the Scan.)

Step four: look through the found files and folders from the scan result and pick out the ones you really need.
Step five: click on the Save button and choose another drive to store the recovered data in order to avoid overwriting. Finally, click on the OK button to confirm and wait for the software to complete the recovery work for you.
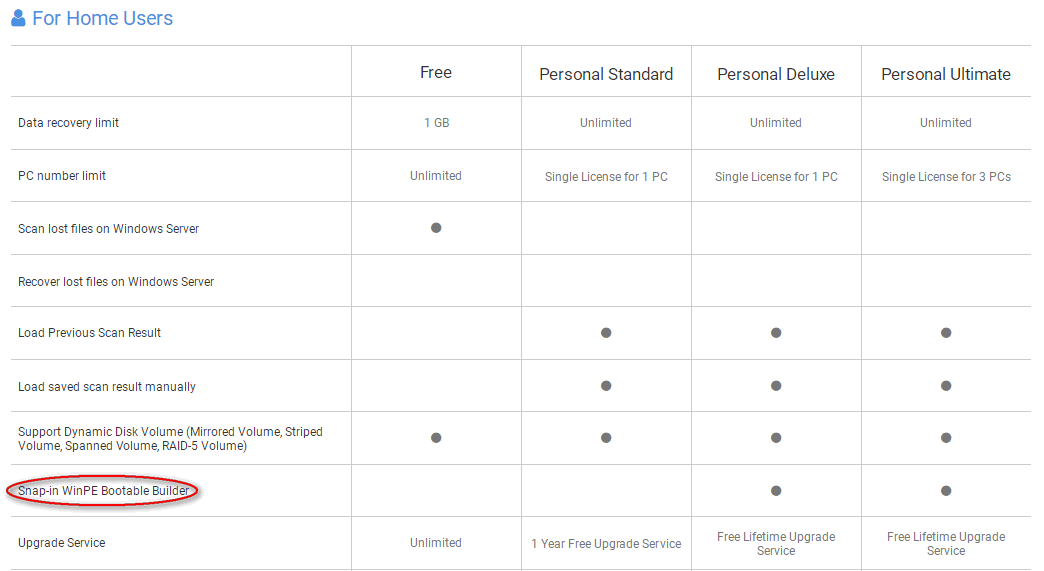
Note: If your PC can’t boot successfully, you should get help from MiniTool Power Data Recovery Bootable (Snap-in WinPE Bootable Builder), which is included in some advanced editions.
When all the lost files have been recovered, you’d better backup your drive in case of future data loss.
Fix Windows Cannot Install Required Files Windows 10
In this part, I will introduce mainly 11 ways to help you fix the Windows cannot install required files error when installing or updating Windows.
Unplug External Devices/Update Drivers
When you find the Windows 10 cannot install required files, you should try to fix it by disconnecting all USB devices and peripheral devices (including internet cable). The bad hardware drivers and outdated drivers are important reasons for causing Windows installation failure.
Your USB device is not required anymore after the files have been copied to the computer successfully. So you should remove it from PC. To fix the errors caused by outdated drivers, you must update the drivers to the latest versions.
Update BIOS
- Press Windows + R keyboard combination to open the Run dialog.
- Type msinfo32 into the text box.
- Press Enter to open the System Information window.
- Look for the BIOS Version/Date information (please write down the manufacturer and BIOS version if necessary).
- Go to the official website of the manufacturer and enter the computer serial number into the search box (you can also click on the auto-detect option if it has).
- Choose BIOS from the list of drivers to download the recommended update.
- Double click on the .exe file after downloading it successfully.
- Finish the update of BIOS according to instructions.
You must keep your PC connecting to the power source during BIOS updating. Otherwise, your computer may be damaged. It’s also possible that problems occur and you find you can’t boot PC after BIOS update; please don’t get worried, the MiniTool software will enable you to recover data and fix the problem.
Change a port
If you keep receiving this Windows installation error, you should consider that there is something wrong with your SATA port. Some users said they have fixed the problem simply by changing another port.
You should do the following things:
- Shut down your computer.
- Cut off the power supply.
- Open the case carefully.
- Connect the SATA cable of your drive to a different SATA port on the motherboard.
- Try to install Windows again.
But you should pay attention to this – if you have purchased a prebuilt PC, the action of opening the case will make its warranty invalid.
Change SATA to AHCI
- Boot into the BIOS by pressing the corresponding key (if you’re not clear, please go to find the answer on the official website).
- Navigate to Drives and SATA Operation (the name will be a little bit different on different PCs).
- Change SATA to AHCI under Storage configuration.
- Exit BIOS and save changes.
- Turn off the computer and remove all external drives.

Change Hard Drive to IDE
Once your hard disk is configured to work as an AHCI device, you’ll run into the installation error when trying to install Windows 10.
To fix the problem in this case, you only need to:
- Restart your computer and enter the BIOS.
- Locate and change the mode to IDE.
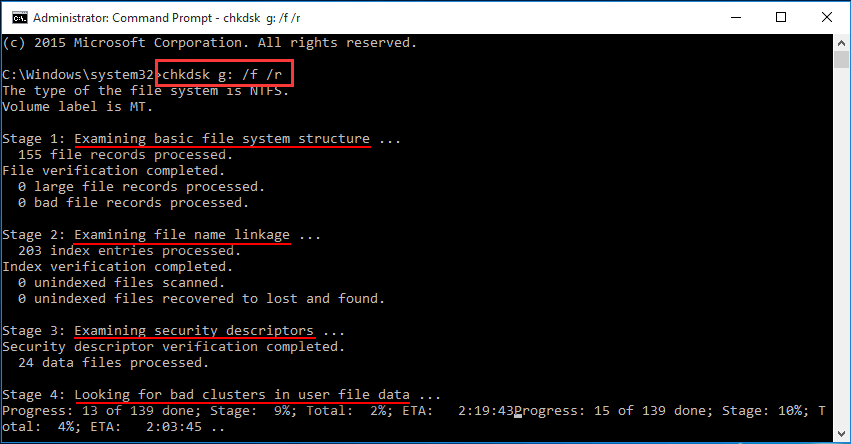
Run System File Checker/Check Disk for Errors
- Type cmd into the search box on the taskbar.
- Right click on Command Prompt and choose Run as administrator.
- Type sfc /scannow or chkdsk /f /r and press Enter.
- Wait for it to complete.
- Restart your PC.
CHKDSK Deletes Your Data? Now Recover Them In Two Ways!
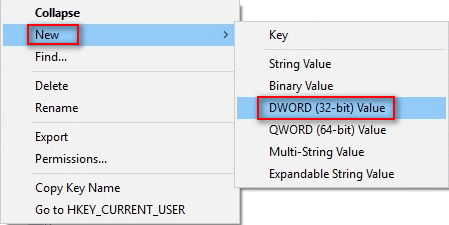
Modify Registry Editor
- Press Windows + R to see Run window.
- Type regedit and press Enter.
- Navigate to: HKEY_LOCAL_MACHINESOFTWAREMicrosoftWindowsCurrentVersionWindowsUpdateOSUpgrade.
- Right click on the blank area on the right pane and choose New > DWORD (32-bit) Value.
- Name it as AllowOSUpgrade.
- Double click on the newly created key to set the value to 1.
- Check Hexadecimal and click OK.
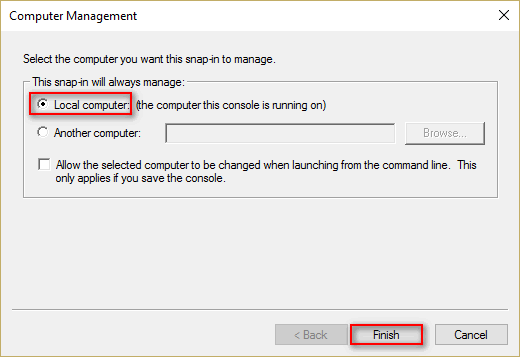
Use Microsoft Management Console (MMC)
- Open Command Prompt.
- Type mmc and hit Enter.
- Select File from the menu bar of the Microsoft Management Console.
- Select Add/Remove Snap-in from the submenu.
- Choose Computer Management from the left pane and click Add.
- Check Local Computer in Computer Management window.
- Click on the Finish button.
- Expand System Tools > Local Users and Groups > Users under Computer Management.
- Double click on Administrator from the right pane.
- Uncheck Account is disabled and click OK.
- Right click on Administrator to choose Set Password.
- Pick a password and reboot your computer.
Turn off Execute Disable Bit
If certain settings in BIOS are not appropriate, the Windows installation error will appear. Some users reported that it is the Execute Disable Bit setting that was causing the issue in BIOS.
Here’s how to fix:
- Restart your computer to enter BIOS.
- Find the Execute Disable Bit setting.
- Change the setting from enabled to disabled.
Confirm the Version of Windows
There are two types of Windows available for you: 32-bit and 64-bit. Most of the new hardware is based on 64-bit architecture. But if you’re using the 32-bit hardware and try to install a 64-bit version of Windows, you’ll fail obviously.
Therefore, I suggest you check the type of your motherboard and CPU by visiting the website of your manufacturer.
Make Sure SSD Has More Than One Partition
According to some users, the Windows cannot install required files message will appear sometimes when they try to install Windows 10 on an SSD which has a single large partition.
The possible fix is to create two partitions on the SSD drive before installing the Windows. I still have not a clue of how and why this happens.
In addition, you can also try the following methods that worked sometimes:
- Try Windows Update troubleshooter.
- Go to check the date and time settings.
- Get a new Windows 10 ISO image file.
- Activate default administrator account.
- Modify the Windows Update installation files.
- Reduce disk space of HDD or SSD & format it.
- Re-write ISO (burn the image onto another USB drive).
- Run memory diagnostic on your RAM and replace the bad RAM stick.
Guess you may be interested in another installation error – Windows could not complete the installation.
Click to Tweet
Verdict
Windows cannot install required files is a common error on Windows 10, Windows 8 and Windows 7 PC; it is followed by various error codes (as you can see in the prompt window indicating the problem). The causes and solutions to fix Windows 10 cannot install required files are given above. Please read them carefully and choose the ones suitable for your case to try to solve the problem yourself.
No doubt Windows has a relatively easy installation process. However, that’s not the case always. During the installation process, errors occur and interrupt the process, preventing you from completing the performance.
If you are in trouble with Windows not installing required files error, which frequently occurs while reinstalling or updating Windows 10, you need to understand the solutions to repair it, right? That’s the motive behind this article.
Situation one: Windows cannot install required files on Windows 10
- 0x80070002
- 0x80070570
- 0x8007025D
- 0x80070003
If you see errors like this on your computer screen, you must note that the storage media you’ve selected for installation is broken. You wish to test your DVD/CD or create new installation media on a USB flash drive and look at the installation again.
Situation two: Windows cannot install required files
- Network problems could also be preventing.
- The file is also corrupt.
- The file doesn’t exist; it might be corrupt.
This series of errors also appear often, indicating that something is wrong with your computer. So you ought to attempt to fix them by using the solutions mentioned in the next part.
How to solve the errors of Windows Cannot Install Required Files?
Installing Windows will be a tedious process, and sometimes errors like Windows cannot install required files can appear and interrupt your installation. This error can be an enormous problem, and today we’ll show you the way to repair it.
Solution 1 – Make sure to clean your DVD drive
While installing Windows from a DVD or a CD, you may encounter Windows not installing the required file’s message if your lens is dirty. To solve this error, it’s advised that you clean your DVD drive lens and check if that solves the matter. There are several methods to try this, and you’ll need a disc with a brush to scrub your drive.
Alternatively, you’ll be able to open your DVD drive and clean it; however, this might void your warranty. If you’re not careful, you’ll even damage your DVD drive, so if you don’t know what you’re doing, we advise you to remain off from this method.
After cleaning your drive, check if the matter is resolved. Even if you don’t have the required tools to wash your campaign, ensure that your DVD doesn’t have any scratches on that. If your disc is scratched, it is advisable to form a brand-new installation disc and take a look at using it instead.
Solution 2 – Remove overclock settings
Many users tend to overclock their hardware to realize enhanced performance. By overclocking your hardware, you place extra stress thereon, and sometimes overclock settings can prevent you from installing Windows.
Several users reported that Windows could not install the required file message while putting in Windows on an overclocked PC. The sole thanks to fixing this problem were to enter BIOS and take away overclock settings. After disabling overclock settings, try and install Windows again and check if the matter remains there.
Solution 3 – Attach your Winchester drive to a unique SATA port
If you retain getting Windows cannot install required files message, the matter will be with the SATA port. Ascertain glitches occur, and many users claim to fix the issue by connecting their drive to a different SATA port.
To do that, you’ll power down your PC, and disconnect it from the ability outlet. Then, open the case, and connect the SATA cable that goes to your disc drive to a different SATA port on your motherboard.
If you’re installing Windows from optical media, you’ll also connect your DVD drive to a unique SATA port. Check and confirms if that helps or not.
Solution 4 – Ensure that you’re installing the correct version of Windows
As you’ll know, there are two kinds of Windows available, 32-bit and 64-bit. While a 64-bit version nearly completely replaces 32-bit, some users still use 32-bit hardware. Point to note, you can’t install a 64-bit version of Windows on 32-bit hardware, and if you are attempting to try to do so, you may get Windows cannot install required files.
Therefore, before you attempt to put in Windows 10, check what sort of motherboard and CPU you are using. The majority of new hardware uses 64-bit architecture, so if you bought a brand-new computer system, you might have a 64-bit CPU. However, you’ll always visit the manufacturer’s website and double-check it just in case.
Solution 5 – Disable Execute Bit option in the BIOS
According to some users, Windows cannot install required files error pops up due to individual BIOS settings. Perusers, it seems that the Execute Disable Bit setting was causing this issue in BIOS.
To fix the matter, enter BIOS, locate this setting, and disable it. To work out the way to access BIOS and disable this setting on your PC, make sure to test the motherboard manual for more information. After disabling the feature, check if the error remains there.
Solution 6 – Confirm that you’re not installing Windows on an external part
Windows cannot install required files error if you’re trying to install in Windows 10 on an external SSD. Some users report this issue while trying to install Windows 10 on an SSD drive with one large partition.
According to users, they had to form two partitions on their SSD drive, and after doing that, the matter was resolved, and Windows was installed with no further issues.
Solution 7 – Change the drive type to the IDE
If you’re getting Windows cannot install required files while trying to put in Windows 10, perhaps the problem is your BIOS configuration. in step with users, this problem can sometimes occur if your drive is about to figure as an AHCI device.
To fix the matter, enter BIOS and alter the disk drive type to IDE. Once you are doing that, you ought to be able to install Windows with no issues. After you put in Windows, you’ll switch back to AHCI mode, and everything should work with no problems.
Solution 8 – Check your hardware
In certain instances, your hardware can result in this and lots of other problems. If you retain getting Windows cannot install required files message, it’s advised that you inspect your hardware and make sure of its working ratio.
The most common cause of this issue is your RAM, and to check your RAM, we advise you to remove additional RAM modules and look at installing Windows with only 1 RAM module on your computer.
If you would like to make sure that your RAM is the problem, we advise you to use the MemTest86+ tool and check your RAM. Start this app from a flash drive and let it endure a pair of hours. If it gives you any errors, one amongst your modules is undoubtedly broken.
If you have any issues with your Audio rendering then you can check out our article on How to Fix an Audio Renderer Error in Windows 10. For screen tearing problems in Windows 10, you can use this article. Do check out our fix “we can’t activate windows on this device” error. Refer to this article if you are having System Service Exception BSOD (bug check 0x0000003B).
What is the most common error code of windows?
Windows Cannot Install Required Files 0x80070570 is the most common error among people. Many users are conversant in this error message: Windows cannot install required files. The file could also be corrupt or missing. Confirm all the files needed for installation are available and restart the installation.
Error code: 0x80070570
There are four reasons for the error code 0x80070570.
Cause 1: RAM (Random-access memory) failure
The RAM check utility is built-in in Windows since Windows Vista. This tool’s utilization doesn’t require any professional knowledge. The most important feature of the RAM check tool is that the analysis process is prolonged. Therefore, test one memory slot at one go.
If there are any errors by the RAM check utility, you ought to try and fix them by:
• Trying different slots
• Wiping the straps with a dry cloth
• Performing the test with different configurations
If these fail to assist, you must buy new RAM.
Cause 2: Classification system error
The classification system is additionally vital in a very PC; it decides how files are stored and retrieved. A brand new drive can only be wont to save data after proper formatting. If the classification system failure causes any problems, you must attempt to reformat the drive.
If you’ve got finished formatting a tough drive only to search out there are still some valuable data; please recover them ASAP.
Check out this article if you want to fix Windows Update Error C0000034.
Cause 3: Windows installation file error
You may write the boot file once more after reinstalling the OS: copy the essential files from your PC and put them aside to a secure place. If any of the files are corrupted, you need to recover them directly with data recovery software.
Cause 4: Disc drive damage
The disc drive is one of the main essential components of a PC/laptop. If the disk drive is broken somehow, it’ll result in lots of problems. For example,
- The request will fail thanks to the fatal device computer error.
- Windows was unable to repair the drive.
- The disc drive is clicking.
Conclusion
It might be quite troublesome for users, mostly inexperienced users, to end Windows installation alone. This is often a tedious process for them, and plenty of problems may occur during this process.
For example, Windows cannot install required files. And in this article, we have presented numerous solutions for this type of error. Microsoft Windows has a series of graphical packages that suites to different people. Not only that, Microsoft has optimizing systems that attract more people.
However, the installation processes of Windows, apps, and files aren’t always smooth. On the contrary, windows errors frequently occur on computer systems. Windows cannot install required files is the most showed error on the Windows PC after you reinstall or update your system.