While installing Windows 11 or Windows 10, if you get No device drivers were found error, here is how you can fix the issue. It happens when you try to clean install Windows 11/10 on your computer. Although it doesn’t appear frequently, you can troubleshoot the problem if you are getting it.
No new devices drivers were found. Make sure that the installation media contact the correct drivers, and then click OK.
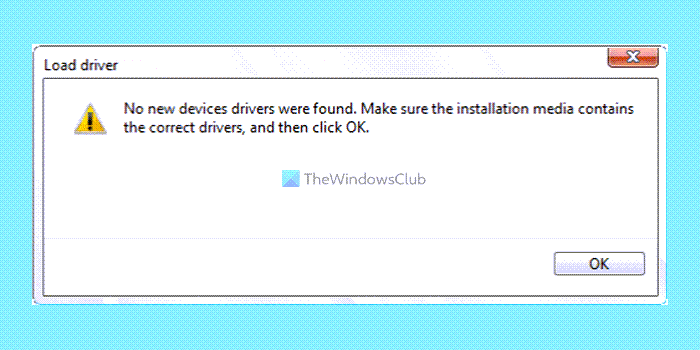
The error means Windows didn’t find the correct drivers to go ahead with the installation, which can happen for many reasons. For instance, your installation driver might be corrupted or not signed, you are trying to install unsupported drivers, or Windows is having trouble verifying the drivers. The error occurs during Windows installation when the user tries to install drivers along with Windows setup.
If this problem occurs, you cannot fix it by clicking the corresponding OK button. If your selected hard drive becomes inactive, there is a chance of getting this error. On the other hand, a corrupted ISO file can also cause this issue. Therefore, follow this article to get rid of the issue you are getting while installing Windows 11 or Windows 10.
The Windows installation window allows you to select the correct device drivers. Alternatively you can try using a fresh copy of the driver to complete your Windows Installation. To fix the No device drivers were found error, during Windows installation, you can use one of these suggestions:
- Make Partition active
- Format Hard drive
- Browse to Add Device Driver
- Create fresh bootable USB
To learn more about these steps, continue reading.
1] Make Partition active
It is the first thing you need to follow in order to fix the aforementioned issue. For that, you must continue using the bootable USB you have made earlier to clean install Windows OS. Then, follow these steps:
- Make sure you are in the boot manage and the installation wizard is opened.
- Choose the language and click the Next button.
- Click on the Repair your computer option.
- Go to the Advanced options and select Command Prompt.
- Enter the password and click the Continue button.
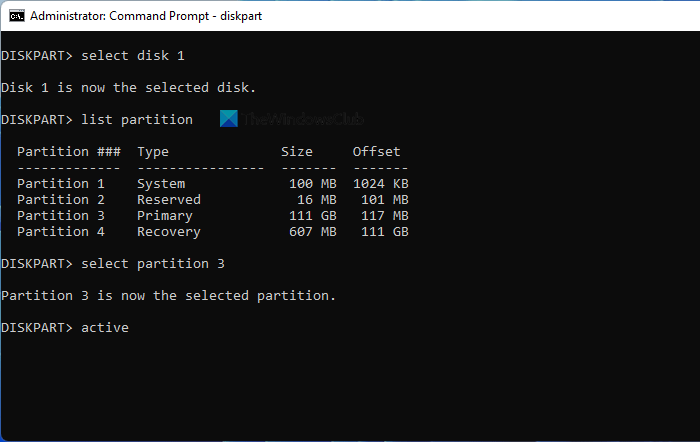
- Enter these commands:
diskpart
list disk
select disk [disk number]
list partition
select partition [drive-letter]
active
After that, restart the installation process.
Hopefully, you won’t have any problem. However, if it doesn’t help, you can follow the next solution.
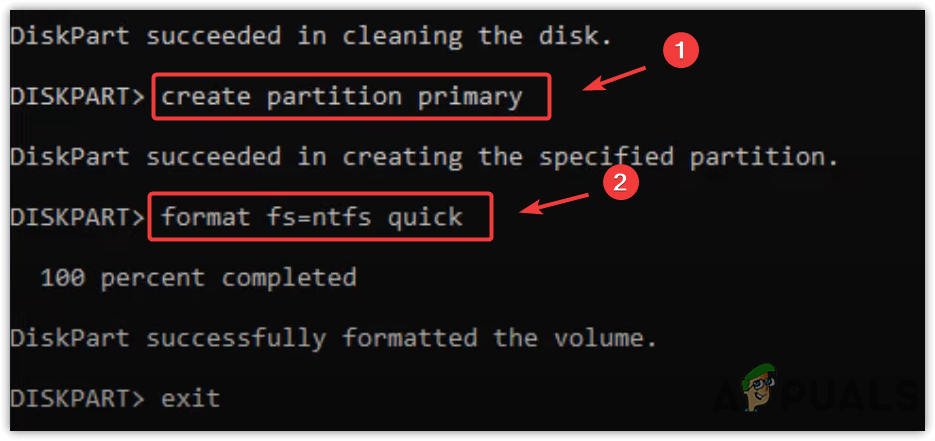
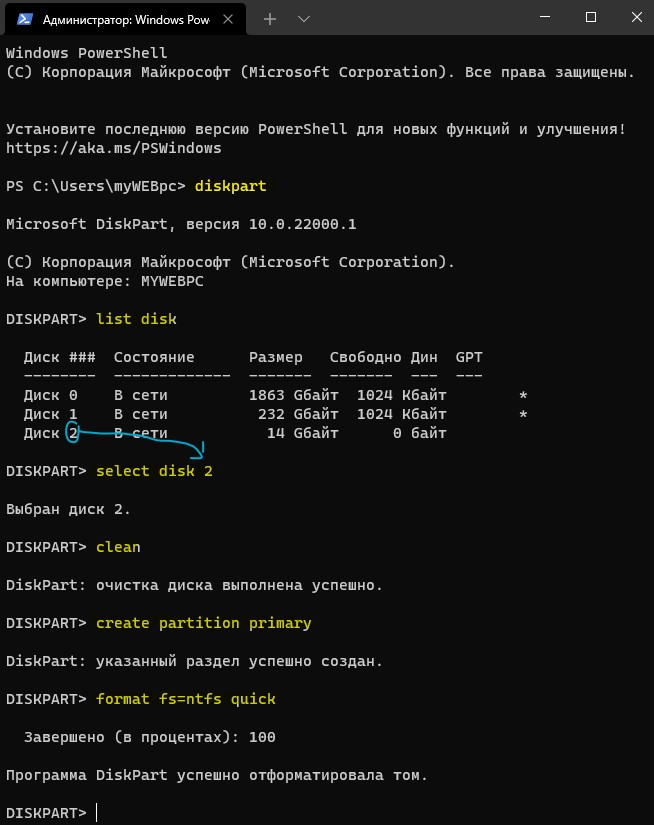
2] Format Hard drive
If there is some problem with the hard drive, you might have the same problem while installing Windows 11 or Windows 10. Whether it is an SSD or HDD, the problem will remain the same. To fix that issue, you need to format your hard drive. For that, do the following:
- Open the install wizard > choose the language > click the Next button.
- Click on the Repair your computer option.
- Navigate to Advanced options > Command Prompt.
- Enter the password and click the Continue button.
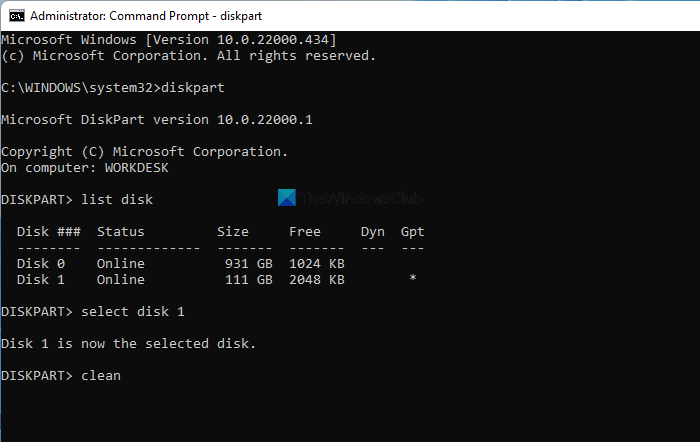
- Enter these commands:
diskpart
list disk
select disk [disk-number]
clean
create partition primary
format fs=ntfs quick
Then, you need to close all windows and restart the installation process.
3] Browse to Add Device Driver
The error means that your drivers are not readable, signed, or corrupt. Hence, manually downloading the driver files and adding them to your bootable USB drive would be a good idea. So you can manually select the driver files while installing Windows at a later stage.
Here is a step-by-step guide:
- First, you must download the chipset or storage drivers from your computer manufacturer’s website. For laptops and pre-built PCs, the manufacturer would be the company. For a custom PC, the manufacturer would be the motherboard company.
- To download the drivers go to the OEM’s website and search for the drivers using the model number.
- Once drivers are downloaded, extract them inside your bootable USB Driver.
- After that, boot up your PC using the USB Driver, usually as you do.
- Once you reach the screen where you received the error, choose the browse button.
- Now, select the inf files and click Ok.
- Finally, Windows will verify the driver files and let you complete the installation.
Once the setup is complete, you can go to the device manager and verify if the driver was installed on the PC. Though we still believe installing a driver post-installation is a better choice. However, if you are testing a setup disk, then it’s worth doing it.
4] Create fresh bootable USB
If none of the above-mentioned solutions worked for you, you might need to create a fresh bootable USB drive of Windows 11 or Windows 10. You have multiple options in your hands. For example, you can create a bootable Windows 11 installation media by downloading the Windows 11 ISO, using Media Creation Tool, etc. Either way, you need to create a clean installation media and perform a fresh installation.
Related: A media driver your computer needs is missing.
How do you fix No drivers are installed for this device?
If you get No drivers are installed for this device error in the Device Manager, you need to install the corresponding driver. For example, if you are getting this error for the graphics card, you need to install the graphics driver. Similarly, you need to perform the same thing for audio driver, Wi-Fi driver, or any other.
What is a Signed Device Driver?
A signed device driver is a driver that has been digitally signed by the manufacturer or developer to indicate that the driver works with the Windows version. This is important because it ensures that the driver is not corrupted or altered. If not, then it can cause problems with the PC. To use a signed device driver in Windows, the driver must be signed with a digital certificate recognized by Microsoft. This certificate is used to verify the driver developer’s identity and ensure that the driver has not been tampered with. That said, if you try to install a driver from a non-verified website, Windows will warn you about its legitimacy. It is advised never to install a driver from unknown sources.
How do you tell if a Driver is Signed?
If you have downloaded a driver, and want to check if the driver is signed, then you can use the sigverif tool in Windows. When you launch the Sigverif tool, go to the advanced option and then use the browser button to select the driver package you need to verify. Sigverif will scan the driver package and verify the signatures of all the drivers included in the package. If any of the drivers are not signed, Sigverif will display a message indicating that the driver is not signed and may not work correctly with your system.
How do I fix No device drivers found during Windows 11/10 installation?
To fix No device drivers found during Windows 11/10 installation error, you need to follow the above-mentioned solutions. First, you have to make the partition active so that it can be used for installing Windows 11/10. Secondly, you can format the hard drive. Last but not least is that you can create a fresh Windows 11/10 installation media.
That’s all! Hope this guide helped.
Read: No audio input device found on Windows.
This error often occurs when the Windows installation media does not have disk drivers, which is why you cannot see the connected disks while installing Windows. To fix this issue, you will have to download the disk drivers using another device and then transfer them to your Windows installation media to fix this error.

Besides, formatting and activating the primary partition and resetting the motherboard bios settings also worked for several affected users.
After analyzing the issue, the leading cause of this issue does not have the disk drivers. But apart from that, when the primary partition where the Windows will install is not activated, this error can also appear. The benefit of activating the primary partition is that system will use that disk first. So the Windows will be able to boot.
If you build a new computer and the error occurs, ensure the disks are connected properly with the SATA cable. Moreover, it is also possible that the connected disks are disabled from the motherboard bios settings, causing this error.
Another main problem that led many users to this issue is that they plugged the Windows installation USB into the USB 3.0 port. USB 3.0 sometimes does not work due to the interference of USB 2.0 drivers or incompatible drivers. Therefore, before applying the following methods, we recommend you try to plug the USB into the 2.0 port.
1. Download disk drivers via another device
When this error occurs, Windows does not detect the disk drivers, which is why you cannot see the disks connected to your computer. In this case, you will have to download the drivers using another device or the current device if the operating system is working fine on your computer. Then, you will browse the drivers and select the appropriate one according to your processor to fix this issue.
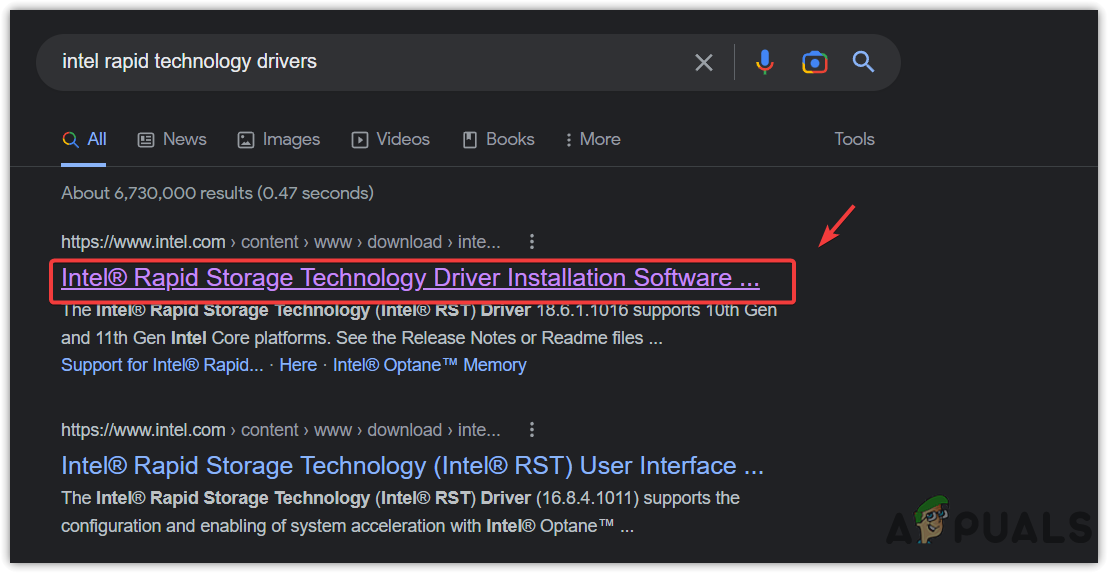
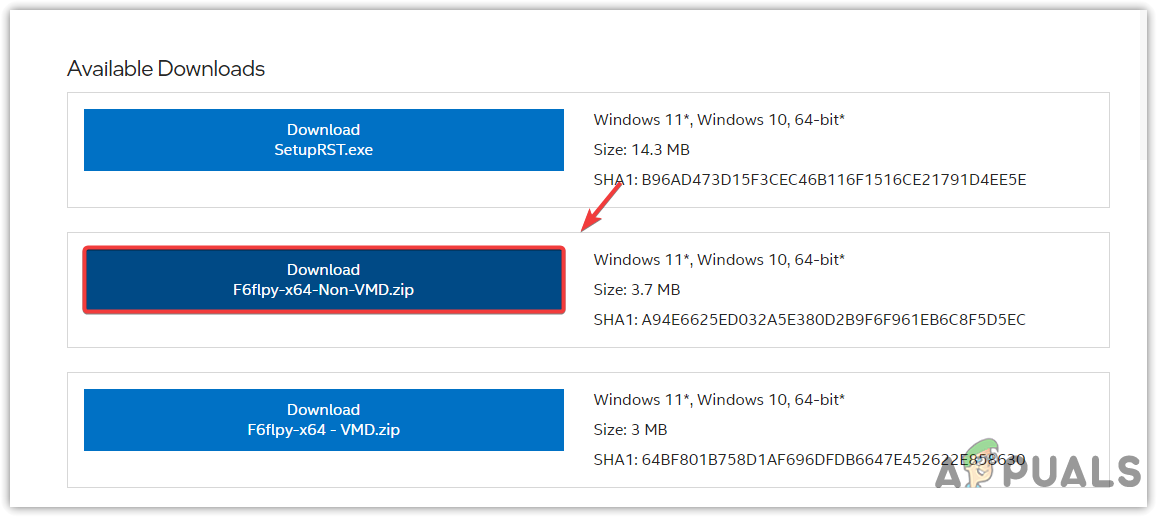
- To download the disk drivers, open the browser and search for the Intel rapid technology driver. If you have an AMD processor, search for AMD rapid technology driver.
- Then, hit Enter to see the results.
- Go to the official Manufacturer’s website, such as AMD or Intel, according to your processor.

Opening Official Manufacturer’s Website - Then, download the driver according to your Windows version.
Note: Make sure to download drivers with a zip folder.
Downloading Intel Rapid Technology Driver - Once done, connect your Windows installation USB.
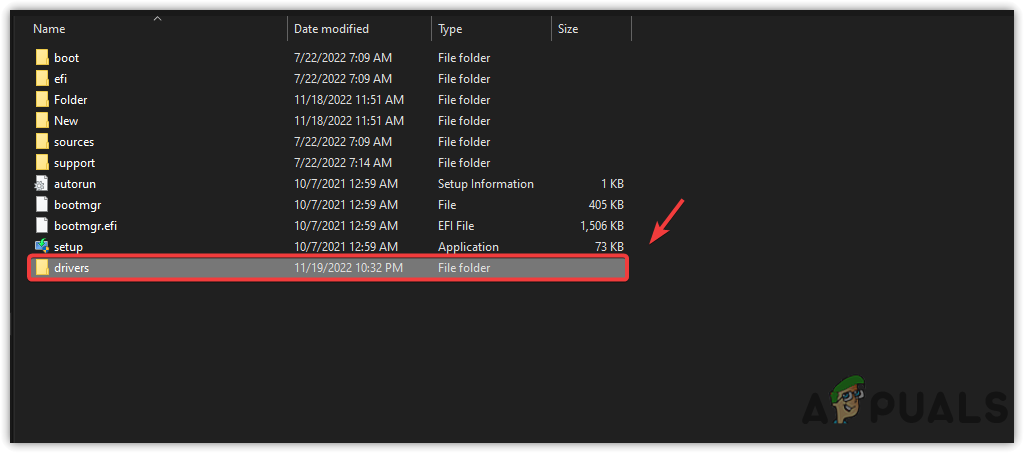
- Then, go to the Windows installation USB directory, and make a folder with the name drivers.

Creating a folder named drivers - After that, go to the directory where you downloaded the Intel rapid technology driver.
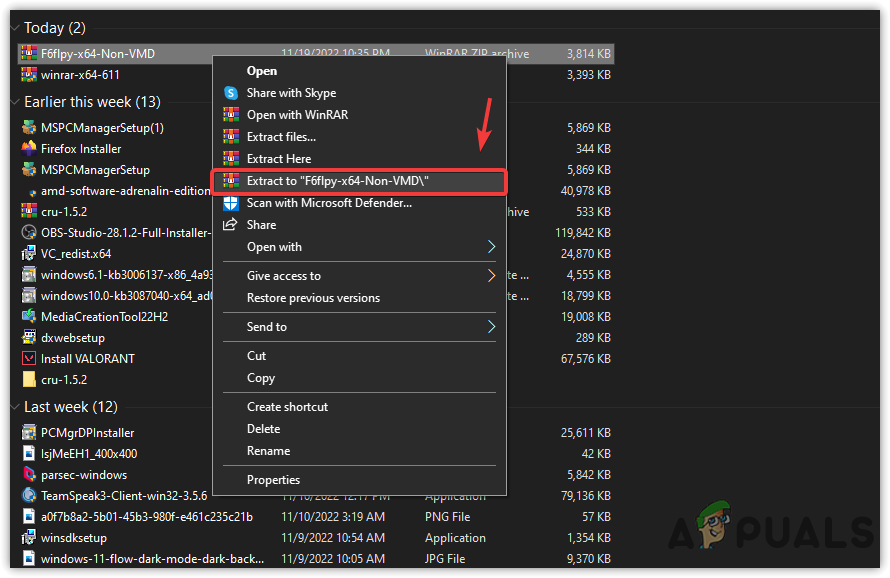
- Right-click the Zip folder and click Extract to “F6flpy-x64-Non-VMD”.
Note: We recommend using WinRar or 7-zip for extracting the folder.
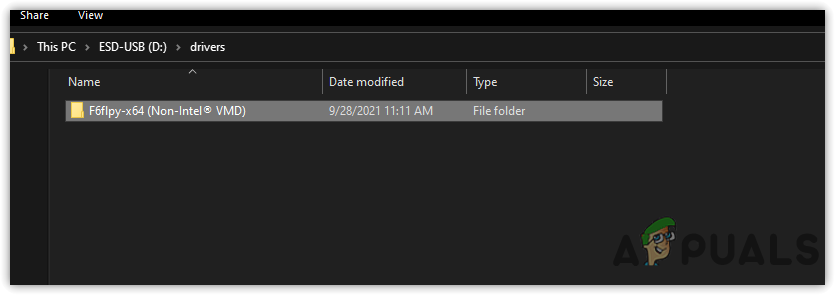
Extracting Driver Folder - Once done, go to the folder and copy the driver folder.
- Then, go to the Windows installation directory and paste the folder into the driver’s folder that you have created in the Windows installation media directory.

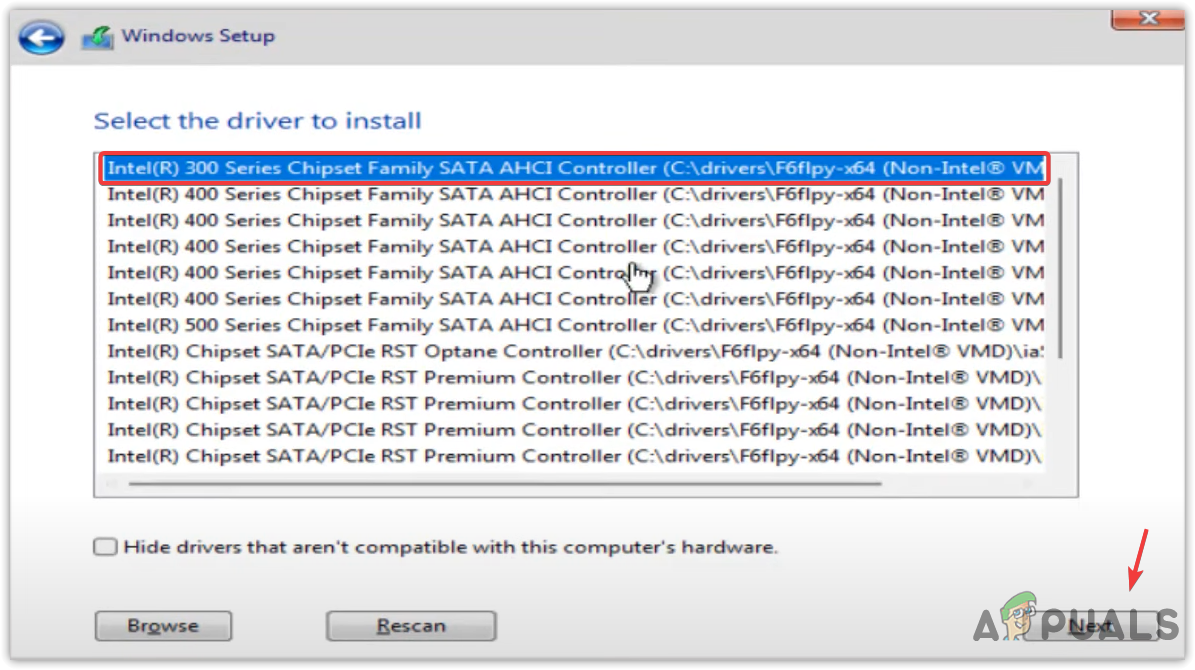
Pasting drivers into the USB - Once done, boot your USB, and click Browse when you see the No Device Drivers Were Found error.
- Select the driver folder, which should be located in the Windows installation media folder.

Selecting intel rapid technology driver - Once done, click OK and select the appropriate driver, then click Next
Note: If you don’t know which driver is compatible with you, select any driver and click Next. Repeat this process until you find the appropriate driver.
Selecting Appropriate Driver - Once done, it should detect the disks connected to your computer.

2. Activate the partition
This error can also appear when the disk where you plan to install Windows is not set as active. The system disk should be set as active, as the system will use the active disk first. Remember, you can make only one partition active at a time on a disk, so activate your system partition to eliminate this error message. Follow the steps to activate the system partition:
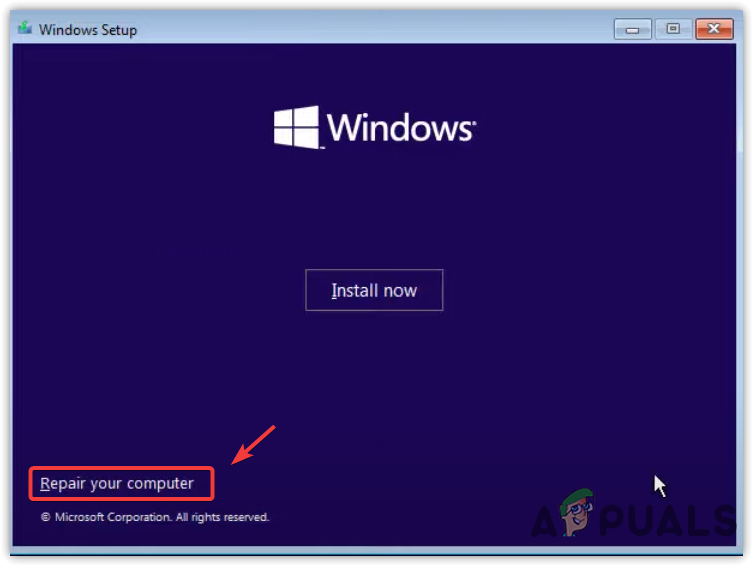
- Insert the installation media storage device, and wait for the Windows setup to load.
- Then, click Next and click Repair your computer to open the Windows preinstallation environment.

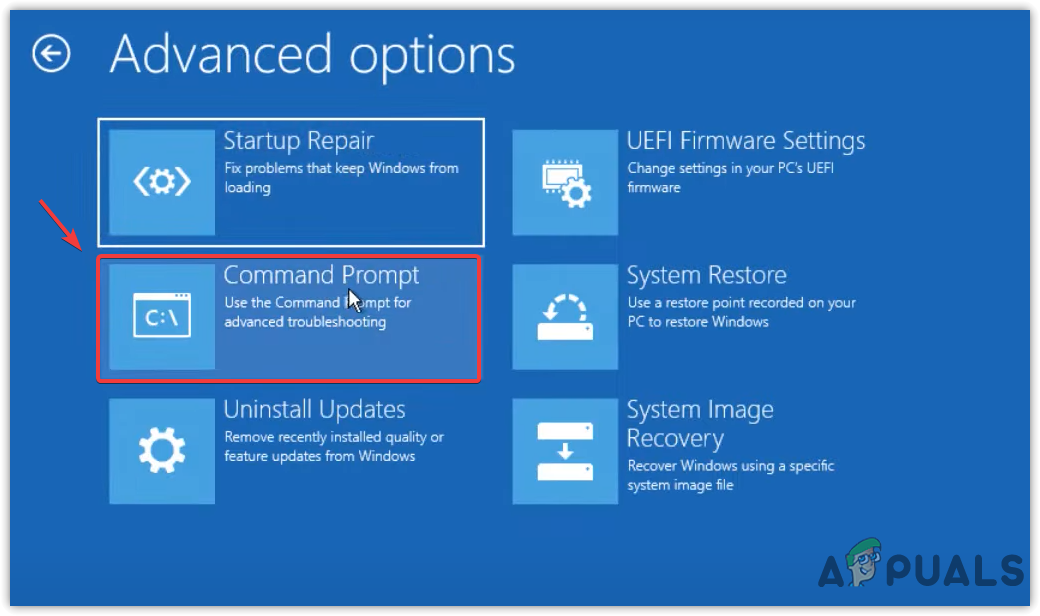
Opening Preinstallation Environment Mode - Then, go to Troubleshoot.
- Then, select the command prompt to open it.

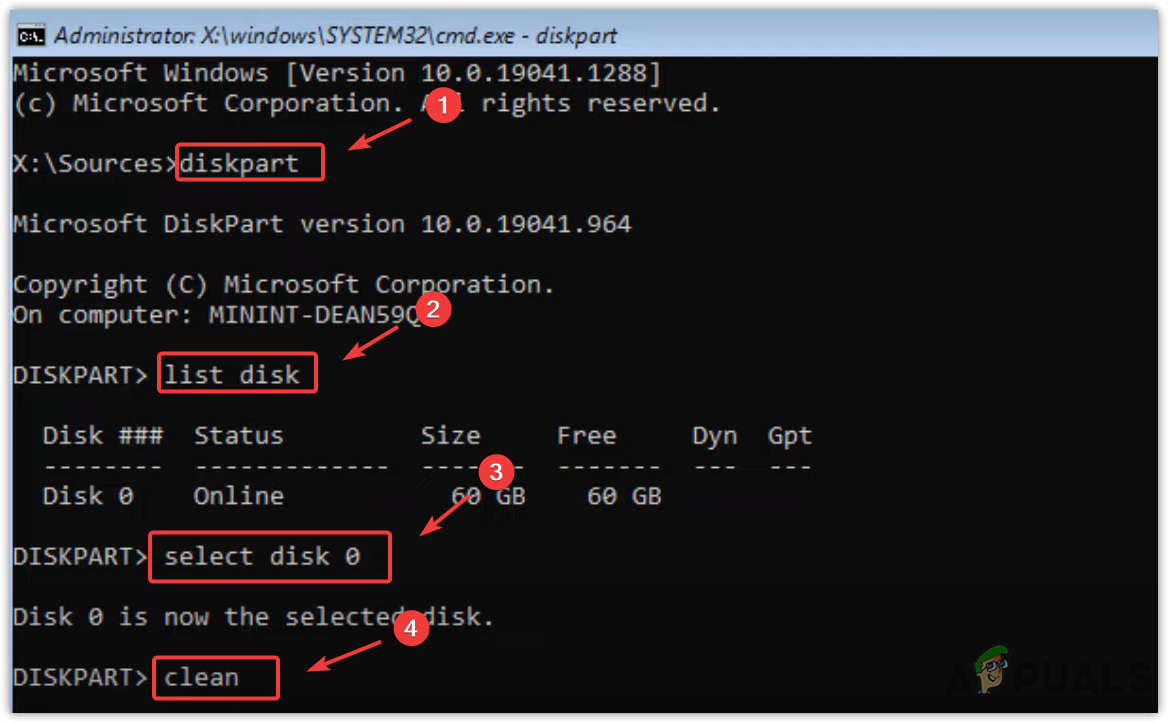
Opening Command Prompt - Now type diskpart to use the diskpart utility.
- After that, type the following command to select the partition and make sure to replace the X with the partition on the disk you plan to install Windows.
list disk
select disk X
list partition
select partition X
active
- Once done, exit the command prompt and restart your computer to install the Windows.
3. Format your disk
If the error is not fixed, you can try to format your disk. This helps in re-formatting the disk, which often fixes the no device drivers were found error. Make sure the disk you will format does not contain any essential data. If the disk has important data, we recommend you transfer the data to another drive and proceed with the following steps to clean the disk.
- To format the disk, boot your installation media device, and wait for it to load the Windows setup.
- Then, click Next and click Repair your computer to navigate into the Windows preinstallation environment.
- Then, select Troubleshoot and select the Command Prompt to open.
Launching Command Prompt - Now type diskpart to use the diskpart utility.
- Then, enter list disk and hit Enter to see the disks
- Select the disk on which you intend to install Windows by typing the following command
select disk X
Note: Replace X with the disk you plan to install Windows
- Then, type clean to remove all the data from the disk

Cleaning disk using diskpart utility - After that, enter the following command to create a primary partition where Windows will install
create partition primary
- Then, type the following command to format the disk to NTFS
format fs=ntfs quick

Formatting the disk to NTFS - Once done, type exit and try to install Windows.
4. Reset motherboard bios settings
You can also run into this issue if the disks are not detecting due to the incorrect bios settings. Even though the disks are always enabled from the bios settings, it is better to reset the bios settings to ensure that there is no problem from the motherboard bios. If this error occurs due to the incorrect motherboard bios settings, it will automatically fix when you reset the motherboard bios settings by following the steps.
- To reset the motherboard bios settings, turn off your computer completely.
- Then, turn the computer on when you see the manufacturer’s logo.
- Press the F10, F2, F12, F1, or DEL to enter the motherboard bios settings.
- Once you access the motherboard bios settings, press the F9 key to factory reset the bios settings to default.

Resetting Motherboard Bios Settings - Once done, boot the Windows installation media device and try installing the Windows to check if the issue is fixed.
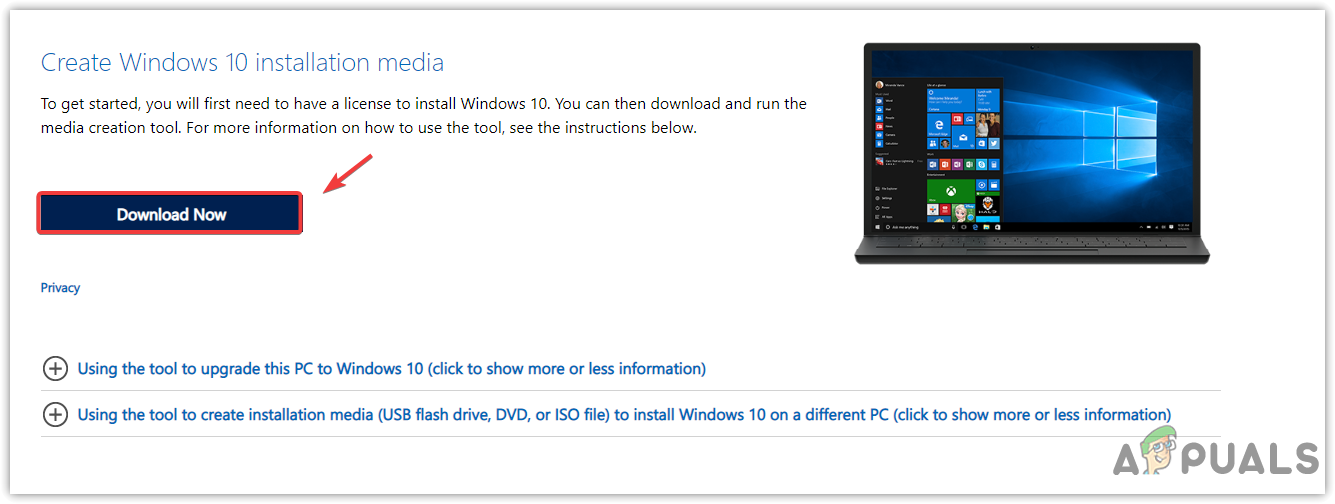
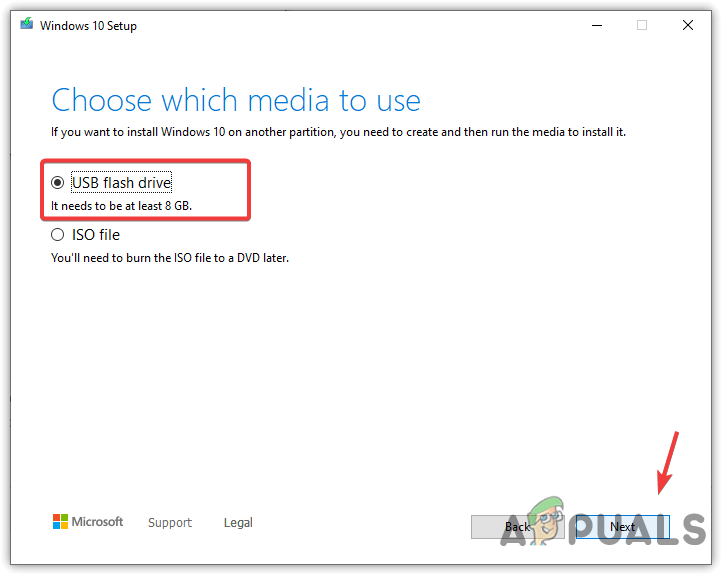
5. Create a Windows installation media
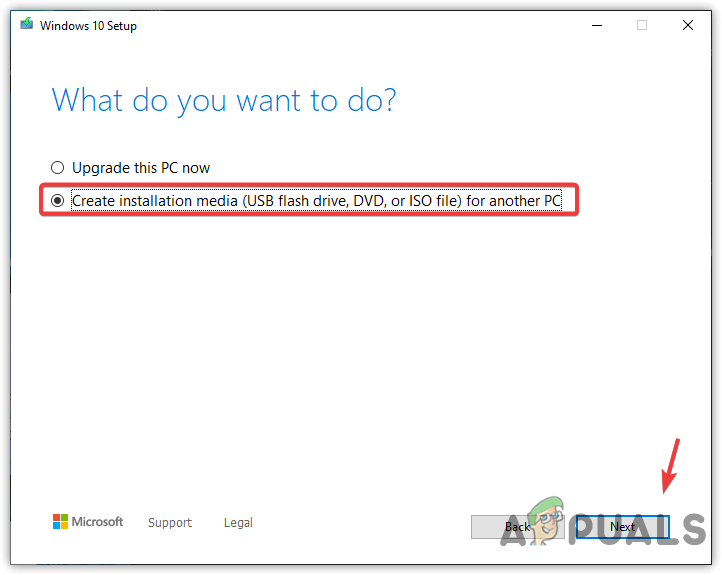
If you are still facing this issue, the error could be due to not having disk drivers in the Windows installation media or the disk not being properly connected. You can try creating a new Windows installation media from the official website, which contains all the necessary drivers that need to be installed in Windows installation media for the disk to be detected. Carefully follow the steps to create Windows installation media:
- Go to the official Microsoft website to download the Windows Media Creation tool.

Downloading Windows Installation Media Tool - Once you have downloaded the tool, open the Windows Media Creation tool.
- Accept the terms and conditions.
- After that, select Create installation media (USB flash drive, DVD, or ISO file) for another PC.
- Then, click Next.

Selecting the installation media option - Again select Next.
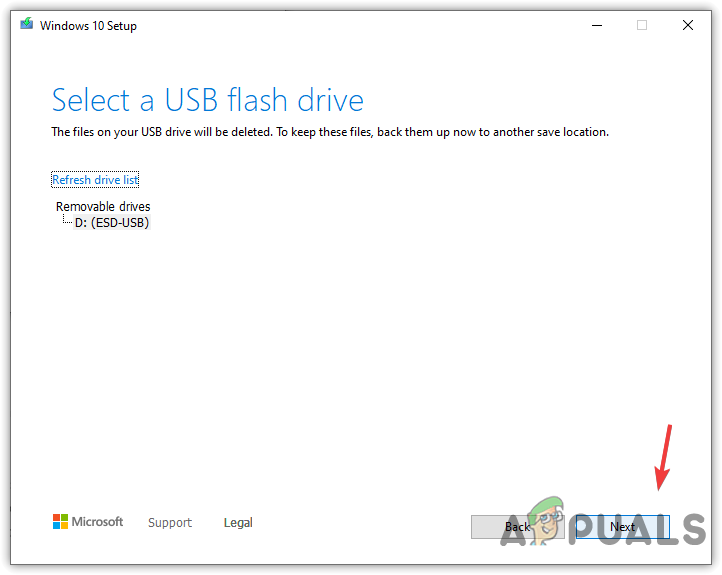
- Choose USB flash drive and select Next.
Selecting a USB flash drive - Again select Next to start the downloading process.
Selecting next to start the process - Wait till you see that Your USB flash drive is ready.
- Then, click Finish, boot your USB flash drive, and try installing Windows to see if this fixes the No Device Drivers were found error.
If that does not work with other previous methods, either the USB has a problem or your hard disk is having issues which is why you cannot see the drives connected to your computer while installing Windows. To fix this, you can take your computer to a repair shop for a complete diagnosis.

Hamza Mohammad Anwar
Hamza Khan is an intermediate javaScript web developer specializing in reactjs, MongoDb, express nodeJs, and more. He creates faster and better applications using mern technologies.
При установке Windows 11 или Windows 10 пользователь может столкнуться с ошибкой Драйверы устройств не найдены. Проверьте, что на установочном носителе имеются правильные драйверы и нажмите OK.
Ошибка, когда не удается найти драйверы устройств возникает из-за поврежденного ISO образа, неактивного раздела или формата самого диска. Разберем, что делать и как исправить данную проблему.

Исправить ошибку не найденных драйверов для устройств
1. Установка Windows 11/10 c USB 2.0
Попробуйте установить Windows 11/10 с USB 2.0 на компьютере или ноутбуке. Обратите внимания на картинку ниже, синий порт это USB 3.0, а черный USB 2.0.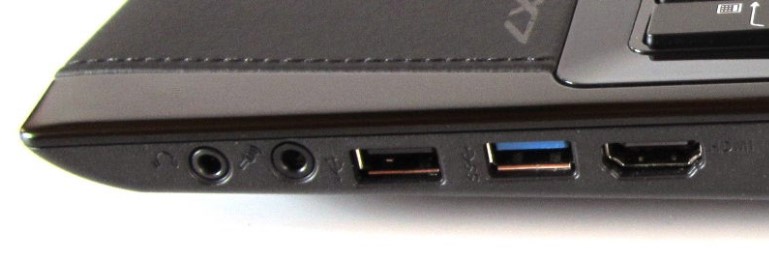
2. Установочная USB флешка
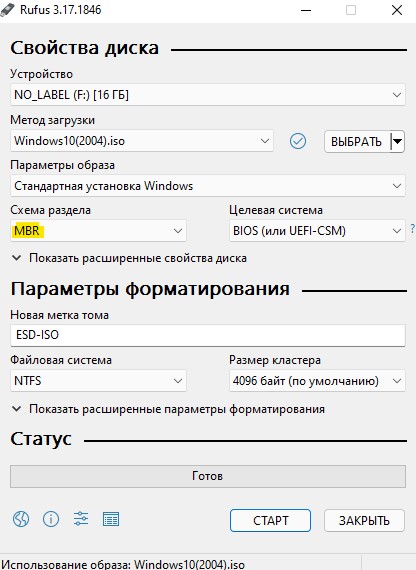
Попробуйте создать установочную флешку с разметкой MBR, так как в большинстве случаев MediaCreationTool создает со схемой GPT. Воспользуйтесь программой Rufus и выберите схему MBR.
3. Скачать драйверы SATA или AHCI
Загрузите последнюю версию драйвера SATA или AHCI с сайта производителя и закиньте их на другую USB флешку. Воспользуйтесь поиском Google, чтобы найти нужные драйеры. Для Intel, драйвер называется Intel Rapid Storage Technology (IRST). Если ноутбук, то в поиске наберите его модель или, если это ПК, то процессор + материнская плата.
Далее начните установку Windows 11/10 и, когда появится ошибка, что драйверы устройств не найдены, вставьте другую флешку с драйверами SATA и AHCI и нажмите Загрузить или Обзор, и укажите путь к флешке с драйверами.

4. Сделать раздел активным
1. Начините установку системы Windows 11/10 и на шаге «Установить» нажмите снизу на Восстановление системы, чтобы попасть в дополнительные параметры.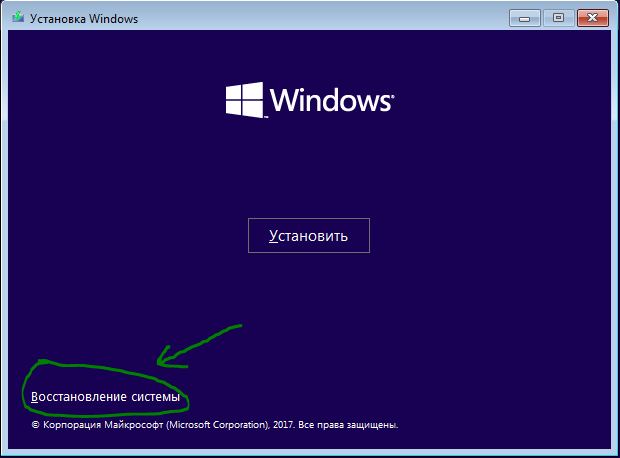
2. Далее Поиск и устранение неисправностей > Дополнительные параметры и Командная строка.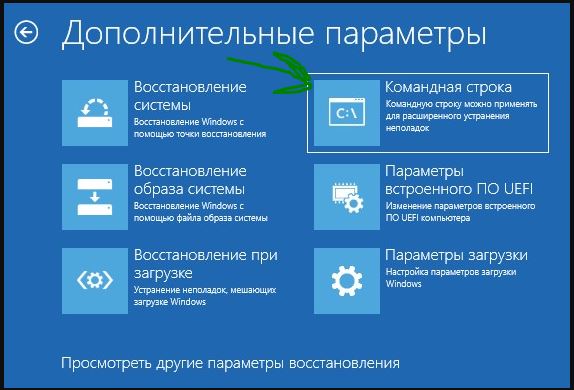
3. В окно командной строке задайте следующие команды:
diskpartlist diskselect disk(Номер Диска)list partitionselect partition(Номер раздела)active
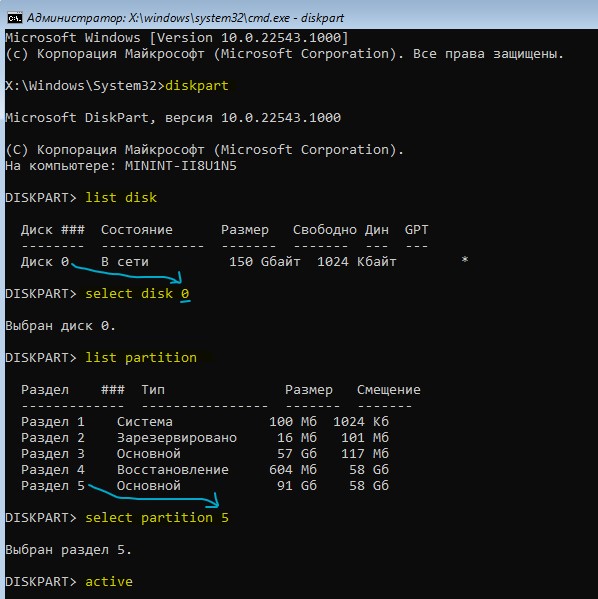
Описание команд: Запускаем инструмент Diskpart, выводим список дисков, выбираем нужный нам диск, на котором windows и ошибка, далее выводим список разделов на выбранном диске, выбираем нужный раздел, где нужно установить windows 11/10 или старый, где уже было система, после чего делаем его активным.
Важно: Хочу заметить, что это только для MBR разметки, если у вас GPT, то данная схема не нуждается в активном разделе. Пропустите данный пункт, если у вас ошибка после последней команды Active.
5. Отформатировать диск
Это удалит все ваши данные на всем диске. Запустите обратно командную строку из дополнительных параметров и введите следующие команды, после чего выключите ПК и начните заново установку Windows 11/10.
diskpartlist diskselect disk(номер диска)cleancreate partition primaryformat fs=ntfs quick
Обратите внимание, что я пример показываю на форматировании USB-накопителя и через запуск Терминала на рабочем столе. Вы должны указать тот диск, на который хотите установить систему или выдается ошибка, что драйверы устройств не найдены при установке Windows 11/10.
Смотрите еще:
- Исправить No boot disk has been detected or the disk has failed
- No Bootable Device при включении Windows 10 — Что делать?
- No suitable graphics card found — Как исправить?
- Ошибка: A disk read error occurred Press Ctrl+Alt+Del to restart
- Reboot and select proper Boot Device
[ Telegram | Поддержать ]
|
814 / 526 / 214 Регистрация: 22.12.2017 Сообщений: 1,495 |
|
|
1 |
|
|
07.04.2022, 01:48. Показов 2889. Ответов 14
При попытке установки Windows 10(или 11), после нажатия кнопки «Установить» появляется уведомление об ошибке «No device drivers were Found / Не найден необходимый драйвер носителя» и предложение подключить носитель с этими драйверами. Все методы что нашел в сети уже испробовал. Перебрал 3 флешки, менял порты USB, перебрал все драйвера на сайте производителя(ноутбук gigabyte g5 gd, поставляется без ОС) и на сайте intel(intel rst), всё что смог потыкал в биосе, хотя тыкать там особо нечего — биос выглядит почти как на этом видео, но кнопок «create raid volume» или «sata mode» нету. Также пробовал всяческие манипуляции с diskpart из этой статьи, пытался установить разные образы windows, как официальный образ windows 10 home, так и прочие, проблема та же. При этом linux отлично встал, без каких-либо проблем. Заранее спасибо!
0 |

|
41 / 35 / 19 Регистрация: 24.09.2013 Сообщений: 240 |
|
|
07.04.2022, 06:32 |
2 |
|
codcw, Попробуйте обновить BIOS с офф сайта gigabyte
о кнопок «create raid volume» или «sata mode» нету Как показано в видео с ютуба, нужно несколько раз переходить по разделам «Main» и «Advanced» что бы появилась пункт SATA MODE. Так не работает?
0 |

|
814 / 526 / 214 Регистрация: 22.12.2017 Сообщений: 1,495 |
|
|
07.04.2022, 13:39 [ТС] |
3 |
|
Аркалык,
Попробуйте обновить BIOS с офф сайта gigabyte На оф сайте биос для своей модели не нашел, да и для соседних моделей в линейке он не представлен на сайте, моя модель идет с биосом fb08, что судя по этому обзору — одна из последних версий
нужно несколько раз переходить На видео видно, что пункт sata mode есть уже после первого нажатия на вкладку advanced, у меня его нет сколько бы раз не переходил
0 |
|
8446 / 2968 / 494 Регистрация: 14.04.2011 Сообщений: 7,359 |
|
|
07.04.2022, 15:41 |
4 |
|
Драйвер Intel Rapid Storage Technology (IRST) не пробовали «скормить» во время установки.
0 |
|
814 / 526 / 214 Регистрация: 22.12.2017 Сообщений: 1,495 |
|
|
07.04.2022, 15:52 [ТС] |
5 |
|
Добавлю еще немного — если выключить vmd, после перезагрузки в биосе пропадает вкладка intel rapid storage, но во вкладке main появляются 4 новые вкладки, впрочем что так что так — в этих вкладках и во вкладке intel rapid storage изменить ничего нельзя
А так при выключенном:
Также при выключенном vmd драйвера отказываются устанавливаться
0 |

|
814 / 526 / 214 Регистрация: 22.12.2017 Сообщений: 1,495 |
|
|
07.04.2022, 15:53 [ТС] |
6 |
|
Андрей1224, да, причём разные, все что смог найти — не помогает
0 |
|
881 / 193 / 53 Регистрация: 06.11.2015 Сообщений: 1,912 Записей в блоге: 2 |
|
|
07.04.2022, 18:06 |
7 |
|
codcw, а все порты USB 3?
При этом linux отлично встал, без каких-либо проблем в live режиме?
0 |
|
814 / 526 / 214 Регистрация: 22.12.2017 Сообщений: 1,495 |
|
|
07.04.2022, 18:44 [ТС] |
8 |
|
Luca Brasi,
а все порты USB 3? один порт 2.0, остальные 2 — 3.0, флешки пробовал тыкать во все порты, и менять порты во время установки, это ничего не даёт
в live режиме? и в live режиме, и на внутренний ssd устанавливается без проблем
0 |
|
814 / 526 / 214 Регистрация: 22.12.2017 Сообщений: 1,495 |
|
|
08.04.2022, 02:27 [ТС] |
9 |
|
Тема всё ещё актуальна. Добавляю деталь — если при попытке загрузиться с флешки забить все слоты usb флешками, загрузиться не получится — выдаёт сообщение с ошибкой, также становится невозможно зайти во вкладку administer secure boot в биосе — текст ошибки точно не помню, что-то вроде «не подключено ни одного устройства с которого можно загрузиться», как только вынимаю какую-то флешку, загрузиться сразу становится возможно, ошибка не появляется
0 |
|
881 / 193 / 53 Регистрация: 06.11.2015 Сообщений: 1,912 Записей в блоге: 2 |
|
|
08.04.2022, 09:46 |
10 |
|
codcw, у меня на MSI материнке от количества занятых портов кидало разного формата сообщения.
1 |
|
814 / 526 / 214 Регистрация: 22.12.2017 Сообщений: 1,495 |
|
|
08.04.2022, 14:55 [ТС] |
11 |
|
Luca Brasi, да, у меня получилось обойти ошибку с драйверами таким образом(спасибо!), но теперь у меня один диск и один partition(mbr), потому что на gpt нельзя выставить partition active, и во время установки windows ругается на то что диск не в gpt partition, а если переформатировать то это всё-равно не помогает, я думаю потому что винда на этом же диске который я форматирую и конвертирую в gpt
0 |
|
814 / 526 / 214 Регистрация: 22.12.2017 Сообщений: 1,495 |
|
|
08.04.2022, 15:01 [ТС] |
12 |
|
И я пробовал разделить диск на 2 части, на одну из них положить установщик винды и так запускать — по итогу опять вылазит ошибка с драйверами(даже так это не решило бы проблему — конвертация в gpt доступна только в пределах всего диска, а не одного partition)
0 |
|
8446 / 2968 / 494 Регистрация: 14.04.2011 Сообщений: 7,359 |
|
|
08.04.2022, 15:50 |
13 |
|
Решениеcodcw, Лет 6 назад я создал тему на этом форуме про установку систем c жесткого диска, но особо умные начали писАть, что это старо как мир и типа никому не нужно и я эту тему забросил.
1 |
 Сообщение было отмечено codcw как решение
|
814 / 526 / 214 Регистрация: 22.12.2017 Сообщений: 1,495 |
|
|
08.04.2022, 17:06 [ТС] |
14 |
|
Андрей1224, Огромное спасибо! Сделал точь в точь как вы описали — всё установилось без каких-либо проблем. Единственное замечание — из-за fat32 не вышло использовать официальный образ windows 10 x64 — он занимает примерно 5.5гб, а насчёт
В UEFI-BIOS должен быть установлен режим загрузки UEFI или UEFI and Legacy. у меня в биосе нету никаких подобных настроек, но и без этого всё получилось
1 |
|
8446 / 2968 / 494 Регистрация: 14.04.2011 Сообщений: 7,359 |
|
|
08.04.2022, 18:26 |
15 |
|
codcw,
1 |
|
IT_Exp Эксперт 87844 / 49110 / 22898 Регистрация: 17.06.2006 Сообщений: 92,604 |
08.04.2022, 18:26 |
|
Помогаю со студенческими работами здесь Ошибка при установке Windows: «Не найден необходимый драйвер для дисковода оптических дисков» Ошибка при установке Windows: «Не найден необходимый драйвер для дисковода оптических дисков» Ошибка при установке Windows: «Не найден необходимый драйвер для дисковода оптических дисков»
Ошибка при установке Windows: «Не найден необходимый драйвер для дисковода оптических дисков»
Ошибка при установке Windows: «Не найден необходимый драйвер для дисковода оптических дисков» Искать еще темы с ответами Или воспользуйтесь поиском по форуму: 15 |
- Remove From My Forums
-
Question
-
When I tried to install windows 7 Home premium (Dell) on my pc, I get this message…All it gives is only OK, Cancel and Browse options…I tried browsing everywhere in my pc but it didn’t solve that…Hope someone would help me…
The actual message is:
«A required CD/DVD drive device driver is missing. If you have a driver floppy disk, CD, DVD, or USB flash
drive, please insert it now. Note: If the Windows installation media is in the CD/DVD drive, you can safely remove it for this step.» <Browse> <OK> <Cancel>-
Moved by
Tuesday, August 10, 2010 9:40 PM
Moved to relevant forum category (From:Windows Vista Setup)
-
Moved by
Answers
-
I have had the same problem on an Acer laptop. My issue was that I tried to install via the USB 3.0 port. Both external dvd and usb/iso failed. Iserting the USB stick into the USB 2.0 port, and installed flawlessly.
-
Proposed as answer by
A Critical Error Has Occured
Tuesday, September 25, 2012 6:16 AM -
Marked as answer by
Carey FrischMVP
Friday, December 28, 2012 1:47 PM
-
Proposed as answer by
 Здравствуйте!
Сегодня будет «узкая» заметка, посвященная ошибке: «Драйверы устройств не найдены…», см. скрин ниже 👇(примечание: она всплывает при попытке установить Windows, чаще на ноутбуках. Причем, на новой 11-й версии ОС тоже…).
Заранее предупрежу, что универсального решения нет, т.к. причинами такого «поведения» устройства может быть далеко не одна причина… (например, неправильно записанная установочная флешка, повреждение USB-порта, отсутствие драйверов на USB 3.0 и пр.).
Ниже кратко о том, что нужно проверить, и в какой последовательности. Рекомендую «разбираться» от «верха к низу» (в таком же порядке, как указано в заметке).
Итак…
*
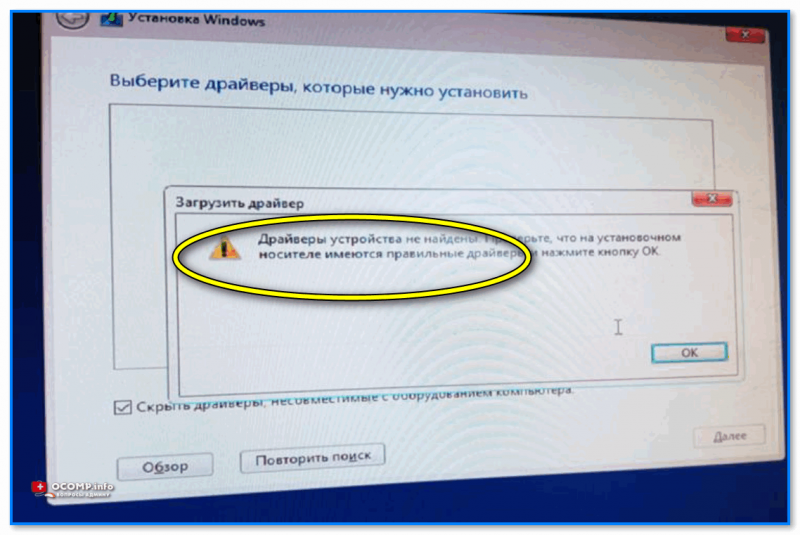
Появилось окно «Загрузить драйвер». Не могу установить Windows…
*
Несколько рекомендаций при появлении этой ошибки
📌 Совет #1
Опционально, при возможности…
Если на дисках компьютера вам не нужны никакие данные — можно попробовать удалить все разделы (если они отображаются), выбрать неразмеченную область и нажать «Далее» (кнопки «Загрузить» и «создать раздел» оставить без внимания…).
В идеале, должна начаться установка ОС (но заранее предупреждаю, что этот метод работает не всегда!).
*
*
📌 Совет #2
Далее обратите внимание, что у вас на компьютере (ноутбуке) может быть несколько типов USB-портов (2.0 и 3.0). Не все дистрибутивы Windows можно установить, подключив установочную флешку к порту USB 3.0 (они помечаются, обычно, синим цветом). Именно по этой причине Asus на многих своих ноутбуках даже в текущем году не «ликвидирует» 2.0 порты (кстати, при их использовании не возникает «помех»… но это совсем другая тема).
Вывод: попробуйте воспользоваться другим USB-портом, желательно 2.0. Кстати, не стоит подключать установочную флешку через различные переходники или удлинители!
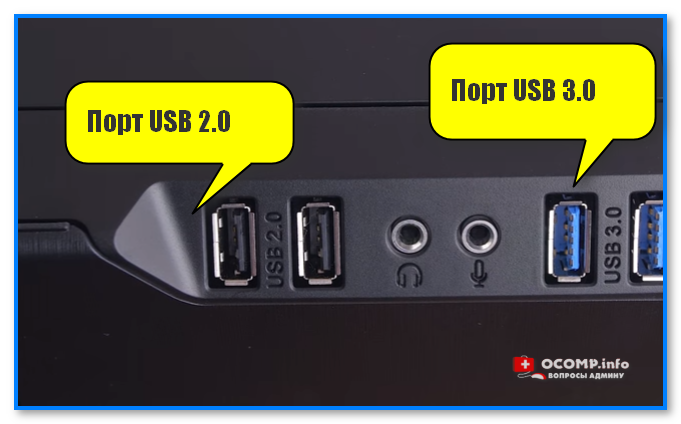
Порт USB 2.0 и 3.0
*
📌 Примечание!
Если у вас на компьютере есть DVD-привод — можете попробовать установить Windows с компакт-диска (этот способ часто менее «замороченный», чем иметь дело с USB-накопителями…).
*
📌 Совет #3
Эту рекомендацию начну с вопроса: «Какую версию Windows вы пытаетесь установить?»…
Дело в том, что (например) в дистрибутиве Windows 7 отсутствуют драйвера для USB 3.0 (и у вас не получится ее установить, если вы не загрузите иной ISO образ со встроенными драйверами // либо не добавите их «туда» самостоятельно).
Для ноутбуков: также порекомендовал бы посмотреть на офиц. сайте, какие версии Windows поддерживает устройство (для каких версий есть драйвера).
В общем, попробуйте установить другую версию Windows (по возможности). Например, вместо Windows 10 —> 11-ю… (либо Windows 7 с инсталлятором от 10-ки).
📌 В помощь!
Как и где искать «редкие» файлы: программы, ISO-образы, игры и пр. — https://ocomp.info/kak-i-gde-skachat-faylyi-i-igryi.html
*
👉 Небольшой лайфхак для тех, кому нужно установить Windows 7!
Если у вас есть установочная флешка с Windows 8 — попробуйте из образа ISO с Windows 7 извлечь на нее один файл intall.esd (весит около 3-4 ГБ), с заменой! (он в папке «/sources»).
Далее, подключив эту флешку к USB и начав установку ОС, вы заметите, что вместо «восьмёрки» устанавливается Windows 7! 👌
*
📌 Совет #4
Довольно часто ошибки на первом этапе инсталляции ОС происходят из-за некорректно-записанной установочной флешки (либо при использовании «битого» ISO образа). В этом плане я бы посоветовал следующее:
- загрузить 👉 офиц. образ ISO (лучше сразу несколько);
- попробовать подготовить пару флешек, записанных 👉 разными утилитами (ссылка на подборку лучших программ и инструкций по работе с ними);
- вызвать 👉Boot-меню и проверить их работу (📌еще лучше, использовать флешку, которая уже многократно проверена на др. ПК).
*
Кстати, как вариант — можно даже не подготавливать загрузочные флешки, а запустить установку Windows прямо из образа ISO, не распаковывая его (например, воспользовавшись LiveCD).
Запуск установки Windows из образа
*
📌 Совет #5
Проверьте настройки BIOS (как войти в него):
- в разделе: «System Configuration → USB3.0 Configuration in Pre-OS» → установите «Disabled» (название может несколько отличаться: «USB 3.0 Support», например);
- в разделе: «System Configuration → Boot Options → Secure Boot» → установите «Disabled»;
- в разделе: «System Configuration → Boot Options → Legacy Support» → установите «Enabled».
(актуально для ОС не поддерживающих защищенную загрузку // при проблемах с работой с USB 3.0).
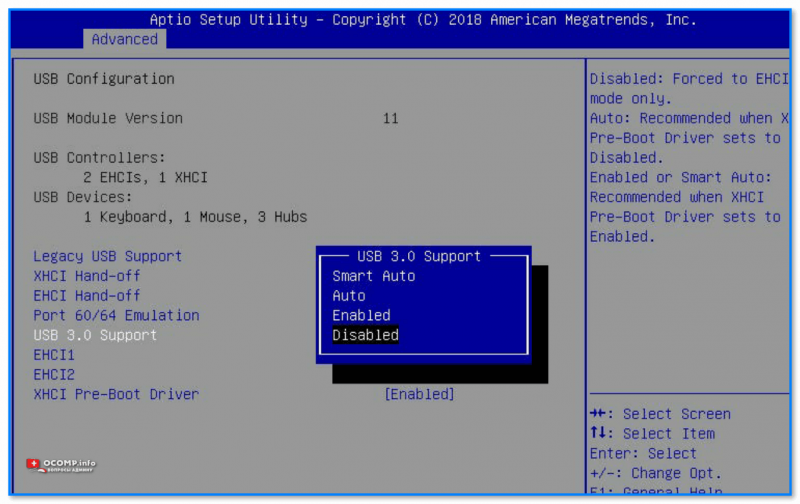
USB 3.0 Support (Поддержка USB 3.0, Disabled — значит отключено)
*
Дополнения по теме — приветствуются!
Успехов!
👋


Полезный софт:
-

- Видео-Монтаж

Отличное ПО для создания своих первых видеороликов (все действия идут по шагам!).
Видео сделает даже новичок!
-
- Ускоритель компьютера

Программа для очистки Windows от «мусора» (удаляет временные файлы, ускоряет систему, оптимизирует реестр).
Often users get “No signed drivers were found” issue in their windows system. Mostly, this error prompts when a user goes for a re-install or fresh install of Windows OS using the preferred installation media.
Here, you must be thinking about what is a signed driver and why it is specified here.
Well, Signed Drivers are authorized drivers i.e. digitally certified. It helps in identifying the required details like manufacturer and security of the driver. Like in case it has been previously modified, the driver will become an unsigned driver and the system will show such errors whenever you try to insert it. Signed drivers work at high security and allow windows to install it automatically. In simple words, it is the harmless drivers authorized by Microsoft to use in Windows.
Now, you must be clear that signed drivers have a prominent role in running a system. So, a proper resolution is required to fix no signed device drivers were found windows 10 install. That’s why we are here with an authentic range of methods.
Let’s get started!
No Signed Device Drivers Were Found: Problem Overview
When a user tries to reinstall their operating system, they get stuck because of “no signed device drivers were found to make sure the installation media contains the correct drivers, then click ok” error. This is not a Windows OS version centric issue. Windows 8, 10 users are getting this including Windows 7. Like, no signed device drivers were found windows 7 installation.
Windows setup no signed device drivers were found and load driver no signed device drivers were found are some of the question’s users are trying to figure out. We have included the possible causes behind this issue for your reference.
- An unresponsive USB ports
- A Corrupt bootable device
- Conflicting Boot mode
No Signed Device Drivers Were Found: Related Problems
There is a range of related issues it covers. Like, Virtio No signed device drivers were found, No signed device drivers were found dell, no device drivers were found windows 7 hp laptop, among many more. As you can see most of the top brand users are getting this issue.
No need to worry as this is fixable, just follow the methods included in this blog to fix the “No signed device drivers were found” issue.
Basic Troubleshooting
First things first! Check on the external things like a USB port or DVD drive. In case these are corrupt or not working properly then it might interrupt you with these kinds of error messages.
-
Tweak between the USB port
In case you are using USB media for windows installation via 3.0 USB port. Then switch to USB 2.0 USB port to get a better result. This has worked for many. Sometimes there are issues with USB ports, which rarely gets identified.
So, trying this simple hack can work for you. Also, check on the port if it is in good condition or not. If this doesn’t then head to our next method.
Deeper flaws require deeper inspection. To fix “no signed device drivers were found to make sure the installation media contains the correct drivers, then click ok” we require to get our hands into BIOS while performing some of the below-given methods. Just follow it as per instructions and order to fix it.
- Step-1 : Check and make the Partition as Active
- Step-2 : Create a New installation media
- Step-3 : Get into BIOS to alter the xHCL hand-off
- Step-4 : Change your systems Boot Mode to Legacy and set the Priority
- Step 1
Check and make the Partition as Active
Allowing a specific partition to install windows file has fixed the “No service device drivers were found” issue for many users. This method requires a recovery tool as you will get an option to choose it. Make sure you have an installation media before you start this.
- Step 1: Insert the installation device you have to your computer and start it. Steps after this are different for different operating systems as shown below.
For Windows XP:
- Then tap a random key on your keyboard on the “Press any key” screen. “Welcome to Setup” screen will appear, just tap “R”. Now type “1” and press Enter, this will log in to your recovery console.
- Then, type “diskpart” and hit Enter. then type “list partition” and hit enter. now, you must type the partition you want to set active, type “select partition Z” (Replace Z as per your drive’s letter) then tap Enter. Now type “Active” and press Enter. At last “Restart” your system.
Windows VISTA, 7:
- You will get a Windows setup pop up to choose the preferred language including time, date, and keyboard method. Type all the required information correctly and tap “Next”.
- Now, look at the bottom of the screen to find “Repair your computer”, tap on this option. Now, you will get into the “System Recovery Options” screen, just tap on the “Command Prompt”.
Windows 8,8.1,10:
- At first, choose the keyboard layout you want to use from the popped-up screen. Now, the “Choose an Option” screen will appear, just follow these options, Troubleshoot > Advanced Options > Command Prompt.


![]()
Note: Follow the above-given instructions as per your preferred windows OS. Then continue with the next steps till the end.
- Step 2: Now as the command prompt has appeared, just write the following command lines and press ENTER after each command:
diskpart- DiskPart.

- list disk.

- select disk {number}

- list partition
- select partition {number}
- DiskPart.


Here “Z” stands for the partition you want to set “Active” to install your Window. So replace it according to your choice of the drive letter.
- Step 3: Once the above command is executed, write “active” and press ENTER.
- Step 4: Once it is done, “Restart” your compute to make these changes effective.

Now, you can initiate the installation procedure into this new set driver. In case even now you are getting “No signed device drivers were found” issue then carry on with the next method regarding creating a new disc.
We are making this best laptops list after spending hours in research so that you can find the best laptop as per your liking.
- Step 2
Create a New installation media
As the error says “No signed”, this means, the installation media does not contain the required signed driver i.e. digitally certified. Or the other scenario can be, when you burnt the setup into Disc or USB, it was corrupt. Another thing can be, maybe your installation media has got corrupt resulting in damaging the required files.
Make sure you have noted down the serial key of your Windows 10 OS. As this can be used only once and will be required.
Go for the below steps to create a fresh installation media:
- Follow this link of Microsoft official site to download the media creation tool. Once the file is downloaded i.e. MediaCreation.exe, tap on it to open this. Now accept the Licence terms set by Microsoft.
- Now, choose “Create installation media (USB flash drive, DVD, or ISO file) from another PC” line and tap “Next”.

- There will be an option to choose the language, edition, and architecture (i.e. 64-bit or 32-bit). Choose it as per your system’s requirement if you are creating installation media on another computer.
- tap “Next” and choose the device you want to set windows installation image into i.e. USB drive or DVD.
- Now, you will get a screen with the storage devices connected with your system. Just tap on the drive you want to install it in and tap “Next”. This will start the downloading process


Be patient until it gets finished. Once it is done follow this link to install your Windows 10 OS to check if the “No signed device drivers were found” gets fixed or not.
- Step 3
Get into BIOS to alter the xHCL hand-off
xHCL hand-off option is responsible for managing the USB ports so the connected devices. The noticeable part is, when it is turned off or disabled, the BIOS manages the USB port. When it is enabled the operating system gets a chance to manage the USB port. Here, this seems a very silly thing but it has fixed the “No signed device drivers were found” issue for many. The reason is in case your BIOS is not managing the USB port properly, that might be the reason it is not getting detected and found as “Unsigned driver”.
Follow the below steps to perform this method:
- Shut down your computer. Then on your system again.
- Simply press Delete or Esc key continuously. Or you can also go for the key said to the press, available at the bottom left of your startup screen i.e. PRESS ____ TO ENTER SETUP.
- Generally, “xHCL Hand-off” or “BIOS EHCL Hand-off” (Anyone out of this) settings are found in the “Advanced” tab, under the “USB Configuration” option.
- once you found the right setting just “Enable” it. Then Exit by saving the changes.
- Now just try to install your Windows 10 again using the installation media. Once you are done, please again change the xHCL Hand- off settings using the same steps.
WE hope that this has let you install the window by eliminating the issue “No signed device drivers were found” error.

You must consider to pick up some accessories for your laptop to get the best out of your laptop & make it power pack.
- Step 4
Change your systems Boot Mode to Legacy and set the Priority
Support legacy should not be ignored here as this plays an essential role. Making a few changes in support legacy configuration has worked for many. As per users, they found that when they inserted the windows installation media to re-install their system, it just got ignored and taken to the systems Hard disk drive to perform the boot.
This thing has interrupted the readability of inserted installation media resulting in “No signed device drivers were found” issue.
Go with the below-given steps to perform this:
- Follow Step 1 and Step 2 of method 4 again to get into the BIOS.
- Switch to the “System Configuration” tab by navigating using the right arrow key. Then choose “Boot Options” using the down arrow key then tap ENTER to open it. A warning may prompt, just tap the F10 key to continue.
- Now get down to choose the “Secure Boot” option. Then use the right arrow key to modify it i.e. DISABLE.
- Now look for “Legacy Support” on the same screen, choose it, and “Enable” it by pressing ENTER or using the right arrow keys. A confirmation message may prompt, just choose “Yes” using the right or left arrow key then again press Enter.
Change Boot Order
- To change the boot order, go down using at “Legacy boot order”, use F5 and F6 keys to move the devices up or down after selecting them. Here, just take “USB” related options on top as per your requirement. For Example, choose “USB HARD DISK” if your bootable media is USB. This will set the priority order.
- Then tap F10 to accept the changes you have made. A box will prompt, just choose “Yes” and tap ENTER.
- Once it is done, your system will start asking to type the 4-digit code shown on the screen. Type it and tap ENTER to confirm the boot mode changes you have made.
- Once done just tap the Power button to turn off your system. Now insert the Window installation media. After few seconds turn it ON again using the power button and press the “Esc” key continuously till you see the “Startup” window. Once it is opened, just tap on the F9 key to get into the Boot Menu.
- Just choose “Hard disk” from the option by tapping ENTER and go ahead with your installation.
This has worked for many by fixing the “No signed device drivers were found” error, we wish the same for you.
![]()
Note: The steps may vary for different system users according to the manufacturer. This has been written according to HP. But the difference is slight so you go with it.
Tips To Avoid No Signed Device Drivers Were Found Error
- Make sure you are not connecting your bootable device in a malfunctioned system accidentally. Also, protect it from any kind of external damage.
- Clean your CD/DVD drive to avoid any glitch while using it to boot your system.
Contact Official Support
In case no signed device drivers were found the issue is yet not fixed. we recommend you to visit your nearest service center as per your respective manufacturer (Like, HP, DELL, etc). You can also try online official support before visiting.
Do not worry they will provide you the required assistance. Make sure you have warranty information if applicable.
Final Words: Conclusion
Overall, these five solutions should work for you to fix “no signed device drivers were found to make sure the installation media contains the correct drivers, then click ok”. If you have any suggestions related to fixing, do mention us. We would like to proceed with your ideas as well.
Do leave us your feedback after getting rid of this issue. It helps us in evaluating your requirement as well as our input.