Файлы DLL состоят из наборов функций, которые требуются для работы приложений в Windows. Например, диалоговые окна, с которыми работаем в Windows, используют разные функции из библиотеки Comdlg32.dll. Таким образом, каждый процесс так или иначе зависит от DLL-библиотек.
Но иногда после внесения изменений в настройки устройств воспроизведения или записи, система может выбросить ошибку, что Windows Shell Common DLL не отвечает. То есть, окно конфигурации откроется, но когда попытаетесь изменить какую-либо настройку, увидите ошибку, и в результате оно будет закрыто. Это окно конфигурации непосредственно обращается к драйверу аудио устройства. Поэтому если драйвер поврежден или несовместим с Windows, он может привести к этому сбою процесса DLL.

Содержание
- 1 Обновление драйвера
- 2 Отключение звуковых эффектов
- 3 Отключение обязательной проверки подписи драйверов
- 4 Проверка наличия ошибки в режиме чистой загрузки
Обновление драйвера
Несовместимые драйвера аудиоустройств работают вопреки принципу, которые следуют операционные системы Windows 7, 8 и 10. Поэтому нужно проверить, что в системе используется стабильная версия драйверов вместо любой бета-версии. Если видите ошибку, что Windows Shell Common DLL перестал отвечать, нужно скачать последнюю версию программного обеспечения из сайта производителя звукового устройства и установить его через Диспетчера устройств.
Перейдите в «Диспетчер устройств» командой devmgmt.msc, запущенной из окна Win + R.
В окне управления устройствами разверните вкладку «Звуковые, игровые и видеоустройства». Щелкните правой кнопкой мыши на High Definition Audio и выберите «Обновить».
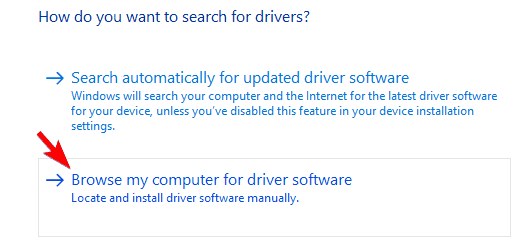
Выберите второй вариант поиска драйверов на этом компьютере и нажмите на кнопку «Обзор». Перейдите в папку с загруженными драйверами и следуйте инструкциям до завершения их установки.
Если ошибка отображается при попытке подключить наушники USB, попробуйте подключить их в порт USB 3.0, чтобы решить эту проблему.
Отключение звуковых эффектов
Если применили какой-либо звуковой эффект, например, выравнивание громкости, то это также способствует появлению ошибки.
Поэтому проверьте, что все эффекты отключены. Также удалите приложение или функцию, способствующую улучшению качества звука.
Отключение обязательной проверки подписи драйверов
В Windows по умолчанию включена проверка подписи драйверов. Но если INF стороннего производителя не содержит информации о цифровой подписи, это может привести к тому, что ОС система не сможет поверить идентичность определенных устройств, и в результате столкнетесь с ошибкой Windows Shell Common DLL.
Для отключения этой функции разверните меню Пуск и кликните на значок питания. Затем удерживая Shift, нажмите на кнопку «Перезагрузка». При отображении окна выбора действия перейдите по пути: Поиск и устранение неисправностей – Дополнительные параметры. Затем в окне среды восстановления перейдите на вкладку «Параметры загрузки» и нажмите на F7, чтобы отключить обязательную проверку подписи драйверов.
После перезагрузки компьютера выполните то действие, которое не удавалось из-за ошибки.
Проверка наличия ошибки в режиме чистой загрузки
Если Windows Shell Common DLL все еще не отвечает, попробуйте обойти ошибку выполнением проблемного действия в режиме чистой загрузки. Вполне возможно, что какое-то стороннее приложение вмешивается в работу компонентов ОС. С помощью чистой загрузки можно определить проблемное программное обеспечение и удалить его.
Откройте окно Конфигурации системы командой msconfig из строки Win + R.
На вкладке Службы отметьте флажком опцию «Не показывать службы Майкрософт». Когда в писке будут отображены только сторонние службы, нажмите кнопку «Отключить все».
Затем на вкладке Автозагрузка перейдите по ссылке в «Диспетчер задач» и отключите все программы, которые запускаются при загрузке WIndows.
При применении изменений система должна запросить перезагрузку, подтвердите это действие. Компьютер будет загружен в режиме чистой загрузки. Выполните то действие, при которой не отвечала оболочка Windows Shell Common DLL.
Если проблема исчезла, включайте службы одну за другой, перезагружая периодически компьютер, пока не определите ту, при которой возвращается ошибка. Если ее обнаружите, оставьте отключенной.
На вашем компьютере могут появляться всевозможные ошибки, но одна из самых раздражающих — Windows Shell Common Dll перестала работать. Эта ошибка может помешать вам использовать стандартные функции Windows, и она может быть довольно проблематичной, поэтому мы покажем вам, как исправить эту ошибку.
Решение 1. Убедитесь, что служба времени Windows работает
Для правильной работы Windows использует различные службы, но иногда эта проблема может возникать из-за отключенных служб. По словам пользователей, Windows Shell Common Dll перестала работать, ошибка начала появляться после выполнения восстановления системы. Кажется, что это сообщение об ошибке не позволяет пользователям изменять свою дату и время, но есть способ исправить это. Чтобы решить эту проблему, вам просто нужно включить службу времени Windows, выполнив следующие действия:
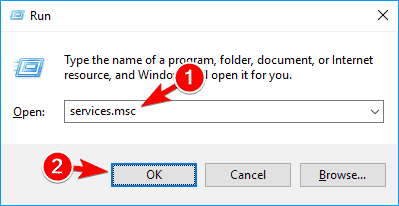
- Нажмите Windows Key + R и введите services.msc. Теперь нажмите Enter или нажмите ОК.

- Окно служб теперь появится. Найдите службу Windows Time, щелкните ее правой кнопкой мыши и выберите « Пуск» в меню.


После запуска службы Windows Time вы сможете без проблем изменять дату и время. Помните, что это решение применимо только в том случае, если сообщение об ошибке появляется при попытке изменить дату и время. Если вы можете без проблем изменить дату или время, это решение не будет применяться к вам.
Решение 2. Используйте другое приложение для изменения настроек микрофона
Это необычный обходной путь, но он работает в зависимости от пользователей. Многие пользователи сообщают, что Windows Shell Common Dll перестала работать ошибка при попытке изменить свои настройки микрофона с Windows. По их словам, вы можете обойти эту проблему, используя другое приложение для доступа к настройкам микрофона. Многим пользователям удалось обойти эту проблему, просто используя Bandicam для изменения настроек своего микрофона. Для этого вам необходимо сделать следующее:
- ЧИТАЙТЕ ТАКЖЕ: Ошибки Xinput1_3.dll на ПК с Windows
- Запустите Bandicam и перейдите в настройки видео. Теперь нажмите кнопку « Настройки» в разделе « Запись ».
- Откроется окно настроек записи. Теперь вам просто нужно нажать кнопку « Настройки» рядом с микрофоном.
- После этого вы увидите стандартное окно настройки микрофона и сможете без проблем изменить настройки.
Имейте в виду, что это всего лишь обходной путь, поэтому вам придется использовать его всякий раз, когда вы хотите отрегулировать настройки микрофона. Программное обеспечение Bandicam — это хороший обходной путь, но если у вас есть какое-либо другое программное обеспечение, позволяющее настроить микрофон, вы можете использовать его вместо этого.
Решение 3 — Переустановите ваши аудио драйверы
По словам пользователей, им удалось исправить Windows Shell Common Dll перестала работать ошибка, просто переустановив свои аудио драйверы. Ваши драйверы могут содержать ошибки, и это может привести к появлению этой ошибки. Чтобы решить эту проблему, многие пользователи предлагают переустановить аудио драйверы. Это довольно просто, и вы можете сделать это, выполнив следующие действия:
- Нажмите Windows Key + X, чтобы открыть меню Win + X, и выберите « Диспетчер устройств» из списка.
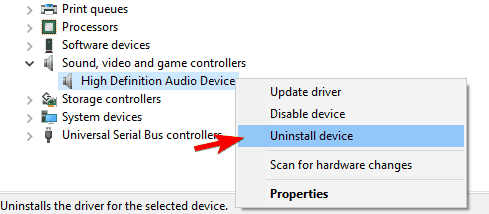
- Когда откроется диспетчер устройств, найдите свой аудио драйвер и щелкните его правой кнопкой мыши. Выберите Удалить устройство из меню.
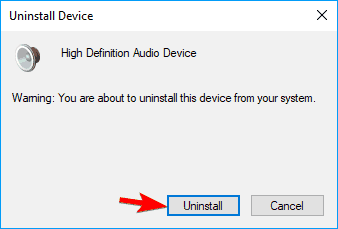
- Откроется диалоговое окно подтверждения. Если доступно, установите флажок Удалить программное обеспечение драйвера для этого устройства. Нажмите на Удалить, чтобы удалить драйвер.
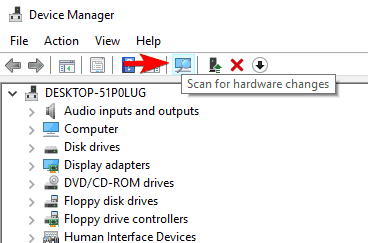
- После удаления драйвера нажмите значок « Сканировать на предмет изменений оборудования».


Теперь Windows автоматически установит отсутствующие драйверы, и проблема должна быть решена полностью. Некоторые пользователи предлагают перезагрузить компьютер вместо выполнения шага 4, поэтому не стесняйтесь попробовать это.
Имейте в виду, что вы должны держаться подальше от любых бета-драйверов. Бета-драйверы не полностью протестированы, и они могут не всегда работать. На самом деле, иногда бета-драйверы могут вызвать эту проблему. Чтобы избежать проблем с совместимостью, рекомендуется всегда использовать последние версии драйверов. Если проблема появляется даже с последними драйверами, вы можете установить более старую версию аудио драйверов.
- ЧИТАЙТЕ ТАКЖЕ: DLL-файлы отсутствуют после установки Windows 10 Creators Update
Решение 4 — Изменить разрешения безопасности ключа UserChoice
Пользователи сообщили, что Windows Shell Common Dll перестала работать ошибка при попытке открыть TXT-файлы на своем ПК. По словам пользователей, эта проблема вызвана тем, что разрешения безопасности для этого ключа отсутствуют. Чтобы решить эту проблему, вам нужно установить разрешения безопасности для этого ключа. Вы можете сделать это, выполнив следующие действия:
- Нажмите Windows Key + R и введите regedit. Нажмите Enter или нажмите ОК.
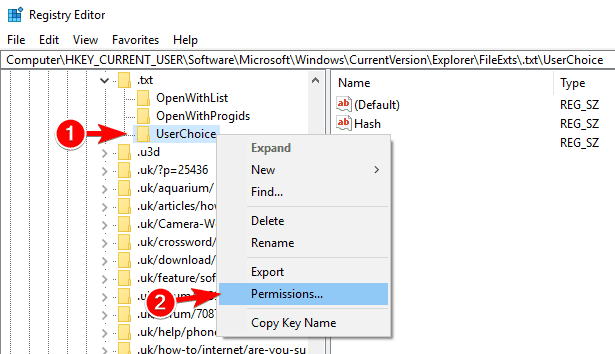
- Когда редактор реестра откроется в левой панели, перейдите к разделу «Компьютер HKEY_CURRENT_USER Software Microsoft Windows CurrentVersion Explorer FileExts .txt UserChoice». Теперь щелкните правой кнопкой мыши ключ UserChoice и выберите « Разрешения» в меню.
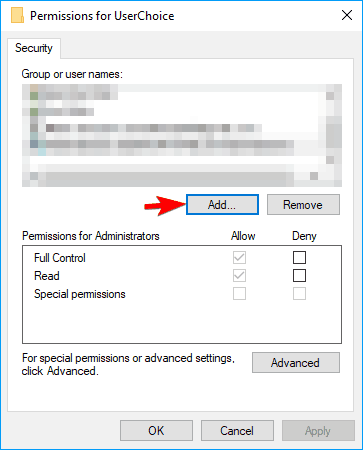
- Если раздел « Группа» или «Имена пользователей » пуст, это означает, что ваши разрешения безопасности отсутствуют, поэтому вам необходимо добавить их снова. Если разрешения безопасности не пропущены, это решение не будет применяться к вам, поэтому вы можете просто пропустить его.
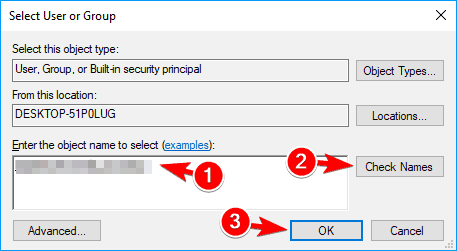
- Чтобы добавить отсутствующие разрешения, нажмите кнопку « Добавить».
- В поле Введите имена объектов для выбора введите « Администраторы» и нажмите « Проверить имена». Если все в порядке, нажмите ОК.
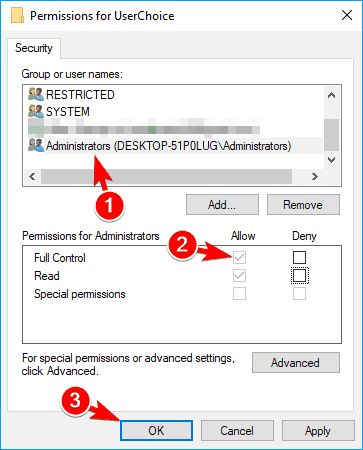
- Группа администраторов теперь будет добавлена в список групп или имен пользователей. Выберите « Администраторы» из списка и выберите « Полный доступ» в столбце « Разрешить». Теперь нажмите OK и Применить, чтобы сохранить изменения.
- Необязательно: Возможно, вам придется добавить SYSTEM, RESTRICTED и ваше имя пользователя в список, выполнив шаги, описанные выше.


После изменения настроек безопасности для ключа UserChoice проблема должна быть полностью решена. Имейте в виду, что это решение применяется только в том случае, если эта ошибка появляется при попытке открыть файлы.txt. Если вы можете открыть.txt файлы без проблем, вы можете полностью пропустить это решение.
Решение 5 — Обновите драйвер сенсорной панели
Многие пользователи сообщили об этой проблеме на своих ноутбуках, и, похоже, проблема была в их драйвере тачпада. По словам пользователей, драйвер тачпада Elantech привел к тому, что Windows Shell Common Dll перестала работать ошибка, но пользователи исправили ее, просто обновив драйвер тачпада. Имейте в виду, что эта ошибка может появляться даже с другими драйверами сенсорной панели, поэтому даже если вы не используете сенсорную панель Elantech, обязательно обновите драйвер до последней версии.
Несколько пользователей сообщили, что они устранили проблему, удалив программное обеспечение сенсорной панели Elan со своего ПК, поэтому не стесняйтесь попробовать это тоже.
- ЧИТАЙТЕ ТАКЖЕ: уязвимость безопасности Windows gdi32.dll исправлена сторонним 0patch
Решение 6 — Подключите стерео ресивер к порту USB 3.0
Несколько пользователей сообщили, что Windows Shell Common Dll перестала работать из-за ошибки при использовании стереоресивера с ПК. По их словам, приемник был подключен к порту USB 2.0, и это привело к появлению ошибки. Чтобы решить проблему, вам просто нужно подключить стерео ресивер к порту USB 3.0, и проблема должна быть полностью решена.
Решение 7. Скопируйте необходимые файлы в каталог System32.
По словам пользователей, Windows Shell Common Dll перестала работать, появляется ошибка при попытке настройки параметров геймпада. Чтобы решить эту проблему, вам нужно скопировать один файл в каталог System32. Для этого выполните следующие действия:
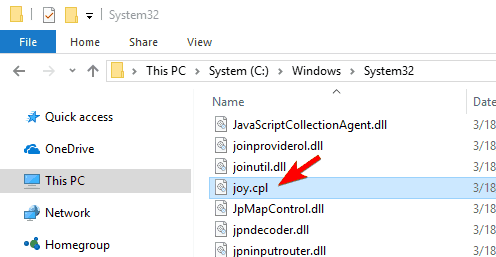
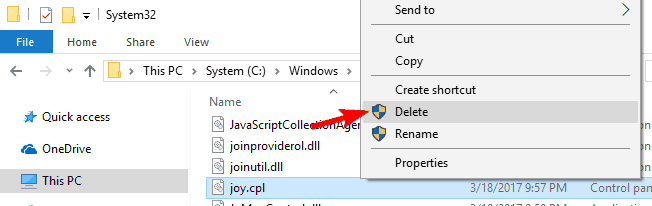
- Перейдите в каталог C: Windows System32. Найдите joy.cpl и скопируйте его на рабочий стол.
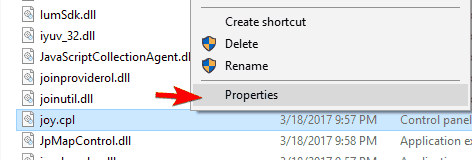
- Щелкните правой кнопкой мыши joy.cpl и выберите « Свойства» в меню.
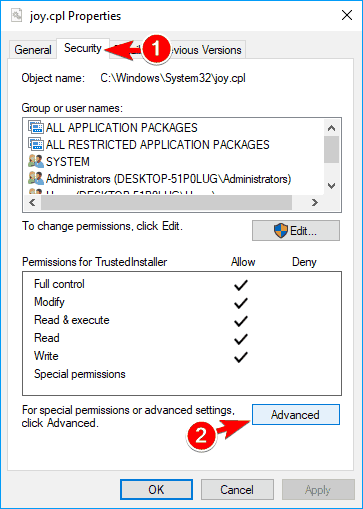
- Перейдите на вкладку « Безопасность » и нажмите « Дополнительно».
- Найдите раздел « Владелец » и нажмите « Изменить».
- Теперь введите свое имя пользователя в поле « Введите имя объекта» и нажмите « Проверить имена». Если все в порядке, нажмите OK, чтобы сохранить изменения.
- После этого нажмите Apply и OK, чтобы сохранить изменения.
- После вступления во владение joy.cpl удалите его.
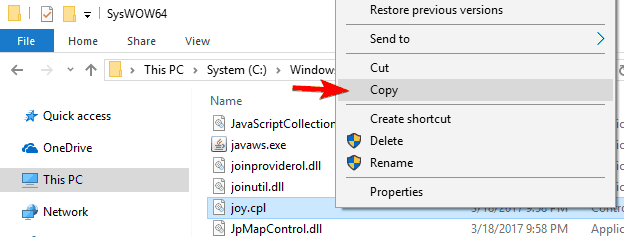
- После удаления файла перейдите в каталог C: Windows SysWOW64. Найдите файл joy.cpl и скопируйте его в каталог C: Windows System32.


После того, как вы скопируете файл, проблема должна быть решена, и вы сможете без проблем получить доступ к настройкам геймпада из Windows.
Решение 8 — Удалить программное обеспечение Intellipoint и драйвер Synaptics
По словам пользователей, Windows Shell Common Dll перестала работать, ошибка может появиться из-за программного обеспечения Intellipoint и драйвера Synaptics. Эти два несовместимы, и для решения проблемы необходимо удалить их обоих с вашего ПК. После этого вы можете скачать и установить последнюю версию Intellipoint.
- ЧИТАЙТЕ ТАКЖЕ: Исправлено: отсутствует ошибка VCOMP140.DLL в Windows 10
Теперь вам просто нужно снова установить драйвер Synaptics. Несколько пользователей предположили, что вы можете исправить эту ошибку, просто установив драйвер вручную из диспетчера устройств. Для этого вам нужно извлечь драйвер Synaptics и сделать следующее:
- Откройте диспетчер устройств.
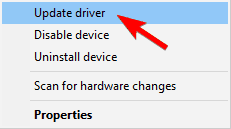
- Найдите сенсорную панель в диспетчере устройств, щелкните ее правой кнопкой мыши и выберите « Обновить драйвер».
- Теперь выберите Обзор моего компьютера для программного обеспечения драйвера.
- Нажмите на Обзор и найдите извлеченные файлы драйвера. Установите флажок «Включить подфодлеры» и нажмите « Далее», чтобы установить драйвер.


После установки драйвера вручную проблема должна быть полностью решена.
Решение 9 — Отключить аппаратный графический ускоритель в Office
Windows Shell Common Dll перестала работать, ошибка может затронуть практически любое приложение, и Outlook не является исключением. Однако вы можете решить эту проблему, просто отключив аппаратный графический ускоритель. Это просто, и вы можете сделать это, выполнив следующие действия:
- Откройте Outlook или любое другое приложение Office.
- Выберите « Файл»> «Параметры»> «Дополнительно».
- Теперь найдите и отключите опцию Аппаратный графический ускоритель.
После отключения этой функции сообщение об ошибке перестает отображаться, и вы сможете без проблем использовать Outlook.
Решение 10 — Удалить плагин Outlook для Microsoft Dynamics CRM
Outlook имеет различные плагины, которые расширяют его функциональные возможности, но иногда эти плагины могут привести к тому, что Windows Shell Common Dll перестает работать, появляется ошибка. Чтобы устранить эту проблему, пользователи рекомендуют удалить плагин Outlook для Microsoft Dynamics CRM с вашего ПК. После этого проблема должна перестать появляться, и вы сможете снова использовать Outlook. Если проблема не устранена, возможно, вам придется удалить свой профиль Outlook и заново создать его, чтобы устранить проблему.
Решение 11. Обновите драйверы AMD
Несколько пользователей сообщили, что Windows Shell Common Dll перестала работать, появляется ошибка из-за проблем с драйверами AMD. Если у вас установлены драйверы AMD, мы настоятельно рекомендуем вам удалить их и установить последнюю версию. По словам пользователей, обновление драйверов AMD устранило проблему для них, поэтому обязательно попробуйте это.
- ЧИТАЙТЕ ТАКЖЕ: Исправлено: ошибка SysMenu.dll в Windows 10
Решение 12. Отключите или удалите антивирусное программное обеспечение
Наличие антивирусного программного обеспечения довольно важно, но иногда ваш антивирус может вызывать появление ошибки Windows Shell Common Dll. Чтобы устранить проблему, вам необходимо отключить антивирусное программное обеспечение и проверить, решает ли это проблему. Если проблема не устранена, возможно, вам придется полностью удалить антивирусное программное обеспечение. Мы также должны упомянуть, что антивирусные инструменты имеют тенденцию оставлять оставшиеся файлы. Чтобы полностью удалить антивирус, вам нужно использовать специальный инструмент для удаления. Большинство антивирусных компаний предлагают средства для удаления своего программного обеспечения, поэтому обязательно загрузите один из них для своего антивируса.
Если удаление антивируса решает проблему, вам просто нужно установить его снова или переключиться на другое антивирусное решение. Пользователи сообщили, что эта ошибка была вызвана программным обеспечением CA Anti-Virus, поэтому обязательно удалите этот инструмент с вашего компьютера. Даже если вы не используете этот инструмент, вы можете попробовать отключить и удалить антивирус и проверить, решает ли это проблему.
Решение 13 — Отключить улучшения звука
Многие пользователи любят использовать различные улучшения звука, чтобы изменить качество звука. Тем не менее, иногда эти улучшения могут привести к тому, что Windows Shell Common Dll перестала работать. Чтобы решить эту проблему, необходимо отключить все улучшения звука, такие как эквалайзеры или любые другие функции улучшенного звука. Обычно эти функции можно найти в программном обеспечении для настройки аудио драйвера. После отключения всех этих улучшений звука проблема должна быть решена.
Решение 14. Удалите ненужные аудиоустройства из диспетчера устройств.
Если у вас возникли проблемы с настройками звука из-за того, что Windows Shell Common Dll перестала работать, вы можете исправить их, удалив ненужные аудиоустройства из диспетчера устройств. Это относительно просто, и вы можете сделать это, выполнив следующие действия:
- ЧИТАЙТЕ ТАКЖЕ: Исправлено: ошибки Autorun.dll в Windows 10
- Откройте диспетчер устройств.
- Теперь перейдите в « Просмотр»> «Показать скрытые устройства».
- Найдите любое неизвестное аудиоустройство и удалите его.

Пользователи сообщили, что причиной этой проблемы был Sndt Audio, но после удаления его драйвера и программного обеспечения проблема была полностью решена.
Решение 15 — Удалить сенсорный базовый UPDD
Ваши драйверы могут часто вызывать ошибку Windows Shell Common Dll перестала работать. Несколько пользователей сообщили, что проблема возникла из-за программного обеспечения Touch-Base UPDD, и для его устранения необходимо удалить его. После удаления проблемного программного обеспечения проблема должна быть полностью решена, и все снова начнет работать.
Решение 16. Запустите сканирование SFC
Иногда эта ошибка может появиться, если ваши системные файлы повреждены. Повреждение файла может произойти по разным причинам, но вы должны быть в состоянии исправить это, выполнив сканирование SFC. Для этого вам необходимо выполнить следующие шаги:
- Нажмите Windows Key + X и выберите Командную строку (Admin) из списка. Если командная строка недоступна, вы можете выбрать PowerShell (Admin).
- Когда запускается командная строка, введите sfc / scannow и нажмите Enter, чтобы запустить ее.
- Сканирование начнется. Имейте в виду, что сканирование SFC может занять около 10-15 минут, поэтому не прерывайте его.

По завершении сканирования проверьте, не исчезла ли проблема. Если проблема не решена или вы не можете запустить сканирование SFC вообще, вам, возможно, придется использовать сканирование DISM. Для этого просто запустите командную строку от имени администратора и введите DISM / Online / Cleanup-Image / RestoreHealth и нажмите Enter, чтобы запустить его. Сканирование DISM теперь попытается восстановить вашу систему, поэтому не прерывайте ее. Этот процесс может занять более 15 минут, поэтому вам придется набраться терпения.
Решение 17 — Используйте PowerShell
По словам пользователей, Windows Shell Common Dll перестала работать, ошибка может появиться из-за того, что Windows не настроена на прием сертификатов. Тем не менее, вы можете легко решить эту проблему с помощью PowerShell. Мы должны предупредить вас, что PowerShell — это мощный инструмент, и при неправильном использовании вы можете повредить свою систему. Чтобы устранить эту проблему с PowerShell, выполните следующие действия:
- ЧИТАЙТЕ ТАКЖЕ: Исправлено: wdsutil.dll отсутствует / не найден в Windows 10
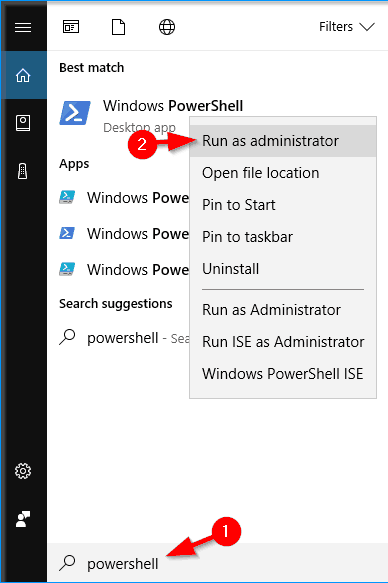
- Нажмите Windows Key + S и введите powershell. Щелкните правой кнопкой мыши Windows PowerShell и в меню выберите « Запуск от имени администратора».
- Когда запускается командная строка, введите Set-ExecutionPolicy -ExecutionPolicy Unrestricted -Scope CurrentUser и нажмите Enter, чтобы запустить ее.

После выполнения этой команды вам просто нужно перезагрузить компьютер, и проблема должна быть полностью решена.
Решение 18. Использование системы обслуживания
Немногие пользователи утверждают, что они решили проблему, просто запустив средство устранения неполадок обслуживания системы. Это встроенный инструмент, который иногда может решить различные проблемы с Windows. Чтобы использовать этот инструмент, вам просто нужно сделать следующее:
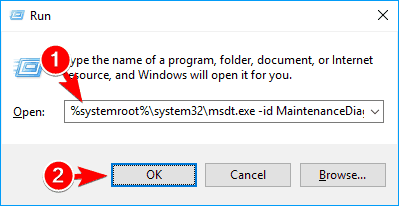
- Нажмите клавишу Windows + R и введите % systemroot% system32 msdt.exe -id MaintenanceDiagnostic. Теперь нажмите Enter или нажмите OK, чтобы запустить его.
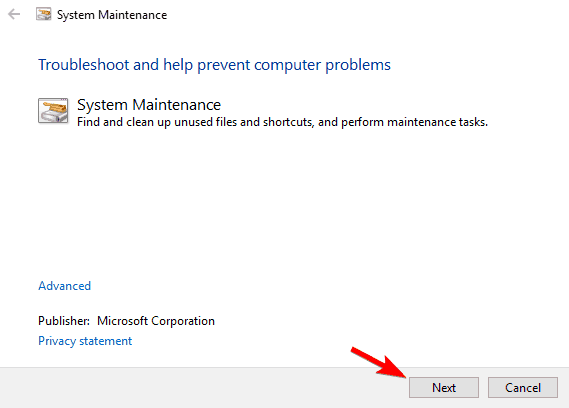
- Инструмент обслуживания системы теперь появится. Нажмите Далее, чтобы продолжить и следуйте инструкциям на экране.


После завершения технического обслуживания системы проблема должна быть решена.
Решение 19 — Перерегистрация ваших DLL
Если вы получаете сообщение об ошибке Windows Shell Common Dll перестало работать, причиной могут быть ваши DLL-файлы, в частности, shell32.dll. По словам пользователей, файлы DLL могут стать незарегистрированными по неизвестной причине, и это может вызвать появление этого сообщения об ошибке. Чтобы решить эту проблему, вам просто нужно перерегистрировать shell32.dll. Для этого выполните следующие действия:
- Откройте командную строку от имени администратора.
- После запуска командной строки введите команду regsvr32 / i shell32.dll и нажмите Enter, чтобы запустить ее.
После выполнения команды файл shell32.dll будет перерегистрирован, и сообщение об ошибке должно перестать появляться.
Решение 20 — Переустановите проблемное приложение
На всех наших компьютерах установлены сторонние приложения, но эта ошибка может появиться практически в любом приложении. Если эта ошибка появляется в ваших любимых приложениях, мы советуем вам переустановить их и проверить, решает ли это проблему. Помимо переустановки, обязательно обновите проблемное приложение до последней версии и проверьте, сохраняется ли проблема. Если разработчики знают об этой проблеме, вполне вероятно, что проблема была решена, и вы сможете исправить ее, просто обновив свое приложение.
- ЧИТАЙТЕ ТАКЖЕ: Исправлено: отсутствующие DLL-файлы после ежегодного обновления
Решение 21. Выполните чистую загрузку
Если Windows Shell Common Dll перестала работать, на вашем компьютере часто появляется сообщение об ошибке, возможно, это вызвано сторонним приложением. Windows запускается с различными сторонними приложениями и службами, и иногда приложения и службы могут вызывать эту проблему. Чтобы устранить эту проблему, необходимо отключить все запускаемые приложения и службы, выполнив следующие действия:
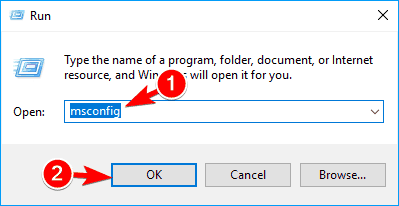
- Нажмите Windows Key + R и введите msconfig. Нажмите Enter или нажмите ОК.
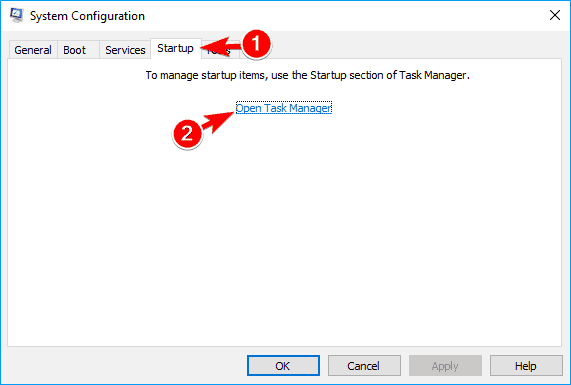
- Перейдите на вкладку « Службы » и установите флажок « Скрыть все службы Microsoft». Теперь нажмите Отключить все.
- Перейдите на вкладку « Автозагрузка » и нажмите « Открыть диспетчер задач».
- Когда откроется диспетчер задач, найдите первый элемент в списке, щелкните его правой кнопкой мыши и выберите « Отключить» в меню. Повторите это для всех элементов в списке.
- После этого вернитесь в окно System Configuration и нажмите Apply и OK.


Теперь вам просто нужно перезагрузить компьютер и проверить, появляется ли проблема. Если нет, то наверняка эта ошибка вызывается сторонним приложением или службой.
Чтобы найти проблемный сервис, вам нужно повторить те же шаги и включить отключенные приложения и сервисы по одному. Имейте в виду, что вам необходимо перезагрузить компьютер после включения набора служб или приложений, чтобы применить изменения. Найдя проблемное приложение, вы можете оставить его отключенным, удалить его или переустановить и проверить, решает ли это проблему.
Решение 22. Удалите файлы.wmv из каталога Synaptics.
В одном из наших предыдущих решений мы упоминали, что драйверы Synaptics могут иногда приводить к тому, что Windows Shell Common Dll перестает работать и появляется сообщение об ошибке. Очевидно, что пользователи не могут настраивать или получать доступ к настройкам Synaptics, и это может быть большой проблемой.
Оказывается, что окно конфигурации Synaptics воспроизводит демонстрацию видео при настройке сенсорной панели, и эти видео могут быть причиной этой проблемы. В качестве обходного пути, пользователи предлагают перейти к C: Program Files Synaptics SynTP каталог и удалить все файлы.wmv оттуда. После удаления файлов.wmv проблема должна быть решена, и все начнет работать без проблем.
- ЧИТАЙТЕ ТАКЖЕ: Исправлено: ошибка Rundll32.exe в Windows 10
Немногие пользователи утверждают, что вы можете решить эту проблему, просто переименовав файл igdumdim64.dll в каталоге System32. Прежде чем вы сможете переименовать файл, вы должны стать владельцем этого файла. В Решении 7 мы кратко продемонстрировали, как стать владельцем определенного файла, поэтому обязательно ознакомьтесь с ним для получения подробных инструкций.
Решение 23. Установите последние обновления Windows
По словам пользователей, вы можете решить эту проблему, просто установив последние обновления Windows. Microsoft решает различные проблемы, и если это серьезная проблема, возможно, вы сможете исправить ее, обновив Windows. В большинстве случаев Windows 10 автоматически загружает обновления, но иногда вы можете пропустить важное обновление. Однако вы всегда можете проверить и установить отсутствующие обновления вручную. Для этого выполните следующие действия:
- Откройте приложение «Настройки». Чтобы сделать это быстро, вы можете просто нажать Windows Key + I на клавиатуре.
- После открытия приложения Настройки перейдите в раздел « Обновление и безопасность ».
- Теперь нажмите кнопку Проверить наличие обновлений. Теперь Windows проверит отсутствующие обновления и загрузит их в фоновом режиме.


После загрузки обновлений они будут установлены автоматически после перезагрузки компьютера.
Решение 24 — Создать новую учетную запись пользователя
Иногда Windows Shell Common Dll перестала работать, ошибка может повлиять только на одну учетную запись пользователя на вашем компьютере. Если это так, вы можете создать новую учетную запись пользователя на своем ПК в качестве обходного пути. Чтобы создать новую учетную запись, сделайте следующее:
- Откройте приложение «Настройки» и перейдите в раздел « Аккаунты ».
- На левой панели выберите Семья и другие люди. На правой панели нажмите Добавить кого-то еще на этот компьютер.
- Нажмите, у меня нет информации для входа этого человека.
- Теперь вам будет предложено создать новую учетную запись Microsoft. Нажмите Добавить пользователя без учетной записи Microsoft.
- Теперь введите желаемое имя пользователя и нажмите Далее.


После создания новой учетной записи переключитесь на нее и проверьте, появляется ли проблема по-прежнему. Если нет, вам, возможно, придется перенести файлы в новую учетную запись и использовать ее вместо старой.
- ЧИТАЙТЕ ТАКЖЕ: Как исправить ошибку WSClient.DLL в Windows 10 Builds
Решение 25 — переименовать olmapi32.dll
Как упоминалось ранее, Windows Shell Common Dll перестала работать, ошибка может затронуть практически любое приложение, и пользователи сообщали об этой проблеме в Outlook 2016. Похоже, что проблема вызвана одним файлом.dll, и для ее устранения необходимо найти и переименовать этот файл. Для этого просто перейдите в корневой каталог Office16 C: Program Files Microsoft Office и переименуйте файл olmapi32.dll.
После этого попробуйте снова запустить Outlook. Если проблема не устранена, вы можете восстановить установку Office.
Решение 26 — Сброс Windows 10
Если сообщение об ошибке все еще появляется, и это делает ваш компьютер практически непригодным для использования, вы можете попробовать сбросить Windows 10. Мы должны упомянуть, что сброс удалит все файлы с вашего системного диска, поэтому обязательно сделайте резервную копию их заранее. В дополнение к резервному копированию ваших файлов вам также может понадобиться установочный носитель Windows 10, поэтому обязательно создайте его с помощью Media Creation Tool. После резервного копирования файлов вы можете сбросить Windows 10, выполнив следующие действия:
- Откройте меню «Пуск», нажмите кнопку питания, нажмите и удерживайте клавишу Shift и выберите « Перезагрузка» из меню.
- Выберите Устранение неполадок> Сбросить этот компьютер> Удалить все.
- Для продолжения может потребоваться вставить установочный носитель Windows, поэтому убедитесь, что он готов.
- Выберите вашу версию Windows и выберите Только диск, на котором установлена Windows> Просто удалите мои файлы.
- Теперь вы увидите список изменений, которые выполнит сброс. Если вы готовы начать, нажмите кнопку « Сброс».
- Следуйте инструкциям на экране для завершения сброса.
После завершения процесса сброса у вас будет новая установка Windows 10. Теперь вам просто нужно переместить файлы из резервной копии и установить все ваши приложения. Это радикальное решение, поэтому вы должны использовать его, только если другие решения не могут решить проблему.
Windows Shell Common Dll перестала работать. Сообщение об ошибке может вызвать много проблем на вашем компьютере, но вы должны быть в состоянии исправить это с помощью одного из наших решений.
ЧИТАЙТЕ ТАКЖЕ:
- Исправлено: Opencl.dll проблемы в Windows 10
- Исправлено: DLL файлы отсутствуют на вашем компьютере с Windows 10
- Как исправить сообщение «Ваше местоположение в данный момент используется» в Windows 10, 8
- Исправлено: MSVCR100.dll и MSVCP100.dll отсутствуют после обновления до Windows 10
- Как исправить распространенные проблемы синхронизации OneNote в Windows 10
DLL — это библиотеки динамических ссылок и внешние компоненты приложений, присутствующие в операционной системе. Если есть необходимость в коде, связанный с ним DLL-файл загружается в память и используется. Если это не удается, программа может перестать работать. В такие моменты вы можете получить следующее сообщение во время работы над программами:
Windows Shell Common Dll has stopped working. A problem caused the program to stop working correctly. Windows will close the program and notify you if a solution is available.

Windows Shell Common DLL перестала работать
Когда вы получите сообщение об ошибке, у вас есть возможность только закрыть программу. Если это происходит часто, вам может потребоваться устранить проблему.
1] Обновление Windows или Загрузка драйверов с веб-сайта производителей
Эта проблема может быть вызвана неисправными драйверами. Таким образом, первым шагом должно быть запуск Windows Update и обновление драйверов.
На основе приложения, которое вызывает ошибку при запуске, мы должны определить неисправный драйвер. Если Windows Update не помогло, драйверы можно загрузить с веб-сайта производителя.
2] Запустите средство устранения неполадок обслуживания системы
Запустите средство устранения неполадок обслуживания системы. Это поможет исправить общие проблемы с Windows.
3] Перерегистрируйте файл shell32.dll
Нажмите Win + R и откройте окно Run. Скопируйте-вставьте следующую команду в окно «Запуск» и нажмите «Ввод»:
regsvr32 /i shell32.dll
4] Запустите сканирование SFC
Сканирование SFC проверяет и восстанавливает поврежденные файлы Windows. Это может помочь решить проблему, если системный файл стал искаженным.
5] Разрешить Windows принимать сертификаты
Часто Windows настроена на блокировку сертификатов. Теперь, когда Windows нуждается в этих сертификатах для проверки подлинности драйверов, становится сложно проверить драйверы, даже если они установлены правильно. Чтобы исправить это, выполните следующую процедуру:
Откройте Windows PowerShell в качестве администратора и выполните следующую команду:
Set-ExecutionPolicy -ExecutionPolicy Unrestricted -Scope CurrentUser

Подождите, пока команда выполнит и перезапустит систему.
6] Если вы получаете ошибку при запуске конкретной программы, восстановите или переустановите программу
Если вы получаете эту ошибку для определенного программного обеспечения или программы, ее следует ремонтировать или переустанавливать.
Перейти к Панель управления и выберите Программы и файлы, Щелкните правой кнопкой мыши по вашей программе и восстановите ее или удалите. Если вы удалите его, переустановите программу после перезапуска системы.
7] Загрузите систему в состояние чистой загрузки и устраните проблему вручную
Вы можете перезагрузить систему в состоянии чистой загрузки. Это поможет диагностировать и устранять проблемы с расширенными окнами.
Как правило, упомянутые выше шаги должны помочь решить проблему. Всего наилучшего!
Tweet
Share
Link
Plus
Send
Send
Pin
Содержание
- 1 Решение 1. Обновите драйверы вашего устройства
- 2 Решение 2. Используйте инструмент проверки системных файлов
- 3 Решение 3. Используйте Windows PowerShell

Работа программ в Windows зависит от файлов Dll. Если файл Dll дает сбой, ваша программа может не работать, и там вы получаете ошибку Перестал работать Windows Shell Common Dll. Этот небольшой урок даст вам решения для ошибки. Пожалуйста, не торопитесь, следуя простым шагам ниже, чтобы попытаться решить ее на вашем компьютере
Решение 1. Обновите драйверы вашего устройства
Устаревшие или поврежденные драйверы в вашей Windows могут вызывать различные проблемы, включая проблему, о которой мы говорим. Поэтому обязательно обновите драйверы устройства на вашем компьютере. Как сообщили пользователи, проблема всегда связана со звуковым устройством. Таким образом, вы можете сначала обновить аудио драйвер.
Чтобы обновить драйверы, вы можете разрешить Windows обновлять их в диспетчере устройств.
1)
Нажмите Windows ключ + р одновременно нажмите кнопку, чтобы открыть окно «Выполнить».
Тип devmgmt.msc в поле и ударил Войти открыть диспетчер устройств.

2)
Затем разверните диалоговое окно устройства и щелкните правой кнопкой мыши на программное обеспечение драйвера, которое вы хотите обновить.
Тогда выбирай Обновить драйвер или некоторые другие опции, связанные с обновлением.

3)
Нажмите Автоматический поиск обновленного программного обеспечения драйвера.

Теперь Windows автоматически обнаружит обновление для вашего драйвера. Следуйте инструкциям на экране, если обнаружено обновление.
Замечания: По некоторым причинам Microsoft не всегда может обнаружить обновление. Чтобы не пропустить последний драйвер, рекомендуется Водитель Легко помочь тебе.
Driver Easy — чрезвычайно безопасный и полезный инструмент для водителя. Это может помочь вам отсканировать все отсутствующие и устаревшие драйверы и найти правильные для вас. С этими Бесплатная версия, Вы можете установить новый драйвер один за другим. Но если обновить его Pro версия, все ваши драйверы могут быть обновлены одним щелчком мыши — Обновить все.

Не беспокойтесь, чтобы попробовать его Pro версию, так как она поставляется без вопросов 30-дневная гарантия возврата денег а также профессиональная техническая поддержка 24/7.
Решение 2. Используйте инструмент проверки системных файлов
Средство проверки системных файлов (SFC) может помочь вам восстановить отсутствующие или поврежденные файлы Windows, включая Dlls. Для запуска sfc scan на вашем компьютере выполните следующие действия.
1)
Тип CMD в поле поиска из меню Пуск.
Затем щелкните правой кнопкой мыши на командной строке в верхнем результате и нажмите Запустить от имени администратора.
Нажмите да когда предложено контролем учетной записи пользователя.

2)
Тип SFC / SCANNOW в открывшемся окне и нажмите Войти запустить его.

Подождите до подтверждения 100% полный.
Решение 3. Используйте Windows PowerShell
Если ваша операционная система не может проверить подлинность устройств (таких как устройства воспроизведения и записи) и их драйверов, вы также встретите ошибку. В таком случае мы можем использовать PowerShell для настройки Windows на прием сертификатов.
1)
Тип PowerShell в поле поиска из меню Пуск.
Затем щелкните правой кнопкой мыши на Windows PowerShell из верхнего результата и выберите Запуск от имени администратора.

2)
Нажмите да когда подсказано Контроль учетной записи пользователя.

3)
Введите следующую команду во всплывающем окне и нажмите Войти.
Set-ExecutionPolicy -ExecutionPolicy Неограниченный -Scope CurrentUser

4)
Когда команда будет выполнена, закройте окно и перезагрузите компьютер.
Это все, что нужно сделать.
Надеюсь, что ваша ошибка была решена с помощью решений здесь.
РЕКОМЕНДУЕМ: Нажмите здесь, чтобы исправить ошибки Windows и оптимизировать производительность системы
Процесс, известный как Windows Shell Common Dll или Felles DLL-fil для Windows-skall, принадлежит программному обеспечению Microsoft Windows Operating System, Operativsystemet, Microsoft Windows или Microsoft Windows.
Описание: Shell32.dll не является необходимым для ОС Windows и вызывает относительно небольшое количество проблем. Shell32.dll находится в папке C: Windows System32. Известные размеры файлов в Windows 10/8/7 / XP составляют 13 179 660 байт (36% всех вхождений), 8 463 872 байт и еще 16 вариантов.
Программное обеспечение загружается во время процесса загрузки Windows (см. Раздел реестра: ShellServiceObjectDelayLoad). Это не системный файл Windows. Файл подписан Microsoft. Shell32.dll способен записывать ввод с клавиатуры и мыши. Поэтому технический рейтинг надежности 14% опасности. но вы также должны сравнить этот рейтинг с отзывами пользователей.
Удаление этого варианта: Если у вас есть какие-либо проблемы с shell32.dll, вы также можете сделать следующее:
1) безопасно удалить программу с помощью программы удаления Microsoft Windows (Панель управления ⇒ Удалить программу)
2) зайдите в зону поддержки сайта Microsoft.
Важно: некоторые вредоносные программы маскируются под shell32.dll, особенно если они не находятся в папке C: Windows System32. Таким образом, вы должны проверить файл shell32.dll на вашем ПК, чтобы убедиться, что это угроза. Мы рекомендуем Security Task Manager для проверки безопасности вашего компьютера. Это был один из лучших вариантов загрузки The Washington Post и PC World .
Аккуратный и опрятный компьютер — это главное требование для избежания проблем с shell32. Это означает запуск сканирования на наличие вредоносных программ, очистку жесткого диска с использованием 1 cleanmgr и 2 sfc / scannow, 3 удаления ненужных программ, проверку наличия программ автозапуска (с использованием 4 msconfig) и включение автоматического обновления Windows 5. Всегда не забывайте выполнять периодическое резервное копирование или, по крайней мере, устанавливать точки восстановления.
Если у вас возникла реальная проблема, попробуйте вспомнить последнее, что вы сделали, или последнее, что вы установили до того, как проблема появилась впервые. Используйте команду 6 resmon для определения процессов, которые вызывают вашу проблему. Даже для серьезных проблем, вместо переустановки Windows, лучше восстановить вашу установку или, для Windows 8 и более поздних версий, выполнить команду 7 DISM.exe / Online / Cleanup-image / Restorehealth. Это позволяет восстановить операционную систему без потери данных.
Security Task Manager показывает все запущенные сервисы Windows, включая внедренные скрытые приложения (например, мониторинг клавиатуры или браузера, авто вход). Уникальный рейтинг риска безопасности указывает на вероятность того, что процесс является потенциальным шпионским ПО, вредоносным ПО или трояном. B Malwarebytes Anti-Malware обнаруживает и удаляет спящие шпионские, рекламные программы, трояны, клавиатурные шпионы, вредоносные программы и трекеры с вашего жесткого диска.
Связанный файл:
rooksbas.dll dragon.exe trustadssvc.exe shell32.dll lmir0001.tmp_r.bat sua.exe droid4xservice.exe asustpcenter.exe qfanhelp.exe 000stthk.exe tomtomhomeservice.exe
Shell32.dll Загрузить
- Разработчик:
- Microsoft
- Описание:
- Windows Shell Common Dll
- Рейтинг:
Вы запускаете:
Windows 7
![]()
Файл DLL найден в нашей базе данных DLL.
Дата обновления базы данных dll:
04 Feb 2023
![]()
специальное предложение
См. дополнительную информацию о Outbyte и удалении :инструкции. Пожалуйста, просмотрите Outbyte EULA и Политика конфиденциальности
Нажмите «Загрузить Сейчас», чтобы получить утилиту для ПК, которая идет с shell32.dll. Утилита автоматически определит отсутствующие dll и предложит установить их автоматически. Будучи простой в использовании утилитой, она является отличной альтернативой ручной установке, что было признано многими компьютерными экспертами и компьютерными журналами. Ограничения: пробная версия предлагает неограниченное количество сканирований, резервное копирование, бесплатное восстановление реестра Windows. Полную версию необходимо приобрести. Она поддерживает такие операционные системы, как Windows 10, Windows 8 / 8.1, Windows 7 и Windows Vista (64/32 bit).
Размер файла: 3,04 Мб, Время загрузки: < 1 мин. на DSL/ADSL/кабеле
Так как вы решили посетить эту страницу, есть шанс, что вы ищете либо файл shell32.dll, либо способ исправить ошибку “shell32.dll отсутствует”. Просмотрите информацию ниже, которая объясняет, как решить вашу проблему. На этой странице вы также можете скачать файл shell32.dll
Что такое Shell32.dll?
Shell32.dll — файл DLL (Dynamic Link Library): разработанный_, который относится к основным системным файлам ОС Windows. Обычно он содержит набор процедур и функций драйвера, которые могут применяться Windows.
Для чего используется Shell32.dll?
Shell32.dll file, также известен как Windows Shell Common Dll, обычно ассоциируется с Microsoft® Windows® Operating System. Это важный компонент, обеспечивающий правильную работу программ Windows. Таким образом, отсутствие файла shell32.dll может отрицательно сказаться на работе связанного программного обеспечения.
Что такое Shell32.dll пропущена ошибка означает?
Есть несколько причин, которые могут привести к ошибкам shell32.dll. К ним относятся проблемы с реестром Windows, вредоносное программное обеспечение, неисправные приложения и т.д.
Сообщения об ошибках, связанные с файлом shell32.dll, также могут указывать на то, что файл был неправильно установлен, поврежден или удален.
Другие распространенные ошибки shell32.dll включают:
- “shell32.dll отсутствует”
- “shell32.dll ошибка загрузки”
- “shell32.dll сбой”
- “shell32.dll не найден”
- “shell32.dll не может быть обнаружен”
- “shell32.dll Нарушение Доступа”
- “Ошибка процедуры входа shell32.dll”
- “Невозможно найти shell32.dll”
- “Невозможно зарегистрировать shell32.dll”
shell32.dll — Системная Ошибка
Программа не может работать, потому что shell32.dll отсутствует на вашем компьютере. Попробуйте переустановить программу, чтобы исправить проблему.
Как исправить ошибку Shell32.dll отсутствует?
Если появляется оштбка “shell32.dll отсутствует”, решить проблемы можно используя один из приведенных ниже методов — ручной или автоматический. Ручной метод предполагает, что вы загружаете файл shell32.dll и помещаете его в папку установки игры/приложения, в то время как второй метод гораздо проще, так как позволяет автоматически исправить ошибку с минимальными усилиями.
- Метод 1: Загрузить Shell32.dll
- Метод 2: Исправить ошибку отсутствующего Shell32.dll автоматически
- Метод 3: Обновите драйверы для восстановления отсутствующих .dll-файлов
- Метод 4: Просканируйте свой ПК на вирусы, чтобы исправить ошибку shell32.dll
- Метод 5: Исправить ошибку отсутствующего Shell32.dll с System File Checker (SFC)
- Метод 6: Исправить испорченный файл Shell32.dll за счет выполнения System Restore
Метод 1: Загрузить Shell32.dll
Выполните поиск по доступным версиям shell32.dll из списка ниже, выберите нужный файл и нажмите на ссылку «Загрузить». Если вы не можете решить, какую версию выбрать, прочитайте статью ниже или используйте автоматический метод для решения проблемы
Shell32.dll, 25 доступные версии
| Биты и Версии | размер файлы | Язык | Описание | контрольные суммы | |
|---|---|---|---|---|---|
|
32bit 6.3.9600.17055 |
17.8 MB | U.S. English | Windows Shell Common Dll |
MD5 MD5 SHA1 SHA1 |
|
|
64bit 6.3.9600.16474 |
20.2 MB | U.S. English | Windows Shell Common Dll |
MD5 MD5 SHA1 SHA1 |
|
|
32bit 6.3.9600.16474 |
17.8 MB | U.S. English | Windows Shell Common Dll |
MD5 MD5 SHA1 SHA1 |
|
|
32bit 6.2.9200.16882 |
16.7 MB | U.S. English | Windows Shell Common Dll |
MD5 MD5 SHA1 SHA1 |
|
|
32bit 6.2.9200.16680 |
16.7 MB | U.S. English | Windows Shell Common Dll |
MD5 MD5 SHA1 SHA1 |
|
|
32bit 6.1.7601.18429 |
12.3 MB | U.S. English | Windows Shell Common Dll |
MD5 MD5 SHA1 SHA1 |
|
|
32bit 6.1.7601.18222 |
12.3 MB | U.S. English | Windows Shell Common Dll |
MD5 MD5 SHA1 SHA1 |
|
|
32bit 6.1.7601.17859 |
12.3 MB | U.S. English | Windows Shell Common Dll |
MD5 MD5 SHA1 SHA1 |
|
|
64bit 6.1.7601.17859 |
13.5 MB | U.S. English | Windows Shell Common Dll |
MD5 MD5 SHA1 SHA1 |
|
|
32bit 6.0.6002.18646 |
11.0 MB | U.S. English | Windows Shell Common Dll |
MD5 MD5 SHA1 SHA1 |
|
|
32bit 6.0.6001.18588 |
11.0 MB | U.S. English | Windows Shell Common Dll |
MD5 MD5 SHA1 SHA1 |
|
|
64bit 6.0.6001.18588 |
12.3 MB | U.S. English | Windows Shell Common Dll |
MD5 MD5 SHA1 SHA1 |
|
|
32bit 6.0.2900.6242 |
29.8 MB | Italian | DLL comune della shell di Windows |
MD5 MD5 SHA1 SHA1 |
|
|
32bit 6.0.2900.6072 |
29.7 MB | U.S. English | Windows Shell Common Dll |
MD5 MD5 SHA1 SHA1 |
|
|
32bit 6.0.2900.5512 |
8.1 MB | Swedish | DLL-fil för Windows-gränssnittet |
MD5 MD5 SHA1 SHA1 |
|
|
32bit 6.0.2900.2180 |
8.0 MB | Swedish | DLL-fil för Windows-gränssnittet |
MD5 MD5 SHA1 SHA1 |
|
|
32bit 4.72.3812.600 |
1.3 MB | Swedish | DLL-fil för Windows-gränssnittet |
MD5 MD5 SHA1 SHA1 |
|
|
64bit 10.0.19041.572 |
7.3 MB | U.S. English | Windows Shell Common Dll |
MD5 MD5 SHA1 SHA1 |
|
|
64bit 10.0.14393.0 |
21.2 MB | U.S. English | Windows Shell Common Dll |
MD5 MD5 SHA1 SHA1 |
|
|
32bit 10.0.14393.0 |
20.0 MB | U.S. English | Windows Shell Common Dll |
MD5 MD5 SHA1 SHA1 |
|
|
32bit 10.0.10586.494 |
20.1 MB | U.S. English | Windows Shell Common Dll |
MD5 MD5 SHA1 SHA1 |
|
|
64bit 10.0.10586.494 |
21.5 MB | U.S. English | Windows Shell Common Dll |
MD5 MD5 SHA1 SHA1 |
|
|
64bit 10.0.10586.11 |
21.5 MB | U.S. English | Windows Shell Common Dll |
MD5 MD5 SHA1 SHA1 |
|
|
32bit 10.0.10586.11 |
20.1 MB | U.S. English | Windows Shell Common Dll |
MD5 MD5 SHA1 SHA1 |
|
|
32bit 10.0.10240.16384 |
19.9 MB | U.S. English | Windows Shell Common Dll |
MD5 MD5 SHA1 SHA1 |
Как выбрать правильную версию Shell32.dll?
Сначала просмотрите описания в таблице выше и выберите подходящий файл для вашей программы. Обратите внимание на то, 64- или 32-битный ли это файл, а также на используемый в нем язык. Для 64-битных программ используйте 64-битные файлы, если они перечислены выше.
Лучше всего по возможности выбирать те dll-файлы, язык которых соответствует языку вашей программы. Мы также рекомендуем загрузить последние версии dll-файлов, чтобы иметь актуальный функционал.
Где разместить файл Shell32.dll?
Исправить ошибку “shell32.dll отсутствует” можно, поместив файл в папку установки приложения/игры. Или же вы можете поместить файл shell32.dll в системный каталог Windows.
Как зарегистрировать Shell32.dll?
Если размещение отсутствующего shell32.dll файла в нужном каталоге не решает проблему, вам придется его зарегистрировать. Для этого скопируйте файл DLL в папку C:WindowsSystem32 и откройте командную строку с правами администратора. Там введите «regsvr32shell32.dll» и нажмите Enter.
Метод 2: Исправить ошибку отсутствующего Shell32.dll автоматически
С помощью WikiDll Fixer вы можете автоматически исправлять ошибки под псевдонимом. Утилита не только бесплатно скачает корректную версию shell32.dll и предложит нужный каталог для его установки, но и решит другие проблемы, связанные с shell32.dll файлом.
-
Шаг 1:
Нажмите на кнопку “Загрузить App.”, чтобы получить автоматический инструмент, предоставляемый WikiDll.
-
Шаг 2:
Установите утилиту, следуя простым инструкциям по установке. -
Шаг 3:
Запустите программу для исправления ошибок shell32.dll и других проблем.
специальное предложение
4.365.534
Загрузки
См. дополнительную информацию о Outbyte и удалении :инструкции. Пожалуйста, просмотрите Outbyte EULA и Политика конфиденциальности
Размер Файлы: 3.04 MB, время загрузки: < 1 min. on DSL/ADSL/Cable
Этот инструмент совместим с:

Ограничения: пробная версия предлагает неограниченное количество проверок, резервное копирование, бесплатное восстановление реестра Windows. Полную версию необходимо приобрести.
Метод 3: Обновите драйверы для восстановления отсутствующих .dll-файлов
Обновления драйверов для операционной системы Windows, а также для сетевых адаптеров, мониторов, принтеров и т.д. можно самостоятельно загрузить и установить из Центра обновлений Windows или с помощью специализированных утилит.
ОПЦИЯ 1 — Автоматическое Обновление Драйверов Устройств
Outbyte Driver Updater автоматически обновляет драйверы на Windows. Рутинные обновления драйверов теперь в прошлом!
-
Шаг 1:
Загрузить обновление драйвера Outbyte» -
Шаг 2:
Установите приложение -
Шаг 3:
Запустите приложение -
Шаг 4:
Driver Updater будет сканировать систему на наличие устаревших и отсутствующих драйверов -
Шаг 5:
Нажмите Обновить, чтобы автоматически обновить все драйверы
ОПЦИЯ 2 — Ручное Обновление Драйверов Устройств
-
Шаг 1:
Перейти в окно поиска на панели задач — написать Диспетчер устройств — выбрать Диспетчер устройств -
Шаг 2:
Выберите категорию для просмотра имен устройств — щелкните правой кнопкой мыши то устройство, которое необходимо -
Шаг 3:
Выберите Автоматический поиск обновленных драйверов -
Шаг 4:
Посмотрите на драйвер обновления и выберите его -
Шаг 5:
Windows, возможно, не сможет найти новый драйвер. В этом случае пользователь может увидеть драйвер на сайте производителя, где доступны все необходимые инструкции
Метод 4: Просканируйте свой ПК на вирусы, чтобы исправить ошибку shell32.dll
Иногда ошибка shell32.dll может произойти из-за вредоносного ПО на вашем компьютере. Вредоносная программа может намеренно повреждать DLL-файлы, чтобы заменить их своими собственными вредоносными файлами. Поэтому вашим приоритетом номер один должно быть сканирование компьютера на наличие вредоносных программ и их скорейшее устранение.
ОПЦИЯ 1 — Windows Defender
Новая версия Windows 10 имеет встроенное приложение под названием «Windows Defender», которое позволяет проверять компьютер на наличие вирусов и удалять вредоносные программы, которые трудно удалить в работающей операционной системе. Для того, чтобы использовать Windows Defender Offline сканирование, перейдите в настройки (Пуск — значок Gear или клавиша Win + I), выберите «Обновить и безопасность» и перейдите в раздел «Windows Defender».
Как использовать автономное сканирование Windows Defender
-
Шаг 1:
Нажмите клавишу Win или Start и нажмите на иконку Gear. В качестве альтернативы нажмите комбинацию клавиш Win + I. -
Шаг 2:
Выберите опцию Обновить и безопасность и перейдите в раздел Windows Defender. -
Шаг 3:
В нижней части настроек защитника установлен флажок «Windows Defender Offline scan». Чтобы ее запустить, нажмите кнопку «Сканировать сейчас». Обратите внимание, что перед перезагрузкой компьютера необходимо сохранить все несохраненные данные».
После нажатия кнопки «Сканировать сейчас» компьютер перезагрузится и автоматически начнет поиск вирусов и вредоносных программ. После завершения сканирования компьютер перезагрузится, и в уведомлениях Вы увидите отчет о выполненной проверке.
ОПЦИЯ 2 — Outbyte Antivirus
Продукты Outbyte — одни из самых популярных и эффективных для борьбы с вредоносным и нежелательным ПО, и они принесут пользу даже тогда, когда у вас установлен качественный сторонний антивирус. Сканирование в новой версии Malwarebyte можно выполнять в режиме реального времени и вручную. Чтобы инициировать ручное сканирование, пожалуйста, выполните следующие шаги:
-
Шаг 1:
Запустите программу Outbyte и нажмите кнопку Scan Now. Также в левой части окна программы можно выбрать опцию «Сканировать» и нажать кнопку Полное сканирование. Система начнет сканирование, и Вы сможете увидеть результаты сканирования». -
Шаг 2:
Выберите элементы, которые вы хотите поместить в карантин и нажмите кнопку «Карантин выбран». При помещении в карантин может появиться запрос на перезагрузку компьютера. -
Шаг 3:
«После перезапуска программы вы можете удалить все карантинные объекты, перейдя в соответствующий раздел программы или восстановить некоторые из них, если выяснилось, что после карантина что-то из вашей программы начало работать некорректно.
Метод 5: Исправить ошибку отсутствующего Shell32.dll с System File Checker (SFC)
Многие пользователи знакомы с командой проверки целостности системных файлов sfc/scannow, которая автоматически проверяет и исправляет защищенные системные файлы Windows. Чтобы выполнить эту команду, вам нужно запустить командную строку от имени администратора.
-
Шаг 1:
Запустите командную строку от имени администратора в Windows, нажав клавишу Win на клавиатуре и введя «Командную строку» в поле поиска, затем — щелкните правой кнопкой мыши по результату и выберите Запустить от имени администратора. В качестве альтернативы можно нажать комбинацию клавиш Win + X, в результате чего откроется меню, в котором можно выбрать Command Prompt (Admin). -
Шаг 2:
Введите sfc / scannow в командной строке и нажмите Enter.
После ввода команды начнется проверка системы. Это займет некоторое время, так что, пожалуйста, будьте терпеливы. После завершения операции вы получите сообщение “Windows Resource Protection нашла поврежденные файлы и успешно их восстановила” или “Windows Resource Protection нашла поврежденные файлы, но не смогла исправить некоторые из них”.
Помните, что System File Checker (SFC) не может исправить ошибки целостности тех системных файлов, которые в настоящее время используются операционной системой. Чтобы исправить эти файлы, нужно выполнить команду SFC через командную строку в среде восстановления Windows. Вы можете попасть в Windows Recovery Environment с экрана входа в систему, нажав Shutdown, затем удерживая клавишу Shift при выборе Restart.
В Windows 10 можно нажать клавишу Win, выбрать «Настройки» > «Обновление и безопасность» > «Восстановление», а в разделе «Дополнительный запуск» — «Перезагрузка». Вы также можете загрузиться с установочного диска или загрузочного USB-накопителя с дистрибутивом Windows 10. На экране установки выберите предпочтительный язык, а затем выберите «Восстановление системы». После этого перейдите в «Устранение неисправностей» > «Дополнительные настройки» > «Командная строка». В командной строке введите следующую команду: sfc/scannow /offbootdir=C: /offwindir=C:Windows, где C — раздел с установленной операционной системой, и C: Windows — это путь к папке Windows 10.
Эта операция займет некоторое время, и важно дождаться ее завершения. По завершении закройте командную строку и перезагрузите компьютер, как обычно.
Метод 6: Исправить испорченный файл Shell32.dll за счет выполнения System Restore
Восстановление системы очень полезно, когда вы хотите исправить ошибку shell32.dll. С помощью функции «Восстановление системы» вы можете выбрать восстановление Windows до даты, когда файл shell32.dll не был поврежден. Таким образом, восстановление Windows до более ранней даты отменяет изменения, внесенные в системные файлы. Чтобы откатить Windows с помощью функции «Восстановление системы» и избавиться от ошибки shell32.dll, выполните следующие действия.
-
Шаг 1:
Нажмите комбинацию клавиш Win + R, чтобы запустить диалог «Запуск». -
Шаг 2:
Введите rstrui в текстовом поле Run и нажмите OK или нажмите Enter. Откроется утилита восстановления системы. -
Шаг 3:
В окне «Восстановление системы» можно выбрать опцию «Выбрать другую точку восстановления». Если да, то выберите эту опцию и нажмите «Далее». Установите флажок «Показывать больше точек восстановления», чтобы увидеть полный список. -
Шаг 4:
Выберите дату для восстановления Windows 10. Помните, что нужно выбрать точку восстановления, которая восстановит Windows до даты, когда не появилось сообщение об ошибке shell32.dll. -
Шаг 5:
Нажмите кнопку «Далее» и затем нажмите «Готово» для подтверждения точки восстановления.
В этот момент компьютер перезагрузится нормально и загрузится с восстановленной версией Windows, и ошибка shell32.dll должна быть устранена.
Эта страница доступна на других языках:
English |
Deutsch |
Español |
Français |
Italiano |
Português |
Bahasa Indonesia |
Nederlands |
Nynorsk |
Svenska |
Tiếng Việt |
Suomi
by Milan Stanojevic
Milan has been enthusiastic about technology ever since his childhood days, and this led him to take interest in all PC-related technologies. He’s a PC enthusiast and he… read more
Updated on July 30, 2021
- To work properly, Windows relies on various components, and one of them is Windows Shell Common DLL.
- The best way to fix this problem is to use specialized software that can repair your damaged DLL files.
- Another way to fix this issue is to update or reinstall the problematic drivers.
- If Windows Shell Common DLL is not responding you might have to adjust the security parameters in the registry to fix that.
XINSTALL BY CLICKING THE DOWNLOAD FILE
- Download Restoro PC Repair Tool that comes with Patented Technologies (patent available here).
- Click Start Scan to find DLL files that could be causing PC problems.
- Click Repair All to replace broken DLLs with working versions
- Restoro has been downloaded by 0 readers this month.
There are all sorts of errors that can appear on your PC, but one of the most annoying ones is Windows Shell Common Dll has stopped working.
This error can prevent you from using standard Windows features and it can be quite problematic, so in this article, keep reading to find additional solutions for this error.
How can I fix the Windows Shell Common DLL error?
1. Make sure that Windows Time service is running
- Press Windows Key + R and enter services.msc. Now press Enter or click OK.

- The Services window will now appear. Locate Windows Time service, right click it and choose Start from the menu.


Windows relies on various services in order to work properly, but sometimes this problem can occur due to disabled services. According to users, Windows Shell Common Dll has stopped working error started appearing after performing a System Restore.
It seems that this error message is preventing users from changing their date and time, but there’s a way to fix it. To fix the problem, you just need to enable Windows Time service by following the steps above.
NOTE: Keep in mind that this solution only applies if the error message appears when trying to change the date and time.
2. Use third-party software
If you want to fix issues with Windows Shell Common DLL, the simplest and the fastest way would be to use a third-party dll fixer.
Restoro is a reliable third-party DLL fixer which uses a built-in automated system and an online library full of functional DLLs to replace and repair any files that might be corrupted or damaged on your PC.
All you need to do to resolve your PC’s problems is to launch it, and simply follow the on-screen instructions to start the process, as everything else is covered by the software’s automated processes.
This is how you can fix registry errors using Restoro:
- Download and install Restoro.
- Launch the software.
- Wait for it to scan your PC for any stability issues and possible malware.
- Press Start Repair.
- Restart your PC for all the changes to take effect.
After this process is completed your PC will be as good as new, and you will no longer have to deal with BSoD errors, slow response times, or other similar issues.
⇒ Get Restoro
Disclaimer: This program needs to be upgraded from the free version in order to perform some specific actions.
3. Use a different application to change your microphone settings

- Start Bandicam and go to Video settings. Now click on the Settings button in the Record section.
- Recording settings window will appear. Now you just have to click the Settings button next to your microphone.
- After doing that, you’ll see a standard microphone configuration window and you’ll be able to change your settings without any problems.
This is an unusual workaround, but it works according to users. Many users reported that Windows Shell Common Dll is not responding when trying to change their microphone settings from Windows.
According to them, you can circumvent this problem by using a different application to access your microphone settings. Many users managed to circumvent this problem simply by using Bandicam to modify their microphone settings.
Keep in mind that this is just a workaround, so you’ll have to use it whenever you want to adjust your microphone settings. Bandicam software is a solid workaround, but if you have any other software that allows you to configure your microphone you can use it instead.
4. Reinstall your audio drivers
- Press Windows Key + X to open Win + X menu and choose Device Manager from the list.

- When Device Manager opens locate your audio driver and right-click it. Choose Uninstall device from the menu.

- Confirmation dialog will now appear. If available, check Remove driver software for this device option. Click on Uninstall to remove the driver.

- After removing the driver, click on Scan for hardware changes icon.


Windows will now automatically install the missing drivers and the problem should be resolved entirely. Some users are suggesting to restart your PC instead of performing Step 4, so feel free to try that.
Keep in mind that you should stay away from any Beta drivers. Beta drivers aren’t fully tested and they might not always work. In fact, sometimes Beta drivers can cause this problem to appear.
To avoid any compatibility issues, it’s recommended to always use the latest drivers. If the problem appears even with the latest drivers you might want to install an older version of audio drivers.
According to users, they managed to fix Windows Shell Common Dll has stopped working error simply by reinstalling their audio drivers. Your drivers can be buggy and that can cause this error to appear.
To keep your drivers up to date at all times, we advise using specialized driver updater software such as DriverFix.
⇒ Get DriverFix
5. Change the security permissions of UserChoice key
- Press Windows Key + R and enter regedit. Press Enter or click OK.
- When Registry Editor opens in the left pane navigate to:
ComputerHKEY_CURRENT_USERSoftwareMicrosoftWindowsCurrentVersionExplorerFileExts.txtUserChoice - Now right click UserChoice key and choose Permissions from the menu.

- If Group or user names section is empty, it means that your security permissions are missing, so you’ll need to add them again. If security permissions aren’t missing, this solution won’t apply to you so you can just skip it.
- To add missing permissions, click the Add button.

- In Enter the object names to select field enter Administrators and click on Check Names. If everything is in order, click on OK.

- Administrators group will now be added to the Group or user names list. Select Administrators from the list and check Full Control in the Allow column. Now click OK and Apply to save changes.
- Optional: You might have to add SYSTEM, RESTRICTED and your user name to the list by following the steps above.


After changing the security settings for the UserChoice key the problem should be completely resolved. Keep in mind that this solution applies only if this error appears while trying to open .txt files.
If you can open .txt files without any problems, you might want to skip this solution entirely.
Users reported Windows Shell Common Dll has stopped working error while trying to open .txt files on their PC, but you should be able to fix that with the steps above.
6. Update your touchpad driver

Many users reported this problem on their laptops, and it seems that the problem was their touchpad driver.
According to users, the Elantech touchpad driver caused Windows Shell Common Dll has stopped working error to appear, but users fixed it simply by updating the touchpad driver.
Keep in mind that this error can appear even with other touchpad drivers, so even if you’re not using Elantech touchpad be sure to update your driver to the latest version.
Several users reported that they fixed the problem by removing the Elan touchpad software from their PC, so feel free to try that as well.
7. Connect your stereo receiver to a USB 3.0 port

Several users reported Windows Shell Common Dll is not responding while using a stereo receiver with their PC. According to them, the receiver was connected to a USB 2.0 port and that caused the error to appear.
To fix the problem, you just have to connect the stereo receiver to the USB 3.0 port and the problem should be completely resolved.
8. Copy necessary files to System32 directory
- Navigate to the following directory:
C:WindowsSystem32 - Locate joy.cpl and copy it to your Desktop.

- Right click joy.cpl and choose Properties from the menu.

- Navigate to Security tab and click on Advanced.

- Locate the Owner section and click on Change.

- Now enter your username in the Enter the object name to select and click on Check Names. If everything is in order, click on OK to save changes.
- After doing that, click Apply and OK to save changes.

- After taking the ownership of joy.cpl delete it.

- Once you delete the file, go to the following directory:
C:WindowsSysWOW64 - . Locate joy.cpl and copy it to
C:WindowsSystem32


Once you copy the file, the problem should be resolved and you’ll be able to access gamepad settings from Windows without any problems.
According to users, Windows Shell Common Dll is not responding error appears while trying to configure gamepad settings.
To fix the problem you need to copy a single file to your System32 directory like we showed you above.
9. Uninstall Intellipoint software and Synaptics driver
- Open Device Manager.
- Locate your touchpad in Device Manager, right click it and choose Update driver.

- Now select Browse my computer for driver software.

- Click on Browse and locate the extracted driver files. Check Include subfodlers and click on Next to install the driver.


According to users, Windows Shell Common Dll has stopped working error can appear due to Intellipoint software and Synaptics driver.
These two aren’t compatible and in order to fix the problem you need to remove them both from your PC.
After doing that, you can download and install the latest version of Intellipoint.
Now you just have to install your Synaptics driver again. Several users suggested that you can fix this error simply by installing the driver manually from Device Manager, like we showed you above.
10. Disable Hardware graphics accelerator in Office

- Open Outlook or any other Office application.
- Choose File > Options > Advanced.
- Now locate and disable Hardware graphics accelerator option.
Windows Shell Common Dll is not responding error can affect almost any application and Outlook is no exception. However, you can fix this problem simply by disabling Hardware graphics accelerator.
After you disable this feature, the error message should stop appearing and you’ll be able to use Outlook without any problems.
11. Delete Outlook plugin for Microsoft Dynamics CRM

Outlook has various plug-ins that enhance its functionality, but sometimes these plugins can cause Windows Shell Common Dll has stopped working error to appear.
To fix the issue, users are recommending to uninstall Outlook Plugin for Microsoft Dynamics CRM from your PC. After doing that, the problem should stop appearing and you’ll be able to use Outlook again.
If the issue still persists, you might have to delete your Outlook profile and recreate it again to fix the problem.
12. Update your AMD drivers

Several users reported that Windows Shell Common Dll has stopped working error appears due to problems with AMD drivers. If you have any AMD drivers installed, we strongly advise you to remove them and install the latest version.
According to users, updating the AMD drivers fixed the problem for them so be sure to try that.
13. Disable or remove your antivirus software
Having an antivirus software is rather important, but sometimes your antivirus can cause Windows Shell Common Dll has stopped working error to appear.
To fix the problem you need to disable your antivirus software and check if that solves the issue.
If the problem still persists, you might have to remove your antivirus software completely. We also have to mention that antivirus tools tend to leave leftover files.
In order to completely remove your antivirus, you’ll need to use a dedicated removal tool. Most antivirus companies offer removal tools for their software, so be sure to download one for your antivirus.
If removing the antivirus fixes the problem, you just need to install it again or switch to a different antivirus solution.
Users reported that this error was caused by CA Anti-Virus software, so be sure to remove this tool from your PC.
Even if you don’t use this tool, you might want to try disabling and removing your antivirus and check if that solves the problem.
14. Disable audio enhancements

Many users love to use various audio enhancements to change their sound quality. However, sometimes these enhancements can cause Windows Shell Common Dll is not responding error to appear.
To fix the issue, you need to disable all audio enhancements such as equalizers or any other Enhanced Audio features.
You can usually find these features available in your audio driver configuration software.
Some PC issues are hard to tackle, especially when it comes to corrupted repositories or missing Windows files. If you are having troubles fixing an error, your system may be partially broken.
We recommend installing Restoro, a tool that will scan your machine and identify what the fault is.
Click here to download and start repairing.
After disabling all these audio enhancements, the problem should be resolved.
15. Remove unnecessary audio devices from Device Manager
- Open Device Manager.
- Now go to View > Show hidden devices.

- Locate any unknown audio device and remove it.
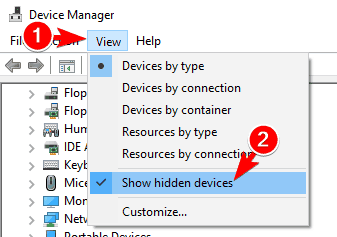
If you have any problems with your audio settings due to Windows Shell Common Dll has stopped working error, you might be able to fix them by removing unnecessary audio devices from Device Manager. The steps above should help with this.
Users reported that the cause for this problem was Sndt Audio, but after removing its driver and software the issue was resolved completely.
16. Remove Touch-Base UPDD

Your drivers can often cause Windows Shell Common Dll is not responding error to appear.
Several users reported that Touch-Base UPDD software caused the problem, and in order to fix the issue, you need to remove it.
After removing the problematic software, the issue should be resolved completely and everything will start working again.
17. Run the SFC scan
- Press Windows Key + X and choose Command Prompt (Admin) from the list. If Command Prompt isn’t available, you can choose PowerShell (Admin).

- When Command Prompt starts, enter
sfc /scannowand press Enter to run it. - The scan will now start. Keep in mind that sfc scan can take about 10-15 minutes, so don’t interrupt it.

Sometimes this error can appear if your system files are corrupted. File corruption can occur for various reasons, but you should be able to fix it by performing SFC scan.
Once the scan is completed, check if the problem still appears. If the problem isn’t resolved or if you can’t run SFC scan at all, you might have to use DISM scan instead.
To do that, simply start Command Prompt as administrator and enter DISM /Online /Cleanup-Image /RestoreHealth and press Enter to run it. DISM scan will now try to repair your system, so don’t interrupt it. This process can take more than 15 minutes so you’ll have to be patient.
It seems that everything is lost when DISM fails on Windows? Check out this quick guide and get rid of the worries.
scannow command has stopped? Don’t worry, we’ve got an easy fix for you.
18. Use PowerShell
- Press Windows Key + S and enter powershell. Right-click Windows PowerShell and choose Run as administrator from the menu.

- When Command Prompt starts, enter
Set-ExecutionPolicy -ExecutionPolicy Unrestricted -Scope CurrentUsercommand and press Enter to run it.
According to users, Windows Shell Common Dll is not responding error can appear because Windows isn’t configured to accept certificates. However, you can easily fix this problem by using PowerShell.
We have to warn you that PowerShell is a powerful tool, and by using it improperly you can cause damage to your system. To fix this problem with PowerShell, do the following:
19. Use System Maintenance
- Press Windows Key + R and enter
%systemroot%system32msdt.exe -id MaintenanceDiagnostic - Now press Enter or click OK to run it.
- System Maintenance tool will now appear. Click on Next to continue and follow the instructions on the screen.

Few users claim that they fixed the problem simply by running System Maintenance Troubleshooter. This is a built-in tool and it can sometimes fix various problems with Windows.
After System Maintenance completes the scan the problem should be resolved.
20. Re-register your DLLs

- Open Command Prompt as administrator.
- When Command Prompt starts enter regsvr32 /i shell32.dll command and press Enter to run it.
If you’re getting Windows Shell Common Dll has stopped working error message, the cause can sometimes be your DLL files, specifically shell32.dll.
According to users, the DLL files can become unregistered for some unknown reason and that can cause this error message to appear. To fix this problem, you just have to re-register shell32.dll.
After the command is executed, the shell32.dll file will be re-registered and the error message should stop appearing.
21. Reinstall the problematic application

We all have third-party applications installed on our PCs, but this error can appear in almost any application. If this error is appearing in your favorite applications, we advise you to reinstall them and check if that solves the problem.
In addition to reinstalling, be sure to update the problematic application to the latest version and check if the problem still persists.
If the developers are aware of this issue, it’s rather likely that the problem was addressed and you should be able to fix it simply by updating your application.
22. Perform a clean boot
- Press Windows Key + R and enter msconfig. Press Enter or click OK.
- Go to the Services tab and check Hide all Microsoft services. Now click on Disable all.

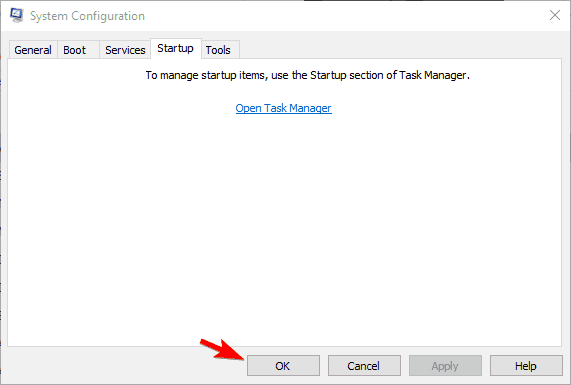
- Navigate to Startup tab and click on Open Task Manager.
- When Task Manager opens, locate the first item on the list, right click it and choose Disable from the menu. Repeat this for all items on the list.

- After doing that, go back to the System Configuration window and click on Apply and OK.


Now you just have to restart your PC and check if the problem still appears. If not, it’s certain that a third-party application or service is causing this error.
To find the problematic service you need to repeat the same steps and enable disabled applications and services one by one. Keep in mind that you need to restart your PC after enabling set of services or applications in order to apply changes.
Once you find the problematic application, you can keep it disabled, remove it or reinstall it and check if that solves the problem.
If Windows Shell Common Dll has stopped working error message appears frequently on your PC, it’s possible that a third-party application is causing it.
Windows starts with various third-party applications and services, and you can disable problematic applications by following the steps from above.
Can’t open Task Manager? Don’t worry, we’ve got the right solution for you.
23. Remove .wmv files from the Synaptics directory

In one of our previous solutions, we mentioned that Synaptics drivers can sometimes cause Windows Shell Common Dll has stopped working error message to appear. Apparently, users can’t configure or access Synaptics settings, and this can be a big problem.
It turns out that the Synaptics configuration window plays a video demonstration when configuring your touchpad, and those videos can be the cause of this problem.
As a workaround, users are suggesting to navigate to the following directory: C:Program FilesSynapticsSynTP
Once you enter the directory, delete all .wmv files from there. After removing .wmv files, the problem should be resolved and everything will start working without problems.
Few users claim that you can fix this problem simply by renaming igdumdim64.dll file in System32 directory. Before you can rename the file, you’ll need to take ownership of that file.
We demonstrated briefly in Solution 7 how to take ownership over a certain file, so be sure to check it out for detailed instructions.
24. Install the latest Windows updates
- Open the Settings app. To do that quickly you can just press Windows Key + I on your keyboard.
- Once the Settings app opens, navigate to Update & security section.

- Now click on Check for updates button. Windows will now check for missing updates and download them in the background.

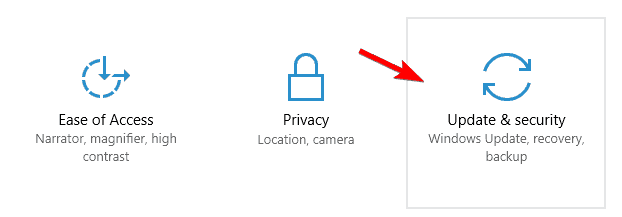
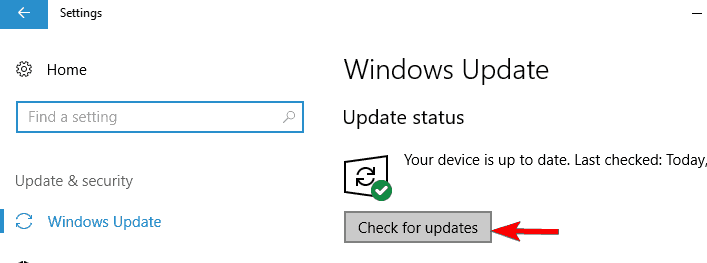
After you download the updates, they’ll be installed automatically once you restart your PC.
According to users, you might be able to fix this problem simply by installing the latest Windows updates.
Microsoft is addressing various issues, and if this is a serious issue, it’s possible that you can fix it by updating Windows.
In most cases, Windows 10 will automatically download the updates, but sometimes you can miss an important update. However, you can always check and install the missing updates manually.
If you’re having trouble opening the Setting app, take a look at this article to solve the issue.
25. Create a new user account
- Open the Settings app and go to Accounts section.

- In the left pane, choose Family & other people. In the right pane click on Add someone else to this PC.

- Click on I don’t have this person’s sign-in information.

- Now you’ll be asked to create a new Microsoft account. Click on Add a user without a Microsoft account.

- Now enter the desired username and click on Next.


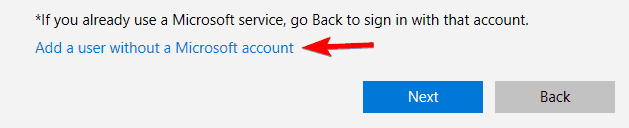
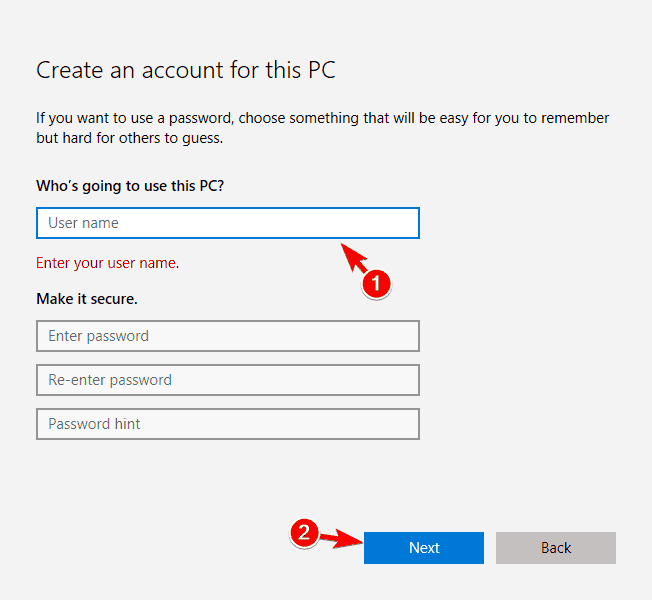
After you create a new account, switch to it and check if the problem still appears. If not, you might have to move your files to a new account and use it instead of your old one.
Sometimes Windows Shell Common Dll is not responding error can affect only a single user account on your PC.
If that’s so, you might want to create a new user account on your PC as a workaround.
26. Rename olmapi32.dll

As previously mentioned, Windows Shell Common Dll has stopped working error can affect almost any application, and users reported this problem in Outlook 2016.
It seems that the problem is caused by a single .dll file, and in order to fix it, you need to find and rename that file.
To do that, just navigate to the following directory: C:Program FilesMicrosoft OfficerootOffice16 Now rename olmapi32.dll file.
After doing that, try to start Outlook again. If the problem still persists, you might want to repair your Office installation.
27. Reset Windows 10
- Open the Start Menu, click the Power button, press and hold the Shift key and choose Restart from the menu.
- Select Troubleshoot > Reset this PC > Remove everything.
- To proceed, you might have to insert your Windows installation media, so be sure to have it ready.
- Select your version of Windows and choose Only the drive where Windows is installed > Just remove my files.
- Now you’ll see a list of changes that reset will perform. If you’re ready to start, click the Reset button.
- Follow the instructions on the screen to complete the reset.
If the error message still appears and it’s making your PC almost unusable, you might want to try resetting Windows 10.
We have to mention that reset will delete all files from your system drive, so be sure to back them up beforehand.
In addition to backing up your files, you might also need a Windows 10 installation media, so be sure to create one using Media Creation Tool. After you back up your files.
After the resetting process is finished, you’ll have a fresh installation of Windows 10. Now you just have to move your files from the backup and install all your applications. This is a drastic solution so you should use it only if other solutions can’t fix the problem.
Windows Shell Common Dll has stopped working error message can cause many problems on your PC, but you should be able to fix it by using one of our solutions.
Still having issues? Fix them with this tool:
SPONSORED
If the advices above haven’t solved your issue, your PC may experience deeper Windows problems. We recommend downloading this PC Repair tool (rated Great on TrustPilot.com) to easily address them. After installation, simply click the Start Scan button and then press on Repair All.
![]()
Newsletter
by Milan Stanojevic
Milan has been enthusiastic about technology ever since his childhood days, and this led him to take interest in all PC-related technologies. He’s a PC enthusiast and he… read more
Updated on July 30, 2021
- To work properly, Windows relies on various components, and one of them is Windows Shell Common DLL.
- The best way to fix this problem is to use specialized software that can repair your damaged DLL files.
- Another way to fix this issue is to update or reinstall the problematic drivers.
- If Windows Shell Common DLL is not responding you might have to adjust the security parameters in the registry to fix that.
XINSTALL BY CLICKING THE DOWNLOAD FILE
- Download Restoro PC Repair Tool that comes with Patented Technologies (patent available here).
- Click Start Scan to find DLL files that could be causing PC problems.
- Click Repair All to replace broken DLLs with working versions
- Restoro has been downloaded by 0 readers this month.
There are all sorts of errors that can appear on your PC, but one of the most annoying ones is Windows Shell Common Dll has stopped working.
This error can prevent you from using standard Windows features and it can be quite problematic, so in this article, keep reading to find additional solutions for this error.
How can I fix the Windows Shell Common DLL error?
1. Make sure that Windows Time service is running
- Press Windows Key + R and enter services.msc. Now press Enter or click OK.
- The Services window will now appear. Locate Windows Time service, right click it and choose Start from the menu.
Windows relies on various services in order to work properly, but sometimes this problem can occur due to disabled services. According to users, Windows Shell Common Dll has stopped working error started appearing after performing a System Restore.
It seems that this error message is preventing users from changing their date and time, but there’s a way to fix it. To fix the problem, you just need to enable Windows Time service by following the steps above.
NOTE: Keep in mind that this solution only applies if the error message appears when trying to change the date and time.
2. Use third-party software
If you want to fix issues with Windows Shell Common DLL, the simplest and the fastest way would be to use a third-party dll fixer.
Restoro is a reliable third-party DLL fixer which uses a built-in automated system and an online library full of functional DLLs to replace and repair any files that might be corrupted or damaged on your PC.
All you need to do to resolve your PC’s problems is to launch it, and simply follow the on-screen instructions to start the process, as everything else is covered by the software’s automated processes.
This is how you can fix registry errors using Restoro:
- Download and install Restoro.
- Launch the software.
- Wait for it to scan your PC for any stability issues and possible malware.
- Press Start Repair.
- Restart your PC for all the changes to take effect.
After this process is completed your PC will be as good as new, and you will no longer have to deal with BSoD errors, slow response times, or other similar issues.
⇒ Get Restoro
Disclaimer: This program needs to be upgraded from the free version in order to perform some specific actions.
3. Use a different application to change your microphone settings
- Start Bandicam and go to Video settings. Now click on the Settings button in the Record section.
- Recording settings window will appear. Now you just have to click the Settings button next to your microphone.
- After doing that, you’ll see a standard microphone configuration window and you’ll be able to change your settings without any problems.
This is an unusual workaround, but it works according to users. Many users reported that Windows Shell Common Dll is not responding when trying to change their microphone settings from Windows.
According to them, you can circumvent this problem by using a different application to access your microphone settings. Many users managed to circumvent this problem simply by using Bandicam to modify their microphone settings.
Keep in mind that this is just a workaround, so you’ll have to use it whenever you want to adjust your microphone settings. Bandicam software is a solid workaround, but if you have any other software that allows you to configure your microphone you can use it instead.
4. Reinstall your audio drivers
- Press Windows Key + X to open Win + X menu and choose Device Manager from the list.
- When Device Manager opens locate your audio driver and right-click it. Choose Uninstall device from the menu.
- Confirmation dialog will now appear. If available, check Remove driver software for this device option. Click on Uninstall to remove the driver.
- After removing the driver, click on Scan for hardware changes icon.
Windows will now automatically install the missing drivers and the problem should be resolved entirely. Some users are suggesting to restart your PC instead of performing Step 4, so feel free to try that.
Keep in mind that you should stay away from any Beta drivers. Beta drivers aren’t fully tested and they might not always work. In fact, sometimes Beta drivers can cause this problem to appear.
To avoid any compatibility issues, it’s recommended to always use the latest drivers. If the problem appears even with the latest drivers you might want to install an older version of audio drivers.
According to users, they managed to fix Windows Shell Common Dll has stopped working error simply by reinstalling their audio drivers. Your drivers can be buggy and that can cause this error to appear.
To keep your drivers up to date at all times, we advise using specialized driver updater software such as DriverFix.
⇒ Get DriverFix
5. Change the security permissions of UserChoice key
- Press Windows Key + R and enter regedit. Press Enter or click OK.
- When Registry Editor opens in the left pane navigate to:
ComputerHKEY_CURRENT_USERSoftwareMicrosoftWindowsCurrentVersionExplorerFileExts.txtUserChoice - Now right click UserChoice key and choose Permissions from the menu.
- If Group or user names section is empty, it means that your security permissions are missing, so you’ll need to add them again. If security permissions aren’t missing, this solution won’t apply to you so you can just skip it.
- To add missing permissions, click the Add button.
- In Enter the object names to select field enter Administrators and click on Check Names. If everything is in order, click on OK.
- Administrators group will now be added to the Group or user names list. Select Administrators from the list and check Full Control in the Allow column. Now click OK and Apply to save changes.
- Optional: You might have to add SYSTEM, RESTRICTED and your user name to the list by following the steps above.
After changing the security settings for the UserChoice key the problem should be completely resolved. Keep in mind that this solution applies only if this error appears while trying to open .txt files.
If you can open .txt files without any problems, you might want to skip this solution entirely.
Users reported Windows Shell Common Dll has stopped working error while trying to open .txt files on their PC, but you should be able to fix that with the steps above.
6. Update your touchpad driver
Many users reported this problem on their laptops, and it seems that the problem was their touchpad driver.
According to users, the Elantech touchpad driver caused Windows Shell Common Dll has stopped working error to appear, but users fixed it simply by updating the touchpad driver.
Keep in mind that this error can appear even with other touchpad drivers, so even if you’re not using Elantech touchpad be sure to update your driver to the latest version.
Several users reported that they fixed the problem by removing the Elan touchpad software from their PC, so feel free to try that as well.
7. Connect your stereo receiver to a USB 3.0 port
Several users reported Windows Shell Common Dll is not responding while using a stereo receiver with their PC. According to them, the receiver was connected to a USB 2.0 port and that caused the error to appear.
To fix the problem, you just have to connect the stereo receiver to the USB 3.0 port and the problem should be completely resolved.
8. Copy necessary files to System32 directory
- Navigate to the following directory:
C:WindowsSystem32 - Locate joy.cpl and copy it to your Desktop.
- Right click joy.cpl and choose Properties from the menu.
- Navigate to Security tab and click on Advanced.
- Locate the Owner section and click on Change.
- Now enter your username in the Enter the object name to select and click on Check Names. If everything is in order, click on OK to save changes.
- After doing that, click Apply and OK to save changes.
- After taking the ownership of joy.cpl delete it.
- Once you delete the file, go to the following directory:
C:WindowsSysWOW64 - . Locate joy.cpl and copy it to
C:WindowsSystem32
Once you copy the file, the problem should be resolved and you’ll be able to access gamepad settings from Windows without any problems.
According to users, Windows Shell Common Dll is not responding error appears while trying to configure gamepad settings.
To fix the problem you need to copy a single file to your System32 directory like we showed you above.
9. Uninstall Intellipoint software and Synaptics driver
- Open Device Manager.
- Locate your touchpad in Device Manager, right click it and choose Update driver.
- Now select Browse my computer for driver software.
- Click on Browse and locate the extracted driver files. Check Include subfodlers and click on Next to install the driver.
According to users, Windows Shell Common Dll has stopped working error can appear due to Intellipoint software and Synaptics driver.
These two aren’t compatible and in order to fix the problem you need to remove them both from your PC.
After doing that, you can download and install the latest version of Intellipoint.
Now you just have to install your Synaptics driver again. Several users suggested that you can fix this error simply by installing the driver manually from Device Manager, like we showed you above.
10. Disable Hardware graphics accelerator in Office
- Open Outlook or any other Office application.
- Choose File > Options > Advanced.
- Now locate and disable Hardware graphics accelerator option.
Windows Shell Common Dll is not responding error can affect almost any application and Outlook is no exception. However, you can fix this problem simply by disabling Hardware graphics accelerator.
After you disable this feature, the error message should stop appearing and you’ll be able to use Outlook without any problems.
11. Delete Outlook plugin for Microsoft Dynamics CRM
Outlook has various plug-ins that enhance its functionality, but sometimes these plugins can cause Windows Shell Common Dll has stopped working error to appear.
To fix the issue, users are recommending to uninstall Outlook Plugin for Microsoft Dynamics CRM from your PC. After doing that, the problem should stop appearing and you’ll be able to use Outlook again.
If the issue still persists, you might have to delete your Outlook profile and recreate it again to fix the problem.
12. Update your AMD drivers
Several users reported that Windows Shell Common Dll has stopped working error appears due to problems with AMD drivers. If you have any AMD drivers installed, we strongly advise you to remove them and install the latest version.
According to users, updating the AMD drivers fixed the problem for them so be sure to try that.
13. Disable or remove your antivirus software
Having an antivirus software is rather important, but sometimes your antivirus can cause Windows Shell Common Dll has stopped working error to appear.
To fix the problem you need to disable your antivirus software and check if that solves the issue.
If the problem still persists, you might have to remove your antivirus software completely. We also have to mention that antivirus tools tend to leave leftover files.
In order to completely remove your antivirus, you’ll need to use a dedicated removal tool. Most antivirus companies offer removal tools for their software, so be sure to download one for your antivirus.
If removing the antivirus fixes the problem, you just need to install it again or switch to a different antivirus solution.
Users reported that this error was caused by CA Anti-Virus software, so be sure to remove this tool from your PC.
Even if you don’t use this tool, you might want to try disabling and removing your antivirus and check if that solves the problem.
14. Disable audio enhancements
Many users love to use various audio enhancements to change their sound quality. However, sometimes these enhancements can cause Windows Shell Common Dll is not responding error to appear.
To fix the issue, you need to disable all audio enhancements such as equalizers or any other Enhanced Audio features.
You can usually find these features available in your audio driver configuration software.
Some PC issues are hard to tackle, especially when it comes to corrupted repositories or missing Windows files. If you are having troubles fixing an error, your system may be partially broken.
We recommend installing Restoro, a tool that will scan your machine and identify what the fault is.
Click here to download and start repairing.
After disabling all these audio enhancements, the problem should be resolved.
15. Remove unnecessary audio devices from Device Manager
- Open Device Manager.
- Now go to View > Show hidden devices.
- Locate any unknown audio device and remove it.
If you have any problems with your audio settings due to Windows Shell Common Dll has stopped working error, you might be able to fix them by removing unnecessary audio devices from Device Manager. The steps above should help with this.
Users reported that the cause for this problem was Sndt Audio, but after removing its driver and software the issue was resolved completely.
16. Remove Touch-Base UPDD
Your drivers can often cause Windows Shell Common Dll is not responding error to appear.
Several users reported that Touch-Base UPDD software caused the problem, and in order to fix the issue, you need to remove it.
After removing the problematic software, the issue should be resolved completely and everything will start working again.
17. Run the SFC scan
- Press Windows Key + X and choose Command Prompt (Admin) from the list. If Command Prompt isn’t available, you can choose PowerShell (Admin).
- When Command Prompt starts, enter
sfc /scannowand press Enter to run it. - The scan will now start. Keep in mind that sfc scan can take about 10-15 minutes, so don’t interrupt it.
Sometimes this error can appear if your system files are corrupted. File corruption can occur for various reasons, but you should be able to fix it by performing SFC scan.
Once the scan is completed, check if the problem still appears. If the problem isn’t resolved or if you can’t run SFC scan at all, you might have to use DISM scan instead.
To do that, simply start Command Prompt as administrator and enter DISM /Online /Cleanup-Image /RestoreHealth and press Enter to run it. DISM scan will now try to repair your system, so don’t interrupt it. This process can take more than 15 minutes so you’ll have to be patient.
It seems that everything is lost when DISM fails on Windows? Check out this quick guide and get rid of the worries.
scannow command has stopped? Don’t worry, we’ve got an easy fix for you.
18. Use PowerShell
- Press Windows Key + S and enter powershell. Right-click Windows PowerShell and choose Run as administrator from the menu.
- When Command Prompt starts, enter
Set-ExecutionPolicy -ExecutionPolicy Unrestricted -Scope CurrentUsercommand and press Enter to run it.
According to users, Windows Shell Common Dll is not responding error can appear because Windows isn’t configured to accept certificates. However, you can easily fix this problem by using PowerShell.
We have to warn you that PowerShell is a powerful tool, and by using it improperly you can cause damage to your system. To fix this problem with PowerShell, do the following:
19. Use System Maintenance
- Press Windows Key + R and enter
%systemroot%system32msdt.exe -id MaintenanceDiagnostic - Now press Enter or click OK to run it.
- System Maintenance tool will now appear. Click on Next to continue and follow the instructions on the screen.
Few users claim that they fixed the problem simply by running System Maintenance Troubleshooter. This is a built-in tool and it can sometimes fix various problems with Windows.
After System Maintenance completes the scan the problem should be resolved.
20. Re-register your DLLs
- Open Command Prompt as administrator.
- When Command Prompt starts enter regsvr32 /i shell32.dll command and press Enter to run it.
If you’re getting Windows Shell Common Dll has stopped working error message, the cause can sometimes be your DLL files, specifically shell32.dll.
According to users, the DLL files can become unregistered for some unknown reason and that can cause this error message to appear. To fix this problem, you just have to re-register shell32.dll.
After the command is executed, the shell32.dll file will be re-registered and the error message should stop appearing.
21. Reinstall the problematic application
We all have third-party applications installed on our PCs, but this error can appear in almost any application. If this error is appearing in your favorite applications, we advise you to reinstall them and check if that solves the problem.
In addition to reinstalling, be sure to update the problematic application to the latest version and check if the problem still persists.
If the developers are aware of this issue, it’s rather likely that the problem was addressed and you should be able to fix it simply by updating your application.
22. Perform a clean boot
- Press Windows Key + R and enter msconfig. Press Enter or click OK.
- Go to the Services tab and check Hide all Microsoft services. Now click on Disable all.
- Navigate to Startup tab and click on Open Task Manager.
- When Task Manager opens, locate the first item on the list, right click it and choose Disable from the menu. Repeat this for all items on the list.
- After doing that, go back to the System Configuration window and click on Apply and OK.
Now you just have to restart your PC and check if the problem still appears. If not, it’s certain that a third-party application or service is causing this error.
To find the problematic service you need to repeat the same steps and enable disabled applications and services one by one. Keep in mind that you need to restart your PC after enabling set of services or applications in order to apply changes.
Once you find the problematic application, you can keep it disabled, remove it or reinstall it and check if that solves the problem.
If Windows Shell Common Dll has stopped working error message appears frequently on your PC, it’s possible that a third-party application is causing it.
Windows starts with various third-party applications and services, and you can disable problematic applications by following the steps from above.
Can’t open Task Manager? Don’t worry, we’ve got the right solution for you.
23. Remove .wmv files from the Synaptics directory
In one of our previous solutions, we mentioned that Synaptics drivers can sometimes cause Windows Shell Common Dll has stopped working error message to appear. Apparently, users can’t configure or access Synaptics settings, and this can be a big problem.
It turns out that the Synaptics configuration window plays a video demonstration when configuring your touchpad, and those videos can be the cause of this problem.
As a workaround, users are suggesting to navigate to the following directory: C:Program FilesSynapticsSynTP
Once you enter the directory, delete all .wmv files from there. After removing .wmv files, the problem should be resolved and everything will start working without problems.
Few users claim that you can fix this problem simply by renaming igdumdim64.dll file in System32 directory. Before you can rename the file, you’ll need to take ownership of that file.
We demonstrated briefly in Solution 7 how to take ownership over a certain file, so be sure to check it out for detailed instructions.
24. Install the latest Windows updates
- Open the Settings app. To do that quickly you can just press Windows Key + I on your keyboard.
- Once the Settings app opens, navigate to Update & security section.
- Now click on Check for updates button. Windows will now check for missing updates and download them in the background.
After you download the updates, they’ll be installed automatically once you restart your PC.
According to users, you might be able to fix this problem simply by installing the latest Windows updates.
Microsoft is addressing various issues, and if this is a serious issue, it’s possible that you can fix it by updating Windows.
In most cases, Windows 10 will automatically download the updates, but sometimes you can miss an important update. However, you can always check and install the missing updates manually.
If you’re having trouble opening the Setting app, take a look at this article to solve the issue.
25. Create a new user account
- Open the Settings app and go to Accounts section.
- In the left pane, choose Family & other people. In the right pane click on Add someone else to this PC.
- Click on I don’t have this person’s sign-in information.
- Now you’ll be asked to create a new Microsoft account. Click on Add a user without a Microsoft account.
- Now enter the desired username and click on Next.
After you create a new account, switch to it and check if the problem still appears. If not, you might have to move your files to a new account and use it instead of your old one.
Sometimes Windows Shell Common Dll is not responding error can affect only a single user account on your PC.
If that’s so, you might want to create a new user account on your PC as a workaround.
26. Rename olmapi32.dll
As previously mentioned, Windows Shell Common Dll has stopped working error can affect almost any application, and users reported this problem in Outlook 2016.
It seems that the problem is caused by a single .dll file, and in order to fix it, you need to find and rename that file.
To do that, just navigate to the following directory: C:Program FilesMicrosoft OfficerootOffice16 Now rename olmapi32.dll file.
After doing that, try to start Outlook again. If the problem still persists, you might want to repair your Office installation.
27. Reset Windows 10
- Open the Start Menu, click the Power button, press and hold the Shift key and choose Restart from the menu.
- Select Troubleshoot > Reset this PC > Remove everything.
- To proceed, you might have to insert your Windows installation media, so be sure to have it ready.
- Select your version of Windows and choose Only the drive where Windows is installed > Just remove my files.
- Now you’ll see a list of changes that reset will perform. If you’re ready to start, click the Reset button.
- Follow the instructions on the screen to complete the reset.
If the error message still appears and it’s making your PC almost unusable, you might want to try resetting Windows 10.
We have to mention that reset will delete all files from your system drive, so be sure to back them up beforehand.
In addition to backing up your files, you might also need a Windows 10 installation media, so be sure to create one using Media Creation Tool. After you back up your files.
After the resetting process is finished, you’ll have a fresh installation of Windows 10. Now you just have to move your files from the backup and install all your applications. This is a drastic solution so you should use it only if other solutions can’t fix the problem.
Windows Shell Common Dll has stopped working error message can cause many problems on your PC, but you should be able to fix it by using one of our solutions.
Still having issues? Fix them with this tool:
SPONSORED
If the advices above haven’t solved your issue, your PC may experience deeper Windows problems. We recommend downloading this PC Repair tool (rated Great on TrustPilot.com) to easily address them. After installation, simply click the Start Scan button and then press on Repair All.
![]()