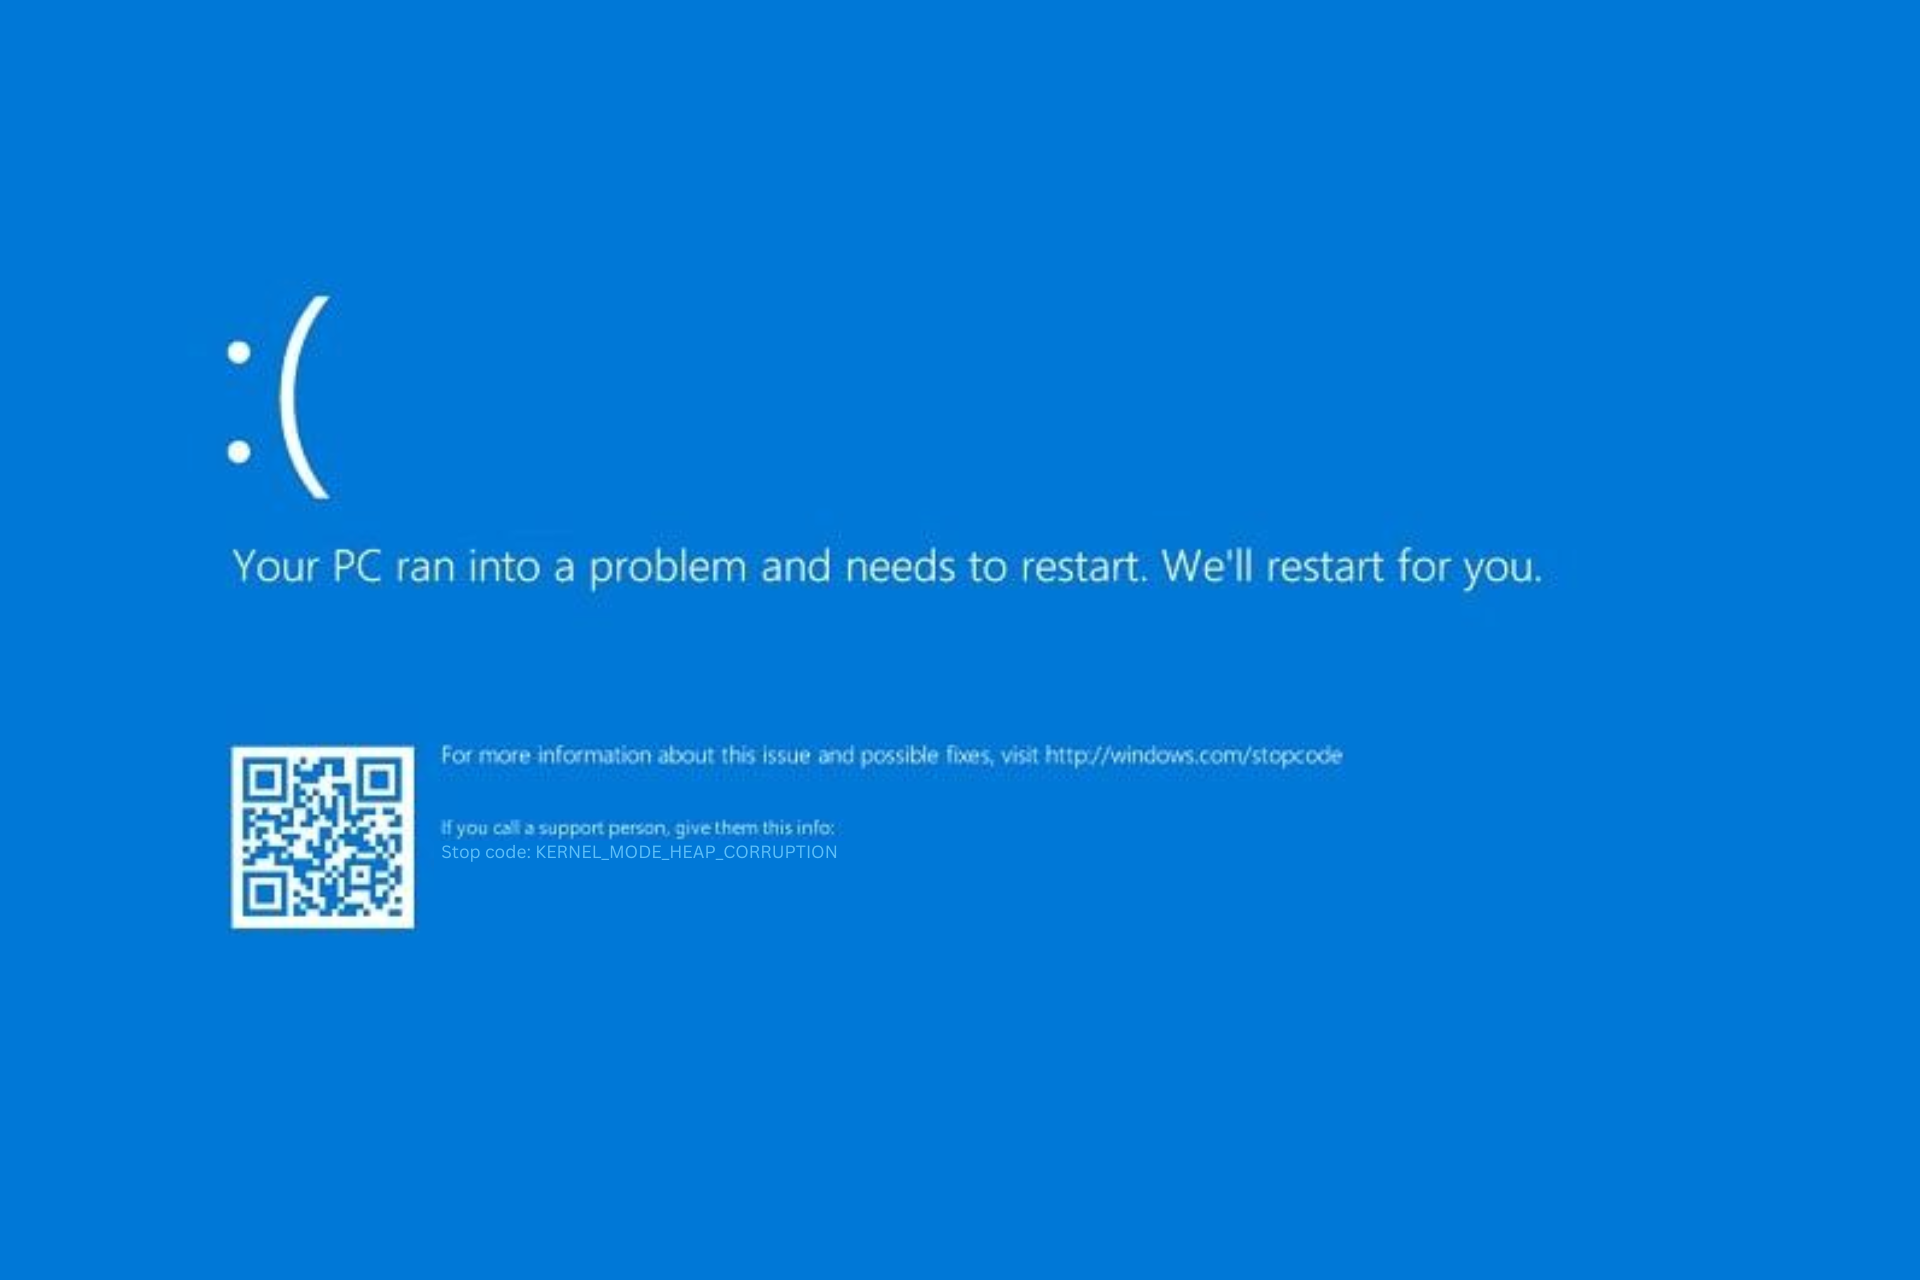
Синий экран с кодом остановки «Kernel Mode Heap Corruption» в Windows 10 может возникнуть при запуске игр и приложений, которые начинают интенсивно использовать ресурсы процессора. Ошибка очень распространена и не указывает на серьезные проблемы с операционной системой. Но в последнее время возникают случаи, когда синий экран BSOD возникает снова и снова при выполнении одного и того же действия, которое первоначально вызвало ошибку.

Содержание
- 1 Причины ошибки
- 2 Удаление несовместимых приложений
- 3 Проверка драйверов на наличие ошибок
- 4 Обновление драйверов
- 5 Проверка оперативной памяти
- 6 Запуск восстановления системы
Причины ошибки
Синий экран Kernel_Mode_Heap_Corruption может возникнуть по ряду причин.
Устаревшие драйвера видеокарты. Часто причиной этой ошибки являются поврежденные или устаревшие графические драйвера. Поэтому, когда запускаем игру или «тяжелое» приложение сталкивается с синим экраном.
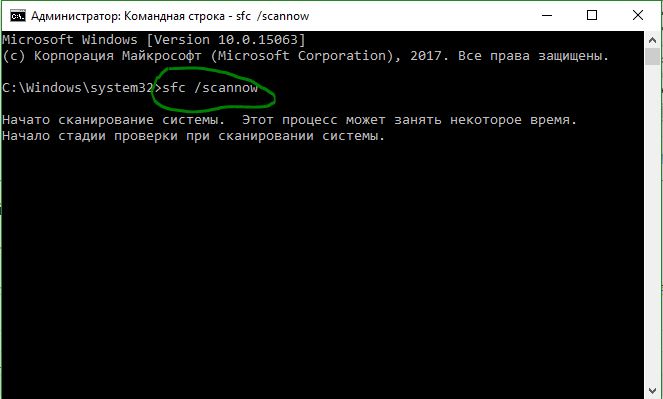
Поврежденные системные файлы. Для решения проблемы можно запустить утилиту проверки системных файлов sfc /scannow или Dism /Online /Cleanup-Image /RestoreHealth из командной строки, запущенной от имени администратора.
Несовместимое программное обеспечение. После установки несовместимого приложения может возникнуть конфликт с ОС. Если приложение вносит изменения в системные параметры, Windows может аварийно прекратить работу и выбросить синий экран.
Аппаратные ошибки. При возникновении ошибок в работе оперативной памяти или в случае ее неисправности, Windows не сможет правильно взаимодействовать с устройством и аварийно прерывает работу.
Перейдем к решениям, но для начала войдите в систему с учетной записью администратора и проверьте подключение к интернету.
Удаление несовместимых приложений
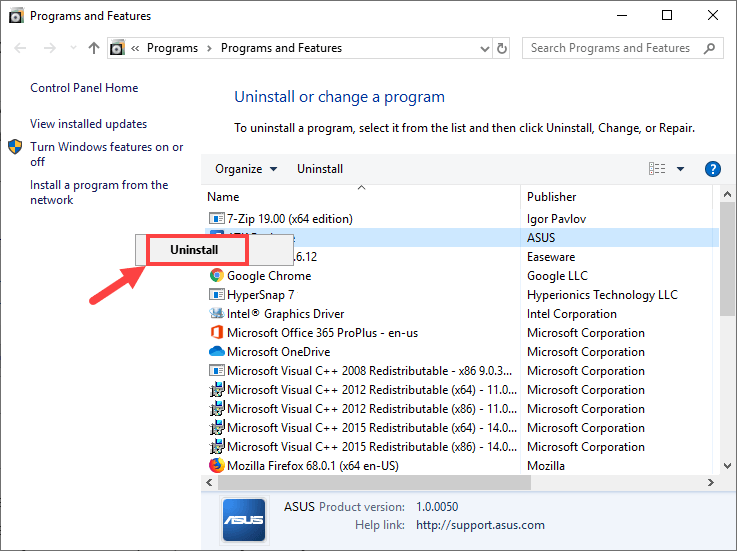
Очень часто синий экран с кодом Kernel_Mode_Heap_Corruption возникает по причине программного конфликта. Некоторые приложения могут внести изменения в основные параметры, что приведет к нестабильной работе Windows. Поэтому сначала нужно их определить. Это могут быть программы, установленные перед появлением ошибки или при запуске которых, отображается синий экран.
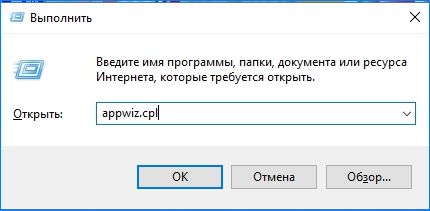
Откройте окно «Выполнить» нажатием на клавиши Windows + R, наберите команду appwiz.cpl и подтвердите ее выполнение на Enter.
Отобразится список всех программ, установленных на компьютере. Если уверены, что ошибка появилась после установки последней программы, отсортируйте список по дате, кликните на ней правой кнопкой мыши и выберите «Удалить».

Когда синий экран возникает при запуске определенной программы, также найдите ее в списке и удалить.
Проверка драйверов на наличие ошибок
Драйвера являются основными компонентами, которые взаимодействуют между операционной системой и оборудованием. Если они повреждены, то будете сталкиваться с многочисленными ошибками, в частности, с Kernel_Mode_Heap_Corruption. Поэтому попробуем их обновить до последней сборки.
Прежде чем перейти к решению, сделайте точку восстановления на случай возникновения ошибок в работе утилиты.
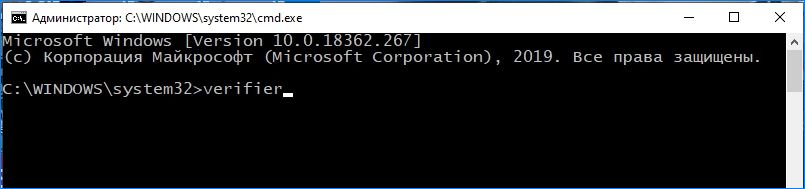
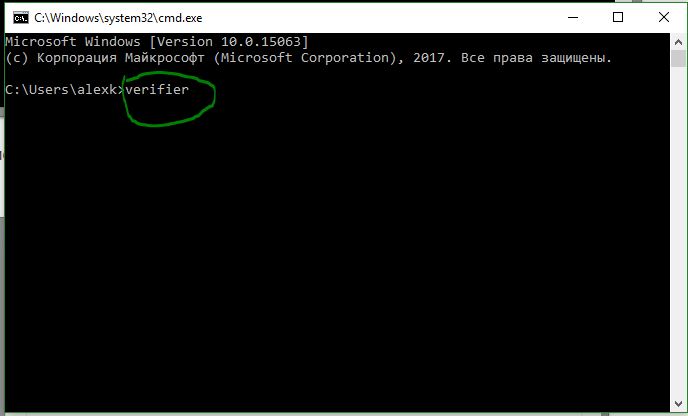
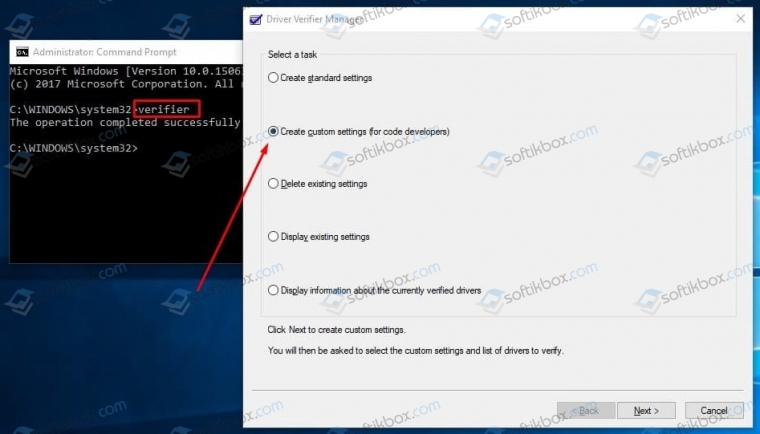
Откройте строку поиска клавишами Windows + S и наберите «командная строка». Кликните на найденный результат правой кнопкой мыши и выберите «Запуск от имени администратора».

В окне командной строки наберите команду:
verifier
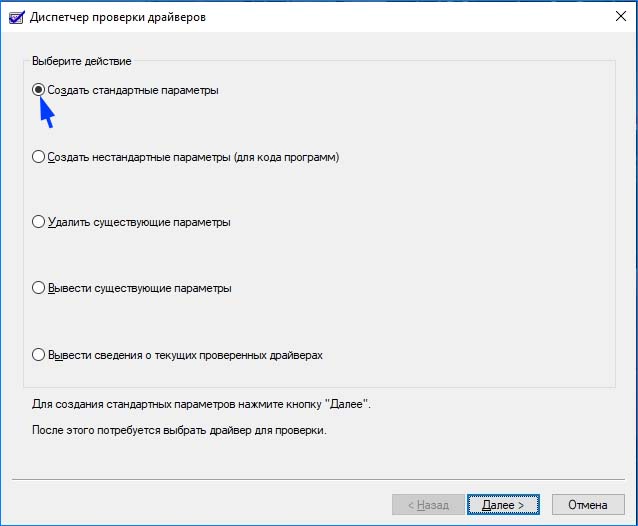
Выберите «Создать стандартные настройки»и нажмите Далее.
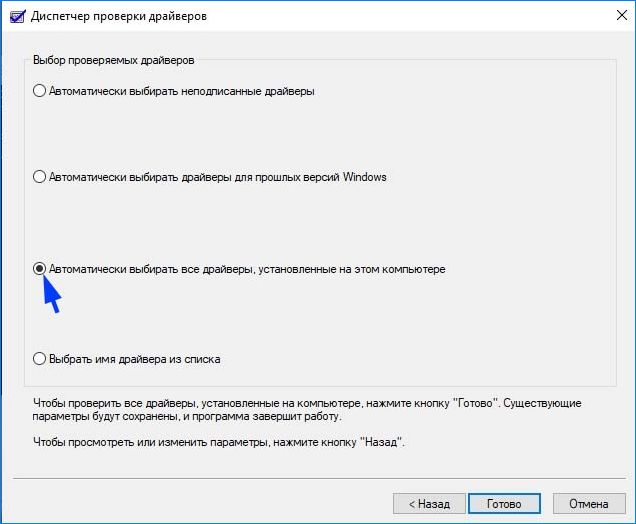
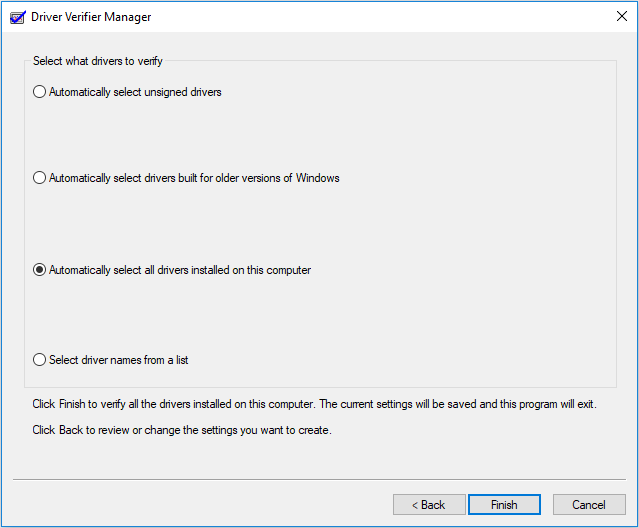
Затем выберите «Автоматически выбирать все драйверы, установленные на этом компьютере» и нажмите «Готово». Подтвердите перезагрузку компьютера.
После перезагрузки сразу начнется проверка. При обнаружении неисправных их нужно обновить, выполнив следующие шаги.
Обновление драйверов
Если какие-то драйвера оказались неисправными в ходе проверки предыдущим решением, обновите их вручную до последней версии.
Первое, что нужно сделать, загрузить требуемые драйвера с официального сайта в указанную папку на диске и запустить их установку.
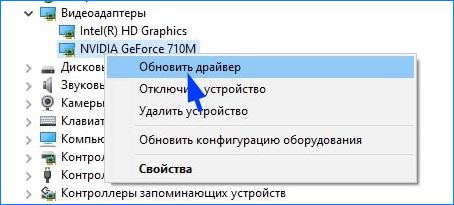
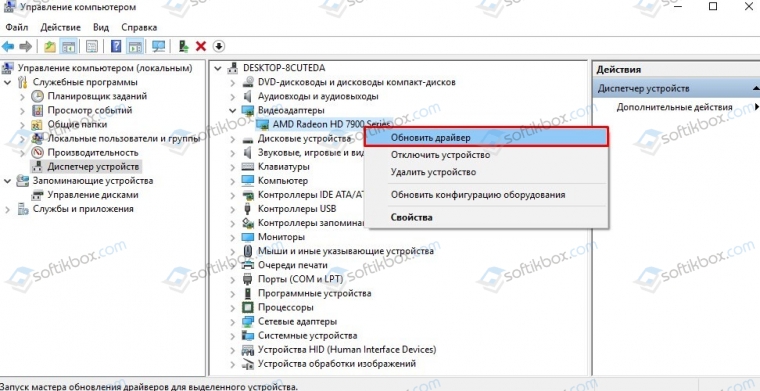
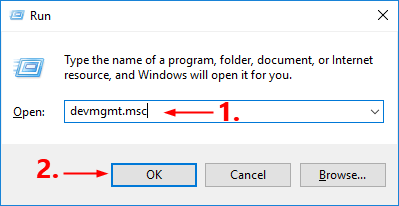
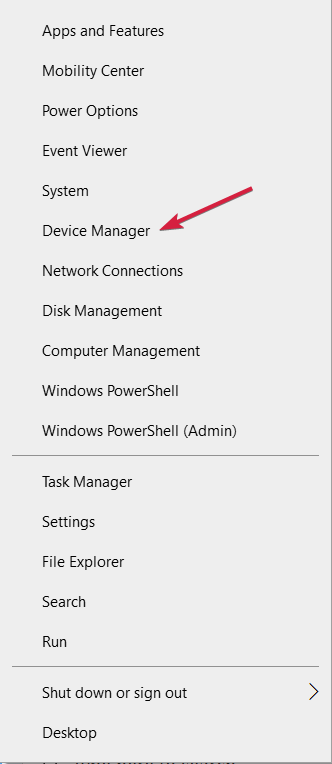
Откройте окно «Выполнить» (Win + R), впишите команду devmgmt.msc для входа в «Диспетчер устройств». В случае повреждения драйверов видеокарты, разверните вкладку «Видеоадаптеры», кликните правой кнопкой мыши на ней и выберите «Обновить».
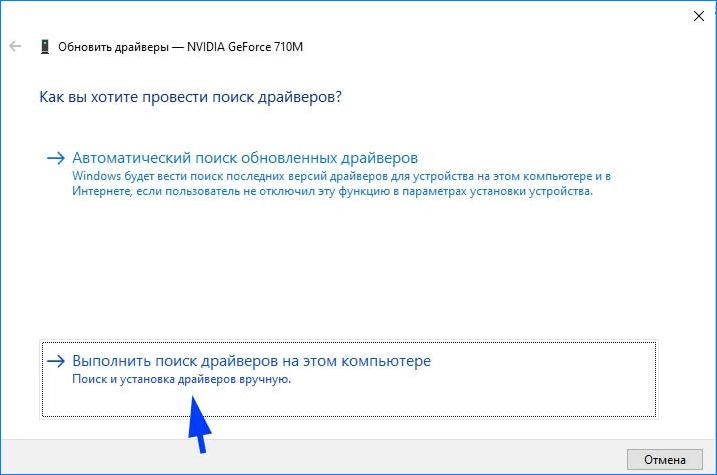
Выберите второй вариант обновления вручную.
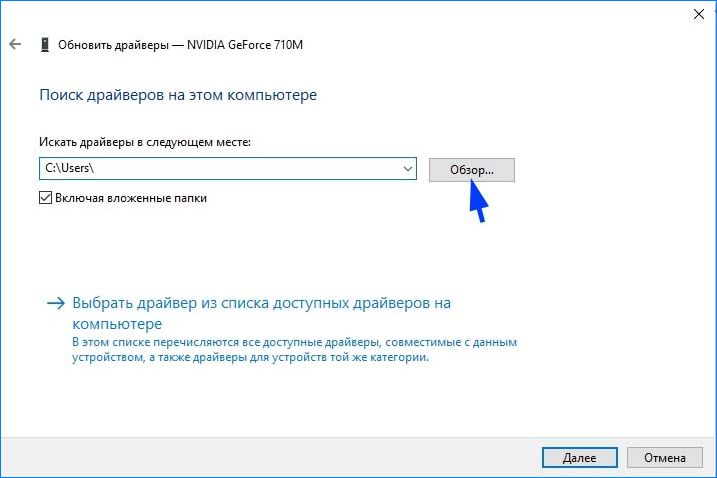
Затем нажмите на кнопку «Обзор», перейдите в папку с загруженными драйверами. Следуйте инструкциям до завершения установки.
Обновите все устройства, драйверы которых были повреждены и перезагрузите компьютер. Если продолжаете сталкиваться с ошибкой Kernel_Mode_Heap_Corruption перейдите к следующему способу.
Проверка оперативной памяти
Ошибка также может возникнуть из-за неполадок планок памяти. Перед запуском теста ОЗУ, нужно извлечь планки из слотов, и аккуратно протереть контакты ластиком. Затем вернуть их обратно, проверить плотность контакта и фиксацию защелок. Проверьте также размещение планок (например, нужно использовать 1 и 3 слот, если на материнской плате есть 2 модуля оперативной памяти).
Для проверки памяти загрузите программу MemTest86+ с официального сайта. Установите флешку и запустите установку программы. Имейте в виду, что при создании загрузочного диска для memtest все содержимое флешки будет удалено.
Переключите в БИОС приоритет на загрузку системы с USB-накопителя. После загрузки запустите проверку ОЗУ. Модули оперативной памяти будут протестированы в несколько циклов.
Запуск восстановления системы
Если не удалось устранить ошибку Kernel_Mode_Heap_Corruption перечисленными способами, попробуйте вернуть Windows в предыдущее состояние до возникновения синего экрана.
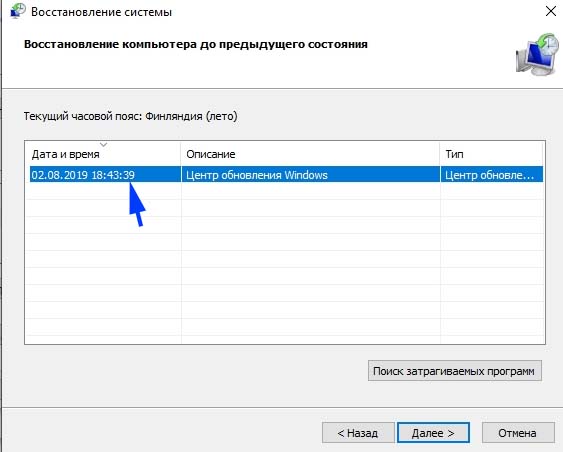
Нажмите Windows + S для вызова строки системного поиска, введите «восстановление» и кликните на найденный результат.

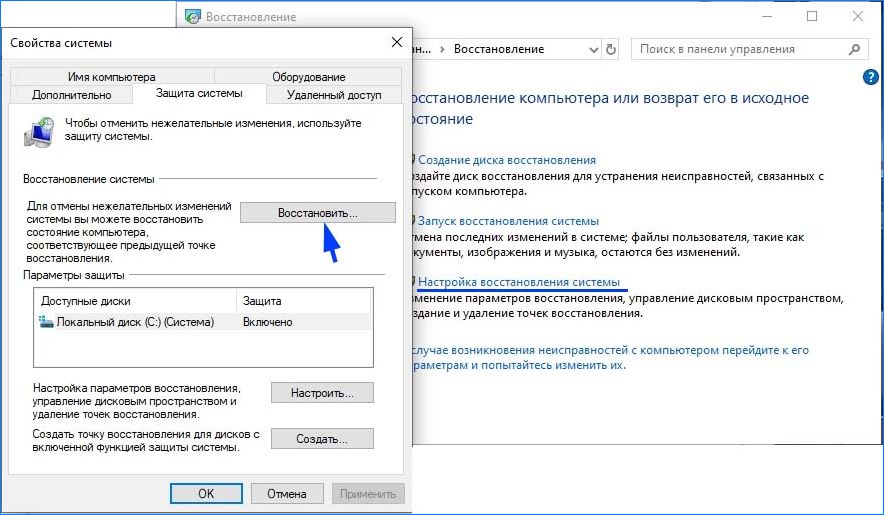
Перейдите в настройки восстановления, затем на вкладке «Защита системы» нажмите кнопку «Восстановить».
На первом экране нажмите на кнопку «Далее». На следующем отметьте флажком «Показать другие точки». Выберите точку восстановления, которая была создана до появления сбоя системы Kernel_Mode_Heap_Corruption.
На экране подтверждения нажмите кнопку «Готово».
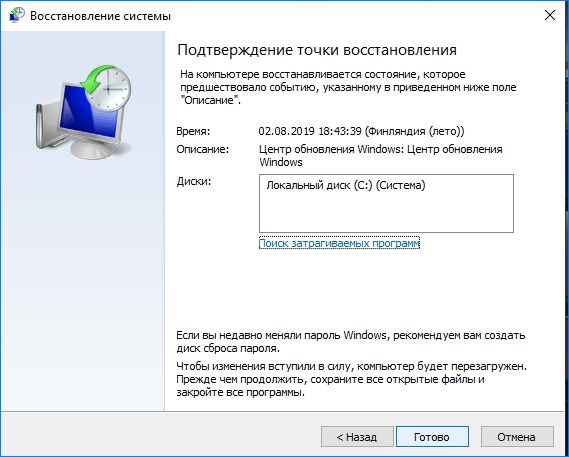
После начнется процесс восстановления. При успешном завершении проверьте, возникает ли ошибка.
Вы можете столкнуться с ошибкой на синем экране BSOD «Kernel Mode Heap Corruption» в Windows 10 при обычной работе за компьютере или когда ваш ПК испытывает нагрузку на оборудование как CPU, GPU или RAM. Ошибка может быть вызвана из-за поврежденного или устаревшего драйвера видеокарты, поврежденных системных файлов, проблемы с оборудованием как ОЗУ, или сама программа или игра является конфликтующей с вашей операционной системой. Разберем, как исправить ошибку Kernel_Mode_Heap_Corruption на синем экране в Windows 10.

1. Проверка системных файлов
Системные файлы могут вызывать ряд ошибок, в том числе и Kernel Mode Heap Corruption. Откройте командную строку от имени администратора и введите команды по очереди. Эти две команды найдут отсутствующие или поврежденные системные файлы, и автоматически исправят их.
sfc /scannowDISM /ONLINE /CLEANUP-IMAGE /RESTOREHEALTH
2. Проверка драйверов на наличие ошибок
Какой именно драйвер отвечает за ошибку сложно сказать без анализа. Мы же будем анализировать все драйверы оборудования в системе. Запустите командную строку от имени администратора и введите команду:
verifier- В появившимся окне «Создать стандартные параметры«.
- Далее «Автоматически выбирать все драйверы установленные на этом компьютере«.
Когда Windows перезагрузится, она проанализирует все драйверы, установленные на вашем компьютере, на наличие проблем. Если Проблемы будут обнаружены, то вы получите уведомление об этом.
3. Обновить драйверы
Если выше способом обнаружился какой-либо драйвер, то его необходимо обновить до последней версии. Нажмите Win+R и введите devmgmt.msc, чтобы попасть быстро в диспетчер устройств. Определите какое устройство вызывает ошибку Kernel Mode Heap Corruption (выше метод), раздвиньте список и нажмите по нему правой кнопкой мыши, после чего выберите «Обновить драйвер«. Далее следуйте рекомендациям на экране.
Вы также можете зайти на сайт производителя оборудования и скачать вручную последнюю версию драйвера.

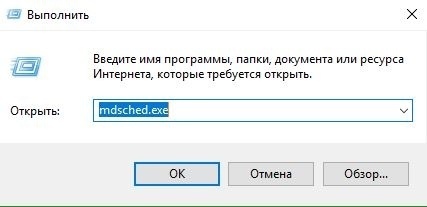
4. Диагностика ОЗУ
В первую очередь убедитесь, что оперативная планка у вас вставлена правильно. Также следует достать её из компьютера и продуть слоты от пыли. Еще один момент, если у вас 4 слота на материнской плате для RAM планок, то попробуйте вставить планки в 1 и 3 слот.

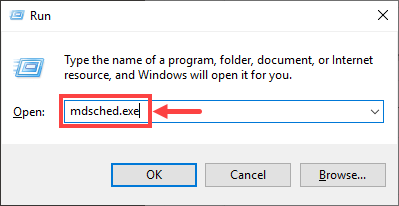
Это сложно сделать в ноутбуке, так как многие боятся его разбирать. По этой причине можно запустить диагностику ОЗУ. Нажмите Win+R и введите mdsched.exe, после чего следуйте рекомендациям на экране. Если будут программные ошибки, то инструмент попытается автоматически исправить их, после чего ошибка Kernel Mode Heap Corruption в Windows 10 устраниться.
Смотрите еще:
- SFC и DISM: Проверка и Восстановление системных файлов в Windows
- Проверка плохих драйверов с Windows Driver Verifier
- Как удалить, отключить, откатить и обновить драйверы устройств в Windows 10/8/7
- Диагностика ошибок синего экрана смерти BSOD Window
- Как проверить оперативную память на ошибки в Windows
[ Telegram | Поддержать ]
17.03.2020
Просмотров: 16514
При загрузке операционной системы, при запуске программы или игры, при работе с настройками самой Windows 10 пользователи могут столкнуться с синим экраном смерти Kernel Mode Heap Corruption, который может возникать по различным причинам. Среди них стоит выделить: повреждение драйверов видеокарты, неполадки с ОЗУ и процессором, конфликт программ и игр с файлами операционной системы, повреждение системных файлов. Поскольку единой причины, которая бы могла вызвать ошибку Kernel Mode Heap Corruption в Windows 10 нет, то решение неполадки усложняется.
Читайте также: Как решить синий экран смерти 0x00000162: KERNEL AUTO BOOST INVALID LOCK RELEASE?
Исправление синего экрана Kernel Mode Heap Corruption в Windows 10
В первую очередь, если на вашем ПК с Windows 10 появился синий экран смерти с кодом Kernel Mode Heap Corruption, стоит провести проверку системы на вирусы. Для этого нужно использовать антивирус с актуальными вирусными базами или бесплатную лечащую утилиту Dr.Web Curelt, которая просканирует Windows 10 на вредоносные объекты.

Если по результатам проверки вирусов не было обнаружено, стоит проверить операционную систему на целостность файлов. Для этого в командной строке с правами Администратора нужно ввести такие команды (по очереди):
- sfc /scannow
- DISM /ONLINE /CLEANUP-IMAGE /RESTOREHEALTH

Если на ПК будут повреждены системные файлы или файлы загрузчика, то данные утилиты их восстановят. Если же проблем не было обнаружено, то следующим шагом должна быть проверка драйверов видеокарты. Для этого нужно открыть Диспетчер устройств (Win+R, devmgmt.msc) и развернуть ветку «Видеоадаптеры». Нажимаем на значке названия видеокарты правой кнопкой мыши и выбираем «Обновить драйвера».
Далее выбираем «Выполнить поиск драйверов на этом компьютере». Указываем путь к ранее загруженному драйверу.
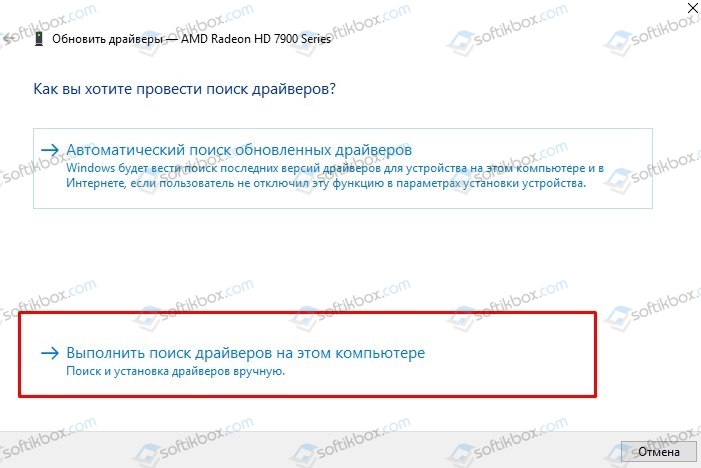
Позволяем системе обновиться.
ВАЖНО! Драйвера для видеокарты стоит загружать только с официальной страницы производителя оборудования в соответствии с версией и разрядностью Windows 10.
Если после обновления драйверов и перезагрузки операционной системы ошибка KERNEL MODE HEAP CORRUPTION не исчезла, то проблема может крыться в другом драйвере. Чтобы определить, какое ПО вызвало ошибку, стоит проанализировать установленные драйвера. Для этого пригодиться инструмент Verifier. Для его запуска нужно открыть командную строку с правами Администратора и ввести verifier. Далее нужно поставить отметку «Создать стандартные параметры».
Далее ставим отметку «Автоматически выбрать все драйвера, установленные на этом компьютере». После того, как компьютер перезагрузиться, утилита проанализирует установленные драйвера. Если какое-то ПО сбоит, то при загрузке ПК появится об этом уведомление. Далее, по ситуации, нужно переустановить драйвер или откатить его до более раннего состояния.
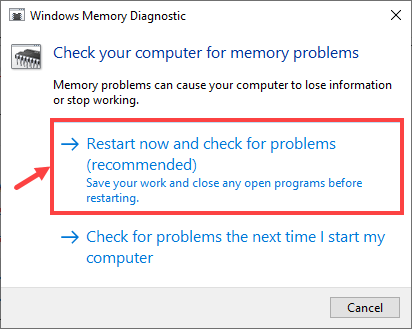
Также на зарубежных форумах пользователи указывали, что ошибка Kernel Mode Heap Corruption в Windows 10 может появиться из-за проблем с оперативной памятью. Для проверки ОЗУ нужно нажать «Win+R» и вводим «mdsched.exe». Появится небольшое окно. Нужно выбирать «Выполнить проверку и перезагрузку (рекомендуется)».
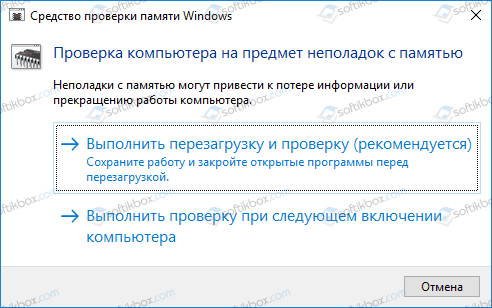
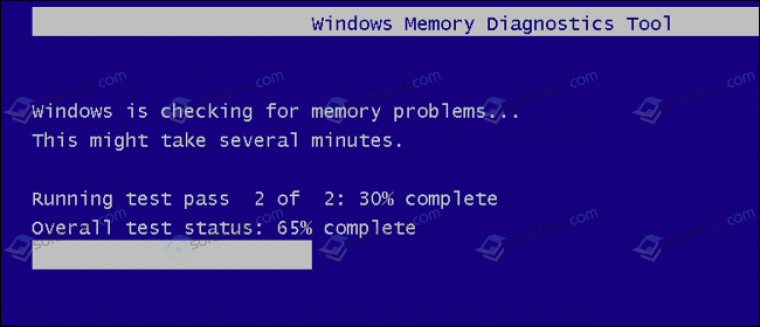
ПК перезагрузиться и на синем экране вы увидите процесс проверки ОЗУ. Ожидаем его завершения. Смотрим результаты.
Для более глубокой проверки можно использовать программу MemTest86. Её нужно записать на флешку или диск и запустить из-под Windows, то есть выставить в BIOSе приоритетность загрузки с носителя.
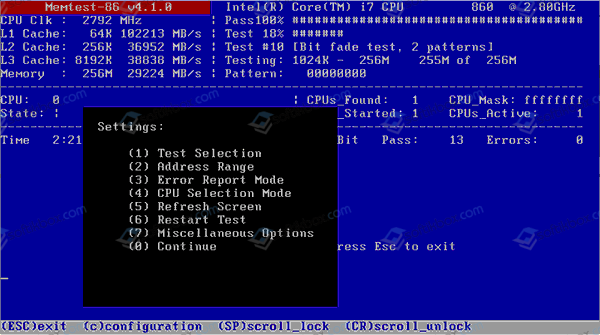
Система перезагрузиться. Нужно запустить проверку ОЗУ. При этом необходимо, чтобы утилита выполнила несколько проходов программой. Проверка может занять несколько часов.
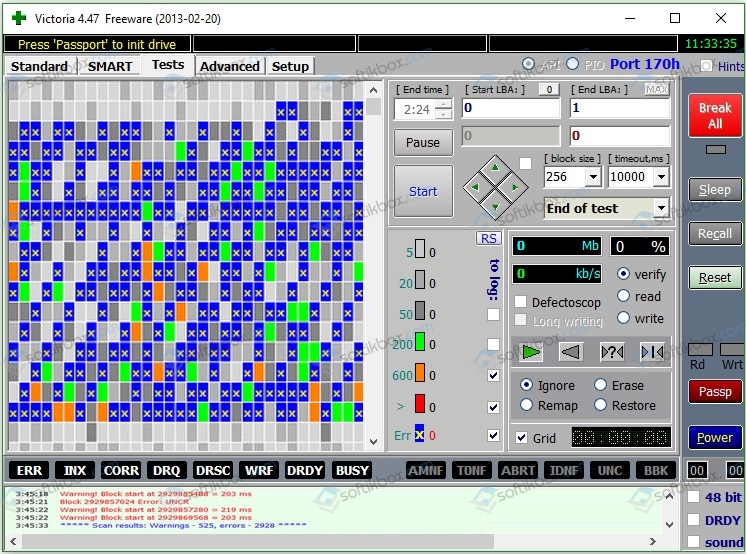
После проверки ОЗУ нужно также проверить температуру процессора на перегрев и жесткий диск на наличие или отсутствие битых секторов. Для первой цели подойдет программа AIDA64, а для второй – Victoria HDD.
В случае, если ошибок с ОЗУ, жестким диском, процессором не обнаружено, стоит обратить внимание на установленный софт. Нужно удалить последнюю установленную или обновленную программу и перезагрузить ПК. Если ошибка исчезла, то софт можно переустановить, только внести в исключение антивируса и инсталлировать с правами Администратора.
Если же исправить ошибку Kernel Mode Heap Corruption вышеуказанными способами не удалось, стоит откатить систему до более раннего состояния или воспользоваться установочным диском.
Encountering a blue screen error on Windows can be frustrating, especially if you’re in the middle of something. This will cause you to lose all progress of what you’re working on and can even corrupt files on your computer. Windows has a long list of BSOD errors, and some of them have been tackled on this website, including:
- VIDEO_DXGKRNL_FATAL_ERROR
- WHEA_UNCORRECTABLE_ERROR
- Netwsw00.Sys BSOD Error
- LGBusEnum.sys BSOD Error
- Ndistpr64.sys BSOD Error
- Dxgmms2.sys BSOD Error
- KMODE EXCEPTION NOT HANDLED (e1d65x64.sys) BSOD
- IRQL_NOT_LESS_OR_EQUAL BSOD Error
- DATA_BUS_ERROR
- DRIVER_POWER_STATE_FAILURE Error
- BAD_POOL_HEADER Error
- VIDEO MEMORY MANAGEMENT INTERNAL BSOD Error
This is just a short list of what can go wrong in Windows 10/11. In this article, we’ll discuss another BSOD error that is commonly encountered by Windows users: the Kernel Mode Heap Corruption Blue Screen on Windows 10/11.
What Is the Windows 10/11 Blue Screen Kernel Mode Heap Corruption?
 The KERNEL_MODE_HEAP_CORRUPTION bug check has a value of 0x0000013A. This indicates that the kernel mode heap manager has detected corruption in a heap.
Kernel Mode Heap Corruption is one of the stop codes presented by Windows when you run into a ‘blue screen error of death’ BSOD error. As is the case with other codes, ‘Kernel Mode Heap Corruption’ is created uniquely to help users identify the problems triggering system crashes. Usually, the error is caused by driver issues (especially graphics card drivers) or software conflicts, but it may also be caused by hardware malfunction.
People have encountered the Kernel Mode Heap Corruption error in different situations. Some said the error happened on startup of Windows 10/11, while others the moment of launching specific programs such as a video game.
In the kernel mode operation of your computer, programs have unrestricted access to the foundational hardware components. When a kernel mode heap corruption occurs, it means a flaw in a running program’s code has modified the contents of a data heap. This also means that the allocator’s handle of the heap has been affected.
Some possible outcomes are critical memory faults within the allocator itself and memory leaks, where some parts of the memory become inaccessible in the future.
What causes Kernel Mode Heap Corruption Blue Screen in Windows 10/11?
The error occurs mostly when a PC is overloaded or used over a long period. Most often, it has to do with the system drivers of a computer. However, users have identified many other conditions that cause the issue.
- Hardware Malfunctions – A faulty hardware component in your computer, such as a corrupt RAM, can trigger the error.
- Driver Problems – According to reports by several Windows 10/11 users, the issue started after they updated their system drivers. In this case, all you need to do is to undo the updates. It’s also possible that the drivers might already be outdated.
- Software Compatibility Issues – Compatibility problems between specific software in your PC can lead to unstable system behaviors, causing the BSOD error.
- System Graphics Card – It might be that you attempted to open some graphics-intensive software too heavy for your graphics card to support.
- Corrupt Files – If there are corrupt files in your system, they can also trigger the Kernel mode heap corruption problem. Note that you must diagnose the cause of the issue using the in-built Event viewer.
To know more about the cause of the error, follow the guide below:
Press the Windows logo + R keys and hit Enter to open the Run dialog box.
- Type “eventvwr” (no quotes) in the Run dialog box and hit Enter.
- In the Event viewer window, navigate Windows logs>System.
- In the System window, find the Kernel Mode Heap Corruption BSOD log from the list table.
- Read the log description displayed under General and Details. The log should describe the cause of the issue, particularly the Event ID and Source information.
Getting the KERNEL_MODE_HEAP_CORRUPTION blue-screen error? Don’t panic – you’re not alone. This is a fairly common error, and it’s usually not very hard to resolve. Here are several ways to fix this error:
Method 1: Boot Windows 10/11 into Safe Mode.
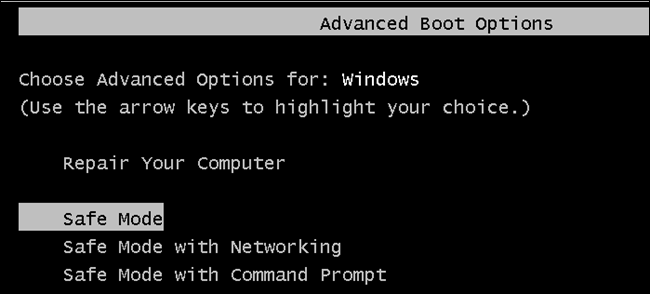 Since you are getting the Blue Screen, you won’t be able to log into Windows normally. So, you need to first boot into Safe Mode then perform the below workarounds. Only a handful of Windows 10/11 programs and services run on this mode preventing any kind of conflicts from third-party apps.
Here are the steps to enter Safe Mode:
- Press the Power button for 5 seconds and wait till it shuts down successfully.
- Repeat this process for 2-3 times until the Preparing Automatic Repair screen comes into view.
- Let the system diagnose this error for a few seconds thereafter click Advanced options.
- On the Windows Recovery Environment (WinRE), go to – Troubleshoot > Advanced options.
- Hit Startup Settings on the next screen followed by the Restart button.
- When Windows reboots, press F5 to boot into Safe Mode with Networking.
Selecting “Safe Mode with Networking” is essential to fix black or blue screen issues. If not, this won’t connect to the Internet causing problems in troubleshooting the actual problem.
Method 2: Roll back your graphics card drivers.
Some Windows users have reported that they experienced this ‘blue screen of death (BSOD)’ error right after an update of their graphics card drivers (or a Windows Update). If that’s when you got the error, you should restore your video driver to a previous version to secure the stability of your hardware device. Here’s how to do it:
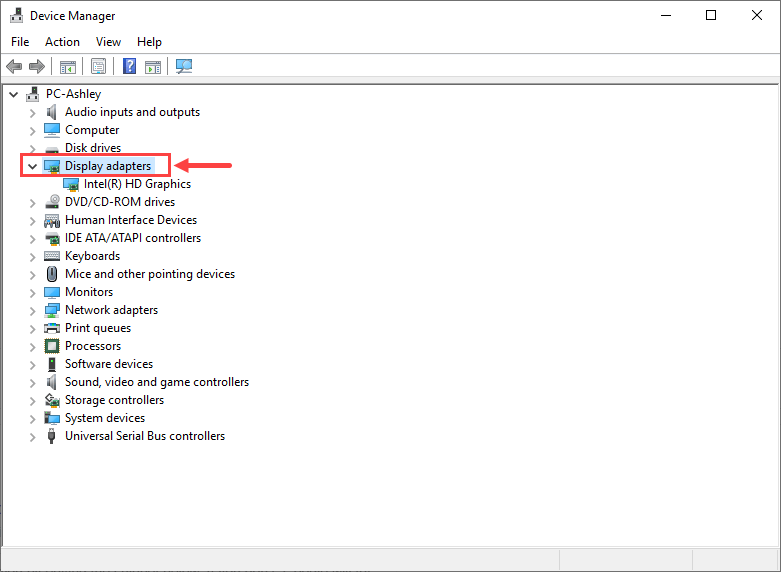
- On your keyboard, press the Windows logo key and R at the same time to invoke the Run dialog box. Then type devmgmt.msc into the box and click OK.
- In the Device Manager window, double-click on the Display adapters node to expand its drop-down list.
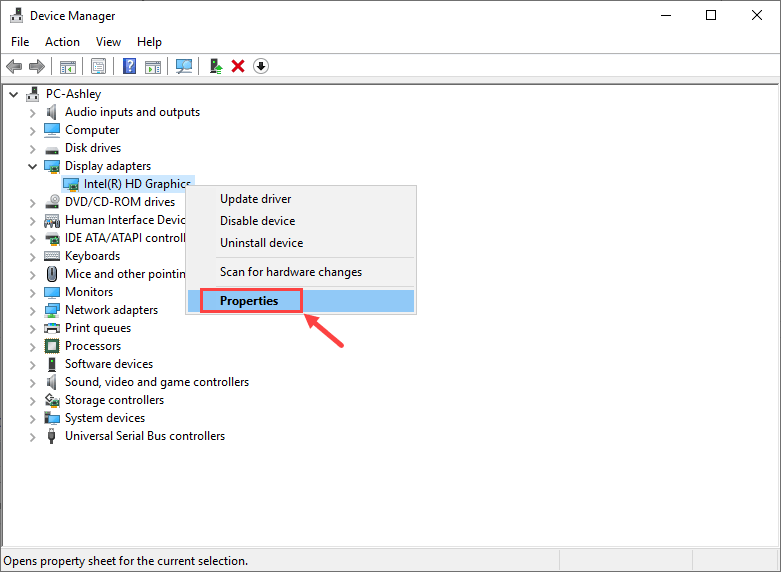
- Right-click on your video card and select Properties from the context menu.
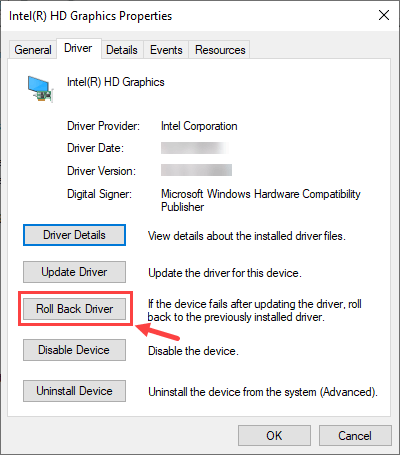
- Go to the Driver tab and select Roll Back Driver.
- If the Roll Back Driver option is grayed out, that means there’s no driver to roll back to. In this case you’ll have to try other fixes.
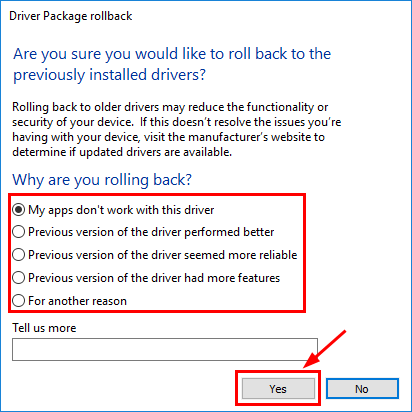
- Choose one of the reasons based on your own situation and click Yes.
- Restart your computer for the changes to take effect.
After you restore your video driver to a previous version, verify if the ‘Kernel Mode Heap Corruption’ error still persists. If it does, try the next fix, below.
Method 3: Update your device drivers.
 The Kernel Mode Heap Corruption error may be caused by an outdated or corrupt device driver. If you’re not sure whether all your device drivers (especially graphics card drivers) are up-to-date, you should check.
You can do this in Windows Device Manager, one device at a time. But this takes a lot of time and patience, and if any of your drivers do happen to be out of date, you’ll need to manually update them, which is difficult and risky. If you don’t have the time, patience or computer skills to update your device drivers manually, you can do it automatically with Outbyte Driver Updater.
This will automatically recognize your system and find the correct drivers for it. You don’t need to know exactly what system your computer is running, you don’t need to risk downloading and installing the wrong driver, and you don’t need to worry about making a mistake when installing. Driver Updater takes care of everything.
Method 4: Check graphics card for problems
As we’ve mentioned earlier the leading cause are drivers, and the graphics card is among the drivers that cause this error. So we need to first identify if there are problems with your display drivers before proceeding with any other troubleshoot. Here are the steps to follow in order to confirm that:
- Open the Run dialogue by typing Windows + R.
- In the dialogue box, you should type msc and hit enter or press OK.
- The device manager will open and you should expand Display Adapters.
- Identify your video card and right-click on it to check for updates.
- When updates are installed the driver will be repaired automatically.
- Windows will search for updates if available and will download the update packs and install them.
- Alternatively, you can check the driver website to see if there are updates available, you can then download manually from the driver site and run the updates on your PC to install them. This should be your option when you receive update error which can happen sometimes.
- After installing updates, you should restart your PC and see if the problem is resolved.
Method 5: Run Driver Verifier Manager.
Driver Verifier Manager is a great tool to discover the problematic drivers on Windows 10/11. So, if you are still getting the Kernel Mode Heap Corruption 0x0000013A error, you should run this tool to check the obsolete device drivers. Here’s how to perform this task –
- Launch Windows PowerShell (Admin).
- On the elevated console, type “verifier“, and hit Enter.
- Open Verifier using PowerShell 0x0000013A
- Subsequently, mark the “Create Standard Settings” checkbox followed by Next.
- 0x0000013A
- Now, mark “Automatically select all drivers installed on this computer” and hit Finish.
- 0x0000013A
- The system prompts to “Restart PC” so as to start scanning for any corrupted or damaged drivers.
- After the reboot, Windows will display a list of drivers that are found to have some errors.
- You may now update, rollback, or uninstall-reinstall the above-displayed device drivers.
Method 6: Run the Windows BSOD Troubleshooter (For Windows version earlier than 1809).
The Blue Screen (BSOD) troubleshooter interprets the bugcheck codes, and tells you if the blue screen crash was caused by:
- Faulty hardware
- Failing disk drive
- Malware
- Memory failure
- Services
- Device drivers
Unfortunately, the Blue Screen troubleshooter is no longer available starting with Windows 10 version 1809. But if you’re running an earlier version, these are the steps to use this tool:
- Open the Control Panel (icons view), and click/tap on the Troubleshooting icon.
- Click/tap on the View all link at the top left in Troubleshooting.
- Right click or press and hold on the Blue Screen troubleshooter, and click/tap on Run as administrator.
- Click/tap on the Advanced link.
- Check the Apply repairs automatically box, and click/tap on Next.
- The troubleshooter will now start detecting problems you may have with blue screen errors.
- If problems were identified, then follow any given instructions to continue troubleshooting.
- If no problems were identified, then you could click/tap on View detailed information to see the troubleshooting report.
You can also use the “Troubleshoot blue screen errors” at Microsoft. Just go to the Troubleshoot blue screen errors web page at Microsoft and follow the steps to answer questions to troubleshoot your blue screen error.
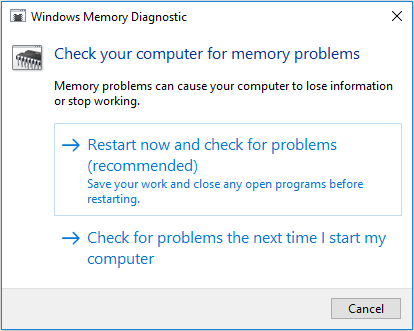
Method 7: Run Windows Memory Diagnostic Tool.
 The Windows Memory Diagnostic tool will check to see if there’s a problem with your Random Access Memory (RAM):
- On your keyboard, press the Windows logo key and R at the same time to invoke the Run dialog box. Type mdsched.exe and hit Enter.
- Select either Restart now and check for problems (recommended) to check your memory straight away, or Check for problems the next time I start my computer if you want to keep working and do the memory check later.
- Remember to save your work before clicking Restart now and check for problems (recommended). It will reboot your computer instantly.
- When the Windows Memory Diagnostic Tool actually runs, you’ll see the following screen that indicates the number of passes it’s doing, along with how far it has progressed.
If you don’t see any errors here, that means the memory in your computer is fine. Otherwise you should replace your RAM or simply contact the hardware manufacturer for assistance.
Method 8: Repair corrupted system files.
Sometimes this blue-screen error is caused by corrupt system files. To repair them, there are two things you should do:
- Scan with System File Checker
- Scan with dism.exe
To scan with System File Checker, follow the instructions below:
System file checker (sfc) is a Windows utility that identifies and repairs corrupted system files: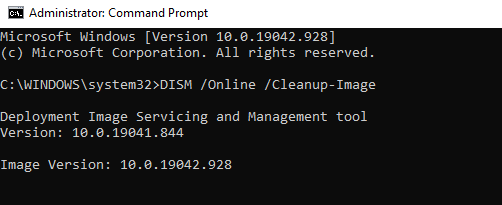
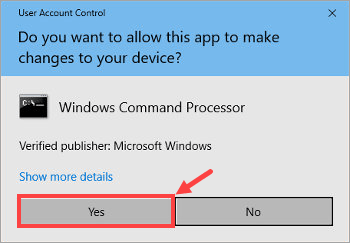
- On your keyboard, press the Windows logo key and R at the same time to open the Run dialog box. Type cmd and press Ctrl+Shift+Enter to run Command Prompt as administrator.
- When Windows asks for permission to make changes to your device, click Yes.
- In the Command Prompt, type the following command (note that there’s a space between sfc and /): sfc /scannow
- After you finish entering the command, hit Enter on your keyboard. Then the sfc tool will begin to scan all system files and repair the corrupted or missing ones.
- Wait until the verification process completes. Then restart your computer for the changes to take effect.
If you continue to experience the Kernel Mode Heap Corruption Error, try running dism.exe as described below.
To scan with dism.exe:
- On your keyboard, press the Windows logo key and R at the same time to open the Run dialog box. Type cmd and press Ctrl+Shift+Enter to run Command Prompt as administrator.
- If prompted for consent, click Yes.
- In Command Prompt, type the following command (note that there’s a space to the left of each slash “/”): dism.exe /online /cleanup-image /restorehealth
- After that, hit Enter on your keyboard. Then the DISM tool will begin to scan for any problems and try to fix them.
Wait for the process to complete. Then, reboot your computer and see whether the Kernel Mode Heap Corruption error reoccurs.
Method 9: Resolve any software conflicts.
Another possible culprit for your Kernel Mode Heap Corruption error is a software conflict. This is particularly likely if you get the error after installing a new app or when you’re trying to launch a certain program, such as a video game.
There’s no quick way to pinpoint which applications are conflicting. You have to fully shut down every unnecessary program (including any associated background processes) and wait to see whether the error reoccurs.
For this, you need to:
- Check to see if you have any software conflicts
- Find out which programs are causing them
- De-prioritize, disable and uninstall those programs
Check to see if you have any software conflicts
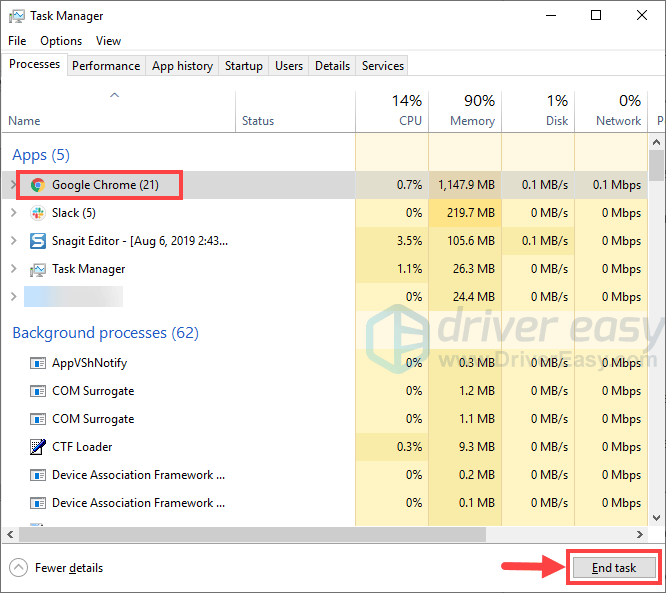
Close all programs. To do this, switch to the program, and close it as you normally would (e.g. by clicking the × at the top right of the program). End all unnecessary background processes by the following procedure:
- On your keyboard, press the Windows logo key and X at the same time, then click Task Manager.
- On the Processes tab, select the program that you want to shut down from the list in Task Manager and click End task to force a close. (If it’s a program you’re using, e.g. Microsoft Word, make sure you save any unsaved work first.)
- Do not close any unfamiliar programs. If you mistakenly shut down the important system programs, that may bring about even more problems. Before you take the step, consult a technician or search for information about the program.
- Wait to see whether the error reoccurs:
- If the error DOES reoccur – It’s probably not caused by a software conflict.
- If the error does NOT reoccur – One or more of the programs you shut down is probably causing the error. Now you need to identify which program(s) caused the error, as described in the next step below.
Find out which programs are causing your conflicts
If closing all unnecessary programs stopped the error from reoccurring, you know that one of those programs was causing the error. Now you just need to figure out which one.
To do this, restart one of your programs, and wait to see if the error comes back. If it doesn’t, restart the next program, and wait for the error again. Then the next, and the next, and so on.
When the error eventually reoccurs, you know that the program you restarted most recently is a problem.
But bear in mind, it may not be the only problem. It may actually be conflicting with another program – one you restarted earlier – and that conflict is what’s causing the error.
If you don’t really need the offending program, you can just disable or uninstall it immediately, as described below. But if you do need the offending program, you should check if it’s conflicting with something else (because then you may be able to disable/uninstall the other program instead).
To do this, leave the offending program open, but shut down all other programs again. If the error reoccurs, you know the program is the sole cause. If the error doesn’t reoccur, you know the program is conflicting with another program. To figure out which one, restart each program again, one at a time, and wait for the error to come back.
When you find which programs are conflicting with each other, you can disable or uninstall the one you need the least.
De-prioritize, disable or uninstall conflicting programs
Once you identify the program(s) causing the conflict, you have three options:
- Set the program’s priority to low
- Permanently disable the program
- Uninstall the program
If you don’t want to disable or uninstall the offending program, you can try de-prioritizing it first. This has resolved the error for some users. To de-prioritize the program:
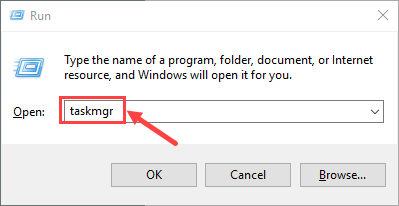
- On your keyboard, press the Windows logo key and R at the same time to invoke the Run dialog box. Type in taskmgr and hit Enter.
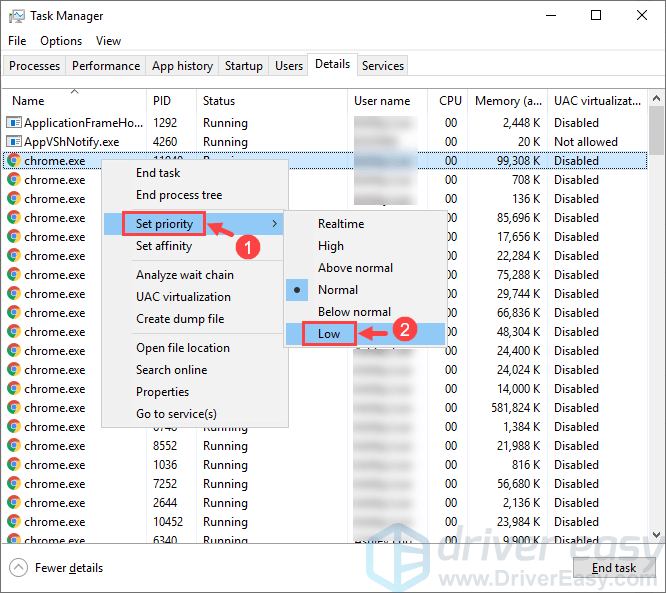
- Go to the Details tab. Scroll through the list until you find the process for which you want to change the priority. Right-click on that item and select Set priority > Low.
- Do not change the priorities for any programs that you’re not familiar with. If you mistakenly set the priority of a crucial system process to low, it may lead to system crashes, freezing or other critical problems.
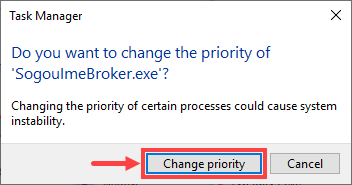
- Click Change priority if prompted for permission.
To permanently disable the program:
- On your keyboard, press the Windows logo key and X at the same time, then click Task Manager.
- On the Processes tab, select the program that you want to shut down from the list in Task Manager and click End task to force a close.
- If the program is also among the startup items, you should stop it from running at startup.
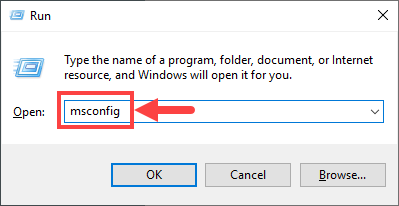
- On your keyboard, press the Windows logo key and R at the same time to invoke the Run dialog box. Type in msconfig and hit Enter.
- Go to the Startup tab, and click Open Task Manager.
- Select the programs you don’t want to start when Windows starts, then click Disable.
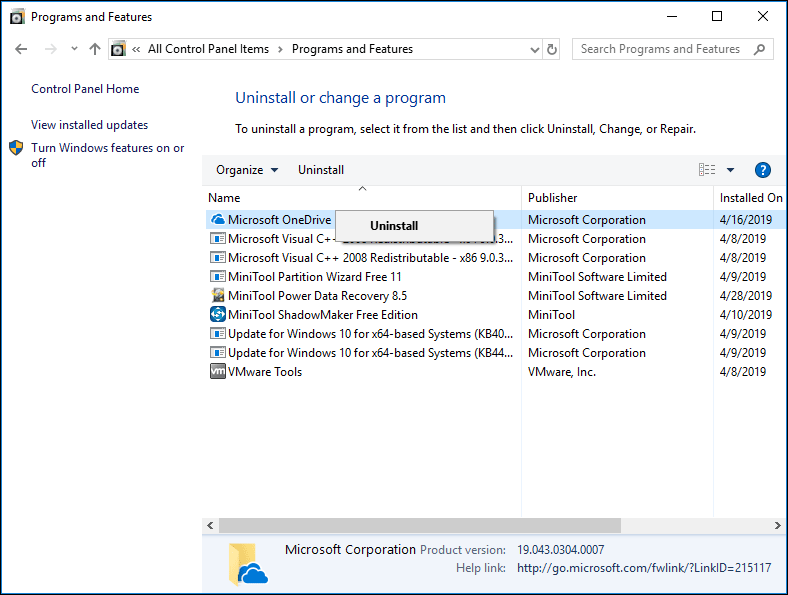
To uninstall the program:
- On your keyboard, press the Windows logo key and R at the same time. Type appwiz.cpl and press Enter.
- In Programs and Features, right-click on the program that you want to uninstall and click Uninstall.
If, after de-prioritizing, disabling or uninstalling conflicting programs the error reoccurs, try the other fixes below.
Method 10. Check for other issues such as overheating.
It’s not that easy to tinker with the hardware if you’re a computer newbie. You need to disassemble the computer chassis, look for problems in each separate component, and find ways to fix them – all by yourself. Merely thinking of it is horrible enough, not to mention putting it into practice. Anyway, if you don’t have much interest in learning the skills, you should contact a local technician for further help.
If you’ve checked for hardware issues, and you’re still getting the error, you still have one more fix to try – reinstall the Windows system.
Method 11: Reinstall your Windows system
If none of the fixes above work for you, you may need to reset or reinstall your Windows operating system.
Resetting Windows will revert your system to its initial state as if it’s your first time to turn on the computer. It removes all the apps that didn’t come with your PC, but you can decide whether to retain your personal data or not. Besides, you don’t need any external storage devices to perform the resetting, because Windows will complete the whole process by itself.
A clean install of Windows will erase everything (including all the apps you installed and your personal data) from the drive where your system is installed. You need an external storage device, e.g. a USB drive, to perform the clean install. Compared with the above option, clean install seems more complex, yet more impactful.
Listed below are some useful articles that teach you how to reset or reinstall Windows 10/11 step by step:
To reset your PC, follow these steps:
- Type settings in the search bar, and then choose Settings that comes up.
- Click on the Update & security icon.
- On the left side of the panel, choose Recovery. On the right side of the panel, choose Restart Now under the option Advanced startup.
- Choose Troubleshoot.
- Click Reset this PC.
- Click Remove everything. Please make sure you have backed up your important files and applications because they will be all gone once you complete the reset.
- If prompted to Insert media, you will need to insert your Windows 10/11 installation media or recovery drive to continue.
- If your computer has more than one drive partition on Windows 10/11 disk, you need to select to remove all files from only the Windows driver or from all drives.
- Click on either Just remove my files or Fully clean the drive accordingly. Please make sure that you have backed up your important personal files and software before you go any further.
- Just remove my files will perform a quick format and it won’t take long. Your files might be recoverable by someone else since they are only marked as deleted. It is suggested that you choose this option if you are keeping your computer.
- Fully clean the drive performs a secure erase to fully clean your drive and your files cannot be recovered easily. It could take hours to finish. It is suggested that you choose this option if you are recycling or selling your computer.
- Tab the Reset button for the reset to begin.
- Resetting will now start. It will take a while to finish and your computer will restart a few times during the process. Unless your computer ran into a server problem, or you know pretty well what you are doing, performing a reset on your work computer or home computer is not recommended.
- When finished, you will need to set up your personal preference. Then click Next.
- Click Accept.
- You could choose the Customize settings on the left side corner or Use express settings on the right corner to go to the next step. If you choose Customize settings, you could change the settings as you will.
After the settings, your computer will be good to go.
To perform a clean install of Windows 10/11, follow the steps here:
- First, you need to create an installation media using the Microsoft Media Creation Tool.
- Next, insert the installation media into your computer.
- With your USB drive or DVD inserted, restart your computer. Press a key for Boot Menu. The key to press for Boot Menu varies for different motherboards. Usually, the boot screen will show you which key to press. You can also read the manual for your motherboard to see what specific key to press for Boot Menu. Usually speaking, Acer is F12/ F9/ Esc, ASUS is F8/ Esc, Dell is F12, HP is Esc/ F9, Lenovo is F12/ F8/ F10 etc.
- Alternatively, you can also go to Use a device option in the Advanced startup options.
- Follow the path Start> Settings> Update & security> Recovery> Restart now button under Advanced startup.
- Then click Troubleshoot> Advanced options and you will see this page.
- Some users might not be able to see the Use a device option here. But we find that if the USB flash drive with the ISO files or the DVD disc is connected to the computer, you can boot from the device by clicking the Continue button.
- You will see the activation screen next. If you have installed Windows 10/11 on this computer, please choose I don’t have a product key. If you have never installed Windows 10/11 on this computer before, please type in your valid license key, which could be the key for Windows 7, Windows 8 or Windows 8.1.
- Continue the clean install process normally until you see Which type of installation do you want? Choose Custom option to ensure that you are perform a clean install instead of and upgrade.
- Choose which partition you would like to install your system drive. If you have only one drive, just click Next to continue. If you have multiple drives, choose the primary partition and click Next.
- Then all you need to do is to wait with patience for the installation to end. Some might encounter a few reboots during the process.
Usually, your computer will be activated automatically once you have access to the Internet. If the activation is not happening, you can force an activation by running the following command.
- Type cmd in the search box, then choose Command Prompt from the list of choices.
- Type in the command slmgr.vbs /ato and press Enter key.
You might need to try this command a couple of times. If you see any errors, please reboot your computer and run this command again. Or you can just wait for Microsoft to help you activate your system automatically.
Wrapping Up
The Kernel Mode Heap Corruption Blue Screen on Windows 10/11 might be a familiar issue for most Windows users, but it doesn’t mean that it is less troublesome. In some cases, you won’t be able to boot normally so some troubleshooting methods won’t apply. So if you are faced with this BSOD, work your way down the list of solutions above until you find the one that works for you.

Vic is a certified gadget freak who feels the need to surround himself with cutting-edge technology. And this passion has helped him a lot in creating content that informs and guides users on using and troubleshooting the latest technology. He is an avid researcher who is always hungry for the latest news and updates on the most cutting-edge technology.
Vic is the one in charge of keeping our website running smoothly and efficiently, to make sure that our readers have a wonderful experience while visiting the website. He’s good at troubleshooting errors and fixing Windows issues that come up either when playing games or working on the computer.

Getting the KERNEL_MODE_HEAP_CORRUPTION blue-screen error? Don’t panic – you’re not alone. This is a fairly common error, and it’s usually not very hard to resolve.
Why am I getting the ‘Kernel Mode Heap Corruption’?
Kernel Mode Heap Corruption is one of the stop codes presented by Windows when you run into a ‘blue screen error of death’ BSOD error. As is the case with other codes, ‘Kernel Mode Heap Corruption’ is created uniquely to help users identify the problems triggering system crashes. Usually, the error is caused by driver issues (especially graphics card drivers) or software conflicts, but it may also be caused by hardware malfunction.
People have encountered the Kernel Mode Heap Corruption error in different situations. Some said the error happened on startup of Windows 10, while others the moment of launching specific programs such as a video game.
How to fix the ‘Kernel Mode Heap Corruption’ error
Here are 6 solutions that have proved useful to many Windows users. So before you call a computer technician, why not try the following methods and fix the problem by yourself? You don’t need to try them all; just work your way down the list until you find the one that works for you.
IMPORTANT: If you can’t reboot your computer now, you’ll need to enter safe mode before trying the fixes below.
- Roll back your graphics card drivers
- Update your device drivers
- Repair corrupted system files
- Resolve any software conflicts
- Resolve any hardware issues
- Reinstall your Windows system
Fix 1: Roll back your graphics card drivers
Some Windows users have reported that they experienced this ‘blue screen of death (BSOD)’ error right after an update of their graphics card drivers (or a Windows Update). If that’s when you got the error, you should restore your video driver to a previous version to secure the stability of your hardware device. Here’s how to do it:
1) On your keyboard, press the Windows logo key and R at the same time to invoke the Run dialog box. Then type devmgmt.msc into the box and click OK.
2) In the Device Manager window, double-click on the Display adapters node to expand its drop-down list.
3) Right-click on your video card and select Properties from the context menu.
4) Go to the Driver tab and select Roll Back Driver.
If the Roll Back Driver option is grayed out, that means there’s no driver to roll back to. In this case, you’ll have to try other fixes.
5) Choose one of the reasons based on your own situation and click Yes.
6) Restart your computer for the changes to take effect.
After you restore your video driver to a previous version, verify if the ‘Kernel Mode Heap Corruption’ error still persists. If it does, try the next fix, below.
Fix 2: Update your device drivers
The Kernel Mode Heap Corruption error may be caused by an outdated or corrupt device driver. If you’re not sure whether all your device drivers (especially graphics card drivers) are up-to-date, you should check.
You can do this in Windows Device Manager, one device at a time. But this takes a lot of time and patience, and if any of your drivers do happen to be out of date, you’ll need to manually update them, which is difficult and risky. If you don’t have the time, patience or computer skills to update your device drivers manually, you can do it automatically with Driver Easy.
Driver Easy will automatically recognize your system and find the correct drivers for it. You don’t need to know exactly what system your computer is running, you don’t need to risk downloading and installing the wrong driver, and you don’t need to worry about making a mistake when installing. Driver Easy takes care of everything.
You can update your drivers automatically with either the FREE or the Pro version of Driver Easy. But with the Pro version it takes just 2 clicks:
1) Download and install Driver Easy.
2) Run Driver Easy and click the Scan Now button. Driver Easy will then scan your computer and detect any problem drivers.

3) Click the Update button next to a flagged driver to automatically download the correct version of that driver, then you can manually install it (you can do this with the FREE version).
Or click Update All to automatically download and install the correct version of all the drivers that are missing or out of date on your system. (This requires the Pro version which comes with full support and a 30-day money back guarantee. You’ll be prompted to upgrade when you click Update All.)
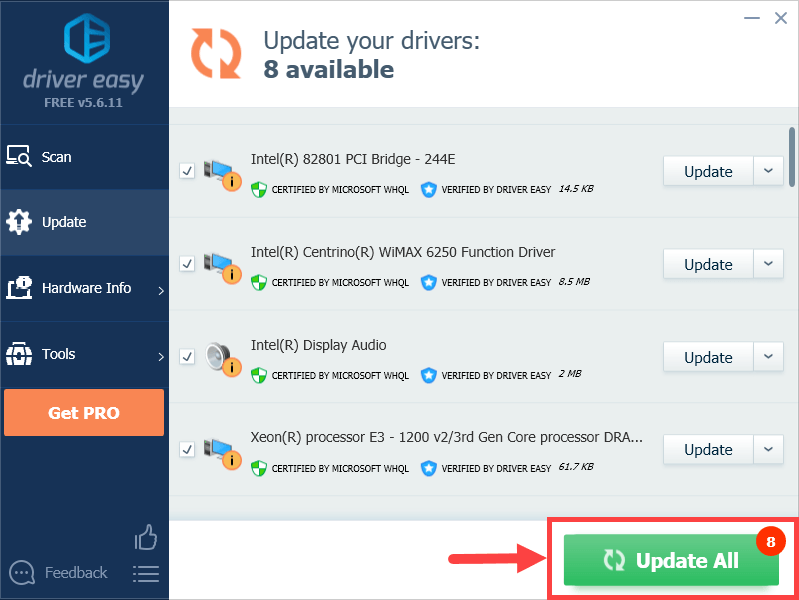
If you have any problems using Driver Easy Pro to update your driver, please feel free to email us at support@drivereasy.com. We are always here to help.
Fix 3: Repair corrupted system files
Sometimes this blue-screen error is caused by corrupt system files. To repair them, there are two things you should do:
- Option 1 – Automatically (Recommended)
Use a repair tool to check various areas in your computer to determine the cause of the Kernel Mode Heap Corruption Error. It will deal with issues related to system errors, critical system files and find the right fix for you. - Option 2 – Manually
System File Checker is a built-in tool to check for corrupt, damaged system files and manage to restore them if there’re any. However, this tool can only diagnose major system files, and won’t deal with damaged DLL, Windows Registry key, etc.
Option 1 – Automatically (Recommended)
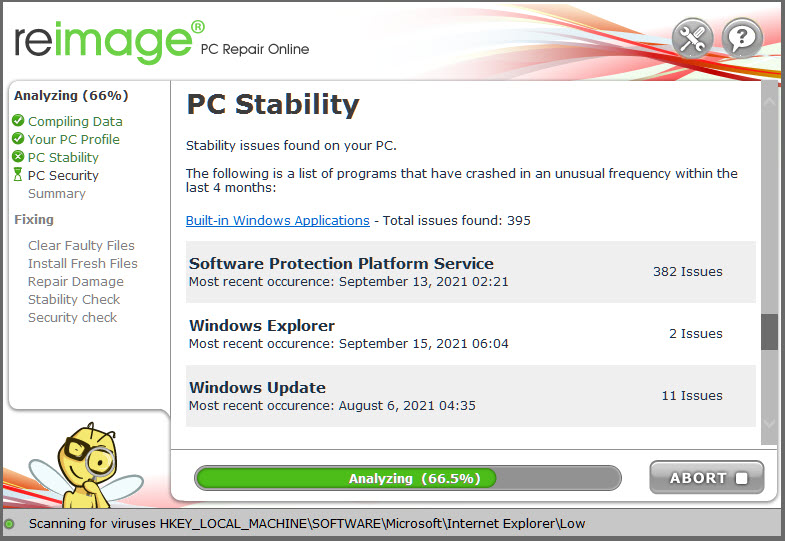
Reimage (commonly known as Reimage Repair) is a computer repair software that can diagnose problems on your computer and fix them immediately.
Reimage Windows Repair is tailored to your specific system and is working in a private and automatic way. It will firstly check hardware-related issues to identify problems, and then security issues (powered by Avira Antivirus), and finally it detects programs that crash, missing system files. Once complete, it will find a solution to your specific problem.
Reimage is a trusted repair tool and it will do no harm to your PC. The best part is that you won’t need to worry about losing any programs and your personal data. Read Trustpilot reviews.
1) Download and install Reimage.
2) Open Reimage and run a free scan. This might take 3~5 minutes to fully analyze your PC. Once complete, you will be able to review the detailed scan report.
3) You’ll see the summary of detected issues on your PC. Click START REPAIR and all the issues will be fixed automatically. (You’ll need to purchase the full version. It comes with a 60-day Money-Back Guarantee so you can refund anytime if Reimage doesn’t fix your problem).
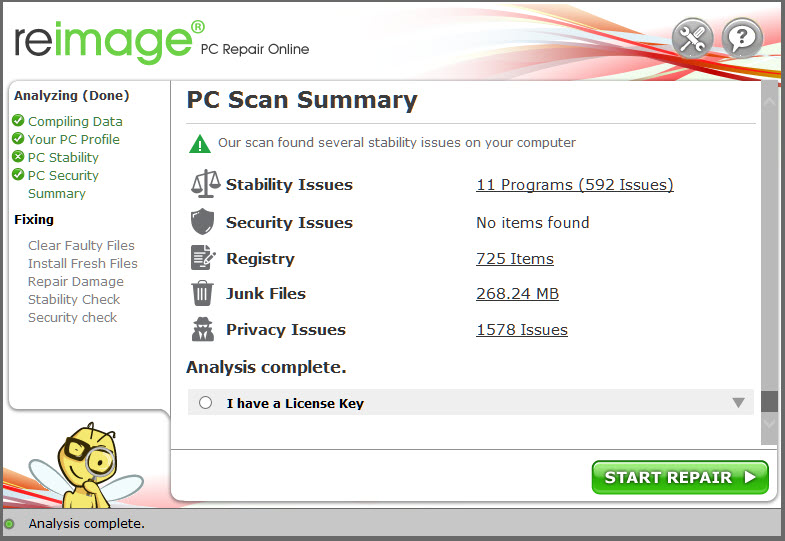
Note: Reimage comes with 24/7 Technical Support. If you need any assistance while using Reimage, click the question mark on the upper-right corner of the software, or use one of the following:
Chat: https://tinyurl.com/y7udnog2
Phone: 1-408-877-0051
Email: support@reimageplus.com / forwardtosupport@reimageplus.com
Option 2 – Manually
1. Scan with System File Checker
System file checker (sfc) is a Windows utility that identifies and repairs corrupted system files:
1) On your keyboard, press the Windows logo key and R at the same time to open the Run dialog box. Type cmd and press Ctrl+Shift+Enter to run Command Prompt as administrator.
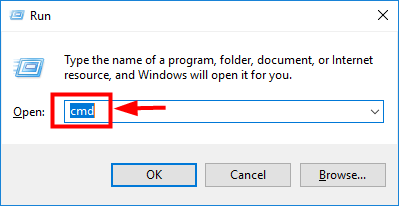
2) When Windows asks for permission to make changes to your device, click Yes.
3) In the Command Prompt, type the following command (note that there’s a space between sfc and /):
sfc /scannow
After you finish entering the command, hit Enter on your keyboard. Then the sfc tool will begin to scan all system files and repair the corrupted or missing ones.
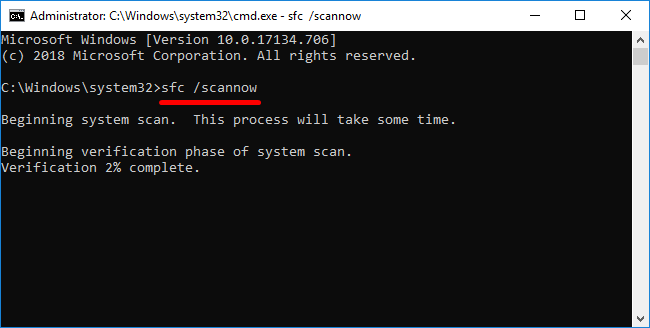
4) Wait until the verification process completes. Then restart your computer for the changes to take effect.
If you continue to experience the Kernel Mode Heap Corruption Error, try running dism.exe as described below.
2. Scan with dism.exe
Deployment Image Servicing and Management (DISM) is an in-built Windows tool that can identify if your Windows installation is corrupt, and repair it if it is:
1) On your keyboard, press the Windows logo key and R at the same time to open the Run dialog box. Type cmd and press Ctrl+Shift+Enter to run Command Prompt as administrator.
If prompted for consent, click Yes.
2) In Command Prompt, type the following command (note that there’s a space to the left of each slash “/”):
dism.exe /online /cleanup-image /restorehealth
After that, hit Enter on your keyboard. Then the DISM tool will begin to scan for any problems and try to fix them.
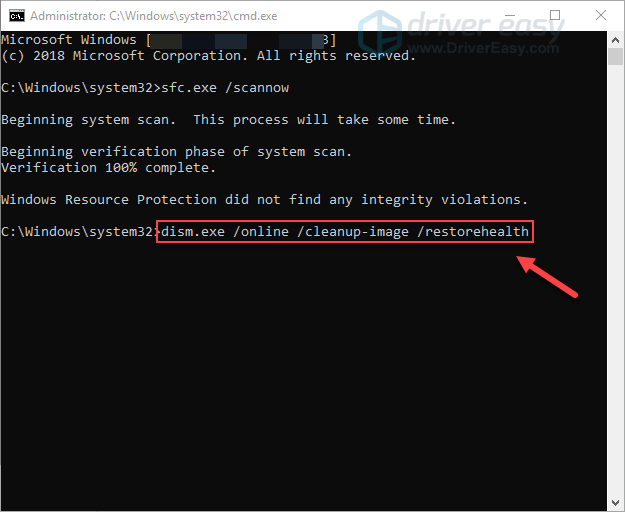
Wait for the process to complete. Then, reboot your computer and see whether the Kernel Mode Heap Corruption error reoccurs. If it does, try Fix 4 below.
Fix 4: Resolve any software conflicts
Another possible culprit for your Kernel Mode Heap Corruption error is a software conflict. This is particularly likely if you get the error after installing a new app or when you’re trying to launch a certain program, such as a video game.
There’s no quick way to pinpoint which applications are conflicting. You have to fully shut down every unnecessary program (including any associated background processes) and wait to see whether the error reoccurs.
Jump ahead to the section you’re interested in:
- Check to see if you have any software conflicts
- Find out which programs are causing them
- De-prioritize, disable and uninstall those programs
1. Check to see if you have any software conflicts
1) Close all programs. To do this, switch to the program, and close it as you normally would (e.g. by clicking the × at the top right of the program).
2) End all unnecessary background processes by the following procedure:
I. On your keyboard, press the Windows logo key and X at the same time, then click Task Manager.
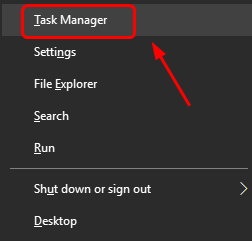
II. On the Processes tab, select the program that you want to shut down from the list in Task Manager and click End task to force a close. (If it’s a program you’re using, e.g. Microsoft Word, make sure you save any unsaved work first.)
Do not close any unfamiliar programs. If you mistakenly shut down the important system programs, that may bring about even more problems. Before you take the step, consult a technician or search for information about the program.
3) Wait to see whether the error reoccurs:
- If the error DOES reoccur – It’s probably not caused by a software conflict, and you should move on to Fix 5.
- If the error does NOT reoccur – One or more of the programs you shut down is probably causing the error. Now you need to identify which program(s) caused the error, as described in Step 2 below.
2. Find out which programs are causing your conflicts
If closing all unnecessary programs stopped the error from reoccurring, you know that one of those programs was causing the error. Now you just need to figure out which one.
To do this, restart one of your programs, and wait to see if the error comes back. If it doesn’t, restart the next program, and wait for the error again. Then the next, and the next, and so on.
When the error eventually reoccurs, you know that the program you restarted most recently is a problem.
But bear in mind, it may not be the only problem. It may actually be conflicting with another program – one you restarted earlier – and that conflict is what’s causing the error.
If you don’t really need the offending program, you can just disable or uninstall it immediately, as described below. But if you do need the offending program, you should check if it’s conflicting with something else (because then you may be able to disable/uninstall the other program instead).
To do this, leave the offending program open, but shut down all other programs again. If the error reoccurs, you know the program is the sole cause. If the error doesn’t reoccur, you know the program is conflicting with another program. To figure out which one, restart each program again, one at a time, and wait for the error to come back.
When you find which programs are conflicting with each other, you can disable or uninstall the one you need the least.
3. De-prioritize, disable or uninstall conflicting programs
Once you identify the program(s) causing the conflict, you have three options:
Jump ahead to the section you’re interested in:
- Set the program’s priority to low
- Permanently disable the program
- Uninstall the program
To set the program’s priority to low
If you don’t want to disable or uninstall the offending program, you can try de-prioritizing it first. This has resolved the error for some users. To de-prioritize the program:
1) On your keyboard, press the Windows logo key and R at the same time to invoke the Run dialog box. Type in taskmgr and hit Enter.
2) Go to the Details tab. Scroll through the list until you find the process for which you want to change the priority. Right-click on that item and select Set priority > Low.
Do not change the priorities for any programs that you’re not familiar with. If you mistakenly set the priority of a crucial system process to low, it may lead to system crashes, freezing or other critical problems.
3) Click Change priority if prompted for permission.
To permanently disable the program:
1) On your keyboard, press the Windows logo key and X at the same time, then click Task Manager.
2) On the Processes tab, select the program that you want to shut down from the list in Task Manager and click End task to force a close.
3) If the program is also among the startup items, you should stop it from running at startup. Here’s how:
On your keyboard, press the Windows logo key and R at the same time to invoke the Run dialog box. Type in msconfig and hit Enter.
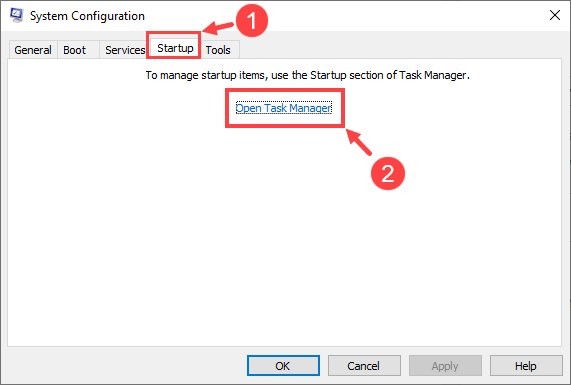
4) Go to the Startup tab, and click Open Task Manager.
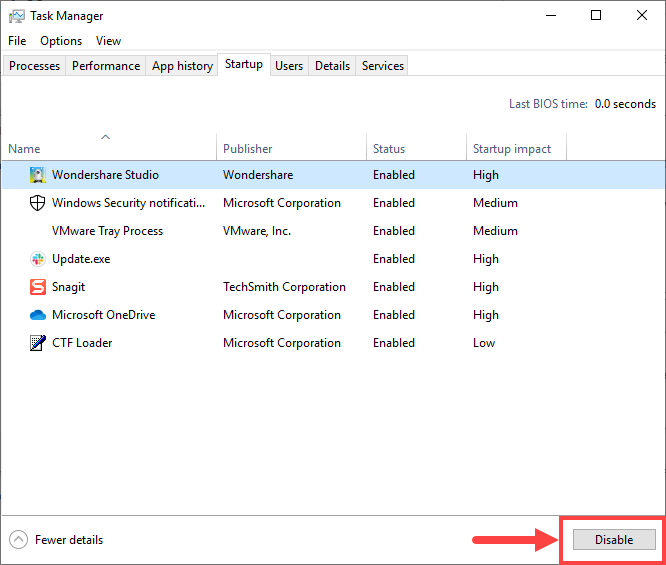
5) Select the programs you don’t want to start when Windows starts, then click Disable.
To uninstall the program:
1) On your keyboard, press the Windows logo key and R at the same time. Type appwiz.cpl and press Enter.
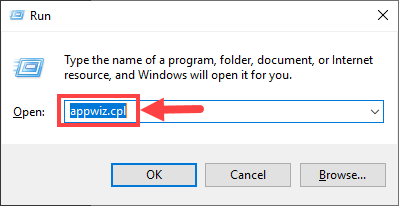
2) In Programs and Features, right-click on the program that you want to uninstall and click Uninstall.
If, after de-prioritizing, disabling or uninstalling conflicting programs the error reoccurs, try Fix 5 below.
Fix 5: Resolve any hardware issues
Some users get the Kernel Mode Heap Corruption error because their computer has hardware problems. Here’s how to check if you have a hardware problem:
Jump ahead to the section you’re interested in:
- Run Windows Memory Diagnostic tool
- Check for other issues such as overheating
1. Run Windows Memory Diagnostic Tool
The Windows Memory Diagnostic tool will check to see if there’s a problem with your Random Access Memory (RAM):
1) On your keyboard, press the Windows logo key and R at the same time to invoke the Run dialog box. Type mdsched.exe and hit Enter.
2) Select either Restart now and check for problems (recommended) to check your memory straight away, or Check for problems the next time I start my computer if you want to keep working and do the memory check later.
IMPORTANT: Remember to save your work before clicking Restart now and check for problems (recommended). It will reboot your computer instantly.
3) When the Windows Memory Diagnostic Tool actually runs, you’ll see the following screen that indicates the number of passes it’s doing, along with how far it has progressed.
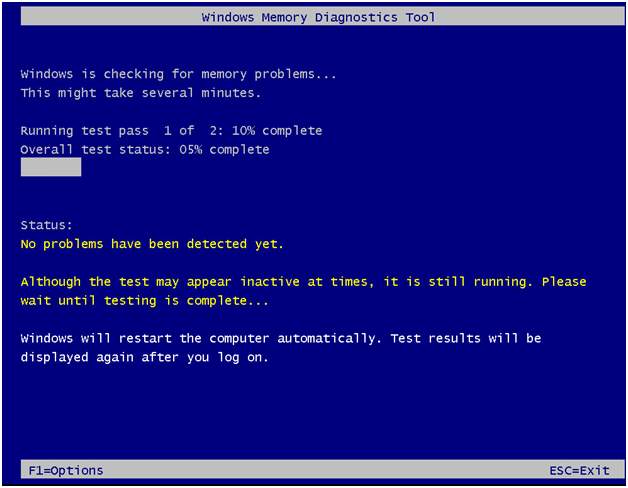
If you don’t see any errors here, that means the memory in your computer is fine. Otherwise, you should replace your RAM or simply contact the hardware manufacturer for assistance.
2. Check for other issues such as overheating
It’s not that easy to tinker with the hardware if you’re a computer newbie. You need to disassemble the computer chassis, look for problems in each separate component, and find ways to fix them – all by yourself. Merely thinking of it is horrible enough, not to mention putting it into practice. Anyway, if you don’t have much interest in learning the skills, you should contact a local technician for further help.
If you’ve checked for hardware issues, and you’re still getting the error, you still have one more fix to try – reinstall the Windows system.
Fix 6: Reinstall your Windows system
If none of the fixes above work for you, you may need to reset or reinstall your Windows operating system.
Resetting Windows will revert your system to its initial state as if it’s your first time to turn on the computer. It removes all the apps that didn’t come with your PC, but you can decide whether to retain your personal data or not. Besides, you don’t need any external storage devices to perform the resetting, because Windows will complete the whole process by itself.
A clean install of Windows will erase everything (including all the apps you installed and your personal data) from the drive where your system is installed. You need an external storage device, e.g. a USB drive, to perform the clean install. Compared with the above option, clean install seems more complex, yet more impactful.
Listed below are some useful articles that teach you how to reset or reinstall Windows 10 step by step:
- To reset your PC, please refer to:
https://www.drivereasy.com/knowledge/how-to-reinstall-reset-windows-10-the-easy-way/ - To perform a clean install of Windows 10, please refer to:
https://www.drivereasy.com/knowledge/how-to-do-a-clean-install-of-windows-10-quickly-and-easily/ - Use Reimage to reinstall the Windows system without losing your personal files and programs.
To view more details about how to reset/clean install Windows 10, you can take a look at this post from Microsoft Support.
Hopefully, this article helped you resolve your Kernel Mode Heap Corruption error. If you have any follow-up questions or ideas, please feel free to leave a comment below. We’ll be more than happy to help you. Thanks for reading!
Have you encountered Kernel Mode Heap Corruption Error on your PC? If so, you can read this post, in which MiniTool offers you 8 methods to solve this error. Please read on to get them.
Hello, I get BSOD’s (Kernel mode heap corruption) when playing ark at random times. The last time it happened was at the end of a cave when trying to loot the artifact. I have tried doing a driver rollback, updating various drivers. I’d love any suggestions. — www.reddit.com
Some users reported that they had encountered Kernel Mode Heap Corruption BSOD when they were using their computers normally or performing some CPU or GPU intensive activity.

The causes for the KERNEL_MODE_HEAP-CORRUPTION error are various, including outdated graphics drivers, corrupt system files, conflicts with unstable software, and hardware issues. Then, how to solve Kernel Mode Heap Corruption BSOD? Please read the following content.
Back up or Rescue Data Before Repairing BSOD
If you are facing Kernel Mode Heap Corruption Windows 10, you can take solutions mentioned below to repair your computer. However, before you performing these solutions, I recommend you to back up or rescue data first, in case important data experiences secondary damage during the repairing process.
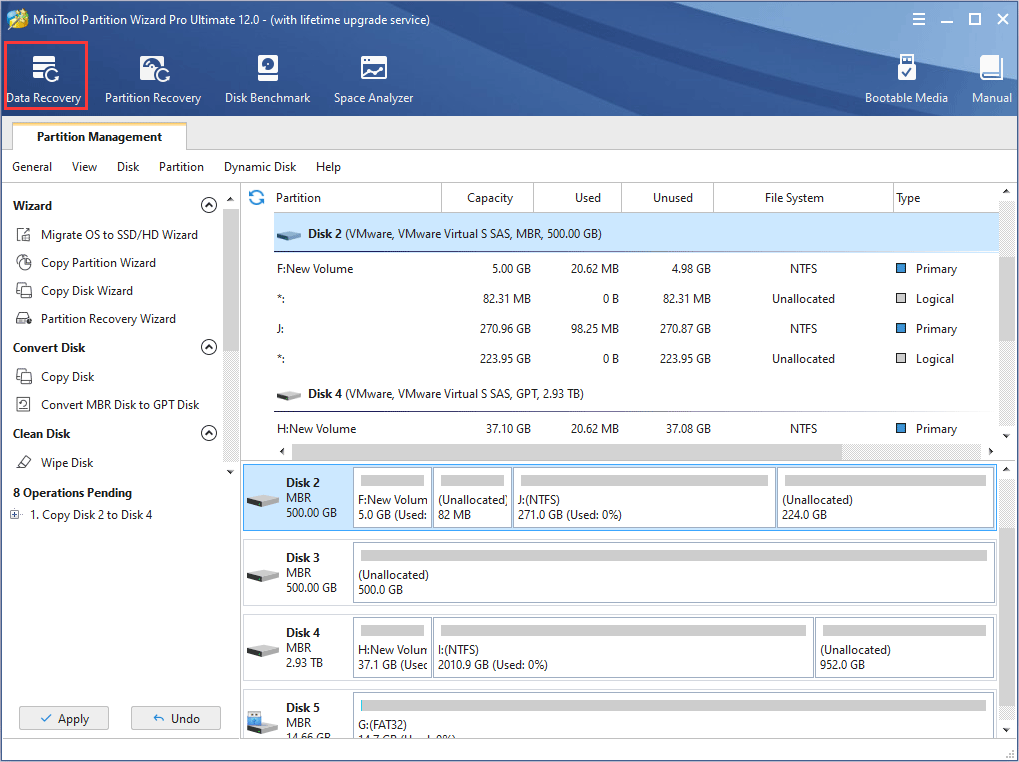
If your computer can boot into Windows normally after this BSOD, you can transfer your important data to a safe place, or back up them through Copy Partition Wizard feature of MiniTool Partition Wizard.
Buy Now
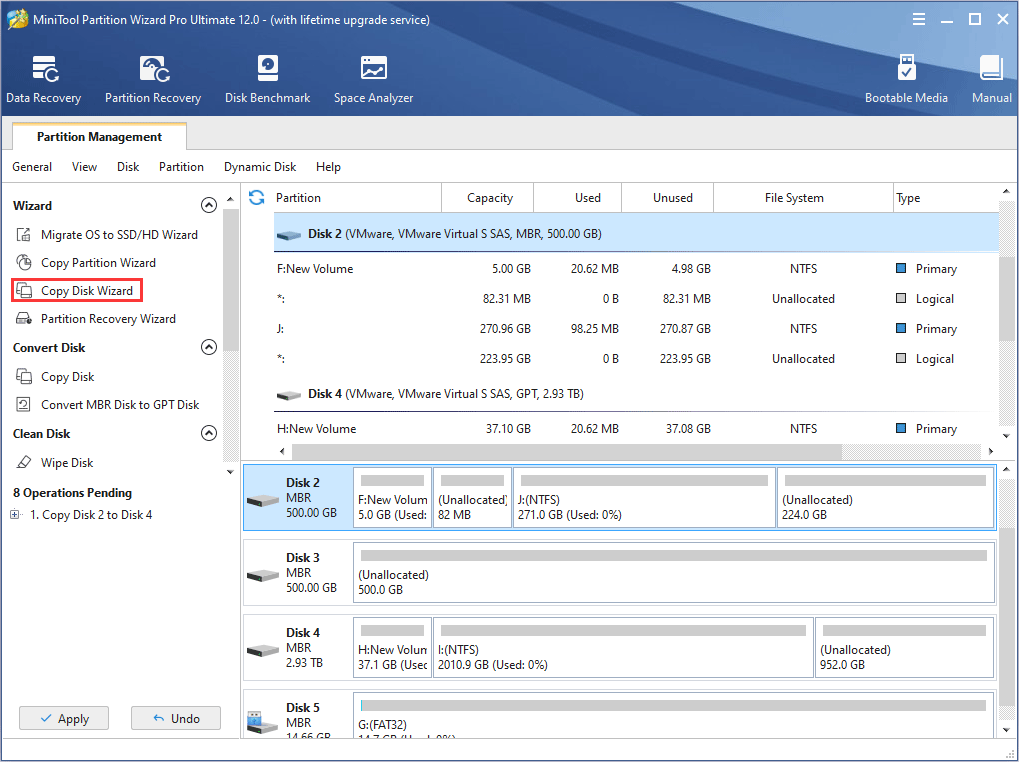
If your computer can’t boot up when encountering this error, you should rescue your important data via a USB flash drive. To do that, I recommend you to use Data Recovery feature of MiniTool Partition Wizard. As for detailed data recovery steps, please refer to this post: A Step-by-Step Tutorial on How to Use a Flash Drive on PC.
Fix 1. Check Event Viewer
When you encounter any error on Windows, the first thing you should do is checking Event Viewer. Event Viewer is a component built into the Microsoft Windows NT operating system that allows you to view all events of your computer as a system administrator. This helps solve computer problems.
However, this method can only be used when the computer can boot into Windows or Safe Mode. If your computer can’t enter Windows normally, please follow the steps below to enter Safe Mode first:
- Boot into WinRE through two consecutive failed attempts to start Windows or an installation media.
- Navigate to Troubleshoot > Advanced options after you enter WinRE.
- Click Startup Settings and press F5 key to choose Enable Safe Mode with Networking option, thus booting into Safe Mode.
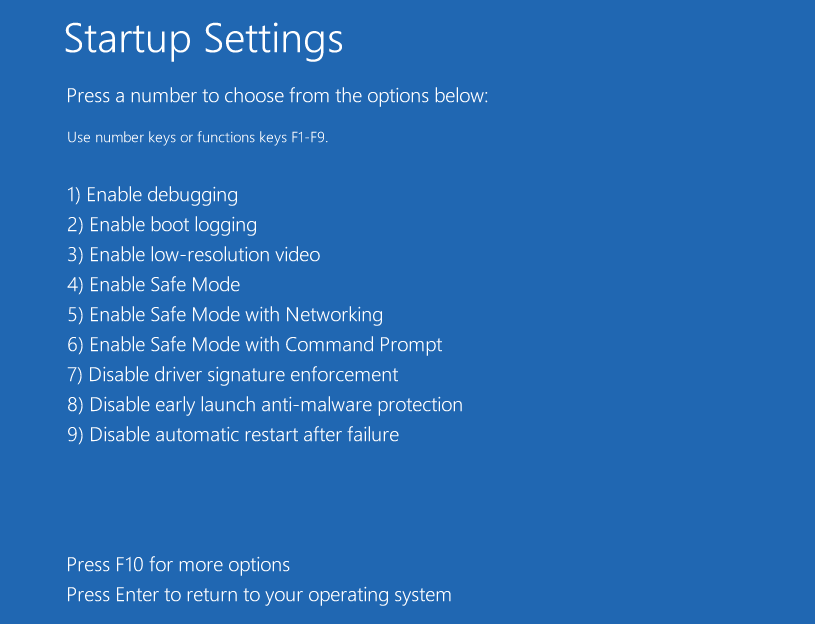
After booting into Windows or Safe Mode, please refer to the following steps to check Event Viewer:
Step 1: Press «Windows + R» keys simultaneously and then type «eventvwr» into the Run box. Then, hit Enter key to open Event Viewer.
Step 2: Navigate to Windows Logs > System to find the log about Kernel Mode Heap Corruption BSOD.
Tip: To find the corresponding log, you can scroll down the System box directly, or use Filter Current Log feature.
Step 3: After finding the log, you should pay attention to the log description because it may indicate the cause of the problem. Additionally, you should also note Source and Event ID information, which may also help you to solve this problem.
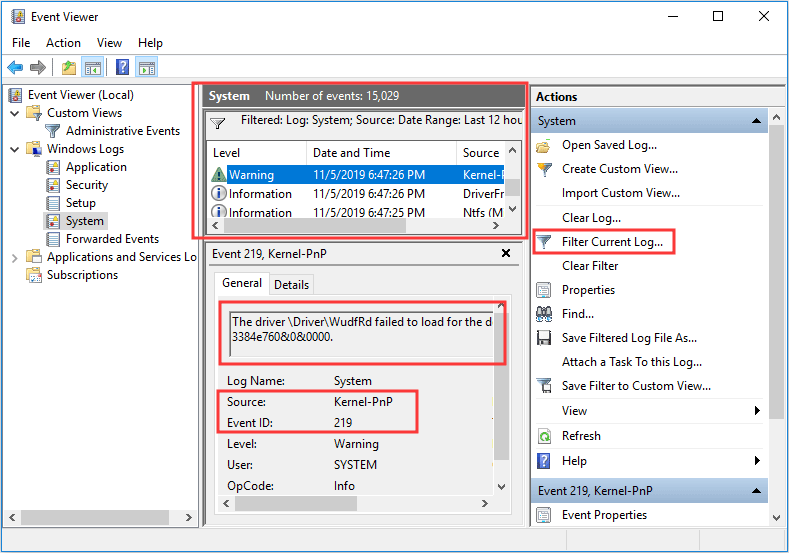
After checking Windows log, you can solve the problem accordingly. However, it’s possible that you still don’t know how to solve this problem because the description doesn’t tell you what you should do. If so, you can try the following methods.
Fix 2. Update, Roll Back, or Reinstall the Graphics Card Driver
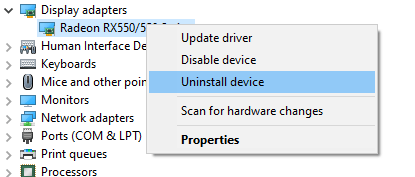
If you encounter KERNEL_MODE_HEAP-CORRUPTION error while starting the game or any graphic intensive application, the culprit usually should be the outdated or corrupt graphics card driver. For example, some users report that their Crash Dump Analysis files indicate it is nvlddmkm.sys (a graphics card driver) that causes the Kernel Mode Heap Corruption BSOD.
Therefore, you should try updating the graphics card driver. If this method fails, you can then try rolling back it. If this method still fails, you should try reinstalling a new graphics card driver.
Similarly, the above methods can only be used when your computer can enter Windows or Safe Mode. As for how to perform them, please refer to the following steps:
Step 1: Press «Windows + X» keys and then select Device Manager in the pop-up menu.
Step 2: Expand the Display adapters and right-click on the graphics card driver listed under it. Then, follow ways below to update, roll back, or reinstall the graphics card driver:
- To update the driver, you should click Update driver directly and then choose Search automatically for updated driver software.
- To roll back the driver, you should click Properties, skip to the Driver tab, and then click Roll Back Driver and OK button.
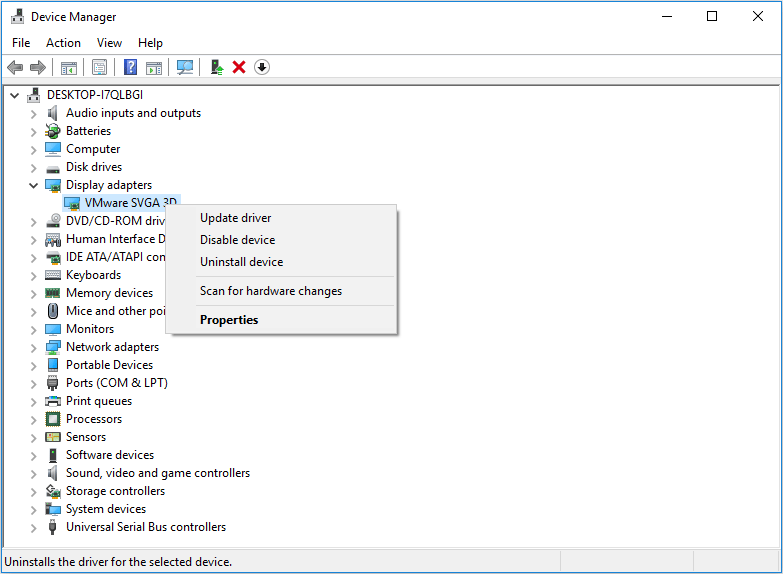
- To reinstall a new driver, you should download the newest driver from the manufacturer’s website first, and then you can click Uninstall device to uninstall the current driver. Finally, you should open the newly-downloaded driver folder and double-click the setup file to install it.
Fix 3. Run Driver Verifier Manager
If the above method fails to solve Kernel Mode Heap Corruption Windows 10, you can run Driver Verifier to see whether there are other problematic drivers, because it’s also possible that this BSOD is caused by other problematic drivers.
The Driver Verifier is a tool included with Microsoft Windows, which can monitor and highlight illegal function calls or actions that may cause system corruption due to the driver. With it, you can identify problematic drivers.
Similarly, this method is only available when your computer can enter Windows or Safe Mode. As for how to run it, please refer to the following steps:
Step 1: Open Driver Verifier Manager through the following two ways:
- Press «Windows + X» keys simultaneously, and then choose Windows PowerShell (Admin). Type the command «verifier» and hit Enter key to open Driver Verifier Manager.
- Type «cmd» into the Windows search box and then right-click on Command Prompt app to choose Run as administrator. After that, type the command «verifier» and hit Enter key to open Driver Verifier Manager.
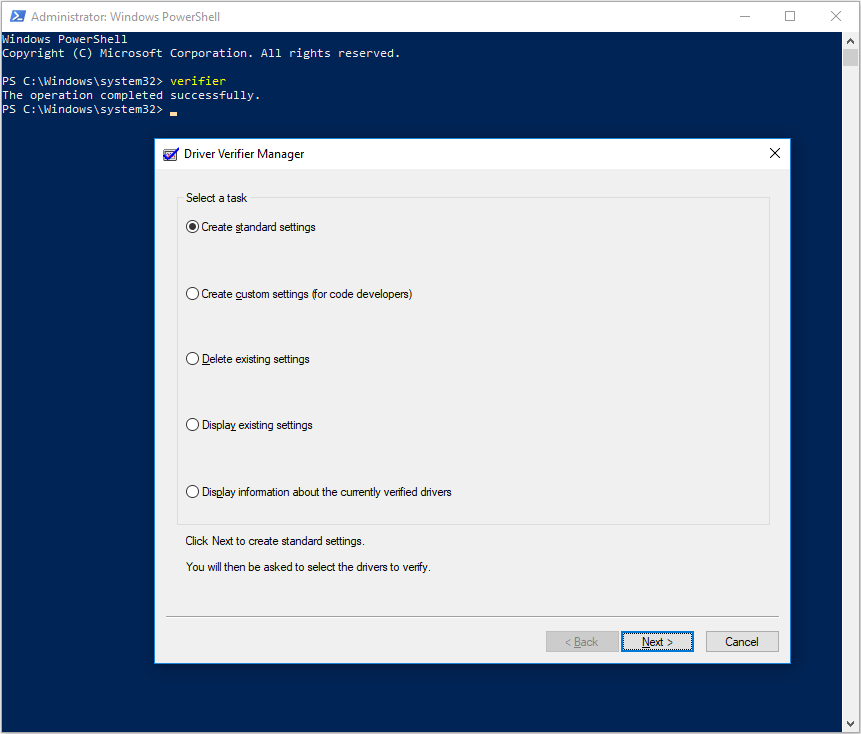
Step 2: Check Create standard settings and click Next button. Then, check Automatically select all drivers installed on this computer and click Finish button. After that, Windows will scan for the errors in the drivers and reboot your computer.
Step 3: After the reboot, Windows will display the drivers that have errors. Then, you need to follow Fix 2 to update, roll back, or reinstall them.
Fix 4. Check for Incompatible Software
If you get the error after installing a new app or when you’re trying to launch a certain program, such as a video game, it’s very possible that the Kernel Mode Heap Corruption BSOD is caused by a software conflict. If your computer can enter Windows or Safe Mode, here are two ways to get rid of the software conflict.
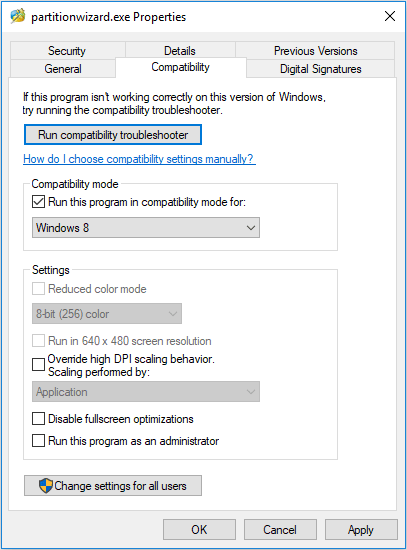
If the software conflict occurs because it’s too old and just compatible with Windows 7/8, you can solve the BSOD by running the program in compatibility mode through the following steps:
- Right-click the software icon on the desktop and then choose Open file location.
- Right-click on the program executable file and select Properties.
- Skip to Compatibilitytab and check the box next to Run this program in compatibility mode for. Then, click OK button to save changes.
If the software conflict is caused by other factors, you should uninstall the incompatible program through the following steps:
- Press «Windows + R» keys simultaneously to call out Run
- Type “cpl” into the Run dialogue box and press Enter to open Programs and Features window.
- Right-click the incompatible application and click Uninstall.
Fix 5. Check RAM
Memory problem is another reason behind this stop error. To solve this issue, you should identify and fix RAM problems on your PC through Memory Diagnostic. Similarly, this method is only available when your computer can enter Windows or Safe Mode. Please follow the steps below to check RAM:
Step 1: Type «memory diagnostic» in the Windows search box. Then, double-click the best-matched icon for Windows Memory Diagnostic.
Step 2: Choose Restart now and check for problems.
Step 3: Your computer will restart and diagnose the memory. Once the diagnosis process is completed, the computer will boot up automatically. Then, you need to view the diagnosis report in Event Viewer through the following steps:
- Open Event Viewer.
- Navigate to Windows Logs > System.
- Click Filter Current Log in the right box.
- In the Event sources box, choose MemoryDiagnostics-Results and then click OK button to display all result logs of the memory test.
- Double-click the latest result log to see whether the diagnosis is passed.
If the diagnosis is not passed, you should take measures according to the diagnosis result description.
Fix 6. Run SFC or DISM
When the Kernel Mode Heap Corruption BSOD occurs, you should run SFC or DISM to check whether it is corrupt system files that cause the BSOD problem.
System File Checker is a tool built in Windows to replace damaged, lost, or changed system files with good system files. In addition, it can be used even if the computer can’t boot into Windows or Safe Mode. Please follow the steps below to run it:
Step 1: Open Command Prompt through the following two ways:
- When your PC can’t enter Windows or Safe Mode: Enter WinRE and then navigate to Troubleshoot > Advanced options > Command Prompt.
- When your PC can enter Windows or Safe Mode: Type «cmd» in Windows search box and right-click the Command Prompt Then, select Run as administrator.
Step 2: Type «sfc /scannow» and press the Enter key. Then, wait until the procedure ends.
DISM is a better tool that can restore corrupt system files. Usually, if SFC fails to repair system files, you can run DISM. However, it is only available when your computer can boot into Windows or Safe Mode. Please follow the steps below to run it:
Step 1: Boot into Windows or Safe Mode and then run Command Prompt as administrator.
Step 2: Type the following commands one by one and hit Enter.
- exe /Online /Cleanup-image /Scanhealth
- exe /Online /Cleanup-image /Restorehealth
Fix 7. Check Slots of the Graphics Card and the Memory
Another cause for the KERNEL_MODE_HEAP-CORRUPTION error is that you have inserted the graphics card or the memory bank into a wrong slot. If so, you should check your motherboard manual and insert it back into the correct lane.
Fix 8. Perform System Restore
If all the above methods don’t work for you, you can try performing System Restore to revert your computer’s state to that of a good point in time. As for how to do that, please refer to the following post:
Here is an article offering you 8 methods to solve Kernel Mode Heap Corruption error. You can try these methods and hope they can help you.Click to Tweet
Bottom Line
Can these methods help you solve the error? Do you have any doubt about these methods? Please leave a comment below or contact us via [email protected]. We will get back to you as soon as possible.
Kernel Mode Heap Corruption FAQ
❄️ How do you fix heap corruption?
- Check Event Viewer.
- Update, Roll Back, or Reinstall the Graphics Card Driver.
- Run Driver Verifier Manager.
- Check for Incompatible Software.
- Check RAM.
- Run SFC or DISM.
- Check Slots of the Graphics Card and the Memory.
- Perform System Restore.
❄️ What is kernel mode heap corruption?
Kernel mode is one of operation modes computer, which allows the computer to have full access to all hardware and make the machine run its any instructions.
Heap corruption occurs when a program damages the allocator’s view of the heap. This error may cause a memory leak where some memory isn’t returned to the heap and is inaccessible to the program afterward, or it may cause a memory fault, usually within the allocator itself.
Everything you need to know about fixing the error
by Tashreef Shareef
Tashreef Shareef is a software developer turned tech writer. He discovered his interest in technology after reading a tech magazine accidentally. Now he writes about everything tech from… read more
Published on October 21, 2022
Reviewed by
Vlad Turiceanu

Passionate about technology, Windows, and everything that has a power button, he spent most of his time developing new skills and learning more about the tech world. Coming… read more
- The Kernel Mode Heap Corruption blue screen error occurs due to a software conflict or hardware incompatibility.
- Check the graphics card drivers for issues in order to fix this issue.
- Also, you should inspect the hardware to see whether you have mistaken some ports.
XINSTALL BY CLICKING THE DOWNLOAD FILE
This software will repair common computer errors, protect you from file loss, malware, hardware failure and optimize your PC for maximum performance. Fix PC issues and remove viruses now in 3 easy steps:
- Download Restoro PC Repair Tool that comes with Patented Technologies (patent available here).
- Click Start Scan to find Windows issues that could be causing PC problems.
- Click Repair All to fix issues affecting your computer’s security and performance
- Restoro has been downloaded by 0 readers this month.
The Blue Screen of Death or BSoD is a common occurrence in Windows and results in system crashes. Kernel Mode Heap Corruption is one such BSoD error and many users have reported that it has crashed their system.
But what does this mean exactly and most importantly why does BSoD happen? Let’s take a closer look.
What causes heap corruption?
First thing first, a Kernel Mode is one of the CPU operating modes (the other is simply the user mode). By default, processes running in kernel mode have no restrictions in controlling the hardware.
But even so, you can stumble across unexpected errors (also called Kernel Mode traps). The heap can get corrupted due to different reasons, some of the most common ones being the following:
- Calling an element outside the index range – This can happen when your computer will try to read an element that exceeds the array of indexed elements.
- Software conflicts – A situation in which a computer cannot successfully run two different apps at the same time is known as a software conflict. It might be caused by the latest installed applications, which you will need to uninstall altogether.
- Memory leaks or a failing memory in general – This is the result of the fragmentation of a computer’s RAM. It happens when applications that are poorly designed or programmed fail to free up memory segments when they are no longer needed.
- Corrupted system files – The directory of a damaged hard drive can make files appear to disappear, which can then lead to more data loss or corruption.
- Faulty or degraded hardware components – Computer components are known to degrade over time, especially when they are overused. You may check your hardware using software, but also by taking a close look at their physical state.
Some of the games in which you may encounter the error are:
- Tarkov Kernel Mode Heap Corruption – Updating your GPU driver is one of the most effective solutions in this case.
- Destiny 2 Kernel Mode Heap Corruption – If Destiny 2 stops working, you can try to reinstall the game, after updating or rolling back your GPU drivers.
- Kernel Mode Heap Corruption Lost Ark – Lost Ark gamers are no exception from this error. Running an SFC scan can do the trick.
- Kernel Mode Heap Corruption Apex Legends – If the game crashes, try to run the DISM command in order to clean up your disk.
Moreover, users reported getting the Kernel Mode Heap corruption error while installing Windows 10, Windows 11, or even on just a computer startup.
What is heap corruption stack? (What is kernel mode heap corruption?)
When a program corrupts the view that the allocator has of the heap, it is known as heap corruption. This error may result in a memory leak, which occurs when a portion of memory isn’t returned to the heap.
If you want to solve the Kernel Mode Heap corruption in a simple way, keep reading.
How do I fix Kernel Mode Heap corruption?
- What causes heap corruption?
- How do I fix Kernel Mode Heap corruption?
- 1. Use a repair tool
- 2. Check graphics drivers for issues
- 3. Use Disk Cleanup
- 4. Run a quick SFC scan
Before moving on to more complex troubleshooting steps, make sure that you check the following:
- Check whether you have inserted your card in the wrong PCIe lane.
- See whether your graphics card is compatible with your motherboard.
- Reduce the memory clock speed to below the factory clock speed, since RAM can also cause Kernel Mode Heap Corruption.
1. Use a repair tool
BSoD errors affect all Windows operating systems and fixing them is quite a difficult task that requires a lot of patience.
Some PC issues are hard to tackle, especially when it comes to corrupted repositories or missing Windows files. If you are having troubles fixing an error, your system may be partially broken.
We recommend installing Restoro, a tool that will scan your machine and identify what the fault is.
Click here to download and start repairing.
However, to make sure that you don’t do more harm than good to your operating system, we recommend using a third-party repair tool to do the job for you. It will easily fix Kernel Mode Heap Corruption on laptop, and more.
Some of the most common Windows errors and bugs are a result of old or incompatible drivers. The lack of an up-to-date system can lead to lag, system errors or even BSoDs.
To avoid these types of problems, you can use an automatic tool that will find, download, and install the right driver version on your Windows PC in just a couple of clicks, and we strongly recommend DriverFix. Here’s how to do it:
- Download and install DriverFix.
- Launch the application.
- Wait for DriverFix to detect all your faulty drivers.
- The software will now show you all the drivers that have issues, and you just need to select the ones you’d liked fixed.
- Wait for DriverFix to download and install the newest drivers.
- Restart your PC for the changes to take effect.

DriverFix
Drivers will no longer create any problems if you download and use this powerful software today.
Disclaimer: this program needs to be upgraded from the free version in order to perform some specific actions.
2. Check graphics drivers for issues
1. Right-click the Start icon from your Taskbar, then select Device Manager from the list.
2. Expand the Display adapters section, then right double click your graphics card driver in order to open the Properties window.
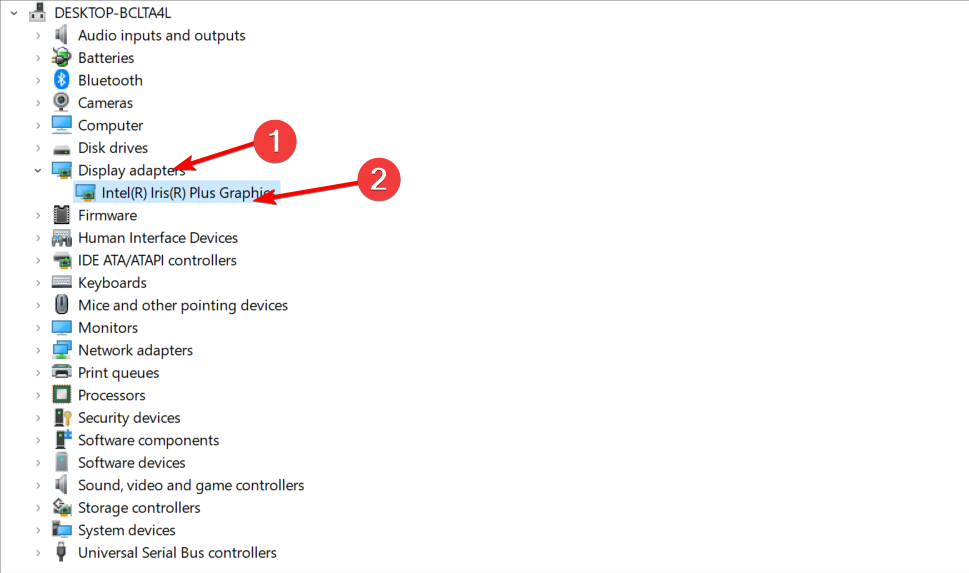
3. Here, go to the Driver tab then click Roll Back Driver if you have the option enabled, or click Update Driver.
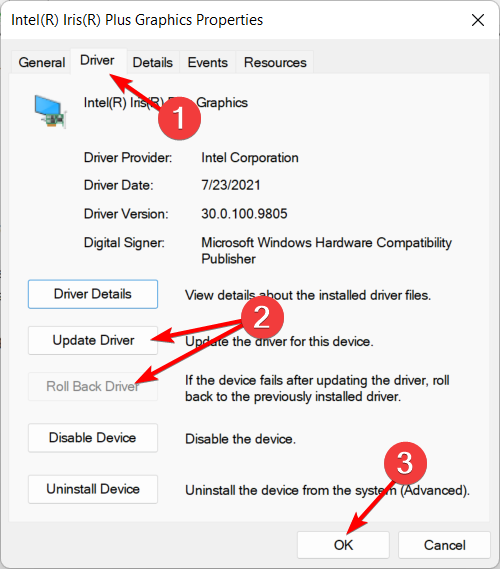
4. Wait for the process to finish and click OK.
5. If you select the Update Driver option, click the Search automatically for drivers option next.
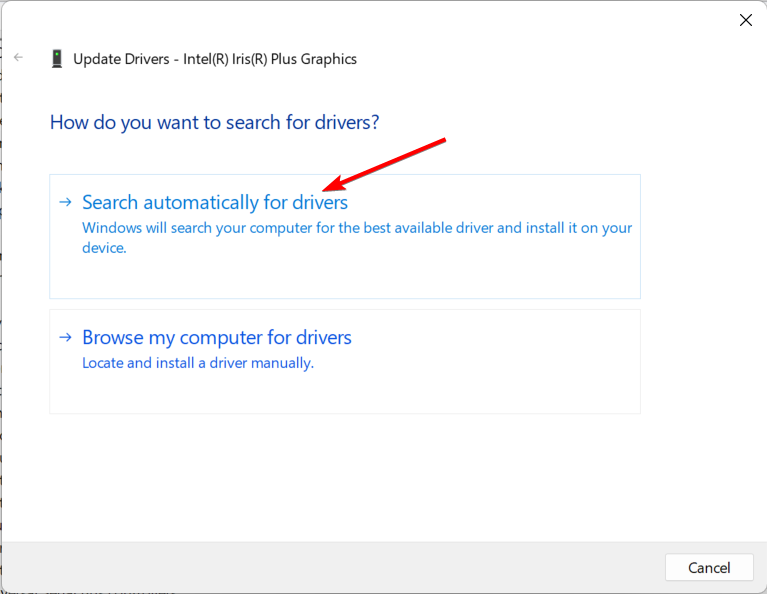
6. Reboot the system and check for any improvements to the Kernel Mode Heap Corruption blue screen issue.
It is important for your PC that you keep your drivers up-to-date. You will not only be able to take advantage of a quicker computer, but you will also prevent a significant number of problems from occurring in the future, such as the Kernel Mode Heap Corruption in NVIDIA.
- 5 Best BSoD Fixers to Repair Blue Screen Errors Effortlessly
- Where is the BSOD log file located and how to read it?
- Getting a BSOD error on Windows 11? Here’s what to do
3. Use Disk Cleanup
- Press Windows then type disk cleanup and click the top result.

- When the Disk Cleanup tool opens, select your system drive. By default, it will be C.
- Select the files that you want to delete, by default you will have the Downloaded Program Files, Temporary Internet Files, and Thumbnails selected. Then click Clean up system files. The Kernel Mode Heap Corruption error when installing Windows 10 will be fixed.

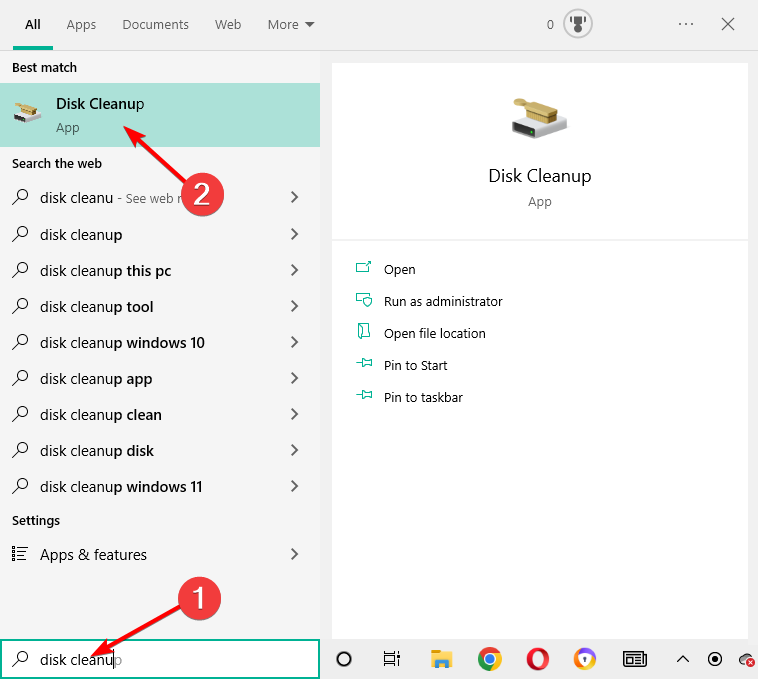

In order to perform free up drive space, you will need to have admin rights. In case you don’t have any right now, check out our guide on how to make yourself an administrator.
4. Run a quick SFC scan
- If you get Kernel Mode Heap Corruption on startup, press the Windows key, then type cmd and click the Run as administrator option under the result on the right side.

- Here, type or copy-paste the following command and press Enter. Wait for the process to finish then reboot your PC:
sfc/scannow
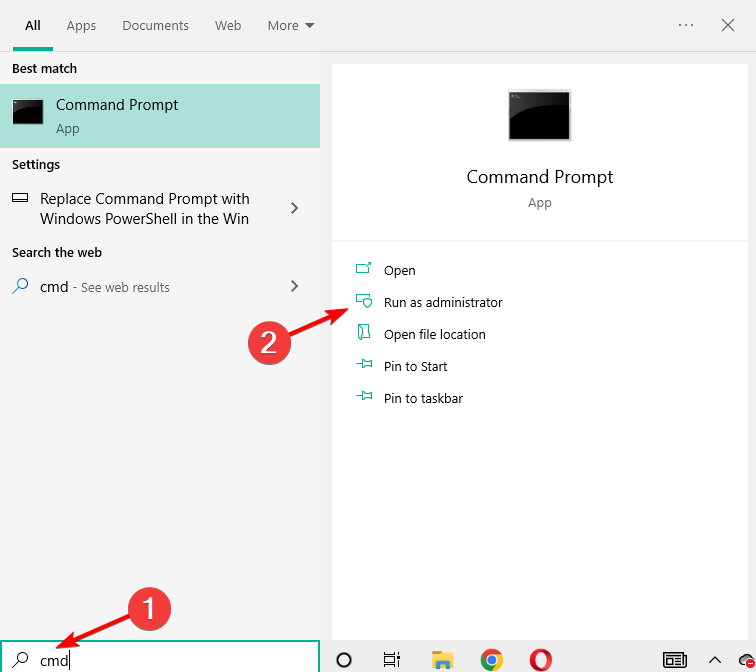

In case the SFC scan stops without solving any corrupted software files, we recommend that you refer to our guide on what to do about it.
To fix BSoD errors for good, you might need a professional fixer. Take a closer look at our list of the best BSoD repair software and find the right program for your needs.
We hope that our recommendations from this guide were helpful for you to solve the Kernel Mode Heap corruption BSOD. For more suggestions, please access the comments section below.
Still having issues? Fix them with this tool:
SPONSORED
If the advices above haven’t solved your issue, your PC may experience deeper Windows problems. We recommend downloading this PC Repair tool (rated Great on TrustPilot.com) to easily address them. After installation, simply click the Start Scan button and then press on Repair All.
![]()
Newsletter
If you are receiving a KERNEL_MODE_HEAP_CORRUPTION Blue Screen on Windows 11/10, then this post will help you resolve it. One of the primary reasons for this error is a conflict between Windows and an outdated driver or a corrupt Windows driver. Other known reasons include memory leaks or hardware faults. However, there is a rare chance where a software conflict can do that unless it has to do something with the drivers.
The KERNEL MODE HEAP CORRUPTION bug check has a value of 0x0000013A. This indicates that the kernel mode heap manager has detected corruption in a heap.

KERNEL_MODE_HEAP_CORRUPTION BSOD
Follow these methods to resolve the BOSD related to Kernel Mode Heap Corruption.
- Run ChkDsk
- Use Device Verifier Manager
- Update or Rollback Driver
- Fix Corrupt System Files
- Run Memory Diagnostics
- Run Hardware Troubleshooter
You will need a clear understanding of what the methods do here and admin permission.
Moreover, if you can log in normally, good; else you will have to boot into Safe Mode, enter Advanced Startup options screen, or use the Installation Media to boot to be able to carry out these instructions.
1] Run ChkDsk
Run ChkDsk using the following command:
chkdsk c: /r
2] Device Verifier Manager

One of the best methods to check if the driver is an issue is to run the Driver Verifier Manager. The tool will help troubleshoot, identify & resolve common device driver problems.
Open the Run prompt ( Win + R), type verifier, and then press the Enter key. Once the Device Verifier is open, select Create Standard settings and then select Automatically select unsigned drivers. This will narrow down the issue if it’s happening because of unsigned drivers. Once you detect it, uninstall the driver, and then reinstall the correct driver.
3] Update or Rollback Driver
Depending on the situation, you can either update or roll back the driver and check if the BSOD issue is resolved.
If the BSOD occurred because you have recently updated the driver, you could roll back using the Device Manager. Use Win + X, followed by M to open the device manager. Next, locate the hardware for which you have updated the driver.
Once you find it, double-click to open the properties window, and then select the Drivers tab. If you recently updated the driver, the Rollback Driver button will be enabled. Use that.

If the BSOD occurred after a Windows Update, then it’s possible that you need to install the latest version of the driver, which is compatible with the version of Windows.
Open the Device Manager, locate the device, right-click, and then choose to update the driver. If this doesn’t work, go to the OEM website, and check for an updated driver.
4] Fix Corrupt System Files
System File Checker and DISM are two tools that can help fix corrupt system files that could be the cause of the BOSD screen. Follow our exhaustive guide on how to use them.
SFC command:
sfc /scannow
DISM Command:
Dism /Online /Cleanup-Image /RestoreHealth
First, run the SFC command; if that doesn’t work out, use the DISM command. Make sure to run them on an elevated command prompt.
5] Run Memory Diagnostics
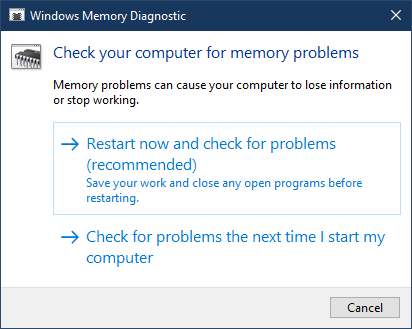
Check your memory. Use the Windows Memory Diagnostic Tool. Go to Control Panel and type “memory” in the Search box. Under Administrative Tools, click Diagnose Your Computer’s Memory Problems. In the Windows Memory Diagnostics Tool, shown here, select one of the options.
6] Run Hardware Troubleshooter

Microsoft offers a built-in hardware troubleshooter that you can invoke using the following command on PowerShell or an elevated Command Prompt.
msdt.exe -id DeviceDiagnostic
Once launched, click on the Advanced link, and uncheck the—Apply repairs automatically—option. You can do this if you want to understand the problem before it gets fixed. Click on the Next button.
The wizard will then run its diagnostics. It may prompt to enable to check for an updated driver. Once done, if there is an issue with the driver, it will figure out and offer a solution.
I hope these solutions help you out with the BSOD related to Kernel Mode Heap Corruption on Windows 11/10. The issue is related to drivers, but it is always good to check for any recently installed software that can also cause the problem.
More Tips: Fix Windows Stop Errors or Blue Screen of Death.