- Remove From My Forums
-
Вопрос
-
Hello, If somebody could give me a solution to my problem it would be greatly appreciated.
Earlier today, I had reactivate my product key for windows 10 Pro (after having it nearly 2 years with no issues). Then after I tried opening GeForce experience but there was issues. This lead me reinstall the application which opened and shut immediately
after opening and a popup occurred which said «windows task scheduler service should be running to continue». After, I went to open task scheduler and a error popup loaded which said » the remote computer was not found», so I went online
and tried figuring out the issue myself where I tried several «fixes» which didn’t work.The next issue I am getting is after I downloaded the windows updates It won’t allow me to restart my computer and I get an error message saying «We’re having trouble restarting to finish the install. Try again in a little while. If you keep seeing
this, try searching the web or contacting support for help. This error code might help: (0x80070032)». I have also tried several solutions to try fix this error but I didn’t have any luck.

Now as all of you might be aware that Microsoft Windows is a very huge operating system and there are a lot of things that need to be taken care of. But since there are a large number of tasks such as software updates, error checking, running various commands, executing scripts, etc which cannot be performed by the user manually. So to complete these tasks which can be easily done when your computer is sitting idle, Windows OS schedules these tasks so that the tasks can start and complete themselves at the scheduled time. These tasks are scheduled & managed by Task Scheduler.
Task Scheduler: Task Scheduler is a feature of Microsoft Windows that provides the ability to schedule the launch of apps or programs at a specific time or after a particular event. Generally, the System & Apps use the Task Scheduler to automate the maintenance tasks but anyone can use it to create or manage their own schedule tasks. Task scheduler works by keeping track of time and events on your computer and executes the task as soon as it met the required condition.
Contents
- Why Task Scheduler is not running in Windows 10?
- Fix Task Scheduler Not Running In Windows 10
- Method 1: Start Task Scheduler Service Manually
- Method 2: Registry Fix
- Method 3: Change the Task Conditions
- Method 4: Delete Corrupted Task Scheduler Tree Cache
- Method 5: Start Task scheduler using Command Prompt
- Method 6: Change Service Configuration
Now there can be many reasons behind the Task Scheduler not working properly such as corrupted registry entries, corrupted Task Scheduler tree cache, Task Scheduler services might be disabled, permission issue, etc. As each user system have a different configuration, so you need to try all the listed methods one by one until your problem is resolved.
If you are facing any problems with the Task Scheduler such as Task Scheduler is not available, Task Scheduler is not running, etc then don’t worry as today we will discuss various methods to fix this issue. So without wasting any time let’s see How to fix Task Scheduler not running in Windows 10 with the help of the below-listed troubleshooting guide.
Fix Task Scheduler Not Running In Windows 10
Make sure to create a restore point just in case something goes wrong.
Method 1: Start Task Scheduler Service Manually
The best and the first method to start with if you are facing Task Scheduler not working issue is to manually start the Task Scheduler service.
To start the Task Scheduler service manually follow the below steps:
1.Open Run dialog box by searching for it using the search bar.

2.Type services.msc in the run dialog box and hit Enter.

3.This will open the Services window where you need to find the Task Scheduler service.

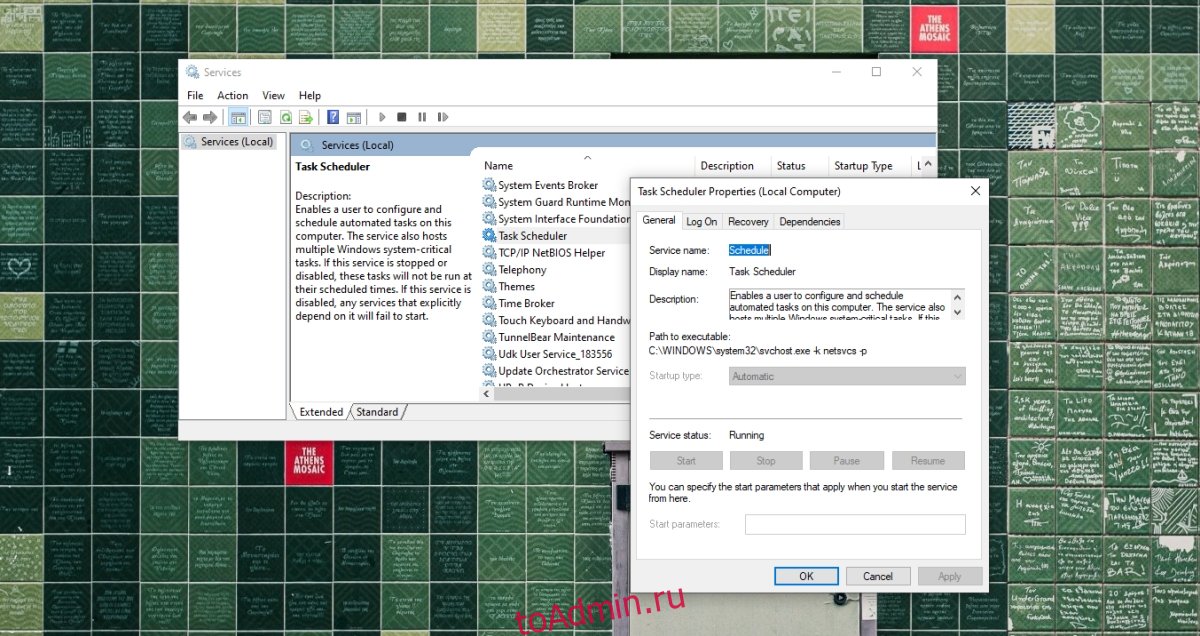
3.Find Task Scheduler Service in the list then right-click and select Properties.

4.Make sure the Startup type is set to Automatic and the service is running, if not then click on Start.

5.Click Apply followed by OK.
6.Reboot your PC to save changes and see if you’re able to Fix Task Scheduler Not Running In Windows 10.
Method 2: Registry Fix
Now the Task Scheduler might not be working properly because of incorrect or corrupt registry configuration. So in order to fix this issue, you need to alter some registry settings, but before you continue, make sure you backup your registry just in case something goes wrong.
1.Open Run dialog box by searching for it using the search bar.
2.Now type regedit in the Run dialog box and hit Enter to open Registry Editor.

3.Navigate to the following registry key:
HKEY_LOCAL_MACHINESYSTEMCurrentControlSetServicesSchedule

4.Make sure to select Schedule in the left window and then in the right window pane look for “Start” registry DWORD.

5.If you can’t find the corresponding key then right-click in an empty area in the right window and select New > DWORD (32-bit) value.

6.Name this key as Start and double-click on it to change its value.
7.In the Value data field type 2 and click OK.

8.Close Registry Editor and reboot your PC to save changes.
After your computer restarts, you may be able to Fix Task Scheduler Not Running in Windows 10, if not then continue with the next methods.
Method 3: Change the Task Conditions
The Task Scheduler not working problem may arise due to incorrect Task conditions. You need to ensure that the Task conditions are correct in order for the proper functioning of Task Scheduler.
1.Open Control Panel by searching for it using the search bar.

2.This will open the Control Panel window then click on System and Security.

3.Under System and Security, click on Administrative Tools.

4.The Administrative Tools window will open up.

5.Now from the list of the tools available under Administrative tools, click on Task Scheduler.

6.This will open the Task Scheduler window.

7.Now from the left side of Task Scheduler, click on Task Scheduler Library to look for all the tasks.

8.Right-click on the Task and select Properties from the context menu.
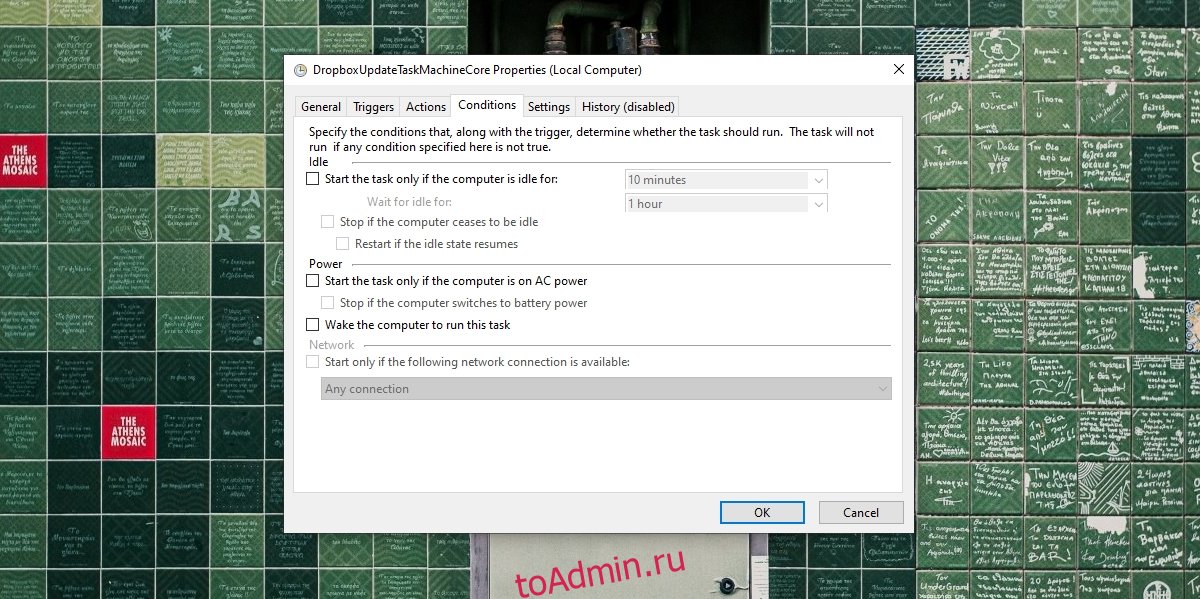
9.In the Properties window, switch to the Conditions tab.

10.Check the box next to “Start only if the following network connection is available“.

11.Once you have checked the above box, from the drop-down select Any connection.

12.Click OK to save changes and reboot your PC.
After your computer restarts, you may be able to Fix Task Scheduler Not Running in Windows 10 issue.
Method 4: Delete Corrupted Task Scheduler Tree Cache
It is possible that Task Scheduler is not working because of the corrupted Task Scheduler tree cache. So, by deleting the corrupted task scheduler tree cache you may resolve this issue.
1.Press Windows Key + R then type regedit and hit Enter to open Registry Editor.
2.Navigate to the following registry key:
HKEY_LOCAL_MACHINESOFTWAREMicrosoftWindows NTCurrentVersionScheduleTaskCacheTree

3.Right-click on Tree Key and rename it to Tree.old and again open Task Scheduler to see if the error message still appears or not.

4.If the error doesn’t appear this means an entry under Tree key is corrupted and we are going to find out which one.
To find out which task is corrupted follow the below steps:
1.First, rename the Tree.old back to Tree which you have renamed in previous steps.
2.Under Tree registry key, rename each key to .old and each time you rename a particular key open the Task Scheduler and see if you’re able to fix the error message, keep doing this until the error message no longer appears.

3.Once the error message appears then that particular Task which you renamed is the culprit.
4.You need to delete the particular Task, right-click on it and select Delete.

5.Reboot your PC to save changes.
After your computer restarts, see if you’re able to Fix Task Scheduler Not Running in Windows 10 issue.
Method 5: Start Task scheduler using Command Prompt
Your Task Scheduler may work properly if you start it using Command Prompt.
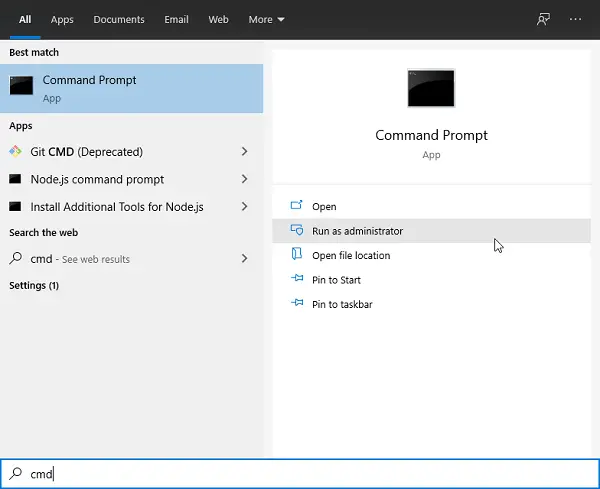
1.Type cmd in Windows Search bar then right-click on Command Prompt and select “Run as administrator“.
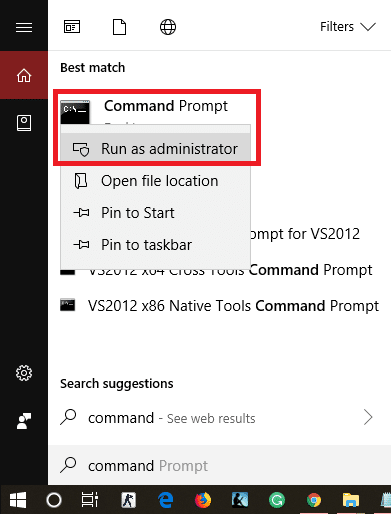
2.When asked for confirmation click on the Yes button. Your Administrator command prompt will open up.
3.Type the below command in command prompt and hit Enter:
net start task scheduler

After completing the above steps, your task scheduler may start working properly.
Method 6: Change Service Configuration
To change the Service configuration follow the below steps:
1.Type cmd in Windows Search bar then right-click on Command Prompt and select “Run as administrator“.
2.Type the below command in command prompt and hit Enter:
SC Comfit schedule start= auto

3.After running the command if you get the reply [SC] Change Service Config SUCCESS, then the service will be changed to automatic once you will reboot or restart your computer.
4.Close the command prompt and restart your computer.
Recommended:
- 3 Ways to Combine Multiple PowerPoint Presentation Files
- Fix VCRUNTIME140.dll is Missing from Windows 10
- 7 Ways to Fix PUBG Crashes on Computer
- Reset or Recover Your Gmail Password
Hopefully, using one of the above methods, you will be able to Fix Task Scheduler Not Running In Windows 10, but if you still have any questions regarding this tutorial then feel free to ask them in the comment section.
Планировщик заданий — стандартное приложение, которое уже много лет входит в состав Windows. Это мощный инструмент, который можно использовать для автоматизации всех видов задач. Его можно использовать для запуска других приложений и выполнения сценариев в ответ на один или несколько триггеров. Он также отвечает за выполнение системных задач, которые установлены по умолчанию, что делает его неотъемлемой частью стабильности ОС.
Если планировщик задач не работает и запланированные задачи не запускаются, ваша система быстро столкнется с проблемами. Вы можете запускать задачи вручную, но в системе их слишком много, чтобы каждый раз запускать их вручную.
Основные проверки
Для выполнения запланированных задач необходимо настроить несколько основных вещей. Убедитесь, что задача не выполняется следующим образом;
Время / расписание, установленное для его запуска.
Был добавлен хотя бы один триггер.
Был добавлен хотя бы один элемент действия.
Элемент «Действие» должен быть исполняемым, например, если это сценарий, путь к нему должен быть правильным.
Задача включена.
График / параметры задачи выполнены, т. Е. Сработали триггеры.
Если вы импортировали задачу, попробуйте создать ее вручную и проверьте, выполняется ли она.
Если все вышеперечисленное выполнено, а задача по-прежнему не выполняется, попробуйте следующие исправления.
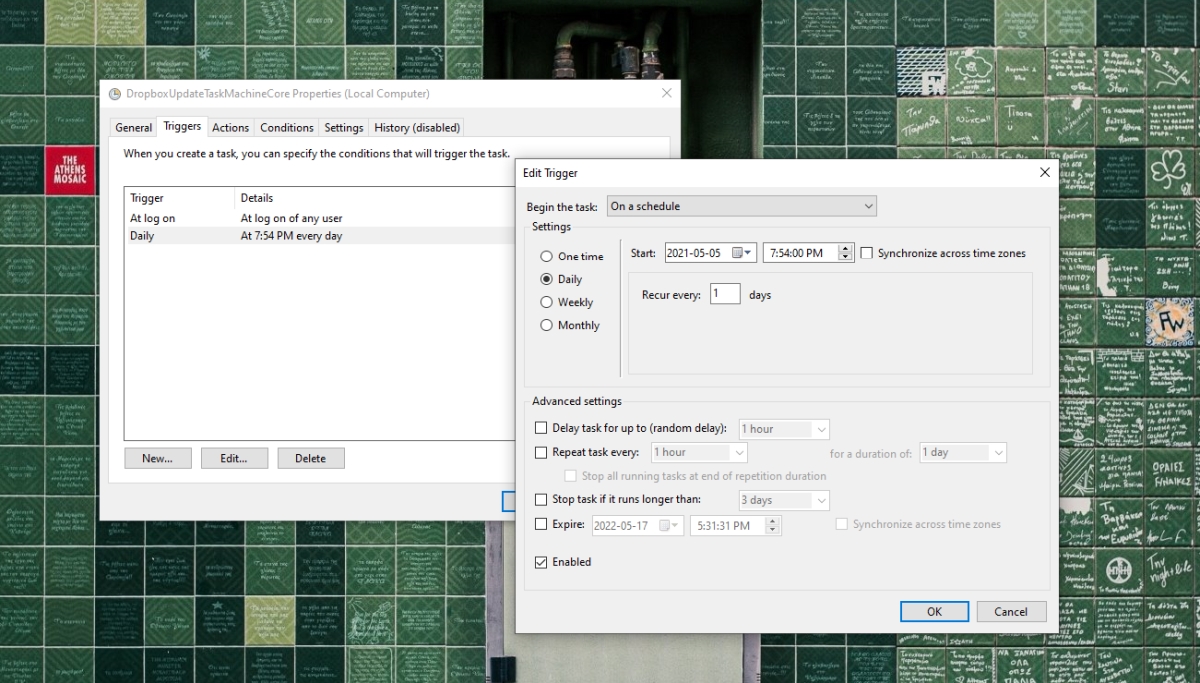
1. Проверить условия задачи
Условия, установленные для запланированной задачи Февраль препятствовать его запуску, например, если задача настроена на запуск только тогда, когда ваш ноутбук подключен к источнику питания, настройка будет иметь приоритет над всеми расписаниями и триггерами.
Откройте планировщик заданий.
Дважды щелкните задачу, которая не будет запущена.
Перейдите на вкладку Условия.
Снимите флажок «Запускать задачу, только если компьютер подключен к сети переменного тока».
Включите параметр «Разбудить компьютер для выполнения этой задачи».
Нажмите ОК и проверьте, работает ли он.
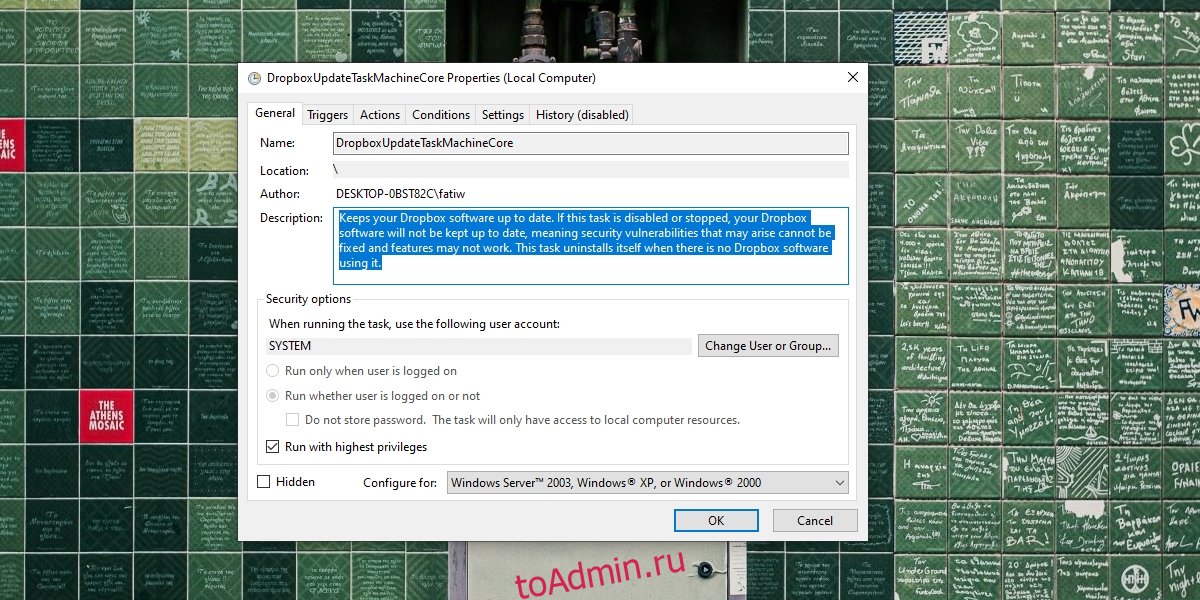
2. Предоставьте задаче доступ администратора.
Некоторые задачи, если они настроены правильно, требуют доступа администратора для запуска. Доступ администратора нужно предоставить только один раз, и без него задача не запустится.
Откройте планировщик заданий.
Дважды щелкните задачу, которая не запускается.
Перейдите на вкладку Общие.
Внизу включите параметр «Запускать с наивысшими привилегиями» и предоставьте ему доступ администратора.
Нажмите ОК, и задача будет запущена.
3. Вручную проверьте действие и триггеры.
Возможно, что настроенные вами действия и триггеры не работают. Попробуйте запустить их все вручную, например, если при открытии Chrome запускается задача, откройте браузер. Если браузер не открывается, значит, триггер задачи не работает.
Точно так же вручную запустите действие для задачи. Например, если у вас настроена задача, при которой при открытии Chrome запускается сценарий для очистки истории браузера при запуске, запустите сценарий вручную. Если сценарий не работает, проблема не в задаче, а в настроенном действии.
Планировщик задач не проверяет правильность триггера или действия. Он принимает все, что настраивает пользователь. Единственное исключение — если пользователь вводит недопустимый путь или недопустимый аргумент.
4. Запустите службу планировщика заданий.
Планировщик задач может запускать задачи без открытия самого приложения, потому что он запускает фоновую службу, которая обрабатывает задачи. Если эта служба не запущена, запланированные задачи также не будут выполняться.
Нажмите сочетание клавиш Win + R, чтобы открыть окно запуска.
В поле запуска введите services.msc и нажмите Enter.
Найдите планировщик заданий и дважды щелкните его.
Проверить статус услуги. Если он не запущен, включите / запустите его.
Примечание: Services.msc не открывается? Попробуйте эти исправления.
5. Обновите Windows 10.
Обновления Windows 10 часто могут выступать в качестве универсального решения, когда что-то ломается в ОС. Если у вас есть ожидающие обновления Windows 10, рекомендуется их установить. Делать это Февраль исправить все, что не так с системой.
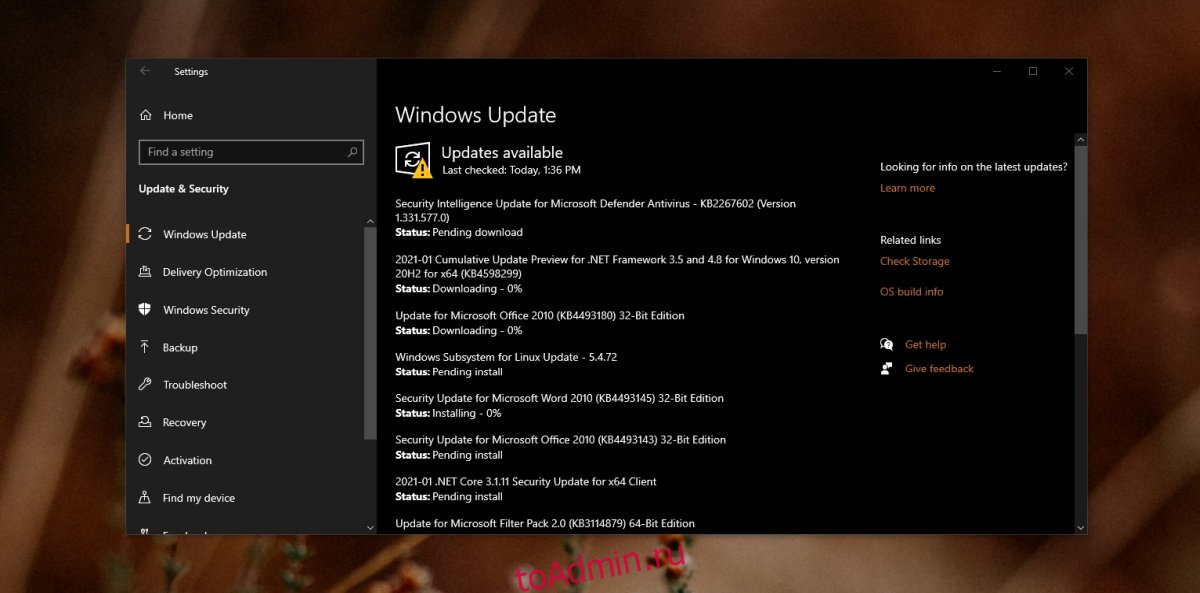
Откройте приложение «Настройки» с помощью сочетания клавиш Win + I.
Перейдите в раздел «Обновление и безопасность».
Выберите вкладку Центр обновления Windows.
Щелкните Проверить наличие обновлений.
Загрузите и установите доступные обновления.
Для надежности перезапустите систему.
Заключение
Планировщик заданий редко сталкивается с проблемами в ОС. Большинство задач, которые не выполняются, часто имеют проблемы либо с триггерами, либо с действиями. Приложение также отключает запланированные задачи после того, как они были запущены 3 раза, если пользователь специально не снимает этот флажок при настройке задачи. Только базовые проверки должны решить проблему в большинстве случаев, если ваши задачи не выполняются.
Updated 09/29/2021 01:03 PM
GFE 3.0 Installation can fail due to Windows Task Scheduler settings. Task Scheduler should be running and set to run automatically on startup. Please follow the steps to update settings and retry GFE Installation.
- Start the SCM by running services.msc command
- Look for Task Scheduler service
- Check to see it is running i.e. Status = «Running»
- Check to see it is set to run automatically on startup i.e. Startup Type = «Automatic»
If Task Scheduler service is not running,
o Right Click on the Task Scheduler row in SCM
o Click «Start» button on the right click menu
o Retry GFE Installation after Task Scheduler shows Status = «Running»If Task Scheduler service is not set to startup Automatically,
o Double Click Task Scheduler row in SCM to Open the Task Scheduler Properties dialog
o Set Startup type to «Automatic»
o Click Ok to save settings and close the dialogIf service is disabled,
o Start the Registry editor by running regedit.exe command
o Navigate to HKEY_LOCAL_MACHINESYSTEMCurrentControlSetServicesSchedule
o Find the DWORD called start, change its value to 2.
o Reboot
o Start the GFE3 installation
Live Chat
Chat online with one of our support agents
CHAT NOW
ASK US A QUESTION
Contact Support for assistance
800.797.6530
Ask a Question
While using Windows 11/10 regularly, one can easily understand that the OS is a mixture of various background tasks and processes. To complete a huge number of background processes, Windows uses a Task Scheduler. The basic work of Task Scheduler is to manage, schedule and align tasks as per the priority. In this article, we are covering some basic and useful steps to fix the Task Scheduler not running issue in Windows 11/10.
Task Scheduler Tasks not running Tasks

Task Scheduler stops automatically
The Task Scheduler is used by the OS to schedule all the background processes, launch applications and manage them. The method used behind is that the schedular calculates all the resources required by any process to get completed. It creates the queue of such processes according to their requirements and priority. When everything is set, all the tasks are then sent to the processor to get executed. It works based on time and memory consumption. Adding to it, anyone can create their own tasks and schedule them.
By now you may have understood that the proper working of the Task Scheduler is a necessity. If you are facing a certain error as Task Scheduler is not working, then it might be a problem for you. It is because of all of your background tasks, ongoing tasks, and upcoming tasks are clashing and making your machine to freeze again and again.
Scheduled Tasks not running
Let us now understand why it isn’t working and what can be the possible method to solve the issue.
Before we start, let’s assume that you have installed any driver or application by downloading it from an unreliable source. Now the possible reasons for error can be, faulty registry entry, corrupted application, etc. Other reasons could be, disabled service of Task Scheduler, absence of admin rights, corrupted tree cache used by the scheduler.
You may not know which of the mentioned reason is behind the error on your system. This means you may have to follow each and every method mentioned in the article below. Please keep in mind that you have to restart your system after the completion of each method. And before you begin, remember to create a system restore point first.
If the Task Scheduler stops automatically or is not running or working on your Windows 11/10 system, you need to do the following things:
- Check and start Task Scheduler service
- Change the Service configuration
- Start Task Scheduler using Command Prompt
- Run System File Checker
- Delete the corrupted Task Scheduler Tree Cache.
Task Scheduler failed to start task for user
1] Check and start Task Scheduler service
This is the most simple step one can perform. Checking Windows Services, restarting them is one of the basic things that even your system admin will also perform without a doubt.
Press Win + R keys. The Run dialog box will appear.
Type services.msc and press enter. The Services Manager window will open up.
In the list of Services search for Task Scheduler.
Right-click on it and select Properties. A new window will open up.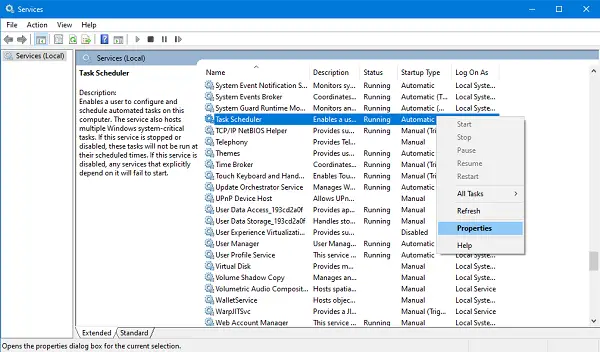
Check the new window whether the Service status is set to Running and Startup type is set to Automatic. If not then change it to the same. Next press the Start button.
Click on Apply then on OK.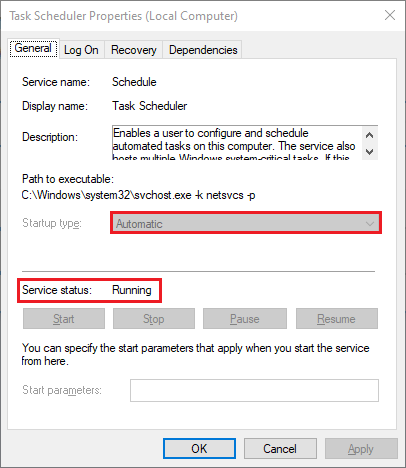
Here you go, your error should get resolved. But if your service was already running as shown in the screenshot, then move to the next method.
2] Change the Service configuration
If the above method fails to start the Service, then try this method.
Open Start Menu and type cmd. Select Run as administrator from the menu.
Type “SC config schedule start= auto” and press Enter.
If the final message you get is [SC] Change Service Config SUCCESS then the scheduler will start working.
Restart your system and you are good to go.
Read: Scheduled Tasks running forever, randomly, or multiple times
3] Start Task Scheduler using Command Prompt
If the above method didn’t work and your service is still not working then you can enable it using Command Prompt or Windows PowerShell too.
Press Win + X keys. A Quick Access menu will open up.
Select Windows PowerShell (Admin) or Command Prompt (Admin) from the list.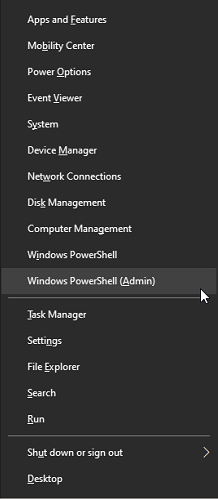
Type “net start task scheduler” and press Enter.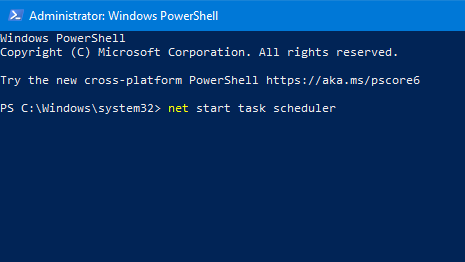
This should get things started.
4] Run System File Checker
Now that you know the service is running properly, you can go with this method. Running System File Checker looks for potentially corrupted system files, repairs and maintains them.
Press Win + X keys. A Quick Access menu will open up.
Select Windows PowerShell (Admin) or Command Prompt (Admin) from the list.
Type “sfc /scannow” and press Enter.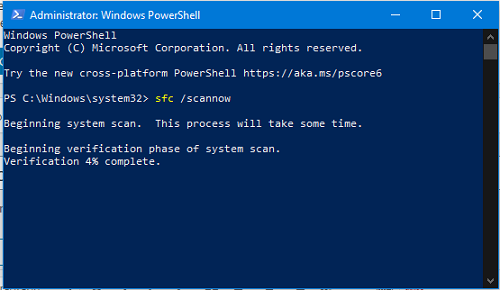
You will know when the process is completed and check whether the scheduler is running now or not. If not then you may go to the next method.
5] Delete the corrupted Task Scheduler Tree Cache
This method is a bit lengthy, go through the steps one by one and you may find that the error is no more.
Press Win + R keys. The Run dialog box will open up.
Type regedit and press Enter.
Go to the following Registry key:
HKEY_LOCAL_MACHINESOFTWAREMicrosoftWindows NTCurrentVersionScheduleTaskCacheTree
Right-click on the Registry and rename it as Tree.old. 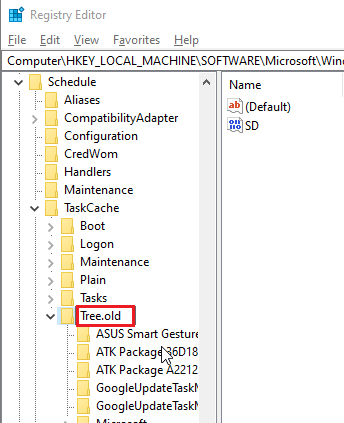
Go to Start search and type Task Scheduler. Click on the application, it should work now. If it does then go through the following steps to find out what was stopping it.
Revert the changes you made previously. Rename the registry as Tree.
Now, open the Registry hierarchy. Start renaming each key to keyname.old. Now try running the Task Scheduler.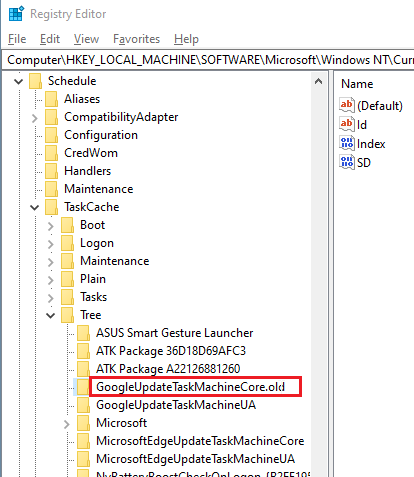
Keep doing Step 2 until you find the key due to which the scheduler was showing error.
Once the culprit is found, right-click on it and select Delete.
Restart your system and see.
These were some of the methods you can try to overcome the problem of Task Scheduler. Make sure to revert any changes you made to the system if any of the methods didn’t work for you.
Related: Startup Program not starting on startup.