In Windows 11, you decide when and how to get the latest updates to keep your device running smoothly and securely. This article will help you answer questions and troubleshoot common problems with your Windows 11 update.
If you’re looking for info on how to activate Windows 11 or to verify that your installation of Windows 11 is activated, see
Activate Windows
.
Have issues installing Windows updates? Start here.
Your device may not be able to update to the latest version of Windows 11 for a few reasons. The following tips can help you pinpoint the issue affecting your device.
Before you begin, make sure your device is plugged into a power source and connected to the internet. Then, try the steps listed below to get your PC to update.
Some updates require administrator access. If your account doesn’t have administrator access, see
Create a local user or administrator account in Windows
. Or if someone else at home or in your office has an administrator account on your device, try asking them to install the updates.
Important:
-
Before trying any of the solutions below, make sure you back up your personal files. You can
use File History
to back up your files to another drive, or insert a USB drive and use File Explorer to drag and copy important files to the USB drive. If you’re signing into Windows with a Microsoft account, your system settings will be automatically restored after updating, once you’re connected to the internet. -
You can also back up your files with OneDrive. For more info, go to
Back up your Documents, Pictures, and Desktop folders with OneDrive
.
-
Learn more about Windows Update
Make sure that your device has enough space.
Your device requires at least 16 GB of free space to upgrade a 32-bit OS, or 20 GB for a 64-bit OS. If your device has a small hard drive, you may need to insert a USB drive to update it.
If your PC is running low on storage, try the techniques at
Free up drive space in Windows
.
Many updates require you to restart your device. Save your work and close all open applications. Then, select
Start
>
Power
, and select either
Update and restart
or
Update and shut down
.
Even if you have downloaded some updates, there may be more available. After trying the preceding steps, run Windows Update again by selecting
Start
>
Settings
>
Windows Update
>
Check for updates
. Download and install any new updates.
Check for updates in Settings
Remove any external storage devices and drives, docks, and other hardware plugged into your device that aren’t needed for basic functionality. Then try to run updates again and see if this resolved your issue. If it didn’t, continue to the next tip.
If you’ve added hardware to your device, check for third-party driver updates and installation instructions on the hardware manufacturer’s website. Update any drivers, then try to run updates again and see if this resolved your issue. If it didn’t, continue to the next tip.
-
In the search box on the taskbar, type
device manager
, then select
Device Manager
from the list of results. -
In the window that appears, look for any device with a yellow exclamation mark next to it. (You may have to select each category to view the list of devices.) Select the device name.
-
Select
Action
, and then choose either
Update driver
or
Uninstall
to correct the errors.
Common troubleshooting questions
The time required to download and install updates depends on connection speed, network settings, and the size of the update. If the installation remains stuck at the same percentage, try checking for updates again or running the
Windows Update Troubleshooter
.
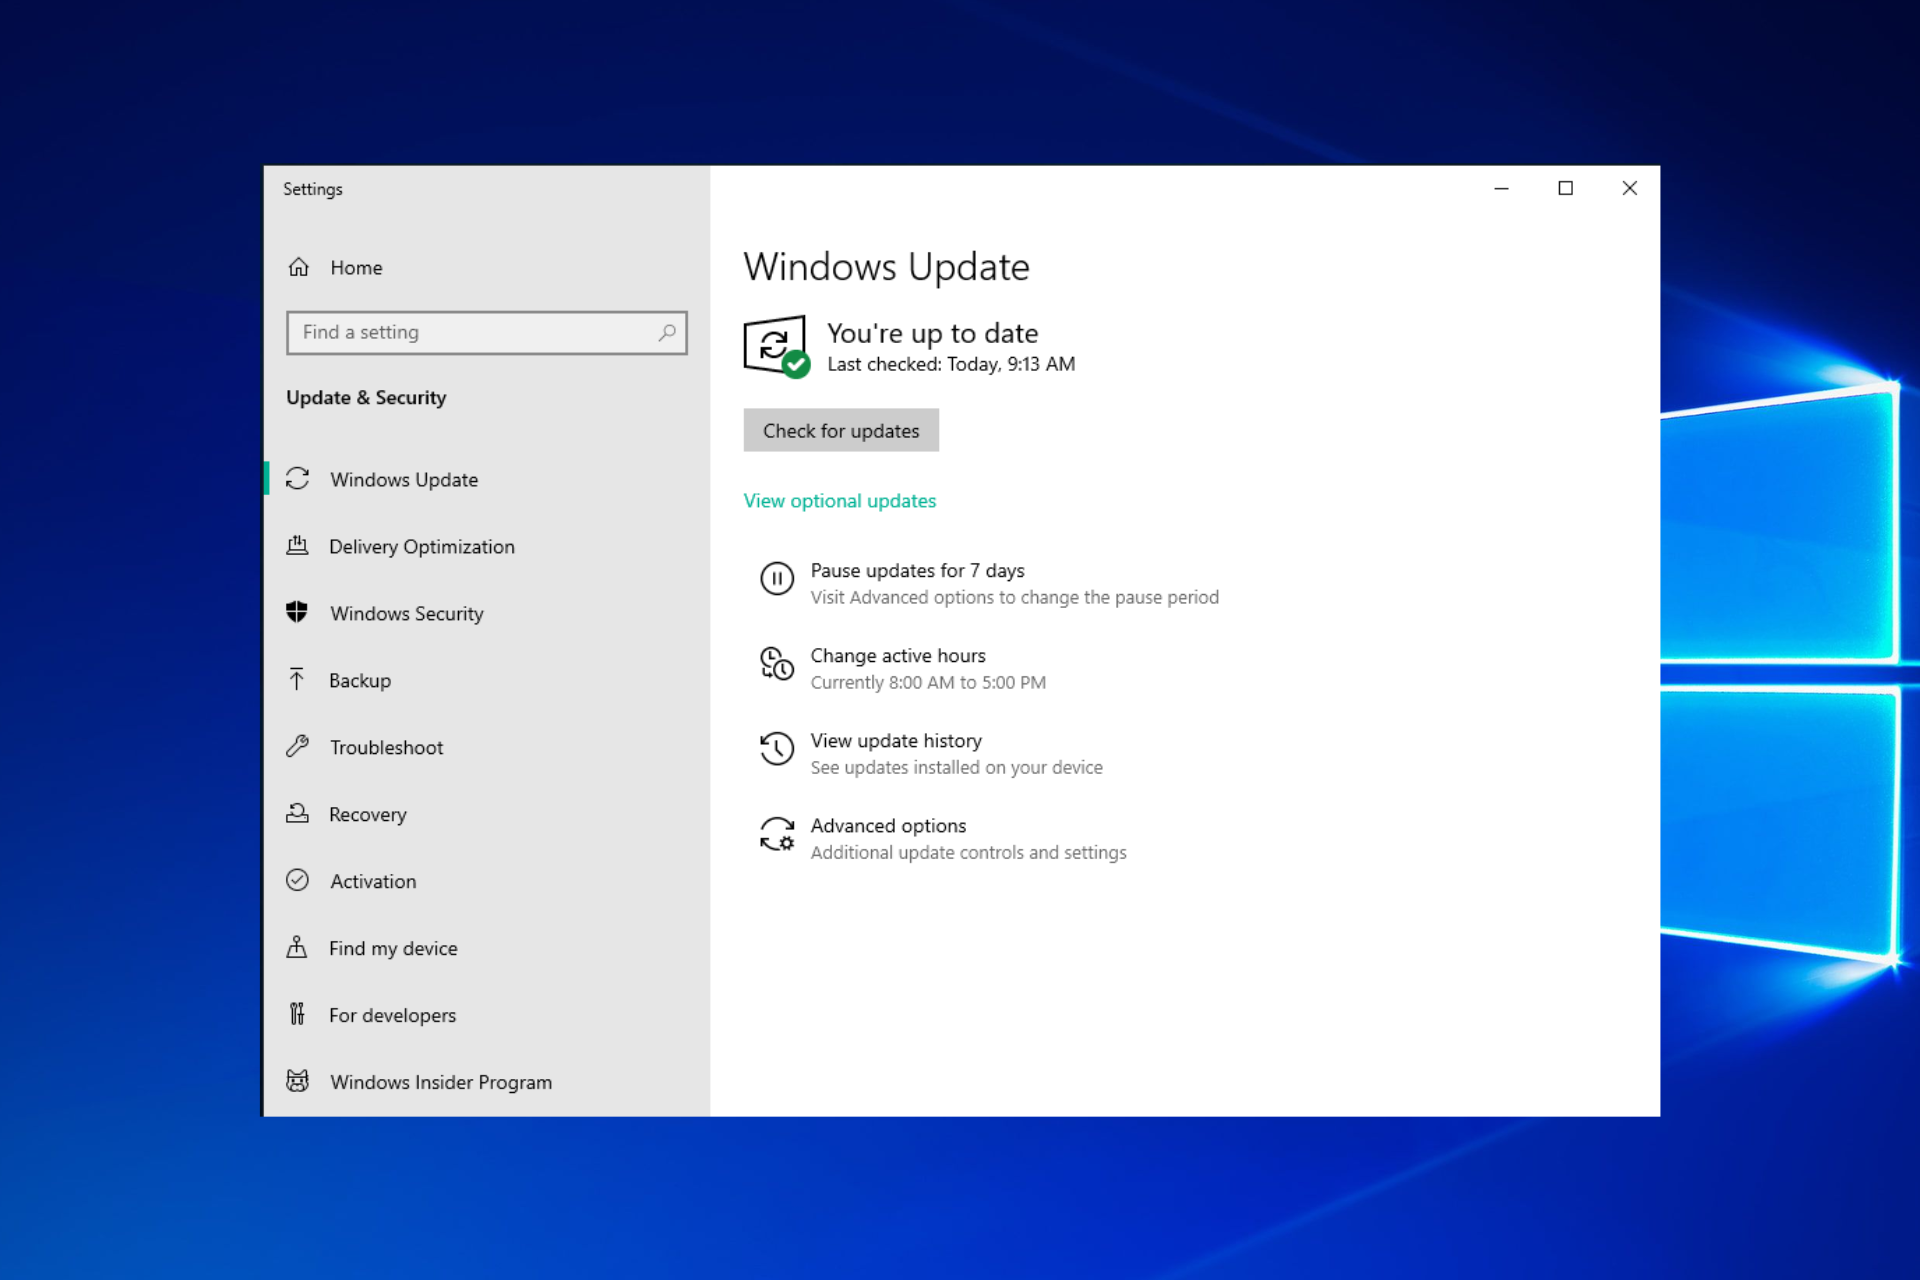
To check for updates, select
Start
>
Settings
>
Windows Update
>
Check for updates
.
To get help, in the search box on the taskbar, type
get help
, then select
Get Help
from the list of results. To leave feedback if you run into further problems, in the search box on the taskbar, type
feedback hub
, then select
Feedback Hub
from the list of results.
You will only receive a notification when it’s time to restart your computer to apply the installed updates.
Monthly quality updates on Windows 11 are quite small and have a minimal impact on data usage. Feature updates typically happen twice per year, and you can control when to install them. They require more data but are less frequent.
If you’re on a metered connection, some updates for Windows won’t be installed automatically.
Metered connections in Windows
Your computer might be slow for a number of reasons, but updating to the latest version of Windows 11 can improve its performance. For help with a slow computer, see
Tips to improve PC performance in Windows
.
Advanced
Warning:
Microsoft only recommends trying the procedures in this section if you’re comfortable working in the command line. These procedures require administrator permissions on your device.
-
In the search box on the taskbar, type
command prompt
, then select
Run as administrator
from the list of options. Select
Yes
. Next, in the window that appears, type the following commands one at a time, including the spaces as shown. After you type each command, press
Enter
. Then let each command complete before you type the next command.
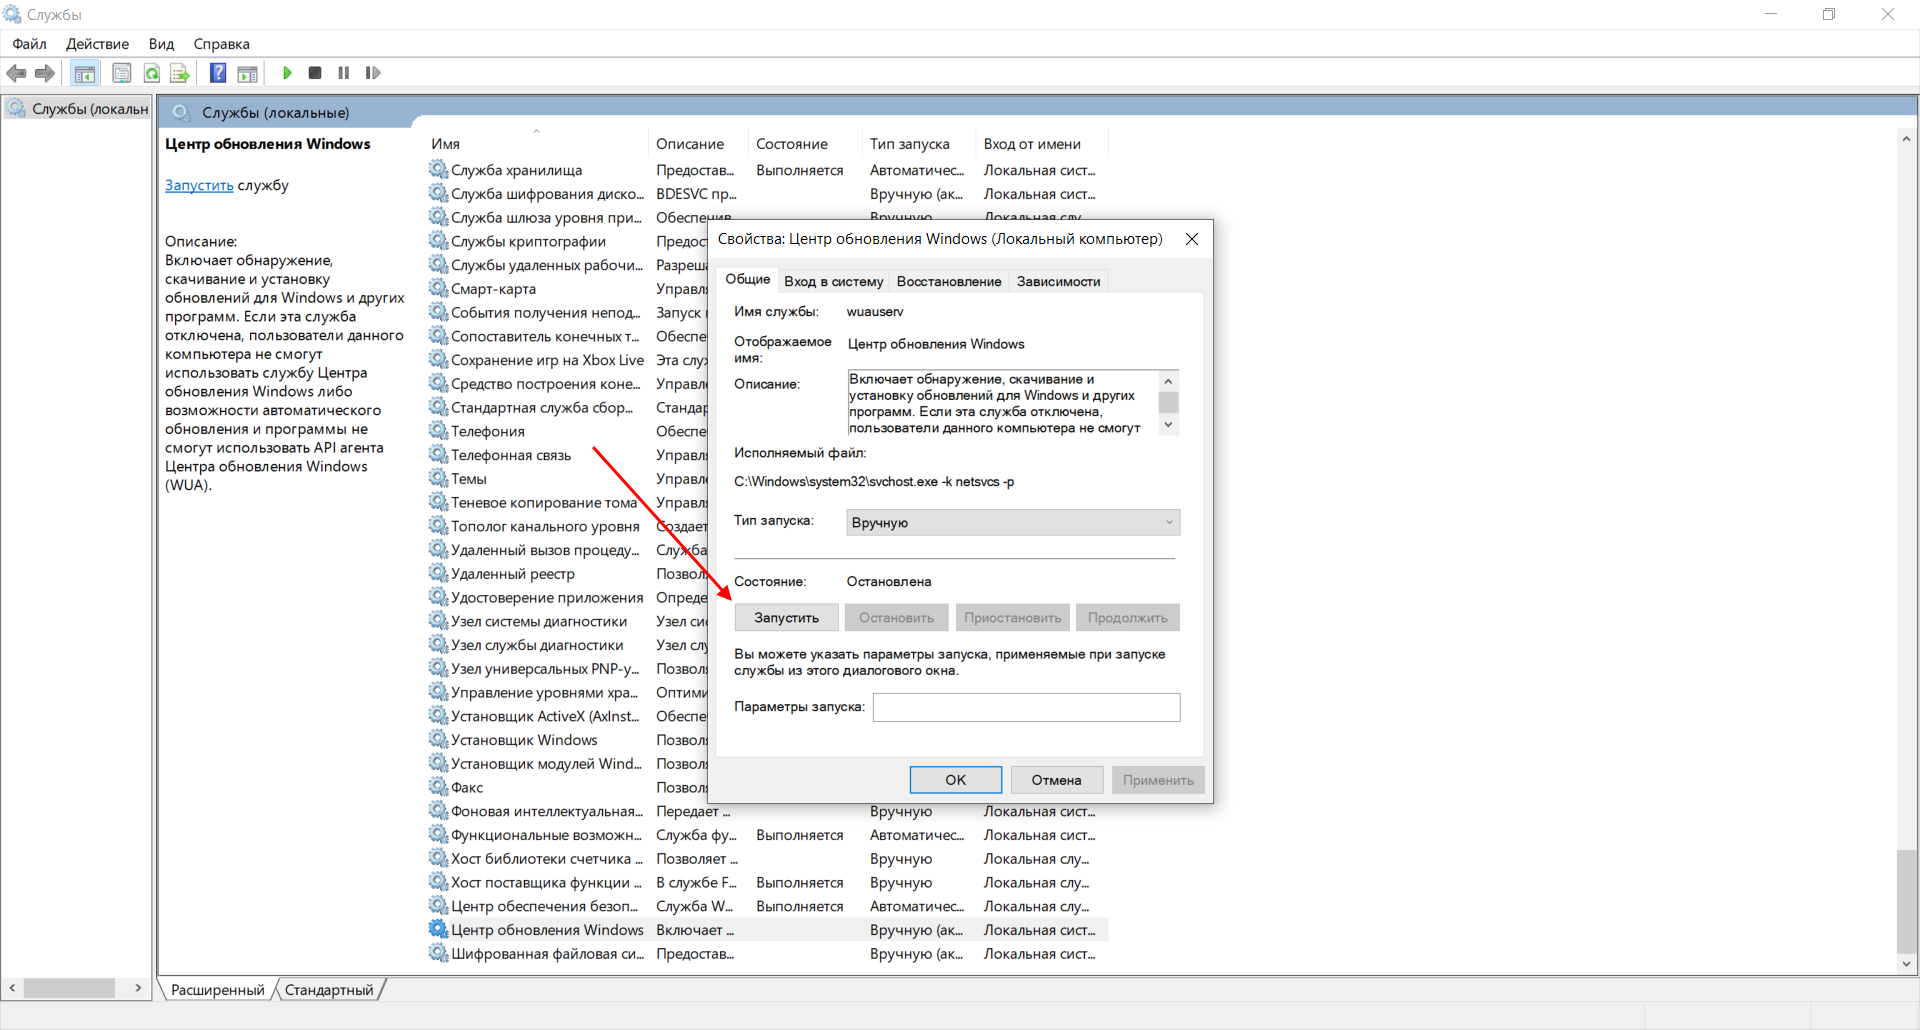
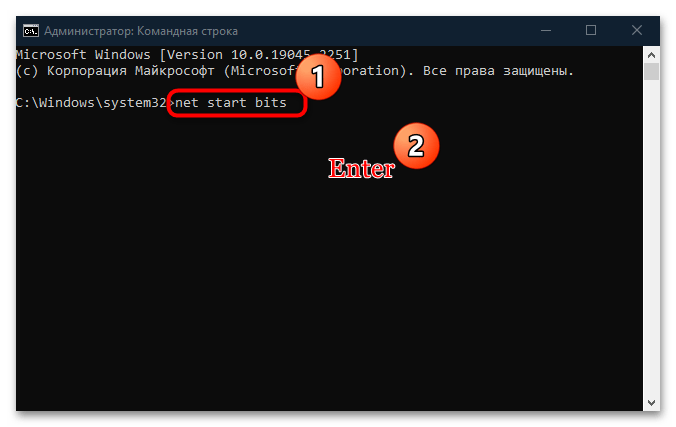
net stop bits
net stop wuauserv
ren %systemroot%softwaredistribution softwaredistribution.bak
ren %systemroot%system32catroot2 catroot2.bak
net start bits
net start wuauserv
-
After all these commands are completed, close the Command Prompt window and restart your computer.
In some instances, third-party antivirus or security software can cause errors when you try to update to the latest version of Windows 11. You can temporarily uninstall this software, update your PC, and then reinstall the software after your device is up to date. We recommend using third-party antivirus or security software that’s compatible with the latest version of Windows 11. You can check compatibility by visiting the software manufacturer’s website.
Note:
Before uninstalling software, make sure you know how to reinstall your programs and that you have any necessary product keys.
In the search box on the taskbar, type
command prompt,
and then select
Run as administrator
from the list of options. Select
Yes
. In the window that appears, type the following command, including the space as shown:
chkdsk/f C:
and then press
Enter
. Repairs will automatically start on your hard drive, and you’ll be asked to restart your device.
A clean restart starts Windows with a minimal set of drivers and startup programs. This helps eliminate software conflicts that occur when you install a program or an update that may cause issues updating your PC.
Learn how to do a clean restart
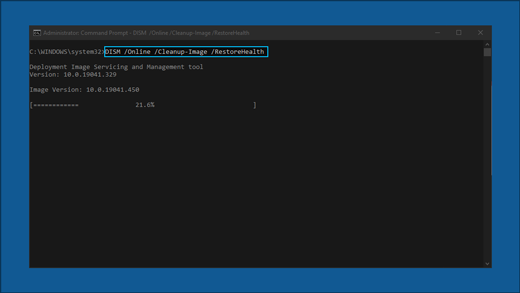
-
In the search box on the taskbar, type
command prompt
, then select
Run as administrator
from the list of options. -
In the window that appears, type this command including spaces as shown:
DISM.exe /Online /Cleanup-image /Restorehealth
-
Press
Enter
. When the command operation has run successfully, you’ll see a confirmation message from Command Prompt that says, “The restore operation completed successfully” or “The operation completed successfully”.
Note: If you don’t see a confirmation message, retype the command and try again. -
Next, type this command, including the space as shown:
sfc /scannow
-
Press
Enter
. Wait until the
sfc
scan verification reaches 100% completion, and then close Command Prompt. -
Try running the Windows Update again.
Learn how to repair a Windows image
Go to
the software download page
and select
Download tool now
to download the clean installation tool. Make sure to carefully read the notes on the software download page before using the tool.
In Windows 10, you decide when and how to get the latest updates to keep your device running smoothly and securely. This article will help you answer questions and troubleshoot common problems with your Windows 10 update.
If you’re looking for info on how to activate Windows 10 or to verify that your installation of Windows 10 is activated, see
Activate Windows
.
Have issues installing Windows updates? Start here.
Your device may not be able to update to the latest version of Windows 10 for a few reasons. The following tips can help you pinpoint the issue affecting your device.
Before you begin, make sure your device is plugged into a power source and connected to the internet. Then, try the steps listed below to get your PC to update.
Some updates require administrator access. If your account doesn’t have administrator access, see
Create a local user or administrator account in Windows
. Or if someone else at home or in your office has an administrator account on your device, try asking them to install the updates.
Important:
-
Before trying any of the solutions below, make sure you back up your personal files. You can
use File History
to back up your files to another drive, or insert a USB drive and use File Explorer to drag and copy important files to the USB drive. If you’re signing into Windows with a Microsoft account, your system settings will be automatically restored after updating, once you’re connected to the internet. -
You can also back up your files with OneDrive. For more info, go to
Back up your Documents, Pictures, and Desktop folders with OneDrive
.
-
Learn more about Windows Update
-
Serviced versions of Windows 10: Frequently asked questions
Make sure that your device has enough space.
Your device requires at least 16 GB of free space to upgrade a 32-bit OS, or 20 GB for a 64-bit OS. If your device has a small hard drive, you may need to insert a USB drive to update it.
If your PC is running low on storage, try the techniques at
Free up drive space in Windows
.
Many updates require you to restart your device. Save your work and close all open applications. Then, select
Start
>
Power
, and select either
Update and restart
or
Update and shut down
.
Even if you have downloaded some updates, there may be more available. After trying the preceding steps, run Windows Update again by selecting
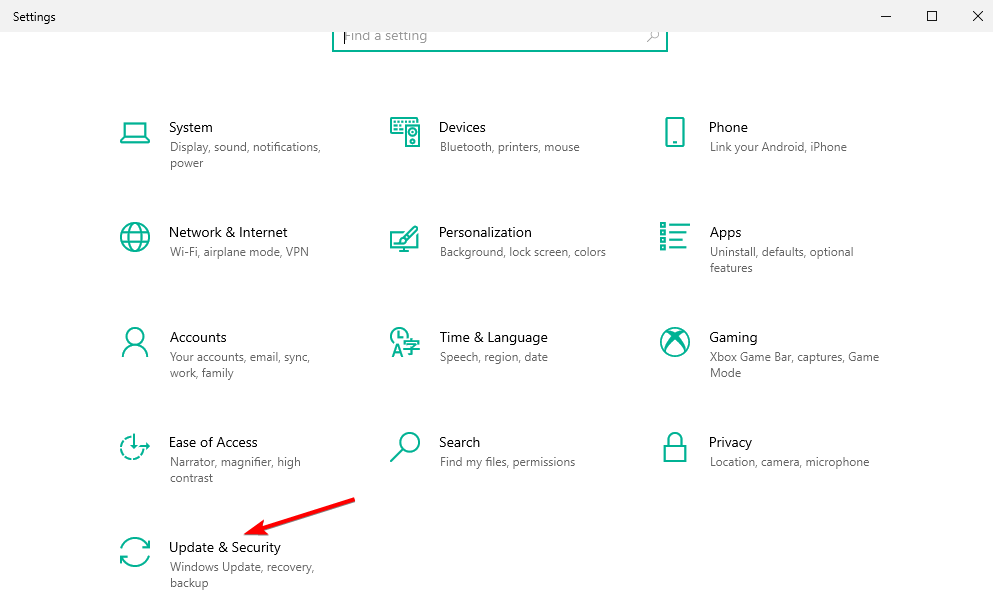
Start
>
Settings
>
Update & Security
>
Windows Update
>
Check for updates
. Download and install any new updates.
Check for updates in Settings
Remove any external storage devices and drives, docks, and other hardware plugged into your device that aren’t needed for basic functionality. Then try to run updates again and see if this resolved your issue. If it didn’t, continue to the next tip.
If you’ve added hardware to your device, check for third-party driver updates and installation instructions on the hardware manufacturer’s website. Update any drivers, then try to run updates again and see if this resolved your issue. If it didn’t, continue to the next tip.
-
In the search box on the taskbar, type
device manager
, then select
Device Manager
from the list of results. -
In the window that appears, look for any device with a yellow exclamation mark next to it. (You may have to select each category to view the list of devices.) Select the device name.
-
Select
Action
, and then choose either
Update driver
or
Uninstall
to correct the errors.
Common troubleshooting questions
The time required to download and install updates depends on connection speed, network settings, and the size of the update. If the installation remains stuck at the same percentage, try checking for updates again or running the
Windows Update Troubleshooter
.
To check for updates, select
Start
>
Settings
>
Update & Security
>
Windows Update
>
Check for updates.
To get help, in the search box on the task bar, type
get help
, then select
Get Help
from the list of results. To leave feedback if you run into further problems, in the search box on the taskbar, type
feedback hub
, then select
Feedback Hub
from the list of results.
You will only receive a notification when it’s time to restart your computer to apply the installed updates.
Tips:
-
If you need to know where you left off in your work after an update, use Timeline to jump back in.
-
To get started with Timeline, select
Task View
on the taskbar, or press the Windows logo key
+Tab and select the activity you want to resume.
Monthly quality updates on Windows 10 are quite small and have a minimal impact on data usage. Feature updates typically happen twice per year, and you can control when to install them. They require more data but are less frequent.
If you’re on a metered connection, some updates for Windows won’t be installed automatically.
Metered connections in Windows
Your computer might be slow for a number of reasons, but updating to the latest version of Windows 10 can improve its performance. For help with a slow computer, see
Tips to improve PC performance in Windows
.
Advanced
Warning:
Microsoft only recommends trying the procedures in this section if you’re comfortable working in the command line. These procedures require administrator permissions on your device.
-
In the search box on the taskbar, type
command prompt
, then select
Run as administrator
from the list of options. Select
Yes
. Next, in the window that appears, type the following commands one at a time, including the spaces as shown. After you type each command, press
Enter
. Then let each command complete before you type the next command.
net stop bits
net stop wuauserv
ren %systemroot%softwaredistribution softwaredistribution.bak
ren %systemroot%system32catroot2 catroot2.bak
net start bits
net start wuauserv
-
After all these commands are completed, close the Command Prompt window and restart your computer.
In some instances, third-party antivirus or security software can cause errors when you try to update to the latest version of Windows 10. You can temporarily uninstall this software, update your PC, and then reinstall the software after your device is up to date. We recommend using third-party antivirus or security software that’s compatible with the latest version of Windows 10. You can check compatibility by visiting the software manufacturer’s website.
Note:
Before uninstalling software, make sure you know how to reinstall your programs and that you have any necessary product keys.
In the search box on the taskbar, type
command prompt,
and then select
Run as administrator
from the list of options. Select
Yes
.
In the window that appears, type the following command, including the space as shown:
chkdsk/f C:
and then press
Enter
. Repairs will automatically start on your hard drive, and you’ll be asked to restart your device.
A clean restart starts Windows with a minimal set of drivers and startup programs. This helps eliminate software conflicts that occur when you install a program or an update that may cause issues updating your PC.
Learn how to do a clean restart
-
In the search box on the taskbar, type
command prompt
, then select
Run as administrator
from the list of options. -
In the window that appears, type this command including spaces as shown:
DISM.exe /Online /Cleanup-image /Restorehealth
-
Press
Enter
. When the command operation has run successfully, you’ll see a confirmation message from Command Prompt that says, “The restore operation completed successfully” or “The operation completed successfully”.
Note: If you don’t see a confirmation message, retype the command and try again. -
Next, type this command, including the space as shown:
sfc /scannow
-
Press
Enter
. Wait until the
sfc
scan verification reaches 100% completion, and then close Command Prompt. -
Try running the Windows Update again.
Learn how to repair a Windows image
Go to
the software download page
and select
Download tool now
to download the clean installation tool. Make sure to carefully read the notes on the software download page before using the tool.
Still stuck?
Contact
Microsoft support
if you continue to have problems with your Windows updates.
Need more help?
Start by running the Windows Update troubleshooter
by Madalina Dinita
Madalina has been a Windows fan ever since she got her hands on her first Windows XP computer. She is interested in all things technology, especially emerging technologies… read more
Published on August 26, 2022
Reviewed by
Vlad Turiceanu

Passionate about technology, Windows, and everything that has a power button, he spent most of his time developing new skills and learning more about the tech world. Coming… read more
- Windows Update is not working? Microsoft’s troubleshooter is great for diagnosing the issue.
- A good idea if Windows update won’t load is to roll back to a previous Windows 10 instance.
- It is also imperative to check your system for possible malware that can cause this issue.
XINSTALL BY CLICKING THE DOWNLOAD FILE
This software will repair common computer errors, protect you from file loss, malware, hardware failure and optimize your PC for maximum performance. Fix PC issues and remove viruses now in 3 easy steps:
- Download Restoro PC Repair Tool that comes with Patented Technologies (patent available here).
- Click Start Scan to find Windows issues that could be causing PC problems.
- Click Repair All to fix issues affecting your computer’s security and performance
- Restoro has been downloaded by 0 readers this month.
Windows 10 is one of the biggest releases that Microsoft ever announced and Windows Update made a colossal difference to the overall user experience.
While they are supposed to download automatically, the process is not always as streamlined as intended and glitches can occur.
For some users, Windows Update not working issues occur frequently, while others may stumble across this problem occasionally when performing specific tasks.
Let’s quickly go through the most common scenarios for which Windows 10 updates won’t install and check out the culprits behind each of them.
Why is my Windows Update not working?
In the event that Windows is unable to finish installing an update, check to confirm that you are properly connected to the Internet and that your hard disk has sufficient free space, as these are the two most common causes.
You might also try restarting your computer, or you could check to make sure that Windows drivers were installed successfully.
Here is a list of the most common Windows Update errors that users reported getting in Windows 10:
- Windows 10 updates won’t install on restart – The update process gets stuck after performing a system restart.
- Windows Update not working in Safe Mode Windows 7/10/11 – Safe Mode only allows essential system programs to start up at boot. Installing Windows updates in Safe Mode is only recommended if you cannot start Windows normally.)
- Windows Update stuck on downloading – This error can also be found under this form: We couldn’t install this update 0x80070541. While the numeric part can vary, the description often reads We couldn’t install this update, but you can try again.
- Windows Update download button is not working or button is missing altogether – This error prevents you from force-downloading certain features. In some cases, Windows Update database corruption can occur and prevent you from installing updates.
- Windows 10 Update can’t find the necessary file – The error stating some update files are missing or have problems is usually caused by some corrupted Windows update caches.)
- Download error 0x80070002 – This error is usually triggered by deprecated apps.
- One of the Update services is not running properly in Windows 10 – One of the essential services on which WU relies, the Windows Update Service is not running at all.
- Windows Update not working through a proxy, after cloning hard drive – Even though it is a solid method to protect your privacy online, many users reported various issues while using a proxy.
- Windows Update, not enough space – This is a common problem, and it’s usually caused by the lack of space. To fix the issue, try removing unnecessary files and check if that resolves your problem.
- We couldn’t install updates because there’s a problem with the date and time information on your device
- Your device is missing important security and quality fixes – This error is sometimes caused by problematic recent updates.
- Windows Update messed up my computer 2022 – Uninstalling the latest Windows update is one of the best solutions in this case.
- Windows Update not up to date but no updates – Perhaps you will simply have to wait until the devs will push a new update.
This being said, let’s see what you can do if Windows 10 or 11 won’t install. If you still can’t seem to fix the issue, check out our last section with similar articles that cover more update-related errors.
What to do if Windows Update is not working?
- Why is my Windows Update not working?
- What to do if Windows Update is not working?
- 1. Run the Windows Update troubleshooter
- 2. Use System Restore to roll back and uninstall a bad update
- 3. Scan your PC for malware
- 4. Install a fresh version of Windows
- 5. Delete all files from the Software Distribution directory
- 5.1 Use the Windows Services
- 5.2 Use Command Prompt
- 6. Change your DNS
- How to delete Windows 10 updates that won’t install?
- What can I do if Windows Update is not working on Windows 11?
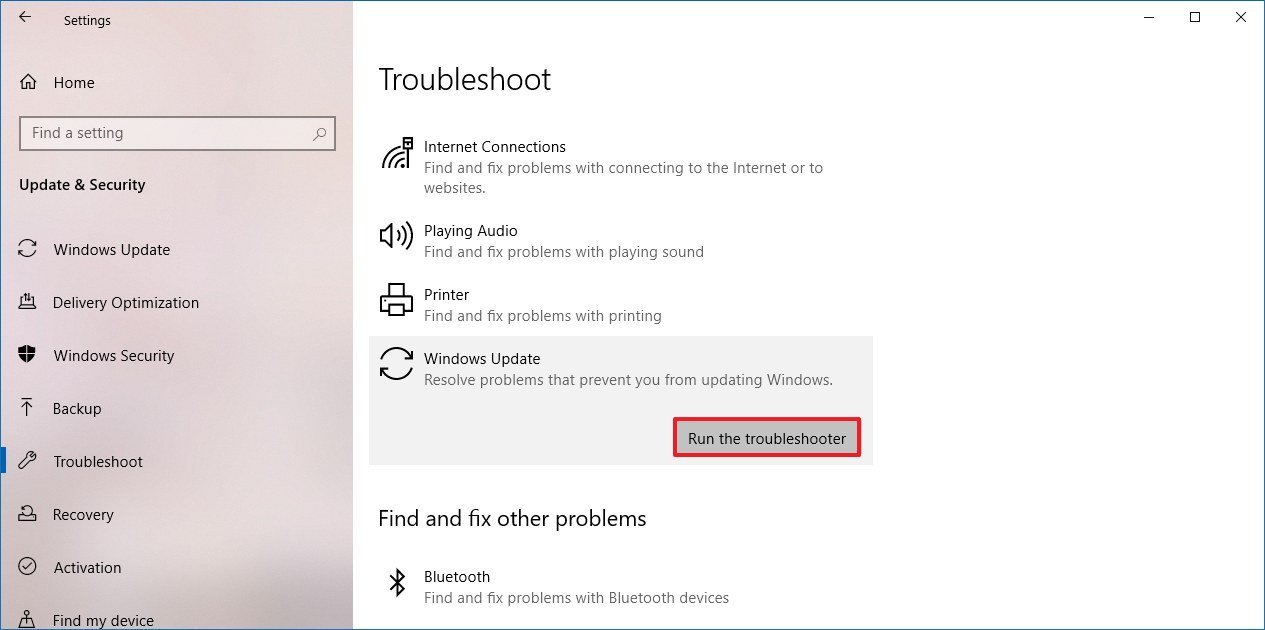
1. Run the Windows Update troubleshooter
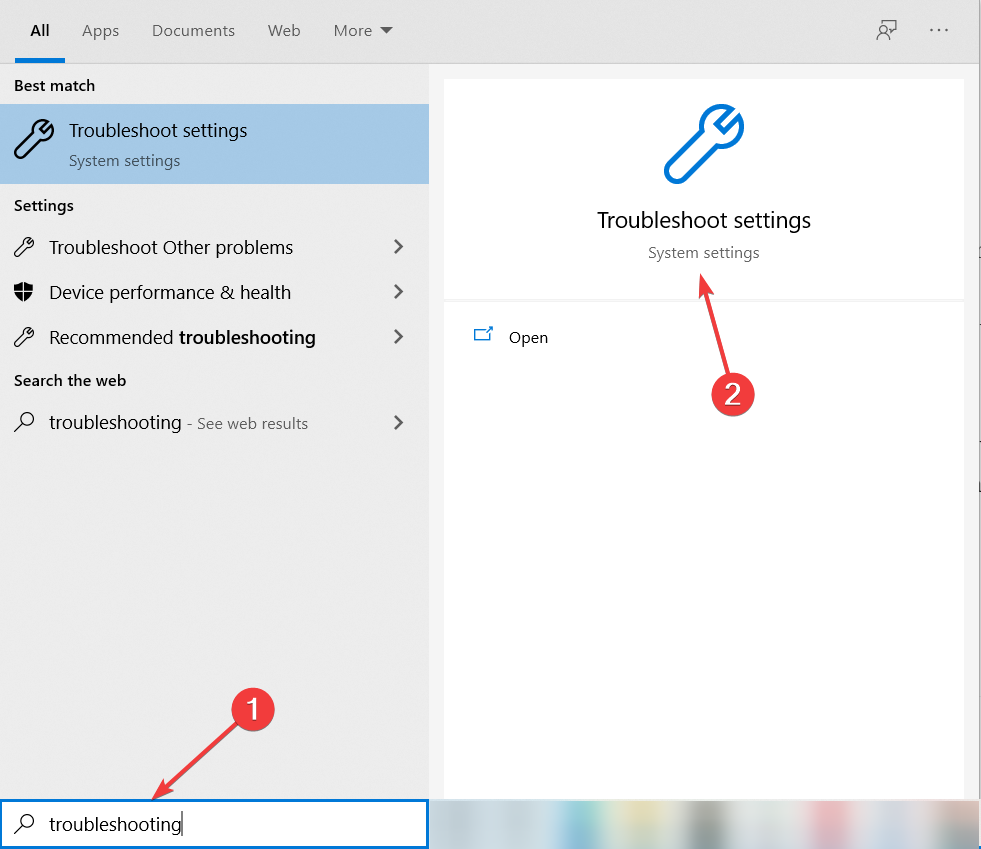
- Click on the Start button, type troubleshoot, and select Troubleshoot settings from the results.

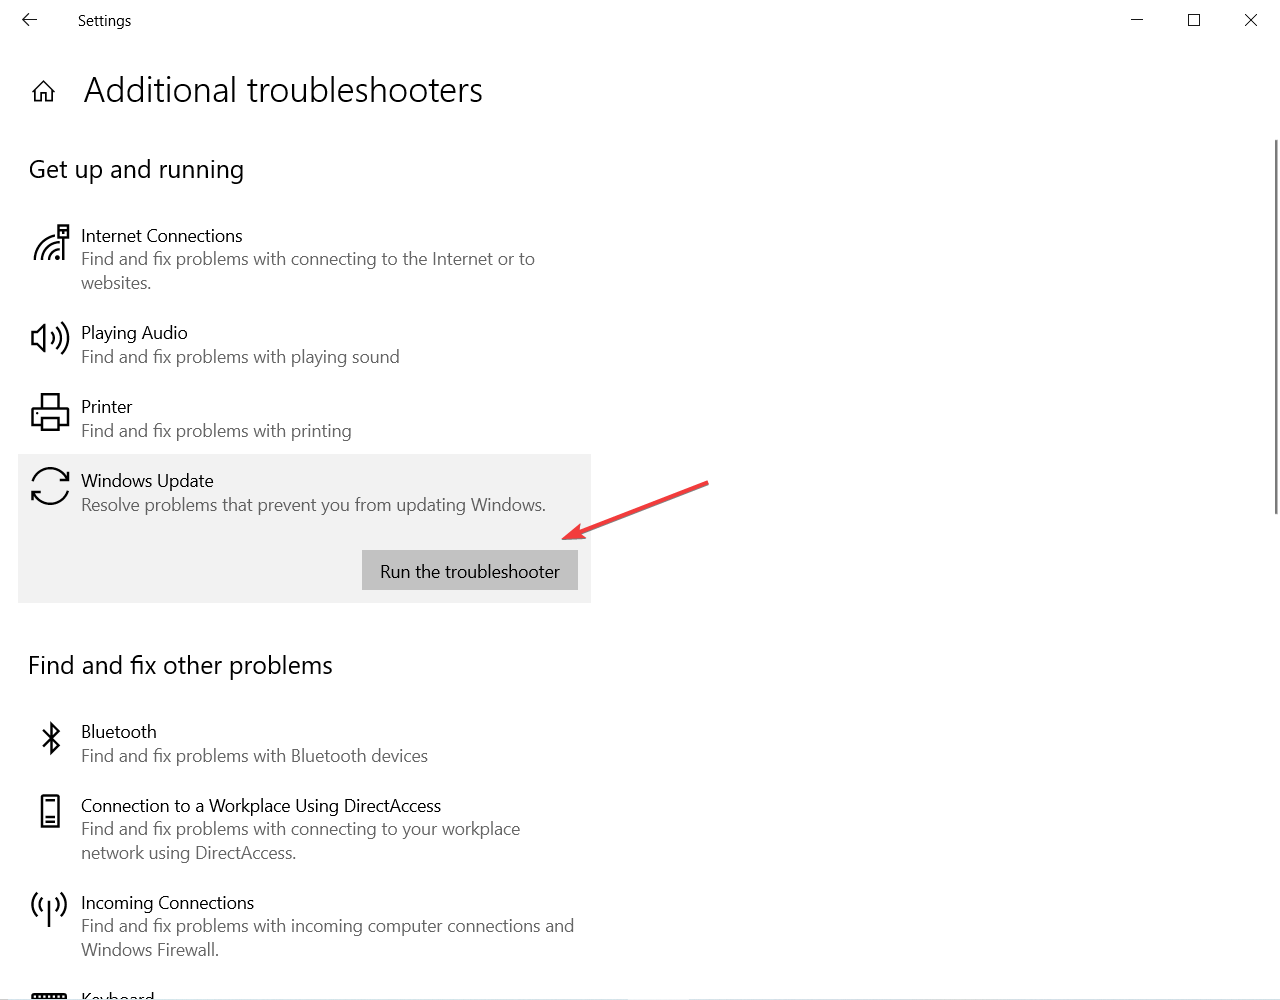
- Click on Aditional troubleshooters.
- Select Windows Update and then click on the Run the troubleshooter button.

Microsoft’s Windows Update Troubleshooter is a good way of knowing the problem if it is not much complex. It is almost everyone’s first choice whether a newbie or a professional.
Unfortunately, it does not always manage to solve the issue. In fact, it will most likely retrieve a result that resembles this description: Windows Update troubleshooting couldn’t identify the problem.
Whether it fixes your problem or not, it can surely provide you with useful information, so don’t be shy to use the Windows Update troubleshooter in Windows 10 or 11. Anyways, if Windows Troubleshooter is not working, move on to our next solution.
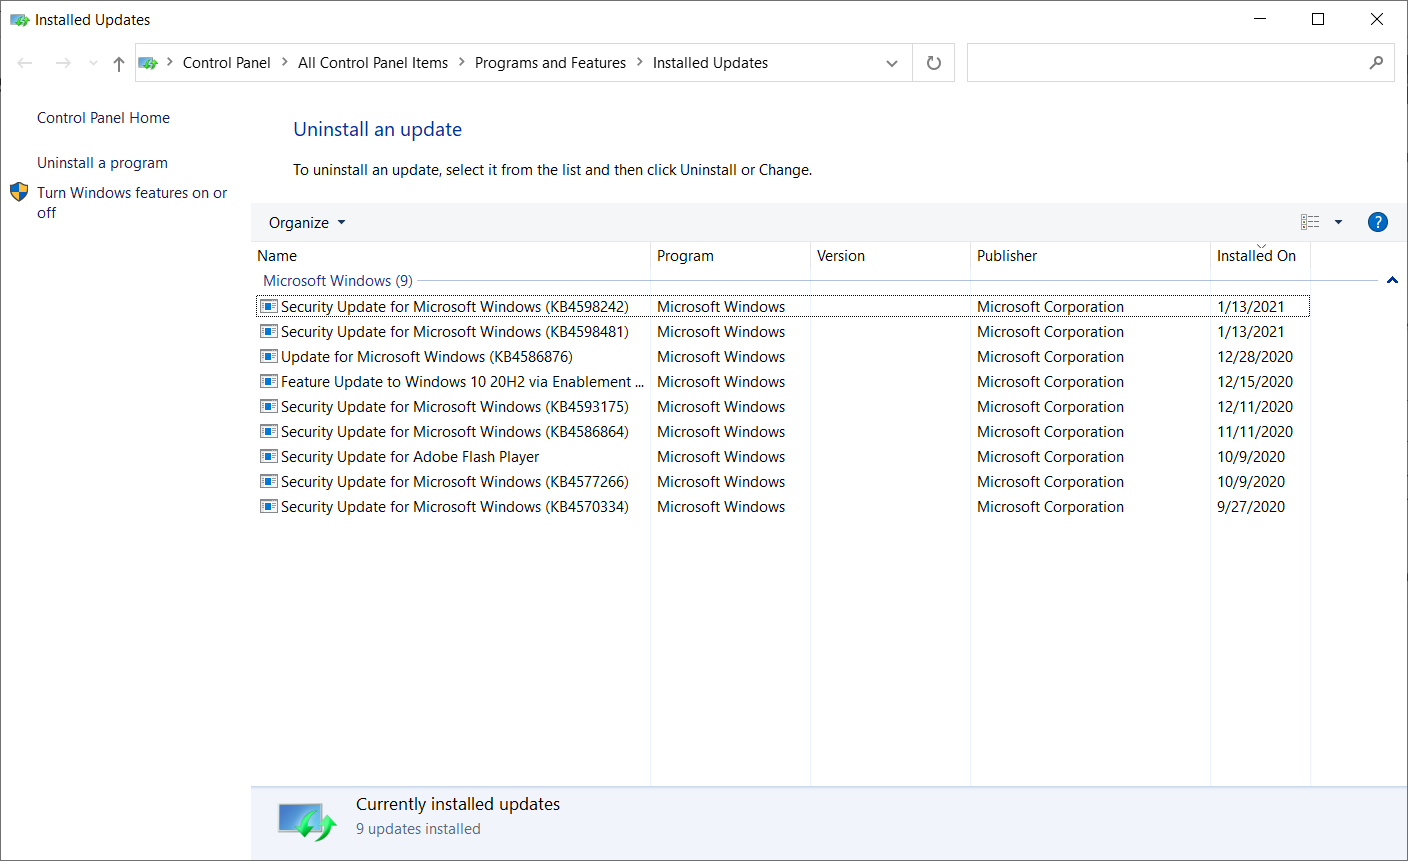
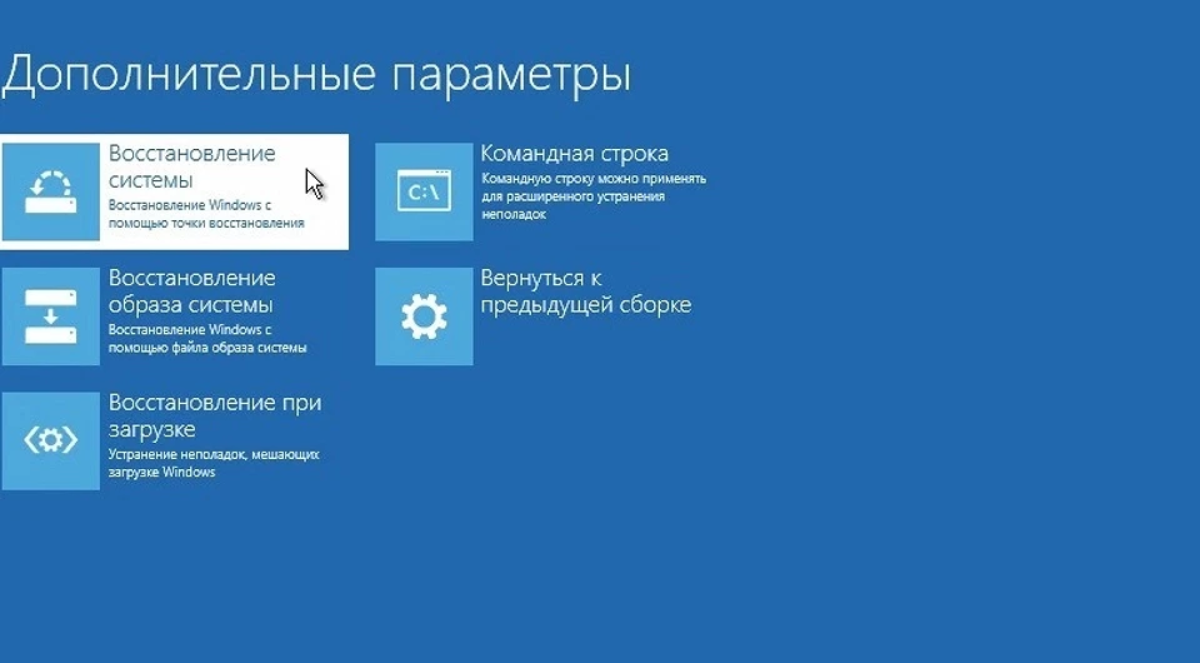
2. Use System Restore to roll back and uninstall a bad update
If Windows Update is not working, System Restore might be the best way to fix it. This makes your computer back into the past when it was working fine, so follow the steps above to get this done.
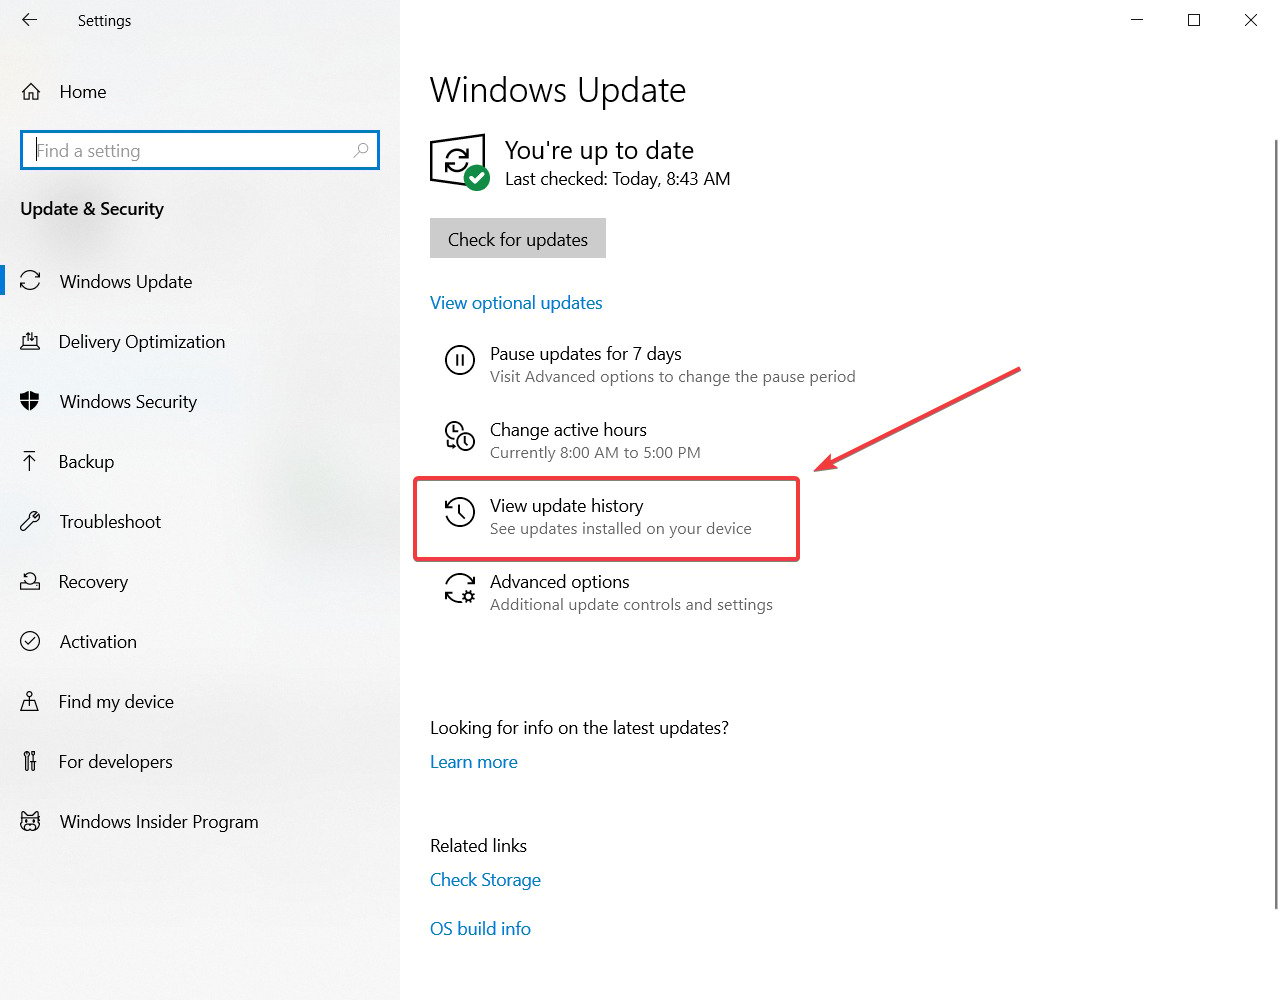
- Open Start Menu from the Taskbar at the bottom of the screen then click to open the Settings right above the Power button.
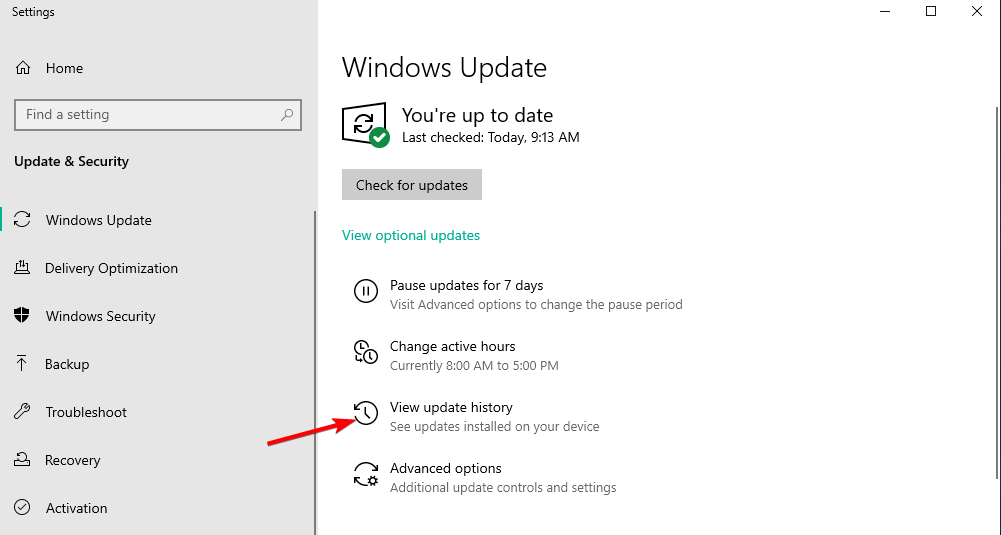
2. Click Update & Security.
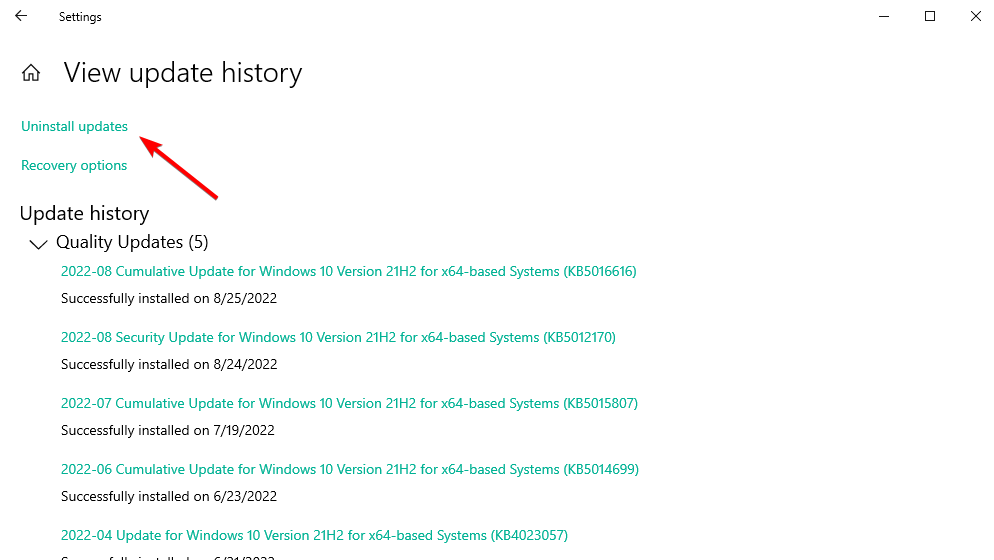
3. In this new window, you need to select View update history and find the last successful update installed on your Windows.
4. You will now see a list of updates installed on your system.
5. Click on the Uninstall updates at the top.
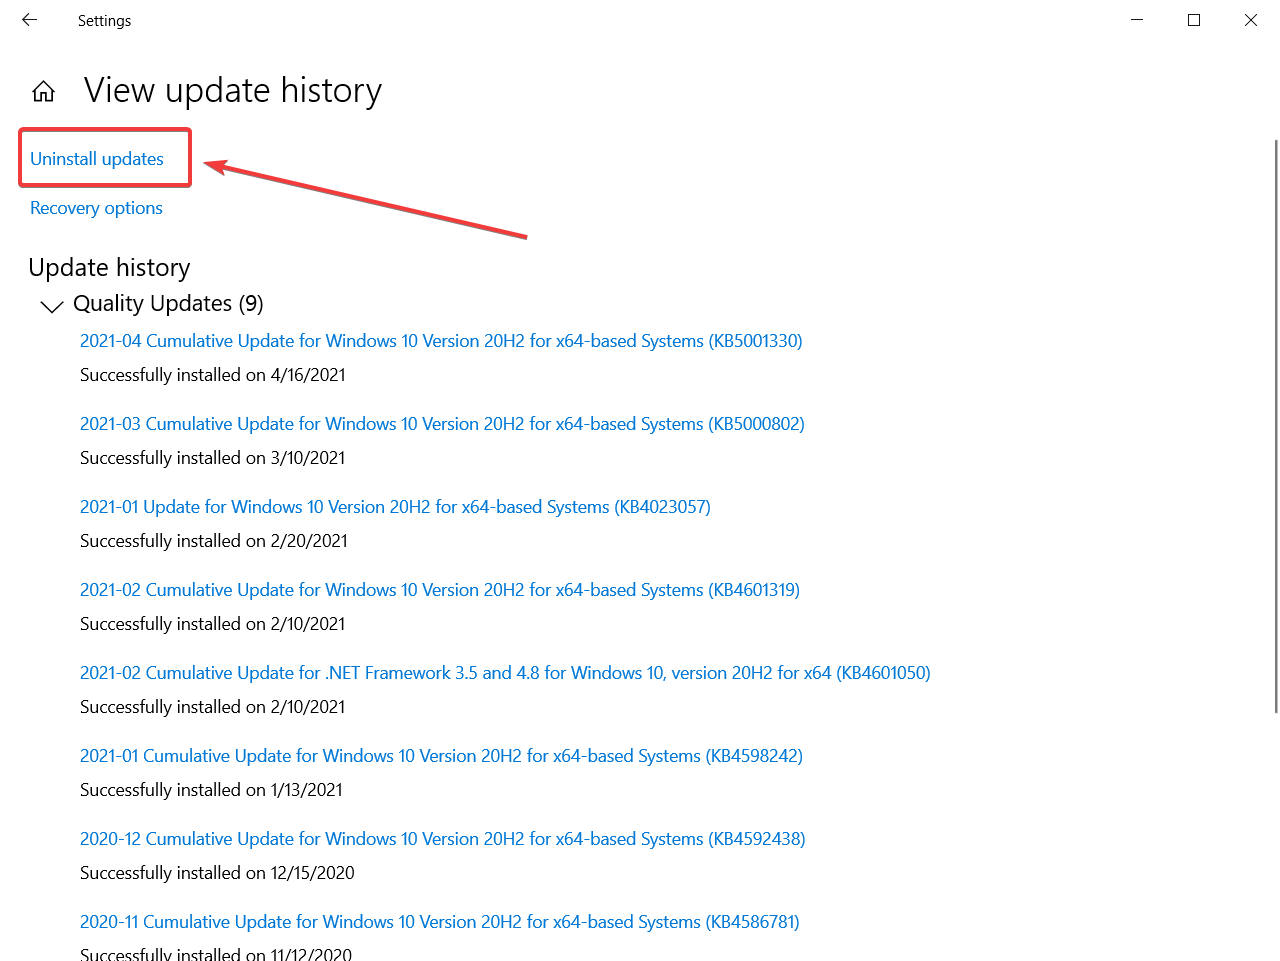
6. When you click Uninstall updates, a new window will pop up which shows the new updates that are installed on the PC.
7. You can choose to uninstall any of these updates but proceed with caution as uninstalling a critical update will lead to a PC that is full of bugs.
After the completion of the restore, your computer will work fine.
Needless to say, the solution implies you already have created a restore point to which you want to revert now. If you can’t find a restore point, you may need to create one manually.
One drawback of using Windows’ own Restore point is that, while it creates an identical picture of your PC’s contents at any given time, you may wind up copying data that is already flawed or corrupted.
To begin with, using a specialist tool like Restoro, which is totally automated and requires no scheduling or user input, can minimize the hassle.
Some PC issues are hard to tackle, especially when it comes to corrupted repositories or missing Windows files. If you are having troubles fixing an error, your system may be partially broken.
We recommend installing Restoro, a tool that will scan your machine and identify what the fault is.
Click here to download and start repairing.
Second, Restoro uses its own repositories to correct registry keys and files before producing its own restore points, so you always know that whichever restore point you pick during a rollback will be completely functioning.

Get Restoro
Create restore points in Windows using a program created specifically for this purpose.
3. Scan your PC for malware
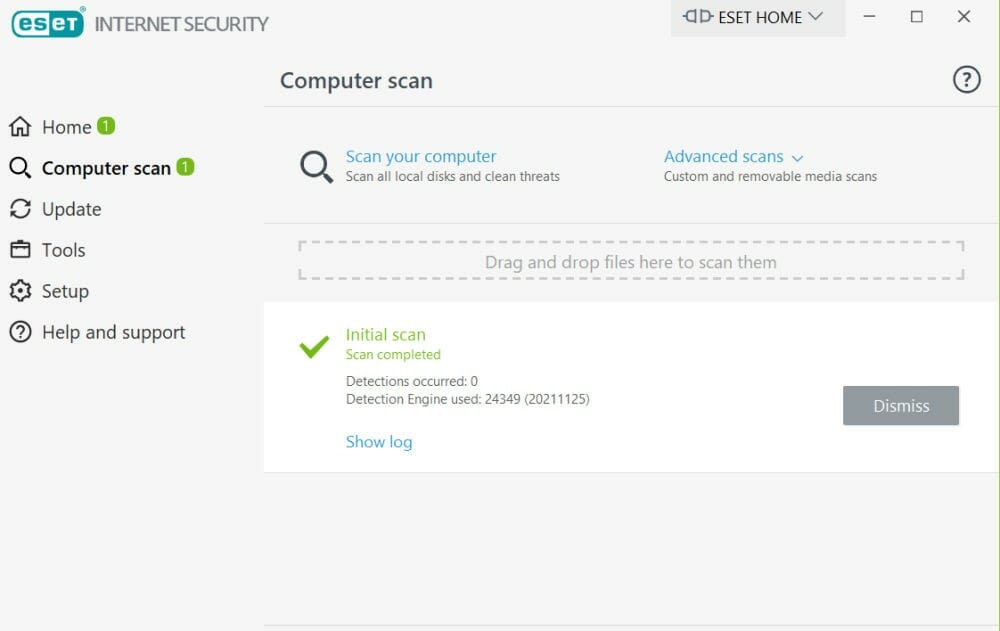
If Windows Update is not working, you will have to make sure your PC is clean and does not have any kind of malware.
To do so, you can either use the built-in tool, Microsoft Defender or download ESET Internet Security a professional malware scanner.
Whatever you choose, you need to make sure your security programs are up to date in order to keep your PC safe.
4. Install a fresh version of Windows
If nothing works for you, then it is a wise choice to install Windows freshly using the Microsoft 10 Install Drive.
For this option, it is very important that you create a backup of your data on an external drive because this option will erase all of it.
Moreover, the product ID of your license should be saved or should be written in a safe place before reinstalling your Windows.
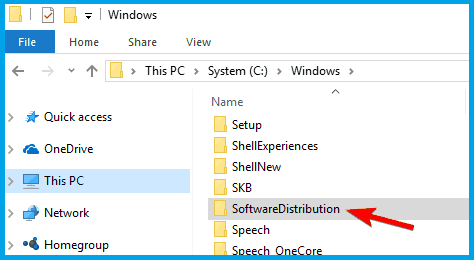
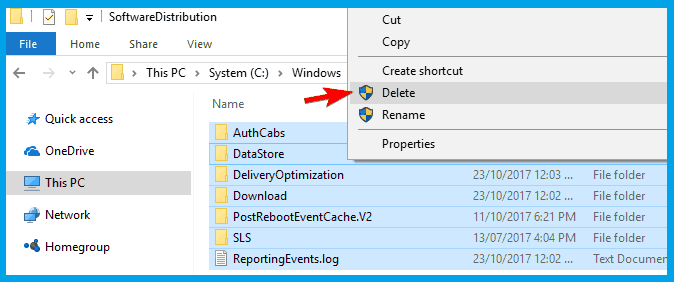
5. Delete all files from the Software Distribution directory
5.1 Use the Windows Services
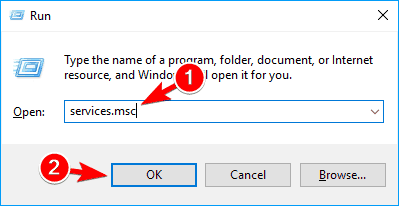
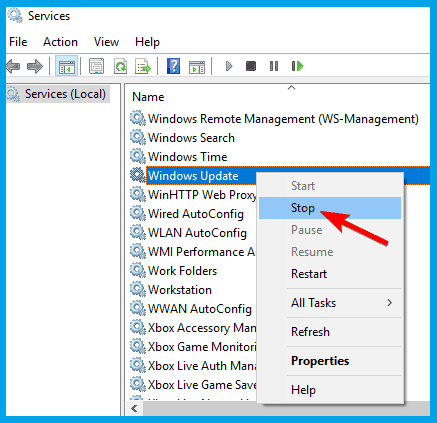
- Press Windows + R, enter services.msc, and press Enter or click OK.

- Locate Background Intelligent Transfer Service, right-click it, and choose Stop from the menu.
- Do the same for the Windows Update service.

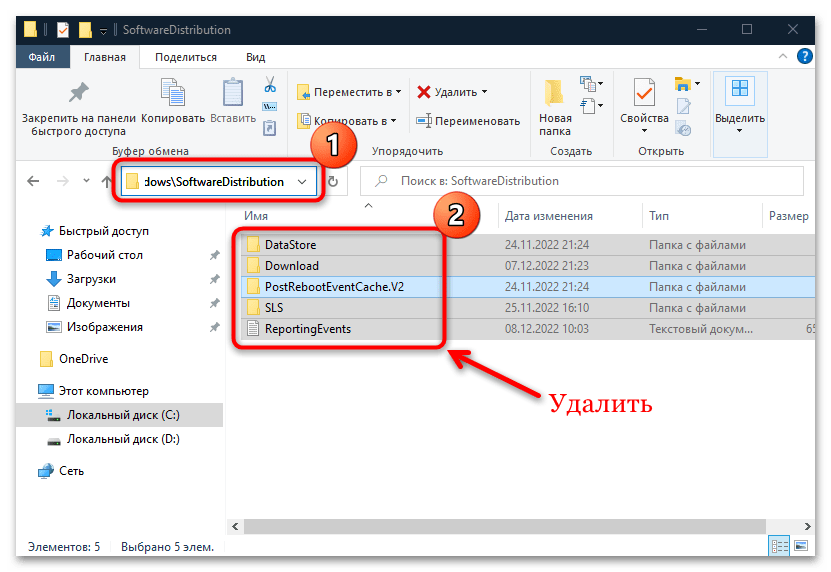
- After disabling these services go to the following folder inside File Explorer:
C:WindowsSoftwareDistribution
- Select all files in the SoftwareDistribution directory and click on Delete.

- Go back to the Services window and start both Windows Update and Background Intelligent Transfer Services.
After doing that, try to download updates manually and check if the problem is resolved.
If Windows Update is not working on your PC, you might be able to solve the problem simply by deleting files from the SoftwareDistribution directory.
Sometimes files in this directory can become corrupted and that can cause this problem to appear.
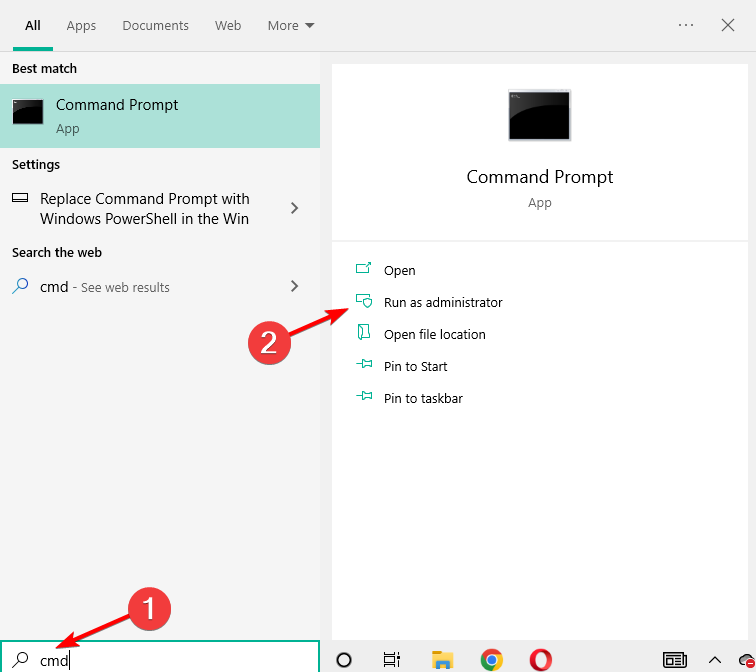
5.2 Use Command Prompt
- Type cmd in the Search box and select Run as administrator to start Command Prompt with elevated privileges.

- Enter the following command lines and run them one by one by pressing Enter:
net stop wuauserv
net stop cryptSvc
net stop bits
net stop msiserver
ren C:WindowsSoftwareDistributionSoftwareDistribution.old
ren C:WindowsSystem32catroot2catroot2.old
net start wuauserv
net start cryptSvc
net start bits
net start msiserver
If you cannot run Command Prompt as an admin or if it is simply not available for whatever reason, you can also use PowerShell.
6. Change your DNS
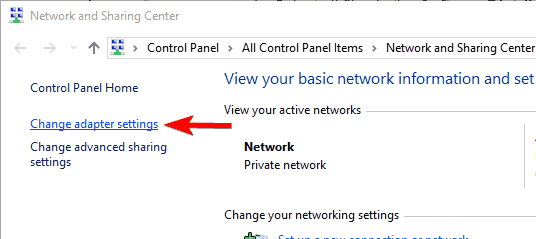
- Right-click the network icon in the bottom right corner and choose Open Network and Sharing Center.

- In the left pane, click on Change adapter settings.

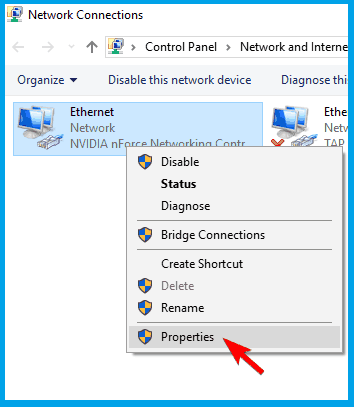
- Locate your network connection, right-click it, and choose Properties from the menu.

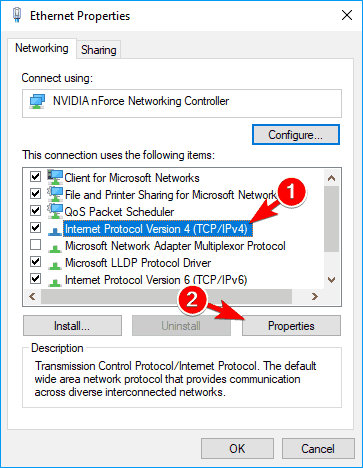
- Select Internet Protocol Version 4 (TCP/IPv4) and click on Properties.

- Select Use the following DNS server addresses and enter 8.8.8.8 as a Preferred DNS server and 8.8.4.4 as Alternate DNS server. Click OK to save changes.

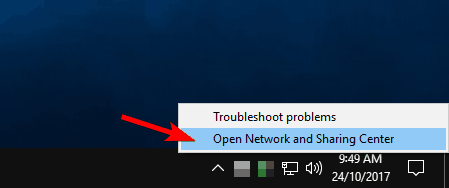
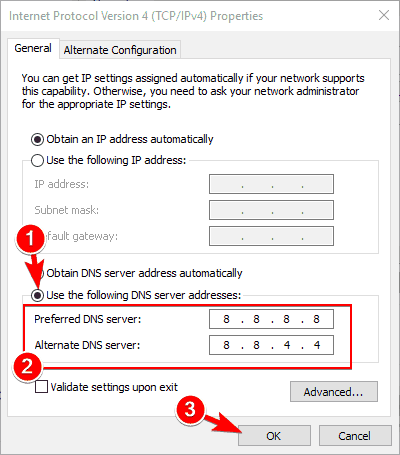
Sometimes, your default DNS might present specific issues such as the server not responding or others that prevent you from using Windows Update.
If Windows Update stopped working, changing your DNS server should solve the issue.
- Fix: Windows Update error code 0x80070003 in Windows 10/11
- Fix: Couldn’t connect to the update service on Windows 10/11
- Fix error code 0x800706be & install Windows updates smoothly
- Fix: Update error 0x8024001e on Windows 10/11 [Easy Guide]
- Fix: Windows Update not showing/missing button on Win 10/11
How to delete Windows 10 updates that won’t install?
- Click the Windows key and select Settings.
- Choose Update & Security.

- In the right section, click on View update history.

- In the new window, choose Uninstall updates.

- From the list that appears, click on the last update and uninstall it.
- After the process has finished, go to Windows Update and check for updates again in order to restart the process.

Tip
As always, file corruption is a potential culprit, so you might want to check your system for signs of deprecation.
We recommend you use a professional utility like Restoro to handle this task automatically, promptly, and most of all hassle-free.
Windows 10 saying you’re not up to date can be problematic, but we’re confident you will be able to get those updates running in no time with our tips.
What can I do if Windows Update is not working on Windows 11?
Windows 11 will automatically check for and install any available updates, helping to keep your computer’s operating system secure and reliable.
However, it is possible that these updates will not install properly, in which case you will see an error related to Windows 11 Windows Update.
The term Windows Update error is a catch-all phrase that refers to a wide variety of glitches, complications, and blunders that prohibit the updating procedure from operating in an orderly fashion. Check out our post on 7 tips to fix the Windows Update in Windows 11.
Moreover, one of the most common errors is 0x80070057 that mostly occurs with Windows 10 but it’s easily moved to other apps, so you will definitely want to fix this as soon as possible.
Besides that, another error you may get when updating your OS is 0x800f081f, this error can easily be fixed by updating your drivers or performing a clean install.
Now, Windows Update errors come in many shapes and sizes. If you ever get stuck, help is no further than a click away.
Still having issues? Fix them with this tool:
SPONSORED
If the advices above haven’t solved your issue, your PC may experience deeper Windows problems. We recommend downloading this PC Repair tool (rated Great on TrustPilot.com) to easily address them. After installation, simply click the Start Scan button and then press on Repair All.
![]()
Newsletter
(Image credit: Windows Central)
On Windows 10, Windows Update is an essential component that provides the mechanism to download and install quality updates as well as feature updates to improve the overall performance, integrate new features, and patch security vulnerabilities. However, for different reasons, sometimes, you may experience problems with the feature, such as stuck for a long time scanning and downloading, errors and failures during installation, and many other issues.
Thankfully, if you run into an issue or an error (for example, 0x80070020, 0x80240438, 0xC19001E2, 0x80070424, 0x80242006, 0x8007000E, 0x80D02002, 0x80070070, 0x80096004, 0x80080005, 0x8007000D, or 0x80240034), you can use a number of troubleshooting steps to fix Windows Update on your installation.
In this Windows 10 guide, we’ll walk you through several ways to fix common problems with Windows Update on your device.
- How to fix Windows Update covering basics
- How to fix Windows Update using Troubleshooter
- How to fix Windows Update installing update manually
- How to fix Windows Update repairing installation
- How to fix Windows Update skipping maintenance schedule
- How to fix Windows Update installing latest version
- How to fix Windows Update performing clean installation
How to fix Windows Update covering basics
If you’re trying to update your device and Windows Update isn’t working, you can follow a few necessary steps to resolve the problem, including restarting your computer, checking to make sure that you have a working internet connection, and using the feature to pause updates.
Restarting device
To restart your device, use these steps:
- Open Start.
- Click the Power options menu.
- Click the Restart button.
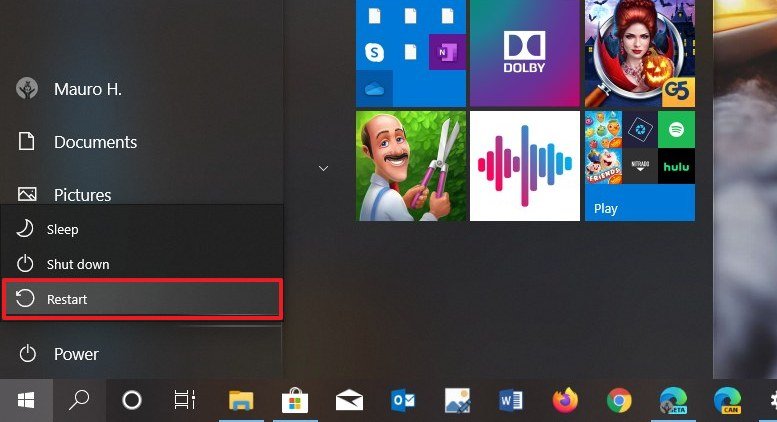
Once you complete the steps, try to update your device again from the Windows Update settings page.
Checking internet connection
Although it might be obvious, but if you’re not connected to the internet, you won’t be able to download and install updates.
To confirm you have an active internet connection, use these steps:
- Open Start.
- Search for Command Prompt and click the top result to open the console.
- Type the following command to confirm you have an active internet connection and press Enter:
ping google.comIn the command, we’re pinging Google domain as an example, but you can use other pingable domains or services, such as CloudFlare.com, or Google DNS services (8.8.8.8 or 8.8.4.4).
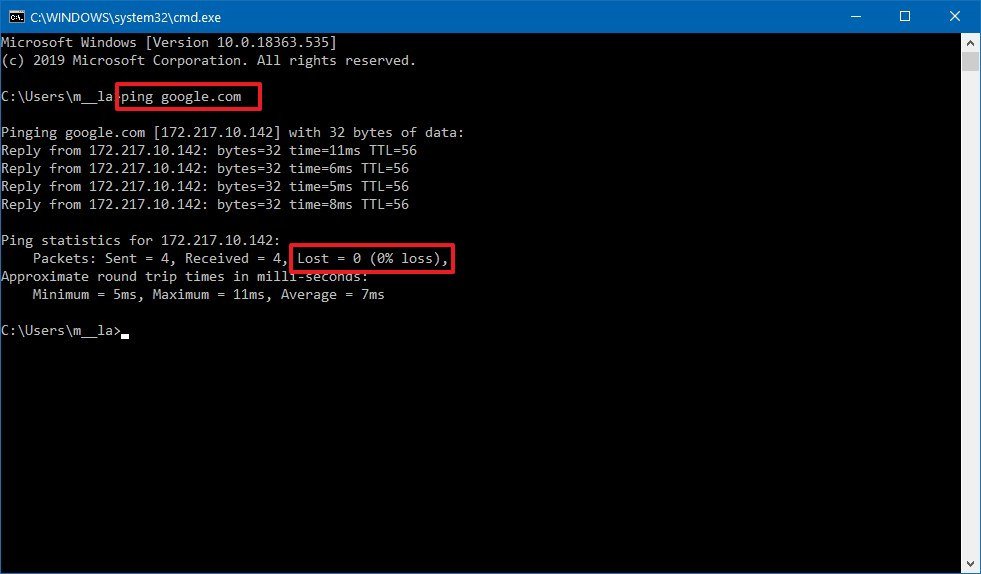
- Confirm you’re getting a reply without any packet loss.
Of course, you can always try to open any website with your web browser, but using Command Prompt is a more effective method to confirm network connectivity.
If you can’t connect to the internet, then it’s probably a problem with your connection, not Windows Update. You can use this comprehensive guide to resolve most common issues connecting to a network.
Pausing updates
Sometimes, if you’re dealing with issues downloading updates, pausing and resuming Windows Update can help to fix the problem.
To pause and resume updates on Windows 10, use these steps:
- Open Settings.
- Click on Update & Security.
- Click on Windows Update.
- Click the Pause updates for 7 days button.

- Restart your device.
- Open Settings.
- Click on Update & Security.
- Click on Windows Update.
- Click the Resume updates button.

After you complete the steps, try checking for updates again to see if the problem was resolved.
Freeing up space
Usually, the lack of storage can trigger errors trying to updates your device. If you need additional space to install updates, use these steps:
- Open Settings.
- Click on System.
- Click on Storage.
- Under the «Local Disk C:» section, click the Temporary files section.

- Select the items that you want to clear to free up space.Quick note: Selecting the Downloads option will clear the files from the «Downloads» folder. If you have important files, clear the option, or copy the files you want to keep to an external drive before proceeding.
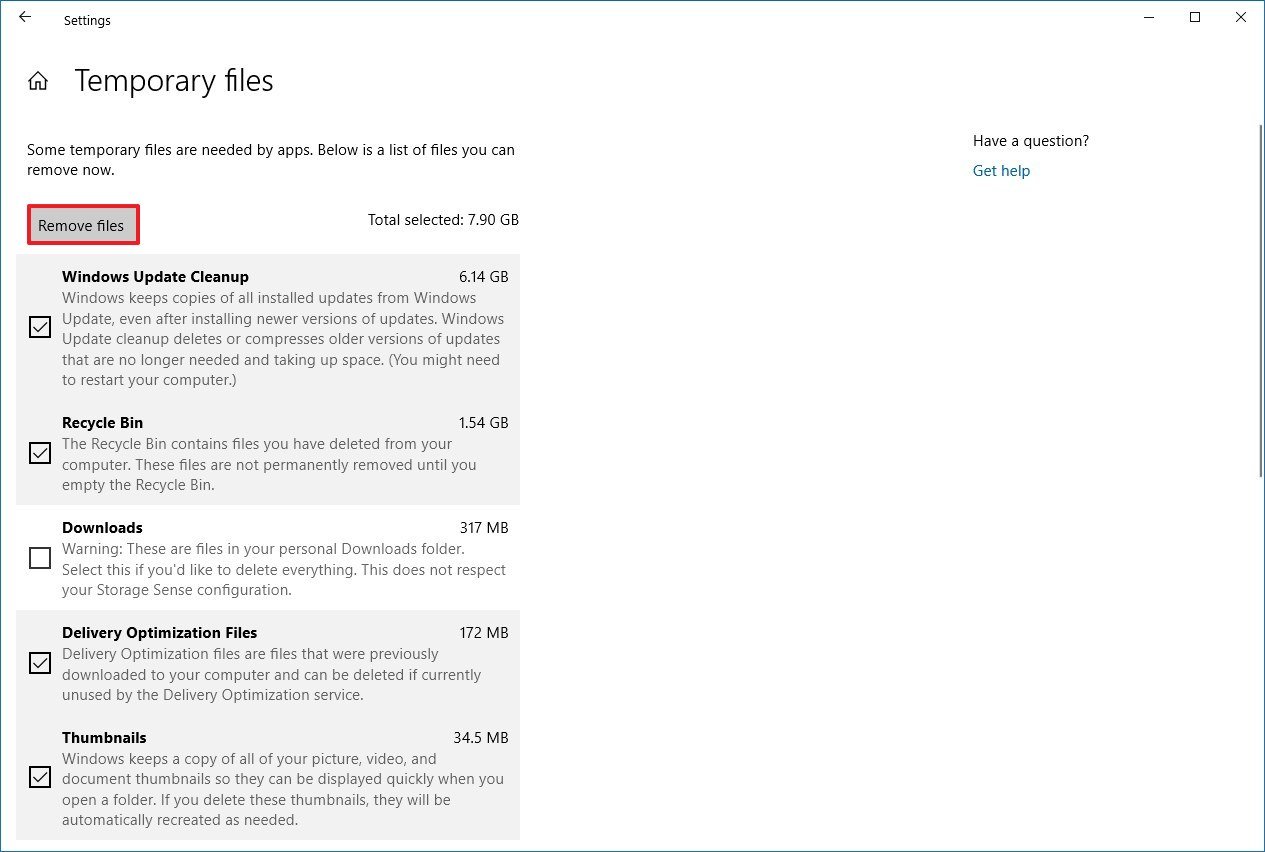
- Click the Remove files button.
Once you complete the steps, you’ll have more space to run Windows Update without triggering the no enough space error code.
If you have to reclaim more space, you can check this guide with many more ways to free up space on Windows 10.
How to fix Windows Update using Troubleshooter
Windows 10 comes with a Windows Update troubleshooter tool that can diagnose and resolve common problems with the feature.
To use the troubleshooter to fix problems with Windows Update, use these steps:
- Open Settings.
- Click on Update & Security.
- Click on Troubleshoot.
- Under the «Get up and running» section, select the Windows Update option.
- Click the Run the troubleshooter button.
- Click the Close button.
Once you complete the steps, the troubleshooter will diagnose and resolve any issue that it finds, and then you should be able to update again.
How to fix Windows Update installing update manually
Sometimes installing the most recent update manually can help to fix problems with the Windows Update service.
Determining system type
Before you can download the correct update package, you have to confirm whether you’re using a 32-bit or 64-bit version of Windows 10.
To determine your device system type, use these steps:
- Open Settings.
- Click on System.
- Click on About.
- Under the «Device specifications» section, determine the system type.
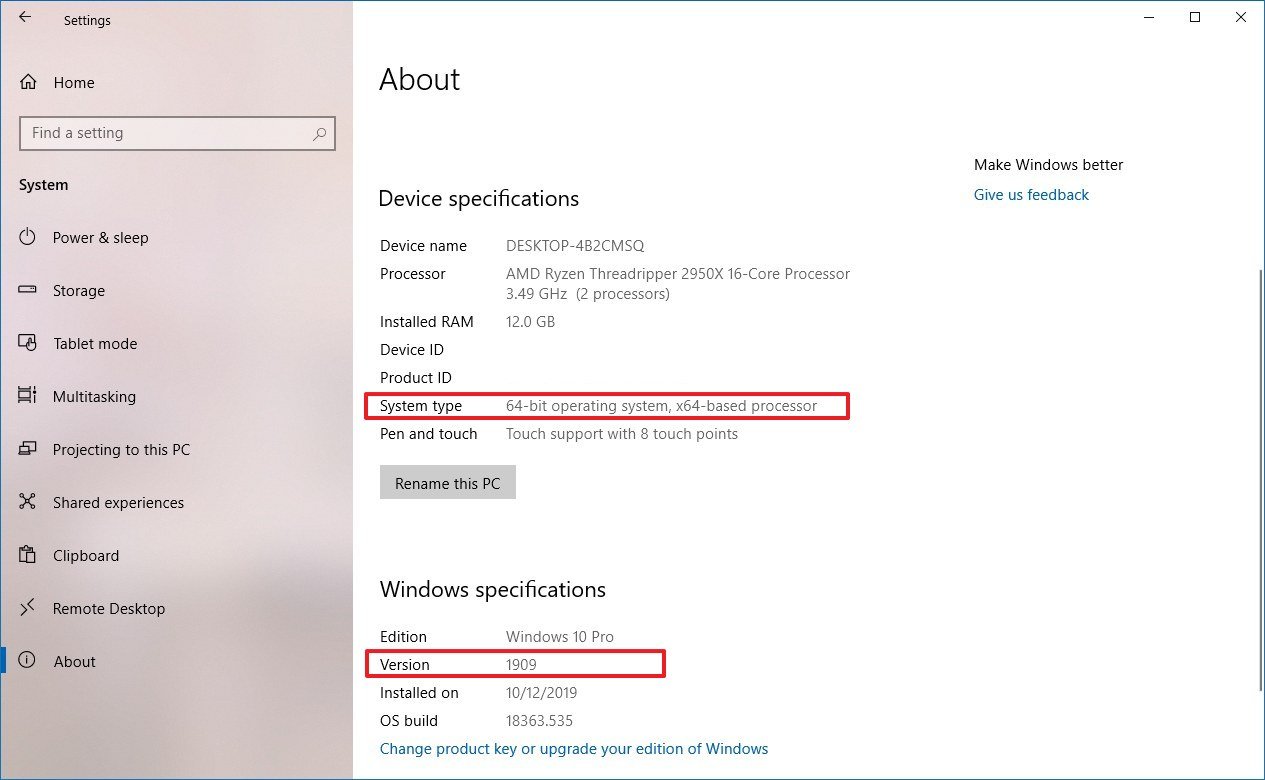
- Under the «Windows specifications» section, determine the version number.
After you complete the steps, you can proceed to download the latest package for your installation.
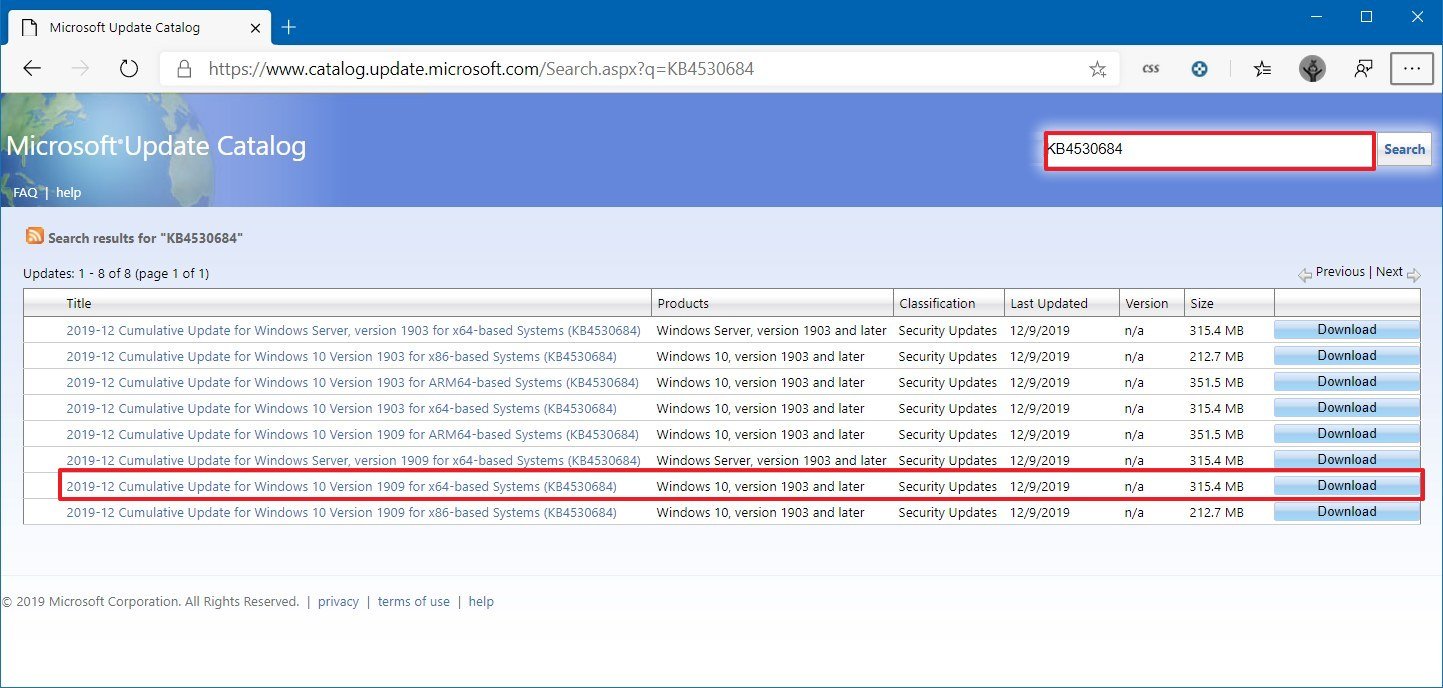
Downloading updates manually
To download quality updates of Windows 10 manually, use these steps:
- Open the Windows Update History page (opens in new tab).
- Click the version of Windows 10 that matches your installation (for example, version 1909) from the left side.
- Confirm the knowledge base number of the latest update — for example, KB4530684.

- Open the Microsoft Update Catalog page (opens in new tab).
- Search for the KB number — for example, KB4530684.
- Click the Download button for the version that applies for your installation. For instance, if you’re running the 64-bit version, you should click the download button for the «Windows 10 Version 1903 for x64-based Systems» update.
- Click the .msu download link to save the package on your device.
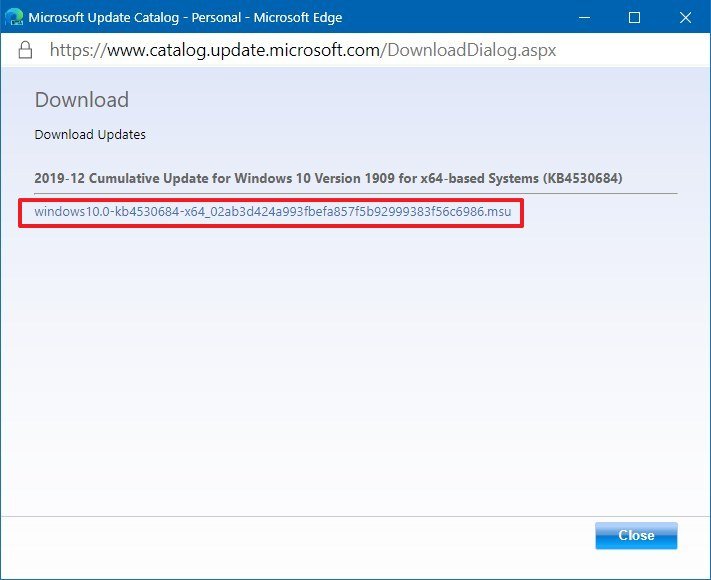
Once you complete the steps, you can proceed to install the update on your computer.
Installing updates manually
To install the latest update that you downloaded manually, use these steps:
- Open Start.
- Search for Command Prompt, right-click the top result, and select the Run as administrator option.
- Type the following command to install the update and press Enter:
wusa C:PATH-TO-UPDATENAME-OF-UPDATE.msu /quiet /norestartThis example installs the update package located in the Downloads folder:wusa C:Usersm__laDownloadswindows10.0-kb4530684-x64_02ab3d424a993fbefa857f5b92999383f56c6986.msu /quiet /norestartQuick tip: If the name is too long to type, then type Windows10.0-kb and press the Tab key to complete the name automatically and continue typing the command.
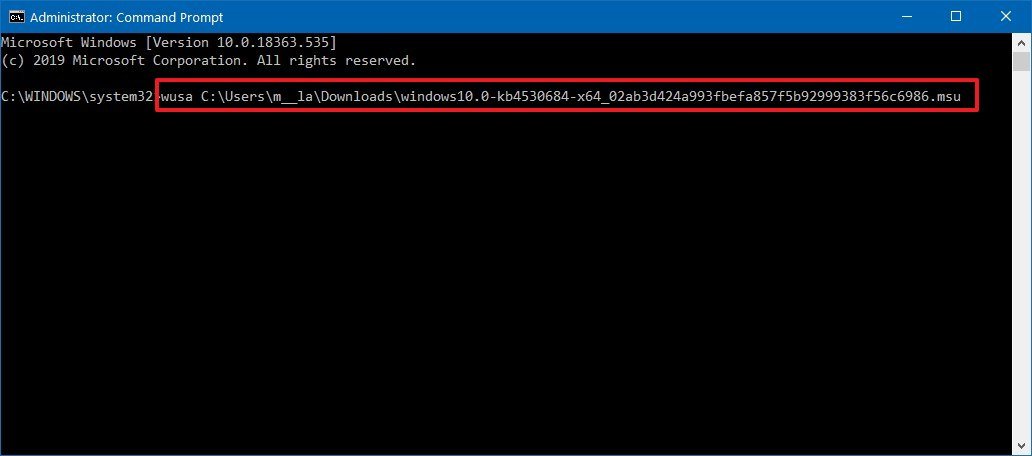
After you complete the steps, the update package will install, but you’ll need to restart the device manually to finish applying the changes. If the update applies successfully, there’s a good chance that Windows Update will start working again.
How to fix Windows Update repairing installation
If there’s a problem with running Windows Update, there is a chance that you may have one or multiple corrupted system files, which you can repair using the System File Checker (SFC) command tool.
To repair the Windows 10 installation to resolve issues with Windows Update, use these steps:
- Open Start.
- Search for Command Prompt, right-click the top result, and select the Run as administrator option.
- Type the following command to repair the system image and press Enter:
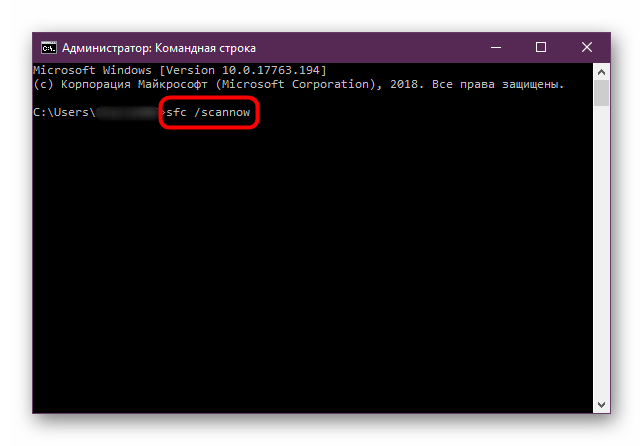
dism /Online /Cleanup-image /Restorehealth - Type the following command to repair the installation files and press Enter:
sfc /scannow
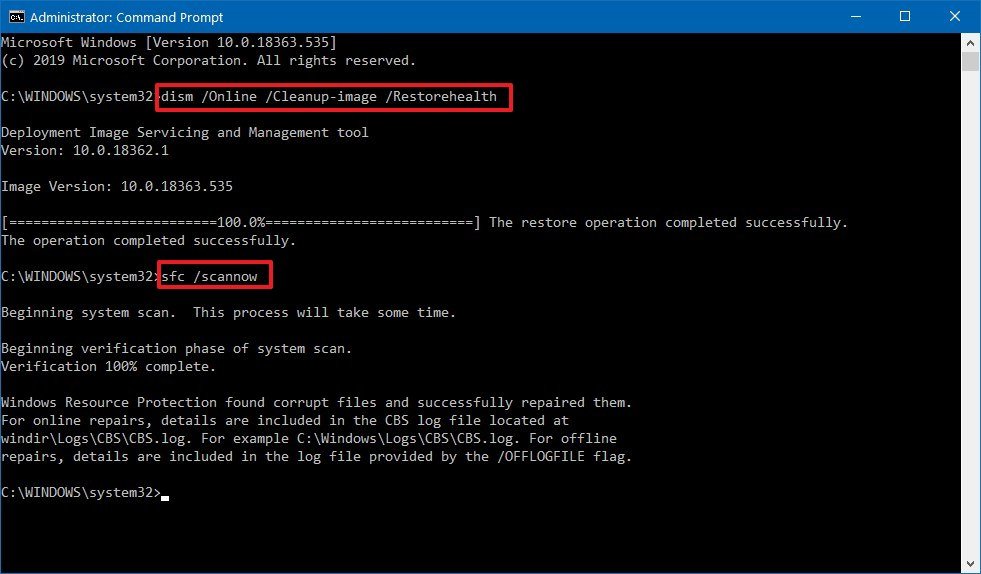
Once you complete the steps, try running Windows Update one more time, and if the problem was a missing or damaged system file, now the update service should start working as always.
How to fix Windows Update skipping maintenance schedule
Although updates are essential to keep your device running smoothly and secure, sometimes updates can roll out with unknown bugs that may cause problems, including installation issues.
If you suspect that the problem could be the update and not your installation, it’s recommended not to install the cumulative update until the next release.
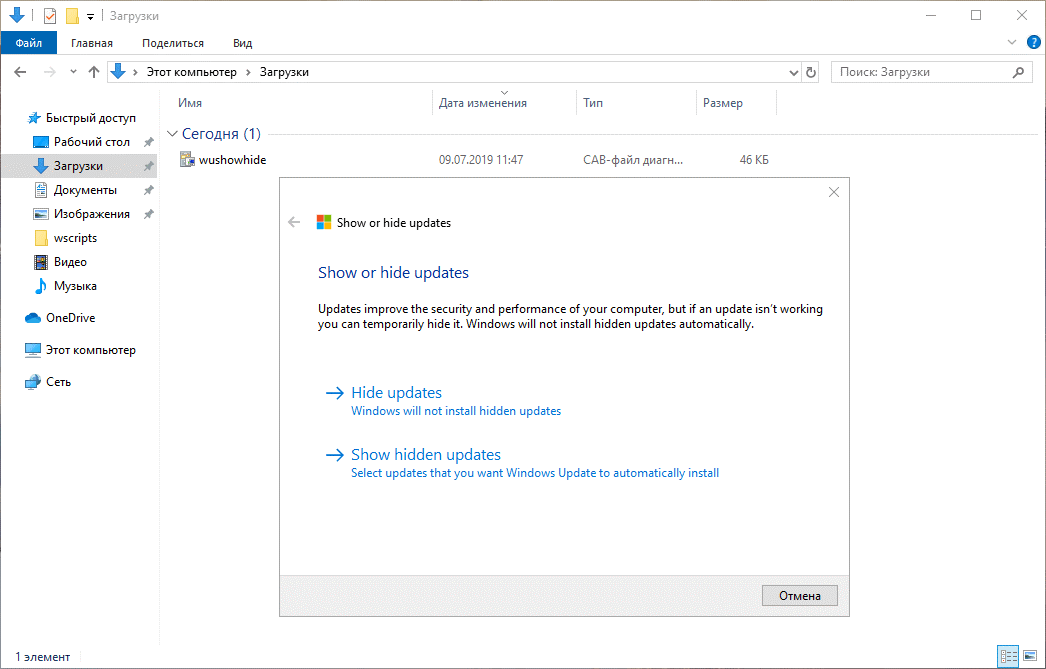
To skip an update release, you have to hide it from your device using these steps:
- Open the Windows Support website (opens in new tab).
- Click the Download the «Show or hide updates» troubleshooter package now link to save the troubleshooter on your device.
- Double-click the wsuhowhide.diagcab file.
- Click the Next button.
- Click the Hide updates option.

- Select the update causing the problem.
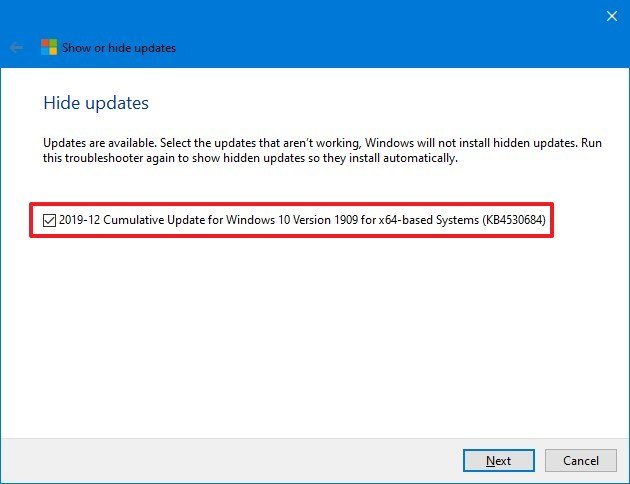
- Click the Next button.
- Click the Close button.
After you complete the steps, the update will no longer be available for your device, resolving any errors trying to install the quality update using Windows Update. However, when a follow-up update becomes available, it’ll eventually download and install automatically.
How to fix Windows Update installing latest version
Sometimes if you’re running an older version of Windows 10, you can try upgrading to the most recent release to fix many problems with the current installation, including issues with Windows Update. While there are multiple ways to upgrade to the latest version, using the Update Assistant tool is the easiest method.
To upgrade a device to the latest version with the Update Assistant, use these steps:
- Open the Windows 10 download page (opens in new tab).
- Click the Update now button.
- Save the Update Assistant installer to your device.
- Double-click the Windows10Upgrade file to launch the assistant.
- Click the Update Now button.
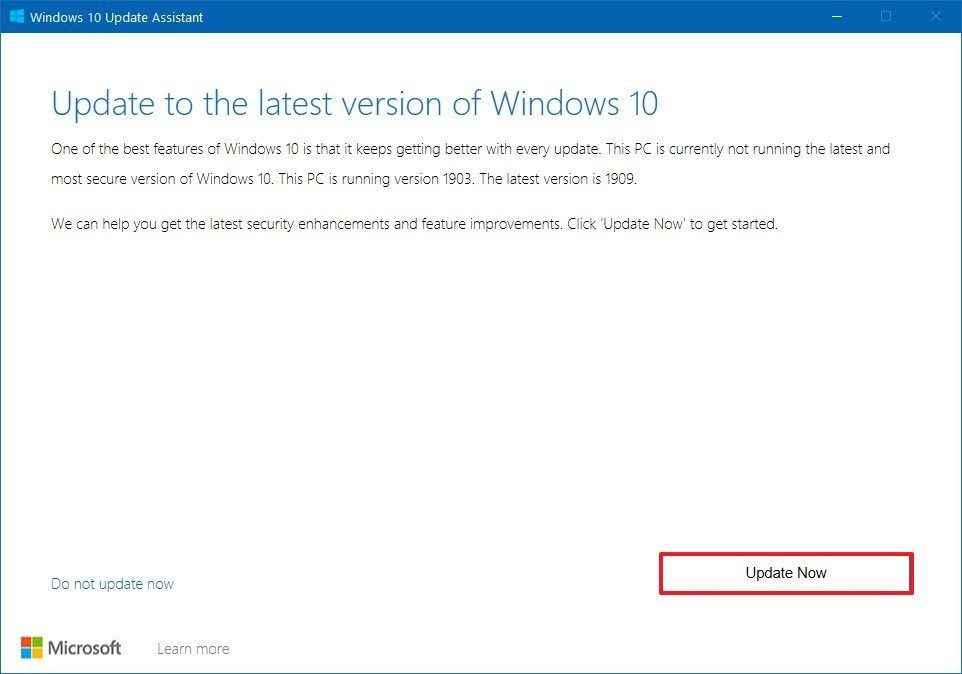
- Click the Next button.
- Click the Restart Now button.
Once you complete the steps, the new version of Windows 10 will hopefully resolve the problem with Windows Update, and it might even improve system performance as well as other issues with the previous release.
How to fix Windows Update performing clean installation
If nothing seems to work to resolve the issue with Windows Update, as a last resort, you may want to consider performing a clean installation of Windows 10 to resolve this and other problems.
Before you can proceed with the installation of Windows 10, you need to create a USB media to start your device and continue with the installation.
To create a bootable media using the Media Creation Tool, use these steps:
- Open the Windows 10 download page (opens in new tab).
- Click the Download tool now button.
- Save the Media Creation Tool installer to your device.
- Double-click the MediaCreationToolxxxx.exe file to begin the process.
- Click the Accept button to agree to the terms.
- Select the Create install media (USB flash drive, DVD, or ISO file) for another PC option.
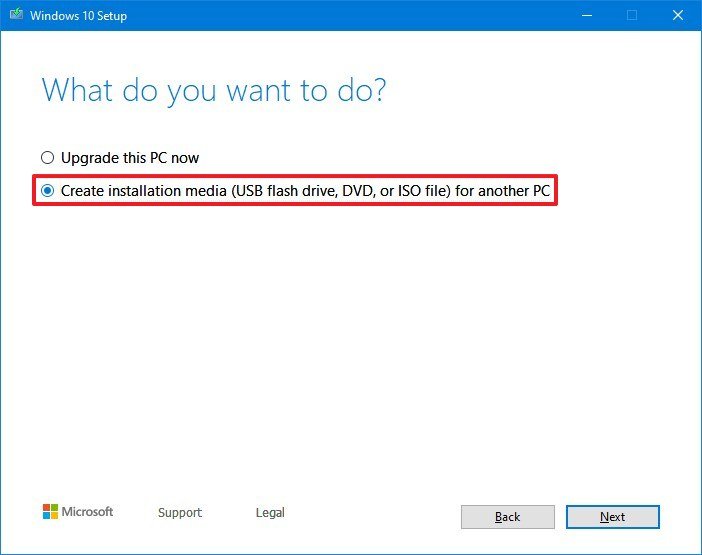
- Click the Next button.
- Click the Next button.
- Select the USB flash drive option.
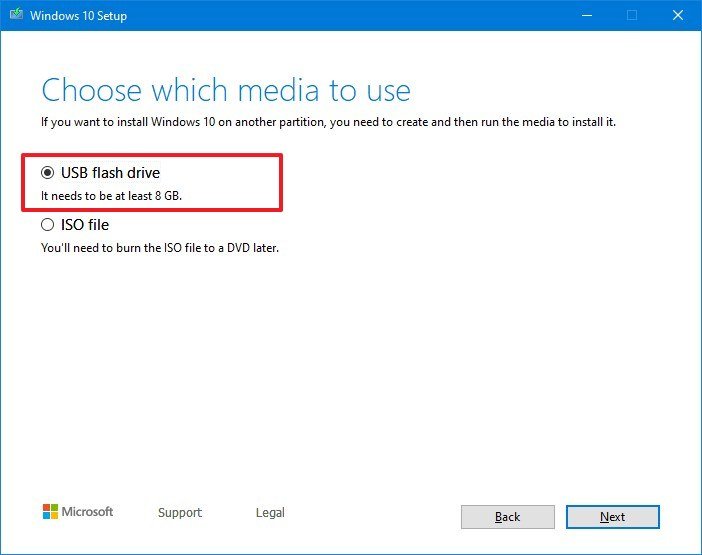
- Click the Next button
- Select the flash drive from the list.
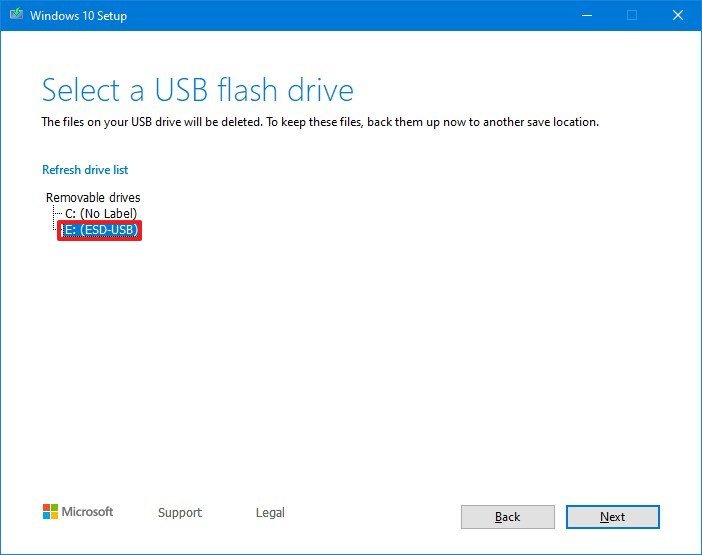
- Click the Next button.
- Click the Finish button.
After you complete the steps, you can proceed with the clean installation of Windows 10.
Installing Windows 10
To do a clean installation of Windows 10, use these steps:
Warning: This is a friendly reminder that this process will erase everything on your computer. It’s always recommended to make a temporary full backup of your PC before proceeding.
- Start the computer with the Windows 10 USB media.Quick tip: If you can’t boot your device with the bootable media, then you need to change your basic input/output system (BIOS) settings to change the boot order to start the device from USB. Usually, this process requires hitting one of the function keys (F1, F2, F3, F10, or F12), the ESC, or Delete key as soon as you start the computer. The only caveat is that these settings will be different per manufacturer, and even by computer model. So make sure to check your device manufacturer’s support website for more specific instructions.
- On prompt, press any key to boot from the device.
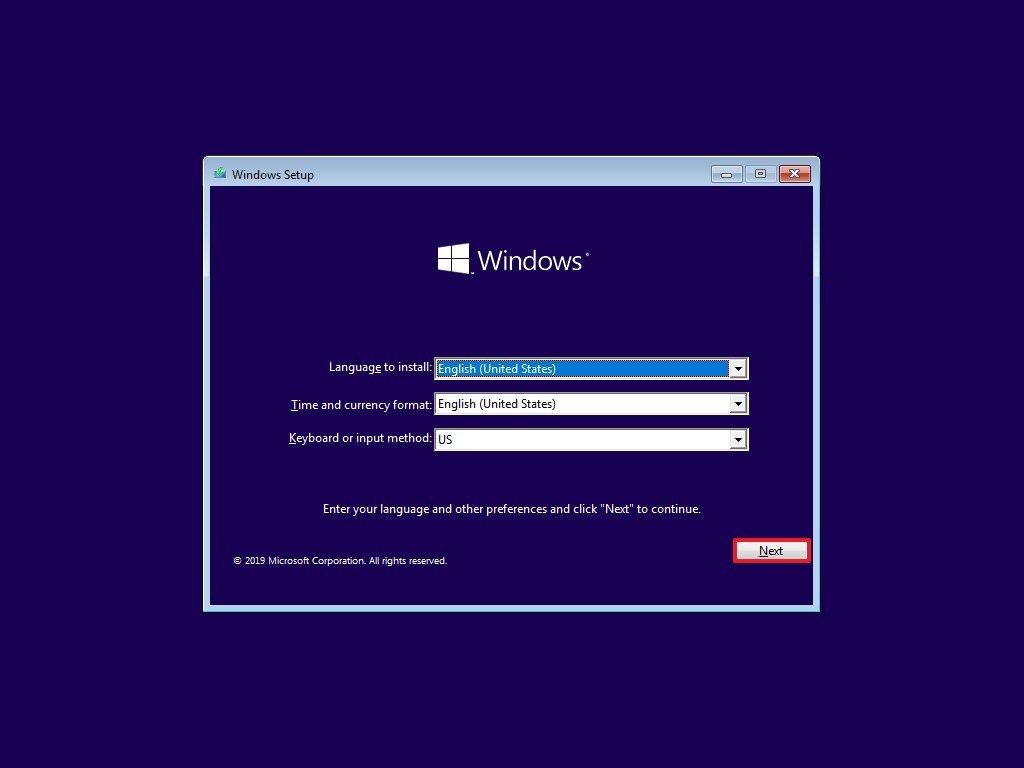
- On the «Windows Setup,» click the Next button.
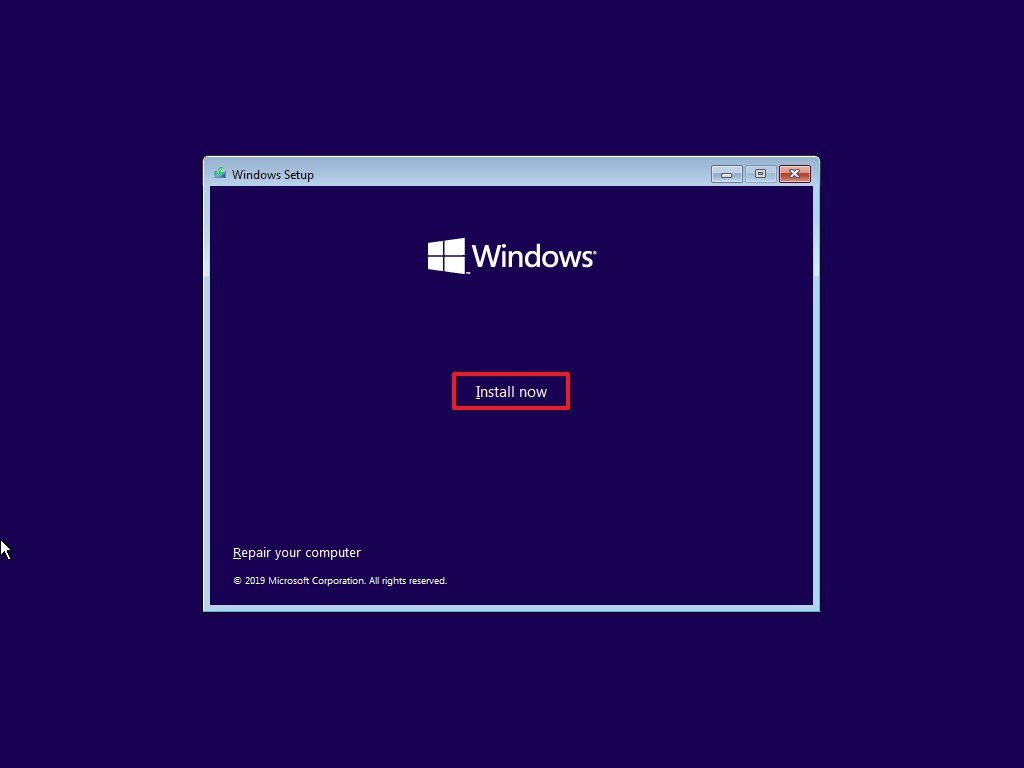
- Click the Install now button.
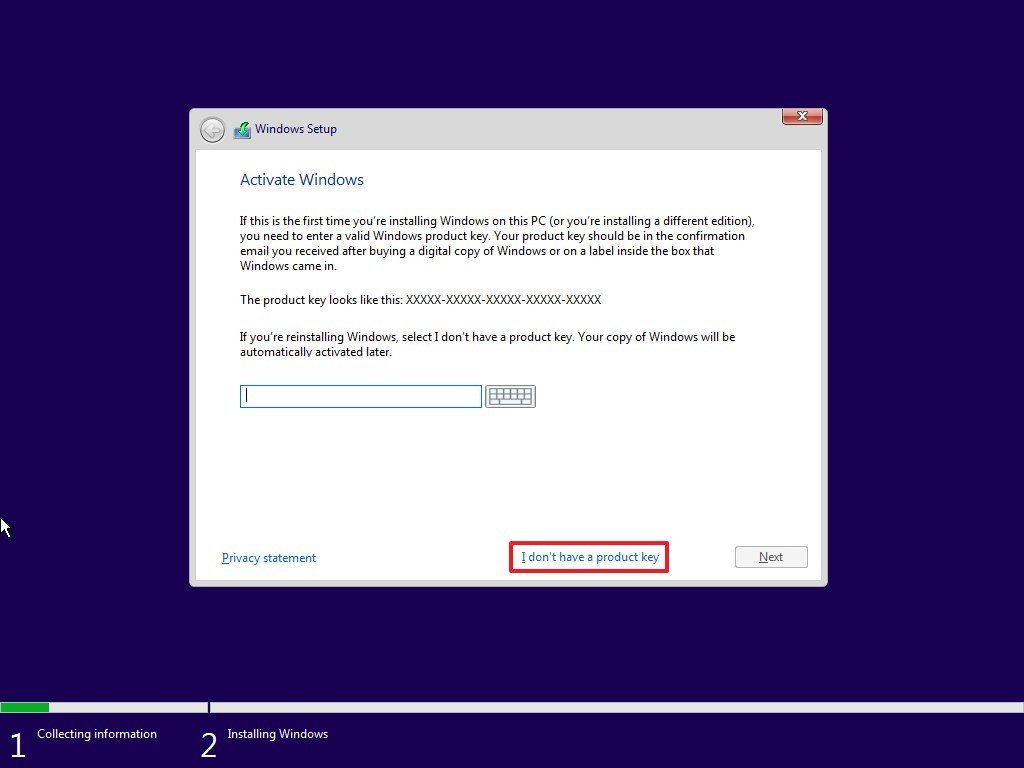
- Click the I don’t have a product key option to continue (assuming that your device was already activated).
- Click the Next button.
- Select the edition of Windows 10. (This selection must match the version your product key activates.)

- Click the Next button.
- Select the I accept the license terms option to continue.
- Click the Next button.
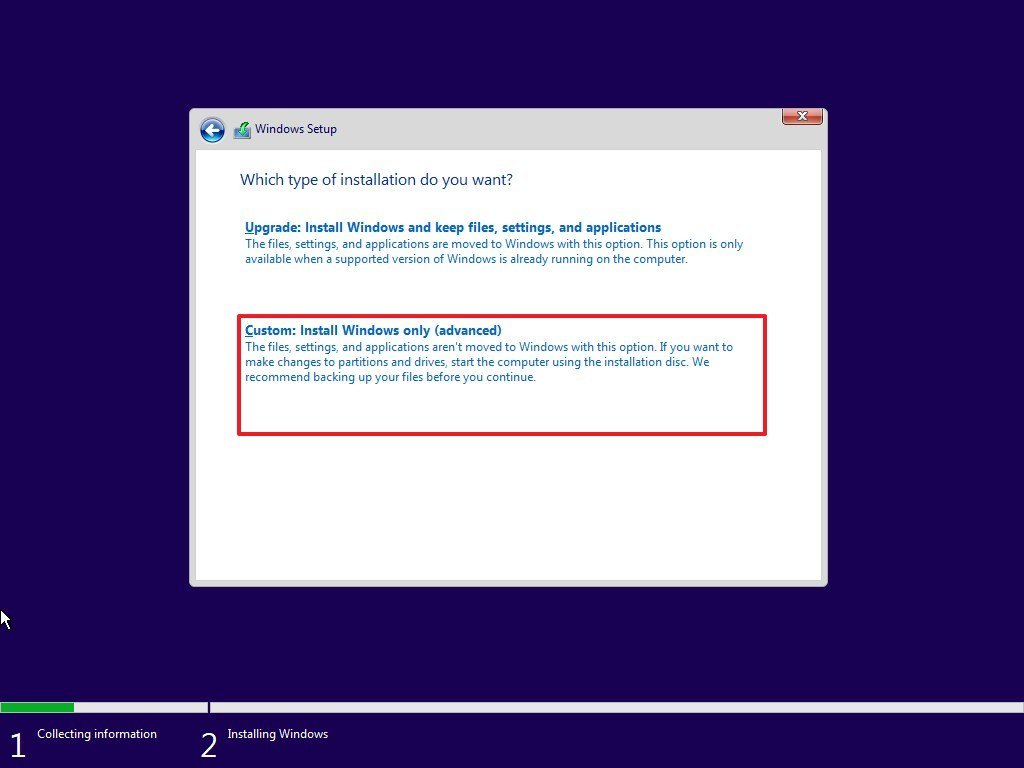
- Click on the Custom: Install Windows only (Advanced) option.
- Select the partition with the current installation (usually «Drive 0»), and click the Delete button.Quick tip: If «Drive 0» has multiple partitions, you have to select and delete each of the partitions to allow the setup to use the entire drive for the new clean installation. Windows 10 will create the required partitions automatically during the process. It’s not necessary to delete the partitions on secondary drives.
- Click the Yes button.

- Select the empty drive (Drive 0 Unallocated Space).
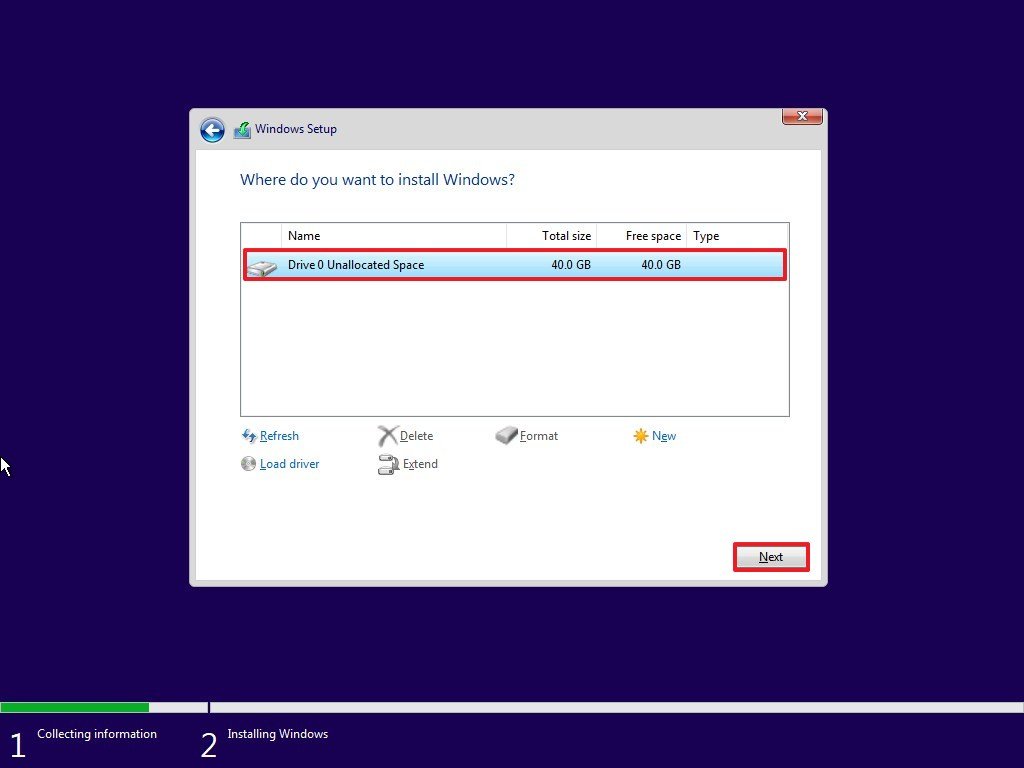
- Click the Next button.
Once you complete the steps, you’ll need to continue with the out-of-box experience (OOBE) to configure your device, and after the process, the issue with Windows Update should be resolved as well as other system problems.
If you need assistant performing a clean install of Windows 10, you can use this comprehensive guide.
Get the best of Windows Central in in your inbox, every day!
Mauro Huculak is technical writer for WindowsCentral.com. His primary focus is to write comprehensive how-tos to help users get the most out of Windows 10 and its many related technologies. He has an IT background with professional certifications from Microsoft, Cisco, and CompTIA, and he’s a recognized member of the Microsoft MVP community.
Получать обновления операционной системы Windows 10 всегда приятно, особенно когда они включают важные и значимые изменения. С их поступлением, как правило, проблем ни у кого не возникает, но установить актуальные обновления получается далеко не у каждого. Нередко бывает, что пользователи сталкиваются с различными рода ошибками, которые блокируют загрузку и инсталляцию свежей версии системы.
О том, как со всем этим бороться и не угробить систему, поговорим в сегодняшней статье.
Исправляем проблему загрузки обновления Windows 10
Что делать, если обновления не загружаются
Если вы получили набор обновлений в Центре обновлений Windows 10, но они просто висят и не могут загрузиться по какой-то причине, то попробуйте воспользоваться следующими способами:
- полностью отключите антивирусное средство и VPN/Proxy-клиент;
- попробуйте самостоятельно загрузить и установить обновления через специальное средство Update Assistant;
- проверьте интернет-соединение – может быть, проблема просто в нем.
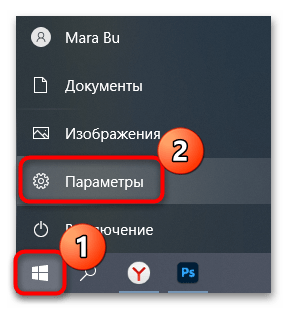
Если обновление начинает загружаться, но в результате вы видите непредвиденную ошибку, то исправить это можно через встроенное средство устранения неполадок от Windows 10. Для этого следует выполнить следующие действия:
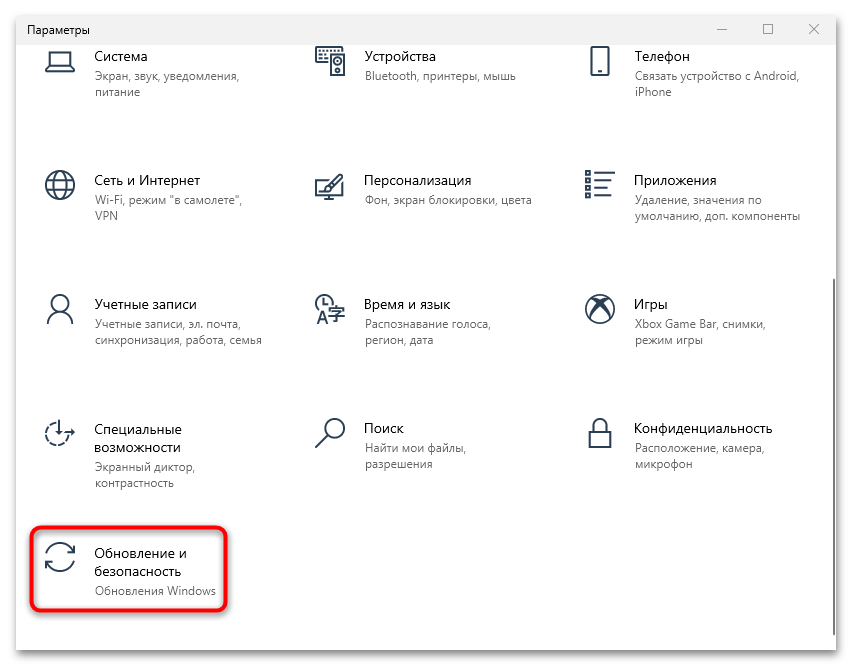
- Зажимаем на клавиатуре комбинацию клавиш «Win+I», где Win – клавиша с логотипом Windows, расположенная в нижней левой части клавиатуры. Таким образом мы попадаем в параметры системы – оттуда переходим в раздел «Обновление и безопасность».
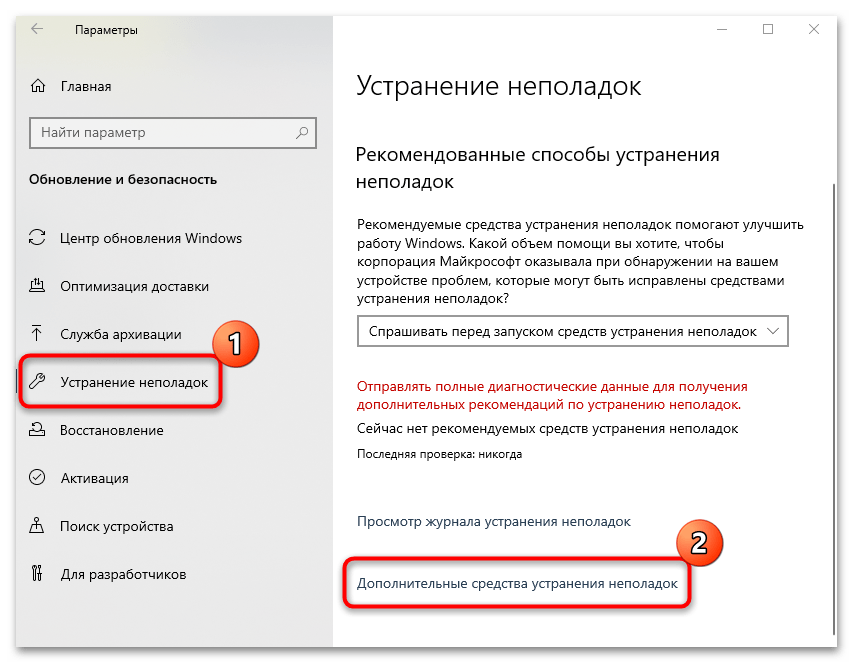
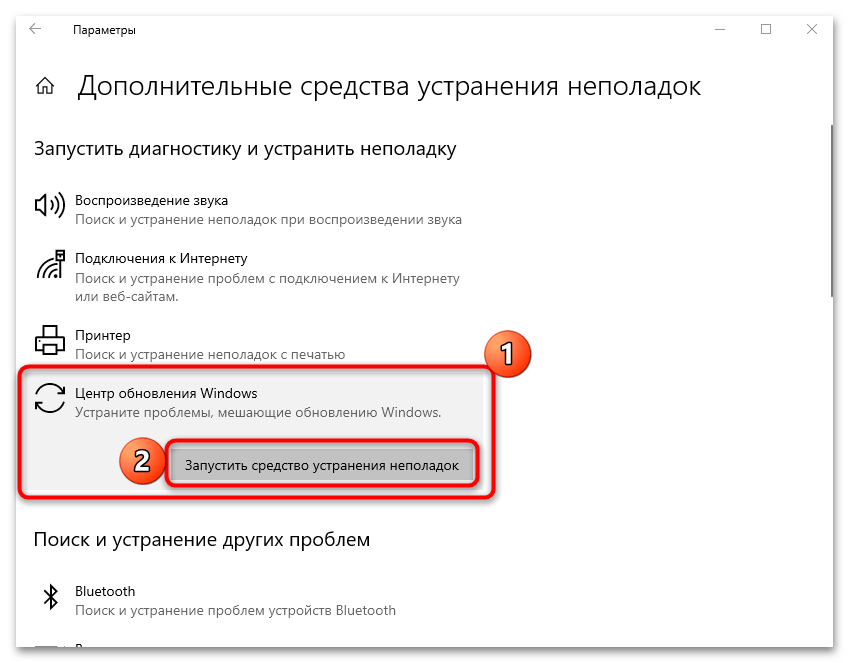
- Переходим в подраздел «Устранение неполадок» и в правой части находим кнопку «Запустить средство устранения неполадок». Если такой кнопки нет, то значит, Windows нечего вам предложить.

Как исправить зависание загрузки
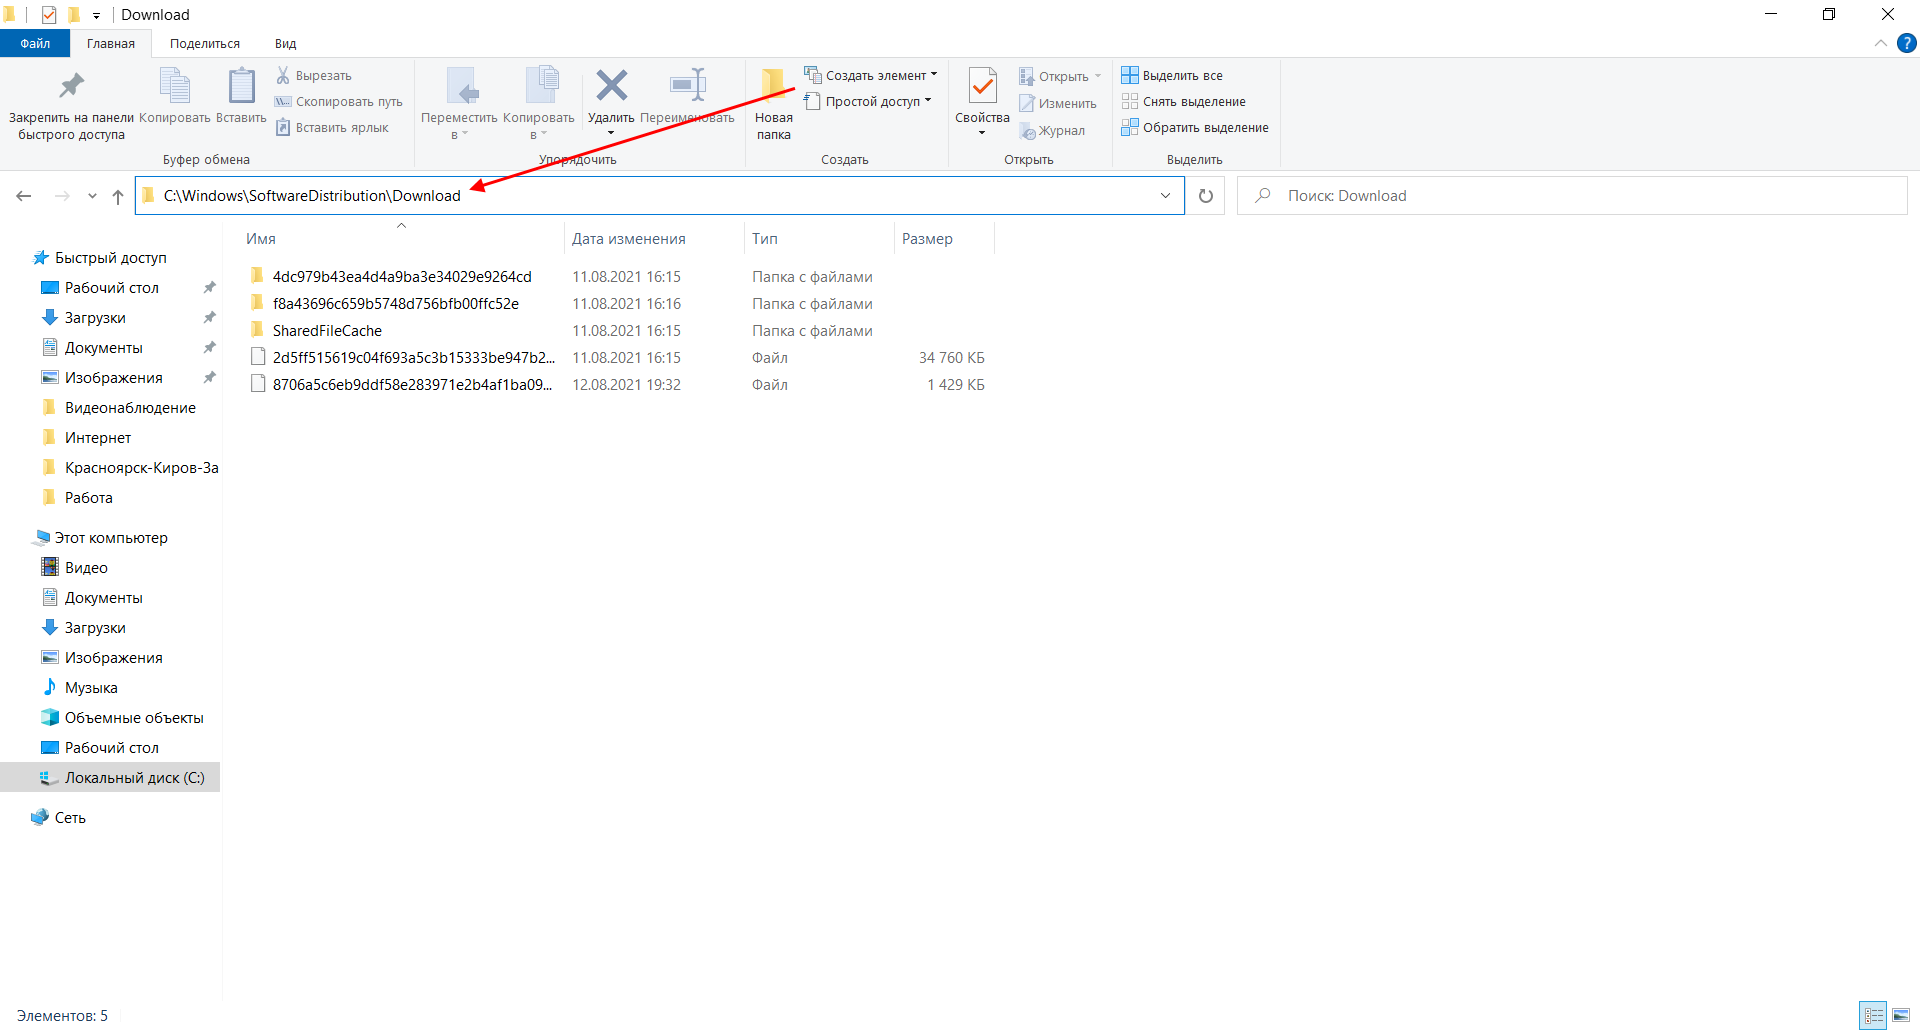
Есть еще один способ, который часто помогает, когда загрузка начинает зависать в диапазоне от 5% до 95%. Чаще всего такая проблема возникает из-за некорректной загрузки файлов. Исправить это можно ручным удалением загруженных обновлений. Для этого открываем любую папку и в строку запроса вводим путь C:WindowsSoftwareDistributionDownload. Просто удаляем оттуда все файлы – используем комбинацию клавиш «CTRL+A» и жмем на клавишу DELETE. После этого Центр обновления попробует заново загрузить свежие апдейты.
Ошибка службы оптимизации доставки
В некоторых случаях обновления могут не загружаться из-за службы «Оптимизация доставки». Исправить это можно следующим образом:
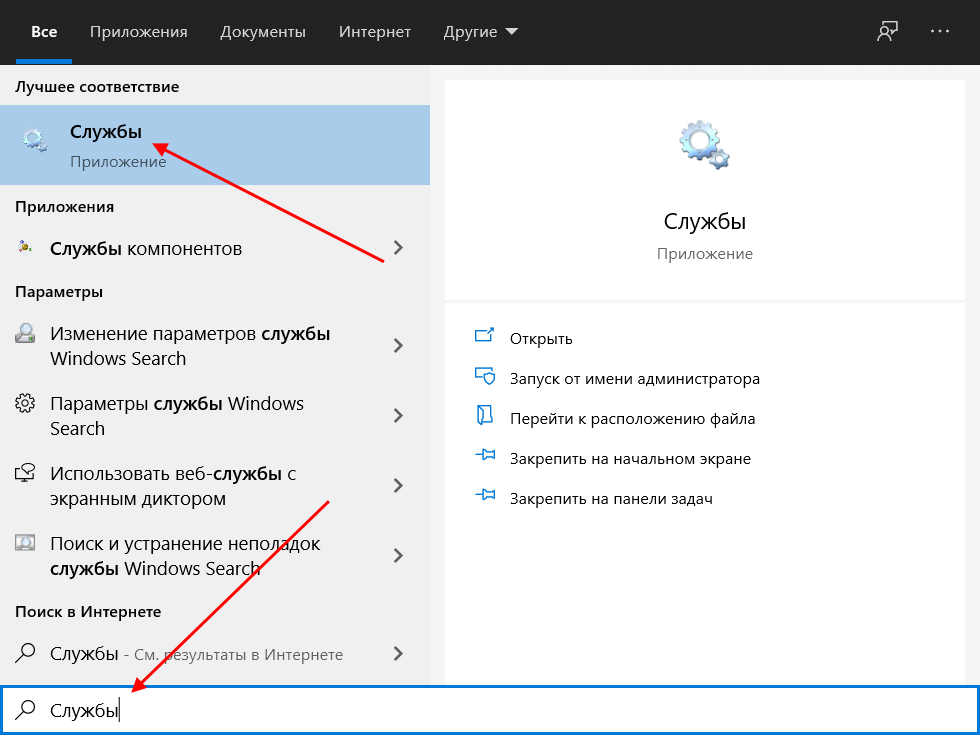
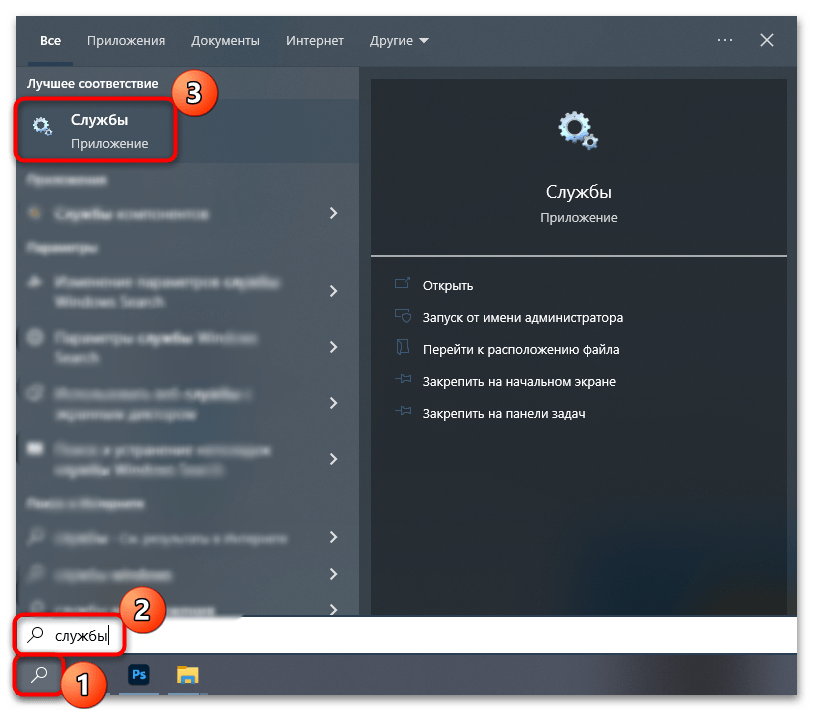
- Открываем в нижнем левом углу меню «Пуск» и вводим запрос «Службы». В отобразившемся окне открываем первый запрос.
- Находим нужную нам службу и кликаем по ней двойным щелчком мыши. Выбираем тип запуска «Вручную» и жмем «ОК».

После этой процедуры потребуется перезагрузить компьютер и попробовать заново скачать обновления. Если это не помогло, то попробуйте выбрать тип запуска «Автоматически (отложенный запуск)».
Остановка службы центр обновлений
Еще один способ – попробовать перезапустить центр обновлений. Иногда бывает, что он попросту зависает по каким-либо причинам. Для этого снова переходим в службы и находим там нужный нам компонент – кликаем по нему двойным щелчком мыши и жмем на кнопку «Остановить». В нашем случае кнопка серая, так как служба отключена.

После остановки службы пробуем активировать ее заново – для этого предназначена кнопка «Запустить».
Если и такие манипуляции не помогли, то следуем дальше.
Комьюнити теперь в Телеграм
Подпишитесь и будьте в курсе последних IT-новостей
Подписаться
Утилита Reset Windows Update Tool
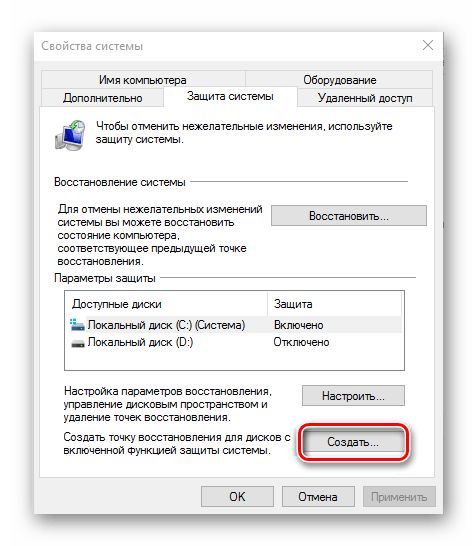
Существует специальная утилита от Microsoft под названием Reset Windows Update Tool, которая выполняет полный набор действий для исправления различных моментов, способных помешать скачиванию и установке обновлений. Перед тем как использовать данный способ, рекомендую создать точку восстановления системы – для этого перейдите в меню Пуск, введите запрос «Восстановление», затем откройте первый запрос и в отобразившемся окне выберите «Создание диска восстановления».
Когда точка восстановления будет создана, можно вернуться к сохраненным данным, если во время исправления ошибок что-то пойдет не так.
Итак, используем утилиту следующим образом:
- Переходим на официальный сайт и загружаем последнюю версию.
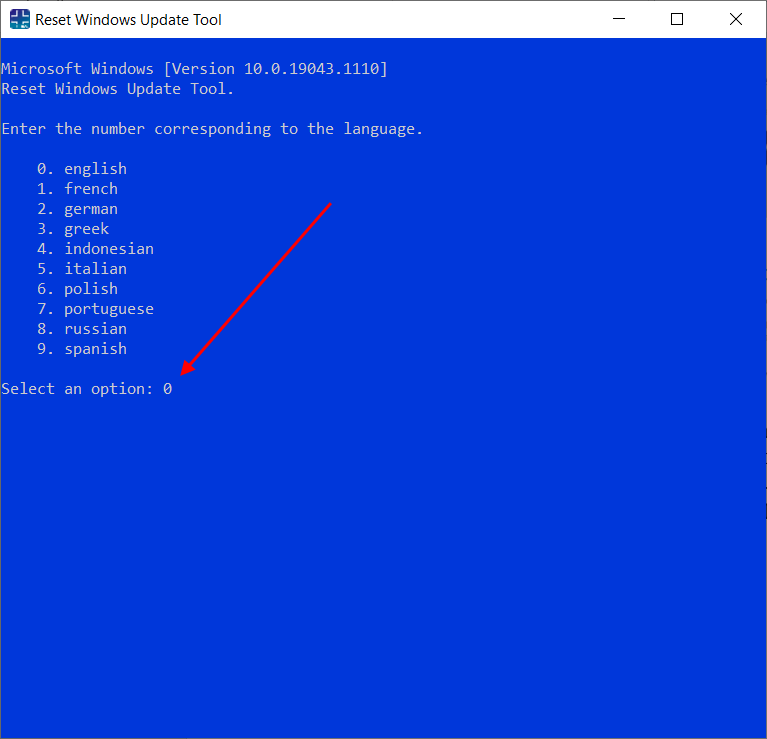
- Устанавливаем Reset Windows Update Tool и запускаем ее от имени администратора – для этого кликаем правой кнопкой мыши по ярлыку и находим необходимую опцию. В отобразившемся окне выбираем английский язык – просто вводим цифру 0 и жмем «Enter».
- После этого перед нами отобразится информация о том, что гарантии исправной работы утилита не дает – соглашаемся с этим клавишей Y. В результате мы увидим окно с доступными опциями. Рекомендую поочередно воспользоваться следующими опциями: 2, 3, 6, 11, 12, 14.

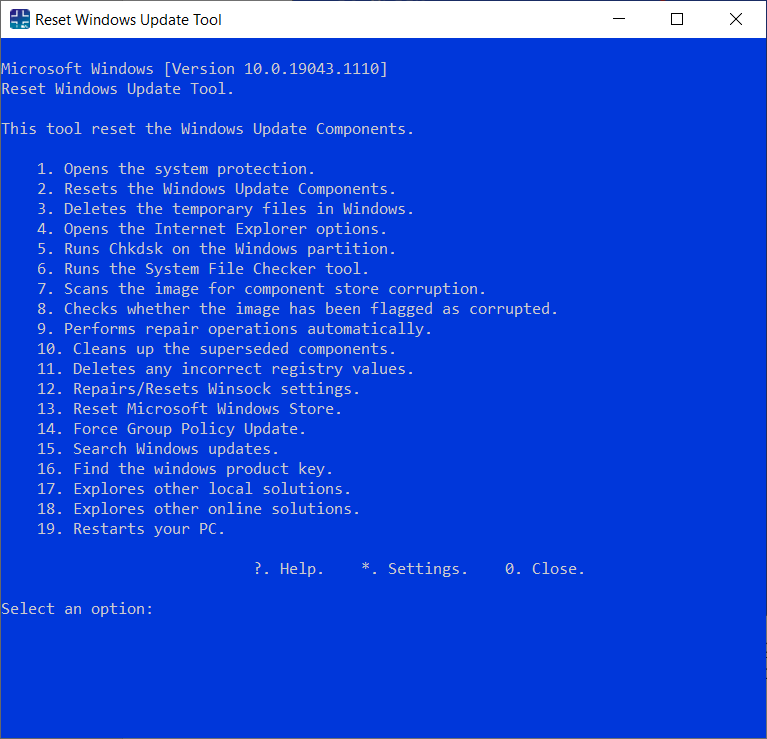
Актуальный список доступных функций утилиты:
- Открывает параметры защиты системы.
- Сбрасывает компоненты Центра обновлений Windows.
- Удаляет временные файлы.
- Открывает настройки Internet Explorer.
- Проверяет диск на наличие ошибок.
- Проверяет целостность файлов системы.
- Проверяет целостность хранилища компонентов.
- Проверяет образ на наличие отметки «поврежденный».
- Автоматически восстановливает хранилища компонентов с помощью dism.exe
- Очищает устаревшие компоненты.
- Очищает записи реестра с ошибками.
- Сбрасывает и корректирует параметры Winsock.
- Сбрасывает данные Microsoft Windows Store.
- Принудительно обновляет локальные групповые политики.
- Включает поиск обновлений Windows.
- Ищет ключ продукта Windows.
- Открывает устранение неполадок Windows.
- Открывает справку на сайте Майкрософт в браузере, чтобы найти дополнительные решения проблемы онлайн.
- Перезапускает компьютер.
Сброс центра обновлений Windows для исправления ошибок
Мы также можем сбросить все параметры Центра обновлений Windows до исходных – такой способ иногда позволяет решить все проблемы. Сделать это можно автоматически с помощью bat-файла, который мы создадим самостоятельно. В этом нет ничего сложного, просто следуйте инструкции, и все получится.
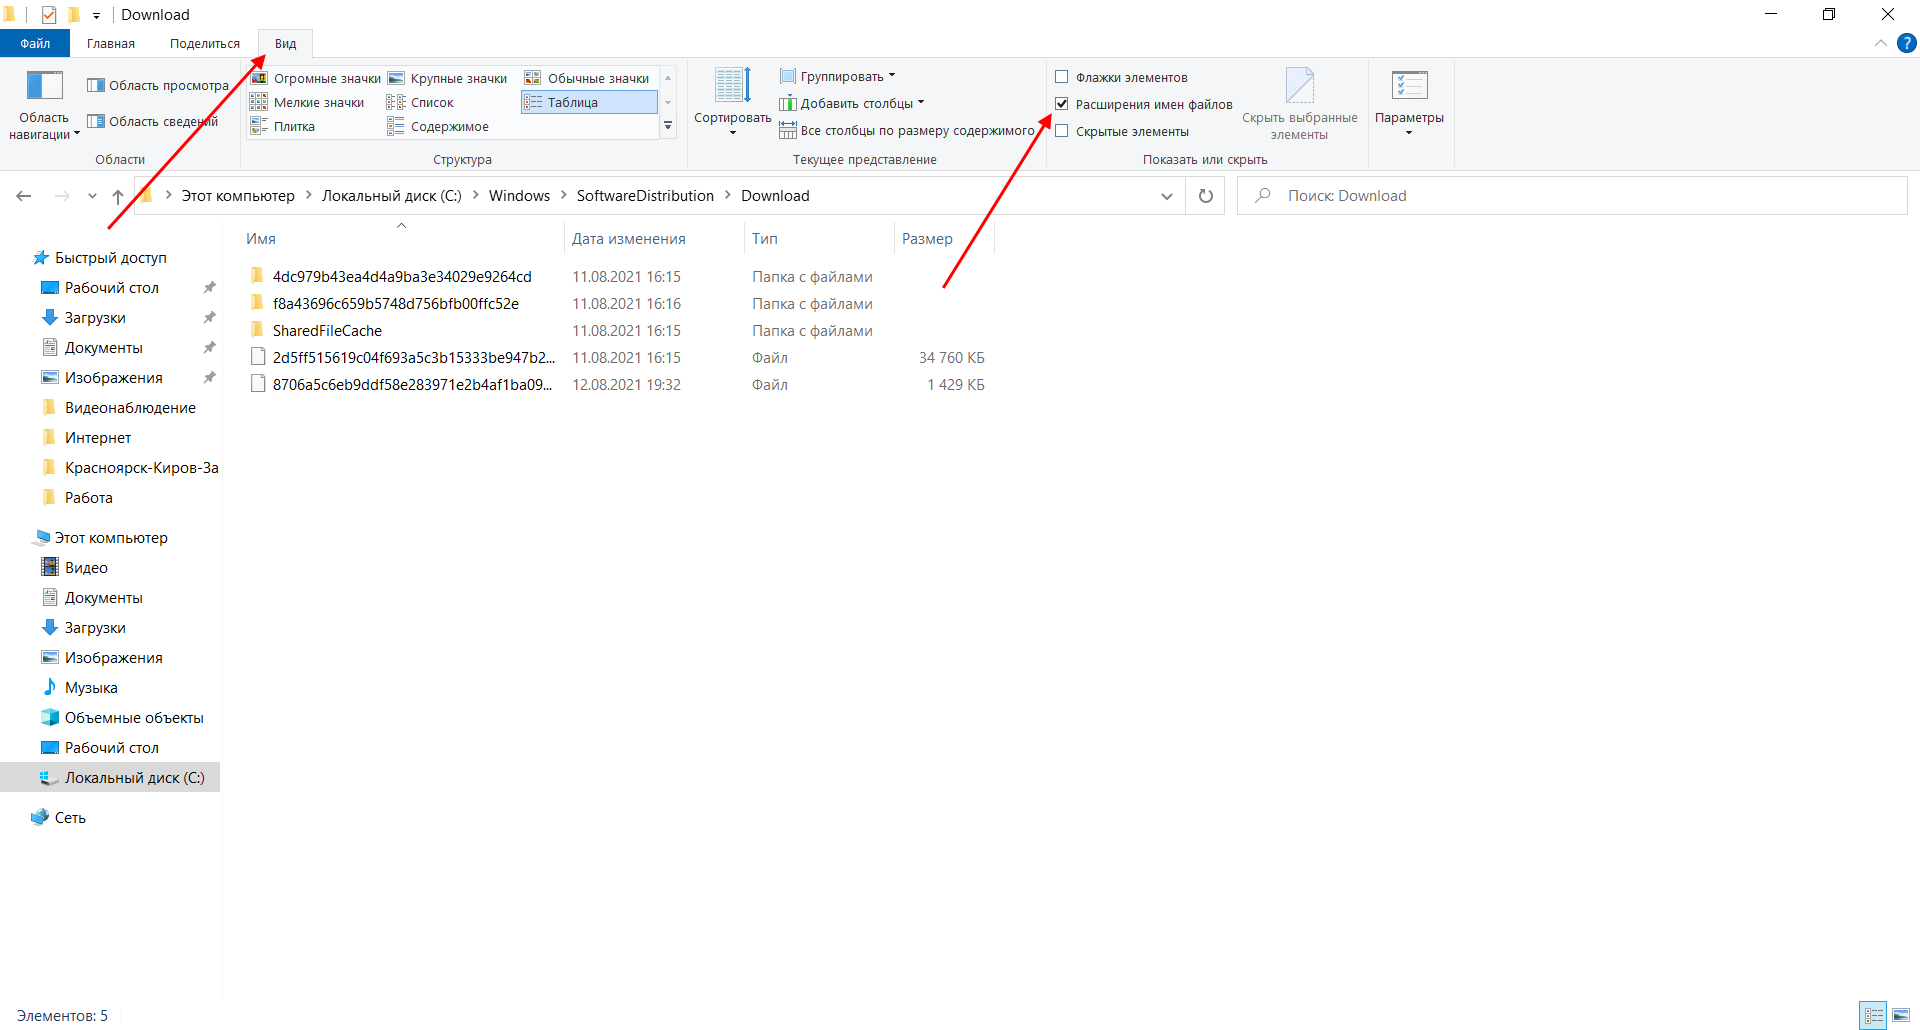
Итак, приступим. Для начала давайте убедимся, что у нас включена возможность изменять расширение файла. Это необходимо, чтобы простой документ преобразовался в bat-файл. Для этого открываем любую папку и переходим в раздел «Вид». Там убеждаемся, что отмечен пункт «Расширения имен файлов».
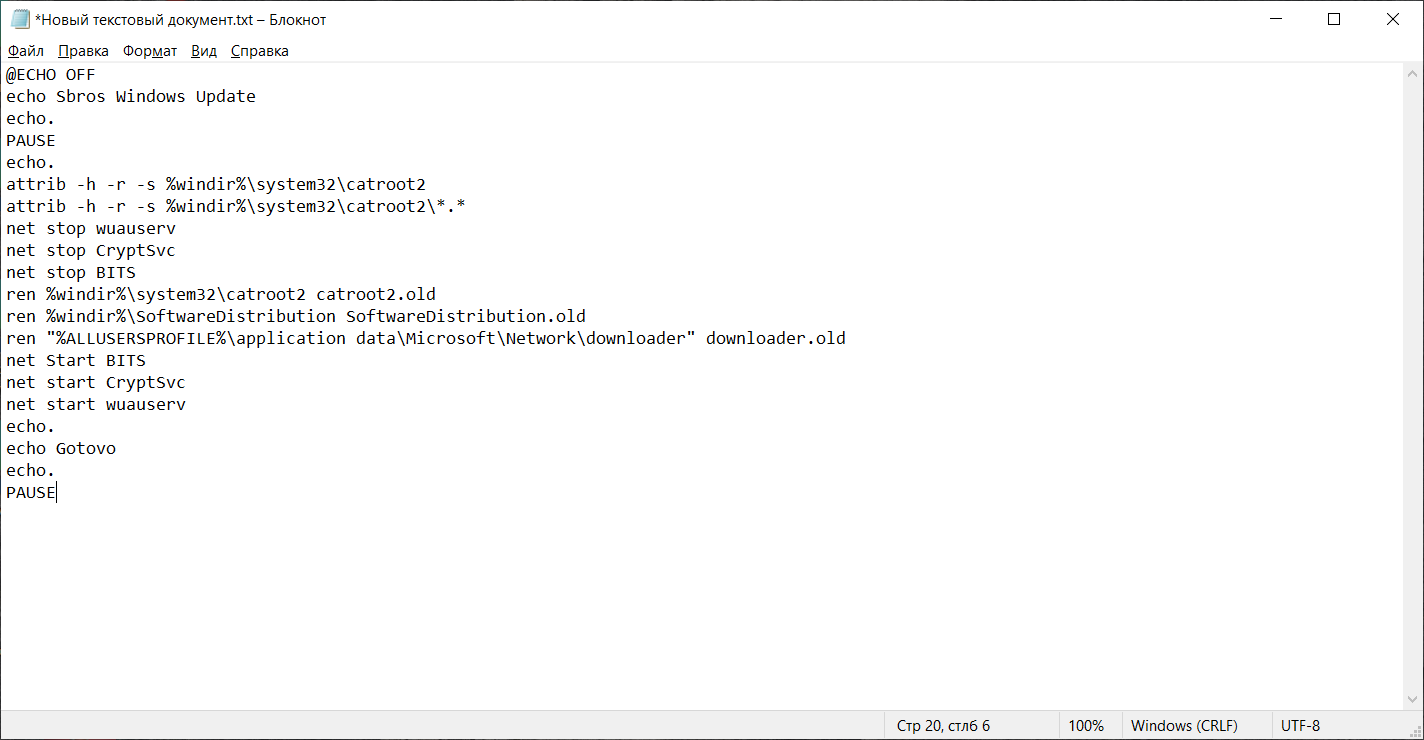
Теперь можем переходить к основным этапам: создаем на рабочем столе блокнот и добавляем в него следующий код:
@ECHO OFF

echo Sbros Windows Update

echo.

PAUSE

echo.

attrib -h -r -s %windir%system32catroot2

attrib -h -r -s %windir%system32catroot2*.*

net stop wuauserv

net stop CryptSvc

net stop BITS

ren %windir%system32catroot2 catroot2.old

ren %windir%SoftwareDistribution SoftwareDistribution.old

ren "%ALLUSERSPROFILE%application dataMicrosoftNetworkdownloader" downloader.old

net Start BITS

net start CryptSvc

net start wuauserv

echo.

echo Finish

echo.

PAUSE
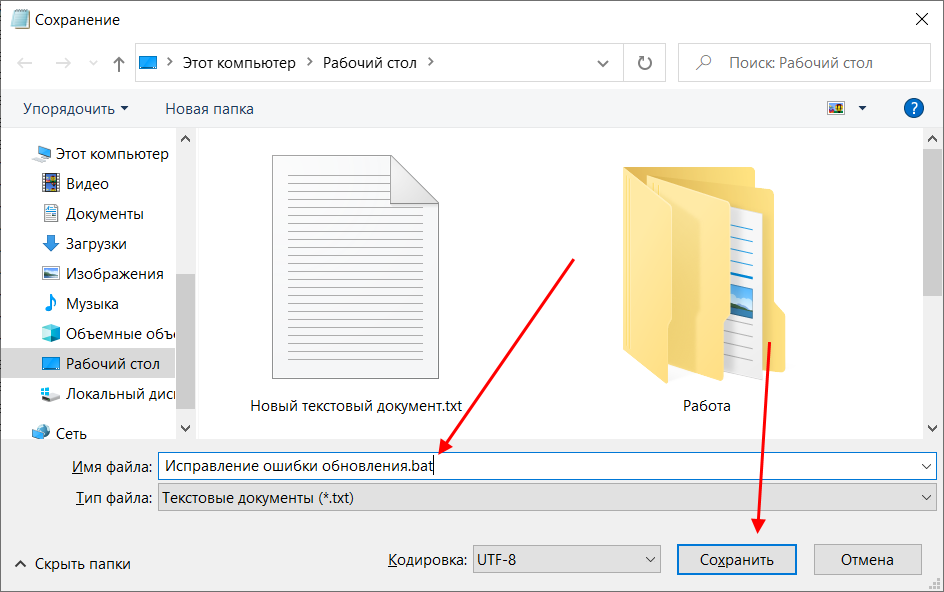
Сохраняем блокнот – переходим для этого в меню «Файл» и выбираем «Сохранить как…».

Даем ему название, например «Исправление ошибки обновления», и в конце обязательно указываем расширение .bat. В завершение жмем «Сохранить».
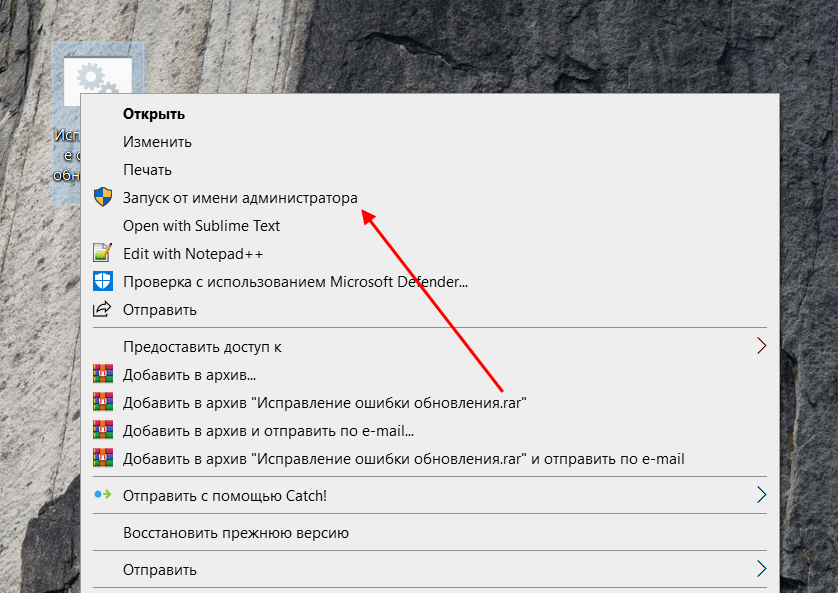
Теперь потребуется запустить файл от имени администратора. Кликаем по нему правой кнопкой мыши и выбираем «Запуск от имени администратора».
В результате увидим следующее:
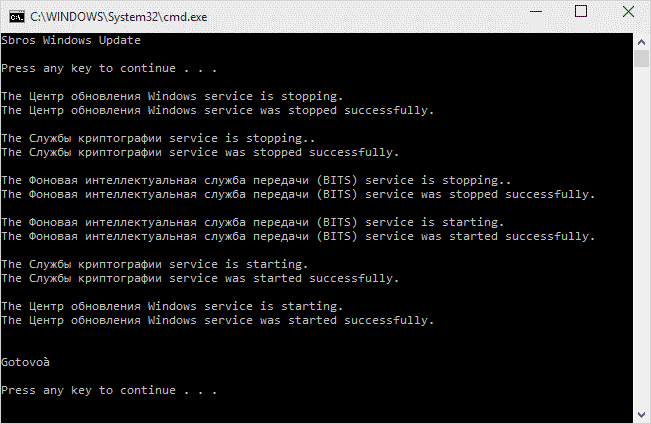
Обязательно перезагружаем компьютер и проверяем, была ли исправлена неполадка с обновлением системы.
Исправляем проблему установки обновления Windows 10
Довольно неприятная ситуация, когда во время установки обновлений компьютер замирает с надписью «Подготовка к настройке Windows. Не выключайте компьютер».

Если вы наблюдаете эту запись крайне долгое время, например несколько часов, то, скорее всего, уже никакого результата не будет. В таких случаях остается только перезагрузить компьютер, но в результате этого может произойти несколько сценариев:
- Компьютер успешно перезагрузится, обновление начнется заново.
- Произойдет сбой системы, и компьютер начнет автоматическое исправление ошибок.
- Произойдет сбой системы, и вы не сможете в нее войти из-за поврежденных файлов.
Последний сценарий, конечно, самый плачевный, и исправить его довольно проблематично. Потребуется восстановить систему, прежде чем в нее войти. Сделать это можно через запуск в безопасном режиме, через флешку с образом системы либо встроенными средствами Windows 10. Часто бывает, что ОС сама предлагает запустить восстановление системы, когда возникают различные неполадки. Это окно появляется после неудачного запуска:
Восстановив систему, попробуйте заново ее обновить. Если же восстановление не удалось, то потребуется помощь специалиста либо ручная переустановка системы.
Синий экран после обновления Windows 10
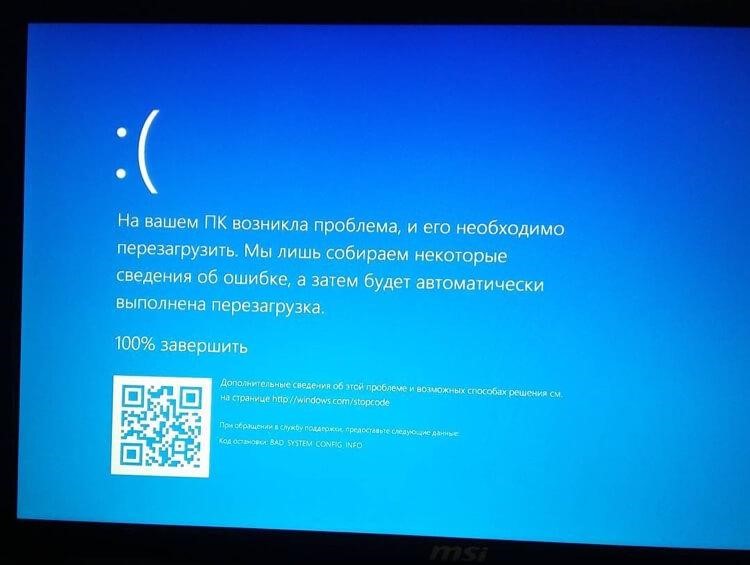
Если после обновления системы у вас стал появляться синий экран смерти, информирующий о том, что пошло что-то не так, то можно пойти следующими путями:
- Используйте мастер восстановления системы. Если система недавно начала испытывать сбои, используйте функцию восстановления системы, чтобы вернуть систему в предыдущее стабильное состояние. Если это поможет, то, скорее всего, проблема была вызвана ошибками программного обеспечения.
- Выполните загрузку в безопасном режиме. Если ваш компьютер постоянно выдает сбои с синим экраном, то попытайтесь загрузиться в безопасном режиме. В безопасном режиме Windows загружает только основные драйверы, поэтому критические ошибки будут опущены. В таком случае мы можем либо откатить систему, либо удалить ранее установленные обновления.
- Переустановите Windows. Крайне радикальный метод, но иногда без него совсем никуда. Если вы не умеете переустанавливать систему, то лучше вызвать специалиста, который не просто переустановит ОС, а попытается восстановить исходную.
Другие проблемы с обновлением Windows 10
Обновление Windows 10 может показаться удачным, но со временем могут появиться некоторые проблемы, например ошибки подключения к интернету. Решить такую проблему можно через командную строку.
Давайте запустим ее и введем некоторые команды:
- Открываем меню «Пуск» и вводим запрос «Командная строка». Кликаем по ней правой кнопкой мыши и выбираем «Запуск от имени администратора».
- В отобразившемся окне поочередно вводим команды: netsh winsock reset catalog и netsh int ipv4 reset reset.log.
Если такой способ не помог, то попробуйте в командной строке ввести запрос ipconfig /renew. В таком случае будет обновлен IP-адрес компьютера, и, возможно, проблема решится.
Команды DISM для проверки проблем с Windows 10
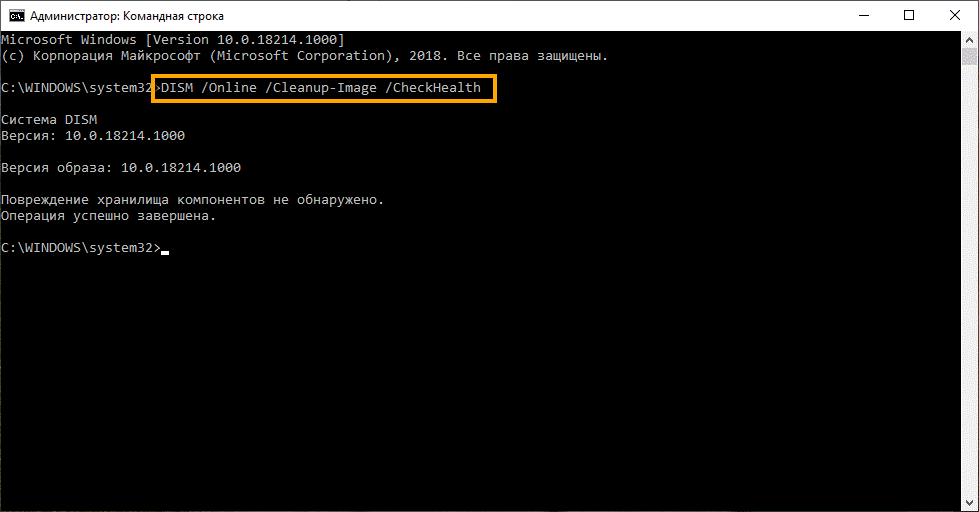
DISM используется для просмотра, установки, удаления и настройки компонентов в образах Windows формата WIM (Windows IMaging Format). С ее помощью мы можем восстановить образ системы и исправить любую проблему с обновлениями. Чтобы обезопасить себя, предварительно рекомендуется создать точку восстановления системы – для этого перейдите в меню Пуск, введите запрос «Восстановление», затем откройте первый запрос и в отобразившемся окне выберите «Создание диска восстановления».
Команда CheckHealth
CheckHealth позволяет обнаружить потенциальные повреждения. Данная команда используется для поиска повреждений, но не исправляет их. Чтобы ее запустить, открываем командную строку от имени администратора, как мы делали это выше, и вводим команду:
DISM /Online /Cleanup-Image /CheckHealth
Команда ScanHealth
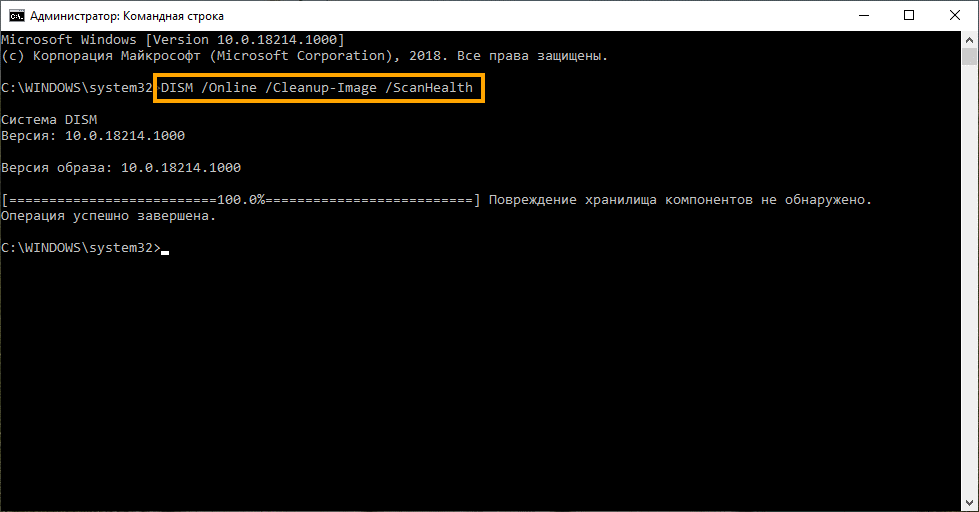
Данная опция позволяет сканировать образ Windows на предмет каких-либо повреждений. В отличие от предыдущей команды, проверка может занимать до 10 минут. Ее запуск выполняется также через командную строку с помощью следующей команды:
DISM /Online /Cleanup-Image /ScanHealth
Команда RestoreHealth
RestoreHealth позволяет автоматически проводить процедуру восстановления поврежденных образов Windows. Она запускается с помощью следующей команды:
DISM /Online /Cleanup-Image /RestoreHealth
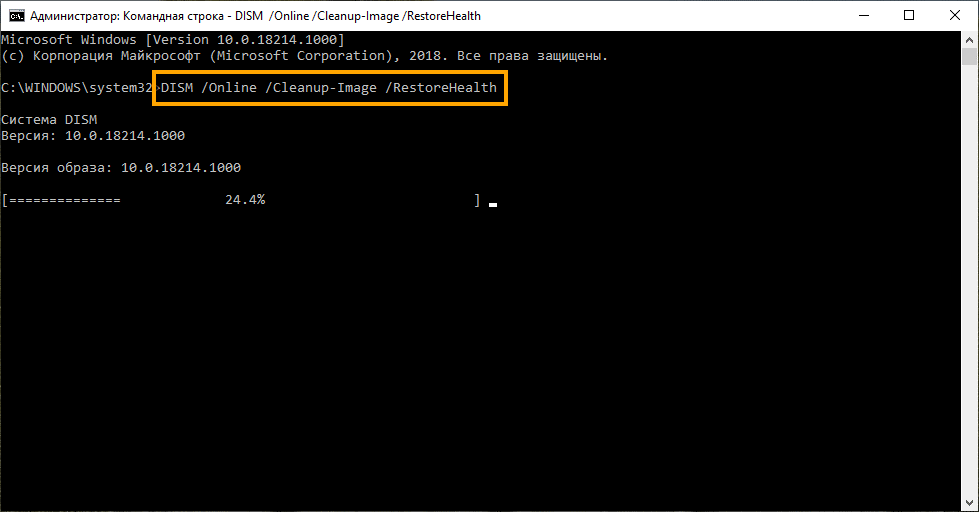
Обратите внимание на то, что во время запуска команд /RestoreHealth или /ScanHealth может наблюдаться зависание процесса между 20% и 30% – в этом нет ничего страшного. Просто подождите, дальше все пойдет нормально.
Отключение обновления Windows 10 и драйверов
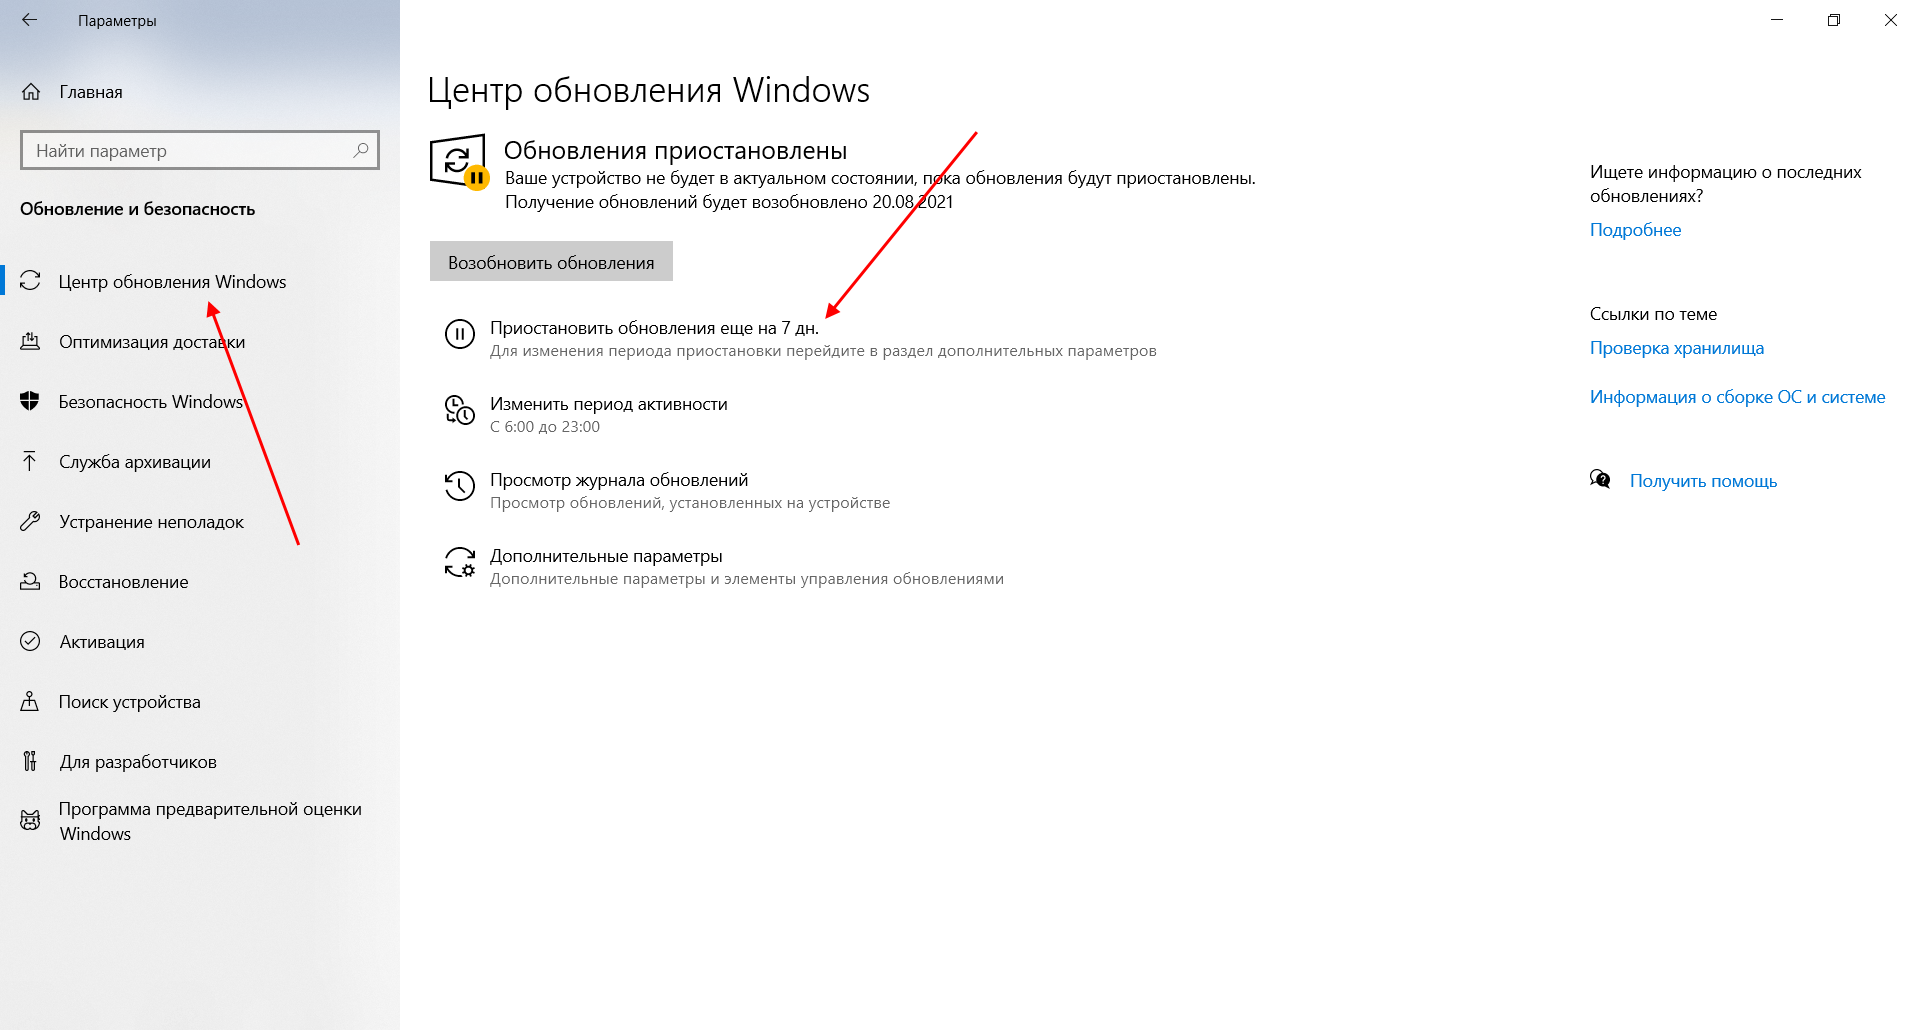
Если вы окончательно намучились с обновлениями и хотите отключить их загрузку и установку, то сделать это вполне реально. Начиная с Windows 10 1903 в Центре обновления Windows стала доступна функция «Приостановить обновление на 7 дн.», позволяющая откладывать все поступающие обновления. Пользователи Windows 10 Home могут активировать ее 5 раз подряд.
Для этого необходимо перейти в параметры компьютера (комбинация клавиш WIN+I), открыть раздел «Обновление и безопасность» и в подразделе «Центр обновление Windows» воспользоваться функцией «Приостановить обновление на 7 дн.».
В случае с обновлением драйверов все немного иначе – потребуется загрузить специальную утилиту, чтобы отключить их автообновление.
Другие возможные причины ошибок при обновлении и способы их исправления
Если вам до сих пор не удалось исправить ошибки с обновлением Windows 10, то вот еще несколько рекомендаций, которые могут вам помочь:
- Если ранее вы использовали стороннюю программу для отключения обновлений, то попробуйте с ее помощью снова запустить обновления.
- Если вы использовали утилиты для отключения слежки Windows 10, то они могли заблокировать доступ к серверам Майкрософт в файле hosts и брандмауэре. Удалите системные адреса из списка блокировок.
- Попробуйте установить DNS 8.8.8.8 и 8.8.4.4 в параметрах интернет-соединения.
- Возможно, что у вас просто отсутствует свободное место на компьютере, поэтому обновления не устанавливаются. Очистите диск и попробуйте снова.
- Проверьте, запущены ли у вас службы обновления Windows.
- Выполните поиск ошибки в интернете по сообщаемому коду, чтобы узнать о возможных причинах ее появления.
Надеюсь, что вы смогли исправить ошибку обновления Windows 10 без радикальных мер. Спасибо за внимание!
Содержание
- Способ 1: Встроенное средство устранения неполадок
- Способ 2: Сторонняя утилита
- Способ 3: Ручная очистка кеша обновлений
- Способ 4: Отключение стороннего антивируса / VPN
- Способ 5: Проверка служб
- Дополнительные рекомендации
- Если известен код ошибки
- Вопросы и ответы

Причин проблем с обновлением Windows 10 может быть множество – от ошибок в работе «Центра обновления» до критических повреждений важных системных файлов. Сначала разберем несколько универсальных способов, которые в большинстве случаев помогают исправить неполадку. Также в статье есть ссылки на статьи с решением самых распространенных кодов ошибок, которые могут отображаться во время установки апдейтов.
Способ 1: Встроенное средство устранения неполадок
За скачивание и установку апдейтов для операционной системы отвечает встроенный инструмент – «Центр обновления Windows». Также в «десятке» предусматривается средство, которое в автоматическом режиме проверяет программный компонент на наличие ошибок и исправляет их, если такие были обнаружены.
- Нажмите на кнопку «Пуск» и через него вызовите «Параметры».
- В открывшемся окне перейдите в раздел «Обновление и безопасность».
- Кликните по строке «Устранение неполадок» на левой панели, потом по ссылке на дополнительные средства.
- В списке отыщите «Центр обновления Windows» и кликните по строке ЛКМ. Появится кнопка для запуска средства.
Остается только дождаться завершения и результата проверки. Если ошибки действительно выявятся, они будут автоматически устранены. После попробуйте снова обновить Windows 10.
Способ 2: Сторонняя утилита
В качестве альтернативы штатным возможностям можно использовать утилиту Windows Update MiniTool от стороннего разработчика, которая позволяет обновить операционную систему с помощью встроенных средств. Она работает на основе штатного «Центра обновления», но при этом оснащена дополнительными функциями.
Скачать Windows Update MiniTool с официального сайта
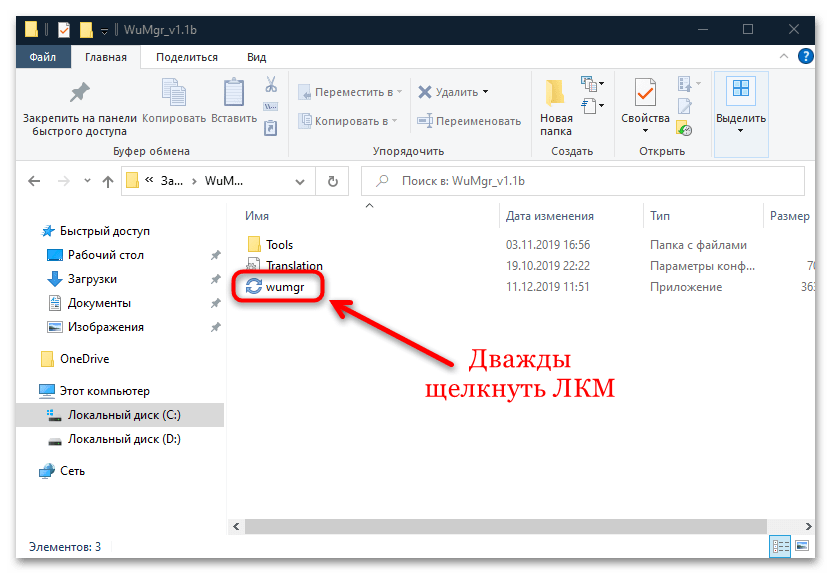
- Скачайте архив и распакуйте его после загрузки. Запустите файл «wumgr» двойным нажатием ЛКМ.
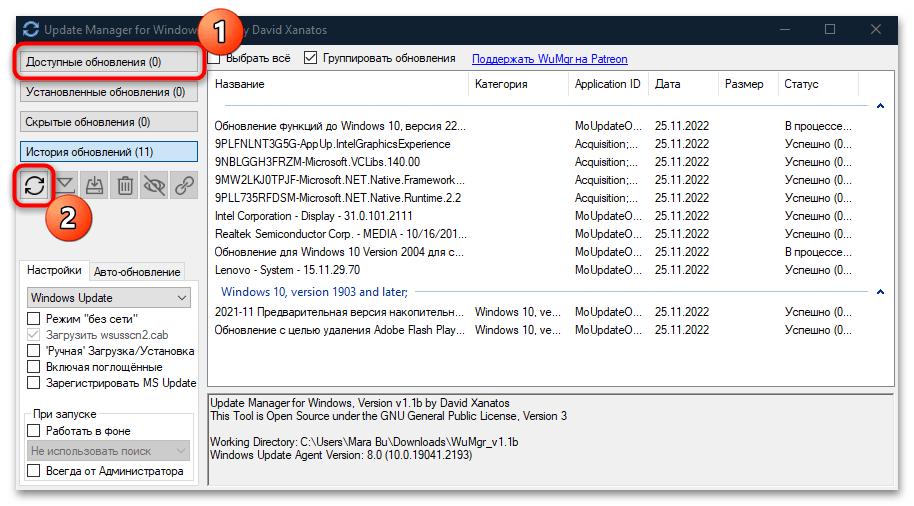
- Поскольку утилита не требует установки, сразу отобразится ее интерфейс. Кликните по кнопке «Доступные обновления», затем по значку в виде двух стрелок, чтобы инструмент проверил наличие актуальных апдейтов на серверах Microsoft.
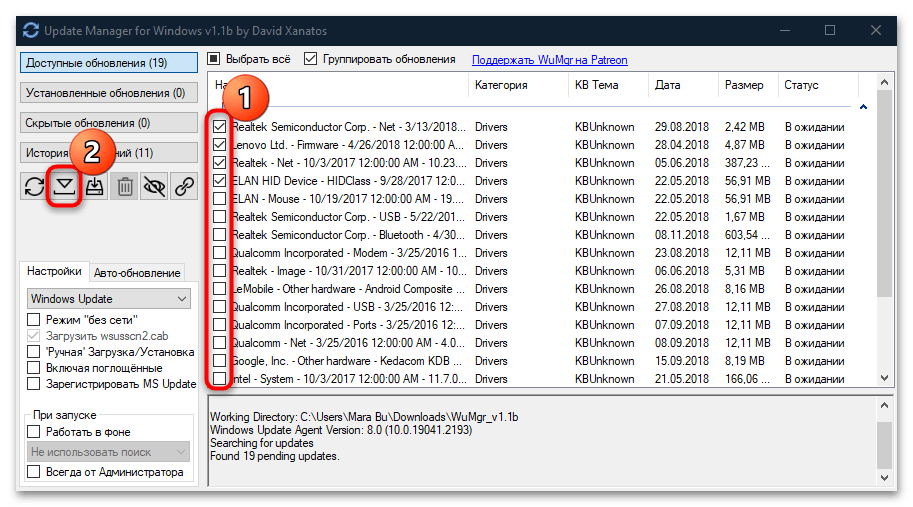
- После того как поиск завершен, в центральной части окна появится список доступных для установки компонентов. Выделите те, которые нужно скачать и инсталлировать, и нажмите на кнопку в виде стрелки вниз, чтобы начать загрузку.
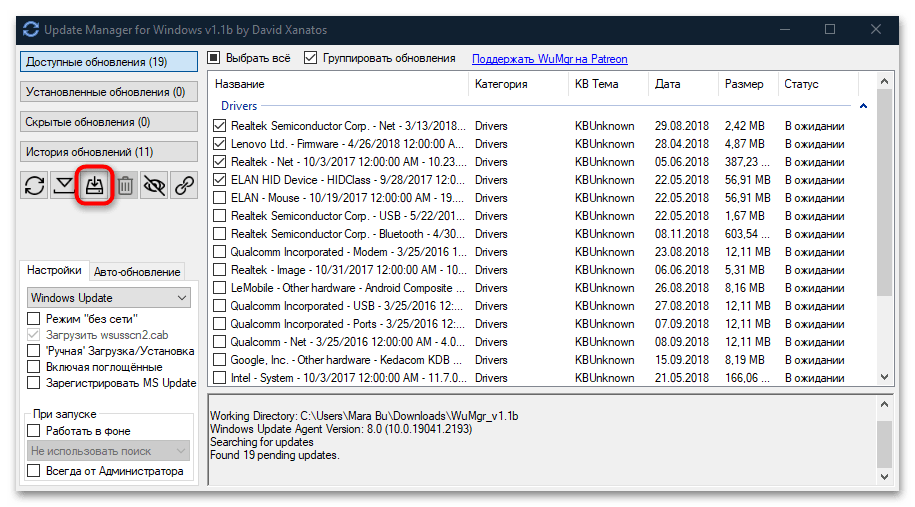
- Когда скачивание также завершится, кликните по кнопке с изображением стрелки и диска: тогда обновление будет установлено.
Этот способ не решает проблему с ошибками во время обновлений, если они возникли в системе, но бывает так, что все исправляется после установки актуальных апдейтов. Особенно если неполадка со стороны разработчиков Microsoft.
Читайте также: Программы для обновления Windows 10

Способ 3: Ручная очистка кеша обновлений
Из-за конфликтов файлов или их повреждений во время установки предыдущих обновлений также возникает ошибка. В этом случае может помочь ручная очистка кеша загруженных программных компонентов.
- Для начала временно отключите интернет. Самый быстрый способ – кликнуть по соответствующему значку в трее и выбрать опцию деактивации Wi-Fi, если это беспроводное соединение. При проводном достаточно вытащить шнур из LAN-разъема.
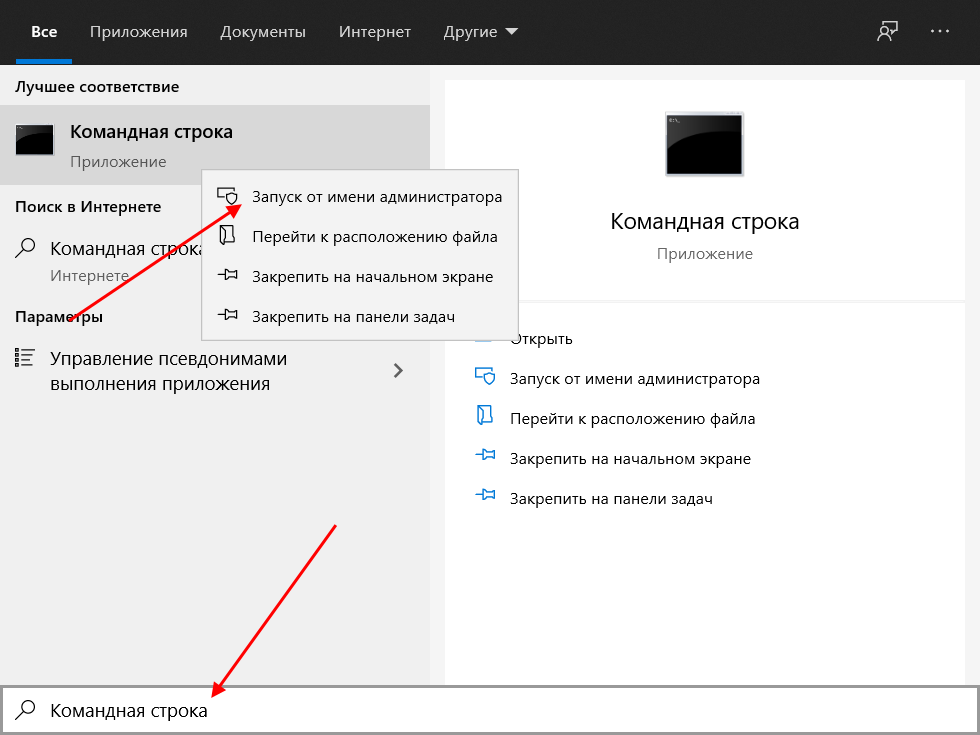
- Запустите консоль «Командная строка» от имени администратора, найдя это приложение в «Пуске».
- Сначала следует остановить работу «Центр обновления» и фоновую передачу. Введите поочередно команды
net stop wuauservиnet stop wuauserv, выполняя каждую из них нажатием на клавишу «Enter». - Затем откройте «Проводник». Вставьте в адресную строку следующий путь:
C:WindowsSoftwareDistribution. Все содержимое папки с кешем обновлений нужно удалить: выделите каталоги и нажмите клавишу «Delete» или воспользуйтесь функциями контекстного меню. - Вернитесь в окно «Командной строки» и запустите отключенные службы, прописав команды
net start bitsиnet start wuauserv, нажимая после каждой клавишу ввода.


После этого подключайтесь к интернету и пробуйте обновить Виндовс 10.
Способ 4: Отключение стороннего антивируса / VPN
Нередко корректной установке препятствуют сторонние антивирусы, которые блокируют инсталляцию, потому что ошибочно видят в апдейтах потенциальную угрозу. Также причиной конфликта может стать и активный VPN-сервис, поскольку подключение к серверам Microsoft происходит не напрямую, а в обход через сторонние серверы в других странах. Попробуйте временно отключить такой софт. В зависимости от интерфейса и раздела настроек алгоритм действий будет отличаться, но в нашем отдельном руководстве даны инструкции для самых популярных антивирусных решений.
Подробнее: Отключение антивируса
Способ 5: Проверка служб
Причиной, почему не обновляется Виндовс 10, может стать и отключенная служба, отвечающая за апдейты. Есть смысл проверить, работает ли она, а если нет, активировать ее:
- Через поиск в «Пуске» найдите оснастку «Службы» и запустите ее.
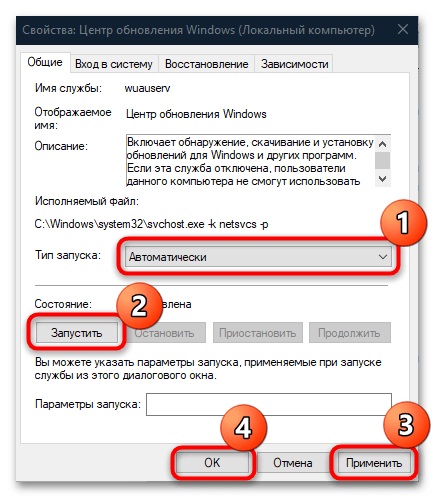
- В списке отыщите службы под названием «Центр обновления Windows». Дважды щелкните по ней ЛКМ, чтобы открыть окно с настройками.
- Убедитесь, что тип запуска выбран «Автоматически». Если служба остановлена, запустите ее работу, нажав на соответствующую кнопку внизу. Примените и сохраните настройки.

Если пришлось вручную исправлять состояние службы, после этого перезагрузите систему и проверьте, исправлена ли проблема с обновлениями.
Дополнительные рекомендации
В качестве дополнительных рекомендаций можно предложить несколько вариантов, которые позволят исправить системные ошибки, а не только сбой в работе «Центра обновления Windows». Например, если повреждены важные системные файлы, могут происходить различные неполадки, включая невозможность установить актуальные компонента для ОС. Попробуйте проверить данные на целостность, используя специальные утилиты SFC и DISM, которые предустановлены в системе.
Подробнее: Использование и восстановление проверки целостности системных файлов в Windows 10
Проверка на вирусы также может решить проблему с обновлениями Windows 10. Как известно, вредоносные утилиты вмешиваются в работу ОС, а блокировка инсталляции апдейтов – один из самых распространенных результатов их деятельности, поскольку средства защиты системы также не смогут обновиться. Применяя встроенный «Защитник», сторонние программы или портативные утилиты, просканируйте «десятку» на наличие такого софта.
Подробнее: Методы удаления вируса с компьютера под управлением Windows 10
Если ни один способ не помог, есть смысл попытаться откатить состояние операционной системы до точки восстановления. Это поможет в том случае, если недавно установленные программы вмешиваются в работу «Центра обновления», а также тогда, когда настройки системы сбились случайно или под воздействием вирусного ПО. Если в Windows 10 активна функция создания контрольных точек, то вернуться к предыдущему состоянию ОС несложно: достаточно воспользоваться специальной функцией, о которой мы писали ранее.
Подробнее: Откат к точке восстановления в Windows 10
Читайте также: Решаем проблему с бесконечной установкой обновлений Windows
Если известен код ошибки
При попытке установки обновлений нередко появляется системное окно с кодом ошибки. Зная это, проще решить проблему, поскольку именно в комбинации букв и цифр скрывается решение. У нас на сайте есть отдельные материалы, где разобраны некоторые распространенные ошибки, возникающие при попытке обновления Windows 10.
Подробнее: Исправление ошибки 0x8007042c / 0x800705b4 / 0x80070643 / 0x800f0988 / 0x80004005 / 0x80070490 / 0x80070422 / 0x803fa067 / 0x80073712 / 0x80070002 в Windows 10
Windows won’t update issue has been a common issue for many computer users. But to solve Windows 10 update problems has been a tough task. However, this article will introduce 7 solutions to the Windows 10 won’t update issue.
Why Windows 10 Won’t Update
Windows update is necessary for many computer users because updating new operating system can perfect the old one and overcome some bugs so as to protect computers and data safely. But some users complain that they have encountered Windows 10 won’t update issue.
Here we list some situations that may lead to Windows update failed.
- Windows 10 won’t download updates.
- Windows 10 update failed to install.
- Windows 10 update stuck.
- Windows 10 won’t update on restart.
- Windows 10 won’t update because of BIOS.
We just list some factors may lead to Windows 10 update failed. It is obvious that other reasons also can lead to Windows 10 upgrade errors. But no matter what causes lead to Windows 10 not updating problem, you can try to use the following 7 methods to have a try.
If you encounter the issue Windows 10 won’t update, you can try these solutions one by one.
Quick Video Guide:
Remove Third-party Security Software
First of all, a piece of third-party security software can protect your computer against virus attack or other security threats, but it also may lead to some application abnormal running.
Thus, if you have installed a piece of third-party security software, you can remove it temporarily and then run Windows Update again. Then we will talk about how to uninstall third-party software simply.
Step 1: Right-click Start menu, then choose Control Panel.
Step 2: Click Programs and Features, and choose the third-party software needing to be uninstalled, then right-click it and choose Uninstall to continue. After that, you can restart your computer and try to check whether Windows 10 won’t update issue is solved.
Check Windows Update Utility Manually
Windows Update is a Microsoft service for the Windows operating system, which automates downloading and installing software updates over the Internet. The service delivers software updates for Windows, as well as the various Microsoft antivirus products, including Windows Defender and Microsoft Security Essentials.
If Windows 10 won’t update, you can try to check whether the Windows Update Utility is working. Then we will introduce how to check Windows Update Utility.
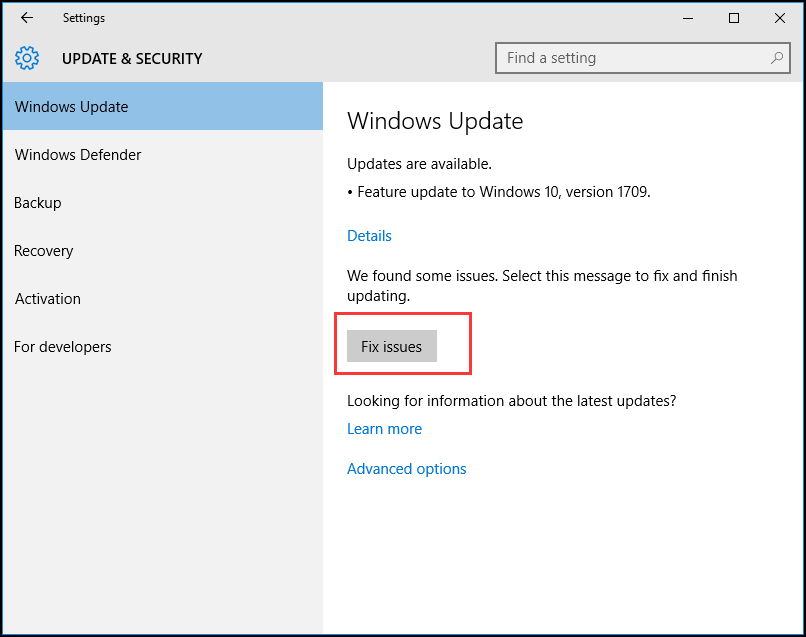
Step 1: Launch Settings app from the Windows 10 Start Menu or press Windows Key + I key together and click Update & Security.
Step 2: You will see the following popup window. If there’s something wrong and Windows knows what it is then you can find details here. Thus you need to click Fix issues and Windows Update utility will help to finish updating automatically.
Step 3: You can also click the Advanced options to know more information. It is recommended to choose Automatic.

After all steps have been finished, you can try to restart our computers and check whether the problem Windows won’t download updates is solved.
Keep All Services about Windows Update Running
If all services about Windows update are not running, then you may also meet the issue Windows 10 won’t update.
Now, we will introduce how to keep all services about Windows update running step by step.
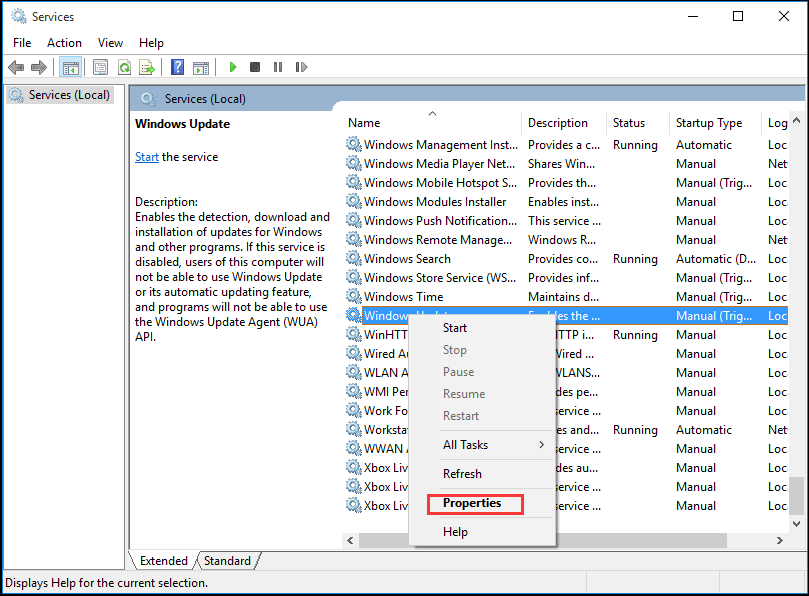
Step 1: Right-click the Start button of Windows and choose Run or press Windows + R keys. Then input services.msc in the box and click OK to continue.
Step 2: In the popup window, choose Windows Update and right-click, and then choose Properties.
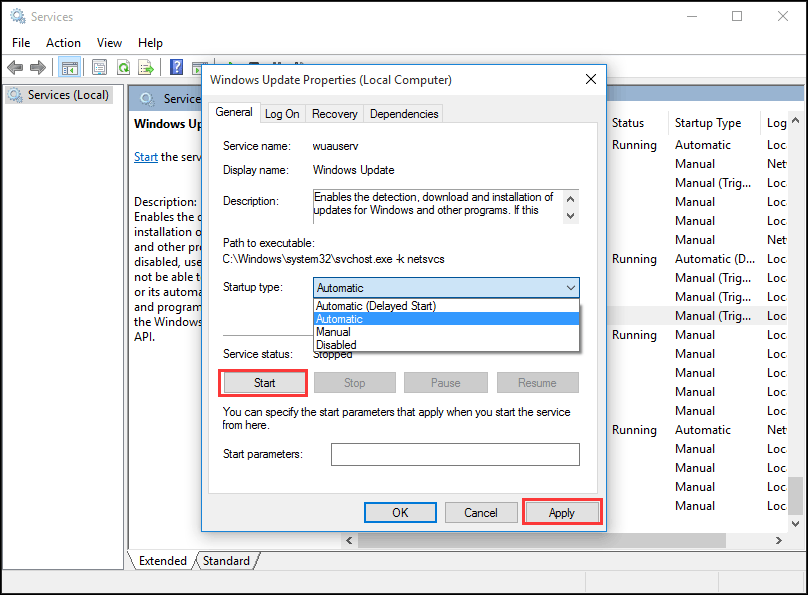
Step 3: In the popup window, set the Startup type as Automatic. If the Service Status is stopped, click Start to start it, and then click Apply and OK to confirm it.
Step 4: Locate and right-click Background Intelligent Transfer Service (BITS), then choose Properties. Here set Startup type as Automatic, and make sure the Service Status is Running. Then click OK to continue.
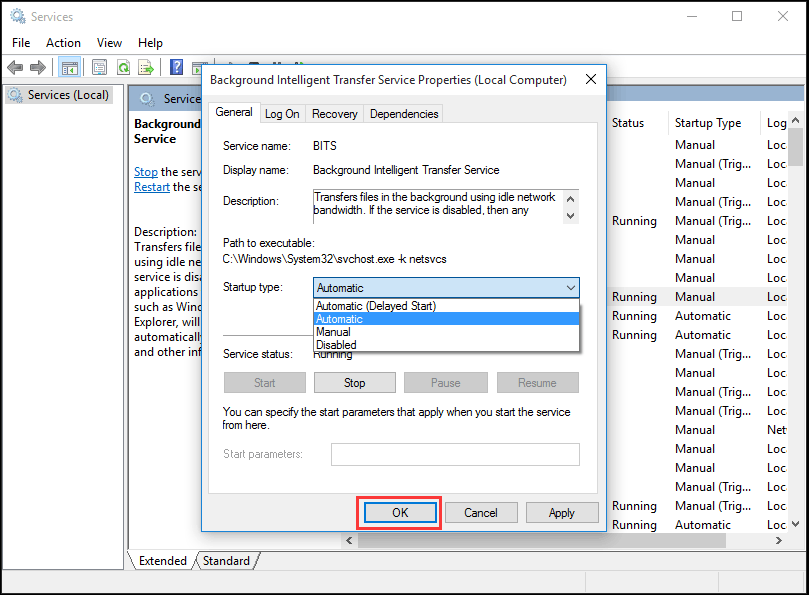
Step 5: Locate and right-click Cryptographic Service and choose Properties. Then set Startup type as Automatic. Then repeat the process to finish the setting.
When all steps have been finished, you can restart computers and check whether Windows 10 update error still occurs.
If Windows Update Utility is normal, but Windows 10 still won’t update, then you need to go to the next method to run Windows Update Troubleshooter.
RECOMMENDED: Should I Upgrade to Windows 10 – How to Decide?
Run Windows Update Troubleshooter
Microsoft provides an automated diagnostic tool called Windows Update Troubleshooter which can be used to fix Windows 10 won’t download updates issues. Now, we will introduce how to use Troubleshooter to fix Window 10 update error.
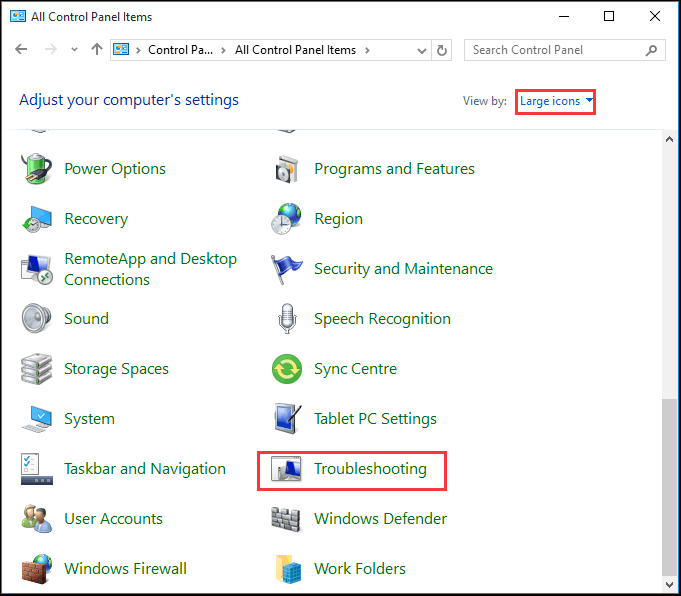
Step 1: Right-click Start menu and choose Control Panel to continue.
Step 2: On the upper right corner, switch the View by option to Large icons and choose Troubleshooting.
Step 3: Click View all to continue and choose Windows Update. Run it to enter the main interface, and then click Next to continue.

Step 4: Click Try troubleshooting as an administrator to continue.

Step 5: Wait for this software to detect and fix errors. Then click Close to exit Windows Update Troubleshooter.

Step 6: Exit Windows Update Troubleshooter, restart our computer and again try to update Windows 10.
Tip: If computer doesn’t install Windows Update Troubleshooter, try to click the link and download it.
Restart Windows Update Service by CMD
If Windows 10 is not updating, you can try to restart Windows Update services. The followings are the detailed operation methods.
Step 1: Right-click the Start menu of Windows 10 or press Windows key + X key together, then choose Command Prompt(Admin).
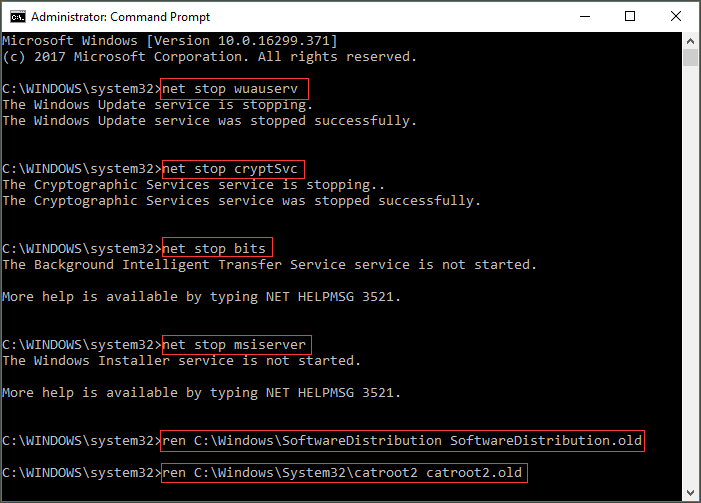
Step 2: In the popup window, type the following command and press Enter after each command. Wait for each process to finish before continuing to the next one.
net stop wuauserv
net stop cryptSvc
net stop bits
net stop msiserver
ren C:WindowsSoftwareDistribution SoftwareDistribution.old
ren C:WindowsSystem32catroot2 catroot2.old
net start wuauserv
net start cryptSvc
net start bits
net start msiserver
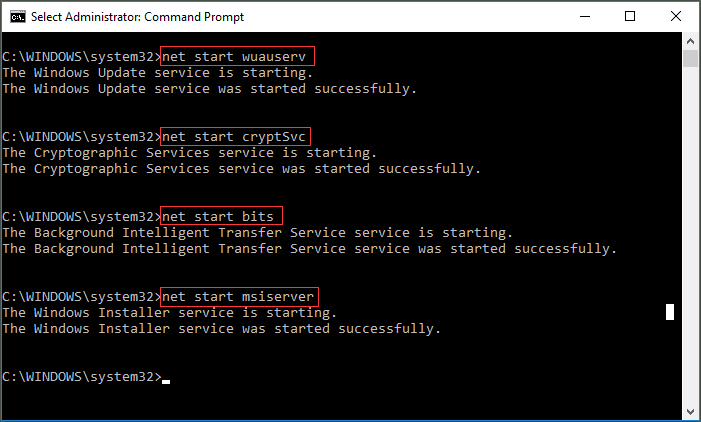
After we have finished all commands, we can restart our computer and try to check whether Windows 10 won’t download updates issue is solved.
Increase Free Space of System Drive
Sometimes, the problem Windows 10 won’t install or download update may be caused by small capacity of the system drive. Thus you had better increase the free space of the system drive in order to install Windows 10.
There are several ways to increase the capacity of system drive. We will introduce two ways, which are Disk Clean-up and Extend Partition.
Disk Clean-up
Disk Clean-up is very useful to free up disk space and remove some unnecessary files on a computer hard drive, which not only occupy the memory of system hard drive but also slow down our PC.
Then we will introduce how to clean up disk step by step.
Step 1: Right-click the Start menu of Windows 10 and choose Run, and input diskmgmt.msc in the box. Then click the OK or hit Enter to continue.

Step 2: Enter the main interface of Disk Management. Then choose the system drive and choose Properties from the context menu.
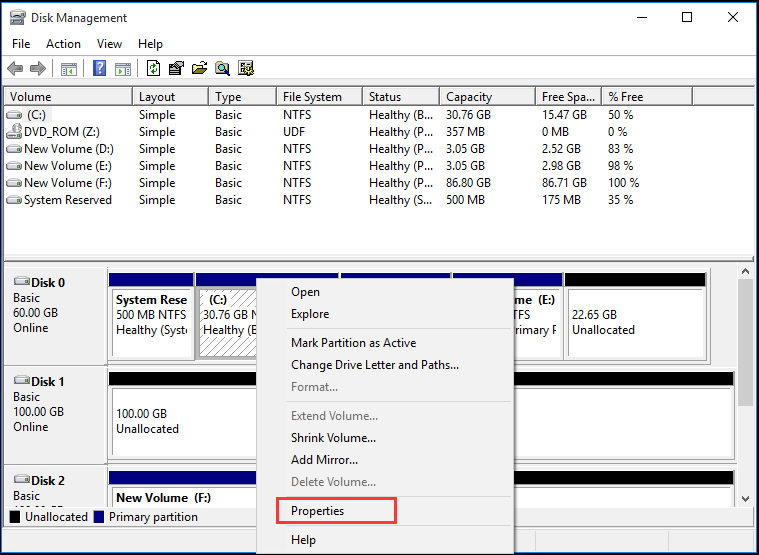
Step 3: You will see a popup window and click the Disk Clean-up to continue.

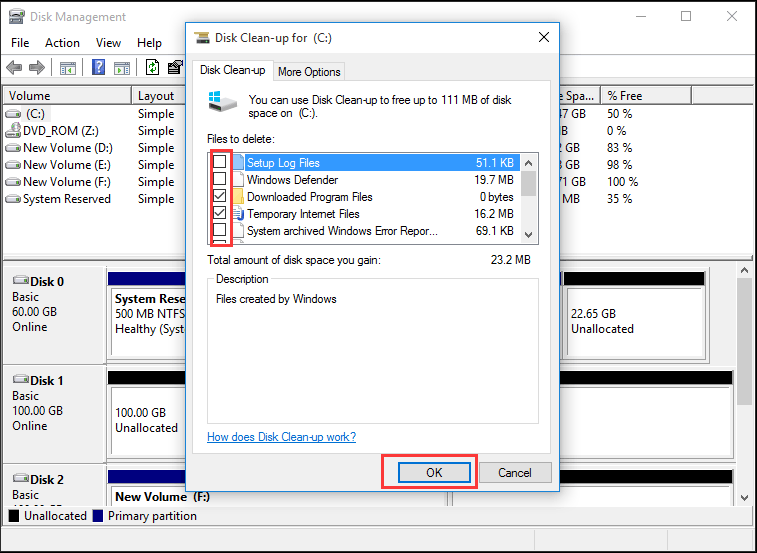
Step 4: Disk Clean-up will take a few minutes to calculate the free space but the specific time depends on how much files the disk has. Then you can tick the files needing to be deleted. Last, click OK to continue.
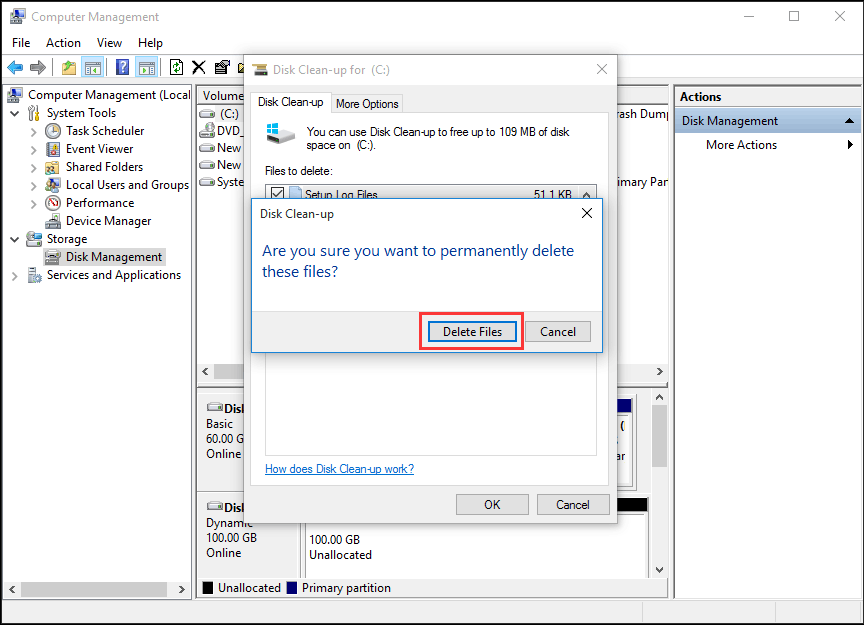
Step 5: You can see a popup message Are you sure to want to permanently delete these files and click Delete Files to continue. Then the Disk Clean-up can be completed.
MiniTool Partition Wizard
In fact, when cleaning up disk, you may find that the capacity of system drive only can be increased a little. If the size of new operating system is large, thus the capacity of system drive is not enough to install it (Here is an article which introduces the Windows 10 Size).
Therefore, applying best partition software to extend partition may be helpful. MiniTool Partition Wizard has been the choice of thousands of users. This high-performance tool helps make the optimal disk space distribution and ensure an ideal hard disk structure.
Buy Now
Step 1: To extend system partition, you had better use the bootable edition. So, launch MiniTool Partition Wizard to enter its main interface, Then click Bootable Media Builder to create a boot drive.
Step 2: Connect it to your computer and boot from it.
Step 3: Choose the system drive. Then choose Extend Partition from left pane or choose Extend from context menu.

Step 4: Then open the dropdown list from the Take Free Space from menu and choose any partition or unallocated space on the same drive to take free space.
Meanwhile, you also can drag the sliding handle to decide how much free space you want to take. Then press the OK button to continue.

Step 5: Choose the Apply button on the top of the menu to extend system partition.
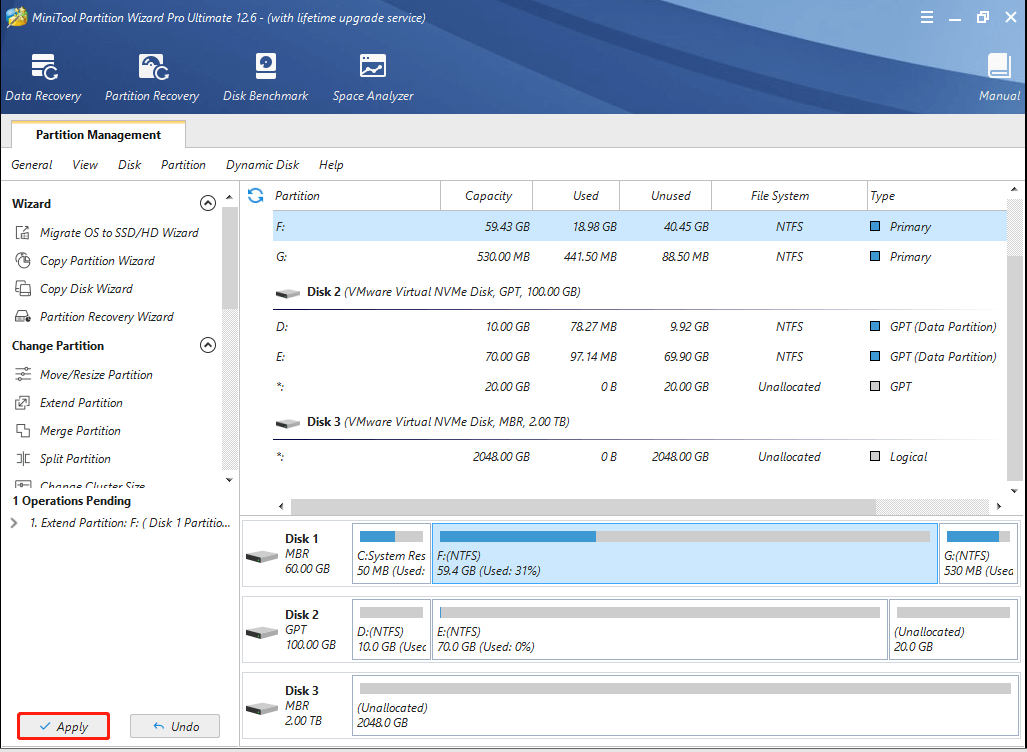
That’s all operation methods of extending partition by MiniTool Partition Wizard Pro. It can extend partition without data loss.
Compared with extending volume by Disk Management, MiniTool Partition Wizard can extend partition even though there is no adjacent unallocated space on the right of the system partition. Therefore, MiniTool Partition Wizard is more convenient to extend partition.
After having increased the capacity of system drive, you can restart our computers and try to get the new Windows update to check whether the issue Windows 10 won’t update is solved.
“I used MiniTool Partition Wizard to help me extend my system drive without any data loss and I can update Windows 10. It can take space from the nonadjacent unallocated space.”Click to Tweet
Repair Corrupted System Files
The issue Windows 10 won’t update may be caused by the corrupted system files. So in order to solve this problem, you can run System File Checker to check and repair the corrupted system files.
And now, we will show you the detailed steps.
Step 1: Type Command Prompt in the search box of Windows 10 and right-click it to choose the Run as administrator.
Step 2: In the Command Prompt windows, type the command sfc /scannow and hit Enter to continue.
After that, the scanning process will begin and please do not close the command line window until you see the message verification 100% completed. When the process is finished, you can reboot your computer and check whether the issue computer won’t update Windows 10 is solved.
Related article: Quickly Fix – SFC Scannow Not Working (Focus on 2 Cases)
However, if none of above methods works, you may need to reinstall Windows 10.
“I have successfully fixed Windows 10 update problems after keeping all services about Windows Update running. And it is easy to operate.”Click to Tweet
Bottom Line
Are you still troubled by Windows 10 update error after reading this post? It’s your turn to have a try on above methods one by one. When you extend partition, try to use MiniTool Partition Wizard. At the same time, remember to back up all files before you want to have a try on any method so as to avoid an accident.
If you have any questions when you are using MiniTool Partition Wizard, you can contact us by sending email to [email protected]. Or if you have a nice solution to Windows 10 not upgrading, you can share it in the comment zone.
Windows 10 Won’t Update FAQ
What do I do if my Windows 10 won’t update?
- Remove third-party security software.
- Check Windows update utility manually.
- Keep all services about Windows update running.
- Run Windows update troubleshooter.
- Restart Windows update service by CMD.
- Increase free space of system drive.
- Repair corrupted system files.
How do I force Windows 10 to update?
- Open Command Prompt as an administrator.
- Type the command wuauclt.exe /updatenow and hit Enter to continue.
- Open Settings and choose Update & Security.
- Go to Windows Update tab and click Check for updates.
What to do if my computer is stuck updating?
- Wait or restart the computer.
- Free up disk space.
- Disable all non-Microsoft programs.
- Turn off Firewall temporarily.
- Run Windows update troubleshooter.
- Restart Windows update service.
- Run antivirus.
Why is Windows update taking so long?
Windows 10 update takes so long to complete because Microsoft is constantly addling larger files and features to them. And the new Windows update will fix some bugs. The biggest updates are usually released on the spring and fall of every year.
Windows Update is sometimes underestimated as a cornerstone of your system’s integrity and security. Not only does it keep your PC healthy and current, but it also delivers new features from time to time to keep the platform fresh and relevant. However, Microsoft’s updates don’t always roll out as smoothly as the company intends.
Contents
- Manage automatic updates
- Run the Windows Update Troubleshooter
- Check your installation error code
- If all else fails, these quick fixes might do it
Here, we’ll show you how to get Windows Update working again when it fails and what to do if it looks like an update is causing problems.
Manage automatic updates
You can’t permanently turn off automatic updates in Windows 10, but you can manage when your machine installs an update and reboots your PC. That way, you can at least make sure your machine doesn’t restart during your workday or at an inconvenient time.
Change your active hours
Step 1: Click on the Notifications icon on the taskbar followed by the All Settings tile in the Action Center.
Step 2: Select Update & Security.
Step 3: The Windows Update category should open by default. Click Change Active Hours.
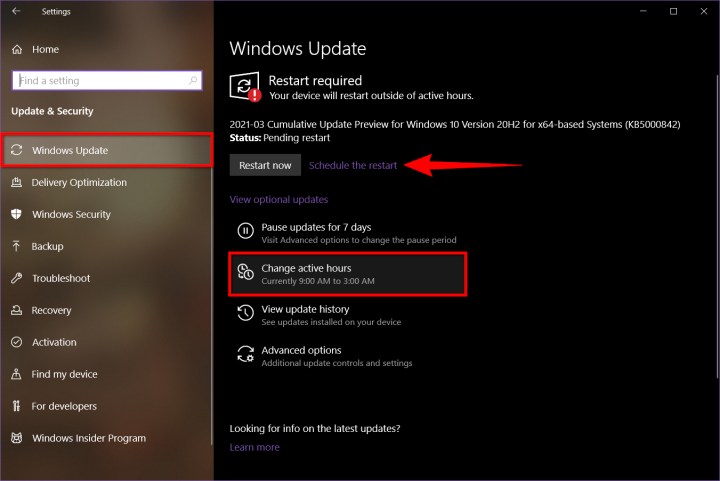
Step 4: You should see the current active hours displayed under a toggle. Click the Change link.
Step 5: Set the start time and the end time, as shown below, and then click the Save button. The maximum length is 18 hours.

Reschedule a system reboot
If Windows 10 already scheduled a restart to finish installing an update, you can change the time and day to better fit your schedule. Here’s how:
Step 1: Click on the Notifications icon on the taskbar followed by the All Settings tile in the Action Center.
Step 2: Select Update & Security.
Step 3: The Windows Update category should open by default. Click on the Schedule the Restart link next to the Restart Now button.
Step 4: Click on the toggle to enable your custom schedule.
Step 5: Pick a time and a day and you’re good to go.
Pause Updates
If you’re having specific issues, the problem may not be with your PC specifically. Instead, a problematic update may be causing issues across multiple devices that Microsoft needs to fix. Here’s how to pause updates for up to 35 days:
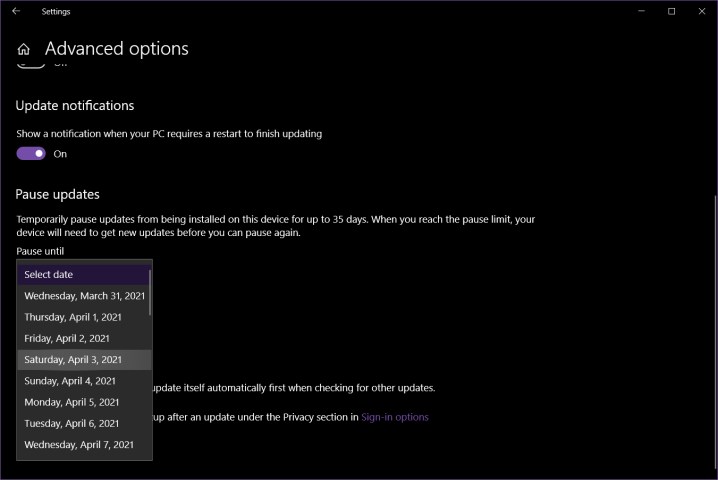
Step 1: Click on the Notifications icon on the taskbar followed by the All Settings tile in the Action Center.
Step 2: Select Update & Security.
Step 3: The Windows Update category should open by default. Click Advanced Options.
Step 4: Click on the downward-facing arrow next to Select Date in the Pause Updates section.
Step 5: Select a date on the drop-down list.
Note: This only applies to “quality” updates, aka cumulative fixes. This does not apply to “feature” updates because they are not automatically installed.
Run the Windows Update Troubleshooter
Microsoft knows that, sometimes, updates (like the infamous Windows 10 May 2019 update) can bring along a few unwanted issues, so it has a Windows Update Troubleshooter. This tool will look for any obvious problems that may be keeping Windows Update from functioning correctly. If it can, the troubleshooter will fix them automatically or at least let you know what is causing the issue.
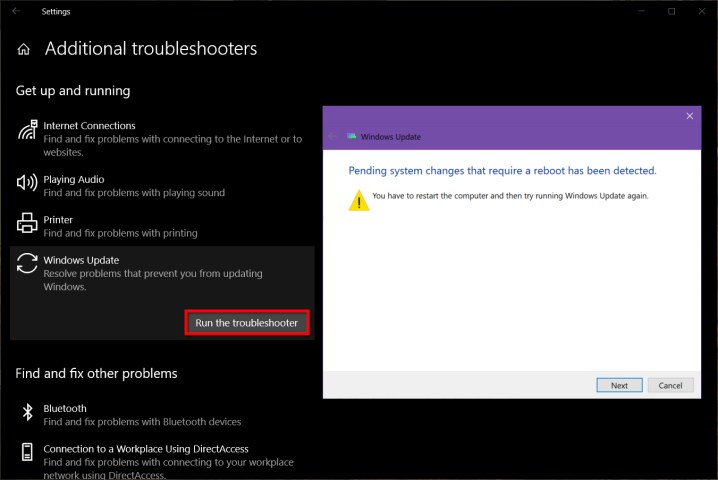
To access the Windows Update Troubleshooter, do the following:
Step 1: Click on the Notifications icon on the taskbar followed by the All Settings tile in the Action Center.
Step 2: Select Update & Security.
Step 3: The Windows Update category should open by default. Click on the Troubleshoot tab listed on the left.
Step 4: Click Additional Troubleshooters listed on the right.
Step 5: Click Windows Update.
Step 6: Click the Run the Troubleshooter button.
The troubleshooter won’t solve every problem, but it’s a great place to start and will usually provide useful information even if it can’t offer a fix.
Check your installation error code
If your general update or feature update fails or causes problems, it will often give you an error code. The codes don’t tell you much by themselves, but they include a lot of useful info if you hop online and consult Microsoft’s guide on the matter. Below, we’ve included a table highlighting some of the more common errors.
| 0x80073712 | A file needed by Windows Update is likely damaged or missing. |
| 0x800F0923 | This might indicate that a driver or other software on your PC isn’t compatible with the upgrade to Windows 10. For info about how to fix this problem, contact Microsoft support. |
| 0x80200056 | This could mean that the upgrade process was interrupted because you accidentally restarted your PC or signed out of your PC. Try upgrading again, and make sure your PC is plugged in and stays turned on. |
| 0x800F0922 |
This error might mean that your PC couldn’t connect to the Windows Update servers. If you’re using a VPN connection to connect to a work network, disconnect from the network, turn off the VPN software (if applicable), and try to upgrade again. The error could also mean there isn’t enough free space in the System Reserved partition. You might be able to fix this problem by using third-party software to increase the System Reserved partition size. |
| 0xC1900208 – 0x4000C | This could indicate that an incompatible app installed on your PC is blocking the upgrade process from completing. Check to make sure that any incompatible apps are uninstalled and then try upgrading again. |
|
0xC1900200 – 0x20008 0xC1900202 – 0x20008 |
This may signify that your PC doesn’t meet the minimum requirements to download or install the upgrade to Windows 10. |
|
0x80070070 – 0x50011 0x80070070 – 0x50012 0x80070070 – 0x60000 |
This likely indicates that your PC doesn’t have enough space available to install the upgrade. Free some space on the drive and try again. |
This guide is designed specifically for Windows 10. Error codes may not mean the same thing in other versions of Windows.
If all else fails, these quick fixes might do it

If our instructions up until now haven’t resolved your issues, then it’s time to go back to the tried-and-true methods, the tricks that have been solving update errors since the update was first invented. Here are a few options that may work for you.
Restart your computer
This is a surprisingly effective method that will solve a host of computer issues — and it often works for Windows Update errors too. When you encounter an error message, restart your machine and try to rerun the updates. If you haven’t run Windows Update for some time, then you might have to repeat this process several times before all updates have been installed.
However, don’t just restart the machine. Turn it off for a few moments so the RAM is cleared of any nefarious code, then turn the machine back on. Data in RAM doesn’t stick around when there’s no power, so you have a clean slate when you boot back into Windows.
Do you have enough disk space?
One scenario in which updates may fail is when your system drive is running out of space. Double-check that you have at least 10GB free. If you don’t, perform a disk cleanup to remove files. Here’s how:
Step 1: Type Disk Cleanup into the taskbar’s search box and select the resulting app.
Step 2: Use the downward-facing arrow to select the drive you need to clean — presumably, it’s the C Drive — then click OK.
Step 3: Specify the type of file that you want to remove and select OK. Try to stay away from important system files, however.
Alternatively, third-party software like CCleaner can be great for freeing up extra space on your system. For more information on this topic, check out our more complete guide on managing Windows 10’s storage space.
Is malware causing the issue?
Malware can affect essential files and services, so it’s vital to run a scanner. If you don’t have antivirus software, look at our favorites for Windows-based computers.
Contact Microsoft Support
If you’re out of options, contact Microsoft support. Visit their contact page and start a chat, request a callback, or make a call. You can also ask the community, which can be useful if there’s already a forum on the issue.
![]()
Today’s tech news, curated and condensed for your inbox
Check your inbox!
Please provide a valid email address to continue.
This email address is currently on file. If you are not receiving newsletters, please check your spam folder.
Sorry, an error occurred during subscription. Please try again later.
Editors’ Recommendations
-
This huge password manager exploit may never get fixed
-
Wi-Fi not working? Here’s how to fix the most common problems
-
The best capture cards for 2023: Xbox, PlayStation, and PC
-
The best Chromebook for students for 2023
-
The best web browsers for 2023
Основные причины таких ошибок при обновлении Windows 10, на пример, перестают работать определенные службы обновления, файлы кэша Windows, сбой серверов Microsoft и поврежденные компоненты. Средство устранения неполадок обновления и командная строка — два эффективных способа решить проблему с обновлением Windows. Кроме того, можно попробовать решить эту проблему вручную, исправив поврежденные системные файлы, установив обновления безопасности или обновления стека обслуживания.

Ниже представлены пошаговые инструкции по перезагрузке компонентов Центра обновления Windows и проверке системных файлов, чтобы исправить ошибки Центра обновления Windows 10 при загрузке и установке обновлений.
Содержание
- Исправляем Центр обновления Windows с помощью средства устранения неполадок
- Устанавливаем последние обновления вручную
- Устанавливаем последние обновления стека обслуживания
- Восстанавливаем поврежденные системные файлы и проверяем образ системы
- Перезапускаем Центр обновления Windows с помощью командной строки
Исправляем Центр обновления Windows с помощью средства устранения неполадок
Использование средства устранения неполадок — самый простой способ исправить компоненты Центра обновления Windows. Таким образом, это может решить проблему загрузки и установки обновлений. Вот шаги, которыми нужно следовать:
- Сначала посетите веб-сайт Microsoft, чтобы загрузить средство устранения неполадок Центра обновления Windows.
- После загрузки установочного файла щелкните на него два раза левой кнопкой мыши, чтобы запустить средство устранения неполадок.

- Выберите Центр обновления Windows и нажмите Далее.
- После этого нажмите Попробуйте выполнить устранение неполадок от имени администратора.
- Снова откройте средство устранения неполадок Центра обновления Windows, если оно закрылось или выберите пункт Диагностика сетей Windows, затем нажмите Далее, чтобы продолжить.
- Следуйте инструкциям на экране, как описано, пока проблема с сетью не будет решена. Проблемы с сетью могут ограничивать загрузку обновлений Windows.
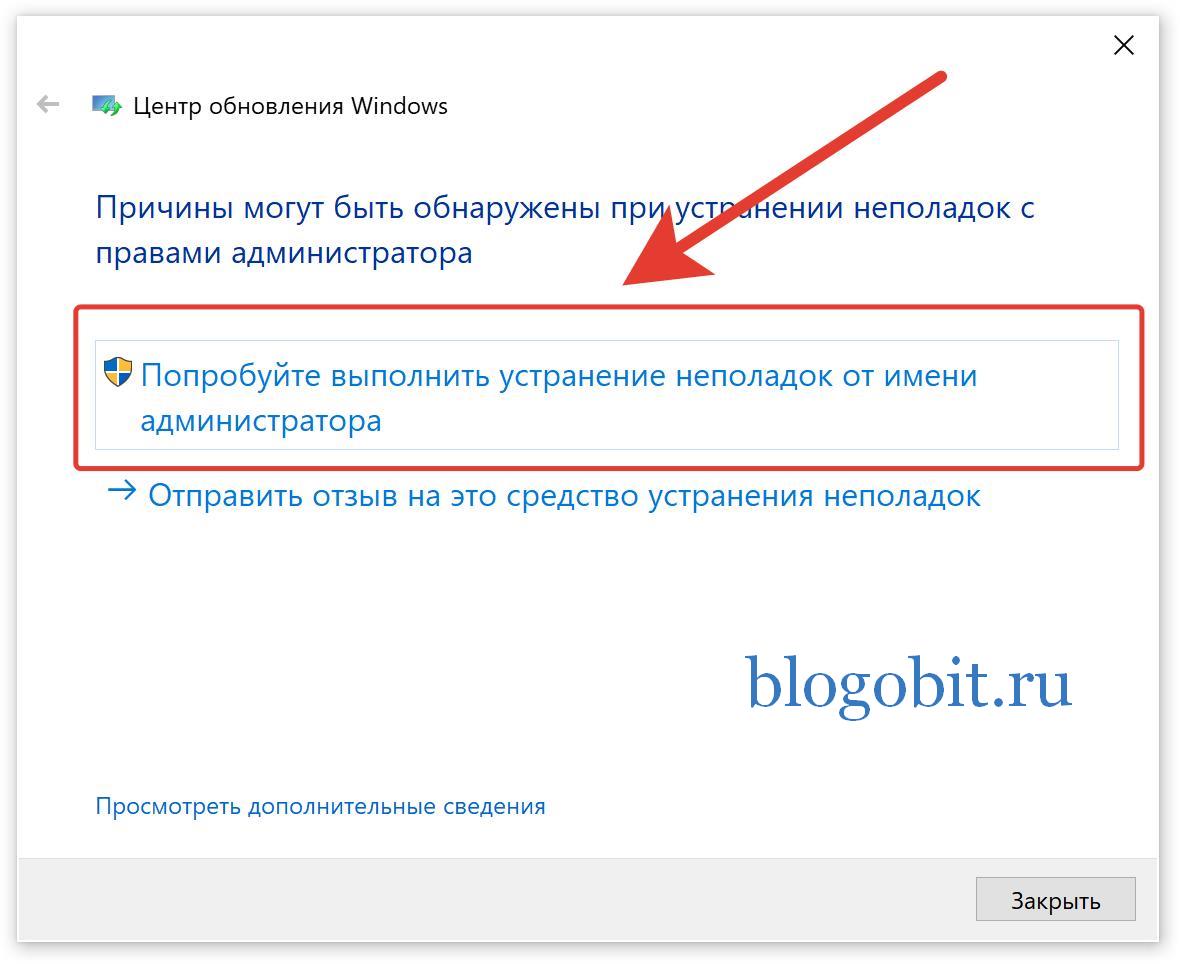
Вот и все, теперь вы можете закрыть этот инструмент и перезагрузить систему. Ваш компьютер должен начать загружать и устанавливать обновления после входа в систему, проверьте. Если ошибки обновления остались, попробуйте другие решения, описанные ниже.
Устанавливаем последние обновления вручную
Если вы по-прежнему сталкиваетесь с ошибками при обновлении вашей операционной системы, попробуйте вручную загрузить и установить необходимые исправления. Для этого следуйте этим рекомендациям:
- Нажмите клавиши Win+R в окне Открыть введите winver и нажмите Enter.
- Снова нажмите Win+R и в окне Открыть введите:
wmic qfe list brief /format:table
- В появившемся списке обновлений, посмотрите номер последнего обновления установленного в системе.
- Откройте в браузере сайт журнала обновлений Windows 10.
- Сравните пакеты обновлений, соответствующие вашей версии и сборке ОС Windows 10, представленные в журнале обновлений Windows 10 (Шаг 4) и установленные в вашей системе, которые мы выводили в командной строке (Шаг 3). Посмотрите номер накопительного бновления, которого не хватает в вашей системе и запишите их (в приведенном примере установлены все обновления, отследите по этому примеру, какие отсутствуют у вас).
- После этого откройте каталог Центра обновления Майкрософт.
- Найдите в каталоге последнее/необходимое накопительное обновление (записанное на Шаге 5) и загрузите его в соответствии с архитектурой вашей системы (32-разрядная (x86) или 64-разрядная (x64)).
Внимание! Если вы не знаете архитектуру своей операционной системы, одновременно нажмите сочетание клавиш Win + I, чтобы открыть окно Параметры Windows. Здесь в разделе Система выберите параметр О системе на левой панели. На правой панели вы можете увидеть характеристики вашего устройства.
- После обновления вашей системы с помощью последнего накопительного пакета обновления, проверьте, появляется ли у вас ошибка или нет.
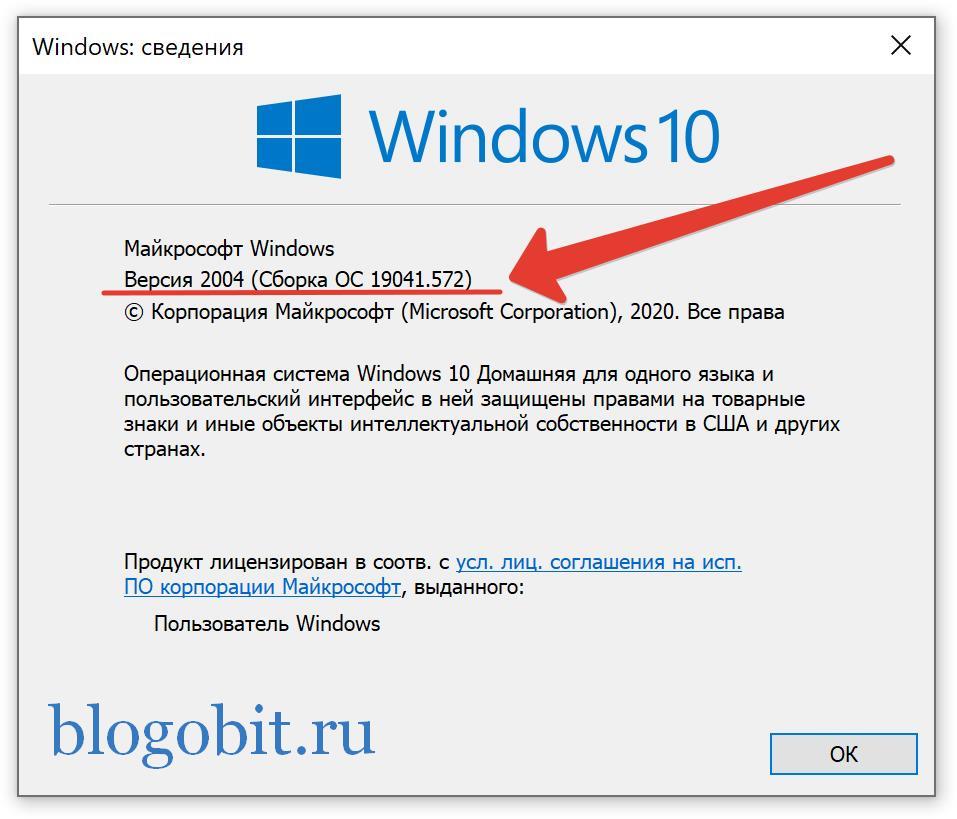
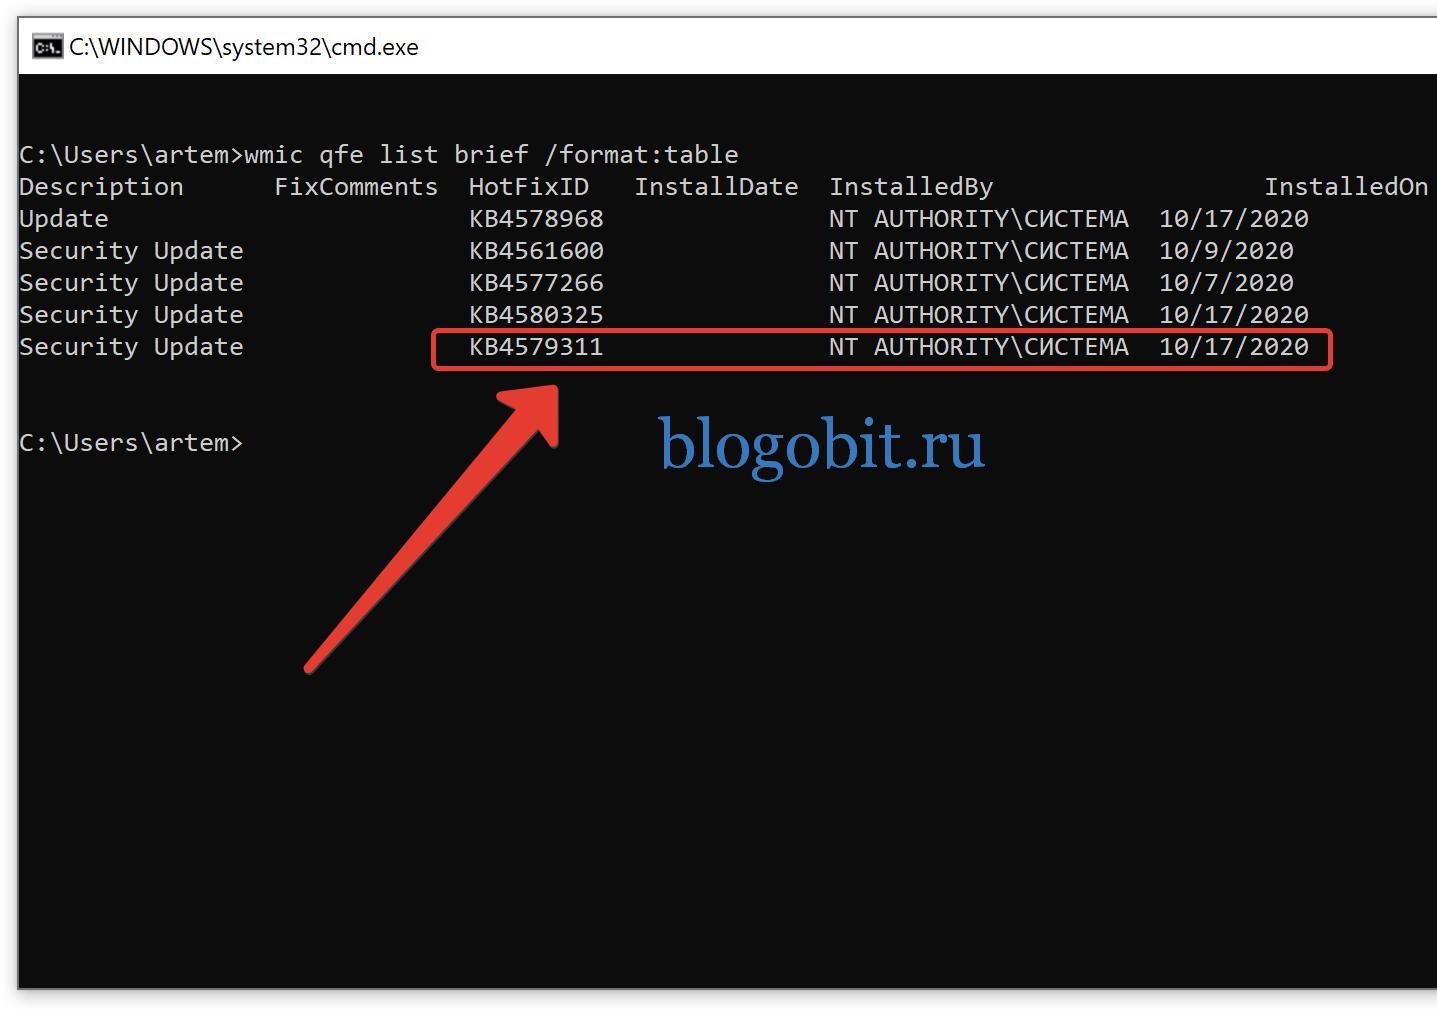
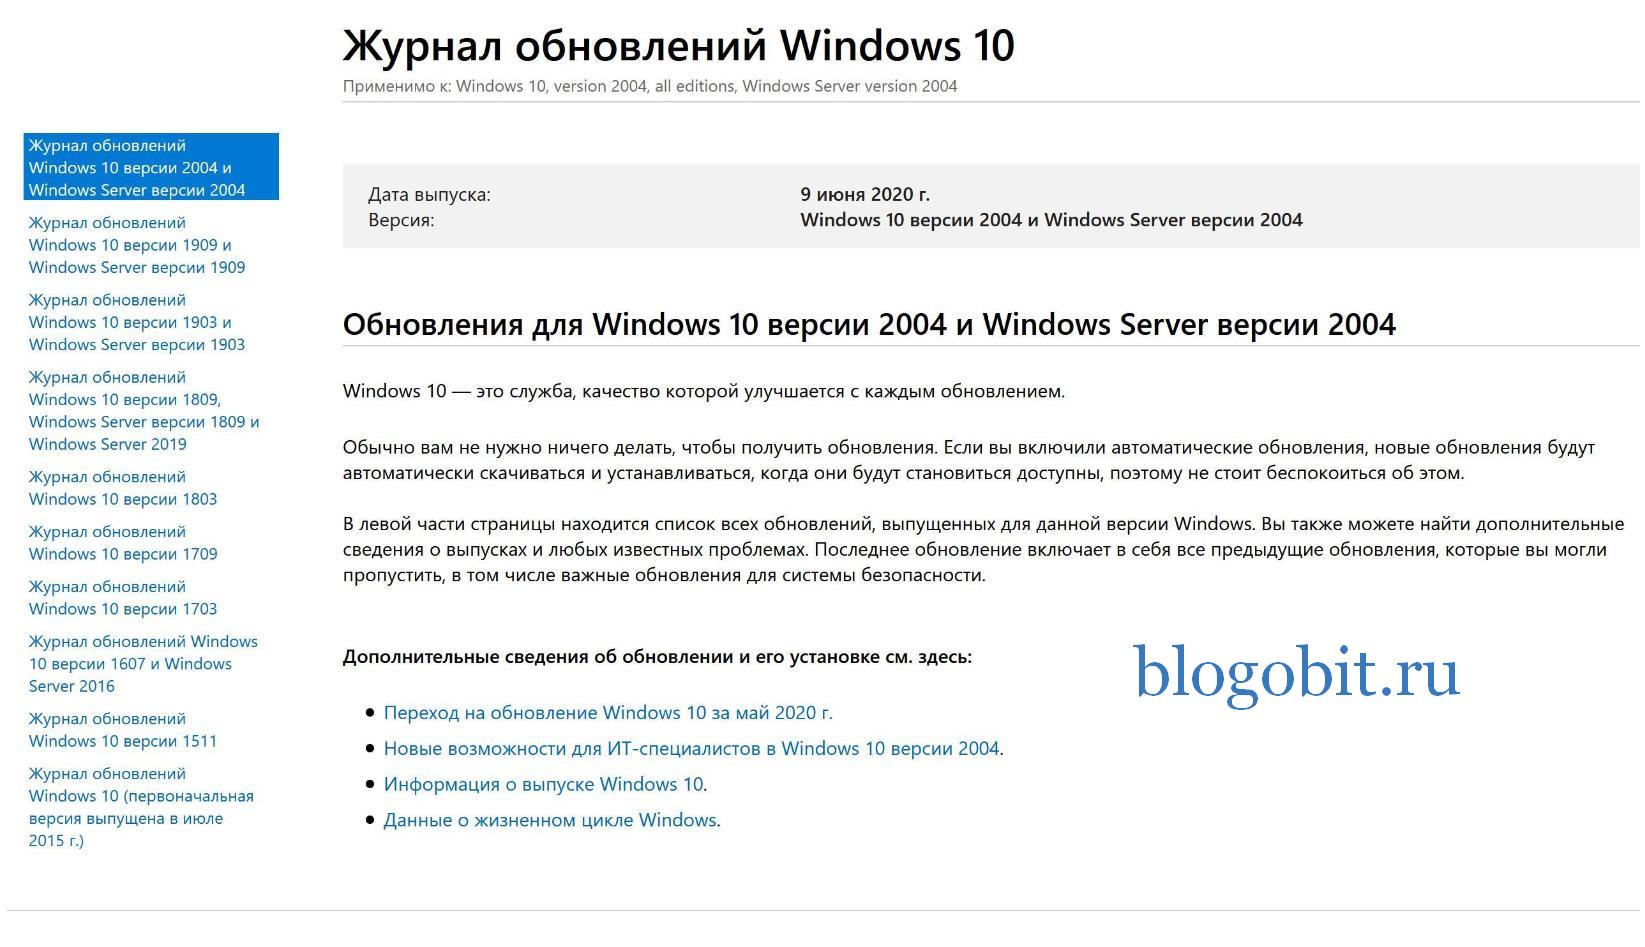
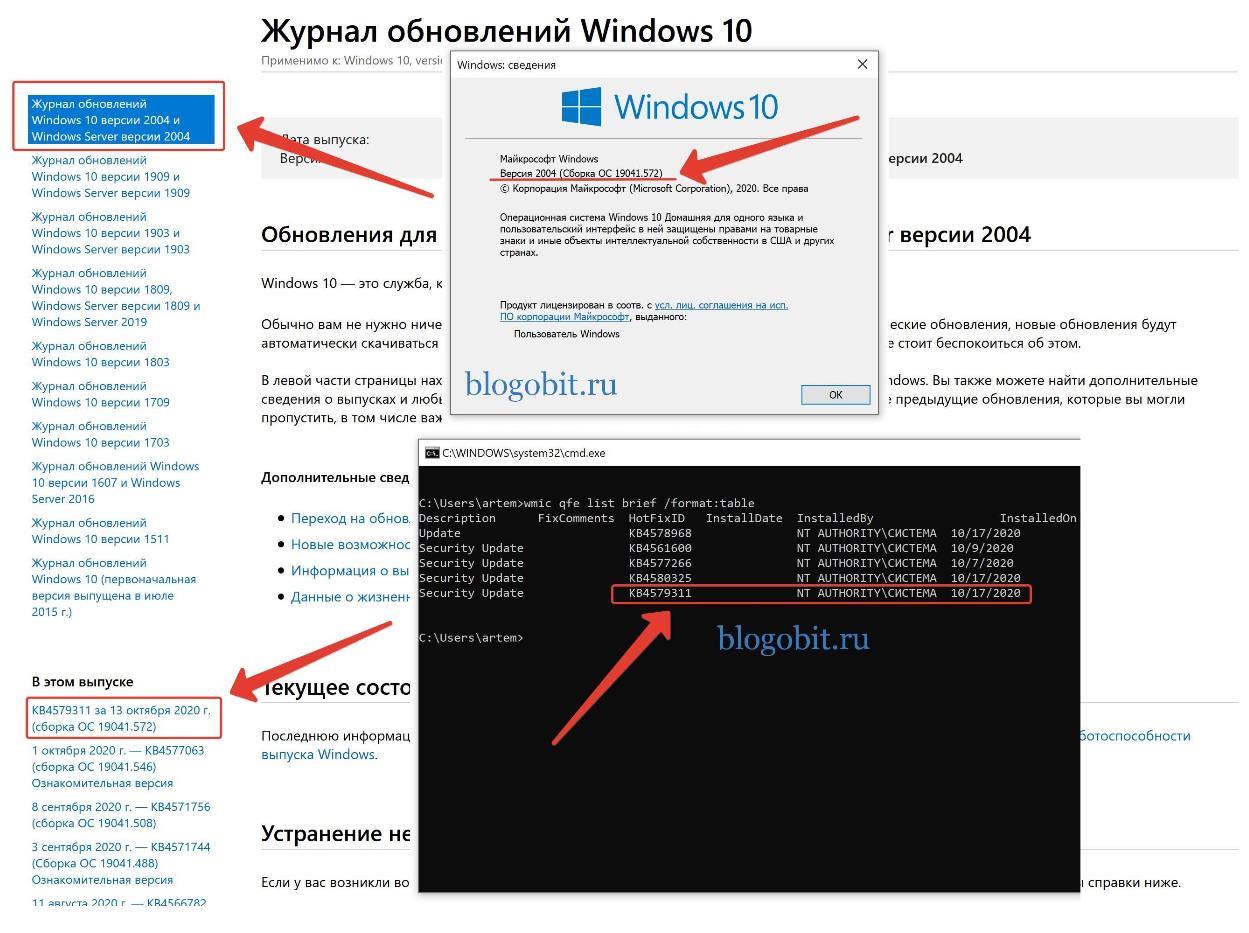
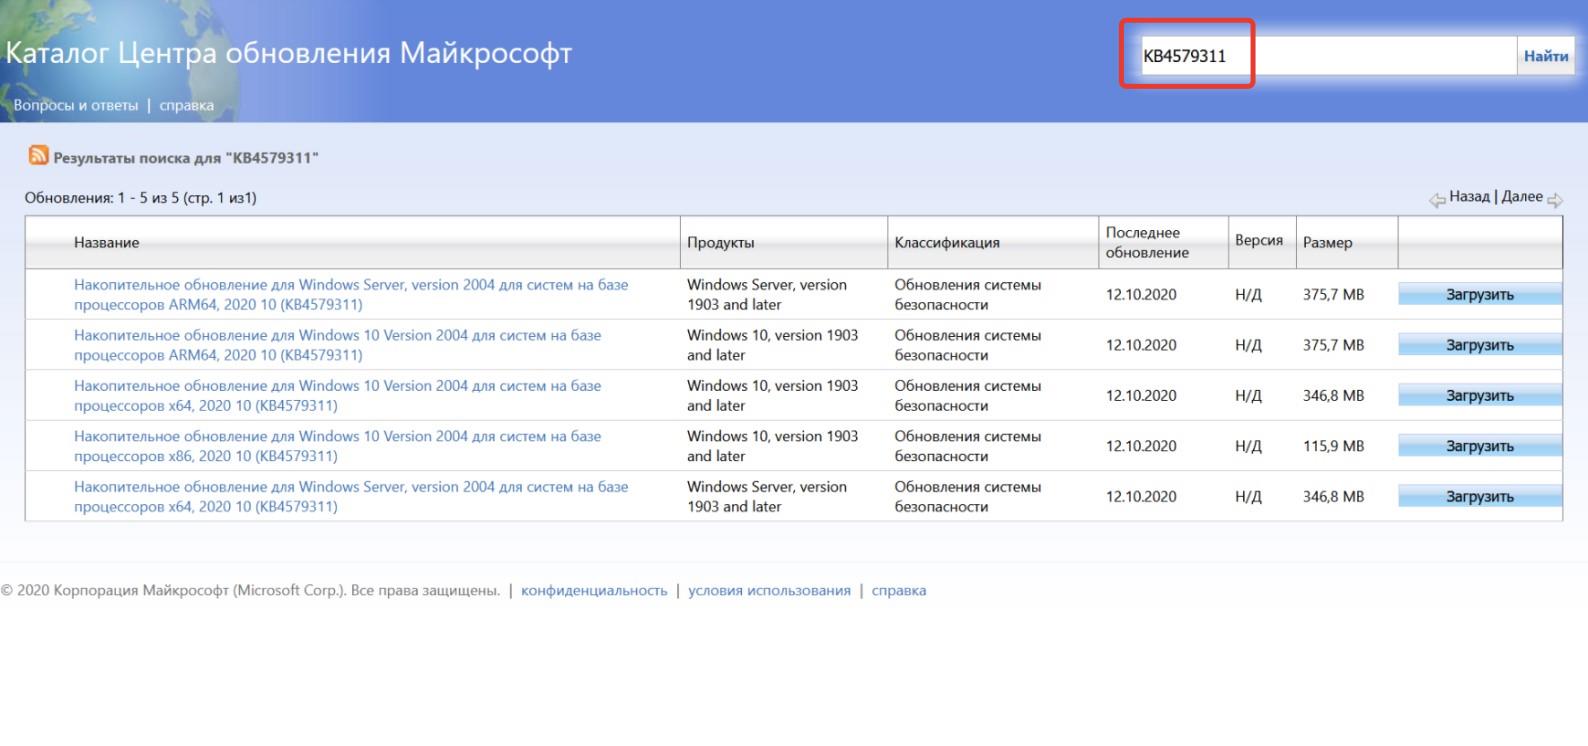
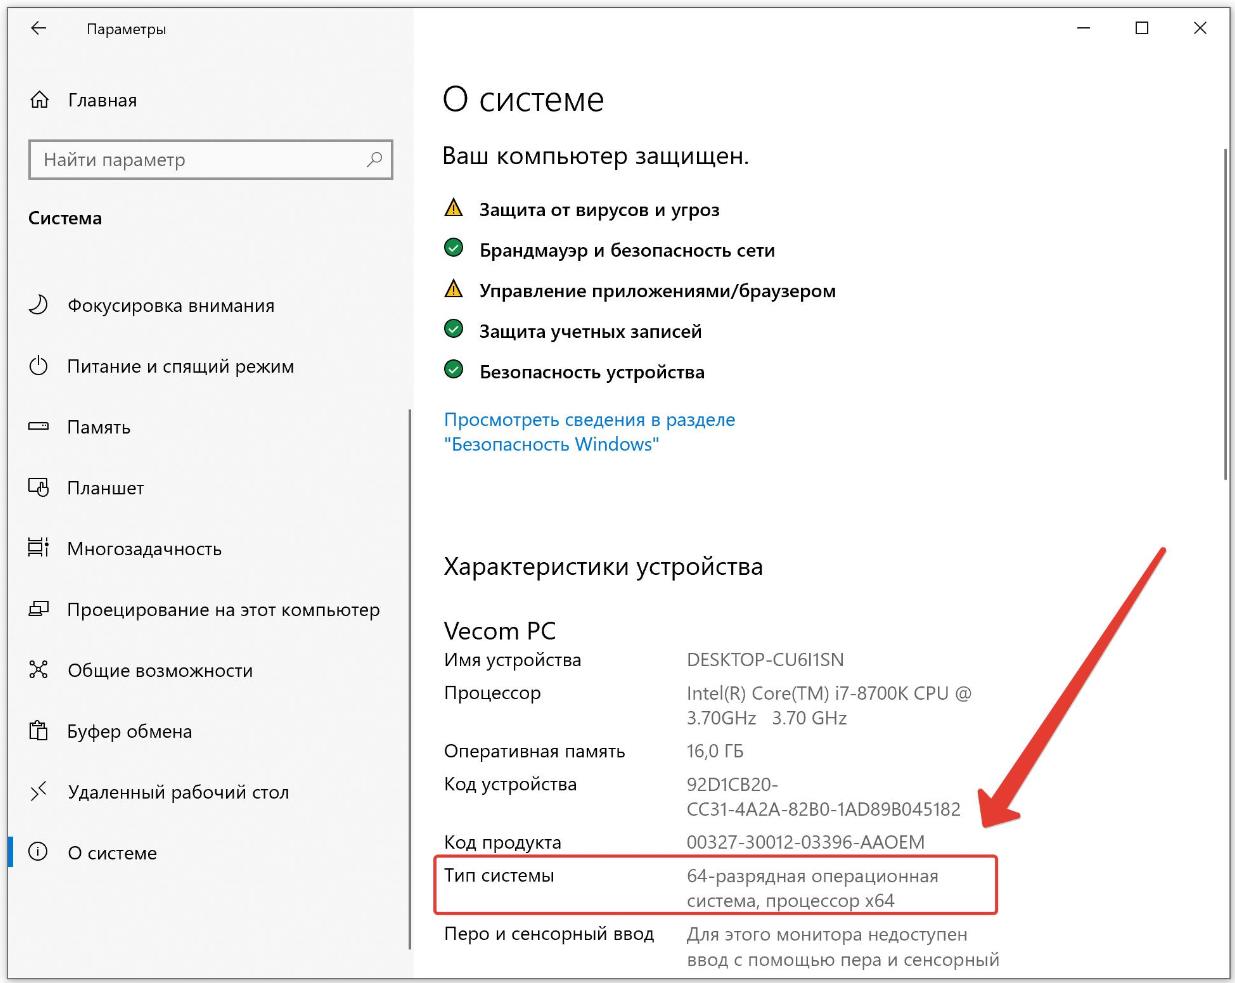
Устанавливаем последние обновления стека обслуживания
Обновления стеков обслуживания предоставляют исправления в стек обслуживания — компонент, который устанавливает обновления для Windows. Кроме того, он содержит «стек обслуживания на основе компонентов» (CBS), являющийся основным компонентом для нескольких элементов развертывания Windows, например DISM, SFC, изменение функций или ролей Windows, и восстановление компонентов. CBS — это небольшой компонент, который, как правило, не содержит обновлений, выпущенных ежемесячно (информация с сайта Microsoft).
Если проблемы, связанные с обновлением, по-прежнему возникают, проверьте и установите последнюю версию обновлений стека обслуживания. Вот шаги, которые необходимо выполнить:
- Прежде всего, вспомните какая версия(Шаг 1) и архитектура ОС Windows(Шаг 7) установлена на вашем ПК.
- Запустите командную строку и снова посмотрите на список установленных обновлений на вашем компьютере, затем откройте сайт последних обновлений стека обслуживания Windows 10 и проверьте установлены ли на компьютере обновления стека обслуживания, для накопительных обновлений, которые вы планируете загружать. Накопительные обновления KB4579311 для версии 2004 (Сборка ОС 19041.572) установлены (мы убедились в предыдущем разделе), убедитесь на своем компьютере, что установлены последние обновления стека обслуживания как на скриншоте ниже.
- Если отсутствуют необходимые обновления стека обслуживания, то окройте каталог Центра обновления Майкрософт (предыдущий раздел) и установите необходимые обновления на свой компьютер.

Восстанавливаем поврежденные системные файлы и проверяем образ системы
Если после обновления ПК вручную вы все еще сталкиваетесь с той же ошибкой, вероятно проблема заключается в неисправности вашей операционной системы. Поэтому, попробуйте выполнить сканирование системы утилитой SFC. Это просканирует весь ваш компьютер на наличие поврежденных файлов ядра и восстановит их. После этого запустите проверку образа системы утилитой DISM — это еще одна служебная программа Windows, которая может решить проблему с обновлением Windows.
Перезапускаем Центр обновления Windows с помощью командной строки
Кроме того, вы также можете перезапустить компоненты Центра обновления Windows через командную строку операционной системы. Однако, поскольку этот метод довольно длительный и сложный, внимательно следуйте инструкциям ниже:
- В окне поиска введите cmd, затем щелкните правой кнопкой мыши Командная строка и выберите параметр Запуск от имени администратора.
- Нажмите Да, если появится запрос Контроль учетных записей.
- Скопируйте и вставьте следующие команды в командную строку, а затем нажмите клавишу Enter после выполнения каждой команды:
net stop bits
net stop wuauserv
net stop appidsvc
net stop cryptsvcПриведенные выше команды остановят фоновую интеллектуальную службу передачи (BITS), службу обновления Windows, службу удостоверения приложений и службу криптографии.
Внимание! Если вы не получили подтверждающие сообщения после каждой команды Служба успешно остановлена, повторите вышеуказанные шаги несколько раз, пока система не уведомит об остановке служб.
- Выполните следующую команду, чтобы удалить все файлы qmgr*.dat, которые используются фоновой интеллектуальной службой передачи (BITS):
Del «%ALLUSERSPROFILE%Application DataMicrosoftNetworkDownloader*.*»
- Если появится подтверждающее сообщение, введите Y, чтобы удалить такие файлы.
- Теперь очистим кэш обновлений Windows 10, используя приведенные ниже команды, после этого попробуйте снова загрузить и установить обновления в Windows 10.
rmdir %systemroot%SoftwareDistribution /S /Q
rmdir %systemroot%system32catroot2 /S /Q - После этого перезагрузите BITS, а также службу Центра обновления Windows10, используя команды ниже. Обязательно нажимайте клавишу Enter после ввода каждой команды.
sc.exe sdset bits D:(A;;CCLCSWRPWPDTLOCRRC;;;SY)(A;;CCDCLCSWRPWPDTLOCRSDRCWDWO;;;BA)(A;;CCLCSWLOCRRC;;;AU)(A;;CCLCSWRPWPDTLOCRRC;;;PU)
sc.exe sdset wuauserv D:(A;;CCLCSWRPWPDTLOCRRC;;;SY)(A;;CCDCLCSWRPWPDTLOCRSDRCWDWO;;;BA)(A;;CCLCSWLOCRRC;;;AU)(A;;CCLCSWRPWPDTLOCRRC;;;PU) - После выполнения команд, перейдите в папку System32, для этого выполните эту команду:
cd /d %windir%system32
- Теперь зарегистрируйте все необходимые библиотеки для работы BITS и Центра обновления Windows 10 в реестре операционной системы. Для этого вам необходимо выполнить следующие команды одну за другой, после каждой нажимая Enter:
regsvr32.exe /s atl.dll
regsvr32.exe /s urlmon.dll
regsvr32.exe /s mshtml.dll
regsvr32.exe /s shdocvw.dll
regsvr32.exe /s browseui.dll
regsvr32.exe /s jscript.dll
regsvr32.exe /s vbscript.dll
regsvr32.exe /s scrrun.dll
regsvr32.exe /s msxml.dll
regsvr32.exe /s msxml3.dll
regsvr32.exe /s msxml6.dll
regsvr32.exe /s actxprxy.dll
regsvr32.exe /s softpub.dll
regsvr32.exe /s wintrust.dll
regsvr32.exe /s dssenh.dll
regsvr32.exe /s rsaenh.dll
regsvr32.exe /s gpkcsp.dll
regsvr32.exe /s sccbase.dll
regsvr32.exe /s slbcsp.dll
regsvr32.exe /s cryptdlg.dll
regsvr32.exe /s oleaut32.dll
regsvr32.exe /s ole32.dll
regsvr32.exe /s shell32.dll
regsvr32.exe /s initpki.dll
regsvr32.exe /s wuapi.dll
regsvr32.exe /s wuaueng.dll
regsvr32.exe /s wuaueng1.dll
regsvr32.exe /s wucltui.dll
regsvr32.exe /s wups.dll
regsvr32.exe /s wups2.dll
regsvr32.exe /s wuweb.dll
regsvr32.exe /s qmgr.dll
regsvr32.exe /s qmgrprxy.dll
regsvr32.exe /s wucltux.dll
regsvr32.exe /s muweb.dll
regsvr32.exe /s wuwebv.dllЗдесь regsvr32 встроенная утилита Windows 10, которая регистрирует файлы библиотек в реестре операционной системы, а ключ /S предназначен для выполнения этих команд без вывода сообщений.
- После этого обновите конфигурацию сети, которая также может вызвать ошибки, с помощью данных команд:
netsh winsock reset
netsh winsock reset proxy - Перезагрузите компьютер, после выполнения команд.
- После следующего входа в систему, проверьте службы Windows, такие как BITS, Центр обновления Windows и службу криптографии, которые вы ранее остановили. Для этого выполните эти команды в командной строке с повышенными привилегиями (от имени администратора).
net start bits
net start wuauserv
net start appidsvc
net start cryptsvc - После того, как вы успешно выполнили вышеуказанные команды, перезагрузите систему снова.

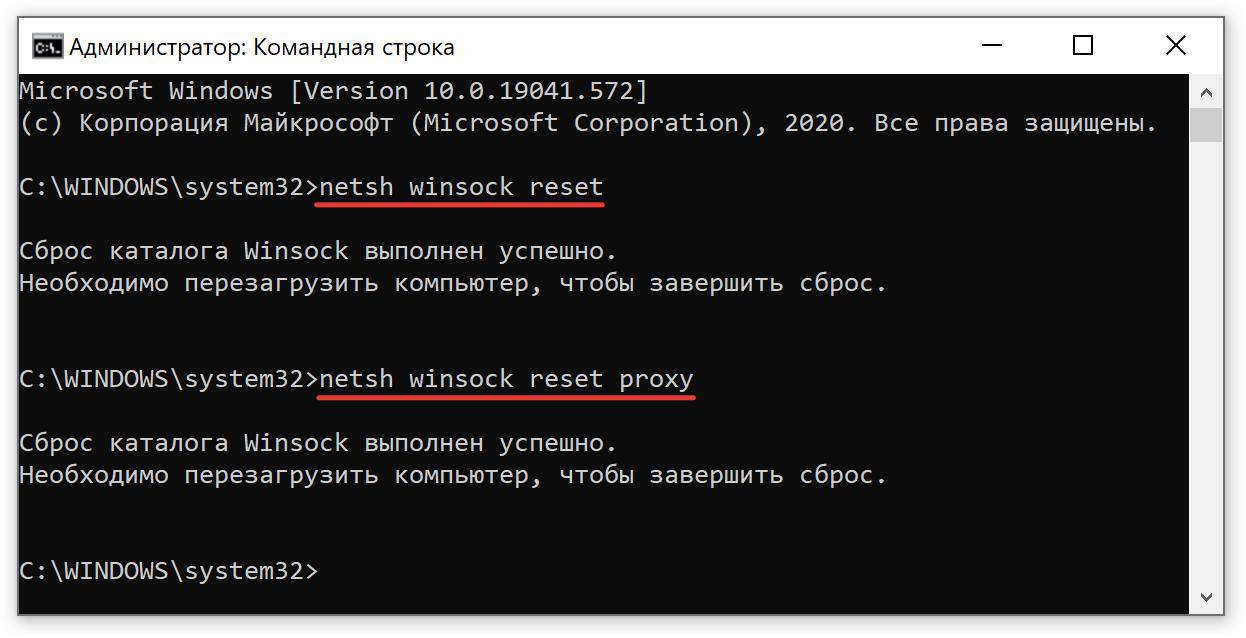
Надеемся, теперь все службы Центра обновления Windows у вас на компьютере функционируют нормально, без перебоев.
Внимание! Если у вас возникли ошибки Центра обновления на Surface Pro 6, Surface Book, Surface Laptop или любом другом устройстве Surface, вы можете попробовать применить описанные выше решения.
«Да черт возьми, почему Windows не обновляется — опять!» — практически все пользователи операционных систем Windows сталкивались с подобной ситуацией. По какой-то необъяснимой причине ОСы Майкрософт — включая, конечно же, и Windows 10 — могут внезапно прекратить автоматическую установку свежих обновлений, выдавая вместо этого пользователю многочисленные ошибки с самыми разными кодами. Некоторые юзеры при появлении этих ошибок впадают в панику и уносят свой компьютер в ближайший сервисный центр, другие — с тяжелыми вздохами начинают искать установочный носитель Windows, чтобы заняться полной переустановкой последней. При возникновении проблем с обновлением Windows главное — это не спешить.
К счастью, существует ряд методов, которые способны избавить вас от проблем с обновлением Windows 10. В сегодняшней статье мы как раз посмотрим на эти методы.
Содержание
- Windows 10 не обновляется — как исправить?
- Метод №1 Перезагрузка компьютера
- Метод №2 Средство устранения неполадок
- Метод №3 Проверка и запуск службы Центра обновления
- Метод №4 Проверка сетевого подключения
- Метод №5 Восстановление системных файлов и образа Windows
- Метод №6 Устранение ошибок файловой системы
- Метод №7 Очистка HDD/SSD для обеспечения необходимого места
- Метод №8 Отключение/удаление антивируса
- Метод №9 Обновление ОС Windows в безопасном режиме
- Метод №10 Использование точки восстановления и повторное обновление
- Метод №11 Сброс компонентов Центра обновления
- Метод №12 Установка обновлений вручную
- Метод №13 Возвращение компьютера в исходное состояние
Windows 10 не обновляется — как исправить?
Метод №1 Перезагрузка компьютера
Самое элементарное решение — перезагрузка компьютера. Дело в том, что некоторые компоненты Windows временами начинают работать не совсем корректно, что приводит к ряду не самых приятных последствий. Чтобы вернуть ОС в нормальное состояние, достаточно перезапустить компьютер. Мы еще раз напоминаем, что аварийную перезагрузку (кнопка на корпусе системного блока или ноутбука) стоит использовать лишь в крайних случаях, потому как она, хоть и редко, но все же может вызывать кое-какие проблемы.
Метод №2 Средство устранения неполадок
Верно, перезагрузка ПК может решить многие проблемы с системой, но далеко не всегда. В таком случае первым делом нужно воспользоваться средством устранения неполадок. Подобное средство уже встроено в вашу ОС, а поэтому вам не придется блуждать по просторам Интернета, пытаясь найти его. Нет никакой гарантии, что средство сможет исправить возникшие проблемы с обновлением Windows, тем не менее было задокументировано множество случаев, когда оно все-таки помогало пользователям на самых разных сборках. Итак, чтобы задействовать средство устранения неполадок, вам нужно выполнить следующие действия:
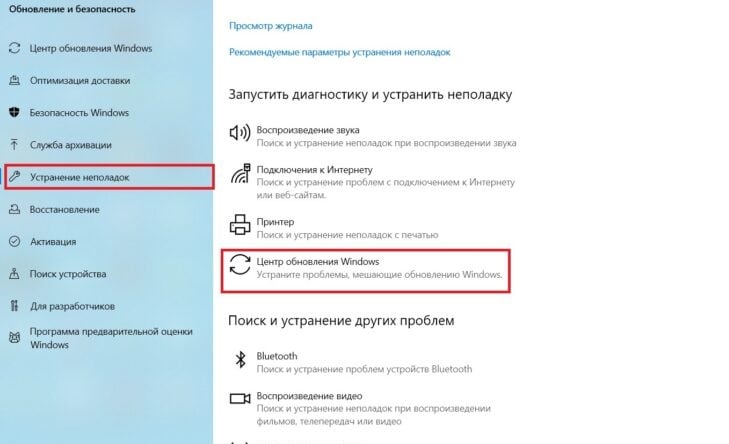
- Откройте Параметры системы любым известным способом, например, Win+I.
- Перейдите в раздел Обновление и безопасность→Устранение неполадок.
- Далее найдите в списке Центр обновления Windows и кликните на него ЛКМ.
- Внизу появится кнопка Запустить средство устранения неполадок — нажмите на нее.
- Следуйте дальнейшим инструкциям на своем экране, чтобы попытаться исправить проблемы с обновлением ОС.
- Перезагрузите ПК, как только закончите работу со средством.
- Зайдите в Центр обновления Windows и проверьте, получится ли у вас нормально ее обновить.
Метод №3 Проверка и запуск службы Центра обновления
В некоторых случаях служба Центра обновления может прекратить нормально функционировать. Вам нужно пройти в свойства этой службы, задать в ней требуемые параметры и запустить ее, если она деактивирована. Сделайте следующее:
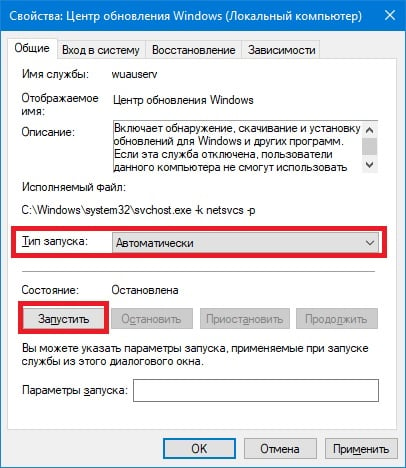
- Вызовите системную поисковую строку.
- Введите запрос Службы и выберите найденный результат.
- Найдите в списке службу Центра обновления Windows и дважды кликните на нее.
- В разделе типа запуска выберите значение Автоматически, после чего кликните на кнопку Запустить, если служба все-таки выключена.
- Перезагрузите ПК и повторите обновление ОС.
Метод №4 Проверка сетевого подключения
Разумеется, для установки свежих обновлений требуется стабильное сетевое подключение. У вас не получится скачать пакеты обновлений с серверов Майкрософт, если ваш ПК не может получить доступ к Интернету. Проверить, все ли нормально с вашим Интернет-подключением очень просто: достаточно взглянуть на соответствующую страничку в Параметрах системы.
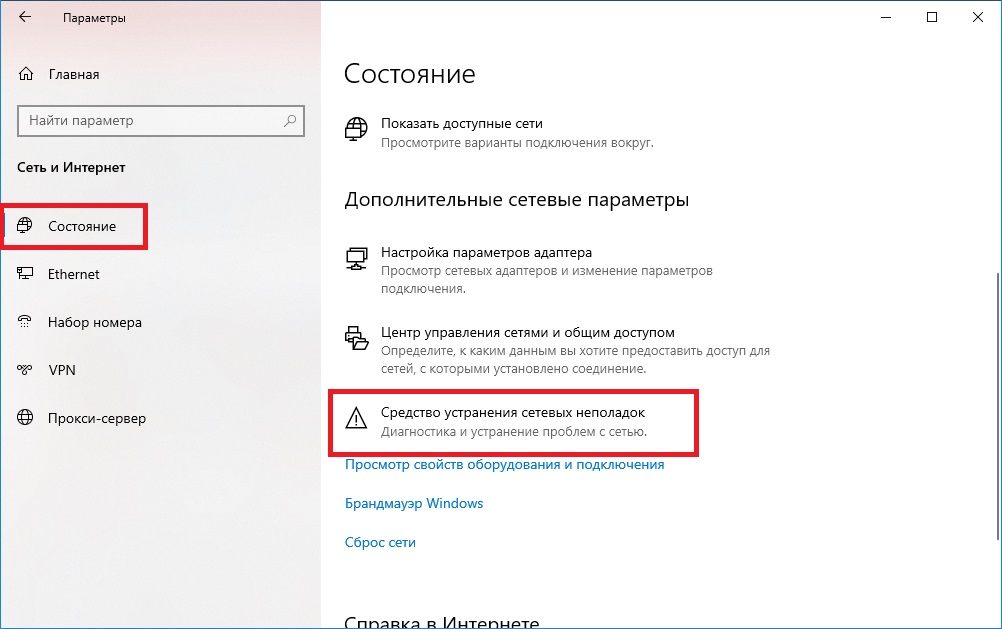
- Откройте Параметры своего компьютера.
- Перейдите в раздел Интернет и сеть→Состояние.
- Кликните на пункт Средство устранения сетевых неполадок.
- Следуйте инструкциям на экране, чтобы установить потенциальные (!) проблемы с сетью.
- Перезагрузите ПК после работы со средством.
- Повторите обновление ОС Windows 10, чтобы проверить наличие проблемы.
- Если ничего не изменилось, вернитесь в раздел Состояние и кликните на пункт Сброс сети (в самом низу окна).
- Далее нажмите на кнопку Сбросить сейчас.
Если проблема заключалась в некорректных настройках сетевого подключения, сброс последнего должен был привести все в порядок. Попытайтесь обновить систему еще раз.
Метод №5 Восстановление системных файлов и образа Windows
Ок, что-то в вашей ОС действительно работает неправильно. Возможно, некоторые из системных файлов/компонентов Windows были повреждены. В этом случае можно попробовать прибегнуть к услугам таких сверх полезных утилит, как SFC и DISM. Первая утилита займется поиском и восстановлением поврежденных системных файлов, вторая — восстановлением хранилища системных компонентов.
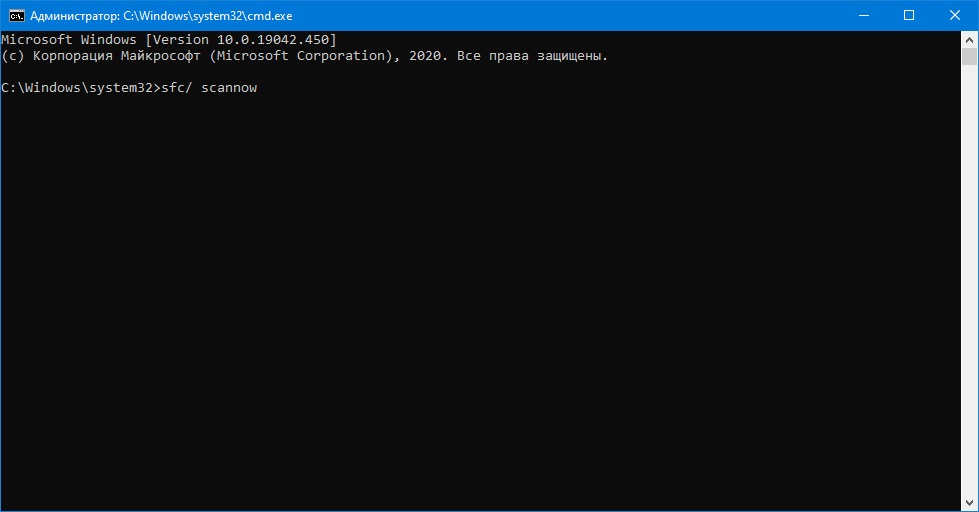
- Откройте Командную строку с правами администраторской учетной записи (Win+R→cmd→Enter+Shift+Enter).
- Пропишите команду sfc/ scannow и нажмите Enter.
- Дождитесь окончания работы SFC и перезагрузите ПК.
- Еще раз откройте Командную строку и выполните в ней следующие три команды:
- DISM /Online /Cleanup-Image /CheckHealth
- DISM /Online /Cleanup-Image /ScanHealth
- DISM /Online /Cleanup-Image /RestoreHealth
- Перезагрузите ПК еще раз и проверьте, были ли решены проблемы с обновлением.
Метод №6 Устранение ошибок файловой системы
Невозможность обновить Windows 10 могла стать результатом ошибок, возникших в файловой системе операционной системы. Устранить подобные ошибки можно с помощью утилиты CHKDSK. Запустить данную утилиту можно через ту же Командную строку. Попробуйте сделать следующее:

- Откройте Командную строку (администратор).
- Впишите в нее команду chkdsk C: /f и нажмите Enter.
- Нажмите клавишу Y на клавиатуре, чтобы перезагрузить свой ПК и запустить проверку диска.
- Подождите окончания работы утилиты и войдите в систему.
Метод №7 Очистка HDD/SSD для обеспечения необходимого места
Важно помнить, что для загрузки и установки новых обновлений Windows 10 на диске пользователя должен присутствовать определенный объем свободного места. Вам нужно как следует пройтись по содержимому своего диска и удалить с него все ненужные данные, например, фильмы, игры, музыку, временные файлы и прочее. Как только закончите, так сказать, наводить марафет, перезагрузите свой компьютер и повторите обновление ОС Windows 10.
Метод №8 Отключение/удаление антивируса
Как правило, антивирус не вызывает проблем при обновлении системы. Тем не менее в некоторых случаях антивирус может начать по ошибке блокировать определенные файлы обновлений. Вам нужно деактивировать установленный антивирус и проверить, вернется ли все в норму. Чтобы отключить системный Защитник Windows, вам нужно сделать следующее:
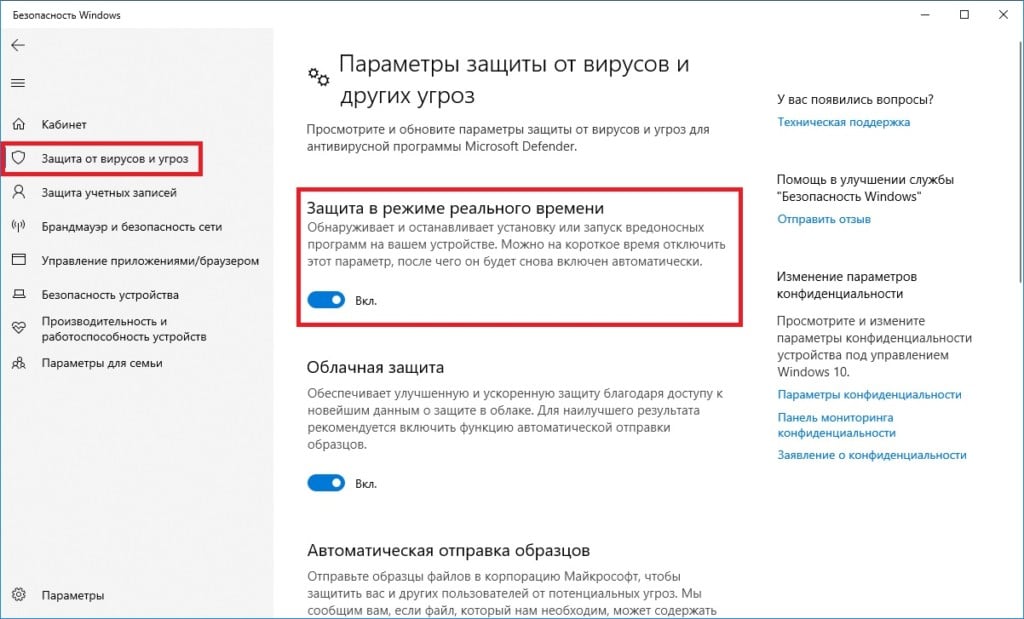
- Откройте Параметры своей системы, как это уже было показано выше.
- Перейдите в разделы Обновление и безопасность→Безопасность Windows.
- Кликните на кнопку Открыть службу “Безопасность Windows”.
- Далее кликните на вкладку Защита от вирусов и угроз и кнопку Управление настройками в новом окошке.
- Деактивируйте опцию Защита в режиме реального времени.
- Перейдите в Центр обновления Windows и повторите апдейт системы.
Если у вас на компьютере установлен антивирус от стороннего производителя, то с его деактивацией вам, к сожалению, придется разбираться самостоятельно. Впрочем, зачастую все сводится к нажатию ПКМ на значок антивируса в области уведомлений панели задач и выбору соответствующего пункта.
Метод №9 Обновление ОС Windows в безопасном режиме
Хорошо, давайте перейдем к чему-то посложнее. Возможно, какая-то сторонняя служба или ПО препятствует нормальному обновлению Windows. Что делать в таком случае? Ответ — попытаться обновить Windows, но только в безопасном режиме, где не будет никаких преград. Разумеется, безопасный режим необходимо запускать с поддержкой сетевых драйверов, иначе ничего не получится. Вот что вам нужно сделать:
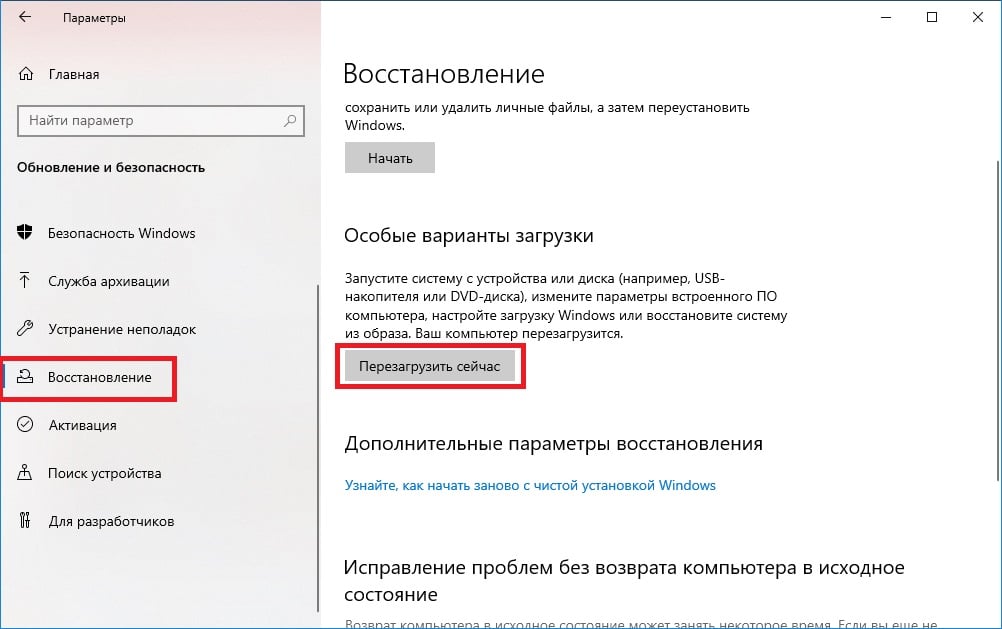
- Перейдите в Параметры→Обновление и безопасность→Восстановление.
- В разделе особых вариантов загрузки кликните на кнопку Перезагрузить сейчас.
- В среде восстановление ОС перейдите в разделы Поиск и устранение неисправностей→Дополнительные параметры→Параметры загрузки.
- Кликните на кнопку Перезагрузить.
- Нажмите на кнопку F5, чтобы запустить ПК в безопасном режиме с загрузкой сетевых драйверов.
- Войдя в ОС, попытайтесь обновить Windows 10 еще раз и проверьте, была ли решена проблема.
Метод №10 Использование точки восстановления и повторное обновление
Пожалуй, к подобному решению стоит приступать лишь в том случае, если все вышеуказанное не возымело должного эффекта. Все довольно просто: возвращаем систему к раннему состоянию, когда она функционировала должным образом и обновляем ее. Понятное дело, у пользователя должна быть заранее активирована функция создания точек восстановления, но, как правило, она активна по умолчанию, а поэтому никаких проблем возникнуть не должно.
Чтобы воспользоваться точкой восстановления, вам нужно сделать следующее:
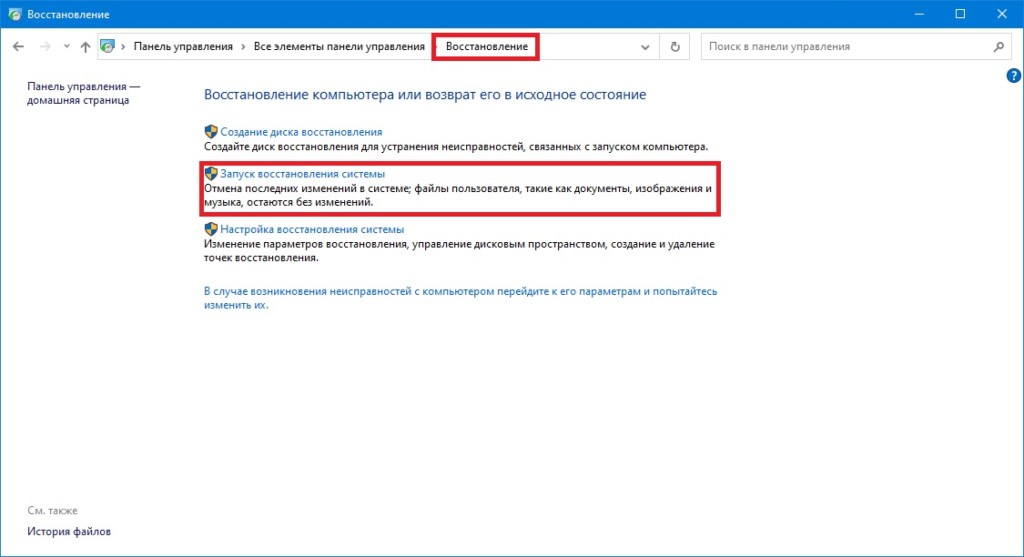
- Вызовите системную поисковую строку (Win+S) и впишите запрос Восстановление.
- Выберите найденный результат, после чего выберите пункт Запуск восстановления системы.
- Далее выберите рекомендуемое восстановление либо вручную выберите необходимую точку восстановления и нажмите Далее→Готово.
- Подождите завершения процесса восстановления Windows 10.
- Войдите в Центр обновления и повторите апдейт системы.
Windows так и не обновляется? Что же, пора приниматься за, так сказать, тяжелую артиллерию…
Метод №11 Сброс компонентов Центра обновления
На данном этапе должно стать понятно, что с вашим Центром обновления что-то явно не так. В таком случае необходимо заняться полным сбросом компонентов Центра обновления. Сделать это можно двумя способами: вручную через Командную строку либо с помощью самодельного батника с особым скриптом. Мы советуем вам не заморачиваться и воспользоваться вторым способом.
- Создайте у себя где-то на компьютере текстовый файл (ПКМ→Создать→Текстовый файл).
- Вставьте в текcтовик следующий скрипт (ни в коем случае ничего не меняйте!):
:: Run the reset Windows Update components.
:: void components();
:: /*************************************************************************************/
:components
:: —— Stopping the Windows Update services ——
call :print Stopping the Windows Update services.
net stop bitscall :print Stopping the Windows Update services.
net stop wuauservcall :print Stopping the Windows Update services.
net stop appidsvccall :print Stopping the Windows Update services.
net stop cryptsvccall :print Canceling the Windows Update process.
taskkill /im wuauclt.exe /f
:: —— Checking the services status ——
call :print Checking the services status.sc query bits | findstr /I /C:»STOPPED»
if %errorlevel% NEQ 0 (
echo. Failed to stop the BITS service.
echo.
echo.Press any key to continue . . .
pause>nul
goto :eof
)call :print Checking the services status.sc query wuauserv | findstr /I /C:»STOPPED»
if %errorlevel% NEQ 0 (
echo. Failed to stop the Windows Update service.
echo.
echo.Press any key to continue . . .
pause>nul
goto :eof
)call :print Checking the services status.sc query appidsvc | findstr /I /C:»STOPPED»
if %errorlevel% NEQ 0 (
sc query appidsvc | findstr /I /C:»OpenService FAILED 1060″
if %errorlevel% NEQ 0 (
echo. Failed to stop the Application Identity service.
echo.
echo.Press any key to continue . . .
pause>nul
if %family% NEQ 6 goto :eof
)
)call :print Checking the services status.
sc query cryptsvc | findstr /I /C:»STOPPED»
if %errorlevel% NEQ 0 (
echo. Failed to stop the Cryptographic Services service.
echo.
echo.Press any key to continue . . .
pause>nul
goto :eof
):: —— Delete the qmgr*.dat files ——
call :print Deleting the qmgr*.dat files.del /s /q /f «%ALLUSERSPROFILE%Application DataMicrosoftNetworkDownloaderqmgr*.dat»
del /s /q /f «%ALLUSERSPROFILE%MicrosoftNetworkDownloaderqmgr*.dat»:: —— Renaming the software distribution folders backup copies ——
call :print Deleting the old software distribution backup copies.cd /d %SYSTEMROOT%
if exist «%SYSTEMROOT%winsxspending.xml.bak» (
del /s /q /f «%SYSTEMROOT%winsxspending.xml.bak»
)
if exist «%SYSTEMROOT%SoftwareDistribution.bak» (
rmdir /s /q «%SYSTEMROOT%SoftwareDistribution.bak»
)
if exist «%SYSTEMROOT%system32Catroot2.bak» (
rmdir /s /q «%SYSTEMROOT%system32Catroot2.bak»
)
if exist «%SYSTEMROOT%WindowsUpdate.log.bak» (
del /s /q /f «%SYSTEMROOT%WindowsUpdate.log.bak»
)call :print Renaming the software distribution folders.
if exist «%SYSTEMROOT%winsxspending.xml» (
takeown /f «%SYSTEMROOT%winsxspending.xml»
attrib -r -s -h /s /d «%SYSTEMROOT%winsxspending.xml»
ren «%SYSTEMROOT%winsxspending.xml» pending.xml.bak
)
if exist «%SYSTEMROOT%SoftwareDistribution» (
attrib -r -s -h /s /d «%SYSTEMROOT%SoftwareDistribution»
ren «%SYSTEMROOT%SoftwareDistribution» SoftwareDistribution.bak
if exist «%SYSTEMROOT%SoftwareDistribution» (
echo.
echo. Failed to rename the SoftwareDistribution folder.
echo.
echo.Press any key to continue . . .
pause>nul
goto :eof
)
)
if exist «%SYSTEMROOT%system32Catroot2» (
attrib -r -s -h /s /d «%SYSTEMROOT%system32Catroot2»
ren «%SYSTEMROOT%system32Catroot2» Catroot2.bak
)
if exist «%SYSTEMROOT%WindowsUpdate.log» (
attrib -r -s -h /s /d «%SYSTEMROOT%WindowsUpdate.log»
ren «%SYSTEMROOT%WindowsUpdate.log» WindowsUpdate.log.bak
):: —— Reset the BITS service and the Windows Update service to the default security descriptor ——
call :print Reset the BITS service and the Windows Update service to the default security descriptor.sc.exe sdset wuauserv D:(A;;CCLCSWLOCRRC;;;AU)(A;;CCDCLCSWRPWPDTLOCRSDRCWDWO;;;BA)(A;;CCDCLCSWRPWPDTLCRSDRCWDWO;;;SO)(A;;CCLCSWRPWPDTLOCRRC;;;SY)S:(AU;FA;CCDCLCSWRPWPDTLOCRSDRCWDWO;;WD)
sc.exe sdset bits D:(A;;CCLCSWLOCRRC;;;AU)(A;;CCDCLCSWRPWPDTLOCRSDRCWDWO;;;BA)(A;;CCDCLCSWRPWPDTLCRSDRCWDWO;;;SO)(A;;CCLCSWRPWPDTLOCRRC;;;SY)S:(AU;FA;CCDCLCSWRPWPDTLOCRSDRCWDWO;;WD)
sc.exe sdset cryptsvc D:(A;;CCLCSWLOCRRC;;;AU)(A;;CCDCLCSWRPWPDTLOCRSDRCWDWO;;;BA)(A;;CCDCLCSWRPWPDTLCRSDRCWDWO;;;SO)(A;;CCLCSWRPWPDTLOCRRC;;;SY)S:(AU;FA;CCDCLCSWRPWPDTLOCRSDRCWDWO;;WD)
sc.exe sdset trustedinstaller D:(A;;CCLCSWLOCRRC;;;AU)(A;;CCDCLCSWRPWPDTLOCRSDRCWDWO;;;BA)(A;;CCDCLCSWRPWPDTLCRSDRCWDWO;;;SO)(A;;CCLCSWRPWPDTLOCRRC;;;SY)S:(AU;FA;CCDCLCSWRPWPDTLOCRSDRCWDWO;;WD):: —— Reregister the BITS files and the Windows Update files ——
call :print Reregister the BITS files and the Windows Update files.cd /d %SYSTEMROOT%system32
regsvr32.exe /s atl.dll
regsvr32.exe /s urlmon.dll
regsvr32.exe /s mshtml.dll
regsvr32.exe /s shdocvw.dll
regsvr32.exe /s browseui.dll
regsvr32.exe /s jscript.dll
regsvr32.exe /s vbscript.dll
regsvr32.exe /s scrrun.dll
regsvr32.exe /s msxml.dll
regsvr32.exe /s msxml3.dll
regsvr32.exe /s msxml6.dll
regsvr32.exe /s actxprxy.dll
regsvr32.exe /s softpub.dll
regsvr32.exe /s wintrust.dll
regsvr32.exe /s dssenh.dll
regsvr32.exe /s rsaenh.dll
regsvr32.exe /s gpkcsp.dll
regsvr32.exe /s sccbase.dll
regsvr32.exe /s slbcsp.dll
regsvr32.exe /s cryptdlg.dll
regsvr32.exe /s oleaut32.dll
regsvr32.exe /s ole32.dll
regsvr32.exe /s shell32.dll
regsvr32.exe /s initpki.dll
regsvr32.exe /s wuapi.dll
regsvr32.exe /s wuaueng.dll
regsvr32.exe /s wuaueng1.dll
regsvr32.exe /s wucltui.dll
regsvr32.exe /s wups.dll
regsvr32.exe /s wups2.dll
regsvr32.exe /s wuweb.dll
regsvr32.exe /s qmgr.dll
regsvr32.exe /s qmgrprxy.dll
regsvr32.exe /s wucltux.dll
regsvr32.exe /s muweb.dll
regsvr32.exe /s wuwebv.dll:: —— Resetting Winsock ——
call :print Resetting Winsock.
netsh winsock reset:: —— Resetting WinHTTP Proxy ——
call :print Resetting WinHTTP Proxy.if %family% EQU 5 (
proxycfg.exe -d
) else (
netsh winhttp reset proxy
):: —— Set the startup type as automatic ——
call :print Resetting the services as automatics.
sc.exe config wuauserv start= auto
sc.exe config bits start= delayed-auto
sc.exe config cryptsvc start= auto
sc.exe config TrustedInstaller start= demand
sc.exe config DcomLaunch start= auto:: —— Starting the Windows Update services ——
call :print Starting the Windows Update services.
net start bitscall :print Starting the Windows Update services.
net start wuauservcall :print Starting the Windows Update services.
net start appidsvccall :print Starting the Windows Update services.
net start cryptsvccall :print Starting the Windows Update services.
net start DcomLaunch:: —— End process ——
call :print The operation completed successfully.echo.Press any key to continue . . .
pause>nul
goto :eof
:: /*************************************************************************************/ - Сохраните внесенные изменения в текстовик и закройте его.
- Нажмите ПКМ на Текстовый документ.txt и выберите Переименовать.
- Назовите файл Скрипт сброса WU и измените его расширение с .txt на .bat.
Заметка: если у вас не видно расширений файлов, то вы должны самостоятельно включить эту функцию. Чтобы это сделать, откройте Проводник, перейдите во вкладку Вид в строке меню и поставьте галочку возле пункта Расширения имен файлов.
- Нажмите ПКМ на Скрипт сброса WU.bat и выберите Запуск от имени администратора.
- Подождите окончания процесса сброса Центра обновления Windows, после чего нажмите любую кнопку на клавиатуре, чтобы закрыть Командную строку.
- Перезагрузите ПК.
Ну а если и эта процедура не поможет вам оживить Центр обновления…
Метод №12 Установка обновлений вручную
Все еще ничего? Windows не обновляется? Рекомендуем плюнуть на автоматические средства и установить нужное обновление самостоятельно. Переходим на официальный сайт каталога обновлений Майкрософт, находим проблемный апдейт, скачиваем и устанавливаем его. Верно, процесс настолько простой. Скачав файл обновления, достаточно дважды кликнуть на него ЛКМ и следовать инструкциям на экране.
Метод №13 Возвращение компьютера в исходное состояние
И последнее, что можно сделать — это вернуть свой компьютер в исходное состояние. По сути, эта процедура представляет собой переустановку Windows, но только с сохранением личных файлов и настроек (если вы захотите их оставить, разумеется).
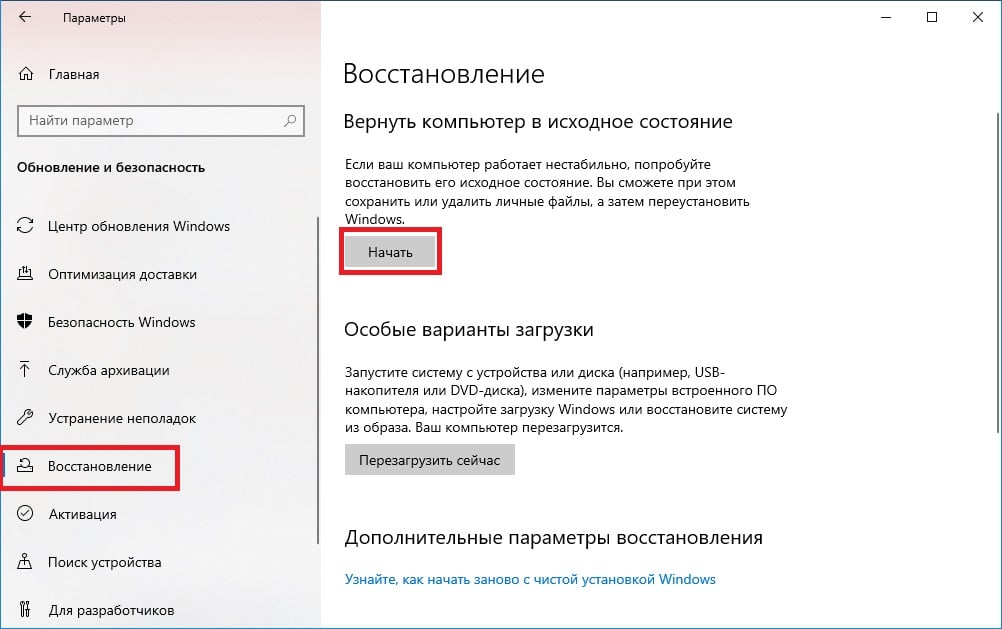
- Откройте Параметры своей Windows.
- Пройдите в Обновление и безопасность→Восстановление.
- Нажмите на кнопку Начать в соответствующем разделе.
- Далее выберите вариант Сохранить мои файлы и жмите кнопку Сброс.
- Подождите окончания процедуры возвращения ПК к исходному состоянию.
Стоит отметить, что во время данной процедуры ваш компьютер будет несколько раз перезагружаться самостоятельно, а поэтому не переживайте по этому поводу. Как только войдете в Windows, откройте Центр обновления и запустите апдейт системы. Больше никаких проблем с обновлением вы испытывать не должны в принципе.
Хочется верить, что наш материал был вам полезен. Удачи!