a. Right click on it and select Export to backup the key for safety reasons. *
* Note: if the «wuauserv» key is missing then skip to step-5.
b. Save the Key to your Desktop with name «Win10UpdateOld.reg»
c. Then right click again on the «wuauserv» key and click Delete.
5. Close the Registry Editor.
6. Open Notepad application. To do that:
a. Simultaneously press the Windows
+ R keys to open run command box.
b. Type notepad and press Enter.
7. Select and copy/paste to notepad the below text (in bold letters):
Windows Registry Editor Version 5.00
[HKEY_LOCAL_MACHINESYSTEMCurrentControlSetServiceswuauserv]
«DependOnService»=hex(7):72,00,70,00,63,00,73,00,73,00,00,00,00,00
«Description»=»@%systemroot%\system32\wuaueng.dll,-106»
«DisplayName»=»@%systemroot%\system32\wuaueng.dll,-105»
«ErrorControl»=dword:00000001
«FailureActions»=hex:80,51,01,00,00,00,00,00,00,00,00,00,03,00,00,00,14,00,00,
00,01,00,00,00,60,ea,00,00,00,00,00,00,00,00,00,00,00,00,00,00,00,00,00,00
«ImagePath»=hex(2):25,00,73,00,79,00,73,00,74,00,65,00,6d,00,72,00,6f,00,6f,00,
74,00,25,00,5c,00,73,00,79,00,73,00,74,00,65,00,6d,00,33,00,32,00,5c,00,73,
00,76,00,63,00,68,00,6f,00,73,00,74,00,2e,00,65,00,78,00,65,00,20,00,2d,00,
6b,00,20,00,6e,00,65,00,74,00,73,00,76,00,63,00,73,00,20,00,2d,00,70,00,00,
00
«ObjectName»=»LocalSystem»
«RequiredPrivileges»=hex(7):53,00,65,00,41,00,75,00,64,00,69,00,74,00,50,00,72,
00,69,00,76,00,69,00,6c,00,65,00,67,00,65,00,00,00,53,00,65,00,43,00,72,00,
65,00,61,00,74,00,65,00,47,00,6c,00,6f,00,62,00,61,00,6c,00,50,00,72,00,69,
00,76,00,69,00,6c,00,65,00,67,00,65,00,00,00,53,00,65,00,43,00,72,00,65,00,
61,00,74,00,65,00,50,00,61,00,67,00,65,00,46,00,69,00,6c,00,65,00,50,00,72,
00,69,00,76,00,69,00,6c,00,65,00,67,00,65,00,00,00,53,00,65,00,54,00,63,00,
62,00,50,00,72,00,69,00,76,00,69,00,6c,00,65,00,67,00,65,00,00,00,53,00,65,
00,41,00,73,00,73,00,69,00,67,00,6e,00,50,00,72,00,69,00,6d,00,61,00,72,00,
79,00,54,00,6f,00,6b,00,65,00,6e,00,50,00,72,00,69,00,76,00,69,00,6c,00,65,
00,67,00,65,00,00,00,53,00,65,00,49,00,6d,00,70,00,65,00,72,00,73,00,6f,00,
6e,00,61,00,74,00,65,00,50,00,72,00,69,00,76,00,69,00,6c,00,65,00,67,00,65,
00,00,00,53,00,65,00,49,00,6e,00,63,00,72,00,65,00,61,00,73,00,65,00,51,00,
75,00,6f,00,74,00,61,00,50,00,72,00,69,00,76,00,69,00,6c,00,65,00,67,00,65,
00,00,00,53,00,65,00,53,00,68,00,75,00,74,00,64,00,6f,00,77,00,6e,00,50,00,
72,00,69,00,76,00,69,00,6c,00,65,00,67,00,65,00,00,00,53,00,65,00,44,00,65,
00,62,00,75,00,67,00,50,00,72,00,69,00,76,00,69,00,6c,00,65,00,67,00,65,00,
00,00,53,00,65,00,42,00,61,00,63,00,6b,00,75,00,70,00,50,00,72,00,69,00,76,
00,69,00,6c,00,65,00,67,00,65,00,00,00,53,00,65,00,52,00,65,00,73,00,74,00,
6f,00,72,00,65,00,50,00,72,00,69,00,76,00,69,00,6c,00,65,00,67,00,65,00,00,
00,53,00,65,00,53,00,65,00,63,00,75,00,72,00,69,00,74,00,79,00,50,00,72,00,
69,00,76,00,69,00,6c,00,65,00,67,00,65,00,00,00,53,00,65,00,54,00,61,00,6b,
00,65,00,4f,00,77,00,6e,00,65,00,72,00,73,00,68,00,69,00,70,00,50,00,72,00,
69,00,76,00,69,00,6c,00,65,00,67,00,65,00,00,00,53,00,65,00,4c,00,6f,00,61,
00,64,00,44,00,72,00,69,00,76,00,65,00,72,00,50,00,72,00,69,00,76,00,69,00,
6c,00,65,00,67,00,65,00,00,00,53,00,65,00,4d,00,61,00,6e,00,61,00,67,00,65,
00,56,00,6f,00,6c,00,75,00,6d,00,65,00,50,00,72,00,69,00,76,00,69,00,6c,00,
65,00,67,00,65,00,00,00,00,00
«ServiceSidType»=dword:00000001
«Start»=dword:00000003
«SvcHostSplitDisable»=dword:00000001
«SvcMemHardLimitInMB»=dword:000000f6
«SvcMemMidLimitInMB»=dword:000000a7
«SvcMemSoftLimitInMB»=dword:00000058
«Type»=dword:00000020
[HKEY_LOCAL_MACHINESYSTEMCurrentControlSetServiceswuauservParameters]
«ServiceDll»=hex(2):25,00,73,00,79,00,73,00,74,00,65,00,6d,00,72,00,6f,00,6f,
00,74,00,25,00,5c,00,73,00,79,00,73,00,74,00,65,00,6d,00,33,00,32,00,5c,00,
77,00,75,00,61,00,75,00,65,00,6e,00,67,00,2e,00,64,00,6c,00,6c,00,00,00
«ServiceDllUnloadOnStop»=dword:00000001
«ServiceMain»=»WUServiceMain»
[HKEY_LOCAL_MACHINESYSTEMCurrentControlSetServiceswuauservSecurity]
«Security»=hex:01,00,14,80,78,00,00,00,84,00,00,00,14,00,00,00,30,00,00,00,02,
00,1c,00,01,00,00,00,02,80,14,00,ff,00,0f,00,01,01,00,00,00,00,00,01,00,00,
00,00,02,00,48,00,03,00,00,00,00,00,14,00,9d,00,02,00,01,01,00,00,00,00,00,
05,0b,00,00,00,00,00,18,00,ff,01,0f,00,01,02,00,00,00,00,00,05,20,00,00,00,
20,02,00,00,00,00,14,00,ff,01,0f,00,01,01,00,00,00,00,00,05,12,00,00,00,01,
01,00,00,00,00,00,05,12,00,00,00,01,01,00,00,00,00,00,05,12,00,00,00
[HKEY_LOCAL_MACHINESYSTEMCurrentControlSetServiceswuauservTriggerInfo]
[HKEY_LOCAL_MACHINESYSTEMCurrentControlSetServiceswuauservTriggerInfo]
«Type»=dword:00000005
«Action»=dword:00000001
«Guid»=hex:e6,ca,9f,65,db,5b,a9,4d,b1,ff,ca,2a,17,8d,46,e0
[HKEY_LOCAL_MACHINESYSTEMCurrentControlSetServiceswuauservTriggerInfo1]
«Type»=dword:00000005
«Action»=dword:00000001
«Guid»=hex:c8,46,fb,54,89,f0,4c,46,b1,fd,59,d1,b6,2c,3b,50
8. Then click File > Save as and save the file at your Desktop with name: «Win10UpdateFix.reg«.
9. Close Notepad.
10. Now double click at «Win10UpdateFix.reg» file and click Yes at UAC warning message.
11. Click Yes again to add the information to the registry.
12. Finally click OK at the information message.
13. Restart your computer.
14. After restart, proceed to check and install updates. The problem should be resolved. *
* Notes:
1. If the Windows Update problem is solved, then delete the .reg file(s) from you desktop and continue your work.
2. If the you still have problems then continue to the next method.
Method 3. FIX Windows corruption errors with DISM & SFC tools.
The next method fix the «Windows Update Service Missing» problem in Windows 10, is to repair the corrupted system files.
1. Open command prompt as administrator. To do that:
a. In the Search box type: cmd or command prompt
b. Right click on the command prompt (result) and select Run as Administrator.
2. At the command prompt window, type the following command & press Enter:
This article provides you step-by-step instructions how to resolve windows update service missing from services.msc issue on Windows 10. Some Windows 7, 8 or Vista computer users reported that the Windows Service Update service is missing from the service list.
They receive the following error message on the screen:
There were some problems installing updates, but we’ll try again later. If you keep seeing this and want to search the web or contact support for this information, this may help: (0x800700006).
Some users encounter the error codes 0x80080005, or 0x8007044 as well. You don’t need to be worry. The issue can easily be resolved by the methods provided right below.
Methods to fix windows update service missing from services.msc
Important one: In order to fix the Window Update service missing issue, you should firstly make ensure that your system is clean from viruses or other malicious threats. You should also check for common system related issues such as BSODs, EXEs and DLLs file errors or system corruption, if these are causing the issue.
In case of any such issues, you have an automatic tool available titled PC Repair Tool. This tool runs full system scans and automatically provides you the fix. The direct downloading link for this tool is provided below.
Method 1: Run Windows Update Troubleshooter
- Open Control Panel, set as View By to Small icons and open Troubleshooting,
- In the Troubleshooting options, click on View all,
- Open Windows Update,
- Click on Next to troubleshoot the detected Windows update problems,
- When the troubleshoot process is complete, close the troubleshooter and restart the PC and check if the issue is gone.
Method 2: Restore Windows Update Services in Registry
The main reason for the windows update service missing from services.msc is the lack of the Windows Update registry key. You need to restore the wuauserv service key manually in this case:
- Press Windows + R to open Run command,
- Type in regedit and hit Enter to open Registry Editor,
- Press + sign on the left pane and navigate to the following sub-folder:
HKEY_LOCAL_MACHINESYSTEMCurrentControlSetservicesBITS
- Find wuauserv there and right-click on it,
- Select on Export, save the key and name it as reg,
- Delete the wuauserv and close the Registry Editor after that.
- Now, open notepad, and copy and paste the following text to it:
Windows Registry Editor Version 5.00
[HKEY_LOCAL_MACHINESYSTEMCurrentControlSetServiceswuauserv]
“DependOnService”=hex(7):72,00,70,00,63,00,73,00,73,00,00,00,00,00
“Description”=”@%systemroot%\system32\wuaueng.dll,-106”
“DisplayName”=”@%systemroot%\system32\wuaueng.dll,-105”
“ErrorControl”=dword:00000001
“FailureActions”=hex:80,51,01,00,00,00,00,00,00,00,00,00,03,00,00,00,14,00,00,
00,01,00,00,00,60,ea,00,00,00,00,00,00,00,00,00,00,00,00,00,00,00,00,00,00
“ImagePath”=hex(2):25,00,73,00,79,00,73,00,74,00,65,00,6d,00,72,00,6f,00,6f,00,
74,00,25,00,5c,00,73,00,79,00,73,00,74,00,65,00,6d,00,33,00,32,00,5c,00,73,
00,76,00,63,00,68,00,6f,00,73,00,74,00,2e,00,65,00,78,00,65,00,20,00,2d,00,
6b,00,20,00,6e,00,65,00,74,00,73,00,76,00,63,00,73,00,20,00,2d,00,70,00,00,
00
“ObjectName”=”LocalSystem”
“RequiredPrivileges”=hex(7):53,00,65,00,41,00,75,00,64,00,69,00,74,00,50,00,72,
00,69,00,76,00,69,00,6c,00,65,00,67,00,65,00,00,00,53,00,65,00,43,00,72,00,
65,00,61,00,74,00,65,00,47,00,6c,00,6f,00,62,00,61,00,6c,00,50,00,72,00,69,
00,76,00,69,00,6c,00,65,00,67,00,65,00,00,00,53,00,65,00,43,00,72,00,65,00,
61,00,74,00,65,00,50,00,61,00,67,00,65,00,46,00,69,00,6c,00,65,00,50,00,72,
00,69,00,76,00,69,00,6c,00,65,00,67,00,65,00,00,00,53,00,65,00,54,00,63,00,
62,00,50,00,72,00,69,00,76,00,69,00,6c,00,65,00,67,00,65,00,00,00,53,00,65,
00,41,00,73,00,73,00,69,00,67,00,6e,00,50,00,72,00,69,00,6d,00,61,00,72,00,
79,00,54,00,6f,00,6b,00,65,00,6e,00,50,00,72,00,69,00,76,00,69,00,6c,00,65,
00,67,00,65,00,00,00,53,00,65,00,49,00,6d,00,70,00,65,00,72,00,73,00,6f,00,
6e,00,61,00,74,00,65,00,50,00,72,00,69,00,76,00,69,00,6c,00,65,00,67,00,65,
00,00,00,53,00,65,00,49,00,6e,00,63,00,72,00,65,00,61,00,73,00,65,00,51,00,
75,00,6f,00,74,00,61,00,50,00,72,00,69,00,76,00,69,00,6c,00,65,00,67,00,65,
00,00,00,53,00,65,00,53,00,68,00,75,00,74,00,64,00,6f,00,77,00,6e,00,50,00,
72,00,69,00,76,00,69,00,6c,00,65,00,67,00,65,00,00,00,53,00,65,00,44,00,65,
00,62,00,75,00,67,00,50,00,72,00,69,00,76,00,69,00,6c,00,65,00,67,00,65,00,
00,00,53,00,65,00,42,00,61,00,63,00,6b,00,75,00,70,00,50,00,72,00,69,00,76,
00,69,00,6c,00,65,00,67,00,65,00,00,00,53,00,65,00,52,00,65,00,73,00,74,00,
6f,00,72,00,65,00,50,00,72,00,69,00,76,00,69,00,6c,00,65,00,67,00,65,00,00,
00,53,00,65,00,53,00,65,00,63,00,75,00,72,00,69,00,74,00,79,00,50,00,72,00,
69,00,76,00,69,00,6c,00,65,00,67,00,65,00,00,00,53,00,65,00,54,00,61,00,6b,
00,65,00,4f,00,77,00,6e,00,65,00,72,00,73,00,68,00,69,00,70,00,50,00,72,00,
69,00,76,00,69,00,6c,00,65,00,67,00,65,00,00,00,53,00,65,00,4c,00,6f,00,61,
00,64,00,44,00,72,00,69,00,76,00,65,00,72,00,50,00,72,00,69,00,76,00,69,00,
6c,00,65,00,67,00,65,00,00,00,53,00,65,00,4d,00,61,00,6e,00,61,00,67,00,65,
00,56,00,6f,00,6c,00,75,00,6d,00,65,00,50,00,72,00,69,00,76,00,69,00,6c,00,
65,00,67,00,65,00,00,00,00,00
“ServiceSidType”=dword:00000001
“Start”=dword:00000003
“SvcHostSplitDisable”=dword:00000001
“SvcMemHardLimitInMB”=dword:000000f6
“SvcMemMidLimitInMB”=dword:000000a7
“SvcMemSoftLimitInMB”=dword:00000058
“Type”=dword:00000020
[HKEY_LOCAL_MACHINESYSTEMCurrentControlSetServiceswuauservParameters]
“ServiceDll”=hex(2):25,00,73,00,79,00,73,00,74,00,65,00,6d,00,72,00,6f,00,6f,
00,74,00,25,00,5c,00,73,00,79,00,73,00,74,00,65,00,6d,00,33,00,32,00,5c,00,
77,00,75,00,61,00,75,00,65,00,6e,00,67,00,2e,00,64,00,6c,00,6c,00,00,00
“ServiceDllUnloadOnStop”=dword:00000001
“ServiceMain”=”WUServiceMain”
[HKEY_LOCAL_MACHINESYSTEMCurrentControlSetServiceswuauservSecurity]
“Security”=hex:01,00,14,80,78,00,00,00,84,00,00,00,14,00,00,00,30,00,00,00,02,
00,1c,00,01,00,00,00,02,80,14,00,ff,00,0f,00,01,01,00,00,00,00,00,01,00,00,
00,00,02,00,48,00,03,00,00,00,00,00,14,00,9d,00,02,00,01,01,00,00,00,00,00,
05,0b,00,00,00,00,00,18,00,ff,01,0f,00,01,02,00,00,00,00,00,05,20,00,00,00,
20,02,00,00,00,00,14,00,ff,01,0f,00,01,01,00,00,00,00,00,05,12,00,00,00,01,
01,00,00,00,00,00,05,12,00,00,00,01,01,00,00,00,00,00,05,12,00,00,00
[HKEY_LOCAL_MACHINESYSTEMCurrentControlSetServiceswuauservTriggerInfo]
[HKEY_LOCAL_MACHINESYSTEMCurrentControlSetServiceswuauservTriggerInfo]
“Type”=dword:00000005
“Action”=dword:00000001
“Guid”=hex:e6,ca,9f,65,db,5b,a9,4d,b1,ff,ca,2a,17,8d,46,e0
[HKEY_LOCAL_MACHINESYSTEMCurrentControlSetServiceswuauservTriggerInfo1]
“Type”=dword:00000005
“Action”=dword:00000001
“Guid”=hex:c8,46,fb,54,89,f0,4c,46,b1,fd,59,d1,b6,2c,3b,50
- Save this file by File>Save as and name it as reg,
- Close Notepad the then,
- Open the reg file and confirm with Yes on the User Account Control pop-up page,
- Click Yes to the pop-up the next to add the information to the Registry and confirm with OK.
- Reboot the device after than see whether the issue is solved.
Method 3: Use SFC and DISM to fix Windows corruption
- In the Search box, type cmd or command prompt,
- Right-click on the command prompt and select Run as Administrator,
- Type in the following command in the command-line and hit Enter:
Dism.exe /Online /Cleanup-Image /Restorehealth
- When this process is complete, give this command and press Enter:
SFC /SCANNOW
- When the SFC scan is completed, restart the PC and see if the problem persists.
Method 4: repair Windows in-place update
This is last in our list of the methods to fix the windows update service missing from services.msc. if none of the above methods help you in getting the fix, performing a Windows 10 Repair-Upgrade is the only resort.
Also Read: How to fix Error ftde.xact.3321.1107296356 in Windows 10 [Steps]
Conclusion
That’s it! Which method works for you? Let us know through the comment section below if this guide helps you in any way to solve the issue or just enhance your knowledge. Also, please like and share this guide to others.
Содержание
- Способ 1: «Службы»
- Способ 2: «Командная строка»
- Способ 3: «Редактор реестра»
- Способ 4: «Редактор локальной групповой политики»
- Способ 5: «Диспетчер задач»
- Способ 6: Сторонний софт
- Возобновление обновлений
- Вопросы и ответы
Способ 1: «Службы»
Если автоматические обновления отключены, то можно вручную их активировать, перезапустив соответствующую службу:
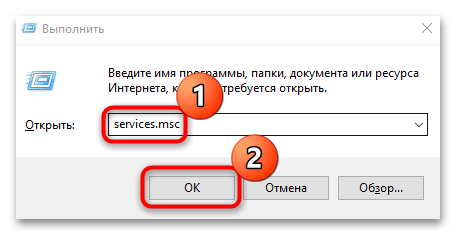
- Откройте приложение «Службы». Для этого одновременным нажатием на клавиши «Win + R» вызовите диалоговое окно «Выполнить» и пропишите команду
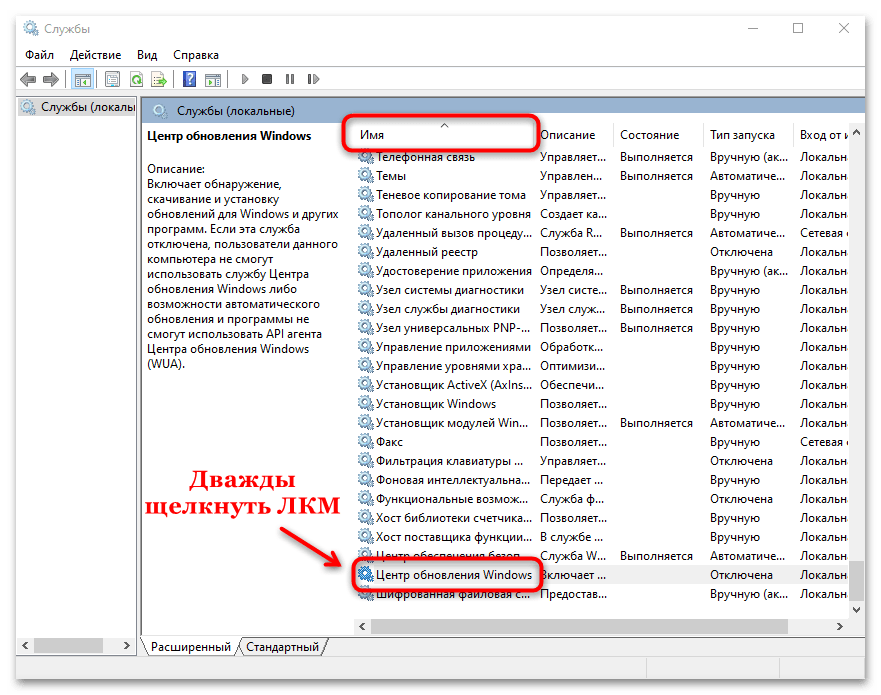
services.msc. - В списке служб найдите «Центр обновления Windows» и дважды щелкните левой кнопкой мыши по названию. Если необходимо, можно нажать на вкладку «Имя» и упорядочить службы по алфавиту, чтобы было проще отыскать строку по имени.
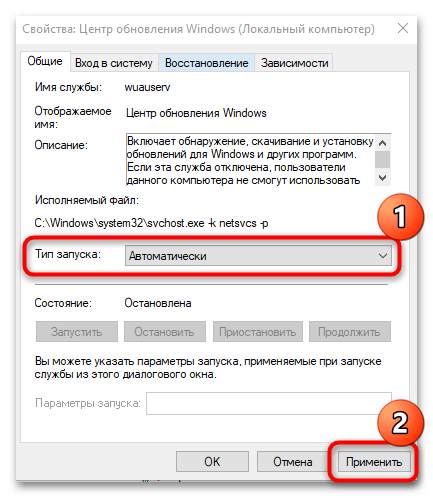
- В новом окошке в меню «Тип запуска» выберите пункт «Автоматически». Нажмите на кнопку «Применить».
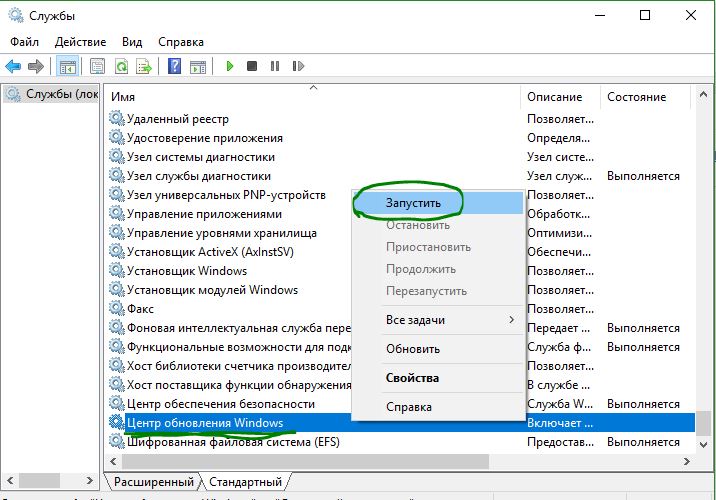
- Если служба выключена, то кликните по кнопке «Запустить», затем по «ОК».
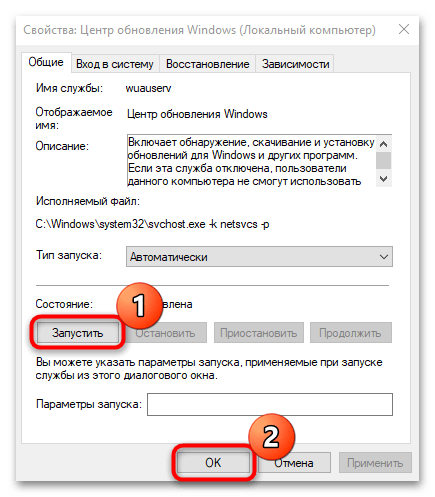
Служба автоматического поиска и установки обновлений для операционной системы, программных компонентов и продуктов компании теперь активирована.
Способ 2: «Командная строка»
Включить автообновление в Виндовс 10 можно с помощью специальной команды, введенной в интерфейсе консоли «Командная строка», которая запущена с расширенными правами:
- Откройте средство, введя соответствующий запрос в системной строке поиска. В результате запросов выберите пункт «Запуск от имени администратора».
- В интерфейсе терминала вставьте команду
net start wuauserv, затем нажмите на клавишу «Enter».
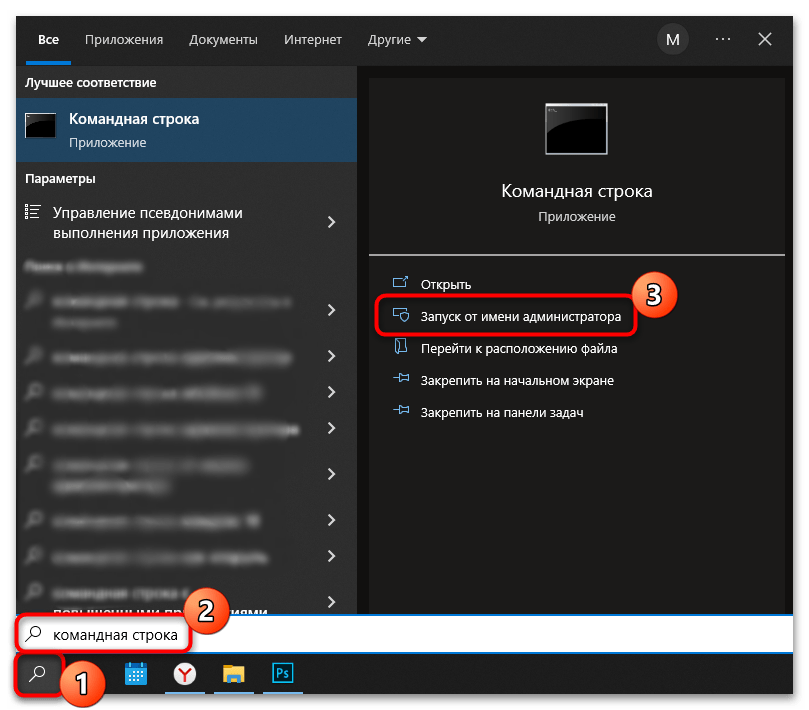
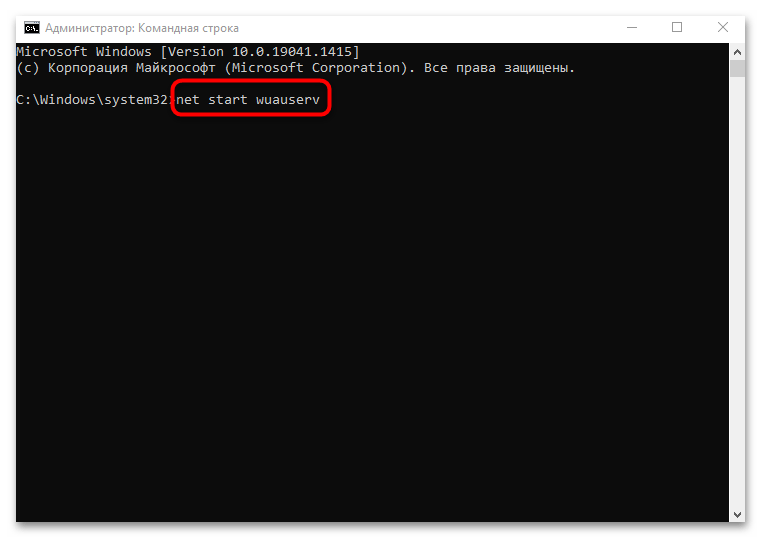
В окне консоли отобразится уведомление, что служба успешно активировалась, и она будет действовать в автоматическом режиме.
Способ 3: «Редактор реестра»
Еще один метод активации служб автоматического обновления Windows 10 – это внесение изменений в системный реестр. Следует отметить, что невнимательно выполненные действия могут привести к нарушению работоспособности системы, поэтому можно создать контрольную точку для восстановления состояния, если что-то пошло не так после редактирования.
Читайте также: Инструкция по созданию точки восстановления Windows 10
- Откройте приложение «Редактор реестра». Быстрее всего оно запускается через вызов приложения «Выполнить» (клавиши Win + R) и команду
regedit. - Разверните ветки:
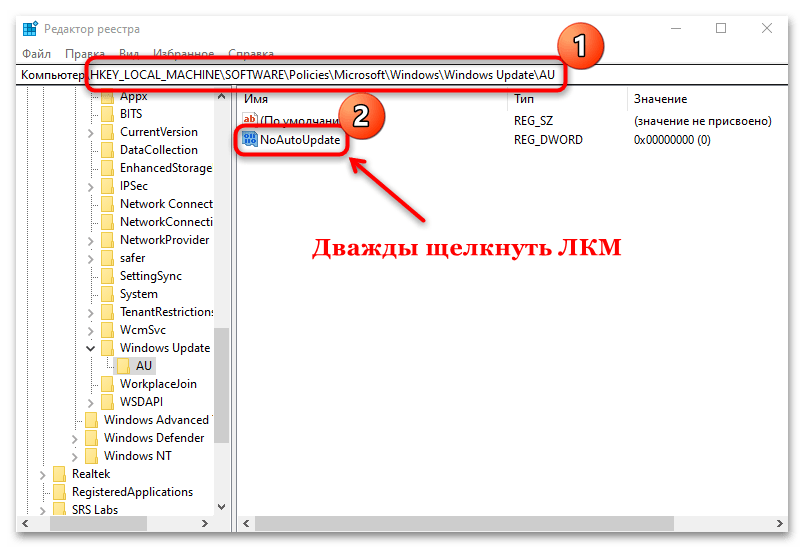
HKEY_LOCAL_MACHINESOFTWAREPoliciesMicrosoftWindowsWindowsUpdateAU. В каталоге «AU» отыщите параметр «NoAutoUpdate» и дважды кликните по нему, чтобы перейти в окно с настройкой. - В поле «Значение» введите «0» и щелкните по кнопке «ОК».
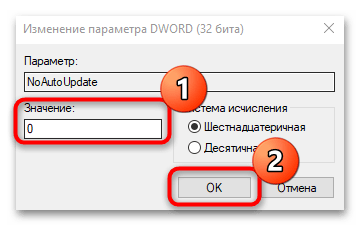
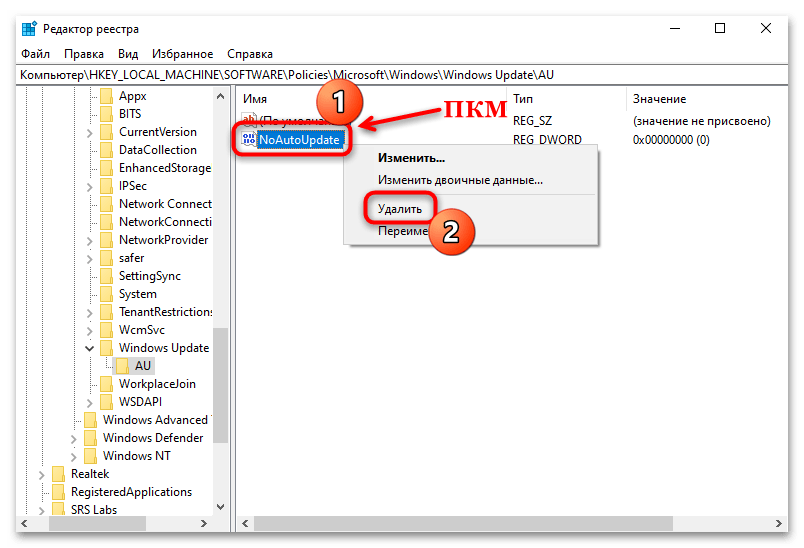
Также можно полностью удалить параметр, кликнув по нему правой кнопкой мыши и выбрав соответствующий пункт.
Способ 4: «Редактор локальной групповой политики»
Настройка автоматического обновления через «Редактор локальной групповой политики» подойдет для редакций Pro и Enterprise. Используя средство, можно включить загрузку и установку апдейтов без вмешательства пользователя:
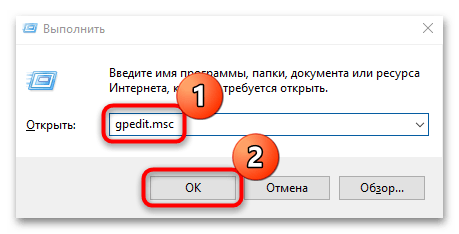
- Через диалоговое окно «Выполнить» перейдите в приложение «Редактор локальной групповой политики», вставив команду
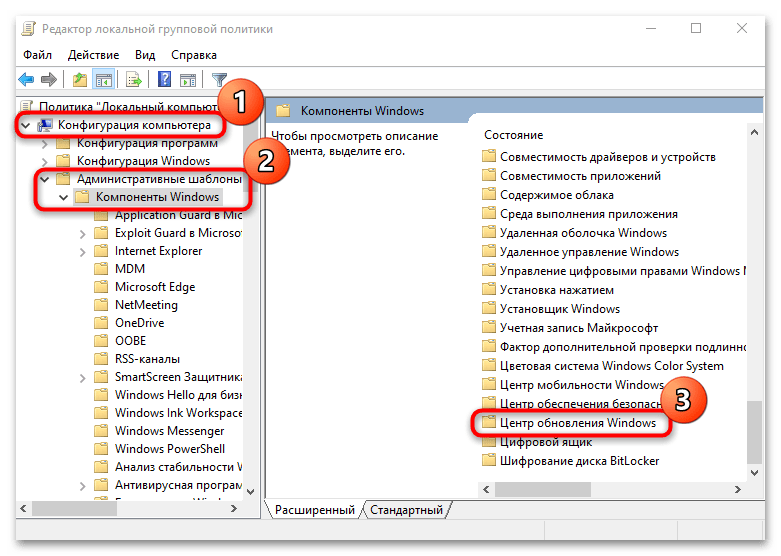
gpedit.msc. - На панели слева раскройте меню «Конфигурация компьютера», затем выберите «Административные шаблоны». В разделе «Компоненты Windows» найдите каталог «Центр обновления Windows». Нажмите на него.
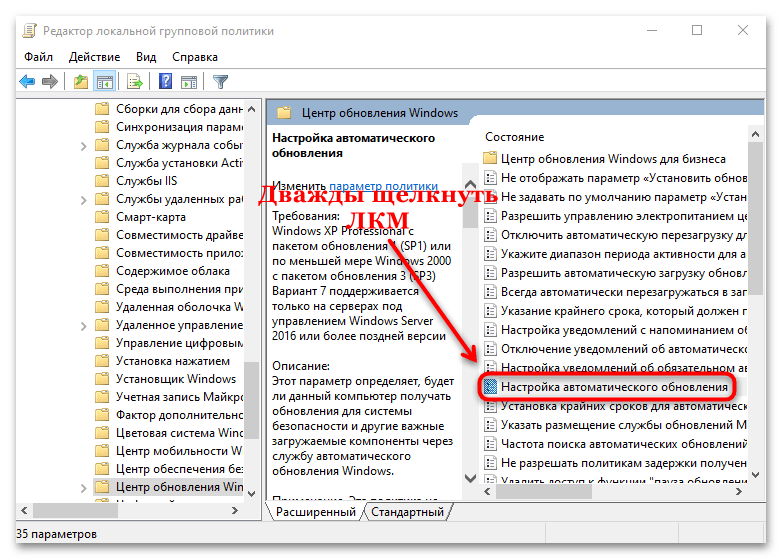
- В главном окне отыщите функцию «Настройка автоматического обновления». Кликните по ней два раза левой кнопкой мыши.
- В новом окне поставьте отметку у пункта «Включено», затем нажмите на кнопку «ОК» для подтверждения действия.
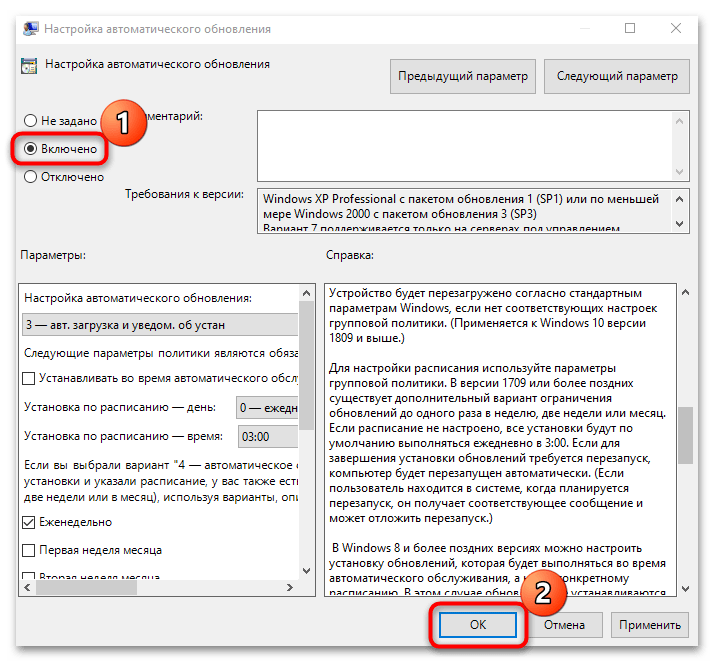
Помимо активации автоматического обновления операционной системы, в окне с настройками можно задать период и время для загрузки апдейтов, определить подходящий вариант обновлений, откладывать процедуру на определенное время.
Способ 5: «Диспетчер задач»
Можно попробовать активировать службу автообновления в Windows 10 через средство «Диспетчер задач», где пользователь может контролировать процессы и управлять ими:
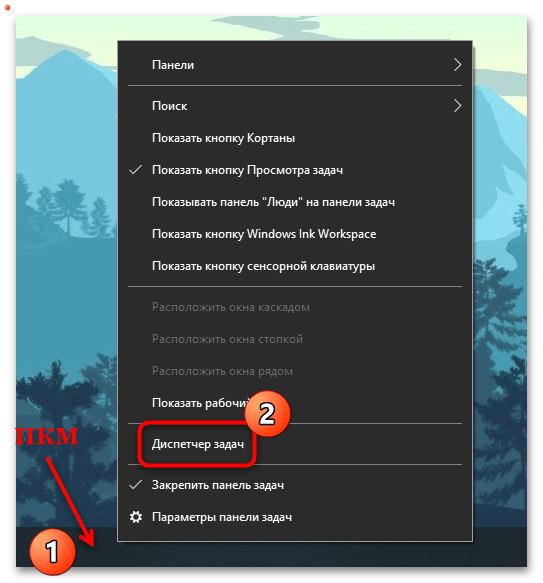
- Запустите «Диспетчер задач». Обычно достаточно щелкнуть правой кнопкой мыши по нижней рабочей панели и выбрать нужное средство в меню.
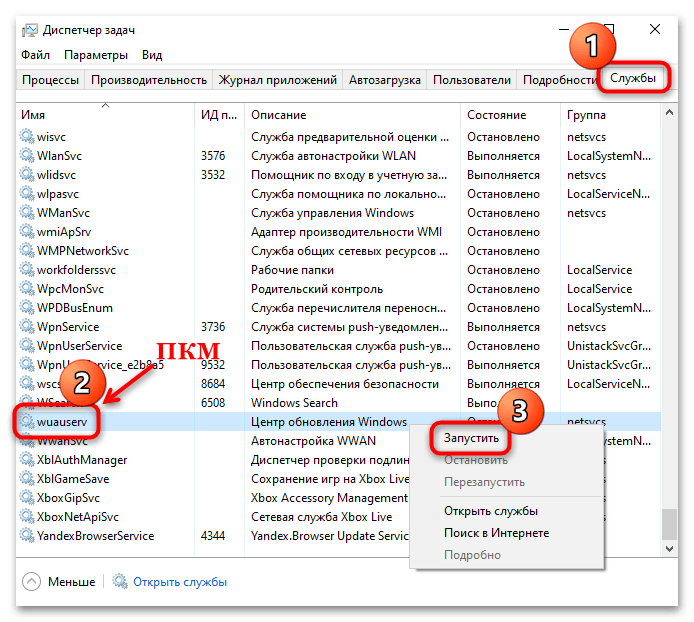
- Откройте вкладку «Службы» и найдите «wuauserv», отвечающую за «Центр обновления Windows». Работает ли служба, можно посмотреть в столбике «Состояние». Чтобы включить ее, кликните по названию правой кнопкой мыши и выберите пункт «Запустить».
Способ 6: Сторонний софт
Для управления обновлениями используются сторонние утилиты, с помощью которых можно быстро, без ручного редактирования реестра или использования команд, как приостановить, так и включить автообновления в Windows 10. Одним из таких инструментов является бесплатная программа Win Update Stop с простым интерфейсом.
Скачать Win Update Stop с официального сайта
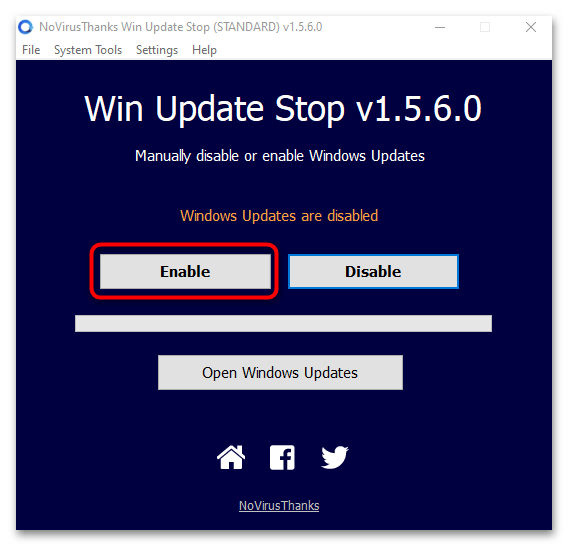
- Скачайте и установите утилиту. После запуска в интерфейсе можно увидеть две кнопки, где «Enable» обозначает включение обновлений операционной системы.
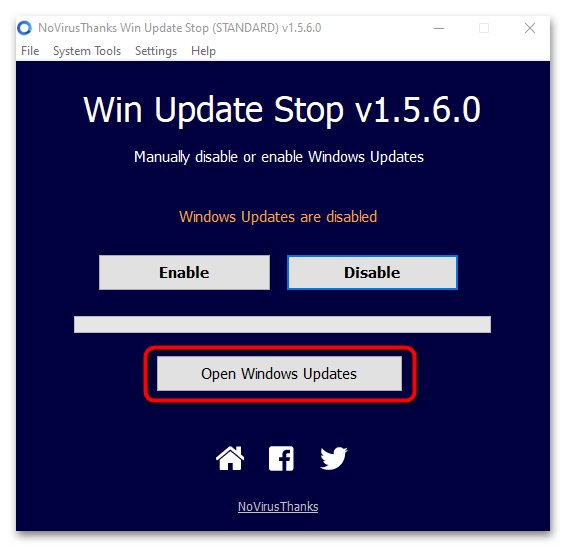
- Принцип работы программы заключается в изменении параметров «Центра обновления Windows». Перейти в раздел «Параметров» можно, нажав на кнопку «Open Windows Updates».
Возобновление обновлений
Через приложение «Параметры» можно не только посмотреть наличие апдейтов, но и настроить автоматическое обновление операционной системы. Если загрузка и установка новых программных компонентов временно отключена, то ее можно возобновить в несколько кликов:
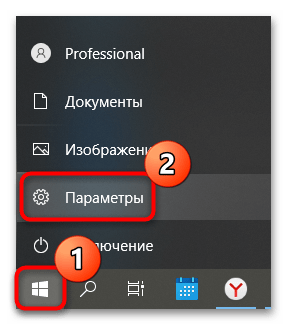
- Щелкните по значку Windows на нижней рабочей панели, затем в меню выберите пункт в виде шестеренки – «Параметры».
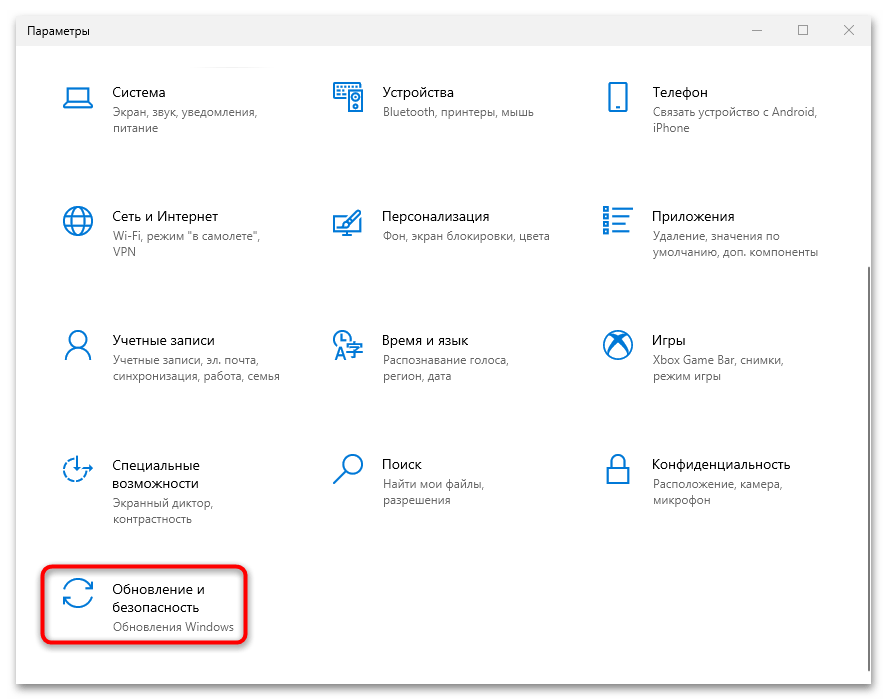
- В новом окне перейдите в раздел «Обновление и безопасность».
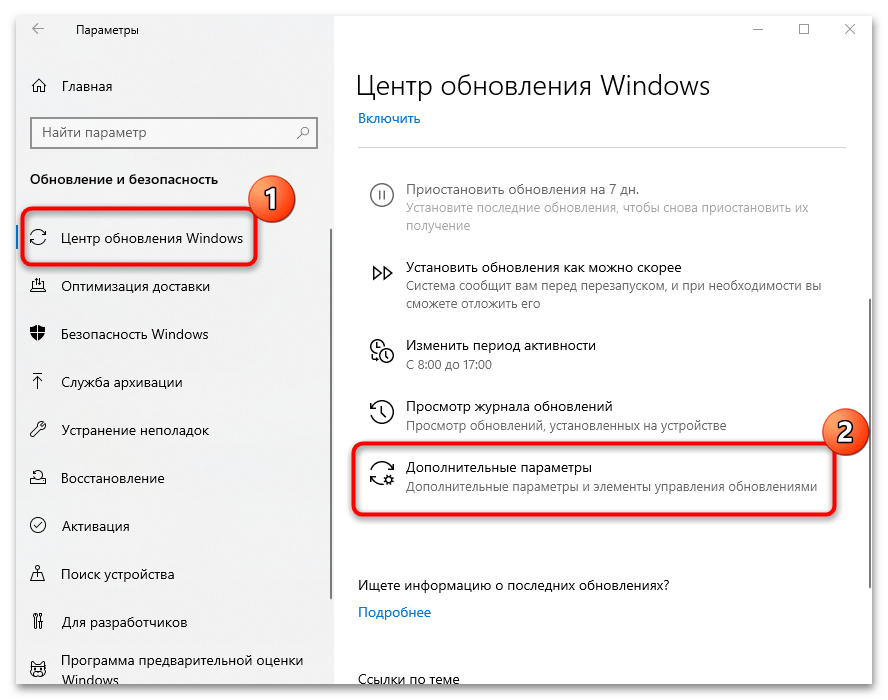
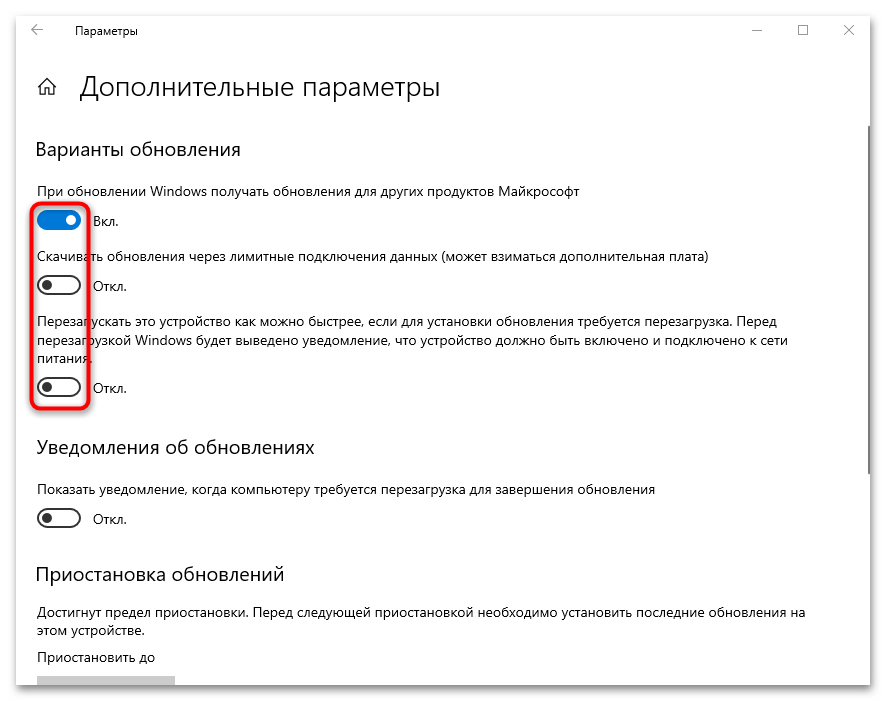
- На вкладке «Центр обновления Windows» выберите функцию возобновления автообновлений. Также можно настроить автоматические обновления, убрав лимитное подключение или изменив другие настройки. Для этого кликните по строке «Дополнительные параметры».
- Если на компьютере установлены другие продукты компании Microsoft, например Word, то для автоматического обновления программ отметьте соответствующую опцию. Если используется интернет с ограниченным трафиком, то лучше отключить скачивание обновлений через лимитные подключения.
Читайте также: Решение проблем с работоспособностью Центра обновлений Windows 10
Еще статьи по данной теме:
Помогла ли Вам статья?
The Windows Update Service helps in updating your Windows 11/10 system to the latest version and it is necessary because it pushes updates required by the operating system. The service is managed through the Service Manager. However, some users have reported a case where the Windows Update Service missing in services.msc in Windows 11/10. At times you may see error code 0x80070424.
Windows Update Service is missing (0x80070424)

While the basic cause is a missing file, a user reported that it was apparently removed by malware. Thus, it is advisable to perform a full system anti-virus scan on your system before proceeding with any troubleshooting mentioned below:
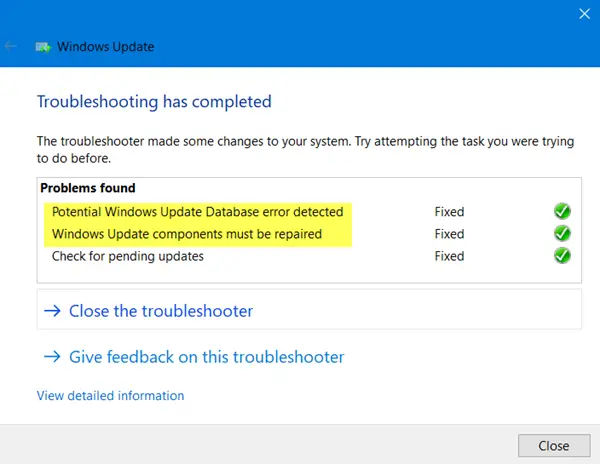
- Run the Windows Updates Troubleshooter
- Run an SFC scan
- Use DISM to fix Windows Update files
- Re-register or reset Windows Updates components
- Use Registry fix
- Reset your computer
- Repair Windows 10 using external media
Try the following solutions sequentially to resolve the issue in discussion.
1] Run the Windows Updates Troubleshooter
The Windows Update Troubleshooter can resolve a lot of problems related to Windows Updates. It can be helpful if you encounter the problem in the discussion. The procedure to run the Windows Updates Troubleshooter is as follows:
Click on the Start button and go to Settings> Updates and Security > Troubleshoot.
Select the Windows Updates Troubleshooter and run it.
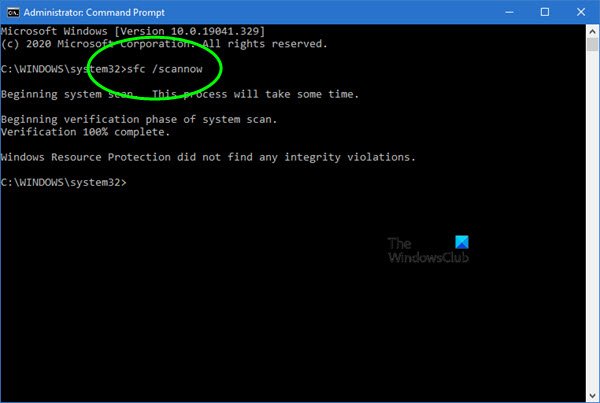
2] Run an SFC scan
The System File Checker or sfc.exe is a utility in Microsoft Windows located in C:WindowsSystem32 folder. This utility allows users to scan for and restore corrupt Windows system files. Since the main cause of the issue is missing files, you can consider running an SFC scan on your system
3] Use DISM to fix Windows Update files
If a generic SFC scan doesn’t work on your system, you could try a Windows Updates specific DISM scan.using the following command:
DISM.exe /Online /Cleanup-image /Restorehealth
This procedure will check for missing and corrupt files associated with Windows Updates and replace them.
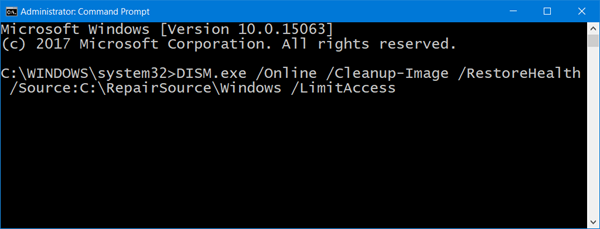
If your Windows Update client is already broken, you will be prompted to use a running Windows installation as the repair source or use a Windows side-by-side folder from a network share, as the source of the files.
You will then be required to run the following command instead:
DISM.exe /Online /Cleanup-Image /RestoreHealth /Source:C:RepairSourceWindows /LimitAccess
Here you have to replace the C:RepairSourceWindows placeholder with the location of your repair source.
Once the process is complete, DISM will create a log file in %windir%/Logs/CBS/CBS.log and capture any issues that the tool finds or fixes.
4] Re-register Windows Updates service/Reset Windows Updates components
If the above-mentioned solutions failed to bring any result, you could consider resetting the Windows Updates components. This is a long a complicated process but works well when done step by step. Usually, this solution should resolve the problem with Windows Updates, no matter what, but if it doesn’t help, you might have to consider resetting your system.
5] Use Registry Fix
Back up your Registry and also create a System Restore Point first and THEN download this file from our servers and extract its contents. It will contain a Fix-WUS.reg file. Double-click on it to add its contents to your Registry.
Check if it has solved the issue. If yes, good; if not, restore your Registry or your Windows using the created backups.
6] Reset your computer
Resetting your Windows system comes with two options: the first is to delete all files and programs on the system start new and the second is to reset the settings to default while keeping your files intact. It is advisable to start with the option to keep the files intact and if that doesn’t work, you can consider wiping data from your system after a proper backup.
7] Repair Windows 11/10 using external media
While resetting Windows 11/10 should clear most of your problems, if that doesn’t work, you could consider a repairing Windows 11/10 using external media. This would require a DVD or USB drive with a Windows ISO. The problem is that unlike previous versions of Windows, the recovery media usually doesn’t come with the package when you buy a computer. You could either order it separately or create it on your own.
We hope this guide helps in resolving your problem.
- Remove From My Forums
-
Question
-
Hey, I’ve been using the beta for a while and have been working under the assumption that winupdate was running in the background doing its thing, however now upon launching windows update I get the red cross shield and ‘check for updates’ button, which upon clicking gives an error message»
‘windows update cannot currently check for updates, because the service is not running. You may need to restart your computer’Restarting does nothing, upon checking services.msc, there IS NO WINDOWS UPDATE SERVICE! I have the wuaueng.dll, and wusa.exe, but am unable to use wusa to install microsoft updates manually (such as the windows media player fix for corrupted mp3s), when I try to launch a .msu file I get this:
‘Installer encountered an error 0x80070424
The specified service does not exist as an installed service’So how can I install… the windows update service?!
I have tried sfc/scannow in cmd and it told me that it did not find any integrity violations
I’m on beta 7000 ultimate x86
Answers
-
Do you have the following registry key info below? It is very likely that your computer/network is infected with a variant of the Conficker virus. One of it’s first attack actions is to cripple the Windows Update service to prevent itself being removed by thngs like Windows Defender or the Maliscious Software Removal Tool. Even though Win7 does not have any vulnerabilities conficker can attack, it also attacks accounts with weak or blank passwords.
Review: http://www.microsoft.com/security/portal/SearchResults.aspx?query=conficker
Download and run MSRT — http://www.microsoft.com/security/malwareremove/families.mspx==========
Key Name: HKEY_LOCAL_MACHINESYSTEMCurrentControlSetServiceswuauserv
Name: PreshutdownTimeout
Type: REG_DWORD
Data: 0x36ee800Name: DisplayName
Type: REG_SZ
Data: @%systemroot%system32wuaueng.dll,-105Name: ImagePath
Type: REG_EXPAND_SZ
Data: %systemroot%system32svchost.exe -k netsvcsName: Description
Type: REG_SZ
Data: @%systemroot%system32wuaueng.dll,-106Name: ObjectName
Type: REG_SZ
Data: LocalSystemName: ErrorControl
Type: REG_DWORD
Data: 0x1Name: Start
Type: REG_DWORD
Data: 0x2Name: DelayedAutoStart
Type: REG_DWORD
Data: 0x1Name: Type
Type: REG_DWORD
Data: 0x20Name: DependOnService
Type: REG_MULTI_SZ
Data: rpcssName: ServiceSidType
Type: REG_DWORD
Data: 0x1=====
Once you have that all done, let me know if you need asistance getting your Windows Update service registry entries back together. Honestly, our recommendation after infection is to reinstall the OS to guarantee that a Conficker variant did not leave behind a rootkit, worm, or backdoor account that AV tools don’t catch.
Ned Pyle [MSFT] — MS Enterprise Platforms Support — Beta Team
-
Marked as answer by
Monday, February 23, 2009 2:51 AM
-
Marked as answer by
Заходя в службы services.msc Windows 11/10, можно обнаружить, что нет в списке службы Центра обновления Windows, тем самым получая ошибку, что она не запущена.
Отсутствие службы центра обновления Windows может быть связано с повреждением записей реестра вредоносным ПО или вы применили программу по отключению данной службы, чтобы Windows 11 или 10 не обновлялись.
В этой инструкции о том, как восстановить службу Windoows Update, которая пропала из списка и не может быть запущена в Windows 11/10.
1. Восстановление некоторых записей реестра
В первую очередь сделайте резервную копию реестра и создайте точку восстановления. Далее скачайте reg файл, распакуйте его и запустите WU missing.reg, после чего перезагрузите ПК. Далее:
- Нажмите Win+R и введите services.msc
- Найдите службу Центр обновления Windows
- Запустите её, если она остановлена
- Убедитесь, что проблема решена
2. Сканирование на вирусы
Воспользуйтесь сканером DrWeb для нахождения вредоносного ПО, которое может быть виновником за отсутствие службы WU.
3. Восстановить системные файлы
Из-за поврежденных системных файлов может не оказаться службы центра обновления windows в списках служб. Чтобы проверить целостность системы, запустите командную строку от имени администратора и введите ниже команды по порядку:
sfc /scannowDISM /Online /Cleanup-Image /RestoreHealth
! Перезагрузитесь и проверьте, появилась ли служба Windows Update
Смотрите еще:
- Служба обновления завершает работу при установке обновления
- Ошибка 1058: Служба не может быть запущена в Windows
- Ошибка NET HELPMSG 2182. Служба BITS уже запущена
- Служба в настоящее время не может принимать команды
- Пользовательская служба Push-уведомлений перестала работать в Windows
[ Telegram | Поддержать ]
Windows может не получать обновления, в том числе и устраняющие критические уязвимости в системе безопасности, по нескольким причинам. В этой статье мы рассмотрим все возможные причины и расскажем как устранить их.
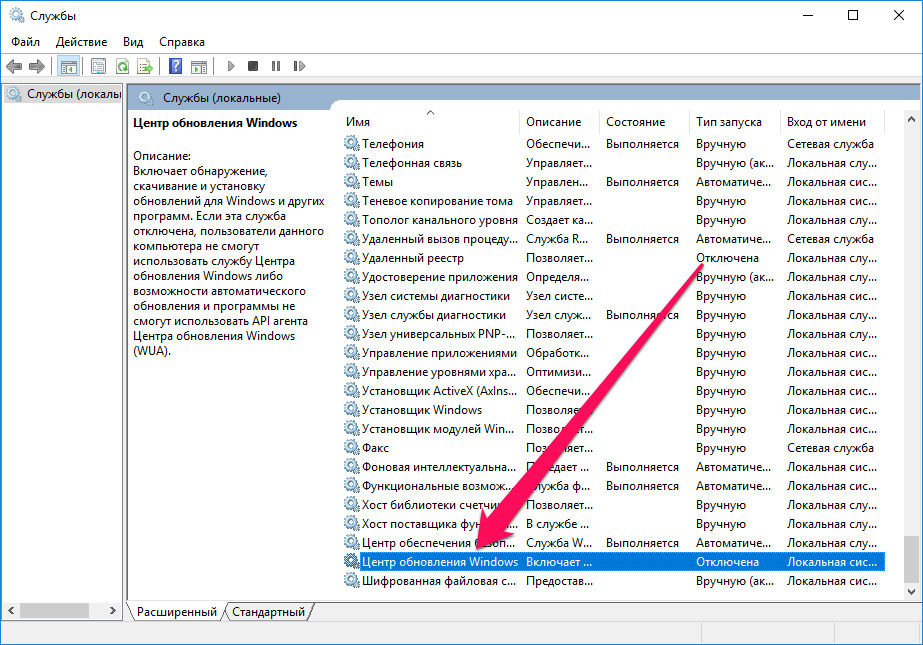
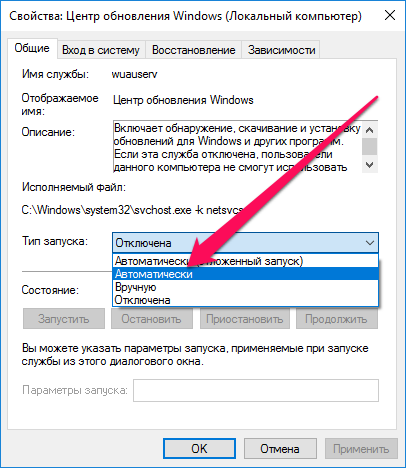
1. Включите службу обновления Windows
Последние обновления Windows могут не загружаться на компьютер из-за того, что служба, отвечающая за их загрузку выключена. Первым делом необходимо убедиться в том, что она активна.
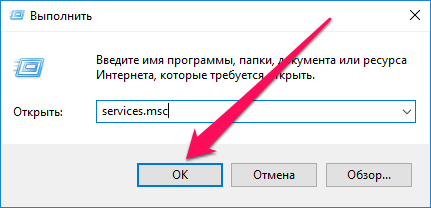
Шаг 1. Нажмите сочетание клавиш Win + R, введите в открывшемся окне команду services.msc и нажмите Enter.
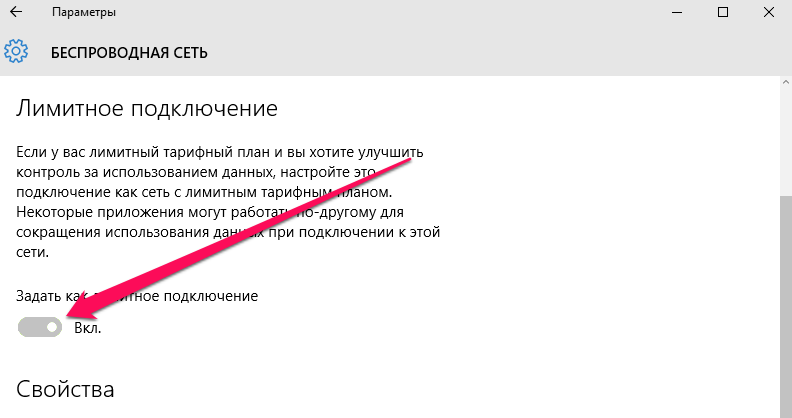
2. Уберите лимит с беспроводного подключения
Примечание: актуально только для Windows 10.
Данный способ подойдет только тем пользователям, которые подключаются к Сети посредством беспроводного соединения. В таком случае на беспроводное подключение может быть установлен лимит, запрещающий автоматическое обновление Windows. Для начала получения обновление и их последующей установки лимит необходимо снять.
Шаг 1. Перейдите в меню «Пуск» и нажмите на «Параметры».
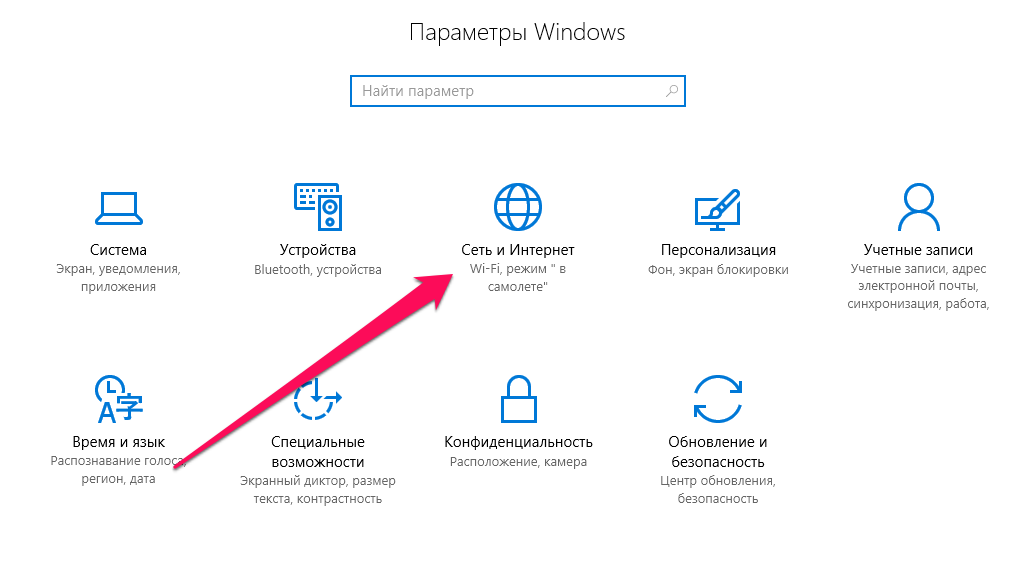
Шаг 3. Переведите переключатель «Задать как лимитное подключение» в неактивное положение.
3. Проверьте параметры групповой политики
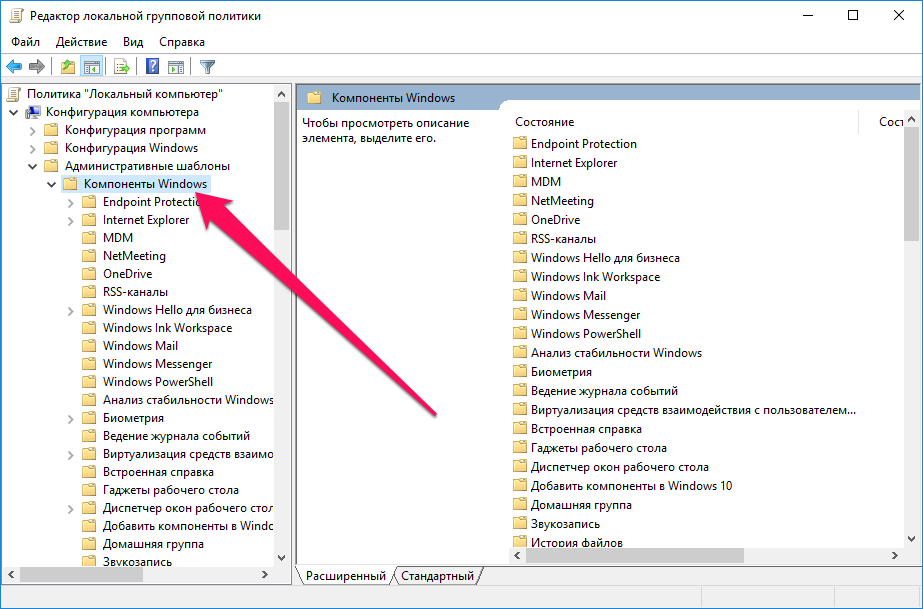
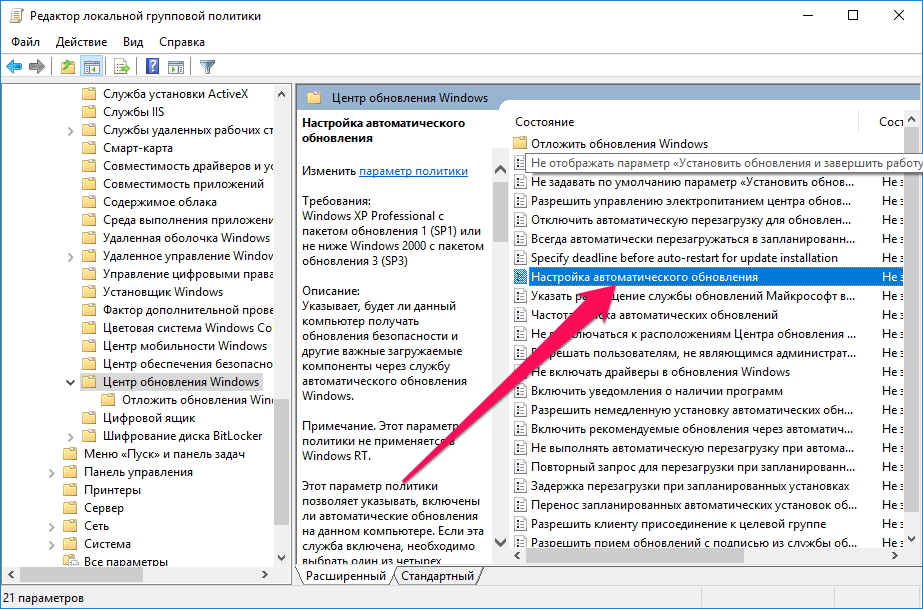
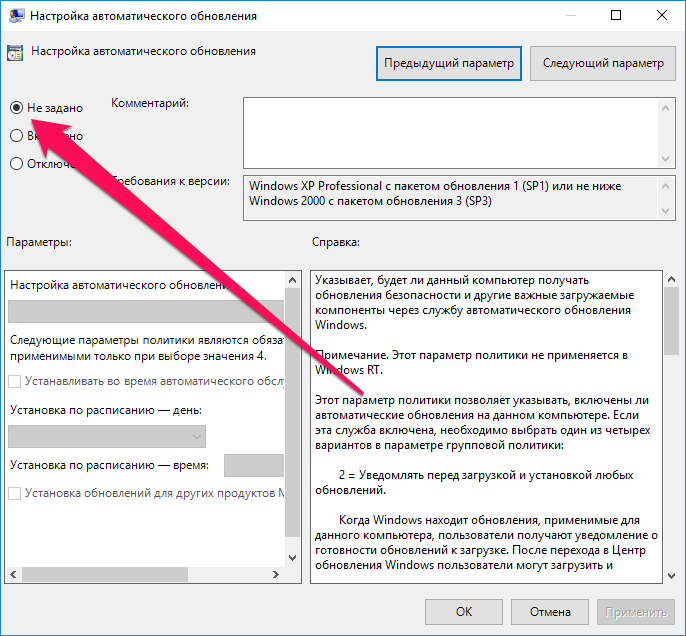
С большой долей вероятности первые два способа вновь позволят вам получать обновления для своего компьютера под управлением Windows. Однако если этого не произошло, «копнуть» необходимо еще глубже. В сторону групповой политики системы.
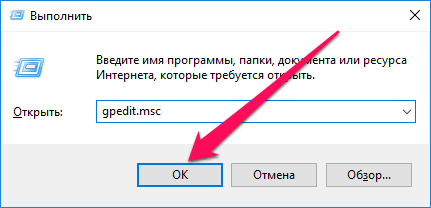
Шаг 1. Нажмите комбинацию клавиш Win + R, введите в открывшемся окне команду gpedit.msc и нажмите Enter.
4. Проверьте файл hosts
Еще одной причиной по которой Windows не может загрузить последние обновления может являться блокировка серверов Microsoft в файле hosts. Проверить его очень просто.
Шаг 1. Перейдите в папку WindowsSystem32driversetc.
Шаг 2. Откройте файл hosts в любом текстовом редакторе, запущенном от имени администратора.
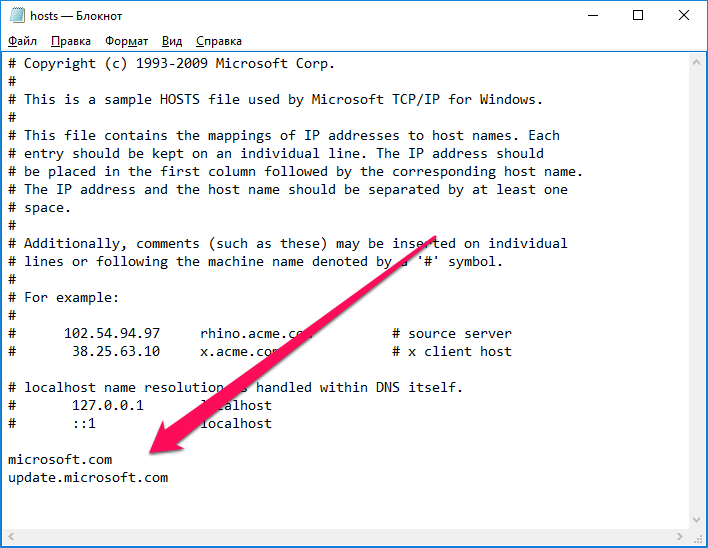
Шаг 4. Сохраните обновленный файл hosts.
Смотрите также:
- Как отключить автоматическое обновление Windows 10
- Как отключить DEP в Windows
- Бесплатный антивирус для Windows — какой выбрать
✅ Подписывайтесь на нас в Telegram, ВКонтакте, и Яндекс.Дзен.
On some Windows 8, 7 or Vista computers the Windows Update service may be missing from services (services.msc) due to a virus attack. When this happens the following error appears on your screen when you try to check for updates : «Windows update cannot currently check for updates, because the service is not running. You may need to restart your computer’.
This tutorial contains detailed instructions on how to restore Windows Update service in it’s original state.
How to solve the Windows Update service missing problem.
Important: In order to fix the Windows Update Service missing problem, first make sure that your computer is clean from viruses or other malicious programs. If you don’t know how to do that, then follow the steps in this guide: How To Scan Your Computer for Viruses & Other Malicious Programs
Method 1. Run the Windows Update Troubleshooter. *
1. Navigate to Windows Control Panel, set the ‘View By’ to Small icons and open Troubleshooting.
2. In Troubleshooting options, click View all.
3. Open the Windows Update.
4. Click Next to troubleshoot Windows update problems.
5. When the troubleshooting process is complete, close the troubleshooter and restart your PC.
6. Check for updates. *
* Note: If you ‘re using Windows Vista, run this tool also: BITS Repair Tool for Vista.
Method 2: Use Microsoft FixIt 50202 to repair Windows Update service. *
* Notes:
1. Because this method no longer works, move on to the next method.
2. This method applies only to Windows 7 OS.
1. Download & save MicrosoftFixit50202 tool on your computer.
2. Run the MicrosoftFixit50202 tool.
3. Accept the license agreement and then press Next.
4. Follow the instructions on screen.
Method 3. Restore invalid/missing registry keys from a working system.
Requirement: Another working computer with the same Windows Edition.
On the working computer, perform the following actions:
1. Open Registry Editor: To do that:
- Simultaneously press “Windows” + “R” keys to open the RUN window.
- In “RUN” window “Open” box, type: regedit
- Press Enter
2. At the left pane, press the “+” sign and navigate to this subfolder:
- HKEY_LOCAL_MACHINESYSTEMCurrentControlSetservicesBITS
3. Right-click on BITS subfolder and select Export.
4. Give a name for the exported file (e.g. ‘BITS‘) and save it to the desktop.
5. Then navigate to this subfolder:
- HKEY_LOCAL_MACHINESYSTEMCurrentControlSetserviceswuauserv
6. Right-click on wuauserv subfolder and select Export.
7. Give a name for the exported file (e.g. ‘wuauserv‘) and save it to the desktop.
8. Close registry editor
9. Copy the exported registry files to a USB flash drive.
On the computer that Windows Update service or BITS Service is missing (not listed).
1. Plug the USB flash drive with the exported reg files to an empty USB port.
2. Double click at the exported BITS registry file (e.g. «BITS.reg) and allow to add its information to registry. *
3. Double click at the exported wuauserv registry file (e.g.»wuauserv‘.reg «) and allow to add its information to registry. *
* Note: If you have problems during import, then start Windows in Safe Mode and then import the key(s).
4. Restart the computer.
5. Check if Windows Update is working.
Method 4. Download & Import the Required Registration files.
If you don’t own another working computer, to get the required registration files, then you can download them from the links below (according your OS) and then to import them to the registry. To accomplish this task:
Step-1. Download the Registration files.
Windows 7
- BITSWin7.reg
- WindowsUpdateWin7.reg
Windows 8
- BITSWin8.reg
- WindowsUpdateWin8.reg
Windows 10
- BITSWin10.reg
- WindowsUpdateWin10.reg
Windows 11
- BITSWin11.reg
- WindowsUpdateWin11.reg
Step-2. Import the Registration Files
1. Open Registry Editor: To do that:
- Simultaneously press “Windows” + “R” keys to open the RUN window.
- In “RUN” window “Open” box, type: regedit
- Press Enter
2. From main menu choose File > Import
3. Select the BITSWin.reg file and click Open. (If the import is successful, then click OK to the dialog box that appears. *
4. By using File > Import again, open the WindowsUpdateWin.reg file.
* Note: If the import is unsuccessful, then boot Windows in Safe mode and then import the registration files.
5. Restart your computer.
Step-3. Start the Windows Update & BITS service.
1. After restart, navigate to Services panel. To do that:
- Simultaneously press “Windows” + “R” keys to open the RUN window.
- In “RUN” window “Open” box, type: services.msc
- Press Enter
2. Right click at BITS service select Properties.
3. Ensure that the Startup type is set to «Automatic (Delayed Start)» and press the Start button to start the service (if it is not started). Click OK.
4. Then right click at Windows Update service and choose Properties.
5. Ensure that the Startup type is set to «Automatic (Delayed Start)» and press the Start button to start the service (if it is not started). Click OK.
6. Try to check for updates again.
That’s all folks! Did it work for you?
Please leave a comment in the comment section below or even better: like and share this blog post in the social networks to help spread the word about this solution.
If this article was useful for you, please consider supporting us by making a donation. Even $1 can a make a huge difference for us.

How to Turn off Windows Updates in Windows 10
- You can do this using the Windows Update service. Via Control Panel > Administrative Tools, you can access Services.
- In the Services window, scroll down to Windows Update and turn off the process.
- To turn it off, right-click on the process, click on Properties and select Disabled.
How do I turn on my Windows Update service?
You can do this by going to Start and typing in services.msc in the search box. Next, press Enter and the Windows Services dialog will appear. Now scroll down until you see the Windows Update service, right-click on it and choose Stop.
How do I turn on Windows 10 update?
Steps to enable or disable Windows Update in Windows 10:
- Step 1: Lauch Run by Windows+R, type services.msc and tap OK.
- Step 2: Open Windows Update in the services.
- Step 3: Click the down arrow on the right of Startup type, choose Automatic (or Manual) in the list and hit OK to have Windows Update enabled.
How do I enable Windows 10 update in the registry?
Change Windows Update settings in Windows 10
- Open Registry Editor.
- Go to the following Registry key: HKEY_LOCAL_MACHINESOFTWAREMicrosoftWindowsCurrentVersionWindowsUpdateAuto Update. Tip: See how to jump to the desired Registry key with one click.
- Set the AUOptions DWORD value here to one of the following values:
- Restart your computer.
How do I enable Windows Update service in Windows 7?
Log in to the Windows 7 or Windows 8 guest operating system as an administrator. Click Start > Control Panel > System and Security > Turn automatic updating on or off. In the Important updates menu, select Never check for updates. Deselect Give me recommended updates the same way I receive important updates.
How do I enable Windows Update in the registry?
To use Registry Editor, follow these steps:
- Click Start, click Run, and then type regedit in the Open box.
- Locate and then click the following key in the registry: HKEY_LOCAL_MACHINESOFTWAREPoliciesMicrosoftWindowsWindowsUpdateAU.
- Add one of the following settings: Value name: NoAutoUpdate. Value data: 0 or 1.
How do I enable Windows Update from the command line?
Open the Run command (Win + R), in it type: services.msc and press enter. From the Services list which appears find the Windows Update service and open it. In ‘Startup Type’ (under the ‘General’ tab) change it to ‘Disabled’ Restart.
How do I find Windows Update in Windows 10?
Check for updates in Windows 10. Open Start Menu and click on Settings > Update & Security settings > Windows Update. Here, press on the Check for updates button. If any updates are available, they will be offered to you.
Are Windows 10 updates automatic?
Once you complete the steps, Windows 10 will stop downloading updates automatically. While automatic updates remains disabled, you can still download and install patches manually from Settings > Update & Security > Windows Update, and clicking the Check for updates button.
How do I turn on automatic updates?
To turn updates on or off, follow these steps:
- Open Google Play.
- Tap the hamburger icon (three horizontal lines) on the top-left.
- Tap Settings.
- Tap Auto-update apps.
- To disable automatic app updates, select Do not auto-update apps.
How do I know if Windows Update is enabled?
- Step 1: Open Windows Update Settings. Using the Windows 10 search bar in the bottom left search “Windows Update Settings” and select the systems settings link that populates.
- Step 2: Select Automatic Updates. Once in Windows Update Settings select “Advanced Options”. Ensure that Automatic is selected in the drop down.
How do I force Windows 10 to check for updates?
Open up the command prompt by hitting the Windows key and typing in cmd. Don’t hit enter. Right click and choose “Run as administrator.” Type (but do not enter yet) “wuauclt.exe /updatenow” — this is the command to force Windows Update to check for updates.
How do I enable Windows Update in group policy?
Change the Group Policy
- Press Win-R, type gpedit.msc , press Enter. This brings up the Local Group Policy Editor.
- Navigate the left pane as if it were File Explorer to. Computer Configuration > Administrative Templates > Windows Components > Windows Update > Defer Updates.
- Choose Select when Feature Updates are received.
How do I manually update Windows 7?
HOW TO MANUALLY CHECK FOR WINDOWS 7 UPDATES
- 110. Open the Windows Control Panel, and then click System and Security.
- 210. Click Windows Update.
- 310. In the left pane, click Check for Updates.
- 410. Click the link for any updates that you wish to install.
- 510. Select the updates that you want to install and click OK.
- 610. Click Install Updates.
- 710.
- 810.
How do I restart Windows Update service in Windows 7?
Restart the device again, and then turn Automatic Updates back on.
- Press the Windows key + X and choose Control Panel.
- Select Windows Update.
- Choose Change Settings.
- Change the settings for updates to Automatic.
- Choose OK.
- Restart the device.
How do I enable services MSC?
To open Windows Services, Run services.msc to open the Services Manager. Here you will be able to start, stop, disable, delay Windows Services. Let us see how to do this in a bit more detail. Right-click on your Start button to open the WinX Menu.
Where are Windows updates in the registry?
Windows Update uses an update agent that actually installs the updates. There are a number of registry keys located at HKEY_LOCAL_MACHINESOFTWAREPoliciesMicrosoftWindowsWindowsUpdateAU that control the automatic update agent. The first of these keys is the AUOptions key.
How do I know if WSUS is working?
WSUS Server Checks
- Check WSUS Service. The first thing you’ll want to do is check that WSUS is actually running and working as expected.
- Check IIS Service.
- Check Port Connectivity.
- Check Log Files.
- Check Windows Update Service.
- Check Port Connectivity.
- Check Group Policy.
- Check Log Files.
How do you update registry keys?
To make changes to the registry and export your changes to a .reg file, follow these steps:
- Click Start, click Run, type regedit in the Open box, and then click OK.
- Locate and then click the subkey that holds the registry item or items that you want to change.
- Click File, and then click Export.
How do I install Windows updates manually?
Windows 10
- Open Start – > Microsoft System Center -> Software Center.
- Go to the Updates section menu (left menu)
- Click Install All (top right button)
- After the updates have installed, restart the computer when prompted by the software.
How do I download Windows 10 updates manually?
Get the Windows 10 October 2018 Update
- If you want to install the update now, select Start > Settings > Update & Security > Windows Update , and then select Check for updates.
- If version 1809 isn’t offered automatically through Check for updates, you can get it manually through the Update Assistant.
Why can’t I run Windows Update?
“Windows Update cannot currently check for updates, because the service is not running. You may need to restart your computer.” Keep in mind, Windows Update isn’t only good for getting the latest Windows features and bug fixes. Following are few things you can try to fix your Windows Update issue.
How do I turn on automatic downloads?
Answer: To turn on Automatic Downloads on your iPhone or iPad, launch the Settings app and select Store. Then select which type of purchases you would like to enable for automatic downloads (music, apps, books are the options). You should also enable Automatic Downloads on your Mac.
How do I turn on automatic app updates?
Tap on iTunes & App Store. Then scroll all the way down towards the bottom until see Automatic Downloads. To turn on automatic app updates, tap in the white oval next to Updates. The apps will now update automatically.
How do I automatically update apps?
How to Enable Automatic App Updates in iOS
- Open the “Settings” app on the iPhone or iPad.
- Go to “iTunes & App Store”
- Under the ‘Automatic Downloads’ section, look for “Updates” and toggle that switch to the ON position.
- Exit out of Settings as usual.
Photo in the article by “Help smartphone” https://www.helpsmartphone.com/en/blog-phoneoperator-lebara-internet-activation-code


