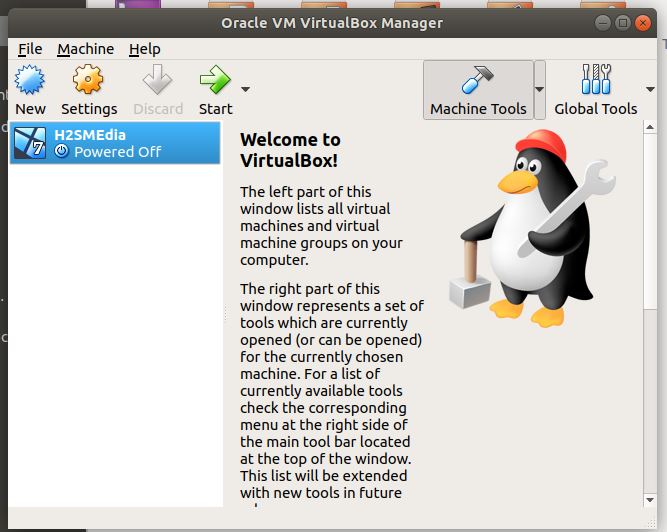
You should use KVM, because … because Ubuntu love Kvm
what is KVM
KVM (for Kernel-based Virtual Machine) is a full virtualization solution for Linux on x86 hardware containing virtualization extensions (Intel VT or AMD-V).
Using KVM, one can run multiple virtual machines running unmodified Linux or Windows images. Each virtual machine has private virtualized hardware: a network card, disk, graphics adapter, etc.
The kernel component of KVM is included in mainline Linux, as of 2.6.20.
Ubuntu uses KVM as the back-end virtualization for non-graphic servers and libvirt as its toolkit/API. Libvirt front ends for managing VMs include virt-manager (GUI).
Let’s go to hack
This setup guide is to configure a KVM on Ubuntu Server and management of the VMs is done remotely from another machine running Ubuntu Desktop.
SERVER SIDE
STEP #1: Install lib-virt package.
sudo apt-get install kvm libvirt-bin
STEP #2:allow incoming tcp and udp packet on port 22 (ssh) on server
sudo ufw allow 22
DESKTOP SIDE
STEP #2: Install Virtual Machine Manager (on Ubuntu Desktop machine).
sudo apt-get install virt-manager
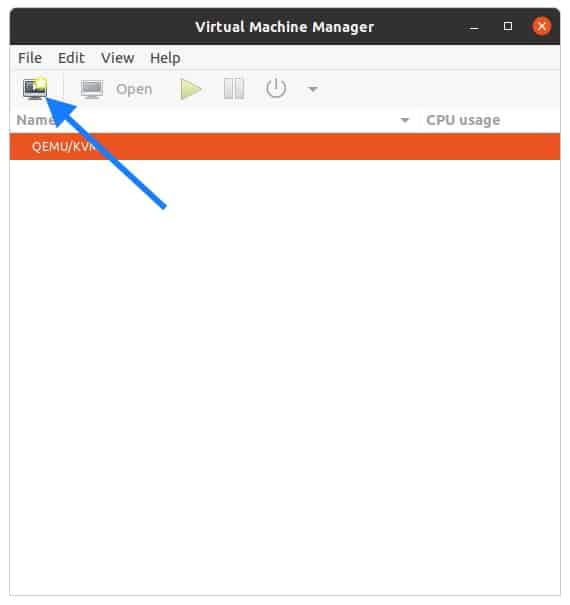
STEP #3: Connect to the server: execute virt-manager
gksudo virt-manager
- FILE.
- ADD Connection.
- Connect to remote computer
- Method : SSH
- User : your user server
- machine name : ip address of the server
NOW YOU ARE READY TO CREATE VIRTUAL MACHINE ON THE SERVER
STEP #4: Create the Guest VM image. Virtual Machine Manager provides a GUI to easily create an image. Just right-click on the server and select “New”. You will then be prompted step-by-step on the variables (e.g. # of processors, memory, etc.) needed to be configured for your VM.
STEP #5: Install the Guest VM OS. Use your regular CD/DVD installer or iso image to install the operating system on the VM.
More information in ubuntu official server Documentation -> here
Good Luck and Happy Rocking
P.S : you souldn’t be afraid of command line…..
Contents
-
Hyper-V
- What is Hyper-V?
- Why Hyper-V?
-
Enabling Hyper-V
- Windows Editions
- Hyper-V System Requirements
- Hyper-V Graphical Install
- Hyper-V PowerShell Install
- Hyper-V Admin Center (Windows 10 Server)
-
Installing Ubuntu on Hyper-V
- Using Quick Create
- Using an Ubuntu CD image (.ISO)
Hyper-V
What is Hyper-V?
Hyper-V is a native type 1 hypervisor developed by Microsoft for the Windows family of operating systems, similar to Xen or VMWare ESXi.
Hyper-V was first released for Windows Server 2008, and is available without additional charge since Windows Server 2012 and Windows 8.
For more information on the difference between type 1 and type 2 hypervisors, click here.
Why Hyper-V?
Hyper-V allows Ubuntu to be run in parallel or in isolation on Windows operating systems. There are several use-cases for running Ubuntu on Hyper-V:
- To introduce Ubuntu in a Windows-centric IT environment.
- To have access to a complete Ubuntu desktop environment without dual-booting a PC.
-
To use Linux software on Ubuntu that is not yet supported on the Windows Subsystem for Linux.
Enabling Hyper-V
Windows Editions
Ubuntu on Hyper-V can be enabled on the following Windows operating systems:
- Windows 10 Pro
- Windows 10 Enterprise
- Windows 10 Education
- Windows 10 Server
Hyper-V is not included in Windows 10 Home, which can be upgraded to Windows 10 Pro.
Hyper-V System Requirements
The following are additional system requirements for Hyper-V:
- A 64-bit processor with Second Level Address Translation (SLAT)
- CPU support for virtualization extensions and virtualization enabled in the system BIOS/EFI
- Minimum of 4 GB of memory, recommended 8 GB
- Minimum of 5 GB of disk space, recommended 15 GB
Hyper-V Graphical Install
-
Right click on the Windows Start button and select ‘Apps and Features’
-
Select ‘Programs and Features’ on the right under Related Settings
-
Select ‘Turn Windows Features on or off’
-
Select ‘Hyper-V’ and click OK
-
Restart when prompted
Hyper-V PowerShell Install
-
Open a PowerShell console as Administrator
-
Run the following command: Enable-WindowsOptionalFeature -Online -FeatureName Microsoft-Hyper-V -All
- Restart when prompted
Hyper-V Admin Center (Windows 10 Server)
See official Microsoft documentation.
Installing Ubuntu on Hyper-V
There are different methods for installing Ubuntu on Hyper-V depending on your use-case. Read each of the descriptions of the following methods and then determine the best for your needs
Using Quick Create
The recommended method for installing Ubuntu on Hyper-V is to use the curated Ubuntu image from the Hyper-V Quick Create Gallery. This method is ideal for desktop development on Ubuntu and for users interested in running a complete Ubuntu desktop environment. The Ubuntu image from the Quick Create Gallery includes pre-configured features, such as clipboard sharing, dynamic resolution display, and shared folders.
-
Enable Hyper-V as described above.
-
Open ‘Hyper-V Manager’ by:
- Click on the Windows Start button, expand the ‘Windows Administrative Tools’ folder, and click ‘Hyper-V Manager’, or
- Click the Windows key and type ‘Hyper-V’ and click ‘Hyper-V Manager’ or select with your keyboard arrow keys and press ‘Enter’
-
In the future, the Quick Create tool can be accessed directly using the above methods, but it is useful to know where Hyper-V Manager is because it is where you will come back to manage your Ubuntu VM.
-
On the ‘Actions’ pane click ‘Quick Create’ and the Quick Create tool will open.
-
Select a version of Ubuntu from the versions on the left. A build of the most recent LTS version of Ubuntu and the most recent interim release are provided. If you are developing for Ubuntu server or an enterprise environment, the LTS version is recommended. If you would like to use the latest versions of software in Ubuntu, the interim release is recommended.
-
Click ‘Create Virtual Machine’ and wait for the VM image to be downloaded.
-
Click ‘Connect’ to open a connection to your VM.
-
Click ‘Start’ to run your VM.
-
Complete the final stages of Ubuntu install, including selection of a username.
Using an Ubuntu CD image (.ISO)
It is also possible to install Ubuntu on Hyper-V using a CD image .ISO. This is useful if you are running Ubuntu Server and do not require an enhanced desktop experience. Note that the enhanced features of the Quick Create images are not enabled by default when you perform a manual install from an ISO.
-
Download an Ubuntu ISO from an official Ubuntu source.
-
Enable Hyper-V as described above.
-
Open ‘Hyper-V Manager’ by:
- Click on the Windows Start button, expand the ‘Windows Administrative Tools’ folder, and click ‘Hyper-V Manager’, or
-
Click the Windows key and type ‘Hyper-V’ and click ‘Hyper-V Manager’ or select with your keyboard arrow keys and press ‘Enter’
-
On the ‘Actions’ pane click ‘Quick Create’ and the Quick Create tool will open.
- Click ‘Change installation source’ and select the ISO file you downloaded before. If you want to give your virtual machine a more descriptive name, click the ‘More options’ down arrow on the bottom right and change ‘New Virtual Machine’ to something more useful, such as ‘Ubuntu Server 18.04 LTS’.
-
Click ‘Create Virtual Machine’ and wait for the virtual machine to be created.
-
Click ‘Connect’ to open a connection to your VM.
-
Click ‘File’ in the menu bar, chose ‘Settings’, click the ‘Security’ tab and under Secure Boot select ‘Microsoft UEFI Certificate Authority’, then ‘Apply’ and ‘OK’ to return to your VM.
-
Click ‘Start’ to run your VM.
-
Complete the manual installation of Ubuntu.
CategoryEnterprise
I love Ubuntu, especially when I wanted to work with python programming, But I also love windows 10 because of its GUI and the vast variety of software support.
In the last blog, I covered how you can install windows 10 on Centos/Redhat KVM. But in this tutorial I going to cover the Debian derivative Ubuntu.
And the steps mentioned here are exactly the same for the other Debian derivative Linux mint.
Since I get a lot of questions with regards to Ubuntu specifically I decided to write separate blogs for Ubuntu and Redhat, so if you are using Centos/Redhat/Fedora you may click here.
Prerequisite.
Ubuntu machine with good configuration.
Download the Windows ISO image by following the guide here.
Windows virtio drivers iso download latest.
Download Spice guest tools.
1. How to install KVM on Ubuntu?
The first step is to prepare the environment by installing the KVM utilities on the Ubuntu host.
On my PC I am using Ubuntu version 20.04 so enter the below commands to install KVM on an ubuntu machine. The Same command can be used with as well.
sudo apt update
sudo apt install qemu-kvm bridge-utils virt-manager libosinfo-bin -y
You may now go ahead and reboot the host, if you dont reboot the machine then you will end getting a below error.
2. Open the virtualization manager and create the VM.
Open terminal and type virt-manager
In the virtual machine manager window click on create a new virtual machine.
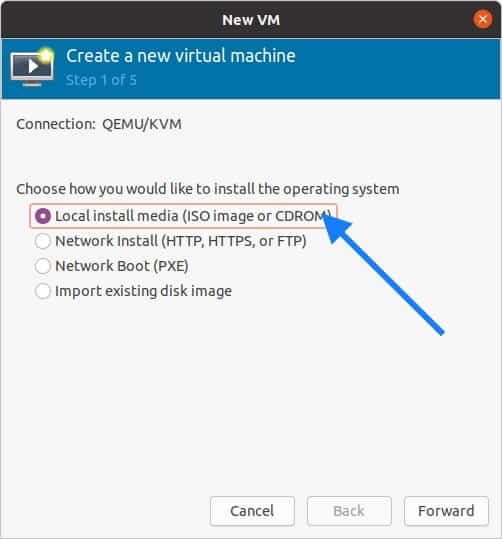
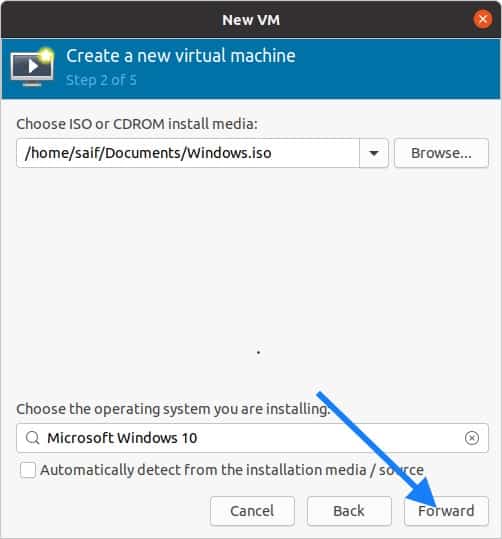
A new window now will pop up. In the New VM wizard select Local install media and click on forward.
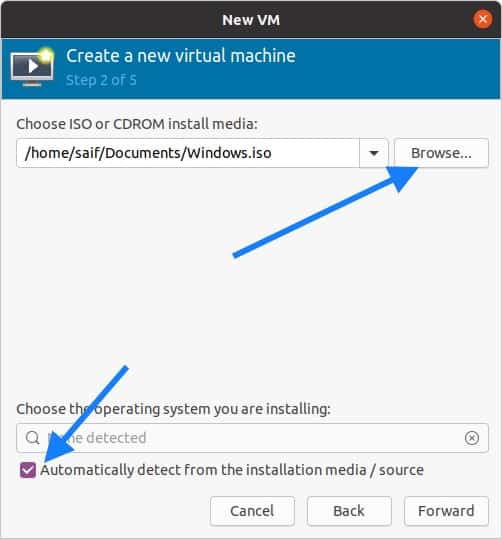
You will now have to browse for the windows 10 iso that you have downloaded and Uncheck the option which says automatically detect from the installation media.
Start searching for the window10 under choose operating system, and check the box which says include end of life operating system. Once you check the box you will be able to see the Microsoft Windows 10 operating system in the list.
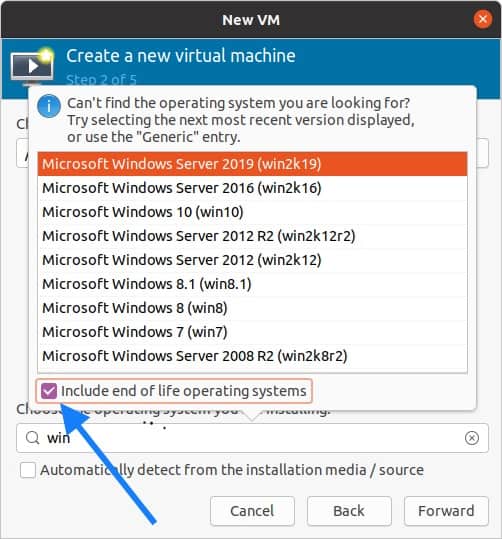
Once you select the Microsoft Windows 10 click on forward.
3. Configure the virtual machine resources.
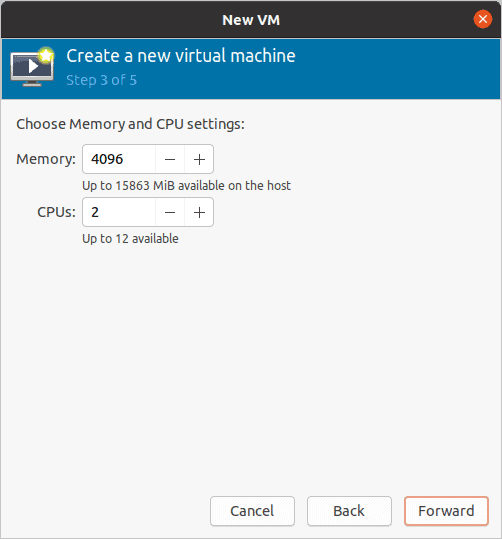
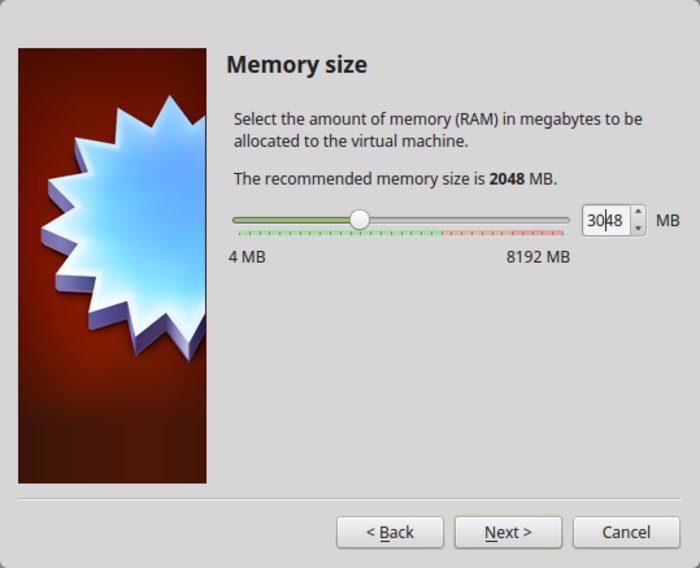
Next, you will be asked to define the memory and the CPU, I am giving 4GB of memory and 2 CPU’s and click on forward.
Depends on your configuration you may choose yours.
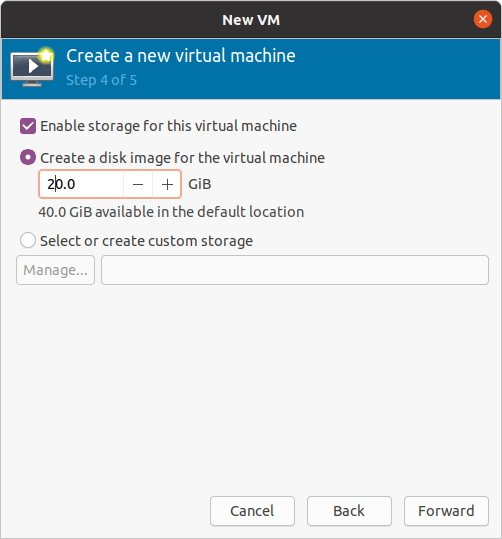
When you configure the virtual hard disk, by default Ubuntu KVM would pick up 40GB, since I don’t require that much space I just added only 20GB and clicked forward.
You may choose 40GB or more.
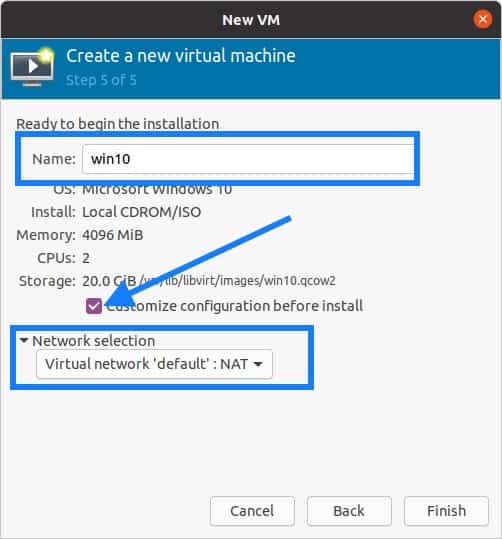
Finally, you will have to Name the windows KVM VM and check the option Customize configuration before install.
I also selected the network as Virtual network ‘default’ NAT. By selecting this network you guest VM will start using the Ubuntu host internet connection.
Click on Finish at this moment now.
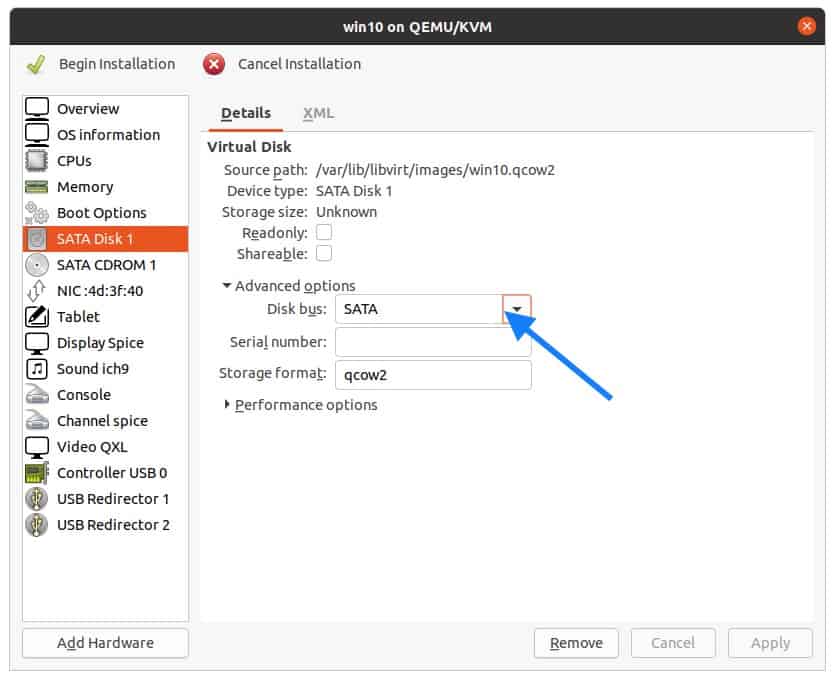
4. Configure the virtual Hardware’s.
Since you selected customize option you will now be presented with the KVM customization screen.
Do not click on Begin installation yet, before that we have to modify some hardware changes.
Click on the SATA Disk1 , and on the right side expand the advanced options and click on the Disk bus drop-down list.
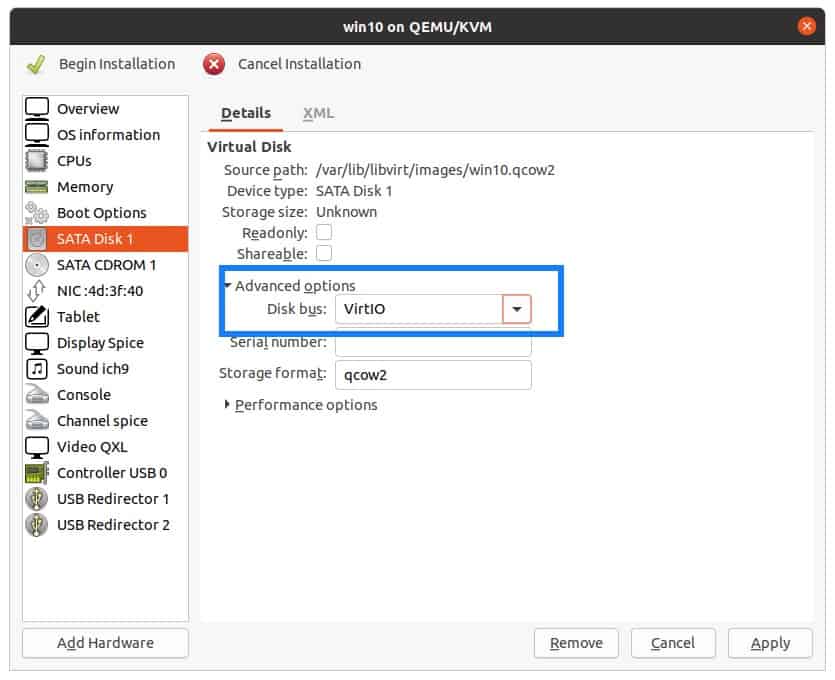
Select VirtIO as the disk bus, and then click on Apply.
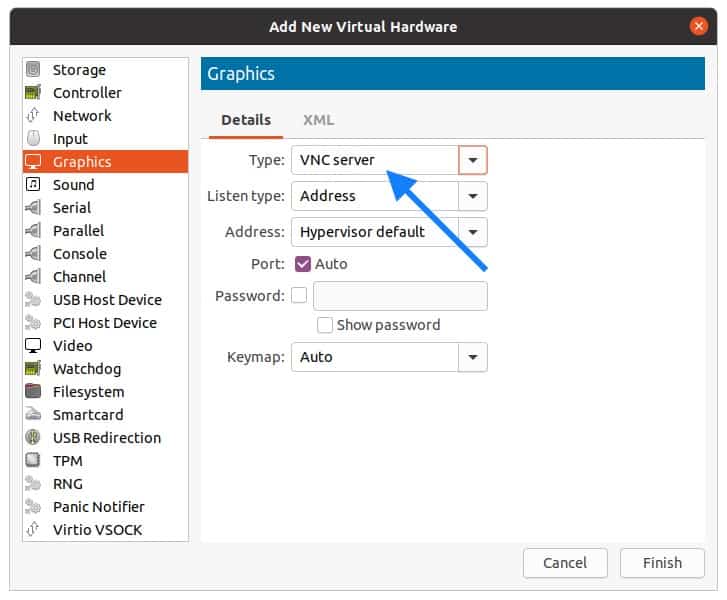
You now have to add VNC Viewer as the graphics, so click on Add hardware from the bottom left.
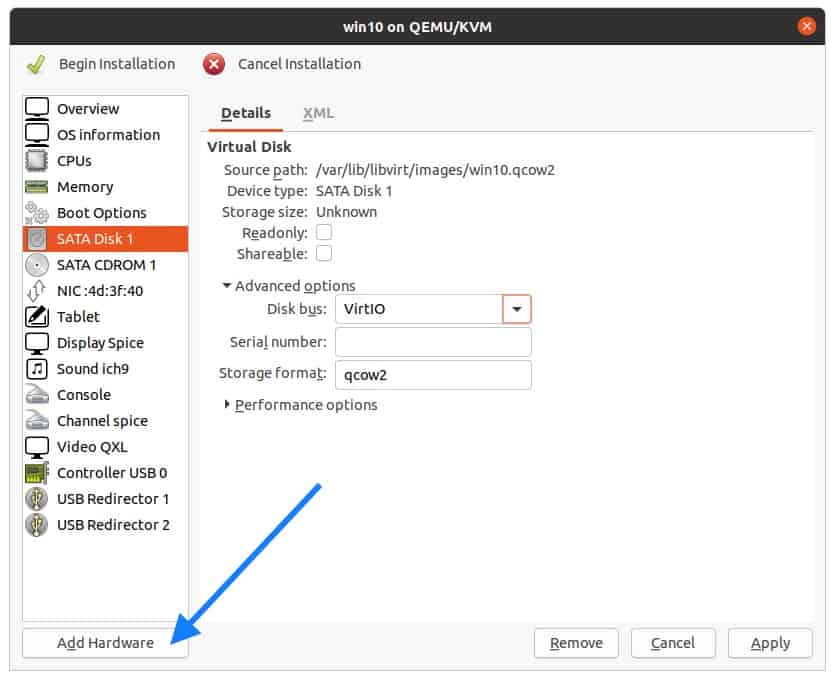
In the add New virtual hardware windows, select Graphics and in the Type select VNC Server and click on Finish.
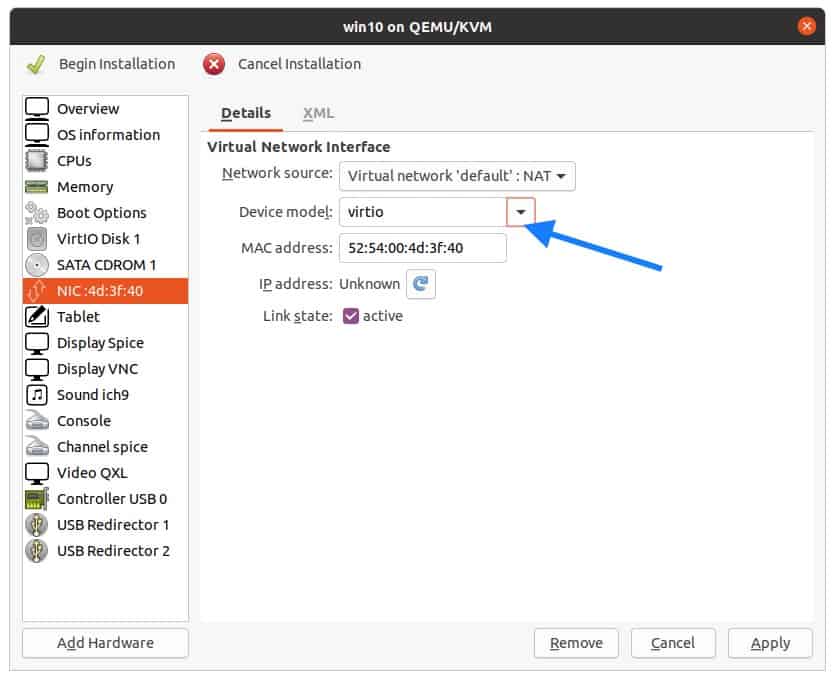
Click on Network interface card (NIC), change the device model to VirtIO, and click on Apply.
5. Add the Windows 10 virt drivers and configure the boot loader.
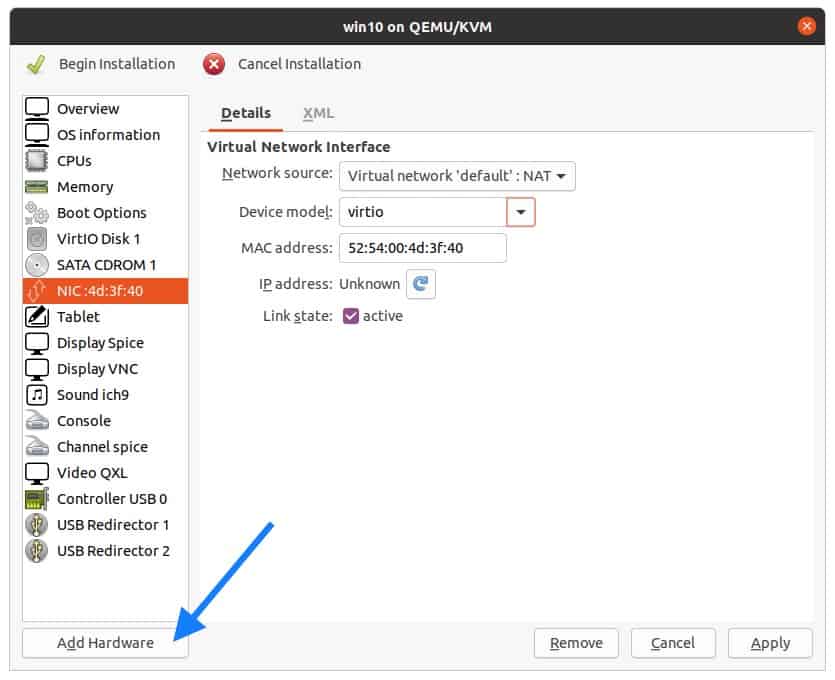
Remember that we have downloaded VirtIO Windows drivers for Ubuntu KVM, let’s attach that now. So click on Add hardware.
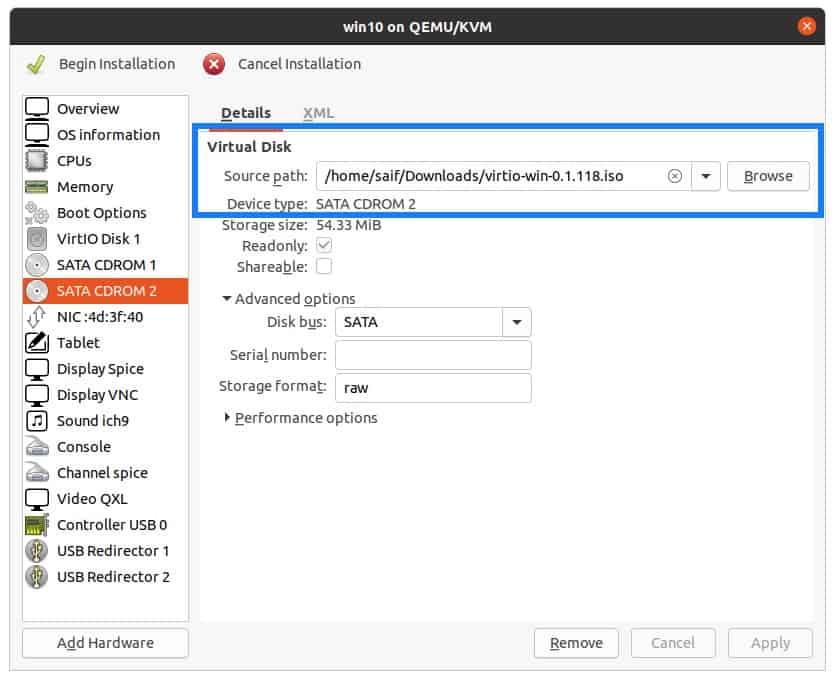
Select the storage and click on manage and attach the VirtIO iso file that we have downloaded, and also change the Disk type to CDROM device and click on Finish.

The second CDROM now has VirtIO drivers and the first one has the windows 10 ISO image.
Change the boot order for windows
Let’s go ahead and change the Boot order of the device, first being the CDROM1 and the VirtIO disk and the CDROM2.
Note : The important part is for the KVM to load the windows 10 image from the list.
Check the option Enable boot menu.
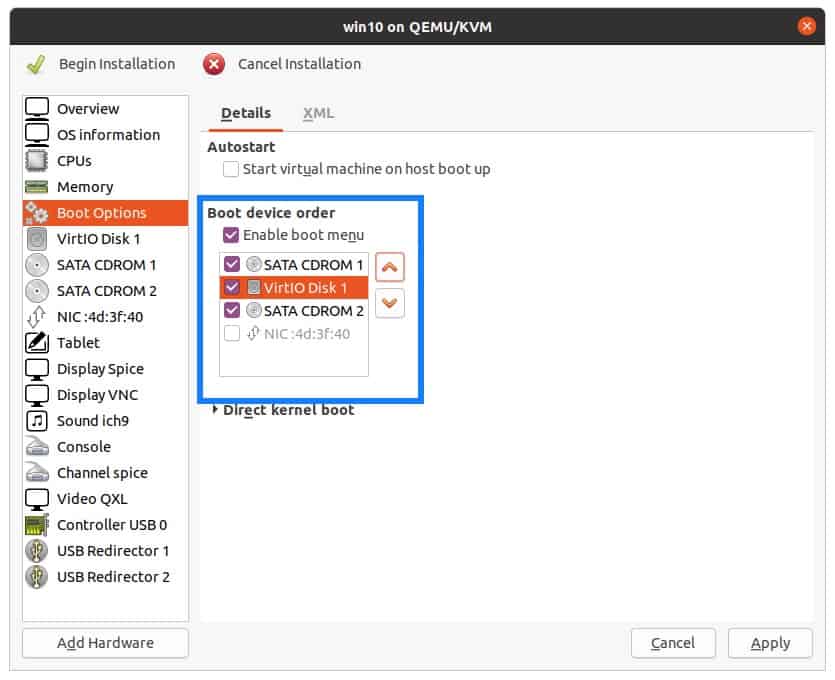
Once you rearranged the boot loader click on Apply.
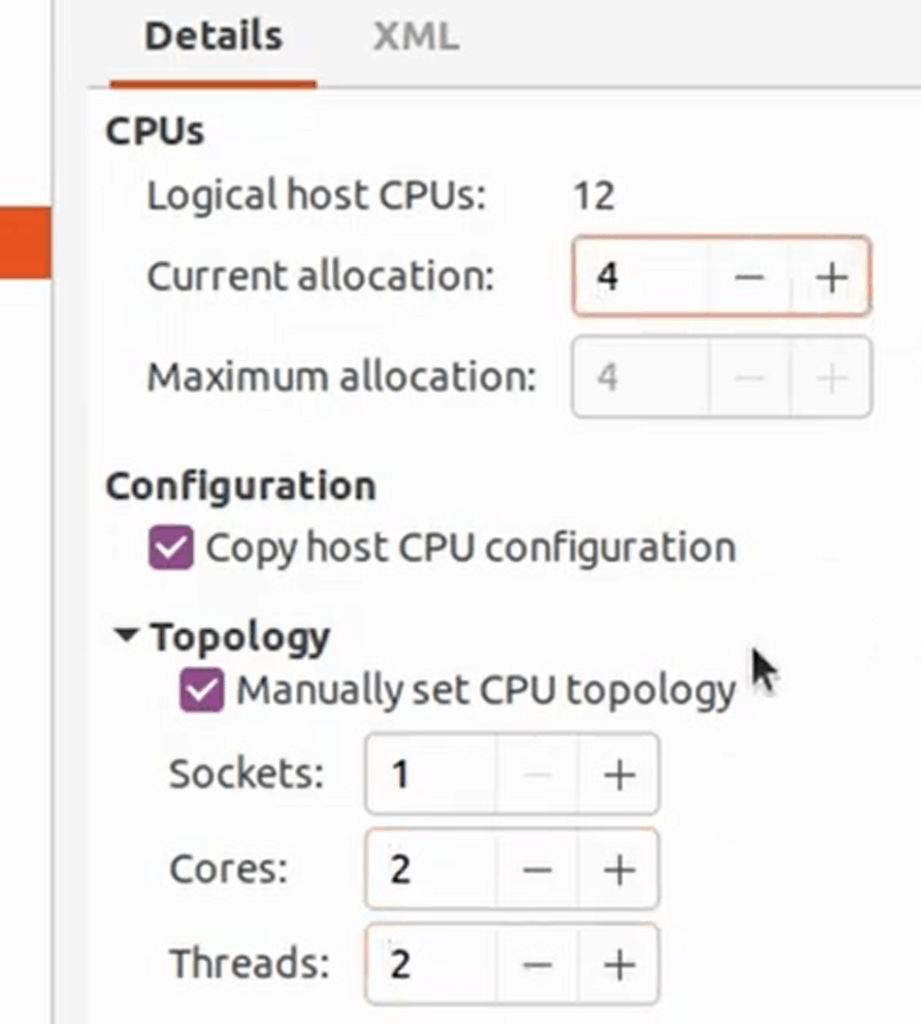
6. Configure the qemu CPU the right way.
Click on CPU and change the current allocations to 4
Check the options which say manually set CPU topology.
In the topology assign 1 socket, 2cores and 2threads.
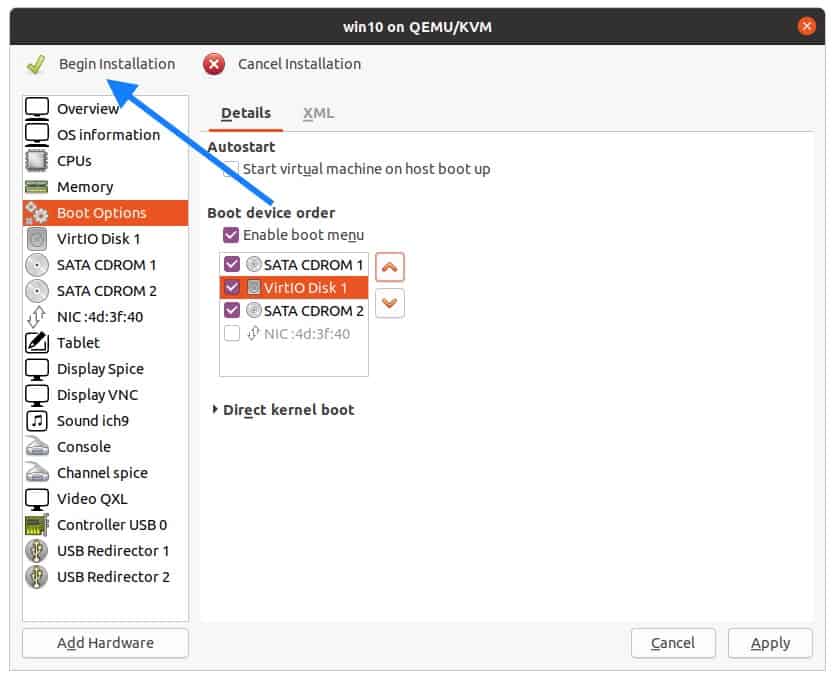
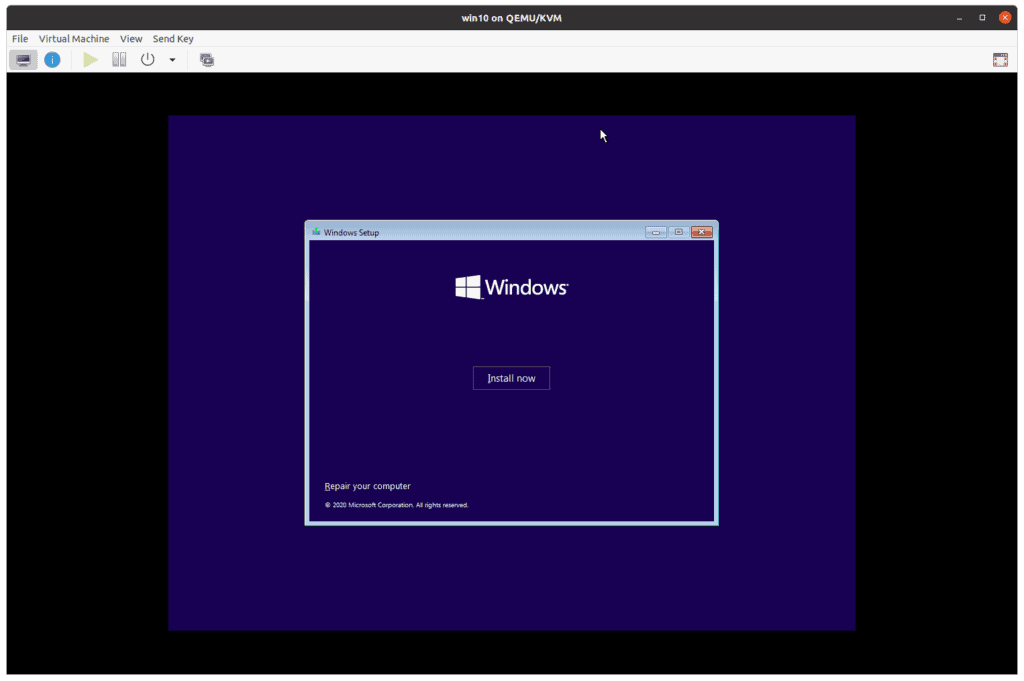
7. Begin the windows 10 VM installation.
We just finished adding the required virtual hardware, you may now click on Begin installation.
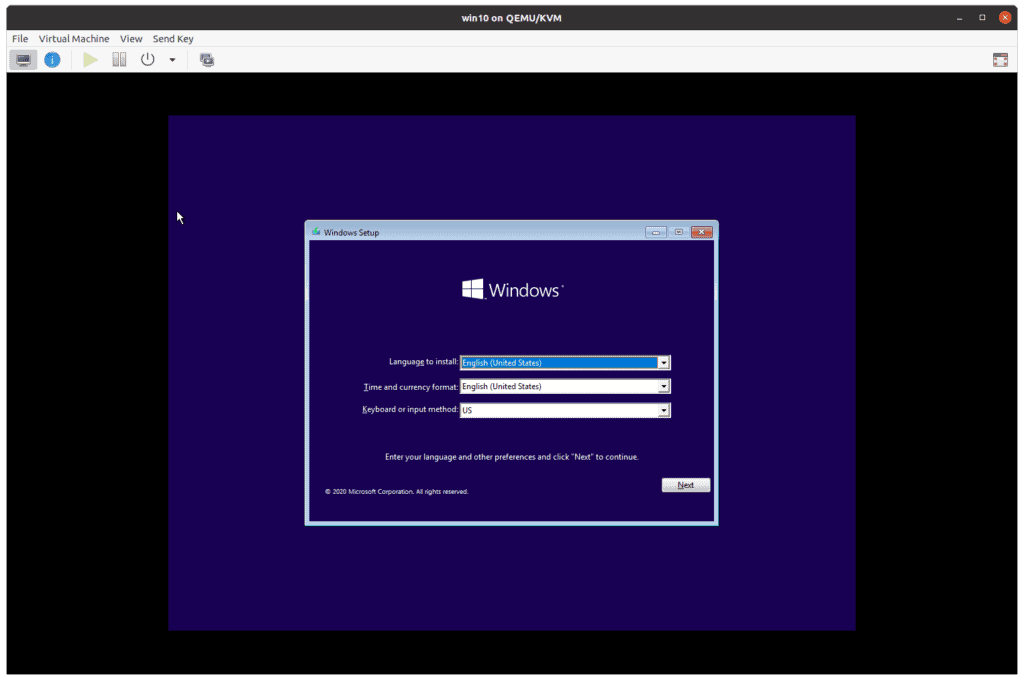
If everything went well, you should be able to see the windows logo, and after few seconds Windows prompt where you have to choose the language and the time and date and the keyboard click on Next.
You will have to click on install now on the next prompt.
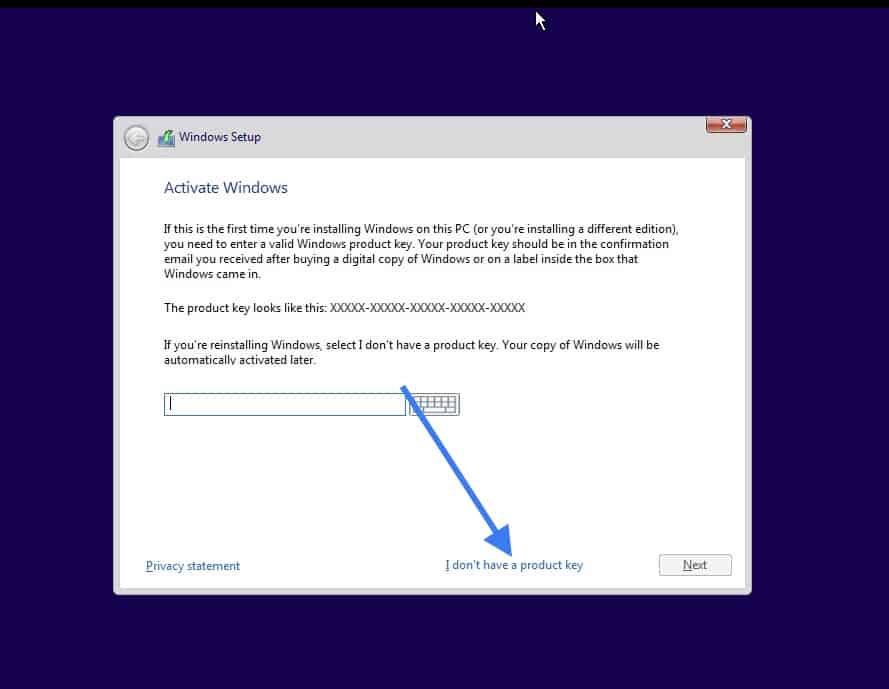
If you have the product license key, you may enter it now. Else click on I don’t have a product key, I choose the same as I didn’t have the product key during the installation.
Select the version that you would like to install, I am choosing the version Windows 10 Pro.

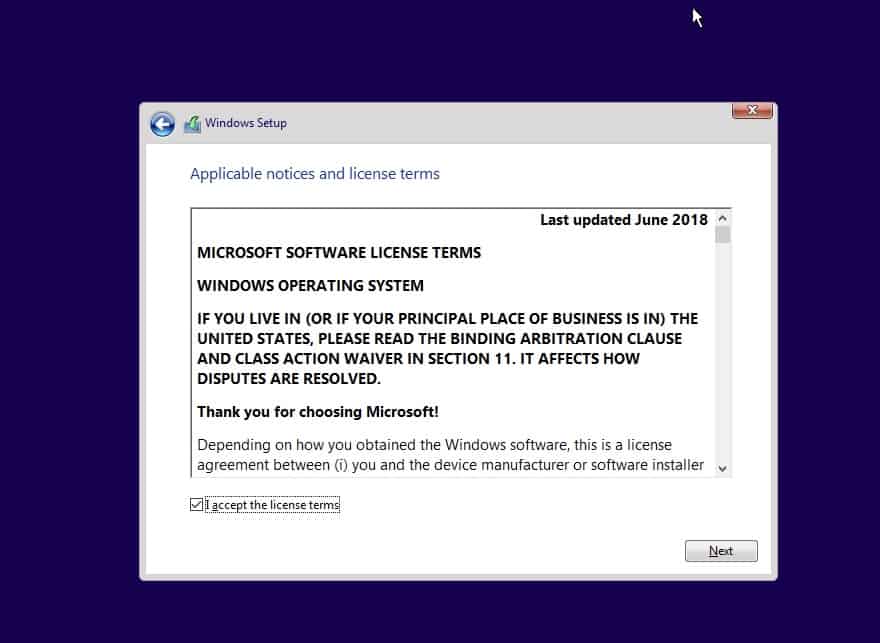
Accept the license agreement and click on Next.
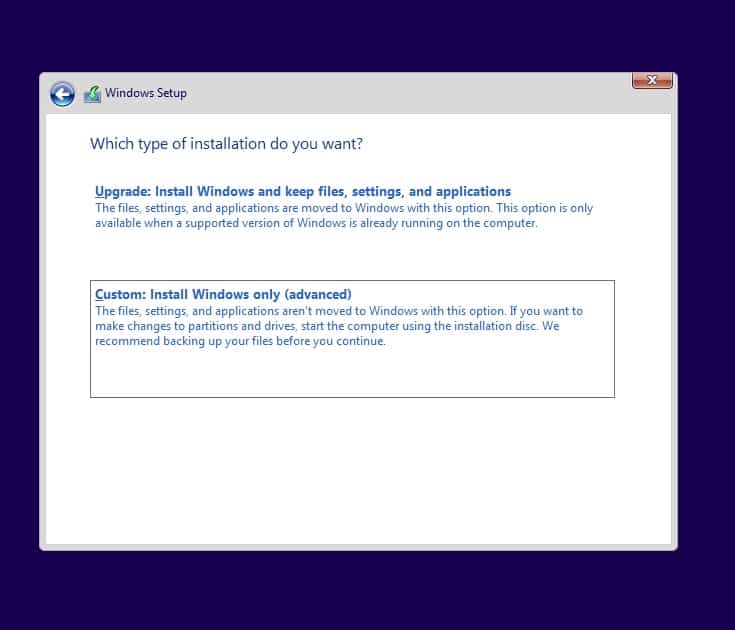
You now have two options to install the windows, Either upgrade or Custom, Choose custom here.
8. Install the Redhat SCSI controller driver.
Remember we have added the storage of 20GB in the beginning, but we are not able to see them so click on Load driver here.
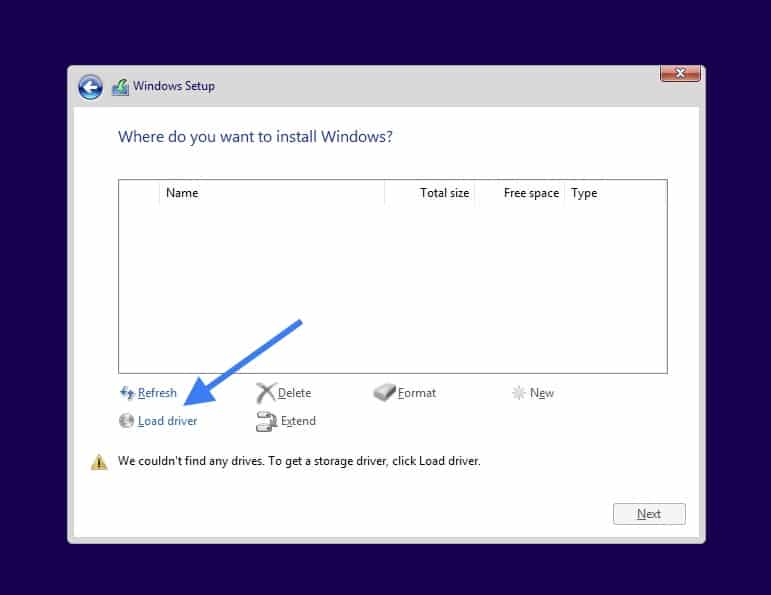
You will get a load driver prompt click on OK.
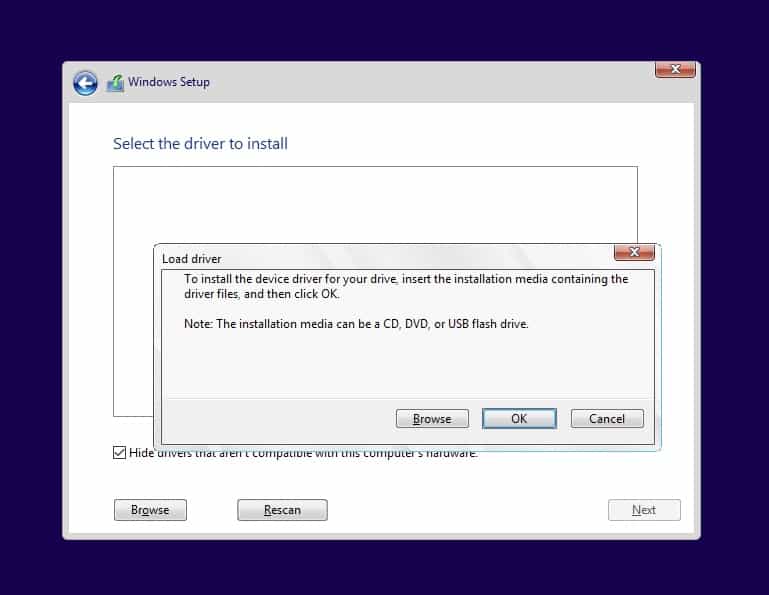
Once you click on OK you will be able to see all the drivers like below.
Select the windows 10 SCSI driver and click on Next.
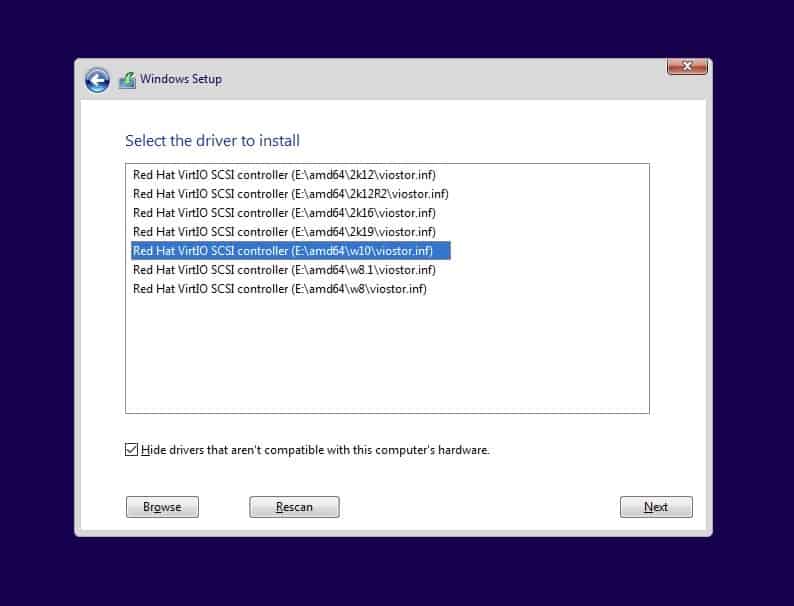
Note: If the driver doesn’t show up then you may follow the below steps.
- Click on Browse and expand the VirtIO driver iso file CDROM.
- Go down and expand the folder viostor.
- Expand Win10
- And select amd64 and click on OK.
- You should now be able to see the drive listed now.
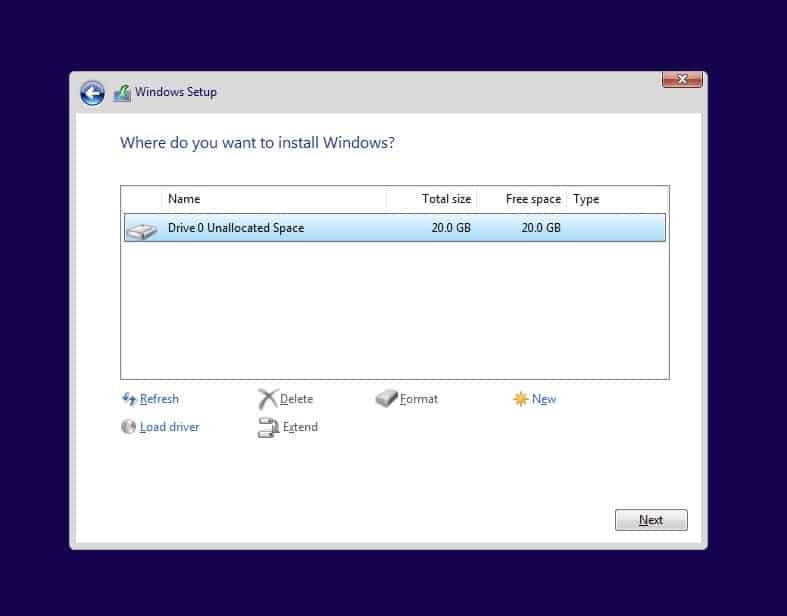
After you selected the drive and once you click on Next after a few seconds you should be able to see the virtual hard disk that you have attached earlier, select that and click on Next.
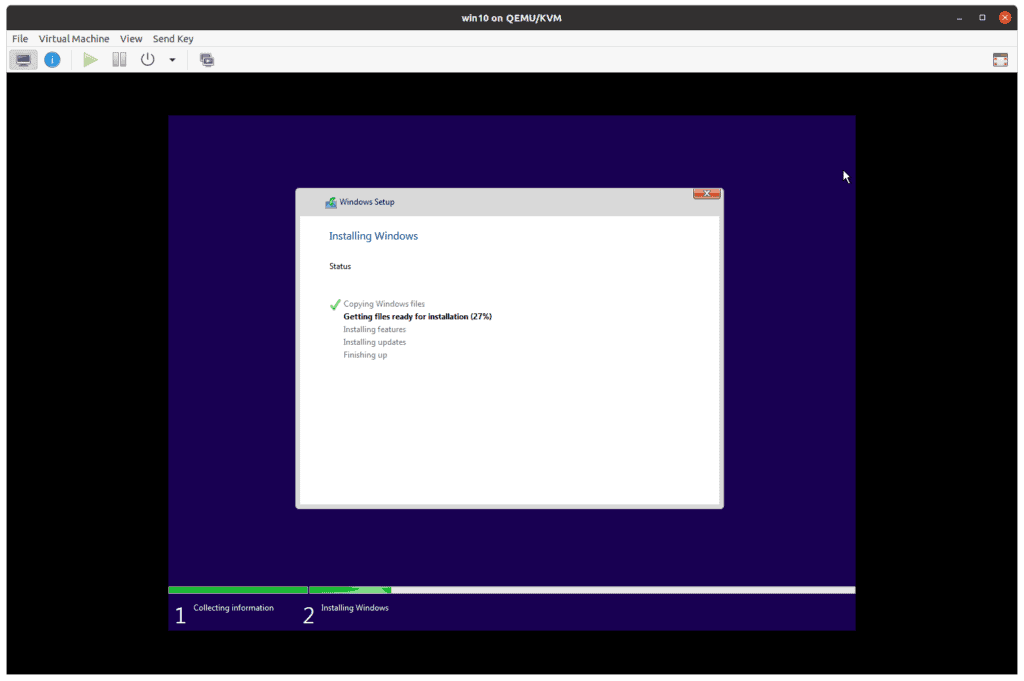
The windows installation now begins and starts to copy the files now.
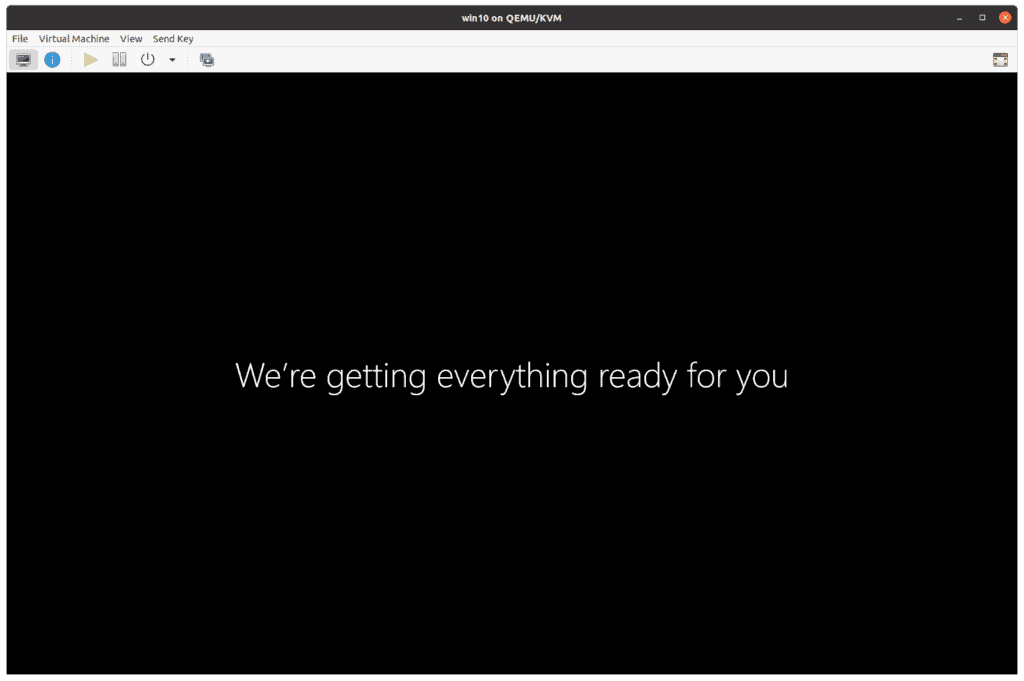
After a couple of restarts, you should get the windows setup screen where you need to have the basic configuration to be done.
During the process, you could either connect the Microsoft account or create a local account.
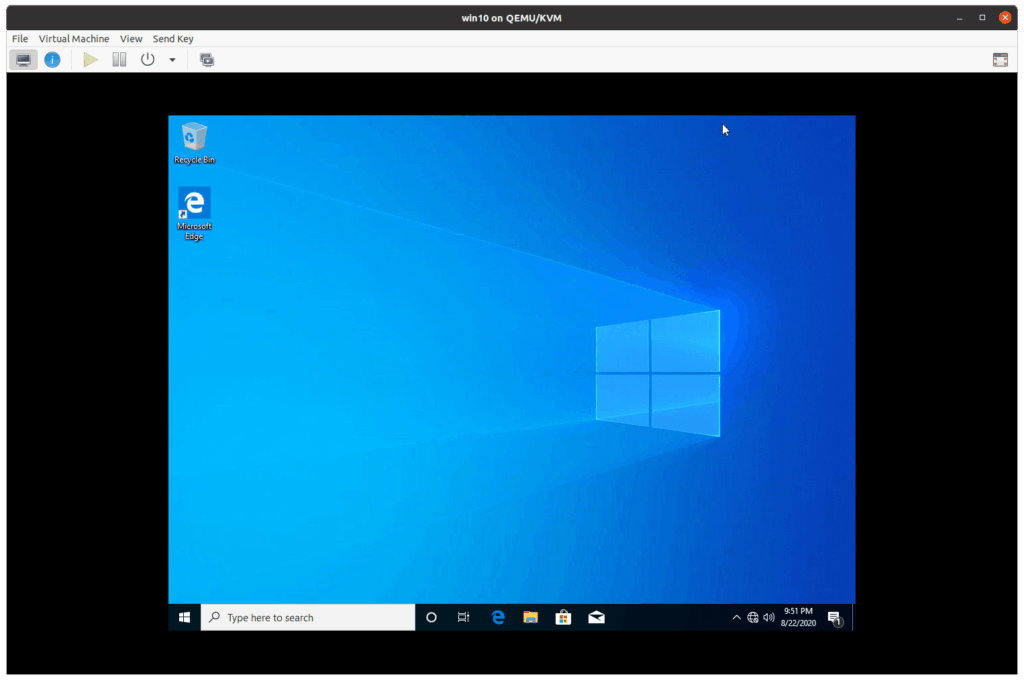
And you should be presented with the windows home screen like below.
9. How to install virtio drivers windows 10.
After the windows 10 installation is completed, you now have to install the VirtIO drivers to windows 10. Post which the networking, display graphics, copy-paste functionality, and others should work.
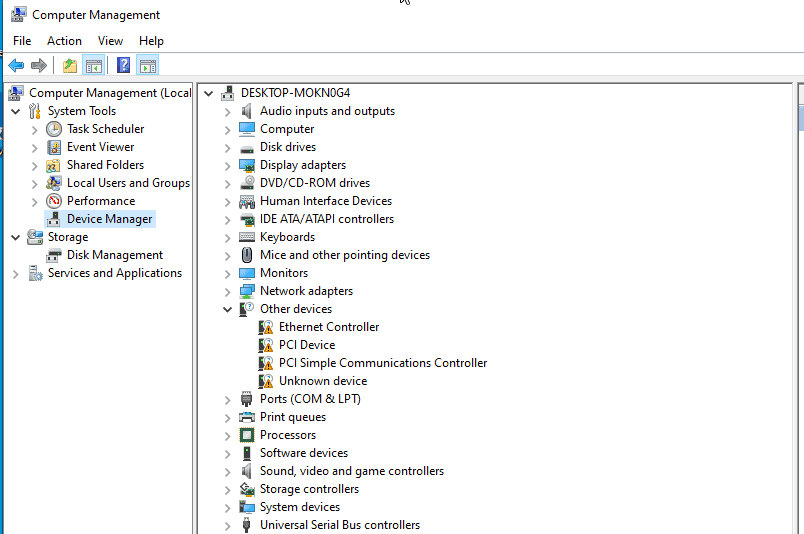
Type This PC and right click and click on Manage.
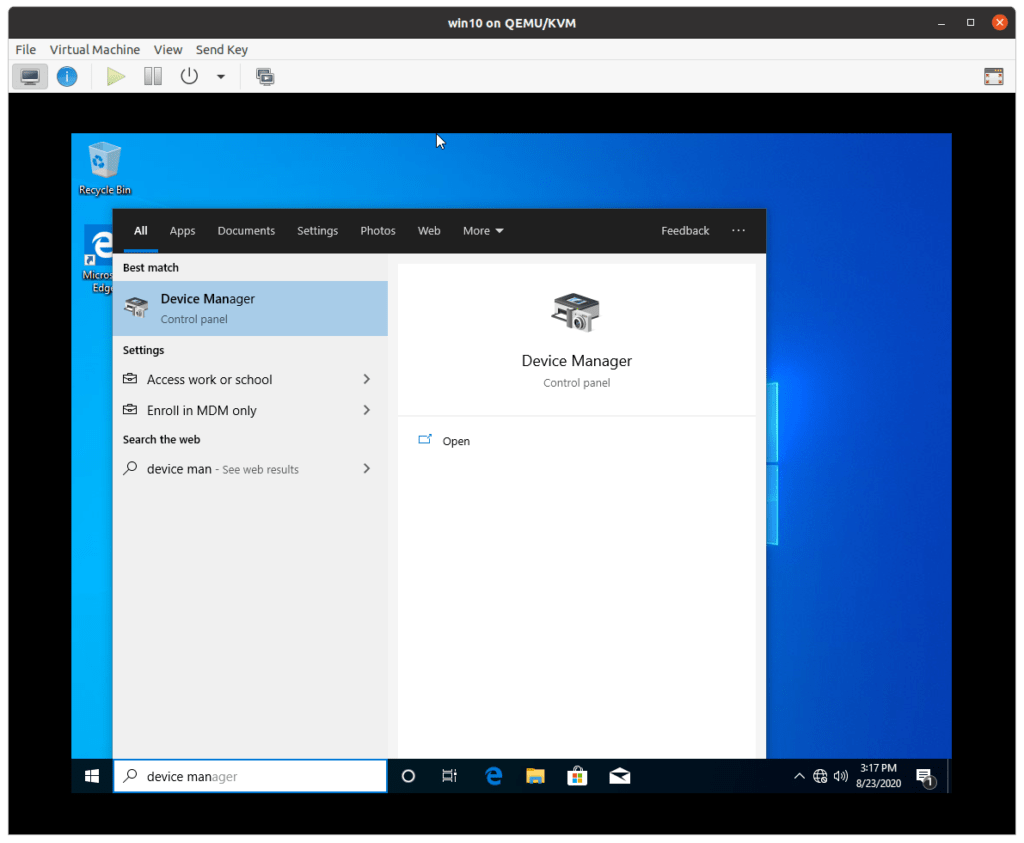
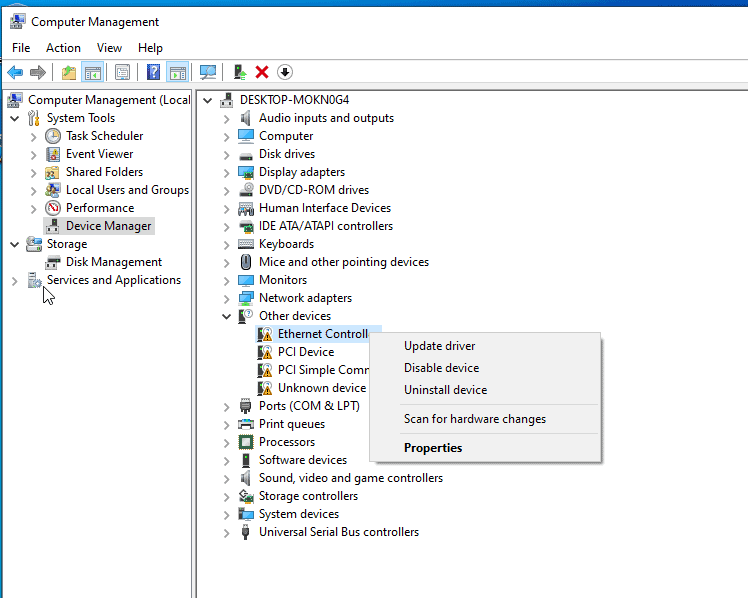
In the device manager, you should be able to see there are some drivers that are not installed under Other devices.
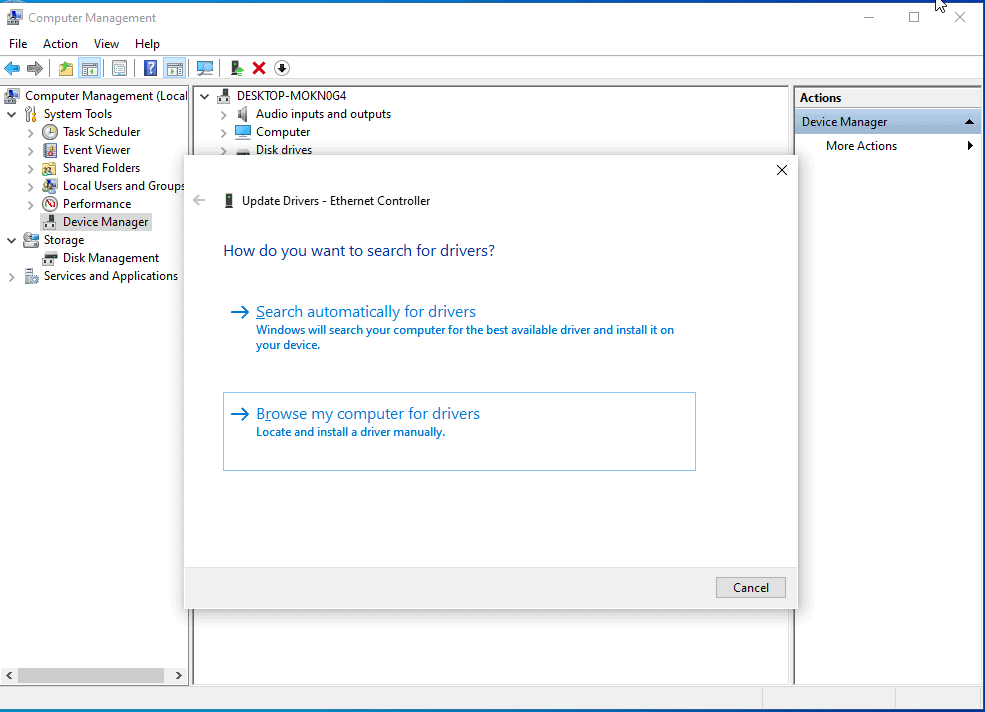
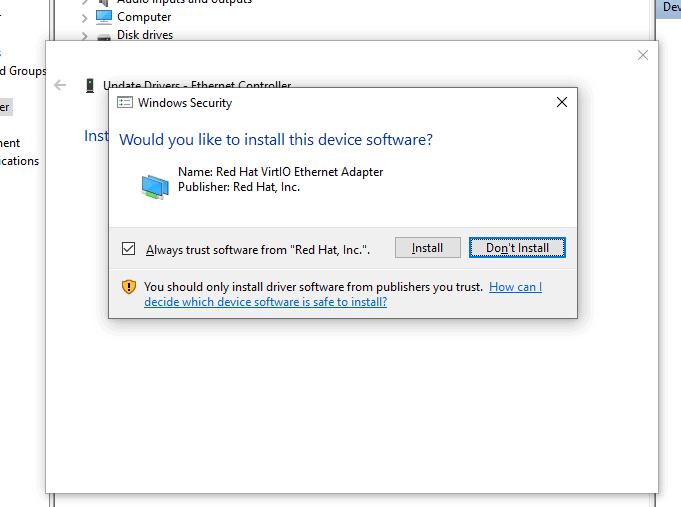
Just right click on each driver and click on update driver. Let’s see how we can do it for the Ethernet controller.
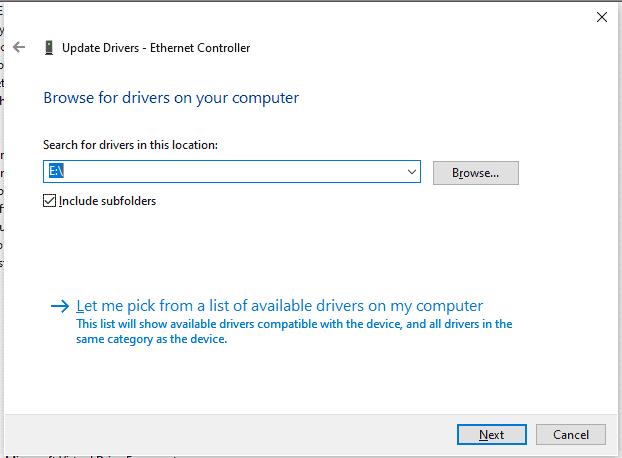
Click on Browse my computer for drivers
In the browse section select the VirtIO iso CDROM that we have attached.

You should be able to see the drive letter as E, check the box which says include subfolders, and click on Next.
You should be able to see the pop up to install the Redhat ehternet Adapter driver to the machine click on Install.
Similarly do it for other dirvers as well.
Note: I couldn’t quite get the ‘Unknown device’ to get it working under other drivers, so it should be fine.
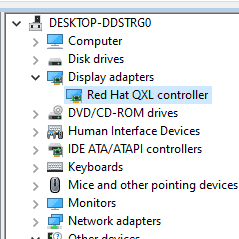
There is one more driver that you need to install, which is Display adapters, By default it has picked up Microsoft Basic Display Adapter.
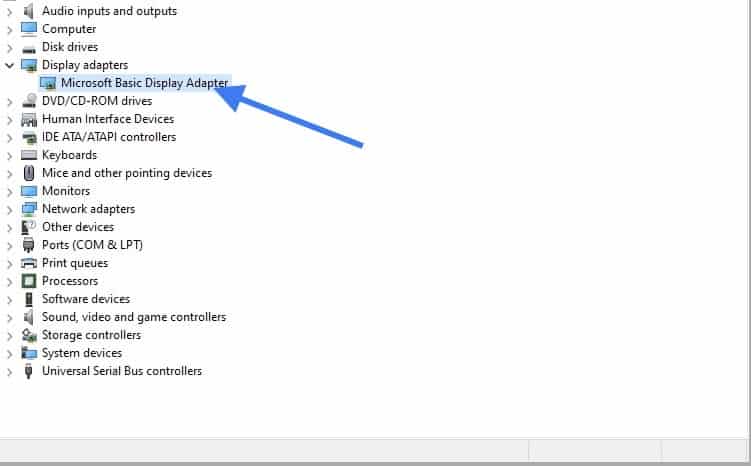
Just like you did the driver update for other devices, do the same thing for the display adapter as well.
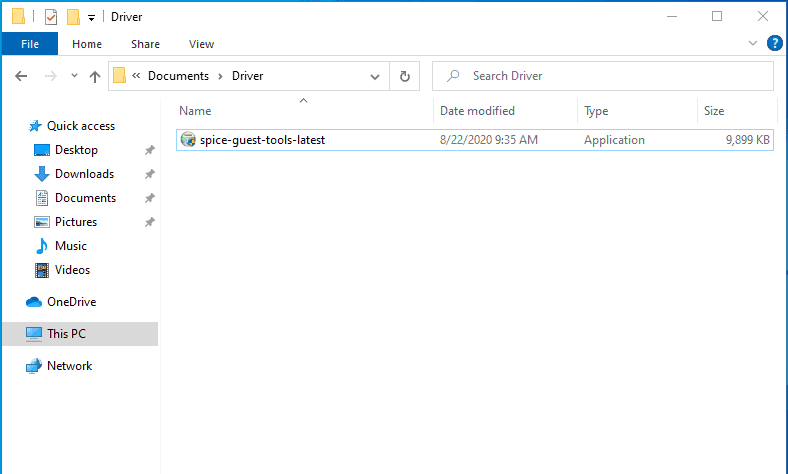
10. Install SPICE Guest tools.
There is a SPICE Guest agent that you need to install now. For that you need to transfer the file from Ubuntu host machine to the windows.
Steps to transfer files from Ubuntu host to Windows 10 guest vm.
In windows create folder called Driver.
Now right click and click on properties.
Click on the Sharing tab, and click on Advanced sharing.
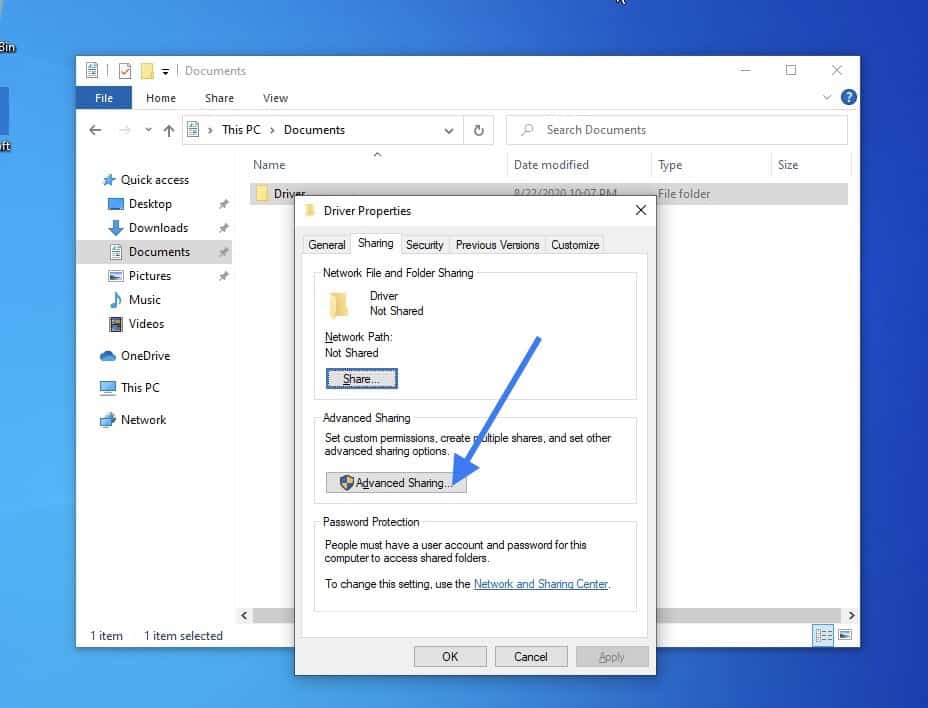
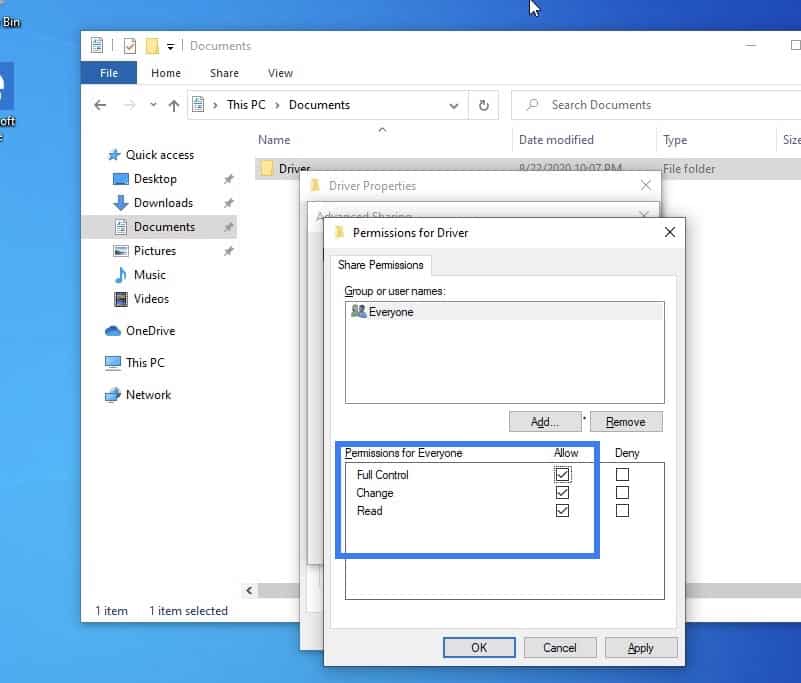
Check the option Share this folder and click on Permissions.
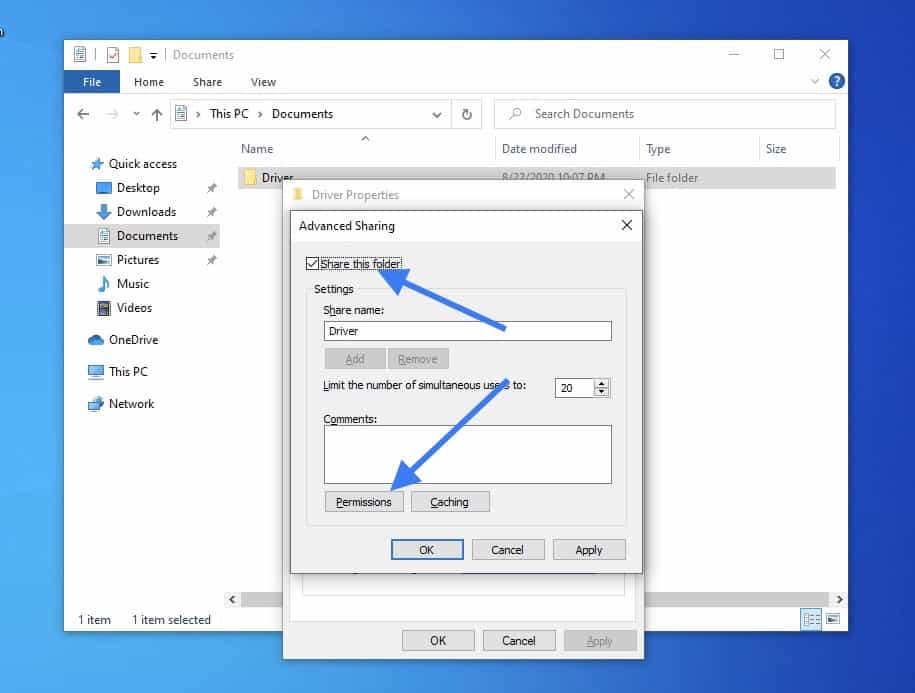
Check all the permissions now, you may cancel this later once you transfer the files.
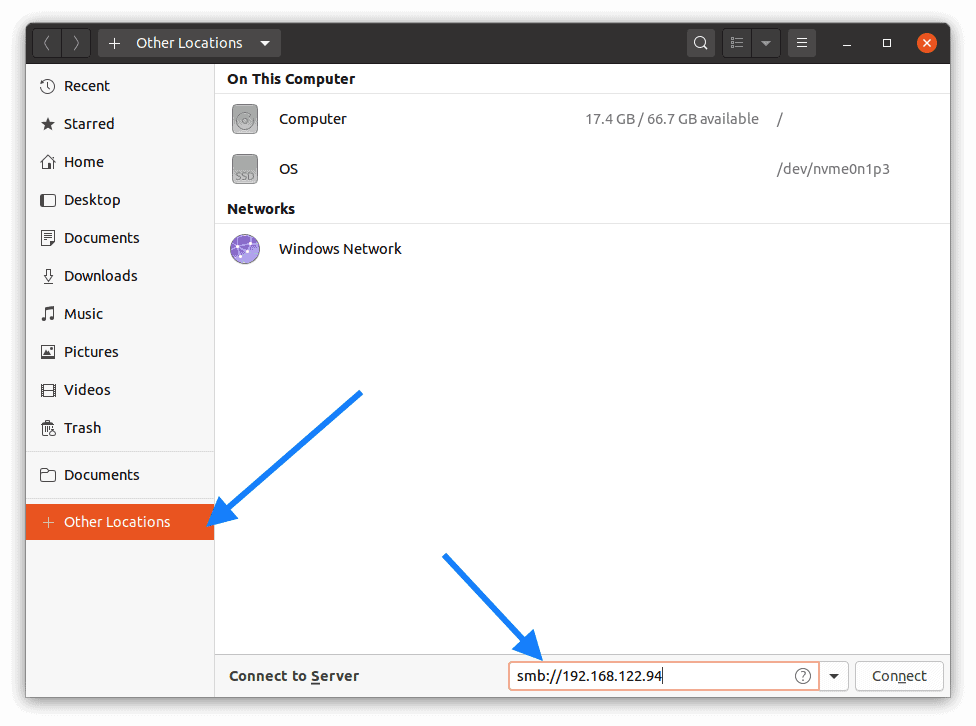
Now the folder is shared, go to Files in Ubuntu and click on Other locations.
In the connect to server address bar, type smb://windows host IP and hit enther.
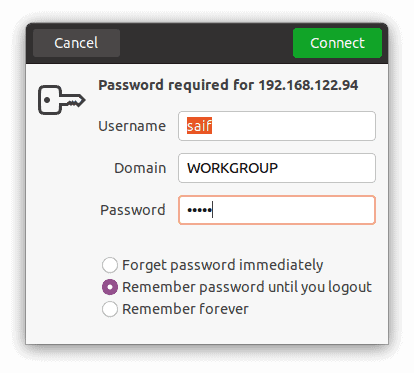
You will be asked to provide the windows 10 credentials, enter it now.
Paste the Spice guest tools here
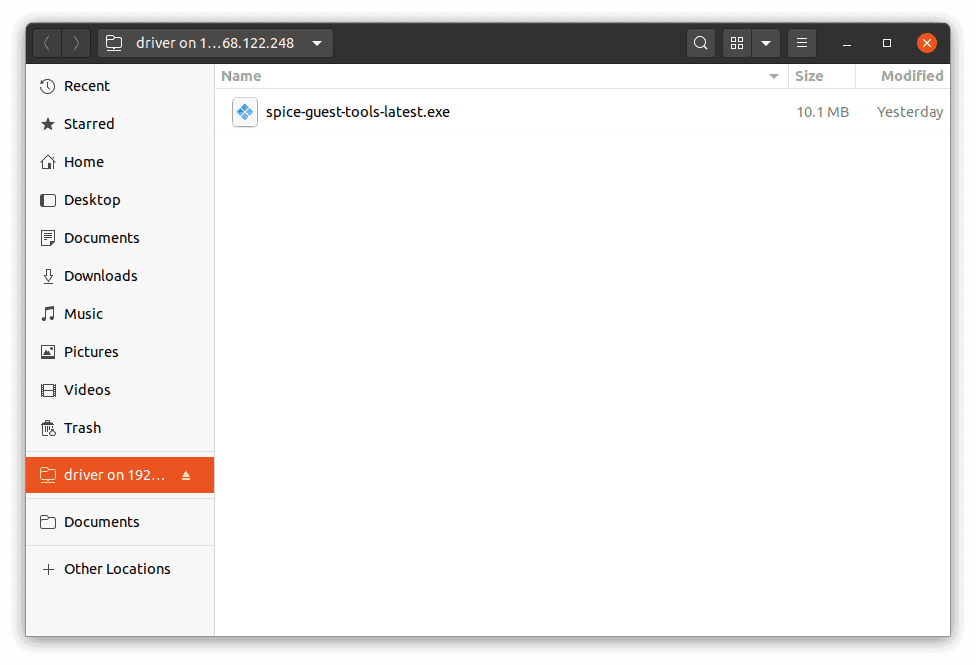
Now go back to the windows 10 and you should be able to see the Spcie guest tools software there, double click on it install the software, and you should be good to go.
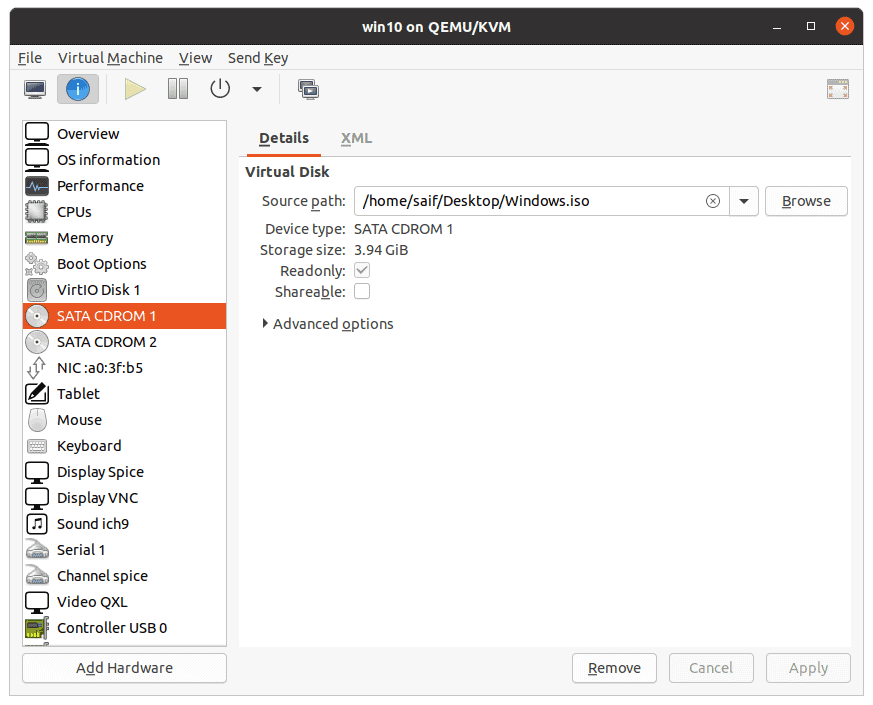
11. Detach the CDROM1 and 2.
Awesome! you just installed windows 10 on your Ubuntu KVM. If you wanted to know how you can manage this VM when you wanted to access it, you can check out the article here.
At this point you should be good to go however, next time when you shutdown the Guest VM, you need to make sure that you remove the CDROM drive 1 and two that you had attached during the installation.
In source path, you may click on the x icon to detach.
Below is the video, if you prefer to watch over video.
Setting up the Windows virtual machine on Linux gives you the flexibility of getting the benefits of both Operating systems on a single PC. If you want to learn the Linux but also don’t want to give up easy to use Windows 7, Windows 8 or Windows 10 OS then either you can install the Linux on Windows or Windows on Linux. Creating free virtual machines with help of some virtual software like Vmware or Oracle VirtualBox is called virtualization. The virtualization environment created by such kind of software is by emulating hardware and make it available for the operating system we about to install on it. We called it a Guest operating system and primary OS of the computer system known as Host.
So, let’s see how to install and create Windows 10/8/7 Virtual Machine on Linux
For performing this tutorial we are using the Ubuntu 18.01 Linux but you can perform these steps with any other Linux too. The only thing which might get change is the way of VirtualBox installation. Rest of the method to create free Windows 7/8/10 machine on Linux will be the same.
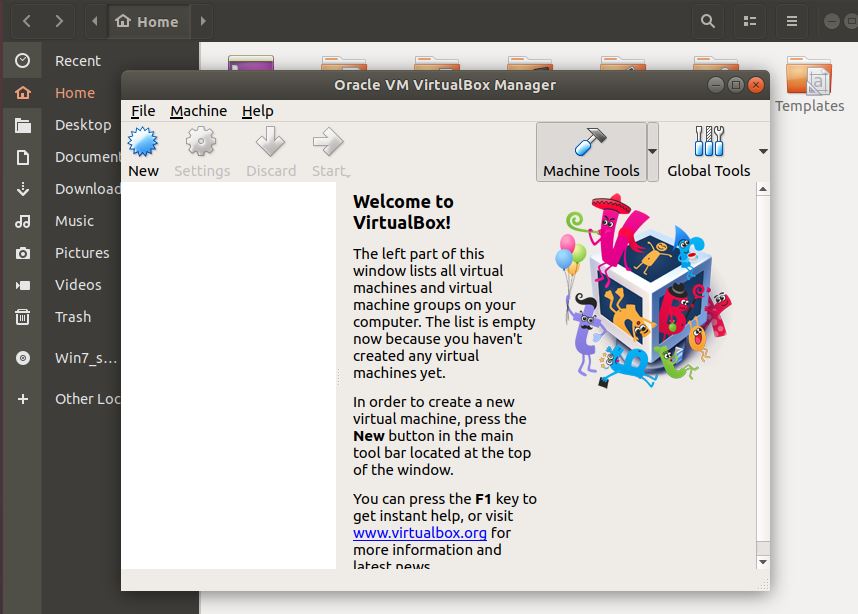
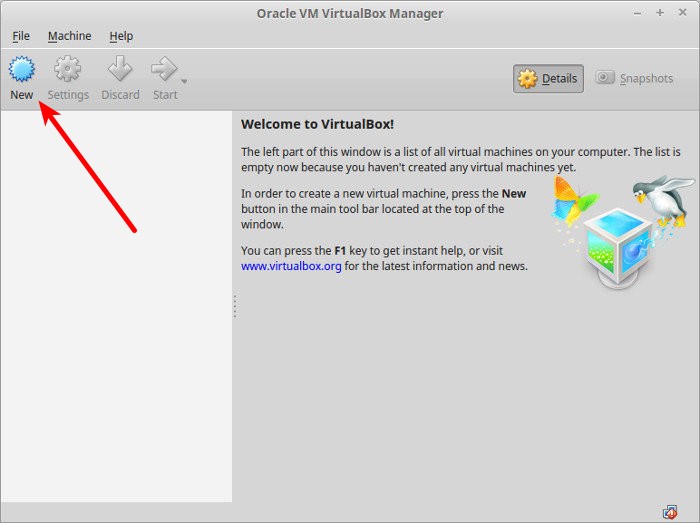
Step 1: Install VirtualBox on Ubuntu Linux host
First of all, we install the Oracle VirtualBox which is an open source & free software for creating a virtual machine on both Linux (link) and Windows (Link) machines. You can download it by using the given links, however, for Ubuntu, here, we are using the command line terminal to install. Please use the below commands:
Sudo apt-get install virtualbox
Step 2: Run the Linux VirtualBox
The above single command will install the VirtualBox on Ubuntu. Now search for the installed VirtualBox and run it
Step 3: Create your first free Windows Virtual Machine on Linux
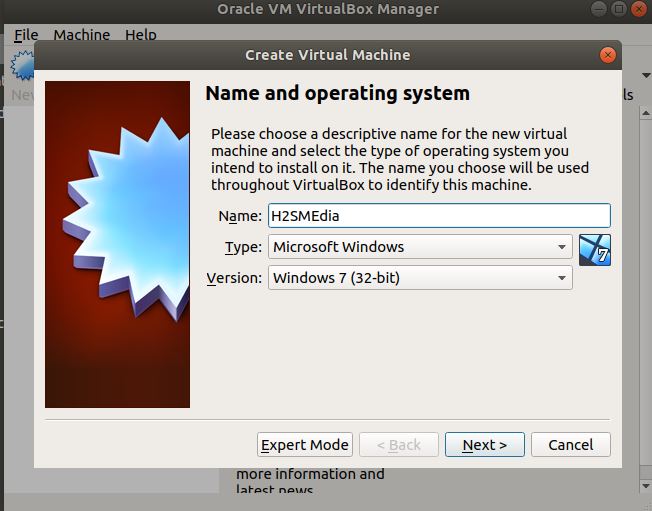
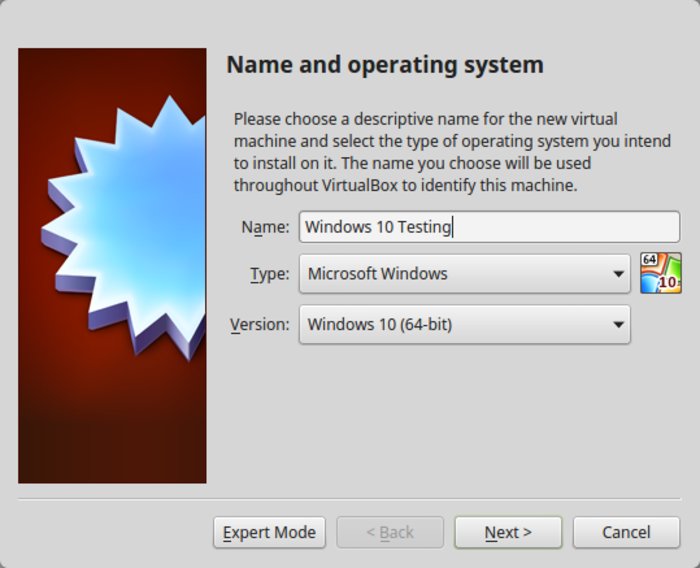
1. Click on the New Button of the Virtualbox Linux.
2. GIve some name to your Windows Virtual machine and select the Type of operating system include the version (32-bit or 64-bit).
Step 4 Assign the Memory to your Windows virtual machine
The availability of the memory (RAM) depends on the host system. Click on the Next button after selecting the RAM.

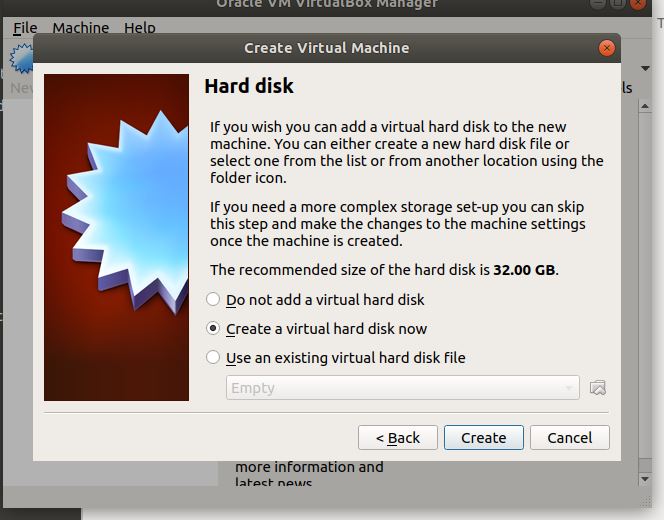
Step 5: Hard disk configuration
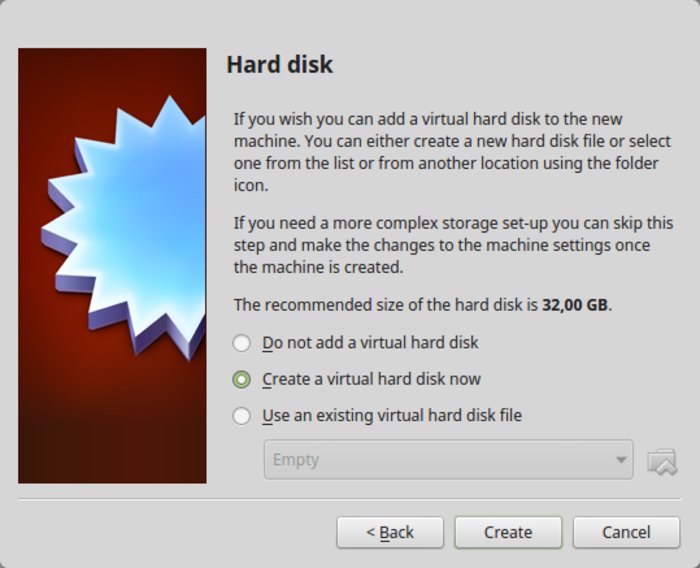
After adding the RAM, it is time to configure the hard disk for your Windows Virtual machine. Select the Create a Virtual hard disk now option and click on the Create button.
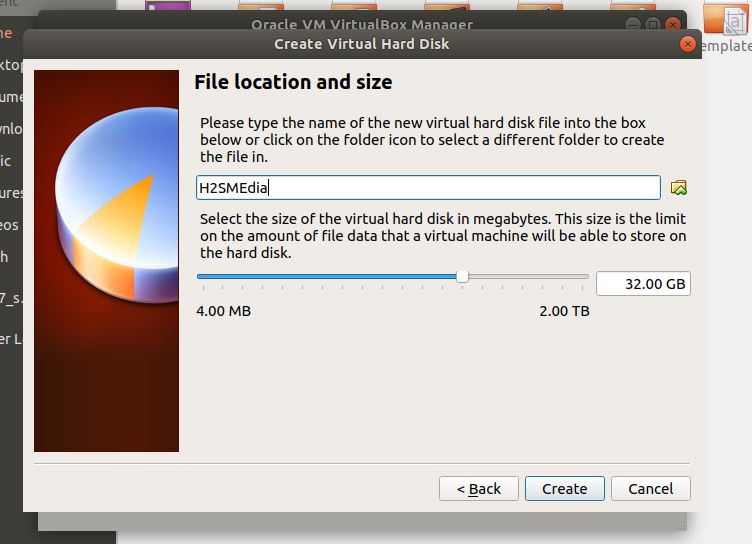
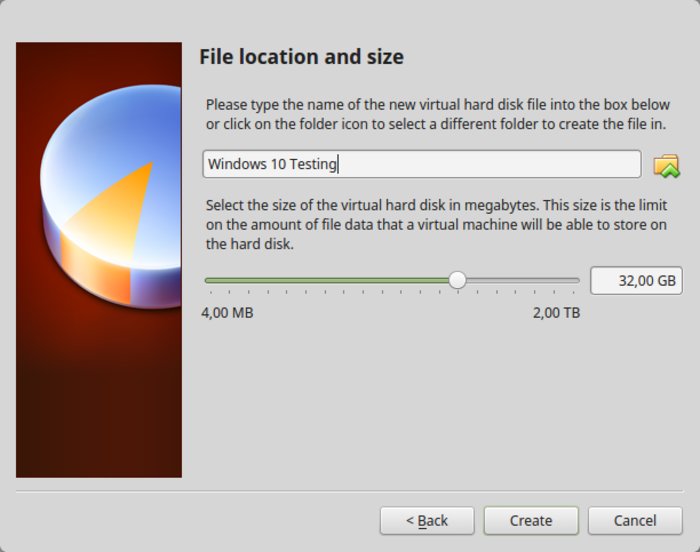
Step 6: File location and size
In this step, we need to give some name to our virtual hard disk and also need to assign the amount of hard disk storage you want to give to your virtual machine. For example, the amount which I have given is the 32GB but you can increase or decrease it as per your requirement. Also, by default, the virtual machine will consume the space of your primary partition, in case you want to instruct the Virtualbox to store all virtual files somewhere else, I mean in some other partition then click on the folder icon given in front of the name box and choose the destination.
Finally, click on the Create button.
Step 7: Choose the Windows 7,8 or 10 ISO image to install.
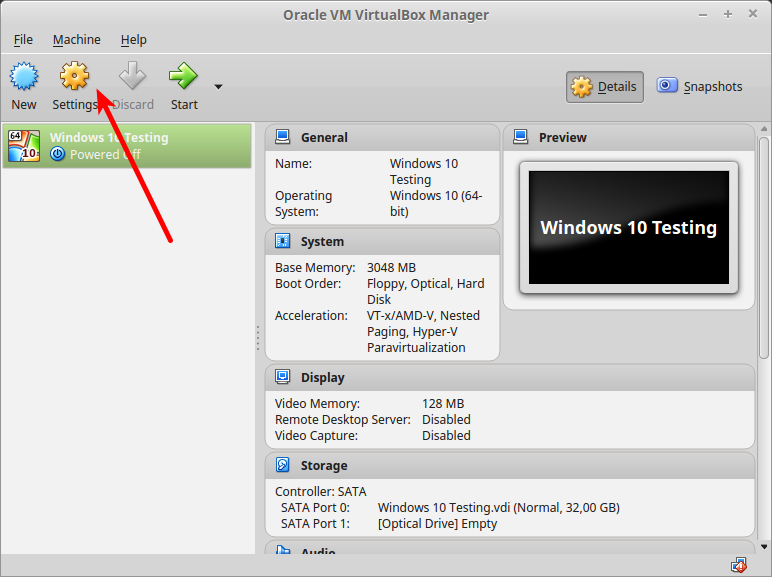
After the above step, you pushed back to the main screen of the Virtualbox from where select the created Virtual machine and then click on the Settings option.
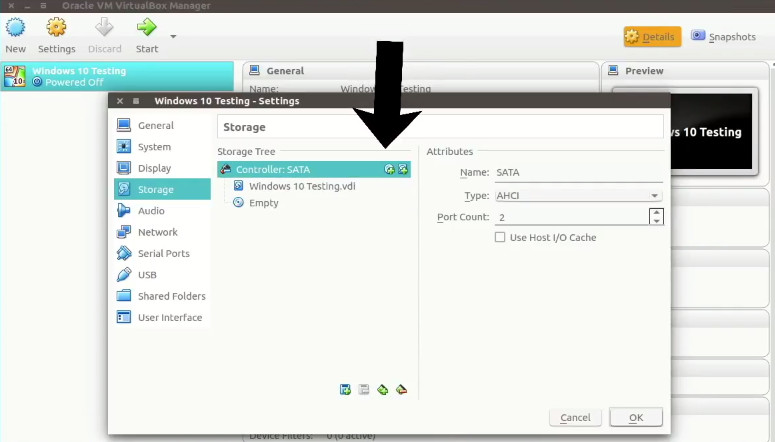
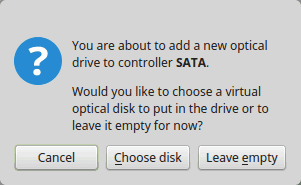
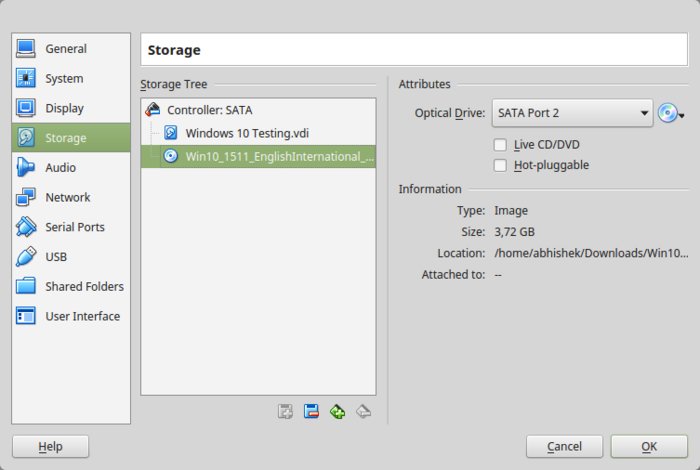
From the settings option go to Storage-> Click on the Empty CD icon and then from the right side panel click on the CD icon. If you have the Windows ISO image then click on the click on Choose Virtual Optical Disk File and select the Windows 7/8/10 ISO image. However, if you have CD disk then put it into your computer’s optical drive and select the Host drive option.
After selecting the ISO image get back to the VirtualBox main screen and click on the START button.

Again click on the start button.

Finally, the VirtualBox will boot the Windows operating system and follow the rest of the Windows installation process on Linux host Virtual machine which is same as on any physical system.

Other Useful resources:
- Install OwnCloud on Virtual Machine- Appliance setup guide
- Connect Synology NAS directly to pc without router & external DHCP
- Install Ubuntu Minimal Server 18.04 “Bionic Beaver”: Just 64 MB
- How To install Portable Virtualbox on USB to Run Virtual Machines Anywhere
- Run Windows 95 app on a Windows, Mac or Linux
- How To Install Rockstor NAS On Ubuntu/Debian in Virtual Machine
This detailed beginner’s guide shows you how to install Windows 10 in VirtualBox on Linux.
I regularly encourage people to use Linux, and when I give them reasons to switch, I always mention that they can use Windows and Linux together if they’re ‘scared of Linux’.
One way to use the two systems together is to dual boot Windows and Linux. It works well except that you have to switch between the operating systems by restarting the system. This is somewhat inconvenient.
If, like me, you’re an infrequent user of Windows and don’t want to trouble yourself with dual booting Ubuntu and Windows 10, I suggest installing Windows 10 inside Linux by creating a virtual machine. In an earlier tutorial, I showed you how to install VMWare on Ubuntu, but in this one, we’ll be using Oracle VirtualBox to create virtual machines and installing Windows 10 on them.
What is VirtualBox and what are its advantages?
VirtualBox is open-source virtualization software from Oracle for creating virtual machines. With a virtual machine, you can run an operating system like an application inside your current operating system. It’s like a computer inside a computer.
These are called virtual machines because they’re basically emulating other operating systems, but they’re not really interacting with the computer system like a true operating system would.
The bottom line is that with virtual machine software, you can use Windows like an application inside Linux. Unlike regular applications, it will consume lots of RAM. But this way, you can use Windows-specific software and programs inside Linux without needing to install Windows fully.
Install Windows 10 in VirtualBox on Ubuntu and Linux Mint
Before installing Windows 10 in VirtualBox, let’s see what you need first:
- An internet connection with good speed, or a Windows 10 ISO that you’ve already downloaded.
- At least 4 GB of RAM. The more RAM you’ve got, the better.
- Around 20 GB of free storage for installing Windows 10.
Once you’ve made sure you have the prerequisites, let’s see how to do it. If you prefer, you can watch this tutorial as a video. Do subscribe to our YouTube channel for more Linux tutorials:
Step 1: Download Windows 10 ISO
First and foremost, you need to download a Windows 10 ISO. You can download Windows 10 32-bit or 64-bit, depending on your system. Go to the link below and choose which version of Windows 10 you’d like to download:
You’ll have to choose the edition and language, and then pick between a 32-bit or 64-bit system, before you download the ISO.
Step 2: Install VirtualBox on Ubuntu and Linux Mint
It’s very easy to install VirtualBox on Ubuntu. All you need to do is to use the command below:
sudo apt install virtualboxStep 3: Install Windows 10 in VirtualBox
Start VirtualBox. You should see a screen like the one below.
Name the VM anything you like. Also select the operating system and version. In this case I’ve chosen Windows 10 and 64-bit.
Choose the RAM size. The recommended RAM size for 64-bit Windows 10 is 2 GB, while for 32-bit Windows 10 it’s 1 GB. But I suggest you have a little more than that for a smoother experience.
Next is the size for the virtual machine. If you’re crunched on space choose the recommended size, otherwise make it a little more than the recommended size.
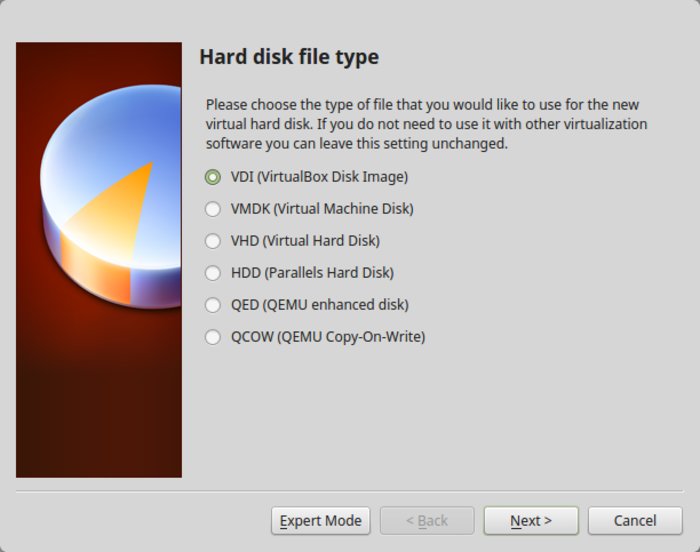
For the format, go ahead with the VDI format.
Confused about dynamic or fixed size? If you choose dynamic, the installed VM will grow beyond its allocated size later. If you’re not going to use Windows extensively, I suggest that you go with fixed size.

Now it’s time to finalize the installation size. You can choose where to create the virtual disk. The default location (Home directory) works fine.
You should now be back at the start screen. But wait, we haven’t used our Windows 10 ISO yet, have we? Now’s the time to actually use the ISO. Click on Settings.
In here, go to Storage and add a new optical drive. I added this screenshot later because a few readers had difficulties finding it.
Click Choose disk and point to the Windows 10 ISO.
Now you should see the Windows 10 ISO listed under Storage. Press OK.
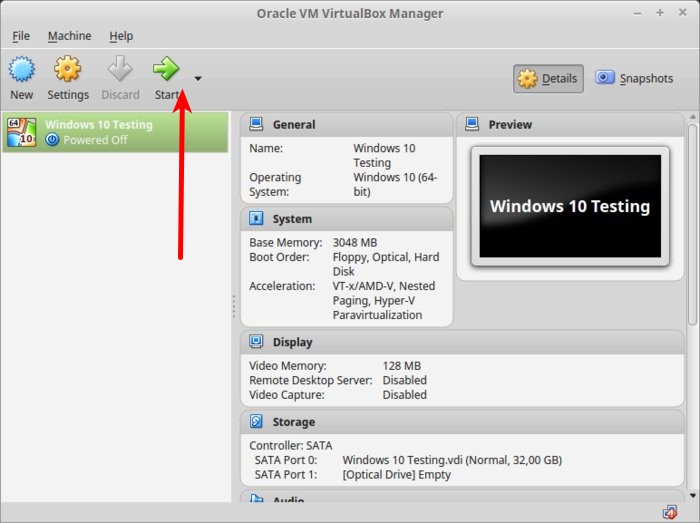
You should now be back at the main screen of Oracle VirtualBox. Now everything is ready. The next step is to install Windows 10. Click on Start from the main screen:
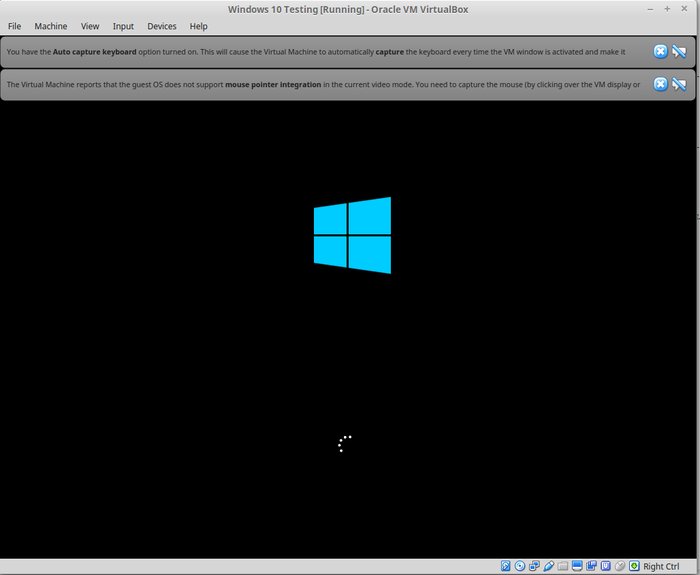
Voila!! You should see the familiar Windows boot screen:
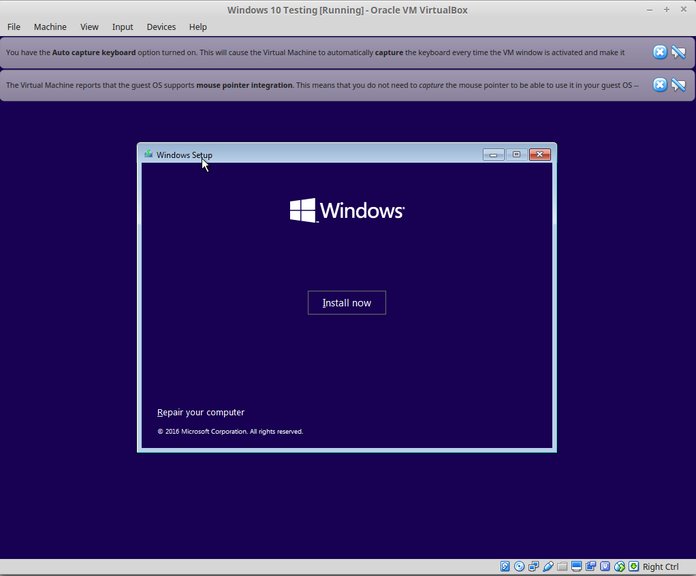
A couple of seconds later, you should see the option to install Windows:
Note: At this point, if you see the Windows logo with a black background and it never starts to install, you may have to perform a little tweak.
As It’s FOSS reader Larry points out, “There seems to be an incompatibility between Virtualbox and Windows 10 1703. A virtual machine that runs W10 1607 fine will fail to boot W10 1703 -UNLESS- the following parameter is set: Under System – Acceleration you must set Paravirtualization to None and then reboot.”
I think you can handle things from here, as installing Windows is just a matter of few clicks. For your convenience I’ve added the screenshots in a gallery. Click on the images to enlarge them if you need any hints.
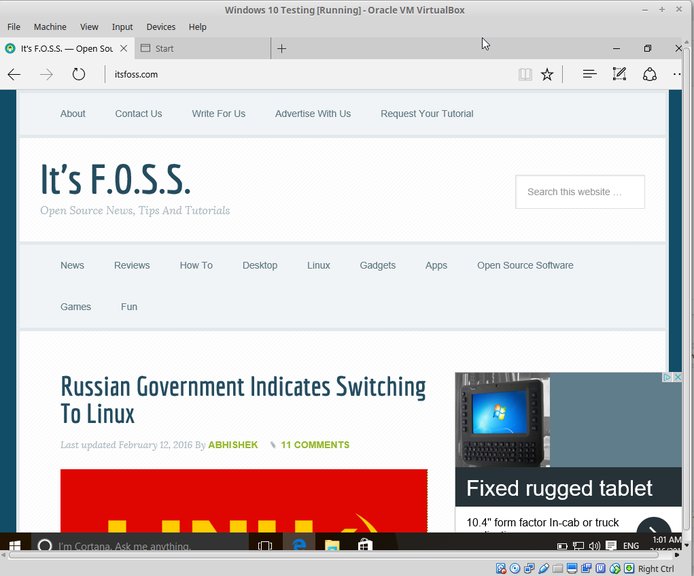
Once you’ve successfully installed Windows 10, you’ll find that the internet connection is shared with the virtual Windows as well: no need for further configuration. Here’s It’s FOSS on the Edge browser in Windows 10 inside a VM.
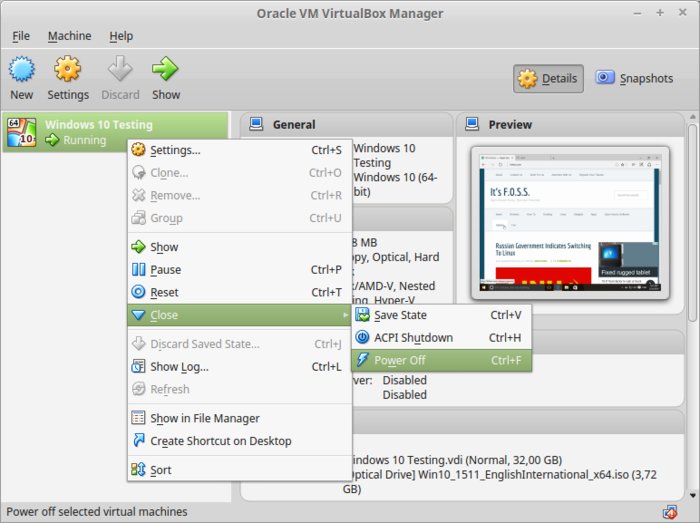
When you’re done using the virtual Windows, you can go back to the main screen and switch off the virtual machine from there:
To start the virtual OS again, just click on Start (green arrow) on the main screen of VirtualBox again. That’s it. More on using virtual operating systems later. I think this gives you a good idea of how to install Windows in Ubuntu or Linux Mint to begin with 
In a related post, you can learn how to create a bootable Windows USB in Linux.
Your take?
Did this tutorial help you install Windows on Linux using VirtualBox? If you have questions or suggestions, feel free to drop a comment.

This page documents how to set up Windows Server 2019 under QEMU/KVM on Ubuntu 18.04. I suspect the procedure is identical for Windows 10 and somewhat newer Ubuntu versions.
What you will need:
- An Ubuntu 18.04 server
- QEMU/KVM installed on it. This is good documentation: https://help.ubuntu.com/community/KVM/Installation
- A Windows Server 2019 or Windows 10 ISO. You can download them from Microsoft for free and try them for 180 days. Good enough for a test lab.
- The virtio driver iso, which you can download here [deeplink].
ISO locations
It is customary to put boot ISOs in /var/lib/libvirt/boot/ and the disk images in /var/lib/libvirt/images. Other places are fine but if you choose to put your disk images in a different location keep in mind you should tell Apparmor about it lest you get bothered with permissions issues.
This document will not describe backing up and restoring of VMs, nor will it explain snapshotting. Both are interesting in their own right and you should learn about them if you haven’t. I wanted to document specifically the process of installing and configuring a Windows Server 2019/Windows 10 guest.
Overview
1. Setting up the network interface
2. Installing the virtual machine
3. Installing drivers and the guest agent
4. Non-related tips
Setting up the network interface
I’m setting up a bridge interface for the VMs to use. By doing this the VMs will show up in my LAN on a regular LAN IP address. My subnet is 192.168.178.0/24. My host’s IP address is 192.168.178.18.
Open the file /etc/netplan/01-netcfg.yaml, or whatever .yaml file is in /etc/netplan.
Mine looked like this:
network:
  version: 2
  renderer: networkd
  ethernets:
    eno1:
      dhcp4: no
      addresses: [192.168.178.18/24]
      gateway4: 192.168.178.1
      nameservers:
        addresses: [192.168.178.1]
Edit the file to look like this:
network:
  version: 2
  renderer: networkd
  ethernets:
    eno1:
      dhcp4: no
      dhcp6: no
  bridges:
    br0:
      interfaces: [eno1]
      dhcp4: no
      addresses: [192.168.178.18/24]
      gateway4: 192.168.178.1
      nameservers:
        addresses: [192.168.178.1]
Be careful when editing this file; it’s easy to lock yourself out. Things to be aware of:
- netplan is very picky about indentations. You need to get this right.
- Instead of # netplan apply do netplan try <file>:
root@z230:/etc/netplan# netplan try 01-netcfg.yaml
Do you want to keep these settings?

Press ENTER before the timeout to accept the new configuration

Changes will revert in 120 seconds
If all goes well do
# netplan apply.
You will end up with a physical interface that provides both the host and the VMs access to your LAN.
In case you have a separate network interface for your VMs try this configuration (enp7s0 and enp4s0f1 are both interfaces on my server; I want the VMs to use interface enp4s0f1 and use enp7s0 for management of the host machine itself):
network:
  ethernets:
    enp7s0:
      dhcp4: no
      dhcp6: no
      addresses: [192.168.178.14/24]
      gateway4: 192.168.178.1
      nameservers:
        addresses: [192.168.178.1]

  enp5s0f1:
    dhcp4: no
    version: 2

  bridges:
     br0:
       interfaces: [enp5s0f1]
       dhcp4: no
Installing the VM
# virt-install --name=W2K19 --ram=2048 --cpu host --hvm --vcpus=2 --os-type=windows --os-variant=win10 --disk /var/lib/libvirt/images/W2K19.img,size=40,bus=virtio --disk /var/lib/libvirt/boot/17763.737.190906-2324.rs5_release_svc_refresh_SERVER_EVAL_x64FRE_en-us_1.iso,device=cdrom,bus=ide --disk /var/lib/libvirt/boot/virtio-win-0.1.171.iso,device=cdrom,bus=ide --network bridge=br0 --graphics vnc,listen=0.0.0.0,port=5904 --check all=off
Note:
When I tried this on Ubuntu 20.04 with a Windows 10 VM I got a bunch of warning and errors and needed to do this:
virt-install --name=win10 --ram=4096 --cpu host --hvm --vcpus=2 --os-type=windows --os-variant=
win10 --disk /var/lib/libvirt/images/win10.img,size=40,bus=virtio --cdrom /var/lib/libvirt/boot/Windows10.iso --disk /var
/lib/libvirt/boot/virtio-win.iso,device=cdrom --network bridge=br0 --graphics vnc,listen=0.0.0.0,port=5904 --check all=of
f --boot cdrom
The difference is the –cdrom specification instead of the –disk one. Also it now seems to require a –boot parameter. The rest of this article continues from the previous command, not the one in this note.
Let me break that down.
First of all, run the command as root or do sudo. The command for installing new VMs is virt-install. Do read its man page.
--name=W2K19
The VM’s name. In KVM terms this is called it’s domain. please note this name is case sensitive.
--ram=2048
The amount of ram in kilobytes
--cpu host
Tells KVM to use the host’s cpu specifications for caching. If you’re planning on using clustering or live migration read up on this part in virt-install’s man page.
--hvm
Do full instead of para virtualisation, if available
--vcpus=2
Give the VM two virtual CPU cores. Again, read the man file for interesting values, like auto.
--os-type=windows
The VM will be optimized for this OS type.
--os-variant=win10
Do
# apt install libosinfo-bin
# osinfo-query os
for a full list of supported OS variants. Pick the closest one.
--disk /var/lib/libvirt/images/W2K19.img,size=40,bus=virtio
Create a disk at this location with this name. I tend to use the .img extension but .qcow2 is also common. The size is in gigabytes. Because we’re using Qemu we’ll be using the virtio bus driver. Note that we will need to install this driver in order to install Windows on the disk.
--disk /var/lib/libvirt/boot/17763.737.190906-2324.rs5_release_svc_refresh_SERVER_EVAL_x64FRE_en-us_1.iso,device=cdrom,bus=ide
We’re connecting the Windows ISO file to a CD ROM device here.
--disk /var/lib/libvirt/boot/virtio-win-0.1.171.iso,device=cdrom,bus=ide
This is the driver CD ROM ISO file. This contains the driver for the drive we’ll be installing Windows on.
--network bridge=br0
Which network interface to install on the VM.
--graphics vnc,listen=0.0.0.0,port=5904
Tell the VM what to do with graphics output. In this case we’ll send it through a VNC interface listening on any address (0.0.0.0) on port 5904. Check the man page for more options. 5900 is VNC’s default port but I’m already running something on that port so I’m specifying a different number.
--check all=off
Do not verify if the CD ROM is already in use by another VM.
Let’s kick off the installation and connect using your favourite VNC client. I used this one.

Connect VNC to your HOST’s IP address followed by the port you specified. The warning is because we didn’t specify a VNC password. That’s ok for now.

The Windows installer will inform you that there are no drives to install on and would like to add a driver?

Choose the virtio scsi driver. In my case the CD ROM ISO was mounted on e:.

Proceed as normal. At one point the installer will reboot and the connection will get lost. Reconnect and continue the installation.
Installing drivers and the guest agent
The guest agent facilitates communication between host and guest. Among other things this will make the VM shutdown gracefully when rebooting or shutting down the host.
After installation shut down the VM and do
# virsh edit W2K19
This will allow you to directly edit the VM’s definition in the form of an XML file. Look up the <devices> section and within it add this section:
<channel type='unix'>
  <source mode='bind' path='/var/lib/libvirt/qemu/win10.agent'/>
  <target type='virtio' name='org.qemu.guest_agent.0'/>
  <address type='virtio-serial' controller='0' bus='0' port='1'/>
</channel>
The W2K19.agent part (second line) must be unique per server. Again, the path can be anything but if you deviate from this standard you must tell Apparmor about it. I suggest you stick to the path above.
Start the server:
# virsh start W2K19
In the VM start the Device Manager. Note there are two devices that lack drivers. Rightclick them, choose Update driver and have the wizard search e: and subfolders.


One is the virtio Balloon Drivers, which allows for memory thin provisioning. The other is the virto serial driver, which is used by the virtio guest agent to facilitate communication between host and guest.
Shut down the VM and restart it with
# virsh start W2K19
To test agent communication, do
# virsh qemu-agent-command W2K19 '{"execute":"guest-info"}'
This should result in quite a bit of information.

If communication cannot be established your will see “error: argument unsupported: QEMU guest agent is not configured”.
Non-related tips
- Use tmux, a terminal multiplexer like screen. It allows you to do more than one thing at a time on your terminal and is highly customizable.
- Use BgInfo to easily see which VM you are managing.
- Learn about KVM snapshots and backups.
Content
- Why?
- Creating your virtual machine
- Where are the Xen configuration files?
- Where are the Xen log files?
- Troubleshooting common problems
- Was it worth it? Windows performance on Xen
Why?
At Tickmeet, our build, test and deployment system for our web apps and back-end services are a one-click affair thanks to the awesome TeamCity. Up until now, our TeamCity server lived on a Rackspace Cloud Server. Not because it makes sense to have a CI server in the cloud (hint: it doesn’t). But simply because we happened to have that server lying around when we decided to give TeamCity a try. And as its happens, our playground server ended up becoming our main (and only) CI server.
Lately however, that setup started showing its limits. Raw performance of cloud servers aren’t great and prices are astronomical for what you get. CI is a terrible use-case scenario for a cloud server.
So we decided to migrate our CI environment to a nifty EX40S-SSD from Hetzner. 32GB of RAM, quad-core processor, a couple of SSDs and great support for less than €50 / month? What’s not to love?
Rather than a bare-metal install of Windows, we decided to give Xen on Ubuntu a try so that we could easily move the whole install to a new machine if needed by just taking a snapshot of the VM and moving the image file across. It also was a great opportunity to get up to speed with Linux again after not having used Linux in anger since 2000 (remember when the only way to get hold of a Linux distribution was to get down to your local newsagent and get it on the CD-ROM that came with Linux Magazine?).
What followed was a exercise in pain and frustration. While Linux has definitely made great stride in the last 13 years in usability (I didn’t have to recompile the kernel once!), Xen is as lovely to setup today as Linux was 13 years ago.
So hopefully, this little guide will help save a few people from pulling their hair out trying to get Windows up and running on Xen.
I’m assuming that you’ve got a basic understanding of virtualization and Linux and that you’re familiar with using SSH, navigating the file system, running commands as root and editing files with vi. I’ll be using Ubuntu 13.10 and Xen 4.3 on a Hetzner dedicated server.
Before you start: request an additional IP address
You’ll need an IP address for your virtual machine. Unless you already have a spare IP you can use, request one from your host. Some hosts can take a few days to issue an extra address so do that now.
If you’re on Hetzner
- Login to the robot interface, select your server and click the IPs tab.
- Click the “Ordering of additional IP” link at the bottom and order an extra IP stating “Virtual Machine” for the purpose of use.
- It might take a day or two for your IP to get issued.
Xen, xend, xm, xl, XenServer, XAPI, XenAPI, xe, XCP, WTF?
Before jumping in, you should take a minute to get familiar with the terms you’ll be faced with when googling for solutions for your Xen problems (and googling you will). Trust me, it will help. Here we go:
Xen
Xen is the hypervisor. It was first created in the late 90’s as part of a research project at Cambridge University by Keir Fraser and Ian Pratt. It was open-sourced in 2002 and is now in version 4.3. Xen powers, among others, Amazon EC2, Rackspace Cloud Server and Linode. If you’re interested in history, check out the History of Xen and Why Xen Project.
xend and xm
Xen itself doesn’t have any user interface — it only expose APIs. Several “toolstacks” have therefore been built to allow humans to create, start, stop, control and otherwise manage virtual machines running on Xen. xend and xm are one of those toolstacks.
xm is a command-line tool that you can use to create and control Xen VMs. xend is a deamon that xm communicates with and that does the actual work.
As of Xen 4.2, xm and xend have been deprecated and replaced with a new toolstack with the lovely name of ‘xl’.
xl
xl is a Xen toolstack introduced with Xen 4.1 and made the default toolstack in Xen 4.2. Just like xm, xl is a command-line tool that you can use to create and control VMs running on the Xen hypervisor. Unlike xm, xl doesn’t rely on the xend deamon to do its work (so you can safely disable xend if you use xl and xend is still running on your server).
xl is the toolstack we’ll use in this guide. xl is mostly backwards-compatible with xm. So if you run into an xm command when googling, simply replace ‘xm’ with ‘xl’ in the command and it should work in the same way.
XAPI, XenAPI, xe
XAPI (short for XenAPI) is another toolstack for Xen, which we won’t be using in this guide. XAPI offers a lot more functionalities than xm and xl.
Unlike xm or xl, XAPI isn’t a command-line tool but instead exposes an XML-RPC interface. You can use XAPI programmatically. Or you can install and use the ‘xe’ command-line tool, which will call the XAPI for you.
XenServer
Unlike what its name suggests, XenServer isn’t a part of the Xen hypervisor but is a completely separate product. We won’t be using XenServer in this guide.
XenServer is a “turnkey open source virtualization solution”. It’s essentially a Linux distribution customised for running Xen VMs. It includes Xen (obviously) and the XAPI toolstack. It was initially created by a company called XenSource founded by Ian Pratt, one of the creators of Xen, as a commercial offering for the enterprise market. It was acquired by Citrix in 2007, which kept commercialising and developing it.
Up until recently, XenServer was partly closed-source. In June 2013, Citrix fully open-sourced it.
XCP
XCP stands for Xen Cloud Platform. It was the open-source subset of XenServer. Since Citrix fully open-sourced XenServer in June 2013, XCP has effectively lost any purpose and has been discontinued.
Xen Basics
Before progressing any further, go and read the Xen Beginner’s Guide. It’s slightly out of date in the details but the main points apply and it’s a very easy to digest introduction to Xen. If you’re feeling lazy, read at least the first section “What is Xen all about?» in order to understand the terms ‘domains’, ‘dom0’, ‘domU’, ‘PV’ and ‘HVM’, which are at the core of everything in Xen.
First things first: pick the right storage medium for your VM — Logical Volume or file-based disk image?
Logical Volumes are the recommended storage medium for best performances of Xen virtual machines. Alternatively, if you haven’t setup LVM on your server, you can use a good old file-based disk image.
If you’ve been living under a rock for the past decade as I have, you’ll have missed the rise of LVM — Linux’ Logical Volume Manager — and you’ll probably be quite confused by now. Think of Logical Volumes as virtual partitions for your drive. Instead of having to decide up-front the size of your partitions, you can just use Logical Volumes instead of partitions. LVM then lets you easily expand or shrink your logical volumes as and when needed. And when I say easily, I mean easily. Check this out:
lvcreate —name my-new-volume —size 60G vg0
lvextend —size 100G /dev/vg0/my-new-volume
lvremove /dev/vg0/my-new-volume
It’s rare to see such beautifully designed interfaces in Linux. Hats off to LVM’s creator Heinz Mauelshagen for creating such a beauty.
There are many more advantages to using LVM instead of partitions. For a quick overview, check out the Wikipedia article and the “Setup LVM storage for guests” section in the Xen Beginner’s Guide. And if you have time, the HOWTO is also good.
Is your server using LVM?
Find out with:
sudo lsblk -o NAME,FSTYPE,SIZE,MOUNTPOINT
Here’s an example setup:
NAME                     FSTYPE              SIZE MOUNTPOINT

sda                                        223.6G

├─sda1                   linux_raid_member   512M

│ └─md0                  ext3              511.7M /boot

└─sda2                   linux_raid_member 223.1G

  └─md1                  LVM2_member         223G

    ├─vg0-swap (dm-0)    swap                 16G [SWAP]

    ├─vg0-root (dm-1)    ext4                 20G /

    └─vg0-windows (dm-2)                     150G
sdb                                        223.6G

├─sdb1                   linux_raid_member   512M

│ └─md0                  ext3              511.7M /boot

└─sdb2                   linux_raid_member 223.1G

  └─md1                  LVM2_member         223G

    ├─vg0-swap (dm-0)    swap                 16G [SWAP]

    ├─vg0-root (dm-1)    ext4                 20G /

    └─vg0-windows (dm-2)                     150G
This system is setup with software RAID1, which is why the two physical drives (sda and sdb) are identical.
Our drive is 223.6GB in size.
md0 is a traditional partition of 512MB for /boot (it used to be that /boot couldn’t be on a logical volume, which is why you’ll often see a separate /boot partition even though it seems to be a relic from the past).
The rest of the drive is used up with the md1 partition. As its file system type indicates, md1 is a volume group managed by LVM – i.e. you can create logical volumes on it (and there are 3 logical volumes created on it at the moment with 37GB of unallocated space for you to create more logical volumes).
If you see a logical group on your drive with enough unallocated space to create a virtual machine image (for reference, a base install of Windows Server 2012 R2 Standard with GUI uses up roughly 13GB), you’re good to go!
What if your drive isn’t already setup with LVM?
Solution 1: start from scratch with LVM
Probably the best solution if you’re setting up a new server that’s been setup with normal partitions instead of logical volumes. Just re-format and re-install the OS using logical volumes instead of partitions. Trivial to do if you’re hosting with Hetzner (see below). I’ll let you figure out how to do it with other hosts.
Got a dedicated server from Hetzner?
The bad news: the default Ubuntu install on Hetzner’s servers uses partitions instead of logical volumes. The good news: Hetzner’s installimage utility makes it a 3-click, 5-minute affair to re-install Ubuntu and set it up with LVM:
- Login to the robot interface.
- Select your server, click the Rescue tab and activate the 64-bit Linux rescue system. Make a note of the randomly-generated root password displayed.
- Reboot your server:
sudo reboot(or simply issue an automatic hardware reset via the robot interface)- SSH into your server as root. You will be greeted by Hetzner’s rescue system. Login with the password noted earlier.
Note: SSH will complain that host key verification failed when you try to connect to the rescue system (for good reason since the rescue system is obviously using a different key than the OS that’s installed on your server). Just delete the entry for your server in your local ~/.ssh/known_hosts file and you’ll be good to go.- Run installimage.
- Select the 64-bit core Ubuntu system
- A config file will then be displayed where you can customise your install. All the defaults are fine. The only part you want to change are the partitioning. This could be a sensible config (read the comments in the config file for an explanation of the syntax):
PART /boot ext3 512M
PART lvm vg0 all
LV vg0 swap swap swap 16G
LV vg0 root / ext4 20G
i.e. a traditional 512MB partition for /boot and everything else setup as a volume group managed by LVM. The volume group contains two logical volumes: one for swap and one for the root file system. 20GB for your root FS is far more than enough if you’ll only be using the server as a Xen host.
Solution 2
If you’ve got enough unallocated space left on your drive or can attach a new drive to your server, just create a volume group there for the purpose of storing your VM image.
Solution 3
Don’t use LVM. A file-based disk image will work fine too, albeit perhaps with reduced performance. We’ll look at how to create a file-based disk image later.
Setup Ubuntu
No need to rewrite the wheel, these two short guides will provide you with the basics:
How To Set Up Your Linode For Maximum Awesomeness – Hacker News discussion
My First 5 Minutes On A Server; Or, Essential Security for Linux Servers – Hacker News discussion
It’s a good idea to read the associated Hacker News discussions to get different view points from possibly more seasoned practitioners.
If needed, you can upgrade to the latest Ubuntu distribution with:
sudo do-release-upgrade
(if you’re not sure of the version of Ubuntu you’re using, try lsb_release -a)
Install Xen
That’s the easy bit:
sudo aptitude install xen-system-amd64
But that’s the AMD package! What if I have an Intel CPU?
The ‘amd64’ in the package name doesn’t refer to AMD CPUs but to the 64-bit version of x86 instruction set, which was initially created by AMD and later adopted by Intel. Wikipedia has a nice overview of the whole thing. So the ’amd64’ package is the correct package for any 64-bit system, including Intel-based systems.
Setup GRUB for Xen
As Xen is a bare-metal hypervisor (you did read the Beginner’s guide, didn’t you?), we need to setup the GRUB bootloader to start Xen before booting Ubuntu.
The configurations for the various systems that GRUB can start are stored in the /etc/grub.d/ directory. Installing the Xen package will have created a new config in that directory for Xen. All we need to do now is reorder the list of operating systems GRUB can start so that Xen + Ubuntu is at the top of the list and is started by default when the server boots up.
And this is how you do it:
sudo dpkg-divert --divert /etc/grub.d/08_linux_xen --rename /etc/grub.d/20_linux_xen
Once that’s done, you need let GRUB know that its configuration has changed by running:
sudo update-grub
Create a networking bridge
The fun part. Getting networking to work with Xen VMs is probably what causes most people the most grief. If you’re interested, you can read the Xen Networking guide to learn about the various options available to you. But you don’t have to.
The most commonly used and easiest way to get networking to work with Xen VMs is to create a software bridge on your host machine, which your VM will use to connect to the network. This will result in your host server and your virtual machine appearing as two separate machines on the network – each with their own IP and MAC addresses as if they were two physical machines. Again, check out the Xen Networking guide if you want to know more.
In Ubuntu, the networking interfaces are configured in the /etc/network/interfaces file. Before doing anything, create a backup copy of this file so that you can revert to the initial networking config should things go wrong:
sudo cp /etc/network/interfaces /etc/network/interfaces.orig
Now edit this file:
sudo vi /etc/network/interfaces
The only thing we’re interested in is the IPv4 config. Everything else can be left untouched.
If your server is setup to use DHCP, you should see something like this:
auto eth0
iface eth0 inet dhcp
eth0 is your physical ethernet interface. If you’ve got more than one ethernet adapter, you might have eth1, eth2, etc configured in there as well. We only need to setup a bridge on the first interface eth0.
The first line indicates that eth0 should be brought up automatically when the system boots up. The second line indicates that the eth0 interface should be configured via DHCP. Simple.
If the server is configured with a static IP address, you’ll have something like:
auto eth0
iface eth0 inet static
address 40.1.1.3
broadcast 40.1.1.31
netmask 255.255.255.224
gateway 40.1.1.1
(you might have more or less settings here depending on your config).
What we need to do is create a new networking interface called xenbr0, indicate that it’s a software bridge that uses the eth0 physical interface and configure it in the exact same way as eth0. Then we need to “unconfigure” eth0 as the bridge interface will now take over. You can theoretically call your new bridge interface whatever you want but the name ‘xenbr0’ is a well-established convention which you would be well advised to follow.
Here we go:
-
Edit the eth0 configuration and replace all instances of
eth0withxenbr0 -
Add the following line to the xenbr0 configuration just after the
ifaceline:bridge_ports eth0(there are more options you could set to configure the software bridge more finely but all the defaults are good. So bridge_ports is the only setting we need to set explicitly) -
We now don’t have a configuration for the eth0 interface anymore. So add a new configuration for eth0 and just set it to manual (as the xenbr0 interface is now handling all the networking work):
auto eth0
iface eth0 inet manual
The IPv4 configuration in your /etc/network/interfaces file should now look like this:
If configured via DHCP:
auto eth0
iface eth0 inet manual

auto xenbr0
iface xenbr0 inet dhcp
bridge_ports eth0
If configured with a static IP address:
auto eth0
iface eth0 inet manual

auto xenbr0
iface xenbr0 inet static
bridge_ports eth0
address 40.1.1.3
broadcast 40.1.1.31
netmask 255.255.255.224
gateway 40.1.1.1
That’s it.
We want to use the latest xl command-line tool to create and manage our VM (as opposed to the older and now deprecated xm tool). So we need to set xl as being our default toolstack in the xen config file.
Edit the xen config file located at /etc/default/xen:
sudo vi /etc/default/xen
In that file, set:
TOOLSTACK=xl
Disable saving VM state on dom0 shutdown or store the VM state in a location with enough storage space
By default, Xen automatically saves the state of your virtual machine to disk when your host server shuts down (e.g. when the physical server is rebooted). This is so that it can restore the virtual machine to whatever state is was in when dom0 (your physical server) is back up. This is a very handy feature which can go badly wrong: if you allocate a lot of RAM to your virtual machine, the state of your VM (which is essentially the content of its RAM) can become huge and fill-up your partition.
Whether or not to save VM state and the location where your VM state is going to be saved are defined in the /etc/default/xendomains config file. So edit this file and either set XENDOMAINS_SAVE to a blank value to disable the feature or make sure that it points to a location with enough storage space.
Reboot
Now is time to reboot:
sudo reboot
Check that Xen has started
If your GRUB config is right, when the server boots up Xen should start in parallel with Ubuntu. When you SSH into the server again, you’ll be in Ubuntu but you can check that Xen has started and is running properly with the following xl command:
sudo xl list
Note that most ‘xl’ commands need to be run as root (hence the sudo).
This command lists all the Xen ‘domains’ (i.e. virtual machines) currently running on the server. Since you haven’t created any virtual machines yet, you will only see the ‘dom0’ domain, which is the host machine (i.e. your physical machine). The output of that command should look like:
Name                                        ID   Mem VCPUs State Time(s)
Domain-0                                     0  1022     2     r-----     440.0
If you get an error indicating that Xen isn’t running, go through your GRUB config again. Make sure that you ran the update-grub command.
If you get an error complaining about the toolstack, double-check that ‘xl’ has been set as your toolstack in the /etc/default/xen config file.
Check that your network bridge is up
Run brctl show
You should see your xenbr0 bridge interface there. The output of this command should look like:
bridge name    bridge id        STP enabled    interfaces
xenbr0        8000.d43d7ee2ffba    no        eth0
You can also run ifconfig and check that the xenbr0 interface has the correct IP address.
Finally, try to ping an external host or wget an external resource to make sure that everything is still working OK on the networking side:
ping google.com
should succeed:
PING google.com (173.194.112.233) 56(84) bytes of data.
64 bytes from fra02s18-in-f9.1e100.net (173.194.112.233): icmp_seq=1 ttl=56 time=6.17 ms
Get the Windows Server 2012 R2 ISO image
Next up, we’ll need the ISO image for the Windows Server 2012 R2 setup. You can download it from MSDN. If you don’t have an MSDN subscription, TechNet has a 180-day trial.
The easiest way to get it on your server is probably to download it on your own machine first and scp it over. If you’re on a Mac or Linux machine:
scp /path/to/windows-server-2012-r2.iso your-username@your-server-address-or-ip:
(don’t forget the colon at the end)
If you’re on Windows, WinSCP works like a charm.
Create a logical volume or a disk image for your virtual machine
If you’ve selected LVM to manage your VM storage
Create a logical volume for your VM. We’ll call it windows-vm and give it a size of 100GB but feel free to call it whatever you fancy and set it to whatever size fits your needs (reminder: a base install of Windows Server 2012 R2 with a GUI uses up roughly 13GB). I’m also assuming that you called your volume group ‘vg0’.
sudo lvcreate -n windows-vm -L 100G vg0
If you prefer to use a file-based disk image
We’ll create a 100GB image file called windows-vm.img. Feel free to name it whatever you fancy and set it to whatever size fits your needs.
Navigate to wherever you want to store the disk image (I personally like to create a ‘xen’ folder in my home directory) and run:
dd if=/dev/zero of=windows-vm.img bs=1024k seek=102400 count=0
Create your virtual machine configuration file
Almost there. All we need now is a configuration file that defines our virtual machine spec: amount of RAM, number of virtual CPUs, location of the disk image, etc.
You can put this file anywhere. I like to create a ‘xen’ directory on my home directory for all my xen configs:
mkdir ~/xen/
cd ~/xen
Now create a file called windows-vm.cfg (or call it whatever you like):
vi windows-vm.cfg
This is what it should contain:
builder='hvm'
memory = 24576
vcpus=4
name = "windows-vm”
vif = ['mac=00:50:56:00:11:22,bridge=xenbr0']
disk = ['phy:/dev/vg0/windows-vm,hda,w','file:/path/to/windows-server-2012-R2.iso,hdc:cdrom,r']
boot="dc"
serial='pty'
vnc=1
vnclisten="0.0.0.0"
vncpasswd=“somepassword”
This is a minimal file. There are many more settings you could set but all the other settings have fine defaults. Refer to the documentation for the XL Domain Configuration File Syntax to find out what other settings are available.
Essential Settings
builder: set to PV by default. But Windows can’t be paravirtualized and needs full virtualisation, hence the HVM.
memory: amount of RAM to allocate to the VM in MB. Set to 24GB here.
vcpus: number of virtual CPUs to allocate to the VM.
name: name of the VM. Set it to whatever you like.
vif: definition of the virtual network interface that will be created for the virtual machine. ‘mac’ is the MAC address that will be allocated to the VM and is optional. If not set, Xen will pick a random one for you. In that case, the MAC might change whenever the VM is shutdown and restarted, which might cause Windows to think that it needs to be re-activated. So hardcoding a MAC address is a good idea. See below for more details on how to pick a MAC address.
disk: definition of the virtual volumes for the VM. Here, we’re defining a hard-drive pointing to the logical volume we created earlier and a CD drive loaded with the Windows Server setup image we downloaded. If you’re using a file-based disk image instead of LVM to store your VM, replace the phy:/ path with: file:/path/to/your/windows-vm.img,hda,w
boot: CD first, then disk.
vnc: Xen includes a built-in VNC server that allows you to view and control your virtual machine via VNC. We’ll need this to install Windows and we’ll then switch to Remote Desktop once Windows has been installed and is connected to the network.
vnclisten: by default, the Xen VNC server only accept connections from the local machine (i.e. your server), which is not going to be very useful. Setting vnclisten to ‘0.0.0.0’ results in connections from any remote machine being accepted.
vncpasswd: anyone who knows the IP address of your server will be able to connect to your virtual machine via VNC while you’re setting it up. So make sure you have a good password here.
Important security note
The VNC protocol is in clear-text and is very simple and well documented. A man-in-the-middle could easily intercept VNC data and view your virtual machine screen as well as all keyboard input. We’ll only be using VNC for the initial setup until we can enable Remote Desktop but the paranoid among you might still want to setup an SSH tunnel to secure VNC data. How to do this is left as an exercise to the reader.
Setting the right MAC address
Your hosting company might only allow machines with known MAC addresses to connect to their network. In this case, you’ll need to either ask your hosting company to provide you with a MAC address to use for your VM or provide them with the MAC address you chose to use.
If you can choose any MAC address, refer to the relevant section in the Xen Networking guide for advice on how to choose correctly.
If you’re hosting with Hetzner
If you’ve requested an additional IP address to use with your VM, Hetzner will also provide you with the MAC address to use with it. You must use the MAC address Hetzner provides or your VM won’t be allowed on their network.
- Login to the robot interface.
- Select your server and click the IPs tab.
- Click the green icon next to the additional IP you were allocated. The MAC address to use with that IP will be displayed. Use that for the
vifconfig.
Start your virtual machine
The moment of truth:
sudo xl create ~/xen/windows-vm.cfg
If everything went well, your virtual machine should now be up:
sudo xl list
should display:
Name                                        ID   Mem VCPUs    State    Time(s)
Domain-0                                     0  1022     2     r-----     911.1
windows-vm                                   1 24576     4     r-----      66.3
Note
The ID column in the output of ‘xl list’ is your virtual machine Domain ID. It changes everytime your virtual machine is restarted. When using xl, you can refer to your virtual machine using either its name or its Domain ID.
Not working?
Check out the troubleshooting section below.
Connect via VNC
Use a VNC client to connect to the IP of your host machine (your host server IP, not your virtual machine IP).
Note that the VNC server implementation in Xen appears to be quite limited and buggy (for those familiar with the VNC protocol, it only supports the Raw and Hextile encodings and seems to have trouble with the initial handshake. If you’re curious, you can check out the source code here).
Mac OS X’s Screen Sharing utility hangs when trying to connect. The RealVNC client for Mac OS X connects successfully but crashes as soon as it tries to display the first frame. I’ve only been able to connect successfully using TightVNC on Windows or Chicken on OS X and only when setting the preferred encoding to either Raw or Hextile. Try Hextile first as it’s much more efficient than Raw but I’ve seen it crash with pseudo-encoding errors. Raw encoding is stable but very slow.
Can’t connect via VNC?
Check out the VNC troubleshooting section below.
Setup Windows
You should now see the Windows setup program. Complete the setup. If using a static IP address in your VM, configure the network adapter in Windows with it (configure it as if it was a normal physical server – i.e. using the same mask, gateway server and DNS servers as you’re using on the host machine).
If you’re hosting with Hetzner
You don’t need to manually configure your VM with the additional IP you requested from Hetzner (although you can if you want). Provided that you’ve configured your VM to use the MAC address Hetzner provided for the additional IP address, you can let your VM get its network config via DHCP – it should work.
Once you’ve got the network up and running on Windows, activate Remote Desktop (go to the Local Server section in Server Manager – you’ll see Remote Desktop listed there). You might also need to go to the Windows firewall and enable all the inbound rules for Remote Desktop (public access might be disabled by default).
Can’t get Windows to connect to the network?
Check out the networking troubleshooting section below.
Clean up your virtual machine configuration file
Once Remote Desktop is up and running, edit your VM configuration file:
vi ~/xen/windows-vm.cfg
and delete all VNC entries.
You can also delete the path to the Windows setup ISO image file so that the CD drive configuration looks like ',hdc:cdrom,r'
(the first comma isn’t a typo – we’re defining an empty CD drive).
You could also remove the CD drive definition altogether. But leaving your VM configured with an empty CD drive can be handy. With an empty CD drive you can easily attach an ISO image while your VM is running with:
sudo xl cd-insert windows-vm hdc /path/to/an/image.iso
(note that you must specify the absolute path to the ISO image with this command or it will fail with a “received an error message from QMP server” error)
Finally, set the boot setting to “c” to only boot from disk.
You can now shutdown and restart your VM to start using the new settings:
sudo xl shutdown windows-vm
sudo xl create ~/xen/windows-vm.cfg
Configure Xen to start your virtual machine automatically on boot
By default, Xen won’t start your virtual machine automatically on boot. If you want your VM started automatically, place its configuration file in the /etc/xen/auto/ directory. Or just add a symlink to it:
sudo ln -s ~/xen/windows-vm.cfg /etc/xen/auto/windows-vm.cfg
Alternatively, you can change the path of the directory where Xen looks for virtual machines to auto-start by editing the Xen domains config file at /etc/defaut/xendomains.
Install the Windows PV drivers
In Windows, download and install James Harper’s PV drivers – they will give your virtual machine a significant performance boost and are a no brainer.
Fine-tune your Xen install
Now that you’ve got everything up and running, spend a few minutes going through the Xen Best Practices, Tuning Xen for Performance and Roger Pau Monné’s presentation on Xen Performance Tuning.
A lot of the performance tuning tips involve passing command-line parameters to Xen on startup. Many of the example you’ll find on the web explaining how to do this are out-of-date and refer to GRUB1 configuration files which don’t exist anymore in GRUB2.
So here is how to pass command-line parameters to Xen with GRUB2. Here, we’ll restrict dom0 to 1GB of RAM and two virtual CPUs and pin dom0′s virtual CPUs to physical CPUs 0 and 1:
Edit GRUB2′s configuration file:
sudo vi /etc/default/grub
Add the following line to pass the relevant command-line arguments to Xen on startup:
GRUB_CMDLINE_XEN_DEFAULT="dom0_mem=1024M,max:1024M dom0_max_vcpus=2 dom0_vcpus_pin=true"
Let GRUB know that its configuration has been updated:
sudo update-grub
Curious about the syntax? Want to know what other options Xen can take on startup? Check out the Xen command-line parameters doc.
The End.
Keep reading for a handy reference on Xen configuration, logging and troubleshooting and for some benchmarks of our Windows VM.
Where are the Xen configuration files?
Xen uses two configuration files located in /etc/default/:
/etc/default/xen
/etc/default/xendomains
Command-line parameters passed to Xen on startup (if any) will be defined in GRUB2′s configuration file:
/etc/default/grub
(look for the GRUB_CMDLINE_XEN_DEFAULT setting and remember to run update-grub if you make any changes to that file)
The network bridge (usually called ‘xenbr0′) that Xen uses to allow virtual machines to connect to the network through the host server’s physical Ethernet adapter is configured in the network interface configuration file /etc/network/interfaces.
Where are the Xen log files?
Xen writes its logs in a number of different files located in the /var/log/xen/ directory. You’ll need to be root to be able to navigate to this location.
You can pass the -v option to xl to enable verbose mode.
This tip by Ian Campbell can also come in handy when debugging networking issues:
«Is /etc/xen/scripts/vif-bridge present? If so then a useful debug technique can be to add to the top
exec >>/tmp/hotplug.log 2>&1
which will cause the script output to be logged to /tmp/hotplug.log which might give a clue.»
Troubleshooting common problems
xl create fails to create the virtual machine with “unable to add nic devices” or some other crytpic error message
Error messages surfaced by xl are often unrelated to the actual problem.
Your first port of call in case of xl errors should be to check the logs.
Virtual machine creation failure is often due to subtle syntax mistakes in the configuration file. So double-check your virtual machine configuration file.
You can enable verbose mode in xl by using the -v parameter, although the extra information is unlikely to be of much use.
If the problem appears to be related to the xenbr0 network bridge, check out the networking troubleshooting tips below.
My VNC client fails to connect, crashes while trying to display the virtual machine screen or displays a black screen
The built-in VNC server in Xen is temperamental. First, review the VNC section above to make sure that you’re connecting to the right IP address with the right VNC client and the right encoding.
If everything looks in order, check that the VNC server has actually been started on your host server. VNC listens on port 5900 (unless you’ve changed it via the ‘vncdisplay’ option in your virtual machine configuration file). So telnet into it from your server to check that it’s indeed listening:
telnet localhost 5900
You should be greeted by the VNC protocol’s handshake welcome message:
RFB 003.008
If the telnet connection fails, review your virtual machine configuration file and make sure that you’ve enabled VNC (vnc=1) and that you’re not using a custom port for VNC (there shouldn’t be a ‘vncdisplay’ setting).
If the local telnet connection succeeds, try to telnet from your own machine:
telnet YOUR_SERVER_IP_OR_ADDRESS 5900
If that telnet connection fails, review your virtual machine configuration file and make sure that you’ve configured VNC to allow connection from remote machines (vnclisten=”0.0.0.0″). If you’ve got a firewall between your own machine and your server, make sure that it allows that connection to go through.
The Windows setup program hangs at the blue Windows logo
I sadly don’t have a solution for that one. I ran into this problem during my first attempt to setup a Windows Server 2012 virtual machine with Xen. The setup program would just hang straight away at the splash screen displaying a blue Windows logo on a black background just after the initial “Loading files…” step.
I tried just about everything to get it to work to no avail. I also downloaded several different ISO images from TechNet (Windows 7, 8, Server 2012 and Server 2012 R2 preview) but they all got stuck at the same point, apart from the Windows 7 setup program which worked just fine.
I eventually resigned to the fact that it might be a problem with Ubuntu 13.10 and Xen 4.3, which had been released just a few days earlier. So I started from scratch again with Ubuntu 13.04 and Xen 4.2. The Windows Server 2012 R2 setup program ran just fine on that new setup – no hangs. Before installing Windows, I upgraded to Ubuntu 13.10 and Xen 4.3 to see if I could reproduce the problem. But the setup program ran just fine after the upgrade no matter what I did. I haven’t been able to reproduce the issue.
My virtual machine can’t connect to the network
Oh boy.
An entire book wouldn’t be enough to list all the reasons why networking might be broken in a virtual machine. Here are a few starting points.
First: is networking not working at all or are you just not able to connect to external networks? Find out by pinging your host server IP from your virtual machine.
If you can’t ping your host server from your virtual machine, then check that your network bridge has been created correctly. When running ifconfig, you should also see the virtual network interface created by Xen to allow your virtual machine to communicate with the bridge interface (it should be be called vif[DOMAIN_ID]).
You may also want to check the logs (there’s a tip there on adding logging to the shell script that sets up Xen’s virtual network interface).
If you can ping your host server but can’t access external networks, check that you’ve assigned the correct MAC address to your virtual machine. Many hosts will only allow devices with white-listed MAC addresses to connect to their network so check with your host which MAC address you should be using for your virtual machine.
And, of course, if you’ve manually configured the network adapter in Windows, double-check that the mask, gateway and DNS servers are all correct and match what is configured on your host server.
Was it worth it? Windows performance on Xen
Short answer: the raw performance of a Windows virtual machine on Xen is quite disapointing to say the least. In practice however, our TeamCity builds and deployments are 2x to 3x faster than they were on our Rackspace Cloud Server — a big win.
Longer answer: I haven’t run any comprehensive or even vaguely scientific benchmarks. But for one of the key metric that matters for us, disk I/O, performance of Windows Server 2012 R2 on Xen leaves a lot to be desired.
The host server, an EX40-SSD server from Hetzner configured with two SSDs in software RAID1 achieves disk read throughput in excess of 440MB/s in the host Ubuntu system (as measured by dd with 1MB block reads and by the hdparm -t benchmark).
The Windows Server 2012 R2 virtual machine on that same physical machine achieves average disk read throughput of:
- 60MB/s without the PV drivers
- 80MB/s after having installed the PV drivers
- 94MB/s after having applied the tweaks suggested in the Xen Performance Tuning guide
(as measured by HD Tune).
This is a rather measly 21% of the performance of the host machine.
For comparison purposes, a bare-metal install of Windows Server 2008 R2 on an old EX4S server from Hetzner with two 7,200rpm hard drives configured with hardware RAID1 achieves an average disk read of 145MB/s (as measured by the same HD Tune).
A Windows Server 2008 R2 install on a first-gen Rackspace Cloud Server (the one we’re moving away from) achieves an average disk read speed of 118MB/s. That’s even though Rackspace also uses Xen (I was hoping that SSDs would give us a good performance boost but it’s looking like Rackspace have actually done some serious Xen optimization on their side even though the end result is still disappointing).
In practice however, the VM delivers. A TeamCity build, test and deployment cycle for the whole Tickmeet stack used to take a frustrating 5 to 10 minutes on our old Rackspace Cloud Server. This is now down to a much more satisfying two minutes — not even enough time to prepare a cup of coffee.
So was it worth it? Not really from the headache point of view — Xen is anything but enjoyable to work with. It’s also interesting to see how critical pieces of functionality in Xen, like the networking setup, are performed by a bunch of shell scripts seemingly cobbled together with sticky tape.
But ending up with a server 3x faster in practice than our old Rackspace server for 1/10th of the price while gaining even more flexibility isn’t too bad.
And that refresher course in Linux sys-admin made it all worth it. While the Tickmeet back-end is mainly built on a .NET stack, projects like PostgreSQL or Go become more appealing by the day. It makes little doubt that Linux is going to start playing a larger and larger role in our tech stack in the coming months. It’s good to have our first Linux server up-and-running.