How to start Safe mode with Command Prompt
Updated on November 12, 2021
What to Know
- Turn on your PC and press F8 before you see the Windows splash screen. Select Safe Mode With Command Prompt.
- Select which operating system you want to start. Most people only have one installed, so it’s an easy choice.
- Log in as an administrator or log in to an account with administrator privileges.
Starting your computer in Windows XP Safe mode with Command Prompt can help you perform advanced diagnostics and solve many serious problems, especially when starting normally or in other Safe Mode options isn’t possible. Here’s how.
Press F8 Before the Windows XP Splash Screen
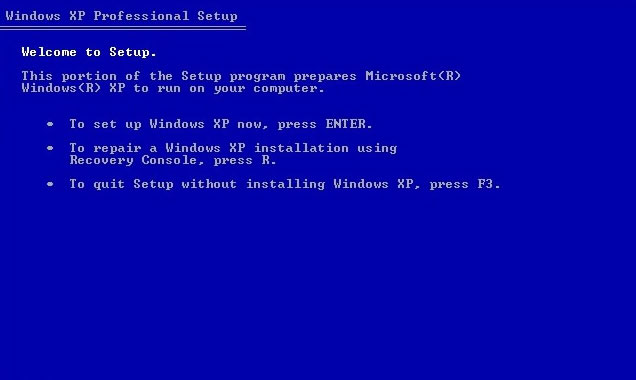
Windows XP Starting Up.
To begin entering Windows XP Safe Mode with Command Prompt, turn your PC on or restart it.
Just before the Windows XP splash screen shown above appears, press F8 to enter the Windows Advanced Options Menu.
Choose Windows XP Safe Mode With Command Prompt
Windows XP «Safe Mode with Command Prompt» Option.
You should now see the Windows Advanced Options Menu screen. If not, you may have missed the small window of opportunity to press F8 from Step 1 and Windows XP is probably now continuing to boot normally if it’s able to. If this is the case, just restart your computer and try pressing F8 again.
Here you’re presented with three variations of Windows XP Safe Mode you may enter:
- Safe Mode: This is the default option and is usually the best choice. This mode will load only the absolute minimum processes necessary to start Windows XP.
- Safe Mode with Networking: This option loads the same processes as Safe Mode but also includes those that allow the networking functions in Windows XP to work. This is valuable if you may need to access the internet or your local network while troubleshooting in Safe Mode.
- Safe Mode with Command Prompt: This flavor of Safe Mode also loads a minimum set of processes but will allow access to the Command Prompt. This is a valuable option if more advanced troubleshooting is necessary.
Using the arrow keys on your keyboard, highlight the Safe Mode with Command Prompt option and press Enter.
Select the Operating System to Start
Windows XP Operating System Choice Menu.
Before entering the Windows XP Safe Mode with Command Prompt, Windows needs to know which operating system installation you would like to start. Most users only have a single Windows XP installation so the choice is usually clear.
Using your arrow keys, highlight the correct operating system and press Enter.
Don’t worry if you don’t see this menu. Just move on to the next step.
Choose an Administrator Account
Windows XP Login Screen.
To enter Windows XP Safe Mode with Command Prompt, you must log on with an administrator account or an account that has administrator permissions.
On the PC displayed in the screenshot above, both my personal account, Tim, and the built-in administrator account, Administrator, have administrator privileges, so either one could be used to enter Safe Mode with Command Prompt. If you’re not sure if any of your personal accounts have administrator privileges, choose the Administrator account by selecting it.
Make Necessary Changes in Windows XP Safe Mode With Command Prompt
Windows XP Safe Mode With Command Prompt.
Entry into Windows XP Safe Mode with Command Prompt should now be complete.
Make any changes you need to make by entering commands into the Command Prompt, and then restart the computer. Assuming there are no remaining issues preventing it, the computer should boot to Windows XP normally after a restart.
You can «convert» Safe Mode into one with a Start menu and desktop by entering the start explorer.exe command. This might not work because you’re most likely using this form of Safe Mode because the normal Safe Mode won’t start, but it’s worth a try.
You can’t see it in this screenshot, but it’s very easy to identify if a Windows XP PC is in Safe Mode because the text «Safe Mode» will always appear in the corners of the screen.
Thanks for letting us know!
Get the Latest Tech News Delivered Every Day
Subscribe
This guide explains how to boot into Safe Mode for the following Windows versions: Windows XP, Vista, 7, 8, 8.1 and 10
Contents
- 1 About the Safe Mode
- 1.1 Options
- 2 How to boot into Safe Mode
- 2.1 Safe Mode in Windows XP
- 2.2 Safe Mode in Windows Vista
- 2.3 Safe Mode in Windows 7
- 2.4 Safe Mode in Windows 8, 8.1 and Windows 10
- 3 Diagnostic tools in Safe Mode
- 3.1 System Restore
- 3.2 Device Manager
- 3.3 Event Viewer
- 3.4 Command Prompt
- 4 Troubleshoot
- 4.1 Safe Mode not working
- 4.2 Windows 8, 10 – F8 key not working
- 5 More Information
- 5.1 Support Links
- 5.2 Applicable Systems
About the Safe Mode
In Safe Mode, your computer is running with non-core components disabled which makes it easier to fix potential errors or remove various software that, in normal conditions, can’t be fixed or removed.
If you boot into Safe Mode, you can use various diagnostic tools:
- System Restore
- Various settings for your Windows version
- Device Manager, where you can update and remove devices and drivers from your computer
- Event Viewer
- System Information, where you can view information about the hardware
- Command Prompt
- Registry Editor
For more information on how to run these diagnostic tools, go to Diagnostic tools in Safe Mode.
In Windows XP, the Windows Advanced Options Menu shows the Safe Mode option available:
Advanced Options Menu in Windows XP
Usually, you can choose from 3 options: Safe Mode, Safe Mode with Networking and Safe Mode With Command Prompt:
- Safe Mode
- Safe Mode with Networking
- Safe Mode with Command Prompt
In Windows Vista, the equivalent of Windows Advanced Options Menu of Windows XP, the Advanced Boot Options, also lists the 3 options available for Safe Mode:
Advanced Options Menu in Windows Vista
Windows 7 is the same:

Advanced Options Menu in Windows 7
Windows 8 has the same options, but the interface is different:
Startup Settings screen in Windows 8
And the Windows 10 screen is slightly different as well:

Startup Settings screen in Windows 10
Options
The Safe Mode of Windows has 3 options available:
- Safe Mode. This is the most used option. It gives you a minimal set of devices, drivers and services to run Windows
- Safe Mode with Networking. This loads the same devices, drivers and services as the Safe Mode option with the additional drivers necessary to load networking.
- Safe Mode with Command Prompt. This option loads the same drivers and services as the Safe Mode option, but loads Command Prompt (cmd.exe) instead of Windows Explorer (graphical interface)
How to boot into Safe Mode
To boot into Safe Mode, you need to press the F8 key while your Windows is booting, but before the logo appears.
For Windows 8 and Windows 10, the combination of Shift and F8 keys might work, but it work for computers with UEFI/EFI.
For Windows-specific steps, follow the steps below.
Safe Mode in Windows XP
For Windows XP to start in Safe Mode, follow these steps:
- Reboot your computer. It’s recommended to remove all external cables and media and leave only the essentials: monitor, keyboard, mouse etc.
- Press the F8 key as your Windows starts, before the Windows XP logo appears
- The Windows Advanced Options Menu should now appear
- Choose Safe Mode
- Hit Enter

Advanced Options Menu in Windows XP
Safe Mode in Windows Vista
For Windows Vista to start in Safe Mode, follow these steps:
- Remove all CDs, DVDs or USBs from your computer. Make sure you don’t have any printers, scanners etc. connect
- Reboot the computer
- Press F8 as your computer start. You need to press this button before the Windows Vista logo appears.If you have more than 1 operating system, use the arrows keys to select which operating system you want to boot into Safe Mode and press Enter.
- At the Advanced Boot Options, use the arrows keys to select Safe Mode
- Press Enter
- Login in as an administrator, if prompted to do so
Advanced Options Menu in Windows Vista
Safe Mode in Windows 7
The steps to boot a Windows 7 system into Safe Mode are similar to those of Windows Vista:
- Remove any peripherals from your computer
- Restart your computer
- Press the F8 key before the Windows 7 logo appears.If you have more than 1 operating system installed on the same computer, use the arrows keys to navigate and select which operating system you want to boot into Safe Mode.
- Select Safe Mode using the arrows keys and press Enter
- If prompted to do, login as an administrator
Advanced Options Menu in Windows 7
Safe Mode in Windows 8, 8.1 and Windows 10
For Windows 8 or Windows 10 to boot into Safe Mode, follow these steps if you can boot into Windows:
- Restart the computer
- Press F8 or Shift + F8 during the boot, but before the Windows logo appears
If F8 or Shift + F8 doesn’t work, go to Windows 8 – F8 key not working or follow the alternative instructions below:
- Boot into Windows
- Press the
 and R keys to open Run
 - Type
msconfig - Click the Boot Tab
- At the Boot options section, check the Safe Boot checkbox and the Minimal checkbox
- Click OK
- Restart the computer. If prompted by the System Configuration window, click Restart – not Exit without Restart.

Boot options menu in Windows

Another method is the combination of Shift and Restart keys at the login window:
- Boot into Windows until the login screen appears, but do not login as a user. If you don’t have a login screen showing, boot into the system and click on Settings
- Press the Power button
- While holding the Shift key, click Restart
- At the Choose an option screen, select Troubleshoot
- Select Advanced options
- Select Startup Settings
- Click Restart
- Your computer may restart and open the Startup Settings screen automatically
- Press the F4 key to boot into Safe Mode. For the other 2 options of Safe Mode, press F5 to boot into Safe Mode with Networking or press F6 to boot into Safe Mode with Command Prompt
Windows Startup Settings screen
It is also possible to use the installation CD/DVD to boot into Safe Mode:
- Insert the disc in the optical drive
- Reboot the system
- Press any key to boot from the CD/DVD
- Choose a keyboard layout
- Click Repair your computer
- Click Troubleshoot > Advanced options > Startup Settings
- Click Restart
- The computer should restart with the Startup Settings screen automatically
- Press F4 to boot into Safe Mode. Press F5 to boot into Safe Mode with Networking. Press F6 to boot into Safe Mode with Command Prompt.

Windows 8 Setup Screen
Diagnostic tools in Safe Mode
You can run various diagnostic tools in Safe Mode.
System Restore
- Boot into Safe Mode
- Go to Start
- Click All Programs
- Go to Accessories
- Click System Tools
- Click System Restore
- Enter the administrator password, if you are prompted to do so
For more details on System Restore, follow our guide Windows System Restore.
Device Manager
Follow these instructions on how to open and edit configuration in Device Manager while in Safe Mode:
- Boot your Windows into Safe Mode
- Click Start
- Click Control Panel
- Click System and Maintenance
- Click Device Manager
- Enter an administrator password, if prompted to do so

Device Manager in Windows Vista
You can use Device Manager and edit configurations only if you are logged in as an administrator. Changes that you do under a non-administrative account will apply to that user only.
Event Viewer
Follow these instructions on how to open Event Viewer while in Safe Mode:
- Boot into Safe Mode
- Click Start
- Click Control Panel
- Click System and Maintenance
- Click Administrative Tools
- Double-click on Event Viewer
Command Prompt
Follow these instructions on how to open Command Prompt while in Safe Mode:
- Boot into Safe Mode
- Click Start
- Click All Programs
- Click Accessories
- Click Command Prompt

Command Prompt screen
Troubleshoot
Safe Mode not working
If you can’t boot into Safe Mode, consider the following tips:
- Check if you have a Keyboard Support USB option in BIOS. If so, make sure it’s Enabled not Disabled.
- If you have a keyboard with F-lock functionality, make sure it’s Off
If the F keys don’t work to boot into Safe Mode even after following the above tips, you can also run msconfig from within Windows (you need to boot into Windows first):
- Boot into Windows
- Click Start
- Click Run
- Type
msconfig - Click OK
- Go to the Boot tab (or Boot.ini for Windows XP users)
- Check the Safe Boot checkbox (or the /SAFEBOOT for Windows XP users)
- Click OK
- Click Restart
- Wait for your Windows to automatically start in Safe Mode
Msconfig screen in Windows
Windows 8, 8.1 and 10 users can open Run by pressing the  and R keys.
If you can’t boot into Windows to run msconfig, you can use the original installation disc or Easy Recovery Essentials to run Command Prompt and run chkdsk and bootrec commands.
chkdsk and bootrec utilities will attempt to fix any issues found on your hard drive or during the booting process of your Windows. After that, you can try again to boot into Safe Mode.
For more information on chkdsk, read our guide: chkdsk. For more information on Bootrec, read our guide: Bootrec.
The instructions for Windows XP are:
- Insert the installation CD in the optical drive
- Restart your computer
- At the “Press any key” message, press any key to make sure you boot from the CD
- Press R at the Windows Options menu to open Recovery Console
- Enter the administrator password
- When Command Prompt appears, type this command:
chkdsk C: /r
Replace
C:with the letter of the drive where Windows XP is installed - Press Enter
- You can also run the equivalent of bootrec found in Vista, 7, 8 for Windows XP, the bootcfg:
bootcfg /rebuild
- Press Enter
- When done, type
exit, press Enter and restart the computer
Windows XP setup screen
The instructions for Windows Vista, 7, 8, 8.1 and 10 are:
- Insert the original installation disc
- Reboot your computer
- Press any key to boot from the installation media: CD, DVD or USB drive
- Click Repair your computer
- Select your operating system
- Click Command Prompt
- Run these commands in order and press Enter after each:
chkdsk /r
bootrec /FixBoot
bootrec /FixMbr

Windows 7 setup screen
If you don’t have an original installation disc, you can run Command Prompt from Easy Recovery Essentials:
- Download Easy Recovery Essentials
- Burn the ISO Image. Follow our instructions on how to burn a bootable ISO image. If you’d like to have a recovery USB instead, follow our instructions on how to make a recovery USB.
- Boot into Easy Recovery Essentials
- Select Launch Command Line

Windows 8, 10 – F8 key not working
If you use Windows 8 or Windows 8.1 and have a computer with UEFI/EFI, the F8 key would not work to boot into Safe Mode as Windows 8 and Windows 10 are optimized to boot very quickly.
To enable the F8 key, follow these steps:
- Open the Command Prompt
- If you’re logged into Windows, click to run it as an administrator
- Type this command:
bcdedit /set bootmenupolicy legacy
- Press Enter
- A success message should appear:
The operation completed successfully.
- Restart your computer

Bcdedit utility results screen
If you can’t boot into Windows to run Command Prompt, you can open it from the installation disc (CD/DVD for Windows 8 and Windows 10; USB drive for Windows 8.1):
- Insert the disc in the optical drive and restart the computer
- Press any key to boot from the disc
- Choose a keyboard layout
- Click Next
- Click Repair your computer
- Click Troubleshoot
- Click Advanced options
- Click Command Prompt
If you don’t have the installation disc, use Easy Recovery Essentials to have access to Command Prompt:
- Download Easy Recovery Essentials
- Burn the ISO Image. Follow our instructions on how to burn a bootable ISO image. If you’d like to have a recovery USB instead, follow our instructions on how to make a recovery USB.
- Boot into Easy Recovery Essentials
- Select Launch Command Line
More Information
Support Links
- Easy Recovery Essentials for Windows – our repair and recovery disk.
It’s an easy-to-use and automated diagnostics disk. It’s available for Windows 8, Windows 7 and Windows Vista. It’s also available for Windows XP and Windows Server.
Read more at Windows Recovery Disks.
- The NeoSmart Support Forums, member-to-member technical support and troubleshooting.
- Get a discounted price on replacement setup and installation discs: Windows XP, Windows Vista, Windows 7, Windows 8, Windows 10.
Applicable Systems
This Windows-related knowledgebase article applies to the following operating systems:
- Windows XP (all editions)
- Windows Vista (all editions)
- Windows 7 (all editions)
- Windows 8 (all editions)
- Windows 8.1 (all editions)
- Windows 10 (all editions)
- Windows Server 2003 (all editions)
- Windows Server 2008 (all editions)
- Windows Server 2012 (all editions)
Propose an edit
Safe Mode in Windows is a special diagnostic mode that allows to use Windows with basic drivers and can help to troubleshoot various problems.
Windows can be started in Safe Mode in different ways, depending on the OS version (Windows 10, 8, 7, XP) and the hardware vendor (Lenovo, DELL, HP, Asus, Acer).
In this note i am showing how to boot Windows 10, 8, 7, XP in Safe Mode from startup (cold boot) and how to restart it and boot it in Safe Mode from a login screen or directly from Windows.
I am also showing how to configure Windows to boot in Safe Mode from the command-line interface (CMD).
Cool Tip: Kill a hanging process in Windows from the CMD! Read more →
Start Windows 10, 8, 7, XP in Safe Mode from Boot
To start Windows 10, 8, 7, XP in Safe Mode from boot, repeatedly press F8 key or one of the key combinations Ctrl + F8 or Shift + F8 or Fn + F8 during the system startup, but before the Windows logo appears (try all these combinations because for different vendors e.g. Lenovo, DELL, HP, Asus, Acer, etc. the key combination for booting in Safe Mode may be different).
Fast Boot: Because of the current fast computers and laptops with fast boot or SSD, it is sometimes complex to catch the exact time frame for pressing the required key combinations during the boot process and it might take several attempts to access the Boot Manager this way.
Restart Windows 10, 8 in Safe Mode
To restart Windows 10, 8 in Safe Mode from login screen or directly from Windows GUI:
- Click the Windows
Powerbutton, hold down the Shift key and click onRestart - Select
Troubleshoot->Advanced options->Startup Settings->Restart. Here you may be asked to enter your BitLocker recovery key. - The relevant options for booting in Safe Mode are the numbers
4,5or6- Press the keys 4 or F4 to boot in Safe Mode
- Press the keys 5 or F5 to boot in Safe Mode with Networking
- Press the keys 6 or F6 to boot in Safe Mode with Command Prompt
bcdedit is a command-line tool for managing Boot Configuration Data (BCD).
It requires administrative privileges to modify boot configuration, so firstly it needs to start CMD as administrator.
Press the ⊞ Win key to open the Start menu, type in cmd to search for the command prompt and press Ctrl + Shift + Enter to launch it as administrator.
Configure Windows to boot in Safe Mode:
C:> bcdedit /set {current} safeboot minimal
Configure Windows to boot in Safe Mode with Networking:
C:> bcdedit /set {current} safeboot network
Configure Windows to boot in Safe Mode with Command Prompt:
C:> bcdedit /set {default} safeboot minimal bcdedit /set {default} safebootalternateshell yes
Restart Windows and it will be started in Safe Mode:
C:> shutdown /r
When you don’t need to boot in Safe Mode anymore, change it back to normal:
C:> bcdedit /deletevalue {current} safeboot
![]()
Download Article
![]()
Download Article
While Windows XP is usually a stable operating system, it still can have a wide variety of problems. Luckily, Microsoft knew that and decided to put in a secret boot mode known as «Safe Mode». This article will tell you how to enter the Windows XP safe mode.
Steps
-
1
Press the F8 key right after the POST check. In practice this can be tricky to time correctly and all too often you can end up in the regular boot mode. The technique is to repeatedly tap the F8 key until the startup menu appears.
- Sometimes you will fill up the buffer memory with all the key taps and get an error message or the computer will complain by beeping. Also, the F8 key may not work with a USB keyboard because USB drivers have not yet been loaded. However, newer computers have USB support in the BIOS so this problem should be limited to older machines.
-
2
These are the choices you should see: (You may not see all choices below, depending on your computer setup.)
- Safe Mode
- Safe Mode with Networking
- Safe Mode with Command Prompt
- Enable Boot Logging
- Enable VGA mode
- Last Known Good Configuration (your most recent settings that worked)
- Directory Services Restore Mode (Windows domain controllers only)
- Debugging Mode
- Disable automatic restart on system failure
- Start Windows Normally
- Reboot
Advertisement
-
3
Use the «up» and «down» arrow keys to highlight the boot mode you want. After you have highlighted the mode you want, press the «Enter» key.


Advertisement
-
1
Click the «Start» button on the taskbar. When the Start Menu appears, click the «Run» menu option. (As a shortcut, you can simply press WinKey+R on the keyboard.)
-
2
In the dialog box that appears, type «msconfig». The System Configuration Utility executes.
-
3
Look for the tabs at the top of the screen. One will say «BOOT.INI». Click on that tab.
-
4
There will be a few checkboxes in the lower portion of the window. Check the box next to the text «/SAFEBOOT».
-
5
Click «OK», and restart your computer.


Advertisement
Add New Question
-
Question
When I reach Safe Mode and press Enter, it shows me again the option Safe Mode, Safe Mode with Networking, etc. What can I do?

Just Safe Mode is fine for simple diagnosing and troubleshooting. Safe Mode with Command Prompt can be nice, and if you’ll need to get online for anything, go with Safe Mode with Networking.
-
Question
When I press F8, the page with all the options pops up. However, I am unable to highlight anything with the up and down arrow keys. Is there any other way to get into safe mode?
While there is no other way, if you’re using a USB-based keyboard, try a different port.
Ask a Question
200 characters left
Include your email address to get a message when this question is answered.
Submit
Advertisement
Video
Thanks for submitting a tip for review!
-
You will no longer boot into regular mode until you uncheck the box next to «/SAFEBOOT» in the System Configuration Utility.
-
Only change what you are told to in the System Configuration Utility. WikiHow is not responsible if your computer will no longer boot, or starts to act strange.
Advertisement
About This Article
Thanks to all authors for creating a page that has been read 204,152 times.
Is this article up to date?
Содержание:
- Что такое безопасный режим?
- Способы загрузки Windows XP в безопасном режиме
- Использование безопасного режима
- Почему Windows XP загружается только в безопасном режиме?
- Если безопасный режим не работает
Что такое безопасный режим (safe mode)
 Безопасным режимом (safe mode) в Windows называют минимальную конфигурацию операционной системы, предназначенную для диагностики и устранения неполадок компьютера, которые препятствуют его загрузке и работе в нормальном режиме (normal mode). При такой конфигурации загружается строго предопределенный набор драйверов и служб, а система работает в режиме ограниченной функциональности.
Отличие безопасного режима от нормального
- Не запускаются драйвера устройств сторонних разработчиков. Поэтому часть оборудования компьютера (принтеры, сканеры, аудиоустройства и т. д) не работает.
- Не запускаются программы, настроенные на автоматическую загрузку.
- Вместо видео высокого разрешения включается графический режим VGA (16 цветов, разрешение экрана — 640 x 480 пикселей).
- В безопасном режиме невозможен запуск большинства приложений. Работают преимущественно только утилиты для диагностики, настройки и восстановления ПК.
- Меняется внешний вид рабочего стола Windows XP: по углам выводится надпись «Безопасный режим», вверху — сведенья о версии системы, по центру — окно-уведомление:

- После принятия соглашения продолжать работать в safe mode, загружается рабочий стол с ярлыками программ без пользовательских «обоев».

Варианты безопасного режима
- Стандартный безопасный режим (safe mode minimal). В этом режиме грузится только необходимый минимум стандартных драйверов Windows.
- Безопасный режим с загрузкой сетевых драйверов (safe mode with networking). Здесь дополнительно будут загружены сетевые драйвера и службы, которые позволят пользователю иметь доступ к локальной сети и Интернету.
- Безопасный режим с поддержкой командной строки (safe mode with command prompt). В этом варианте загрузки вместо графической оболочки Windows — рабочего стола, ярлыков и папок, будет загружаться консольный интерфейс Cmd.exe (командная строка).
- Восстановление службы каталогов (directory services restore). Эту специализированную опцию используют системные администраторы для решения проблем с базами данных Active Directory на контроллерах домена.
Способы загрузки Windows XP в безопасном режиме
С помощью утилиты «Настройка системы»
Такой способ можно использовать только тогда, когда Windows XP грузится и работает в нормальном режиме.
- Нажмите сочетание клавиш «Windows» + «R» (или откройте «Пуск» -«Выполнить»). Для запуска утилиты в строку «Открыть» впишите команду «msconfig» и подтвердите действие нажатием «ОК».

- Перейдите на вкладку «Boot.INI» (Boot.INI — это файл конфигурации загрузки Windows XP) и в разделе «Параметры загрузки» отметьте «Safeboot», что будет означать: произвести следующий запуск системы в безопасном режиме.
- Выберите один из вариантов загрузки: minimal (стандартный безопасный режим), network (с поддержкой сетевых драйверов) или minimal(alternateshell) — режим командной строки. Последний вариант — dsrepair, предназначен для восстановления служб каталогов, поэтому оставим его специалистам.
- Нажмите «ОК» и согласитесь на перезагрузку. Следующий старт компьютера будет выполнен в безопасном режиме.

- Чтобы восстановить загрузку в нормальном режиме, необходимо снять метку с «safeboot».
Внимание! Этот способ нельзя использовать, если у вас есть сомнения в возможности запуска компьютера в safe mode. Настройки сохраняются в файле Boot.INI, и загрузка Windows в нормальном режиме при этом отключена.
С помощью меню дополнительных вариантов загрузки
Более безопасный вариант, поскольку позволяет однократно запустить компьютер в режиме safe mode без изменений в файле конфигурации. Может применяться тогда, когда запуск Windows XP в нормальном режиме нарушен.
- Перезагрузите компьютер. Нажмите и удерживайте несколько секунд клавишу F8 до начала загрузки Windows. Откроется меню, которое позволит выбрать нужный вам вариант безопасного режима.

С помощью командной строки
Редко используемый способ, который может выручить тогда, когда графическая оболочка Windows не запускается или заблокирована, и вы работаете в консольном режиме. Две указанные здесь команды выполняются поочередно, одна за другой.
- Загрузка стандартного безопасного режима:
bootcfg /raw «/safeboot:minimal» /id 1
shutdown /f /r /t 0
- Безопасный режим с поддержкой сети:
bootcfg /raw «/safeboot:network» /id 1
shutdown /f /r /t 0
- Режим командной строки в safe mode:
bootcfg /raw «/safeboot:minimal(alternateshell)» /id 1
shutdown /f /r /t 0
- Загрузка нормального режима:
bootcfg /raw «/fastdetect» /id 1
shutdown /f /r /t 0
Значение команд и параметров
- Bootcfg — изменяет параметры Boot.INI, где «id 1» указывает на номер операционной системы в списке. Если Windows XP — единственная система, id всегда равен 1.
- Shutdown с указанными параметрами немедленно перезагружает компьютер, «t 0» означает: «ожидать до перезагрузки 0 секунд». По желанию это время можно изменить.
Использование безопасного режима
Поскольку безопасный режим Windows предназначен для устранения неполадок, разберемся, как мы можем его использовать в этих целях. Итак, у нас есть следующие возможности:
- проводить антивирусное сканирование компьютера — некоторые вредоносные программы не проявляют активности в safe mode, поэтому здесь их удается быстро выловить и устранить:

- удалить сбойный драйвер или приложение, если после их установки система перестала загружаться нормально — это делается через «Установку и удаление программ»:

или «Диспетчер устройств» (драйвера):

«Диспетчер устройств» вызывается из меню «Пуск» — «Выполнить» командой «devmgmt.msc».
- восстанавливать систему к ранее сохраненному состоянию:


- отключать сбойные элементы автозапуска служб и приложений в нормальном режиме (с помощью утилиты настройки системы «msconfig»).

Почему Windows XP загружается только в безопасном режиме
Наиболее распространены следующие причины:
- сбойный или неподдерживаемый драйвер устройства;
- сбойное приложение, прописанное в автозагрузку;
- вирусное заражение;
- повреждение системных файлов или реестра;
- аппаратная неисправность компьютера.
Причина может быть как только одна, так и несколько, например — вирусная атака плюс повреждение системных файлов.
Алгоритм диагностики и устранения неполадок ПК с помощью безопасного режима
Если Windows XP грузится только в safe mode после подключения нового оборудования, обновления драйвера или установки приложения, выполните следующее:
- выключите компьютер и, если есть возможность, отключите предполагаемо сбойное оборудование;
- загрузите компьютер в безопасном режиме, запустите диспетчер устройств и удалите проблемное устройство из списка;
- если сбой вызывает приложение — деинсталлируйте его через «Установку и удаление программ».
Если вы предполагаете заражение вирусом, который, возможно, что-то повредил или заблокировал работу Windows в нормальном режиме:
- выполните восстановление системы — это откатит реестр и системные файлы на тот период времени, когда они были работоспособны;
- проведите антивирусное сканирование.
При подозрении на сбойную службу или приложение в автозагрузке:
- запустите утилиту «Настройка системы» (msconfig), откройте вкладку «Службы», поставьте отметку «Не отображать службы Microsoft» и отключите галки в левом столбце напротив всех оставшихся служб;
- откройте вкладку «Автозагрузка» и отключите автоматически загружаемые элементы нажатием кнопки «Отключить все»;
- попытайтесь загрузить компьютер в обычном режиме — если он грузится нормально, запустите «Настройку системы» и поочередно включайте отключенные элементы — таким способом вы найдете то, что вызывает сбой.
Если безопасный режим не работает
Бывает так, что Windows грузится только в нормальном режиме, а в безопасном — нет. Это чаще всего случается из-за повреждения ответственного за это раздела системного реестра: HKEY_LOCAL_MACHINESYSTEMCurrentControlSetControlSafeBoot.
Чтобы устранить неполадку, необходимо скопировать этот раздел с другой аналогичной системы Windows XP и перенести на проблемную.
- Запустите на «здоровом» компьютере редактор реестра — regedit.exe, в левой части окна найдите раздел «SafeBoot». Откройте меню «Файл» и выберите команду «Экспорт». Сохраните раздел в файл с расширением REG.

- Перенесите REG-файл на проблемную машину, например, на флешке. Чтобы вставить скопированный раздел в реестр, достаточно запустить файл двойным кликом. После этого ключи, ответственные за безопасный режим, будут восстановлены .
Start Windows in Safe Mode to narrow down the source of the problem
Contents
- Start Windows in Safe Mode to narrow down the source of the problem
- How to Start Windows in Safe Mode on Windows 11, 10, 8, 8.1, 7, Vista, or XP?
- Boot in Safe Mode on Windows XP/Vista/7
- Start Windows in Safe Mode (Windows 7/8/10/11 Guide)
Windows Safe Mode is a diagnostic Windows environment that starts the operating system only with essential services, programs and drivers. Booting in this mode is a typical step before troubleshooting security related problems, remove viruses, fix errors and other issues. You can choose between basic, Networking or Command Prompt mode based on tasks you need to complete.
Booting Windows in Safe Mode starts the operating system with a limited set of programs, drivers and services. If the error does not occur in the secure mode, it means that the problem is not caused by default Windows programs, devices or settings. For this reason, booting in this mode is often used when fixing common errors such as Your PC ran into a problem and needs to restart or Video_Scheduler_Internal_Error.
Earlier, the most popular way to start Windows in Safe Mode while booting was clicking F8, but that is not the case nowadays. Therefore, it is essential to learn the new ways to start Windows in Safe Mode on Dell, HP and other PCs.
The mode is available in several options, and each one is used to address different issues, each listed below.
- Safe Mode. Starts the computer with core drivers and services.
- Safe Mode with Networking. Starts the PC with core drivers and services plus adds those needed for Internet connection to work. It is extremely useful when you think you’ll need a troubleshooter or Internet access to download necessary files or updates.
- Safe Mode with Command Prompt. This mode comes in handy when the taskbar, Desktop or Start menu doesn’t load at all.
There are many ways to boot Windows in the said mode. However, options for different versions of the Windows operating system are slightly different. Therefore, we suggest seeing instructions prepared exceptionally for your Microsoft Windows version (7/Vista/XP, Windows 8 & 8.1, Windows 10 and Windows 11). You can also check the video guide we provide.
How to Start Windows in Safe Mode on Windows 11, 10, 8, 8.1, 7, Vista, or XP?
Boot in Safe Mode on Windows XP/Vista/7
In case you are running one of these older versions of Windows, then your solution includes using the good old F8 key.
- Push the power button to turn on your PC. Immediately start pressing the F8 key in 1-second intervals. Keep pressing the key repeatedly. Wait until your computer displays hardware information and starts a memory test. Then you will see the Advanced Boot Options menu on your screen.
- Here, you will need to navigate using arrow keys on your keyboard. Choose to start Windows in Safe Mode (basic, with Networking or with Command prompt). Press Enter to confirm.
- Wait until the operating system starts. Do whatever you were willing to do in the described computer mode, and to go back to the normal mode, repeat steps 1-3 but choose Start Windows Normally instead. Press Enter to confirm.
Note. You can also try using Shift+F8 keys together. Keep pressing them both down repeatedly as described previously.
Start Windows in Safe Mode (Windows 7/8/10/11 Guide)
Method 1. Use System Configuration panel
This method relies on the System Configuration panel, and it boots into your chosen mode as long as you decide not to. It works for Windows 7, 8, 10, 11. This is also the easiest way to get Windows 10 into Safe Mode.
- To launch System Configuration panel, press Windows key + R, then in the Run prompt type msconfig, press Enter afterward.
- Go to the Boot tab and then look at Boot options. Put a tick on Safe boot and then choose the method you need.
- Minimal one simply boots into Safe mode;
- Alternate shell boots into mode with Command Prompt;
- Active Directory repair boots into a mode that allows repairing Active Directory server;
- Network boots into mode with Networking.
- After selecting the mode, click Apply and OK.
- You will be asked to restart the computer. Click Restart to confirm. The computer now boots into the mode you selected. Whenever you want to exit the safe mode and enter normal one, repeat steps 1-4, but make sure you uncheck the Safe Mode option in System Configuration > Boot tab.

Method 2. Access troubleshooting tools
If you are looking for a way to enter Safe Mode in Windows 11, 10 or 8, then you should review methods described below. First of all, choose a method to access troubleshooting tools – it depends whether you can start the operating system or not. The guide provided below covers both methods.
Step 1. Accessing the troubleshooting tools
In case your computer starts normally, try to boot in Safe Mode (Windows 8, 10 or 11) without F8.
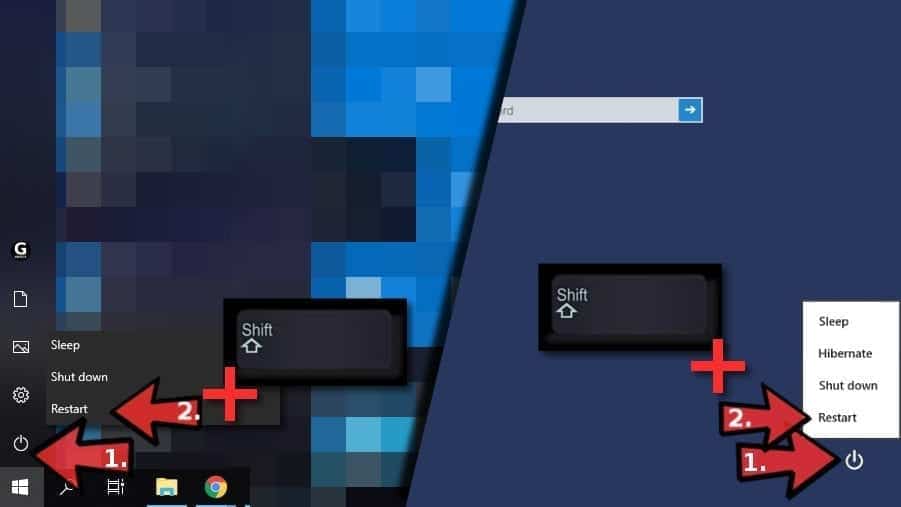
- All you need to do is to turn your computer on and click on Restart while holding the Shift key. You can find Restart button in the login screen or the Windows menu (shown below).
- Another method to get into secure mode is via Windows Settings. Press Windows + I key at the same time; this opens the Settings app. Here, find an option called Update and Security, and click it. Now, navigate to Recovery tab. You will see Advanced Startup panel, click Restart Now under it.

Now, if your computer does not start properly at all, you should try one of the following methods.
In case you are having problems starting the operating system, try booting from a USB recovery drive. You can make one using another computer. You can also try the method with an F8 key, but it does not work in all cases – it depends on your computer model. Whichever way you get into the recovery mode, it will allow you to boot Windows in Safe Mode.
Step 2. Using the troubleshooting options
Methods described earlier will give you access to a special menu where you can choose from provided troubleshooting tools.
- In this menu, select Troubleshoot, then Advanced options.
- Here, select Startup Settings (or Windows Startup Settings). Finally, click the Restart button.
- Here, choose one from F1-F9 buttons, depending on what you want to do (in this case, F4, F5 or F6).
Do not get confused if after restart your computer displays a black screen with the same options – use arrow keys to select the right choice of Safe Mode, and just press Enter to continue.
Method 3. Force enter Automatic Repair mode in Windows 10
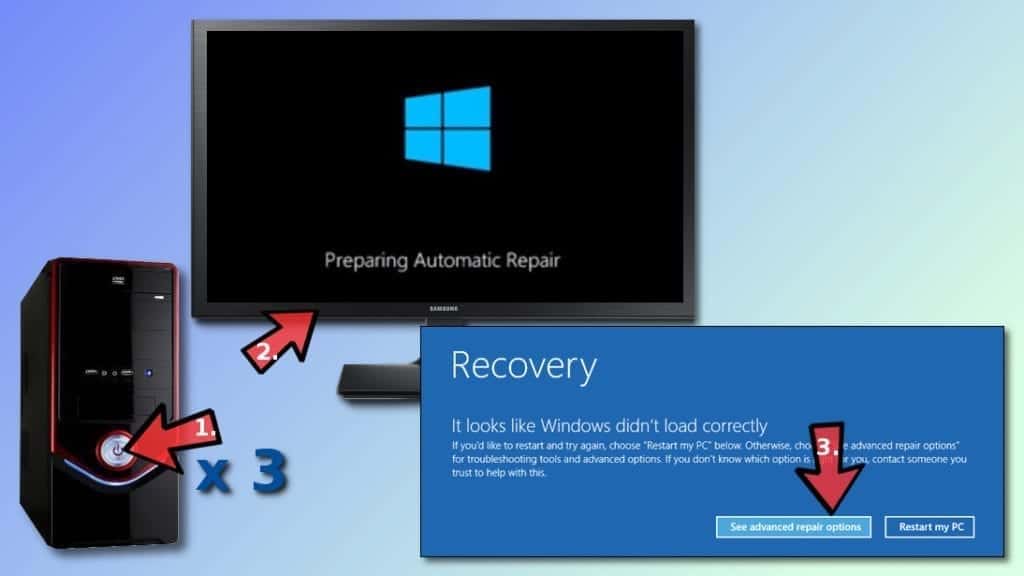
Interrupting normal Windows startup three times in a row triggers Automatic Repair mode. You can use this mode to start Windows 10 in Safe Mode while booting. To trigger the Automatic Repair one, you must interrupt normal Windows 10 startup three consecutive times. Follow the given guide attentively.
- To interrupt the startup, press Power or Reset button. In case you use Power button, you might need to keep it pressed for at least 4 seconds to force shut down. Then turn on the computer, force shut down again. You need to power on – force shutdown (interrupt the startup) three times in a row.
- You will understand that Windows is trying to access Automatic repair mode when it displays “Preparing Automatic Repair” on the screen.
- You may be asked to choose user account. Choose the one with admin’s rights, and enter the password for it.
- Wait until Windows loads. When asked whether you want to restart or enter Advanced options, choose the second option.
- Follow instructions given in Method 3.2.
In case you are using Windows 10 and you are having problems with blank device’s screen, we suggest checking suggestions provided in official Microsoft’s website.
This post was first published on October 28, 2018, and updated on October 16, 2022.

Norbert Webb is the head of Geek’s Advice team. He is the chief editor of the website who controls the quality of content published. The man also loves reading cybersecurity news, testing new software and sharing his insights on them. Norbert says that following his passion for information technology was one of the best decisions he has ever made. “I don’t feel like working while I’m doing something I love.” However, the geek has other interests, such as snowboarding and traveling.
Reader Interactions
The Advanced Boot Options screen lets you start Windows in advanced troubleshooting modes. You can access the menu by turning on your computer and pressing the F8 key before Windows starts.
Some options, such as safe mode, start Windows in a limited state, where only the bare essentials are started. If a problem doesn’t reappear when you start in safe mode, you can eliminate the default settings and basic device drivers and services as possible causes. Other options start Windows with advanced features intended for use by system administrators and IT professionals. For more information, go to the Microsoft website for IT professionals.
Repair Your Computer
Shows a list of system recovery tools you can use to repair startup problems, run diagnostics, or restore your system. This option is available only if the tools are installed on your computer’s hard disk. If you have a Windows installation disc, the system recovery tools are located on that disc.
Safe Mode
Starts Windows with a minimal set of drivers and services.
To start in safe mode:
-
Remove all floppy disks, CDs, and DVDs from your computer, and then restart your computer. Click the Start button , click the arrow next to the Shut Down button (or the arrow next to the Lock button), and then click Restart.
-
Do one of the following:
-
If your computer has a single operating system installed, press and hold the F8 key as your computer restarts. You need to press F8 before the Windows logo appears. If the Windows logo appears, you’ll need to try again by waiting until the Windows logon prompt appears, and then shutting down and restarting your computer.
-
If your computer has more than one operating system, use the arrow keys to highlight the operating system you want to start in safe mode, and then press F8.
-
-
On the Advanced Boot Options screen, use the arrow keys to highlight the safe mode option you want, and then press Enter.
-
Log on to your computer with a user account that has administrator rights.
-
Safe Mode with Networking. Starts Windows in safe mode and includes the network drivers and services needed to access the Internet or other computers on your network.
-
Safe Mode with Command Prompt. Starts Windows in safe mode with a command prompt window instead of the usual Windows interface. This option is intended for IT professionals and administrators.
-
Enable Boot Logging. Creates a file, ntbtlog.txt, that lists all the drivers that are installed during startup and that might be useful for advanced troubleshooting.
-
Enable low-resolution video (640×480). Starts Windows using your current video driver and using low resolution and refresh rate settings. You can use this mode to reset your display settings. For more information, see Change your screen resolution.
-
Last Known Good Configuration (advanced). Starts Windows with the last registry and driver configuration that worked successfully.
-
Directory Services Restore Mode. Starts Windows domain controller running Active Directory so that the directory service can be restored. This option is intended for IT professionals and administrators.
-
Debugging Mode. Starts Windows in an advanced troubleshooting mode intended for IT professionals and system administrators.
-
Disable automatic restart on system failure. Prevents Windows from automatically restarting if an error causes Windows to fail. Choose this option only if Windows is stuck in a loop where Windows fails, attempts to restart, and fails again repeatedly.
-
Disable Driver Signature Enforcement. Allows drivers containing improper signatures to be installed.
-
Start Windows Normally. Starts Windows in its normal mode.
Need more help?
Updated: 01/31/2023 by
Safe Mode helps troubleshoot computer problems, including software and hardware issues. To access Safe Mode in Windows or macOS, select the link below for the operating system you have on your computer.
Note
Accessing Safe Mode for Windows or macOS requires a working keyboard. If the keyboard on your computer does not work, you cannot access Safe Mode.
Windows 11
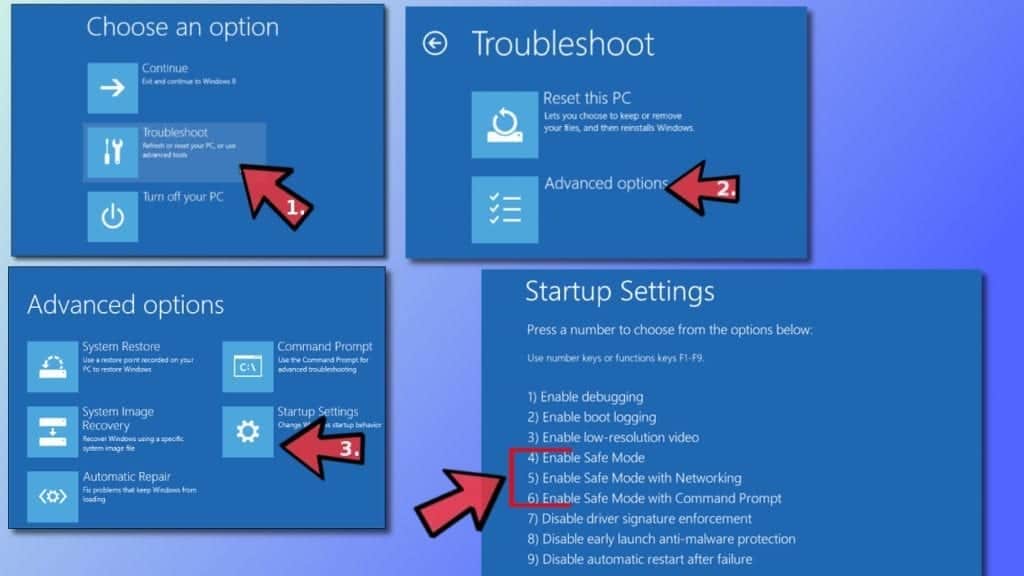
To access Safe Mode in Windows 11, follow the steps below.
- Press the Windows key, type Change advanced startup options, and then press Enter.
- In the Recovery options section, click the Restart now button for the Advanced startup option.
- Click Restart now in the pop-up window.
- After a moment, you will see a menu with four options. Select the Troubleshoot option.
- On the next screen, select Advanced options.
- On the next screen, select Startup Settings.
- Click the Restart button on the following screen.
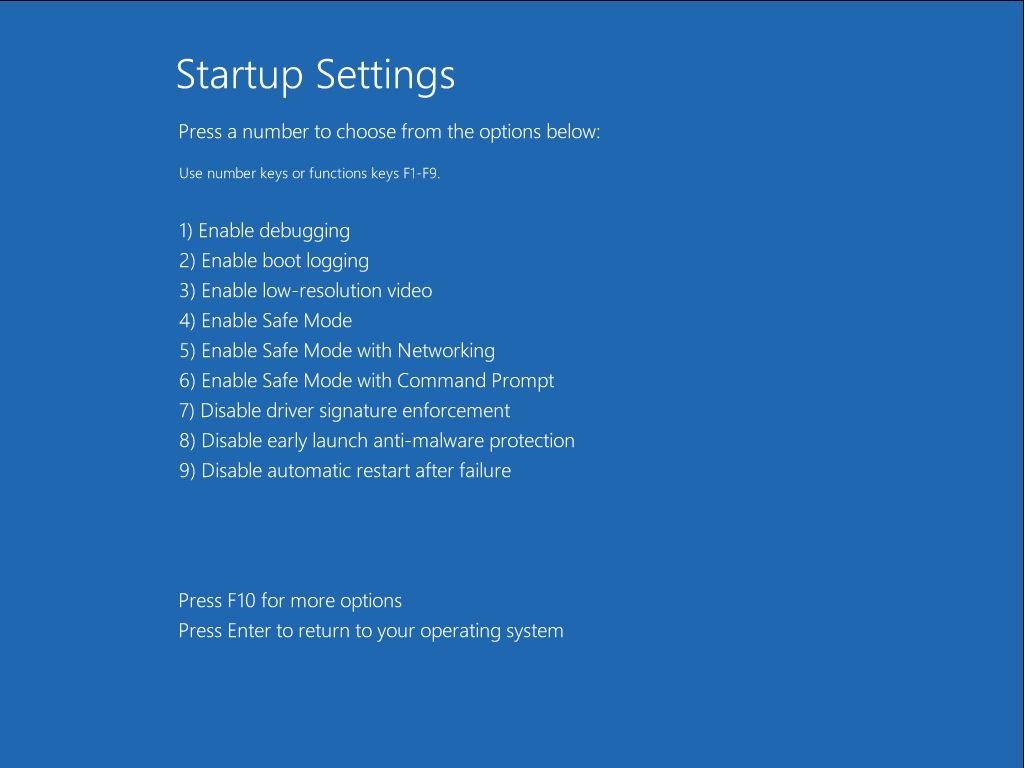
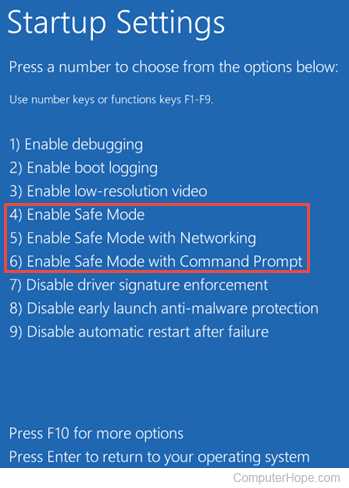
- A screen like the one pictured should appear. Select the appropriate Safe Mode option by pressing the corresponding number on your keyboard.
Alternative method
- Press Windows key and R together to access the Run option.
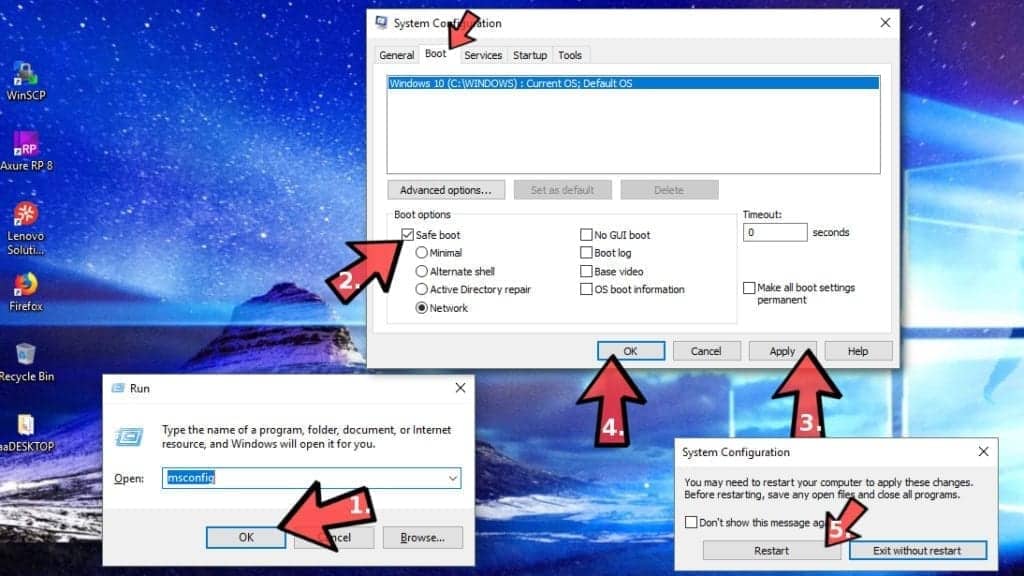
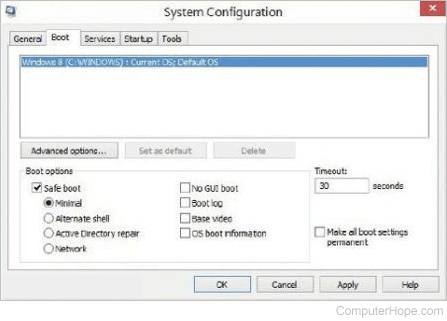
- Type msconfig in the Open: field.
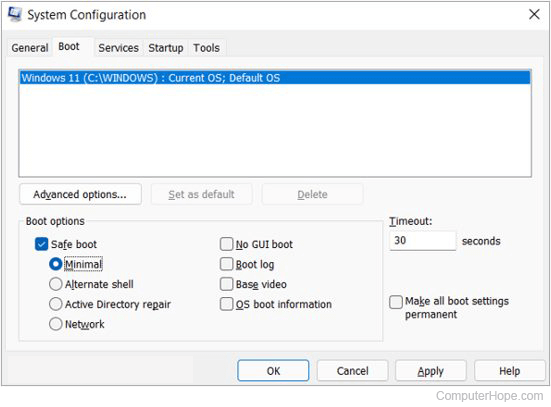
- In the System Configuration window, click the Boot tab.
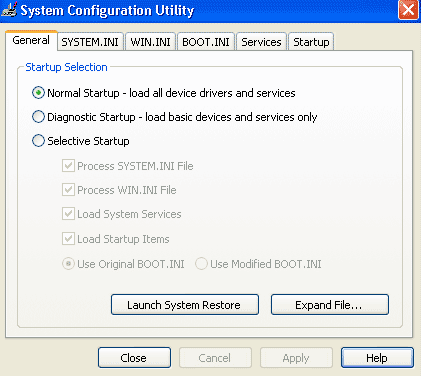
- On the bottom-left side, in the Boot options section, check the box for Safe boot.
- Select the Minimal option, click Apply, and then click OK.
- Restart the computer, and it should load to Safe Mode.
Note
If you use the option above to access Safe Mode, you need to follow the same steps and uncheck the Safe boot option when you’re done. Otherwise, your computer continues to boot to Safe Mode each time you restart it automatically.
Windows 10
To access Safe Mode in Windows 10, follow the steps below.
- Press the Windows key, type Change advanced startup options, and then press Enter.
- Under the Recovery tab, select the Restart now option under Advanced startup.
- After a moment, you see a menu with three options. Select the Troubleshoot option.
- Select Advanced options, Startup Settings, and then the Restart button.
- A screen like the one pictured should appear. Select the appropriate Safe Mode option by pressing the corresponding number on your keyboard.
Alternative method
- Press the Windows key and R together to access the Run option.
- Type msconfig in the Open: field.
- In the System Configuration window, click the Boot tab.
- On the bottom-left side, in the Boot options section, check the box for Safe boot.
- Select the Minimal option, click Apply, and then click OK.
- Restart the computer, and it should load to Safe Mode.
Note
If you use the option above to access Safe Mode, you need to follow the same steps and uncheck the Safe boot option when you’re done. Otherwise, your computer continues to boot to Safe Mode each time you restart it automatically.
Windows 8
To access Safe Mode in Windows 8, follow the steps below.
- Press the Windows key, type Change advanced startup options, and then press Enter.
- Under the Recovery tab, select the Restart now option under Advanced startup.
- After a moment, a menu with three options; select Troubleshoot.
- Select Advanced options, Startup Settings, and then the Restart button.
- A screen like the one pictured should appear. Select the appropriate Safe Mode option by pressing the corresponding number on your keyboard.
Alternative method 1
Note
The following method does work if you have an SSD (solid-state drive). If you have an SSD, try the next section.
- When the computer is booting, press and hold Shift and tap the F8 key repeatedly until the Recovery screen appears.
- Click the See advanced repair options option on the Recovery screen.
- On the Choose an option screen, select the Troubleshoot option.
- Select Advanced options and then Windows Startup Settings.
- On the Windows Start Settings screen, click the Restart option.
Note
If you have trouble getting to the Recovery screen in step 1 above, you may have to try it several times, with several reboots of your computer.
The standard Choose Advanced Options screen should appear when the computer restarts, similar to the example below. Use your arrow keys to move to Safe Mode and press Enter.
Choose Advanced Options for: Microsoft Windows 8
(Use the arrow keys to highlight your choice.)
Repair Your Computer
Safe Mode
Safe Mode with Networking
Safe Mode with Command Prompt
Enable Boot Logging
Enable low-resolution video
Debugging Mode
Disable automatic restart on system failure
Disable Driver Signature Enforcement
Disable Early Launch Anti-Malware Driver
Start Windows Normally
Description: Start Windows with only the core drivers and services. Use
when you cannot boot after installing a new device or driver.
Alternative method 2
- Press the Windows key and R together to access the Run option.
- Type msconfig in the Open field.
- In the System Configuration window, click the Boot tab.
- On the bottom-left side, in the Boot options section, check the box for Safe boot.
- Select the Minimal option, click Apply, and then click OK.
- Restart the computer, and it should load to Safe Mode.
Note
If you use the option above to access Safe Mode, you need to follow the same steps and uncheck the Safe boot option when you’re done. Otherwise, your computer continues to boot to Safe Mode each time you restart it automatically.
Windows 7 and Windows Vista
To get into the Windows Vista and Windows 7 Safe Mode, as the computer is booting, press and hold the F8 key, which brings up the Choose Advanced Options screen shown below. Use your arrow keys to move, highlight Safe Mode, and press your Enter key.
Note
On some computers, if you press and hold a key as the computer is booting, a stuck key message occurs. If this occurs, continuously tap F8 upon startup rather than holding it.
Trouble Getting into Safe Mode — If, after several attempts, you cannot get the Windows Advanced Options Menu screen to come up by pressing F8, turn off your computer while it is loading into Windows. When the computer is turned on the next time, Windows notices the computer did not successfully boot and displays the Safe Mode screen below.
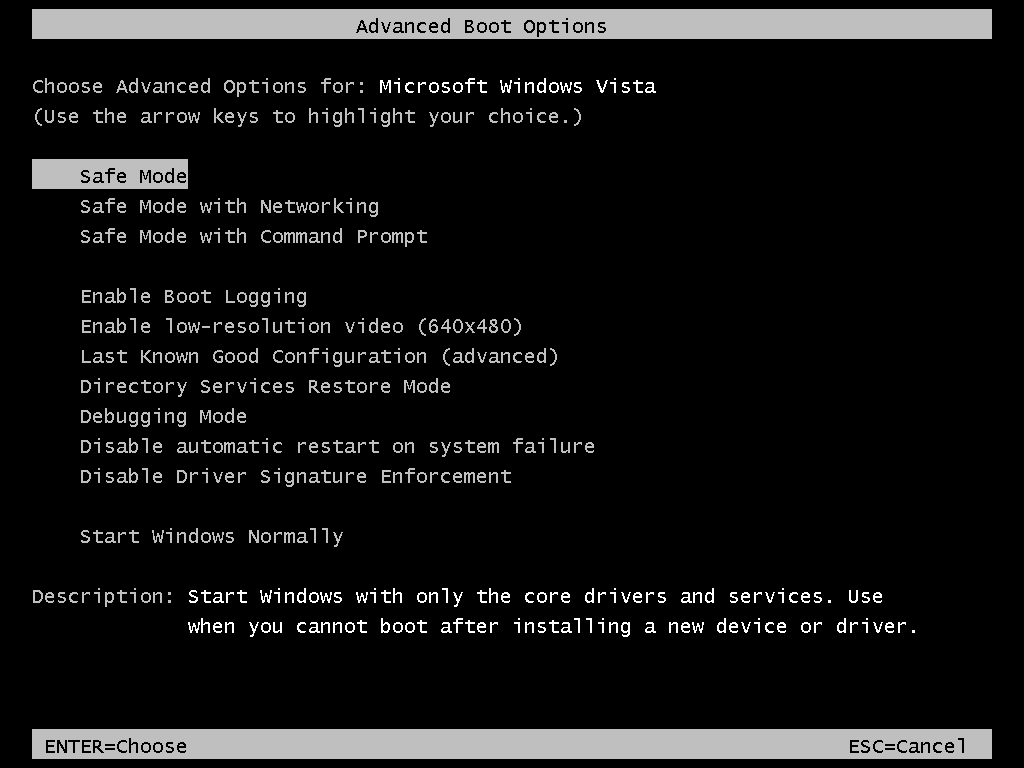
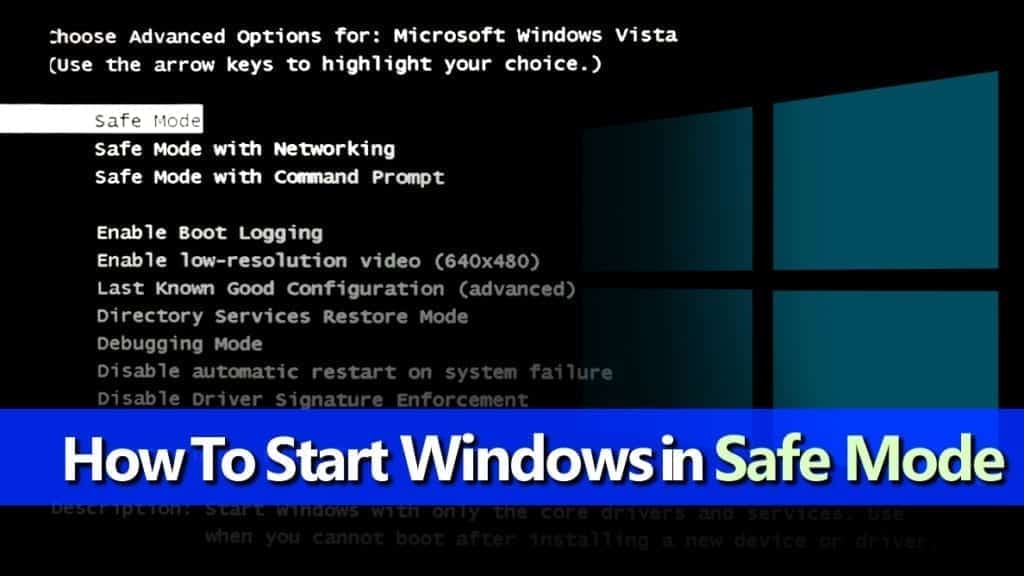
Choose Advanced Options for: Microsoft Windows Vista
Please select an option:
Safe Mode
Safe Mode with Networking
Safe Mode with Command Prompt
Enable Boot Logging
Enable low-resolution video (640x480)
Last Known Good Configuration (advanced)
Directory Services Restore Mode
Debugging Mode
Disable automatic restart on system failure
Disable Driver Signature Enforcement
Start Windows Normally
Description: Start Windows with only the core drivers and services. Use
when you cannot boot after installing a new device or driver.
Once you’re done in Safe Mode, restart the computer to get back into normal Windows. See the below how to get out of Safe Mode if you have further questions.
Alternative method
- Press the Windows key and R together to access the Run option.
- Type msconfig in the Open field.
- In the System Configuration window, click the Boot tab.
- On the bottom-left side, in the Boot options section, check the box for Safe boot.
- Select the Minimal option, click Apply, and then click OK.
- Restart the computer, and it should load to Safe Mode.

Note
If you use the option above to access Safe Mode, you need to follow the same steps and uncheck the Safe boot option when you’re done. Otherwise, your computer continues to boot to Safe Mode each time you restart it automatically.
Windows XP and Windows 2000
To get to the Windows 2000 and XP Safe Mode, as the computer is booting, press and hold F8, which brings up the Windows Advanced Options Menu screen shown below. Use your arrow keys to move to highlight the Safe Mode option and press your Enter key.
Note
On some computers, if you press and hold a key as the computer is booting, a stuck key message occurs. If this occurs, continuously tap F8 upon startup rather than holding it.
Trouble Getting into Windows 2000 or Windows XP Safe Mode — If, after several attempts, you cannot get the Windows Advanced Options Menu screen to come up by pressing F8, turn off your computer while it is loading into Windows. When the computer is turned on the next time, Windows should notice that the computer did not successfully boot and give you the Safe Mode screen.
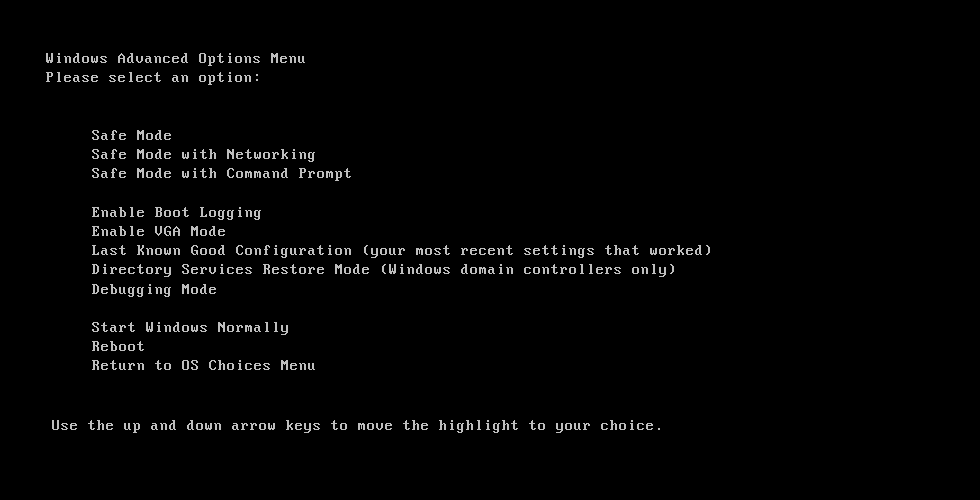
Windows Advanced Options Menu
Please select an option:
Safe Mode
Safe Mode with Networking
Safe Mode with Command Prompt
Enable Boot Logging
Enable VGA mode
Last Known Good Configuration (your most recent settings that worked)
Directory Services Restore Mode (Windows domain controllers only)
Debugging Mode
Start Windows Normally
Reboot
Return to OS Choices Menu
Use the up and down arrow keys to move the highlight to your choice.
Once you’re done in Safe Mode, restart the computer to get back into normal Windows. See the below how to get out of Safe Mode if you have further questions.
Windows 98 and Windows ME
To get into Windows 98 and ME Safe Mode, press and hold either the F8 or Ctrl key as the computer is booting up. If done correctly, a «Windows 98 Startup Menu» or «Windows ME Startup Menu» screen, similar to the example below, should appear. In this menu, choose option 3 by pressing 3 and then press Enter.
Note
On some computers, if you press and hold a key as the computer is booting, a stuck key message occurs. If this occurs, continuously tap F8 on startup rather than holding it.
Microsoft Windows 98 Startup Menu
=============================
1. Normal
2. Logged (BOOTLOG.TXT)
3. Safe mode
4. Step-by-step confirmation
5. Command prompt only
6. Safe mode command prompt only
Enter a choice: 1
F5=Safe Mode Shift+F5=Command prompt Shift+F8= Step-by-step confirmation [N]
Once you’re done in Safe Mode, restart the computer to get back to normal Windows. See the below how to get out of Safe Mode if you have further questions.
Windows 95
To get to Windows 95 Safe Mode, as the computer is booting, when you either hear a beep or when you see the message «Starting Windows 95.» Press F8 on the top of your keyboard. The «Windows 95 Startup Menu» screen, similar to the example below, should appear if done correctly. In this menu, choose option 3 by pressing 3 and then press Enter.
Microsoft Windows 95 Startup Menu
=============================
1. Normal
2. Logged (BOOTLOG.TXT)
3. Safe mode
4. Step-by-step confirmation
5. Command prompt only
6. Safe mode command prompt only
Enter a choice: 1
F5=Safe Mode Shift+F5=Command prompt Shift+F8= Step-by-step confirmation [N]
Once you’re done in Safe Mode, restart the computer to get back to normal Windows. See the below how to get out of Safe Mode if you have further questions.
Windows Command Prompt
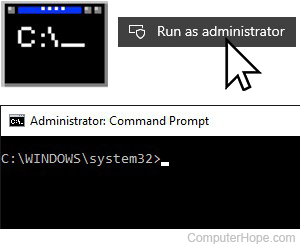
Window users can enable Safe Mode through an elevated version of the Command Prompt.
- Press the Windows key and type Command Prompt (A).
- In the search results on the left, use the arrow keys to highlight the Command Prompt program (B).
- On the right side of the window, click Run as administrator (C).
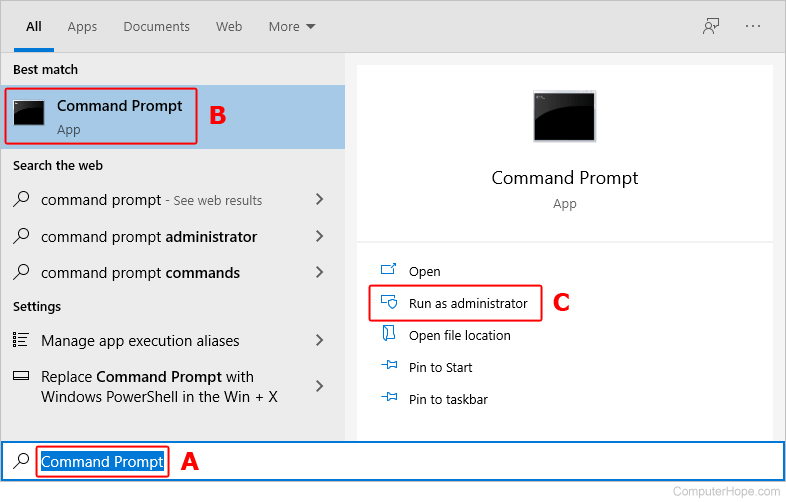
- Click the Yes button on the prompt that appears.
- Enter the following command:
bcdedit /set {current} safeboot minimal
- Your computer is now set to boot into Safe Mode.
- Restart Windows or enter the following command to restart from Command Prompt.
shutdown /r
Note
To access the Internet or troubleshoot network issues, enter Safe Mode with networking capabilities by typing bcdedit /set {current} safeboot network instead of the command mentioned above.
macOS
- Turn on or restart your Mac.
- Press and hold Shift while your computer boots.
- When you see the login window, release Shift.
- Log in to your Mac.
- You should see «Safe Boot» in the upper-right corner of the screen.
Note
You might have to log in a second time.
How to get out of Safe Mode
To get out of Safe Mode on Windows or macOS, restart the computer.
- How to restart Microsoft Windows.
- How to restart a Mac.
Note
Many users believe they are still in Safe Mode because the colors or video may not look correct. Unless it says «Safe Mode» in the corners of the screen, you are not in Safe Mode. If your colors are distorted, or you have video problems, see: How to view or change the screen resolution of a monitor.
What if I can’t get out of Safe Mode?
If you reboot the computer and it’s still in Safe Mode, you may need to disable the feature manually.
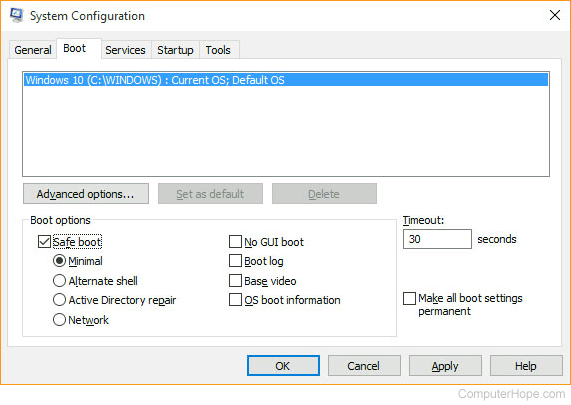
- Press the Windows key, type msconfig, and then press Enter.
- In the window that appears, click the Boot tab (A).
- In the Boot options section, uncheck the box next to Safe boot (B).
- Click Apply (C), then OK (D).
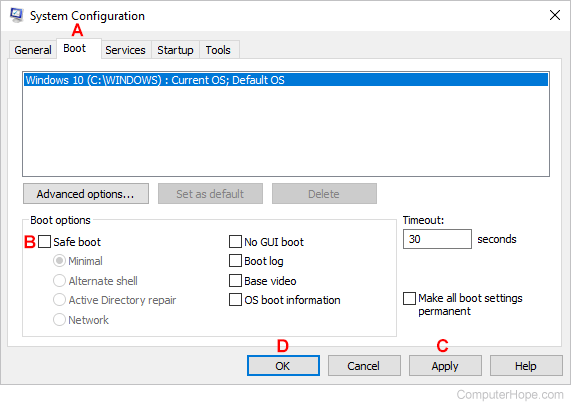
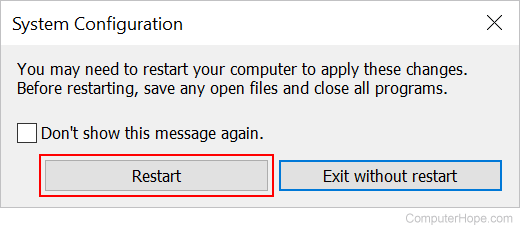
- If prompted, click the Restart button. Otherwise, restart the computer manually.
What if I still can’t get out of Safe Mode?
If you’re still unable to get the computer out of Safe Mode, another problem exists with Windows, preventing it from loading normally. We recommend you see the basic troubleshooting section for ideas to resolve your issue.
Which Safe Mode option should I choose?
Users running later versions of Windows get different options for different versions of Safe Mode. For example, you may have options for «Safe Mode,» «Safe Mode with Networking,» and «Safe Mode with Command Prompt.» Below is a brief description of each of these different modes.
Safe Mode
The basic Safe Mode option is usually what most users want to choose when troubleshooting their computers. The only downside is that this option has no additional support.
Safe Mode with Networking
Users who need access to the Internet or the network while in Safe Mode should select this option. This mode is helpful when you need to access the Internet while in Safe Mode to get updates, drivers, or other files to help troubleshoot your issue.
Safe Mode with Command Prompt
This version of Safe Mode gives you access to the command line (MS-DOS prompt).