Аннотация
При попытке доступа к файлам и папкам в Windows или работе с ними могут возникать такие проблемы:
-
Проблема 1. Вы получаете сообщение об ошибке «Отказано в доступе» или аналогичное.
-
Проблема 2. Невозможно получить доступ к файлам и папкам, изменить, сохранить или удалить их.
-
Проблема 3. Невозможно открыть файл или папку после установки новой версии Windows.
Способ
Чтобы решить конкретную проблему, выберите наиболее подходящее к вашей ситуации описание и выполните указанные действия. Используйте метод, соответствующий вашей версии Windows.
Примечание. При подобных проблемах не всегда появляется сообщение об ошибке «Отказано в доступе». Если устранить проблему не удается, попробуйте другие предлагаемые действия.
Причина
Сообщение об ошибке «Отказано в доступе» может появляться по одной или нескольким из следующих причин:
-
Изменился владелец папки.
-
У вас нет необходимых разрешений.
-
Файл зашифрован.
Решение
Windows 8
Возможно, вы не являетесь владельцем файла или папки.
Если вы недавно обновили систему до Windows 8, могли измениться некоторые сведения о вашей учетной записи. Поэтому вы можете больше не быть владельцем некоторых файлов или папок. Эту проблему можно устранить, снова став владельцем файлов и папок.
Чтобы стать владельцем файла или папки, выполните указанные ниже действия.
-
Нажмите и удерживайте папку, владельцем которой вы хотите стать, и выберите пункт Свойства. (Если вы используете мышь, щелкните папку правой кнопкой и выберите пункт Свойства.)
-
Откройте вкладку Безопасность, нажмите кнопку Дополнительно и выберите пункт Изменить. При получении запроса на ввод пароля администратора или подтверждение введите пароль или подтвердите действие.
-
Введите имя пользователя, которому нужно предоставить права владельца, и выберите элемент Проверить имена.
Примечание. Появится имя учетной записи лица, которому вы предоставляете права владельца.
-
Нажмите кнопку ОК.
-
Если необходимо, чтобы этот пользователь также стал владельцем файлов и вложенных папок в этой папке, установите флажок Заменить владельца подконтейнеров и объектов.
-
Нажмите кнопку ОК.
Возможно, у вас нет необходимых разрешений.
Проблемы при доступе к файлам и папкам могут быть связаны с разрешениями. Разрешения — это правила, которые определяют, может ли пользователь получать доступ к файлам и папкам или изменять их. Чтобы проверить разрешения на файл или папку:
-
Нажмите и удерживайте (или щелкните правой кнопкой мыши) файл или папку, а затем выберите пункт Свойства.
-
Откройте вкладку Безопасность.
-
В разделе Группы или пользователи выберите свое имя, чтобы увидеть имеющиеся у вас разрешения.
Для открытия файла необходимо разрешение на чтение. Чтобы изменить разрешения на файл или папку, выполните указанные ниже действия.
Важно! Чтобы изменить разрешения на файлы и папки, необходимо войти в систему с правами администратора.
-
Нажмите и удерживайте (или щелкните правой кнопкой мыши) файл или папку, а затем выберите пункт Свойства.
-
Откройте вкладку Безопасность.
-
В разделе Группы или пользователи выберите свое имя, чтобы увидеть имеющиеся у вас разрешения.
-
Нажмите кнопку Изменить, выберите свое имя, установите флажки для нужных разрешений и нажмите кнопку ОК.
Файл или папка могут быть зашифрованы.
Шифрование позволяет защитить файлы и папки от нежелательного доступа. Открыть зашифрованный файл или папку без сертификата, который использовался для шифрования, невозможно. Чтобы увидеть, зашифрованы ли файл или папка:
-
Нажмите и удерживайте (или щелкните правой кнопкой мыши) файл или папку, а затем выберите пункт Свойства.
-
Перейдите на вкладку Общие и нажмите кнопку Дополнительно.
Если установлен флажок Шифровать содержимое для защиты данных, для открытия файла или папки потребуется сертификат, который использовался для их шифрования. В этом случае следует получить этот сертификат у пользователя, который создал или зашифровал файл или папку, либо попросить его расшифровать их.
Windows 7
Возможно, вы не являетесь владельцем файла или папки.
Если вы недавно обновили систему до Windows 7, могли измениться некоторые сведения о вашей учетной записи. Поэтому вы можете больше не быть владельцем некоторых файлов или папок. Эту проблему можно устранить, снова став владельцем файлов и папок.
Чтобы стать владельцем файла или папки:
-
Щелкните правой кнопкой мыши значок папки, владельцем которой вы хотите стать, и выберите пункт Свойства.
-
Откройте вкладку Безопасность, нажмите кнопку Дополнительно и выберите вкладку Владелец.
-
Нажмите кнопку Изменить.
Примечание. При получении запроса на ввод пароля администратора или подтверждения введите пароль или подтвердите действие.
-
Выберите имя лица, которому требуется предоставить права владельца.
-
Если необходимо, чтобы этот пользователь также стал владельцем файлов и вложенных папок в этой папке, установите флажок Заменить владельца подконтейнеров и объектов.
-
Нажмите кнопку ОК.
Возможно, у вас нет необходимых разрешений.
Проблемы при доступе к файлам и папкам могут быть связаны с разрешениями. Разрешения — это правила, которые определяют, может ли пользователь получать доступ к файлам и папкам или изменять их. Чтобы установить разрешения файла или папки, выполните указанные ниже действия.
-
Щелкните файл или папку правой кнопкой мыши и выберите пункт Свойства.
-
Откройте вкладку Безопасность.
-
В разделе Группы или пользователи выберите свое имя, чтобы увидеть имеющиеся у вас разрешения.
Для открытия файла необходимо разрешение на чтение. Чтобы изменить разрешения на файл или папку, выполните указанные ниже действия.
Важно! Чтобы изменить разрешения на файлы и папки, необходимо войти в систему с правами администратора.
-
Щелкните файл или папку правой кнопкой мыши и выберите пункт Свойства.
-
Откройте вкладку Безопасность.
-
В разделе Группы или пользователи выберите свое имя, чтобы увидеть имеющиеся у вас разрешения.
-
Нажмите кнопку Изменить, выберите свое имя, установите флажки для нужных разрешений и нажмите кнопку ОК.
Дополнительные сведения о разрешениях см. в статье Что такое разрешения?.
Файл или папка могут быть зашифрованы.
Шифрование позволяет защитить файлы и папки от нежелательного доступа. Открыть зашифрованный файл или папку без сертификата, который использовался для шифрования, невозможно. Чтобы увидеть, зашифрованы ли файл или папка:
-
Щелкните файл или папку правой кнопкой мыши и выберите пункт Свойства.
-
Откройте вкладку Общие и нажмите кнопку Дополнительно.
Если установлен флажок Шифровать содержимое для защиты данных, для открытия файла или папки потребуется сертификат, который использовался для их шифрования.
Этот сертификат следует получить у пользователя, который создал или зашифровал файл или папку, либо попросить его расшифровать их.
Дополнительные сведения см. в статье Импорт и экспорт сертификатов и закрытых ключей.
Причина
Проблемы с доступом к файлам и папкам и при работе с ними могут возникать по одной или нескольким из следующих причин:
-
Изменился владелец папки.
-
У вас нет необходимых разрешений.
-
Файл зашифрован.
-
Файл поврежден.
-
Профиль пользователя поврежден.
Решение
Windows 8
Возможно, вы не являетесь владельцем файла или папки.
Если вы недавно обновили систему до Windows 8, могли измениться некоторые сведения о вашей учетной записи. Поэтому вы можете больше не быть владельцем некоторых файлов или папок. Эту проблему можно устранить, снова став владельцем файлов и папок.
Чтобы стать владельцем файла или папки, выполните указанные ниже действия.
-
Нажмите и удерживайте папку, владельцем которой вы хотите стать, и выберите пункт Свойства. (Если вы используете мышь, щелкните папку правой кнопкой и выберите пункт Свойства.)
-
Откройте вкладку Безопасность, нажмите кнопку Дополнительно и выберите пункт Изменить. При получении запроса на ввод пароля администратора или подтверждение введите пароль или подтвердите действие.
-
Введите имя пользователя, которому нужно предоставить права владельца, и выберите элемент Проверить имена.
Примечание. Появится имя учетной записи лица, которому вы предоставляете права владельца.
-
Нажмите кнопку ОК.
-
Если необходимо, чтобы этот пользователь также стал владельцем файлов и вложенных папок в этой папке, установите флажок Заменить владельца подконтейнеров и объектов.
-
Нажмите кнопку ОК.
Возможно, у вас нет необходимых разрешений.
Проблемы при доступе к файлам и папкам могут быть связаны с разрешениями. Разрешения — это правила, которые определяют, может ли пользователь получать доступ к файлам и папкам или изменять их. Чтобы проверить разрешения на файл или папку:
-
Нажмите и удерживайте (или щелкните правой кнопкой мыши) файл или папку, а затем выберите пункт Свойства.
-
Откройте вкладку Безопасность.
-
В разделе Группы или пользователи выберите свое имя, чтобы увидеть имеющиеся у вас разрешения.
Для открытия файла необходимо разрешение на чтение. Чтобы изменить разрешения на файл или папку, выполните указанные ниже действия.
Важно! Чтобы изменить разрешения на файлы и папки, необходимо войти в систему с правами администратора.
-
Нажмите и удерживайте (или щелкните правой кнопкой мыши) файл или папку, а затем выберите пункт Свойства.
-
Откройте вкладку Безопасность.
-
В разделе Группы или пользователи выберите свое имя, чтобы увидеть имеющиеся у вас разрешения.
-
Нажмите кнопку Изменить, выберите свое имя, установите флажки для нужных разрешений и нажмите кнопку ОК.
Дополнительные сведения о разрешениях см. в статье Что такое разрешения?.
Файл или папка могут быть зашифрованы.
Шифрование позволяет защитить файлы и папки от нежелательного доступа. Открыть зашифрованный файл или папку без сертификата, который использовался для шифрования, невозможно. Чтобы увидеть, зашифрованы ли файл или папка:
-
Нажмите и удерживайте (или щелкните правой кнопкой мыши) файл или папку, а затем выберите пункт Свойства.
-
Перейдите на вкладку Общие и нажмите кнопку Дополнительно.
Если установлен флажок Шифровать содержимое для защиты данных, для открытия файла или папки потребуется сертификат, который использовался для их шифрования. В этом случае следует получить этот сертификат у пользователя, который создал или зашифровал файл или папку, либо попросить его расшифровать их.
Файл или папка могут быть повреждены
Файлы могут оказаться поврежденными по разным причинам. Наиболее часто это случается, когда при открытом файле происходит сбой компьютера или пропадает питание. Большинство поврежденных файлов невозможно восстановить. В таком случае необходимо удалить файл или восстановить его из резервной копии.
Дополнительные сведения о поврежденных файлах и способах их восстановления см. в статье Поврежденные файлы: вопросы и ответы.
Ваш локальный профиль пользователя может быть поврежден.
Иногда Windows может неправильно читать данные локального профиля пользователя. Это может заблокировать доступ к файлам и папкам. В таком случае может потребоваться новый локальный профиль пользователя. Для его создания сначала создайте учетную запись локального пользователя. При создании учетной записи также создается и профиль. Чтобы создать учетную запись локального пользователя:
-
Проведите пальцем от правого края экрана, нажмите Параметры и выберите Изменение параметров компьютера. (Если вы используете мышь, наведите указатель на правый верхний угол экрана, переместите его вниз, нажмите Параметры, а затем Изменение параметров компьютера.)
-
В области навигации выберите элемент Пользователи.
-
Выберите команду Добавить пользователя, а затем выберите пункт Возможен ли вход без учетной записи Майкрософт?
-
Выберите элемент Локальная учетная запись.
-
Введите имя новой учетной записи.
-
Если вы хотите использовать пароль, введите и подтвердите его. Если вы решили не использовать пароль, не вводите его и нажмите кнопку Далее.
-
Нажмите кнопку Готово.
Windows 7
Возможно, вы не являетесь владельцем файла или папки.
Если вы недавно обновили систему до Windows 7, могли измениться некоторые сведения о вашей учетной записи. Поэтому вы можете больше не быть владельцем некоторых файлов или папок. Эту проблему можно устранить, снова став владельцем файлов и папок.
Чтобы стать владельцем файла или папки:
-
Щелкните правой кнопкой мыши значок папки, владельцем которой вы хотите стать, и выберите команду Свойства.
-
Откройте вкладку Безопасность, нажмите кнопку Дополнительно и выберите вкладку Владелец.
-
Нажмите кнопку Изменить. При получении запроса на ввод пароля администратора или подтверждение введите пароль или подтвердите действие.
-
Выберите имя лица, которому требуется предоставить права владельца.
-
Если необходимо, чтобы этот пользователь также стал владельцем файлов и вложенных папок в этой папке, установите флажок Заменить владельца подконтейнеров и объектов.
-
Нажмите кнопку ОК.
Возможно, у вас нет необходимых разрешений.
Проблемы при доступе к файлам и папкам могут быть связаны с разрешениями. Разрешения — это правила, которые определяют, может ли пользователь получать доступ к файлам и папкам или изменять их. Чтобы проверить разрешения на файл или папку:
-
Нажмите и удерживайте (или щелкните правой кнопкой мыши) файл или папку, а затем выберите пункт Свойства.
-
Откройте вкладку Безопасность.
-
В разделе Группы или пользователи выберите свое имя, чтобы увидеть имеющиеся у вас разрешения.
Для открытия файла необходимо разрешение на чтение. Чтобы изменить разрешения на файл или папку, выполните указанные ниже действия.
Важно! Чтобы изменить разрешения на файлы и папки, необходимо войти в систему с правами администратора.
-
Щелкните файл или папку правой кнопкой мыши и выберите пункт Свойства.
-
Откройте вкладку Безопасность.
-
В разделе Группы или пользователи выберите свое имя, чтобы увидеть имеющиеся у вас разрешения.
-
Нажмите кнопку Изменить, выберите свое имя, установите флажки для нужных разрешений и нажмите кнопку ОК.
Дополнительные сведения о разрешениях см. в статье Что такое разрешения?.
Файл или папка могут быть зашифрованы.
Шифрование позволяет защитить файлы и папки от нежелательного доступа. Открыть зашифрованный файл или папку без сертификата, который использовался для шифрования, невозможно. Чтобы увидеть, зашифрованы ли файл или папка:
-
Щелкните файл правой кнопкой мыши и выберите пункт Свойства.
-
Откройте вкладку Общие и нажмите кнопку Дополнительно.
Если установлен флажок Шифровать содержимое для защиты данных, для открытия файла или папки потребуется сертификат, который использовался для их шифрования.
Этот сертификат следует получить у пользователя, создавшего файл. Дополнительные сведения см. в статье Импорт и экспорт сертификатов и закрытых ключей.
Файл или папка могут быть повреждены
Файлы могут оказаться поврежденными по разным причинам. Наиболее часто это случается, когда при открытом файле происходит сбой компьютера или пропадает питание. Большинство поврежденных файлов невозможно восстановить. В таком случае необходимо удалить файл или восстановить его из резервной копии.
Дополнительные сведения о поврежденных файлах и способах их восстановления см. в статье Поврежденные файлы: вопросы и ответы.
Ваш профиль пользователя может быть поврежден.
Иногда Windows может неправильно читать данные локального профиля пользователя. Это может заблокировать доступ к файлам и папкам. В таком случае может потребоваться новый локальный профиль пользователя. Для его создания сначала создайте учетную запись локального пользователя. При создании учетной записи также создается и профиль.
Дополнительные сведения о создании профилей пользователя см. в статье Восстановление поврежденного профиля пользователя. После того как профиль пользователя создан, можно скопировать в него существующие файлы, чтобы иметь к ним доступ.
Причина
Проблемы с доступом к файлам и папкам после обновления версии Windows могут возникать по одной или нескольким из следующих причин:
-
Изменился владелец папки.
-
Файлы из предыдущей системы сохранены в папку Windows.old.
Решение
Windows 8
Возможно, вы не являетесь владельцем файла или папки.
Если вы недавно обновили систему до Windows 8, могли измениться некоторые сведения о вашей учетной записи. Поэтому вы можете больше не быть владельцем некоторых файлов и папок. Эту проблему можно устранить, снова став владельцем файлов и папок.
Чтобы стать владельцем файла или папки:
-
Нажмите и удерживайте папку, владельцем которой вы хотите стать, и выберите пункт Свойства. (Если вы используете мышь, щелкните папку правой кнопкой и выберите пункт Свойства.)
-
Откройте вкладку Безопасность, нажмите кнопку Дополнительно и выберите пункт Изменить. При получении запроса на ввод пароля администратора или подтверждение введите пароль или подтвердите действие.
-
Введите имя пользователя, которому нужно предоставить права владельца, и выберите элемент Проверить имена.
Примечание. Появится имя учетной записи лица, которому вы предоставляете права владельца.
-
Нажмите кнопку ОК.
-
Если необходимо, чтобы этот пользователь также стал владельцем файлов и вложенных папок в этой папке, установите флажок Заменить владельца подконтейнеров и объектов.
-
Нажмите кнопку ОК.
Вам нужно восстановить файлы из папки Windows.old.
Если вы недавно обновили систему до Windows 8 и не переформатировали жесткий диск, старые файлы могут быть доступны в папке Windows.old.
Чтобы устранить эту проблему автоматически, щелкните ссылку или нажмите кнопку Исправить. Затем в диалоговом окне Загрузка файла нажмите кнопку Выполнить и следуйте инструкциям мастера устранения проблем. Чтобы устранить проблему самостоятельно, перейдите к разделу «Самостоятельное решение проблемы».
Получить помощь в решении проблемы
Примечания.
-
Мастер может быть доступен только на английском языке. Однако автоматическое исправление подходит для версий Windows на всех языках.
-
Если вы используете не тот компьютер, на котором возникла проблема, сохраните решение для исправления на устройство флэш-памяти или компакт-диск и запустите его на нужном компьютере.
Самостоятельное решение проблемы
Чтобы извлечь файлы вручную:
-
Откройте рабочий стол, коснитесь значка папки и нажмите Компьютер. Или нажмите клавиши WINDOWS+Е.
-
Дважды коснитесь диска, на котором установлена ОС Windows (обычно это диск С), или дважды щелкните его.
-
Дважды коснитесь папки Windows.old или дважды щелкните ее.
-
Дважды коснитесь папки «Пользователи» или дважды щелкните ее.
-
Дважды коснитесь имени пользователя или дважды щелкните его.
-
Откройте папки с файлами, которые требуется извлечь. Например, чтобы извлечь файлы из папки «Документы», дважды коснитесь папки Документы или дважды щелкните ее.
-
Скопируйте нужные файлы из каждой папки и вставьте их в папку в Windows 8. Например, если необходимо извлечь все содержимое папки «Документы», находящейся в папке Windows.old, скопируйте все файлы из этой папки и вставьте их в библиотеку документов в Windows 8.
-
Повторите действия с 5-го по 7-е для каждой учетной записи пользователя на компьютере.
Дополнительные сведения о восстановлении данных из предыдущих версий Windows см. в статье Восстановление потерянных или удаленных файлов.
Windows 7
Возможно, вы не являетесь владельцем файла или папки.
Если вы недавно обновили систему до Windows 7, могли измениться некоторые сведения о вашей учетной записи. Поэтому вы можете больше не быть владельцем некоторых файлов и папок. Эту проблему можно устранить, снова став владельцем файлов и папок.
Чтобы стать владельцем файла или папки:
-
Щелкните правой кнопкой мыши значок папки, владельцем которой вы хотите стать, и выберите команду Свойства.
-
Откройте вкладку Безопасность, нажмите кнопку Дополнительно и выберите вкладку Владелец.
-
Нажмите кнопку Изменить. При получении запроса на ввод пароля администратора или подтверждение введите пароль или подтвердите действие.
-
Выберите имя лица, которому требуется предоставить права владельца.
-
Если необходимо, чтобы этот пользователь также стал владельцем файлов и вложенных папок в этой папке, установите флажок Заменить владельца подконтейнеров и объектов.
-
Нажмите кнопку ОК.
Возможно, вам потребуется восстановить файлы из папки Windows.old.
Если вы недавно обновили систему до Windows 7 и не переформатировали жесткий диск, старые файлы могут быть доступны в папке Windows.old.
Чтобы устранить эту проблему автоматически, щелкните ссылку или нажмите кнопку Исправить. В диалоговом окне Загрузка файла нажмите кнопку Выполнить и следуйте инструкциям мастера устранения проблем. Если вы предпочитаете решить проблему самостоятельно, перейдите к разделу «Самостоятельное решение проблемы».
Получить помощь в решении проблемы
Примечания.
-
Мастер может быть доступен только на английском языке. Однако автоматическое исправление подходит для версий Windows на всех языках.
-
Если вы используете не тот компьютер, на котором возникла проблема, сохраните решение для исправления на устройство флэш-памяти или компакт-диск и запустите его на нужном компьютере.
Самостоятельное решение проблемы
Чтобы извлечь файлы вручную:
-
Нажмите кнопку Пуск и выберите пункт Компьютер.
-
Дважды щелкните диск, на котором установлена ОС Windows (обычно это диск C).
-
Дважды щелкните папку Windows.old.
-
Дважды щелкните папку «Пользователи».
-
Дважды щелкните имя пользователя.
-
Откройте папки с файлами, которые требуется извлечь. Например, чтобы извлечь файлы из папки «Документы», дважды щелкните папку Документы.
-
Скопируйте нужные файлы из каждой папки и вставьте их в папку в Windows 7. Например, если необходимо извлечь все содержимое папки «Документы», находящейся в папке Windows.old, скопируйте все файлы из этой папки и вставьте их в библиотеку документов в Windows 7.
-
Повторите действия с 5-го по 7-е для каждой учетной записи пользователя на компьютере.
Дополнительные сведения о восстановлении данных из предыдущих версий Windows см. в статье Восстановление потерянных или удаленных файлов.
- Remove From My Forums
-
Question
-
After upgrading a computer to ver 1809 build 17763.316 I cannot connect from other computers on the same network via Windows Explorer. Troubleshooting did not find a solution. I followed the steps outlined at
answers.microsoft.com.
I followed the 3 methods without result. At Method 2 I received the following errors:
- cannot start the Peer Name Resolution Protocol service on Local Computer Error 0x80630203 Unable to access a key.
- cannot start the Peer Networking Grouping service n Local Computer Error 1068 The dependency service or group failed to start.
All other services a running.
At Method 3 the SMB 1.0/CIFS FIle Sharing support only Client is ON, the others are off. I switched the Server to ON, but no result.
Can you help me to connect to this computer please.
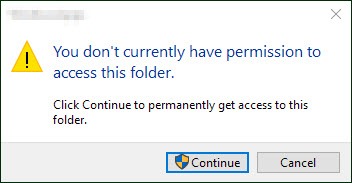
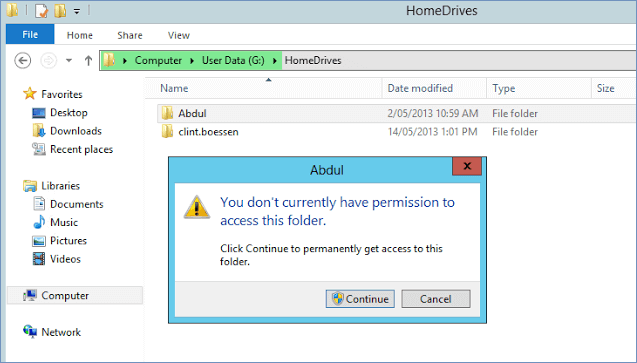
Many Windows users have reported that they have seen an error, saying “You don’t currently have permission to access this folder“. This usually occurs when they try to access a specific folder on their computer.
This is an annoying issue. You can’t open the folder — maybe there are important files or data in it. And you are probably trying hard to find out a solution to this problem.
But don’t worry. It is possible to fix this error. Here are a few things you can try:
Method 1: Gain permission to access the folder
Method 2: Recover your data from the folder
Method 1: Gain permission to access the folder
You can try claiming permission from your computer to access the file. To do so:
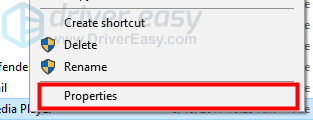
1) Right-click the problem folder and select Properties.
2) Click the Security tab, and then click Edit.
3) Click the Add button.
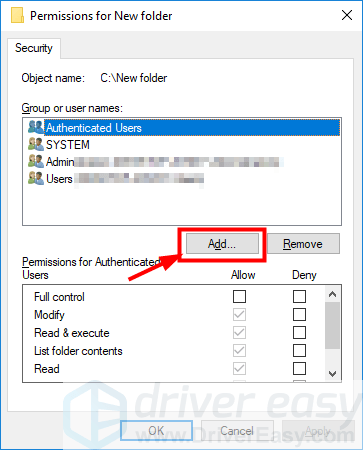
4) Type “Everyone” in the box under Enter the object name to select. Then click OK.
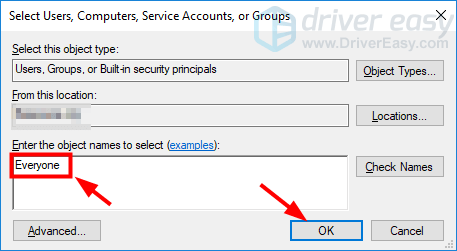
5) Click Everyone, then check the Allow box next to Full control. After that, click OK.
6) Click OK.
7) Try opening the folder. If this method works for you, you won’t see the error again.
Method 2: Recover your data from the folder
If you can’t get permission using the method above, you should use a data recovery tool to recover your data. Be careful about what tool you choose. It can’t help you retrieve your data if the tool isn’t powerful enough. Some programs, even worse, could damage your data because they are unreliable.
When you can’t access files saved in a folder, try any one of the 3 fixes listed below to bring your files back:
| Workable Solutions | Step-by-step Troubleshooting |
|---|---|
| Fix 1. Change Ownership (Recommend) | Right-click inaccessible folder > «Properties» > «Security» > «Advanced»…Full steps |
| Fix 2. Gain Access (Work in Rare Case) | Right-click inaccessible folder > «Properties» > «Security» > «Edit»…Full steps |
| Fix 3. Use File Recovery Software (Data Loss/Deleted) | Run a professional data recovery software > Scan folder > Recover files…Full steps |
«I’m having trouble accessing my files on my USB flash drive. Whenever I try to open the folder, it gives me an error message saying that ‘You don’t currently have permission to access this folder’. Is there any way to fix the issue? I need to view the files in that folder.»
Quickly access the best solution to remove the folder access error:
Reasons for «You Don’t Currently Have Permission to Access This Folder»
While attempting to save a file in a folder or access a folder on a Windows 10 PC, you might get «You don’t currently have permission to access this folder, click Continue to permanently get access this folder» error. Several factors will lead to this error as listed below.
- Remove a user or group from «Group or user names» on the folder’s «Security» tab.
- Application of an explicit «Deny» to the user or group.
- The conflict between the share permissions and the New Technology File System (NTFS) permissions.
Fixes for «You Don’t Currently Have Permission to Access This Folder»
After figuring out the causes of the error, we will show you step-by-step guidelines on how to deal with ‘You don’t currently have permission to access this folder’ problem in Windows 10, 8, or 7 in three easy ways.
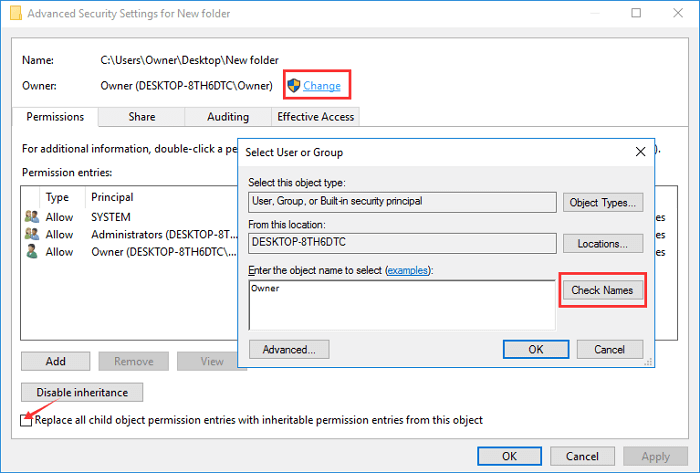
Solution 1. Change the Ownership of the File/Folder (Recommend)
You can also try to change the ownership of the file or folder to troubleshoot «You Don’t Currently Have Permission to Access This Folder» issue on Windows 10/8/7.
1. Right-click on the folder to navigate to «Properties».
2. Go to the «group or username» section on the «Security» tab.
3. Click on «Advanced», and then «Change».
4. Type your account name. Click on «Check names» > «OK».
5. Check «Replace owner on sub containers and objects» > «OK».
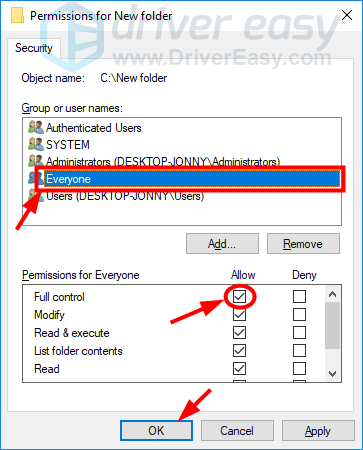
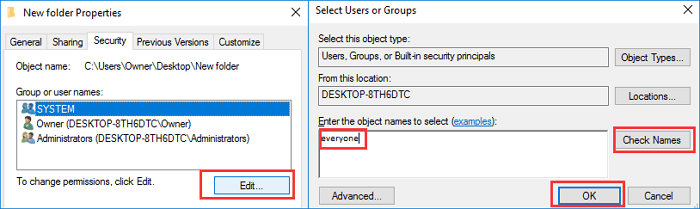
Solution 2. Gain Access by Allowing Everyone (Works in Rare Cases)
1. Right-click on the folder that you’re unable to access and select «Properties».
2. Click on «Security» tab and under Group or user names click on «Edit».
3. Click on «Add» and type everyone. Click on «Check names» and then click «OK».
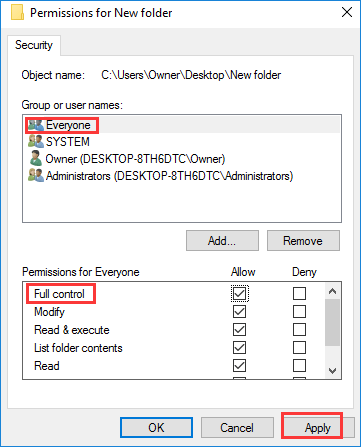
4. Select «Everyone». Under «Allow», select «Full control» and click on «Apply» and click «Ok».
Solution 3. Recover Files in Inaccessible Folder with a Professional Data Recovery Tool
If the solutions above are not helpful, the reasons behind it may be related to system corruption, virus infection, etc. You can try the EaseUS Data Recovery Wizard to recover data from a specific folder in Windows 10/8/7 and read the inaccessible folder urgently. EaseUS Data Recovery Wizard is capable of restoring files on HDD/SSD, USB flash drive, memory card, external hard drive, and other storage devices with a very high recovery rate.
EaseUS File Recovery Software
- Recover lost, deleted, or inaccessible files, videos, documents, photos, audio, music, emails effectively
- Restore data after deleting, formatting, emptying recycle bin, virus attack, system crash, and more.
- Support over 1000 types of files like JPG/JPEG, DOC/DOCX, XLS/XLSX, PPT/PPTX, MP3, WAV, WMA, AVI, MOV, MP4, and more.
Download EaseUS Data Recovery Wizard and follow the steps below to recover data from the inaccessible folder easily.
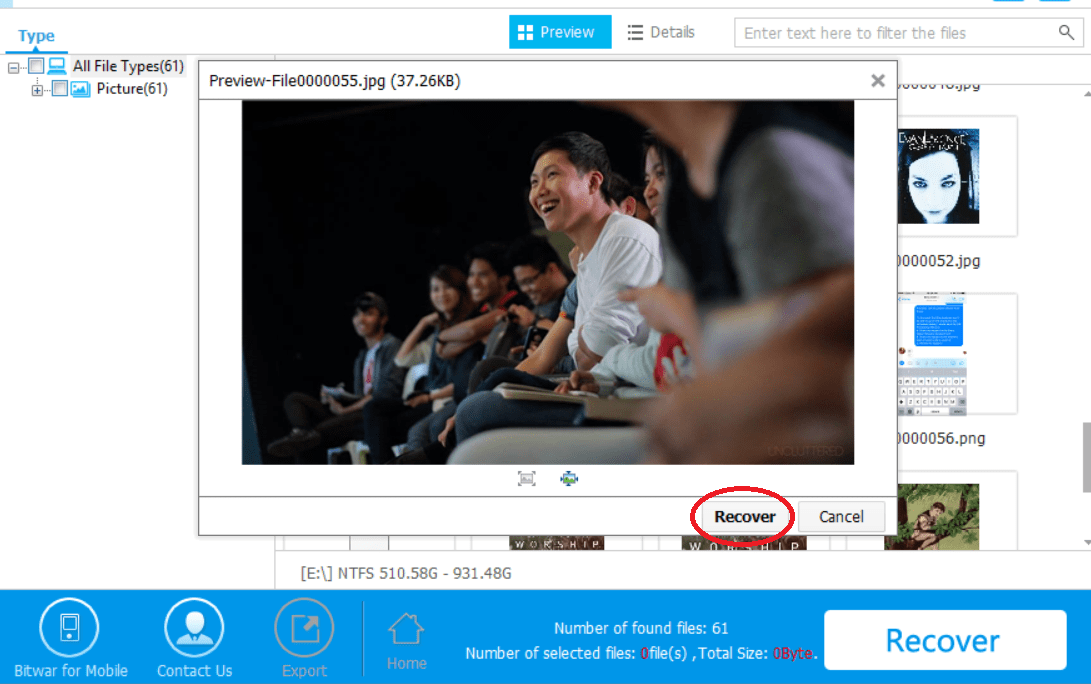
Step 1. Run EaseUS Data Recovery Wizard on your computer. Choose the drive where you lost files and click «Scan». If your lost files were on an external storage device, connect it to your computer firstly.

Step 2. The software will quickly scan the deleted files immediately, and then automatically perform a deep scan to find more lost files. After the scan is completed, you can use «Filter» to quickly filter specific file types.

Step 3. Click the «Preview» button or double-click on a file for a full preview. Finally, select the desired files, click «Recover» and choose another safe location to save all the files at once.

Which Method Is Most Effective? Check The Comparable Table
| Comparison | Change Ownership (Recommend) | Gain Access (Low Chance) | EaseUS Data Recovery Wizard |
|---|---|---|---|
| Scenarios | Check Ownership of your folder. | Don’t allow everyone to access the folder. | Data loss, system crash, virus infection, computer glitch… |
| Cost | None | None | Supported 2GB file recovery in the free version. |
| Operational Risk | None | None | None |
| Easy-to-use | Require more steps. | Yes | Yes |
After compared the three methods we outlined, for the average computer user, we will recommend you apply change ownership of your folder. It requires more steps but is workable. And the gain access solution is suitable for rare cases. In case of both two methods being invalid, you can try a file recovery tool to access data immediately.
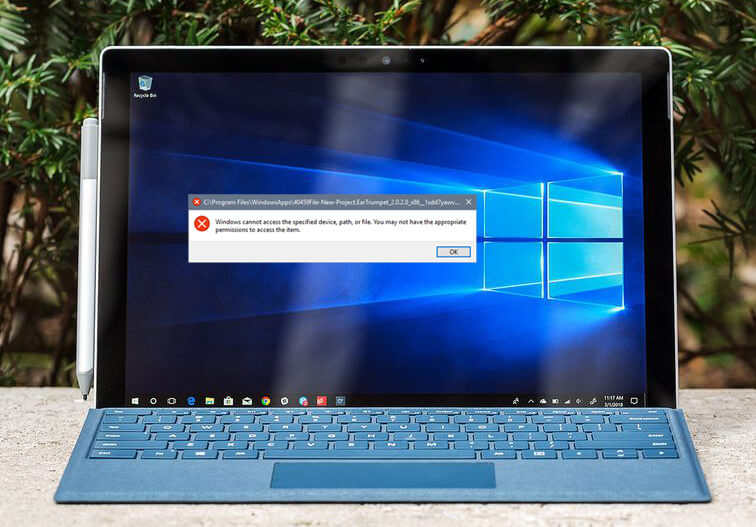
Summary: If you ever encounter “Windows cannot access the specified device path or file. You may not have the appropriate permissions to access the item” then you are facing Windows permissions errors. This article is all about solving this.
Download for PCDownload for Mac
If you are wondering why you do not have permission to open this file or can’t access the computer on windows 7, 8, 10, the reason may be one of these:
- The file is the shortcut file in the external drive or a network location that is not connected appropriately to the PC or maybe not available.
- The file is already deleted, moved to another partition or its shortcut is corrupted.
- Windows or anti-virus program block the file you are trying to access.
Want to know how to do next? Relax, we offer the practical methods that can solve Windows cannot access the specified device path or file in a snap.
Ensure Permission of the File or Folder
Firstly, check if you have the permission of the file or folder when Windows cannot access the specified path windows 10. With this, follow the steps below.
Step 1. Right-click the inaccessible file or folder and select Properties.
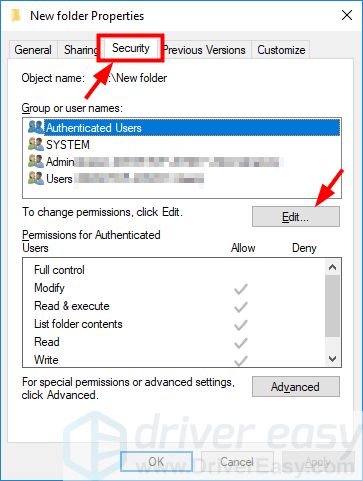
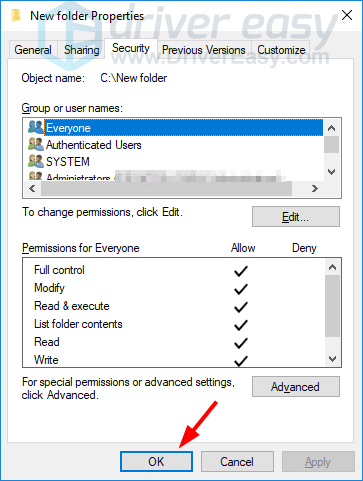
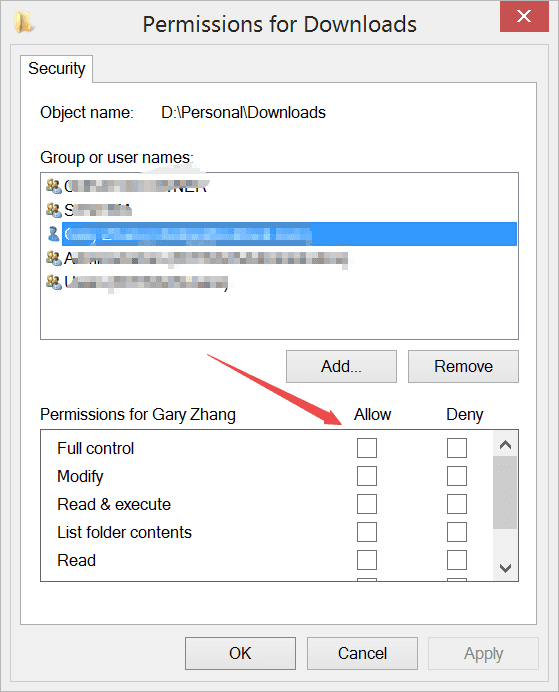
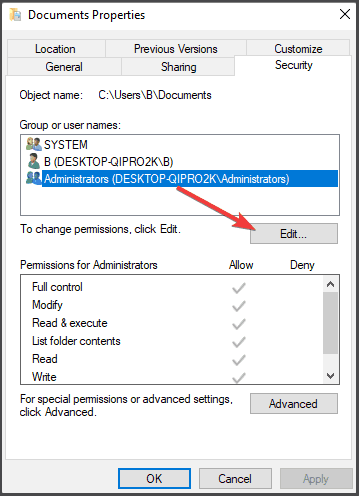
Step 2. Click Security Tab and select your name in the Group or User. Ensure that Permissions for Administrator – Full control, Modify, Read and Execute, List folder contents, Read and Write are all checked in “Allow” column.
If ever you don’t have the permission, click Edit and tick the checkboxes of all the permissions. Then click OK.
Step 3. After finishing step 2, then open the file or folder again.
See if this method works. If not, then proceed to the next.
Enable the Hidden Administrator Account
Also to consider when prompted “Windows cannot access the specified device path or file. You may not have the appropriate permissions to access the item” means your current account doesn’t have the Administrator permissions.
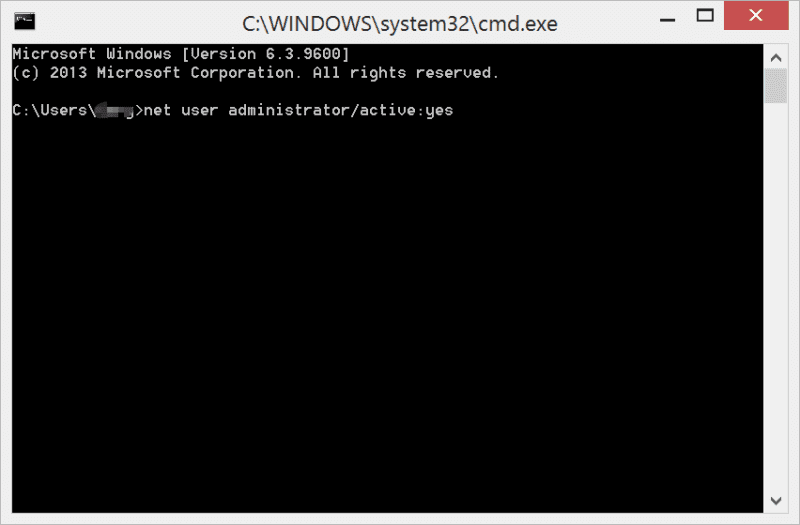
Step 1. Put your Windows in Safe Mode.
Step 2. Type “cmd” in the search box when opening the Start Menu.
Step 3. In the popup window, type “net user administrator/active: yes.” Click Enter. Hidden Administrator now enabled.
Step 4. Restart your computer in Safe mode. Select the Hidden Administrator account.
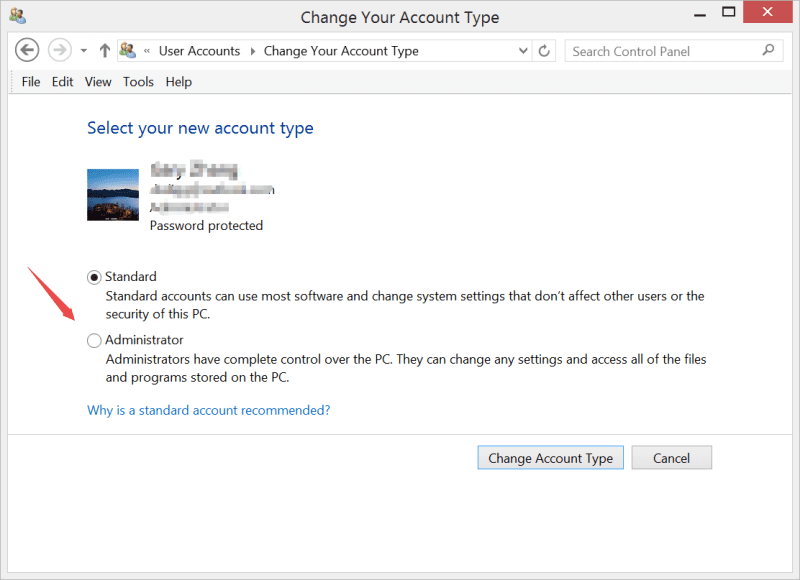
Step 5. Go to Control Panel and view the files in a small icon. Find and select the User Account.
Step 6. Select Manage another account and click your account.
Step 7. Select Change Account Type and click Administrator and change account type.
Step 8. Restart the computer, after that, log in with your account. See if the file can now be opened.
If otherwise, proceed to the next method in solving windows cannot access the specified path windows 10.
Ensure the file is unblocked
Windows are blocking some files; thus, Windows cannot access the specified device path or file error message appears. To check the file if unblocked, go to its Properties.
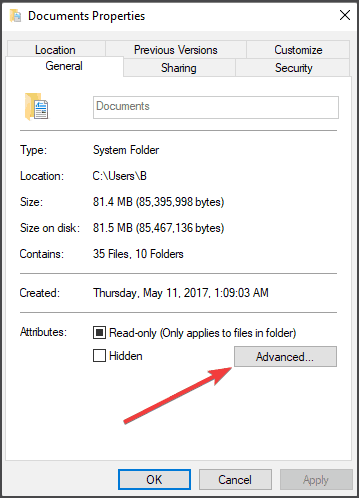
Step 1. Right-click on the file or folder, and then select Properties.
Step 2. In the General Tab, check if “this file came from another computer and might be blocked” is present, select Unblock.

See if the file can now accessible If not, then go to the next method.
Ensure the File or Folder is in the appropriate Location
File from the external or network drive will not be launched or opened in Windows unless the original location of the file is connected to Windows. When you do not have permission to open this file shortcut, check the location of the target file if inaccessible. To do this, follow the two steps:
Step 1. Right-click the shortcut and go to Properties
Step 2. Check the path in Target in the Shortcut tab.
Disable or Uninstall Antivirus Software
At times, anti-virus software blocks file to protect the Windows; thus, windows cannot access it while you don’t have the permission to access the file or folder. In this situation, momentarily disable antivirus software to open the file or folder. After disabling the antivirus software, check whether you can access the file. If yes, then the culprit is the antivirus software. Disable the antivirus whenever you need to open the file or uninstall it and change to another software.
Recreate the Shortcut File
When desktop icon settings windows cannot access, it probably caused by Shortcut file is corrupted, you would probably receive “Windows cannot access the specified device path or file. You may not have the appropriate permissions to access the item”. To fix this error, recreate the shortcut file.
Step 1. Right-click on the empty area of Windows desktop. Choose New and click Shortcut.
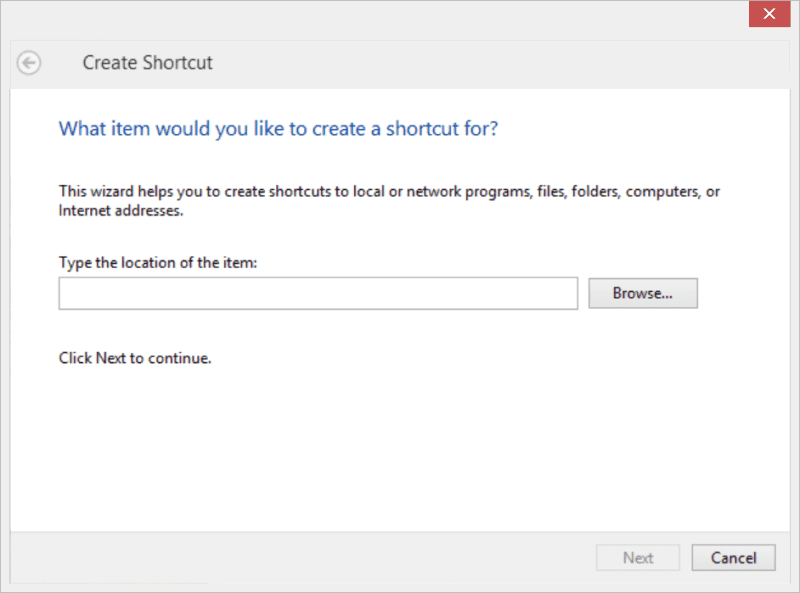
Step 2. Click Browse and select the file to create a shortcut. Click Next.
Step 3. Type the name of the shortcut and then click Finish.
See if this works, if not proceed to the last method.
Recover Deleted or Corrupted File (If necessary)
Bitwar Data Recovery, a software tool most reliable in recovering lost, deleted and corrupted data especially when prompted you don’t have permission to access this device. For a simple guide on how to use this tool, follow the steps below.
Download for PCDownload for Mac
Step 1. Select a device or drive where contains your lost data.
Step 2. Choose a specific recovery mode and then select the target recovering file types (e.g., document or photo)
Step 3. Start to Scan and then preview the data, after that, hit the recover button and save the data into different device or partition.
Easy as that, you get your files back. You can also save your files ahead of performing the methods presented in this article when windows cannot access the specified path windows 10.
Conclusion
“Windows cannot access the specified device path or file. You may not have the appropriate permissions to access the item” is just one of the many errors in Windows. It may be caused by antivirus software or no permission to access the file.
To make sure that files are saved first, download and install Bitwar Data Recovery to secure the data from any crisis due to error messages. We hope that this article has helped your today’s problem.
For more articles in solving other error messages, visit the official website of Bitwar Data Recovery.
Read More
- 7 Fast Fixes for The Application was Unable to Start Correctly Error
- 2018 Best Solutions to Fix SSD Not Showing Up on Windows
Что такое ошибка «В настоящее время у вас нет разрешения на доступ к этой папке»
Если вы открыли это руководство, то, скорее всего, вы станете жертвой В настоящее время у вас нет разрешения на доступ к этой папке — ошибка, которая выскакивает при попытке открыть директорию какой-то папки. Многие пользователи начали сталкиваться с этой проблемой после перехода со старых версий на Windows 10. В результате эта ошибка стала огромным узким местом, не позволяющим пользователям открывать папки, выполнять удаление или даже влиять на некоторые простые изменения. Симптомы очень похожи на «Доступ запрещен», еще одно популярное сообщение, ухудшающее впечатление пользователей. Обычно наиболее частые причины проблем с доступом к папкам связаны с правами пользователя. Если некоторые из них отключены или конфликтуют, пользователи могут иметь ограниченный доступ к некоторым каталогам, включая файлы и папки, расположенные внутри. К счастью, проблема более чем решаема с помощью пары простых шагов. Обязательно следуйте приведенным ниже инструкциям, чтобы устранить ошибку «У вас нет разрешения на доступ к этой папке».

В настоящее время у вас нет разрешения на доступ к этой папке »в Windows 10 (пример 1)

В настоящее время у вас нет разрешения на доступ к этой папке (пример 2)
Скачать средство восстановления Windows

Существуют специальные утилиты для восстановления Windows, которые могут решить проблемы, связанные с повреждением реестра, неисправностью файловой системы, нестабильностью драйверов Windows. Мы рекомендуем вам использовать Advanced System Repair Pro, чтобы исправить ошибку «В настоящее время у вас нет разрешения на доступ к этой папке» в Windows 11, Windows 10, Windows 8 или Windows 7.
1. Измените разрешения в свойствах папки.
Есть вероятность, что при обновлении до Windows 10 система не внесла ваше Имя пользователя в список разрешенных владельцев. В этом методе мы собираемся это проверить и при необходимости устранить недостачу. Вы можете использовать как ручной, так и командный способы. В последнем случае требуется только одна команда для входа и ваше право собственности на папку снова в ваших руках. Выбирайте, что вам нравится:
Используя ручные шаги:
- Щелкните правой кнопкой мыши проблемную папку и выберите Свойства.
- Перейдите в Охранник вкладка и проверьте, есть ли ваше имя пользователя под Имя пользователя или группа.
- Если там нет названия, откройте Дополнительно и нажмите на Изменить (выделено синим) рядом с Владелец.
- В открывшемся окне перейдите к Дополнительно еще раз. Выберите Поиск и выберите свое текущее имя пользователя из появившегося списка и нажмите OK.
- Также выберите Заменить владельца на подконтейнеров и объектов если есть такая возможность.
- Нажмите OK , чтобы закрыть окно и перезагрузить компьютер, чтобы проверить, исчезла ли ошибка.
Используя командную строку:
Перед запуском команд нам нужно знать путь к вашей папке. Для этого щелкните правой кнопкой мыши проблемную папку и выберите Свойства. Скопируйте путь к папке (рядом с Местоположение) и приклеиваем куда-нибудь, чтобы не забыть. После этого вы должны быть готовы выполнить следующие шаги:
- Откройте Командная строка , введя
cmdв поле поиска рядом с Меню Пуск кнопку. - Щелкните правой кнопкой мыши по Командная строка , а затем выберите Запуск от имени администратора. Разрешить окно UAC, нажав Да.
- Затем скопируйте и вставьте эту команду, заменив «Путь к папке» на путь к вашей папке, который мы нашли выше.
- После написания команды нажмите Enter привести его в действие.
- Наконец, вы должны запустить другую команду, используя тот же шаблон, описанный выше.
- После завершения процесса закройте консоль и перезагрузите компьютер, чтобы все изменения вступили в силу.
TAKEOWN /F "Folder Path" /R /D Y
Например, полная команда с C:Users{usernameDocumentsPhotos путь должен выглядеть так TAKEOWN /F C:Users{username}DocumentsPhotos /R /D Y
ICACLS "Folder Path" /grant administrators:F
Надеемся, вам удалось решить проблемы с доступом к папкам. Если нет, выполните следующие шаги, которые мы представили ниже.
2. Разрешить всем
Если вам не удалось решить проблему с помощью предыдущего метода, попробуйте этот альтернативный способ предоставления разрешений. Предыдущие два шага преследовали одну и ту же цель — отсутствие личной собственности. Хотя этот очень похож, все же стоит попробовать избавиться от проблемы.
- Щелкните правой кнопкой мыши проблемную папку и выберите Свойства.
- Перейдите в Охранник вкладку и нажмите Редактировать.
- Затем нажмите Добавить, напишите Все, нажмите Проверить именаи OK в конце.
- Выберите Все и поставьте галочку рядом с Полный доступ.
- Нажмите Применить и OK , чтобы закрыть окно.
- Перезагрузите компьютер и проверьте, можете ли вы снова получить доступ к папке.
3. Измените значения в редакторе локальной политики.
Есть еще один способ обойти проблемы администратора — изменить настройки локальной политики. Мы отключим режим одобрения администратором, чтобы Windows не была слишком строгой в отношении доступа. Следуйте инструкциям ниже:
- Нажмите Windows Key + R кнопки, вставьте
gpedit.mscи откройте его. - На левой панели перемещайтесь по этим папкам Конфигурация компьютера > Параметры Windows > Настройки безопасности > Локальная политика > параметры безопасности.
- После нажатия на параметры безопасности, найдите и дважды щелкните Режим одобрения администратором контроля учетных записей пользователей для встроенной учетной записи администратора на правой панели.
- Установите это как Запрещено, затем нажмите Применить и OK для сохранения изменений.
- Вы также должны найти запись под названием Контроль учетных записей пользователей Запускать всех администраторов в режиме утверждения администратором и сделайте те же изменения, что и на предыдущем шаге.
- После этого закройте Редактор политик и перезагрузите вашу систему, чтобы эти изменения вступили в силу.
4. Просканируйте свой компьютер на наличие вредоносных программ.
Если у вас когда-либо возникало подозрение, что ваш компьютер заражен, также стоит запустить сканирование на наличие вредоносных программ и другого нежелательного программного обеспечения. Знаете вы об этом или нет, но вредоносное ПО могло проникнуть в вашу систему без согласия и вызвать некоторые изменения в конфигурации системы, что привело к различным ошибкам. Несмотря на то, что вы только что обновились до Windows 10, мы по-прежнему рекомендуем сделать это, даже если вероятность заражения незначительна. Вы можете использовать либо встроенный Защитник Windows, либо установить расширенное антивирусное программное обеспечение, которое будет бороться с угрозами, которые Windows может пропустить. Мы рекомендуем вам использовать антивирус, разработанный Malwarebytes — надежной и талантливой группой экспертов, постоянно обновляющей свое программное обеспечение для борьбы как с незначительными, так и с глобальными угрозами. Вы можете скачать его сейчас, используя ссылку ниже, и бесплатно попробовать 14-дневную пробную версию окончательного решения для защиты от вредоносных программ.

Главное окно Malwarebytes

Настройки Malwarebytes

Результаты сканирования Malwarebytes
Скачать Malwarebytes
Заключение
Мы надеемся, что вы больше не имеете дело с сообщением «В настоящее время у вас нет разрешения на доступ к этой папке». Однако, если ни одно из перечисленных решений не помогло вам забыть об этой проблеме, попробуйте переустановить систему с нуля. Возможно, что-то пошло не так при переходе на Windows 10. Вот почему полная переустановка Windows может помочь вам устранить проблему. Если что-то еще ухудшает работу вашего ПК, вы можете поискать другие руководства на нашей странице, чтобы получить быстрые и эффективные решения. Мы регулярно обновляем их по мере появления новых ошибок.
Check out curated solutions to fix file permission errors
by Milan Stanojevic
Milan has been enthusiastic about technology ever since his childhood days, and this led him to take interest in all PC-related technologies. He’s a PC enthusiast and he… read more
Published on September 28, 2022
Reviewed by
Vlad Turiceanu

Passionate about technology, Windows, and everything that has a power button, he spent most of his time developing new skills and learning more about the tech world. Coming… read more
- Windows has many file and folder access protocols, which are strongly tied to the users and their administrative permissions.
- More often than not, users find themselves unable to access specific files from their computers and are wondering why.
- Fixing things is usually simple in this case, and you would have to modify the permissions.
XINSTALL BY CLICKING THE DOWNLOAD FILE
This software will repair common computer errors, protect you from file loss, malware, hardware failure and optimize your PC for maximum performance. Fix PC issues and remove viruses now in 3 easy steps:
- Download Restoro PC Repair Tool that comes with Patented Technologies (patent available here).
- Click Start Scan to find Windows issues that could be causing PC problems.
- Click Repair All to fix issues affecting your computer’s security and performance
- Restoro has been downloaded by 0 readers this month.
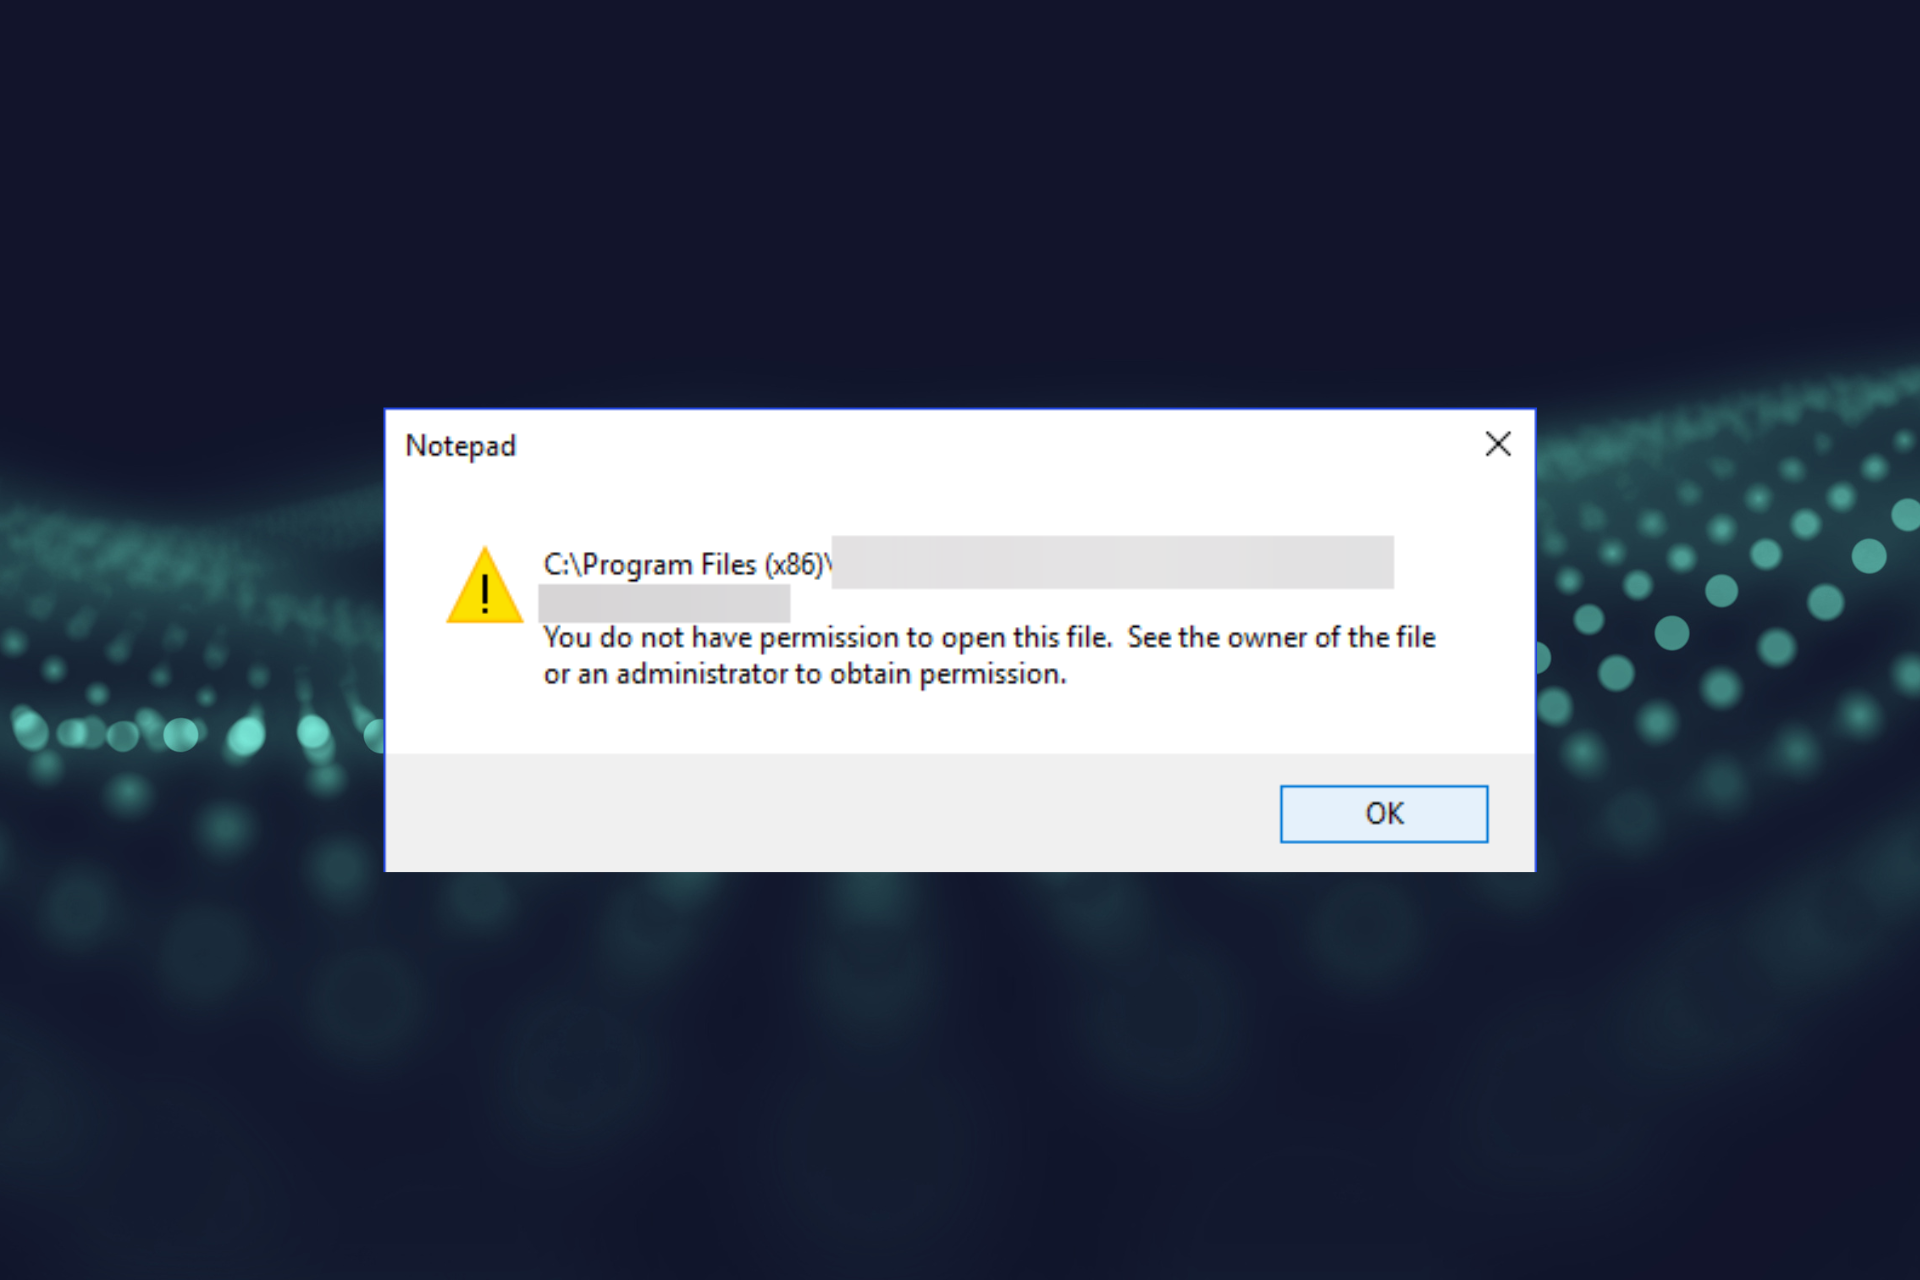
If you’ve ever tried to access your files and folders in Windows and received the error message, you don’t have permission to open this file; things are not as tricky as they may appear.
The problem has been present in all recent iterations of the OS, including Windows 10. And it’s a problem per se, but just the misconfigured permissions.
It may be an issue of file and folder permissions, but there are basic permissions like Full control, Modify, Read and Execute, or Read, and Write, while folder permissions are the same, with an extra one to list folder contents.
Whenever you work with file and folder permissions, you should consider that read is the only permission to run scripts, read access is for accessing shortcuts and their targets, and write but not delete prevents users from deleting file contents. At the same time, total control means the user can delete files regardless of their permissions.
These permissions are created by combining special permissions in logical groups. The user is denied access if no access is granted or denied. Permissions set for parent folders force all files and subfolders in it to inherit the
permissions.
Quite a lot goes unnoticed whenever file sharing and permissions are involved, but check out some of the issues and solutions to resolve the problem.
Why does the You don’t have permission to open this file message appear?
The error is usually encountered when the permissions configured by the administrator do not permit you to access the file. The standard user account is usually more likely to see the problem, though it could also appear on administrator accounts for specific files.
Also, the problem can arise due to a corrupt user account, in which case creating a new one should work. Besides, several users saw the message after upgrading Windows since the file was now stored in the Windows.old folder.
Almost every program and file format may throw the error, and here are some of the common ones:
- Excel You don’t have permission to open this file
- PDF You don’t have permission to open this file
- Outlook You don’t have permission to open this file
Why does my computer keep asking for administrator permission?
This error occurs when you try to access a file but do not have the necessary permissions to do so.
In such a situation, you have the ability to claim ownership of that file by right-clicking it and selecting Properties followed by Security from the context menu that appears.
How do I fix You don’t have permission to open this file error?
1. Use File Viewer Plus
The first thing you should do is install File Viewer. The software is an easy-to-use file reader that can access different formats from other versions as recent ones. It also has a file identifier that can search for information regarding any new and unknown formats.
Moreover, it has a feature that inspects the content of the files before you open them. You can open, edit, save, and convert your files with File Viewer.
The program will open over 300 formats, such as PDFs, spreadsheets, images, audio and video files, source code files, word processing documents, and much more. You can also convert many files at once using the Plus variant of the software.

File Viewer Plus
File Viewer shows the data of over 300 file formats, allowing you to open, edit easily, and convert all of them.
2. You get an access denied error message
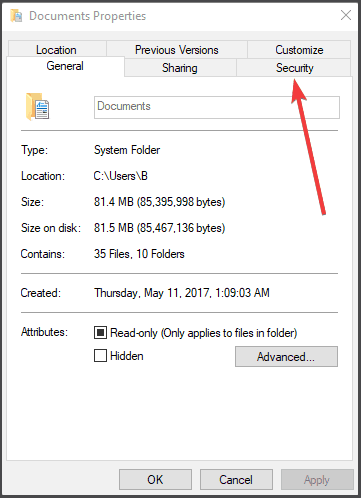
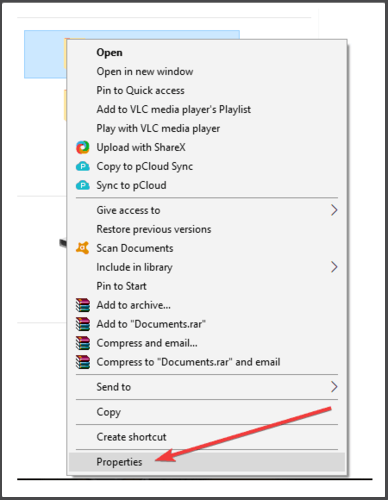
- Right-click the file or folder, and then click Properties.
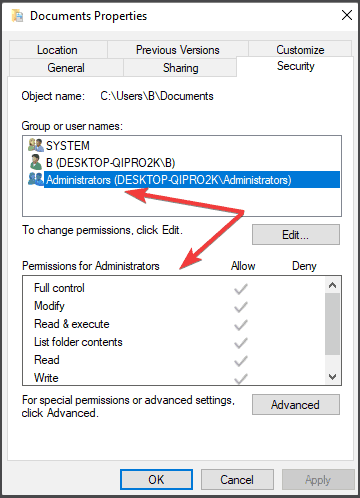
- Click the Security tab.

- Under Group or user names, click your name to see your permissions.
To open a file, you need to have Read permission. To change the permissions of a file or folder, follow these steps:
- First, log on as an Administrator.
- Right-click the file or folder, and then select Properties.
- Click the Security tab.
- Under Group or user names, click your name to see your permissions.
- Click Edit, click your name, select the checkboxes for the permissions that you must have, and then click OK.
Some PC issues are hard to tackle, especially when it comes to corrupted repositories or missing Windows files. If you are having troubles fixing an error, your system may be partially broken.
We recommend installing Restoro, a tool that will scan your machine and identify what the fault is.
Click here to download and start repairing.
This can happen either because the file/folder ownership has changed, you don’t have appropriate permissions, or the file is encrypted. When the file displays green, it indicates that someone has encrypted it to block access. Only the person that encrypted it can decrypt it.
If you recently upgraded to a higher version of Windows, some account information may have changed, so you may no longer have ownership of some files or folders. To resolve it, take ownership of a file or folder using the steps above.
The file or folder is encrypted
- Right-click the file or folder, and then click Properties.
- Click the General tab.
- Click Advanced.
- In the Advanced Attributes tab, check if the encryption is checked.

NOTE
If the file or folder is encrypted, you cannot open it without the certificate that was used to encrypt it. Use the steps above to determine if it was encrypted.
If the Encrypt contents to secure data check box is selected, you’ll need the certificate used to encrypt the file or folder to open it. In this case, get the certificate from the person who created or encrypted the file or folder, or have them decrypt it.
3. Cannot make changes to files/folders
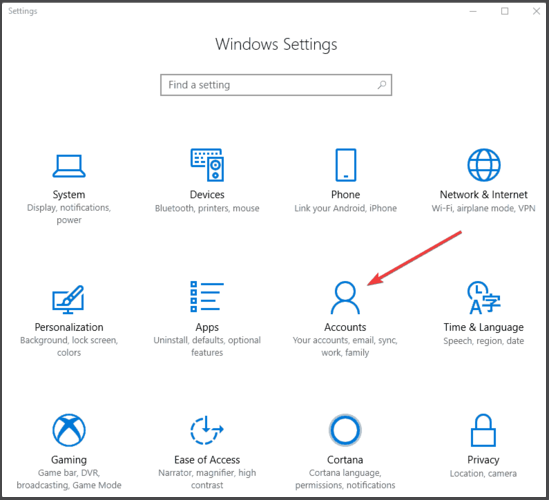
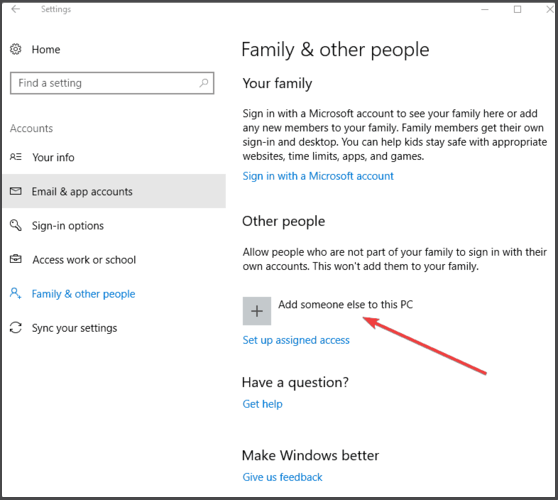
- Press Windows + I to open Settings and then click Accounts.
- Select Family and Other people.
- Click Add someone else to this PC.
- Fill in the form with the username and password. Your new user account will now be created.
- Click on Change account type.
- Click the dropdown and then select Administrator.
- Restart your computer.
- Login to your new account and see if you can access the file or folder.
This could happen for several reasons, including that the file is encrypted or corrupted, you have no appropriate permissions, or the folder ownership has changed.
You can use the steps in solution #2 if the file is encrypted, you have no appropriate permissions, or the folder ownership has changed.
However, if the file/folder is corrupted, it could be that you have an open file when your computer crashes or loses power. Most such files cannot be repaired, so that you can delete or restore them from a backup copy.
If your user profile is corrupted, Windows may prevent you from accessing files or folders, so you need to use a new user profile by creating a local user account, which makes a user profile.
- Fix: Brother Printer Scanner Not Working/Connecting to PC
- How to Fix The Network Security Key Isn’t Correct on Windows
- WHEA Internal Error: Fix it Using These 9 Quick Methods
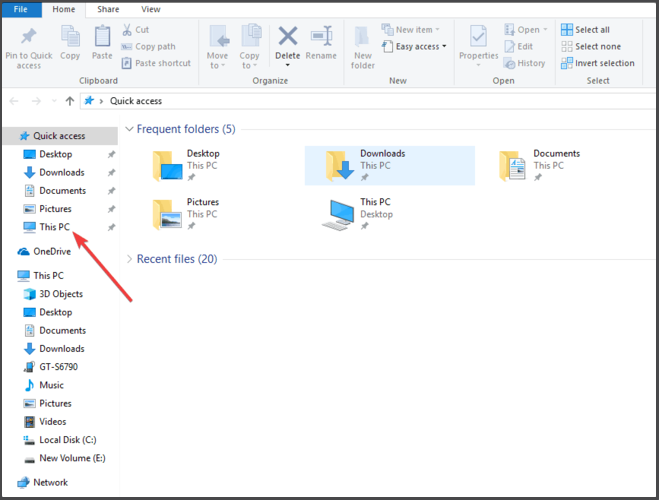
4. Cannot open a file/folder after updating Windows
- Press Windows + E to open File Explorer, then click This PC.
- Double-click the drive where Windows is installed (typically, drive C:).
- Now, double-click the Windows.old folder.
- Double-click the Users folder.
- Double-click your username.
- Open the folders that contain the files you want to retrieve.
- Copy the files you want from each folder and paste them into a folder in Windows 10.
- Repeat these last three steps for each user account on your computer
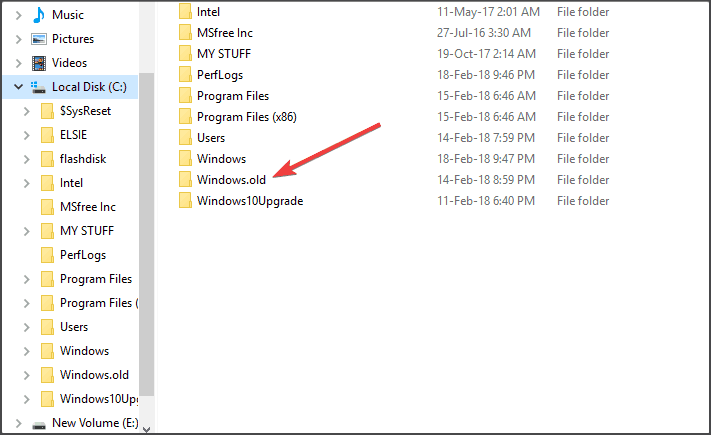
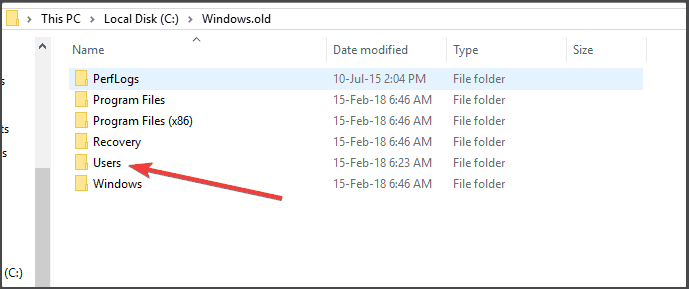
This happens when folder ownership changes or the files are stored in a Windows.old folder from your previous operating system. But if you didn’t reformat the hard disk, you may still be able to access old files from this folder.
How do I fix You don’t have permission to open this file on Windows 11?
Since the issue has to do with permissions, it is common in Windows 11 when accessing files without the required permissions. The complete error message reads You don’t have permission to open this file. Contact the file owner or an administrator in Windows 11
In this case, too, you will have to reconfigure them and allow complete control of the current user account.
That’s the only solution that works in this case, except for using a third-party tool. However, if the problems plague a lot of critical Windows files, you could factory reset Windows 11, as this would also reset the permissions to default.
What is a file permission error?
As the name suggests, a File Permission error is also due to the absence of necessary permission, including accessing a file, saving it, and accessing the location it’s being saved to.
Other common issues include unsupported file format, corrupted file state, and conflicts created by third-party apps.
That’s it! You must have fixed the You don’t have permission to open this file error in Windows 10 and 11.
Also, find out how to reset all permissions to default in Windows and be able to get rid of at least some of these errors.
Let us know if any of these solutions helped fix the file permissions issue on your computer by leaving a comment in the section below.
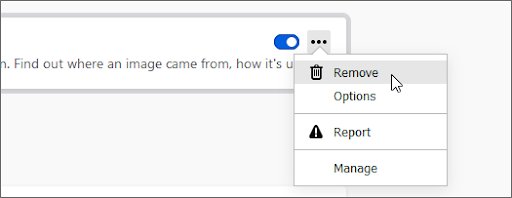
![]()
Newsletter
The “Access Denied” error appears when your browser uses different proxy settings or VPN instead of what’s really set on your Windows 10 PC. Thus, when a website detects that there is something wrong with your browser cookies or your network, it blocks you and this is why you can’t open it.
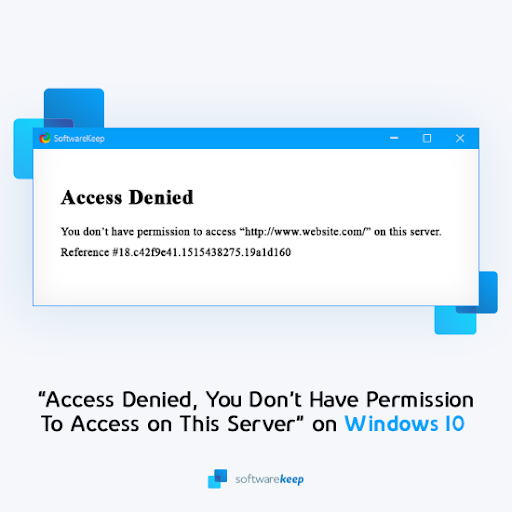
Windows 10 users – we’ve all been there. You’re working on your computer and suddenly you get an error message that says “Access Denied, You don’t have permission to access this server”. There could be a number of reasons this is happening including the server was taken down, the URL has changed, or the host may have disabled access from a VPN.
No matter what the reason is, it can be frustrating not being able to access certain websites when you need them most. Here are some tips on how to fix this issue so you can get back to work with ease.
Solved: Access Denied, You Don’t Have Permission To Access on This Server
There are a number of things you can try to recover from this pesky error. The solution that’ll work for you is mainly dependent on what caused the error in the first place. For example, when using the Firefox browser, a website might block you when you have a VPN activated. This happens because the site thinks something is wrong with your proxy or browser cookies.
So, what can you do to restore a website affected by the “Access Denied” error? Let’s review our options, and then jump right into troubleshooting. You can try:
- Clearing your browser cookies and history
- Turning off VPN and VPN extensions
- Disabling your proxy
- Switching to a premium VPN service
- Resetting your browser data
The step-by-step guides below will help you get past whatever might stand between you and your favorite website!
Method 1. Forget the Website in Firefox
It appears that this error is the most common in Mozilla Firefox. If you’re using this browser, there’s a handy button to forget a single website, which may help solve your issues without having to clear other data.
- Open Mozilla Firefox, and then use the Ctrl + H keyboard shortcut to open the History tab.
- Find the website causing the “Access Denied” error from your browsing history. Select it by clicking on it once, and then choose to Forget About This Site from the context menu.

- Refresh the website, or navigate to it again and see if you’re still getting the error message.

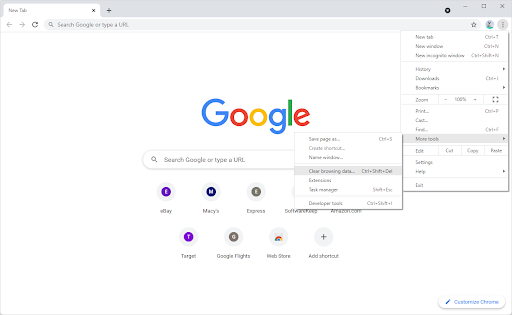
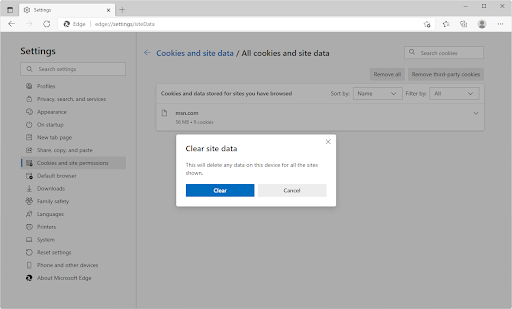
Method 2. Delete the Site Data of a Specific Website in Chrome
Google Chrome has a similar option to Firefox, which allows you to clear cookies from just a single website. If you’re not having other issues, it might be best to perform this method before deleting all of your browsing data in one sweep.
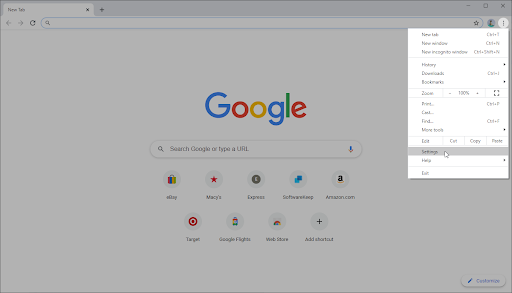
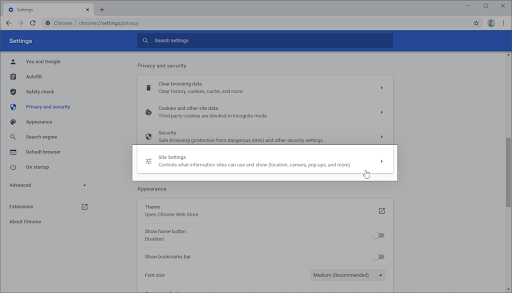
- In Google Chrome, click on the More icon (displayed by three dots arranged vertically) and choose Settings.

- Click on Privacy and security from the menu on the left, and then click on Site settings.
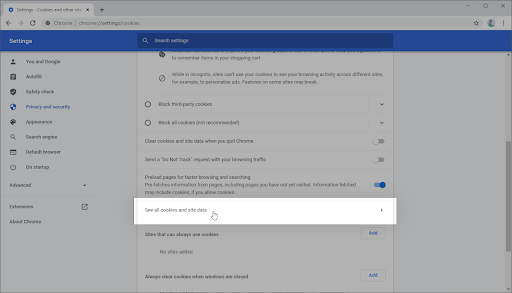
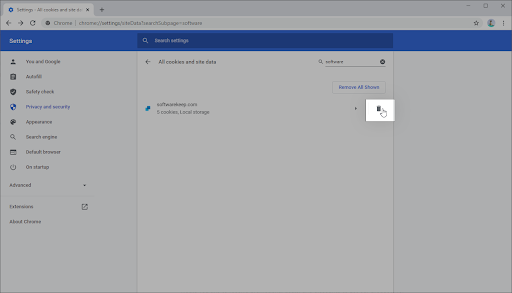
- Click on Cookies and site data, and then select the See all cookies and site data option. You’ll see a list of all of your cookies appear shortly after.
- Search for the domain of the problematic website. Click on the Delete button next to the shown cookies.
- Restart your browser and see if the error still happens when you try to access the website.
Method 3. Turn Off Your VPN Extension
VPNs can cause some unexpected issues despite being extremely useful in other areas. Things can happen whether you’re using a VPN on your computer itself, or a VPN extension in your browser. To ensure your VPN isn’t causing the “Access Denied” error, temporarily disable it.
Disable VPN Extensions in Google Chrome
- In Google Chrome, click on the More icon (displayed by three dots arranged vertically) and choose More tools → Extensions.
- Alternatively, you can get to the Extensions page by typing chrome://extensions into your address bar.
- Find your VPN extension. In the bottom-right corner of the extension box, you’ll see a toggle. Make sure that the VPN is toggled off.

- To entirely uninstall your VPN extension, you can also click on the Remove button. Keep in mind that you’ll have to re-install the extension to use it again.
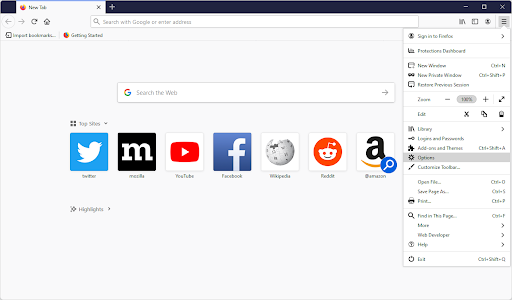
Disable VPN Extensions in Firefox
- In Mozilla Firefox, click on the menu button, and then select Add-ons and Themes from the context-menu.
- Switch to the Extensions tab. Locate your VPN extension, and then use the toggle to turn it off temporarily.

- To uninstall a VPN extension you don’t want to keep on your device, click the More actions button and select Remove from the context-menu.
Disable VPN Extensions in Microsoft Edge
- In Microsoft Edge, type the following link into your address bar: edge://extensions/
- Find any VPN extension you want to turn off, and then click on the toggle so it’s greyed out and disabled.

- You can uninstall a VPN extension from Edge by clicking on the Remove link underneath the extension’s name and details.

Disable VPN Extensions in Opera
- In Opera, click on the Main menu near the top-left corner, and then navigate to Extensions → Extensions.
- Find your VPN extension and disable it with the toggle button. Alternatively, click the X button near the top-right corner to uninstall it.

Method 4. Disable Proxy Server in Windows 10
You might be using a proxy server for your LAN. In this case, we recommend turning the feature off to test whether or not the issue was caused by the configuration.
- Open the search bar in your taskbar by clicking on the magnifying glass icon. You can also bring it up with the Windows + S keyboard shortcut.
- Type in Internet Options and click on the first search result. Switch to the Connections tab once the pop-up window shows up, and then click on LAN Settings.
- Once in the Local Area Network (LAN) Settings window, deselect the Use a proxy server for your LAN option if it’s currently turned on. If the option is not ticked, your issue is not related to the proxy server.
- Check if the website will load after disabling this option. If the error was caused by network traffic filtered by a proxy, you might be able to get on now.
Method 5. Download a Premium VPN
Users with a freeware VPN may experience poor connection and limited features. However, premium VPN services get around these problems with ease. While it will cost you some money to get started, it’s definitely worth switching to a well-endorsed VPN for your own comfort and safety.
It might be hard to find the perfect, most suitable VPN for you and your personal browsing needs. Here are some of the top-selling services we recommend using:
- Surfshark VPN
- NordVPN
- ExpressVPN
After making your purchase and installing the VPN, try and access the website you’re getting the “Access Denied” error on. The best VPNs are definitely worth the investment. Premium services come with a lot of benefits, like unlimited bandwidth and more robust security features that will keep you safe when browsing on public WiFi hotspots or video chatting!
Method 6. Clear Your Browser Data
Try to clear your browser data before moving on to more drastic steps. Clearing browser data will allow you to keep custom settings intact, but will remove your cookies and history.
Clear Browser Data in Google Chrome
- Open Google Chrome, then click on the More icon, displayed by three dots arranged vertically. Hover over More Tools, and then select Clear browsing data.

- Make sure the Time range is set to All time. Tick the following options: Browsing history, Cookies, and other site data, and Cached images and files.
- Click on the Clear data button.
- After the process is over, restart Google Chrome and see if the error is still appearing when you try to access the website.

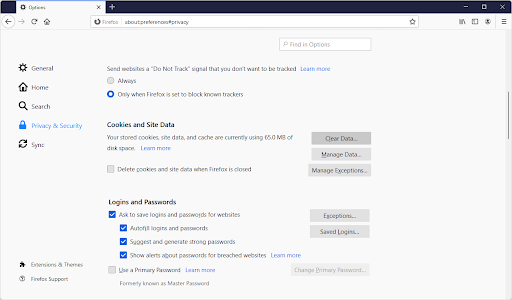
Clear Browser Data in Mozilla Firefox
- Open Firefox. In the upper right-hand corner of the browser, click the menu and click the Options setting. Alternatively, you can type about: preferences into the address bar and hit Enter.

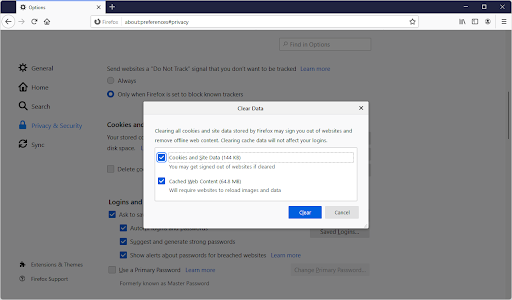
- Switch to the Privacy & Security tab. Scroll down until you reach the cookies and site data section. Here, click on the Clear Data… button.
- Select Cookies and Site Data. You can also delete the cache if you want to make some space on your computer, but this option is not necessary for troubleshooting.
- Click on the Clear button. Once the clearing is complete, try to access the problematic website again. The error might’ve been solved by this process.
Clear Browser Data in Microsoft Edge
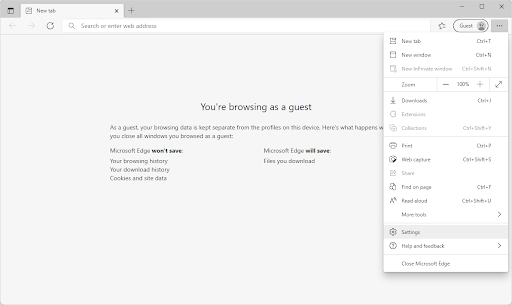
- Launch Microsoft Edge. Click on the menu icon in the top-right, and then click on Settings. You can also type edge://settings into the address bar, and press the Enter key.

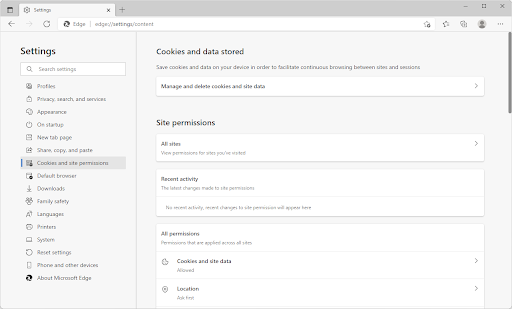
- Switch to the Cookies and site permissions tab. Here, click on the Manage and delete cookies and site data button on the top of the page.

- Click on the See all cookies and site data button. You’ll once again be redirected to a new page.

- Click on the Remove all button. A pop-up message will show up on the screen. Read the warning, and then proceed by clicking on the Clear button.
- Check if you’re able to access the website giving you the “Access Denied” error previously.
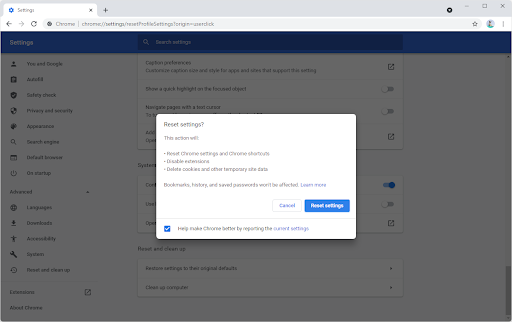
Method 7. Reset the Browser
If nothing else has worked, try to reset your browser to its default settings.
How to Reset Google Chrome
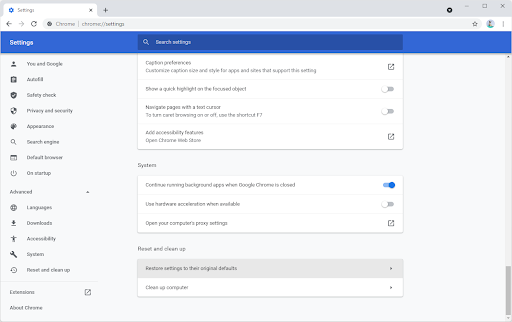
- Open Google Chrome, then click on the More icon, displayed by three dots arranged vertically. Click on Settings.
- Scroll down to the bottom of the page, and expand the Advanced settings. Scroll down to the bottom again, and then click Restore settings to their original defaults.
- Read the warning, and then click the Reset settings button if you agree to have your browser restored to the default configuration.

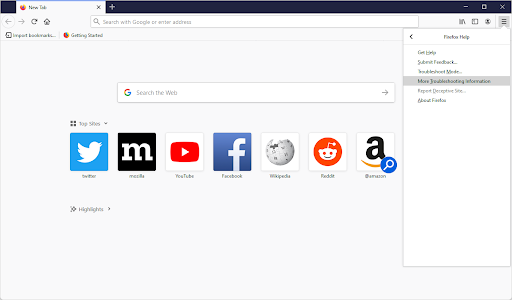
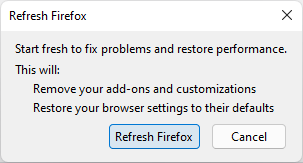
How to Reset Mozilla Firefox
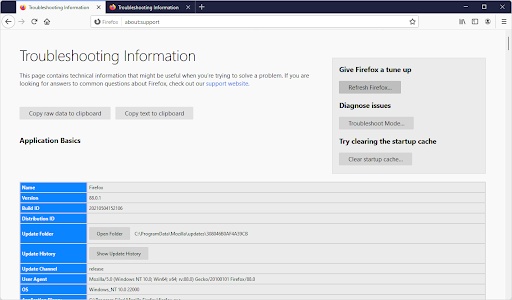
- Open the Firefox menu with the icon in the upper right corner, and then click on Help. Next, click on More Troubleshoot Information. Alternatively, you can type about: support into the address bar and press Enter to be redirected.
- Click on the Refresh Firefox button.
- Read the pop-up warning, and then press Refresh Firefox again if you wish to proceed. After the process has concluded, try and see if you’re able to access the website.

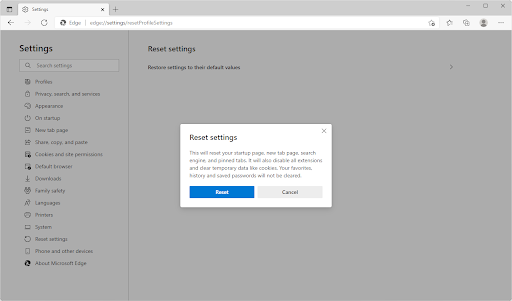
How to Reset Microsoft Edge
- Press the three dots in the top-right corner to open the menu, and then click on Settings from the available options.
- Switch to the Reset Settings tab. Here, click on the button that says Restore settings to their default values. In the pop-up window, confirm your choice after reading the information.

- Allow some time for Edge to reset. When it’s done, navigate to the website with the “Access Denied” error to see if it’s been resolved.
Final Thoughts
As we’ve discussed, there are a number of reasons you might be receiving an Access Denied error. Thankfully, you can remedy most of them with minimal effort on your part. In the event that they cannot, our experts will help to find a solution for you — so don’t hesitate to reach out! We hope these tips have been helpful and would love to hear from you if something here has helped solve your problem.
Have any other trouble accessing websites? Let us know! Our Help Center and Blog offer plenty of tips and tricks like the ones above, which will help make sure you never have an issue again when trying to access certain sites online.
If you want more information about this issue or other computer problems, sign up for our newsletter. Get promotions, deals and discounts from us right in your inbox. Subscribe with your email address below.
You May Also Like
» What Is the “A Web Page Is Slowing Down Your Browser” Warning in Firefox?
» Which Web Browser Should You Be Using in 2021?
» Save Hundreds of Dollars With These Google Chrome Extensions