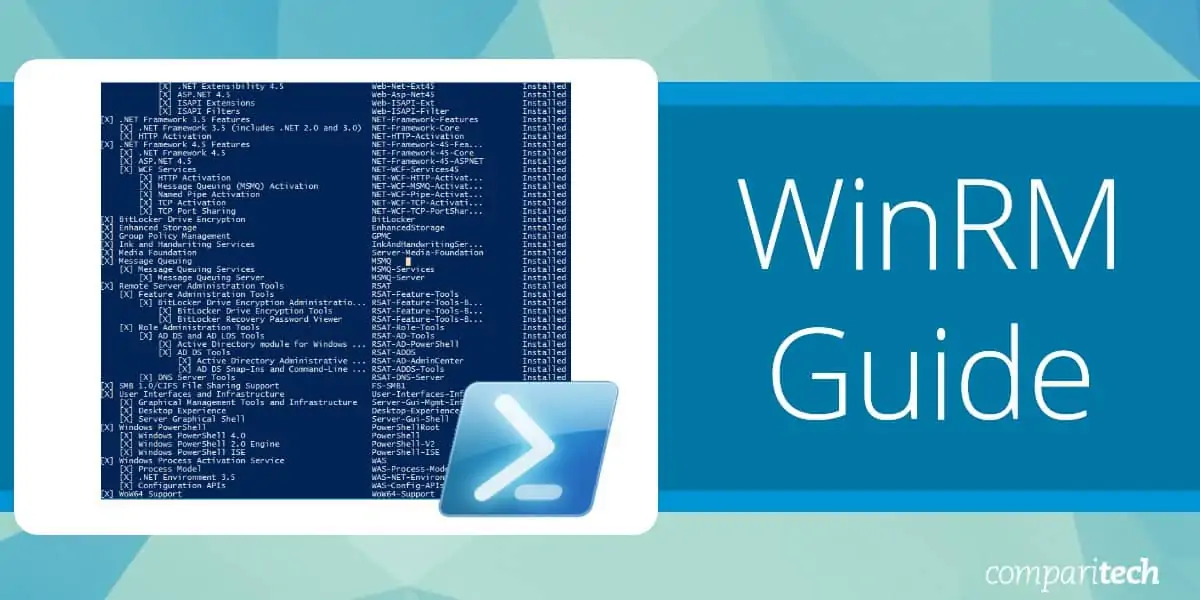
From Wikipedia, the free encyclopedia
| Developer(s) | Microsoft |
|---|---|
| Operating system | Microsoft Windows |
| Type | Application programming interface |
| License | Proprietary commercial software |
| Website | docs.microsoft.com/en-us/windows/win32/winrm/portal |
WinRM (Windows Remote Management) is Microsoft’s implementation of WS-Management in Windows which allows systems to access or exchange management information across a common network. Utilizing scripting objects or the built-in command-line tool, WinRM can be used with any remote computers that may have baseboard management controllers (BMCs) to acquire data. Windows-based computers including WinRM certain data supplied by Windows Management Instrumentation (WMI) can also be obtained.[1]
Components[edit]
| Developer(s) | Microsoft |
|---|---|
| Operating system | Microsoft Windows |
| Type | Command |
| License | Proprietary commercial software |
| Website | docs.microsoft.com/en-us/windows-server/administration/windows-commands/winrs |
- WinRM Scripting API
- Provides an Application programming interface enabling scripts to remotely acquire data from computers that perform WS-Management operations.
- winrm.cmd
- Built-in systems management command line tool allowing a machine operator to configure WinRM. Implementation consists of a Visual Basic Scripting (VBS) Edition file (Winrm.vbs) which is written using the aforementioned WinRM scripting API.
- winrs.exe
- Another command line tool allowing the remote execution of most Cmd.exe commands. This tool utilizes the WS-Management protocol.
- Intelligent Platform Management Interface (IPMI) driver
- Provides hardware management and facilitates control of remote server hardware through BMCs. IPMI is most useful when the operating system is not running or deployed as it allows for continued remote operations of the bare metal hardware/software.
- WMI plug-in
- Allows WMI data to be made available to WinRM clients.[2]
- WMI service
- Leverages the WMI plug-in to provide requested data or control and can also be used to acquire data from most WMI classes. Examples include the Win32_Process, in addition to any IPMI-supplied data.
- WS-Management protocol
- Web Services Management is a DMTF open standard defining a SOAP-based protocol for the management of servers, devices, applications and various Web services. WS-Management provides a common way for systems to access and exchange management information across the IT infrastructure.[3]
- Ports
- By default WinRM HTTPS used 5986 port, and HTTP uses 5985 port. By default, port 5985 is in listening mode, but port 5986 has to be enabled.
Common uses[edit]
![]()
Ansible communicates with Windows servers over WinRM using the Python pywinrm package and can remotely run PowerShell scripts and commands.[4]
Thycotic’s Secret Server also leverages WinRM to enable PowerShell remoting.[5]
SolarWinds Server and Application Monitoring software (SAM) utilizes a WinRM server on monitored servers for its PowerShell integration.[6]
CloudBolt leverages WinRM as part of Blueprints, Server Actions, and CB Plugins to execute remote scripts on Windows servers using the python pywinrm module.[7]
Security[edit]
WinRM uses Kerberos for initial authentication by default. This ensures that actual credentials are never sent in client-server communications, instead relying on features such as hashing and tickets to connect.[8] Although WinRM listeners can be configured to encrypt all communications using HTTPS, with the use of Kerberos, even if unencrypted HTTP is used, all communication is still encrypted using a symmetric 256-bit key after the authentication phase completes. Using HTTPS with WinRM allows for additional security by ensuring server identity via SSL/TLS certificates thereby preventing an attacker from impersonating it.[9]
References[edit]
- ^ windows-sdk-content. «Windows Remote Management — Windows applications». docs.microsoft.com. Retrieved 2019-02-21.
- ^ windows-sdk-content. «Windows Remote Management Glossary — Windows applications». docs.microsoft.com. Retrieved 2019-02-21.
- ^ windows-sdk-content. «About Windows Remote Management — Windows applications». docs.microsoft.com. Retrieved 2019-02-21.
- ^ «Windows Remote Management — Ansible Documentation». docs.ansible.com. Retrieved 2019-02-21.
- ^ «Thycotic Support». thycotic.force.com. Retrieved 2019-02-21.
- ^ «Create a WinRM HTTPS listener». SolarWinds Worldwide, LLC. Help and Support. 2016-03-24. Retrieved 2019-02-24.
- ^ «Remote Scripts — CloudBolt 8.7 Documentation». docs.cloudbolt.io. Retrieved 2019-06-04.
- ^ «How To: Configure WINRM for HTTPS». support.microsoft.com. Retrieved 2019-02-24.
- ^ FoxDeploy (2017-02-08). «Is WinRM Secure or do I need HTTPs?». FoxDeploy.com. Retrieved 2019-02-24.
External links[edit]
- Windows Remote Management — Windows applications | Microsoft Docs
| title | description | ms.date | ms.assetid | ms.topic | ms.custom |
|---|---|---|---|---|---|
|
Installation and configuration for Windows Remote Management |
For Windows Remote Management (WinRM) scripts to run, and for the **Winrm** command-line tool to perform data operations, Windows Remote Management (WinRM) has to be both installed and configured. |
09/10/2021 |
81c40456-0003-46d0-8695-83bf77432056 |
article |
contperf-fy21q1 |
Installation and configuration for Windows Remote Management
For Windows Remote Management (WinRM) scripts to run, and for the Winrm command-line tool to perform data operations, Windows Remote Management (WinRM) has to be both installed and configured.
These elements also depend on WinRM configuration.
- The Windows Remote Shell command-line tool (Winrs).
- Event forwarding.
- Windows PowerShell 2.0 remoting.
Where WinRM is installed
WinRM is automatically installed with all currently-supported versions of the Windows operating system.
Configuration of WinRM and IPMI
These WinRM and Intelligent Platform Management Interface (IPMI) WMI provider components are installed with the operating system.
- The WinRM service starts automatically on Windows Server 2008 and onwards (on Windows Vista, you need to start the service manually).
- By default, no WinRM listener is configured. Even if the WinRM service is running, WS-Management protocol messages that request data can’t be received or sent.
- Internet Connection Firewall (ICF) blocks access to ports.
Use the Winrm command to locate listeners and the addresses by typing the following command at a command prompt.
winrm e winrm/config/listener
To check the state of configuration settings, type the following command.
Quick default configuration
You can enable the WS-Management protocol on the local computer, and set up the default configuration for remote management with the command winrm quickconfig.
The winrm quickconfig command (or the abbreviated version winrm qc) performs these operations.
- Starts the WinRM service, and sets the service startup type to auto-start.
- Configures a listener for the ports that send and receive WS-Management protocol messages using either HTTP or HTTPS on any IP address.
- Defines ICF exceptions for the WinRM service, and opens the ports for HTTP and HTTPS.
[!NOTE]
Thewinrm quickconfigcommand creates a firewall exception only for the current user profile. If the firewall profile is changed for any reason, then you should runwinrm quickconfigto enable the firewall exception for the new profile; otherwise, the exception might not be enabled.
To retrieve information about customizing a configuration, type winrm help config at a command prompt.
To configure WinRM with default settings
-
Type
winrm quickconfigat a command prompt.If you’re not running under the local computer Administrator account, then you must either select Run as Administrator from the Start menu, or use the Runas command at a command prompt.
-
When the tool displays Make these changes [y/n]?, type y.
If configuration is successful, then the following output is displayed.
WinRM has been updated for remote management.

WinRM service type changed to delayed auto start.
WinRM service started.
Created a WinRM listener on https://* to accept WS-Man requests to any IP on this machine.
-
Keep the default settings for client and server components of WinRM, or customize them. For example, you might need to add certain remote computers to the client configuration TrustedHosts list.
You should set up a trusted hosts list when mutual authentication can’t be established. Kerberos allows mutual authentication, but it can’t be used in workgroups—only domains. A best practice when setting up trusted hosts for a workgroup is to make the list as restricted as possible.
-
Create an HTTPS listener by typing the command
winrm quickconfig -transport:https. Be aware that you must open port 5986 for HTTPS transport to work.
Listener and WS-Management protocol default settings
To get the listener configuration, type winrm enumerate winrm/config/listener at a command prompt. Listeners are defined by a transport (HTTP or HTTPS) and an IPv4 or IPv6 address.
winrm quickconfig creates the following default settings for a listener. You can create more than one listener. For more information, type winrm help config at a command prompt.
Address
Specifies the address for which this listener was created.
Transport
Specifies the transport to use to send and receive WS-Management protocol requests and responses. The value must be either HTTP or HTTPS. The default is HTTP.
Port
Specifies the TCP port for which this listener is created.
WinRM 2.0: The default HTTP port is 5985.
Hostname
Specifies the host name of the computer on which the WinRM service is running. The value must be a fully-qualified domain name, or an IPv4 or IPv6 literal string, or a wildcard character.
Enabled
Specifies whether the listener is enabled or disabled. The default value is True.
URLPrefix
Specifies a URL prefix on which to accept HTTP or HTTPS requests. This is a string containing only the characters a-z, A-Z, 9-0, underscore (_), and slash (/). The string must not start with or end with a slash (/). For example, if the computer name is SampleMachine, then the WinRM client would specify https://SampleMachine/<*URLPrefix*> in the destination address. The default URL prefix is «wsman».
CertificateThumbprint
Specifies the thumbprint of the service certificate. This value represents a string of two-digit hexadecimal values found in the Thumbprint field of the certificate. This string contains the SHA-1 hash of the certificate. Certificates are used in client certificate-based authentication. Certificates can be mapped only to local user accounts, and they do not work with domain accounts.
ListeningOn
Specifies the IPv4 and IPv6 addresses that the listener uses. For example: «111.0.0.1, 111.222.333.444, ::1, 1000:2000:2c:3:c19:9ec8:a715:5e24, 3ffe:8311:ffff:f70f:0:5efe:111.222.333.444, fe80::5efe:111.222.333.444%8, fe80::c19:9ec8:a715:5e24%6».
Protocol default settings
Many of the configuration settings, such as MaxEnvelopeSizekb or SoapTraceEnabled, determine how the WinRM client and server components interact with the WS-Management protocol. The following list describes the available configuration settings.
MaxEnvelopeSizekb
Specifies the maximum Simple Object Access Protocol (SOAP) data in kilobytes. The default is 150 kilobytes.
[!NOTE]
The behavior is unsupported if MaxEnvelopeSizekb is set to a value greater than 1039440.
MaxTimeoutms
Specifies the maximum time-out, in milliseconds, that can be used for any request other than Pull requests. The default is 60000.
MaxBatchItems
Specifies the maximum number of elements that can be used in a Pull response. The default is 32000.
MaxProviderRequests
Specifies the maximum number of concurrent requests that are allowed by the service. The default is 25.
WinRM 2.0: This setting is deprecated, and is set to read-only.
WinRM client default configuration settings
The client version of WinRM has the following default configuration settings.
NetworkDelayms
Specifies the extra time in milliseconds that the client computer waits to accommodate for network delay time. The default is 5000 milliseconds.
URLPrefix
Specifies a URL prefix on which to accept HTTP or HTTPS requests. The default URL prefix is «wsman».
AllowUnencrypted
Allows the client computer to request unencrypted traffic. By default, the client computer requires encrypted network traffic and this setting is False.
Basic
Allows the client computer to use Basic authentication. Basic authentication is a scheme in which the user name and password are sent in clear text to the server or proxy. This method is the least secure method of authentication. The default is True.
Digest
Allows the client to use Digest authentication. Digest authentication is a challenge-response scheme that uses a server-specified data string for the challenge. Only the client computer can initiate a Digest authentication request. The client computer sends a request to the server to authenticate, and receives a token string from the server. Then the client computer sends the resource request, including the user name and a cryptographic hash of the password combined with the token string. Digest authentication is supported for HTTP and for HTTPS. WinRM Shell client scripts and applications can specify Digest authentication, but the WinRM service does not accept Digest authentication. The default is True.
[!NOTE]
Digest authentication over HTTP is not considered secure.
Certificate
Allows the client to use client certificate-based authentication. Certificate-based authentication is a scheme in which the server authenticates a client identified by an X509 certificate. The default is True.
Kerberos
Allows the client to use Kerberos authentication. Kerberos authentication is a scheme in which the client and server mutually authenticate by using Kerberos certificates. The default is True.
Negotiate
Allows the client to use Negotiate authentication. Negotiate authentication is a scheme in which the client sends a request to the server to authenticate. The server determines whether to use the Kerberos protocol or NTLM. The Kerberos protocol is selected to authenticate a domain account, and NTLM is selected for local computer accounts. The user name must be specified in domainuser_name format for a domain user. The user name must be specified in «server_nameuser_name» format for a local user on a server computer. The default is True.
CredSSP
Allows the client to use Credential Security Support Provider (CredSSP) authentication. CredSSP enables an application to delegate the user’s credentials from the client computer to the target server. The default is False.
DefaultPorts
Specifies the ports that the client will use for either HTTP or HTTPS.
WinRM 2.0: The default HTTP port is 5985, and the default HTTPS port is 5986.
TrustedHosts
Specifies the list of remote computers that are trusted. Other computers in a workgroup or computers in a different domain should be added to this list.
[!Note]
The computers in the TrustedHosts list are not authenticated. The client may send credential information to these computers.
If an IPv6 address is specified for a TrustedHost, the address must be enclosed in square brackets as demonstrated by the following winrm utility command: winrm set winrm/config/client '@{TrustedHosts ="[0:0:0:0:0:0:0:0]"}'.
For more info about how to add computers to the TrustedHosts list, type winrm help config.
WinRM service default configuration settings
The service version of WinRM has the following default configuration settings.
RootSDDL
Specifies the security descriptor that controls remote access to the listener. The default is «O:NSG:BAD:P(A;;GA;;;BA)(A;;GR;;;ER)S:P(AU;FA;GA;;;WD)(AU;SA;GWGX;;;WD)».
MaxConcurrentOperations
The maximum number of concurrent operations. The default is 100.
WinRM 2.0: The MaxConcurrentOperations setting is deprecated, and is set to read-only. This setting has been replaced by MaxConcurrentOperationsPerUser.
MaxConcurrentOperationsPerUser
Specifies the maximum number of concurrent operations that any user can remotely open on the same system. The default is 1500.
EnumerationTimeoutms
Specifies the idle time-out in milliseconds between Pull messages. The default is 60000.
MaxConnections
Specifies the maximum number of active requests that the service can process simultaneously. The default is 300.
WinRM 2.0: The default is 25.
MaxPacketRetrievalTimeSeconds
Specifies the maximum length of time, in seconds, the WinRM service takes to retrieve a packet. The default is 120 seconds.
AllowUnencrypted
Allows the client computer to request unencrypted traffic. The default is False.
Basic
Allows the WinRM service to use Basic authentication. The default is False.
Certificate
Allows the WinRM service to use client certificate-based authentication. The default is False.
Kerberos
Allows the WinRM service to use Kerberos authentication. The default is True.
Negotiate
Allows the WinRM service to use Negotiate authentication. The default is True.
CredSSP
Allows the WinRM service to use Credential Security Support Provider (CredSSP) authentication. The default is False.
CbtHardeningLevel
Sets the policy for channel-binding token requirements in authentication requests. The default is Relaxed.
DefaultPorts
Specifies the ports that the WinRM service will use for either HTTP or HTTPS.
WinRM 2.0: The default HTTP port is 5985, and the default HTTPS port is 5986.
IPv4Filter and IPv6Filter
Specifies the IPv4 or IPv6 addresses that listeners can use. The defaults are IPv4Filter = * and IPv6Filter = *.
IPv4: An IPv4 literal string consists of four dotted decimal numbers, each in the range 0 through 255. For example: 192.168.0.0.
IPv6: An IPv6 literal string is enclosed in brackets and contains hexadecimal numbers that are separated by colons. For example: [::1] or [3ffe:ffff::6ECB:0101].
EnableCompatibilityHttpListener
Specifies whether the compatibility HTTP listener is enabled. If this setting is True, then the listener will listen on port 80 in addition to port 5985. The default is False.
EnableCompatibilityHttpsListener
Specifies whether the compatibility HTTPS listener is enabled. If this setting is True, then the listener will listen on port 443 in addition to port 5986. The default is False.
Winrs Default Configuration Settings
winrm quickconfig also configures Winrs default settings.
AllowRemoteShellAccess
Enables access to remote shells. If you set this parameter to False, then new remote shell connections will be rejected by the server. The default is True.
IdleTimeout
Specifies the maximum time, in milliseconds, that the remote shell will remain open when there is no user activity in the remote shell. The remote shell is automatically deleted after the time that is specified.
WinRM 2.0: The default is 180000. The minimum value is 60000. Setting this value lower than 60000 will have no effect on the time-out.
MaxConcurrentUsers
Specifies the maximum number of users who can concurrently perform remote operations on the same computer through a remote shell. New remote shell connections will be rejected if they exceed the specified limit. The default is 5.
MaxShellRunTime
Specifies the maximum time, in milliseconds, that the remote command or script is allowed to execute. The default is 28800000.
WinRM 2.0: The MaxShellRunTime setting is set to read-only. Changing the value for MaxShellRunTime will have no effect on the remote shells.
MaxProcessesPerShell
Specifies the maximum number of processes that any shell operation is allowed to start. A value of 0 allows for an unlimited number of processes. The default is 15.
MaxMemoryPerShellMB
Specifies the maximum amount of memory allocated per shell, including the shell’s child processes. The default is 150 MB.
MaxShellsPerUser
Specifies the maximum number of concurrent shells that any user can remotely open on the same computer. If this policy setting is enabled, then the user won’t be able to open new remote shells if the count exceeds the specified limit. If this policy setting is disabled or is not configured, the limit will be set to 5 remote shells per user by default.
Configuring WinRM with Group Policy
Use the Group Policy editor to configure Windows Remote Shell and WinRM for computers in your enterprise.
To configure with Group Policy
- Open a Command Prompt window as an administrator.
- At the Command Prompt, type
gpedit.msc. The Group Policy Object Editor window opens. - Find the Windows Remote Management and Windows Remote Shell Group Policy Objects (GPO) under Computer ConfigurationAdministrative TemplatesWindows Components.
- On the Extended tab, select a setting to see a description. Double click a setting to edit it.
Windows Firewall and WinRM 2.0 ports
Starting in WinRM 2.0, the default listener ports configured by Winrm quickconfig are port 5985 for HTTP transport, and port 5986 for HTTPS. WinRM listeners can be configured on any arbitrary port.
If a computer is upgraded to WinRM 2.0, the previously configured listeners are migrated, and still receive traffic.
WinRM installation and configuration notes
WinRM isn’t dependent on any other service except WinHttp. If the IIS Admin Service is installed on the same computer, then you might see messages that indicate that WinRM can’t be loaded before Internet Information Services (IIS). However, WinRM doesn’t actually depend on IIS—those messages occur because the load order ensures that the IIS service starts before the HTTP service. WinRM does require that WinHTTP.dll be registered.
If the ISA2004 firewall client is installed on the computer, then it can cause a Web Services for Management (WS-Management) client to stop responding. To avoid this issue, install ISA2004 Firewall SP1.
If two listener services with different IP addresses are configured with the same port number and computer name, then WinRM listens or receives messages on only one address. This is because the URL prefixes used by the WS-Management protocol are the same.
IPMI driver and provider installation notes
The driver might not detect the existence of IPMI drivers that are not from Microsoft. If the driver fails to start, then you might need to disable it.
If the baseboard management controller (BMC) resources appear in the system BIOS, then ACPI (Plug and Play) detects the BMC hardware, and automatically installs the IPMI driver. Plug and Play support might not be present in all BMCs. If the BMC is detected by Plug and Play, then an Unknown Device appears in Device Manager before the Hardware Management component is installed. When the driver is installed, a new component, the Microsoft ACPI Generic IPMI Compliant Device, appears in Device Manager.
If your system doesn’t automatically detect the BMC and install the driver, but a BMC was detected during the setup process, then you must create the BMC device. To do this, type the following command at a command prompt: Rundll32 ipmisetp.dll, AddTheDevice. After this command is executed, the IPMI device is created, and it appears in Device Manager. If you uninstall the Hardware Management component, then the device is removed.
For more information, see Hardware Management Introduction.
The IPMI provider places the hardware classes in the roothardware namespace of WMI. For more information about the hardware classes, see IPMI Provider. For more information about WMI namespaces, see WMI Architecture.
WMI plug-in configuration notes
Beginning with Windows 8 and Windows Server 2012, WMI plug-ins have their own security configurations. For a normal or power (non-administrator) user to be able to use the WMI plug-in, you need to enable access for that user after the listener has been configured. First, you must set up the user for remote access to WMI through one of these steps.
- Run
lusrmgr.mscto add the user to the WinRMRemoteWMIUsers__ group in the Local Users and Groups window, or - use the winrm command-line tool to configure the security descriptor for the namespace of the WMI plug-in, as follows:
winrm configSDDL http://schemas.microsoft.com/wbem/wsman/1/wmi/ WmiNamespace.
When the user interface appears, add the user.
After setting up the user for remote access to WMI, you must set up WMI to allow the user to access the plug-in. To do this, run wmimgmt.msc to modify the WMI security for the namespace to be accessed in the WMI Control window.
The majority of the WMI classes for management are in the rootcimv2 namespace.
Discover what WinRM protocol is all about and gain insight on how you can use it to manage your network
Windows Remote Management (WinRM) is the Microsoft implementation of Web Services-Management (WS-Management) protocol that provides a common way for systems (hardware and operating systems) from different vendors, to interact to access and exchange management information across an IT infrastructure.
WinRM is an important and useful protocol, especially for Network Administrators managing large windows network infrastructure.
Microsoft started implementing the WS-Management standard when it released WinRM 1.1, available for Windows XP, Windows Server 2003, Windows Vista, and Windows Server 2008. This was followed by WinRM 2.0 found in Windows 7 and Windows Server 2008 R2, which allows PowerShell 2.0 scripts and cmdlets to be invoked on a remote machine or a large set of remote machines. The latest version of Windows Remote Management—WinRM 3.0 was released in 2012 and comes pre-installed out of the box in Windows 8 and Windows Server 2012.
Why is the WinRM protocol important?
Why is the WinRM protocol important and why do we need it? With WinRM protocol, the connection between computers or servers can be easily established, so that remote operations can be performed. You can obtain data or manage resources on remote computers as well as the local computer. Connecting to a remote computer in a Windows Remote Management script is very similar to making a local connection. The WinRM protocol is intended to improve hardware management in a network environment with various devices running a variety of operating systems.
As a command-line tool, WinRM is built into Windows operating systems and based on .NET and PowerShell, which allows scripts and remote PowerShell commands to be invoked on Windows-based machines or a large set of remote machines without RDP or log into the remote machine. This method makes it easier for Windows Administrators to manage multiple machines using scripts and cmdlet, and perform tasks such as:
- Monitor, manage and configure servers, operating systems, and client machines from a remote location.
- Remotely communicate and interface with hosts through readily available channels/ports within your network, including workstations, servers, and any operating system that supports it.
- Execute commands remotely on systems that you are not local to you but are network accessible
The Windows Remote Shell (WinRS) command-line tool relies on WinRM to execute remote commands. It leverages WinRM to let you launch processes on remote machines. WinRM is the server component of this remote management application and WinRS is the client component for WinRM, which runs on the remote computer attempting to remotely manage the WinRM server. However, both computers must have WinRM installed and enabled on them for WinRS to work and retrieve information from the remote system.
WinRM architecture and components
The WinRM architecture consists of components on the client and server computers. The diagram in Figure 1.0 below shows the components on both the requesting client and responding server computers, and how they interact with each other, including the protocol that is used to communicate between them.

Table 1.0 below is a breakdown of the various WinRM components and where they reside.
| Component | Description | Residence |
|---|---|---|
| WinRM application | WinRM command-line tool that uses the WinRM scripting API to make calls to request data or to execute methods | Client-side |
| WSMAuto.dll | The Automation layer that provides scripting support | Client and server-side |
| WsmCL.dl | API layer within the OS | Client and server-side |
| HTTP API | Provides support for HTTP and HTTPS transport | Client and server-side |
| WsmSvc.dll | WinRM listener service | Server-side |
| WsmProv.dll | Provider subsystem | Server-side |
| WsmRes.dll | Resource file | Server-side |
| WsmWmiPl.dll | WMI plug-in that allows you to obtain WMI data through WinRM | Server-side |
| IPMI driver and WMI IPMI provider | Supply any hardware data that is requested using the IPMI (Intelligent Platform Management Interface) classes | Server-side |
Table 1.0 | WinRM components and description
WinRM configuration and commands
For the WinRM command-line tool and scripts to run, and perform data operations effectively, Windows Remote Management (WinRM) must be installed and configured. However, the good news is that WinRM is automatically installed with all currently-supported versions of the Windows operating system, including IPMI (Intelligent Platform Management Interface) WMI (Windows Management Instrumentation) provider components.
By default, WinRM is enabled on Windows Server OS since Windows Server 2012, but not on Windows 10 operating system. This means that you need to enable it on Windows 10 machines. To enable WinRM on a Windows 10 machine, open PowerShell and run the following cmdlet:
Enable-PSRemoting -force
If you have a single Windows 10 machine that is not part of an Active Directory domain network, you may need to add the machine you are going to connect from to the trusted host of the Windows 10 machine. The reason we need to add trusted hosts is to be able to connect to a Windows machine using WinRM.
However, in situations where you have 100+ Windows 10 machines in an Active Directory domain network, you may need to use a Group Policy (GPO) to get it working with minimal effort. To use a GPO, create a new one or edit an existing one and modify the following settings and set WinRM to “Enabled”:
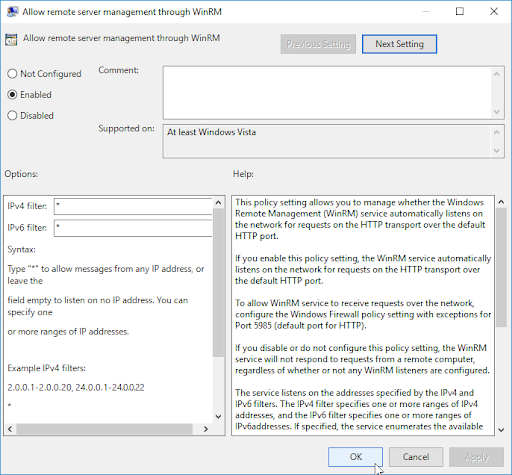
- Computer Configuration > Policies > Administrative Templates > Windows Components > Windows Remote Management (WinRM) > WinRM Service > Allow remote server management through WinRM
Remember to apply the GPO to the Organizational Units (OU) that have all your Windows 10 machines. Within a few minutes after applying the GPO to the OU, all your hosts will get the policy update. In this case, there is no need to modify the trusted hosts’ list.
The table below is a collection of some WinRM commands you can use to execute remote operations. Please note that these commands work best when you are on an Active Directory domain network. For workgroup machines, the WinRM service may require additional configuration such as modifying the trusted hosts’ list.
| Description | Command | Remark |
|---|---|---|
| Locate listeners and the addresses | winrm e winrm/config/listener | |
| Check the state of configuration settings | winrm get winrm/config | |
| Quickly configure the WS-Man service | winrm QuickConfig | Run from an Elevated Command prompt |
| Quickly delete the WS-Man listener | winrm invoke Restore winrm/Config @{} | Run from an Elevated Command prompt |
| Display your machine’s basic hardware info | winrm enumerate wmicimv2/Win32_ComputerSystem | Run from an Elevated Command prompt |
| Display your operating system properties | winrm get wmicimv2/Win32_OperatingSystem | Run from an Elevated Command prompt |
| Output your OS info in XML | winrm get wmicimv2/Win32_OperatingSystem -format:pretty | Run from an Elevated Command prompt |
| Test WS-Man access to a remote machine | winrm id -remote: | Run from an Elevated Command prompt |
| Grab a remote machine’s WS-Man config | winrm get winrm/Config -r: | Run from an Elevated Command prompt |
| Grab a remote machine’s CPU load | winrm g wmicimv2/Win32_Processor?DeviceID=CPU0 -fragment:LoadPercentage -r: | Run from an Elevated Command prompt |
| Grab a remote machine’s free memory | winrm g wmicimv2/Win32_OperatingSystem -fragment:FreePhysicalMemory -r: | Run from an Elevated Command prompt |
| Stop a service on a remote machine | winrm invoke stopservice wmicimv2/Win32_Service?name=w32time -r: | Run from an Elevated Command prompt |
| Start a service on a remote machine | winrm invoke startservice wmicimv2/Win32_Service?name=w32time -r: | Run from an Elevated Command prompt |
| Reboot a remote machine | winrm invoke reboot wmicimv2/Win32_OperatingSystem -r: | Run from an Elevated Command prompt |
| Run a command on a remote machine (this uses winrS, not winrM) | winrs -r: ipconfig /all | Run from an Elevated Command prompt |
| Use PowerShell to grab the WS-Man Win32_OperatingSystem XML output | [xml]$osInfo = winrm get wmicimv2/Win32_OperatingSystem /format:pretty | Run from PowerShell |
| Display the OS version property | $osInfo.Win32_OperatingSystem.Version | Run from PowerShell |
| Display the last boot time | $osInfo.Win32_OperatingSystem.LastBootupTime.DateTime | Run from PowerShell |
| Put free memory metric into an XML variable | [xml]$freemem = cmd /c “winrm get wmicimv2/Win32_OperatingSystem -fragment:FreePhysicalMemory -f:pretty -r:” | Run from PowerShell |
| Display the free memory value | $freemem.XMLFragment.FreePhysicalMemory | Run from PowerShell |
Table 2.0 | Common WinRM commands and description
WinRM security
By default, WinRM uses Kerberos for authentication. This means that Windows never sends the actual credentials to the system requesting validation instead of relying on features such as hashing and tickets to connect.
WinRM listens on TCP port 80 (HTTP) by default, it doesn’t mean traffic is unencrypted. Traffic by default is only accepted by WinRM when it is encrypted using the Negotiate or Kerberos SSP. WinRM also includes helper code that lets the WinRM listener share port 80 with the Microsoft IIS web server or any other application that may need to use that port. Although WinRM listeners can be configured to encrypt all communications using HTTPS, with the use of Kerberos, even if unencrypted HTTP is used, all communication is still encrypted using a symmetric 256-bit key after the authentication phase completes.
You can manually configure WinRM to use HTTPS. The purpose of configuring WinRM for HTTPS is to encrypt the data being sent across the network. This allows for additional security by ensuring server identity via SSL/TLS certificates thereby preventing an attacker from impersonating it. To configure WinRM to use HTTPS, a local computer Server Authentication certificate with a CNAME matching the hostname is required to be installed. To install certificates for the local computer, follow the steps below:
- Select Start and then select Run (or using keyboard combination press Windows key+R)
- Type MMC and then press Enter
- Select File from menu options and then select Add or Remove Snap-ins
- Select Certificates and select Add
- Go through the wizard selecting the Computer account
- Install or view the certificates under Certificates (Local computer) >> Personal >> Certificates.
Once the certificate is successfully installed, use the following command to configure WRM to listen on HTTPS: winrm quickconfig -transport:https
Notable applications of WinRM
- SolarWinds Server & Application Monitor software (SAM) enables remote access for PowerShell with WinRM. It utilizes a WinRM server on monitored servers for its PowerShell integration.
- Thycotic Secret Server—privileged access management (PAM) solution, relies on WinRM components to run PowerShell scripts.
- Ansible—an agentless open-source software provisioning and deployment tool, leverages WinRM to communicate with Windows servers and run PowerShell scripts and commands. Ansible is agentless because of its ability to remotely connect via WinRM, thereby allowing remote PowerShell execution to do its tasks.
- CloudBolt—a hybrid cloud management platform, leverages WinRM as part of Blueprints, Server Actions, and CB Plugins to execute remote scripts on Windows servers using the python pywinrm module.
Windows Remote Management FAQs
Is WinRM the same as RDP?
WinRM and RDP are two different systems, although both were developed by Microsoft. WinRM is designed for the remote management of Windows computers. RDP stands for Remote Desktop Protocol and it provides a view of the Desktop of a remote Windows computer. There are also RDP clients available for Linux, Unix, macOS, Android, and iOS.
What is the difference between WinRM and WMI?
WinRM is the Windows Remote Management system. WMI is the Windows Management Instrumentation system. WMI collects status reports on the services that are integrated into the Windows system. WinRM is a remote protocol. In truth, WinRM extracts WMI data from remote computers, so it uses WMI as a local agent.
Is WinRM enabled by default?
WinRM isn’t enabled by default in Windows Server versions up to 2012. From Windows Server 2012 R2, WinRM is enabled by default.
В этой статье мы рассмотрим, как централизованно включить и настроить службу удаленного управления Windows Remote Management (WinRM) на компьютерах домена с помощью групповых политик. Напомню, что Windows Remote Management это реализация протокола WS-Management Protocol для удаленного управления клиентскими и серверными ОС Windows. WinRM позволяет удаленно управлять компьютерами через:
- Server Manager (Windows Server);
- PowerShell Remoting (PSSession);
- Windows Admin Center.
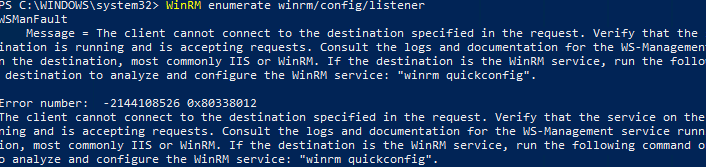
Как включить WinRM в Windows вручную?
Служба WinRM установлена во всех современных версиях Windows. В Windows Server она включена по умолчанию, и отключена в десктопных редакциях Windows 11/10/8.1). По умолчанию слушатель службы WinRM listener не принимает подключения. Чтобы проверить это, выполните на клиенте команду:
WinRM enumerate winrm/config/listener
Появится ошибка, которая говорит, что служба WinRM не настроена:
WSManFault Message = The client cannot connect to the destination specified in the request. Verify that the service on the destination is running and is accepting requests. Consult the logs and documentation for the WS-Management service running on the destination, most commonly IIS or WinRM. If the destination is the WinRM service, run the following command on the destination to analyze and configure the WinRM service: "winrm quickconfig".
Error number: -2144108526 0x80338012
Чтобы включить и настроить службу WinRM в Windows, достаточно выполнить команду:
winrm quickconfig
или
Enable-PSRemoting –Force
WinRM has been updated to receive requests.
WinRM service type changed successfully.
WinRM service started.

Данная команда изменит тип запуска службы WinRM на автоматический, задаст стандартные настройки WinRM и добавить исключения для WinRM портов (5985 и 5986) в список исключений Windows Defender Firewall.
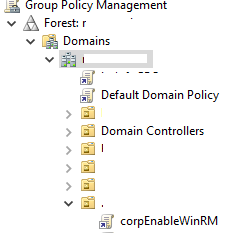
Настройка WinRM с помощью групповых политик
Вы можете автоматически включить и настроить WinRM на компьютерах домена с помощью групповых политик Windows.
- Откройте консоль редактора Group Policy Management Console (gpmc.msc), выберите контейнер с компьютерами на которых вы хотите включить WinRM и создайте новую политику corpEnableWinRM;

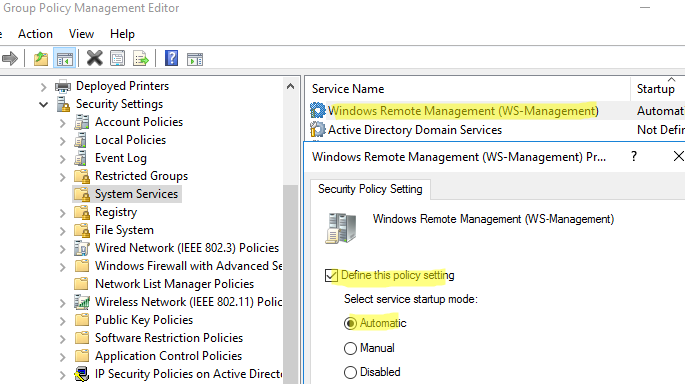
- Откройте политику на редактирование;
- Перейдите в раздел Computer Configuration -> Policies -> Windows Settings -> Security Settings -> System Services. Найдите службу Windows Remote Service (WS-Management) и настройте ее на автоматический запуск;
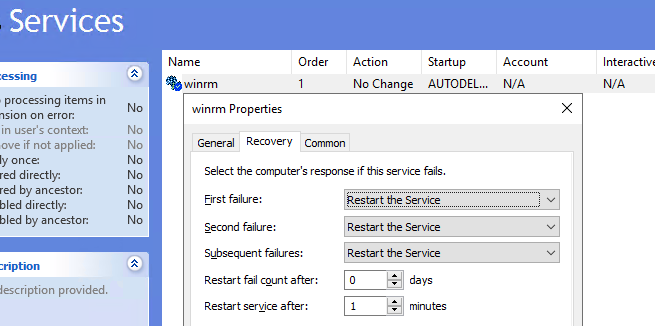
- Теперь перейдите в раздел Computer Policies -> Preferences -> Control Panel Settings -> Services и выберите New -> Service. Укажите имя службы WinRM и на вкладке Recovery задайте действие Restart the Service;
- Перейдите в раздел Computer Configuration -> Policies -> Administrative Templates -> Windows Components -> Windows Remote Management (WinRM) -> WinRM Service. Включите параметр Allow remote server management through WinRM. В поле фильтр IPv4/IPv6 можно указать IP адреса или подсети, на которых нужно слушать удаленные подключения через WinRM. Если вы хотите разрешать принимать WinRM подключения на всех IP адресах, оставьте здесь *;
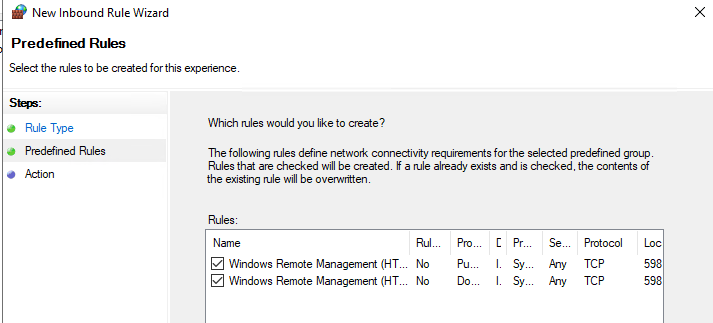
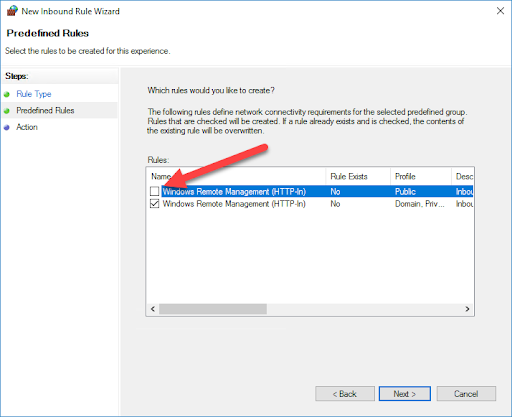
- Откройте в Windows Defender Firewall правила, разрешающие подключаться к WinRM по стандартным портам 5985 и 5986. Перейдите в Computer Configuration -> Policies -> Windows Settings -> Security Settings -> Windows Firewall with Advanced Security -> Windows Firewall with Advanced Security -> Inbound Rules. Выберите predefined rule Windows Remote Management;
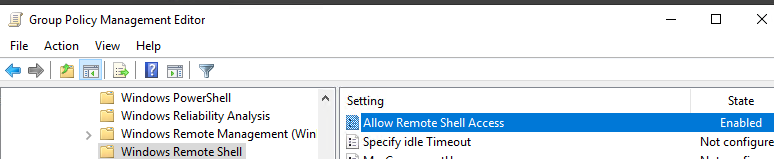
- Перейдите в раздел Computer Configuration -> Policies -> Windows Components -> Windows Remote Shell и включите параметр Allow Remote Shell Access.

Обновите настройки GPO на клиентах и проверьте, что служба WinRM настроилась автоматически. Для диагностики применения групповой политики на клиенте можно использовать утилиту gpresult.
Проверка настроек WinRM
Чтобы проверить, что настройки WinRM на компьютере заданы через групповые политики, выполните команду:
winrm e winrm/config/listener
Команда выведет текущие настройки WinRM листенера. Обратите внимание на строку
Listener [Source="GPO"]
. Она означает, что настройки получены через групповые политики.

Полную конфигурацию службы WinRM можно вывести с помощью команды:
winrm get winrm/config
Теперь нужно попробовать удаленно подключиться к компьютеру через WinRM. Запустите на удаленном компьютере консоль PowerShell с учетной записью с правами администратора на обоих компьютерах и выполните команду:
Test-WsMan YourCompName1
Если WinRM включен, появится такой ответ:
wsmid : http://schemas.dmtf.org/wbem/wsman/identity/1/wsmanidentity.xsd
ProtocolVersion : http://schemas.dmtf.org/wbem/wsman/1/wsman.xsd
ProductVendor : Microsoft Corporation
ProductVersion : OS: 0.0.0 SP: 0.0 Stack: 3.0

Проверить доступность порта 5985 на удаленном компьютере можно так:
Test-NetConnection -ComputerName YourCompName1 -Port 5985
Теперь можно попробовать выполнить интерактивное подключение к удаленному компьютеру через PSRemoting с помощью командлета Enter-PSSession:
Enter-PSSession CompNameHere1

В данном случае подключение было успешно установлено и перед вами открылась консоль удаленного сервера.
По аналогии через PSRemoting на удаленном компьютере команду можно выполнить произвольную команду с помощью Invoke-Command:
Invoke-Command -ComputerName YourCompName1 -ScriptBlock {ipconfig /all}
Если соединение работает, вы увидите на экране вывод команды
ipconfig
.
Также можно выполнить команду на удаленном хосте так:
winrs -r:wsk-w10BO1 dir
В некоторых случаях при подключении через PSSession может появится ошибка:
Enter-PSSession : Connecting to remote server wsk-w10BO1 failed with the following error message : Access is denied.
CategoryInfo : InvalidArgument: (wsk-w10BO1:String) [Enter-PSSession], PSRemotingTransportException FullyQualifiedErrorId : CreateRemoteRunspaceFailed
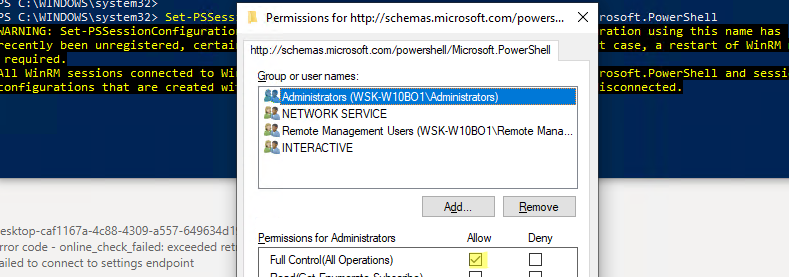
В этом случае проверьте настройки разрешения для подключения к WinRM на удаленном компьютере:
Set-PSSessionConfiguration -ShowSecurityDescriptorUI -Name Microsoft.PowerShell
Убедитесь, что ваша учетная запись входит в группу Administrators или Remote Management Users (см. статью об удаленном доступе через WinRM без прав администратора) и им предоставлены права FullControl. Также проверьте, нет ли Deny правил.
Для настройки WinRM и PSRemoting в рабочей группе (без домена AD) рекомендуем использовать эту инструкцию.
Skip to content
- ТВикинариум
- Форум
- Поддержка
- PRO
- Войти
Служба удаленного управления Windows (WS-Management)
Имя службы: WinRM
Отображаемое имя: Служба удаленного управления Windows (WS-Management)
Состояние: не работает
Тип запуска: Вручную
Зависимости: нет
Описание по умолчанию
Служба удаленного управления Windows (WinRM) применяет протокол WS-Management для удаленного управления. WS-Management — стандартный протокол веб-служб для удаленного управления программным обеспечением и оборудованием. Служба WinRM прослушивает сеть на наличие запросов WS-Management и обрабатывает их. Для принятия сетевых запросов необходимо настроить службу WinRM с помощью средства командной строки «winrm.cmd» или через групповую политику. Служба WinRM предоставляет доступ к данным WMI и включает поддержку сбора событий. Работа службы необходима для сбора событий и подписки на события. Для передачи сообщений WinRM используются протоколы HTTP и HTTPS. Служба WinRM не зависит от служб IIS, однако по умолчанию использует тот же порт, что и IIS. Служба WinRM резервирует префикс URL-адреса /wsman. Для предотвращения конфликтов со службами IIS размещенные на IIS веб-сайты не должны использовать префикс URL-адреса /wsman.
Нормальное описание
Служба, позволяющая выполнять удалённые команды на компьютерах локальной сети.
Рекомендации
Учитывая, что служба:
- не имеет зависимостей
- не нужна для Удалённого рабочего стола и Удалённого помощника
- представляет потенциальную опасность для домашних ПК из-за возможности
взлома локальной сети и дальнейшего выполнения удалённых команд
Службу нужно отключить.
Windows Remote Management (WinRM) service implements the WS-Management protocol for remote management. WS-Management is a standard web services protocol used for remote software and hardware management. The WinRM service listens on the network for WS-Management requests and processes them. The WinRM Service needs to be configured with a listener using winrm.cmd command line tool or through Group Policy in order for it to listen over the network. The WinRM service provides access to WMI data and enables event collection. Event collection and subscription to events require that the service is running. WinRM messages use HTTP and HTTPS as transports. The WinRM service does not depend on IIS but is preconfigured to share a port with IIS on the same machine. The WinRM service reserves the /wsman URL prefix. To prevent conflicts with IIS, administrators should ensure that any websites hosted on IIS do not use the /wsman URL prefix.
This service also exists in Windows 7, 8 and Vista.
Startup Type
| Windows 10 version | Home | Pro | Education | Enterprise |
|---|---|---|---|---|
| 1507 | Manual | Manual | Manual | Manual |
| 1511 | Manual | Manual | Manual | Manual |
| 1607 | Manual | Manual | Manual | Manual |
| 1703 | Manual | Manual | Manual | Manual |
| 1709 | Manual | Manual | Manual | Manual |
| 1803 | Manual | Manual | Manual | Manual |
| 1809 | Manual | Manual | Manual | Manual |
| 1903 | Manual | Manual | Manual | Manual |
| 1909 | Manual | Manual | Manual | Manual |
| 2004 | Manual | Manual | Manual | Manual |
| 20H2 | Manual | Manual | Manual | Manual |
| 21H1 | Manual | Manual | Manual | Manual |
| 21H2 | Manual | Manual | Manual | Manual |
| 22H2 | Manual | Manual | Manual | Manual |
Default Properties
| Display name: | Windows Remote Management (WS-Management) |
| Service name: | WinRM |
| Type: | share |
| Path: | %WinDir%System32svchost.exe -k NetworkService -p |
| File: | %WinDir%system32WsmSvc.dll |
| Error control: | normal |
| Object: | NT AUTHORITYNetworkService |
| Privileges: |
|
Default Behavior
The Windows Remote Management (WS-Management) service is running as NT AUTHORITYNetworkService in a shared process of svchost.exe. Other services might run in the same process. If Windows Remote Management (WS-Management) fails to start, the error is logged. Windows 10 startup proceeds, but a message box is displayed informing you that the WinRM service has failed to start.
Dependencies
Windows Remote Management (WS-Management) is unable to start, if at least one of the following services is stopped or disabled:
- HTTP Service
- Remote Procedure Call (RPC)
Restore Default Startup Type of Windows Remote Management (WS-Management)
Automated Restore
1. Select your Windows 10 edition and release, and then click on the Download button below.
2. Save the RestoreWindowsRemoteManagementWSManagementWindows10.bat file to any folder on your hard drive.
3. Right-click the downloaded batch file and select Run as administrator.
4. Restart the computer to save changes.
Note. Make sure that the WsmSvc.dll file exists in the %WinDir%system32 folder. If this file is missing you can try to restore it from your Windows 10 installation media.
Yea, though I walk through the valley of the shadow of death, I will fear no evil: for thou art with me; thy rod and thy staff they comfort me.
If you know anything about PDQ.com, you know we get pretty excited about tools that make our lives easier. That’s why we’re such big fans of PowerShell. How big of fans are we? We’re big enough fans to add command-line functionality into our products. We’re big enough fans to add a PowerShell scanner right into PDQ Inventory. We’re big enough fans to have dedicated videos and blog posts about PowerShell. Heck, we even wear PowerShell t-shirts.

With that said, while PowerShell is excellent when it works, when it doesn’t work, it can definitely be frustrating. Usually, any issues I have with PowerShell are self-inflicted. Incorrect commands, misspelled variables, missing punctuation are all too common in my scripts. Occasionally though, I’ll run into issues that didn’t have anything to do with my poor scripting skills. Let’s take a look at an issue I ran into recently and how to resolve it.
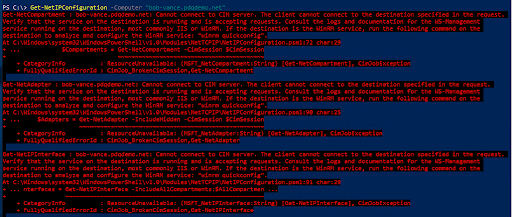
Cannot Connect To CIM Server
Get-NetIPConfiguration -Computer “computer-name”
Running Get-NetIPConfiguration by itself locally on my computer worked perfectly, but running this command against a remote computer failed with the following error.
“Get-NetCompartment : computer-name: Cannot connect to CIM server. The client cannot connect to the destination specified in the request…”
If you want to see a very unintentional yet perfect example of this error in video form, check out our YouTube video covering IPConfig in PowerShell.
Thankfully, PowerShell is pretty good about giving us detailed error messages (I wish I could say the same thing about Windows). If you continue reading the message, it actually provides us with the solution to our problem.
“Consult the logs and documentation for the WS-Management service running on the destination, most commonly IIS or WinRM. If the destination is the WinRM service, run the following command on the destination to analyze and configure the WinRM service: ‘winrm quickconfig’.”
Since I was working on a newly built lab, the WinRM (Windows Remote Management) service not running was definitely a possibility worth looking into. PowerShell was even kind enough to give me the command “winrm quickconfig” to test and see if the WinRM service needed to be configured.
Configure Windows Remote Management With WinRM Quickconfig
The command “winrm quickconfig” is a great way to enable Windows Remote Management if you only have a few computers you need to enable the service on. The command will need to be run locally or remotely via PSEXEC. Here’s what happens when you run the command on a computer that hasn’t had WinRM configured.
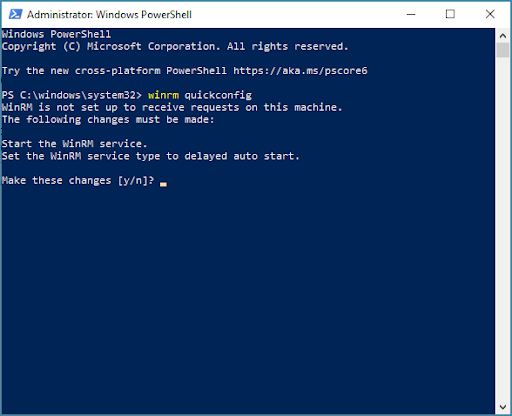
Since the service hasn’t been configured yet, the command will ask you if you want to start the setup process. To begin, type “y” and hit enter.
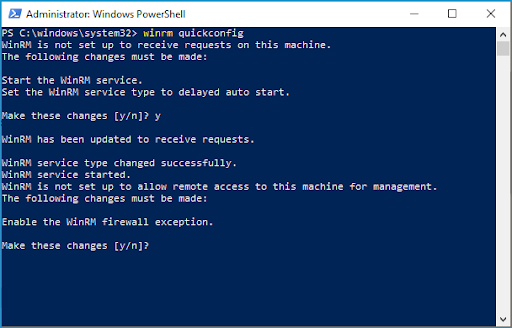
After starting the service, you’ll be prompted to enable the WinRM firewall exception. Type “y” and hit enter to continue.
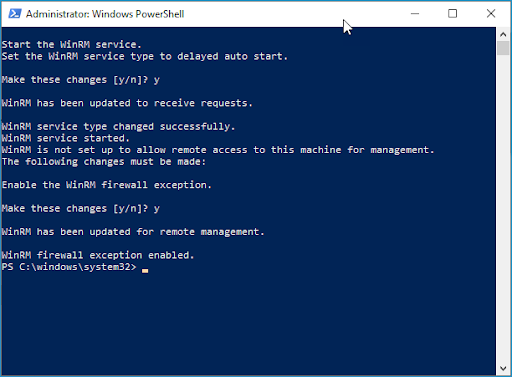
Once the process finishes, it’ll inform you that the firewall exception has been added, and WinRM should be enabled. This process is quick and straightforward, though it’s not very efficient if you have hundreds of computers to manage.
Enabling WinRM With Group Policy
If you have hundreds or even thousands of computers that need to have WinRM enabled, Group Policy is a great option. With Group Policy, you can enable WinRM, have the service start automatically, and set your firewall rules.
-
Open Group Policy Management console
-
Right-click on the OU you want to apply the GPO to and click Create a GPO in this Domain, and Link it here…
-
Name the policy Enable WinRM and click OK
-
Right-click on the new GPO and click Edit
-
Expand Computer Configuration > Policies > Administrative Templates > Windows Components > Windows Remote Management (WinRM) > WinRM Service
-
Find the setting Allow remote server management through WinRM and double-click on it.
-
Select Enable
-
For the IPv4 and IPv6 filter, you can supply an IP address range, or you can use an asterisk * to allow all IP addresses. Once finished, click OK
-
Next, we’ll set the WinRM service to start automatically. Navigate to Computer Configurations > Preferences > Control Panel Settings
-
Right-click in the Services window and click New > Service
-
Change Startup to Automatic (Delayed Start)
-
Click the ellipsis button with the three dots next to Service name.
-
Find and select the service name WinRM
-
Select Start Service from the service action menu and then click Apply and OK
-
Lastly, we need to configure our firewall rules. Navigate to Computer Configuration > Policies > Windows Settings > Security Settings > Windows Firewall with Advanced Security > Windows Firewall with Advanced Security
-
Right-click on Inbound Rules and select New Rule…
-
Select Predefined, and select Windows Remote Management from the drop-down menu, then click Next
-
Uncheck the Public profile rule
-
Click Next
-
Select Allow the connection and click Finish
Congrats! Once all of your computers apply the new Group Policy settings, your environment will be ready for Windows Remote Management.
Enabling WinRM With PDQ Deploy
If Group Policy isn’t an option for your environment, you can use PDQ Deploy to push out the “winrm quickconfig” command to all of your computers, and we’ll use the “-quiet” parameter to make sure it installs silently without user interaction.
-
With PDQ Deploy, click New Package
-
Enter a name for your package, like Enable WinRM
-
Click New Step > PowerShell
-
Add the command winrm quickconfig -quiet
-
Click Save
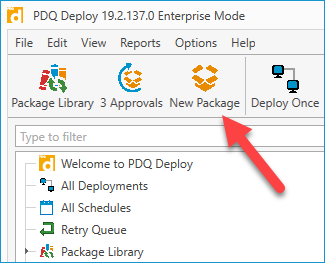

That’s all there is to it! Now you can deploy that package out to whatever computers need to have WinRM enabled.
Wrapping Up
Enabling WinRM will ensure you don’t run into the same issue I did when running certain commands against remote machines. One less thing to worry about while you’re scripting yourself out of a job… I mean, writing scripts to make your job easier.
If you’re looking for other ways to make your job easier, check out PDQ Deploy and Inventory. PDQ Deploy and Inventory will help you automate your patch management processes. We’ll do all the work, and we’ll let you take all the credit. Try PDQ Deploy and Inventory for free with a 14-day trial.

Brock Bingham
Born in the ’80s and raised by his NES, Brock quickly fell in love with everything tech. With over 15 years of IT experience, Brock now enjoys the life of luxury as a renowned tech blogger and receiver of many Dundie Awards. In his free time, Brock enjoys adventuring with his wife, kids, and dogs, while dreaming of retirement.
Собственно WinRM (или Windows Remote Management) и переводится как «удаленное управление Windows». WinRM – служба удаленного управления для операционных систем Windows. Она входит в состав операционных систем начиная с Vista и Server 2008, для Windows XP и Server 2003 ее нужно устанавливать отдельно отсюда. WinRM – серверная часть приложения удаленного управления, к которому возможно удаленное подключение с помощью клиента Windows Remote Shell (WinRS).
WinRM основан на службах Web Services for Management (WS-Management) и использует протокол HTTP (порт 80) или HTTPS (443) и запросы SOAP для выполнения работы. Независимо от используемого протокола весь трафик, передаваемый WinRM шифруется (если специально не отключить эту опцию). Для аутентификации по умолчанию используется протокол Kerberos.
В Windows Server 2008 WinRM установлен, но (по соображениям безопасности) по умолчанию не включен. Чтобы проверить, запущен ли WinRM на нашей машине, набираем в командной строке winrm enumerate winrm/config/listener
Если ответа нет, значит WinRM не запущен. Для того, чтобы настроить WinRM на автоматический запуск и разрешить удаленное подключение к компьютеру, набираем команду winrm quickconfig или winrm qc

Чтобы WinRM не спрашивал подтверждения, можно добавить к вызову ключ -quiet. Узнать информацию о более тонкой настройке можно посмотреть встроенную справку WinRM: winrm help config
Ну и отключить WinRM можно с помощью такой команды:
winrm delete winrm/config/listener?IPAdress=*+Transport=HTTP
Также все необходимые настройки можно сделать с помощью групповых политик. Для этого нужно:
- Настроить службу WinRM на автоматический запуск
- Разрешить подключения на соответствующие порты (80 и 443) в брандмауэре Windows
- Настроить элемент групповой политики Конфигурация компьютераАдминистративные шаблоныКомпоненты WindowsУдаленное управление WindowsСлужба удаленного управления WindowsРазрешить автоматическую установку прослушивателей (Computer ConfigurationAdministrative TemplatesWindows ComponentsWindows Remote Management WinRM ServiceAllow automatic configuration of listeners). Тут нужно будет указать IP-адреса, с которых разрешаются подключения.
Теперь перейдем непосредственно к использованию. Для подключения к удаленному компьютеру используем утилиту WinRS. WinRS – аббревиатура для Windows Remote Shell (удаленная среда Windows). С WinRS мы можем делать удаленные запросы на компьютеры, на которых запущен WinRM. Однако имейте ввиду, что на вашей машине также необходимо запускать WinRM для работы с WinRS.
Основным способом использования WinRS является выполнение команд на удаленной машине. Имя компьютера задаётся ключом -r, а после него следует выполняемая команда, например winrs –r:SRV2 ipconfig /all запускает на удаленном компьютере SRV2 команду ipconfig /all

По умолчанию для коммуникаций используется протокол http, но можно использовать и https: winrs -r:https://SRV2 ipconfig /all
Также можно с помощью WinRS открыть интерактивный сеанс на удалённом компьютере: winrs -r:SRV2 cmd.exe

Эта функция аналогична подключению по telnet, но использование WinRS однозначно лучше с точки зрения безопасности.
Для использования WinRM все компьютеры должны быть членами одного домена. Если в вашем случае это не так, то можно попробовать понизить уровень безопасности. Для этого на компьютере, к которому хотим получить доступ, вводим следующие команды:
WinRM set winrm/config/service/auth @{Basic=«true»}
WinRM set winrm/config/client @{TrustedHosts=«<local>»}
WinRM set winrm/config/client @{TrustedHosts=«ComputerName»}
где ComputerName — удаленный компьютер, с которого будет производиться подключение.
На компьютере, с которого будем подключаться, вводим :
WinRM set winrm/config/service/auth @{Basic=«true»}
WinRM set winrm/config/client @{TrustedHosts=«<local>»}
WinRM set winrm/config/client @{TrustedHosts=«ComрuterName»}
где ComputerName — компьютер, которым будем управлять.
Затем устанавливаем соедининие с помощью команды:
winrs -r:«ComputerName»: –u:DomainUsername –p:Password cmd.exe
где DomainUsername — учетная запись пользователя с административными правами на удаленном компьютере.