This article describes an update for Windows Server 2012 R2 and Windows Server 2012. Before you install this update, check the Prerequisites section.
About this update
This update enables Windows Server Update Services (WSUS) on a Windows Server 2012-based or a Windows Server 2012 R2-based server to sync and distribute feature upgrades for Windows 10. This update is not required to enable WSUS to sync and distribute servicing updates for Windows 10.
Important This update must be installed before you sync the upgrades classification. If the update is not installed when the upgrades classification is enabled, WSUS will see the Windows 10 build 1511 feature upgrade even if it can’t properly download and deploy the associated packages. If you try to sync any upgrades without having first installed KB 3095113, you will populate the SUSDB with unusable data that must be cleared before upgrades can be properly distributed. This situation is recoverable but the process is nontrivial and can be avoided altogether if you make sure to install the update before enabling sync of upgrades. If you have encountered this issue, refer to the following article:
How to delete upgrades in WSUS
This update also fixes an issue in which Windows 10-based computers are displayed as «Windows Vista» on Windows Server 2012 R2 or Windows Server 2012.
How to get this update
Important If you install a language pack after you install this update, you must reinstall this update. Therefore, we recommend that you install any language packs that you need before you install this update. For more information, see Add language packs to Windows.
Method 1: Windows Update
This update is provided as a Recommended update on Windows Update. For more information on how to run Windows Update, see How to get an update through Windows Update.
Method 2: Microsoft Download Center
The following files are available for download from the Microsoft Download Center:
|
Operating system |
Update |
|---|---|
|
All supported x64-based versions of Windows Server 2012 R2 |
|
|
All supported x64-based versions of Windows Server 2012 |
|

For more information about how to download Microsoft support files, click the following article number to view the article in the Microsoft Knowledge Base:
119591 How to obtain Microsoft support files from online services Microsoft scanned this file for viruses. Microsoft used the most current virus-detection software that was available on the date that the file was posted. The file is stored on security-enhanced servers that help prevent any unauthorized changes to the file.
Prerequisites
Registry information
To apply this update, you don’t have to make any changes to the registry.
Restart requirement
You may have to restart the computer after you apply this update.
Update replacement information
This update doesn’t replace a previously released update.
Status
Microsoft has confirmed that this is a problem in the Microsoft products that are listed in the «Applies to» section.
More Information
This update will not be shipped for Windows Server 2008 R2 or earlier platforms. See Important update for WSUS 4.0 (KB 3095113) for more information.
Administrators of WSUS 3.0 SP2 (including SBS 2011) and unpatched WSUS 4.0 will be able to deploy Windows 10 updates, but not feature upgrades.
References
Learn about the terminology that Microsoft uses to describe software updates.
File Information
The English (United States) version of this software update installs files that have the attributes that are listed in the following tables.
Notes
-
The files that apply to a specific product, milestone (RTM, SPn), and service branch (LDR, GDR) can be identified by examining the file version numbers as shown in the following table:
Version
Product
Milestone
Service branch
6.3.960 0.18 xxx
Windows Server 2012 R2
RTM
GDR
-
GDR service branches contain only those fixes that are widely released to address widespread, critical issues. LDR service branches contain hotfixes in addition to widely released fixes.
-
The MANIFEST files (.manifest) and the MUM files (.mum) that are installed for each environment are listed in the «Additional file information» section. MUM, MANIFEST, and the associated security catalog (.cat) files, are very important to maintain the state of the updated components. The security catalog files, for which the attributes are not listed, are signed with a Microsoft digital signature.
x64 Windows Server 2012 R2
|
File name |
File version |
File size |
Date |
Time |
Platform |
|---|---|---|---|---|---|
|
Adminapi.sql |
Not applicable |
598,283 |
22-Aug-2013 |
07:02 |
Not applicable |
|
Clientwebservice.sql |
Not applicable |
34,123 |
22-Aug-2013 |
07:02 |
Not applicable |
|
Createdatabase.sql |
Not applicable |
469 |
22-Aug-2013 |
07:02 |
Not applicable |
|
Evtnamespaceimport.sql |
Not applicable |
38,249 |
04-Feb-2016 |
14:38 |
Not applicable |
|
Inventory.sql |
Not applicable |
14,466 |
22-Aug-2013 |
07:02 |
Not applicable |
|
Mwus_database_schema.sql |
Not applicable |
772,544 |
04-Feb-2016 |
14:46 |
Not applicable |
|
Popdb.sql |
Not applicable |
92,804 |
22-Aug-2013 |
07:01 |
Not applicable |
|
Publicviews.sql |
Not applicable |
20,724 |
22-Aug-2013 |
07:02 |
Not applicable |
|
Reporting.sql |
Not applicable |
22,639 |
22-Aug-2013 |
07:02 |
Not applicable |
|
Reportingrollup.sql |
Not applicable |
55,727 |
22-Aug-2013 |
07:02 |
Not applicable |
|
Reportingsummarization.sql |
Not applicable |
90,285 |
22-Aug-2013 |
07:02 |
Not applicable |
|
Serversync.sql |
Not applicable |
37,503 |
22-Aug-2013 |
07:02 |
Not applicable |
|
Setup.sql |
Not applicable |
10,083 |
04-Feb-2016 |
14:46 |
Not applicable |
|
Sqlsettings.sql |
Not applicable |
92 |
22-Aug-2013 |
07:02 |
Not applicable |
|
Uninstall.sql |
Not applicable |
454 |
22-Aug-2013 |
07:02 |
Not applicable |
|
Versioncheck.sql |
Not applicable |
1,575 |
04-Feb-2016 |
14:46 |
Not applicable |
|
Applications.xml |
Not applicable |
6,846 |
18-Jun-2013 |
15:05 |
Not applicable |
|
Clientservicingapidetectoid.xml |
Not applicable |
932 |
18-Jun-2013 |
15:05 |
Not applicable |
|
Criticalupdates.xml |
Not applicable |
9,842 |
18-Jun-2013 |
15:05 |
Not applicable |
|
Definitionupdatesusxml.xml |
Not applicable |
13,276 |
18-Jun-2013 |
15:05 |
Not applicable |
|
Drivers.xml |
Not applicable |
8,036 |
18-Jun-2013 |
15:05 |
Not applicable |
|
Dynamiccompression.vbs |
Not applicable |
8,332 |
22-Aug-2013 |
07:01 |
Not applicable |
|
Eventcategories.dll |
6.3.9600.18228 |
8,704 |
04-Feb-2016 |
18:14 |
x64 |
|
Exchange.xml |
Not applicable |
1,823 |
18-Jun-2013 |
15:05 |
Not applicable |
|
Exchange2000server.xml |
Not applicable |
2,902 |
18-Jun-2013 |
15:05 |
Not applicable |
|
Exchangeserver2003.xml |
Not applicable |
2,474 |
18-Jun-2013 |
15:05 |
Not applicable |
|
Featurepacks.xml |
Not applicable |
8,745 |
18-Jun-2013 |
15:05 |
Not applicable |
|
Iisconfig.xml |
Not applicable |
4,669 |
18-Jun-2013 |
15:06 |
Not applicable |
|
Iiscustomaction.exe |
6.3.9600.18228 |
102,912 |
04-Feb-2016 |
19:20 |
x86 |
|
Iiscustomaction.exe.config |
Not applicable |
166 |
18-Jun-2013 |
15:06 |
Not applicable |
|
Inventoryrules.cab |
Not applicable |
17,967 |
18-Jun-2013 |
15:07 |
Not applicable |
|
Inventoryrules.xml |
Not applicable |
16,536 |
18-Jun-2013 |
15:07 |
Not applicable |
|
Locallypublishedpackages.xml |
Not applicable |
9,153 |
18-Jun-2013 |
15:05 |
Not applicable |
|
Localpublisher.xml |
Not applicable |
7,943 |
18-Jun-2013 |
15:05 |
Not applicable |
|
Microsoft.updateservices.catalogsyncagent.dll |
6.3.9600.18228 |
56,832 |
04-Feb-2016 |
19:20 |
x86 |
|
Microsoft.updateservices.contentsyncagent.dll |
6.3.9600.18228 |
46,080 |
04-Feb-2016 |
19:20 |
x86 |
|
Microsoft.updateservices.reporting.rollup.dll |
6.3.9600.18228 |
93,696 |
04-Feb-2016 |
19:20 |
x86 |
|
Microsoft.windows.bits.dll |
6.6.4000.18228 |
130,560 |
04-Feb-2016 |
19:20 |
x64 |
|
Microsoftcorporation.xml |
Not applicable |
11,834 |
18-Jun-2013 |
15:05 |
Not applicable |
|
Office.xml |
Not applicable |
5,200 |
18-Jun-2013 |
15:05 |
Not applicable |
|
Office2003.xml |
Not applicable |
5,470 |
18-Jun-2013 |
15:05 |
Not applicable |
|
Officexp.xml |
Not applicable |
5,374 |
18-Jun-2013 |
15:05 |
Not applicable |
|
Securityupdates.xml |
Not applicable |
9,291 |
18-Jun-2013 |
15:05 |
Not applicable |
|
Servicepacks.xml |
Not applicable |
15,167 |
18-Jun-2013 |
15:05 |
Not applicable |
|
Setapppool.vbs |
Not applicable |
4,218 |
22-Aug-2013 |
07:01 |
Not applicable |
|
Setmimemap.vbs |
Not applicable |
5,813 |
22-Aug-2013 |
07:01 |
Not applicable |
|
Sql.xml |
Not applicable |
2,024 |
18-Jun-2013 |
15:05 |
Not applicable |
|
Sqlserver.xml |
Not applicable |
2,282 |
18-Jun-2013 |
15:05 |
Not applicable |
|
Tools.xml |
Not applicable |
8,468 |
18-Jun-2013 |
15:05 |
Not applicable |
|
Updaterollups.xml |
Not applicable |
14,278 |
18-Jun-2013 |
15:05 |
Not applicable |
|
Updates.xml |
Not applicable |
9,717 |
18-Jun-2013 |
15:05 |
Not applicable |
|
Updateservices-services-replacement.man |
Not applicable |
2,825 |
21-Jun-2013 |
07:49 |
Not applicable |
|
Windows.xml |
Not applicable |
6,645 |
18-Jun-2013 |
15:05 |
Not applicable |
|
Windows2000family.xml |
Not applicable |
7,887 |
18-Jun-2013 |
15:05 |
Not applicable |
|
Windowsserver2003datacenteredition.xml |
Not applicable |
8,746 |
18-Jun-2013 |
15:05 |
Not applicable |
|
Windowsserver2003family.xml |
Not applicable |
8,439 |
18-Jun-2013 |
15:05 |
Not applicable |
|
Windowsxp64biteditionversion2003.xml |
Not applicable |
6,695 |
18-Jun-2013 |
15:05 |
Not applicable |
|
Windowsxpfamily.xml |
Not applicable |
7,530 |
18-Jun-2013 |
15:05 |
Not applicable |
|
Wsuscertserver.exe |
6.3.9600.18228 |
66,560 |
04-Feb-2016 |
17:39 |
x64 |
|
Wsusservice.exe |
6.3.9600.18228 |
17,920 |
04-Feb-2016 |
19:20 |
x86 |
|
Wsusservice.exe.config |
Not applicable |
406 |
18-Jun-2013 |
15:05 |
Not applicable |
|
Blank.rdlc |
Not applicable |
689 |
18-Jun-2013 |
15:06 |
Not applicable |
|
Computerdetails.rdlc |
Not applicable |
71,318 |
18-Jun-2013 |
15:06 |
Not applicable |
|
Computersstatusforupdate.rdlc |
Not applicable |
26,844 |
18-Jun-2013 |
15:06 |
Not applicable |
|
Computerstatus.rdlc |
Not applicable |
44,694 |
18-Jun-2013 |
15:06 |
Not applicable |
|
Computersummary.rdlc |
Not applicable |
63,673 |
18-Jun-2013 |
15:06 |
Not applicable |
|
Microsoft.updateservices.ui.adminapiaccess.dll |
6.3.9600.18228 |
142,848 |
04-Feb-2016 |
19:20 |
x86 |
|
Microsoft.updateservices.ui.oobewizard.exe |
6.3.9600.18228 |
6,656 |
04-Feb-2016 |
19:20 |
x86 |
|
Microsoft.updateservices.ui.snapin.dll |
6.3.9600.18228 |
731,136 |
04-Feb-2016 |
19:20 |
x86 |
|
Reportparameters.rdlc |
Not applicable |
38,344 |
18-Jun-2013 |
15:06 |
Not applicable |
|
Snapinabout.dll |
6.3.9600.18228 |
40,960 |
04-Feb-2016 |
18:14 |
x64 |
|
Synchronizationerrors.rdlc |
Not applicable |
22,835 |
18-Jun-2013 |
15:06 |
Not applicable |
|
Synchronizationreport.rdlc |
Not applicable |
109,175 |
18-Jun-2013 |
15:06 |
Not applicable |
|
Updateapprovalsummary.rdlc |
Not applicable |
32,690 |
18-Jun-2013 |
15:06 |
Not applicable |
|
Updatedetails.rdlc |
Not applicable |
73,879 |
18-Jun-2013 |
15:06 |
Not applicable |
|
Updatesstatusforcomputer.rdlc |
Not applicable |
30,363 |
18-Jun-2013 |
15:06 |
Not applicable |
|
Updatestatus.rdlc |
Not applicable |
45,303 |
18-Jun-2013 |
15:06 |
Not applicable |
|
Updatesummary.rdlc |
Not applicable |
67,643 |
18-Jun-2013 |
15:06 |
Not applicable |
|
Windows server update services.lnk |
Not applicable |
1,092 |
22-Aug-2013 |
07:00 |
Not applicable |
|
Wsus.ico |
Not applicable |
29,926 |
18-Jun-2013 |
15:06 |
Not applicable |
|
Wsus.msc |
Not applicable |
30,687 |
18-Jun-2013 |
15:06 |
Not applicable |
|
Microsoft.updateservices.baseapi.dll |
6.3.9600.18228 |
542,208 |
04-Feb-2016 |
19:20 |
x86 |
Notes
-
The files that apply to a specific product, milestone (RTM, SPn), and service branch (LDR, GDR) can be identified by examining the file version numbers as shown in the following table:
Version
Product
Milestone
Service branch
6.2.920 0.17xxx
Windows Server 2012
RTM
GDR
6.2.920 0.21xxx
Windows Server 2012
RTM
LDR
-
GDR service branches contain only those fixes that are widely released to address widespread, critical issues. LDR service branches contain hotfixes in addition to widely released fixes.
-
The MANIFEST files (.manifest) and the MUM files (.mum) that are installed for each environment are listed in the «Additional file information» section. MUM, MANIFEST, and the associated security catalog (.cat) files, are very important to maintain the state of the updated components. The security catalog files, for which the attributes are not listed, are signed with a Microsoft digital signature.
x64 Windows Server 2012
|
File name |
File version |
File size |
Date |
Time |
Platform |
|---|---|---|---|---|---|
|
Adminapi.sql |
Not applicable |
598,283 |
25-Jul-2012 |
20:38 |
Not applicable |
|
Clientwebservice.sql |
Not applicable |
34,123 |
25-Jul-2012 |
20:38 |
Not applicable |
|
Createdatabase.sql |
Not applicable |
469 |
25-Jul-2012 |
20:38 |
Not applicable |
|
Evtnamespaceimport.sql |
Not applicable |
37,225 |
28-Jan-2016 |
14:21 |
Not applicable |
|
Inventory.sql |
Not applicable |
14,466 |
25-Jul-2012 |
20:38 |
Not applicable |
|
Mwus_database_schema.sql |
Not applicable |
772,544 |
28-Jan-2016 |
14:46 |
Not applicable |
|
Popdb.sql |
Not applicable |
92,804 |
25-Jul-2012 |
20:38 |
Not applicable |
|
Publicviews.sql |
Not applicable |
20,724 |
25-Jul-2012 |
20:38 |
Not applicable |
|
Reporting.sql |
Not applicable |
22,639 |
25-Jul-2012 |
20:38 |
Not applicable |
|
Reportingrollup.sql |
Not applicable |
55,727 |
25-Jul-2012 |
20:38 |
Not applicable |
|
Reportingsummarization.sql |
Not applicable |
90,285 |
25-Jul-2012 |
20:38 |
Not applicable |
|
Serversync.sql |
Not applicable |
37,503 |
25-Jul-2012 |
20:38 |
Not applicable |
|
Setup.sql |
Not applicable |
10,083 |
28-Jan-2016 |
14:45 |
Not applicable |
|
Sqlsettings.sql |
Not applicable |
92 |
25-Jul-2012 |
20:38 |
Not applicable |
|
Uninstall.sql |
Not applicable |
454 |
25-Jul-2012 |
20:38 |
Not applicable |
|
Versioncheck.sql |
Not applicable |
647 |
28-Jan-2016 |
14:46 |
Not applicable |
|
Adminapi.sql |
Not applicable |
598,283 |
25-Jul-2012 |
20:38 |
Not applicable |
|
Clientwebservice.sql |
Not applicable |
34,123 |
25-Jul-2012 |
20:38 |
Not applicable |
|
Createdatabase.sql |
Not applicable |
469 |
25-Jul-2012 |
20:38 |
Not applicable |
|
Evtnamespaceimport.sql |
Not applicable |
37,225 |
28-Jan-2016 |
14:21 |
Not applicable |
|
Inventory.sql |
Not applicable |
14,466 |
25-Jul-2012 |
20:38 |
Not applicable |
|
Mwus_database_schema.sql |
Not applicable |
772,544 |
28-Jan-2016 |
14:44 |
Not applicable |
|
Popdb.sql |
Not applicable |
92,804 |
25-Jul-2012 |
20:38 |
Not applicable |
|
Publicviews.sql |
Not applicable |
20,724 |
25-Jul-2012 |
20:38 |
Not applicable |
|
Reporting.sql |
Not applicable |
22,639 |
25-Jul-2012 |
20:38 |
Not applicable |
|
Reportingrollup.sql |
Not applicable |
55,727 |
25-Jul-2012 |
20:38 |
Not applicable |
|
Reportingsummarization.sql |
Not applicable |
90,285 |
25-Jul-2012 |
20:38 |
Not applicable |
|
Serversync.sql |
Not applicable |
37,503 |
25-Jul-2012 |
20:38 |
Not applicable |
|
Setup.sql |
Not applicable |
10,083 |
28-Jan-2016 |
14:44 |
Not applicable |
|
Sqlsettings.sql |
Not applicable |
92 |
25-Jul-2012 |
20:38 |
Not applicable |
|
Uninstall.sql |
Not applicable |
454 |
25-Jul-2012 |
20:38 |
Not applicable |
|
Versioncheck.sql |
Not applicable |
647 |
28-Jan-2016 |
14:45 |
Not applicable |
|
Applications.xml |
Not applicable |
6,846 |
02-Jun-2012 |
14:37 |
Not applicable |
|
Clientservicingapidetectoid.xml |
Not applicable |
932 |
02-Jun-2012 |
14:37 |
Not applicable |
|
Criticalupdates.xml |
Not applicable |
9,842 |
02-Jun-2012 |
14:37 |
Not applicable |
|
Definitionupdatesusxml.xml |
Not applicable |
13,276 |
02-Jun-2012 |
14:37 |
Not applicable |
|
Drivers.xml |
Not applicable |
8,036 |
02-Jun-2012 |
14:37 |
Not applicable |
|
Dynamiccompression.vbs |
Not applicable |
8,332 |
25-Jul-2012 |
20:38 |
Not applicable |
|
Eventcategories.dll |
6.2.9200.16384 |
8,704 |
26-Jul-2012 |
03:07 |
x64 |
|
Exchange.xml |
Not applicable |
1,823 |
02-Jun-2012 |
14:37 |
Not applicable |
|
Exchange2000server.xml |
Not applicable |
2,902 |
02-Jun-2012 |
14:37 |
Not applicable |
|
Exchangeserver2003.xml |
Not applicable |
2,474 |
02-Jun-2012 |
14:37 |
Not applicable |
|
Featurepacks.xml |
Not applicable |
8,745 |
02-Jun-2012 |
14:37 |
Not applicable |
|
Iisconfig.xml |
Not applicable |
4,669 |
02-Jun-2012 |
14:37 |
Not applicable |
|
Iiscustomaction.exe |
6.2.9200.17642 |
102,912 |
03-Feb-2016 |
17:54 |
x86 |
|
Iiscustomaction.exe.config |
Not applicable |
166 |
02-Jun-2012 |
14:37 |
Not applicable |
|
Inventoryrules.cab |
Not applicable |
17,967 |
12-Jul-2012 |
02:00 |
Not applicable |
|
Inventoryrules.xml |
Not applicable |
16,536 |
02-Jun-2012 |
14:37 |
Not applicable |
|
Locallypublishedpackages.xml |
Not applicable |
9,153 |
02-Jun-2012 |
14:37 |
Not applicable |
|
Localpublisher.xml |
Not applicable |
7,943 |
02-Jun-2012 |
14:37 |
Not applicable |
|
Microsoft.updateservices.catalogsyncagent.dll |
6.2.9200.17642 |
56,832 |
03-Feb-2016 |
17:54 |
x86 |
|
Microsoft.updateservices.contentsyncagent.dll |
6.2.9200.17642 |
46,080 |
03-Feb-2016 |
17:54 |
x86 |
|
Microsoft.updateservices.reporting.rollup.dll |
6.2.9200.17642 |
93,696 |
03-Feb-2016 |
17:54 |
x86 |
|
Microsoft.windows.bits.dll |
6.6.4000.17642 |
131,072 |
03-Feb-2016 |
17:54 |
x64 |
|
Microsoftcorporation.xml |
Not applicable |
11,834 |
02-Jun-2012 |
14:37 |
Not applicable |
|
Office.xml |
Not applicable |
5,200 |
02-Jun-2012 |
14:37 |
Not applicable |
|
Office2003.xml |
Not applicable |
5,470 |
02-Jun-2012 |
14:37 |
Not applicable |
|
Officexp.xml |
Not applicable |
5,374 |
02-Jun-2012 |
14:37 |
Not applicable |
|
Securityupdates.xml |
Not applicable |
9,291 |
02-Jun-2012 |
14:37 |
Not applicable |
|
Servicepacks.xml |
Not applicable |
15,167 |
02-Jun-2012 |
14:37 |
Not applicable |
|
Setapppool.vbs |
Not applicable |
4,218 |
25-Jul-2012 |
20:38 |
Not applicable |
|
Setmimemap.vbs |
Not applicable |
5,813 |
25-Jul-2012 |
20:38 |
Not applicable |
|
Sql.xml |
Not applicable |
2,024 |
02-Jun-2012 |
14:37 |
Not applicable |
|
Sqlserver.xml |
Not applicable |
2,282 |
02-Jun-2012 |
14:37 |
Not applicable |
|
Tools.xml |
Not applicable |
8,468 |
02-Jun-2012 |
14:37 |
Not applicable |
|
Updaterollups.xml |
Not applicable |
14,278 |
02-Jun-2012 |
14:37 |
Not applicable |
|
Updates.xml |
Not applicable |
9,717 |
02-Jun-2012 |
14:37 |
Not applicable |
|
Windows.xml |
Not applicable |
6,645 |
02-Jun-2012 |
14:37 |
Not applicable |
|
Windows2000family.xml |
Not applicable |
7,887 |
02-Jun-2012 |
14:37 |
Not applicable |
|
Windowsserver2003datacenteredition.xml |
Not applicable |
8,746 |
02-Jun-2012 |
14:37 |
Not applicable |
|
Windowsserver2003family.xml |
Not applicable |
8,439 |
02-Jun-2012 |
14:37 |
Not applicable |
|
Windowsxp64biteditionversion2003.xml |
Not applicable |
6,695 |
02-Jun-2012 |
14:37 |
Not applicable |
|
Windowsxpfamily.xml |
Not applicable |
7,530 |
02-Jun-2012 |
14:37 |
Not applicable |
|
Wsuscertserver.exe |
6.2.9200.16384 |
64,512 |
26-Jul-2012 |
03:08 |
x64 |
|
Wsusservice.exe |
6.2.9200.17642 |
17,920 |
03-Feb-2016 |
17:54 |
x86 |
|
Wsusservice.exe.config |
Not applicable |
406 |
02-Jun-2012 |
14:37 |
Not applicable |
|
Applications.xml |
Not applicable |
6,846 |
02-Jun-2012 |
14:37 |
Not applicable |
|
Clientservicingapidetectoid.xml |
Not applicable |
932 |
02-Jun-2012 |
14:37 |
Not applicable |
|
Criticalupdates.xml |
Not applicable |
9,842 |
02-Jun-2012 |
14:37 |
Not applicable |
|
Definitionupdatesusxml.xml |
Not applicable |
13,276 |
02-Jun-2012 |
14:37 |
Not applicable |
|
Drivers.xml |
Not applicable |
8,036 |
02-Jun-2012 |
14:37 |
Not applicable |
|
Dynamiccompression.vbs |
Not applicable |
8,332 |
25-Jul-2012 |
20:38 |
Not applicable |
|
Eventcategories.dll |
6.2.9200.16384 |
8,704 |
26-Jul-2012 |
03:07 |
x64 |
|
Exchange.xml |
Not applicable |
1,823 |
02-Jun-2012 |
14:37 |
Not applicable |
|
Exchange2000server.xml |
Not applicable |
2,902 |
02-Jun-2012 |
14:37 |
Not applicable |
|
Exchangeserver2003.xml |
Not applicable |
2,474 |
02-Jun-2012 |
14:37 |
Not applicable |
|
Featurepacks.xml |
Not applicable |
8,745 |
02-Jun-2012 |
14:37 |
Not applicable |
|
Iisconfig.xml |
Not applicable |
4,669 |
02-Jun-2012 |
14:37 |
Not applicable |
|
Iiscustomaction.exe |
6.2.9200.21761 |
102,912 |
03-Feb-2016 |
16:05 |
x86 |
|
Iiscustomaction.exe.config |
Not applicable |
166 |
02-Jun-2012 |
14:37 |
Not applicable |
|
Inventoryrules.cab |
Not applicable |
17,967 |
12-Jul-2012 |
02:00 |
Not applicable |
|
Inventoryrules.xml |
Not applicable |
16,536 |
02-Jun-2012 |
14:37 |
Not applicable |
|
Locallypublishedpackages.xml |
Not applicable |
9,153 |
02-Jun-2012 |
14:37 |
Not applicable |
|
Localpublisher.xml |
Not applicable |
7,943 |
02-Jun-2012 |
14:37 |
Not applicable |
|
Microsoft.updateservices.catalogsyncagent.dll |
6.2.9200.21761 |
56,832 |
03-Feb-2016 |
16:05 |
x86 |
|
Microsoft.updateservices.contentsyncagent.dll |
6.2.9200.21761 |
46,080 |
03-Feb-2016 |
16:05 |
x86 |
|
Microsoft.updateservices.reporting.rollup.dll |
6.2.9200.21761 |
93,696 |
03-Feb-2016 |
16:05 |
x86 |
|
Microsoft.windows.bits.dll |
6.6.4000.21761 |
131,072 |
03-Feb-2016 |
16:05 |
x64 |
|
Microsoftcorporation.xml |
Not applicable |
11,834 |
02-Jun-2012 |
14:37 |
Not applicable |
|
Office.xml |
Not applicable |
5,200 |
02-Jun-2012 |
14:37 |
Not applicable |
|
Office2003.xml |
Not applicable |
5,470 |
02-Jun-2012 |
14:37 |
Not applicable |
|
Officexp.xml |
Not applicable |
5,374 |
02-Jun-2012 |
14:37 |
Not applicable |
|
Securityupdates.xml |
Not applicable |
9,291 |
02-Jun-2012 |
14:37 |
Not applicable |
|
Servicepacks.xml |
Not applicable |
15,167 |
02-Jun-2012 |
14:37 |
Not applicable |
|
Setapppool.vbs |
Not applicable |
4,218 |
25-Jul-2012 |
20:38 |
Not applicable |
|
Setmimemap.vbs |
Not applicable |
5,813 |
25-Jul-2012 |
20:38 |
Not applicable |
|
Sql.xml |
Not applicable |
2,024 |
02-Jun-2012 |
14:37 |
Not applicable |
|
Sqlserver.xml |
Not applicable |
2,282 |
02-Jun-2012 |
14:37 |
Not applicable |
|
Tools.xml |
Not applicable |
8,468 |
02-Jun-2012 |
14:37 |
Not applicable |
|
Updaterollups.xml |
Not applicable |
14,278 |
02-Jun-2012 |
14:37 |
Not applicable |
|
Updates.xml |
Not applicable |
9,717 |
02-Jun-2012 |
14:37 |
Not applicable |
|
Windows.xml |
Not applicable |
6,645 |
02-Jun-2012 |
14:37 |
Not applicable |
|
Windows2000family.xml |
Not applicable |
7,887 |
02-Jun-2012 |
14:37 |
Not applicable |
|
Windowsserver2003datacenteredition.xml |
Not applicable |
8,746 |
02-Jun-2012 |
14:37 |
Not applicable |
|
Windowsserver2003family.xml |
Not applicable |
8,439 |
02-Jun-2012 |
14:37 |
Not applicable |
|
Windowsxp64biteditionversion2003.xml |
Not applicable |
6,695 |
02-Jun-2012 |
14:37 |
Not applicable |
|
Windowsxpfamily.xml |
Not applicable |
7,530 |
02-Jun-2012 |
14:37 |
Not applicable |
|
Wsuscertserver.exe |
6.2.9200.16384 |
64,512 |
26-Jul-2012 |
03:08 |
x64 |
|
Wsusservice.exe |
6.2.9200.21761 |
17,920 |
03-Feb-2016 |
16:05 |
x86 |
|
Wsusservice.exe.config |
Not applicable |
406 |
02-Jun-2012 |
14:37 |
Not applicable |
|
Blank.rdlc |
Not applicable |
689 |
02-Jun-2012 |
14:37 |
Not applicable |
|
Computerdetails.rdlc |
Not applicable |
71,318 |
02-Jun-2012 |
14:37 |
Not applicable |
|
Computersstatusforupdate.rdlc |
Not applicable |
26,844 |
02-Jun-2012 |
14:37 |
Not applicable |
|
Computerstatus.rdlc |
Not applicable |
44,694 |
02-Jun-2012 |
14:37 |
Not applicable |
|
Computersummary.rdlc |
Not applicable |
63,673 |
02-Jun-2012 |
14:37 |
Not applicable |
|
Microsoft.updateservices.ui.adminapiaccess.dll |
6.2.9200.17642 |
142,848 |
03-Feb-2016 |
17:54 |
x86 |
|
Microsoft.updateservices.ui.oobewizard.exe |
6.2.9200.17642 |
6,656 |
03-Feb-2016 |
17:54 |
x86 |
|
Microsoft.updateservices.ui.snapin.dll |
6.2.9200.17642 |
731,648 |
03-Feb-2016 |
17:54 |
x86 |
|
Reportparameters.rdlc |
Not applicable |
38,344 |
02-Jun-2012 |
14:37 |
Not applicable |
|
Snapinabout.dll |
6.2.9200.16384 |
40,960 |
26-Jul-2012 |
03:07 |
x64 |
|
Synchronizationerrors.rdlc |
Not applicable |
22,835 |
02-Jun-2012 |
14:37 |
Not applicable |
|
Synchronizationreport.rdlc |
Not applicable |
109,175 |
02-Jun-2012 |
14:37 |
Not applicable |
|
Updateapprovalsummary.rdlc |
Not applicable |
32,690 |
02-Jun-2012 |
14:37 |
Not applicable |
|
Updatedetails.rdlc |
Not applicable |
73,879 |
02-Jun-2012 |
14:37 |
Not applicable |
|
Updatesstatusforcomputer.rdlc |
Not applicable |
30,363 |
02-Jun-2012 |
14:37 |
Not applicable |
|
Updatestatus.rdlc |
Not applicable |
45,303 |
02-Jun-2012 |
14:37 |
Not applicable |
|
Updatesummary.rdlc |
Not applicable |
67,643 |
02-Jun-2012 |
14:37 |
Not applicable |
|
Windows server update services.lnk |
Not applicable |
1,092 |
25-Jul-2012 |
20:26 |
Not applicable |
|
Wsus.ico |
Not applicable |
29,926 |
02-Jun-2012 |
14:37 |
Not applicable |
|
Wsus.msc |
Not applicable |
30,687 |
02-Jun-2012 |
14:37 |
Not applicable |
|
Blank.rdlc |
Not applicable |
689 |
02-Jun-2012 |
14:37 |
Not applicable |
|
Computerdetails.rdlc |
Not applicable |
71,318 |
02-Jun-2012 |
14:37 |
Not applicable |
|
Computersstatusforupdate.rdlc |
Not applicable |
26,844 |
02-Jun-2012 |
14:37 |
Not applicable |
|
Computerstatus.rdlc |
Not applicable |
44,694 |
02-Jun-2012 |
14:37 |
Not applicable |
|
Computersummary.rdlc |
Not applicable |
63,673 |
02-Jun-2012 |
14:37 |
Not applicable |
|
Microsoft.updateservices.ui.adminapiaccess.dll |
6.2.9200.21761 |
142,848 |
03-Feb-2016 |
16:05 |
x86 |
|
Microsoft.updateservices.ui.oobewizard.exe |
6.2.9200.21761 |
6,656 |
03-Feb-2016 |
16:05 |
x86 |
|
Microsoft.updateservices.ui.snapin.dll |
6.2.9200.21761 |
731,648 |
03-Feb-2016 |
16:05 |
x86 |
|
Reportparameters.rdlc |
Not applicable |
38,344 |
02-Jun-2012 |
14:37 |
Not applicable |
|
Snapinabout.dll |
6.2.9200.16384 |
40,960 |
26-Jul-2012 |
03:07 |
x64 |
|
Synchronizationerrors.rdlc |
Not applicable |
22,835 |
02-Jun-2012 |
14:37 |
Not applicable |
|
Synchronizationreport.rdlc |
Not applicable |
109,175 |
02-Jun-2012 |
14:37 |
Not applicable |
|
Updateapprovalsummary.rdlc |
Not applicable |
32,690 |
02-Jun-2012 |
14:37 |
Not applicable |
|
Updatedetails.rdlc |
Not applicable |
73,879 |
02-Jun-2012 |
14:37 |
Not applicable |
|
Updatesstatusforcomputer.rdlc |
Not applicable |
30,363 |
02-Jun-2012 |
14:37 |
Not applicable |
|
Updatestatus.rdlc |
Not applicable |
45,303 |
02-Jun-2012 |
14:37 |
Not applicable |
|
Updatesummary.rdlc |
Not applicable |
67,643 |
02-Jun-2012 |
14:37 |
Not applicable |
|
Windows server update services.lnk |
Not applicable |
1,092 |
25-Jul-2012 |
20:26 |
Not applicable |
|
Wsus.ico |
Not applicable |
29,926 |
02-Jun-2012 |
14:37 |
Not applicable |
|
Wsus.msc |
Not applicable |
30,687 |
02-Jun-2012 |
14:37 |
Not applicable |
|
Microsoft.updateservices.baseapi.dll |
6.2.9200.17642 |
539,648 |
03-Feb-2016 |
17:54 |
x86 |
|
Microsoft.updateservices.baseapi.dll |
6.2.9200.21761 |
539,648 |
03-Feb-2016 |
16:05 |
x86 |
x64 Windows Server 2012 R2
|
File property |
Value |
|---|---|
|
File name |
Amd64_23cff30c8022605fe85a84a00f7601ce_31bf3856ad364e35_6.3.9600.18228_none_fd28769a1ccb05a1.manifest |
|
File version |
Not applicable |
|
File size |
697 |
|
Date (UTC) |
05-Feb-2016 |
|
Time (UTC) |
19:14 |
|
Platform |
Not applicable |
|
File name |
Amd64_9fd8ad1efef830b66a5109563a3f509f_31bf3856ad364e35_6.3.9600.18228_none_e0848ac17b010d90.manifest |
|
File version |
Not applicable |
|
File size |
695 |
|
Date (UTC) |
05-Feb-2016 |
|
Time (UTC) |
19:14 |
|
Platform |
Not applicable |
|
File name |
Amd64_aa8cdad1b2a772c23f0bfc717563887b_31bf3856ad364e35_6.3.9600.18228_none_4ccd50e3017f3f15.manifest |
|
File version |
Not applicable |
|
File size |
704 |
|
Date (UTC) |
05-Feb-2016 |
|
Time (UTC) |
19:14 |
|
Platform |
Not applicable |
|
File name |
Amd64_ba4f6f9c6f5d91b78f32df8819961f1b_31bf3856ad364e35_6.3.9600.18228_none_2ff50b5169f4a2fd.manifest |
|
File version |
Not applicable |
|
File size |
683 |
|
Date (UTC) |
05-Feb-2016 |
|
Time (UTC) |
19:14 |
|
Platform |
Not applicable |
|
File name |
Amd64_updateservices-database-common_31bf3856ad364e35_6.3.9600.18228_none_6dcb14f8ff3be1d9.manifest |
|
File version |
Not applicable |
|
File size |
13,981 |
|
Date (UTC) |
04-Feb-2016 |
|
Time (UTC) |
19:26 |
|
Platform |
Not applicable |
|
File name |
Amd64_updateservices-services_31bf3856ad364e35_6.3.9600.18228_none_6fc82fce930a900a.manifest |
|
File version |
Not applicable |
|
File size |
58,825 |
|
Date (UTC) |
04-Feb-2016 |
|
Time (UTC) |
19:26 |
|
Platform |
Not applicable |
|
File name |
Amd64_updateservices-snapin_31bf3856ad364e35_6.3.9600.18228_none_ff96648c15f9932d.manifest |
|
File version |
Not applicable |
|
File size |
29,013 |
|
Date (UTC) |
04-Feb-2016 |
|
Time (UTC) |
19:26 |
|
Platform |
Not applicable |
|
File name |
Msil_microsoft.updateservices.baseapi_31bf3856ad364e35_6.3.9600.18228_none_eacd287befc7820c.manifest |
|
File version |
Not applicable |
|
File size |
1,333 |
|
Date (UTC) |
05-Feb-2016 |
|
Time (UTC) |
18:39 |
|
Platform |
Not applicable |
|
File name |
Update.mum |
|
File version |
Not applicable |
|
File size |
2,299 |
|
Date (UTC) |
05-Feb-2016 |
|
Time (UTC) |
19:14 |
|
Platform |
Not applicable |
x64 Windows Server 2012
|
File property |
Value |
|---|---|
|
File name |
Amd64_05a377c22fa7f195a8231fa658e6f73d_31bf3856ad364e35_6.2.9200.17646_none_cf4c64515edf536f.manifest |
|
File version |
Not applicable |
|
File size |
721 |
|
Date (UTC) |
04-Feb-2016 |
|
Time (UTC) |
23:07 |
|
Platform |
Not applicable |
|
File name |
Amd64_0793b6ab1ee1060582efddb60156aed5_31bf3856ad364e35_6.2.9200.17646_none_16aa4080ea4a04b5.manifest |
|
File version |
Not applicable |
|
File size |
721 |
|
Date (UTC) |
04-Feb-2016 |
|
Time (UTC) |
23:07 |
|
Platform |
Not applicable |
|
File name |
Amd64_1a29208ec7b9047f1e3d9b20f952ff34_31bf3856ad364e35_6.2.9200.17646_none_b2a90efdb4293d51.manifest |
|
File version |
Not applicable |
|
File size |
721 |
|
Date (UTC) |
04-Feb-2016 |
|
Time (UTC) |
23:07 |
|
Platform |
Not applicable |
|
File name |
Amd64_214c9272b9dc92ab2c34f14a4df1e1ae_31bf3856ad364e35_6.2.9200.17646_none_6d6d3ab898e51b3f.manifest |
|
File version |
Not applicable |
|
File size |
704 |
|
Date (UTC) |
04-Feb-2016 |
|
Time (UTC) |
23:07 |
|
Platform |
Not applicable |
|
File name |
Amd64_21652096aa640c9fb673c30c3c333bef_31bf3856ad364e35_6.2.9200.17646_none_427cec9042baa10c.manifest |
|
File version |
Not applicable |
|
File size |
721 |
|
Date (UTC) |
04-Feb-2016 |
|
Time (UTC) |
23:07 |
|
Platform |
Not applicable |
|
File name |
Amd64_24447995be5abb294f0fa33279c7507b_31bf3856ad364e35_6.2.9200.17646_none_019d3eb2a18c79b7.manifest |
|
File version |
Not applicable |
|
File size |
695 |
|
Date (UTC) |
04-Feb-2016 |
|
Time (UTC) |
23:07 |
|
Platform |
Not applicable |
|
File name |
Amd64_27e6cf50b9993246499d71e5ae0cf84b_31bf3856ad364e35_6.2.9200.17646_none_418b14255a2878af.manifest |
|
File version |
Not applicable |
|
File size |
721 |
|
Date (UTC) |
04-Feb-2016 |
|
Time (UTC) |
23:07 |
|
Platform |
Not applicable |
|
File name |
Amd64_2b9d8ca1e34887c6adf1552ab07624dc_31bf3856ad364e35_6.2.9200.17646_none_cb58f4d5ccd7072f.manifest |
|
File version |
Not applicable |
|
File size |
721 |
|
Date (UTC) |
04-Feb-2016 |
|
Time (UTC) |
23:07 |
|
Platform |
Not applicable |
|
File name |
Amd64_35aa6ed8dd6c09fd2449045a24aa6bfd_31bf3856ad364e35_6.2.9200.17646_none_517cb545f2f165ae.manifest |
|
File version |
Not applicable |
|
File size |
683 |
|
Date (UTC) |
04-Feb-2016 |
|
Time (UTC) |
23:07 |
|
Platform |
Not applicable |
|
File name |
Amd64_35f5fdfe099710499074a1b8ca68c809_31bf3856ad364e35_6.2.9200.21765_none_1814a7c5a636a4a0.manifest |
|
File version |
Not applicable |
|
File size |
721 |
|
Date (UTC) |
04-Feb-2016 |
|
Time (UTC) |
23:07 |
|
Platform |
Not applicable |
|
File name |
Amd64_37983c333b72bbd2140709ef32d2f4f5_31bf3856ad364e35_6.2.9200.17646_none_bcca16c2faeac51b.manifest |
|
File version |
Not applicable |
|
File size |
721 |
|
Date (UTC) |
04-Feb-2016 |
|
Time (UTC) |
23:07 |
|
Platform |
Not applicable |
|
File name |
Amd64_3973c2187deda10102ca2cc3306f8ba8_31bf3856ad364e35_6.2.9200.21765_none_7a6e20bda891a44d.manifest |
|
File version |
Not applicable |
|
File size |
721 |
|
Date (UTC) |
04-Feb-2016 |
|
Time (UTC) |
23:07 |
|
Platform |
Not applicable |
|
File name |
Amd64_3bb262fbd27d69a53f426f1db9f3814e_31bf3856ad364e35_6.2.9200.17646_none_0e8b7b3c355a9637.manifest |
|
File version |
Not applicable |
|
File size |
721 |
|
Date (UTC) |
04-Feb-2016 |
|
Time (UTC) |
23:07 |
|
Platform |
Not applicable |
|
File name |
Amd64_3c1f0f13dc95f0dcf03929d202cd2f72_31bf3856ad364e35_6.2.9200.21765_none_1263301a57f77bf1.manifest |
|
File version |
Not applicable |
|
File size |
721 |
|
Date (UTC) |
04-Feb-2016 |
|
Time (UTC) |
23:07 |
|
Platform |
Not applicable |
|
File name |
Amd64_3f53f21d6f0d4ab1cbe3f0b1477c2b4e_31bf3856ad364e35_6.2.9200.17646_none_6dfa2ad079011be6.manifest |
|
File version |
Not applicable |
|
File size |
721 |
|
Date (UTC) |
04-Feb-2016 |
|
Time (UTC) |
23:07 |
|
Platform |
Not applicable |
|
File name |
Amd64_43fef97e5810600eab4d720d5e0e9f42_31bf3856ad364e35_6.2.9200.21765_none_3841c6b062cd1033.manifest |
|
File version |
Not applicable |
|
File size |
721 |
|
Date (UTC) |
04-Feb-2016 |
|
Time (UTC) |
23:07 |
|
Platform |
Not applicable |
|
File name |
Amd64_4ce70eec7f42dd76ff132da26a76f0ee_31bf3856ad364e35_6.2.9200.21765_none_d97e85c02d91191c.manifest |
|
File version |
Not applicable |
|
File size |
721 |
|
Date (UTC) |
04-Feb-2016 |
|
Time (UTC) |
23:07 |
|
Platform |
Not applicable |
|
File name |
Amd64_67f4fce5e5632336011b69403bac1803_31bf3856ad364e35_6.2.9200.17646_none_9552a05ec3cd0d65.manifest |
|
File version |
Not applicable |
|
File size |
721 |
|
Date (UTC) |
04-Feb-2016 |
|
Time (UTC) |
23:07 |
|
Platform |
Not applicable |
|
File name |
Amd64_6955e3f5778377bbf4805707d256dec3_31bf3856ad364e35_6.2.9200.21765_none_cfeca3d2a6dcd3d3.manifest |
|
File version |
Not applicable |
|
File size |
695 |
|
Date (UTC) |
04-Feb-2016 |
|
Time (UTC) |
23:07 |
|
Platform |
Not applicable |
|
File name |
Amd64_6c3d8f489b60d9708669ba45e81856d4_31bf3856ad364e35_6.2.9200.21765_none_2dd37fbc922e650c.manifest |
|
File version |
Not applicable |
|
File size |
721 |
|
Date (UTC) |
04-Feb-2016 |
|
Time (UTC) |
23:07 |
|
Platform |
Not applicable |
|
File name |
Amd64_6c835c7603e5285f5a8b6d09650496c8_31bf3856ad364e35_6.2.9200.17646_none_4e21b6ab52b94bb3.manifest |
|
File version |
Not applicable |
|
File size |
721 |
|
Date (UTC) |
04-Feb-2016 |
|
Time (UTC) |
23:07 |
|
Platform |
Not applicable |
|
File name |
Amd64_70097b9bd390089f575338b185b39303_31bf3856ad364e35_6.2.9200.21765_none_5774eb3ea808e9c3.manifest |
|
File version |
Not applicable |
|
File size |
721 |
|
Date (UTC) |
04-Feb-2016 |
|
Time (UTC) |
23:07 |
|
Platform |
Not applicable |
|
File name |
Amd64_75d879f43843667139dcbdb1942e25a3_31bf3856ad364e35_6.2.9200.21765_none_061a80c615d72616.manifest |
|
File version |
Not applicable |
|
File size |
721 |
|
Date (UTC) |
04-Feb-2016 |
|
Time (UTC) |
23:07 |
|
Platform |
Not applicable |
|
File name |
Amd64_7e0dbdab9837f8c4d9707151034b668b_31bf3856ad364e35_6.2.9200.21765_none_e1058562d0199659.manifest |
|
File version |
Not applicable |
|
File size |
721 |
|
Date (UTC) |
04-Feb-2016 |
|
Time (UTC) |
23:07 |
|
Platform |
Not applicable |
|
File name |
Amd64_86efc56cf4faedad7fad7541f20405e8_31bf3856ad364e35_6.2.9200.17646_none_05313366463dc14c.manifest |
|
File version |
Not applicable |
|
File size |
721 |
|
Date (UTC) |
04-Feb-2016 |
|
Time (UTC) |
23:07 |
|
Platform |
Not applicable |
|
File name |
Amd64_93c45463496726fb1d0abd703c9c4e1e_31bf3856ad364e35_6.2.9200.21765_none_e6d0e17a67fecf04.manifest |
|
File version |
Not applicable |
|
File size |
721 |
|
Date (UTC) |
04-Feb-2016 |
|
Time (UTC) |
23:07 |
|
Platform |
Not applicable |
|
File name |
Amd64_a8234c82858e13e07ccad75376b5d3a9_31bf3856ad364e35_6.2.9200.21765_none_039f075620615f67.manifest |
|
File version |
Not applicable |
|
File size |
721 |
|
Date (UTC) |
04-Feb-2016 |
|
Time (UTC) |
23:07 |
|
Platform |
Not applicable |
|
File name |
Amd64_ad53090a9a51f4ebac091577f36280fa_31bf3856ad364e35_6.2.9200.21765_none_00590c6705de397a.manifest |
|
File version |
Not applicable |
|
File size |
721 |
|
Date (UTC) |
04-Feb-2016 |
|
Time (UTC) |
23:07 |
|
Platform |
Not applicable |
|
File name |
Amd64_b96bca87ec24a3eb0f403113b50d3d31_31bf3856ad364e35_6.2.9200.21765_none_95a00153b6630846.manifest |
|
File version |
Not applicable |
|
File size |
721 |
|
Date (UTC) |
04-Feb-2016 |
|
Time (UTC) |
23:07 |
|
Platform |
Not applicable |
|
File name |
Amd64_bb32ace34f445d5f62eeab14f8699453_31bf3856ad364e35_6.2.9200.17646_none_700e32bf0038e06d.manifest |
|
File version |
Not applicable |
|
File size |
721 |
|
Date (UTC) |
04-Feb-2016 |
|
Time (UTC) |
23:07 |
|
Platform |
Not applicable |
|
File name |
Amd64_c223184e1159438691bde151d158225b_31bf3856ad364e35_6.2.9200.21765_none_b324f158e1742fdb.manifest |
|
File version |
Not applicable |
|
File size |
721 |
|
Date (UTC) |
04-Feb-2016 |
|
Time (UTC) |
23:07 |
|
Platform |
Not applicable |
|
File name |
Amd64_c6c8744437cdf52e6e8bd3ff7fe1d00c_31bf3856ad364e35_6.2.9200.21765_none_c758a188c593025b.manifest |
|
File version |
Not applicable |
|
File size |
721 |
|
Date (UTC) |
04-Feb-2016 |
|
Time (UTC) |
23:07 |
|
Platform |
Not applicable |
|
File name |
Amd64_cd990e1d5d04c1fbf831455af3f57a1e_31bf3856ad364e35_6.2.9200.21765_none_7b952399553833cc.manifest |
|
File version |
Not applicable |
|
File size |
683 |
|
Date (UTC) |
04-Feb-2016 |
|
Time (UTC) |
23:07 |
|
Platform |
Not applicable |
|
File name |
Amd64_cefe55543bdaf8308f60e9c7488589ee_31bf3856ad364e35_6.2.9200.21765_none_9a36c36325461f98.manifest |
|
File version |
Not applicable |
|
File size |
704 |
|
Date (UTC) |
04-Feb-2016 |
|
Time (UTC) |
23:07 |
|
Platform |
Not applicable |
|
File name |
Amd64_d3e8f67453aad153cf1bc43304f4db15_31bf3856ad364e35_6.2.9200.21765_none_7adafcdc5b4d9a2c.manifest |
|
File version |
Not applicable |
|
File size |
721 |
|
Date (UTC) |
04-Feb-2016 |
|
Time (UTC) |
23:07 |
|
Platform |
Not applicable |
|
File name |
Amd64_d4119d91bce575932786190840db6631_31bf3856ad364e35_6.2.9200.17646_none_3c3913dda56087dd.manifest |
|
File version |
Not applicable |
|
File size |
721 |
|
Date (UTC) |
04-Feb-2016 |
|
Time (UTC) |
23:07 |
|
Platform |
Not applicable |
|
File name |
Amd64_d6eb17770af038ac1da9417965bbbe0d_31bf3856ad364e35_6.2.9200.17646_none_79efc219f38bed61.manifest |
|
File version |
Not applicable |
|
File size |
697 |
|
Date (UTC) |
04-Feb-2016 |
|
Time (UTC) |
23:07 |
|
Platform |
Not applicable |
|
File name |
Amd64_d8870a21d8cd981298dca90672bde7ad_31bf3856ad364e35_6.2.9200.17646_none_a132f47e1da26662.manifest |
|
File version |
Not applicable |
|
File size |
721 |
|
Date (UTC) |
04-Feb-2016 |
|
Time (UTC) |
23:07 |
|
Platform |
Not applicable |
|
File name |
Amd64_dad4d041be28a50c78b159c7a4e0530d_31bf3856ad364e35_6.2.9200.21765_none_d45a70abfc9b9165.manifest |
|
File version |
Not applicable |
|
File size |
697 |
|
Date (UTC) |
04-Feb-2016 |
|
Time (UTC) |
23:07 |
|
Platform |
Not applicable |
|
File name |
Amd64_db62ef6fb77b7fe23a0e01415649deee_31bf3856ad364e35_6.2.9200.21765_none_2b3e53edfb2c0d88.manifest |
|
File version |
Not applicable |
|
File size |
721 |
|
Date (UTC) |
04-Feb-2016 |
|
Time (UTC) |
23:07 |
|
Platform |
Not applicable |
|
File name |
Amd64_e36fbebf0b0a91b2fc570af26c7d60e3_31bf3856ad364e35_6.2.9200.21765_none_fb06074103dbbbf9.manifest |
|
File version |
Not applicable |
|
File size |
721 |
|
Date (UTC) |
04-Feb-2016 |
|
Time (UTC) |
23:07 |
|
Platform |
Not applicable |
|
File name |
Amd64_eb3e440f1bc5adaeda113d35f52c4b31_31bf3856ad364e35_6.2.9200.17646_none_6fd5a339e963b5af.manifest |
|
File version |
Not applicable |
|
File size |
721 |
|
Date (UTC) |
04-Feb-2016 |
|
Time (UTC) |
23:07 |
|
Platform |
Not applicable |
|
File name |
Amd64_f0cadb0cd11da918a3b19361609cfd7c_31bf3856ad364e35_6.2.9200.17646_none_5d9c7a28810131b4.manifest |
|
File version |
Not applicable |
|
File size |
721 |
|
Date (UTC) |
04-Feb-2016 |
|
Time (UTC) |
23:07 |
|
Platform |
Not applicable |
|
File name |
Amd64_f1b76eef2080f4b2bfaa0b6d15314244_31bf3856ad364e35_6.2.9200.17646_none_4f35fc9017b81342.manifest |
|
File version |
Not applicable |
|
File size |
721 |
|
Date (UTC) |
04-Feb-2016 |
|
Time (UTC) |
23:07 |
|
Platform |
Not applicable |
|
File name |
Amd64_f874993e017bda5cdcd6a5bd081e89d6_31bf3856ad364e35_6.2.9200.21765_none_f80e4a192ae5040d.manifest |
|
File version |
Not applicable |
|
File size |
721 |
|
Date (UTC) |
04-Feb-2016 |
|
Time (UTC) |
23:07 |
|
Platform |
Not applicable |
|
File name |
Amd64_fbe6850ff0e8f044f24f270053b93e01_31bf3856ad364e35_6.2.9200.17646_none_6bfa1d4b837f6c4a.manifest |
|
File version |
Not applicable |
|
File size |
721 |
|
Date (UTC) |
04-Feb-2016 |
|
Time (UTC) |
23:07 |
|
Platform |
Not applicable |
|
File name |
Amd64_updateservices-database-common_31bf3856ad364e35_6.2.9200.17646_none_d5beda46b51af18b.manifest |
|
File version |
Not applicable |
|
File size |
13,981 |
|
Date (UTC) |
03-Feb-2016 |
|
Time (UTC) |
18:10 |
|
Platform |
Not applicable |
|
File name |
Amd64_updateservices-database-common_31bf3856ad364e35_6.2.9200.21765_none_d631d6efce49afe0.manifest |
|
File version |
Not applicable |
|
File size |
13,981 |
|
Date (UTC) |
03-Feb-2016 |
|
Time (UTC) |
18:07 |
|
Platform |
Not applicable |
|
File name |
Amd64_updateservices-services_31bf3856ad364e35_6.2.9200.17646_none_d7bbf51c48e99fbc.manifest |
|
File version |
Not applicable |
|
File size |
55,225 |
|
Date (UTC) |
04-Feb-2016 |
|
Time (UTC) |
23:07 |
|
Platform |
Not applicable |
|
File name |
Amd64_updateservices-services_31bf3856ad364e35_6.2.9200.21765_none_d82ef1c562185e11.manifest |
|
File version |
Not applicable |
|
File size |
55,225 |
|
Date (UTC) |
04-Feb-2016 |
|
Time (UTC) |
23:07 |
|
Platform |
Not applicable |
|
File name |
Amd64_updateservices-snapin_31bf3856ad364e35_6.2.9200.17646_none_678a29d9cbd8a2df.manifest |
|
File version |
Not applicable |
|
File size |
29,016 |
|
Date (UTC) |
04-Feb-2016 |
|
Time (UTC) |
23:07 |
|
Platform |
Not applicable |
|
File name |
Amd64_updateservices-snapin_31bf3856ad364e35_6.2.9200.21765_none_67fd2682e5076134.manifest |
|
File version |
Not applicable |
|
File size |
29,016 |
|
Date (UTC) |
04-Feb-2016 |
|
Time (UTC) |
23:07 |
|
Platform |
Not applicable |
|
File name |
Msil_microsoft.updateser..resources.resources_31bf3856ad364e35_6.2.9200.17646_cs-cz_f3ba7e75bfbfd8b1.manifest |
|
File version |
Not applicable |
|
File size |
1,611 |
|
Date (UTC) |
03-Feb-2016 |
|
Time (UTC) |
21:16 |
|
Platform |
Not applicable |
|
File name |
Msil_microsoft.updateser..resources.resources_31bf3856ad364e35_6.2.9200.17646_de-de_8e1ff3d8b7dc294a.manifest |
|
File version |
Not applicable |
|
File size |
1,611 |
|
Date (UTC) |
03-Feb-2016 |
|
Time (UTC) |
21:39 |
|
Platform |
Not applicable |
|
File name |
Msil_microsoft.updateser..resources.resources_31bf3856ad364e35_6.2.9200.17646_en-us_3710c9d1a6ba350f.manifest |
|
File version |
Not applicable |
|
File size |
1,611 |
|
Date (UTC) |
03-Feb-2016 |
|
Time (UTC) |
17:13 |
|
Platform |
Not applicable |
|
File name |
Msil_microsoft.updateser..resources.resources_31bf3856ad364e35_6.2.9200.17646_es-es_36dc26b5a6e126b4.manifest |
|
File version |
Not applicable |
|
File size |
1,611 |
|
Date (UTC) |
03-Feb-2016 |
|
Time (UTC) |
21:33 |
|
Platform |
Not applicable |
|
File name |
Msil_microsoft.updateser..resources.resources_31bf3856ad364e35_6.2.9200.17646_fr-fr_d9939cb499b33d16.manifest |
|
File version |
Not applicable |
|
File size |
1,611 |
|
Date (UTC) |
03-Feb-2016 |
|
Time (UTC) |
21:52 |
|
Platform |
Not applicable |
|
File name |
Msil_microsoft.updateser..resources.resources_31bf3856ad364e35_6.2.9200.17646_hu-hu_21041cfc7e130c32.manifest |
|
File version |
Not applicable |
|
File size |
1,611 |
|
Date (UTC) |
03-Feb-2016 |
|
Time (UTC) |
21:21 |
|
Platform |
Not applicable |
|
File name |
Msil_microsoft.updateser..resources.resources_31bf3856ad364e35_6.2.9200.17646_it-it_c3bb92fb70e52294.manifest |
|
File version |
Not applicable |
|
File size |
1,611 |
|
Date (UTC) |
03-Feb-2016 |
|
Time (UTC) |
20:56 |
|
Platform |
Not applicable |
|
File name |
Msil_microsoft.updateser..resources.resources_31bf3856ad364e35_6.2.9200.17646_ja-jp_65e112086400346f.manifest |
|
File version |
Not applicable |
|
File size |
1,611 |
|
Date (UTC) |
03-Feb-2016 |
|
Time (UTC) |
20:45 |
|
Platform |
Not applicable |
|
File name |
Msil_microsoft.updateser..resources.resources_31bf3856ad364e35_6.2.9200.17646_ko-kr_094aeebd5670fb85.manifest |
|
File version |
Not applicable |
|
File size |
1,611 |
|
Date (UTC) |
03-Feb-2016 |
|
Time (UTC) |
20:47 |
|
Platform |
Not applicable |
|
File name |
Msil_microsoft.updateser..resources.resources_31bf3856ad364e35_6.2.9200.17646_nl-nl_f01cbb302fc23116.manifest |
|
File version |
Not applicable |
|
File size |
1,611 |
|
Date (UTC) |
03-Feb-2016 |
|
Time (UTC) |
21:27 |
|
Platform |
Not applicable |
|
File name |
Msil_microsoft.updateser..resources.resources_31bf3856ad364e35_6.2.9200.17646_pl-pl_365915b214e49eca.manifest |
|
File version |
Not applicable |
|
File size |
1,611 |
|
Date (UTC) |
03-Feb-2016 |
|
Time (UTC) |
21:22 |
|
Platform |
Not applicable |
|
File name |
Msil_microsoft.updateser..resources.resources_31bf3856ad364e35_6.2.9200.17646_pt-br_38ad0056136e32ae.manifest |
|
File version |
Not applicable |
|
File size |
1,614 |
|
Date (UTC) |
03-Feb-2016 |
|
Time (UTC) |
20:56 |
|
Platform |
Not applicable |
|
File name |
Msil_microsoft.updateser..resources.resources_31bf3856ad364e35_6.2.9200.17646_pt-pt_398ecfc212dda28a.manifest |
|
File version |
Not applicable |
|
File size |
1,611 |
|
Date (UTC) |
03-Feb-2016 |
|
Time (UTC) |
20:48 |
|
Platform |
Not applicable |
|
File name |
Msil_microsoft.updateser..resources.resources_31bf3856ad364e35_6.2.9200.17646_ru-ru_8031e185f7bf30b6.manifest |
|
File version |
Not applicable |
|
File size |
1,611 |
|
Date (UTC) |
03-Feb-2016 |
|
Time (UTC) |
20:59 |
|
Platform |
Not applicable |
|
File name |
Msil_microsoft.updateser..resources.resources_31bf3856ad364e35_6.2.9200.17646_sv-se_1c2ccbfaeee83b11.manifest |
|
File version |
Not applicable |
|
File size |
1,611 |
|
Date (UTC) |
03-Feb-2016 |
|
Time (UTC) |
21:00 |
|
Platform |
Not applicable |
|
File name |
Msil_microsoft.updateser..resources.resources_31bf3856ad364e35_6.2.9200.17646_tr-tr_c53a1641dda43d02.manifest |
|
File version |
Not applicable |
|
File size |
1,611 |
|
Date (UTC) |
03-Feb-2016 |
|
Time (UTC) |
21:52 |
|
Platform |
Not applicable |
|
File name |
Msil_microsoft.updateser..resources.resources_31bf3856ad364e35_6.2.9200.17646_zh-cn_9697343f8ddc0f21.manifest |
|
File version |
Not applicable |
|
File size |
1,616 |
|
Date (UTC) |
03-Feb-2016 |
|
Time (UTC) |
21:24 |
|
Platform |
Not applicable |
|
File name |
Msil_microsoft.updateser..resources.resources_31bf3856ad364e35_6.2.9200.17646_zh-hk_95422ccd8eb781b1.manifest |
|
File version |
Not applicable |
|
File size |
1,614 |
|
Date (UTC) |
03-Feb-2016 |
|
Time (UTC) |
21:54 |
|
Platform |
Not applicable |
|
File name |
Msil_microsoft.updateser..resources.resources_31bf3856ad364e35_6.2.9200.17646_zh-tw_9a9371958b4ceb91.manifest |
|
File version |
Not applicable |
|
File size |
1,616 |
|
Date (UTC) |
03-Feb-2016 |
|
Time (UTC) |
21:02 |
|
Platform |
Not applicable |
|
File name |
Msil_microsoft.updateser..resources.resources_31bf3856ad364e35_6.2.9200.21765_cs-cz_f42d7b1ed8ee9706.manifest |
|
File version |
Not applicable |
|
File size |
1,611 |
|
Date (UTC) |
03-Feb-2016 |
|
Time (UTC) |
21:22 |
|
Platform |
Not applicable |
|
File name |
Msil_microsoft.updateser..resources.resources_31bf3856ad364e35_6.2.9200.21765_de-de_8e92f081d10ae79f.manifest |
|
File version |
Not applicable |
|
File size |
1,611 |
|
Date (UTC) |
03-Feb-2016 |
|
Time (UTC) |
21:36 |
|
Platform |
Not applicable |
|
File name |
Msil_microsoft.updateser..resources.resources_31bf3856ad364e35_6.2.9200.21765_en-us_3783c67abfe8f364.manifest |
|
File version |
Not applicable |
|
File size |
1,611 |
|
Date (UTC) |
03-Feb-2016 |
|
Time (UTC) |
18:01 |
|
Platform |
Not applicable |
|
File name |
Msil_microsoft.updateser..resources.resources_31bf3856ad364e35_6.2.9200.21765_es-es_374f235ec00fe509.manifest |
|
File version |
Not applicable |
|
File size |
1,611 |
|
Date (UTC) |
03-Feb-2016 |
|
Time (UTC) |
21:24 |
|
Platform |
Not applicable |
|
File name |
Msil_microsoft.updateser..resources.resources_31bf3856ad364e35_6.2.9200.21765_fr-fr_da06995db2e1fb6b.manifest |
|
File version |
Not applicable |
|
File size |
1,611 |
|
Date (UTC) |
03-Feb-2016 |
|
Time (UTC) |
22:24 |
|
Platform |
Not applicable |
|
File name |
Msil_microsoft.updateser..resources.resources_31bf3856ad364e35_6.2.9200.21765_hu-hu_217719a59741ca87.manifest |
|
File version |
Not applicable |
|
File size |
1,611 |
|
Date (UTC) |
03-Feb-2016 |
|
Time (UTC) |
21:19 |
|
Platform |
Not applicable |
|
File name |
Msil_microsoft.updateser..resources.resources_31bf3856ad364e35_6.2.9200.21765_it-it_c42e8fa48a13e0e9.manifest |
|
File version |
Not applicable |
|
File size |
1,611 |
|
Date (UTC) |
03-Feb-2016 |
|
Time (UTC) |
21:54 |
|
Platform |
Not applicable |
|
File name |
Msil_microsoft.updateser..resources.resources_31bf3856ad364e35_6.2.9200.21765_ja-jp_66540eb17d2ef2c4.manifest |
|
File version |
Not applicable |
|
File size |
1,611 |
|
Date (UTC) |
03-Feb-2016 |
|
Time (UTC) |
21:36 |
|
Platform |
Not applicable |
|
File name |
Msil_microsoft.updateser..resources.resources_31bf3856ad364e35_6.2.9200.21765_ko-kr_09bdeb666f9fb9da.manifest |
|
File version |
Not applicable |
|
File size |
1,611 |
|
Date (UTC) |
03-Feb-2016 |
|
Time (UTC) |
21:42 |
|
Platform |
Not applicable |
|
File name |
Msil_microsoft.updateser..resources.resources_31bf3856ad364e35_6.2.9200.21765_nl-nl_f08fb7d948f0ef6b.manifest |
|
File version |
Not applicable |
|
File size |
1,611 |
|
Date (UTC) |
03-Feb-2016 |
|
Time (UTC) |
21:13 |
|
Platform |
Not applicable |
|
File name |
Msil_microsoft.updateser..resources.resources_31bf3856ad364e35_6.2.9200.21765_pl-pl_36cc125b2e135d1f.manifest |
|
File version |
Not applicable |
|
File size |
1,611 |
|
Date (UTC) |
03-Feb-2016 |
|
Time (UTC) |
21:20 |
|
Platform |
Not applicable |
|
File name |
Msil_microsoft.updateser..resources.resources_31bf3856ad364e35_6.2.9200.21765_pt-br_391ffcff2c9cf103.manifest |
|
File version |
Not applicable |
|
File size |
1,614 |
|
Date (UTC) |
03-Feb-2016 |
|
Time (UTC) |
21:51 |
|
Platform |
Not applicable |
|
File name |
Msil_microsoft.updateser..resources.resources_31bf3856ad364e35_6.2.9200.21765_pt-pt_3a01cc6b2c0c60df.manifest |
|
File version |
Not applicable |
|
File size |
1,611 |
|
Date (UTC) |
03-Feb-2016 |
|
Time (UTC) |
21:11 |
|
Platform |
Not applicable |
|
File name |
Msil_microsoft.updateser..resources.resources_31bf3856ad364e35_6.2.9200.21765_ru-ru_80a4de2f10edef0b.manifest |
|
File version |
Not applicable |
|
File size |
1,611 |
|
Date (UTC) |
03-Feb-2016 |
|
Time (UTC) |
21:17 |
|
Platform |
Not applicable |
|
File name |
Msil_microsoft.updateser..resources.resources_31bf3856ad364e35_6.2.9200.21765_sv-se_1c9fc8a40816f966.manifest |
|
File version |
Not applicable |
|
File size |
1,611 |
|
Date (UTC) |
03-Feb-2016 |
|
Time (UTC) |
21:09 |
|
Platform |
Not applicable |
|
File name |
Msil_microsoft.updateser..resources.resources_31bf3856ad364e35_6.2.9200.21765_tr-tr_c5ad12eaf6d2fb57.manifest |
|
File version |
Not applicable |
|
File size |
1,611 |
|
Date (UTC) |
03-Feb-2016 |
|
Time (UTC) |
20:53 |
|
Platform |
Not applicable |
|
File name |
Msil_microsoft.updateser..resources.resources_31bf3856ad364e35_6.2.9200.21765_zh-cn_970a30e8a70acd76.manifest |
|
File version |
Not applicable |
|
File size |
1,616 |
|
Date (UTC) |
03-Feb-2016 |
|
Time (UTC) |
21:02 |
|
Platform |
Not applicable |
|
File name |
Msil_microsoft.updateser..resources.resources_31bf3856ad364e35_6.2.9200.21765_zh-hk_95b52976a7e64006.manifest |
|
File version |
Not applicable |
|
File size |
1,614 |
|
Date (UTC) |
03-Feb-2016 |
|
Time (UTC) |
22:12 |
|
Platform |
Not applicable |
|
File name |
Msil_microsoft.updateser..resources.resources_31bf3856ad364e35_6.2.9200.21765_zh-tw_9b066e3ea47ba9e6.manifest |
|
File version |
Not applicable |
|
File size |
1,616 |
|
Date (UTC) |
03-Feb-2016 |
|
Time (UTC) |
21:24 |
|
Platform |
Not applicable |
|
File name |
Msil_microsoft.updateservices.baseapi_31bf3856ad364e35_6.2.9200.17646_none_dac2b032db92476a.manifest |
|
File version |
Not applicable |
|
File size |
1,396 |
|
Date (UTC) |
03-Feb-2016 |
|
Time (UTC) |
18:10 |
|
Platform |
Not applicable |
|
File name |
Msil_microsoft.updateservices.baseapi_31bf3856ad364e35_6.2.9200.21765_none_c3f720cef537c07d.manifest |
|
File version |
Not applicable |
|
File size |
1,396 |
|
Date (UTC) |
03-Feb-2016 |
|
Time (UTC) |
18:07 |
|
Platform |
Not applicable |
|
File name |
Update.mum |
|
File version |
Not applicable |
|
File size |
15,008 |
|
Date (UTC) |
04-Feb-2016 |
|
Time (UTC) |
23:07 |
|
Platform |
Not applicable |
С помощью сервера обновлений Windows Server Update Services (WSUS) вы можете развернуть собственную централизованную систему обновления продуктов Microsoft (операционных систем Widows, Office, SQL Server, Exchange и т.д.) на компьютерах и серверах в локальной сети компании. В этой статье мы рассмотрим, как установить и настроить сервер обновлений WSUS в Windows Server 2019/2016/2012R2.
Содержание:
- Установка роли WSUS в Windows Server
- Начальная настройка сервера обновлений WSUS в Windows Server
- Установка консоли администрирования WSUS в Windows 10/11
- Оптимизация производительности WSUS
Как работает WSUS?
Сервер WSUS реализован в виде отдельной роли Windows Server. В общих словах сервис WSUS можно описать так:
- После установки сервер WSUS по расписанию синхронизируется с серверами обновлений Microsoft Update в Интернете и скачивает новые обновления для выбранных продуктов;
- Администратор WSUS выбирает, какие обновления нужно установить на рабочие станции и сервера компании и одобряет их установку;
- Клиенты WSUS в локальной сети скачивают и устанавливают обновления с вашего сервера обновлений согласно настроенным политикам.
Установка роли WSUS в Windows Server
Начиная с Windows Server 2008, сервис WSUS выделен в отдельную роль, которую можно установить через консоль управления сервером или с помощью PowerShell.
Если вы развертываете новый сервер WSUS, рекомендуется сразу устанавливать его на последнем релизе Windows Server 2022 (возможна установка на Windows Serve Core).
Чтобы установить WSUS, откройте консоль Server Manager и отметьте роль Windows Server Update Services (система автоматически выберет и предложит установить необходимые компоненты веб сервера IIS).

В следующем окне нужно выбрать, какие компоненты WSUS нужно установить. Обязательно отметьте опцию WSUS Services. Две следующие опции зависят от того, какую базу данных вы планируете использовать для WSUS.
Настройки сервера, метаданные обновлений, информация о клиентах WSUS хранятся в базе данных SQL Server. В качестве базы данных WSUS вы можете использовать:
- Windows Internal Database (WID) – встроенную базу данных Windows, опция WID Connectivity (это рекомендуемый и работоспособный вариант даже для больших инфраструктур);
- Отдельную базу Microsoft SQL Server, развернутую на локальном или удаленном сервере. Вы можете использовать редакции MS SQL Enterprise, Standard (требуют лицензирования) или бесплатную Express редакцию. Это опция SQL Server Connectivity.
Внутреннюю базу Windows (Windows Internal Database) рекомендуется использовать, если:
- У вас отсутствуют лицензии MS SQL Server;
- Вы не планируется использовать балансировку нагрузки на WSUS (NLB WSUS);
- При развертывании дочернего сервера WSUS (например, в филиалах). В этом случае на вторичных серверах рекомендуется использовать встроенную базу WSUS.
В бесплатной SQL Server Express Edition максимальный размер БД ограничен 10 Гб. Ограничение Windows Internal Database – 524 Гб. Например, в моей инфраструктуре размер базы данных WSUS на 3000 клиентов составил около 7Гб.
При установке роли WSUS и MS SQL Server на разных серверах есть ряд ограничений:
- SQL сервер с БД WSUS не может быть контроллером домена Active Directory;
- Сервер WSUS нельзя разворачивать на хосте с ролью Remote Desktop Services.
База WID по умолчанию называется SUSDB.mdf и хранится в каталоге windir%widdata. Эта база поддерживает только Windows аутентификацию (но не SQL). Инстанс внутренней (WID) базы данных для WSUS называется server_nameMicrosoft##WID.
Базу WID можно администрировать через SQL Server Management Studio (SSMS), если указать в строке подключения
\.pipeMICROSOFT##WIDtsqlquery
.
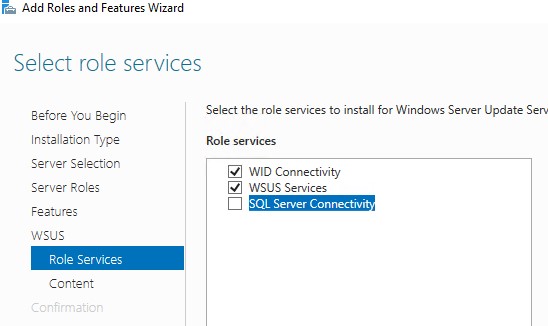
Если вы хотите хранить файлы обновлений локально на сервере WSUS, включите опцию Store updates in the following locations и укажите путь к каталогу. Это может быть папка на локальном диске (рекомендуется использовать отдельный физический или логический том), или сетевой каталог (UNC путь). Обновления скачиваются в указанный каталог только после их одобрения администратором WSUS.
Размер базы данных WSUS сильно зависит от количества продуктов и версий ОС Windows, которое вы планируете обновлять. В большой организации размер файлов обновлений на WSUS сервере может достигать сотни Гб.
Если у вас недостаточно места на дисках для хранения файлов обновлений, отключите эту опцию. В этом случае клиенты WSUS будут получать одобренный файлы обновлений из Интернета (вполне рабочий вариант для небольших сетей).

Также вы можете установить сервер WSUS с внутренней базой данный WID с помощью PowerShell командлета Install-WindowsFeature:
Install-WindowsFeature -Name UpdateServices, UpdateServices-WidDB, UpdateServices-Services, UpdateServices-RSAT, UpdateServices-API, UpdateServices-UI –IncludeManagementTools
Начальная настройка сервера обновлений WSUS в Windows Server
После окончания установки роли WSUS вам нужно выполнить его первоначальную настройку. Откройте Server Manager и выберите Post-Deployment Configuration -> Launch Post-Installation tasks.

Для управления WSUS из командной строки можно использовать консольную утилиту
WsusUtil.exe
. Например, чтобы указать путь к каталогу с файлами обновлений WSUS, выполните:
CD "C:Program FilesUpdate ServicesTools"
WsusUtil.exe PostInstall CONTENT_DIR=E:WSUS
Или, например, вы можете перенастроить ваш WSUS на внешнюю базу данных SQL Server:
wsusutil.exe postinstall SQL_INSTANCE_NAME="SQLSRV1SQLINSTANCEWSUS" CONTENT_DIR=E:WSUS_Content
Затем откройте консоль Windows Server Update Services. Запустится мастер первоначальной настройки сервера обновлений WSUS.
Укажите, будет ли сервер WSUS скачивать обновления с сайта Microsoft Update напрямую (Synchronize from Microsoft Update) или он должен получать их с вышестоящего WSUS сервера (Synchronize from another Windows Update Services server). Дочерние WSUS сервера обычно развертываются на удаленных площадках с большим количеством клиентов (300+) для снижения нагрузки на WAN канал.

Если в вашей сети используется прокси-сервер для доступа в Интернет, далее нужно указать адрес и порт прокси сервера, и логин/пароль для аутентификации.

Проверьте подключение к вышестоящему серверу обновлений (или Windows Update). Нажмите кнопку Start Connecting.

Выберите языки продуктов, для которых WSUS будет получать обновления. Мы укажем English и Russian (список языков может быть в дальнейшем изменен из консоли WSUS).

Затем выберите продукты, для которых WSUS должен скачивать обновления. Выберите только те продукты Microsoft, которые используются в Вашей корпоративной сети. Например, если вы уверены, что в вашей сети не осталось компьютеров с Windows 7 или Windows 8, не выбирайте эти опции.
Обязательно включите в классификации следующие общие разделы:
- Developer Tools, Runtimes, and Redistributable — для обновления библиотек Visual C++ Runtime
- Windows Dictionary Updates в категории Windows
- Windows Server Manager – Windows Server Update Services (WSUS) Dynamic Installer

На странице Classification Page, нужно указать типы обновлений, которые будут распространяться через WSUS. Рекомендуется обязательно указать: Critical Updates, Definition Updates, Security Packs, Service Packs, Update Rollups, Updates.
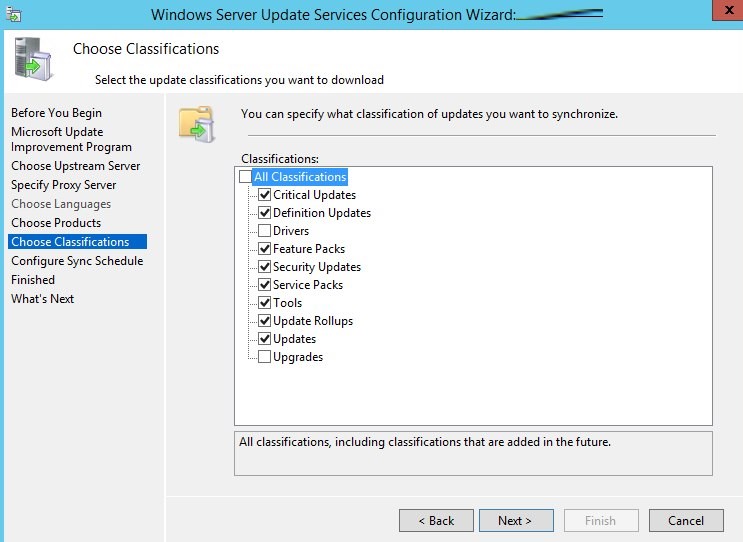
Обновления редакций (билдов) Windows 10 (21H2, 20H2, 1909 и т.д.) в консоли WSUS входят в класс Upgrades.
Настройте расписание синхронизации обновлений. В большинстве случаев рекомендуется использовать автоматическую ежедневную синхронизацию сервера WSUS с серверами обновлений Microsoft Update. Рекомендуется выполнять синхронизацию в ночные часы, чтобы не загружать канал Интернет в рабочее время.

Первоначальная синхронизация сервера WSUS с вышестоящим сервером обновлений может занять несколько дней (в зависимости от количества продуктов, которое вы выбрали ранее).
После окончания работы мастера запустится консоль WSUS.

Консоль WSUS состоит из нескольких разделов:
- Updates – обновления, доступные на сервере WSUS (здесь можно управлять одобрением обновлений и назначать их для установки)
- Computers – здесь можно создать группы клиентов WSUS (компьютеры и серверы)
- Downstream Servers – позволяет настроить, будете ли вы получать из обновления Windows Update или вышестоящего сервера WSUS
- Syncronizations –расписание синхронизации обновлений
- Reports – отчёты WSUS
- Options – настройка сервера WSUS
Клиенты теперь могут получать обновления, подключившись к WSUS серверу по порту 8530 (в Windows Server 2003 и 2008 по умолчанию использоваться 80 порт). Проверьте, что этот порт открыт на сервере обновлений:
Test-NetConnection -ComputerName wsussrv1 -Port 8530
Можно использовать защищенное SSL подключение по порту 8531. Для этого нужно привязать сертификат в IIS.
Если порт закрыт, создайте соответствующее правило в Windows Defender Firewall.
Установка консоли администрирования WSUS в Windows 10/11
Для администрирования сервера обновления WSUS используется консоль Windows Server Update Services (
wsus.msc
). Вы можете управлять серверов WSUS как с помощью локальной консоли, так и по сети с удаленного компьютера.
Консоль администрирования WSUS для десктопных компьютеров с Windows 10 или 11 входит в состав RSAT. Для установки компонента Rsat.WSUS.Tool, выполните следующую PowerShell команду:
Add-WindowsCapability -Online -Name Rsat.WSUS.Tools~~~~0.0.1.0
Если вы хотите установить консоль WSUS в Windows Server, выполните команду:
Install-WindowsFeature -Name UpdateServices-Ui
При установке WSUS в Windows Server создаются две дополнительные локальные группы. Вы можете использовать их для предоставления доступа пользователям к консоли управления WSUS.
- WSUS Administrators
- WSUS Reporters
Для просмотра отчетов по установленным обновлениям и клиентам на WSUS нужно установить:
- Microsoft System CLR Types для SQL Server 2012 (SQLSysClrTypes.msi);
- Microsoft Report Viewer 2012 Runtime (ReportViewer.msi).
Если компоненты не установлен, при формировании любого отчета WSUS появится ошибка:
The Microsoft Report Viewer 2012 Redistributable is required for this feature. Please close the console before installing this package.
Оптимизация производительности WSUS
В этом разделе опишем несколько советов, касающихся оптимизации производительности сервера обновлений WSUS в реальных условиях.
- Для нормальной работы WSUS на сервере обновлений нужно должно быть свободным минимум 4 Гб RAM и 2CPU;
- При большом количестве клиентов WSUS (более 1500) вы можете столкнутся с существенным снижением производительность пула IIS WsusPoll, который раздает обновления клиентам. Может появляться ошибка 0x80244022 на клиентах, или при запуске консоль WSUS падать с ошибкой Error: Unexpected Error + Event ID 7053 в Event Viewer (The WSUS administration console has encountered an unexpected error. This may be a transient error; try restarting the administration console. If this error persists).
 Для решения проблемы нужно добавить RAM на сервер и оптимизировать настройки пула IIS в соответствии с рекомендациями в статье. Воспользуетесь такими командами:
Import-Module WebAdministration
Set-ItemProperty -Path IIS:AppPoolsWsusPool -Name queueLength -Value 2500
Set-ItemProperty -Path IIS:AppPoolsWsusPool -Name cpu.resetInterval -Value "00.00:15:00"
Set-ItemProperty -Path IIS:AppPoolsWsusPool -Name recycling.periodicRestart.privateMemory -Value 0
Set-ItemProperty -Path IIS:AppPoolsWsusPool -Name failure.loadBalancerCapabilities -Value "TcpLevel" - Включите автоматическое одобрения для обновлений антивируса Microsoft В противном случае WSUS станет существенно тормозить и потреблять всю доступную оперативную память.
 Для решения проблемы нужно добавить RAM на сервер и оптимизировать настройки пула IIS в соответствии с рекомендациями в статье. Воспользуетесь такими командами:
Антивирусные проверки могут негативно влиять на производительность WSUS. Во встроенном Microsoft Defender антивирусе в Windows Server рекомендуется исключить следующие папки из области проверки:
- WSUSWSUSContent;
- %windir%widdata;
- SoftwareDistributionDownload.
 Обновлено: 15.01.2022
Опубликовано: 08.05.2020
Windows Server Update Services или WSUS предназначен для распространения обновлений внутри сети. Он позволит скачивать все пакеты для их установки на один сервер и распространять данные пакеты по локальной сети. Это ускорит процесс получения самих обновлений, а также даст администратору контроль над процессом их установки.
В данной инструкции мы рассмотрим пример установки и настройки WSUS на Windows Server 2012 R2.
Подготовка сервера
Установка роли сервера обновлений
Постустановка и настройка WSUS с помощью мастера
Ручная настройка сервера
Установка Microsoft Report Viewer
Конфигурирование сервера
Настройка клиентов
Групповой политикой
Реестром
Автоматическая чистка
Перед установкой
Рекомендуется выполнить следующие действия, прежде чем начать установку WSUS:
- Задаем имя компьютера.
- Настраиваем статический IP-адрес.
- При необходимости, добавляем компьютер в домен.
- Устанавливаем все обновления Windows.
Также нужно убедиться, что на сервере достаточно дискового пространства. Под WSUS нужно много места — в среднем, за 2 года использования, может быть израсходовано около 1 Тб. Хотя, это все условно и, во многом, зависит от количества программных продуктов, которые нужно обновлять и как часто выполнять чистку сервера от устаревших данных.
Установка роли
Установка WSUS устанавливается как роль Windows Server. Для начала запускаем Диспетчер серверов:

В правой части открытого окна нажимаем Управление — Добавить роли и компоненты:

На странице приветствия просто нажимаем Далее (также можно установить галочку Пропускать эту страницу по умолчанию):

На следующей странице оставляем переключатель в положении Установка ролей или компонентов:

Далее выбираем сервер из списка, на который будем ставить WSUS:

В окне «Выбор ролей сервера» ставим галочку Службы Windows Server Update Services — в открывшемся окне (если оно появится) нажимаем Добавить компоненты:

Среди компонентов оставляем все по умолчанию и нажимаем Далее:

Мастер запустит предварительную настройку служб обновления — нажимаем Далее:

Среди ролей службы можно оставить галочки, выставленные по умолчанию:

Прописываем путь, где WSUS будет хранить файлы обновлений:

* в нашем примере был прописан путь C:WSUS Updates. Обновления нужно хранить на разделе с достаточным объемом памяти.
Запустится настройка роли IIS — просто нажимаем Далее:

Среди служб ролей оставляем все галочки по умолчанию и нажимаем Далее:

В последнем окне проверяем сводную информацию о всех компонентах, которые будут установлены на сервер и нажимаем Установить:

Процесс установки занимаем несколько минут. После завершения можно закрыть окно:

Установка роли WSUS завершена.
Первый запуск и настройка WSUS
После установки наш сервер еще не готов к работе и требуется его первичная настройка. Она выполняется с помощью мастера.
В диспетчере сервера кликаем по Средства — Службы Windows Server Update Services:

При первом запуске запустится мастер завершения установки. В нем нужно подтвердить путь, по которому мы хотим хранить файлы обновлений. Кликаем по Выполнить:

… и ждем завершения настройки:

Откроется стартовое окно мастера настройки WSUS — идем далее:

На следующей странице нажимаем Далее (при желании, можно принять участие в улучшении качества продуктов Microsoft):

Далее настраиваем источник обновлений для нашего сервера. Это может быть центр обновлений Microsoft или другой наш WSUS, установленный ранее:

* в нашем примере установка будет выполняться из центра Microsoft. На данном этапе можно сделать сервер подчиненным, синхронизируя обновления с другим WSUS.
Если в нашей сети используется прокси-сервер, задаем настройки:

* в нашем примере прокси-сервер не используется.
Для первичной настройки WSUS должен проверить подключение к серверу обновлений. Также будет загружен список актуальных обновлений. Нажимаем Начать подключение:

… и дожидаемся окончания процесса:

Выбираем языки программных продуктов, для которых будут скачиваться обновления:

Внимательно проходим по списку программных продуктов Microsoft и выбираем те, которые есть в нашей сети, и для который мы хотим устанавливать обновления:

* не стоит выбирать все программные продукты, так как на сервере может не хватить дискового пространства.
Выбираем классы обновлений, которые мы будем устанавливать на компьютеры:

* стоит воздержаться от установки обновлений, которые могут нанести вред, например, драйверы устройств в корпоративной среде не должны постоянно обновляться — желательно, чтобы данный процесс контролировался администратором.
Настраиваем синхронизацию обновлений. Желательно, чтобы она выполнялась в автоматическом режиме:

Мы завершили первичную настройку WSUS. При желании, можно установить галочку Запустить первоначальную синхронизацию:

После откроется консоль управления WSUS.
Завершение настройки сервера обновлений
Наш сервис установлен, настроен и запущен. Осталось несколько штрихов.
Установка Microsoft Report Viewer
Для просмотра отчетов, необходим компонент, который не ставится с WSUS. Для его установки нужно сначала зайти в установку ролей и компонентов:
… и среди компонентов на соответствующей странице выбираем .NET Framework 3.5:

Продолжаем установку и завершаем ее.
Для загрузки Microsoft Report Viewer переходим на страницу https://www.microsoft.com/ru-ru/download/details.aspx?id=45496 и скачиваем установочный пакет:

После выполняем установку приложения и перезапускаем консоль WSUS — отчеты будут доступны для просмотра.
Донастройка WSUS
Мастер установки предлагает выполнить большую часть настроек, но для полноценной работы необходимо несколько штрихов.
1. Группы компьютеров
При подключении новых компьютеров к серверу, они должны распределиться по группам. Группы позволят применять разные обновления к разным клиентам.
В консоли управления WSUS переходим в Компьютеры — кликаем правой кнопкой мыши по Все компьютеры и выбираем Добавить группу компьютеров…:

Вводим название для группы и повторяем действия для создания новой группы. В итоге получаем несколько групп, например:

2. Автоматические утверждения
После получения сервером обновлений, они не будут устанавливаться, пока системный администратор их не утвердит для установки. Чтобы не заниматься данной работой в ручном режиме, создадим правила утверждения обновлений.
В консоли управления WSUS переходим в раздел Параметры — Автоматические утверждения:

Кликаем по Создать правило:

У нас есть возможность комбинировать условия, при которых будут работать наши правила. Например, для созданных ранее групп компьютеров можно создать такие правила:
- Для тестовой группы применять все обновления сразу после их выхода.
- Для рабочих станций и серверов сразу устанавливать критические обновления.
- Для рабочих станций и серверов применять обновления спустя 7 дней.
- Для серверов устанавливать обновления безопасности по прошествии 3-х дней.
3. Добавление компьютеров в группы
Ранее, нами были созданы группы компьютеров. После данные группы использовались для настройки автоматического утверждения обновлений. Для автоматизации работы сервера осталось определить, как клиентские компьютеры будут добавляться в группы.
В консоли WSUS переходим в Параметры — Компьютеры:

Если мы хотим автоматизировать добавление компьютеров в группы, необходимо установить переключатель в положение Использовать на компьютерах групповую политику или параметры реестра:

Настройка клиентов
И так, наш сервер готов к работе. Клиентские компьютеры могут быть настроены в автоматическом режиме с помощью групповой политики Active Directory или вручную в реестре. Рассмотрим оба варианта. Также стоит отметить, что, как правило, проблем совместимости нет — WSUS сервер на Windows Server 2012 без проблем принимает запросы как от Windows 7, так и Windows 10. Приведенные ниже примеры настроек являются универсальными.
Групповая политика (GPO)
Открываем инструмент настройки групповой политики, создаем новые политики для разных групп компьютеров — в нашем примере:
- Для тестовой группы.
- Для серверов.
- Для рабочих станций.
Создаем GPO для соответствующих организационных юнитов. Открываем данные политики на редактирование и переходим по пути Конфигурация компьютера — Политики — Административные шаблоны — Компоненты Windows — Центр обновления Windows. Стоит настроить следующие политики:
| Название политики | Значение | Описание |
|---|---|---|
| Разрешить управлению электропитанием центра обновления Windows выводить систему из спящего режима для установки запланированных обновлений | Включить | Позволяет центру обновления выводить компьютер из спящего режима для установки обновлений. |
| Настройка автоматического обновления | Включить. Необходимо выбрать вариант установки, например, автоматическую. Также задаем день недели и время установки. Для серверов рекомендуется не устанавливать обновления автоматически, чтобы избежать перезагрузок. |
Позволяет определить, что нужно делать с обновлениями, как именно их ставить и когда. Обратите внимание, что Microsoft большую часть обновлений выпускает во вторник — используйте эту информацию, чтобы задать наиболее оптимальное время установки. |
| Указать размещение службы обновлений Microsoft в интрасети | Включить. Указать адрес сервера в формате веб ссылки, например, http://WSUS-SRV:8530 * |
Настройка говорит клиентам, на каком сервере искать обновления. |
| Разрешать пользователям, не являющимся администраторами получать уведомления об обновлениях | Включить | Позволяет предоставить информацию об устанавливаемых обновлениях всем пользователям. |
| Не выполнять автоматическую перезагрузку, если в системе работают пользователи | Включить | Позволит избежать ненужных перезагрузок компьютера во время работы пользователя. |
| Повторный запрос для перезагрузки при запланированных установках | Включить и выставить значение в минутах, например, 1440 | Если перезагрузка была отложена, необходимо повторить запрос. |
| Задержка перезагрузки при запланированных установках | Включить и выставить значение в минутах, например, 30 | Дает время перед перезагрузкой компьютера после установки обновлений. |
| Разрешить клиенту присоединяться к целевой группе | Включить и задать значение созданной в WSUS группе компьютеров: — Рабочие станции — Серверы — Тестовая группа |
Позволяет добавить наши компьютеры в соответствующую группу WSUS. |
* 8530 — сетевой порт, на котором по умолчанию слушает сервер WSUS. Уточнить его можно на стартовой странице консоли управления WSUS.
Ждем применения политик. Для ускорения процесса некоторые компьютеры можно перезагрузить вручную.
Настройка клиентов через реестр Windows
Как говорилось выше, мы можем вручную настроить компьютер на подключение к серверу обновлений WSUS.
Для этого запускаем редактор реестра и переходим по пути: HKEY_LOCAL_MACHINESOFTWAREPolicesMicrosoftWindowsWindowsUpdate. Нам необходимо создать следующие ключи:
- WUServer, REG_SZ — указывает имя сервера, например, http://WSUS-SRV:8530
- WUStatusServer, REG_SZ — указывает имя сервера, например, http://WSUS-SRV:8530
- TargetGroupEnabled, REG_DWORD — значение 1
- TargetGroup, REG_DWORD — значение целевой группы, например, «Серверы».
Теперь переходим в раздел реестра HKEY_LOCAL_MACHINESOFTWAREPolicesMicrosoftWindowsWindowsUpdateAU. Если он отсутствует, создаем вручную. После нужно создать ключи:
- AUOptions, REG_DWORD — значение 2
- AutoInstallMinorUpdates, REG_DWORD — значение 0
- NoAutoUpdate, REG_DWORD — значение 0
- ScheduledInstallDay, REG_DWORD — значение 0
- ScheduledInstallTime, REG_DWORD — значение 3
- UseWUServer, REG_DWORD — значение 1
После перезагружаем компьютер. Чтобы форсировать запрос к серверу обновлений, на клиенте выполняем команду:
wuauclt.exe /detectnow
Автоматическая чистка WSUS
Как говорилось ранее, сервер WSUS очень требователен к дисковому пространству. Поэтому удаление устаревшей информации является критически важным этапом его администрирования.
Саму чистку можно сделать в панели управления сервером обновления в разделе Параметры — Мастер очистки сервера.
Также можно воспользоваться командлетом в Powershell Invoke-WsusServerCleanup — целиком команда будет такой:
Get-WSUSServer | Invoke-WsusServerCleanup -CleanupObsoleteComputers -CleanupObsoleteUpdates -CleanupUnneededContentFiles -CompressUpdates -DeclineExpiredUpdates -DeclineSupersededUpdates
Для автоматизации чистки создаем скрипт с расширением .ps1 и создаем задачу в планировщике. Чистку стоит делать раз в неделю.
Обновлено 28.10.2014
WSUS (Windows Server Update Services) – это сервер обновлений ОС и продуктов компании Microsoft. ПО может быть скачано бесплатно с сайтов Microsoft и инсталлировано на серверную ОС семейства Windows Server. Сервер обновлений синхронизируется с сайтом Microsoft и скачивает обновления, которые потом могут быть распространены внутри локальной сети. Такой метод экономит внешний трафик компании и ускоряет установку обновлений с целью исправления ошибок и уязвимостей в ОС. Также это позволяет централизованно управлять обновлениями рабочих стаций и серверов.
Открываем Диспетчер серверов

Как установить WSUS на Windows Server 2012R2-01
Нажимаем Управление-Добавление роли или компонента.
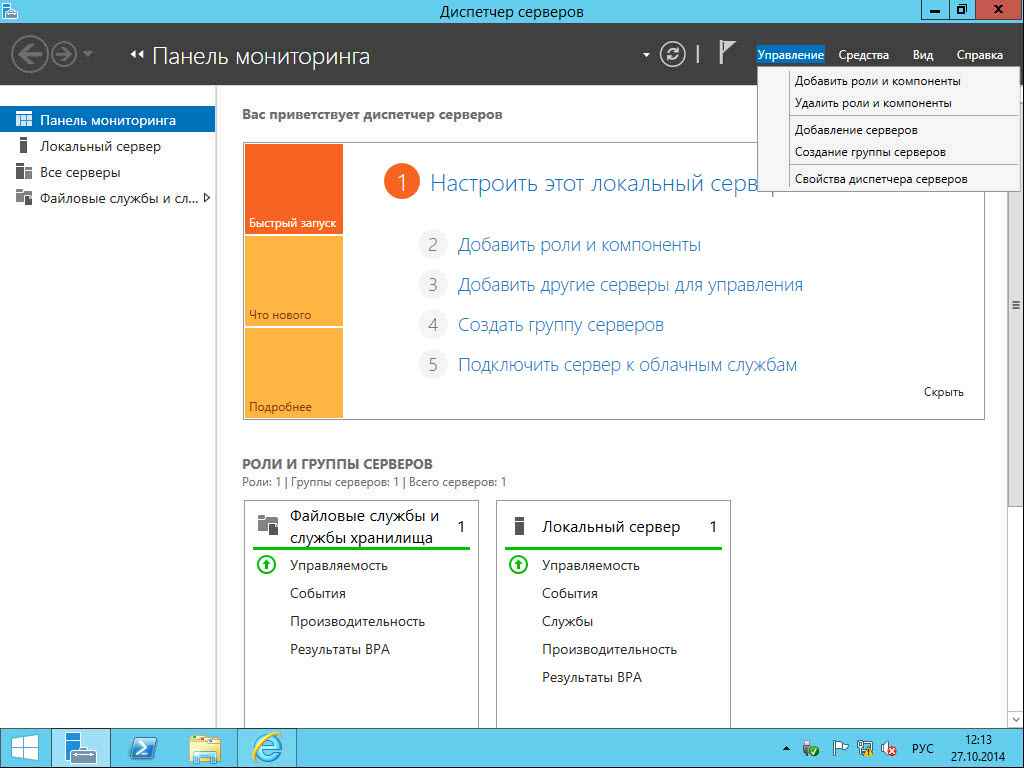
Как установить WSUS на Windows Server 2012R2-02
Читаем немного полезной информации от мастера 🙂 и щелкаем Далее.
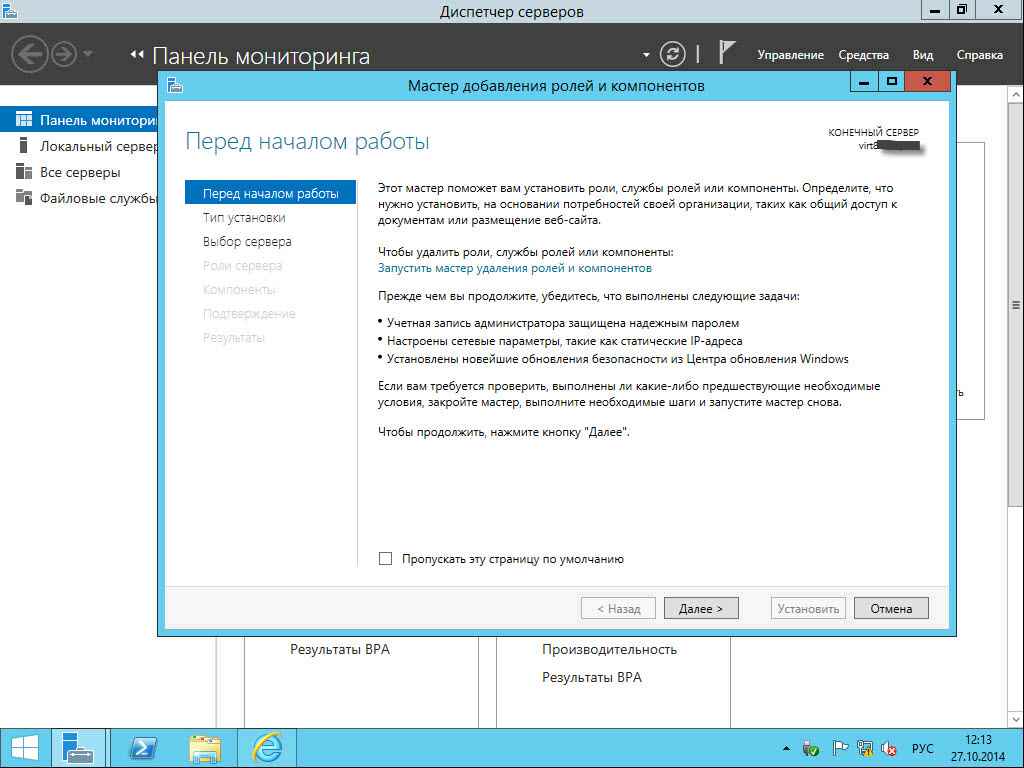
Как установить WSUS на Windows Server 2012R2-03
Далее.

Как установить WSUS на Windows Server 2012R2-04
Далее.

Как установить WSUS на Windows Server 2012R2-05
Выбираем Windows Server Update Service.
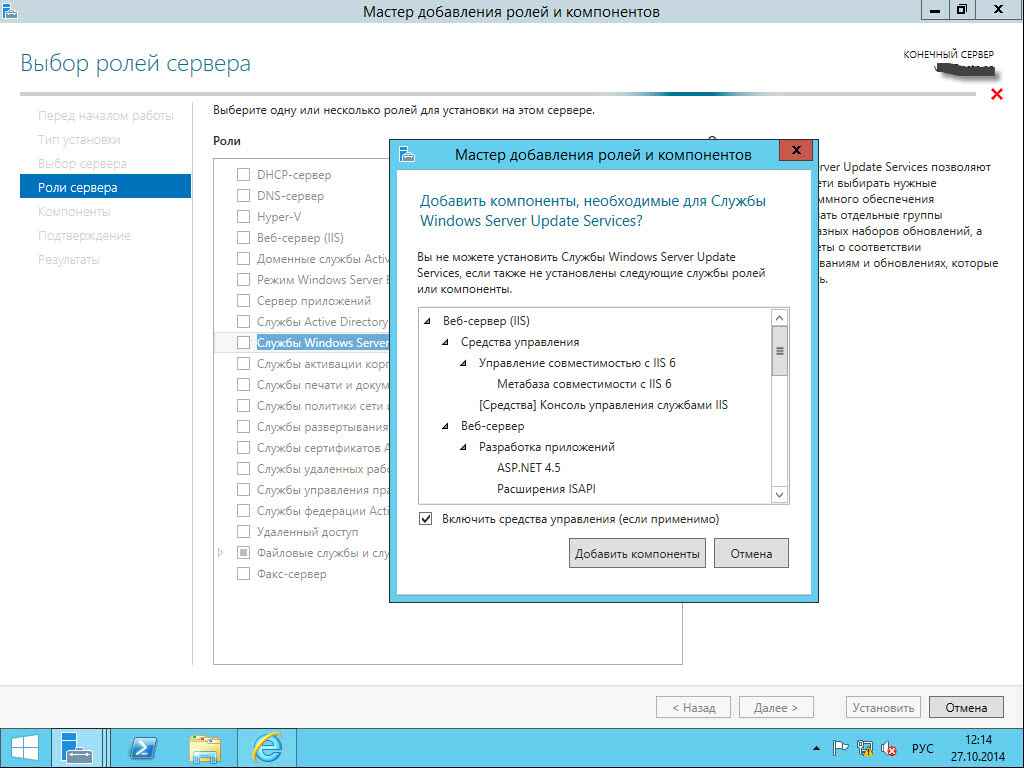
Как установить WSUS на Windows Server 2012R2-06
Далее.
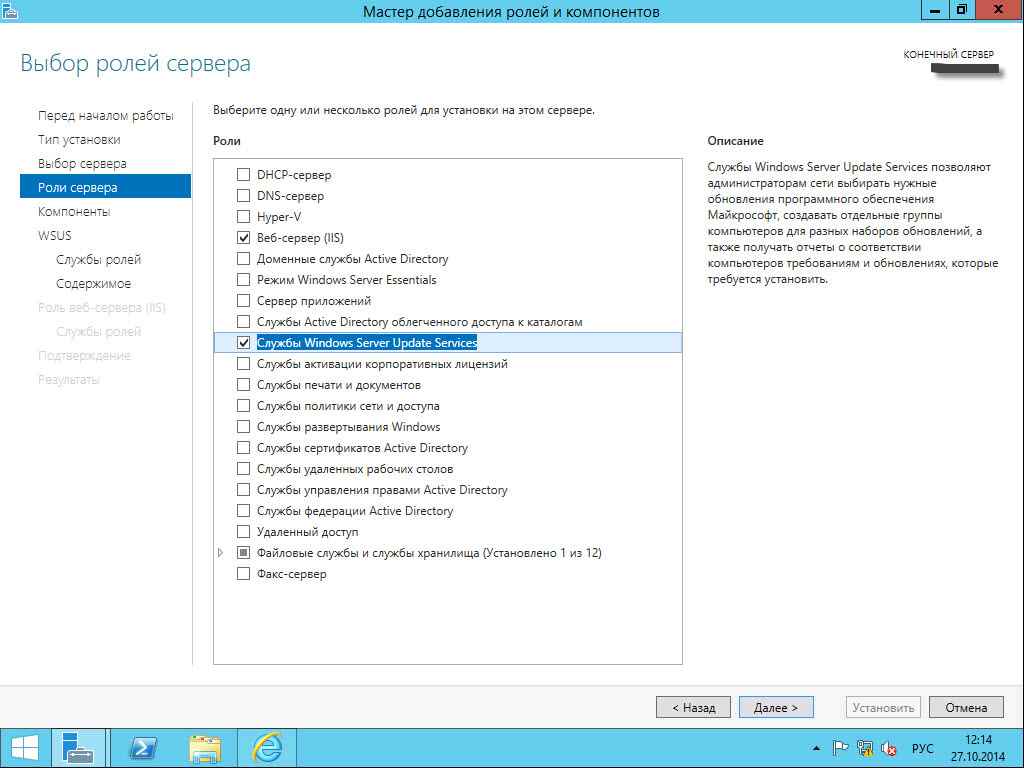
Как установить WSUS на Windows Server 2012R2-07
Далее

Как установить WSUS на Windows Server 2012R2-08
Немного описания, что делает служба, жмем Далее.
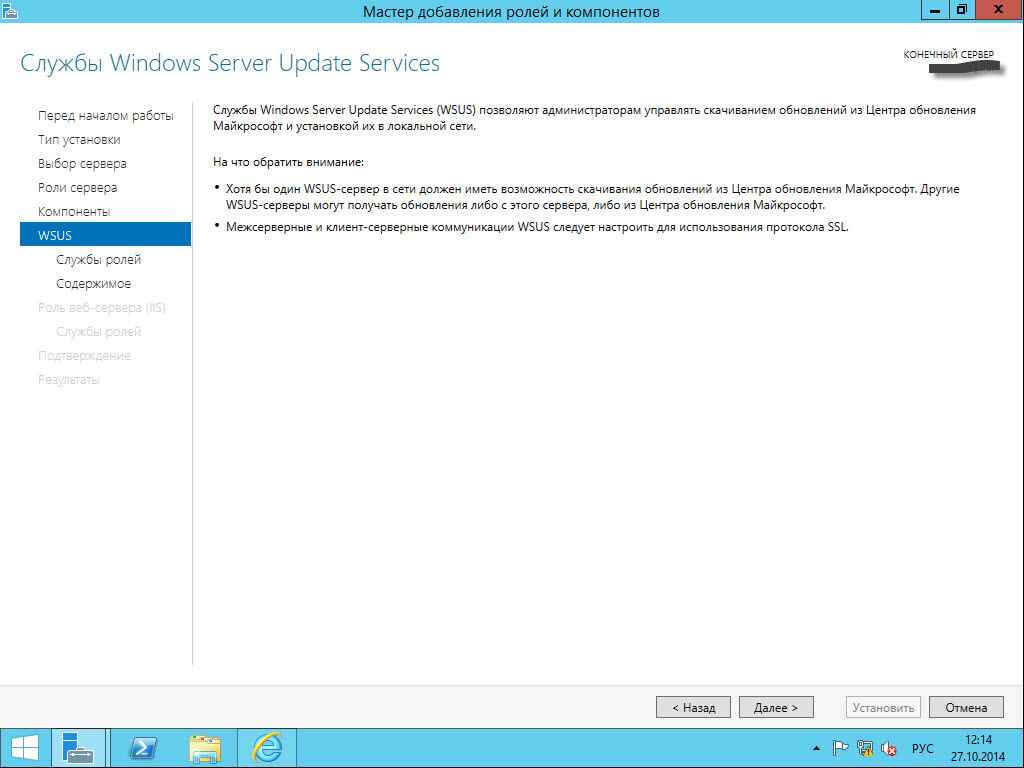
Как установить WSUS на Windows Server 2012R2-09
Ставим первые две птички и жмем далее.
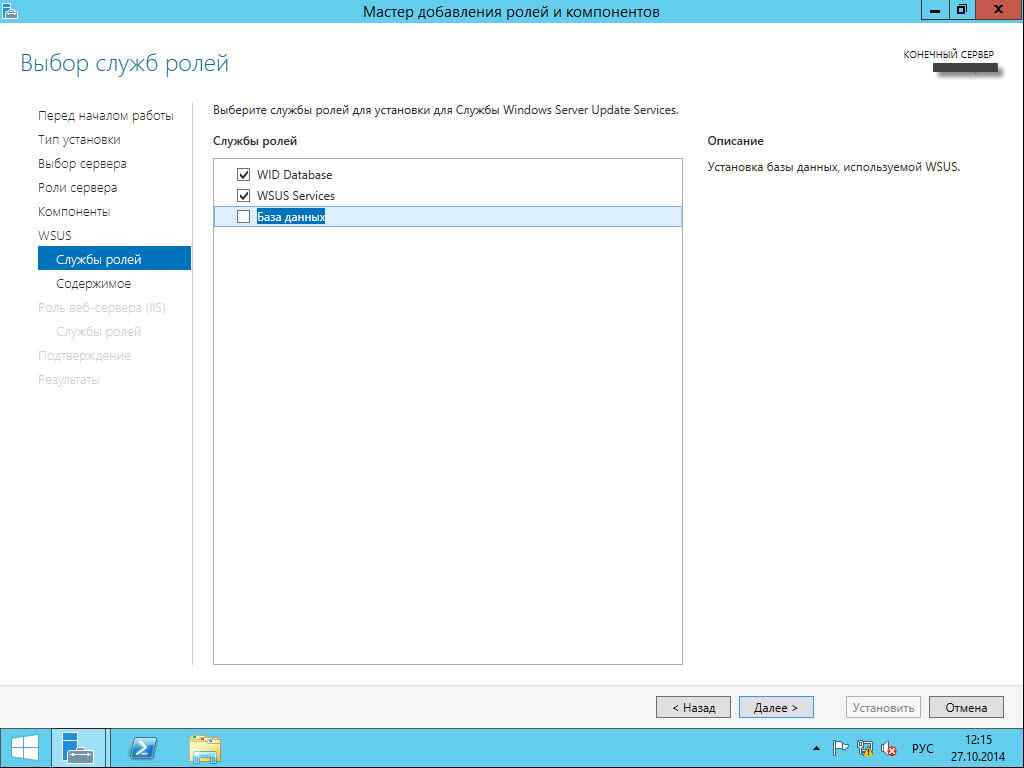
Как установить WSUS на Windows Server 2012R2-10
Выбираем каталог, куда будут скачиваться ваши обновления. Советую для этого выделить отдельный диск, 200-300ГБ. Жмем Далее.
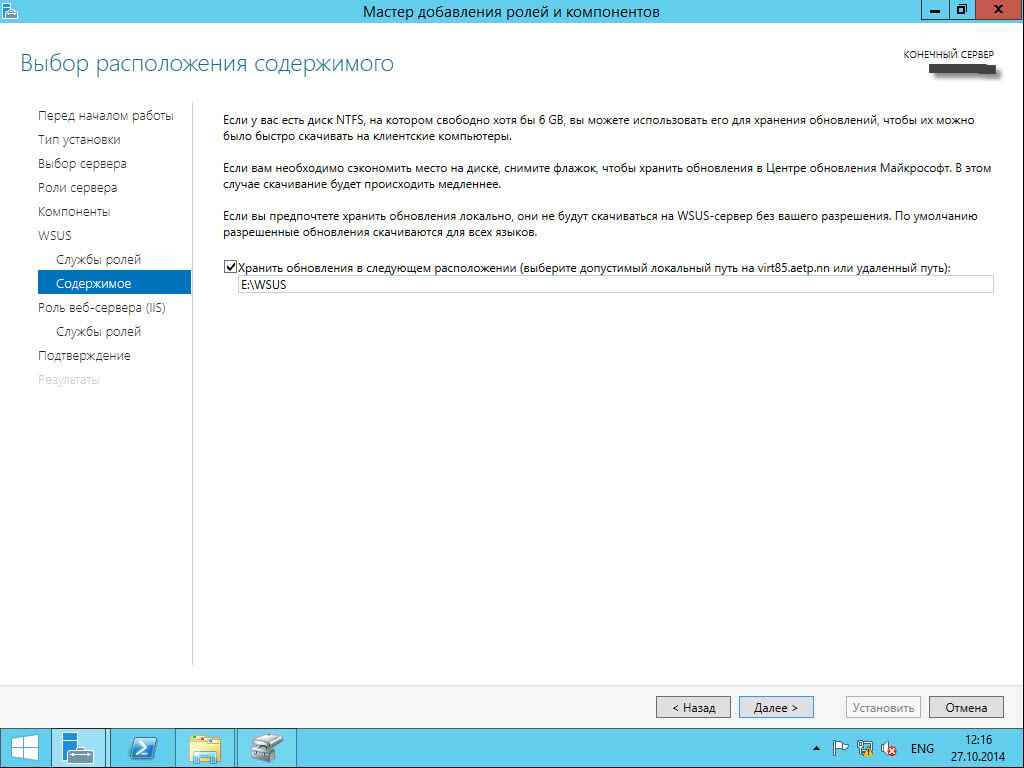
Как установить WSUS на Windows Server 2012R2-11
Дальше мастер покажет какие именно компоненты ставятся из роли IIS.
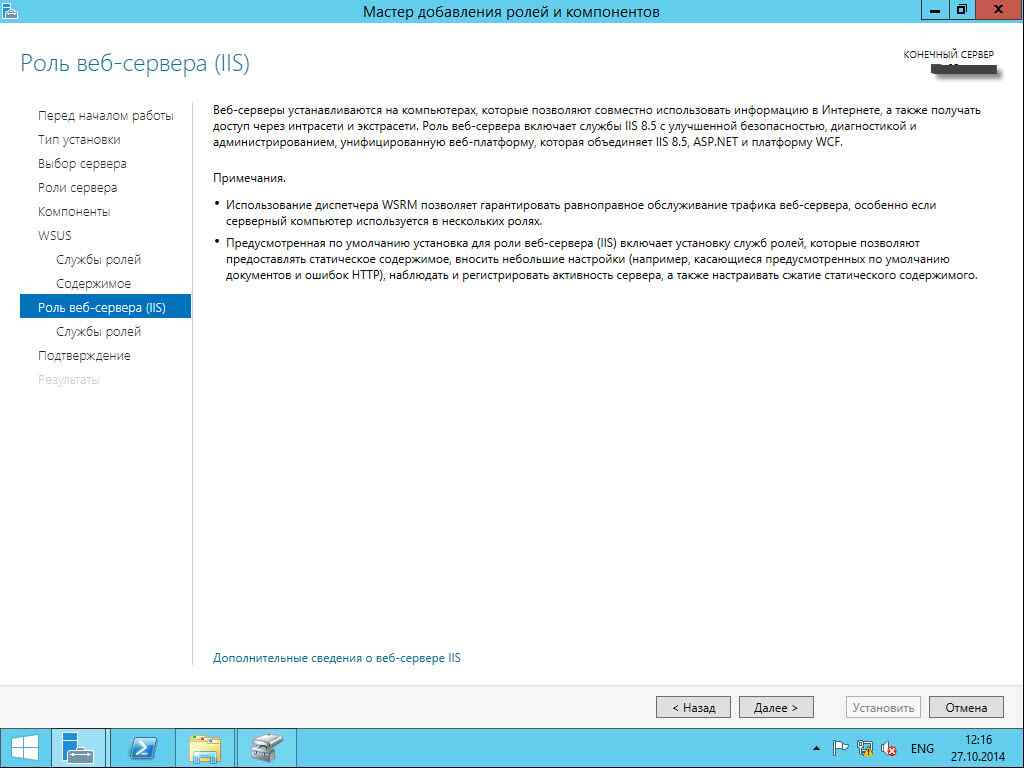
Как установить WSUS на Windows Server 2012R2-12

Как установить WSUS на Windows Server 2012R2-13
Жмем Установить.
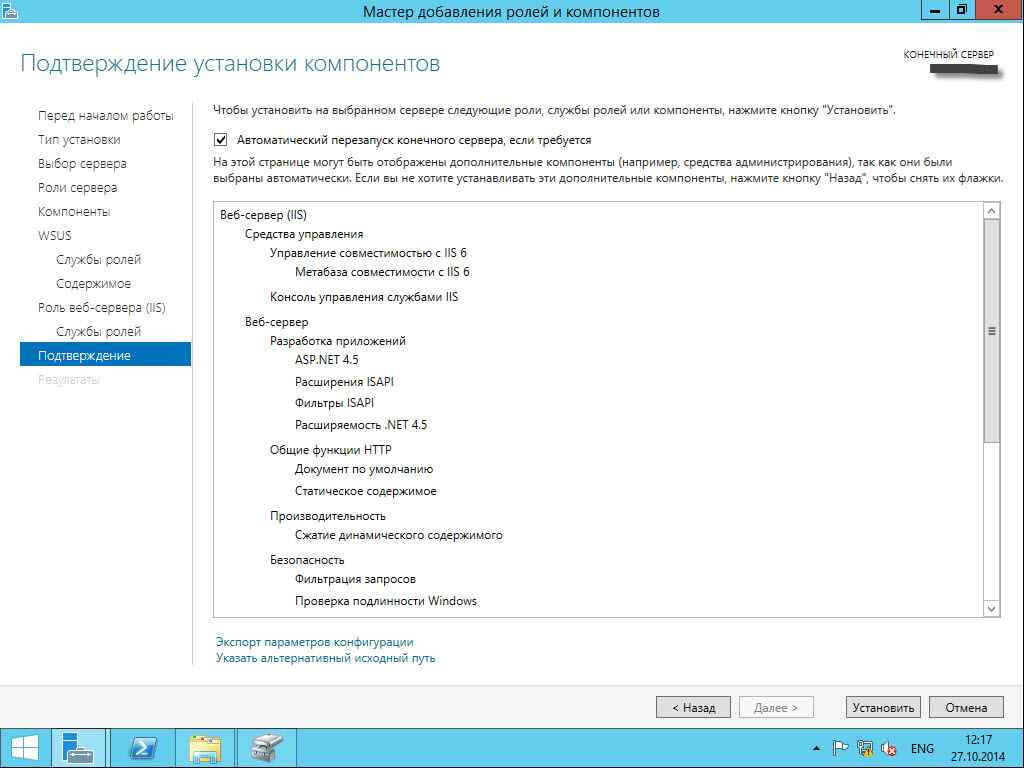
Как установить WSUS на Windows Server 2012R2-14
На время установки прогресс бар можно закрыть
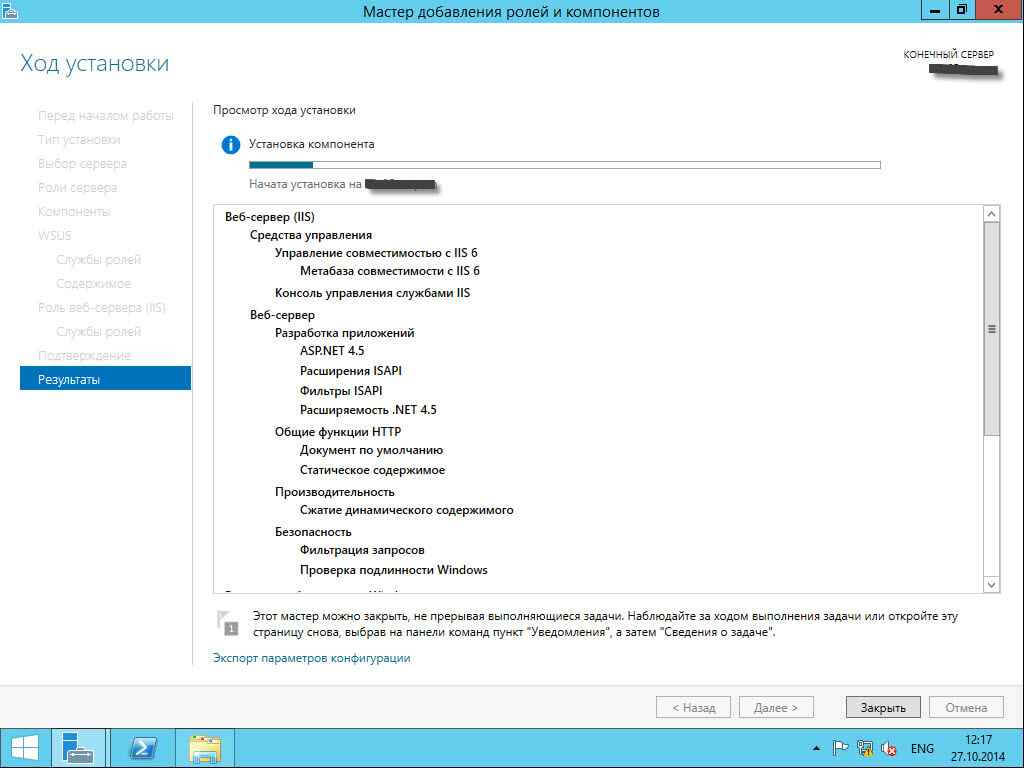
Как установить WSUS на Windows Server 2012R2-15
После установки, можно заметить предупреждение, что нужно запустить послеустановочные настройки.
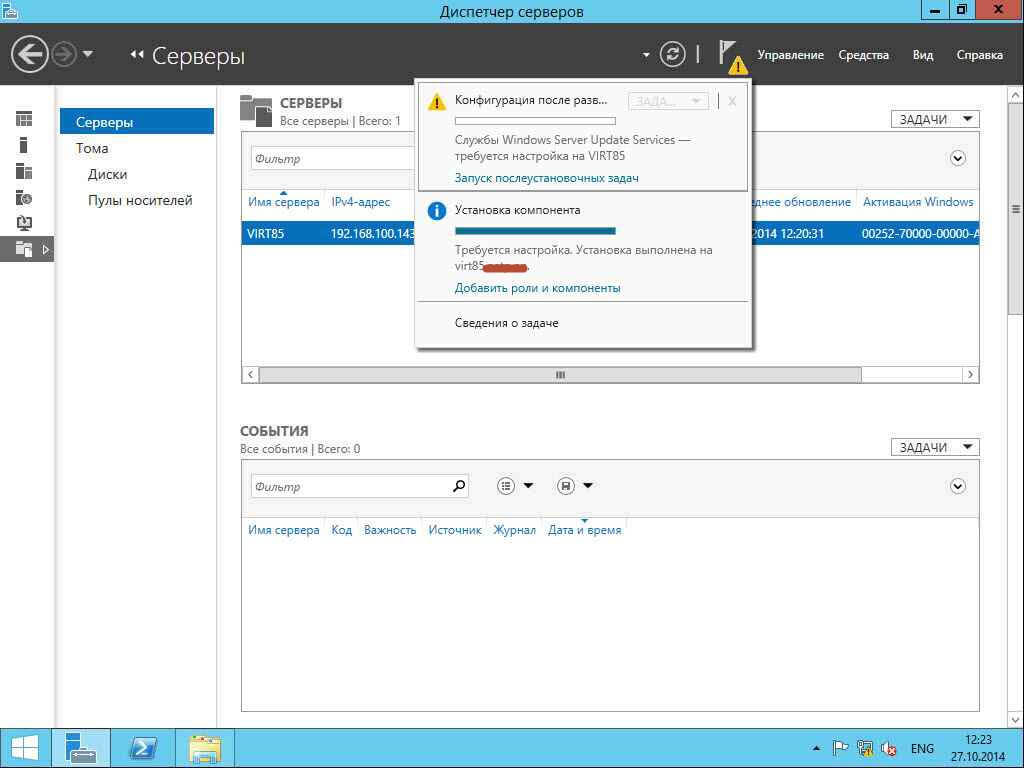
Как установить WSUS на Windows Server 2012R2-16
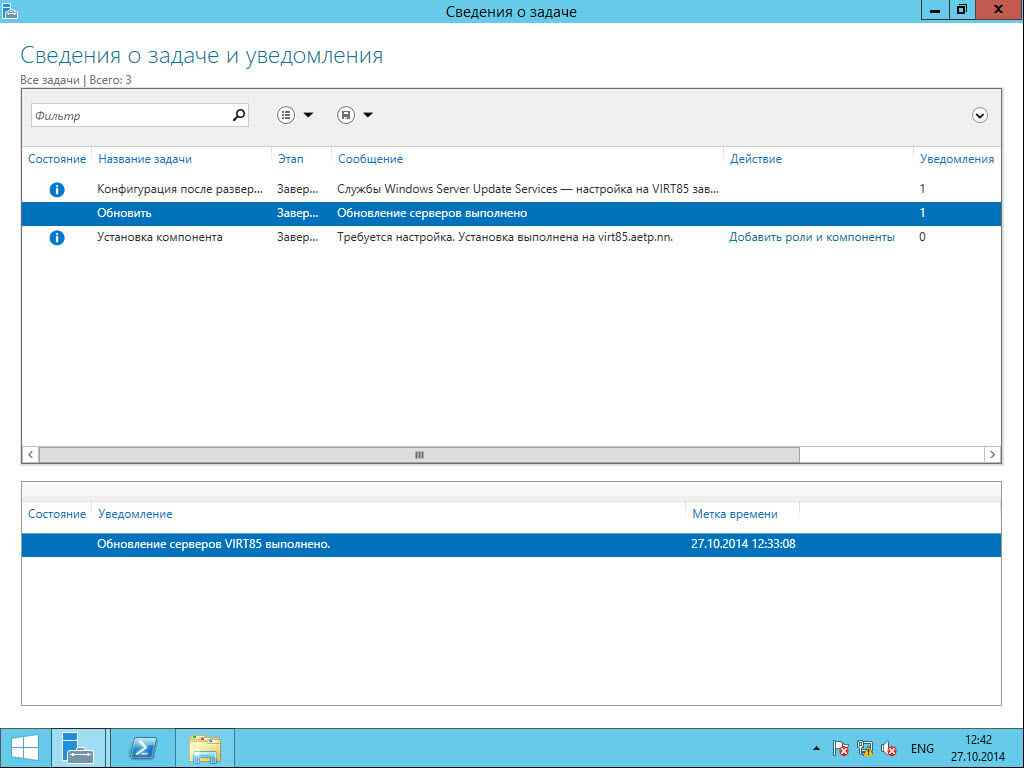
Как установить WSUS на Windows Server 2012R2-17
В каталоге установки обновлений появились две папки.

Как установить WSUS на Windows Server 2012R2-18
Теперь перейдем в меню Средства и выберем там WSUS оснастку.
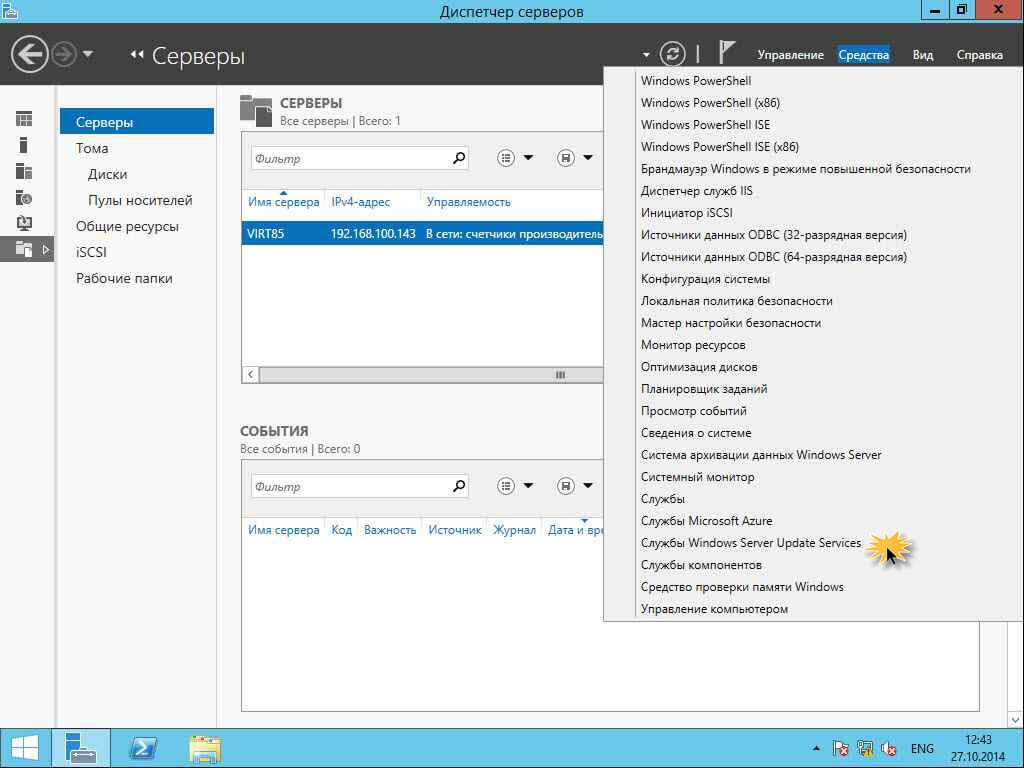
Как установить WSUS на Windows Server 2012R2-19
Запустится мастер настройки служб WSUS. Сразу жмем далее.
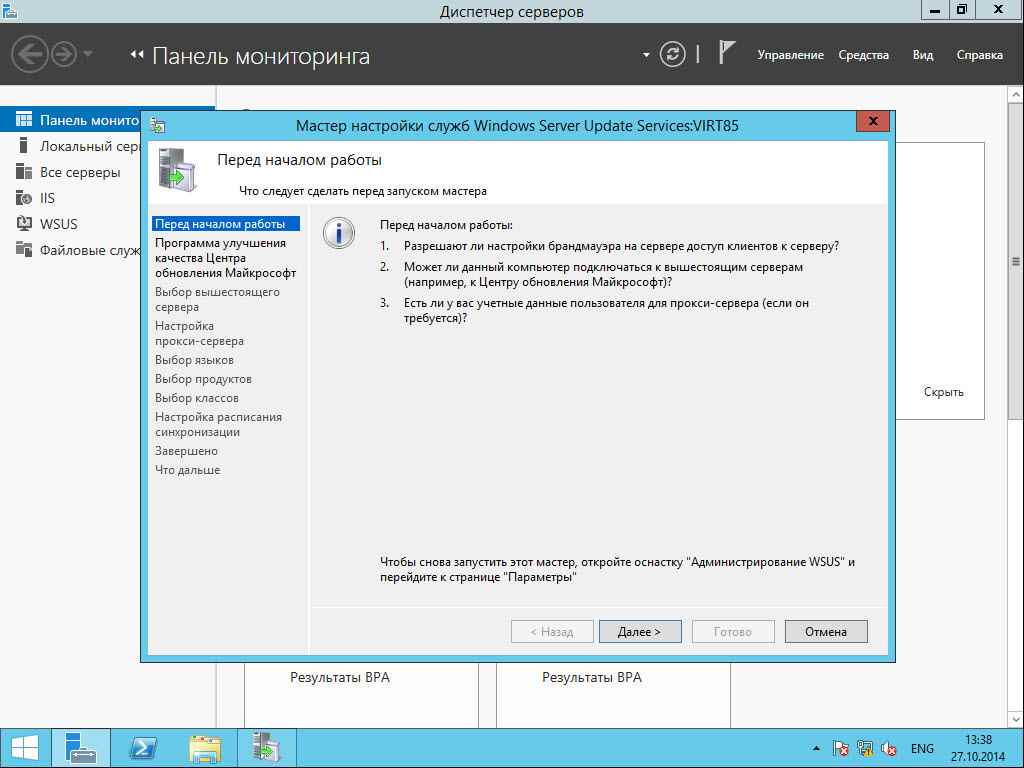
Как установить WSUS на Windows Server 2012R2-20
Можете при желании участвовать в программе по улучшению от Microsoft, для этого ставим птичку. Далее.
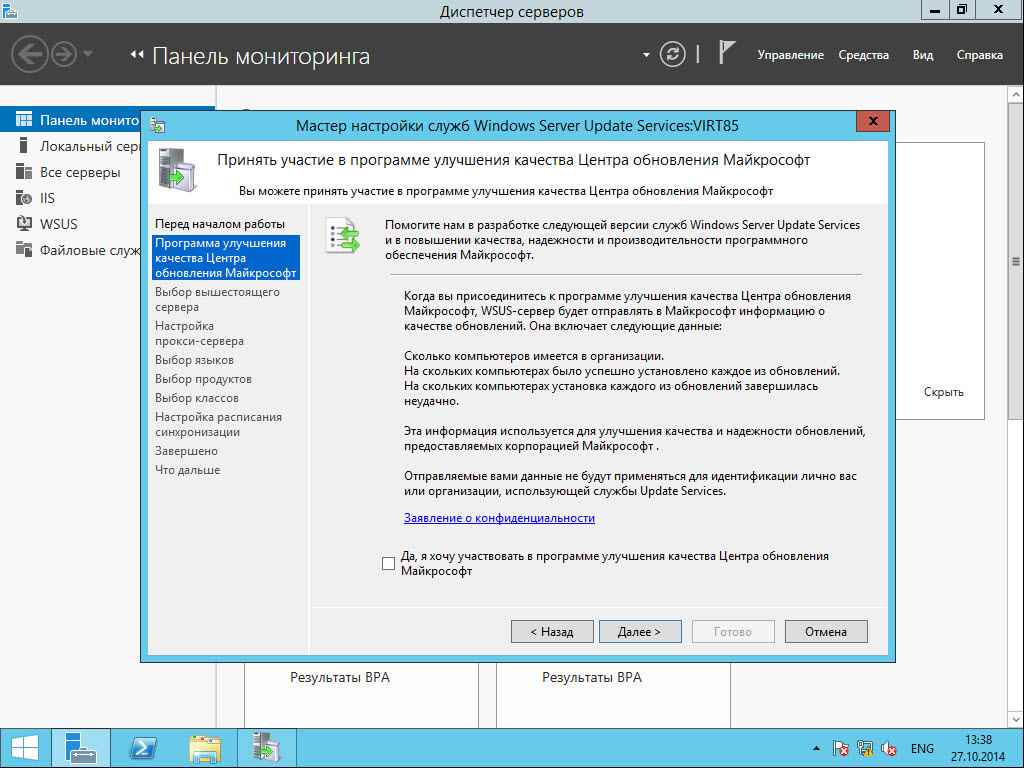
Как установить WSUS на Windows Server 2012R2-21
Выбираем с кем нужно выполнять синхронизацию, тут на выбор либо сайт Microsoft, либо ваш вышестоящий WSUS сервер. Выбираем Microsoft.
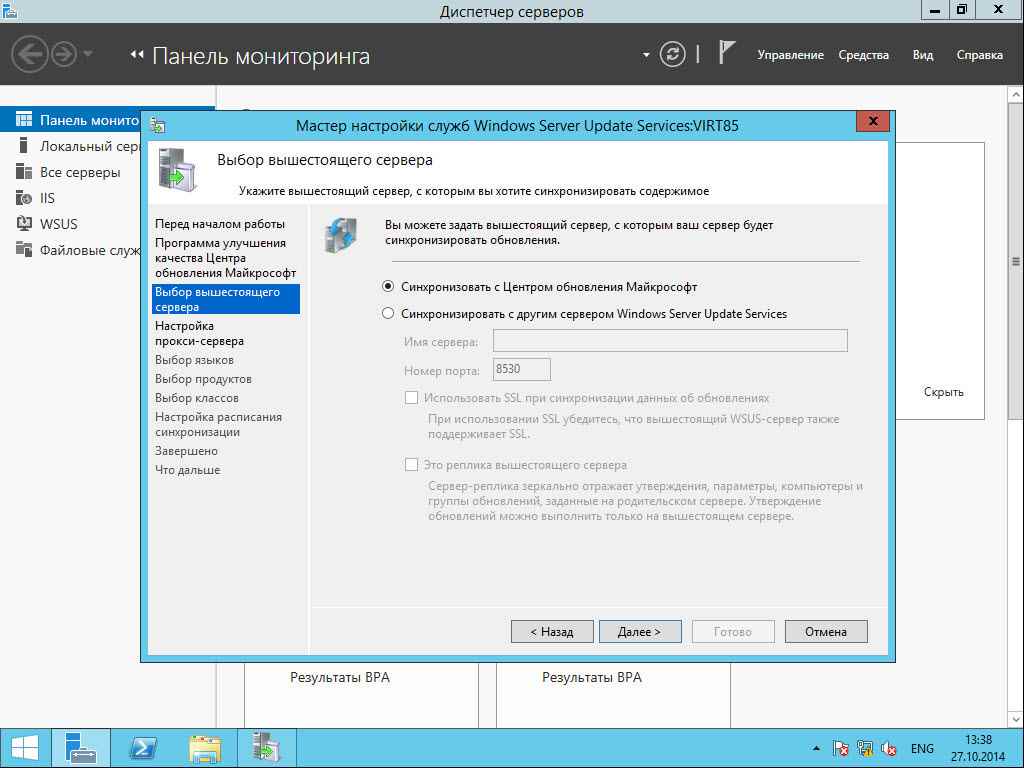
Как установить WSUS на Windows Server 2012R2-22
Если прокси нет, то просто жмем далее.
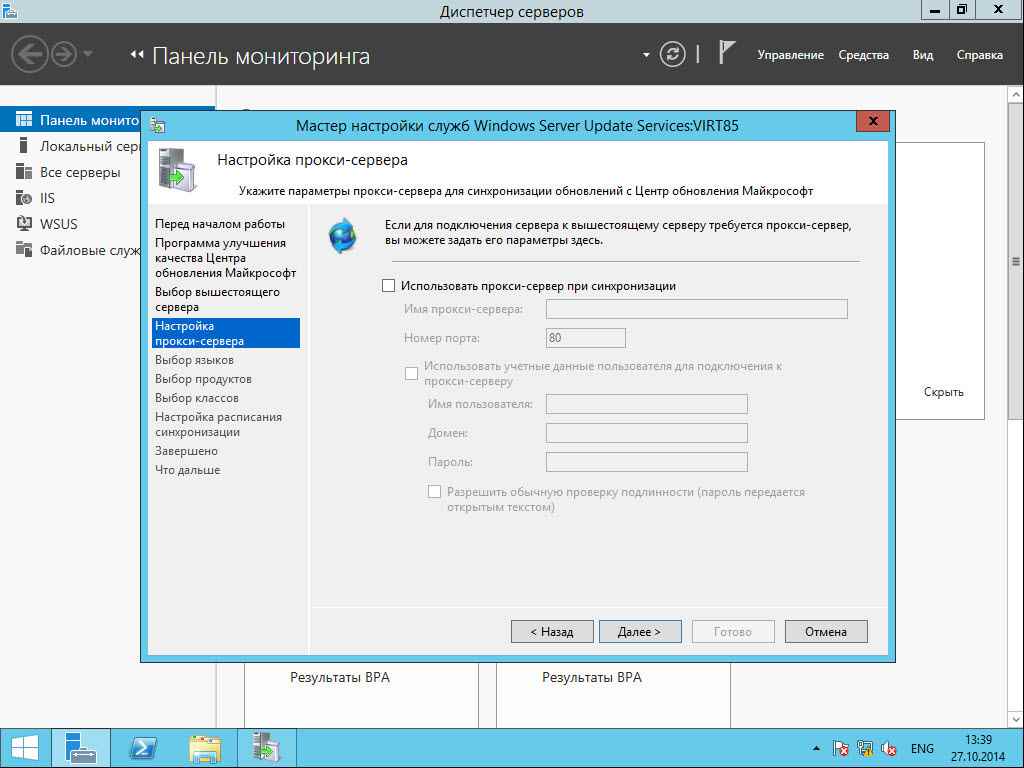
Как установить WSUS на Windows Server 2012R2-23
Нажимаем Начать подключение.
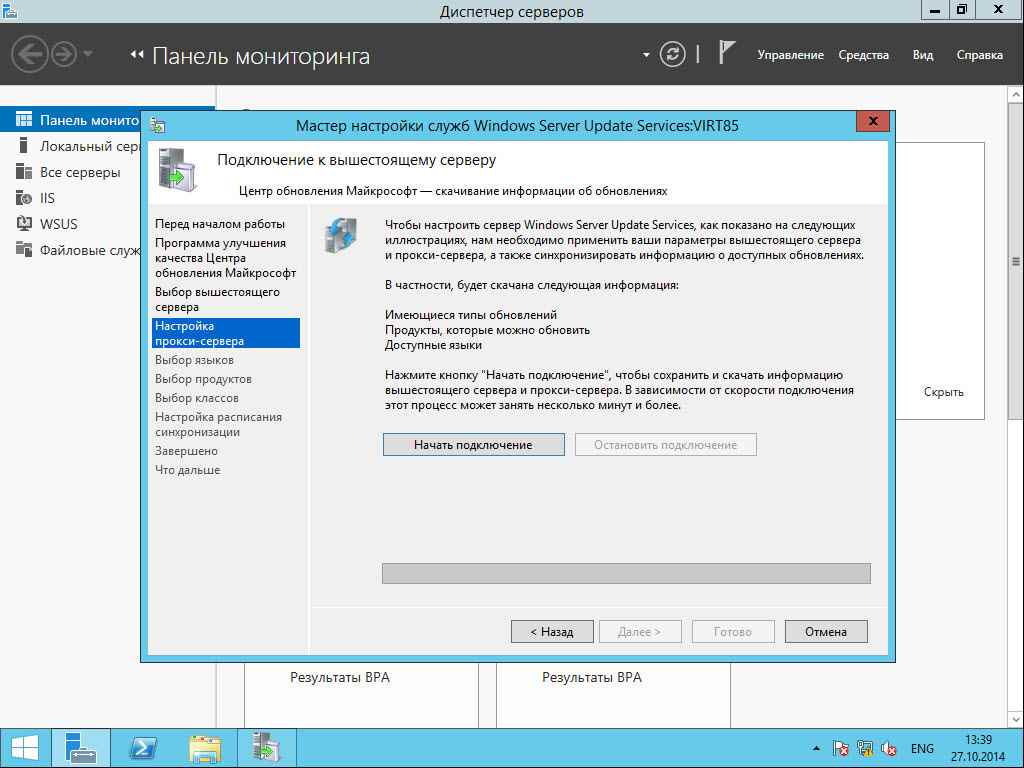
Как установить WSUS на Windows Server 2012R2-24

Как установить WSUS на Windows Server 2012R2-25
После подключения жмем Далее.
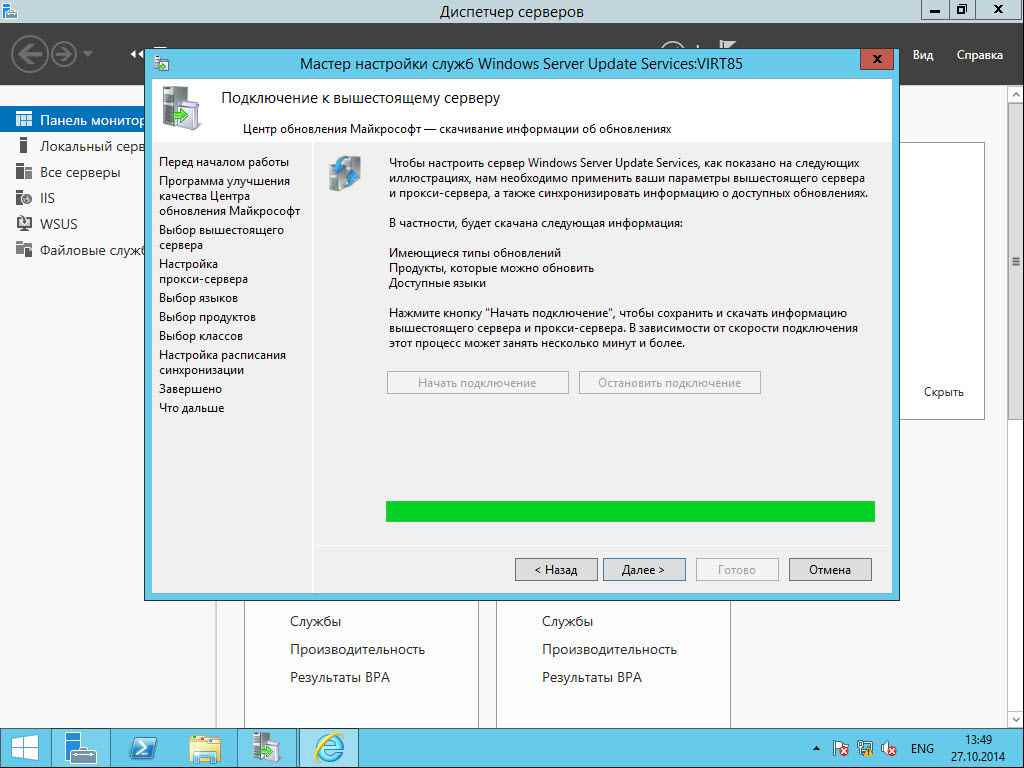
Как установить WSUS на Windows Server 2012R2-26
Выбираем какие языковые обновления будем скачивать
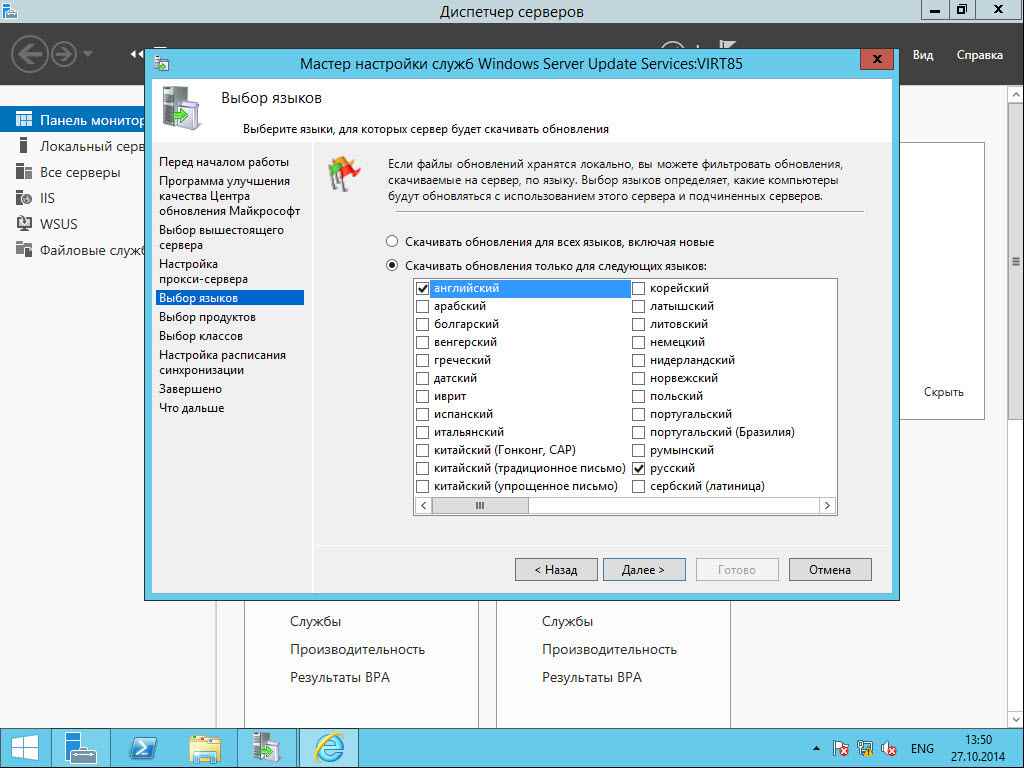
Как установить WSUS на Windows Server 2012R2-27
Выбираем нужные вам продукты.
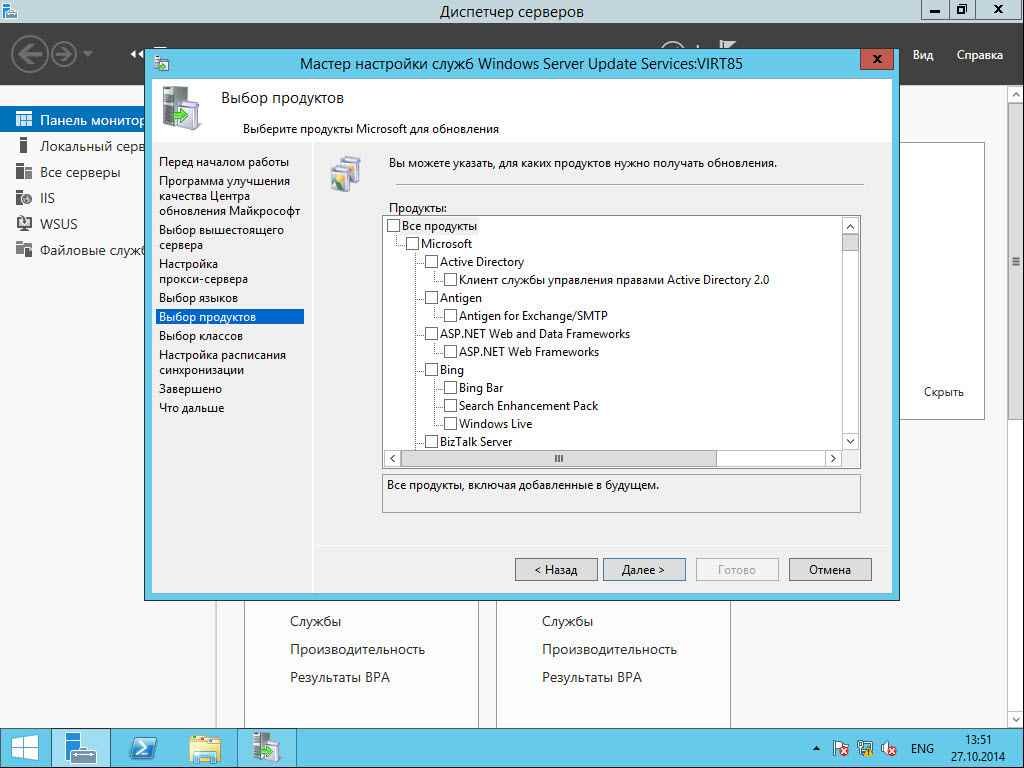
Как установить WSUS на Windows Server 2012R2-28
Выбираем классы обновлений. Советую поставить все.
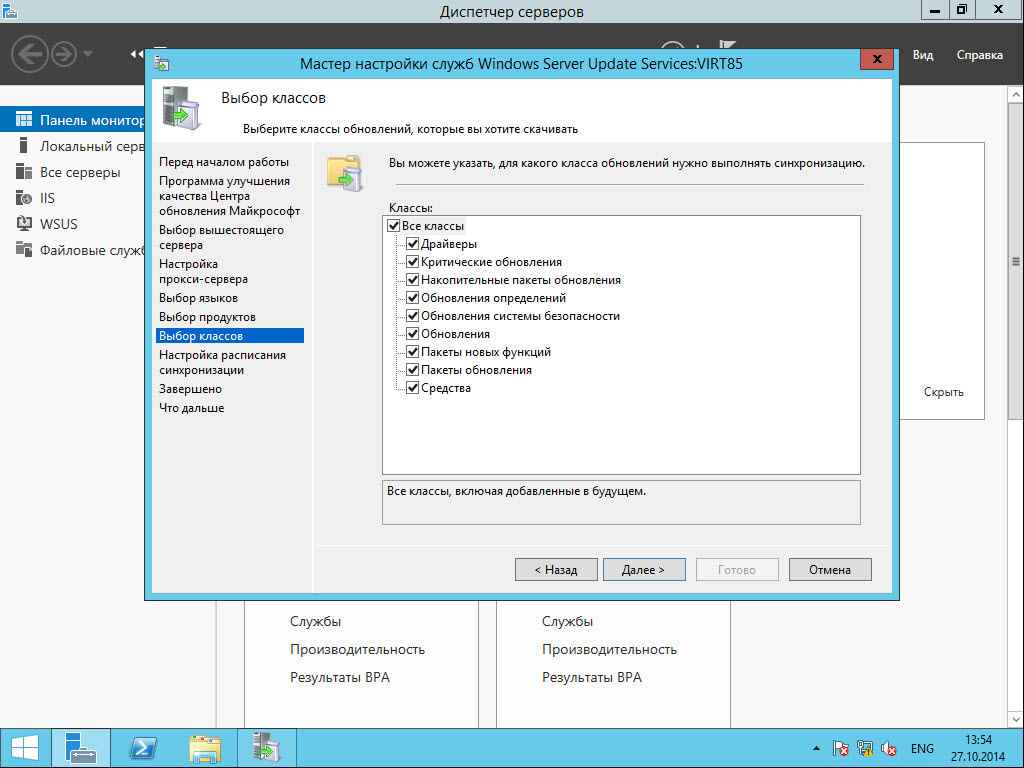
Как установить WSUS на Windows Server 2012R2-29
Выбираем расписание синхронизации.

Как установить WSUS на Windows Server 2012R2-30
Запускаем первоначальную синхронизацию

Как установить WSUS на Windows Server 2012R2-31
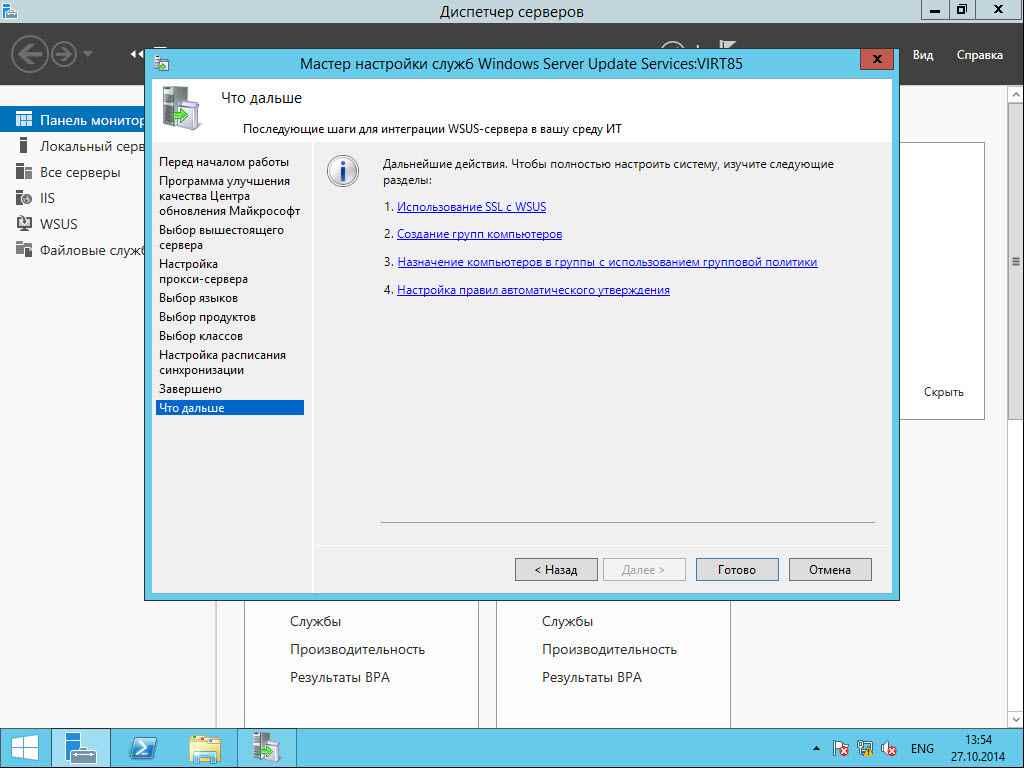
Как установить WSUS на Windows Server 2012R2-32
Заходим в оснастку.

Как установить WSUS на Windows Server 2012R2-33
Видим прогресс бар нашей синхронизации
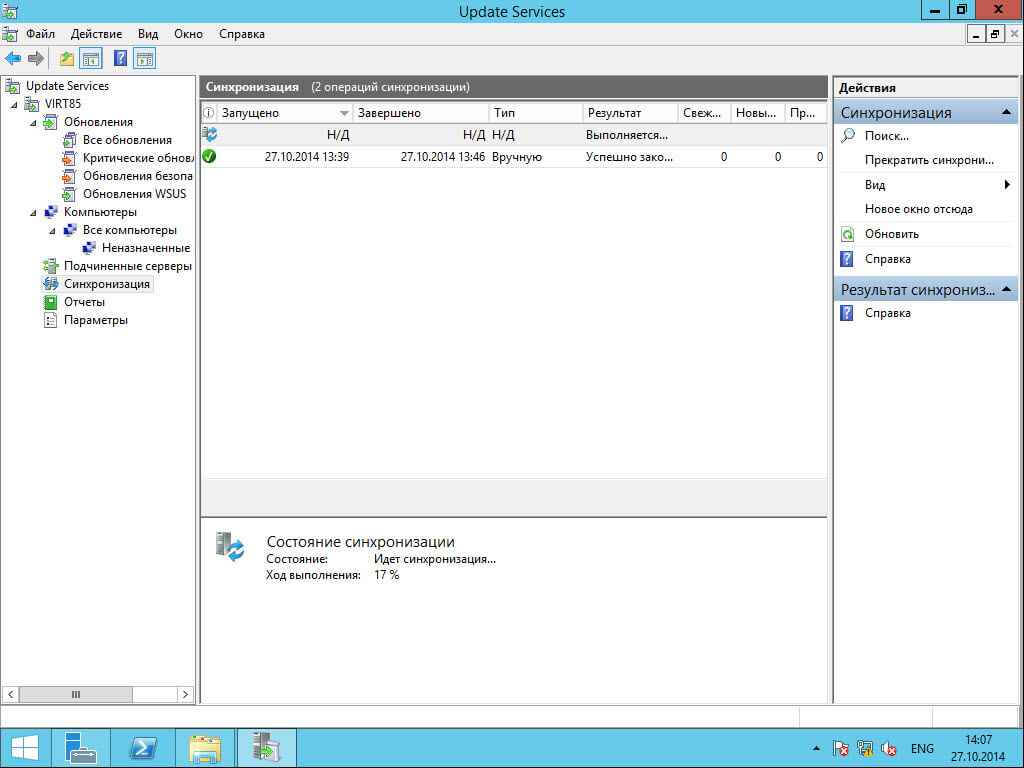
Как установить WSUS на Windows Server 2012R2-34
Обратите внимание, что начали появляться подпапки категорий продуктов.
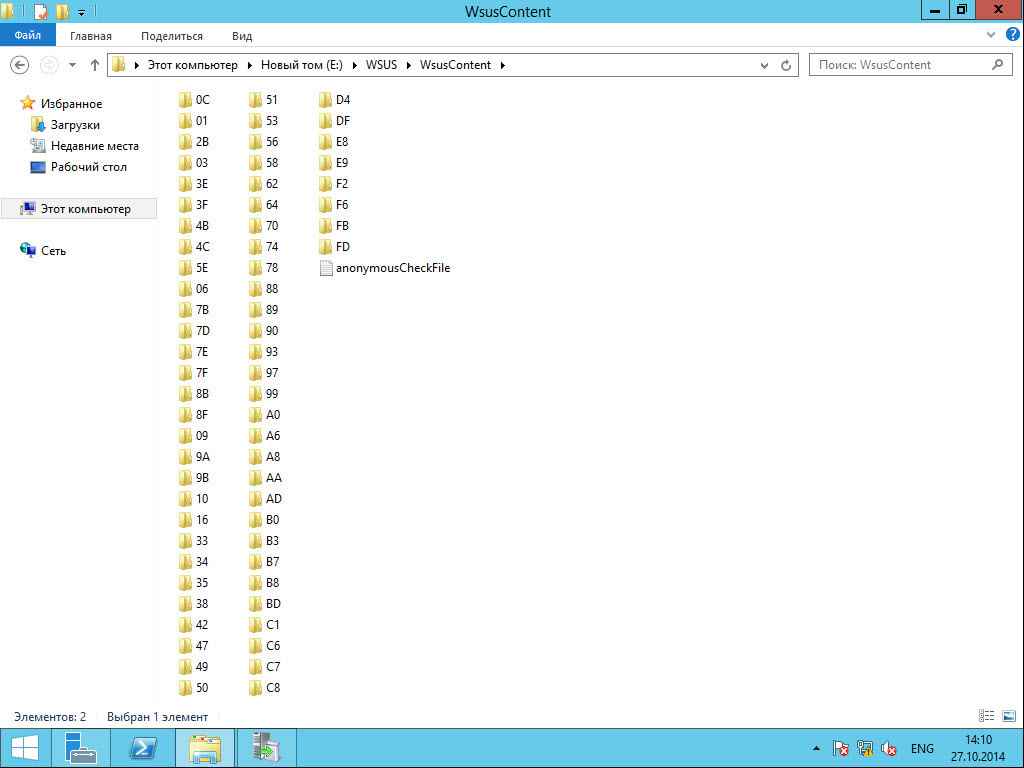
Как установить WSUS на Windows Server 2012R2-35
На этом первая часть о WSUS закончена, как настроить WSUS будет рассказано в следующей статье.
- Remove From My Forums
-
Question
-
how to update WSUS Win2012R2 to the latest version? I have several WSUS at 18324 build, but one of then is the 18838
Before my reboot, the build was 18964, but any way, my downstream wsus are stuck in version 18324 and i´m thinking about how to update my wsus downstraom servers if they can´t download anything from upstream…
how to download and install offline/standalone version of the latest wsus version for WIn2012R2?
-
Edited by
Wednesday, May 9, 2018 8:37 PM
typo
-
Edited by
 Тема настройки локального сервера обновлений (WSUS) уже поднималась на нашем сайте, но так как с тех пор прошло довольно много времени и произошли довольно серьезные изменения, то назрела необходимость обновить статью. Сегодня мы расскажем о настройке роли WSUS на платформе Windows Server 2012, данный процесс во многом стал проще и легче, а службы WSUS теперь полноценно интегрированы в систему.
Научиться настраивать MikroTik с нуля или систематизировать уже имеющиеся знания можно на углубленном курсе по администрированию MikroTik. Автор курса, сертифицированный тренер MikroTik Дмитрий Скоромнов, лично проверяет лабораторные работы и контролирует прогресс каждого своего студента. В три раза больше информации, чем в вендорской программе MTCNA, более 20 часов практики и доступ навсегда.
Наш предыдущий материал рассматривал установку WSUS на платформе Windows Server 2008, тогда это была довольно непростая задача для неподготовленного администратора. Требовалось установить дополнительные пакеты, специальным образом настроить веб-сервер, да и сами службы WSUS устанавливались как отдельное приложение.
Начиная с Windows Server 2008 R2, WSUS был включен в состав ОС в качестве одной из ролей, поэтому, несмотря на то, что мы будем рассматривать платформу Windows Server 2012 R2, все сказанное, за незначительными поправками, будет справедливо и для Server 2008 R2.
Из сторонних пакетов потребуется установить только Microsoft Report Viewer 2008 SP1 Redistributable, однако он не является обязательным и на работу службы не влияет, а требуется только для формирования отчетов. Поэтому даже если вы забудете его установить — ничего страшного не произойдет, при первом обращении к отчетам система сообщит вам об этом и даст ссылку на скачивание.
Важно! Существует ряд ограничений на установку служб ролей WSUS. Сервер БД WSUS не может быть контроллером домена, Сервер WSUS не может быть одновременно сервером терминалов Remote Desktop Services.
Для установки WSUS откроем Диспетчер серверов и перейдем в Управление — Добавить роли и компоненты. В открывшемся мастере добавляем роль Службы Windows Server Update Services.
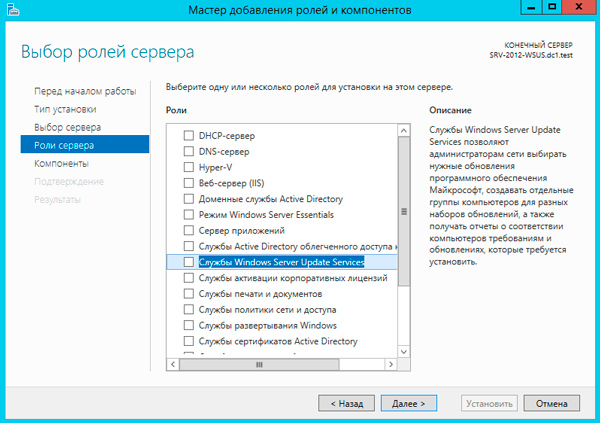 Следующим шагом будут добавлены все необходимые роли и компоненты, таким образом больше ничего настраивать отдельно не придется.
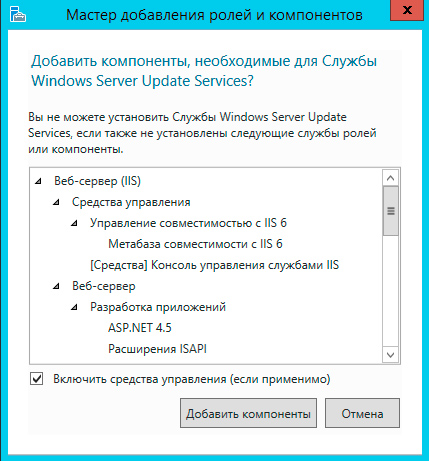 В качестве хранилища по умолчанию WSUS предлагает использовать внутреннюю базу данных Windows (Windows Internal Database, WID). Для небольших внедрений мы не видим смысла в установке отдельного SQL-сервера, никаких существенных преимуществ это не даст.
Следующим шагом переходим к базовым настройкам служб роли. В нашем случае потребуется выбрать опции WID Database и WSUS Services, если вы собираетесь использовать SQL-сервер, то вместо WID Database следует выбрать опцию База данных. Сам сервер баз данных к этому моменту уже должен быть развернут в вашей сети.
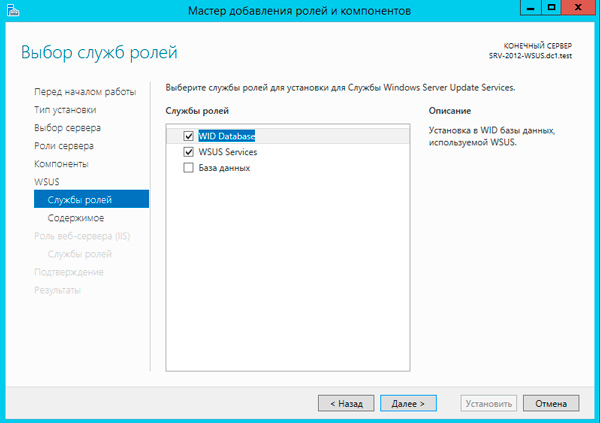 Следующим шагом укажите размещение хранилища обновлений, рекомендуем выделить для этих целей отдельный жесткий диск или раздел диска.
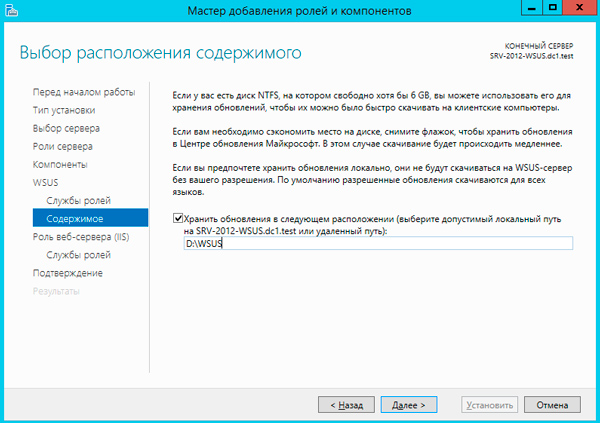 Также возможен вариант, когда на сервере WSUS будет храниться только информация об обновлениях, сами пакеты обновлений будут, после их одобрения и назначения администратором, скачиваться с серверов Microsoft. На наш взгляд такая схема будет удобна небольшим компаниям с хорошим интернет каналом, действительно, ради десятка машин организовывать локальное хранилище большого смысла не имеет, особенно если WSUS не единственная роль данного сервера.
Для приблизительной оценки требуемого места приведем данные с одной реальной инсталляции, произведенной летом 2012 года. На текущий момент выбраны следующие продукты: все клиентские ОС от Windows XP до Windows 8.1, кроме Vista, все серверные ОС от Server 2003 до Server 2012 R2, Office 2010, Exchange 2010, SQL Server 2008 — 2012, а также ряд дополнительных продуктов из разряда Распространяемых пакетов Visual C++ и т.п.
Размер обновлений в хранилище на текущий момент (два года после установки) — 173 ГБ, размер SQL базы данных — около 10 ГБ.
Если вы выбрали внешнюю базу данных, то также потребуется указать параметры подключения к SQL серверу. После чего можно переходить к установке роли, перезагрузка не требуется. После установки нажмите на флажок с желтым восклицательным знаком в Диспетчере серверов и щелкните Запуск послеустановочных задач, дождитесь окончания процедуры (восклицательный знак исчезнет).
 На этом установку роли можно считать законченной и переходит к настройке службы WSUS, мы подробно освещали этот процесс в предыдущей статье и не видим смысла заострять на этом внимание.
Если коротко, то сначала нужно выбрать источник синхронизации: сервера Microsoft или вышестоящий WSUS сервер.
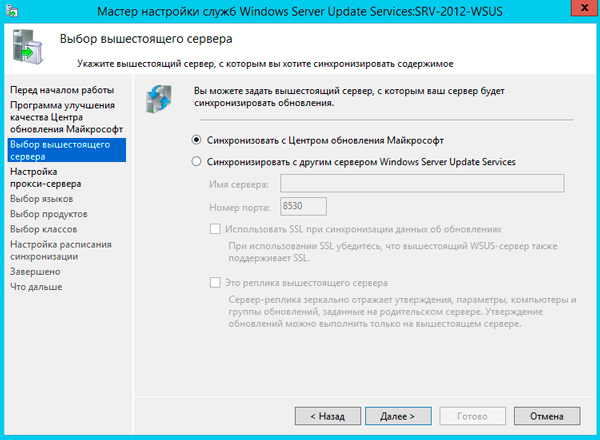 Затем выбрать языки и продукты.
 Указать классы обновлений.
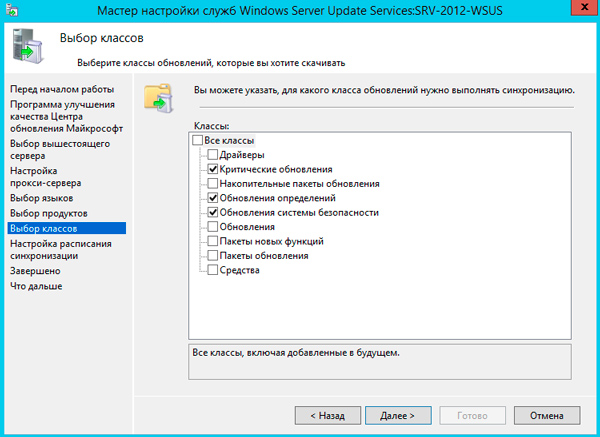 И задать параметры автоматической синхронизации.
 Процесс первоначальной синхронизации может занять продолжительное время, зависящее от выбранного набора продуктов и классов, а также скорости вашего интернет канала.
Не забудьте указать правила автоматического одобрения и одобрить уже скачанные обновления.
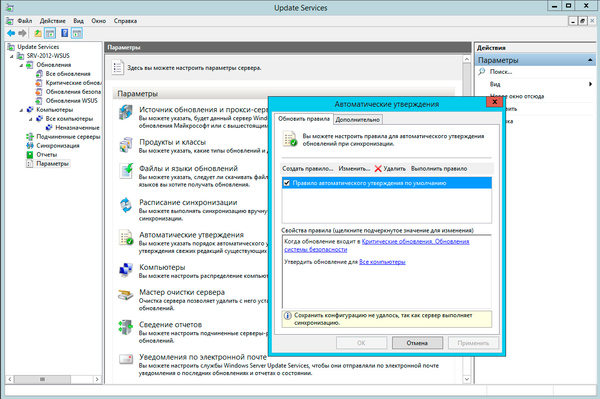 После чего потребуется сообщить клиентам расположение вашего WSUS сервера, это можно сделать через групповые политики: Конфигурация компьютера — Политики — Административные шаблоны — Центр обновления Windows — Указать размещение службы обновлений Microsoft в интрасети.
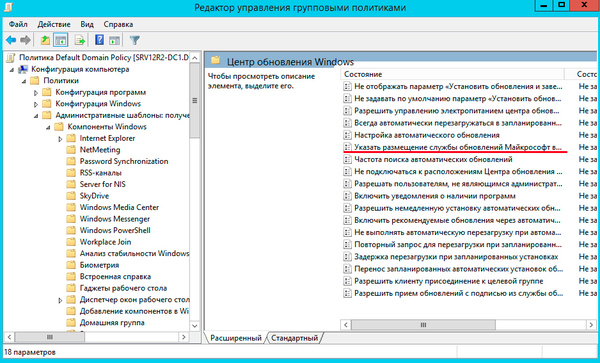 Или в локальных политиках: Пуск — Выполнить — gpedit.msc, затем Конфигурация компьютера — Административные шаблоны — Центр обновления Windows (Windows Update)- Указать размещение службы обновлений Microsoft в интрасети.
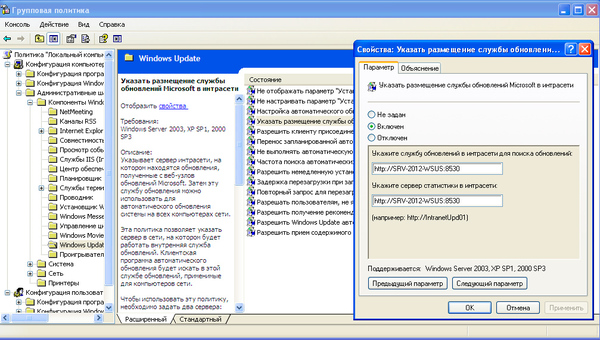 Путь к серверу следует прописывать как http://SERVER_NAME:8530, при этом рекомендуем явно указывать порт службы. Через некоторое время компьютеры начнут получать обновления и появятся в консоли сервера, где можно получить детальную информацию по уже установленным и требующимся обновлениям.
 Кстати, если вы забыли установить Microsoft Report Viewer 2008 SP1 Redistributable, то при попытке вызвать отчет получите следующее сообщение, которое содержит ссылку на скачивание необходимого пакета. :
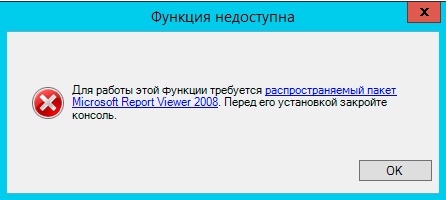 Как видим, Microsoft проделало большую работу по совершенствованию службы WSUS, теперь это одна из ролей системы и ее установка и настройка не должна вызывать затруднений даже у новичков.
Научиться настраивать MikroTik с нуля или систематизировать уже имеющиеся знания можно на углубленном курсе по администрированию MikroTik. Автор курса, сертифицированный тренер MikroTik Дмитрий Скоромнов, лично проверяет лабораторные работы и контролирует прогресс каждого своего студента. В три раза больше информации, чем в вендорской программе MTCNA, более 20 часов практики и доступ навсегда.
Windows Server Update Services (WSUS) in Server 2012 R2
Windows Server Update Services (WSUS) enables the administrators to deploy the latest Microsoft product updates. You can use WSUS to fully manage the distribution of product updates onto your organization computers. A WSUS server can also be the update source for other WSUS servers within the organization. The WSUS server that acts as an update source is called an Upstream Server and the server that connects to the upstream server in called Downstream Server. In a WSUS implementation, at least one WSUS server on your network must be able to connect to Microsoft Update to get available update information.
Note: Upgrade from any version of Windows Server that supports WSUS 3.2 to Windows Server 2012 R2 requires you to first uninstall the WSUS 3.2
Install the WSUS Server Role
-
- Log on to the server on which you plan to install the WSUS server role by using an account that is a member of the Local Administrators group.
- In Server Manager, click Manage, and then click add Roles and Features.
- On the Before you begin page, click Next.
- In the select installation type page, confirm that Role-based or feature-based installation option is selected and click Next.

5. On the select destination server page, choose where the server is located (from a server pool or from a virtual hard disk). After you select the location, choose the server on which you want to install the WSUS server role, and then click Next.

6. On the select server roles page, select Windows Server Update Services. To Add features that are required for Windows Server Update Services, click Add Features, and then click Next.

7. On the Select features page, keep the default selections, and then click Next.
8. On the Windows Server Update Services page, click Next.
9. On the Select Role Services page, choose your preferred database type and then click Next. If you are already have a SQL server on same server (or on different server), you can go ahead and uncheck the WID Database option, then check the Database option. If you choose SQL database, you will have to provide SQL connection details as shown in following diagram:

If you want to use Windows Internal Database (WID), just select WID Database and WSUS services option and click Next as shown in following diagram:

Tip: You must select one Database type. If the database options are all cleared (not selected), the post installation tasks will fail.
10. On the Content location selection page, type a valid location to store the updates. For example, you can create a folder named WSUS at the root of drive C: specifically for this purpose, and type C:WSUS as the valid location.

11. Click Next. The Web Server Role (IIS) page opens. Review the information, and then click Next. In select the role services to install for Web Server (IIS), keep the defaults, and then click Next.
12. On the Confirm installation selections page, review the selected options, and then click Install.

The WSUS installation wizard runs. This might take several minutes to complete.
13. Once WSUS installation is complete, in the summary window on the Installation progress page, click Launch Post-Installation tasks. The text changes, requesting: Please wait while your server is configured.

When the task has finished, the text changes to: Configuration successfully completed. Click Close.
14. In Server Manager, verify if a notification appears to inform you that a restart is required. This can vary according to the installed server role. If it requires a restart make sure to restart the server to complete the installation.
WSUS Configuration
- Launch WSUS console.

2. When WSUS Configuration wizard opens up, click Next

3. Now you are asked to participate into Microsoft Update Improvement plan. If you are fine with Microsoft collecting some information about your organization (like how many computers your organization have, how many computers successfully installed each update etc.), select the checkbox Yes, I would like to join Microsoft Update Improvement Program and click Next.

4. Next screen is to configure your upstream server which defines Where does this WSUS server will download the updates. You can either select Synchronize from Microsoft Update (which is default) or select Synchronize from another Windows Server Update Services server. If this is the first WSUS server in your organization, you should select first option so that the server can download the updates directly from Windows Update. Make sure to adjust your firewall settings for both cases. If you choose to connect to Windows Update, make sure your server has access to internet or if you choose to connect to an upstream server, be sure to allow Port 8530 or 8531 (SSL) on both servers.

In my case, I already have a WSUS server on 192.168.0.2 server, I will choose to download updates from this server. You can also make this server as a replica server. Replica server picks all the configuration from upstream server and you can not directly approve any update on Replica server, it can only deploy the updates to computers.
5. Next step is to choose Proxy settings, If you use proxy to connect to internet, you can enter the details here. If not, leave everything at its default setting.

6. Now, click Start Connecting. It will take some time to complete the operation.

When progress bar turns all green, click Next.
7. On Language selection screen, select the language for your products and click Next.

8. Next step is to configure the Sync schedule. If you choose to Synchronize manually, server will not check for new updates and will not download any update until you run the synchronization

9. In the next step, uncheck the option Begin initial synchronization and click Finish Since initial synchronization takes a lot of time, we will do it after completing all the configuration steps.

10. Windows Server Update Services wizard will launch automatically.

Close the WSUS console for now. We have to install some required updates.
Install some Required Updates on WSUS server
On Windows Server 2012 R2 and Windows Server 2012 R2, you need to install the KB3095113 and KB3159706.
1. KB3095113 enables the WSUS support for Windows 10 feature upgrades. The update can be downloaded from following link:
https://support.microsoft.com/en-us/kb/3095113
2. KB3159706 enables the ESD decryption provision in WSUS in Windows Server 2012 and Windows Server 2012 R2. The update can be downloaded from following link:
https://support.microsoft.com/en-us/kb/3159706
KB3159706 requires some manual steps to complete the installation. If you do not perform these steps, the WSUS server will keep crashing.
Manual Steps
a. Open an elevated Command Prompt, and run the following command (assuming “C” as OS drive):
"C:Program FilesUpdate ServicesToolswsusutil.exe" postinstall /servicing

b. Open Server Manager, click Manage and then select Add Roles and Features

c. On Add and Remove Roles wizard, press Next a couple times until you see Features screen. Expand .NET Framework 4.5 features, and then expand WCF Services and select HTTP Activation feature. When prompted to add required role services, click Add Features button and click Next.

d. Now click Install button and wait for installation to complete.
e. After completing the install either restart the server or restart the WSUS services.

Advanced Configuration of WSUS server
Launch the WSUS console and follow the steps to do additional configurations:
Create Computer Groups
Computer groups enable you to target updates to specific computers. There are two default computer groups: All Computers and Unassigned Computers. When each client computer initially contacts the WSUS server, the server adds that client computer to each of these groups.
Let us add three more computer groups with names IT, Testing, and User PCs. To do this:
- Right click on All Computers default group and select Add Computer Group

- Enter the name for the group and click Add.
It is a good practice to create a Testing group and then add some test lab PCs to this group so that you can test the updates on these computers before rolling out the updates to whole organization computers. If anything goes wrong, you can identify the offending update and Decline that update so that it does not get installed on your production PCs.
Select Product and Classifications
It is always a good idea to select only the products and classifications you require in your organization. By doing so, you will only download what you need. It will save a lot of hard drive space as well as internet bandwidth. To select Products and Classifications:
- Click Options in WSUS console.
- Click Products and Classifications.

- Under Products tab, only select products that are installed in your organization. By default, a whole lot of products will be selected. For example, in my case, I have only Office 2016 and Windows 10 installed. Therefore, I will only select Office 2016 and Windows 10 and uncheck everything else.

- Under Classifications tab, select the product classification you need. In most of the cases you only need to select Critical Updates, Security Updates, Updates and Upgrades but you can choose anything as per your policy or requirement.

Below are some short descriptions of every classification (source Microsoft documentation):
- Critical Updates: Specifies a broadly released update for a specific problem that addresses a critical, non-security-related bug.
- Definition Updates: Specifies an update to virus or other definition files.
- Feature Packs: Specifies new product features that are distributed outside of a product release and that are typically included in the next full product release.
- Security Updates: Specifies a broadly released update for a product-specific, security-related issue.
- Service Packs: Specifies a cumulative set of hotfixes that are applied to an application. These hotfixes can include: security updates, critical updates, software updates, and so on.
- Tools: Specifies a utility or feature that helps to complete one or more tasks.
- Update Rollups: Specifies a cumulative set of hotfixes that are packaged together for easy deployment. These hotfixes can include security updates, critical updates, updates, and so on. An update rollup generally addresses a specific area, such as security or a product component.
- Updates: Specifies an update to an application or file that is currently installed.
- Upgrade: Specifies an upgrade for Windows 10 features and functionality. Your software update points and sites must run a minimum of WSUS 4.0 with the hotfix 3095113to get the Upgrade
Update Files and Languages
You can specify whether to store update files on your local WSUS server or on Microsoft Update. If you choose to store the updates locally, you can limit the updates downloaded to your server by language. If you choose to store the update files on Microsoft Update, then your WSUS server obtains only update information (metadata) for the criteria you have specified on the Synchronization Options page. In this scenario, the update files come directly from Microsoft Update and are downloaded at the time of installation on the client computers receiving updates. You will need to make sure your client computers have direct access to Microsoft Update in this scenario. This option does not make any sense of deploying the WSUS server in organization if every client computer is supposed to download updates from internet.
To select Update Files and Languages:
- Click Options in WSUS console.
- Click Update Files and Languages option.
On Update Files tab, make sure that the Store update files locally on this server radio button is selected. If you want the updates to start downloading only when you approve the updates, select the checkbox against Download update files to this server only when updates are approved. This option gives you explicit privilege to download only the updates you want. You should consider using this option if your ISP gives you limited monthly data.

- Under Update Languages tab, only select the languages that are applicable to your products. In my case, I only selected English since I know that every software (including Windows) in my organization is running on US English. Never ever select the radio button Download updates in all languages. This option will unnecessarily cost you huge disk space and internet bandwidth.

Automatic Approvals
After updates have been synchronized to your WSUS server, you must approve them to initiate a deployment action. When you approve an update, you are essentially telling WSUS what to do with it (for example, your choices are Install, Detect only, Remove, or Decline update). When approving an update, you specify a default approval setting for the All Computers group, and any necessary settings for each computer group in the Approve Updates dialog box. If you do not approve an update, its approval status remains Not approved and your WSUS server performs no action for the update. The exceptions to this are in the Critical Updates and Security Updates classifications, which by default are automatically approved for detection after they are synchronized.
If you do not wish to approve each and every update manually, WSUS console gives you an option to set automatic approval rules.
To open Automatic Approvals:
- Click Options in WSUS console.
- Click Automatic Approvals option.
I would personally recommend creating an automatic approval rule for Testing group we created earlier. In most of the case, WSUS server is set to Sync after business hours. If you do not create any automatic approval rule, what would happen is this:
- Remember previously we selected an option to Download updates only when they are approved.
- If we do not create any automatic approval rule, WSUS server will not download any update after synchronization finishes. It will wait for you to approve the updates. As soon as you approve the updates, the download will start.
- Guess what happens if there are hundreds of updates to be downloaded. The internet connection will get congested which will affect your business applications and production.
- If you want the updates to be downloaded after business hours, you must set the Sync schedule after your business hours and create an automatic approval rule. When WSUS finishes synchronization and it finds new updates to download, the updates will be auto approved and downloaded at the same time thus not impacting production hours. Of course all the updates matching your Products and Classifications criteria will be downloaded. So, be sure to select your Products and Classifications wisely.

If you want to download and approve the Updates for WSUS software itself, go to Advanced tab and select the checkbox against Automatically approve updates to the WSUS product itself option under WSUS Updates.
")
Assign Computers to Different Groups
We created different Groups (User PC, IT, Testing etc.) so that we could assign the computers into these groups. But how does WSUS assign any computer to a group. This is where Computers option of WSUS console comes into play.
To open the settings:
- Click Options in WSUS console.
- Click Computers option.

There are only two options:
- Use the Update Services console: This option allows you to manually assign the computers to groups.
- Use Group Policy or registry settings on computers: This is the most preferred way of assigning computers. If you are running an Active Directory Domain, you can use Group policy to provide WSUS settings for all the computers. If you are using Workgroup environment, you can use registry settings.
Group Policy settings are located at Computer Configuration –> Policies –> Administrative Templates –> Windows Components –> Windows Update.

To do so via Registry editing, copy the following code into notepad, save the file with .reg extension and then run this file on target client computer. The client computer will be auto configured to download updates from WSUS server instead of Windows update.
Windows Registry Editor Version 5.00

[HKEY_LOCAL_MACHINESOFTWAREPoliciesMicrosoftWindowsWindowsUpdate]
"AcceptTrustedPublisherCerts"=dword:00000001
"ElevateNonAdmins"=dword:00000001
"TargetGroup"="User PCs"
"TargetGroupEnabled"=dword:00000001
"WUServer"="http://192.168.0.2:8530"
"WUStatusServer"="http://192.168.0.2:8530"

[HKEY_LOCAL_MACHINESOFTWAREPoliciesMicrosoftWindowsWindowsUpdateAU]
"AUOptions"=dword:00000004
"AUPowerManagement"=dword:00000001
"AutoInstallMinorUpdates"=dword:00000001
"DetectionFrequency"=dword:0000000a
"DetectionFrequencyEnabled"=dword:00000001
"IncludeRecommendedUpdates"=dword:00000001
"NoAUAsDefaultShutdownOption"=dword:00000001
"NoAUShutdownOption"=dword:00000001
"NoAutoRebootWithLoggedOnUsers"=dword:00000001
"NoAutoUpdate"=dword:00000000
"RebootRelaunchTimeout"=dword:0000000a
"RebootRelaunchTimeoutEnabled"=dword:00000001
"RescheduleWaitTime"=dword:0000000a
"RescheduleWaitTimeEnabled"=dword:00000001
"ScheduledInstallDay"=dword:00000007
"ScheduledInstallTime"=dword:00000002
"UseWUServer"=dword:00000001
Of course replace the IP and Port (192.168.0.2:8530) with your WSUS server’s IP (Name) and port.
See the following table for more information about registry code:
| Entry name | Data type | Values |
| AcceptTrustedPublisherCerts | Reg_DWORD | Range = 1|0
– 1 = Enabled. The WSUS server distributes available signed non-Microsoft updates. |
| DisableWindowsUpdateAccess | Reg_DWORD | Range = 1|0
– 1 = Disables access to Windows Update. |
| ElevateNonAdmins | Reg_DWORD | Range = 1|0
– 1 = All members of the Users security group can approve or disapprove updates. |
| TargetGroup | Reg_SZ | Name of the computer group to which the computer belongs. This policy is paired with TargetGroupEnabled. |
| TargetGroupEnabled | Reg_DWORD | Range = 1|0
– 1 = Use client-side targeting. |
| WUServer | Reg_SZ | HTTP(S) URL of the WSUS server that is used by Automatic Updates and API callers (by default). This policy is paired with WUStatusServer, and both keys must be set to the same value to be valid. |
| WUStatusServer | Reg_SZ | The HTTP(S) URL of the server to which reporting information is sent for client computers that use the WSUS server that is configured by the WUServer key. This policy is paired with WUServer, and both keys must be set to the same value to be valid. |
| Entry name | Data type | Values |
| AUOptions | Reg_DWORD | Range = 2|3|4|5
– 2 = Notify before download. |
| AutoInstallMinorUpdates | Reg_DWORD | Range = 0|1
– 0 = Treat minor updates like other updates. |
| DetectionFrequency | Reg_DWORD | Range = n, where n = time in hours (1–22).
– Time between detection cycles. |
| DetectionFrequencyEnabled | Reg_DWORD | Range = 0|1
– 1 = Enable detection frequency. |
| NoAutoRebootWithLoggedOnUsers | Reg_DWORD | Range = 0|1
– 1 = Logged-on user can decide whether to restart the client computer. |
| NoAutoUpdate | Reg_DWORD | Range = 0|1
– 0 = Enable Automatic Updates. |
| RebootRelaunchTimeout | Reg_DWORD | Range = n, where n = time in minutes (1–1,440).
– Time between prompts for a scheduled restart. |
| RebootRelaunchTimeoutEnabled | Reg_DWORD | Range = 0|1
– 1 = Enable RebootRelaunchTimeout. |
| RebootWarningTimeout | Reg_DWORD | Range = n, where n = time in minutes (1–30).
– Length, in minutes, of the restart warning countdown after updates have been installed that have a deadline or scheduled updates. |
| RebootWarningTimeoutEnabled | Reg_DWORD | Range = 0|1
– 1 = Enable RebootWarningTimeout. |
| RescheduleWaitTime | Reg_DWORD | Range = n, where n = time in minutes (1–60).
– Time in minutes that Automatic Updates waits at startup before it applies updates from a missed scheduled installation time. |
| RescheduleWaitTimeEnabled | Reg_DWORD | Range = 0|1
– 1 = Enable RescheduleWaitTime . |
| ScheduledInstallDay | Reg_DWORD | Range = 0|1|2|3|4|5|6|7
– 0 = Every day. |
| ScheduledInstallTime | Reg_DWORD | Range = n, where n = the time of day in 24-hour format (0–23). |
| UseWUServer | Reg_DWORD | Range = 0|1
– 1 = The computer gets its updates from a WSUS server. |
Finally, I would like to say that WSUS is a great tool which every organization should consider to save their monthly internet data and bandwidth. This prevents repeated download of same updates over and over again when each computer of your organization is updated.
As your WSUS keeps downloading new and new updates, it will need more and more disk space. Whatever it downloads over a period of time is not always necessary for you to keep. So, I would suggest to run Server Cleanup Tool (available in Options page of WSUS console) once within 1-2 months so that unnecessary updates (like expired, superseded, not-required) could be removed to reclaim disk space.
Windows Server Update Services (WSUS) is a free patch management tool by Microsoft. It allows sysadmins to centrally push Microsoft product updates to computers that are running Windows on their network.
This guide will help you set up your very own WSUS server on Windows Server 2012 R2.
Why WSUS?
How do Windows computers usually update? In a non-WSUS environment (generally all home environments), each PC independently connects to Microsoft Update to get its patches and MS product updates.
This may not be always preferred in a corporate environment. Instead of each workstation manually connecting to Microsoft Update, testing updates and then deploying updates using traditional methods, administrators can use WSUS to download updates centrally to an internal server. Once updates are authorised in WSUS, they’re also deployed internally and reporting tools keep administrators informed of patch progress. This is a very efficient way of working, allowing administrators full control of which updates are deployed to workstations.
In Windows Server 2012 and 2012 R2, WSUS is integrated with the operating system as a server role. In previous versions of Windows Server (2003, 2008, 2008 R2), you had to separately install WSUS 3.0.
Also, seems like Microsoft will be moving away from WSUS to an entirely new product called Windows Update for Business (WUB). You can read more about it here.
Ok, so now, let’s see how we can set up WSUS on Windows Server 2012 R2
What you need:
- A machine with Windows Server 2012 R2 installed
- Internet connection
- 20 minutes (not including download times)
I started with a fresh install of Windows Server 2012 R2 on a VM and connected it to my domain.
Step 1:
On your Windows Server 2012 R2 machine, launch Server Manager as shown below.
You can either launch it using the icon in the taskbar or you can click the Start button and just search for “server manager”.
Step 2:
Once Server Manager is open, select Add roles and features.
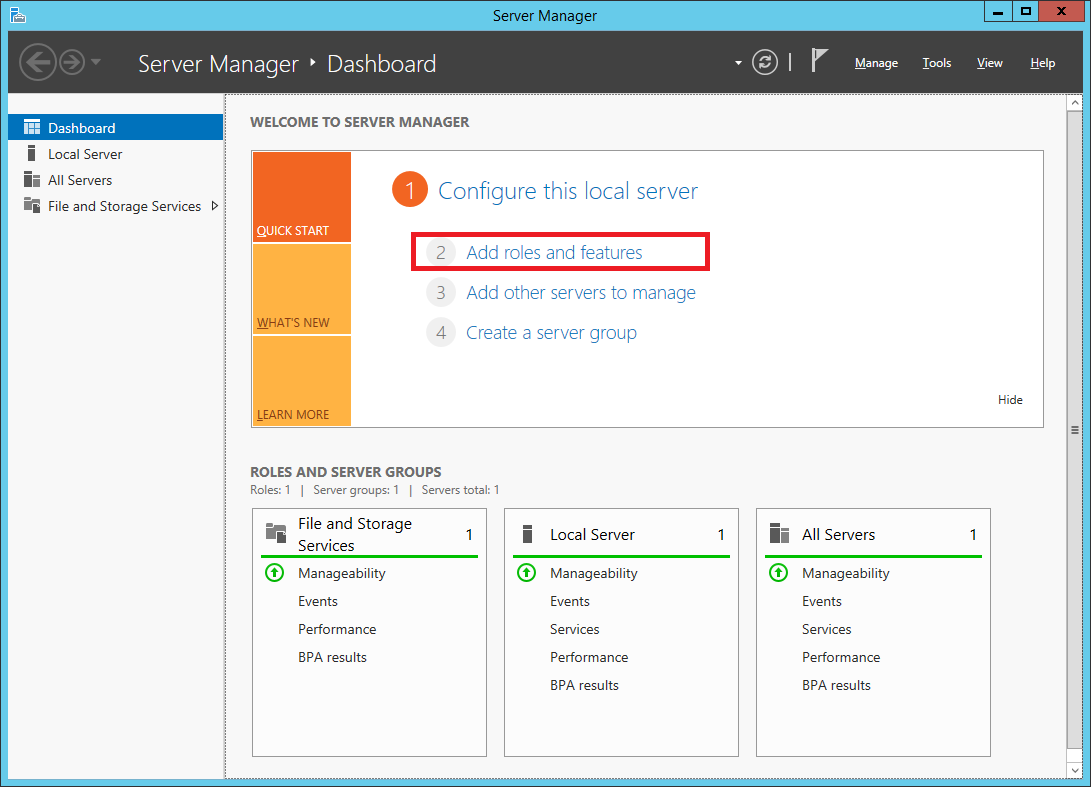
Step 3:
In the Add Roles and Features Wizard, click next on the Before You Begin page. You can optionally select to Skip this page by default for the future.
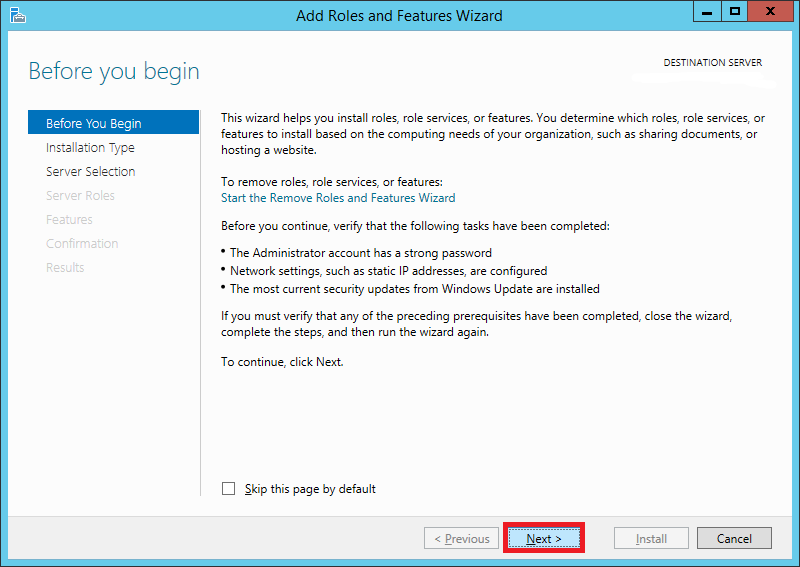
Step 4:
Select Role-based or feature-based installation
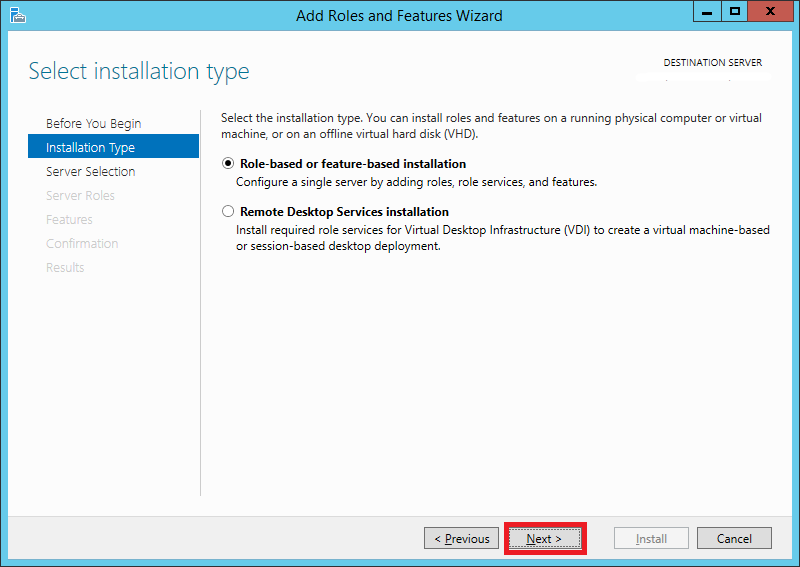
Step 5:
Select your server from the server pool. If you’re not using Hyper-V, you will see only one server, i.e., your soon-to-be WSUS server.
Step 6:
In the Server Roles list, scroll down and select Windows Server Update Services
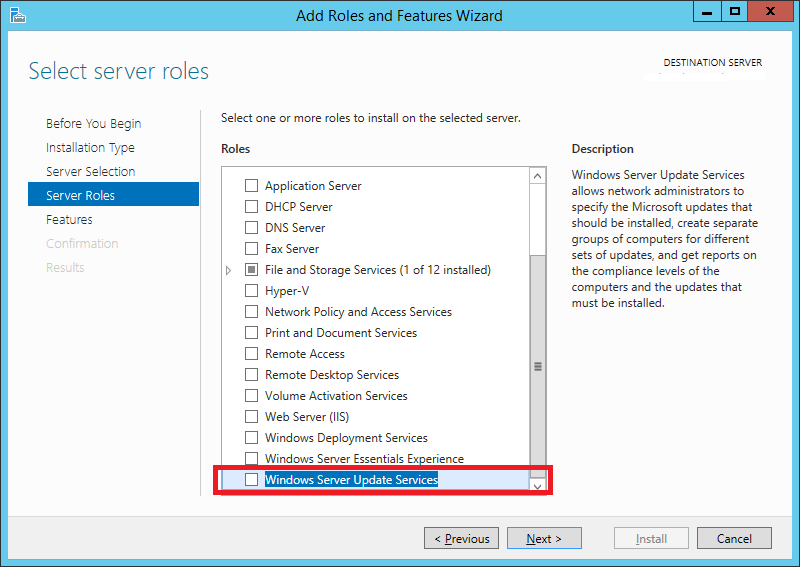
Step 7:
A window will pop up showing you the features that are required for WSUS which will be enabled. Click Add Features
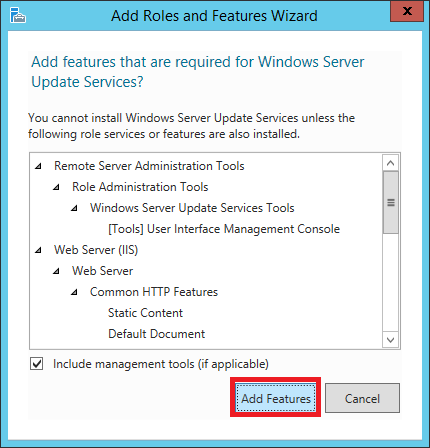
Step 8:
You will notice that IIS has been automatically selected. Leave everything as default and click Next
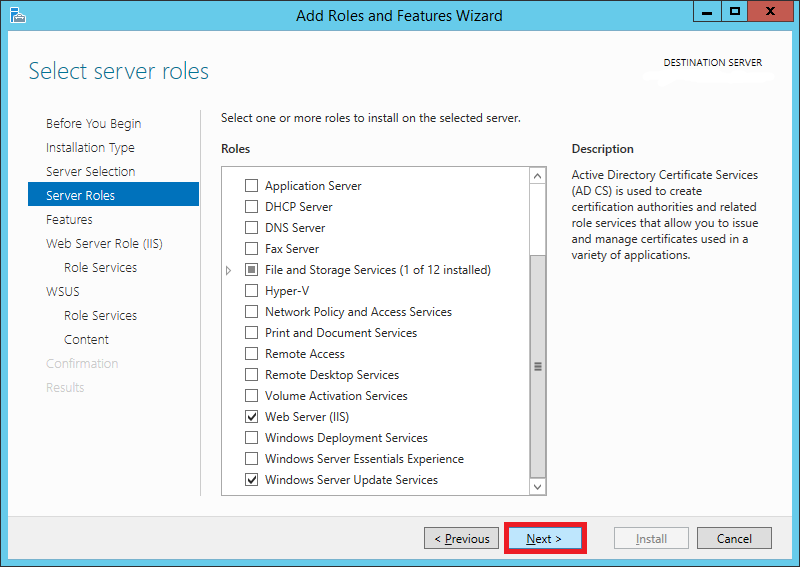
Step 9:
On the Features screen, leave the default selections and click Next
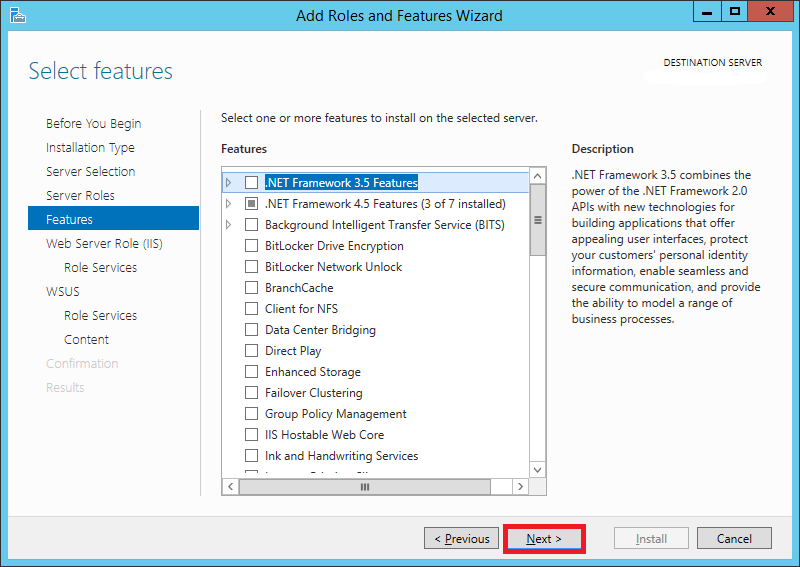
Step 10:
On the Web Server Role (IIS) page, click Next
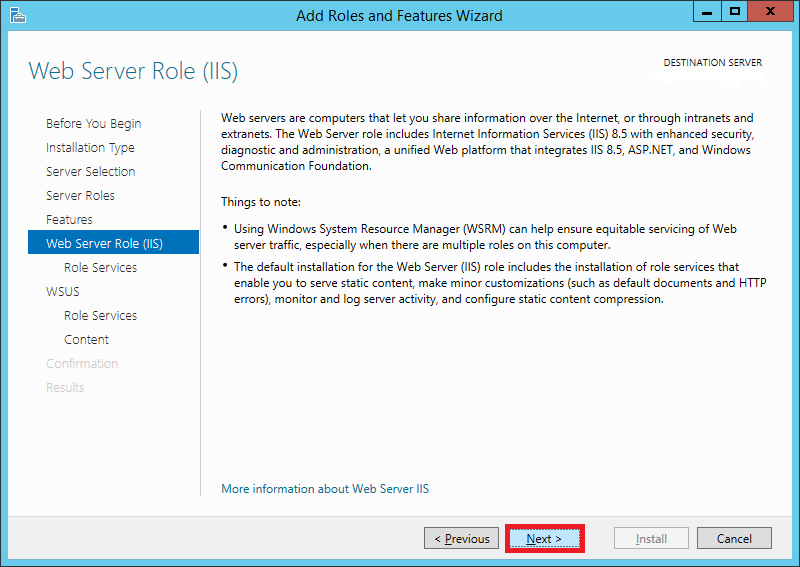
Step 11:
Leave all selections as default on the Role Services page and click Next
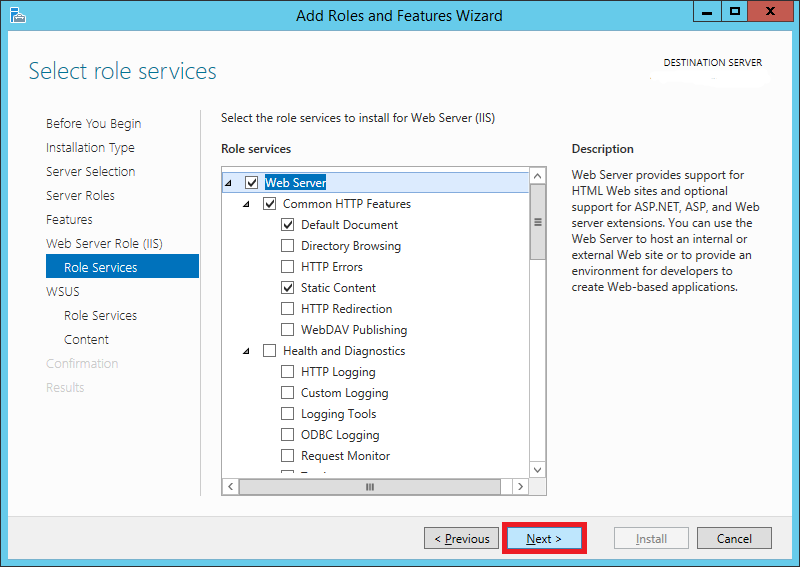
Step 12:
Click Next on this screen
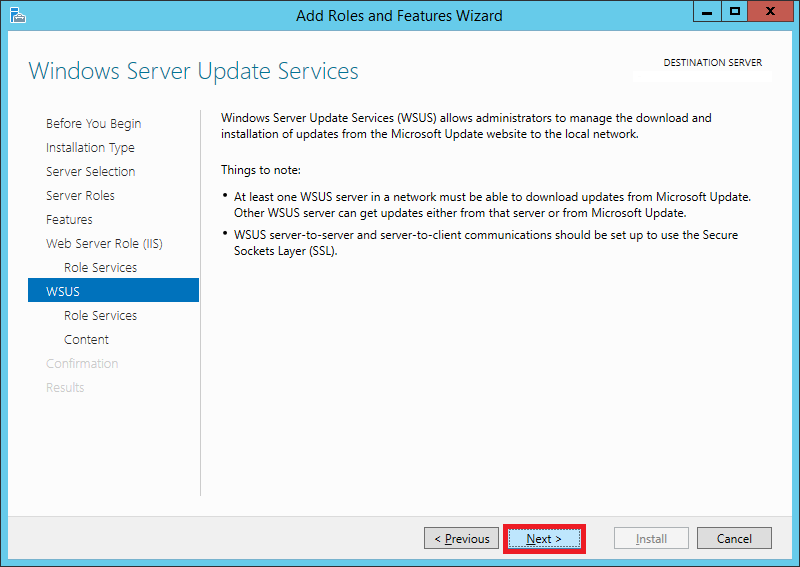
Step 13:
On the Role Services page, make sure WID Database and WSUS Services are selected (They should be selected by default). Click Next
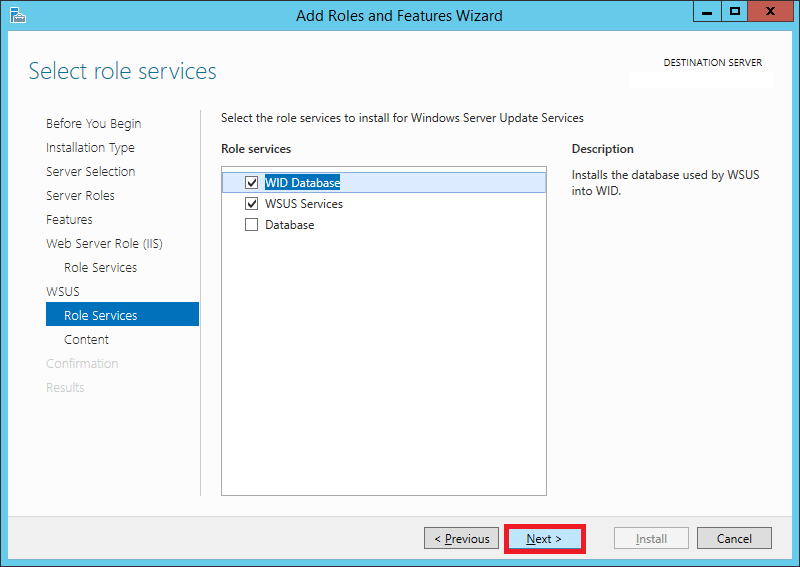
Step 14:
This page will allow you to set the destination directory for the downloaded updates. Tick the checkbox for Store updates in the following location.
Enter the path here. It can either be a local or a remote path.
Keep in mind that WSUS will take up considerable amount of storage as time goes on. It is not unusual to find update folders of sizes greater than 100 GB.
Choose your destination accordingly.
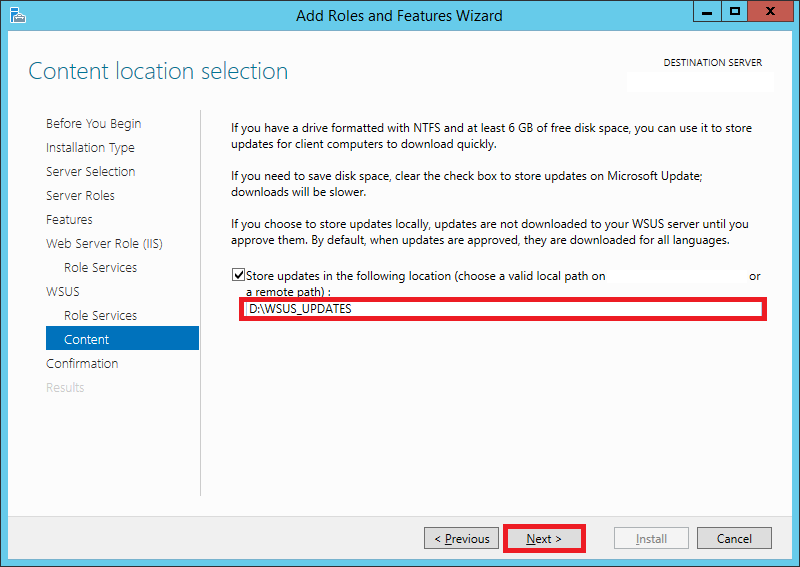
Step 15:
On the Confirmation screen, check the Restart the destination server automatically if required option if you wish to do so, otherwise you can leave it unchecked.
Click Install
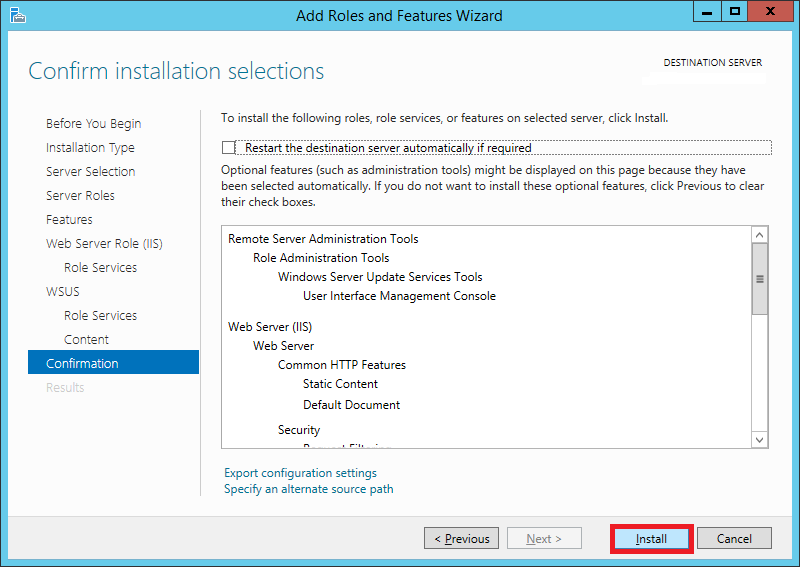
Step 16:
Sit back and grab a coffee. This will take about 5-10 minutes.
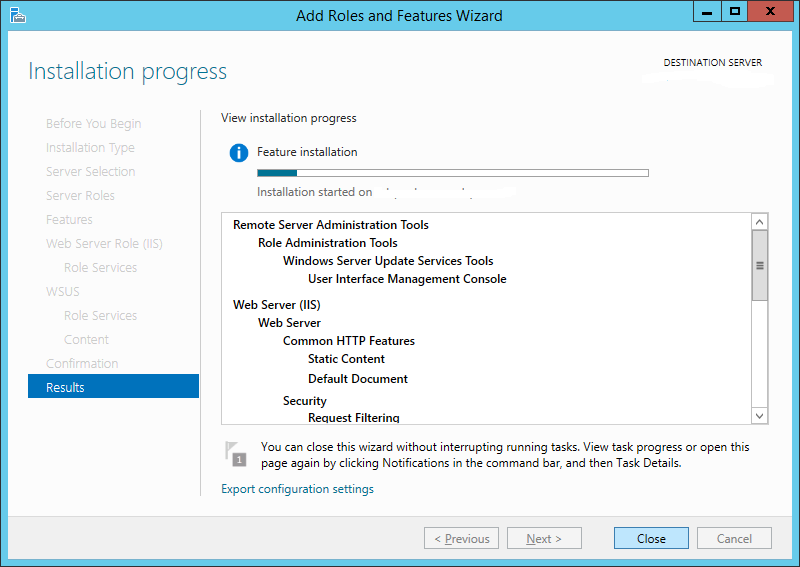
Step 17:
Once its installed, hit Close
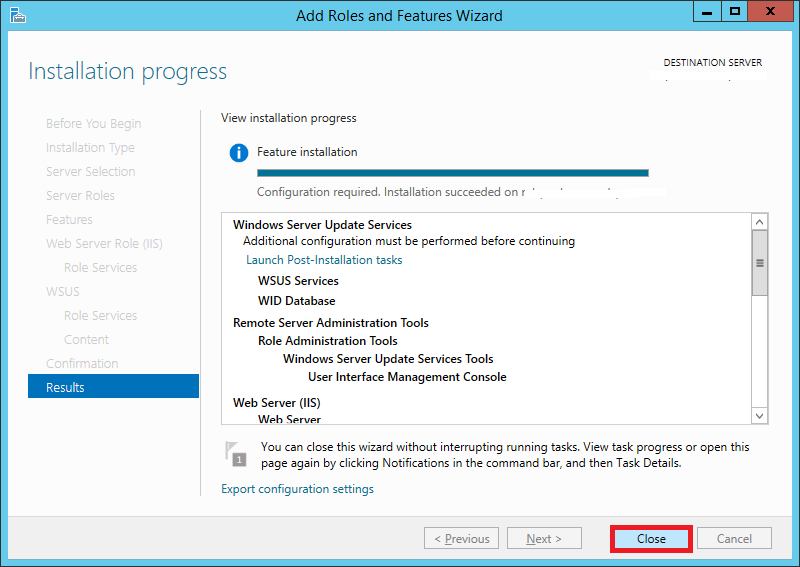
Step 18:
Search for WSUS or Windows Server Update Services and launch it
Step 19:
Since it’s the first time you’re opening it, it’ll take a while to set up. Wait for it to complete and then hit Close
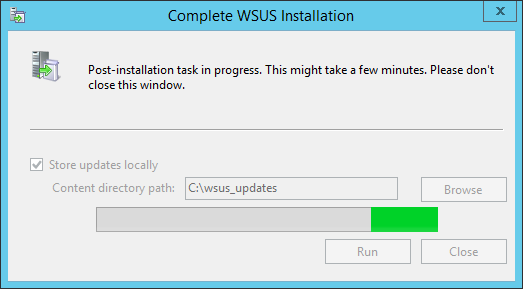
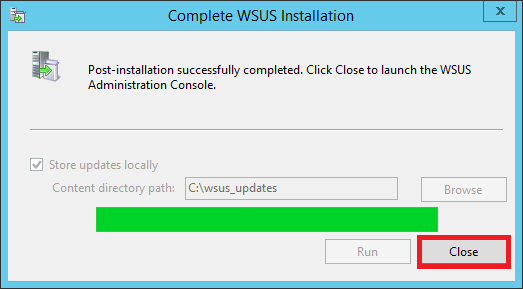
Step 20:
You will now see a wizard that will walk you through a series of steps to configure your installation.
Before starting, make sure of the following:
- Confirm whether the PCs on your network can communicate with this server.
- Your WSUS server should be able to communicate with Microsoft Update (Make sure your firewall isn’t blocking it)
- If your environment uses a proxy, make sure you have the proxy server credentials before continuing.
If all seems well, click Next
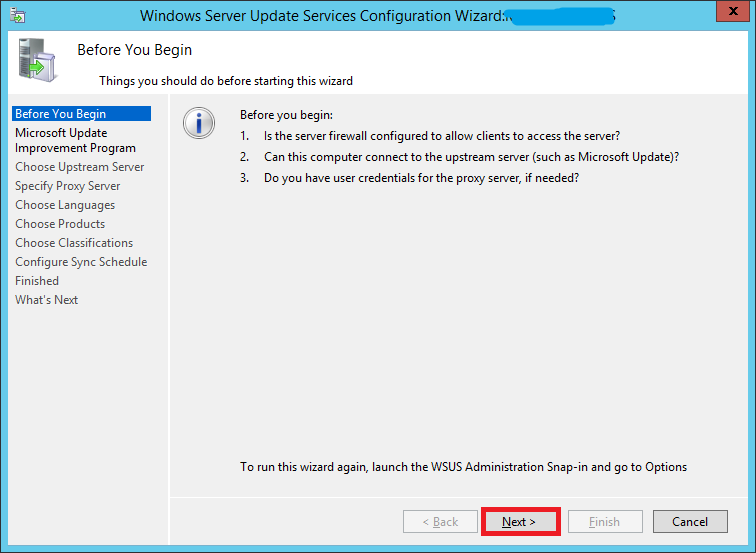
Step 21:
If you would like to join the Microsoft Update Improvement Program, check the box. Otherwise uncheck it. Click Next
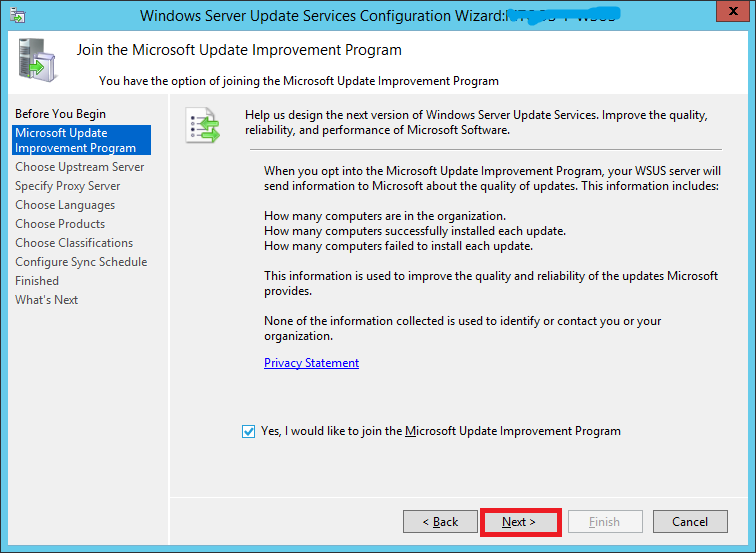
Step 22:
If you want to synch updates directly from Microsoft Update (the most likely scenario in your case since you’re reading this guide), enable the first option and click Next.
If you have already have a WSUS server in your environment and want your new WSUS to synch updates from that instead of Microsoft Update, enable the second option.
- Enter the server name and port number (For WSUS on Windows Servere 2012 R2, the default port is 8530)
- Enable/disable SSL based on your environment
- Decide whether it is going to be a replica server or not and click Next
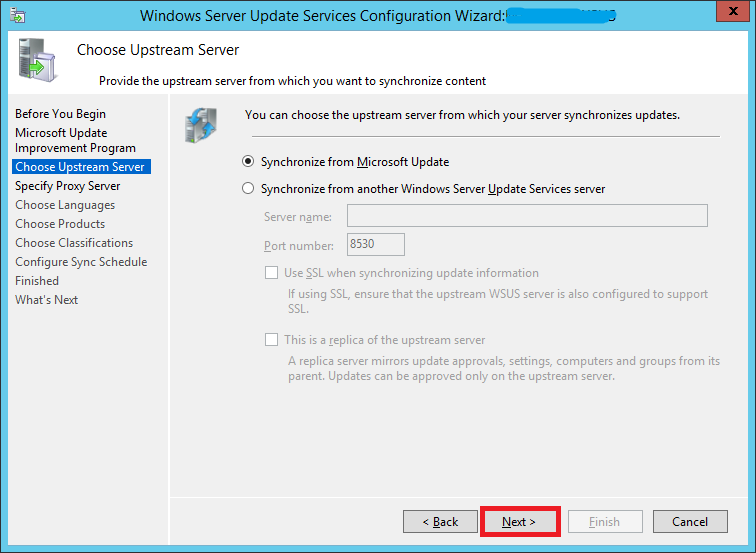
Step 23:
If you use a proxy server, enter the details here, otherwise leave the checkbox unchecked and click Next
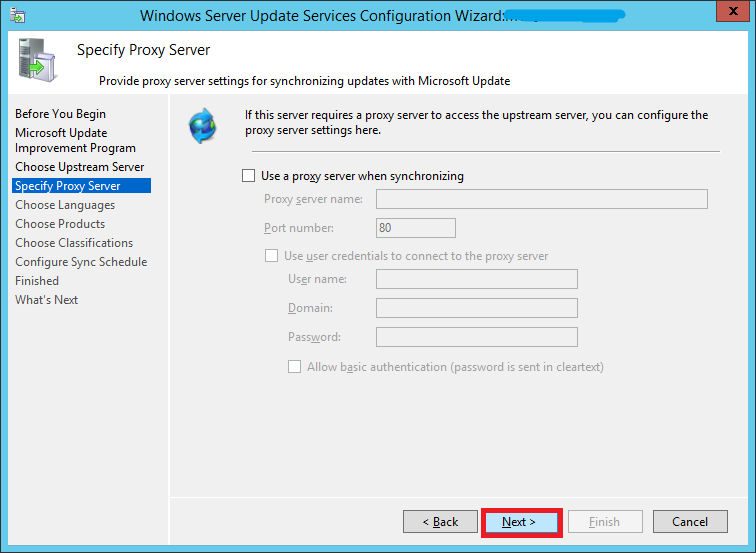
Step 24:
Your server will now need to connect to Microsoft Update and find out information about all available updates.
Click Start Connecting. This might take upto 20 minutes or more depending upon your connection.
Once it’s done, hit Next
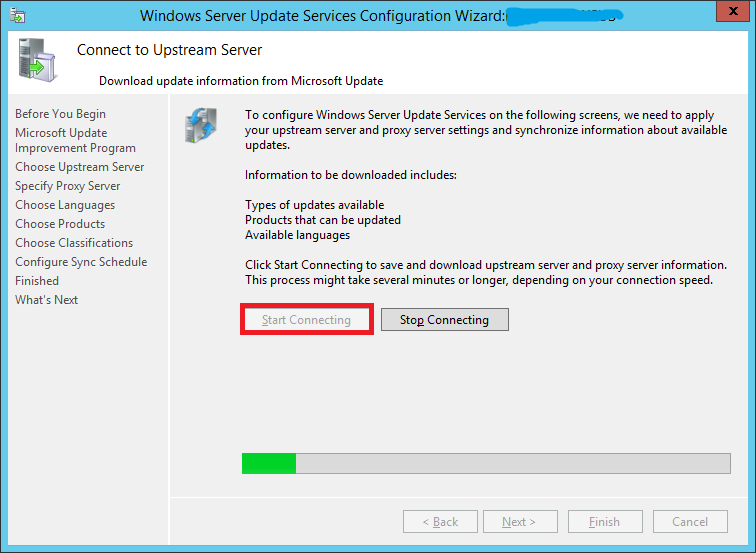
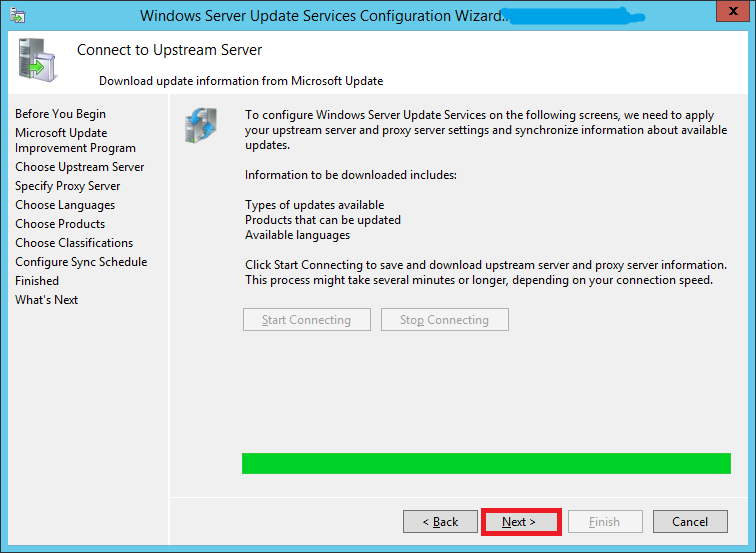
Step 25:
Choose which all languages do you need updates for and click Next. You can always modify this later.
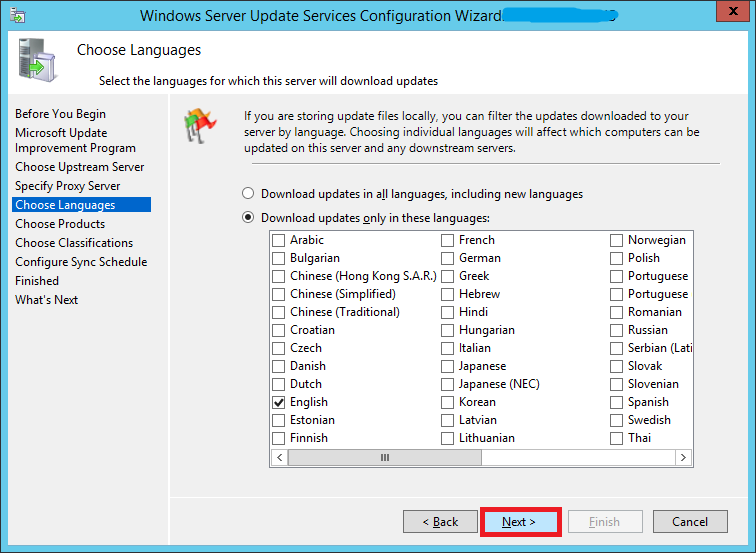
Step 26:
The Choose Products screen will allow you to subscribe for updates for different Microsoft products.
After selecting your products, click Next
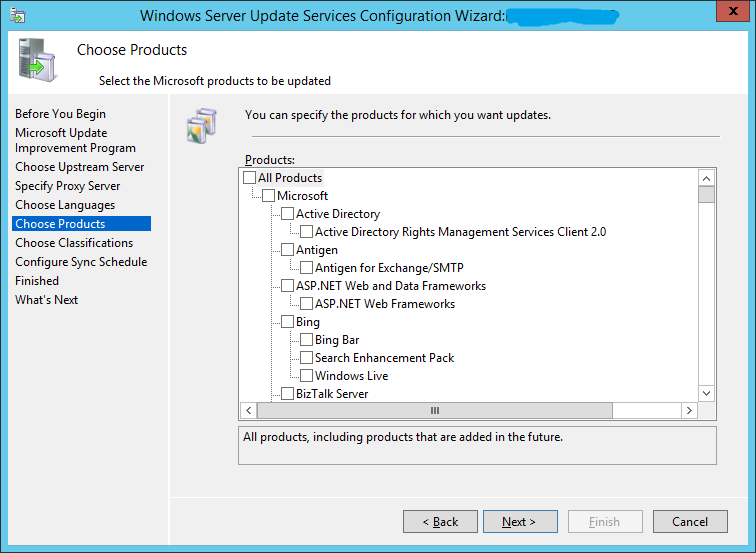
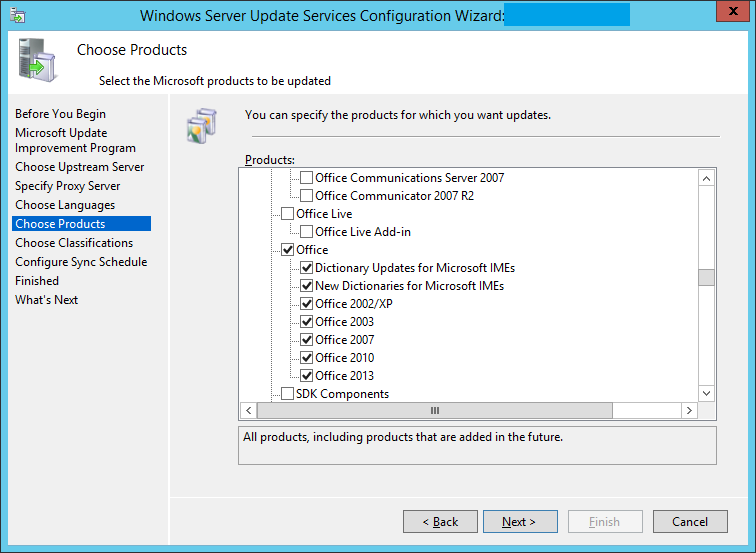
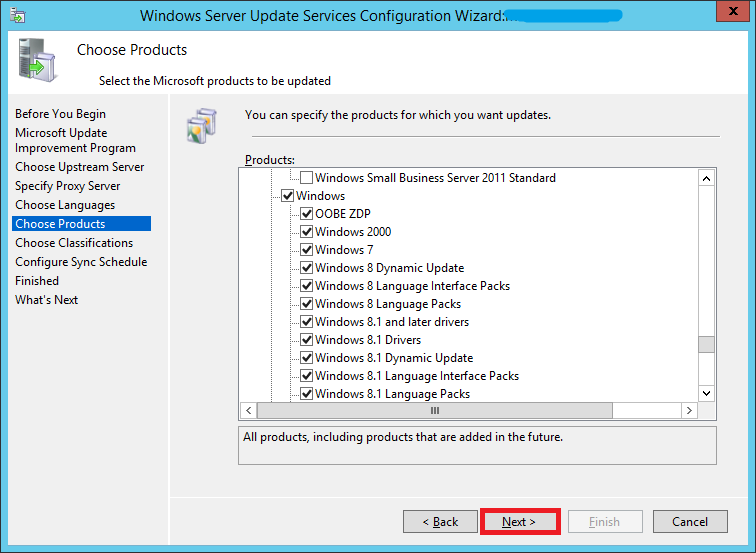
Step 27:
Here you can choose what type of updates you want to subscribe to. Do you want just critical & security updates? Or do you want everything? This is where you can specify that.
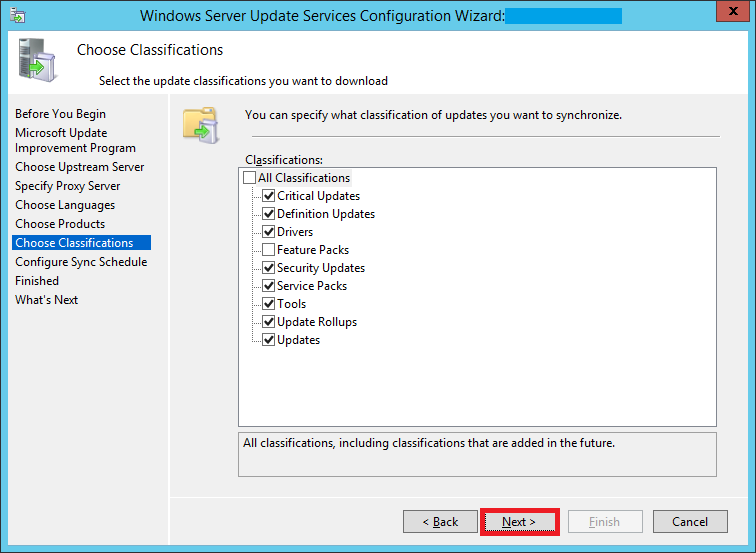
Step 28:
Configure your sync schedule for updates here. The synchronization process involves downloading updates from Microsoft Update or another WSUS server. WSUS determines if any new updates have been made available since the last time you synchronized. If this is the first time you are synchronizing the WSUS server, all of the updates are made available for approval.
I chose to automatically sync my server with Microsoft Update daily at 2 AM.
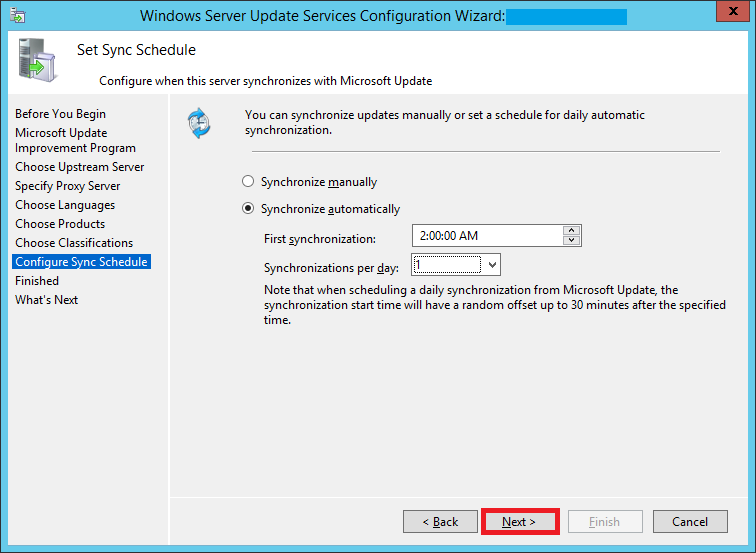
Step 29:
Select Begin initial synchronization to sync with Microsoft Update and click Next and then Finish
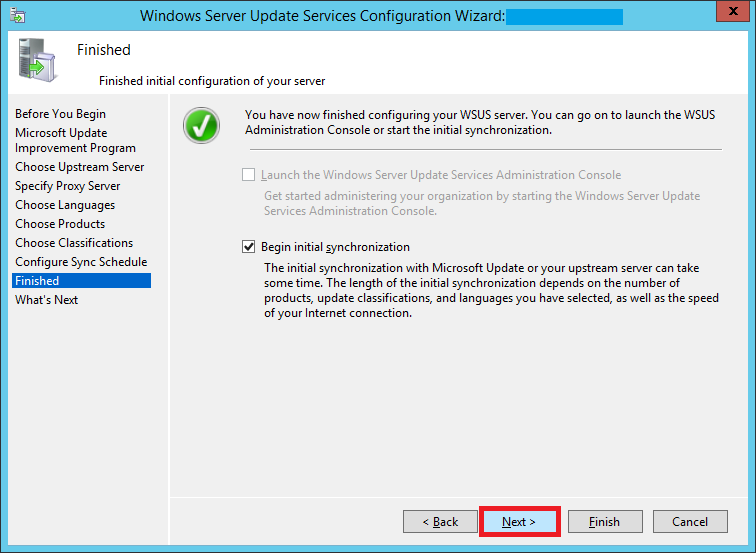

Step 30:
The Update Services console will now launch.
This is going to be the place from where you can control everything.
Right now, under the To Do section, you will not see much. Wait for the server to synchronize with Microsoft Update. Once it syncs, you will see information like how many updates are available, how many are approved, etc.
Under the Overview section, you can see the Synchronization Status.

Synchronization status is now 12%

Step 31:
Synchronization is finally complete. You can now see the number of updates that are available to you under the To Do section.
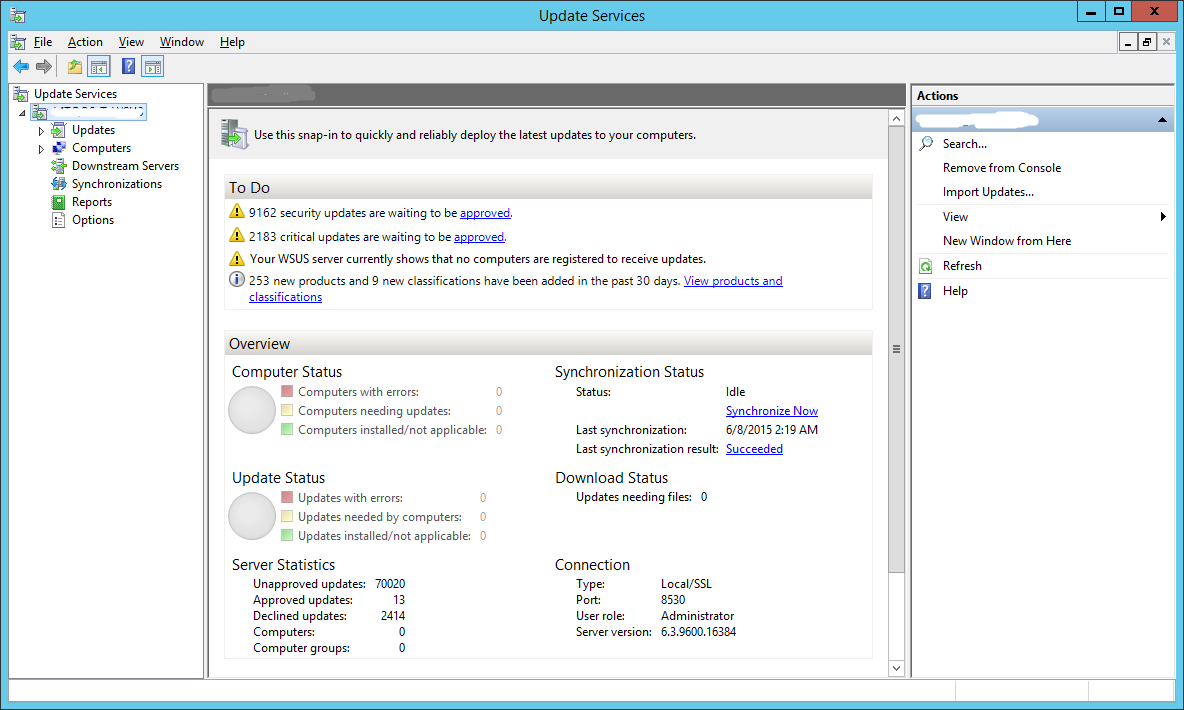
This completes the installation and initial configuration of our WSUS server. However, this server is not going to be much use to you right now. It still isn’t pushing any updates to your workstations still.
Lets fix that.
Step 32:
We will be using a GPO to register the workstations on our network with our newly created WSUS server.
Fire up your Group Policy Management console. Right-click Group Policy Objects and create a new GPO.

Give it an easy-to-identify name.
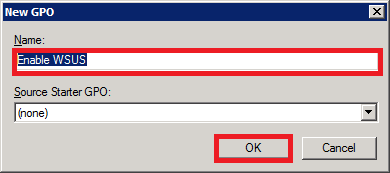
After its created, right-click and choose Edit. We will now configure the GPO.
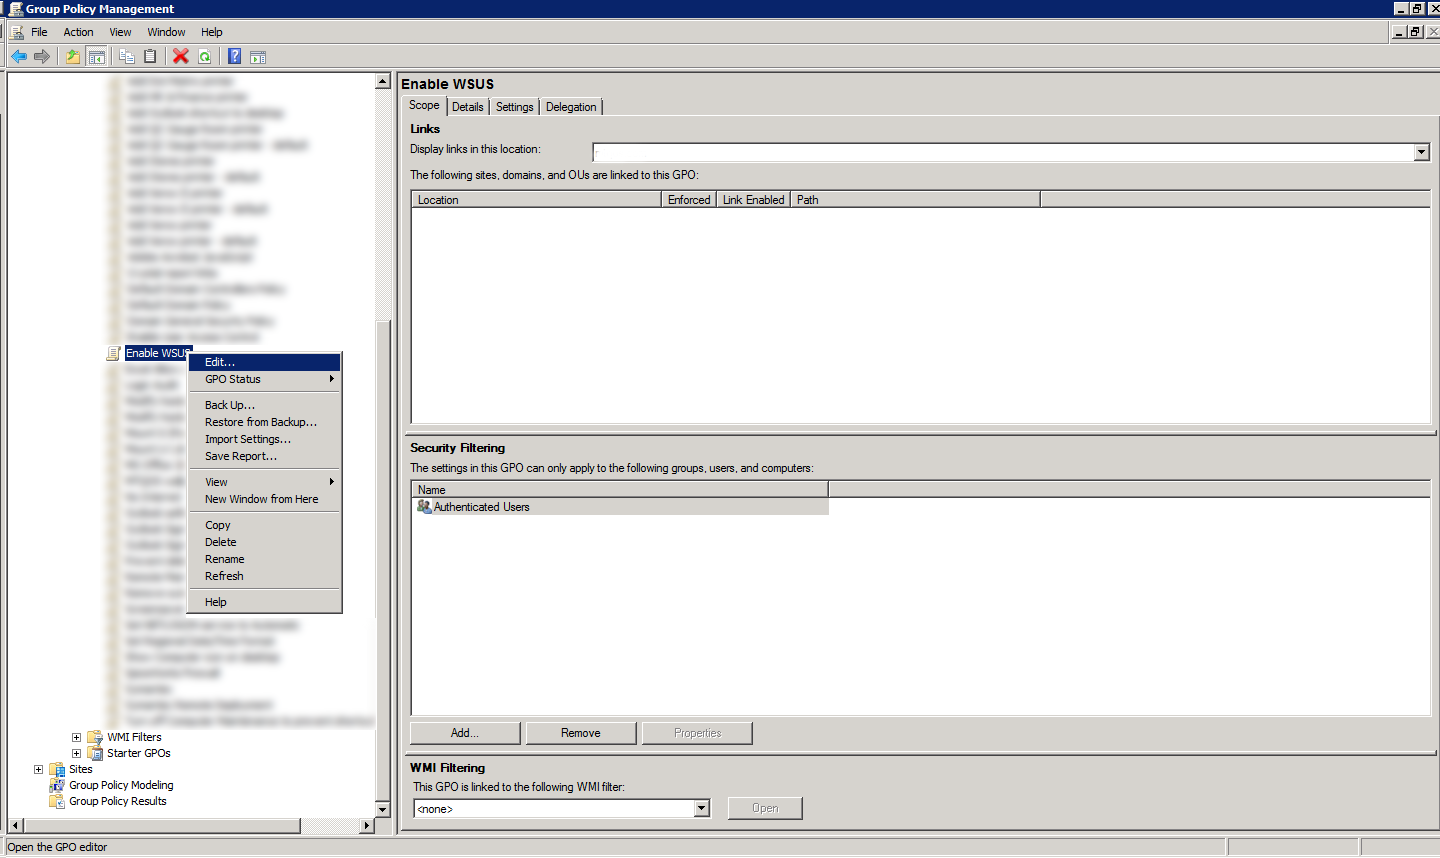
Step 33:
Expand Computer Configuration > Policies > Administrative Templates > Windows Components > Windows Update
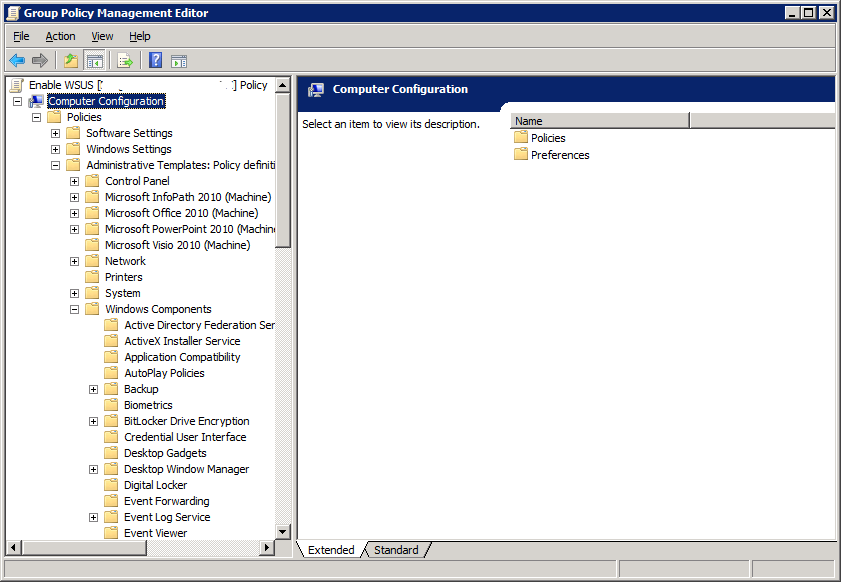
Step 34:
Double-click Configure Automatic Updates
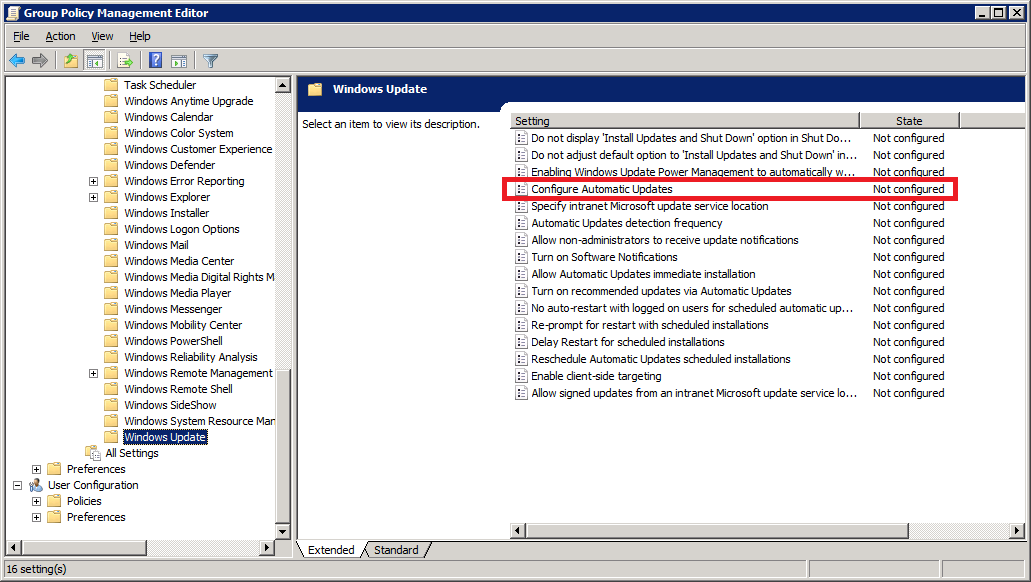
Select Enabled
Under Options, choose how would you want your workstations to update. In my case, I prefer the PCs to download the updates and schedule them to be installed at 3 AM daily.
Once you are satisfied with the options, click OK to exit the screen.
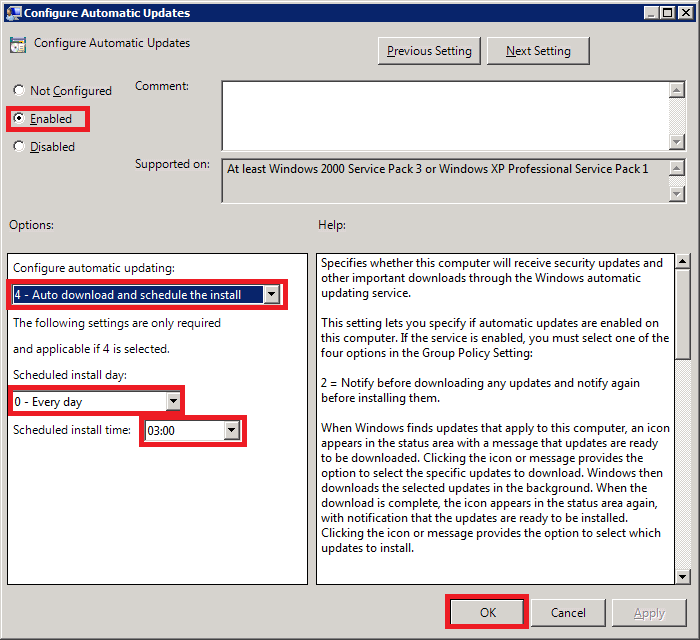
Step 35:
Next, double-click Enable client-side targeting.
Configuring this setting will enable the workstations on your network to register directly with your WSUS server (client-side registration).

Select Enabled.
In the Options area, type the group name for this computer (Your WSUS server can use this information to group computers into different groups. We will see how this is done further below).
Step 36:
Next, double-click on Specify intranet Microsoft update service location.
This is where you will specify your WSUS server’s address.
Select Enabled.
In the Options area, specify your server name in the form of a URL as shown below.
My WSUS server’s hostname is my-wsus-server. The default port number for WSUS on Windows Server 2012 R2 is 8530, so my complete server address is:
http://my-wsus-server:8530
Enter the same URL in both the text boxes and click OK.
Step 37:
Well, the last step is to link the GPO to an OU. Select an OU which has your test computer. Right-click it and select Link an Existing GPO.

Choose your newly created GPO and click OK.
Step 38:
Let’s go back to our WSUS server and create a new computer group. By default, under All Computers, you’ll see a default group called Unassigned Computers. Any computer that doesn’t belong to a group will appear here.
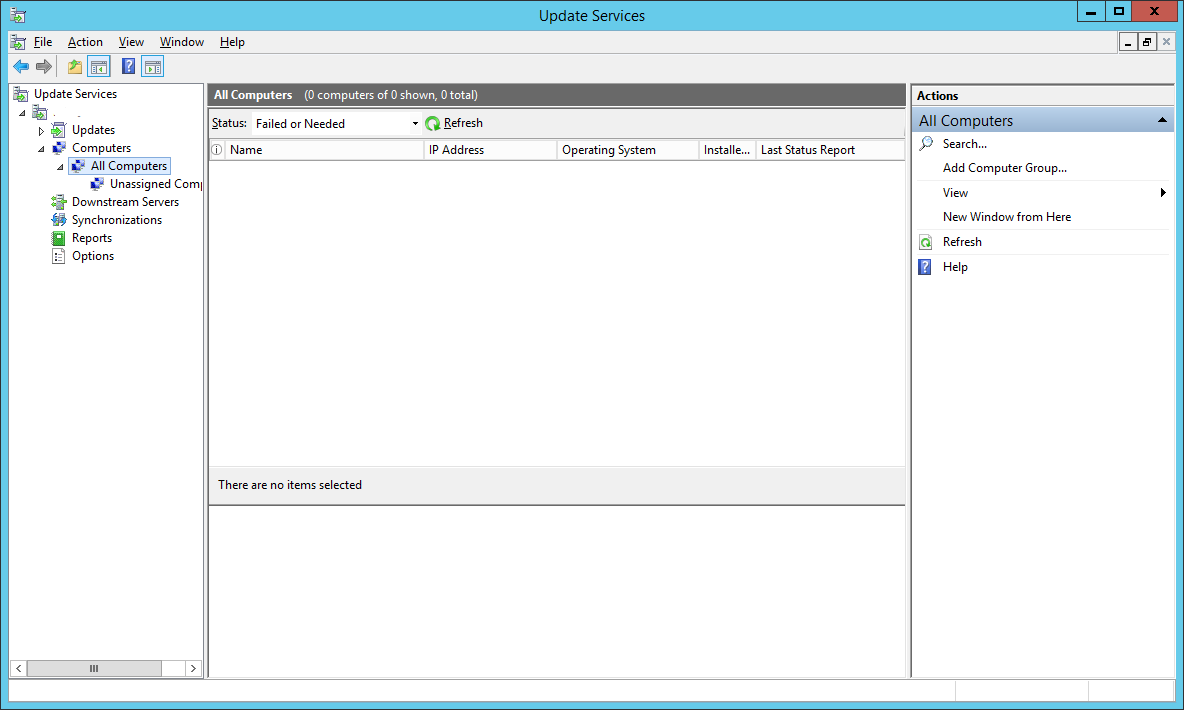
Right-click All Computers and select Add Computer Group…
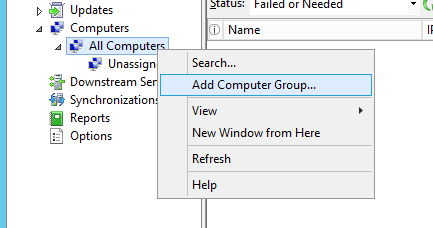
Enter the name of the group. I entered the same group name that I had specified in my GPO (Step 35).
Click Add.
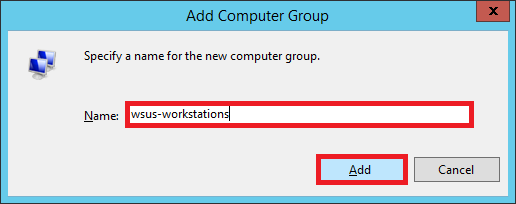
Step 39:
Now, we can either wait for the GPO to be automatically applied to our test computer or, if you are impatient like me, we can speed things up.
Log into your test computer.
Open up Command Prompt as Administrator and run 3 commands as shown below.
gpupdate /forcewuauclt.exe /detectnowwuauclt.exe /reportnow
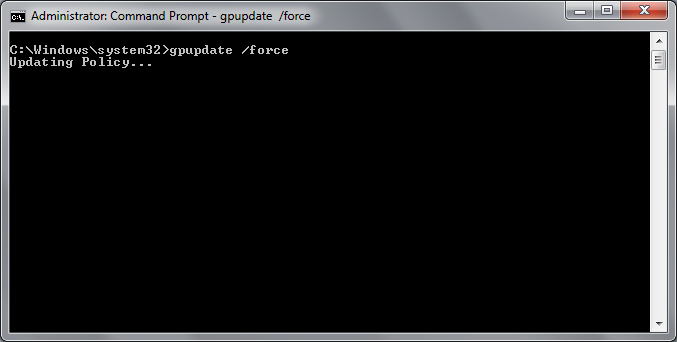
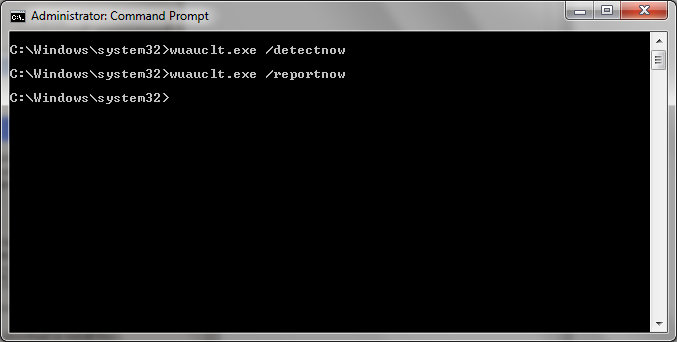
Step 40:
Go back to your WSUS server. Select All Computers group.
Hit refresh.
You will see that your test computer has appeared in the list.
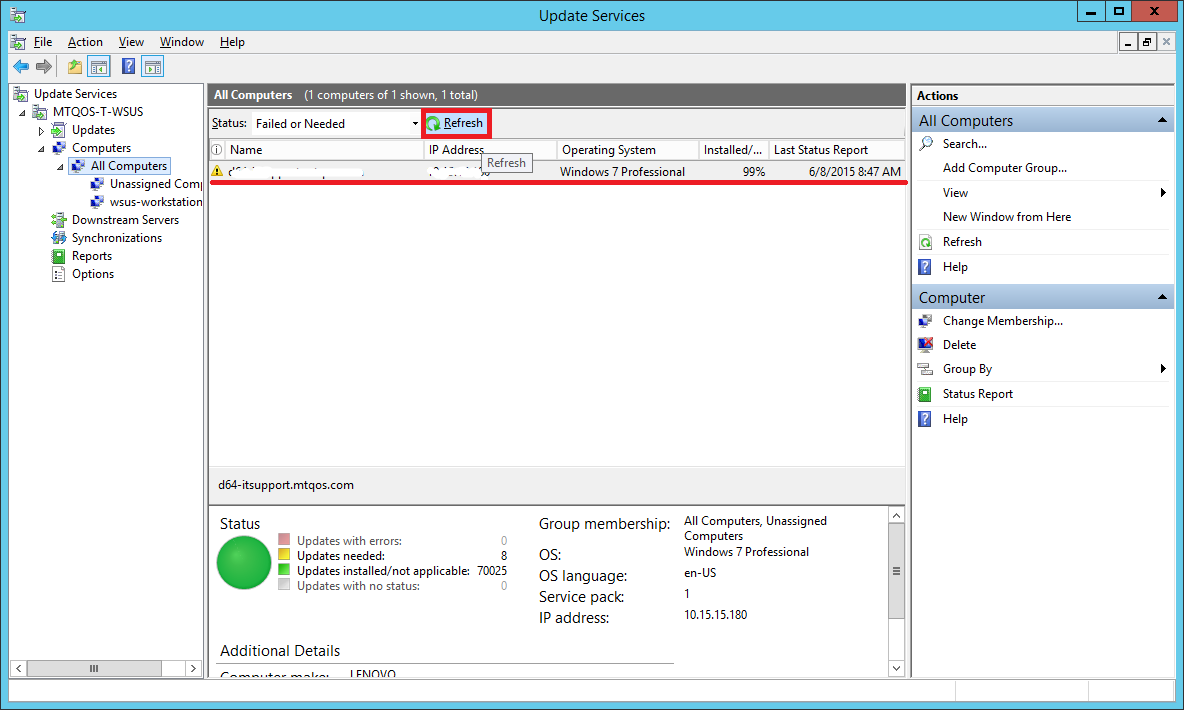
If you don’t see your test computer here, do the following:
- Wait for about 5 minutes and hit Refresh again. Sometimes it takes a while for the PCs to show up even if you have run the above commands.
- Double-check your GPO settings. Make sure you linked it to the correct OU. The OU should have your test computer account and not the user account since its a Computer Configuration policy.
- Run the commands (specified in Step 39) again on your test computer. Make sure you run them from an elevated command prompt.
- Reboot your test computer.
Step 41:
You will notice that even though you have specified the computer to be added to a group wsus-workstations in the GPO, the test computer still appears under Unassigned Computers.
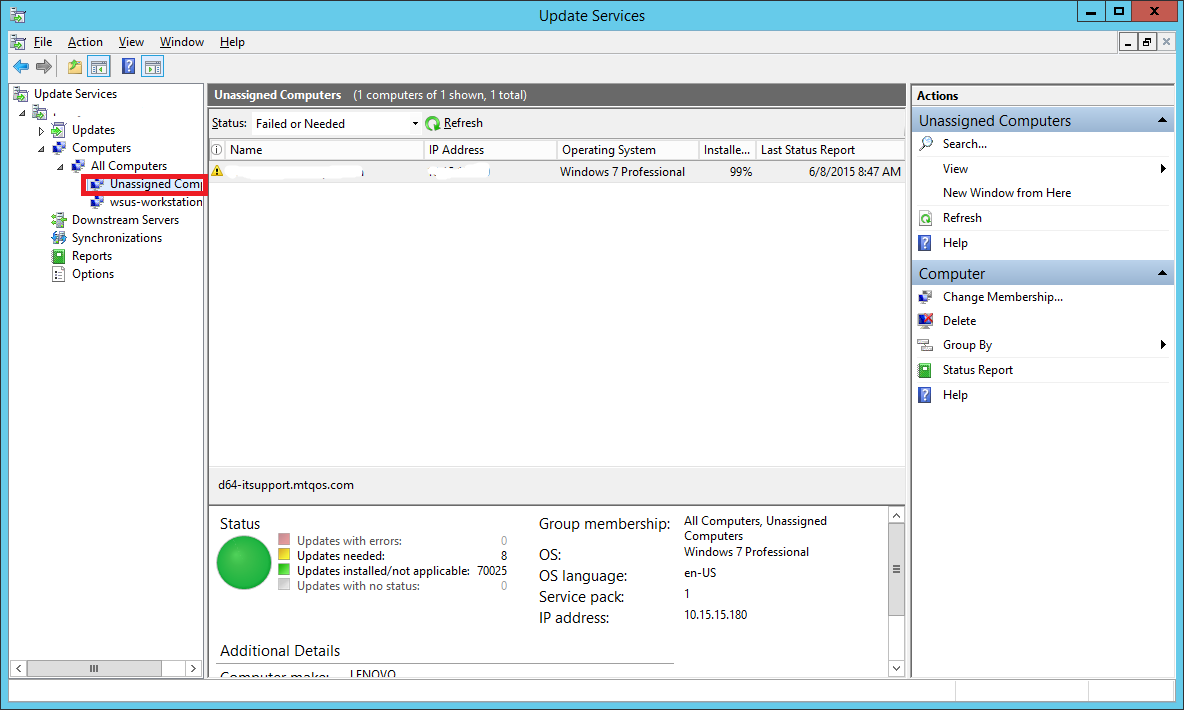
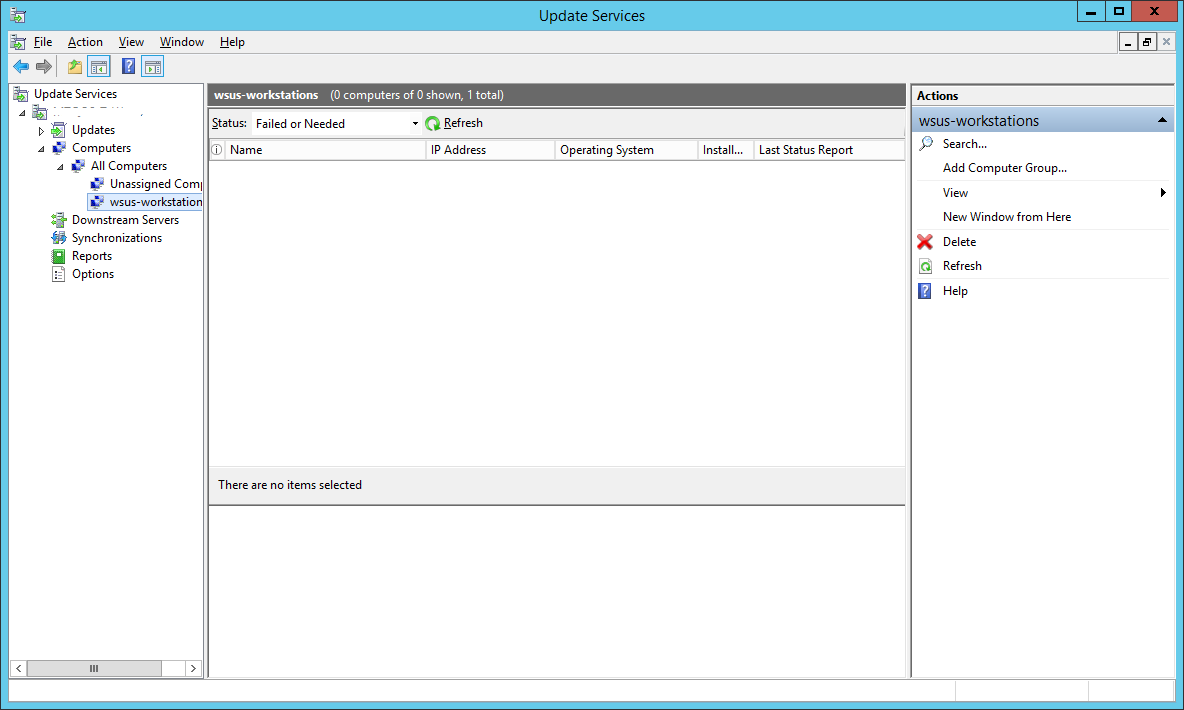
Well, that’s because by default, WSUS ignores the groups and places all discovered computers in the Unassigned Computers group. You can then manually move it to whichever group you want.
You can change this setting. If you want the computers to automatically add themselves to the group specified in the GPO, do the following.
In your Update Services console, select Options. Double-click on Computers
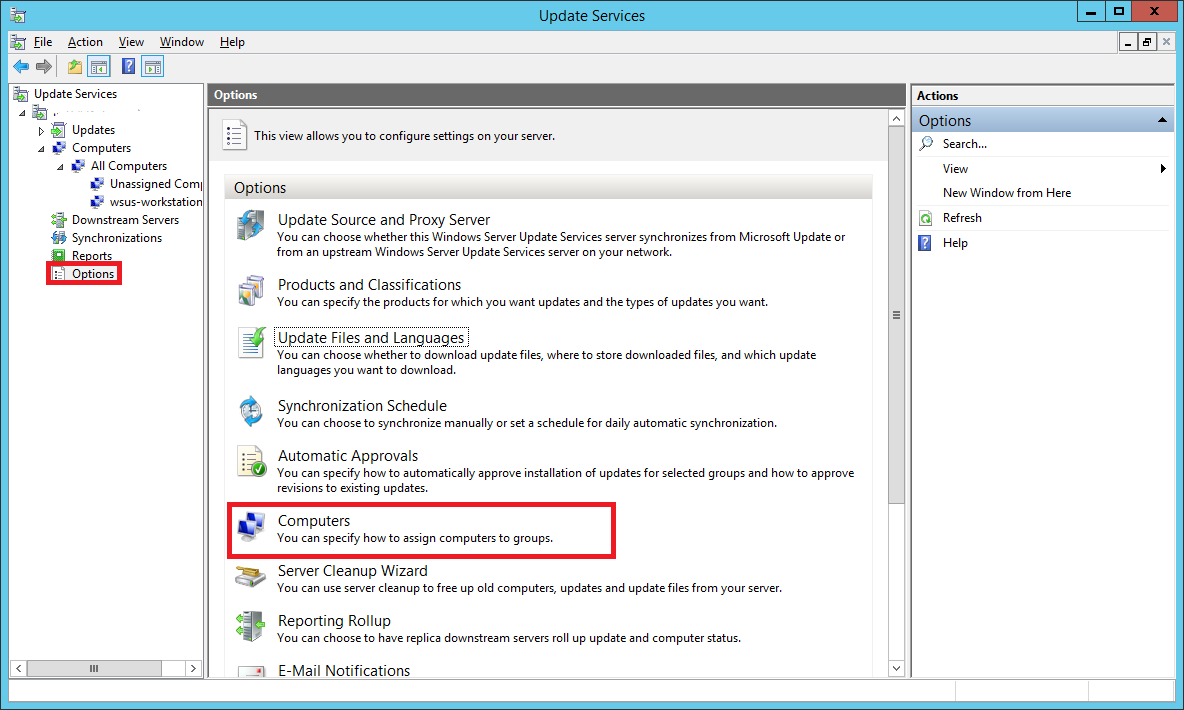
Choose the second option that says Use Group Policy or registry settings on computers.
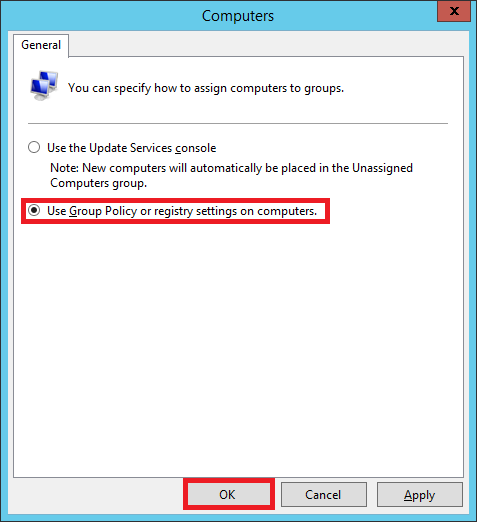
Now any computer that your GPO will apply to, will automatically appear in the group wsus-computers instead of Unassigned Computers.
You can make different GPOs for machines that you want to be grouped differently.
Step 42:
Now, since we have added a test computer, lets see how we can push updates to it.
In your WSUS console, expand the Updates tree and select All Updates. You will see updates which are needed and that are not yet approve.
You will have to Approve them so that they can be pushed out to your test computer.
Select the updates you want to approve using the Shift or Ctrl key.
From the Actions sidebar on the right, select Approve… (you can also right-click the selected updates and do the same)

In the window that pops up, right-click All Computers and select Approved for Install.
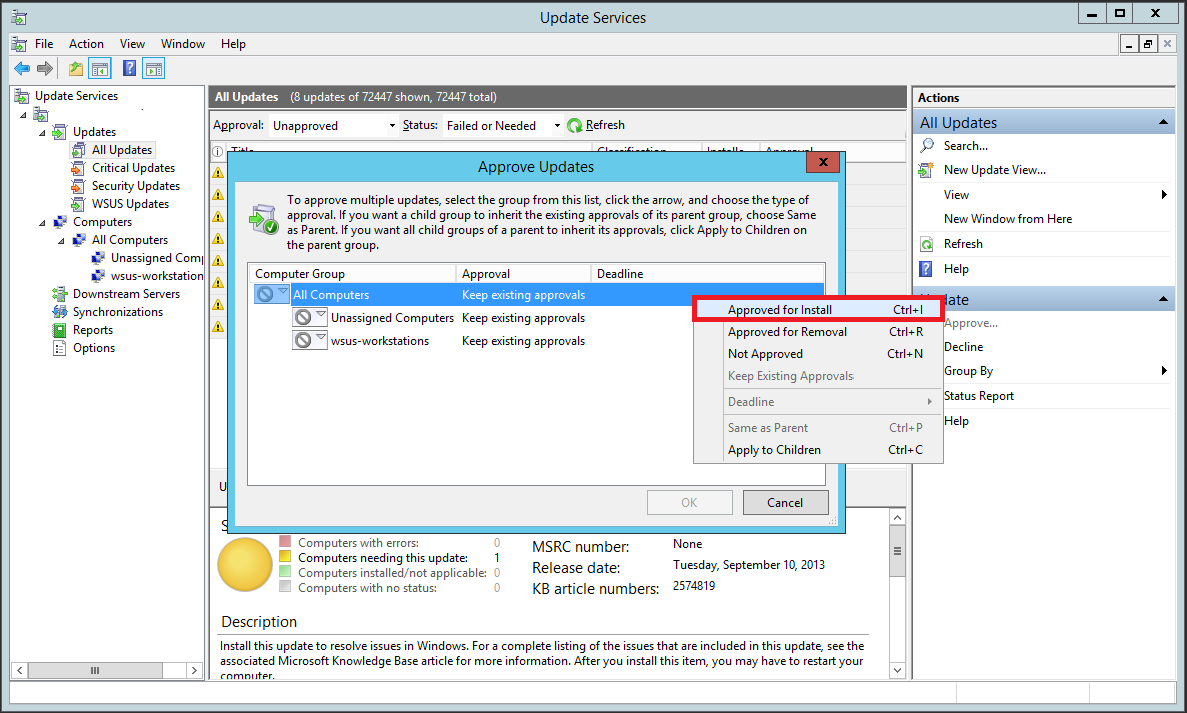
You’ll notice that the updates haven’t been approved for the groups individually. Right-click All Computers again and select Apply to Children. This will approve updates for all the children groups under All Computers.
Since you have just one test computer right now, we have approved it for all the computers. However, in a production environment you should first approve the updates to a test group (instead of all computers) to see if the updates cause any sorts of problems. Once you are certain the updates don’t break anything, you can push it to the critical machines.
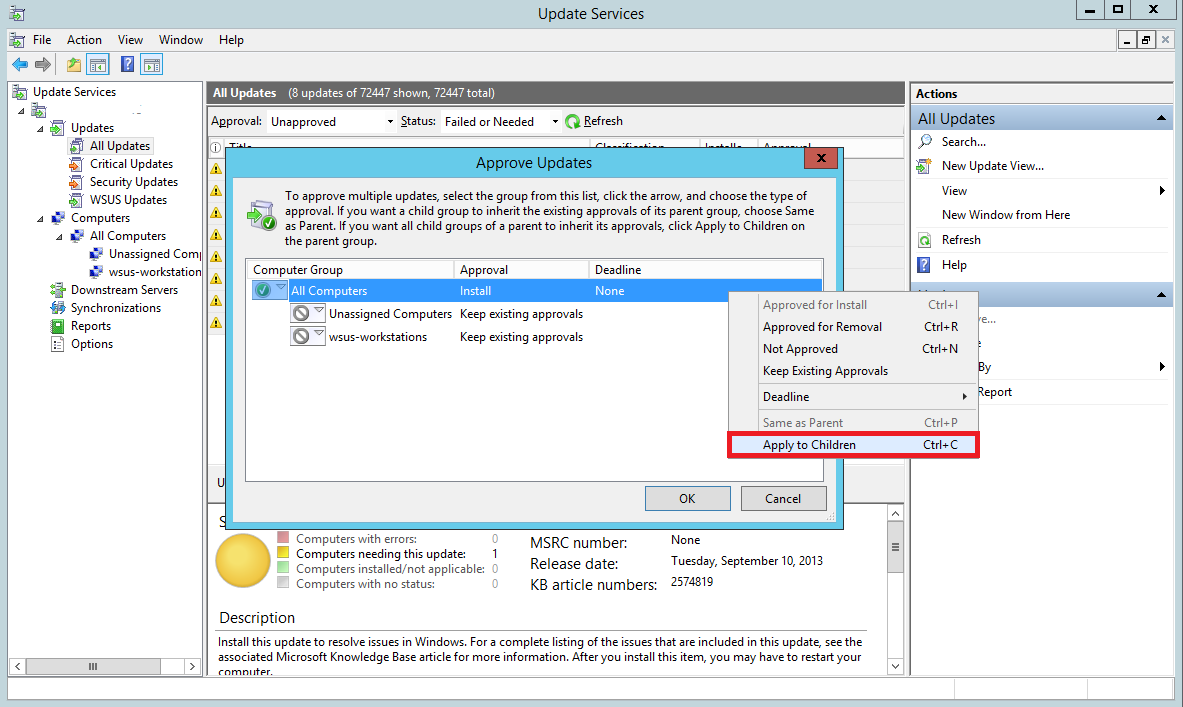
Select OK
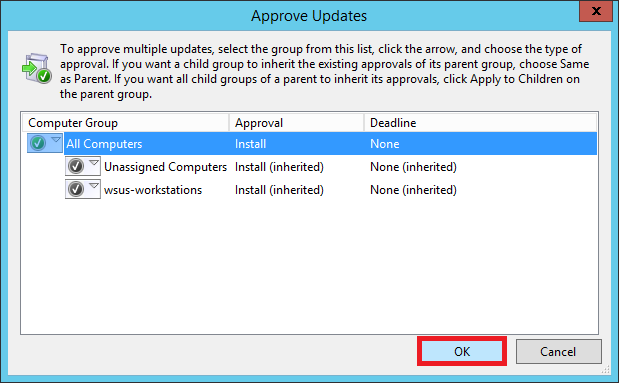
The updates have been approved. Now during the scheduled time (3 AM in our case), these updates will be pushed to out test computer.
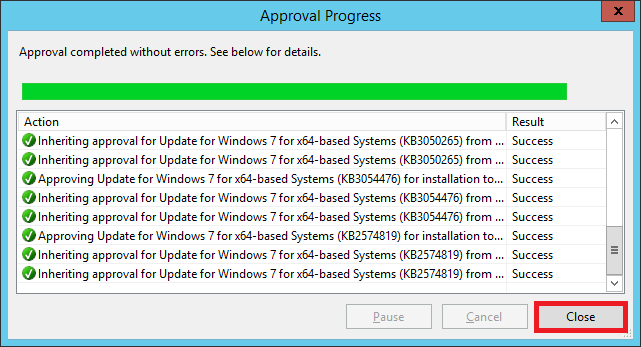
That’s it! Our WSUS server is now set up.
Hope this guide was useful to you. You can leave your feedback in the comments below.
You can use the Windows Server Update Services (WSUS) update server to deploy Microsoft product updates (Windows, Office, SQL Server, Exchange, etc.) to computers and servers in the company’s local network. In this article, we’ll walk you through how to install and configure the WSUS update server on Windows Server 2022/2019/2016, or 2012 R2.
Contents:
- How to Install WSUS Role on Windows Server 2016/2016/2012R2?
- Initial WSUS Configuration on Windows Server
- How to Install WSUS Management Console on Windows 10 and 11?
- Optimizing WSUS Performance
How does WSUS work?
The WSUS server is implemented as a separate Windows Server role. In general terms, the WSUS service can be described as follows:
- After installation, the WSUS server is scheduled to synchronize with Microsoft Update servers on the Internet and download new updates for selected products;
- The WSUS administrator selects which updates to install on company workstations and servers and approves their installation;
- WSUS clients (computers) on the local network download and install updates from your update server according to configured update policies.
How to Install WSUS Role on Windows Server 2016/2016/2012R2?
Starting with Windows Server 2008, WSUS is a separate role that can be installed through the Server Management console or using PowerShell.
If you are deploying a new WSUS server, we recommend that you install it on the latest release of Windows Server 2022 (installation on Windows Server Core is possible).
To install WSUS, open the Server Manager console and check the Windows Server Update Services role (the system will automatically select and offer to install the necessary IIS web server components).
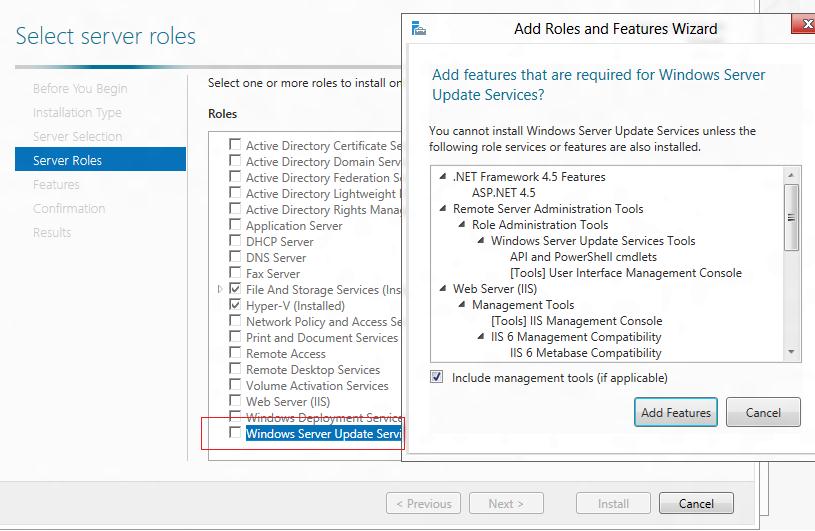
In the next window, choose which WSUS role services you want to install. Be sure to check the WSUS Services option. The next two options depend on which SQL database you plan to use for WSUS.
Server settings, update metadata, and WSUS client information are stored in a SQL Server database. As a WSUS database you can use:
- Windows Internal Database (WID) – built-in Windows database (WID Connectivity option). This is the recommended and workable option even for large infrastructures;
- A separate Microsoft SQL Server database is deployed on a local or remote server. You can use MS SQL Enterprise, Standard (licensing required), or the free Express edition. This is the SQL Server Connectivity option.
The Windows Internal Database) is recommended if:
- You don’t have unused MS SQL Server licenses;
- You are not planning to use WSUS load balancing (NLB WSUS)
- When deploying a downstream (child) WSUS server (for example, in branch offices). In this case, it is recommended to use the built-in WSUS database on secondary servers.
In the free SQL Server Express Edition, the maximum database size is limited to 10 GB. The Windows Internal Database is limited to 524 GB. For example, in my infrastructure, the size of the WSUS database for 3000 clients was about 7GB.
If you install the WSUS role and the MS SQL database on different servers, there are some limitations:
- SQL Server with WSUS database cannot be an Active Directory domain controller;
- The WSUS server cannot be deployed on a host with the Remote Desktop Services role.
The default WID database is called SUSDB.mdf and is stored in the folder %windir%widdata. This database supports only Windows authentication (not SQL). The internal (WID) database instance for WSUS is called server_nameMicrosoft##WID.
The WSUS WID database can be administered through SQL Server Management Studio (SSMS) if you specify the following connection string: \.pipeMICROSOFT##WIDtsqlquery.
If you do not have enough disk space to store update files, disable this option. In this case, WSUS clients will receive approved update files from the Internet (a viable option for small networks).
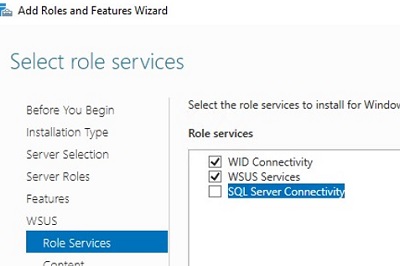
If you want to store update files locally on the WSUS server, enable the option Store updates in the following locations and specify the directory path. This can be a folder on a local disk (a separate physical or logical volume is recommended), or a network location (UNC path). Updates are downloaded to the specified directory only after they have been approved by the WSUS administrator.
The size of the WSUS database is highly dependent on the number of Microsoft products and the Windows versions you plan to update. In a large organization, the size of update files on a WSUS server can reach hundreds of GB.
If you do not have enough disk space to store update files, disable this option. In this case, WSUS clients will receive approved update files from the Internet (a viable option for small networks).
You can also install a WSUS server with an internal database (WID) using the following PowerShell command:
Install-WindowsFeature -Name UpdateServices, UpdateServices-WidDB, UpdateServices-Services, UpdateServices-RSAT, UpdateServices-API, UpdateServices-UI -IncludeManagementTools
Initial WSUS Configuration on Windows Server
After you finish installing the WSUS role, you need to complete its initial configuration. Open Server Manager and select Post-Deployment Configuration -> Launch Post-Installation tasks.
You can use the WsusUtil.exe console tool to manage WSUS from the command prompt. For example, to change the path to the WSUS update files directory, run:
CD "C:Program FilesUpdate ServicesTools"

WsusUtil.exe PostInstall CONTENT_DIR=D:WSUS
Or, for example, you can switch your WSUS to an external SQL Server database:
wsusutil.exe postinstall SQL_INSTANCE_NAME="MUN-SQL1WSUSDB" CONTENT_DIR=D:WSUS_Content
Then open the Windows Server Update Services console. The WSUS Update Server Initial Configuration Wizard starts.
Specify whether the WSUS server will download updates from the Microsoft Update site directly (Synchronize from Microsoft Update) or if it should receive them from an upstream WSUS server (Synchronize from another Windows Update Services server). Downstream WSUS servers are usually deployed at remote sites with a large number of clients (300+) to reduce the load on the WAN link.
On Windows 10 and 11, you can use Delivery Optimization to reduce the bandwidth usage of update traffic on your communication channels.
If your access the Internet through a proxy server, you need to specify the address and port of the proxy server, as well as authentication credentials.
Next, check the connection to the upstream update server (or Windows Update). Click Start Connecting.
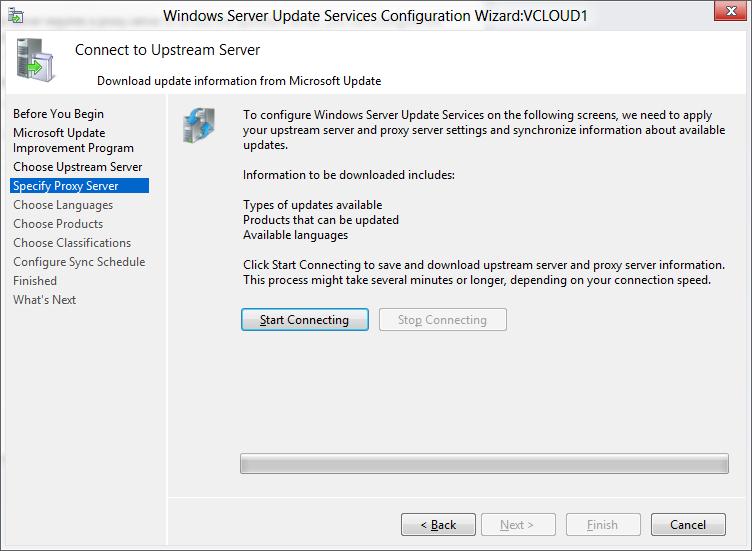
Then you need to select the product languages for which WSUS will download updates. We select English (the list of the languages can further be changed from the WSUS console).
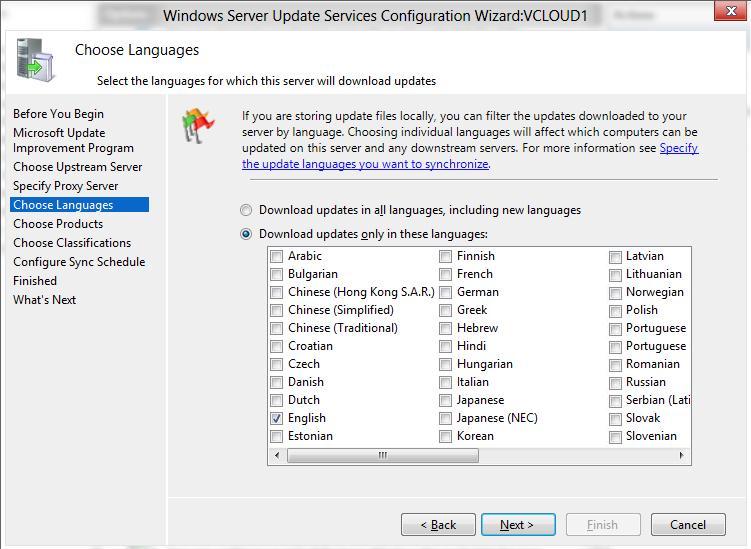
Then specify the list of products for which the WSUS should download updates. Select only those Microsoft products that are used in your environment. For example, if you are sure that there are no Windows 7 or Windows 8 computers left on your network, don’t select these options. This will significantly save space on the WSUS server drive.
Be sure to include the following general sections in the WSUS classification:
- Developer Tools, Runtimes, and Redistributable — used to update Visual C++ Runtime libraries;
- Windows Dictionary Updates in the Windows category;
- Windows Server Manager – Windows Server Update Services (WSUS) Dynamic Installer.
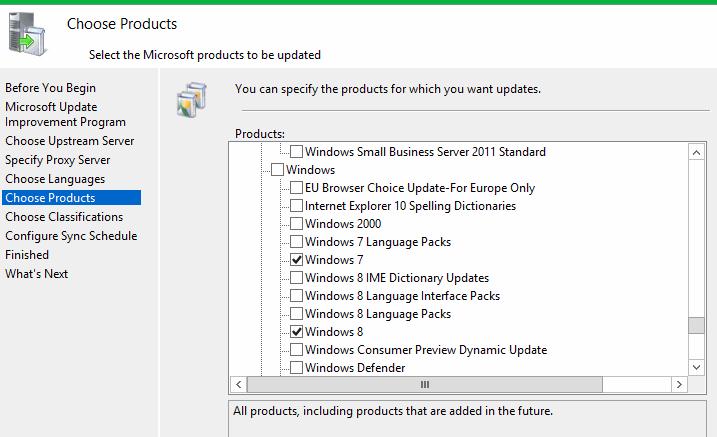
On the Classification Page, you need to specify the types of updates to be deployed via WSUS. It is recommended to select: Critical Updates, Definition Updates, Security Packs, Service Packs, Update Rollups, and Updates.
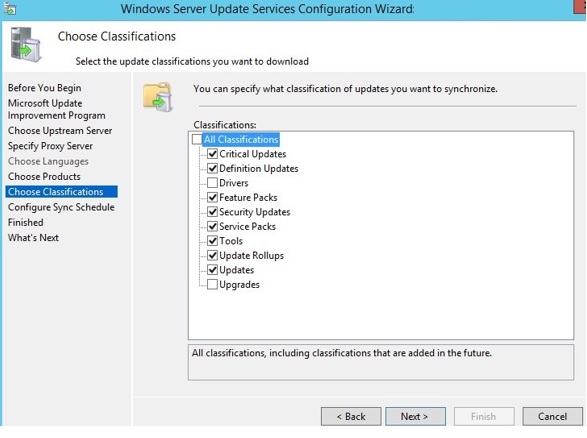
The Windows 10 build upgrades (21H2, 20H2, 1909, etc.) in the WSUS console are included in the Upgrades class.
Configure your update synchronization schedule. It is recommended to use the automatic daily synchronization of the WSUS server with Microsoft Update servers. The WSUS synchronization should be performed at night, in order not to impact the Internet channel during business hours.
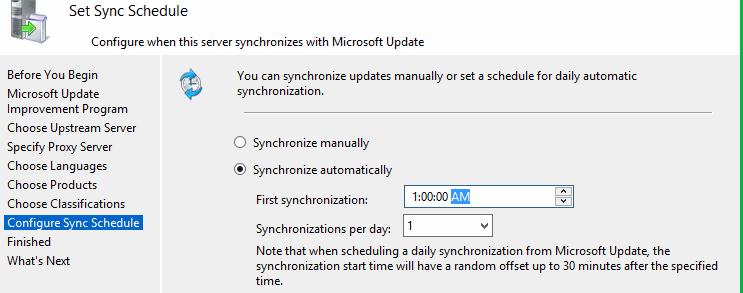
The initial synchronization of the WSUS server with the upstream update server may take up to several days, depending on the number of products you chose earlier and your ISP.
After the wizard is done, the WSUS console will start.

There are several sections in the WSUS console tree:
- Updates – available updates on the WSUS server (here you can manage the update approvals and assign them for installation);
- Computers – here you can manage WSUS client groups (computers, servers, test, and production groups, etc.);
- Downstream Servers – allows you to configure whether you receive from Windows Update or an upstream WSUS server;
- Synchronizations – update synchronization schedule;
- Reports –different WSUS reports;
- Options –WSUS configuration settings.
Clients can now receive updates by connecting to the WSUS server on port 8530 (in Windows Server 2003 and 2008, port 80 is used by default). Check that this port is open on the WSUShost:
Test-NetConnection -ComputerName yourwsushost1 -Port 8530
You can use a secure SSL connection on port 8531. To do this, you need to bind a certificate to the WSUS Administration website in IIS.
If the port is closed, create an allow rule in Windows Defender Firewall.
How to Install WSUS Management Console on Windows 10 and 11?
You use the Windows Server Update Services console (wsus.msc) to manage WSUS. You can manage WSUS hosts either using the local console or over the network from a remote computer.
The WSUS Administration Console for Windows 10 or 11 is installed from the Remote Server Administration Tools (RSAT). To install the Rsat.WSUS.Tool component, run the following PowerShell command:
Add-WindowsCapability -Online -Name Rsat.WSUS.Tools~~~~0.0.1.0
If you want to install the WSUS console on Windows Server, use the command:
Install-WindowsFeature -Name UpdateServices-Ui
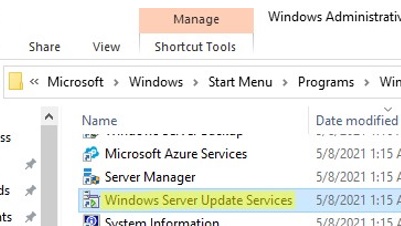
When you install WSUS on Windows Server, two additional local groups are created. You can use them to grant users access to the WSUS management console.
- WSUS Administrators
- WSUS Reporters
To view reports about updates and clients on WSUS, you must install:
- Microsoft System CLR Types for SQL Server 2012 (SQLSysClrTypes.msi);
- Microsoft Report Viewer 2012 Runtime (ReportViewer.msi).
To view different update reports in the WSUS console, you must install the optional Microsoft Report Viewer 2008 SP1 Redistributable (or higher) components on your server.
If these components are not installed, then when generating any WSUS report, an error will appear:
The Microsoft Report Viewer 2012 Redistributable is required for this feature. Please close the console before installing this package.
Optimizing WSUS Performance
This section describes a few tips for optimizing the performance of the WSUS Update Server in a real-world environment.
- For WSUS to work properly, the update host must have at least 4 GB of RAM and 2CPU free;
- With a large number of WSUS clients (more than 1500), you may experience significant performance degradation of the IIS WsusPoll pool that distributes updates to clients. Error 0x80244022 may appear on clients, or when starting the WSUS console, it may crash with an error Error: Unexpected Error + Event ID 7053 in the Event Viewer (
The WSUS administration console has encountered an unexpected error. This may be a transient error; try restarting the administration console. If this error persists). To resolve this issue, you need to add more RAM to your WSUS host and optimize your IIS pool settings as recommended in the article. Use these PowerShell commands:
Import-Module WebAdministration

Set-ItemProperty -Path IIS:AppPoolsWsusPool -Name queueLength -Value 2500

Set-ItemProperty -Path IIS:AppPoolsWsusPool -Name cpu.resetInterval -Value "00.00:15:00"

Set-ItemProperty -Path IIS:AppPoolsWsusPool -Name recycling.periodicRestart.privateMemory -Value 0

Set-ItemProperty -Path IIS:AppPoolsWsusPool -Name failure.loadBalancerCapabilities -Value "TcpLevel" - Enable automatic approval for Microsoft antivirus signature/definition updates. Otherwise, WSUS can slow down significantly and consume all available RAM.
 To resolve this issue, you need to add more RAM to your WSUS host and optimize your IIS pool settings as recommended in the article. Use these PowerShell commands:
Antivirus checks can negatively impact WSUS performance. In the built-in Microsoft Defender Antivirus in Windows Server, it is recommended to exclude the following folders from the Real-time protection scope:
- WSUSWSUSContent;
- %windir%widdata;
- SoftwareDistributionDownload.
Stay tuned!