I’m using XAMPP, and I can start Apache, but, MySQL (phpMyAdmin) start!
When I start, I get this error;
10:07:49 [Apache] Error: Apache shutdown unexpectedly.
10:07:49 [Apache] This may be due to a blocked port, missing dependencies,
10:07:49 [Apache] improper privileges, a crash, or a shutdown by another method.
10:07:49 [Apache] Press the Logs button to view error logs and check
10:07:49 [Apache] the Windows Event Viewer for more clues
10:07:49 [Apache] If you need more help, copy and post this
10:07:49 [Apache] entire log window on the forums
I search on it, and, change the port of Apache in Config -> Service and Port setting. I have;
Service name: Apache 2.4
Main port: 122
SSL port: 444
I also uninstall Skype (Windows 8/10/Metro version). Nothing is working. In the httpd.conf file I have;
Listen 122
ServerName localhost:122
I start it via apache_start.bat and get;
(OS 10013)An attempt was made to access a socket in a way forbidden by its access permissions.  : AH00072: make_sock: could not bind to address [::]:445
(OS 10013)An attempt was made to access a socket in a way forbidden by its access permissions.  : AH00072: make_sock: could not bind to address 0.0.0.0:445
AH00451: no listening sockets available, shutting down
AH00015: Unable to open logs
Please note that all the log files don’t exists!
Skype is uninstalled.
После установки панели управления XAMPP в Windows 10 многие пользователи сообщали об ошибке при запуске. Apache. Эта проблема обычно возникает, когда такой процесс, как World Wide Publishing Service, продолжает работать в порту 80 вашего устройства. Из-за этого операционная система Windows 10 не позволяет серверу Apache работать, что вызывает ошибку.
5:38:38 PM  [Apache]    Error: Apache shutdown unexpectedly.
5:38:38 PM  [Apache]    This may be due to a blocked port, missing dependencies,
5:38:38 PM  [Apache]    improper privileges, a crash, or a shutdown by another method.
5:38:38 PM  [Apache]    Press the Logs button to view error logs and check
5:38:38 PM  [Apache]    the Windows Event Viewer for more clues
5:38:38 PM  [Apache]    If you need more help, copy and post this
5:38:38 PM  [Apache]    entire log window on the forums
Фактически, порт 80 на компьютере также использовался в качестве порта TCP / IP по умолчанию, который модуль Apache использует на XAMPP. А поскольку два разных приложения не могут использовать один и тот же сетевой порт, вам необходимо остановить его перед запуском сервера Apache XAMPP. Если вы также столкнулись с этой проблемой на своем устройстве, есть несколько простых обходных путей, которые я упомянул в этом руководстве. Итак, приступим.
Очистка службы публикации в Интернете — лучший способ снова запустить Apache. Однако вы также можете получить его, изменив номер порта TCP / IP или остановив службу, если это необходимо. Итак, чтобы исправить, что Apache не запускается на панели управления XAMPP, выполните все возможные методы:
- Очистить службы World Wide Web
- Измените порт TCP / IP Apache по умолчанию
- Остановить службу публикации в Интернете
Давайте посмотрим на них подробнее.
1]Очистить службы World Wide Web
Чтобы решить проблему запуска службы Apache, вам необходимо очистить всемирные веб-службы со своего устройства. Но перед началом убедитесь, что у вас нет приложения, использующего эту службу.
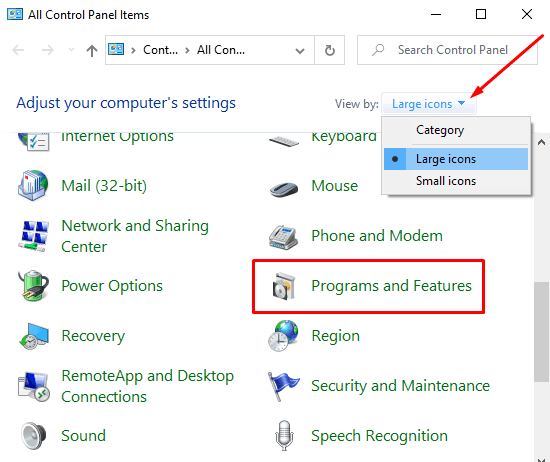
Если все в порядке, откройте панель управления в системе Windows.
Когда он откроется, выберите, чтобы просмотреть панель управления в любом Большие иконки или же Маленькие значки вариант, чтобы вы могли видеть все элементы панели управления.
Из доступных элементов выберите Программы и особенности вариант.
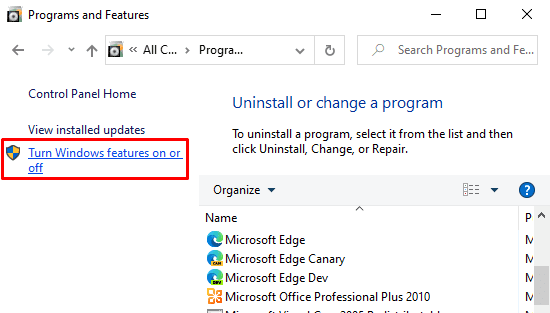
На левой боковой панели есть ссылка под названием Включение и отключение функций Windows, нажмите здесь.
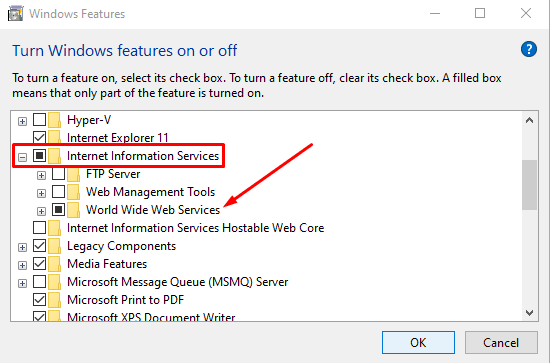
В диалоговом окне «Возможности Windows» разверните Информационные службы Интернета поле.
Теперь снимите флажок относительно Сервисы всемирной паутины а затем нажмите на Ok кнопку, чтобы сохранить изменения.
Выполнив вышеуказанные шаги, перезагрузите устройство. После этого откройте панель управления XAMPP и нажмите кнопку «Пуск» в Apache. Теперь он должен работать через порт 80 на вашем компьютере.
2]Измените порт TCP / IP Apache по умолчанию.
Если по какой-либо причине описанный выше метод не работает для вас, вам необходимо настроить Apache для выполнения на другом порту TCP / IP. Итак, следуйте этим советам:
Откройте панель управления XAMPP на вашем устройстве Windows.
Нажать на Конфиг кнопка модуля Apache.
Выбирать Apache (httpd.conf) вариант из списка всплывающего меню.
На следующей странице блокнота вам нужно найти Слушай 80.
Чтобы упростить поиск, нажмите сочетание клавиш Ctrl + F. Во всплывающем меню введите то, что вы хотите найти. отметка Обернуть вокруг флажок, оставить Учитывать регистр не отмечен, а затем нажмите на Найти следующий кнопка.
Как только вы найдете соответствующую строку, измените номер порта на любое произвольное число по вашему выбору.
Например, вы можете попробовать порт 121. Тогда соответствующий результат для номера порта TCP / IP будет примерно таким: Слушайте 121.
Нажмите сочетание клавиш Ctrl + S, чтобы сохранить изменения в Блокноте.
Примечание: Обратите внимание, что при использовании этой конфигурации вам всегда нужно добавлять номер порта TCP / IP к URL-адресу, который вы хотите подключить к своему сайту. Например, чтобы получить доступ к серверу Apache в вашем браузере, вам нужно будет ввести: localhost: 121 / панель управления скорее, чем локальный хост / панель управления.
После правильного выполнения вышеуказанных шагов проблема запуска Apache в XAMPP будет исправлена.
3]Остановить службу публикации в Интернете
В качестве альтернативы вам нужно остановить службу публикации в Интернете и изменить ее настройки, чтобы службу можно было запускать только вручную. Итак, приступим:
Чтобы остановить службу публикации в Интернете, сначала необходимо открыть диспетчер служб Windows на компьютере с Windows 10.
На экране «Службы» найдите Служба публикации в Интернете вариант под Имя столбец.
Когда найдете, дважды щелкните по нему, чтобы открыть окно свойств.
В окне свойств по умолчанию открывается вкладка Общие.
На вкладке Общие найдите Тип запуска и переключите его на Руководство. Это позволит вам запускать службу вручную, когда это необходимо.
Двигаясь вперед, остановите статус работающей службы и нажмите Подать заявление > Ok кнопка.
Теперь откройте панель управления XAMPP и нажмите на Начинать кнопку для запуска сервера Apache.
Вот и все. Я надеюсь, что это руководство поможет вам решить проблему запуска службы Apache на панели управления XAMPP.
After installing the XAMPP Control Panel on Windows, many users reported encountering an error while starting Apache. This issue commonly occurs when a process like World Wide Publishing Service keeps running in the 80 port of your device. Due to this, the Windows 11/10 operating system does not allow the Apache server to execute, and that way it causes the error.
5:38:38 PM  [Apache]    Error: Apache shutdown unexpectedly.
5:38:38 PM  [Apache]    This may be due to a blocked port, missing dependencies,
5:38:38 PM  [Apache]    improper privileges, a crash, or a shutdown by another method.
5:38:38 PM  [Apache]    Press the Logs button to view error logs and check
5:38:38 PM  [Apache]    the Windows Event Viewer for more clues
5:38:38 PM  [Apache]    If you need more help, copy and post this
5:38:38 PM  [Apache]    entire log window on the forums
Actually, Port 80 on a computer also used to be the default TCP/IP port that Apaches module uses on XAMPP. And since two different applications can’t use the same networking port, therefore you must have to stop it before starting the XAMPP’s Apache server. If you’re also experiencing this issue on your device, there are a few easy workarounds that I have mentioned in this guide. So, let’s get started.
Clearing the World Wide Web Publishing Service would be the best approach to make start the Apache again. However, you can also get it by changing the TCP/IP port number or by stopping the service if needed. So, to fix Apache not starting on XAMPP Control Panel, follow these all possible methods:
- Clear World Wide Web Services
- Change the default Apache TCP/IP port
- Stop World Wide Web Publishing Service
Let us see them in detail.
1] Clear World Wide Web Services
In order to solve the starting problem of the Apache service, you must have to clear the world Wide Web Services from your device. But before begin, ensure that you don’t have any app relying on this service.
If everything seems to be okay, open the Control Panel on your Windows system.
Once it opens, select to view the Control Panel in either Large icons or Small icons option, so that you could see all the Control Panel items.
From the available items, select Programs and Features option.
In the left sidebar, there is a link named Turn Windows features on or off, click on it.
In the Windows Features dialog box, expand the Internet Information Services field.
Now, clear the checkbox regarding World Wide Web Services and then click on the OK button to save the changes.
Once you complete the above steps, reboot your device. After that, open the XAMPP Control Panel and click on the Start button on Apache. It should now run in port 80 on your computer.
2] Change the default Apache TCP/IP port
If due to any reason, the above method workaround doesn’t work for you, you need to configure Apache to execute on a different TCP/IP port. So, follow these suggestions:
Open the XAMPP Control Panel on your Windows device.
Click on the Config button of the Apache module.
Select Apache (httpd.conf) option from the list of the pop-up menu.

On the following notepad page, you need to find Listen 80.
To make the search easy, press the Ctrl+F shortcut key. In the pop-up menu, type what you want to search. Mark Wrap around checkbox, leave Match case unchecked, and then click on the Find Next button.
Once you find the respective line, change the port number with any arbitrary number of your choice.
For example, you can try port 121. Then the corresponding result for TCP/IP port number would be something like – Listen 121.
Press Ctrl+S shortcut key to save the changes in the Notepad.
Note: Please note that while using this configuration, you always need to append the TCP/IP port number on the URL you want to connect to your site. For instance, to access the Apache server on your browser, you will need to enter: localhost:121/dashboard rather than localhost/dashboard.
After performing the above steps properly, the starting problem of the Apache in XAMPP would be fixed.
3] Stop World Wide Web Publishing Service
In an alternative way, you need to stop the World Wide Web Publishing Service and change its settings so that the service can only be started manually. So, let’s get started:
In order to stop the World Wide Web Publishing Service, you first need to open Windows Services Manager on your Windows 10 PC.
On the Services screen, search for the World Wide Web Publishing Service option under the Name column.
Once you find, double-click on it to open the properties window.
In the properties window, the General tab opens by default.
On the General tab, locate Startup Type and switch it to Manual. This will let you start the service manually when it is required.
Moving ahead, stop the service running status and click on Apply > OK button.
Now, open the XAMPP Control Panel and click on the Start button to run the Apache server.
That’s it. I hope this guide would help you to fix the starting problem of the Apache service on the XAMPP Control Panel.
XAMPP is a helpful development tool. However, you may run into problems at some point, such as receiving the notification: “Apache shutdown unexpectedly”. This error might seem to come out of nowhere, so identifying the cause – let alone the solution – can be puzzling.
Fortunately, there is a common explanation for Apache’s sudden shutdown. With a few simple modifications, you should be able to fix the problem and get Apache up and running again. All you have to do is update some settings in the configuration files.
In this article, we’ll discuss the common cause of this Apache error in XAMPP and then walk you through four steps to fix it, both on Windows and macOS.
Let’s get started!
An Introduction to the XAMPP “Apache Shutdown Unexpectedly” Error
XAMPP is a free, open source server stack that includes the Apache server and MariaDB database:

It runs PHP and Perl scripts, and is used to develop and test dynamic websites on local machines. This means that if you are building a website, you can install WordPress locally on your computer. You can use XAMPP without having to upload your site’s files to your web hosting service.
If you’re reading this article, we’ll assume you’re already at least somewhat familiar with XAMPP. However, what may be new to you is the “Apache shutdown unexpectedly” error you’re seeing.
This message is most commonly caused by a blocked port. Usually, it means that another application installed on your computer, such as Skype, is using the same port as XAMPP. Additionally, you may notice that the error message indicates the problem may also be attributed to “missing dependencies, improper privileges, a crash, or a shutdown by another method.”
In any event, the easiest fix is to simply modify the XAMPP default settings. However, the method for resolving the error varies slightly between Windows and macOS. Also, the interface may look a bit different depending on the XAMPP version you’re using. We will provide instructions for both operating systems below, starting with Windows.
How to Fix the XAMPP Error “Apache Shutdown Unexpectedly” in Windows
If you’re using a Windows device, you can follow these four steps to update your default port settings in XAMPP.
Step 1: Open the Configuration Settings from the XAMPP Control Panel
The first step is, of course, to launch XAMPP. This will open the XAMPP control panel. From here, you can update the configuration settings for the server stack.
Since this error is related to Apache, we’ll focus on those settings. In the “Apache” row of options, click on the Config button.
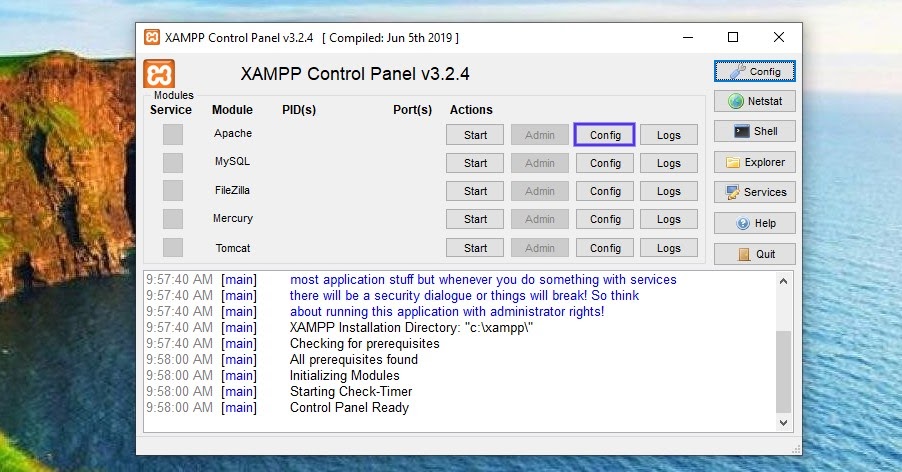
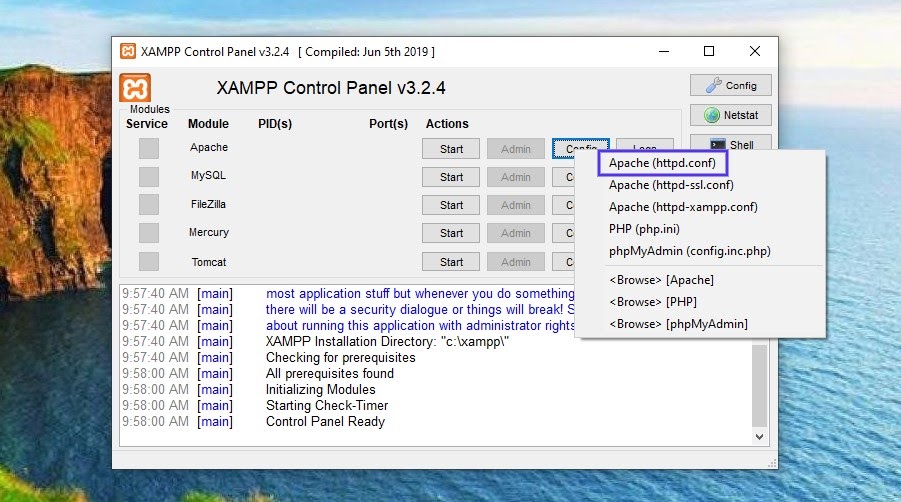
This will open a drop-down menu of files. We’re going to be editing two of these files, starting with httpd.conf.
Step 2: Change the Default Port Settings of the httpd.conf File
From the menu of files, click on Apache (httpd.conf). Once you do, the file will open in your computer’s default text editor:
Within this file, there are three settings you’ll want to update. To get started, press Ctrl + F, then enter “80” in the search field:
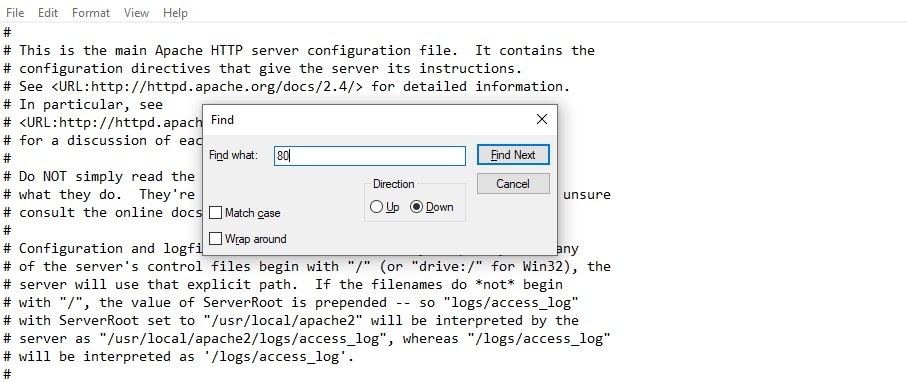
This will display all instances of the number 80 in the file. Locate “Port 80” and change it to “Port 8080”. Once the port setting is updated, search for “Listen 80” and update it to “Listen 8080”.
Finally, search for “servername localhost:80”. Once you find it, modify it to “servername localhost:8080”. When you’re finished, save and close the file.
Step 3: Update the Default Port Settings in the http-ssl.conf File
Now it’s time to move on to the second file. To do so, you can return to the XAMPP control panel, then select Config under the Apache settings again. This time, open the Apache (http-ssl.conf) file.
When the file opens in your text editor, press Ctrl + F, and then enter 443 in the search field. Locate “Listen 443” and update this to “Listen 4433”.
Next, search the file for the next instance of “443”. It should be “<VirtualHost _default_:443>”. Once you find it, you can go ahead and change it to “<VirtualHost _default_:4433>”. When you’re finished, remember to save and close the file.
Step 4: Restart Apache
Once you’ve updated the settings in both files, the final step is to stop Apache. You can do this by clicking on the Stop button along the same Apache row. After Apache has been stopped, click the Start button to complete the restart process.
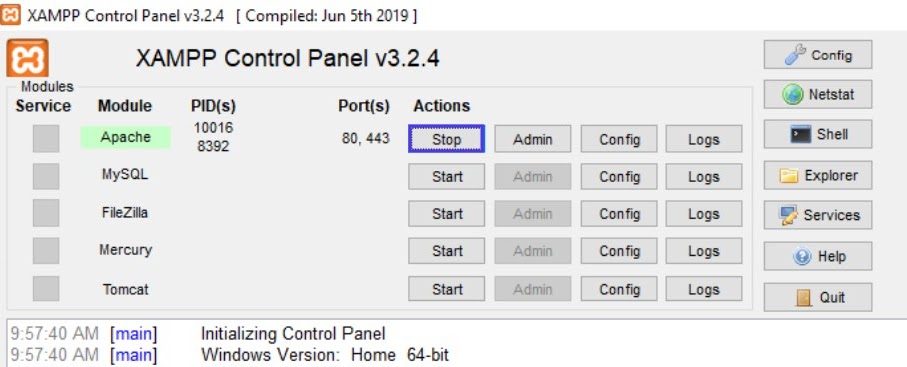
That’s it! Your port numbers will be updated and Apache should now run without error.
How to Fix the XAMPP Error “Apache Shutdown Unexpectedly” in macOS
Depending on what version of macOS you’re running, you may already have Apache installed on your computer. This default application of Apache will use the same default port settings as the Apache server in XAMPP, so this may be the cause of the “Apache shutdown unexpectedly” error.
If you’re using macOS, you can follow these four steps to update the default port settings.
Step 1: Open the XAMPP Apache Configuration
To start, open the XAMPP Application Manager if you haven’t already done so:

Next, select the Manage Servers tab next to the Welcome tab at the top:

On this screen, you’ll find a list of options. You can click on Apache Web Server, followed by the Configure button.
Step 2: Open the Conf File
From the Configure Apache Web Server box, select Open Conf File:

A warning box will appear, stating that the file is for advanced users:

You can click on Yes to continue. This will open the httpd.conf file.
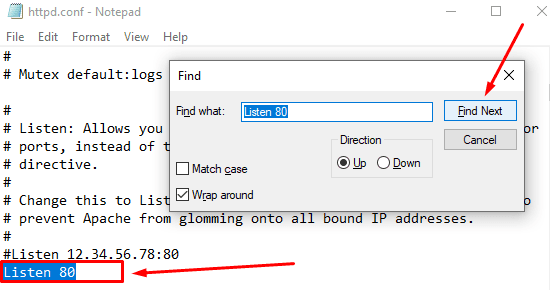
Step 3: Update the Port Settings
Once the file opens in your text editor, the next step is to update the port settings. To do so, you can hit Ctrl + F, and then enter “80” in the search field. This will display instances of the number 80:

Locate the these lines:
#Listen 12.34.56.78:80
Listen 80
Once you do, go ahead and change them to the following:
#Listen 12.34.56.78:8080
Listen 8080
When you’re done, you can save and close the file. In the Configure Apache Web Server box, click on OK.
Step 4: Restart Apache
The final step is to stop and restart Apache, which you can do from the XAMPP Application Manager’s Manage Servers tab. Once Apache is stopped, click on Start to restart:

That’s it! Your port numbers will be updated and Apache should now run without error.
Summary
The XAMPP error “Apache shutdown unexpectedly” is commonly caused by another program, such as Skype, using the default Apache port. While this can be frustrating, it usually has a simple resolution.
As we discussed in this article, the easiest way to fix this problem is to update XAMPP’s Apache configuration settings. You can do this by editing the httpd.conf file and the http-ssl.conf file (for Windows users). Once this is done, you should stop and restart Apache to resume normal operation.
Get all your applications, databases and WordPress sites online and under one roof. Our feature-packed, high-performance cloud platform includes:
- Easy setup and management in the MyKinsta dashboard
- 24/7 expert support
- The best Google Cloud Platform hardware and network, powered by Kubernetes for maximum scalability
- An enterprise-level Cloudflare integration for speed and security
- Global audience reach with up to 35 data centers and 275+ PoPs worldwide
Test it yourself with $20 off your first month of Application Hosting or Database Hosting. Explore our plans or talk to sales to find your best fit.