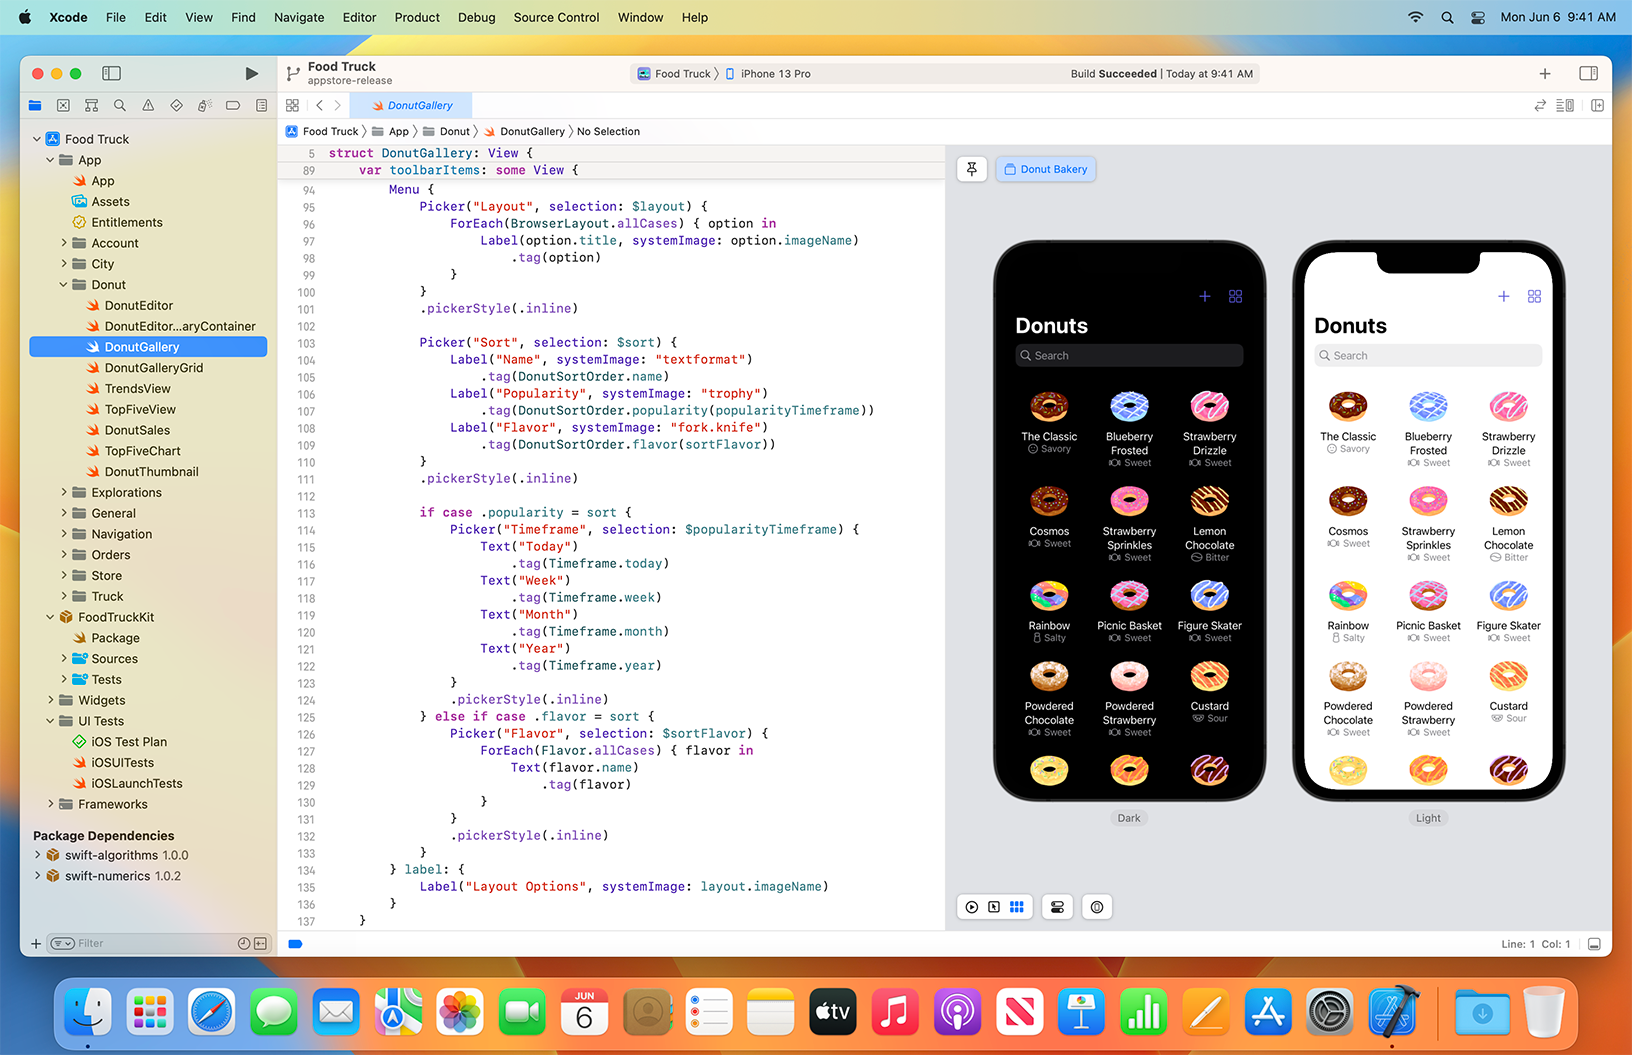
Xcode 14 includes everything you need to develop, test, and distribute apps across all Apple platforms. Leverage the simplicity and power of Swift and SwiftUI with a new multiplatform app experience, code faster with enhanced editor features, and start testing and deploying from Xcode Cloud to TestFlight and the App Store. Creating amazing apps has never been easier.
Lighter. Faster.
Xcode 14 lets you get started faster than ever with a binary that’s 30% smaller than before. Now with downloadable simulator runtimes for watchOS and tvOS, Xcode makes the latest platforms available as you need them.
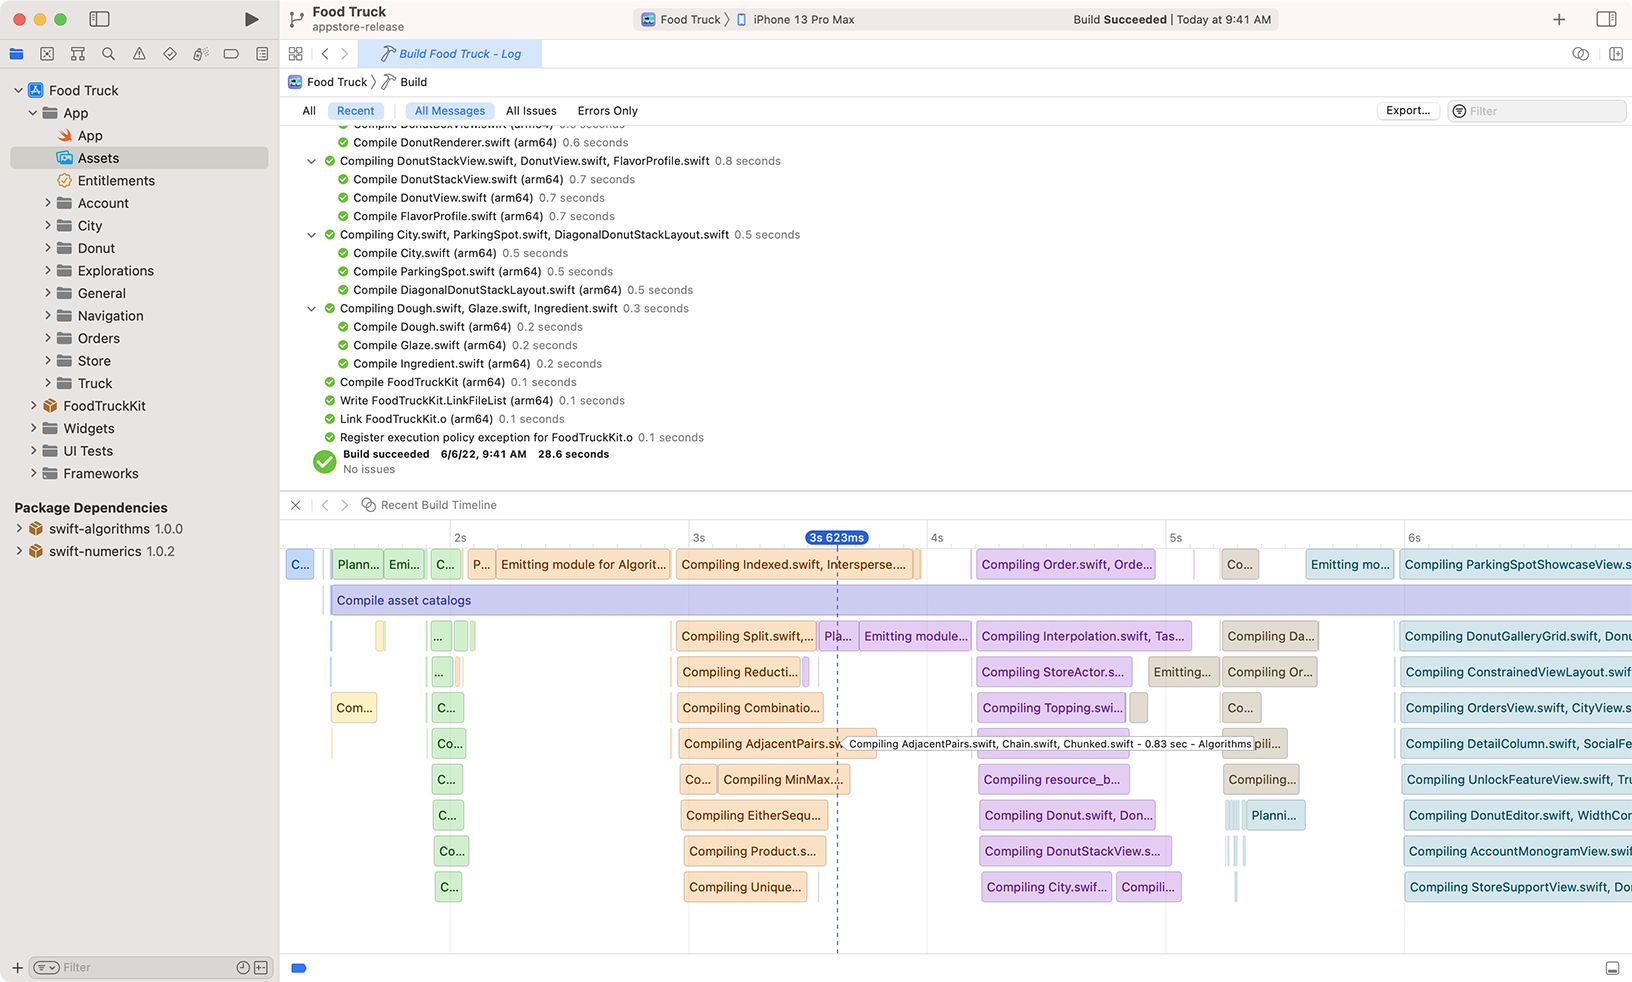
Projects build up to 25% faster thanks to improved parallelism in all build and link phases.
And the new Build Timeline helps identify unexpectedly long-running build tasks and bottlenecks in your build.
Designed for multiplatform
The new multiplatform target creates a single SwiftUI interface for use across iOS, iPadOS, macOS, and tvOS. Your code is easier to maintain, and ready to be customized to take advantage of each platform’s unique capabilities.
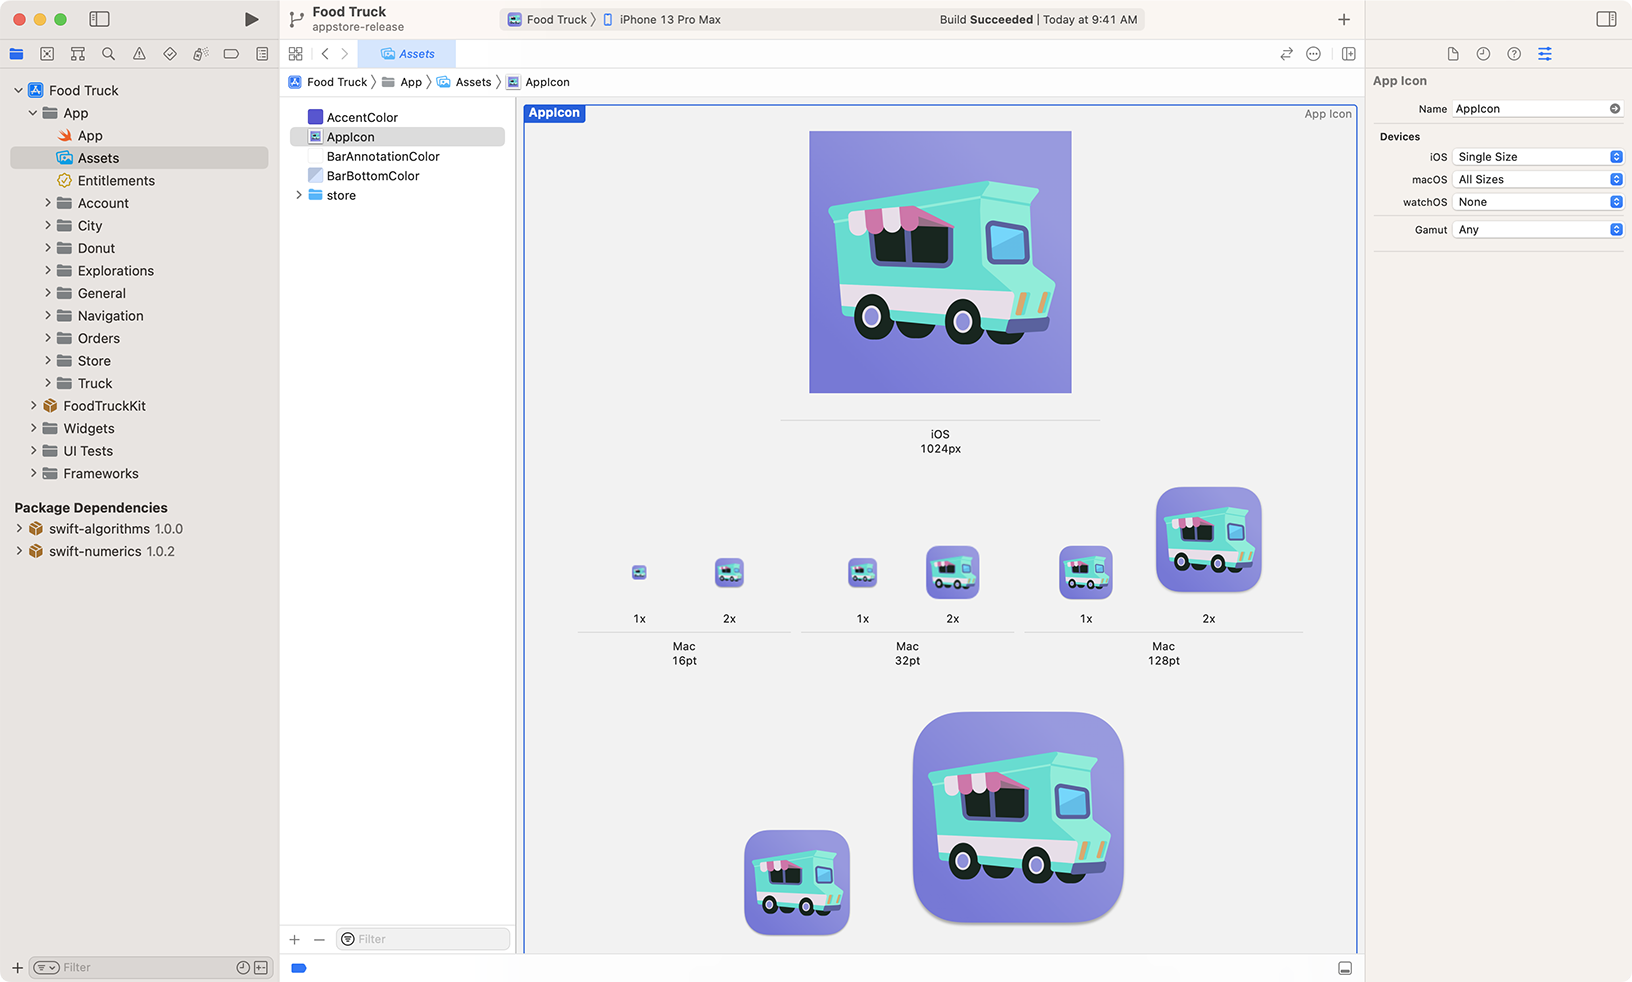
With the redesigned App Icon experience in Asset Catalogs, you can provide a single icon size for all platforms and Xcode will generate all the rest.
Productive coding
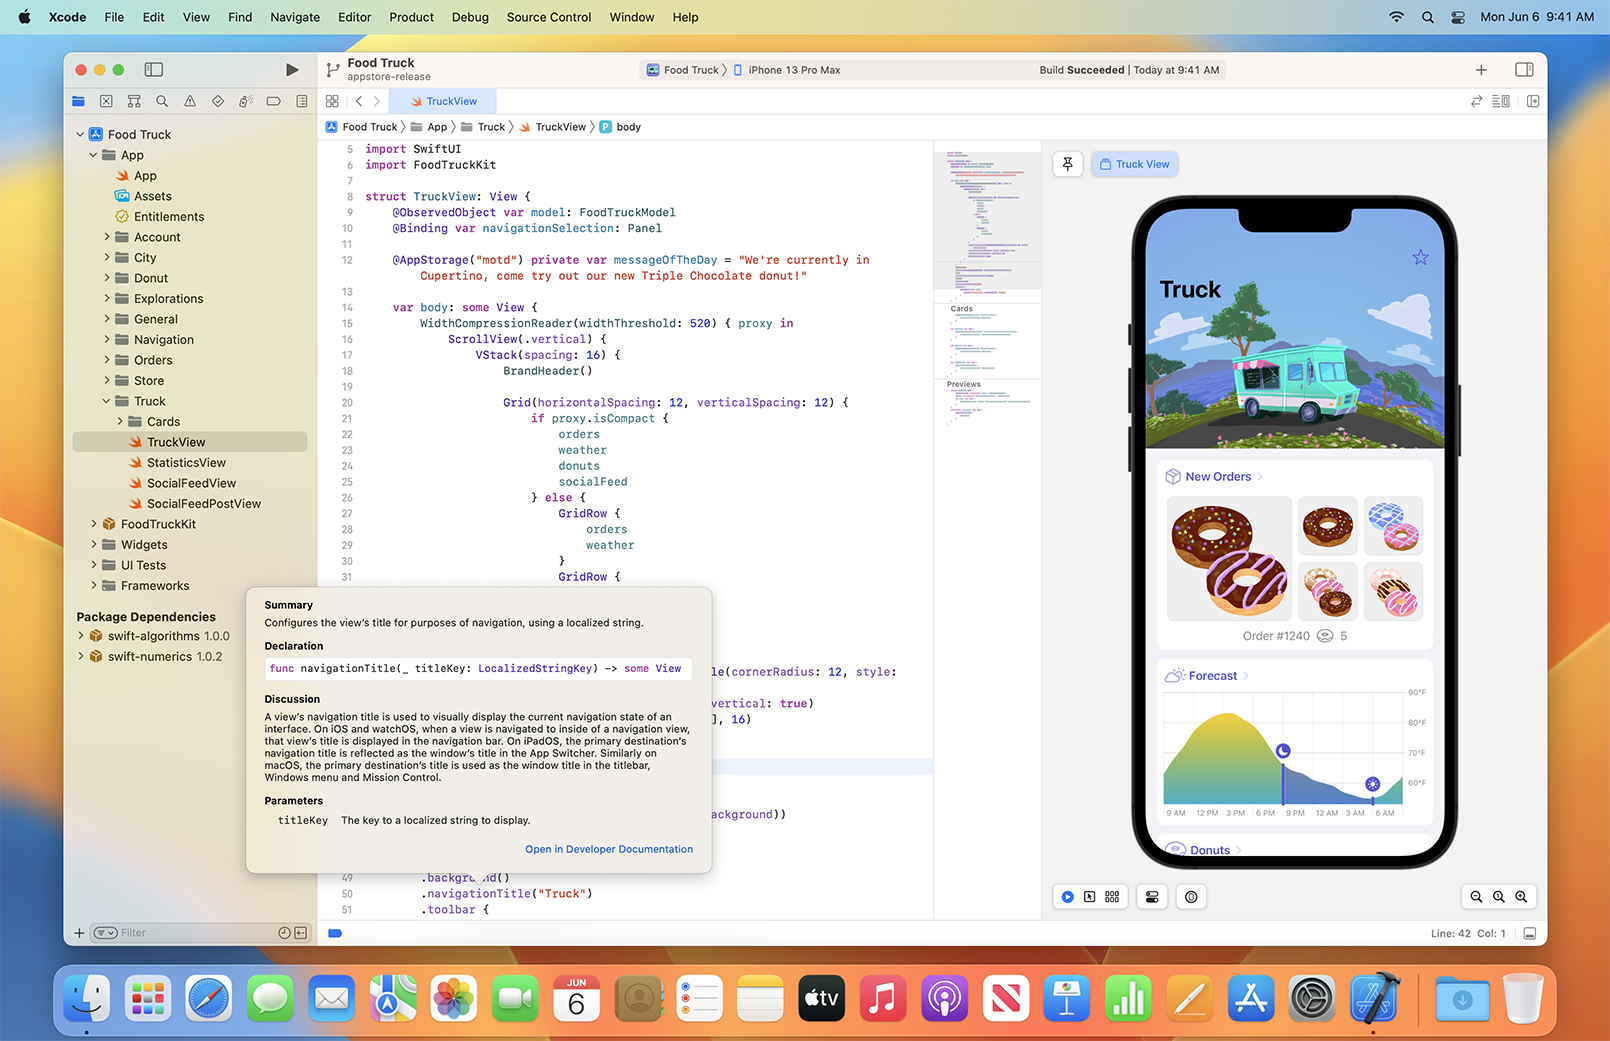
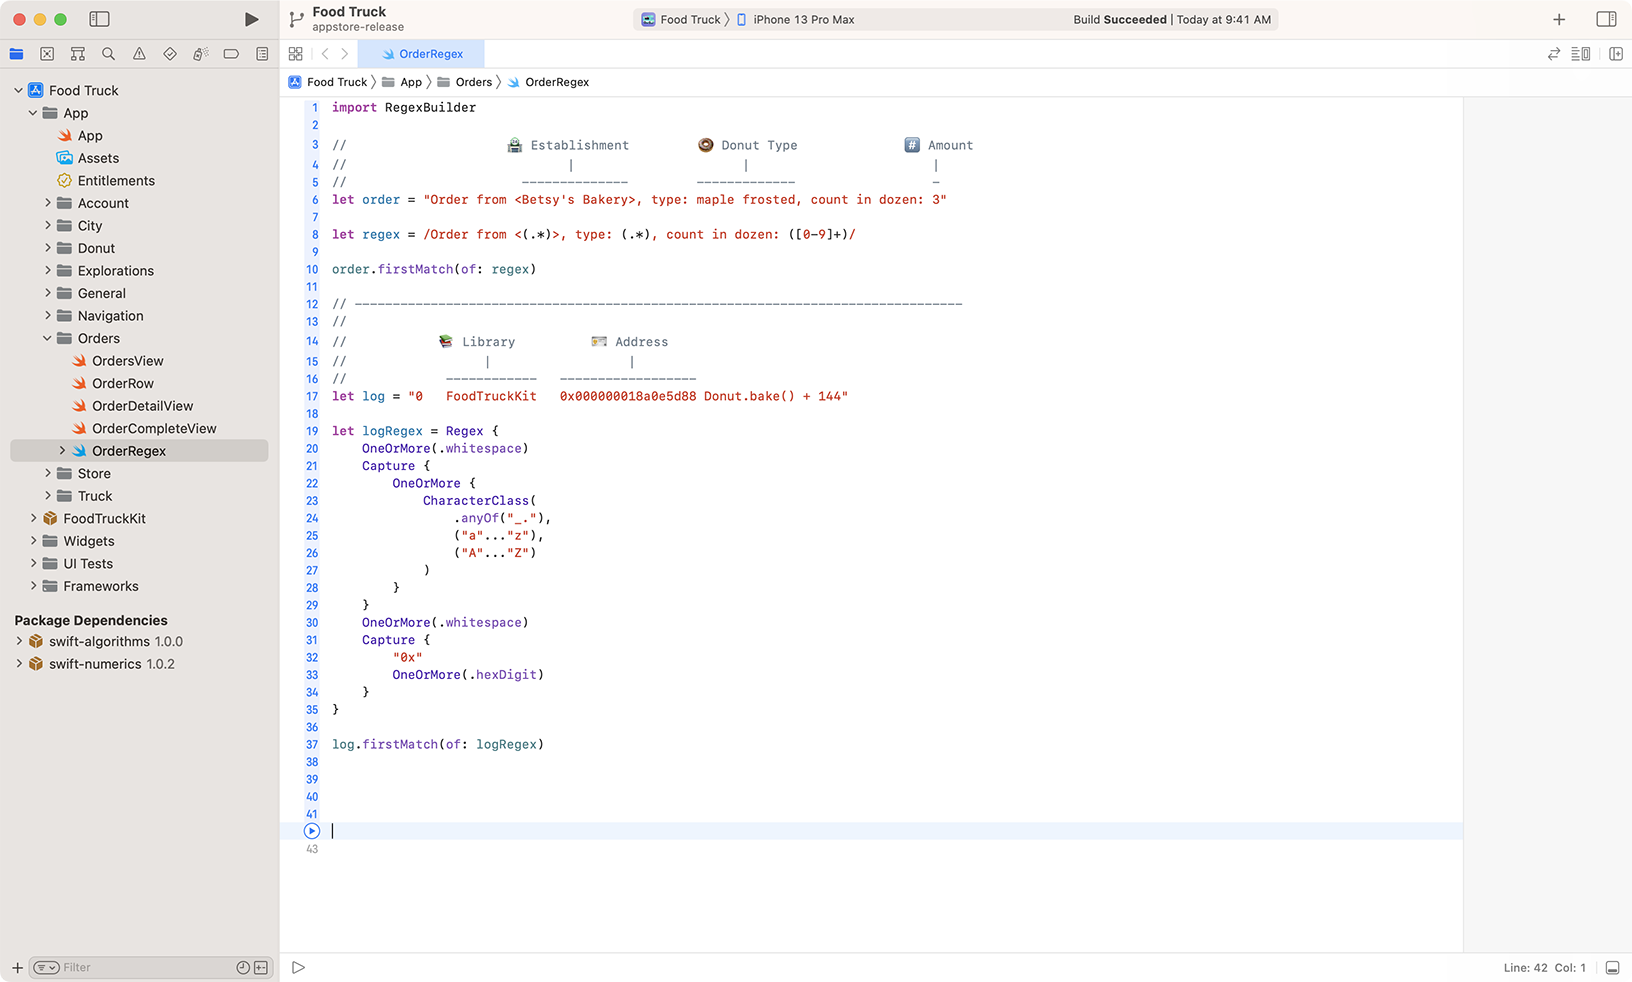
Be more productive than ever with many language and editing improvements. Smarter code completion and additional dynamic snippets will get you the code you want more quickly. While you scroll, code structure (like function declarations) stays visible so you always know where you are. And regular expressions in Swift are integrated with syntax highlighting, refactoring operations, and more.
Swift, SwiftUI, Swift Package
Swift, SwiftUI, and Xcode 14 work together as one. SwiftUI previews are immediately interactive, and UI variations, such as light and dark appearances, are just a click away. The new template for Instruments makes it easy to debug and optimize usage of distributed actors and other Swift concurrency features. And with build and command package plug-ins, you can customize Xcode and your build process like never before.
Learn more about Swift
Learn more about SwiftUI
![]()
Xcode Cloud
Xcode Cloud is now available for all Apple Developer Program members. Xcode Cloud is a continuous integration and delivery service built into Xcode and designed expressly for Apple developers. Start building your app in just a few minutes, monitor build status and reports, and distribute automatically to your testers and users. The Feedback organizer helps you review metrics, crashes, and user feedback, and now includes screenshots.
Learn more
![]()
Get started
Download Xcode and use these resources to build apps for all Apple platforms.
Download Xcode
Tools, documentation, tutorials, videos, and more.
Download Xcode
This version includes the SDKs for iOS 16, iPadOS 16, macOS Monterey 12.3, tvOS 16, and watchOS 9.
View on the Mac App Store
Xcode beta
Access the beta version of Xcode (when available) to take advantage of new features. To view downloads, simply sign in with your Apple ID. Apple Developer Program membership isn’t required.
View downloads
Additional downloads
Get command line tools and older versions of Xcode. To view downloads, simply sign in with your Apple ID. Apple Developer Program membership isn’t required.
View additional downloads
Documentation and videos
API reference and sample code
Browse the latest documentation, including API reference, articles, and sample code.
View documentation
Videos
Learn about the latest advances and features in Xcode through presentations by Apple engineers.
Watch videos
Forums
Ask questions and discuss development topics with Apple engineers and other developers.
Visit the forums
Support
Learn about minimum requirements, submitting apps to the App Store, and more.
View support page
Tutorials
Exploring SwiftUI Sample Apps
Explore these SwiftUI samples using Swift Playgrounds on iPad or in Xcode to learn about defining user interfaces, responding to user interactions, and managing data flow.
Start tutorial

Develop Apps for iOS
12hr 25min Estimated Time
Get started using Xcode and the developer tools needed to build an app. Learn the basics of Xcode, SwiftUI, and UIKit to create apps for iOS.
Start tutorial

Introducing SwiftUI
SwiftUI is a modern way to declare user interfaces for any Apple platform. Create beautiful, dynamic apps faster than ever before.
Start tutorial

Bring an iPad App to the Mac with Mac Catalyst
Build a Mac app from the same codebase as your iPad app.
Start tutorial

Contents
- 1 Xcode – App Development Kit
- 2 Requirements Needed to Install Xcode on Windows 7/8/10 OS
- 3 ✔ Steps to Install Xcode on Windows 10, 8/8.1 and 7 PC or Laptop
- 4 Alternative For Xcode
- 4.1 Summing Up: Xcode For Windows 2023
It’s quite tough if you want to build an ios app but does not have Mac devices!
Xcode for windows is your choice. It is well used by the programmers who want to develop ios apps using windows.
Xcode is an IDE (Integrated Development Environment), designed by Apple that consists of various software tools that are used to create applications for macOS, iOS, watchOS and tvOS.
 This SDK (Software Development Kit) does not work on any of the other operating system except Mac OS X and iOS.
If you want to install Xcode on your Windows PC (7, 8.1 and 10), then you have landed exactly on the right page.
Xcode – App Development Kit
Free Xcode for windows 10 is a testing application and an asset management toolkit or in other words, it is an interface builder which is not supported on windows due to some reasons and compatibility issues.
There is a method of it’s installation using Oracle Virtual Box.
Hence, One can create and develop basic apps on Windows PC by installing this Xcode SDK on your Windows OS.
Give It A Look: How To Use iMessage On PC, Windows Or MAC
Requirements Needed to Install Xcode on Windows 7/8/10 OS
These below are the few system requirements that you must need to follow to install Xcode for windows 7, 8 or 8.1 and 10.
After discussing the requirements we will look into the detailed installation process for sure.
- First you need a working Mac OS X virtual machine on VMware or Virtual Box.
- Then you need Downloaded Xcode package from Apple site. But remember You need to have Apple ID in order to download Xcode from Apple store.
- Dual Core Intel processor
- Minimum 2GB of RAM (Recommended: 4 GB+)
- Hardware Virtualization
Make sure that you have a working Mac OS X virtual machine when you are installing Xcode for windows download free. One need to purchase Apple hardware with OS X and app developer ID if you are a professional app developer.
To Know More, Watch It Now:
Read It: Best Tuneskit DRM Media Converter For Windows
✔ Steps to Install Xcode on Windows 10, 8/8.1 and 7 PC or Laptop
These are the following steps that you need to follow to install xcode on windows virtual box, go through these carefully:
- First of all you have to download and install VMware or VirtualBox on your Windows Pc. If you do not know that from where to download, click on VirtualBox. From here, it can downloaded for free as it is open source.
- Then, the next you have to download and install is OSX Mavericks ISO as a virtual machine.
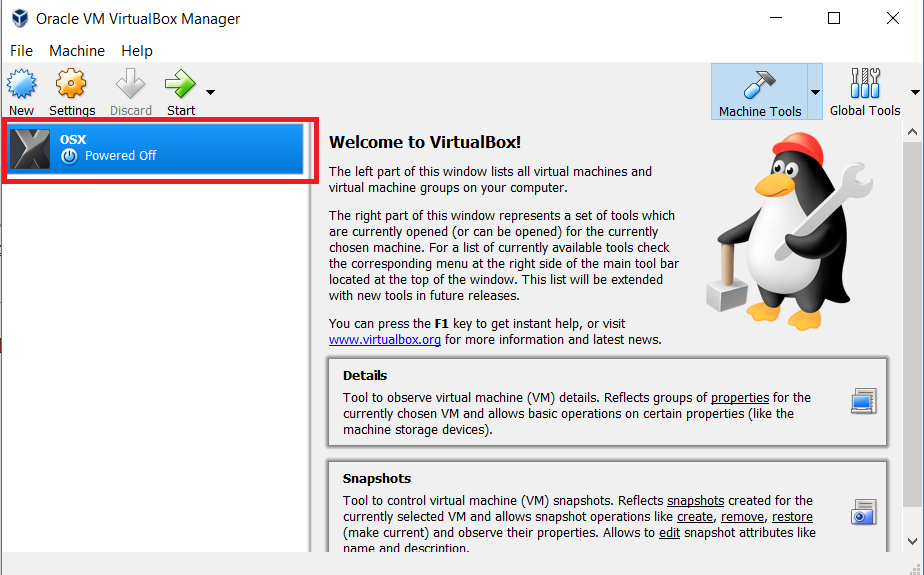
- Now you have to open virtual box and click on New to create the virtual machine on your oracle virtual box.
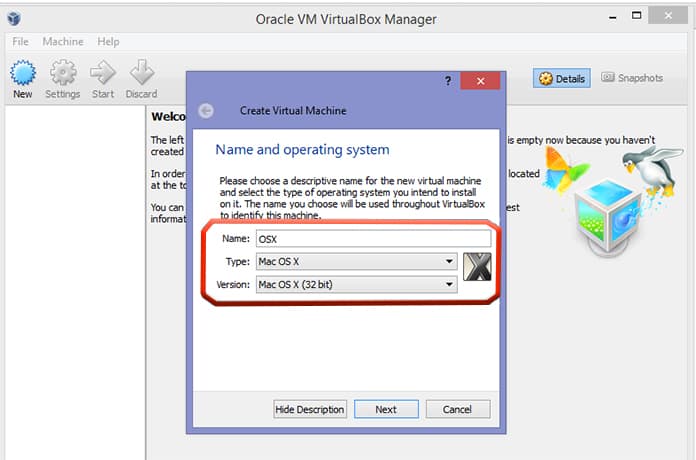
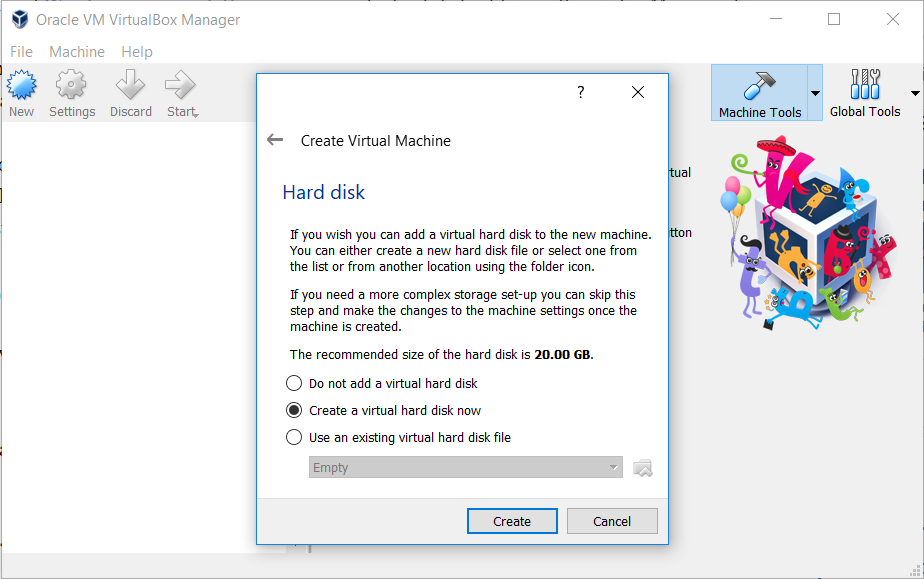
- As soon as you will click on the New button, a new window will open which will ask for new name of operating system. In this, enter Name as OSX, Type of the OS as Mac OS X and also enter the Version as Mac OS X (32 bit) and then hit enter.
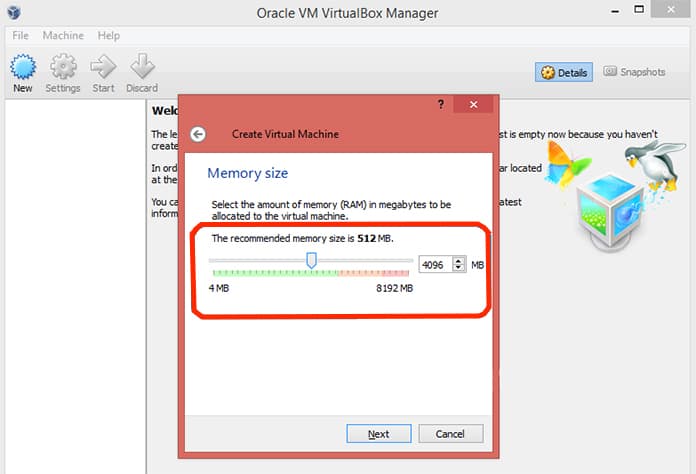
- Now it is needed to select the RAM size for downloading free xcode for windows to the virtual machine. The maximum memory required is 1024 MB (1 GB) for Android to run on your Windows Pc. Select the required size and hit enter.
- Now it’s time to create virtual hard drive file.
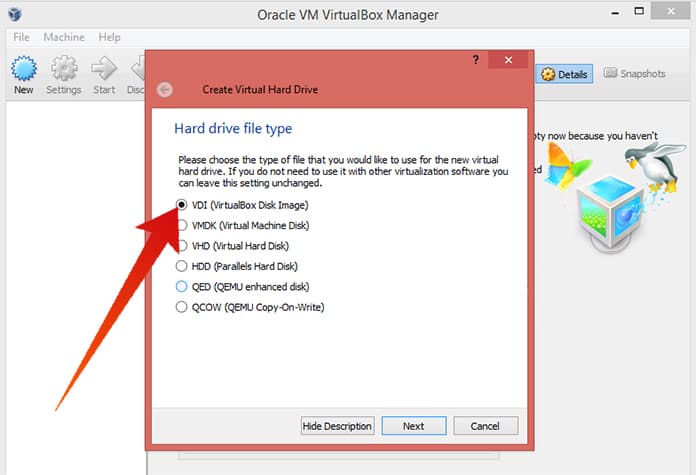
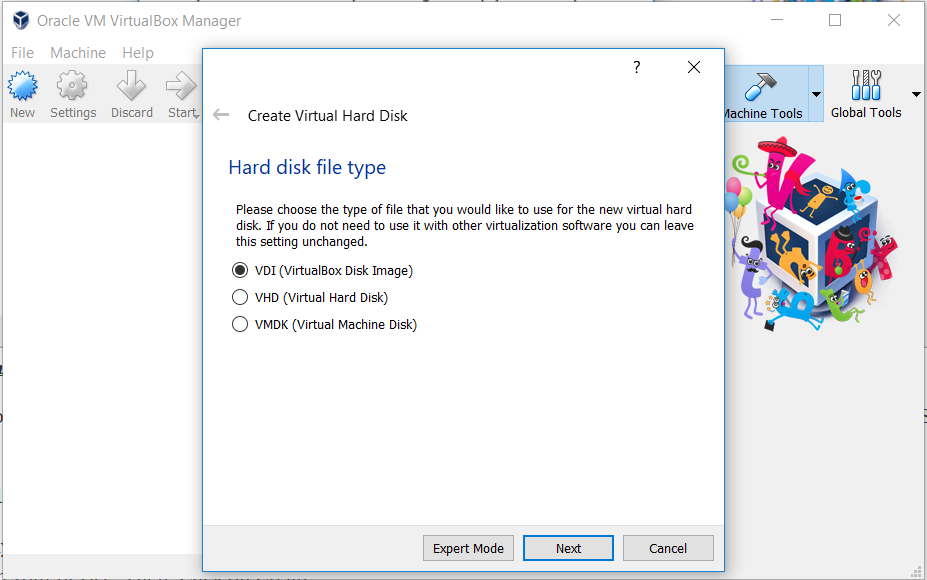
- After it, for selecting Hardware file, always go for VDI (VirtualBox Disk Image) n terms of ISO image. When you are done click next.
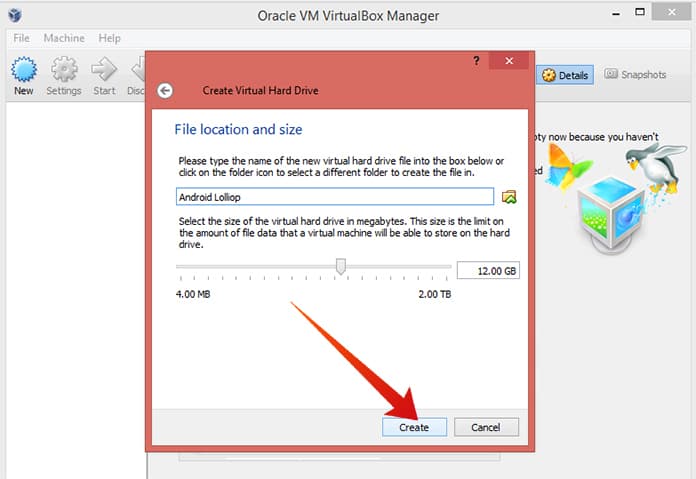
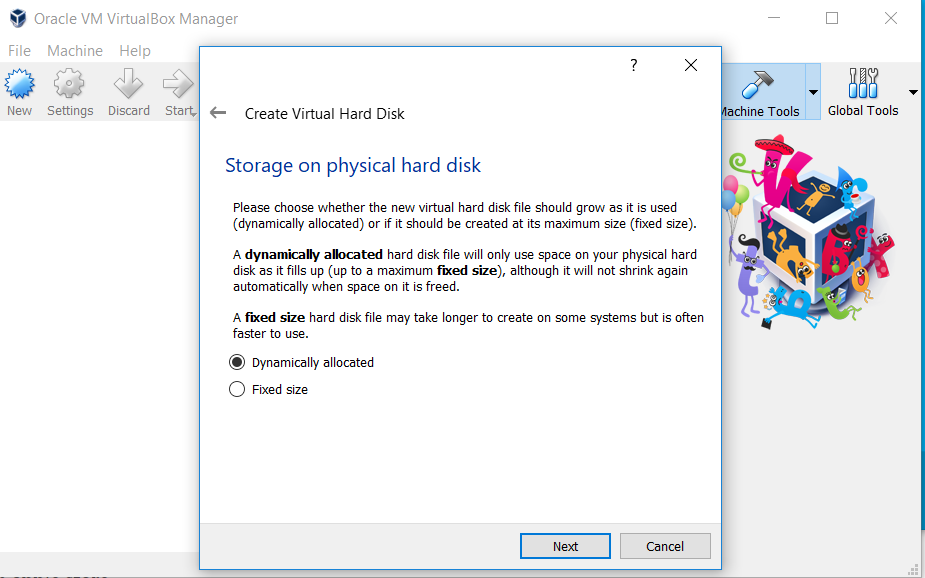
- Choose the physical hard drive as Dynamically allocated. From physical hard drive on your device, allocate the file location as well as android size. Then hit create.
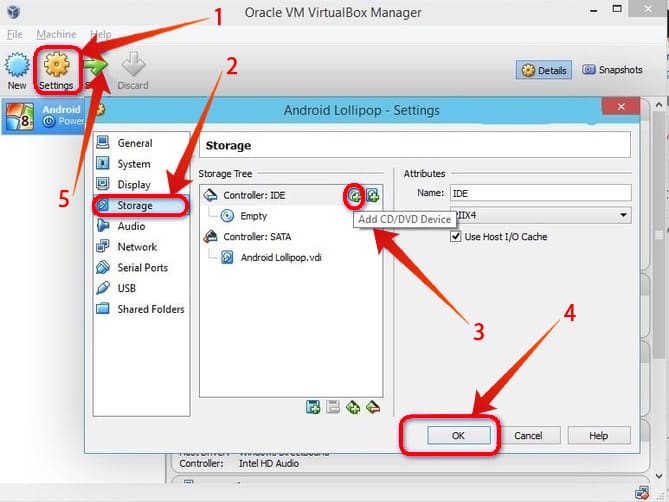
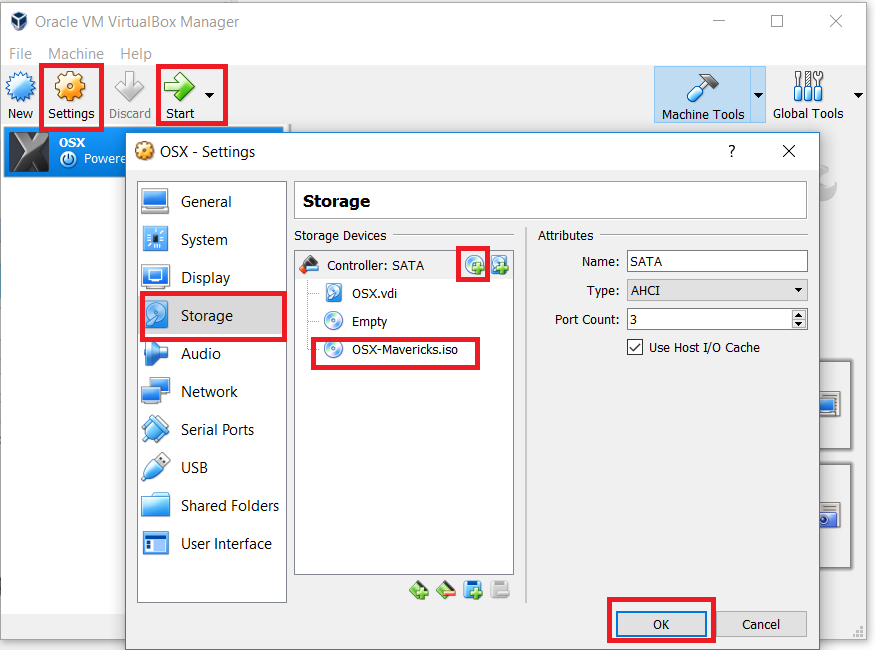
- If you are done correctly with all these steps mentioned, it means you have successfully created virtual machine on your virtual box. Now what is remaining is iso file, that was downloaded previously. For this, Go to Settings >> Storage >> Load iso File >> Click Ok >> Start.
- To install xcode for windows 8.1 download, the next you have to do is follow the on-screen steps of OSX boot as Wizard and then OSX will be installed in Oracle Virtual easily.
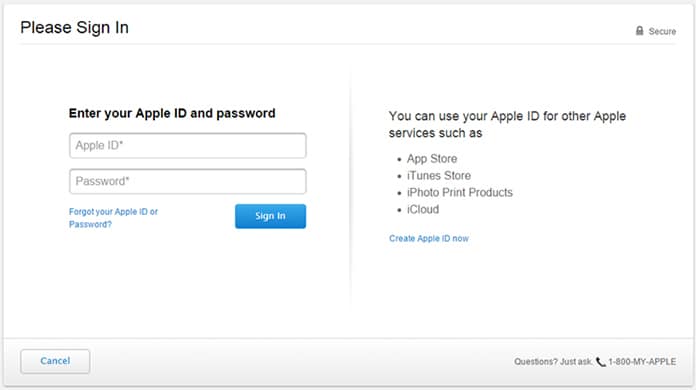
- Now open official Apple App store by opening safari browser by signing into the App store Apple ID and password.
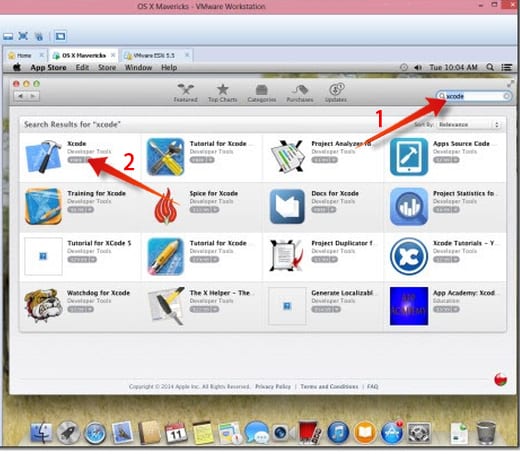
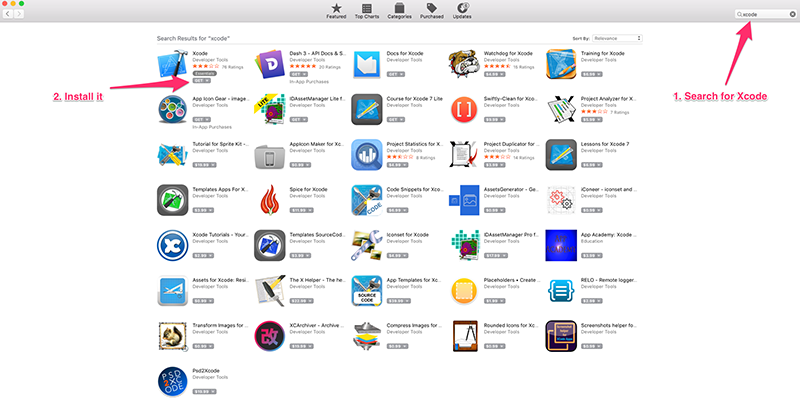
- To get the complete package, type xcode in the search box after signing up. As you hit enter the search option, it will show you various related apps and from these apps select the xcode and click on Free and Download. Then click on OK to download the file.
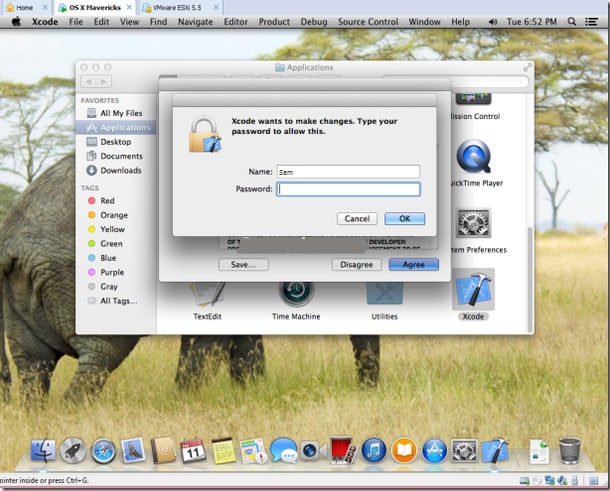
- Now as you finish the installation of it, open it from the applications of the computer and provide your root credential to install Xcode for windows pc components, along with the system settings. Enter your name as well as password and click on OK.
- What’s next? That’s all. You have installed latest Xcode version on your Windows 10, 8/8.1 and 7 PC using desktop virtualization software VMware workstation.
Must Read: Why Easeus Is Best Data Recovery Software For Windows
Now it’s time to look up into the most frequently asked questions about xcode for windows free, keep your pen and paper ready and note down these below discussed queries right away!
Alternative For Xcode
If you wish to learn and develop ios based applications but does not have mac system, then you have a alternative, and that is Swift.
Swift is a programming language which is used to develop iOS, macOS, tvOS and watchOS applications.
You can also use objective c in place of swift, as objective c was used before swift but now swift is highly recommended by all.
Swift is open source programming language and if you want to learn it we recommend, Swift Playgrounds app for the iPad is great to start with.
Q 1: How can we open the Xcode programming environment in windows?
Ans: All you need to install is macOS/OSX in a virtual environment, like VMWare or VirtualBox in order to use Xcode on any environment of Windows.
Q 2: Is there is any complications after installing the Xcode on windows portable?
Ans: If we talk about the complications, only one thing is their, that might disturb or irritate you and that thing is it’s speed.
As obviously if you are downloading and installing xcode on windows that are actually designed for Mac users only, it will not work as well as it works on Mac.
Q 3: What is Xcode for windows?
Ans: Xcode is SDK (Software Development Kit) basically or in other words it is a complete developer tool set that is used to develop applications for for Mac, iPhone, iPad, Apple Watch, and Apple TV.
Q 4: What is the use of command line tools for Xcode?
Ans: It is a small self-contained package that uses command line development in OS X. OS X SDK and command-line tools such as Clang are the two components of it that are installed in /usr/bin.
Q 5: What is the programming language used in Xcode for windows?
Ans: Xcode uses many programming languages such as C, C++, Objective-C, Objective-C++, Java, AppleScript, Python, Ruby, Rez, and Swift. GNU Pascal, Free Pascal, Ada, C#, Perl, and D are the third party system added programming languages support.
Q 6: Can We use Xcode on Linux?
Ans: No we can not use Xcode on Linux.
Must Read: Best PDF Converter and PDF Editor for Windows
Summing Up: Xcode For Windows 2023
So this was the detailed information about the how to download and install Xcode on windows. We hope this information was enough to make you understand about the procedure that you need to follow to make a Xcode work on your Pc.
So what are you waiting for, start developing your ios apps today!
Xcode is coding software or to precisely say is an app development software for Apple devices created by Apple Inc. The devices like iPhone, iPad & MacOS can use the software or applications developed using the Xcode. The Xcode IDE (Integrated Development Environment) can easily analyze the project made by the user and even identify the mistakes or issues that can arise because of an incorrect logic or syntax. But still, you can’t use the application because you do not have a system having MacOS and you want to download Xcode for Windows now.
So, today in this article I will help you install Xcode in Windows PC if available and if not available then will let you know what are the best alternatives instead of Xcode.

Contents
- 1 Is Xcode available for Windows?
- 2 How to Install and Run Xcode on Windows?
- 2.1 1. Virtual Box.
- 2.2 2. VMWare Player
- 2.3 3. Boot Windows to Mac OS
- 3 Windows Alternatives for Xcode
- 3.1 1. These applications/platforms might help
- 3.2 2. Other Alternatives
- 4 Conclusion
Is Xcode available for Windows?
Since it is developed by Apple, meaning that it is not officially available for Windows platform to develop applications and users can use it for Mac OS only. But, though there are some ways using which we can use Xcode in Windows.
Below, in the next point, I will discuss a few methods using which you can install the Xcode for Windows OS. Just follow the steps that I provide and you can install Xcode easily and start developing applications for various Apple devices.
How to Install and Run Xcode on Windows?
Apple has not launched any software or application using which one can use Xcode on Windows and create applications for iPhone, iPad or MacOS. Meaning you would need MacOS to run the Xcode software and create your own apps. So, you should install MacOS in your system first and then you can install Xcode for your Windows.
1. Virtual Box.
A Virtual Box is a software developed that allows users to use multiple operating systems in one single operating system of a PC. You can use any operating systems like Windows, Linux, Mac, whichever you want to use and the best part of using this app is you don’t need to remove your old operating system.
- You can download the Virtual Box software from here.
- Install the software and run it.
- Open the OS that you want to open using the Add button in Virtual Box. But you need to download the Virtual Box image file of that O.S. in your system beforehand.
- After the O.S. is added you can use the Xcode software to create the apps of Apple devices howsoever you wish.
Apart from Virtual Box, there is another similar software for using multiple operating systems i.e. VMWare Player. If you have already installed VMWare then you can use it for the installing Xcode for Windows.
2. VMWare Player
VMware player is also the same as Virtual Box and can be used to install any operating systems on a single PC and run multiple OS at the same time. The steps for the installing VMware would be the same as those of Virtual Box but for your reference, I will guide you using these simple steps:
- Download the VMware using the link.
- Install & run the software now.
- You must have download OS image file (MacOS image file for VMware) already in your PC.
- Add the OS using the add button and after installation is done, you can start using it.
You can now create applications for various Apple devices like iPhone, iPad or Mac or if you are a beginner then you can start learning & creating applications slowly.
3. Boot Windows to Mac OS
In this method, you can download and create a bootable drive(like pen drive) to install the MacOS on your Windows PC. You can use the devices as an external bootable drive to use it for MacOS(but it should have a large space of more than 16GB) or you can boot it into your device keeping or removing your Windows OS during the process and install MacOS.
The whole process can be followed using this link.
After the MacOS is installed using any of the above mentioned 3 methods, you can now download and install Xcode software to your MacOS.
The link to download Xcode for Windows is here.

Using these methods you can download Xcode for Windows 32 bit or 64 bit and use it for developing the apps. But an important note – Apple has not legalized the use of MacOS in Windows by anyway yet and using the Xcode in Windows is illegal.
Windows Alternatives for Xcode
Now since we know that Xcode is not officially available for Windows and so, we can use some alternatives instead of Xcode to develop applications for Apple devices.
1. These applications/platforms might help
- React Native – Uses JavaScript to build native mobile apps for Android & iOS.
- Xamarin – It uses C# language to build mobile apps that you can deploy natively to Android, iOS, and Windows operating systems.
- Appcelerator – It can also be used to build native mobile apps using JavaScript.
- PhoneGap – It builds a hybrid cross-platform mobile app using HTML, CSS, and JavaScript languages.
- Flutter – Flutter is a mobile application development framework created by Google to develop applications for Android and iOS.
These are the best alternatives available in the market which can develop apps for both Apple & Android and some can develop for Windows too. But using them to develop applications for Apple devices won’t be of worth because as a result, you will be needing the Xcode software to check the application & also you would need an Apple developer I’d to add the application to the Apple Store.
2. Other Alternatives
- Rent the MacOS over a cloud – The cheapest way to use MacOS for those who can’t afford to buy the MacOS system then you can use MacOS by renting it through the cloud. You can just google rent MacOS using cloud and there will be a bunch of results helping you out. Review the site properly before renting the MacOS and then only pay. Using this method, you can use MacOS and complete your needs for a short term period.
- Buy a Mac – The best option and the last option left is to buy a system from Apple and use it for developing applications for Apple devices. The easiest and legal way for those who can afford the system.
Also Read: Best Android Emulators for Win 10
Conclusion
The Xcode isn’t available for Windows since Apple hasn’t launched anything on this topic yet. Also, if you really need to install MacOS and use Xcode for Windows then the alternatives are there for your help. For more help, we are there for you and you can comment below and let us know if in case you have any doubts or queries. Also, you can comment below if you find any new method or alternative that can help people use Xcode on Windows OS.
Xcode is an IDE that is used to develop apps for different operating systems. As we know, we have a lot of different software tools and systems that can be used to develop apps for operating systems like Windows and Linux. On the very another hand, when it comes to developing Mac apps, it is not an easy job. We can easily install any software tool on an operating system like Windows to develop apps on it. But, Mac requires SDK that is Xcode. This is a platform that can be used to develop apps on Mac or iOS. In this post, we will show you how to install Xcode on Windows 10, 8, 7 or Vista PC.
The problem with Xcode is it is challenging and complicated to install. However, here we will tell you an easy way to install this tool on your machine. You will need some stuff in order to install Xcode on Windows 10,8, or 7 PC.
- Mac OS X Virtual machine
- Intel processor with dual core integrity
- Hardware virtualization
- Xcode application install package
- Memory of the system with at least 2GB
Steps to Install Xcode on Windows Computers
Here you will get to know how you can install the package to your virtual machine in order to get the installation of Xcode completed. You can download the latest Xcode application package from the official site of Apple. All you need is going to the Xcode website, putting your Apple ID and downloading the package. Now if you are ready for the installation process, have a look at this process.
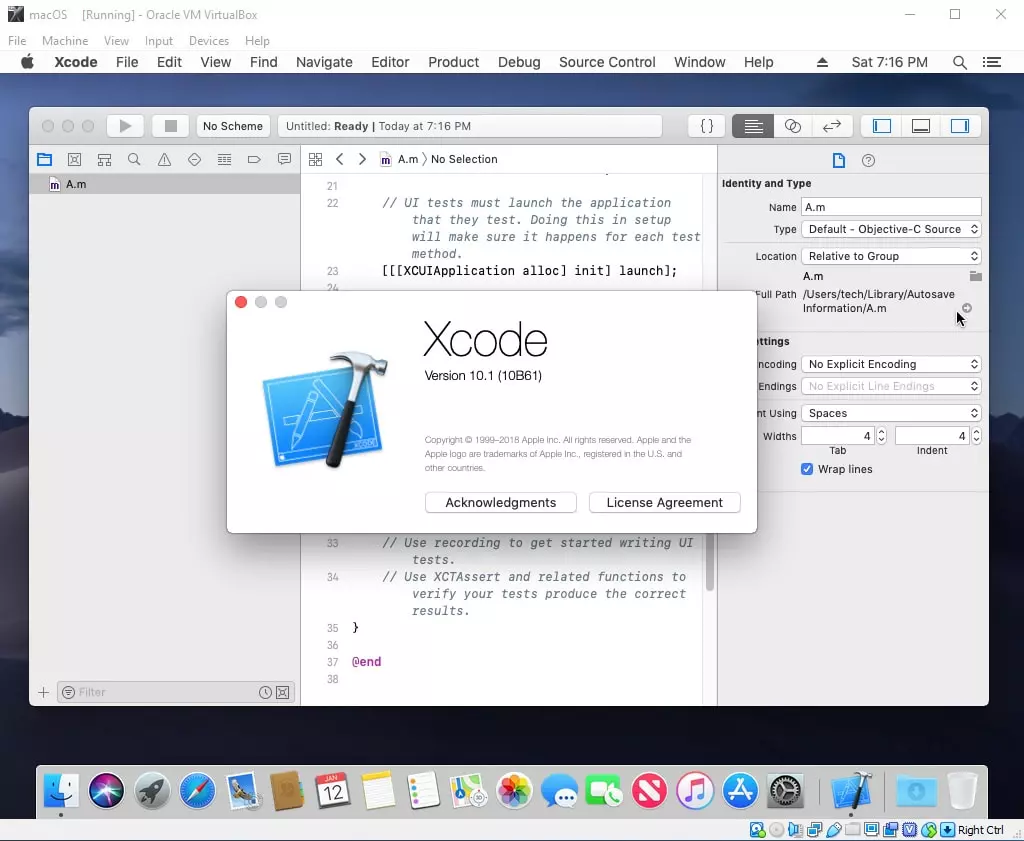
Step 1: You will need to download VirtualBox on your Windows OS running machine. You can easily download this tool from the official website of VirtualBox.
Step 2: After downloading VirtualBox on your system, get OSX Mavericks ISO as a virtual machine.
Step 3: Now open the install VirtualBox on your system. On the top left corner, you will see the New option. Click on it.
Step 4: Here you can create a virtual machine on your system. You will have to enter the Name as OSX, Type as Mac OS X and Version as Mac OS X (32 bit).
Create Virtual Machine to Install Xcode on Windows 10
Step 5: After putting the necessary information in it, click on next to proceed to the next step.
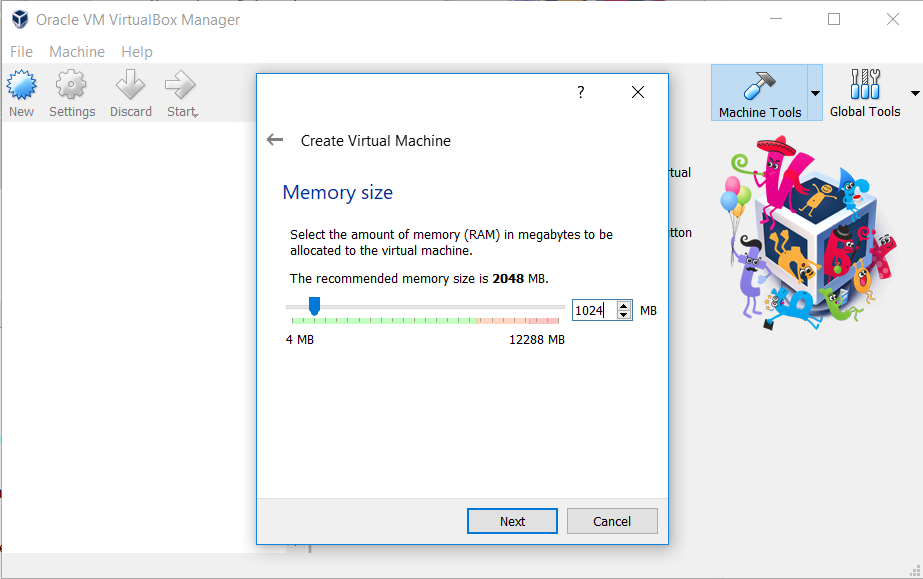
Step 6: Now you will see Memory Size option. This option allows your system to provide enough Ram to the virtual machine.
Step 7: Select the size as a minimum of 1GB and click Next.
Select the amount of RAM to create virtual machine
Step 8: Now you will see the type of virtual hard drive. Choose the first option named as VDI (VirtualBox Disk Image) and click Next.
Select VDI to install Mac OS on Windows PC
Step 9: Now select the hard drive space you want to allocate to the virtual machine and click Create.
Select HD size to install Xcode on Windows
Step 10: The virtual machine has successfully been created on your VirtualBox.
Step 11: In the head left corner, you will see the Settings icon. Click on it. Now click on Storage then Load iOS File and click OK.
Add storage and Start the MAC OS X Machine
Step 12: After that, you just follow the on-screen steps of OSX boot.
Download and Install Xcode on Windows 10,8 or 7 PC
Step 13: Now open the Safari browser in your VirtualBox and log in with your Apple ID.
Download Xcode for PC running Windows 10/8/7
Step 14: Type Xcode in the search bar and select the Xcode from the search results.
Install Xcode on Windows Computer
Step 15: Provide your name and password there and click OK.
Download and install xcode on PC
Step 16: You are all done! You have successfully installed Xcode on your machine.
Use Xcode on Windows 7, 8 or 10 PC
You have successfully installed Xcode, app development software on your Windows PC or Laptop. The performance and speed of Xcode won’t be extremely high because you are running this software on Windows, but it can be used for educational purpose. Hope that these steps will help you to install Xcode on Windows 10, 8 and 7 PC.
Xcode is a complete developer toolset for creating apps for Mac, iPhone, iPad, Apple Watch, and Apple TV. Xcode brings user interface design, coding, testing, debugging, and submitting to the App Store into a unified workflow.
Downloading and updating Xcode
The current release of Xcode is available as a free download from the Mac App Store. The Mac App Store will notify you when an update is available or you can have macOS update automatically as it becomes available.
The latest beta version and previous versions of Xcode can be downloaded from the Downloads page. To download Xcode, simply sign in with your Apple ID. Apple Developer Program membership is not required.
Learning about Xcode
For step-by-step guidance on how to use Xcode to build, test, and submit apps to the App Store, take a look at Xcode documentation. You can also learn about the latest features and capabilities in Xcode. For details on the latest released versions, including each beta release, view the Xcode release notes.
Submitting apps to the App Store
Xcode provides an integrated workflow for Apple Developer Program members to prepare and submit apps to the App Store. To submit your apps, use the latest version of Xcode available on the Mac App Store or, when available, the latest Release Candidate from the Downloads page.
Minimum SDK requirements for App Store submissions.
iOS and iPadOS apps submitted to the App Store must be built with Xcode 13 and the iOS 15 SDK. And watchOS apps submitted to the App Store must be built with Xcode 13 and the watchOS 8 SDK.
Minimum requirements and supported SDKs
| Xcode Version | Minimum OS Required | SDK | Architecture | Deployment Targets | Simulator | Swift |
|---|---|---|---|---|---|---|
| Xcode 14.2 | macOS Monterey 12.5 | iOS 16.2 macOS 13.1 tvOS 16.1 watchOS 9.1 DriverKit 22.2 |
i386 x86_64 armv7k arm64 arm64e arm64_32 |
iOS 11-16.2 iPadOS 13-16.2 macOS 10.13-13.1 tvOS 11-16.1 watchOS 4-9.1 DriverKit 19-22.2 |
iOS 12.4-16.2 tvOS 12.4-16.1 watchOS 7-9.1 |
Swift 4 Swift 4.2 Swift 5.7 |
| Xcode 14.1 | macOS Monterey 12.5 | iOS 16.1 macOS 13 tvOS 16.1 watchOS 9.1 DriverKit 22.1 |
i386 x86_64 armv7k arm64 arm64e arm64_32 |
iOS 11-16.1 iPadOS 13-16.1 macOS 10.13-13 tvOS 11-16.1 watchOS 4-9.1 DriverKit 19-22.1 |
iOS 12.4-16.1 tvOS 12.4-16.1 watchOS 7-9.1 |
Swift 4 Swift 4.2 Swift 5.7 |
| Xcode 14.0.x | macOS Monterey 12.5 | iOS 16 macOS 12.3 tvOS 16 watchOS 9 DriverKit 22 |
i386 x86_64 armv7k arm64 arm64e arm64_32 |
iOS 11-16 iPadOS 13-16 macOS 10.13-12.5 tvOS 11-16 watchOS 4-9 DriverKit 19-22 |
iOS 12.4-16 tvOS 12.4-16 watchOS 7-9 |
Swift 4 Swift 4.2 Swift 5.7 |
| Xcode 13.4 | macOS Monterey 12 | iOS 15.5 macOS 12.3 tvOS 15.4 watchOS 8.5 DriverKit 21.4 |
i386 x86_64 armv7 armv7s armv7k arm64 arm64e arm64_32 |
iOS 9-15.5 iPadOS 13-15.5 macOS 10.9-12.3 tvOS 9-15.4 watchOS 2-8.5 DriverKit 19-21.4 |
iOS 12.4-15.5 tvOS 12.4-15.4 watchOS 7-8.5 |
Swift 4 Swift 4.2 Swift 5.6 |
| Xcode 13.3 | macOS Monterey 12 | iOS 15.4 macOS 12.3 tvOS 15.4 watchOS 8.5 DriverKit 21.4 |
i386 x86_64 armv7 armv7s armv7k arm64 arm64e arm64_32 |
iOS 9-15.4 iPadOS 13-15.4 macOS 10.9-12.3 tvOS 9-15.4 watchOS 2-8.5 DriverKit 19-21.4 |
iOS 12.4-15.4 tvOS 12.4-15.4 watchOS 7-8.5 |
Swift 4 Swift 4.2 Swift 5.6 |
| Xcode 13.2 | macOS Big Sur 11.3 | iOS 15.2 macOS 12.1 tvOS 15.2 watchOS 8.3 DriverKit 21.2 |
i386 x86_64 armv7 armv7s armv7k arm64 arm64e arm64_32 |
iOS 9-15.2 iPadOS 13-15.2 macOS 10.9-12.2 tvOS 9-15.2 watchOS 2-8.3 DriverKit 19-21.2 |
iOS 10.3.1-15.2 tvOS 10.2-15.2 watchOS 3.2-8.3 |
Swift 4 Swift 4.2 Swift 5.5 |
| Xcode 13.1 | macOS Big Sur 11.3 | iOS 15 macOS 12 tvOS 15 watchOS 8 DriverKit 21.0.1 |
i386 x86_64 armv7 armv7s armv7k arm64 arm64e arm64_32 |
iOS 9-15 iPadOS 13-15 macOS 10.9-12 tvOS 9-15 watchOS 2-8 DriverKit 19-21.0.1 |
iOS 10.3.1-15 tvOS 10.2-15 watchOS 3.2-8 |
Swift 4 Swift 4.2 Swift 5.5 |
| Xcode 13 | macOS Big Sur 11.3 | iOS 15 macOS 11.3 tvOS 15 watchOS 8 DriverKit 20.4 |
i386 x86_64 armv7 armv7s armv7k arm64 arm64e arm64_32 |
iOS 9-15 iPadOS 13-15 macOS 10.9-11.3 tvOS 9-15 watchOS 2-8 DriverKit 19-20.4 |
iOS 10.3.1-15 tvOS 10.2-15 watchOS 3.2-8 |
Swift 4 Swift 4.2 Swift 5.5 |
| Xcode 12.5.1 | macOS Big Sur 11 | iOS 14.5 macOS 11.3 tvOS 14.5 watchOS 7.4 DriverKit 20.4 |
i386 x86_64 armv7 armv7s armv7k arm64 arm64e arm64_32 |
iOS 9-14.7 iPadOS 13-14.7 macOS 10.9-11.5 tvOS 9-14.7 watchOS 2-7.6 DriverKit 19-20.4 |
iOS 10.3.1-14.5 tvOS 10.2-14.5 watchOS 3.2-7.4 |
Swift 4 Swift 4.2 Swift 5.4 |
| Xcode 12.5 | macOS Big Sur 11 | iOS 14.5 macOS 11.3 tvOS 14.5 watchOS 7.4 DriverKit 20.4 |
i386 x86_64 armv7 armv7s armv7k arm64 arm64e arm64_32 |
iOS 9-14.6 iPadOS 13-14.6 macOS 10.9-11.4 tvOS 9-14.6 watchOS 2-7.5 DriverKit 19-20.4 |
iOS 10.3.1-14.5 tvOS 10.2-14.5 watchOS 3.2-7.4 |
Swift 4 Swift 4.2 Swift 5.4 |
| Xcode 12.4 | macOS Catalina 10.15.4 (Intel-based Mac)
macOS Big Sur 11 |
iOS 14.4 macOS 11.1 tvOS 14.3 watchOS 7.2 DriverKit 20.2 |
i386 x86_64 armv7 armv7s armv7k arm64 arm64e arm64_32 |
iOS 9-14.4 iPadOS 13-14.4 macOS 10.9-11.1 tvOS 9-14.3 watchOS 2-7.2 DriverKit 19-20.2 |
iOS 10.3.1-14.4 tvOS 10.2-14.3 watchOS 3.2-7.2 |
Swift 4 Swift 4.2 Swift 5.3 |
| Xcode 12.3 | macOS Catalina 10.15.4 (Intel-based Mac)
macOS Big Sur 11 |
iOS 14.3 macOS 11.1 tvOS 14.3 watchOS 7.2 DriverKit 20.2 |
i386 x86_64 armv7 armv7s armv7k arm64 arm64e arm64_32 |
iOS 9-14.3 iPadOS 13-14.3 macOS 10.9-11.1 tvOS 9-14.3 watchOS 2-7.2 DriverKit 19-20.2 |
iOS 10.3.1-14.3 tvOS 10.2-14.3 watchOS 3.2-7.2 |
Swift 4 Swift 4.2 Swift 5.3 |
| Xcode 12.2 | macOS Catalina 10.15.4 (Intel-based Mac)
macOS Big Sur 11 |
iOS 14.2 macOS 11 tvOS 14.2 watchOS 7.1 DriverKit 20 |
i386 x86_64 armv7 armv7s armv7k arm64 arm64e arm64_32 |
iOS 9-14.2 iPadOS 13-14.2 macOS 10.9-11 tvOS 9-14.2 watchOS 2-7.1 DriverKit 19-20 |
iOS 10.3.1-14.2 tvOS 10.2-14.2 watchOS 3.2-7.1 |
Swift 4 Swift 4.2 Swift 5.3 |
| Xcode 12.1 | macOS Catalina 10.15.4 (Intel-based Mac)
macOS Big Sur 11 |
iOS 14.1 macOS 10.15.6 tvOS 14 watchOS 7 DriverKit 19 |
i386 x86_64 armv7 armv7s armv7k arm64 arm64e arm64_32 |
iOS 9-14.1 iPadOS 13-14.1 macOS 10.9-11 tvOS 9-14 watchOS 2-7 DriverKit 19 |
iOS 10.3.1-14.1 tvOS 10.2-14 watchOS 2-7 |
Swift 4 Swift 4.2 Swift 5.3 |
| Xcode 12 | macOS Catalina 10.15.4 (Intel-based Mac) | iOS 14 macOS 10.15.6 tvOS 14 watchOS 7 DriverKit 19 |
i386 x86_64 armv7 armv7s armv7k arm64 arm64e arm64_32 |
iOS 9-14 iPadOS 13-14 macOS 10.6-10.15.6 tvOS 9-14 watchOS 2-7 DriverKit 19 |
iOS 10.3.1-14 tvOS 10.2-14 watchOS 3.2-7 |
Swift 4 Swift 4.2 Swift 5.3 |
| Xcode 11.7 | macOS Catalina 10.15.2 | iOS 13.7 macOS 10.15.6 tvOS 13.4 watchOS 6.2 DriverKit 19 |
i386 x86_64 armv7 armv7s armv7k arm64 arm64e arm64_32 |
iOS 8-13.7 iPadOS 13-13.7 macOS 10.6-10.15.6 tvOS 9-13.4 watchOS 2-6.2 DriverKit 19 |
iOS 10.3.1-13.7 tvOS 10.2-13.4 watchOS 3.2-6.2 |
Swift 4 Swift 4.2 Swift 5.2 |
| Xcode 11.6 | macOS Catalina 10.15.2 | iOS 13.6 macOS 10.15.6 tvOS 13.4 watchOS 6.2 DriverKit 19 |
i386 x86_64 armv7 armv7s armv7k arm64 arm64e arm64_32 |
iOS 8-13.6 iPadOS 13-13.6 macOS 10.6-10.5.6 tvOS 9-13.4 watchOS 2-6.2 DriverKit 19 |
iOS 10.3.1-13.6 tvOS 10.2-13.4 watchOS 3.2-6.2 |
Swift 4 Swift 4.2 Swift 5.2 |
| Xcode 11.5 | macOS Catalina 10.15.2 | iOS 13.5 macOS 10.15.4 tvOS 13.4 watchOS 6.2 DriverKit 19 |
i386 x86_64 armv7 armv7s armv7k arm64 arm64e arm64_32 |
iOS 8-13.5 iPadOS 13-13.5 macOS 10.6-10.15.4 tvOS 9-13.4 watchOS 2-6.2 DriverKit 19 |
iOS 10.3.1-13.5 tvOS 10.2-13.4 watchOS 3.2-6.2 |
Swift 4 Swift 4.2 Swift 5.2 |
| Xcode 11.4.x | macOS Catalina 10.15.2 | iOS 13.4 macOS 10.15.4 tvOS 13.4 watchOS 6.2 DriverKit 19 |
i386 x86_64 armv7 armv7s armv7k arm64 arm64e arm64_32 |
iOS 8-13.4.x iPadOS 13-13.4.x macOS 10.6-10.15.4 tvOS 9-13.4 watchOS 2-6.2 DriverKit 19 |
iOS 10.3.1-13.4.x tvOS 10.2-13.4 watchOS 3.2-6.2 |
Swift 4 Swift 4.2 Swift 5.2 |
| Xcode 11.3.x | macOS Mojave 10.14.4 | iOS 13.3 macOS 10.15.2 tvOS 13.3 watchOS 6.1.1 DriverKit 19 |
i386 x86_64 armv7 armv7s armv7k arm64 arm64e arm64_32 |
iOS 8-13.3 iPadOS 13-13.3 macOS 10.6-10.15.2 tvOS 9-13.3 watchOS 2-6.1.1 DriverKit 19 |
iOS 10.3.1-13.3 tvOS 10.2-13.3 watchOS 3.2-6.1.1 |
Swift 4 Swift 4.2 Swift 5.1 |
| Xcode 11.2.x | macOS Mojave 10.14.4 | iOS 13.2 macOS 10.15.1 tvOS 13.2 watchOS 6.1 DriverKit 19 |
i386 x86_64 armv7 armv7s armv7k arm64 arm64e arm64_32 |
iOS 8-13.2.x iPadOS 13-13.2.x macOS 10.6-10.15.1 tvOS 9-13.2 watchOS 2-6.1 DriverKit 19 |
iOS 10.3.1-13.2.x tvOS 10.2-13.2 watchOS 3.2-6.1 |
Swift 4 Swift 4.2 Swift 5.1 |
| Xcode 11.1 | macOS Mojave 10.14.4 | iOS 13.1 macOS 10.15 tvOS 13 watchOS 6 DriverKit 19 |
i386 x86_64 armv7 armv7s armv7k arm64 arm64e arm64_32 |
iOS 8-13.1 iPadOS 13-13.1 macOS 10.6-10.15 tvOS 9-13 watchOS 2-6 DriverKit 19 |
iOS 10.3.1-13.1 tvOS 10.2-13 watchOS 3.2-6 |
Swift 4 Swift 4.2 Swift 5.1 |
| Xcode 11 | macOS Mojave 10.14.4 | iOS 13 macOS 10.15 tvOS 13 watchOS 6 DriverKit 19 |
i386 x86_64 armv7 armv7s armv7k arm64 arm64e arm64_32 |
iOS 8-13 iPadOS 13 macOS 10.6-10.15 tvOS 9-13 watchOS 2-6 DriverKit 19 |
iOS 10.3.1-13 tvOS 10.2-13 watchOS 3.2-6 |
Swift 4 Swift 4.2 Swift 5.1 |
| Xcode 10.3 | macOS Mojave 10.14.3 | iOS 12.4 macOS 10.14.6 tvOS 12.4 watchOS 5.3 |
i386 x86_64 armv7 armv7s armv7k arm64 arm64e arm64_32 |
iOS 8-12.4 macOS 10.6-10.14.6 tvOS 9-12.4 watchOS 2-5.3 |
iOS 10.3.1-12.4 tvOS 10.2-12.4 watchOS 3.2-5.3 |
Swift 4 Swift 4.2 Swift 5 |
| Xcode 10.2.x | macOS Mojave 10.14.3 | iOS 12.2 macOS 10.14.4 tvOS 12.2 watchOS 5.2 |
i386 x86_64 armv7 armv7s armv7k arm64 arm64e arm64_32 |
iOS 8-12.2 macOS 10.6-10.14.4 tvOS 9-12.2 watchOS 2-5.2 |
iOS 8.1-12.2 tvOS 9-12.2 watchOS 2-5.2 |
Swift 4 Swift 4.2 Swift 5 |
Legend
Minimum OS Required: The version of macOS required to install this version of Xcode.
SDK: The version of SDKs included in this version of Xcode.
Architecture: The architectures supported for development by this version of Xcode.
OS: The iOS, iPadOS, macOS, tvOS, and watchOS versions supported by this version of Xcode for developing, installing, and debugging applications.
Simulator: Versions of iOS, tvOS, and watchOS simulators supported for development by this version of Xcode.
Swift: Version of Swift supported for development by this version of Xcode.
Providing feedback and reporting bugs
Your feedback goes a long way toward making Xcode even better. With Feedback Assistant, you can report issues or request enhancements to APIs and tools. Provide detailed information about issues, including your system and developer tool versions, and any relevant crash logs or console messages. To ask questions and find answers from Apple engineers and other developers, visit the Apple Developer Forums.
Invalid private key and certificate pairing
If you receive an error message saying, «Xcode could not find a valid private-key/certificate pair for this profile in your keychain,” the Keychain Access application on your Mac is missing either the public or private key for the certificate you’re using to sign your app.
This often happens when you’re trying to sign and build your app from a different Mac than the one you originally used to request your code signing certificate. It can also happen if your certificate has expired or has been revoked. Ensure that your app’s provisioning profile contains a valid code signing certificate, and that the Keychain Access application on your Mac contains that certificate, the private key originally used to generate that certificate, and the WWDR Intermediate Certificate.
For instructions on how to resolve this and other code signing errors, review the Code Signing Support page.
Apple security updates
For information on the security content of Xcode updates, visit the Apple security updates page.
Nowadays, every operating system got their own app development programs. Like we have used Windows apps on Linux and vice versa. But when we talk about Mac OS, it’s not easy to use Mac apps on Windows or Linux like the rest. Mac uses an SDK called Xcode to develop apps in itself. Seeing it, a few Windows users started craving for it, ignorant of the fact that Xcode cannot be used on Windows.
But is it really so?
Xcode is available only for Mac and iOS platforms and not for any other OS. The reason for this unavailability is a number of compatibility issues.
So is there any fix for this?
Yes!
We firmly believe that everything is possible when it comes to technology. So we’ve brought you a detailed method to install Xcode on Windows. But before that, you need to learn what actually Xcode is and what it includes.
What is Xcode?
Xcode is an IDE (Integrated Development Environment) that contains a set of software development tools, designed by Apple. These tools are available specifically for developing software on Mac OS X, iOS, and Apple TV. And this IDE is programmed in such a way that you cannot install it on any other OSs.
As a developer, I had always felt easy to develop apps for Linux and Windows OS as compared to Mac OS. The reason being is you can develop Linux and Windows apps on any platform while developing apps on Mac requires a toolset called XCode. If you are interested to install Xcode for Windows PC (7, 8.1 and 10), then here is a detailed way on how to install Xcode on Windows 7 and 8/8.1 and Windows 10 PC.
So we’ll be giving you a detailed guide to install Xcode on your Windows 7, Windows 8 and Windows 10 systems.
The procedure to run Xcode on other systems and developing apps for Apple is separated into two parts. First is installing Mac OS on a virtual workstation on Windows or Linux. And the second is, installing Xcode on a virtual Mac OS.
- A working Mac OS X virtual machine on VMware or VirtualBox
- Downloaded Xcode package from Apple site. You need to have an Apple ID in order to download Xcode from Apple store.
- Dual-Core Intel processor in the computer
- Minimum 2GB of RAM (Recommended: 4 GB+)
- Availability of the hardware virtualization on the computer
10 Most Popular Free File Sharing Sites (Secure Upload Websites)
Steps to install Xcode on Windows 10, 8/8.1 and 7 PC or Laptop
Here, we will use Virtual Box to install Xcode on Windows. So if you don’t have a copy of an installed Virtual Box, then you can download it as it is the free and open source.
Follow the below steps so as to install Xcode on Windows 10, 8 or 8.1 and Windows 7 desktop or Laptop for iOS SDK.
Step 1: Download and install VMware or VirtualBox on your Windows computer from the here. Search for “VirtualBox 5.2.4 platform packages” and click on “Windows Hosts”.
Step 2: Now, download and install OSX Mavericks ISO as a virtual machine from here.
Step 3: Create the virtual machine on your Oracle virtual box. For that, you need to open Virtual Box and click New.
Step 4: Now, you will get a new window asking for the name of the new operating system. Enter Name as OSX, Type of the OS as Mac OS X and also enter the Version as Mac OS X (32 bit). Click Next.

Create New Virtual Machine
Step 5: Select the memory size for the virtual machine as 1024 MB (1 GB) and then click Next.
Select memory size for virtual machine
Step 6: Now, Select and create the type of virtual hard drive file.
Create Virtual machine – Hard Disk
Step 7: Select the type of Hardware file as VDI (VirtualBox Disk Image). It is always recommended to go for VDI in terms of ISO image. Click Next.
Create Virtual Machine-Hard Disk File Type
Step 8: Select the physical hard drive as Dynamically allocated. Now, you need to allocate the file location and size from the physical hard drive on your device. Then, Click on Create.
Create Virtual Machine- Storage
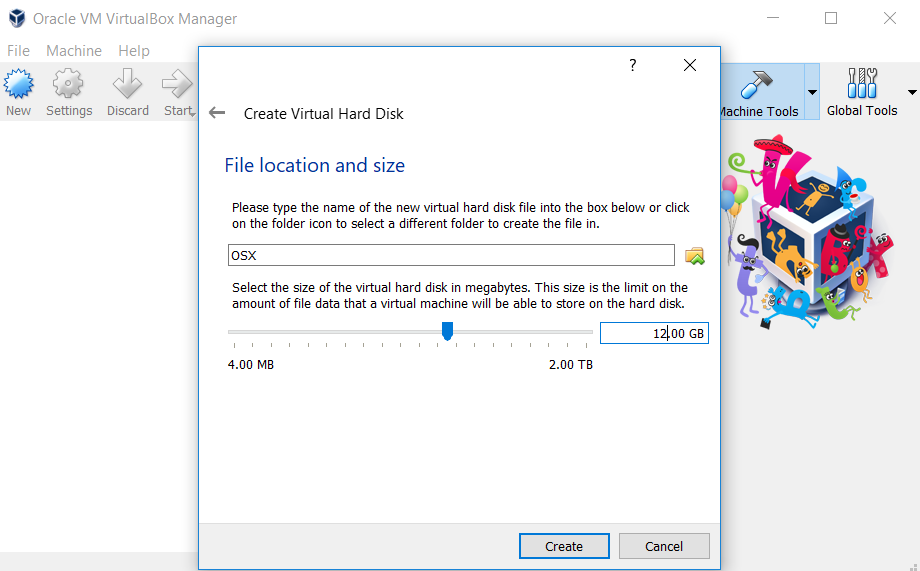
Create Virtual Machine – File Size & Location
Step 9: Now, you have successfully created a virtual machine on your virtual box. Currently, it will be in “Powered Off” state.
Virtual Machine – OSX
Step 10: Now you need to mount the OSX Mavericks ISO that we have downloaded before. For that, Go to Settings -> Storage -> Load iso File -> Click Ok -> Start.
Create VM on Oracle
Step 11: Next, follow the on-screen steps of OSX boot and then OSX will be installed in Oracle Virtual.
Step 12: Go to safari browser in your Virtualbox.
Step 13: Open official Apple App store and sign in using your Apple ID in the App store. You need to enter the Apple ID and password as shown in the image below:
Step 14: After signing, type Xcode in the search box. You can select any of the apps. Click on Free and Download. Then, click OK to download the kit. After completing the installation process, open it from the applications.
Step 15: In order to install Xcode components, you need to be the root user. So now, you need to provide your root credential. Enter your name and password and press OK.
7 Best Antivirus Apps – An iPad User Must Have
That’s it, we have now successfully installed the latest Xcode version on your Windows 10, 8/8.1 and 7 PC using desktop virtualization software VMware workstation. Start creating new projects and better apps using this interface.
So in this way, you can easily download and install Xcode for windows Personal computer or laptop. The performance and speed of Xcode won’t be extremely high.
Hope this tutorial helps you in the best way to install Xcode on Windows 10, 8/8.1 and 7 OS running PC or Laptop.
If you have to build Mac OS software or iOS applications and don’t have Mac to download Xcode, don’t get disheartened.
This article will show you a workaround to download Xcode for Windows 10.
Though the article is solely for educational purposes as if you are a professional developer and would be making lots of Mac OS or iOS software/applications, I’d suggest you get Mac itself.
Xcode is a complete software development kit (SDK) that helps you make Mac OS or iOS software without any need for installing any other software.
Contents
- 1 What is Xcode?
- 2 How to get Xcode for Windows
- 2.1 Pre-requisite for Xcode for Windows:
- 2.2 The step-wise procedure to download Xcode for Windows-
It is a complete package you need in order to build software or applications for Apple devices. Xcode is solely made for Mac OS and it is not available for Windows and other operating systems.
There are several problems as to why Xcode is not available for other platforms, at least for Windows (a widely used OS)!
One of the most prompt reasons is compatibility.
Of course, the other (Windows ) operating system and the Mac OS both are developed to function differently and coded in a different programing language.
On a broader note, Xcode is a Mac software and it is not possible to download Xcode for Windows without the workaround that I’ve discussed below.
Also see: Download Facetime for Windows
What is Xcode?
Whenever we’ve to build an application or software of any operating system, we need a kind of software development kit which is called SDK in general.
The software development kit has all the necessary sets of software required to develop a fully functional application (or software). Xcode does this job for Mac OS.
Xcode is an Integrated Development Environment that has to be installed on Mac before you start developing an app for Mac OS or the iOS operating system.
Xcode according to Wikipedia was first launched in 2003 with a motive to make developing Mac OS-based applications easy.
Xcode SDK is a complete package for developing Mac OS or iOS applications that includes tools for building interfaces and coding. The interface builder and an assets management toolkit are the important features of Xcode.
It could be disappointing for the people who want to learn to develop Mac OS or iOS applications but don’t have Mac to download Xcode.
Don’t worry, as I said above, with the workaround that I’ve explained below, anyone can get Xcode for Windows operating system as well.
let’s go ahead and see how.
How to get Xcode for Windows
The process is a bit long but if you follow the steps I explained, you will get Xcode for Windows pretty easily. It is a several steps process and needs you to install a couple of software/applications.
Pre-requisite for Xcode for Windows:
Before we start with the process, below are the pre-requisites. You must have to get the below things ready.
- Mac OS X Virtual Machine/ VMware or VirtualBox. Download VirtualBox
- An Apple ID.
- Xcode package (download it from here, you need an Apple ID to download it)
- PC with Intel Core i3 Processor (i5 is recommended)
- 2GB RAM (4 GB recommended)
- Reliable Internet Connection (to download Xcode, VMware, etc).
The step-wise procedure to download Xcode for Windows-
Step:1– Since you had already downloaded VirtualBox, install it on your computer now.
Step:2– Now search on Google “OSX Maverick ISO file” and download it. You can find it easily. If you don’t, drop me a line.
Step:3– It is now time to create a Virtual Machine with Oracle VirtualBox. Open VM VirtualBox Manager and hit “New” as shown in the below screenshot.

Step:4– Now you need to name it. Enter OSX under the name field. Select Mac OS X from the “Type” drop-down menu and select version 32- bit.

Step:5– Now you need to select the memory size. It is recommended to assign 2 GB if your PC has 4 GB RAM. If the RAM of your PC is 2 GB, assign 1 GB to a virtual machine. You can change the size by sliding the arrow left or right on the ruler.

Step:6– Next, from three options, select “Create a Virtual hard disk now”.

Step:7– Now you need to select the Hard Drive type. Select VDI (Virtual Disk Image).

Step:8– Now you need to select storage on a physical hard disk. Chose “Dynamically Allotted”.

Step:9– Enter the location and check for storage size. If everything looks fine, hit “Create”. Congratulations! Virtual Machine has been installed. Now we need to mount the ios file.

Step:10– Click on “Settings” > Storage and add a file by clicking the Green Plus button as shown in the below image and finally click OK.


Step:11– You will see the desktop!

Step:12– Now we need to download Xcode from the Apple App Store. Lunch App store and search for “Xcode”. It will ask you to log in with your Apple ID before taking it to an app store. The search results should show Xcode.

Step:13– Click Xcode to install. Allow it for some time until the process is completed. Once the installation is done, you’ll have the shortcut created. That’s all! You can now develop Mac OS applications on our windows machine.

Help your friends by sharing this article on Facebook and other social channels if they are caught in the same situation and looking for an alternative.
Can I really use Xcode for Windows as it is exclusively for Mac?
Xcode is available for Mac users only, hence those who want to use this application for educational purposes, this is the workaround.
If you want to use Xcode for professional purposes, it is better to get Macbook.
Will it slow down my PC
Xcode is programming software that utilizes resources. Hence, you can expect some lag.
Xcode for Windows – This is the generation of advanced technology, applications, and software to turn entertainment and multi-tasks easier.
So, if you are planning to develop software for Mac OS X or iOS then you need an SDK called Xcode, which is an Integrated Development Environment (IDE).
Mac iOS X users can enjoy the benefits of Xcode 14 by downloading it from the Mac App Store. There is no fee charge applied to it. Apart from the mentioned ones, the prior versions and the preview releases of Xcode can be downloaded from the Apple Developer’s Website. However, they will ask you to provide your Apple ID & Password. So, make sure to register an account for the download.

Contents
- Xcode for Windows 10 Free Download
- Xcode Alternatives for Windows
- Three Methods To Run The Xcode on Windows
- 1. Virtual Machine
- 2. Hackintosh
- 3. Macincloud (Rent a Mac in the Cloud)
- Requirements to Install Xcode on Windows / Xcode for Windows 10
- About Xcode
- Conclusion
Xcode is a tool kit to turn ideas and creativity into an application, it is to be noted that it is only available for the iOS and Mac OS. The reason lies in the fact that it is specifically meant for the development of the Apple OS X Software.
Downloading and directly using it on windows 10, windows 8.1, and Windows 7 will lead to a number of issues. One needs to follow a prescribed method to download and install the Xcode on the Windows operating system. The method will be discussed below in this article about the Xcode for Windows 10 Free Download.
Xcode Alternatives for Windows
Since there is no available version of Xcode for Windows 10 Free Download, it seems a distant star to turn your vision into reality. But technology has a solution to every problem.
We understand that you might not be in a state to buy a new Mac as of now; hence we bring to you a few suggested tricks to run the Xcode on windows. Although you can never get the best of experience on windows, yet to start with Xcode you can opt for one of the ways. While the best option will be Xcode for Windows 10 Free Download.
Three Methods To Run The Xcode on Windows
- Virtual Machine
- Hackintosh
- Macincloud
So, we will explain to you each and every part of these three methods with the one-by-one guide for you, wherein you will get step by step installation tutorial about How to Use Xcode on Windows. Just keep reading the article check the below-mentioned tutorials and decide which one is best for you.
1. Virtual Machine

This method is considered to be the best of the three suggested ones and hence is discussed in great detail in the later section of the article. You would be requiring a powerful speedy computer to run a virtual machine after the installation of the Mac OS X virtual box is the most recommended option being free and an open-source solution. If you want to use the Xcode for windows. Follow the below instructions.
1. Install the Virtual Box on your computer.
2. Follow it by purchasing an OS X after signing into the Apple App Store.
3. Create a New Virtual Machine in your newly installed Virtual Box.
4. Now follow the prescribed steps to install OS X on your Virtual Machine.
5. You are all ready to download and install the Xcode app now. Once you’ve got Xcode installed now you can build your own brand new iOS app from your Windows PC!
2. Hackintosh
The installation and functioning of the Hackintosh are similar to the virtual machine in most aspects. The only point of difference lies in the fact that using the Hackintosh, the OS X on a separate hard drive, in its own space while it is installed inside the virtual machine otherwise. We all want to use the Xcode for Windows
Although the method will be a good escape from the performance issues, you might need to bang your head a bit more during the installation process. Moreover encountering bugs becomes more frequent.
3. Macincloud (Rent a Mac in the Cloud)
If you are not satisfied with the above-given options and if you don’t want to download and install a virtual machine or Hackintosh on your PC, you can opt for a service called Macincloud. Its import part is due to Windows users.
If you choose this method, you will be basically renting a Mac that could be accessed through a remote. the entire work can be done using your mobile phone or computer. Once you are done connecting to the Apple OS X machine that you might have rented from the Macincloud, you can get a strong grip over the Xcode to develop the new apps.
The drawback of this method is the slow internet connection that might obstruct the process every now and then. Hence running Xcode could become a headache for you later.
Requirements to Install Xcode on Windows / Xcode for Windows 10
If you have made all the plans to install the upgraded Xcode software in your computer for windows, make sure to tally the requirements of Xcode.
There is certain other software that needs to be pre-installed in your computer for the Xcode to run smoothly and efficiently. Below is the list of the software requirements that need to be checked well in advance:
- Virtualization software like VMWare or a virtual box
- A valid package of the Xcode to be downloaded from the Apple site
- Availability of the hardware virtualization on the computer
- A dual-core Intel processor inbuilt in the computer
- A valid Apple Id so as to smoothly run the download process from the Apple store.
- A vacant space of approximately 2GB of RAM at least.
Note: An apple software app developer is required to have an Apple developer id.
STEPS TO INSTALL XCODE ON WINDOWS / XCODE FOR WINDOWS
One needs to carefully follow the below-mentioned steps in order to install and run the Xcode on Windows:
- Download the virtual box software like VMWare on your computer followed by its installation
- The next step is the downloading and installing of the OSX Maverick ISO file.
- Follow the steps to create a new virtual machine by taking the help of the Oracle VM Manager
Step next to create a new os with your name in order to personalize it. - You can use OSX, OS as Mac OS X as the name thereby providing Mac OS X as the selected version.
- In order to proceed further, click on the “next” button on the screen.
- In order to create a new virtual machine, you would be requiring selecting the apt size of the RAM for your virtual machine. For the efficient and effective functioning of the virtual machine, it is recommended to opt for 1GB RAM.
- Follow up on the above-mentioned step by creating the virtual hard drive file.
- You will be seeing a pop-up message on the screen that will demand you select one of the options in order to specify the hard drive file type.
- The virtual box disk image is the most recommended type for the iso image files and hence would be the most suitable option for you to choose from. The other options that are available include virtual machine disk, virtual hard disk, parallel hard disk, QEMU Enhanced disk, etc.
- Specifying the location and size is essential for the installation on your physical drive.
- Click the next option to smoothly carry forward the processing.
- So congratulations! You have successfully downloaded the virtual machine on your virtual box.
- Follow the mentioned instructions to load the iso image file- go to settings- storage- load iso file – click ok – start.
- Now open a speedy updated internet browser like Chrome, Firefox, or UC browser from the installed virtual box followed by entering your apple id credentials in the specified spaces of the apple store.
- This will sign you in to download and use the applications of the Apple store.
- After completing the signing-in process, navigate through the search option to find the Xcode.
- As soon as you find it, download and install the software on your computer.
- The completion of the installation will flash a screen that would require you to enter the root credentials of the Xcode application. Providing the required information would give you 1000 percent access to the legal rights and the Xcode settings.
- Click the Ok button after entering the correct username and password for the Xcode.
- Congratulations again. You are finally done with the installation of the Xcode for windows. Now you are free to enjoy the services and benefits of Xcode on Windows.
This is to notify you that the speed and smooth functioning of the Xcode for Windows 10 Free Download largely depend upon the set of instructions that you follow and the process you opt for in order to download and install it.
Also, keep in mind that the mentioned set of instructions is the only way to install the Xcode on your personal computer and use the Xcode for the windows based system, Xcode for Windows.
About Xcode
Xcode can be termed as an integrated development environment or a toolkit that s required to build and develop the applications for macOS, watchOS, and iOS. The software came into existence in the year 2003 and has seen various progressions and development in its versions since then.
The latest stable version is 8.0. using the Xcode tools, one can develop efficiently fast applications of higher quality that will serve the infinite purpose of human beings. Looking at the increasing demand of the people, technological advancement is being carried on in the direction to save human’s time, energy and efforts.
The Xcode is developed by taking all the mentioned factors into consideration. The best part of it is Xcode for windows for all types of users.
The features of the Xcode allow the user to put in their creativity, new ideas, and efforts to create and test, check- monitor the performance and thereby debug the code.
It is to be noted that the Xcode can only run effectively on the MacOS X. Hence in order to use the software on windows, one needs to install a workable version of macOS X on windows prior to activating Xcode on it. You do not have to get confused as it is not as tricky as it may seem.
All you need to have is virtualization software or an open-source alternative virtual box. A good example of virtualization software is VMWare.
Since 8.0 is the latest and most compatible version of Xcode, we can have a brief insight into its features that makes it a perfect app developing software.
Interface builder- now you can speed up the work while efficiently controlling it according to your whims using the interface builder design interface. The best experience is to actually have a look at how your app is going to appear on all Apple devices.
Don’t neglect the Pan and zoom feature which are incredibly fast and lovely to use. In fact, editing the interface while the storyboard is zoomed out is amazing.
Editor extensions- you can customize you’re coding using the new Xcode extension for the source editor. You can easily select, modify and change the code by navigating within the editor’s text using the Xcode extension.
You can be sure and secure the safety of your Xcode since there is an entirely separate process that guards the functioning of the Xcode. There is a new template for the Xcode for the users to create editor extensions and thereby dispatch them on the Mac store.
Runtime issues- the updated version of Xcode helps in detecting the bugs and issues that are usually hard to track until the time the app gets into the hands of the users. This could deteriorate the image and reputation of the application and hence reduced the number of its users.
Hence it’s better to check and resort to the bugs well in advance. All types of threading-related bugs are spotted by the new thread sanitizer while the UI constraints problems are inspected and resolved by the updated view debugger. The memory debuggers alert you in any case of memory leaks that might create a bigger problem in the later stages.
Easy signing- the setting up of the device and the code designing is relatively easier and more powerful here. The entire process is automatic which aptly generates all the required assets to properly run the application on a good workable Apple device. It depends on the users to either leave the entire processing on the Xcode or manually choose the profiles for signing in.
Report navigators give you an insight into the logs, improved error messages, and solutions, in the possible case of encountering an error message.
Read More:
- Equalizer for Windows
- Chromecast App for Windows
- Adobe Flash Player for Windows
- Online Xcode Compiler for Windows
- www.Lowes.com/Survey $500
Do not worry if you have innumerable Macs since the Xcode is an expert in generating a unique development certificate for each Mac.
Conclusion
The major reason, why people choose Xcode and then want to install it on windows and they search about the Xcode for windows topics is because it’s user-friendly less and it’s easy to use. The Apple company has standard rules of zero tolerance in the App Store.
So, people who develop such applications or tools must have to make sure to create a great application that entertainment people and it should be innovative as well. The major reason, why people choose Xcode is because it’s user-friendly less and it’s easy to use.
The Apple company has standard rules of zero tolerance in the App Store. So, people who develop such applications or tools must have to make sure to create a great application that entertainment people and it should be innovative as well.
So, for all those people who have just started creating an application, they have to use this application at least once and you can also share your expertise of using Xcode in the commenting section with us so that our other readers can get such testimonials to inspire and motivate their self to start using it and starting their career in this development field.
Smartphone users are getting high every year, therefore mobile app industries are becoming more giant. However, major of the users are comfortable with the Android operating system while iOS users are less.
Since the Android market is set by the world’s biggest company Google and it has power on the internet to build such a big app store it has more applications for sure in comparison with the Apple store and Microsoft store. That’s all about the Xcode for Windows Free Download.