Skip to content
Windows 10 version 1803 «April 2018 Update» is available for stable branch users. The XPS Viewer is no longer installed by default if you install Windows 10 1803 from scratch (clean install). Here is how to install it manually.
The XPS viewer is an application designed to view XPS documents. It was bundled with Windows starting with Vista. XPS documents are files saved to the XML Paper Specification (.xps file format). In Windows 10 version 1709 «Fall Creators Update» and earlier versions, XPS Viewer is installed by default. After updating to Windows 10 version 1803 via Windows Update, the app remains available. You will still have XPS Viewer, so no action is required.
Microsoft has changed the way you get XPS Viewer in case of a clean install. On a device with Windows 10 version 1803 pre-installed, and after installing Windows 10 1803 from scratch (clean install), XPS Viewer won’t be available. To use it, you need to install it manually.
To install XPS Viewer in Windows 10 version 1803, do the following.
- Open the Settings app.
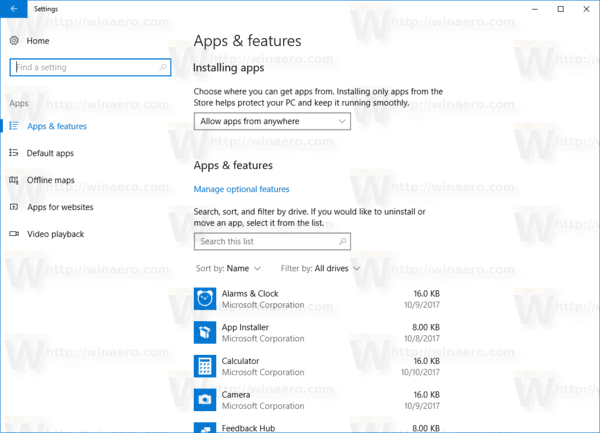
- Go to Apps > Apps & features.

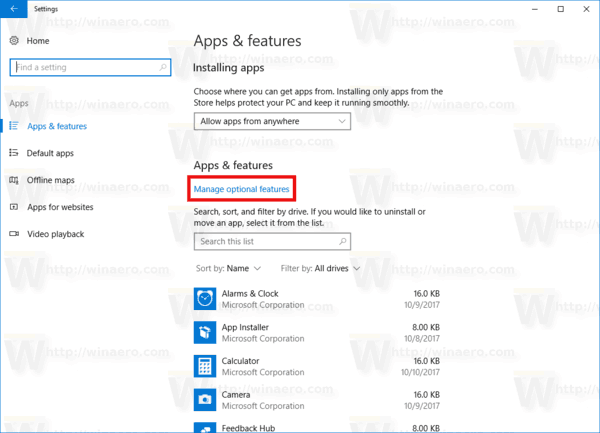
- On the right, click on the link Manage optional features.
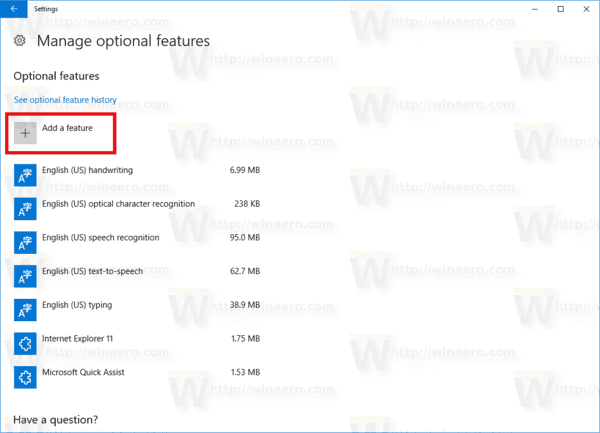
- Click on the button Add a feature at the top of the next page.
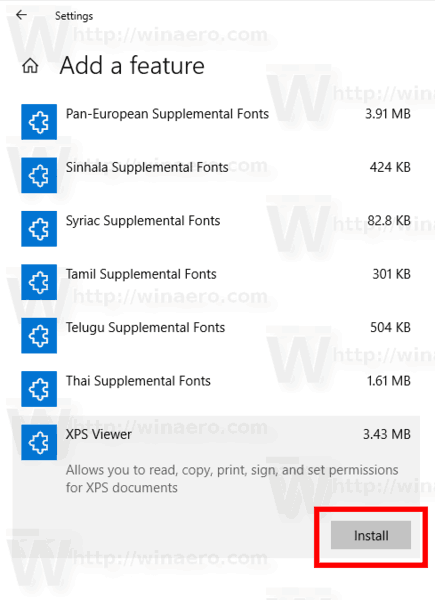
- Find the optional feature named XPS Viewer in the list under Add a feature.
- Select it and click on the Install button.

You are done. You now have XPS Viewer installed. You can open any xps document stored on your PC or by entering xpsrchvw.exe in the Run dialog (Win + R).
Alternatively, you can get XPS Viewer installed with DISM
- Open an elevated command prompt.
- Copy-paste or type the following command:
dism /Online /Add-Capability /CapabilityName:XPS.Viewer~~~~0.0.1.0
- After installing the feature, you can close the command prompt.

Uninstall XPS Viewer
To uninstall XPS Viewer, you can use either Settings or the DISM app.
- Go to Settings — Apps & features — Manage optional features. Select XPS Viewer in the list of features and click on Uninstall.
- Alternatively, open the command prompt as Administrator and type
dism /Online /Remove-Capability /CapabilityName:XPS.Viewer~~~~0.0.1.0
This will remove XPS Viewer from Windows 10.
That’s it.
Support us
Winaero greatly relies on your support. You can help the site keep bringing you interesting and useful content and software by using these options:
If you like this article, please share it using the buttons below. It won’t take a lot from you, but it will help us grow. Thanks for your support!
Hello. Add your message here.

Поддержка документов XPS по умолчанию появилась еще в Windows Vista и была доступной вплоть до апрельского обновления Windows 10. Сам XPS представляет собой основанный на XML формат для работы с графическими документами, позиционируемый Microsoft как альтернатива более «тяжелому» PDF. Особой популярности формат так и не приобрел, и в Windows 10 1083 Microsoft приняла решение не включать XPS Viewer, если установка операционной системы выполняется с нуля, то есть с установочного диска.
Если вы хотите использовать в чисто установленной Windows 1083 XPS Viewer, вам нужно будет добавить его вручную.
Если установка новой версии выполнялась через Центр обновления, никаких действий не потребуется, так как компонент для работы с документами XPS по-прежнему будет доступен.
В «чистой» системе модуль устанавливается следующим образом.
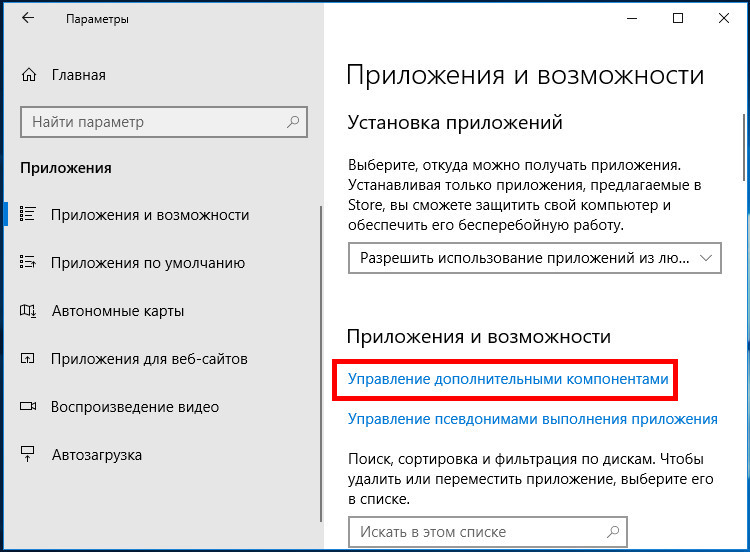
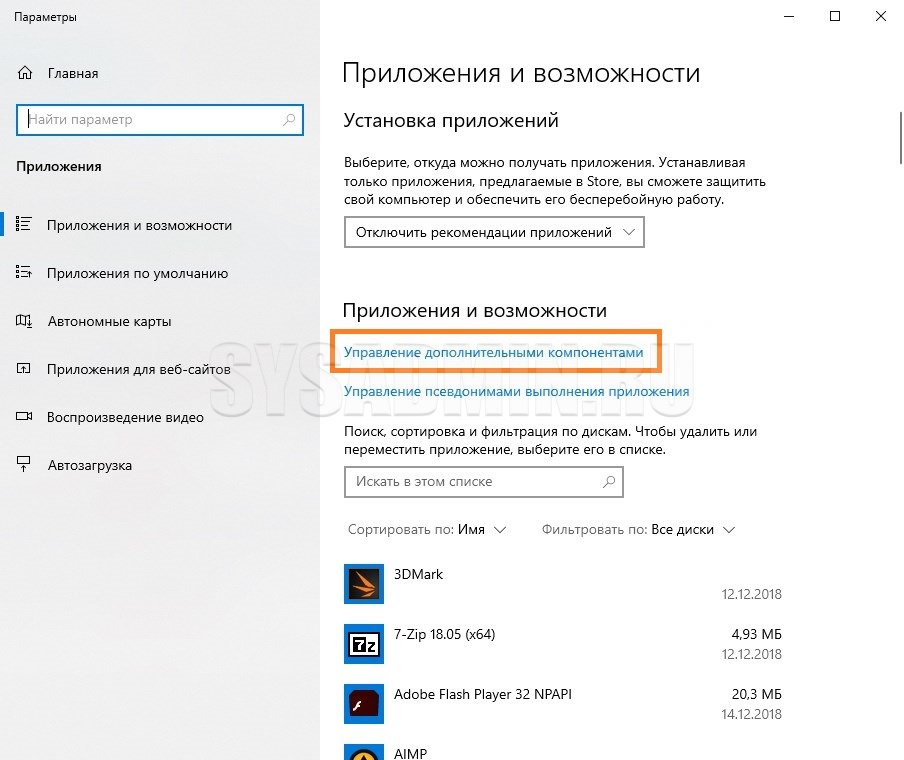
Откройте приложение «Параметры», зайдите в раздел «Приложения и возможности» и нажмите ссылку «Управление дополнительными компонентами».
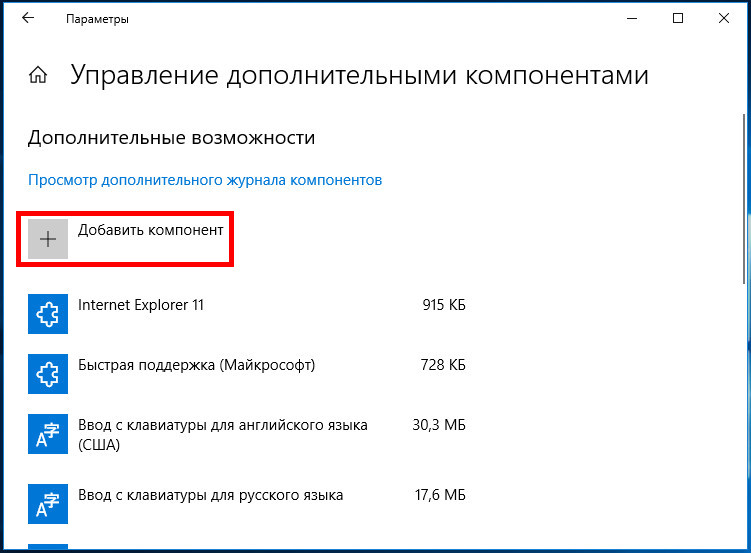
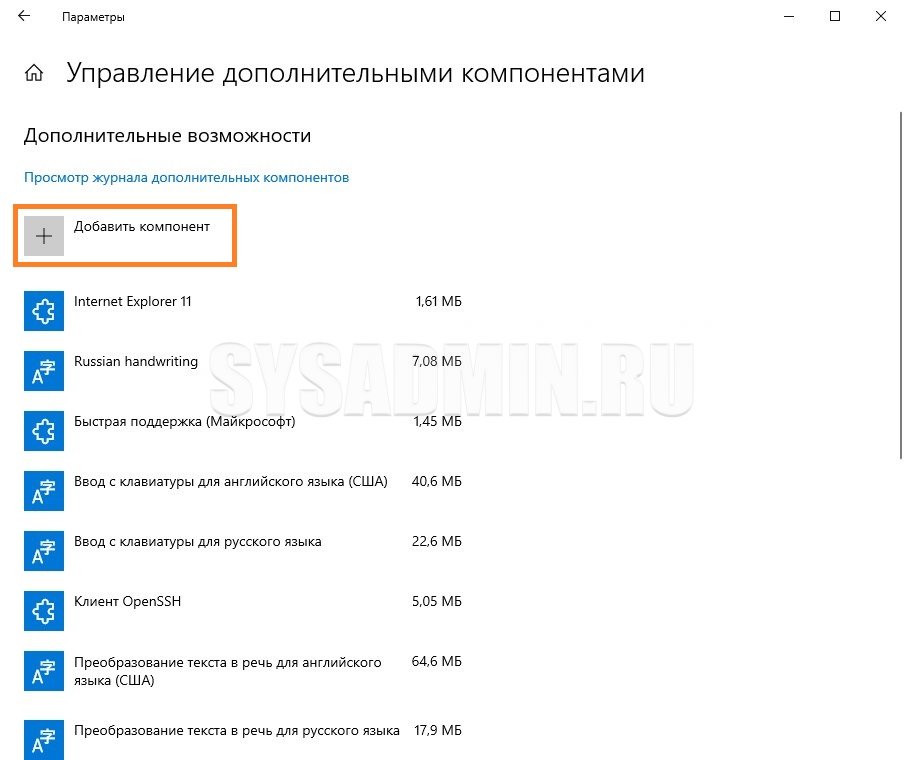
В следующем окне нажмите «Добавить компонент».
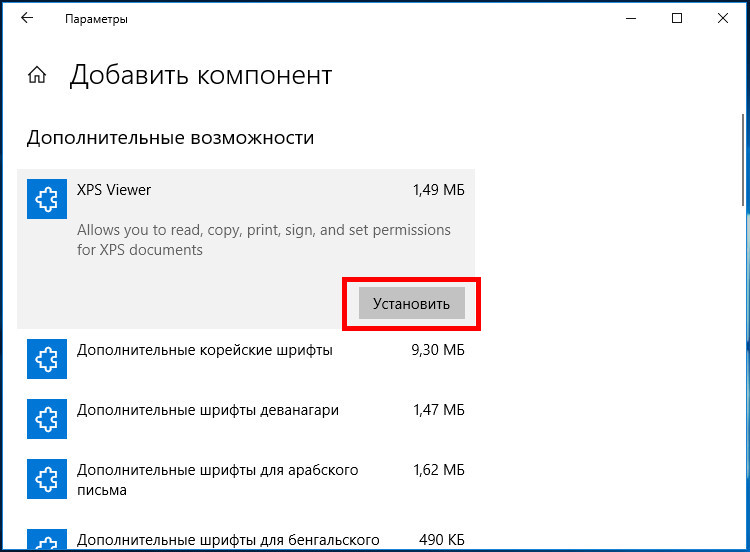
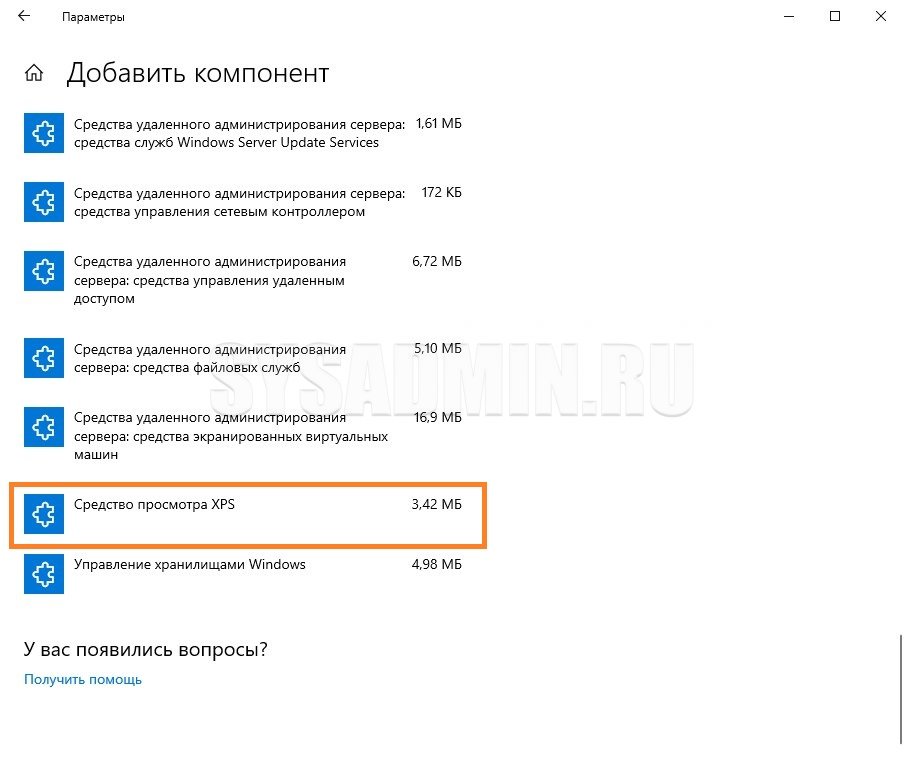
Выберите из списка XPS Viewer (он должен идти в списке первым) и нажмите кнопку «Установить».
Если при установке вдруг возникнут какие-то проблемы, воспользуйтесь консольной утилитой DISM.
Откройте командную строку от имени администратора и выполните в ней такую команду:
dism /Online /Add-Capability /CapabilityName:XPS.Viewer~~~~0.0.1.0

Через пару минут компонент будет установлен, и вы сможете запустить его командой xpsrchvw.exe в окошке «Выполнить» или просто открыв привычным способом любой файл XPS.
Оцените Статью:
 (10 оценок, среднее: 5,00 из 5)
![]() Загрузка…
Загрузка…
Leading Features of XPS Viewer Tool
XPS File Reader Software’s Features to View XPS/OXPS File

Unlock and View XPS Files
XPS Viewer software is a complete solution to preview and read the content of XPS documents. This professional utility displays the complete text and images that are integrated with browsed XPS file in its preview panel. Any add-on or plug-in is not required to run this tool.

Able to Open OXPS Files
OXPS Reader allows users to open OXPS files in Windows XP and in all other versions. Some common errors like ‘OXPS file not opening’ can be easily fixed via this software. Also, the tool permits users to access OXPS file after downloading if this software is properly installed on the machine.

Explore XPS File Content
XPS Viewer tool allows individuals to open and read XPS files with its basic information such as file name, creation date, and size (in KB). Additionally, this software also comprises a sorting feature through which users can organize the displayed data items according to the name of file, creation date, and size of the file.

Zoom In / Zoom Out Property
FreeViewer XPS Reader software includes an intelligent option i.e., users can zoom the content of XPS / OXPS data files. To enable this functionality, users are required to press the Ctrl key and scroll mouse ball together at the same time. It is a very helpful feature especially for forensic investigators for deep analysis.

Support All Windows Versions
XPS viewer software tool supports any Windows OS like 10, 8.1, 8, 7, etc. If the user is having a large number of XPS / OXPS files then, they can use its batch OXPS file conversion feature to export the data from every file to their respective files into the selected format. This functionality can save a lot of time and can convert XPS into multiple format etc.

User-friendly Interface
The graphical user interface of XPS Viewer tool for Windows is very easy to understand and operate. Users only are required to hit the folder icon that comprises the XPS / OXPS files and then, the software will automatically load entire files with their content and without any data loss. After doing this, users need to click on the file that they need to explore.
XPS File Viewer Tool Specifications
Free Download XPS/OXPS Viewer Software
Software Download
Size: 3.5 MB
Version: 3.0
Trial Limitations
Limitations
XPS File Reader Shows the Preview of XPS/OXPS File.
System Specifications
Hard Disk Space
100 MB of free hard disk space required
RAM
4 GB of RAM (4 GB is recommended)
Processor
Intel® Core™ 2 Duo CPU E4600 @ 2.40GHz 2.39GHz
Application Pre-Requisites
Pre-Requisites
If you are using Windows 10/8.1/8/7, then please launch the tool as «Run as Administrator».
Microsoft .NET framework 4.5 and Above Version
Supported Versions
Microsoft Windows
Microsoft Windows 10, 8, 7 (32 bit or 64 bit) & Windows Server 2016, 2012 R2, 2008
Electronic Delivery
The product delivery is automated. You will receive an email with the link to download the product and the activation key within a few minutes after the payment has been confirmed.
Обновлено
2020-12-18 12:10:58
Совместимость
Windows XP, Windows 2003, Windows Vista, Windows 7, Windows 8, Windows 10
Сайт
www.softwareimaging.com
Описание
XPS Viewer — это небольшая автономная программа, предназначенная для просмотра документов в формате XPS.
Описание программы
При помощи XPS Viewer, вы сможете работать с документами в формате XPS. Последний во многом схож с PDF, но создан на базе XML компанией Microsoft и зачастую не совместим со стандартными средствами просмотра документов. Помимо простого чтения XPS файлов, эта программа обладает функцией поворота что позволит открыть документ на полный экран. Вам также будут доступны инструменты зумирования, сглаживания, кастомизации цветовых профилей, а также ряд прочих полезных инструментов и возможностей.
Стоит отметить, что ранее открытые файлы автоматически сохраняются в секции недавних файлов, что поможет в любой момент вернуться к работе над ними. Кроме того, XPS Viewer обладает очень простым и понятным интерфейсом, а главное — распространяется совершенно бесплатно.
Ищете удобную программу для работы с файлами XPS? Тогда скачайте XPS Viewer с нашего сайта.
Версии
In a previous tutorial I mentioned the steps required to install XPS Viewer on Windows 10. But, some users complaining that they cannot install XPS Viewer, because the XPS viewer is not listed after pressing the ‘Add a feature’ button (Apps > Manage optional features > Add a feature), or cannot be installed.
This tutorial contains instructions on how to troubleshoot XPS viewer installation problems in Windows 10 1803 & 1809 versions.
How to Resolve XPS Viewer installation problems in Windows 10.
Method 1. Uninstall and Reinstall Microsoft XPS Document Writer.
1. Open Programs and Features and then click Turn Windows features on or off.

2. Uncheck the Microsoft XPS Document Writer box and hit OK.

3. Now click the Turn Windows features on or off again and check the Microsoft XPS Document Writer box and click OK.
4. Restart your PC.
5. Try to install the XPS Viewer.
Method 2. Install XPS Viewer by using the DISM command.
1. Open Command Prompt as Administrator.
2. In command prompt, give the following command and press Enter.
- dism /Online /Add-Capability /CapabilityName:XPS.Viewer~~~~0.0.1.0

Method 3. Download XPS Viewer from Windows Update instead of WSUS. (Windows 10 Pro & Enterprise).
If you ‘re using Windows 10 Pro or Enterprise, then apply the following steps in Group Policy Editor. *
* Note: If the computer belongs to a Domain, you need to modify the domain group policy settings (GPO) and then to run the «gpupdate /force» command, before installing XPS Viewer.
1. Open Group Policy Editor. To do that:
1. Press simultaneously the Windows
+ R keys to open the run command box.
2. Type gpedit.msc & Press Enter.

2. At the left pane navigate to:
- Computer Configuration -> Administrative Templates -> System
3. At the right pane double click at Specify settings for optional component installation and component repair

4. Set the policy to Enabled and then check the Download repair content and optional features directly from Windows Update instead of Windows Server Update Services (WSUS) box.
5. When done, click Apply and OK and restart your PC.

6. After restart, try to install the XPS Viewer by using the DISM method above.
7. After XPS viewer installation, open Group Policy Editor and revert back the changes.
That’s all folks! Did it work for you?
Please leave a comment in the comment section below or even better: like and share this blog post in the social networks to help spread the word about this solution.
If this article was useful for you, please consider supporting us by making a donation. Even $1 can a make a huge difference for us.

The XPS file format was developed by Microsoft as opposed to the PDF file format. It is quite possible that many of you have encountered an XPS file that cannot be used, or even opened. For those who wish to create or use XPS documents, this post may prove useful for understanding what XPS is, what XPS Viewer is, and how to use it.
Table of contents
- What is XPS file
- What is XPS Viewer
- Download and Install XPS Viewer on Windows 11/10
- How to use XPS Viewer
- How to remove XPS Viewer
- Microsoft XPS Document Writer (MXDW)
- XPS Viewer alternatives
- GroupDocs
- SumatraPDF
- Google Drive
- Verdict
You may have tried using an XML file, but are unable to open it since your operating system does not find a supporting application, and may see something like this:

Allow us to shed some light on what XPS is all about.
What is XPS file
XPS stands for XML Paper Specification. Microsoft developed this format in order to compete with Portable Document Format (PDF). However, it was not as popular as expected. The XML documents can contain regular text as well as additional information about the content, such as its layout and appearance.
The purpose behind the creation of XPS was to eliminate the use of paper in an attempt by Microsoft to go green.
An XPS file may have an extension .xps or .oxps (OpenXPS).
What is XPS Viewer
XPS Viewer is a free-to-use application by Microsoft for using and viewing XPS files and documents. It used to come preinstalled with Windows 10 up until version 1803 was released. Since it was not in demand, it was given as an optional application that users can install manually when and if required.
With XPS Viewer, you can save copies of a file, digitally sign them, manage permissions, and search through them. The application supports a number of file formats:
- .XPS
- .OXPS
Download and Install XPS Viewer on Windows 11/10
Installing the XPS Viewer on Windows 11 and 10 is pretty much the same; some layouts may be a bit different.
Here is how you can install XPS Viewer on Windows 11:
You have now successfully installed XPS Viewer.
You can launch the application by searching for it in Windows Search, or the Start menu.

Alternatively, you can also type in xpsrchvw in Run or Command Prompt to launch XPS Viewer.
To open an XPS document, click on File from the top menu in the XPS Viewer, and click Open. You can then browse the saved XPS file and select it to open it in XPS Viewer.

Once a document is open, you can then save its copies, or change its permissions by clicking on the Permissions menu from the top, and then clicking Set permissions.

You can also convert an XPS file to PDF format. To do so, simply click on the Print button at the top of the app, and then select Print to PDF. Click OK to save the document as a PDF file.

Since XPS Viewer is a tiny application, it cannot do much of anything else, except for what we have already discussed.
How to remove XPS Viewer
If you are no longer in need of the XPS Viewer, you can just as easily remove it from your computer. Here is how:
- Open the Settings app, click App on the left, and then click Optional features on the right side of the window. Here, scroll down and click on XPS Viewer in the right-side pane. Once expanded, click Uninstall.

- The XPS Viewer app will then be immediately uninstalled. You can confirm this by running through the installed applications list on the Optional features page.

Microsoft XPS Document Writer (MXDW)
Microsoft XPS Document Writer is another hidden gem in both Windows 11 and 10. Similar to the method of creating a PDF document while printing and selecting the option Print to PDF, MXDW provides the same option, but for XPS.

This feature has to be enabled manually through Optional Features. To do so, type in appwiz.cpl in Run, and then click Turn Windows features on or off on the left.

In the pop-up window, scroll down and check the box next to “Microsoft XPS Document Writer,” then click Ok.

MXDW will now be installed in a few seconds. You should now be able to see the option to Print to XPS on the print pages, which you can select to save files in .xps format.
In case you8 ever feel like turning off the feature, simply uncheck the box next to “Microsoft XPS Document Writer” on the Windows Features page.
XPS Viewer alternatives
There are other methods available on the internet that can be used instead of XPS Viewer. Some are applications that can be installed, whilst others provide an online web view.
GroupDocs
GroupDocs is a quick and free online tool to help you view your XPS and OXPS files. All that is required is for you to drag and drop your file, and it will convert and display it for you.
To use GroupDocs, open their webpage in any browser and simply drop your file over the given area.

SumatraPDF
SumatraPDF is a downloadable application that can be used to view almost any document. This includes .xps, .oxps, and .pdf.

Google Drive
Google Drive is an excellent tool as it also supports XPS formatting. All you need to do is upload the file to Google Drive and you can then view it easily.
Open Google Drive, click New, and then click File Upload from the drop-down menu.

Now browse to upload the XPS file. Once uploaded, click on it to view it within the browser directly from Google Drive.

Verdict
Not many people use the XPS format anymore. However, there can be certain scenarios where you already have an XPS document but have no idea how to access its content.
We hope that this blog post helps you understand everything there is to know about XPS and its associated applications.
Also see:
Subhan Zafar is an established IT professional with interests in Windows and Server infrastructure testing and research, and is currently working with Itechtics as a research consultant. He has studied Electrical Engineering and is also certified by Huawei (HCNA & HCNP Routing and Switching).
Skip to content
So I wanted to view some important documents that I had saved last year in the XPS file format. I thought Windows 10 already has XPS Viewer built inside it, but to my surprise, I could not open XPS documents in Windows 10 PC. Upon some investigation, I found out that Microsoft has decided to remove XPS Viewer from regular installations and now users have to manually install it if they need it. This is really very annoying because Microsoft was pushing XPS for many years (since Windows Vista times) and now suddenly users have to manually install it?
Anyway, there are two ways you can view XPS documents in the latest version of Windows 10 – one is to use a third-party software like Foxit PDF Reader and second is to install Microsoft XPS Viewer. You can install Microsoft XPS Viewer in Windows 10 in the following manner:
- Click on Start and then on the cogwheel icon to open Windows settings. Alternatively, you can also press the Win+I hotkey.
- In Windows settings, select Apps.

- On the Apps screen, select Apps & Features from the left side, then click/tap on Manage optional features.
- On the Manage options features screen, click on Add a feature.
- Select XPS Viewer from the list of the optional features and click on the Install button.
- Your Windows 10 PC will be ready to view XPS documents in a few seconds.


Once you have installed Microsoft XPS Viewer in your computer, you can view XPS documents by double-clicking on any of the XPS files. In the future, if you want to save the documents instead of printing them, you should choose PDF printer instead of XPS printers so that you don’t run into this problem all over again. PDF documents are versatile and can be opened by hundreds of PDF viewer applications unlike XPS documents.
We use cookies on our website to give you the most relevant experience by remembering your preferences and repeat visits. By clicking “Accept”, you consent to the use of ALL the cookies.
Программное обеспечение
- 13.05.2019
- 68 103
- 16
- 07.01.2022
- 287
- 284
- 3
- Содержание статьи
- Включаем поддержку формата XPS (OXPS) в Windows 10
- Программы с возможностью просмотра файлов XPS (OXPS)
- Комментарии к статье ( 16 шт )
- Добавить комментарий
XPS (или OXPS — Open XPS) — альтернатива формату PDF, разработанная компанией Microsoft в 2006 году. Как итог, поддержка данного формата по умолчанию присутствует в Windows Vista, Windows 7 и Windows 8 и первых редакциях Windows 10. Затем, начиная с версии Windows 10 1803, поддержка данного формата была убрана, в связи с его неактуальностью. К счастью, окончательно она убрана не была, и если Вам нужно открыть файлы данного формата, то это легко делается с помощью небольших манипуляций с настройками ОС или использованием стороннего программного обеспечения.
Включаем поддержку формата XPS (OXPS) в Windows 10
Описанные ниже действия нужно проводить из под учетной записи, имеющей права администратора — в противном случае, список компонентов будет пустым!
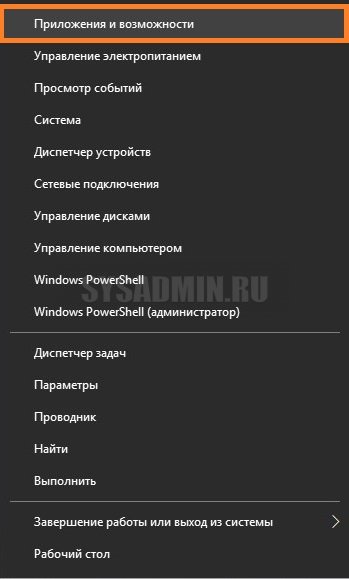
- Нажимаем правой кнопкой по кнопке «Пуск» — и в открывшемся меню выбираем пункт «Приложения и возможности».

- Откроется окно Параметров, со списком установленных программ. Нужно найти строчку «Управление дополнительными компонентами», и нажать на неё.

- Далее, нужно нажать на «Добавить компонент».
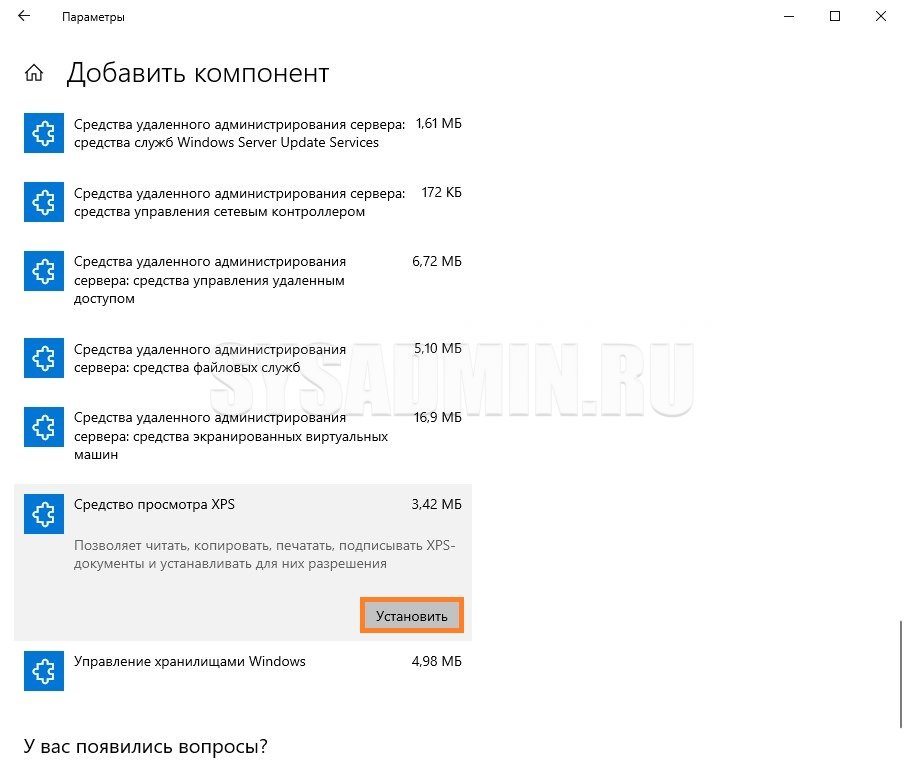
- Ищем пункт «Средство просмотра XPS» (должен быть в самом низу), нажимаем на него.
Затем нажимаем на появившуюся кнопку «Установить».
После этого компонент просмотра XPS будет установлен в системе.
Программы с возможностью просмотра файлов XPS (OXPS)
Помимо официальных приложений Microsoft, входящих в состав Windows, есть так же альтернативные приложения от сторонних разработчиков:
- Evince
- MuPDF
- Okular
- STDU Viewer
- SumatraPDF