In a previous tutorial I mentioned the steps required to install XPS Viewer on Windows 10. But, some users complaining that they cannot install XPS Viewer, because the XPS viewer is not listed after pressing the ‘Add a feature’ button (Apps > Manage optional features > Add a feature), or cannot be installed.
This tutorial contains instructions on how to troubleshoot XPS viewer installation problems in Windows 10 1803 & 1809 versions.
How to Resolve XPS Viewer installation problems in Windows 10.
Method 1. Uninstall and Reinstall Microsoft XPS Document Writer.
1. Open Programs and Features and then click Turn Windows features on or off.

2. Uncheck the Microsoft XPS Document Writer box and hit OK.

3. Now click the Turn Windows features on or off again and check the Microsoft XPS Document Writer box and click OK.
4. Restart your PC.
5. Try to install the XPS Viewer.
Method 2. Install XPS Viewer by using the DISM command.
1. Open Command Prompt as Administrator.
2. In command prompt, give the following command and press Enter.
- dism /Online /Add-Capability /CapabilityName:XPS.Viewer~~~~0.0.1.0

Method 3. Download XPS Viewer from Windows Update instead of WSUS. (Windows 10 Pro & Enterprise).
If you ‘re using Windows 10 Pro or Enterprise, then apply the following steps in Group Policy Editor. *
* Note: If the computer belongs to a Domain, you need to modify the domain group policy settings (GPO) and then to run the «gpupdate /force» command, before installing XPS Viewer.
1. Open Group Policy Editor. To do that:
1. Press simultaneously the Windows
+ R keys to open the run command box.
2. Type gpedit.msc & Press Enter.

2. At the left pane navigate to:
- Computer Configuration -> Administrative Templates -> System
3. At the right pane double click at Specify settings for optional component installation and component repair

4. Set the policy to Enabled and then check the Download repair content and optional features directly from Windows Update instead of Windows Server Update Services (WSUS) box.
5. When done, click Apply and OK and restart your PC.

6. After restart, try to install the XPS Viewer by using the DISM method above.
7. After XPS viewer installation, open Group Policy Editor and revert back the changes.
That’s all folks! Did it work for you?
Please leave a comment in the comment section below or even better: like and share this blog post in the social networks to help spread the word about this solution.
If this article was useful for you, please consider supporting us by making a donation. Even $1 can a make a huge difference for us.

Содержание
- Как установить XPS Viewer в Windows 10 1803
- Как установить (удалить) XPS Viewer в Windows 10
- Установить (удалить) “Средство просмотра XPS” в параметрах системы
- Установить (удалить) “Средство просмотра XPS” в командной строке
- Средство просмотра xps windows 10 не устанавливается
- Вопрос
- Ответы
- Все ответы
- Чем открыть файл XPS в Windows 10
- Средство просмотра XPS Windows 10
- Параметры системы
- Командная строка
- Как открыть файл XPS в Windows 10
- FIX: Cannot Install XPS Viewer in Windows 10 (Solved)
- How to Resolve XPS Viewer installation problems in Windows 10.
Как установить XPS Viewer в Windows 10 1803

Если вы хотите использовать в чисто установленной Windows 1083 XPS Viewer, вам нужно будет добавить его вручную.
В «чистой» системе модуль устанавливается следующим образом.
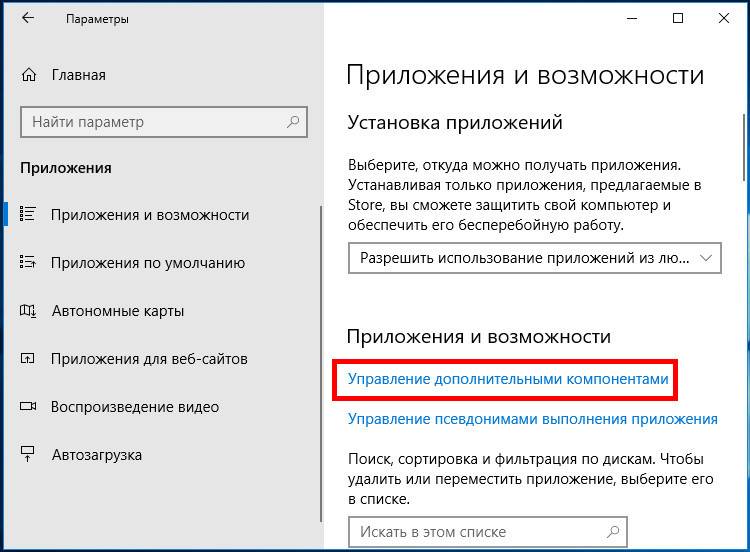
Откройте приложение «Параметры», зайдите в раздел «Приложения и возможности» и нажмите ссылку «Управление дополнительными компонентами».

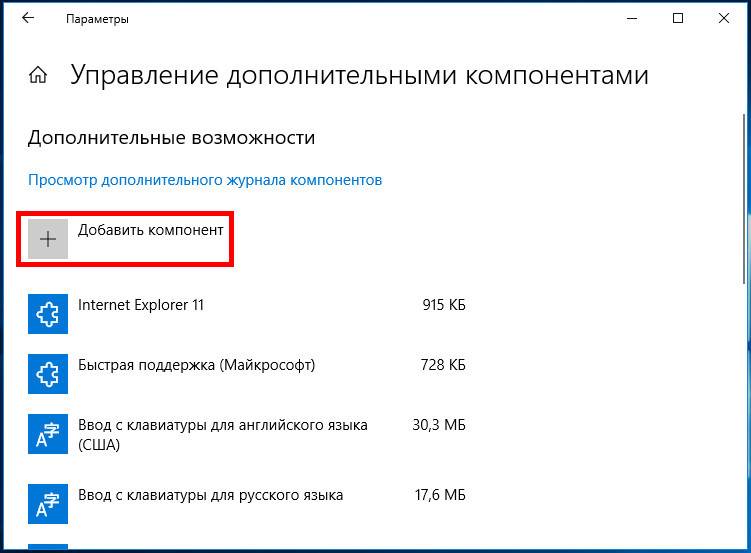
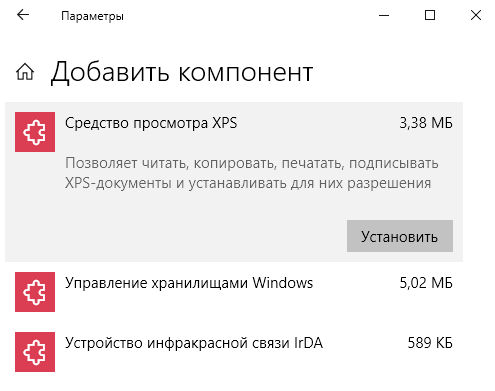
В следующем окне нажмите «Добавить компонент».

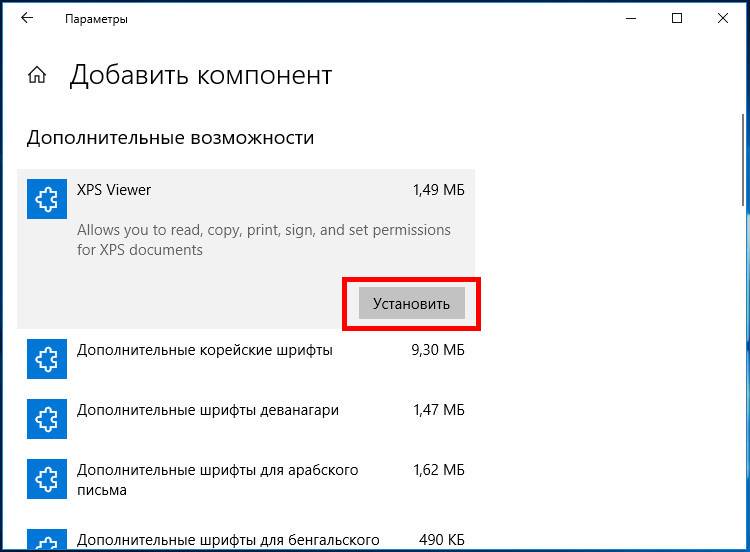
Выберите из списка XPS Viewer (он должен идти в списке первым) и нажмите кнопку «Установить».

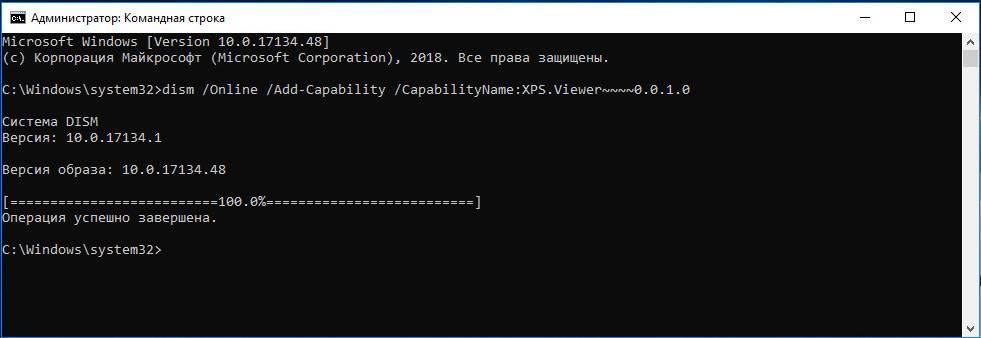
Если при установке вдруг возникнут какие-то проблемы, воспользуйтесь консольной утилитой DISM.
Откройте командную строку от имени администратора и выполните в ней такую команду:


Источник
Как установить (удалить) XPS Viewer в Windows 10
Приложение “Средство просмотра XPS” используют для работы с документами XPS. В Windows 10 до v1803 оно было установлено по умолчанию, сейчас же, чтобы его добавить нужно проделать некоторые действия. Сегодня рассмотрим как установить или удалить XPS Viewer в Windows 10.
Установить (удалить) “Средство просмотра XPS” в параметрах системы
1. Откройте меню “Пуск” и зайдите в “Параметры” (или нажмите на клавиатуре клавиши Win+I).

2. Зайдите в “Приложения”, с левой стороны выберите “Приложения и возможности”, с правой стороны нажмите на “Управление дополнительными компонентами”.

3. Если вы хотите удалить “XPS Viewer” – найдите его в списке, нажмите на него левой клавишей мыши и нажмите на “Удалить”.

Если вы хотите установить “XPS Viewer” – нажмите на “Добавить компонент”.

Найдите “XPS Viewer” => нажмите на него левой клавишей мыши и нажмите на “Установить”.

Установить (удалить) “Средство просмотра XPS” в командной строке
1. Откройте командную строку от имени администратора: введите в строке поиска cmd – нажмите на “Командная строка” правой клавишей мыши и выберите “Запуск от имени администратора”.

2. Чтобы удалить “XPS Viewer” введите команду DISM /Online /Remove-Capability /CapabilityName:XPS.Viewer
0.0.1.0 и нажмите клавишу Enter. По окончанию выполнения команды вам предложит перезагрузить компьютер, если вы согласны – нажмите клавишу y на клавиатуре, если нет – клавишу n

Чтобы установить “XPS Viewer” введите команду DISM /Online /Add-Capability /CapabilityName:XPS.Viewer
0.0.1.0 и нажмите клавишу Enter. По окончанию выполнения команды вам предложит перезагрузить компьютер, если вы согласны – нажмите клавишу y на клавиатуре, если нет – клавишу n

На сегодня все, если вы знаете другие способы – пишите в комментариях! Счастья Вам 🙂
Источник
Средство просмотра xps windows 10 не устанавливается

Вопрос
Edition: Windows 10 Pro
Ответы
Формат XPS на сегодня устарел и приложение для просмотра XPS файлов убрано из Window 10 1803 по умолчанию.
Если вам требуется данное приложение, то его можно добавить через «Apps and features/Manage optional features/Add feature/XPS Viewer» (или локализованный эквивалент).
This posting is provided «AS IS» with no warranties, and confers no rights.
Все ответы
Проверьте, пожалуйста, в свойствах этих файлов какая програма по умолчанию задана?
Если Вам помог чей-либо ответ, пожалуйста, не забывайте жать на кнопку «Предложить как ответ» или «Проголосовать за полезное сообщение» Мнения, высказанные здесь, являются отражение моих личных взглядов, а не позиции корпорации Microsoft. Вся информация предоставляется «как есть» без каких-либо гарантий.
Впервые слышу об этом файле, гугл предупреждает что это вирус/траян.
Проверьте пожалуйста систему на заражение, в инете не мало бесплатных продуктов как например касперский, макафи.
Если Вам помог чей-либо ответ, пожалуйста, не забывайте жать на кнопку «Предложить как ответ» или «Проголосовать за полезное сообщение» Мнения, высказанные здесь, являются отражение моих личных взглядов, а не позиции корпорации Microsoft. Вся информация предоставляется «как есть» без каких-либо гарантий.
Источник
Чем открыть файл XPS в Windows 10
Непосредственно Майкрософт предложили альтернативу классическим PDF. Файл XPS представляет собой основанный на XML формат для работы с графическими документами. В сравнении с PDF файл XPS является более лёгким. Поддержка данного формата по умолчанию присутствует во всех версиях системы включительно до Windows 10.
Эта статья расскажет, чем открыть файл XPS в Windows 10. Для их просмотра используется уже установленное средство просмотра XPS. Теперь же пользователям придётся его включить в компонентах начиная с версии 1803 Windows 10. Расположение программ и компонентов было несколько перенесено в обновлённые параметры системы.
Средство просмотра XPS Windows 10
XPS Viewer (средство просмотра) уже давно использовалось для просмотра файлов XPS. Оно позволяет читать, копировать, печатать, подписывать XPS-документы и устанавливать для них разрешения. После обновления операционной системы его нужно будет включить в разделе программы и компоненты Windows 10.
Параметры системы
Перейдите в расположение Параметры > Приложения > Приложения и возможности > Дополнительные возможности. Теперь нажмите Добавить компонент и выделив Средство просмотра XPS ткните Установить.

Важно! Расположение программ и компонентов в разных версиях операционной системы может незначительно отличаться. Так как дополнительных компонентов немало, возможность их установки точно есть.
Командная строка
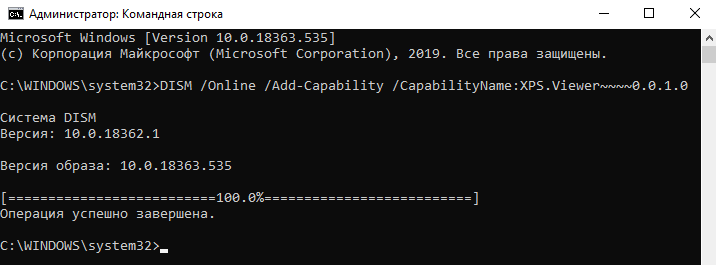
В принципе можно воспользоваться классической командной строкой, запущенной от имени администратора. В открывшемся окне достаточно выполнить команду: DISM /Online /Add-Capability /CapabilityName:XPS.Viewer

Дождитесь завершения процесса установки выбранного компонента. Будьте внимательны, для установки компонентов нужно подключение к Интернету. Если же нужного компонента нет в системе, он будет загружен с сервером Майкрософт.
Как открыть файл XPS в Windows 10
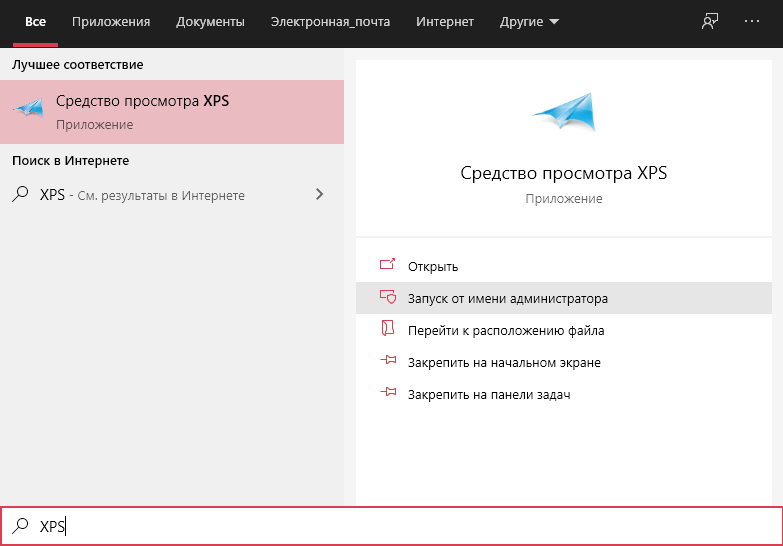
Теперь можно запустить XPS Viewer, выполнив команду: xpsrchvw.exe в окне Win+R. При необходимости используя поиск найдите приложение Средство просмотра XPS.

В открывшемся окне средства просмотра нажиме Файл > Открыть. В проводнике укажите расположение и выберите XPS-документ. В принципе можно используя контекстное меню открыть с помощью выбрать нужное приложение.
Большинство классических приложений для работы с PDF позволяют открыть файл формата XPS. Дополнительно не составит проблем возможность выполнения конвертации неизвестного XPS в привычный PDF. Для быстрой конвертации можно воспользоваться онлайн-сервисами или соответствующим программным обеспечением.
Например, популярный STDU Viewer умеет просматривать файлы в формате XPS. А также Internet Explorer 11 позволяет просматривать XPS-файлы, если установлен компонент NET Framework 3.5 для Windows 10.
Для просмотра содержимого XPS-документа можно воспользоваться стандартными средствами операционной системы. Дополнительно можно использовать и множество сторонних программ: классических для рабочего стола и доверенных с Microsoft Store.
Источник
FIX: Cannot Install XPS Viewer in Windows 10 (Solved)
In a previous tutorial I mentioned the steps required to install XPS Viewer on Windows 10. But, some users complaining that they cannot install XPS Viewer, because the XPS viewer is not listed after pressing the ‘Add a feature’ button (Apps > Manage optional features > Add a feature), or cannot be installed.
This tutorial contains instructions on how to troubleshoot XPS viewer installation problems in Windows 10 1803 & 1809 versions.
How to Resolve XPS Viewer installation problems in Windows 10.
Method 1. Uninstall and Reinstall Microsoft XPS Document Writer.
1. Open Programs and Features and then click Turn Windows features on or off.
2. Uncheck the Microsoft XPS Document Writer box and hit OK.
Method 2. Install XPS Viewer by using the DISM command.
1. Open Command Prompt as Administrator.
2. In command prompt, give the following command and press Enter.
Method 3. Download XPS Viewer from Windows Update instead of WSUS. (Windows 10 Pro & Enterprise).
If you ‘re using Windows 10 Pro or Enterprise, then apply the following steps in Group Policy Editor. *
* Note: If the computer belongs to a Domain, you need to modify the domain group policy settings (GPO) and then to run the «gpupdate /force» command, before installing XPS Viewer.
1. Open Group Policy Editor. To do that:
1. Press simultaneously the Windows
+ R keys to open the run command box.
2. Type gpedit.msc & Press Enter.
 + R keys to open the run command box.
2. At the left pane navigate to:
3. At the right pane double click at Specify settings for optional component installation and component repair
4. Set the policy to Enabled and then check the Download repair content and optional features directly from Windows Update instead of Windows Server Update Services (WSUS) box.
5. When done, click Apply and OK and restart your PC.
6. After restart, try to install the XPS Viewer by using the DISM method above.
7. After XPS viewer installation, open Group Policy Editor and revert back the changes.
That’s all folks! Did it work for you?
Please leave a comment in the comment section below or even better: like and share this blog post in the social networks to help spread the word about this solution.
Источник
1. Введите Start PowerShell в окне командной строки, чтобы запустить Windows PowerShell. 2. Введите Install-WindowsFeature XPS-Viewer. и нажмите Enter, чтобы установить XPS Viewer.
Поддерживает ли Windows 10 средство просмотра XPS?
В Windows 10 версии 1709 и более ранних версиях приложение включено в установочный образ. Если у вас есть XPS Viewer и вы обновились до Windows 10 версии 1803, никаких действий не требуется. У вас по-прежнему будет XPS Viewer.
Как загрузить Microsoft XPS Viewer?
Как установить XPS Viewer в Windows 10 бесплатно
- Введите «Установка и удаление программ» в строке поиска Windows.
- Щелкните ссылку Дополнительные функции.
- Нажмите значок плюса, чтобы добавить новые функции.
- Прокрутите список до конца, установите флажок рядом с XPS Viewer и нажмите кнопку «Установить».
Не удается установить XPS Viewer Windows 10?
Откройте «Программы и компоненты», а затем нажмите «Включение или отключение компонентов Windows». 2. Снимите флажок Microsoft XPS Document Writer и нажмите OK. … Теперь снова нажмите Включить или выключить функции Windows, установите флажок Microsoft XPS Document Writer и нажмите OK.
Нужна ли мне программа просмотра XPS?
Windows XPS Viewer — это безпринтерный способ сохранение документов, доступ к ним и работа с ними, не распечатывая их. Это экономит бумагу, позволяет вам иметь доступ к своим документам, где бы вы ни находились, и дает вам возможность работать с ними так, как если бы вы их распечатали.
Как установить XPS Viewer в Windows 10 с помощью PowerShell?
Введите Start PowerShell в окне командной строки, чтобы запустить Windows PowerShell. 2. Введите Install-WindowsFeature XPS-Viewer и нажмите Enter. для установки XPS Viewer.
Какая программа открывает XPS файлы Windows 10?
Если вы используете Windows 10, есть встроенный просмотрщик XPS что позволяет открывать и конвертировать файл в формат PDF. Вы также можете открывать и конвертировать файлы XPS в PDF с помощью Google Диска на любом компьютере или использовать веб-сайт преобразования XPS в PDF, который также будет работать на телефоне или планшете.
Что открывает файлы XPS в Windows 10?
Как просматривать документы XPS в Windows 10
- Нажмите клавишу Windows, введите «Управление дополнительными функциями» и нажмите «Ввод», чтобы открыть приложение «Настройки» на правой странице. …
- Чтобы добавить XPS Viewer, нажмите кнопку «Добавить функцию» в верхнем левом углу. …
- Найдите в списке «XPS Viewer», установите соответствующий флажок и нажмите «Установить».
XPS Viewer бесплатен?
Бесплатная стильная программа просмотра XPS с перекидной книгой и просмотром прокрутки. Подходит для настольных ПК, ноутбуков или планшетов. Включает дополнительную технологию для преобразования XPS; XPS в PDF и XPS в несколько форматов изображений. Преобразование может быть выполнено прямо из программы просмотра.
Как открыть файл XPS в Word?
Импорт документов XPS в Word
- Запустите Word.
- Перейдите в меню «Файл» и «Открыть», чтобы открыть текущий документ, или выберите «Создать», чтобы создать новый документ.
- Нажмите «Вставить» и найдите раздел «Текст».
- Щелкните Объект, откроется новое окно.
- В окне «Объект» выберите параметр «Создать из файла».
Не удается открыть файл XPS?
Убедитесь, что XPS Viewer активен
xps, вам необходимо убедиться, что на вашем устройстве установлено приложение XPS Viewer. Самый быстрый способ сделать это — запустить командную строку от имени администратора и ввести следующую команду: DISM / Online / Add-Capability / CapabilityName: XPS. … Эта команда автоматически добавляет XPS Viewer на ваш компьютер.
Как открыть файл XPS в Windows 10 1909?
Установить Средство просмотра XPS в Windows 10
Перейдите в Приложения и щелкните ссылку Дополнительные функции. Выберите Добавить функцию. Выберите XPS Viewer из списка. Щелкните кнопку Установить.
Как преобразовать XPS в PDF?
Как конвертировать XPS в PDF.
- В приложении просмотра XPS нажмите «Файл» и выберите «Печать» в раскрывающемся меню.
- В диалоговом окне выберите Microsoft Print to PDF.
- Щелкните Печать.
- Выберите желаемое место для вашего нового PDF-файла.
Содержание
- 1 XPS Viewer под Windows 10
- 2 Исправление обновления января 2020 года:
- 3 Средство просмотра XPS Windows 10
- 4 Как открыть файл XPS в Windows 10
РЕКОМЕНДУЕМЫЕ: Нажмите здесь, чтобы исправить ошибки Windows и оптимизировать производительность системы.
Документ Документ XPS это формат документов Microsoft, который позволяет архивировать содержимое в стандартном формате или публиковать его в удобочитаемой форме. Вы также можете использовать этот формат, чтобы никто не мог редактировать вашу оригинальную работу. Средство просмотра XPS был представлен в Windows 7 и также доступен в Windows 10 / 8.
XPS Viewer под Windows 10
Исправление обновления января 2020 года:
Мы рекомендуем вам попробовать этот новый инструмент. Он исправляет множество компьютерных ошибок, а также защищает от таких вещей, как потеря файлов, вредоносное ПО, сбои оборудования и оптимизирует ваш компьютер для максимальной производительности. Это исправило наш компьютер быстрее, чем делать это вручную:
- Шаг 1: Скачать PC Repair & Optimizer Tool (Windows 10, 8, 7, XP, Vista — Microsoft Gold Certified).
- Шаг 2: Нажмите «Начать сканирование”, Чтобы найти проблемы реестра Windows, которые могут вызывать проблемы с ПК.
- Шаг 3: Нажмите «Починить все», Чтобы исправить все проблемы.
 (дополнительное предложение для Advanced System Repair Pro -> Cайт | Лицензионное соглашение | Политика Kонфиденциальности | Удалить)
Щелчок по файлу .xps открывает файл в средстве просмотра XPS.
Чтобы открыть XPS Viewer, вы также можете ввести XPS в поле Начать поиск и нажмите Enter.
Файл xpsrchvw.exe и расположен в C: WindowsSystem32xpsrchvw.exe.
Средство просмотра XPS позволяет просматривать и управлять документами XPS. Вы также можете подписать их цифровой подписью и указать, кто будет иметь к ним доступ и как долго, изменяя разрешения для документа.
Если вы не используете его, вы можете включить или отключить его через Панель управления> Удалить программу> Включить или отключить функции Windows.
Найдите Microsoft XPS Document Writer и установите или снимите флажок. Нажмите OK и завершите процесс.
Загрузить: Microsoft XPS Viewer | Microsoft XPS Essentials Pack. (Загрузки были удалены Microsoft.
ОБНОВИТЬ: Начиная с Windows 10 v1803программа просмотра XPS по умолчанию отключена для новых установок. Вы должны вручную активировать или деактивировать функции Windows в окне .
РЕКОМЕНДУЕМЫЕ: Нажмите здесь, чтобы устранить ошибки Windows и оптимизировать производительность системы
Поддержка документов XPS по умолчанию появилась еще в Windows Vista и была доступной вплоть до апрельского обновления Windows 10. Сам XPS представляет собой основанный на XML формат для работы с графическими документами, позиционируемый Microsoft как альтернатива более «тяжелому»PDF. Особой популярности формат так и не приобрел, и в Windows 10 1083 Microsoft приняла решение не включать XPS Viewer, если установка операционной системы выполняется с нуля, то есть с установочного диска.
Если вы хотите использовать в чисто установленной Windows 1083 XPS Viewer, вам нужно будет добавить его вручную.
Если установка новой версии выполнялась через Центр обновления, никаких действий не потребуется, так как компонент для работы с документами XPS по-прежнему будет доступен.
В «чистой» системе модуль устанавливается следующим образом.
Откройте приложение «Параметры», зайдите в раздел «Приложения и возможности» и нажмите ссылку «Управление дополнительными компонентами».
В следующем окне нажмите «Добавить компонент».
Выберите из списка XPS Viewer (он должен идти в списке первым) и нажмите кнопку «Установить».
Если при установке вдруг возникнут какие-то проблемы, воспользуйтесь консольной утилитой DISM.
Откройте командную строку от имени администратора и выполните в ней такую команду:
Через пару минут компонент будет установлен, и вы сможете запустить его командой xpsrchvw.exe в окошке «Выполнить» или просто открыв привычным способом любой файл XPS.
Непосредственно Майкрософт предложили альтернативу классическим PDF. Файл XPS представляет собой основанный на XML формат для работы с графическими документами. В сравнении с PDF файл XPS является более лёгким. Поддержка данного формата по умолчанию присутствует во всех версиях системы включительно до Windows 10.
Эта статья расскажет, чем открыть файл XPS в Windows 10. Для их просмотра используется уже установленное средство просмотра XPS. Теперь же пользователям придётся его включить в компонентах начиная с версии 1803 Windows 10. Расположение программ и компонентов было несколько перенесено в обновлённые параметры системы.
Средство просмотра XPS Windows 10
XPS Viewer (средство просмотра) уже давно использовалось для просмотра файлов XPS. Оно позволяет читать, копировать, печатать, подписывать XPS-документы и устанавливать для них разрешения. После обновления операционной системы его нужно будет включить в разделе программы и компоненты Windows 10.
Параметры системы
Перейдите в расположение Параметры > Приложения > Приложения и возможности > Дополнительные возможности. Теперь нажмите Добавить компонент и выделив Средство просмотра XPS ткните Установить.
Важно! Расположение программ и компонентов в разных версиях операционной системы может незначительно отличаться. Так как дополнительных компонентов немало, возможность их установки точно есть.
Командная строка
В принципе можно воспользоваться классической командной строкой, запущенной от имени администратора. В открывшемся окне достаточно выполнить команду: DISM /Online /Add-Capability /CapabilityName:XPS.Viewer~~~~0.0.1.0.
Дождитесь завершения процесса установки выбранного компонента. Будьте внимательны, для установки компонентов нужно подключение к Интернету. Если же нужного компонента нет в системе, он будет загружен с сервером Майкрософт.
Как открыть файл XPS в Windows 10
Теперь можно запустить XPS Viewer, выполнив команду: xpsrchvw.exe в окне Win+R. При необходимости используя поиск найдите приложение Средство просмотра XPS.
В открывшемся окне средства просмотра нажиме Файл > Открыть. В проводнике укажите расположение и выберите XPS-документ. В принципе можно используя контекстное меню открыть с помощью выбрать нужное приложение.
Большинство классических приложений для работы с PDF позволяют открыть файл формата XPS. Дополнительно не составит проблем возможность выполнения конвертации неизвестного XPS в привычный PDF. Для быстрой конвертации можно воспользоваться онлайн-сервисами или соответствующим программным обеспечением.
Например, популярный STDU Viewer умеет просматривать файлы в формате XPS. А также Internet Explorer 11 позволяет просматривать XPS-файлы, если установлен компонент NET Framework 3.5 для Windows 10.
Заключение
Документ содержит данные, записанную в формате XPS (XML Paper Specification). Этот формат может содержать метки, а также данные, необходимые для печати документа. Файл формата XPS похож на файл .PDF, но основан уже на XML вместо PostScript.
Для просмотра содержимого XPS-документа можно воспользоваться стандартными средствами операционной системы. Дополнительно можно использовать и множество сторонних программ: классических для рабочего стола и доверенных с Microsoft Store.
Используемые источники:
- http://windowsbulletin.com/ru/просмотрщик-xps-под-windows-7/
- https://www.white-windows.ru/kak-ustanovit-xps-viewer-v-windows-10-1803/
- https://windd.ru/chem-otkryt-fajl-xps-v-windows-10/
Несмотря на то, что официальные лица Редмонда постоянно заявляют, что Windows 11 — это качество, ни одна операционная система не может быть идеальной, и проблемы иногда возникают, когда вы меньше всего их ожидаете.
Ранее сегодня мы говорили о том, что процессоры с поддержкой Windows 11 и VAES подвержены повреждению данных, и пришло время поднять еще одну тревогу, когда речь идет об операционных системах, разработанных Microsoft.
Microsoft только что выпустила уведомление для пользователей Windows 10 и 11 о новой известной проблеме в ОС.
Файлы XPS не открываются в Windows 10 и Windows 11
Судя по тому, что мы прочитали на странице документации Windows Health Dashboard, Windows в настоящее время испытывает трудности с открытием определенных документов XPS (альтернатива Microsoft для Adobe PDF, которая не имеет ничего общего с линейкой Dell XPS).
После установки обновлений KB5014666 или более поздних версий XPS Viewer может не открыть документы XML Paper Specification (XPS) на некоторых языках, отличных от английского, включая некоторые кодировки символов японского и китайского языков.
Обратите внимание, что вышеупомянутая проблема затрагивает как файлы спецификации XML Paper (XPS), так и файлы спецификации Open XML Paper (OXPS).
При возникновении этой проблемы вы можете получить сообщение об ошибке, например, эта страница не может быть отображена в средстве просмотра XPS, или оно может перестать отвечать на запросы и иметь высокую загрузку ЦП с постоянно увеличивающимся использованием памяти.
Технический гигант из Редмонда также заявил, что при возникновении ошибки, если XPS Viewer не закрыт, он может использовать до 2,5 ГБ памяти, прежде чем неожиданно закрыться.

Помимо невозможности открывать документы XPS и OXPS на языках, отличных от английского, XPS Viewer перестает отвечать на запросы и начинает потреблять ресурсы ЦП и ОЗУ, пока не произойдет сбой при достижении 2,5 ГБ использования ОЗУ.
Представители Microsoft заявили, что проблема связана с KB5014666 и KB5014666 (Windows 10 19044.1806 и Windows 11 22000.778), которые были выпущены 26 и 28 июня.
Технический колосс сейчас занят расследованием ошибки и обещает выпустить исправление в следующих выпусках. К сожалению, нет временных обходных путей.
Пожалуйста, имейте в виду, что эта проблема даже не будет беспокоить подавляющее большинство обычных пользователей Windows 10 в любом виде, форме или форме.
Помимо того факта, что формат XPS не получил распространения, Microsoft с тех пор прекратила связывать Windows 10 с XPS Viewer в версии 1803.
При этом вы можете установить XPS Viewer в качестве дополнительного компонента Windows в приложении «Настройки», если это то, что вы хотите.
Вы сталкивались с такими проблемами? Поделитесь с нами своими мыслями в специальном разделе комментариев, расположенном ниже.
Поддержка документов XPS по умолчанию появилась еще в Windows Vista и была доступной вплоть до апрельского обновления Windows 10. Сам XPS представляет собой основанный на XML формат для работы с графическими документами, позиционируемый Microsoft как альтернатива более «тяжелому» PDF. Особой популярности формат так и не приобрел, и в Windows 10 1083 Microsoft приняла решение не включать XPS Viewer, если установка операционной системы выполняется с нуля, то есть с установочного диска.
Если вы хотите использовать в чисто установленной Windows 1083 XPS Viewer, вам нужно будет добавить его вручную.
Если установка новой версии выполнялась через Центр обновления, никаких действий не потребуется, так как компонент для работы с документами XPS по-прежнему будет доступен.
В «чистой» системе модуль устанавливается следующим образом.
Откройте приложение «Параметры», зайдите в раздел «Приложения и возможности» и нажмите ссылку «Управление дополнительными компонентами».
В следующем окне нажмите «Добавить компонент».
Выберите из списка XPS Viewer (он должен идти в списке первым) и нажмите кнопку «Установить».
Если при установке вдруг возникнут какие-то проблемы, воспользуйтесь консольной утилитой DISM.
Откройте командную строку от имени администратора и выполните в ней такую команду:
dism /Online /Add-Capability /CapabilityName:XPS.Viewer~~~~0.0.1.0
Через пару минут компонент будет установлен, и вы сможете запустить его командой xpsrchvw.exe в окошке «Выполнить» или просто открыв привычным способом любой файл XPS.
Оцените Статью:
 (10 оценок, среднее: 5,00 из 5)
![]() Загрузка…
Загрузка…
-
Question
-
When I try to copy text from a XPS document the viewer crashes. I have seen this behavior on multiple computers running Windows 10.
Is there a fix?
-
Moved by
Chenchen Li
Friday, October 20, 2017 7:54 AM
XPSViewer
-
Moved by
All replies
-
Hi L Phillips,
I have the same issue as you.
[environment]
Windows 10 Pro 64-bit, version 1709, build 16299.19
for testing, I created an XPS file via Excel: [Export]P.S.
I’ve tried in Windows 7, using the same file.
XPS viewer works fine (does not crash).Regards,
Ashidacchi
-
Edited by
Ashidacchi
Friday, October 20, 2017 4:00 AM
add comment
-
Edited by
-
Hi L Phillips,
This forum(General Office Development) is for development issues related to Office Object Model and your issue is more related to XPS Viewer produces, I would move the thread to
Windows 10 Application Compatibility. Thanks for your understanding.
Best Regards,
Terry
MSDN Community Support Please remember to click "Mark as Answer" the responses that resolved your issue, and to click "Unmark as Answer" if not. This can be beneficial to other community members reading this thread. If
you have any compliments or complaints to MSDN Support, feel free to contact MSDNFSF@microsoft.com.-
Edited by
Terry Xu — MSFT
Friday, October 20, 2017 7:53 AM
-
Edited by
-
Thanks Terry. I appreciate it.
-
Hi,
How did you do this? Just right click the text and choose Copy. Where did you copy to?
Please check event log and see the detailed applications logs related to this issue. I have the latest Windows update installed on my PC, and there is no such issue.
Let’s test this issue in Clean boot Mode and Safe mode.
For further troubleshooting, please help to collect following dump file for our research:
First enable app crash dump collection by copying following words into notepad, saving it as dump.reg and importing it:
Windows Registry Editor Version 5.00
[HKEY_LOCAL_MACHINESOFTWAREMicrosoftWindowsWindows Error Reportinglocaldumpsxpsrchvw.exe]
«DumpFolder»=hex(2):63,00,3a,00,5c,00,63,00,72,00,61,00,73,00,68,00,64,00,75,
00,6d,00,70,00,73,00,00,00
«DumpCount»=dword:00000010
«DumpType»=dword:00000001
«CustomDumpFlags»=dword:00000000
Then, open
xps viewerto repro the issue. If crash issue appeared, please find the *.dump file under c:.To further help you, please upload this file into Onedrive and shared the link here.
Also, you can try to analyze dump by yourself if you would like to:
How to analyze app crash dump file:
http://blogs.technet.com/b/askperf/archive/2007/05/29/basic-debugging-of-an-application-crash.aspx
Please remember to mark the replies as answers if they help.
If you have feedback for TechNet Subscriber Support, contact
tnmff@microsoft.com. -
I open the xps file in the MS viewer, select text, right click, and click copy. Then XPS crashes at this point. Here is the dump file.
Dump File Link
-
Hi,
Let’s try to run the sfc /scannow in CMD as administrator (System File Checker command) to replace a missing or corrupt copy of the msvcrt.dll file. This DLL file is provided by Microsoft in most versions of Windows, so the System File Checker tool should
restore it.Analysis results:
Probably caused by : msvcrt.dll ( msvcrt!__CxxCallCatchBlock+190 )

BUGCHECK_STR:  APPLICATION_FAULT

STACK_TEXT:
000000e6`275ab6d0 00007ffe`44e99e08 KERNELBASE!RaiseException+0x68
000000e6`275ab7b0 00007ffe`482837f0 msvcrt!__CxxCallCatchBlock+0x190
000000e6`275ab890 00007ffe`483b9603 ntdll!RcFrameConsolidation+0x3
000000e6`275af570 00007ff7`321a95df xpsrchvw!WindowsXHpp::WndProcImpl<Mainframe,Mainframe,MainframeBase,&Mainframe::WndProc,&MainframeBase::SetHWND>::CallClientProc+0x7f
000000e6`275af5e0 00007ff7`321a8931 xpsrchvw!WindowsXHpp::WndProcImpl<Mainframe,Mainframe,MainframeBase,&Mainframe::WndProc,&MainframeBase::SetHWND>::Proc+0x11
000000e6`275af620 00007ffe`45c6bc50 user32!UserCallWinProcCheckWow+0x280
000000e6`275af780 00007ffe`45c6b5cf user32!DispatchMessageWorker+0x19f
000000e6`275af800 00007ff7`321b817c xpsrchvw!MessagePumper::ProcessMessage+0x58
000000e6`275af830 00007ff7`321b836c xpsrchvw!MessagePumper::GetMessagesAndNotifyOnIdle+0x1e8
000000e6`275af8c0 00007ff7`32220fc6 xpsrchvw!RealMain+0x1796
000000e6`275afd80 00007ff7`3222138c xpsrchvw!wWinMain+0x1f4
000000e6`275afe00 00007ff7`323804a3 xpsrchvw!__wmainCRTStartup+0x1c7
000000e6`275afec0 00007ffe`459e2774 kernel32!BaseThreadInitThunk+0x14
000000e6`275afef0 00007ffe`48380d51 ntdll!RtlUserThreadStart+0x21
Please remember to mark the replies as answers if they help.
If you have feedback for TechNet Subscriber Support, contact
tnmff@microsoft.com. -
@ Kate Li,
I can always reproduce OP’s issue.
Does not it occur in your environment (Windows 10)?
Ashidacchi
-
Yes, my computer works fine. Here’s my build number:
Please remember to mark the replies as answers if they help.
If you have feedback for TechNet Subscriber Support, contact
tnmff@microsoft.com. -
Hi Kate Li,
I appreciate your confirmation and apologize my rude manner.
I’ve just checked both with ver.1607(not 1703) and ver.1709 of Windows 10.When open an XPS file with XPS viewer and copy a part of text:
a) Windows 10 ver.1607(not 1703): no problem, copied text can be pasted into notepad.
b) Windows 10 ver.1709: crashed (see the below screenshots)
—
Hi L Phillps,
Please provide your Windows 10 version and build.I suspect Windows 10 version 1709 has some fault with XPS viewer.
Regards.
Ashidacchi
-
Edited by
Ashidacchi
Wednesday, October 25, 2017 11:31 PM
typo (version)
-
Edited by
-
Edition: Windows 10 Home
Version: 1703
OS Build: 15063.674 -
Here is an example of a file that fails when copying text. I had to move around in this document and copy three different sections before it failed.
XPS Test File
-
Hi,
This is my test result: I used an XPS file that you provided.
XPS Viewer in my Windows 10 (version 1703, build 15063.674) worked fine.
If you want my screenshots, please say so, I will provide them.
And sorry, I have no idea about your issue at this moment.Regards,
Ashidacchi
-
Hi Philips,
This could be caused that the file has been blocked, please right click the file and choose Properties, check on Unblock and Apply.
The issue can be resolved.
Please remember to mark the replies as answers if they help.
If you have feedback for TechNet Subscriber Support, contact
tnmff@microsoft.com. -
Unblocking the file does not help. The file I provided does not always cause the issue. But if I use the outline to move around in the file and copy text, it will eventually fail.
I have attached another xps document that fails no matter what.
Test File that Always Fails
-
Hi L Phillips,
Thank you for sharing a new (revised) XPS file.
I can reproduce your issue, even if checkbox [Unblock] is checked.I’m wondering if XPS format is «must». Do you have any inevitability of XPS? Can’t you use
PDF format?
(I guess the original file is Word document.)And I would like to recommend to send a feedback to MS via Feedback Hub.
Regard,
Ashidacchi
-
Edited by
Ashidacchi
Thursday, October 26, 2017 3:13 AM
-
Edited by
-
Hi There, I am experiencing the same issue… Windows 10 1709 XPS viewer crashing when copy. Hopefully you can push out an update in between defending against BadRabbit etc
Thanks — Mitch -
I will help to feedback this issue in our platform.
Please remember to mark the replies as answers if they help.
If you have feedback for TechNet Subscriber Support, contact
tnmff@microsoft.com. -
Open Control Panel > Programs and Features >
Turn Windows Features on or off and uncheck XPS Viewer and click OK. Restart your PC and go back and apply a check to XPS Viewer and click OK. Let us know if this resolved
your crashing issue.
Carey Frisch
-
Hi Carey Frisch,
Your approach is a nice alternative to XPS Viewer, i.e. XPS Reader.
But I’m afraid it could not be a solution for OP’s issue. It’s up to OP’s decision.Regards,
Ashidacchi
-
Edited by
Ashidacchi
Friday, October 27, 2017 9:05 AM
-
Edited by
-
Some Insight into
Microsoft XPS Viewer«XPS is not meant to be used as a file format for intermediate data that still need to be changed. Like with PDF, you’re not supposed to edit XPS files»
Perhaps saving your document as a PDF would be a viable solution. You can download the free version of Acrobat Read
here.
Carey Frisch
-
Nope, this idea doesn’t resolve the issue.
Carey Frisch
-
Hi Carey,
I am experiencing this issue on 4 separate computers.
If I open the original Word document, copy its contents to a blank doc, save as XPS and open in the Viewer then I can copy one selection of text without the XPS viewer crashing. If I copy a second selection in this same file it crashes.
Not all XPS files cause the crash. Moreover, all the files I have tested have been saved from MS Word. If a document is small (just 3 or 4 pages) then likely it will not cause an issue. If the document has more than 50 pages, contains text, graphics, and
the outline (navigation bar on the left side of the screen) is present then it will likely fail if you keep moving around (using the outline) and copying sections.The purpose of our using XPS is to provide information that a client can read, navigate, search easily and print but not change. XPS is perfect for that. I do not wish to use a PDF format because most users will open the file with Microsoft Edge. This means
no navigation bar in the PDF document unless they download Acrobat Reader. That is not a viable alternative. As Mitch pointed out, I think it is obvious that there is an issue with the XPS viewer that needs to be addressed and corrected by Microsoft. I have
used Feedback to inform Microsoft of the issue. In the meantime, I will warn my clients not to copy text from our XPS documents.Best Wishes,
Lance Phillips-
Edited by
L Phillips
Friday, October 27, 2017 12:45 PM
-
Edited by
-
I am also having this issue. Has there been any progress with this?
-
When will the XPS Viewer copy crash get fixed!?! Every Windows 10 FCU release on the planet is presently affected by this bug. This bug was introduced with FCU, in case it’s not obvious what to test on.
This really should be a high priority item, since it affects basic functionality of a feature that has existed in the XPS Viewer since it was first released.
-
Once again Microsoft devs go silent on a critical bug. Painful.
-
I have the same problem through the last two or three Windows 10 updates.
A good workaround that works for me is to use the Windows 10 built print > print to pdf, then copy from the pdf.
(Windows 10 Pro version 1709 build 16299.248 64 bit)
-
Agree
Same issue February 2018 — —> where is the fix from Microsoft……..
 Thanks — Mitch
-
Question
-
When I try to copy text from a XPS document the viewer crashes. I have seen this behavior on multiple computers running Windows 10.
Is there a fix?
-
Moved by
Chenchen Li
Friday, October 20, 2017 7:54 AM
XPSViewer
-
Moved by
All replies
-
Hi L Phillips,
I have the same issue as you.
[environment]
Windows 10 Pro 64-bit, version 1709, build 16299.19
for testing, I created an XPS file via Excel: [Export]P.S.
I’ve tried in Windows 7, using the same file.
XPS viewer works fine (does not crash).Regards,
Ashidacchi
-
Edited by
Ashidacchi
Friday, October 20, 2017 4:00 AM
add comment
-
Edited by
-
Hi L Phillips,
This forum(General Office Development) is for development issues related to Office Object Model and your issue is more related to XPS Viewer produces, I would move the thread to
Windows 10 Application Compatibility. Thanks for your understanding.
Best Regards,
Terry
MSDN Community Support Please remember to click "Mark as Answer" the responses that resolved your issue, and to click "Unmark as Answer" if not. This can be beneficial to other community members reading this thread. If
you have any compliments or complaints to MSDN Support, feel free to contact MSDNFSF@microsoft.com.-
Edited by
Terry Xu — MSFT
Friday, October 20, 2017 7:53 AM
-
Edited by
-
Thanks Terry. I appreciate it.
-
Hi,
How did you do this? Just right click the text and choose Copy. Where did you copy to?
Please check event log and see the detailed applications logs related to this issue. I have the latest Windows update installed on my PC, and there is no such issue.
Let’s test this issue in Clean boot Mode and Safe mode.
For further troubleshooting, please help to collect following dump file for our research:
First enable app crash dump collection by copying following words into notepad, saving it as dump.reg and importing it:
Windows Registry Editor Version 5.00
[HKEY_LOCAL_MACHINESOFTWAREMicrosoftWindowsWindows Error Reportinglocaldumpsxpsrchvw.exe]
«DumpFolder»=hex(2):63,00,3a,00,5c,00,63,00,72,00,61,00,73,00,68,00,64,00,75,
00,6d,00,70,00,73,00,00,00
«DumpCount»=dword:00000010
«DumpType»=dword:00000001
«CustomDumpFlags»=dword:00000000
Then, open
xps viewerto repro the issue. If crash issue appeared, please find the *.dump file under c:.To further help you, please upload this file into Onedrive and shared the link here.
Also, you can try to analyze dump by yourself if you would like to:
How to analyze app crash dump file:
http://blogs.technet.com/b/askperf/archive/2007/05/29/basic-debugging-of-an-application-crash.aspx
Please remember to mark the replies as answers if they help.
If you have feedback for TechNet Subscriber Support, contact
tnmff@microsoft.com. -
I open the xps file in the MS viewer, select text, right click, and click copy. Then XPS crashes at this point. Here is the dump file.
Dump File Link
-
Hi,
Let’s try to run the sfc /scannow in CMD as administrator (System File Checker command) to replace a missing or corrupt copy of the msvcrt.dll file. This DLL file is provided by Microsoft in most versions of Windows, so the System File Checker tool should
restore it.Analysis results:
Probably caused by : msvcrt.dll ( msvcrt!__CxxCallCatchBlock+190 )

BUGCHECK_STR:  APPLICATION_FAULT

STACK_TEXT:
000000e6`275ab6d0 00007ffe`44e99e08 KERNELBASE!RaiseException+0x68
000000e6`275ab7b0 00007ffe`482837f0 msvcrt!__CxxCallCatchBlock+0x190
000000e6`275ab890 00007ffe`483b9603 ntdll!RcFrameConsolidation+0x3
000000e6`275af570 00007ff7`321a95df xpsrchvw!WindowsXHpp::WndProcImpl<Mainframe,Mainframe,MainframeBase,&Mainframe::WndProc,&MainframeBase::SetHWND>::CallClientProc+0x7f
000000e6`275af5e0 00007ff7`321a8931 xpsrchvw!WindowsXHpp::WndProcImpl<Mainframe,Mainframe,MainframeBase,&Mainframe::WndProc,&MainframeBase::SetHWND>::Proc+0x11
000000e6`275af620 00007ffe`45c6bc50 user32!UserCallWinProcCheckWow+0x280
000000e6`275af780 00007ffe`45c6b5cf user32!DispatchMessageWorker+0x19f
000000e6`275af800 00007ff7`321b817c xpsrchvw!MessagePumper::ProcessMessage+0x58
000000e6`275af830 00007ff7`321b836c xpsrchvw!MessagePumper::GetMessagesAndNotifyOnIdle+0x1e8
000000e6`275af8c0 00007ff7`32220fc6 xpsrchvw!RealMain+0x1796
000000e6`275afd80 00007ff7`3222138c xpsrchvw!wWinMain+0x1f4
000000e6`275afe00 00007ff7`323804a3 xpsrchvw!__wmainCRTStartup+0x1c7
000000e6`275afec0 00007ffe`459e2774 kernel32!BaseThreadInitThunk+0x14
000000e6`275afef0 00007ffe`48380d51 ntdll!RtlUserThreadStart+0x21
Please remember to mark the replies as answers if they help.
If you have feedback for TechNet Subscriber Support, contact
tnmff@microsoft.com. -
@ Kate Li,
I can always reproduce OP’s issue.
Does not it occur in your environment (Windows 10)?
Ashidacchi
-
Yes, my computer works fine. Here’s my build number:
Please remember to mark the replies as answers if they help.
If you have feedback for TechNet Subscriber Support, contact
tnmff@microsoft.com. -
Hi Kate Li,
I appreciate your confirmation and apologize my rude manner.
I’ve just checked both with ver.1607(not 1703) and ver.1709 of Windows 10.When open an XPS file with XPS viewer and copy a part of text:
a) Windows 10 ver.1607(not 1703): no problem, copied text can be pasted into notepad.
b) Windows 10 ver.1709: crashed (see the below screenshots)
—
Hi L Phillps,
Please provide your Windows 10 version and build.I suspect Windows 10 version 1709 has some fault with XPS viewer.
Regards.
Ashidacchi
-
Edited by
Ashidacchi
Wednesday, October 25, 2017 11:31 PM
typo (version)
-
Edited by
-
Edition: Windows 10 Home
Version: 1703
OS Build: 15063.674 -
Here is an example of a file that fails when copying text. I had to move around in this document and copy three different sections before it failed.
XPS Test File
-
Hi,
This is my test result: I used an XPS file that you provided.
XPS Viewer in my Windows 10 (version 1703, build 15063.674) worked fine.
If you want my screenshots, please say so, I will provide them.
And sorry, I have no idea about your issue at this moment.Regards,
Ashidacchi
-
Hi Philips,
This could be caused that the file has been blocked, please right click the file and choose Properties, check on Unblock and Apply.
The issue can be resolved.
Please remember to mark the replies as answers if they help.
If you have feedback for TechNet Subscriber Support, contact
tnmff@microsoft.com. -
Unblocking the file does not help. The file I provided does not always cause the issue. But if I use the outline to move around in the file and copy text, it will eventually fail.
I have attached another xps document that fails no matter what.
Test File that Always Fails
-
Hi L Phillips,
Thank you for sharing a new (revised) XPS file.
I can reproduce your issue, even if checkbox [Unblock] is checked.I’m wondering if XPS format is «must». Do you have any inevitability of XPS? Can’t you use
PDF format?
(I guess the original file is Word document.)And I would like to recommend to send a feedback to MS via Feedback Hub.
Regard,
Ashidacchi
-
Edited by
Ashidacchi
Thursday, October 26, 2017 3:13 AM
-
Edited by
-
Hi There, I am experiencing the same issue… Windows 10 1709 XPS viewer crashing when copy. Hopefully you can push out an update in between defending against BadRabbit etc
Thanks — Mitch -
I will help to feedback this issue in our platform.
Please remember to mark the replies as answers if they help.
If you have feedback for TechNet Subscriber Support, contact
tnmff@microsoft.com. -
Open Control Panel > Programs and Features >
Turn Windows Features on or off and uncheck XPS Viewer and click OK. Restart your PC and go back and apply a check to XPS Viewer and click OK. Let us know if this resolved
your crashing issue.
Carey Frisch
-
Hi Carey Frisch,
Your approach is a nice alternative to XPS Viewer, i.e. XPS Reader.
But I’m afraid it could not be a solution for OP’s issue. It’s up to OP’s decision.Regards,
Ashidacchi
-
Edited by
Ashidacchi
Friday, October 27, 2017 9:05 AM
-
Edited by
-
Some Insight into
Microsoft XPS Viewer«XPS is not meant to be used as a file format for intermediate data that still need to be changed. Like with PDF, you’re not supposed to edit XPS files»
Perhaps saving your document as a PDF would be a viable solution. You can download the free version of Acrobat Read
here.
Carey Frisch
-
Nope, this idea doesn’t resolve the issue.
Carey Frisch
-
Hi Carey,
I am experiencing this issue on 4 separate computers.
If I open the original Word document, copy its contents to a blank doc, save as XPS and open in the Viewer then I can copy one selection of text without the XPS viewer crashing. If I copy a second selection in this same file it crashes.
Not all XPS files cause the crash. Moreover, all the files I have tested have been saved from MS Word. If a document is small (just 3 or 4 pages) then likely it will not cause an issue. If the document has more than 50 pages, contains text, graphics, and
the outline (navigation bar on the left side of the screen) is present then it will likely fail if you keep moving around (using the outline) and copying sections.The purpose of our using XPS is to provide information that a client can read, navigate, search easily and print but not change. XPS is perfect for that. I do not wish to use a PDF format because most users will open the file with Microsoft Edge. This means
no navigation bar in the PDF document unless they download Acrobat Reader. That is not a viable alternative. As Mitch pointed out, I think it is obvious that there is an issue with the XPS viewer that needs to be addressed and corrected by Microsoft. I have
used Feedback to inform Microsoft of the issue. In the meantime, I will warn my clients not to copy text from our XPS documents.Best Wishes,
Lance Phillips-
Edited by
L Phillips
Friday, October 27, 2017 12:45 PM
-
Edited by
-
I am also having this issue. Has there been any progress with this?
-
When will the XPS Viewer copy crash get fixed!?! Every Windows 10 FCU release on the planet is presently affected by this bug. This bug was introduced with FCU, in case it’s not obvious what to test on.
This really should be a high priority item, since it affects basic functionality of a feature that has existed in the XPS Viewer since it was first released.
-
Once again Microsoft devs go silent on a critical bug. Painful.
-
I have the same problem through the last two or three Windows 10 updates.
A good workaround that works for me is to use the Windows 10 built print > print to pdf, then copy from the pdf.
(Windows 10 Pro version 1709 build 16299.248 64 bit)
-
Agree
Same issue February 2018 — —> where is the fix from Microsoft……..