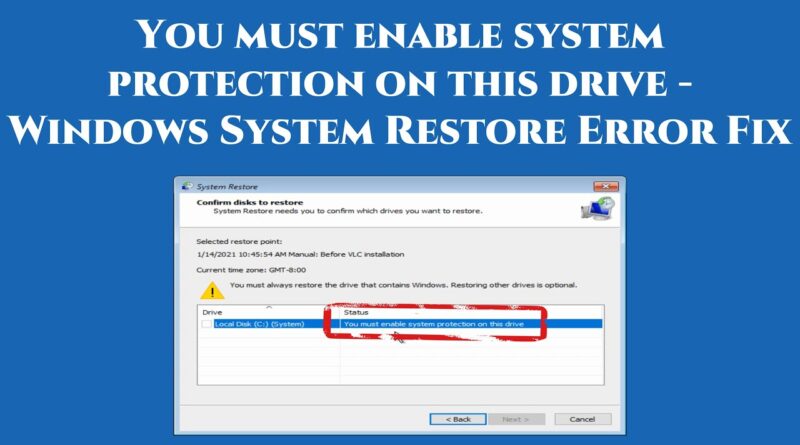
When performing system restore in Windows 10/8/7, you may find there is an error message, saying “you must enable system protection on this drive”. In this case, what should you do to solve this issue? Here are two useful ways for you, and a better way to restore your PC to a previous state without enabling system protection.
System Restore You Must Enable System Protection on This Drive
You may create System Restore points for system backup before performing some other system related operations like changing Windows registry, upgrading Windows, etc. Once the Windows operating system goes wrong, you can restore your computer to a previous state by the created restore points.
However, one user recently told us that he wanted a system restore after upgrading Windows 7 to Windows 10 since the new OS ran quite slowly. But he got into the System Restore from the Troubleshoot option, an error message stopped him:
“You must always restore the drive that contains Windows. Restoring other drives is optional.
You must enable system protection on this drive.”
In general, this issue is very common and many users report that in forums like Reddit. If you are also bothered by this issue, although Windows says there are multiple restore points to restore, you still get the same message when restoring C drive.
What Is System Protection
Simply speaking, it refers to a Windows feature to regularly create and save information about the system files and registry of your computer. Also, it saves previous versions of files you have changed and also saves these files in restore points before significant system events.
For the drive that includes installed Windows operating system, System Protection is on by default. And System Protection can only be turned on for NTFS drives.
However, when the above issue occurs, this means the feature is turned off. To restore the system successfully, you should ensure System Protection is enabled.
How to Enable System Protection on C Drive
How do I enable System Protection on my hard drive Windows 10/8/7? For this issue, we will show you two ways to turn it on in this part.
Enable System Protection CMD
The recommended method by users is to use Command Prompt. How to enable System Protection on C drive from Command Prompt in Windows 10/8/7 to fix “you must enable system protection on this drive”
Follow these steps now (take Win10 as an example):
Step 1: Open Command Prompt
If your Windows operating system can boot:
- Type cmd in the Search box.
- Right-click on this tool to choose Run as administrator.
If you couldn’t enter Windows desktop
- Restart your PC several times on the Windows log screen to enter Windows Recovery Environment (WinRE). Of course, if not, you can use a recovery disc to enter WinRE.
- Click Troubleshoot > Advanced options > Command Prompt to open this tool.
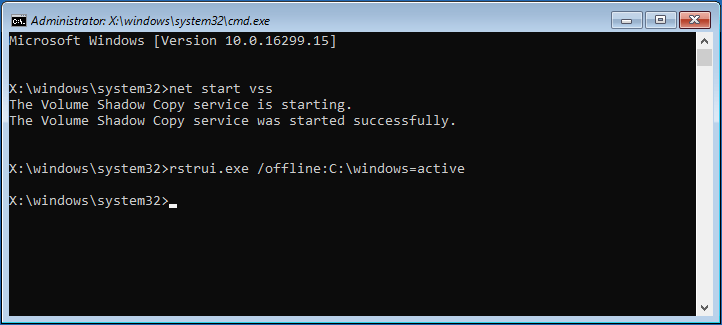
Step 2: Input the Following Command Lines
- Type net start vss and hit Enter. Then, the Volume Shadow Copy service will be started successfully.
- Input rstrui.exe /offline:C:windows=activeand press Enter.
Step 3: Reboot PC
After restoring the restoration, restart your computer to see if you could go back to the previous state.
Furthering tip:
According to a user from the Superuser forum, he also encountered the same error “you must enable system protection on this drive”. After trying the above commands, Rstrui.exe opened up the System Restore windows but it didn’t fix the problem – the System Restore failed.
The error message implied that it had something to do with the registry. Then, this user used Command Prompt and went into C:WindowsSystem32config, and renamed two of the registry files:
ren SYSTEM system.001
ren SOFTWARE software.001
After that, he ran the System Restore again and it worked. And he could log back into his computer. If you also fail to do a restoration after trying these commands, you can also do as the user does.
Enable System Protection via Control Panel
Note: This way is only available when your Windows 10/8/7 can run to the Windows desktop.
Step 1: Open System Protection Tab
- Type control panel in the Search box, click the result to open this desktop app.
- Click System and Security > System > System protection.
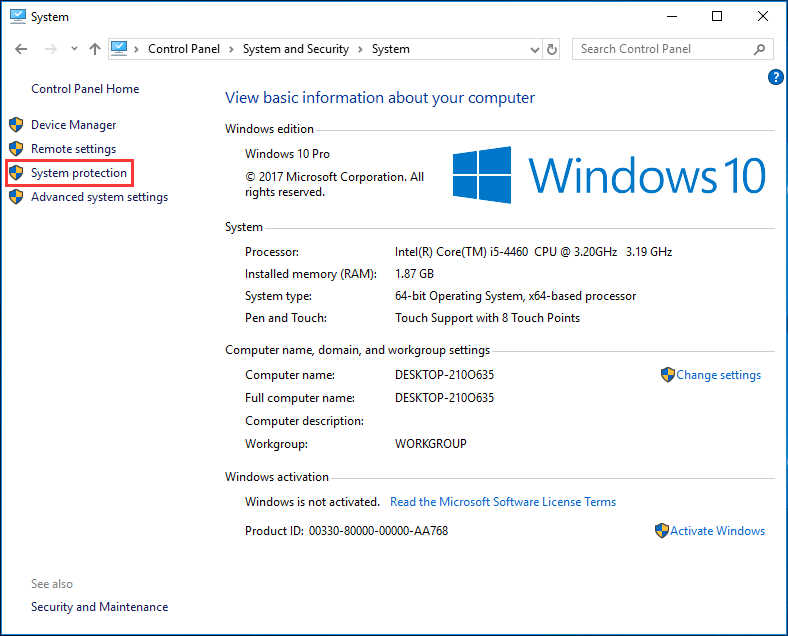
Tip: To open this window, you can also input create a restore point in the search box and directly click the result.
Step 2: Configure Restore Settings
- Under the System Protection tab, choose the target drive.
- Click the Configure button.
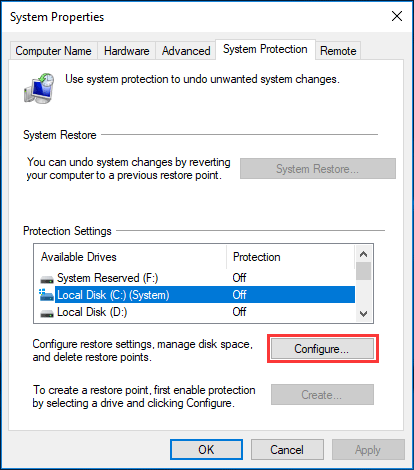
Tip: Some of you may be curious about this question: how to enable System Protection on D drive. Actually, it is easy. You only need to choose drive D from the Available Drives section and click Configure to go on.
Step 3: Enable Windows 7/8/10 System Protection
- Tick the option Turn on system protection.
- Click the Apply and OK button.
Then, you can try to perform restoration and see if you have solved the issue – you must enable system protection on this drive.
“I got ‘you must enable system protection on this drive’ when restoring system after Windows update. These above methods are quite helpful to fix my issue. Share them here!”Click to Tweet
Now, the fixes for system restore error are told to you. It is simple to turn on System Protection in Windows 10/8/7.
But this option may be grayed out or missing in some cases. Besides, you may fail to enable System Protection although you do that work through Command Prompt, let alone restoring system points to the previous state. Luckily, you can protect your Windows in another easy way.
MiniTool offers you a fairly simple way to back up your Windows operating system and quickly restore it, without enabling System Protection. Here, the professional Windows backup software, MiniTool ShadowMaker is recommended to you.
It can help you back up not only Windows OS but also your important files, certain partitions or the entire hard drive with compressing mode to an image file.
If you have made a system image backup, you can restore your PC to the previous version of Windows when you find it doesn’t work as expectation after upgrading to Windows 10.
Right now, get MiniTool ShadowMaker Trial Edition (only for a 30-day free trial) from the following button for Windows backup and restore to avoid the issue “you must enable system protection on this drive”. Of course, if you want to enjoy this software all the time after the expiration date, upgrade it to Pro Edition.
Free Download
See how to back up OS in Windows 10/8/7.
Step 1: Run MiniTool ShadowMaker
- Double click this tool on your computer to launch it.
- Click the Keep Trial button to continue using the Trial Edition.
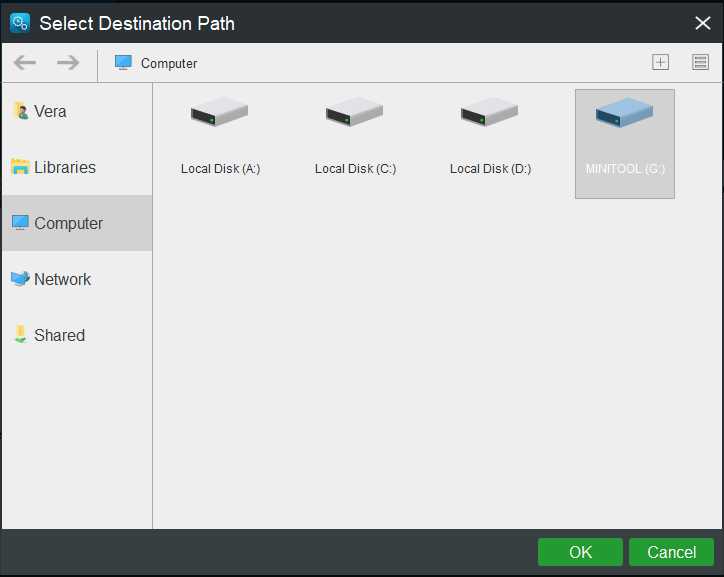
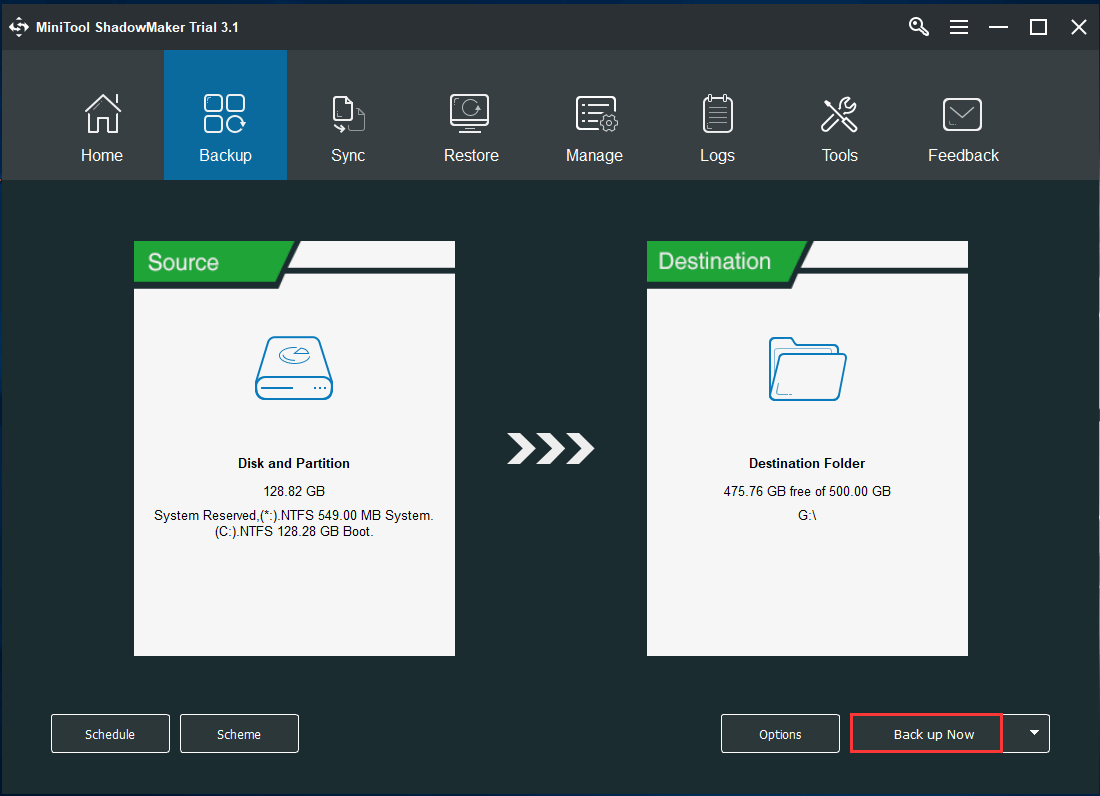
Step 2: Choose Destination Folder
- After going to the Backup page, you see system required partitions for running are chosen by default. Here, you won’t choose them again.
- Sometimes, the target path is also selected. If you don’t want that, just go to the Destination section and choose a path which can be an external hard drive, USB flash drive, NAS, etc.
Step 3: Start System Backup
Finally, hit the Back up Now button to execute the system backup.
Now, you have finished the Windows backup. Here we suggest using Media Builder to create a bootable disc or USB drive/disk so that you can perform a fast recovery in the event of system breakdown, any system issues after Windows update, etc.
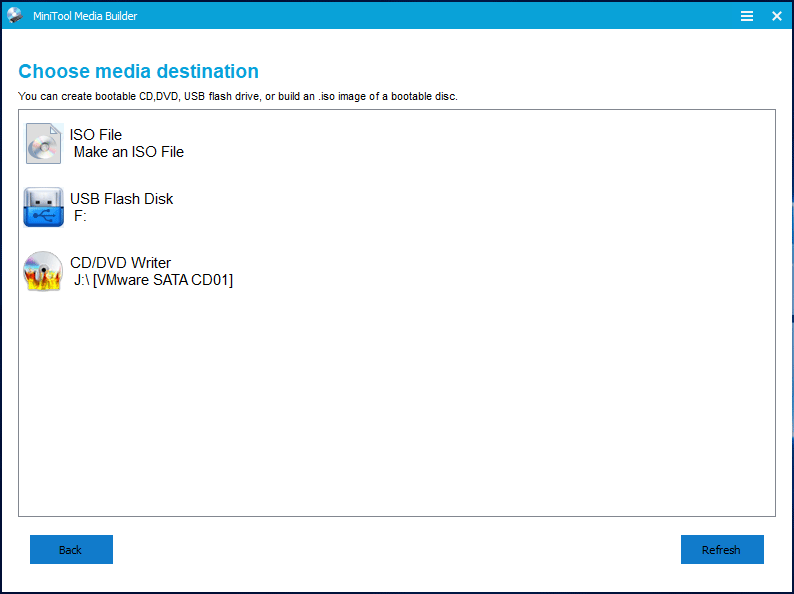
Related article: How to Build Boot CD/DVD Discs and Boot Flash Drive with Bootable Media Builder?
See how to restore the PC without the error “you must enable system protection on this drive”.
If your Windows goes wrong, for example, running slowly, system crash, etc, now start to perform a system recovery.
Step 1: Boot the PC from Created Media and Open MiniTool ShadowMaker
- Go to BIOS to make a setting to ensure the PC boots from the created media.
- Go to the MiniTool PE Loader interface, and run MiniTool ShadowMaker.
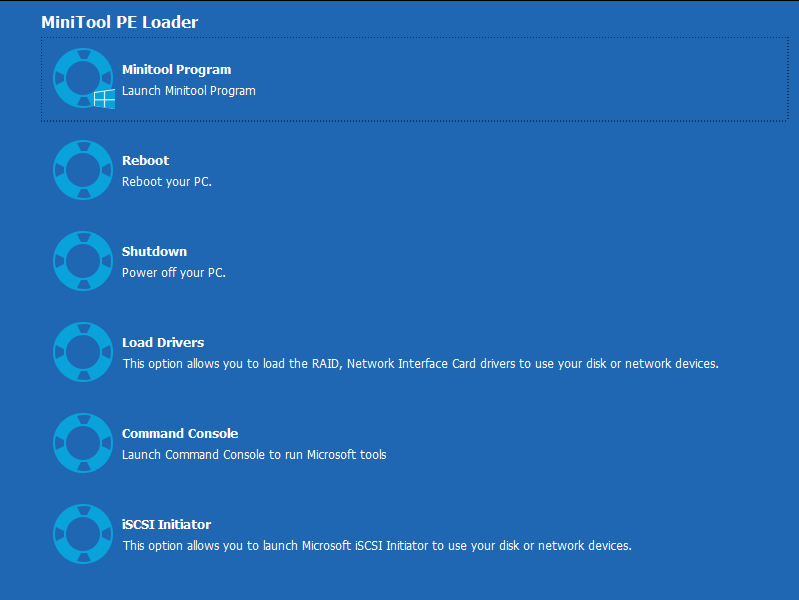
Related article: How to Boot from Burned MiniTool Bootable CD/DVD Discs or USB Flash Drive?
Step 2: Choose a Backup for System Recovery
- Under the Restore window, choose a system image. If your target image backup isn’t displayed here, add it by clicking the Add Backup button.
- Click the Restore button to continue.

Tip: From the above screenshot, you can view that the drive letter of the target drive varies from what it is in Windows. Pay attention to this point.
Step 3: Select a Backup Version
There may be some different backup versions, so choose a proper one.
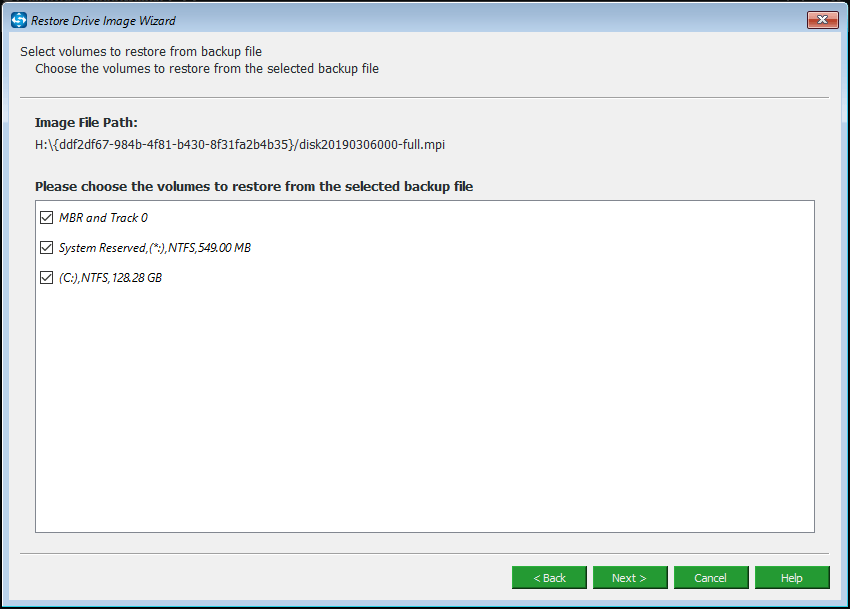
Step 4: Choose Volumes to Restore from Backup File
- Here you can see all the system required partitions included in the system image are listed. Select all of them.
- For a successful restoration, ensure mbr and Track 0 is ticked.
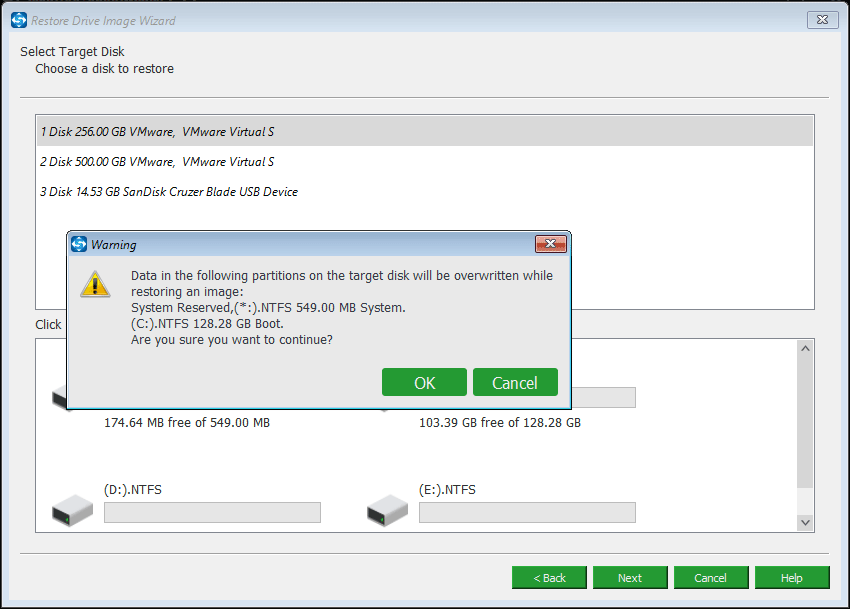
Step 5: Specify a Target Disk
- Choose a disk to restore your system image to.
- Click OK and Next.
Tip: Usually, we suggest restoring the created system backup to the original disk. And MiniTool ShadowMaker will overwrite all data of the original location (system partitions take up) while restoring.
Step 6: Perform Restoration Process
Then, this free backup & restore software will start to perform system recovery process without any error like “you must enable system protection on this drive” on Windows 10/8/7.
“MiniTool ShadowMaker helps back up my OS and restores Windows easily without enabling System Protection. I like it and here share it with you!”Click to Tweet
As mentioned above, to create a success restore point, you need to turn on System Protection. Similarly, you also need to ensure System Protection is enabled when you perform system restore. Otherwise, the issue – System Restore you must enable system protection on this drive Windows 10/8/7 always happens.
When the issue occurs, it may be a little troublesome to fix it since you need to enable System Protection CMD in WinRE or Control Panel in desktop. If you are not lucky, you may still fail to restore the system with other errors.
Compared to System Restore, MiniTool ShadowMaker can be your good assistant since it can let you easily back up and restore the Windows operating system, no need for enabling System Protection. This is a distinct difference. Besides, this program is more powerful and flexible with full protection solutions.
To avoid encountering the above issue, get MiniTool ShadowMaker now for backup and restore.
Free Download
The End
Have you experienced system restore error — Windows 10 you must enable system protection on this device? Just try to turn it on and start the system restore. As a suggestion for PC backup & restore, MiniTool ShadowMaker is a good choice.
For the question regarding MiniTool software, please tell us by contacting [email protected] or leaving a comment below. Of course, any idea is also appreciated.
- When restoring a system in Windows, you may receive an error message that says, “System protection must be enabled on this drive” In this case, what do you need to do to solve this problem? Here are two useful ways that Techquack offers you, and the best way to restore your PC to its previous state.
Windows 10 System Protection
You can use System Restore to undo unwanted changes to the system when your computer is corrupted. System Restore allows you to restore a computer to a previous state without losing personal data.
When restoring a system in Windows, you may receive an error message that says, “System protection must be enabled on this drive”. In this case, what do you need to do to solve this problem? Here are two useful ways that Techquack offers you, and the best way to restore your PC to its previous state without activating system protection.
You Must Always Restore The Drive That Contains Windows
Disk space allocated to restore points is automatically managed by System Restore. As shown in the following table, System Restore allocates disk space according to the size of the computer’s hard disk and the version of Windows it runs. The earliest restore points are purged to make room for the newest ones. For system protection, you can adjust how much space per drive you need.
System Protection Windows 10
Most systems are set up to protect their boot drive by default, but leave other drives untouched.
Before performing any other system-related operations, such as updating Windows or editing the Windows registry, you can back up your system by creating a system restore point. With the help of the restore points you created when Windows encountered an error, you can restore your computer to its original state.
System Restore Windows 10 Command Prompt
You can open the advanced boot options screen by pressing F8 during the startup process.
To Use System Restore You Must
For all drives, System Restore does not automatically activate. Additionally, this is not a backup solution. You must enable the protection manually on each storage if you have other drives attached to your computer. Using it, you can undo changes to the system without affecting your documents.
However, one user recently complained that he was experiencing slow performance after upgrading from Windows 7 to Windows 10. When he went to Troubleshooting and selected System Restore, he received an error message:
It is not necessary to restore any other disks when you restore the disk containing Windows.
This drive must be protected by the system.”
How To Enable System Protection Windows 10
By clicking Configure in the left menu, you can turn on system protection by clicking the Turn on system protection option. You can also modify disk space settings and delete existing restoration points from this dialog box. Click Apply and then OK to accept the changes.
A restore point must first be created and System Restore enabled before it can be used.
The Windows “System” drive is the only drive where you can turn on system protection.
Users report this problem on forums like Reddit on a regular basis, and it’s very common. You will still get the same message when restoring the C drive even if Windows indicates that you can restore multiple restore points if you are also experiencing this problem.
What is system protection?

Select Start, Control Panel, System and Security, System Protection, and System.
Turn On System Protection Windows 10
Under Windows, system protection can also be enabled.
Windows’ System Restore feature periodically creates and stores information about your computer’s system files and registry. Additionally, it backs up changes you make to files and makes copies of the backups so you can restore your system before important events occur.
NTFS drives can only be protected by system protection if they have a Windows operating system installed. System protection is enabled by default for a disk with a Windows operating system installed. If you encounter the above error, the function is disabled. Ensure that system protection is enabled before attempting a system restore.
What is the cause of the “System protection must be unlocked on this drive” error in Windows?

There are two reasons for this problem. When you access Extended Boot in order to restore your system, you may find that the system protection is simply not activated on your computer.
System Protection Is Turned Off
The next screen requires you to choose either the Turn off system protection or Disable system protection option for the hard drive you wish to disable protection for.
You may also need to reboot your computer if the system protection service is not working. It is important to look into both causes and possible solutions!
How to fix the “enable system protection” error?

Activate system protection through the command line
The order list has an option to activate system protection.
- Using the platform search tool and right-clicking on the command prompt, users can open the command prompt from Windows.
- Windows recovery environment can also be used if Windows doesn’t start.
- Select Diagnostics, Advanced Options, and Command Prompt in the Windows recovery environment.
- Press Enter after typing net start vss at the command prompt.
- Using the command prompt, type rstrui.exe /offline:C:windows=active followed by Enter.
- Laptops and desktops should be rebooted.
Rename the registry files
Renaming both registry files at the command line may fix the problem if the above solution fails.
- The first solution describes how to open the command line.
- Click on the prompt, and then type cd %systemroot%system32config.
- By pressing Enter, you will enter ren SYSTEM.001.
- Press Enter after entering ren SOFTWARE software.001.
Check the “Enable system protection” setting in Windows.
- Windows + X key combination can be used to check whether System Restore is enabled.
- The accessories will then be opened by pressing “Run.”.
- Click OK to open the window beneath the “Open from Run” field in which you type sysdm.cpl.
- The tab System Protection can be found by clicking here.
- Select Configure.
- If you do not have this setting enabled, select Enable system protection.
- When you click OK, the window will close when you select the Apply option.
Restart System Protection Service
If you encounter an activation error with system protection, restarting the system protection service can also help solve the problem.
- Click on the prompt to place an order.
- In the command prompt window, type net stop vss.
- Press Enter to restart the service by typing net start vss.
In order to restore system restore, you should follow these solutions.
It is also worth a try to reset the PC using the Windows recovery environment.
Frequently Asked Questions
- Enable system protection from the command line. Try enabling system protection from the command line.
- Rename the registry files.
- Check the «Enable System Protection» setting in Windows.
- Restart the System Protection service.
- Access the command line from additional options if you cannot access the Windows environment.
- Type this command: net start vss and press Enter.
- Enter this command: rstrui.exe /offline:C:windows=active and press Enter.
It is highly recommended that you leave system protection enabled for your Windows drive (e.g. C: ) so that you can quickly restore Windows 10 to an earlier restore point if needed. Restore points are not intended to replace system and image backups.
Step 1: Right-click in the lower-left corner and open System on the access menu at DeepL.
Step 2: Select «System Protection» from the left.
Step 3: Select the hard disk drive and click Configure to continue.
Step 4: Select Enable System Protection and click OK.

Mark Ginter
Mark Ginter is a tech blogger with a passion for all things gadgets and gizmos. A self-proclaimed «geek», Mark has been blogging about technology for over 15 years. His blog, techquack.com, covers a wide range of topics including new product releases, industry news, and tips and tricks for getting the most out of your devices. If you’re looking for someone who can keep you up-to-date with all the latest tech news and developments, then be sure to follow him over at Microsoft.
Are you unable to restore your Windows system? Did you see the You must enable system protection on this drive error on your PC? Then you have landed on the right post.
System Restore is one of the essential utilities of Windows OS. It creates multiple System Restore points and saves the changes of the Windows system.
If you do any modifications, such as driver update or Windows upgrade, you might encounter errors. At that time, you can use the system restore utility to restore the Windows.
But when you try to choose the restore point, you can see the following error message on the selected restore points.
You must enable system protection on this drive.
Whenever you see this problem, troubleshoot it with the methods posted in this article.
Problem Overview You Must Enable System Protection On This Drive
Daily, we do a lot of activities on our Windows PCs. Whenever a new version of Windows is released, users download & install it on their PCs.
What if you see problems like low performance after switching from Windows 7 to Windows 10? What if the Windows PC gets stuck after upgrading the device drivers?
In these situations, System Restore will help you to restore the Windows by choosing the system restore points. System Protection is one such Windows feature that creates and saves the complete data of system files and settings.
In addition to that, it stores the older versions of modified files in the restore points. Whenever you are going to perform any major activities, it creates the system restore points.
By default, System Protection is enabled for the drive that contains the Windows installation file. If System Protection is disabled, then you can’t restore the system.
But sometimes, you can see this You Must Enable System Protection on This Drive error on your Windows PC. The major reasons for this issue are:
- The System Protection is disabled or not activated on your Windows PC.
- If the System Protection Service is not running on your computer, you will encounter this problem.
Regardless of its cause, you have different methods to fix this error, so go through the guide until the end.
Related Problems You Must Enable System Protection On This Drive
Now, know those errors that you encounter with the System Protection option on your Windows PCs.
Basic Troubleshooting Steps You Must Enable System Protection On This Drive
Start using the below basic methods to fix the You Must Enable System Protection on this Drive issue on your Windows 10.
-
Restart your Windows PC
Rebooting your Windows PC is the basic step that you have to take whenever you see any error. A few simple problems can be solved by restarting the device.
- Go to the Start menu or Windows icon at the bottom-left of the taskbar-> Click Power -> Choose Restart option.
Once the system gets restarted, check the You Must Enable System Protection on this Drive issue is fixed.
-
Check the Turn On System Protection Setting in Windows
There is one setting that enables the system protection option on your Windows PC, and that is Turn On System Protection. If this setting is disabled, then enable it on your computer.
- First of all, press Windows + X keys on your keyboard -> Click Run.
- Now, type sysdm.cpl -> Hit Enter.
- It opens the System Properties -> Go to the System Protection tab.
- Now, you have to click the Configure button.
- If the Turn on system protection option is disabled, then click the radio button to enable it.
- Finally, click the Apply and OK buttons to save the changes.
After executing the instructions, check the problem is fixed or still appears.
Steps To Fix You Must Enable System Protection On This Drive Issue
If you are still seeing this error message beside the drive that you have selected to restore, then you can go through the below-advanced methods.
- Step-1 : Rename the Registry Files
- Step-2 : Restart System Protection Service
- Step-3 : Enable System Protection from the Control Panel
- Step-4 : Reset the Windows System
- Step 1
Rename the Registry Files
With the help of Command Prompt, we can open the System Restore option on your Windows PC. But before going to run it, you need to change the names of two registry files.
If you don’t rename them, then you will this You Must Enable System Protection on this Drive issue. So, follow the below instructions to rename the files.
- If your Windows OS is not booting properly, then you need to insert the Windows Installation Drive on your computer.
- After that, boot your PC to enter into the BIOS menu.
- Now, you have to Choose an Option screen -> Go with the Troubleshoot -> After that, click Advanced Options -> Click on the Command Prompt option.
- Now, type the following command to open the Config folder.
- cd %systemroot%system32config
- You will see the Config folder placed under System32.
- In the next step, rename the files by executing the below commands.
- ren SYSTEM system.001
- ren SOFTWARE software.001
- At last, run the System Restore utility by typing the given command.
- rstrui.exe /offline:C:windows=active
Check the System Restore is opened and running perfectly on your PC or showing the same error message.
- Step 2
Restart System Protection Service
It is very important to run the System Protection service on your Windows PC. If this service stops running, then you cannot open the System Restore.
- Press Windows + R -> Type cmd -> Click OK.
- It opens the Command Prompt, and executes the below command.
- net stop vss
- After that, you need to type the next command and press Enter.
- net start vss
- Now, check the System Protection service starts running on your computer.
- Step 3
Enable System Protection from the Control Panel
Apart from Command Prompt, Windows also provides another way to enable the System Protection option through the control panel. If you don’t know how to do it, then you can use the procedure given below.
- Press the Windows key on your keyboard -> Type Control Panel in the Cortana search console -> Hit Enter.
- Once you see the main window of the Control Panel, go to the System & Security section.
- In that section, you have to select System and then open the System Protection.
- Now, you need to choose the drive where you have installed Windows OS (C:) -> Click Configure.
- Enable the Turn on System Protection under the Restore Settings section.
- Save the settings by clicking the OK button.
Check the You Must Enable System Protection on this Drive issue is solved.
- Step 4
Reset the Windows System
Sometimes, everyone got stuck down by failing to resolve this issue on their Windows 7 or Windows 10 PCs. If you belong to that case, then the only way left to you is to reset the system.
- Firstly, boot the PC into Windows recovery mode.
- Now, you have to select Advanced Options.
- Under that, click the Troubleshoot option.
- You can see the Reset this PC option, click on it.
- In the next step, it provides two different choices, one is Refresh your PC and Reset your PC.
(Refreshing the PC is the recommendable choice because it restores all your files without fail whereas, resetting the PC will reset the entire device by deleting the files and apps.)
- Thus, select the Refresh your PC option.
- Now, it displays a few on-screen steps, so go through them to complete the process.
Though it deletes the recently installed programs, but it fixes the issue on your Windows PC.
Want to avoid this You Must Enable System Protection on this Drive error? Then follow the simple tips provided below.
- Never try to modify the important system settings, like deactivating the System Protection feature, because it leads to this kind of issue.
- If you want to escape these errors, don’t install infected apps that change your PC settings and corrupt the system files.
- If you don’t need an inbuilt System Restore utility, download any best third-party backup software to save all the changes of your Windows PC.
Contact Official Support
We believe that you won’t require this section because the above methods will fix the issue undoubtedly. If you can’t get rid of this problem even after enabling the System Protection manually, then there might be some hardware issue.
In this case, you need to check out the forums where the discussion is done on this issue. If you see any steps other than the above, try out those methods to fix it.
When none of the forums helps you, you can ask for help from any tech expert. Or else contact the Microsoft support team through email or text message to get those instructions that can solve it.
Final Words: Conclusion
To sum up everything, System Protection is the best feature to create & save the information of system files and Windows registry. By using the restore points, you can restore the deleted files, apps, and settings.
Either through manual activation of System Protection or renaming the registry files, you can fix this issue. Or else you can fix it by making the System Protection Service to run on your computer.
If you have any new methods to fix it, then feel free to share them with us. For any queries, you can contact us through the comment box.
Click the subscribe button placed at the bottom of the page to get the latest updates on our blog.
- Remove From My Forums
-
Question
-
I’m running a Windows 7 and am currently experiencing BSODs on startup with the error «Process1_Initialization_Failed». Rather that try to fix that specific problem, I thought I’d execute a system restore from the WRE. However, when WRE runs, it assigns the 100MB system reserved partition on my boot drive as drive C, and my Windows partition as drive H. So, even though WRE sees the H drive as the drive with the Windows 7 OS, System Restore accordingly sees all the restore points created on my OS drive, but after I select one the Comfirm disks to restore window comes up and warns that you must always restore the drive that contains Windows. C: is the only drive listed but the check box is grayed out and under status it states that «You must enable System Protection on this drive».
I believe this is because the restore point will only restore to the C drive from which it was created but WRE is recognizing it as H.
I tried reassigning letters using Diskpart but WRE still recognized the OS partition as H.
Any ideas on how to get System Restore to execute?
Answers
-
Hello,
Try to restore the registry settings manually and see if the computer can boot normally:
Restore the registry settings from h:windowssystem32configregback
===================================
1. Insert the Windows 7 installation disc in the DVD drive and restart the computer.
2. Press any key when you are prompted to start from the disc.Note: If the computer is not configured to start from a CD or a DVD, see the documentation that was included with the computer. You may have to change the computer’s BIOS settings.
3. When you are prompted, configure the Language to install, Time and currency format, and Keyboard or input method options as you prefer, and then click Next.
4. On the next page, click «Repair your computer».
5. On the System Recovery Options page, click the version of the Windows Vista operating system that you want to repair, and then click «Next».
6. On the System Recovery Options page, click » Command Prompt”.
7. Type the following commands and press Enter after each line.ren h:windowssystem32configsystem system.bak
ren h:windowssystem32configsoftware software.bak
ren h:windowssystem32configsam sam.bak
ren h:windowssystem32configsecurity security.bak
copy h:windowssystem32configregbacksystem
copy h:windowssystem32configregbacksoftware
copy h:windowssystem32configregbacksam
copy h:windowssystem32configregbacksecurity
8. Restart the computer.
Thomas77
-
Marked as answer by
Friday, February 12, 2010 6:24 AM
-
Marked as answer by
![]()

-
Featured
-
Home
-
Forums
New posts
Trending
Search forums
-
What’s new
New posts
New profile posts
Latest activity
-
Members
Current visitors
New profile posts
Search profile posts
Billboard
Trophies
Question System restore message
-
Thread starterabbarich
-
Start dateThursday at 3:05 PM
Sidebar
-
-
Forums
-
Software
-
Windows 10
Previous
Next
Sort by votes
A
abbarich
Distinguished
-
- Oct 30, 2014
-
- 66
-
- 0
-
- 18,530
- 0


Thursday at 3:05 PM
-
#1
0
A
abbarich
Distinguished
-
- Oct 30, 2014
-
- 66
-
- 0
-
- 18,530
- 0
Thursday at 3:10 PM
-
#2
You must log in or register to reply here.
Share:
Facebook
Twitter
Reddit
Tumblr
WhatsApp
Email
Link
| Thread starter | Similar threads | Forum | Replies | Date |
|---|---|---|---|---|
|
A
|
Question Help with system restore | Windows 10 | 3 | Thursday at 5:15 AM |
|
C
|
Question Corrupted wins 10 on dual boot system. | Windows 10 | 3 | Jan 22, 2023 |
|
N
|
Question saving my windows environment | Windows 10 | 7 | Jan 18, 2023 |
|
|
Question Can I use my old boot drive in a new system? | Windows 10 | 5 | Jan 17, 2023 |
|
S
|
[SOLVED] System Up-time | Windows 10 | 2 | Jan 12, 2023 |
|
N
|
Question System Restore error 0x8007045b or 0x80070026 | Windows 10 | 4 | Dec 18, 2022 |
|
|
Question Creating System Image failed ? | Windows 10 | 17 | Dec 9, 2022 |
|
G
|
Question System restore error — ran out of disk space | Windows 10 | 6 | Oct 18, 2022 |
|
M
|
[SOLVED] Accidentally turned off PC during system restore | Windows 10 | 16 | Sep 29, 2022 |
|
|
[SOLVED] Is restoring from a system image | Windows 10 | 8 | Sep 11, 2022 |


| Similar threads |
|---|
|
Question Help with system restore |
|
Question Corrupted wins 10 on dual boot system. |
|
Question saving my windows environment |
|
Question Can I use my old boot drive in a new system? |
|
[SOLVED] System Up-time |
|
Question System Restore error 0x8007045b or 0x80070026 |
|
Question Creating System Image failed ? |
|
Question System restore error — ran out of disk space |
|
[SOLVED] Accidentally turned off PC during system restore |
|
[SOLVED] Is restoring from a system image |
ASK THE COMMUNITY
-
Forum
-
Title
-
Message
TRENDING THREADS
-
 News De-Bloated Windows 11 Build Runs on 2GB of RAM
- Started by Admin
- Friday at 11:30 AM
- Replies: 36
News Comments -
News AMD Announces Ryzen 7000X3D Pricing: $449 to $699 Starting Feb 28th
- Started by Admin
- Wednesday at 12:50 PM
- Replies: 114
News Comments -
Question Computer Questions Used or New?
- Started by N1njaDestr0yer
- Yesterday at 10:18 PM
- Replies: 11
Systems -
Question need opinions on this XP pc.
- Started by Tac 25
- Today at 1:39 AM
- Replies: 4
Windows XP -
News Samsung Issues Firmware Fix for 980 Pro SSD Failures
- Started by Admin
- Tuesday at 12:20 PM
- Replies: 61
News Comments -
M
Question Gigabyte GA-P31-DS3L wont read bootable w10 usb- Started by MrGreener
- Today at 2:14 AM
- Replies: 2
Motherboards -
Question An External Blu-ray Drive … for XP SP2??
- Started by ChimasLover46
- Today at 1:10 AM
- Replies: 8
Storage


Latest posts
-
Build Advice PC build feedback
- Latest: CHEFY
- 3 minutes ago
Systems -
Question How do I identify my Gigabyte GA-F2A68HM-S1 rev?
- Latest: Yo Shi
- 5 minutes ago
Motherboards -
Question What would happen if i apply two different GPU in my motherboard?
- Latest: SkyNetRising
- 7 minutes ago
Graphics Cards -
Question BT Full Fibre 900 — What router?
- Latest: IAmRooby
- 8 minutes ago
Wireless Networking -
Question An External Blu-ray Drive … for XP SP2??
- Latest: ChimasLover46
- 11 minutes ago
Storage -
Question Is my AIO dying or is it just bubbles?
- Latest: CountMike
- 17 minutes ago
Cooling -
G
Question Msi Z490 with 4 ram slots not work in above 2666 frequenci
- Latest: gss200610
- 25 minutes ago
Memory


Moderators online


Share this page
Facebook
Twitter
Reddit
Tumblr
WhatsApp
Email
Link
-
-
Forums
-
Software
-
Windows 10
Tom’s Hardware is part of Future plc, an international media group and leading digital publisher. Visit our corporate site.
© Future Publishing Limited Quay House, The Ambury, Bath BA1 1UA. All rights reserved. England and Wales company registration number 2008885.
- Advertising
- Cookies Policies
- Privacy
- Term & Conditions
- Topics
This video helps fixing:
You must enable system protection on this drive – windows 10 system restore error fix
Stuck during windows System Restore with error how to fix
You must enable system protection on this drive using command prompt
unable to restore system
rstrui.exe command
next option greyed out not enabled disabled
You must enable system protection on this drive using cmd
You must enable system protection on this drive windows 8.1
You must enable system protection on this drive windows 7
HP Dell Lenovo IBM Asus Acer reddit
Cannot run system restore
Could not run system restore
Fixed Issue: You must enable System Protection on this drive
Fixed You Must Enable System Protection on This Drive
FIX: You must enable system protection on this drive
How do you fix you must enable System Protection on this drive?
How do I enable System Restore from command prompt?
Should I enable System Protection Windows 10?
How do I choose my OS for System Restore?
How to fix You must enable system protection on this drive
How To Enable Disk Write Protection In Windows 10
How to Fix the ‘You Must Enable System Protection on This
You must enable system protection on this drive – System
You Must Enable System Protection On This Drive – Windows 10
How to Fix System Restore Error – “You Must Enable System
you must enable system protection on this drive reddit
windows 7 enable system protection through command prompt
how to enable system protection windows 10
you must always restore the drive that contains windows
the drive is not in the selected restore point
2 main commands used:
net start vss
rstrui.exe /offline:E:windows=active
Note: Change drive letter based on your system config.
Optional commands used:
diskpart
list volume
exit
Drive letter: (Example E:)
DIR
✅ Complete Tutorial for any Windows Boot Issues/Bluescreen errors✅
source
how to repair windows 7

Jacob MORRIS
MORRIS is an impassioned technology writer. He always inspires technologists with his innovative thinking and practical approach. A go-to personality for every Technical problem, no doubt, the chief problem-solver!