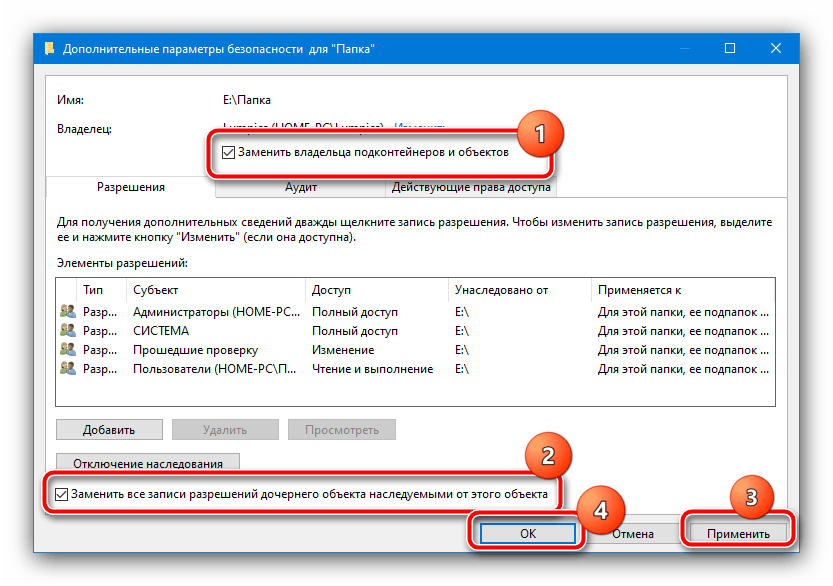
Изменение владельца файла или папки
Рассматриваемая ошибка появляется в ситуациях, когда права доступа по каким-то причинам изменились на системные аккаунты. Следовательно, для устранения проблемы нужно скорректировать параметры, делается это следующим образом:
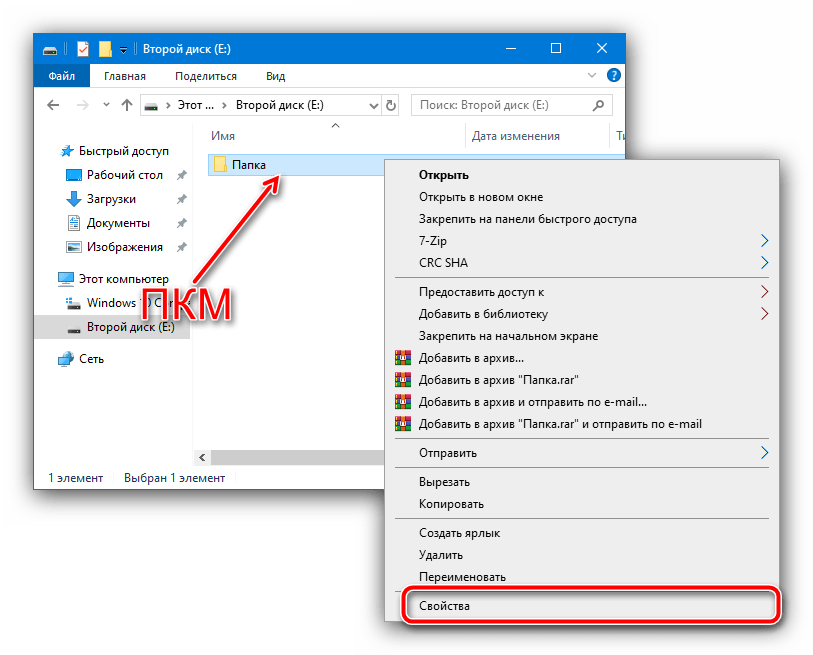
- Выделите требуемый каталог, кликните по нему правой кнопкой мыши и выберите «Свойства».
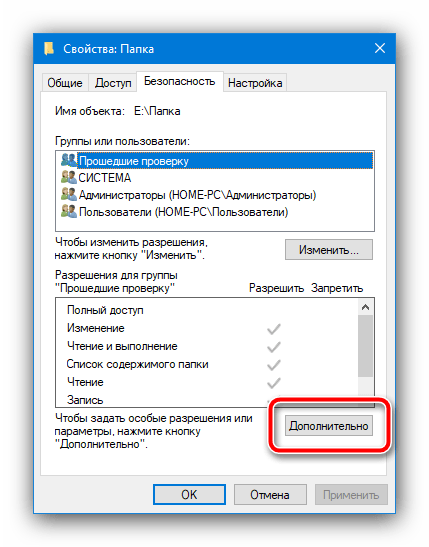
- Здесь нам нужен раздел «Безопасность», перейдите к нему и воспользуйтесь кнопкой «Дополнительно».
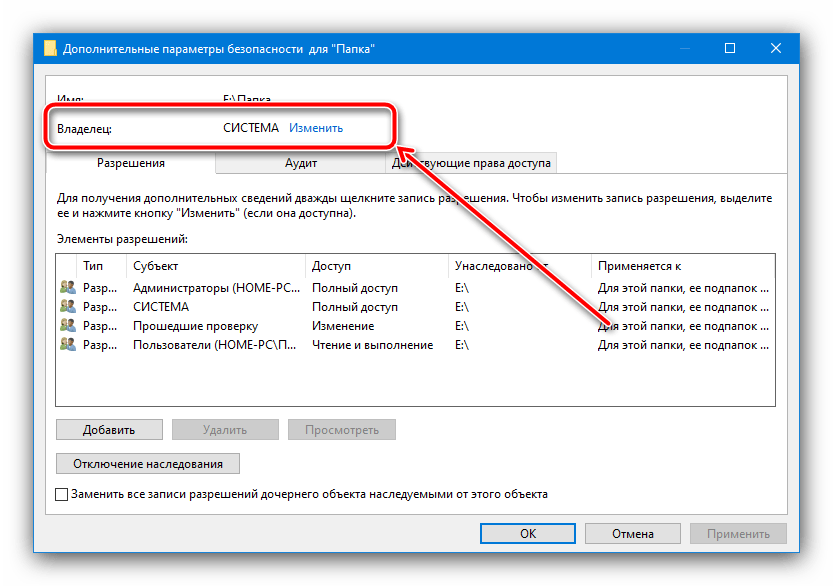
- В окне настроек доступа щёлкните «Изменить» в строке «Владелец».
- Далее снова нажмите «Дополнительно».
- Теперь щёлкните «Поиск» и подождите, пока будут отображены все учётные записи. Затем выберите именно вашу основную и воспользуйтесь кнопкой «ОК».

Здесь тоже воспользуйтесь кнопкой «ОК».
- По возвращении в окно параметров безопасности обязательно отметьте опции «Заменить владельца…» и «Заменить все записи…», после чего снова кликните «ОК».

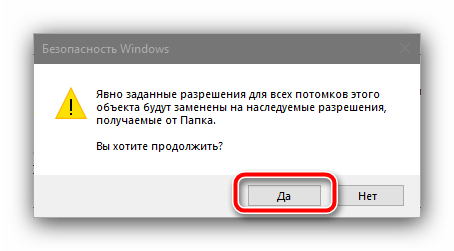
Подтвердите своё намерение.
- Начнётся процесс изменения доступа. Не пугайтесь, если будут появляться ошибки, просто закрывайте их. По окончании операции последовательно закройте все запущенные окна.


Теперь проблема должна быть решена – каталог или файл, попытка изменения которых приводила к появлению ошибки, сейчас будут редактироваться нормально. Единственное замечание, достойное упоминание – не пытайтесь проделывать такие операции с действительно важными системными файлами, иначе рискуете «убить» ОС с долгим и трудоёмким процессом восстановления её работоспособности.
Еще статьи по данной теме:
Помогла ли Вам статья?
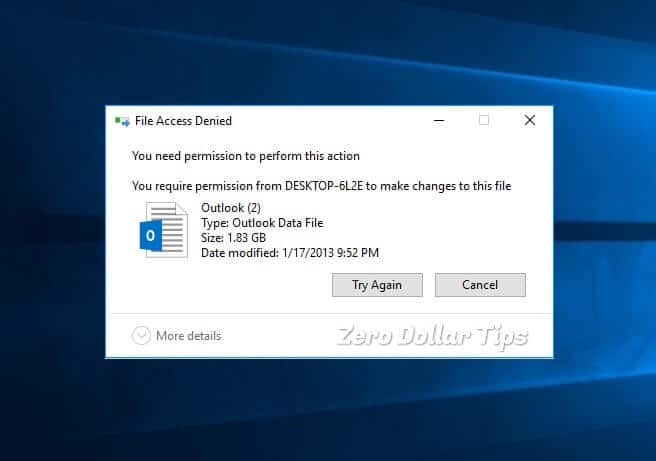
As always, Microsoft wants to ensure that your files never get into the wrong hands. However, sometimes this protection goes overboard and gives you the “You need permission to perform this action” error when trying to delete a folder, run an application, or open a file.
The error doesn’t appear to have any distinct cause, and you’re in despair trying to figure out what’s wrong with the system. Worry no more, we’ve brought you the most efficient methods to fix the “You need permission to perform this action” error. Continue reading to find out its causes, and how you can fix it within minutes.
What Cause «You need permission to perform this action» error?
While a direct cause for this error can’t be identified, users seem to notice that it’s most likely your permissions getting messed up. Permissions allow you to set up user accounts that can’t perform certain actions, increasing the security of a shared computer.
When these permissions get modified in the wrong way, it may lead to errors appearing such as the one this article is about. It may cause devastation, as even with an administrator account, you won’t be able to create new files and folders or even modify or delete existing ones.
Another possible cause could be the use of certain third-party applications or malware infection.
No matter what caused your error, we’re here to help you fix it within minutes. Continue reading the next section to learn how.
How to fix “You need permission to perform this action”
Now that we established the possible reason for your error, its time to get it fixed. We’ve listed the most useful methods of going about fixing this annoying issue, ensuring that you can get full control over your system as soon as possible.
Note: Some of these methods require you to use an administrator account on your device. This means that the account is able to perform various tasks that may change system settings, which are often required to restore your taskbar.
Don’t know how to change your account to have administrator permissions? Want to create a separate administrator user for purposes like this? We recommend watching “Making a user an administrator on a Windows 10 system” by StormWind Studios to learn how you can make admin users like a pro.
Now, let’s start troubleshooting the “You need permission to perform this action” error!
Disable any third-party antivirus
As we mentioned above, it’s possible that a third-party application causes this error on your system. Windows 10 users report that many antivirus applications are able to cause this error. The best and safest way of testing this is by temporarily disabling your antivirus and seeing if the error still occurs.
Note: Make sure you turn on Windows Defender while having your third-party antivirus disabled. Defender is a native Windows 10 solution for malware protection, capable of giving you the necessary protection when using your PC.
Here’s how you can temporarily disable an antivirus application.
- Open the Task Manager using one of the following ways:
- Right-click on your taskbar and choose Task Manager from the context menu.
- Press the Ctrl + Alt + Del keys on your keyboard and wait for the security options screen to show up. Then, select Task Manager.
2. If your Task Manager launched in the compact view, click on the More details option seen in the bottom left of the window.

3. Switch to the Startup tab at the top of the Task Manager window. Here, you can see all of the applications that start along with your computer at launch.
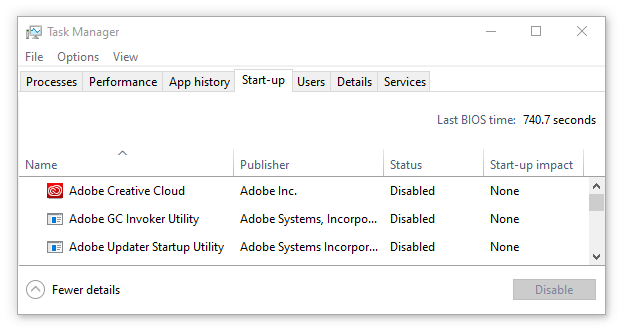
4. Select your third-party antivirus application, then click on the Disable button in the bottom right of the window. The status of the application should change to Disabled.
5. Repeat this for every third-party antivirus software installed on your computer, then restart your device.
After completing these steps, your computer will launch without the third-party antivirus software, giving you the ability to check if your issue is resolved.
If you can modify, delete, and create folders/files again, it’s most likely that the antivirus app you’ve been using messed up your permissions. We recommend looking for a different application or contacting customer support.
Scan your device with Windows Defender
Staying on the antivirus track, it’s possible that the device has been infected with malware which caused the permission error to appear. To test if this is the case, use the integrated Windows Defender to scan your device and remove any viruses.
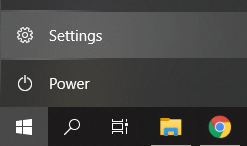
- Click on the Windows icon located in the bottom left corner of your screen. This will open up Windows 10’s tiled Start menu.
![]()
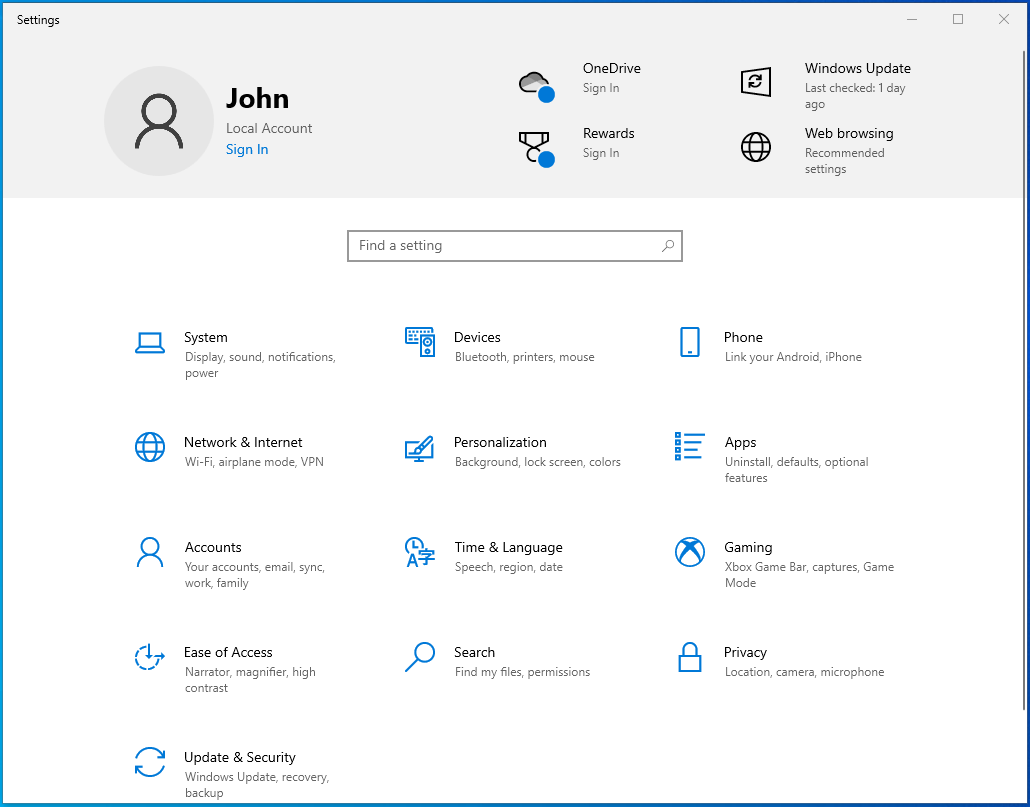
2. Click on Settings, indicated by a gear icon. Keyboard pros can also use the Windows + I shortcut to launch the application faster.
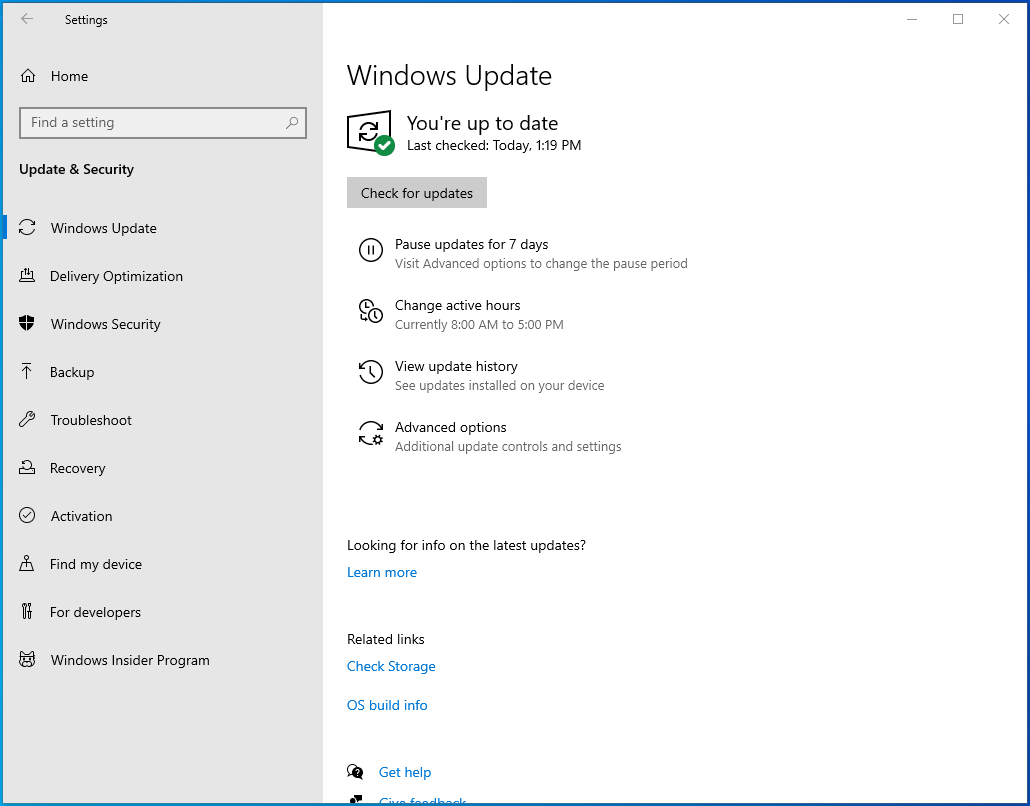
3. When the Settings window finishes loading, you’ll see multiple menu options. Click on Update & Security.
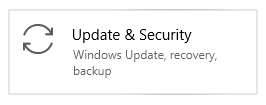
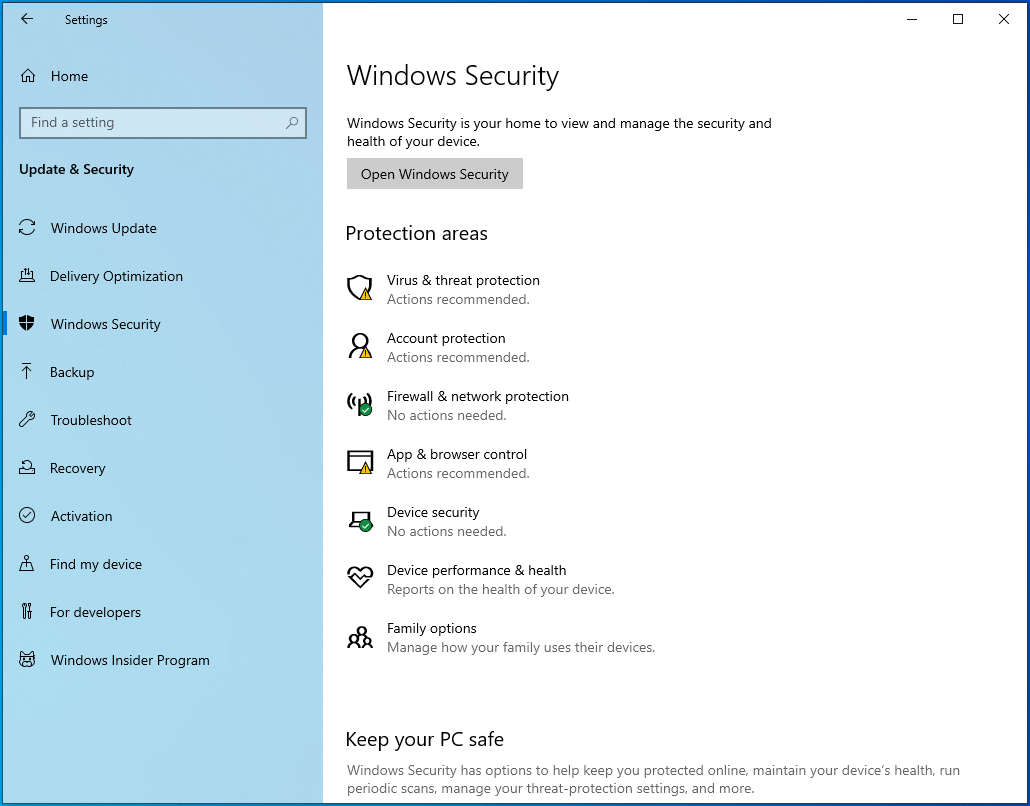
4. Using the menu on the left side, select the Windows Security page.
![]()
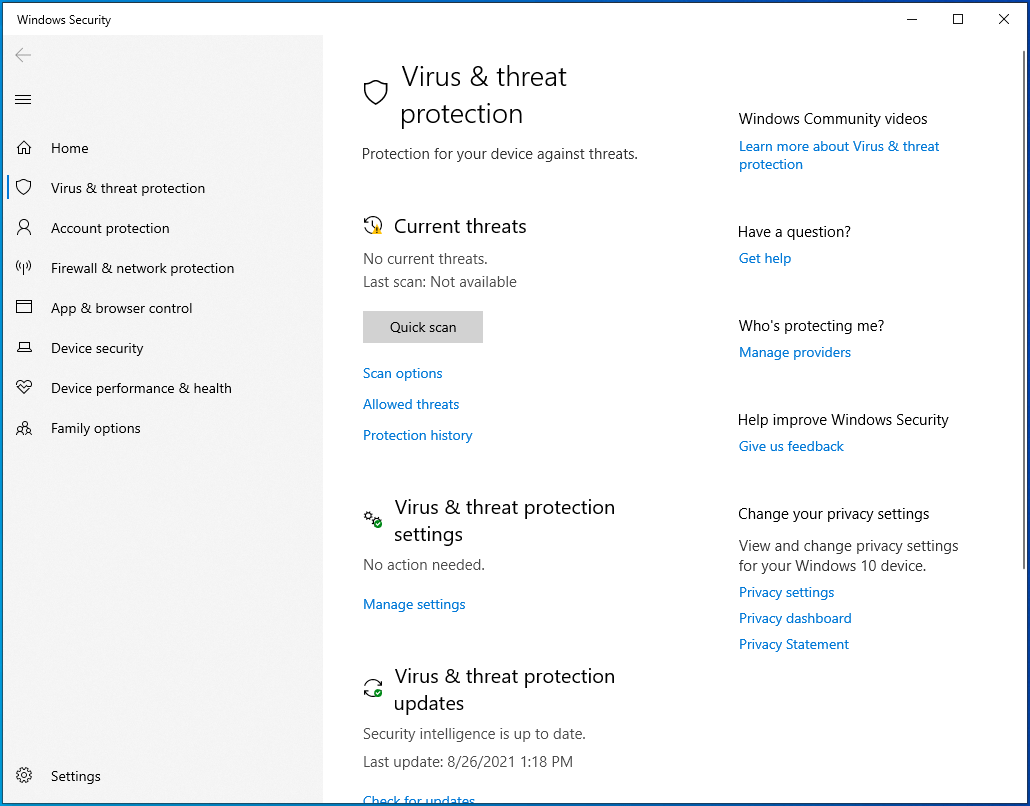
5. Click on Virus & threat protection. This will open up a new window.

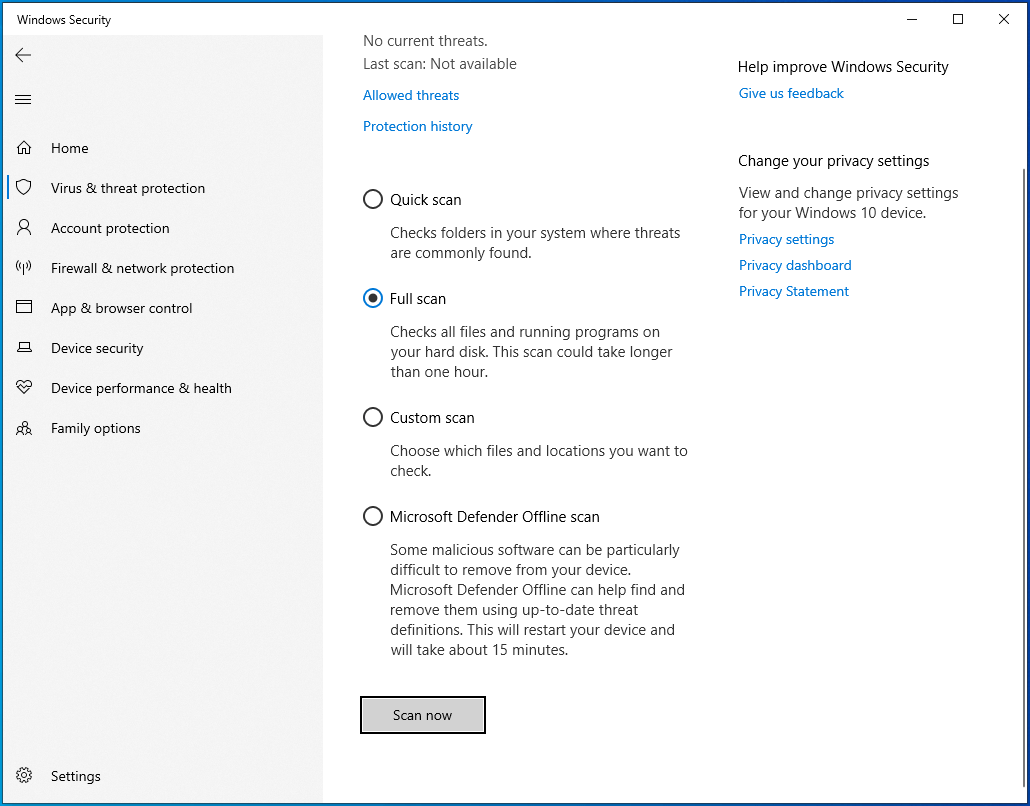
6. Click on the Scan options link, then select a Full scan. Although this scan may take longer, it’s recommended to run it as opposed to a Quick scan. Malware often tries to hide from you, and a full system scan will most likely find it.

7. Wait for the scan to finish and take the appropriate action against any threats found.
Create a .bat file to take ownership
You can try attempting to take back the ownership of a folder using a .bat file. The process of creating one is simple, all you have to do is follow the next few steps.
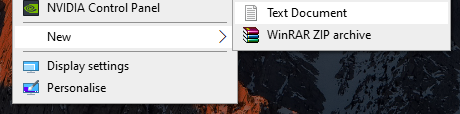
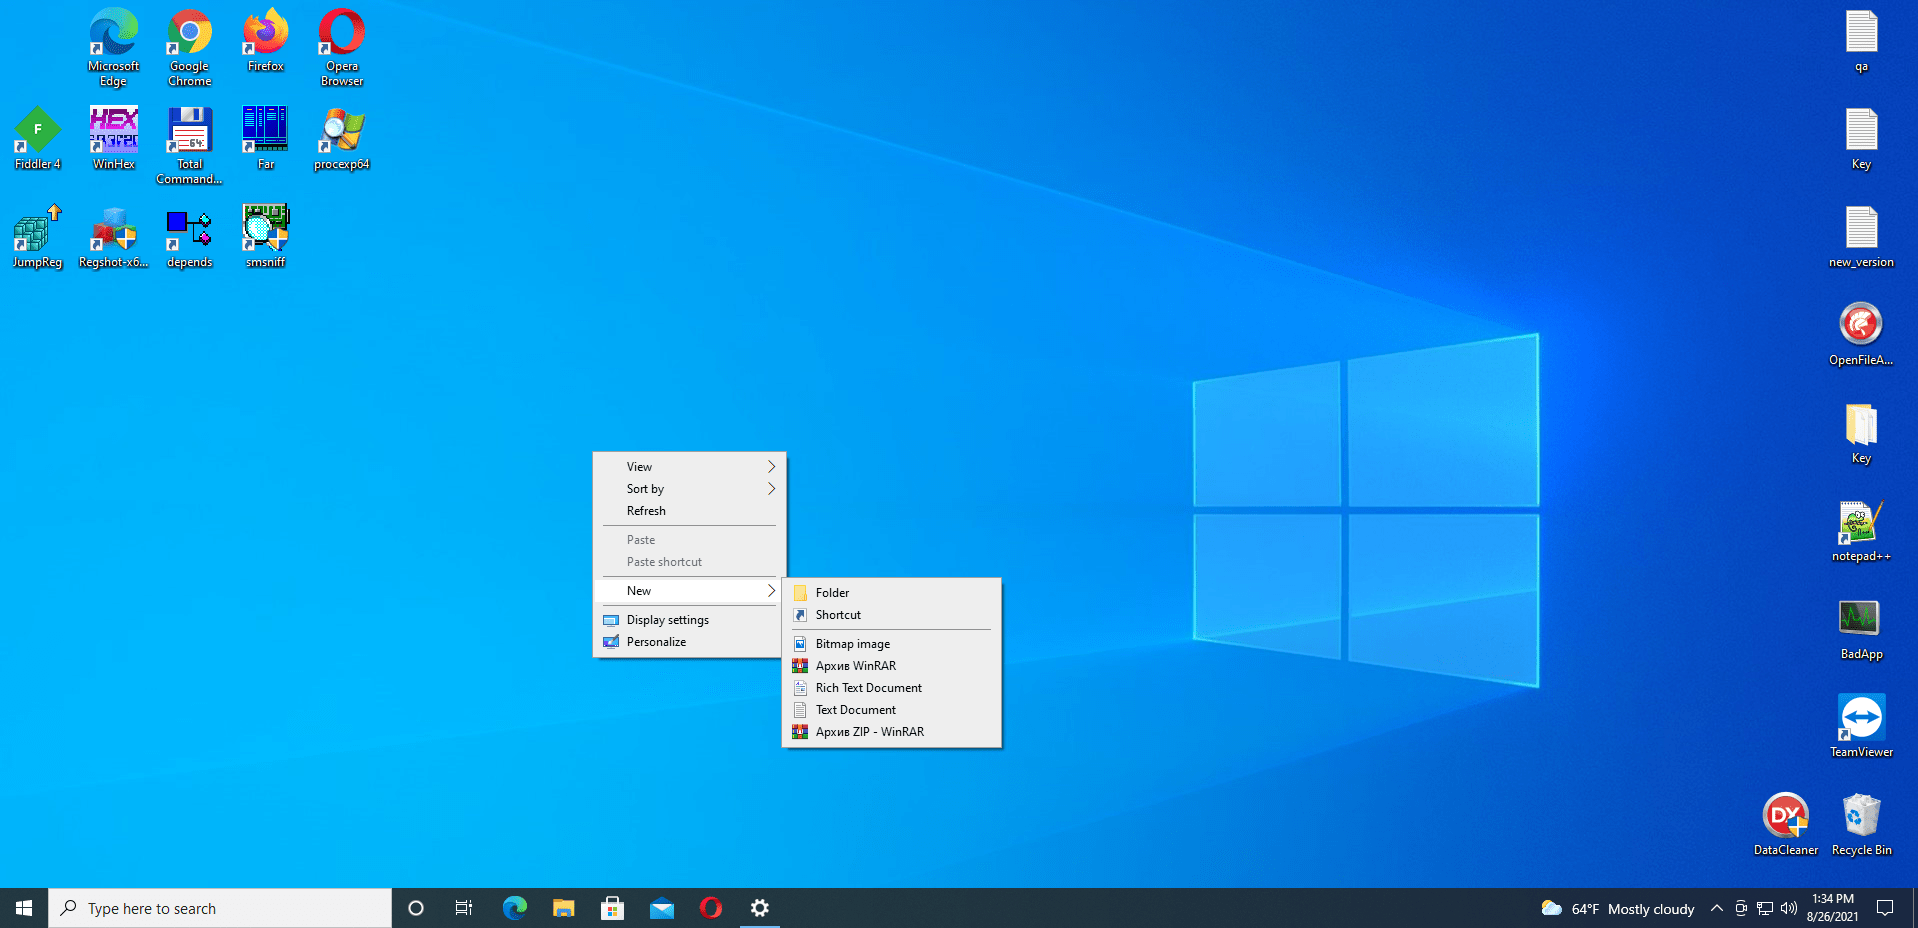
- Right-click on an empty space on your Desktop, then select New, and create a Text document.
2. Name it Fix.txt and use any text editor to open it.
3. Copy-paste in the following lines:
SET DIRECTORY_NAME=”DIRECTORY”
TAKEOWN /f %DIRECTORY_NAME% /r /d y
ICACLS %DIRECTORY_NAME% /grant administrators:F /t
PAUSE
4. Replace DIRECTORY with the path to the problematic folder. For example, if you have issues with a folder named Photos on your Desktop, you want to replace it with “C:Usersyour usernameDesktopPhotos.”

5. Save Fix.txt, then navigate to your desktop and rename it Fix.bat. You’ll get a warning about changing the file extension — simply click on Yes.

6. Right-click on Fix.bat and select Run as administrator.

Check if you can access or delete the folder that was giving you issues.
Change permissions without taking ownership
If you don’t want to change the owner of a file or folder, you can simply give yourself the correct permissions to access it.
Especially when working with sensitive files, passing the ownership back and forth may cause more issues or raise concerns on a shared device. This is why simply giving each user the appropriate permissions is often the better solution.
Here’s how you can change the permissions of a folder or file on Windows 10.
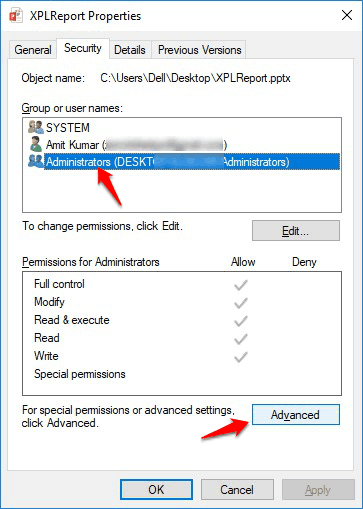
- Right-click on the problematic folder or file, then select Properties from the context menu.
2. Switch to the Security tab found at the top of the Properties window.
![]()
3. Click on the Advanced button.
![]()
- Check if your user has “Full control” listed under the Access column.
- If you see anything other than “Full control” or don’t see your username in the list at all, click the Add button.
- Click on the Select principal link at the top of the window.
- You’ll see a typeable field titled “Enter the object name to select.” Here, simply type in your local username. Make sure not to misspell anything and note that this is case sensitive.
- Click on the Check names button to validate the username, then click OK.
- Place a checkmark next to Full control. This should automatically mark every action except for “Special permissions”.
If the error was caused by permissions getting mixed up, you might be able to successfully perform the action you were previously trying to do. Give it a try!
Run a System File Checker (SFC) scan
Windows 10 comes with many integrated ways of troubleshooting and finding issues on your device. One of these is the System File Checker, a handy tool that is able to detect and solve a wide variety of system issues.
Here’s how you can run an SFC scan on Windows 10 to identify system issues.
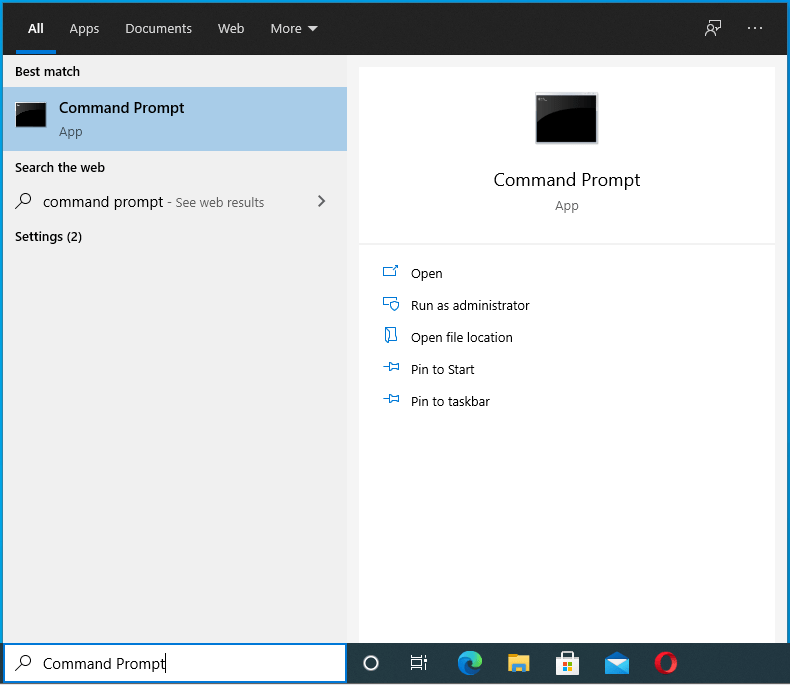
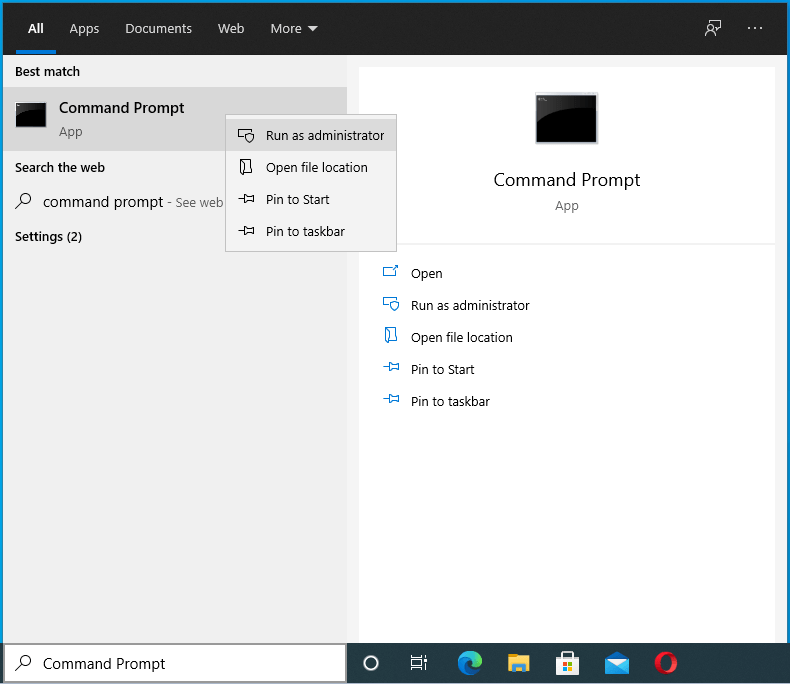
- Press the Windows + R keys on your keyboard to launch the Run utility, then enter “cmd” and press Ctrl + Shift + Enter. This will launch the Command Prompt with administrator permissions.
- Click Yes and enter your password if prompted.
- Enter the following command and press enter: sfc /scannow
- Wait for the scan to finish. This may take a long period of time depending on your system. Make sure the scan isn’t closed or interrupted, as you will lose progress.
- If any issues are identified, the SFC scanner will attempt to fix them automatically.
We hope you were able to fix your issues with the annoying “You need permission to perform this action” error after completing our steps. If you still have the issue even after trying each method, we recommend resetting Windows 10.
If you’re in need of information about other Microsoft Windows issues, need help with troubleshooting, or want to learn more about your operating system, check out our other articles here.
However, if you’re looking for a software company you can trust for its integrity and honest business practices, look no further than SoftwareKeep. We are a Microsoft Certified Partner and a BBB Accredited Business that cares about bringing our customers a reliable, satisfying experience on the software products they need. We will be with you before, during, and after all the sales.
That’s our 360 Degree SoftwareKeep Guarantee. So, what are you waiting for? Call us Today on +1 877 315 1713 or email sales@softwarekeep.com. As well, you can reach us via Live Chat.
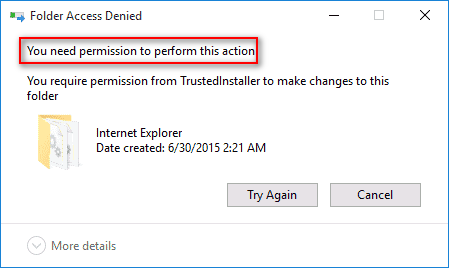
On a Windows 10/8/7 or Vista based computer, the following error appears when trying to delete a folder or file: «Access Denied – You need permission to perform this action. You require permission from SYSTEM or Administrators to make changes.»

The «folder access denied – you need permission to perform this action» issue occurs because the folder or the file that you want to delete is locked by a process or a system service or because the file/folder is essential for Windows’ operation.
In this tutorial you ‘ll find detailed instructions to resolve the following problems in Windows 10/8/7 or Vista OS:
-
- » You require permission from SYSTEM to make changes to this folder…»
- » You require permission from Administrators to make changes «
- » Cannot delete file. Cannot read from the source file or disk «
- » Cannot delete Folder. Directory Not Empty «
- » Folder Access Denied. You need permission to perform this action»
How to Fix: You need permission to perform this action.
Method 1. Delete the Folder/File that you cannot delete in Safe Mode.
The first method to resolve «Access Denied» problems when deleting a folder or a file in Windows OS, is to delete the folder from Windows Safe Mode. To do that:
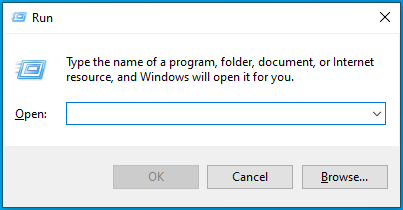
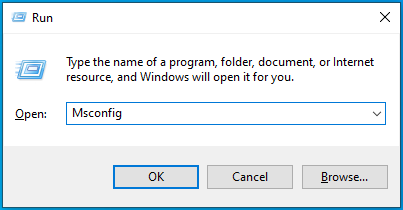
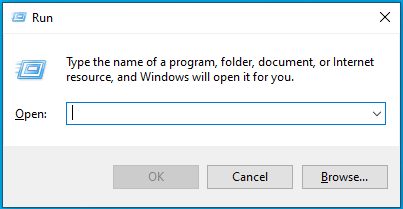
1. Simultaneously press the Windows ![]() + R keys to open the ‘Run‘ command box.
+ R keys to open the ‘Run‘ command box.
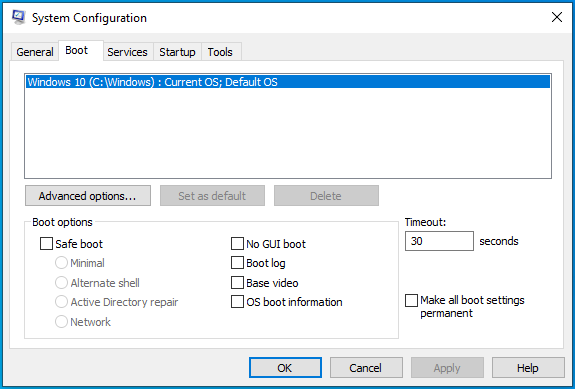
2. In run command box, type msconfig press Enter to open the System Configuration utility.

3. At the Boot tab, check the Safe Boot option and hit OK.

4. At the next window, click Restart.
5. In Windows Safe Mode, try to delete the folder/file.
6. Then, open the System Configuration utility (msconfig) utility again and uncheck the Safe Boot option. Hit OK to re-start Windows normally.
Method 2. Use Unlocker to delete a locked folder/file.
1. Download and Install* the latest Unlocker version from here.
* Note: At ‘Unlocker Setup’ options, click Advanced and uncheck the «Install Delta Toolbar«.

2. When the installation is completed, right click at the folder/file that you cannot delete and select Unlocker.

3. At Unlocker window choose Delete and click Unlock. *
* Note: If the file is locked by a process, then click Kill Process.

Method 3. Change Folder’s Owner.
Another method to bypass the «You need permission» problem, is to change the Owner of the folder. To do that:
1. Right click at the folder or file that you cannot delete and select Properties.
2. Select the Security tab and click Advanced.

3. Click the Change Owner.

4. Type your account username (e.g. «Admin») and click OK.

5. Check the «Replace owner on subcontainers and objects» checkbox and click OK. Then click OK again to close security settings.

6. Now try to delete the folder.
Method 4. Delete the folder from Command Prompt.
1. Open Command Prompt as Administrator.
2. Take the ownership permissions for the folder that you want to delete, by typing this command:
- takeown /F «Full_Path_Folder_Name» /r /d y
Sample: At this example we ‘re going to delete the «C:Folder1», so the command will be:
-
- takeown /F «C:Folder1» /r /d y
3. Then give this command to take full control permissions at the folder that you want to delete:
- icacls «Full_Path_Folder_Name» /grant Administrators:F /t
Sample: For this example the command will be:
-
- icacls «C:Folder1» /grant Administrators:F /t
4. Finally type the following command to delete the folder:
- rd «Full_Path_Folder_Name« /S /Q
Sample: For this example the command will be:
-
- rd «C:Folder1» /S /Q

That’s it! Let me know if this guide has helped you by leaving your comment about your experience. Please like and share this guide to help others.
If this article was useful for you, please consider supporting us by making a donation. Even $1 can a make a huge difference for us in our effort to continue to help others while keeping this site free:

If you want to stay constantly protected from malware threats, existing and future ones, we recommend that you install Malwarebytes Anti-Malware PRO by clicking below (we
do earn a commision from sales generated from this link, but at no additional cost to you. We have experience with this software and we recommend it because it is helpful and useful):
Full household PC Protection — Protect up to 3 PCs with NEW Malwarebytes Anti-Malware Premium!
Contents
- What Does the ‘Need Permission to Perform this Action’ Message Mean?
- How to Fix the “You Need Permission to Perform this Action” Error on Windows 10
- Fix 1: Confirm the Type of User Account You Have
- Fix 2: Log In to Your Administrator Account
- Fix 3: Make Your Account an Administrator Account
- Fix 4: Unlock the File or Folder
- Fix 5: Change the Security Permission of the File, Folder, or App
- Fix 6: Take Ownership of the File or Folder
- Via File Explorer:
- Using Command Prompt (Admin):
- Creating a .bat File:
- Fix 7: Scan Your PC for Malware
- Fix 8: Run A DISM and SFC Scan
- Fix 9: Run A CHKDSK Scan
- Fix 10: Start Your PC in Safe Mode
- Fix 11: Disable Conflicting Programs
- Fix 12: Reinstall the Problematic Program
- Fix 13. Clean Up the Registry
- Fix 14: Disable User Account Control (UAC)
- Fix 15: Reset Your OS

Microsoft designed the Windows OS to be intuitive. To protect itself, the system will prevent you from performing certain actions like running an app or modifying, deleting, and copying a file or folder.
If you have encountered the ‘You need permission to perform this action’ message on your PC, this guide will show you what to do.
What Does the ‘Need Permission to Perform this Action’ Message Mean?
To better understand this restriction, you need to know why Windows is enforcing it. The reasons may include:
- Accessing a System File or Folder: Windows prevents users from unintentionally tampering with crucial system files that may affect the operating system.
- Modifying a Protected File or Folder: An administrator may have barred other users from accessing the file or folder you wish to open, rename, copy, move, or delete.
- You Don’t Have the Administrative Privileges to Perform the Action: On a shared computer with more than one user account, some users can perform certain actions that have system-wide effects while others cannot. So, when your account is not an admin account, the system will prevent you from making some changes to the computer.
However, the scenarios mentioned above are not the only reasons why you could be encountering the restricted permissions on your PC. Malware infection, corrupt system files, disk issues, Windows registry faults, and program conflicts could be what you have on your hands.
Now that we’ve seen the factors that could make you face this limitation on your PC, let’s discuss what you can do about it.
How to Fix the “You Need Permission to Perform this Action” Error on Windows 10
These are the solutions you need:
- Confirm the type of user account you have
- Log in to your administrator account
- Make your account an administrator account
- Unlock the file or folder
- Change the security permission of the file or folder
- Take ownership of the file or folder
- Scan your PC for malware
- Run DISM and SFC scans
- Run a CHKDSK scan
- Boot your PC in Safe Mode
- Disable conflicting programs
- Reinstall the problematic program
- Clean up the Windows registry
- Disable User Account Control (UAC)
- Reset your OS
You may want to attempt the solutions in the order they are presented. On the other hand, you can go at it in any order you prefer. It’s your choice. Soon, you will be able to access the files and run the apps that were triggering the ‘You need permission to perform this action’ message.
Let’s get started, shall we?
Fix 1: Confirm the Type of User Account You Have
There are two types of users on a Windows PC, namely Administrator and Standard users. Formerly, there was a third type of user account: the Guest account.
The type of user account you have determines the actions you can perform on the device.
Take a look:
- Administrator: An admin has free access to the computer. They can control the entire system and other users. An administrator can change security settings, access all files, modify other user accounts, and run all apps. What’s more, an admin account can install and uninstall apps, software, and hardware.
- Guest: Guest accounts have minimum privileges. They are meant for people you let use your system temporarily. Guests cannot install apps, access your private files, or change your PC settings.
Note: Windows 10 no longer offers guest accounts. However, administrators can still create a restricted account to achieve the same purpose.
- Standard: A Standard user can run programs, access files, and perform other actions that do not have system-wide effects. They can use most software and change system settings that don’t impact other users or affect the security of the PC.
A Standard user cannot install new apps or remove existing ones, change PC settings, or run apps and software to which an admin has not given them permission.
If you are not using an administrator account, Windows will prevent you from performing certain actions like modifying files and folders. Moreover, you cannot run apps that have access restrictions. Sometimes, you may be asked to provide an administrator password to continue the action.
To check the type of account you have, here’s what you need to do:
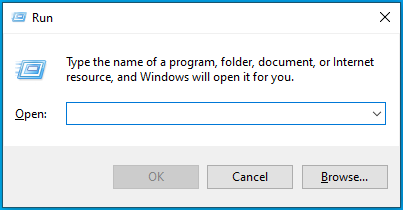
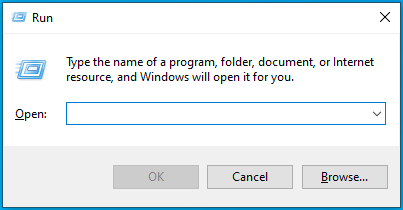
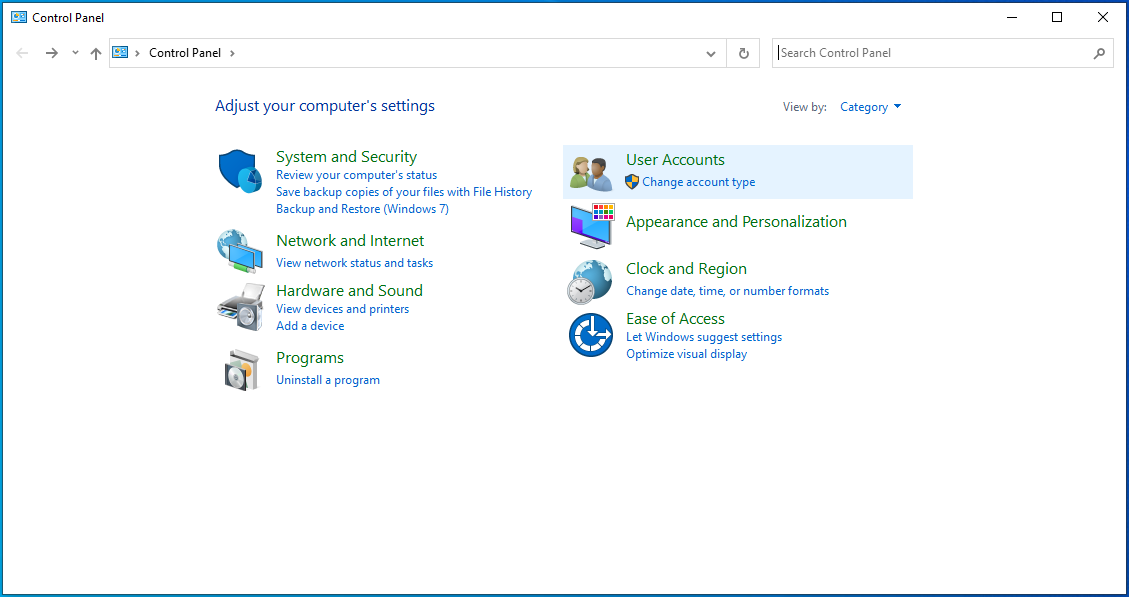
- Press the Windows + R keyboard combination to open the Run dialog box.

- Type “Control Panel” (no quotes) into the text box and press Enter on your keyboard or click the OK button on the dialog.
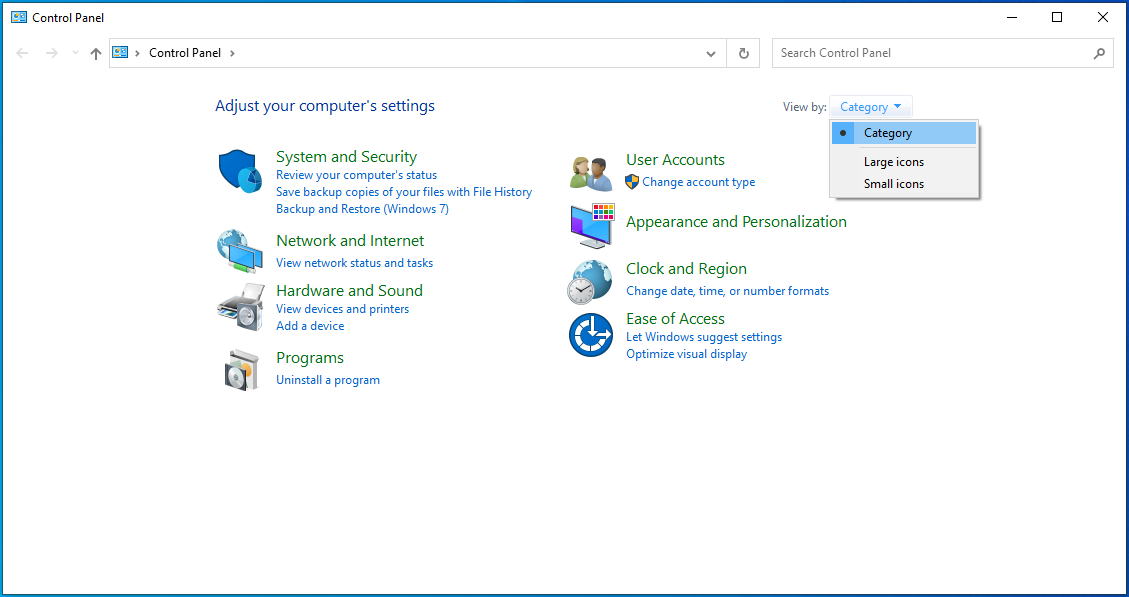
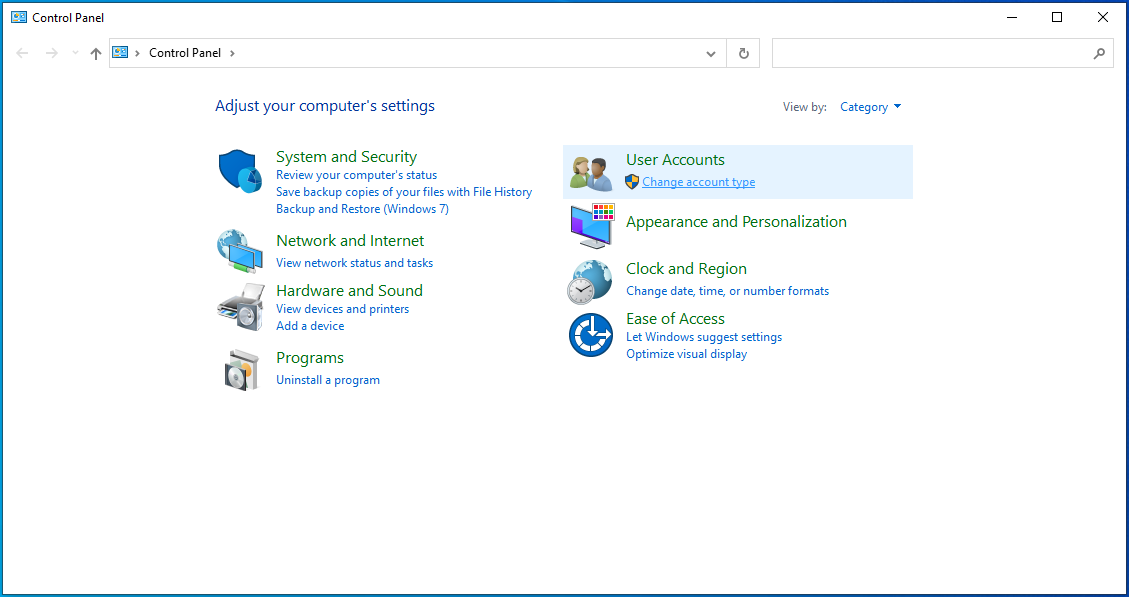
- When Control Panel opens, go to the View By menu in the top-right corner and select Category.

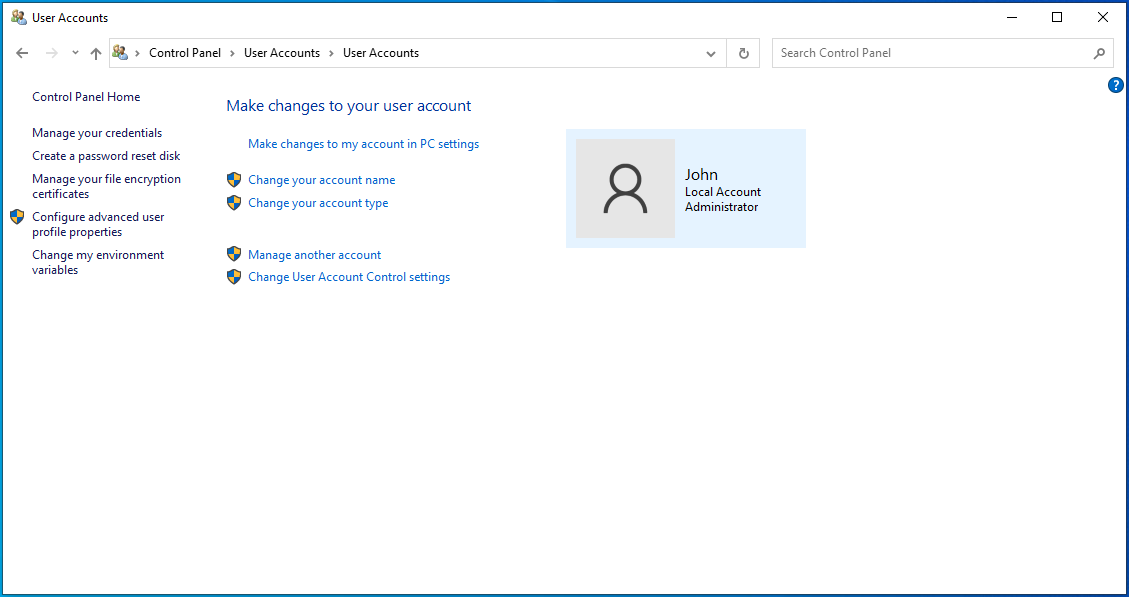
- Click on User Accounts.

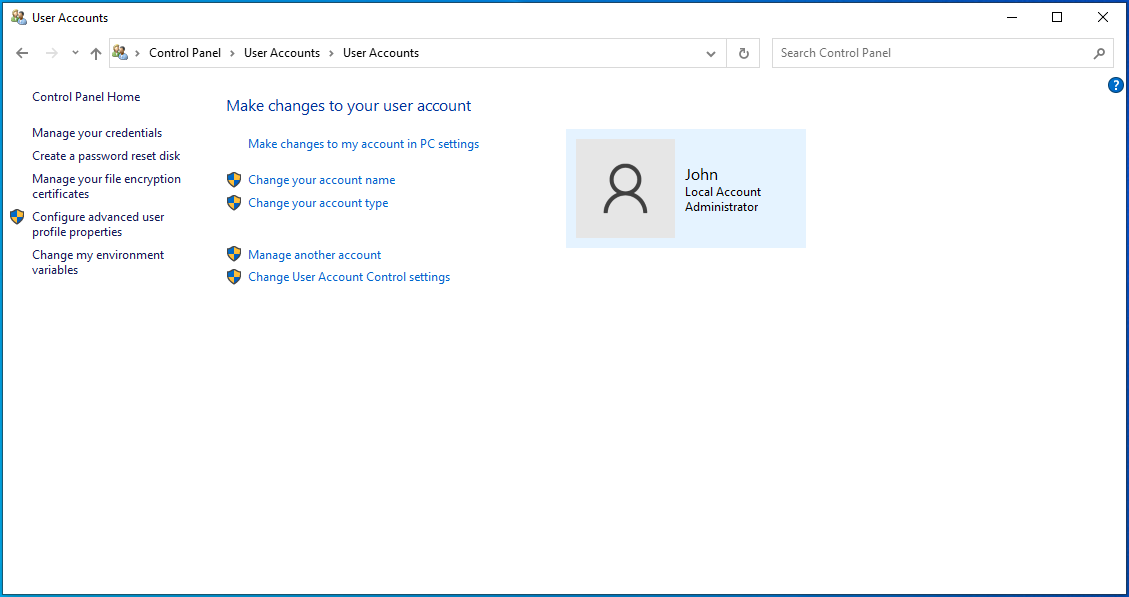
- On the page that opens, you will see your username along with your account type.


Fix 2: Log In to Your Administrator Account
Perhaps, you are the only one using your PC but you have created more than one account. If so, one of the accounts will become an admin account. So, if you find that you cannot perform some actions on the account you are currently signed in on, consider logging in to your admin account.
Here’s how to do so:
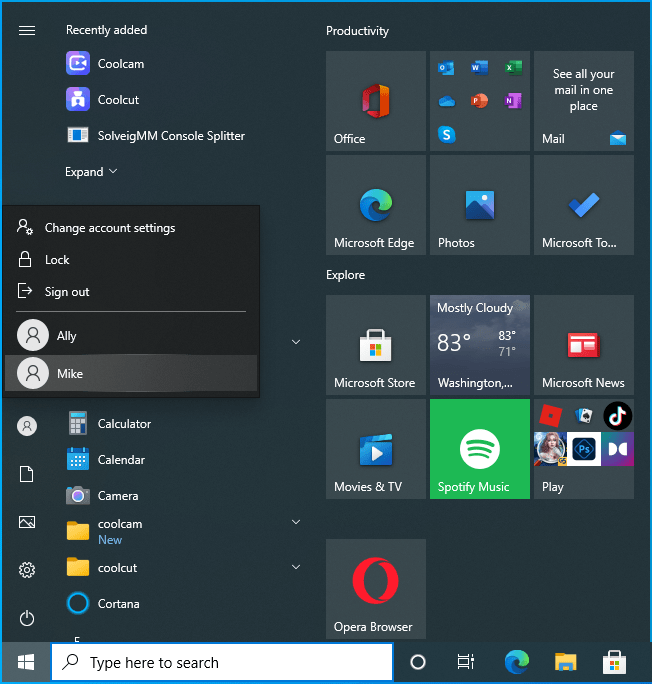
- Launch the Start menu by pressing the Windows key on your keyboard.

- Click the icon of your user account.

- Click on the account to which you want to switch.

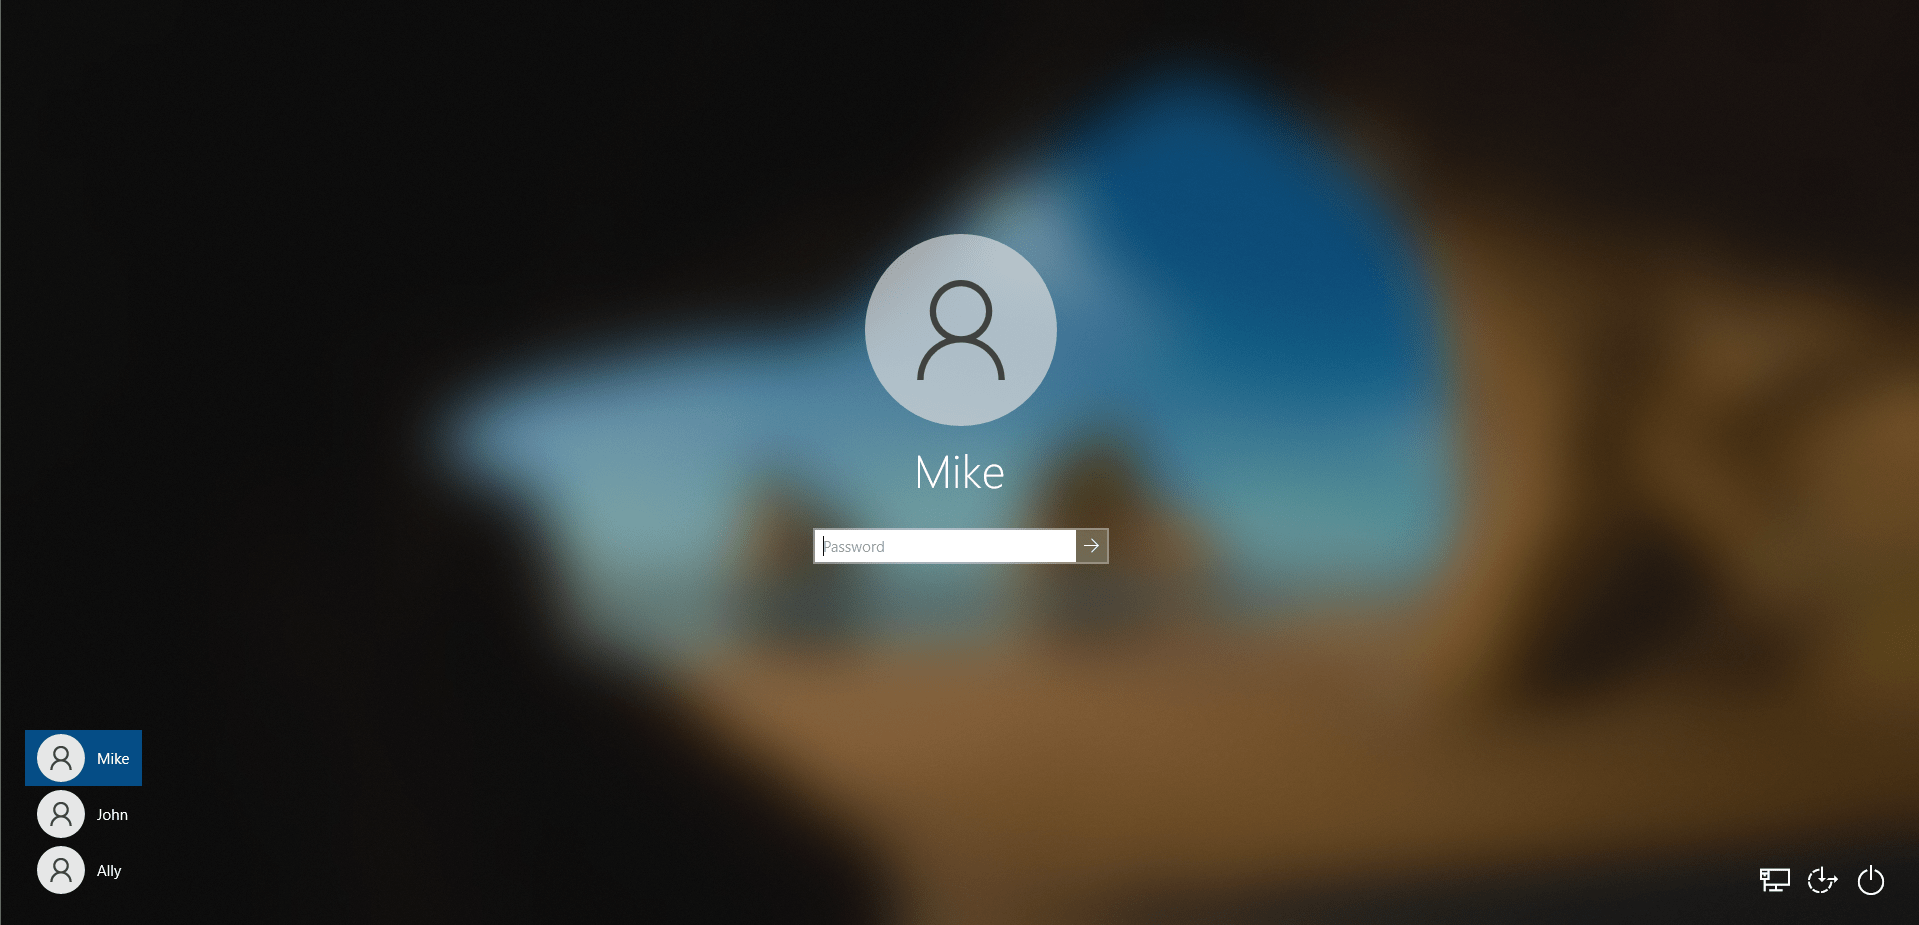
- When the login screen is displayed, provide your login information.

Alternatively, you can use these steps:
- Press the Windows + L combination on your keyboard to get to the Lock screen.
- Click on the screen to switch to the login screen.
- Select the account you want to use and enter your sign-in information.
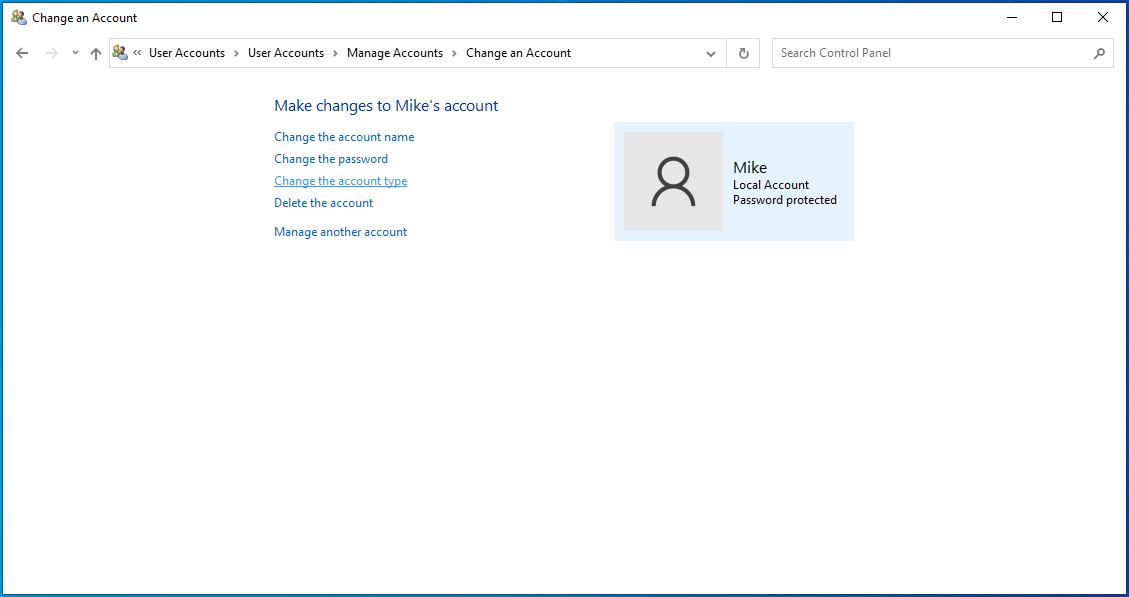
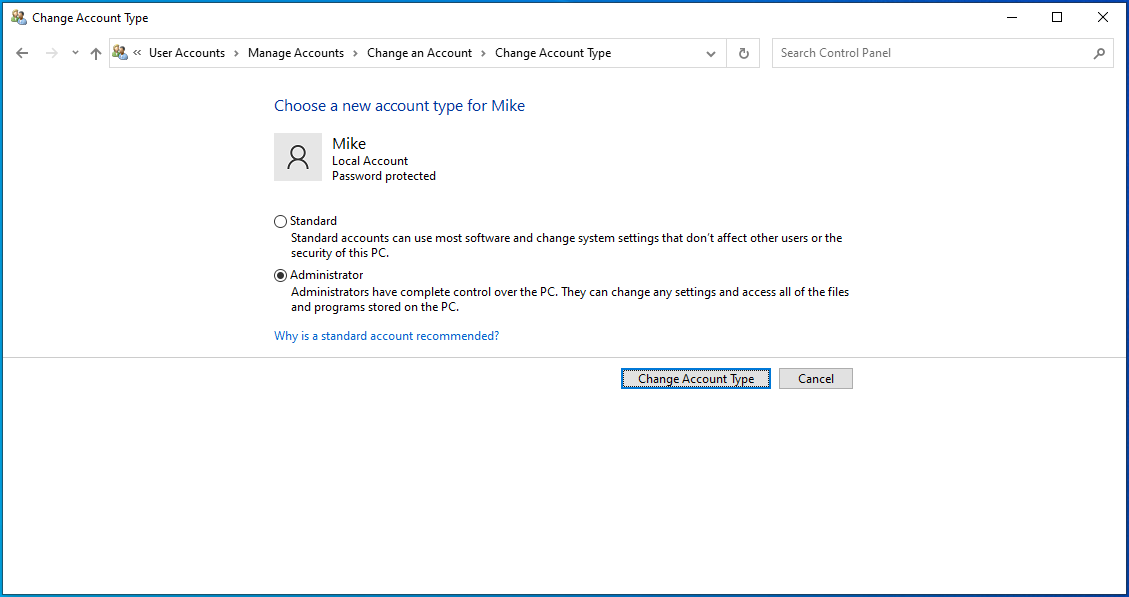
Fix 3: Make Your Account an Administrator Account
If you have more than one user account on your PC, you can change the rights to the account you are currently signed into. Making your account an administrator account implies that you will have unrestricted access to your computer. You can install, remove, and edit protected files and software, and even change the system settings.
Here’s how to get administrator permission on Windows 10:
- Using Command Prompt
- Using Windows Settings
- Using Control Panel
- Using User Accounts
- Using Computer Management
How to Change Your Account Type Using Command Prompt
Follow these steps:
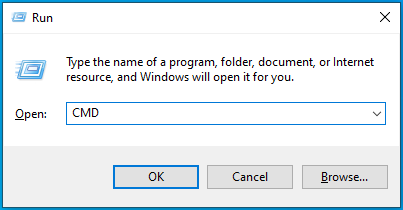
- Press the Windows + R combination on your keyboard to open the Run box.
- Type “CMD” (no quotes) and click the OK button or press Enter on your keyboard.
- When the Command Prompt window opens, input the following line and press Enter to run it:

net user administrator /active: yes
- Restart your computer.
You can now try performing the previously restricted action. You will have permission.
If you would like to deactivate the admin privileges on your account afterward, here’s the command to run in CMD:
net user administrator /active: no
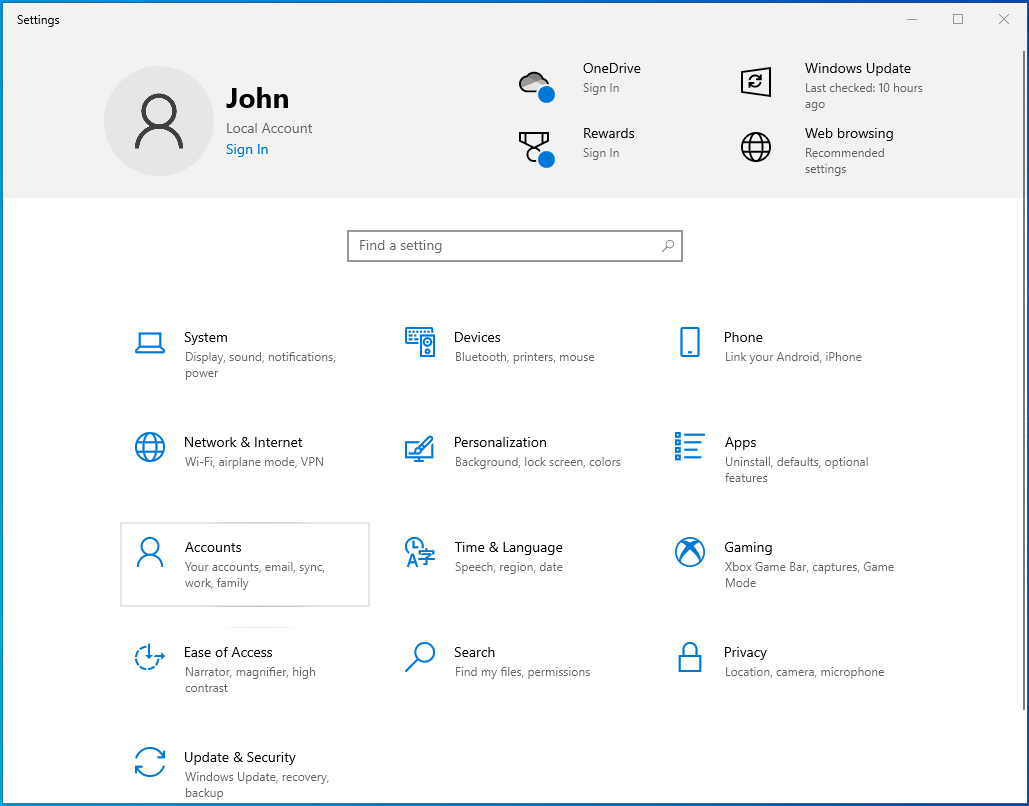
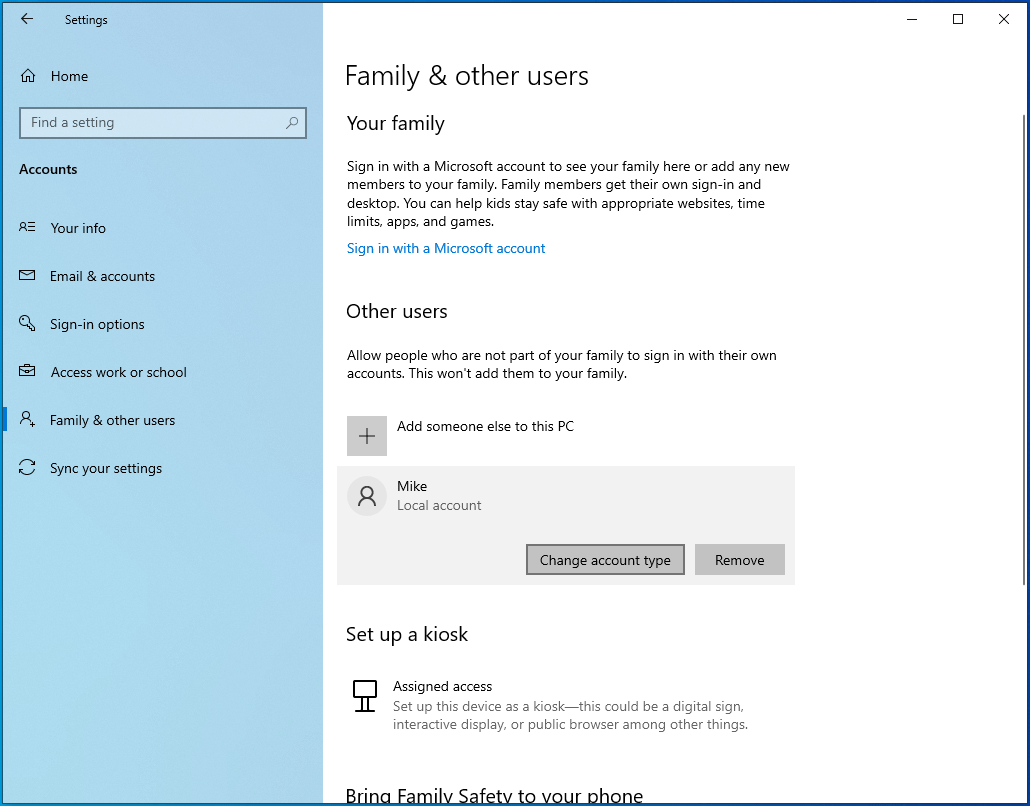
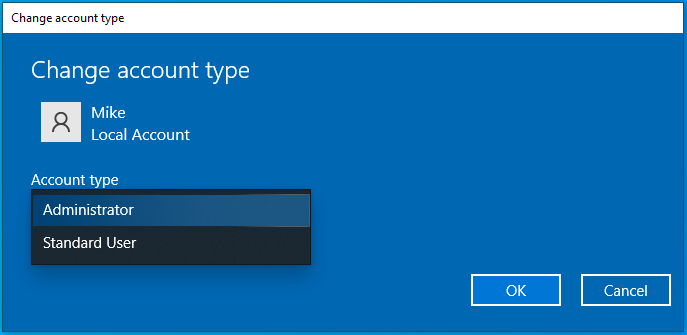
How to Change Your Account Type Using the Settings App
- Log into Windows with your administrator account.
- Press the Windows + I keyboard combination to open the Settings app.

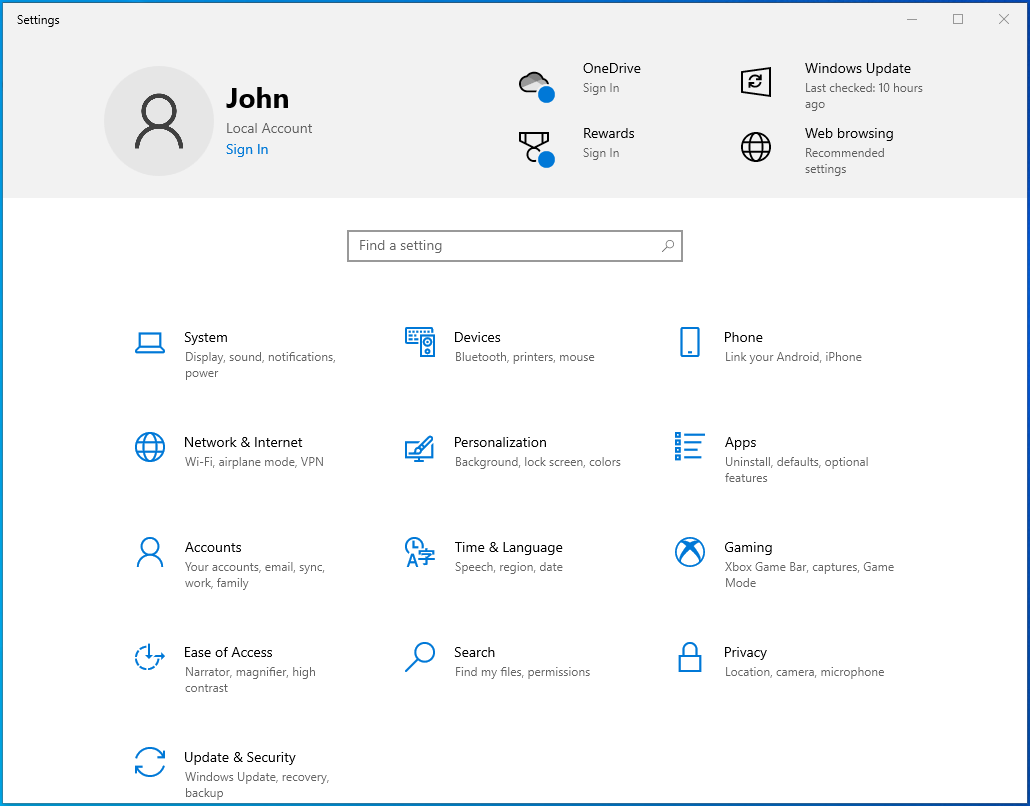
- Click on Accounts.

- Click Family & Other Users in the left pane.
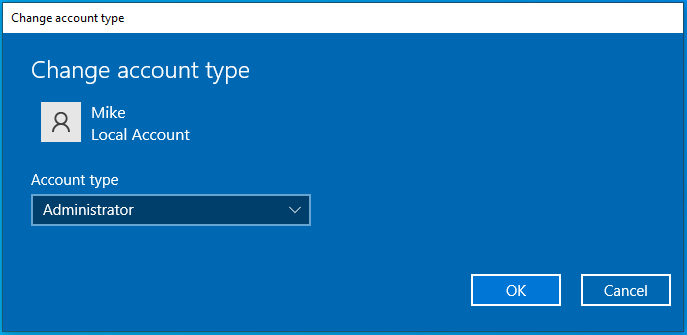
- On the right-hand side of the page, select the account you want to change and click the Change Account Type button.
- Select Administrator.

- Click OK.
- Restart your computer.
How to Change Your Account Type Using the Control Panel
- Press the Windows + R keyboard combination to open the Run dialog.
- Type “Control Panel” (no quotes) and click the OK button or press Enter on your keyboard.

- When the Control Panel window opens, click on Change Account Type under User Accounts. You can use the search bar to locate the option.
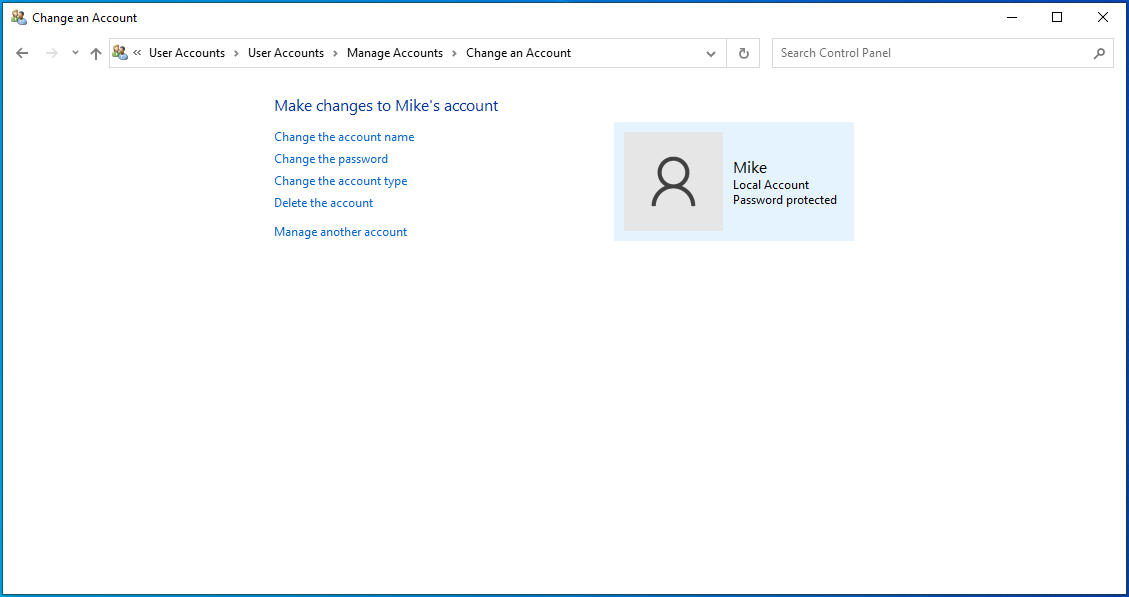
- Select the account you want to change.
- Click the Change the Account Type link in the left pane.
- Select Administrator and click the Change Account Type button.

How to Add Your Account to the Administrators Group Using User Accounts
- Open the Run dialog: Press the Windows + R combo on your keyboard.
- Type “Netplwiz” (no quotes) and click the OK button.
- When the User Accounts box opens, select the account you wish to change and click the Properties button.
- Switch to the Group Membership tab.
- Select Administrator.
- Click the Apply button. Click the OK button.
- Click Apply and OK again.
- Restart your computer.
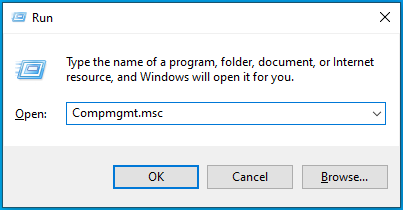
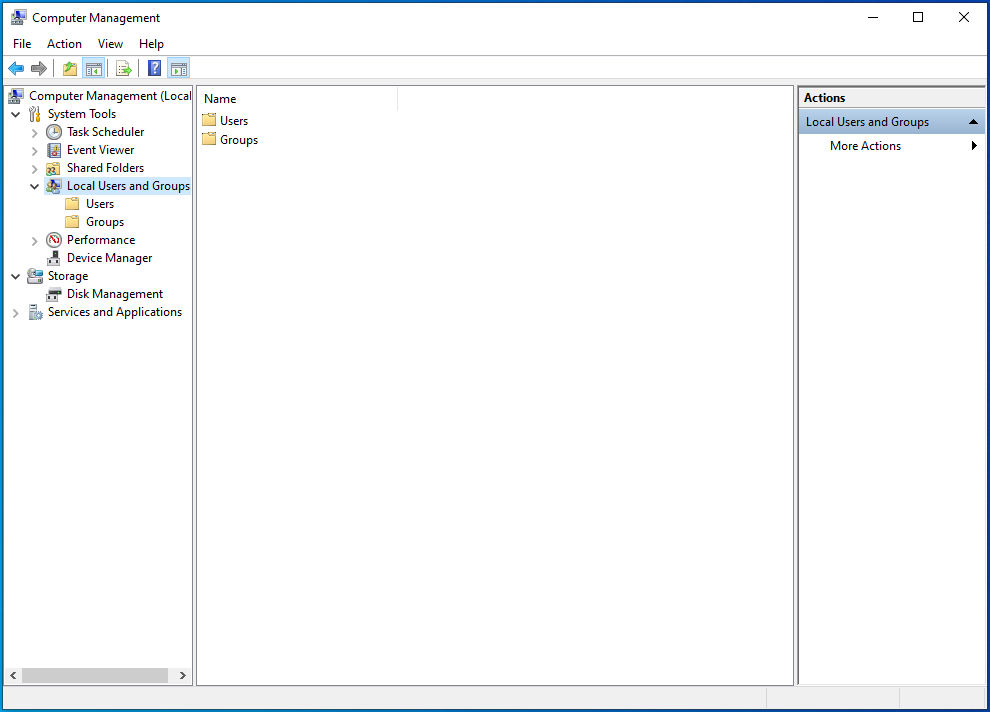
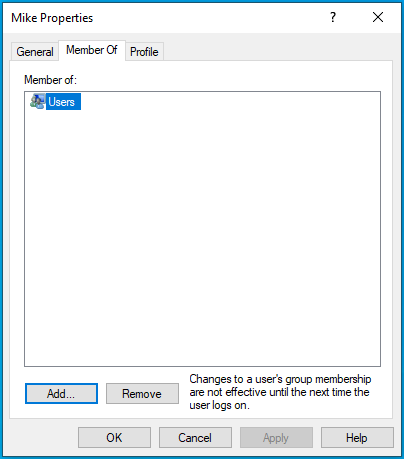
How to Add Your Account to the Administrators Group Using Computer Management
Follow these steps:
- Press the Windows + R keyboard combo to open the Run dialog.
- Type “Compmgmt.msc” (no quotes) and click the OK button or hit Enter on your keyboard.

- When the Computer Management window opens, expand System Tools > Local Users and Groups in the left pane.

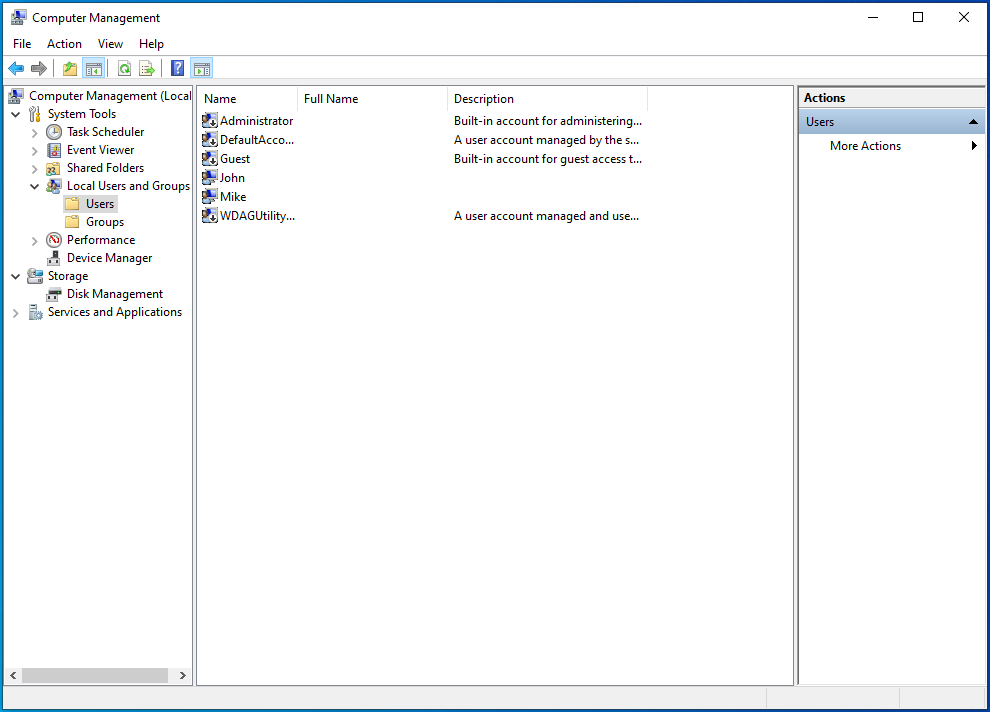
- Open Users.
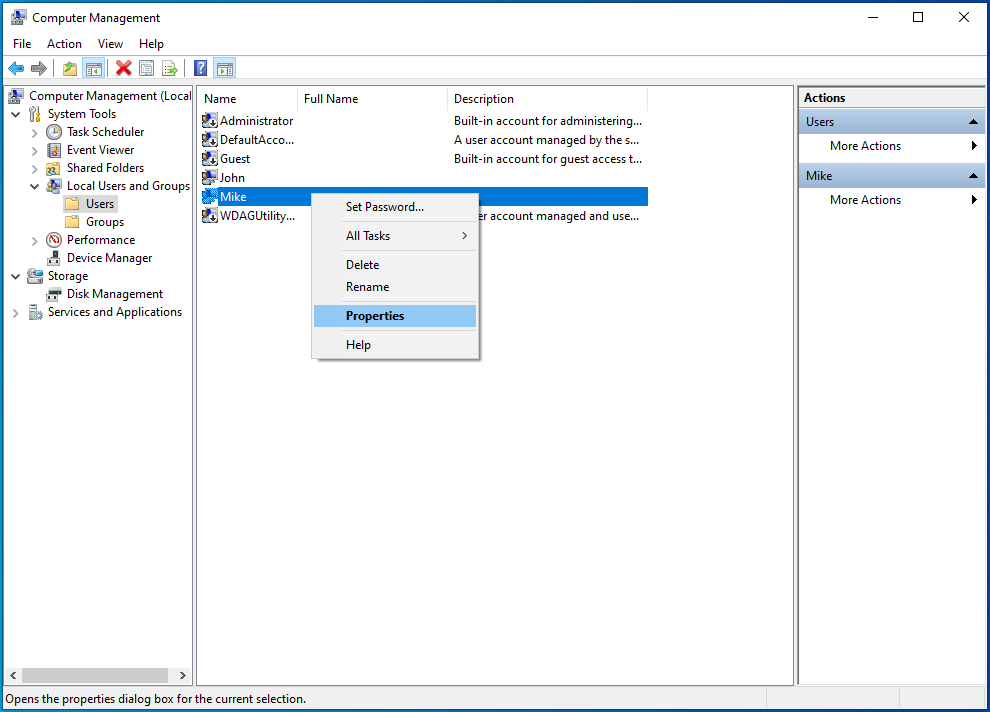
- Locate your account on the right-hand side of the page and double-click on it or right-click on it and click on Properties in the context menu.
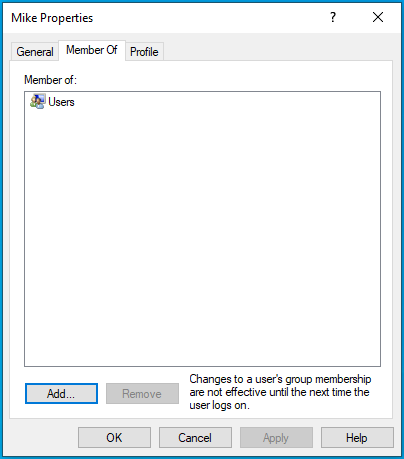
- When the Properties box opens, click on the Member Of tab.

- Click the Add button.
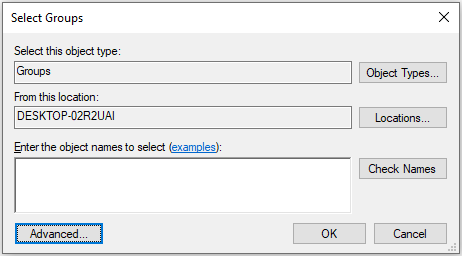
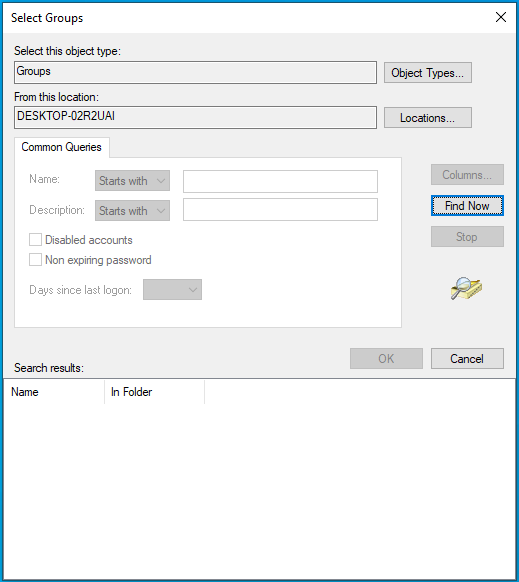
- When the Select Groups box opens, click Advanced.

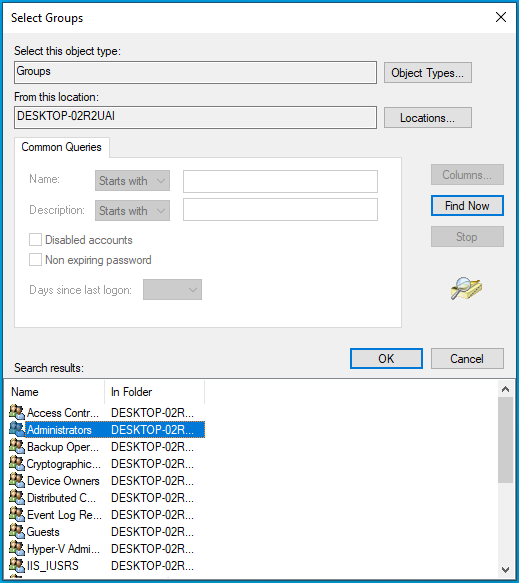
- Click the Find Now button.

- Select Administrators in the search results and click OK.

- Click OK in the User Properties window.
- Restart your computer.
Your account now has administrator rights. You can successfully perform the action that was displaying the ‘You need permission to perform this action’ message.
Fix 4: Unlock the File or Folder
The file or folder you are trying to access may be password-protected or encrypted. If it was made so by another user, you can ask their permission to let you access the file.
Also, there are third-party apps that let you know if a program or process is locking the file or folder. They then allow you to remove all the restrictions on the file/folder.
Fix 5: Change the Security Permission of the File, Folder, or App
You can gain the rights to a file, folder, or application by modifying your security permissions. Here’s how to get it done:
- Press the Windows + E combination on your keyboard to open File Explorer.
- Locate the file, folder, or app you are having issues with and right-click on it.
- Click on Properties in the context menu.
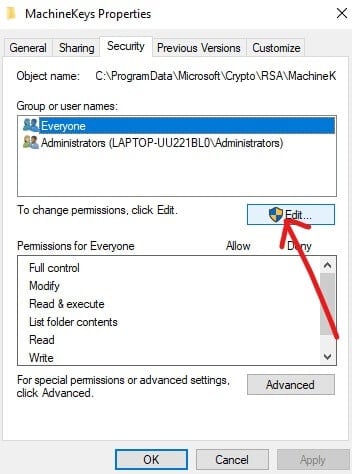
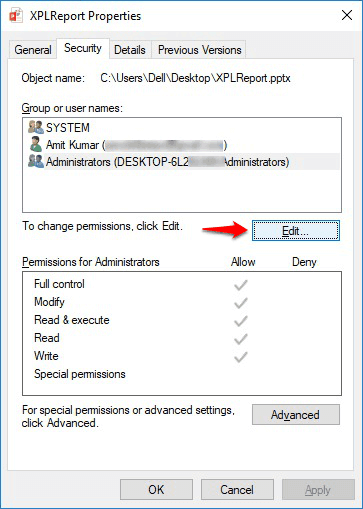
- When the Properties box opens, go to the Security tab and click the Edit button.
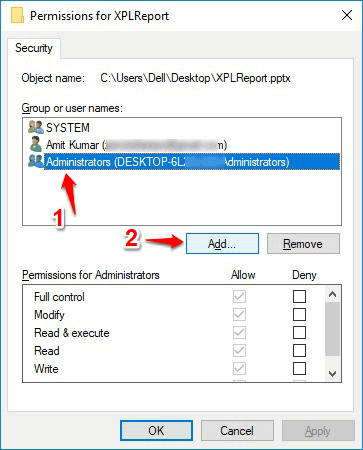
- Check for your username in the Group or User Names field and select it.
Note: If you cannot find your username in the Group or User Names field, here’s what you have to do:
- Click the Add button. It will open the Select Users or Groups box.
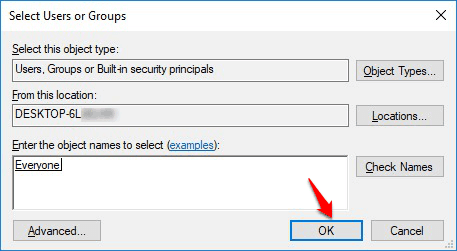
- Type your username into the ‘Enter the object names to select’ field. Note that it is case-sensitive. Finally, click the Check Names button.
Tip: If you are not sure of your username, don’t bother using the ‘Enter the object names to select’ field. Instead, click the ‘Advanced’ button and click the Find Now button. It will list all the available users and groups on your computer. Then locate your username in the search results and select it. Click OK and click OK again.
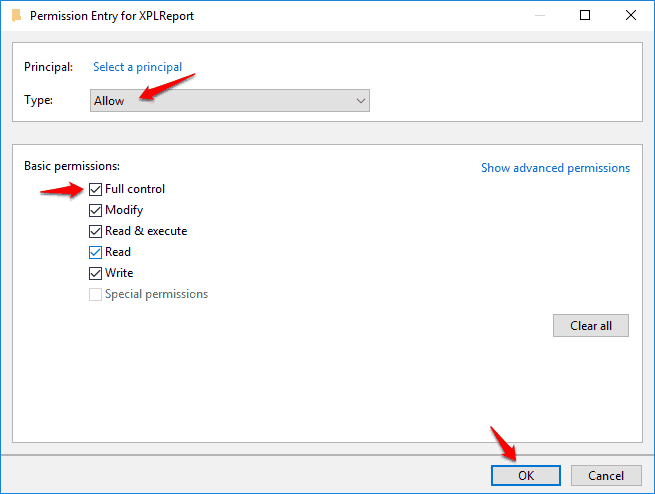
- In the Permissions field, check whether Full Control is allowed for your account. If it is not allowed, mark the Allow checkbox for Full Control. Doing so will also mark the Allow checkbox for other permissions, including Modify, Read & Execute, Read, and Write.
- Click the Apply button.
- Click the OK button.
You can also use Command Prompt (Admin) to change your security permission:
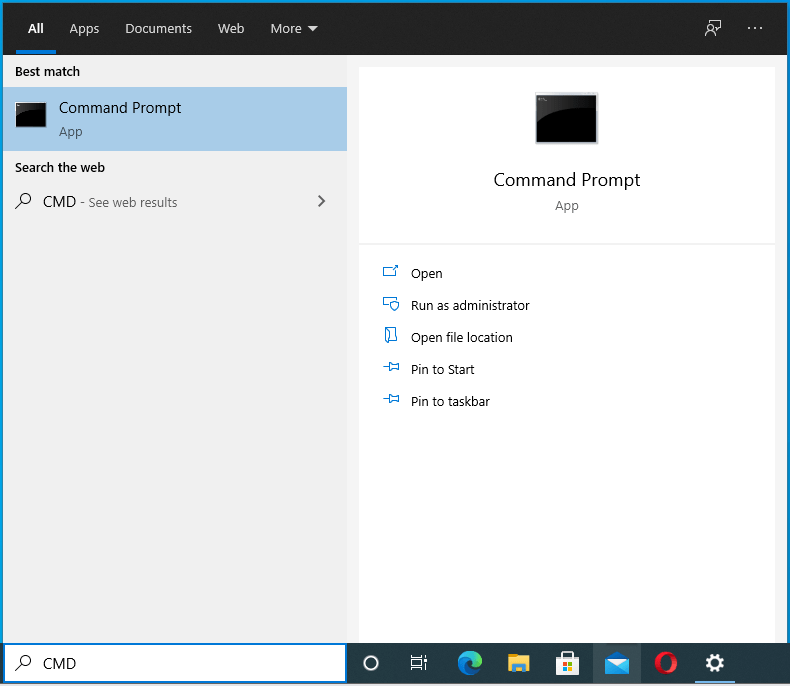
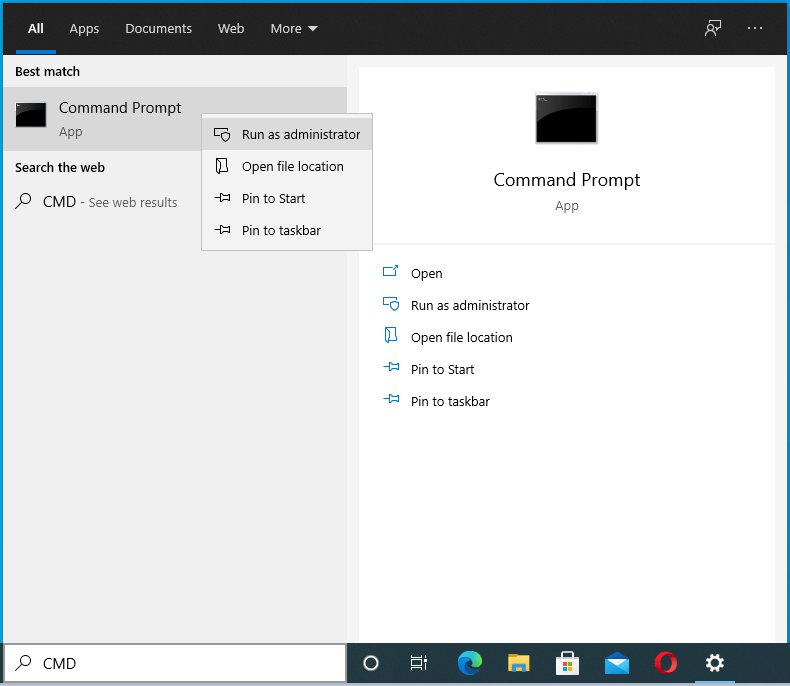
- Log into your Administrator account.

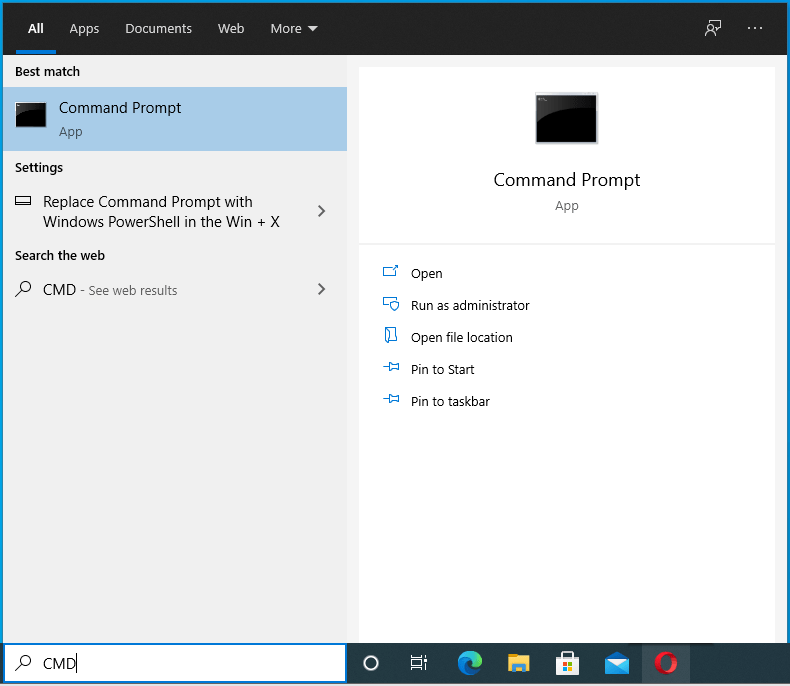
- Go to the Start menu and type “CMD” (no quotes) into the search box.

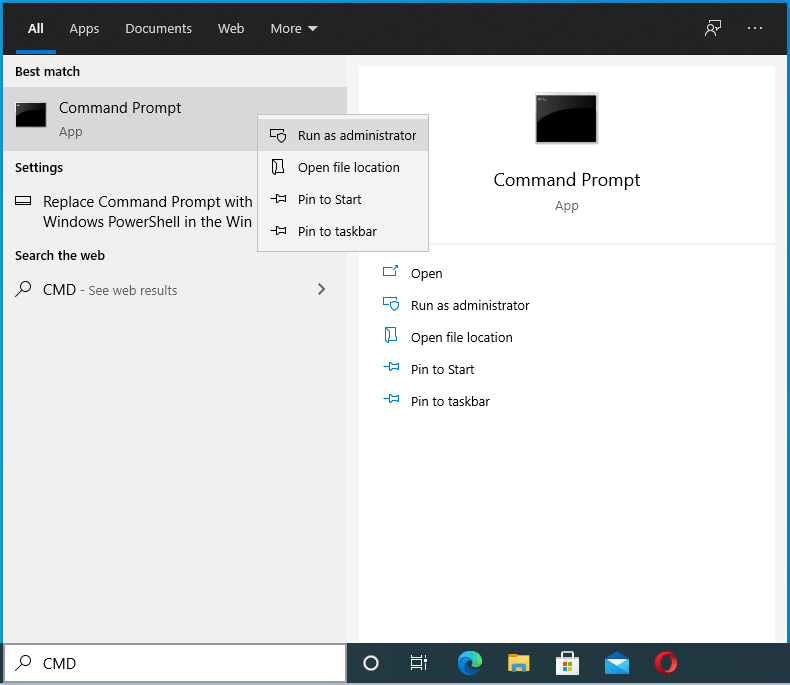
- Right-click on Command Prompt in the search results.

- Click Run as Administrator in the context menu.

- Provide your administrator credentials if the system prompts you for it.
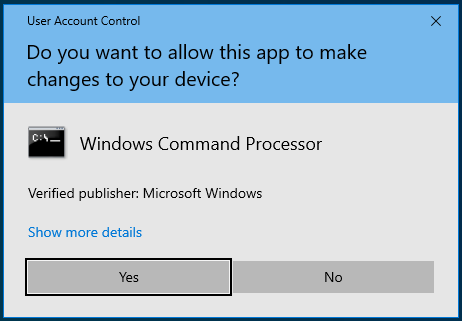
- When User Account Control comes up, click the Yes button to confirm that you want to allow Command Prompt to make changes to your computer.

- When the Command Prompt (Admin) window opens, enter the following command and press Enter to run it:


icacls <folder_path> /grant administrators:F /T
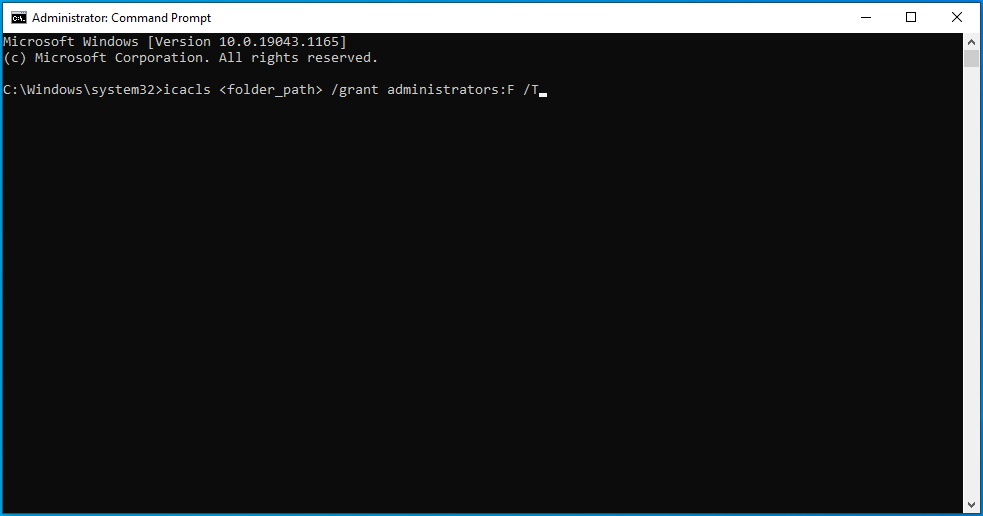
Note: Ensure that you replace <folder_path> with the actual path to the folder or file you wish to access. If you are not sure, locate the item in File Explorer and right-click on it. Then, click on Properties. Copy the text under Location. Input it as your folder_path in the command.
- After executing the command, the Administrators group on your PC will now have full control over the directory/file/folder. If your account is a Standard account and not in the Administrators group, replace ‘administrators’ in the above command with the username of your Standard account.
- Close the Command Prompt (Admin) window and restart your computer.
After completing the procedure shown above, you will now be able to access or modify the item without restriction.
Fix 6: Take Ownership of the File or Folder
Taking ownership of the restricted item will give you permission to access it. However, you should keep in mind that it can be risky to change the ownership of sensitive files, especially system files. You might be better off using the previous method to change your security permissions.
There are different ways for changing ownership:
- Via File Explorer
- Using Command Prompt (Admin) or PowerShell (Admin)
- Creating a .bat file
Via File Explorer:
- Press the Windows + E keyboard combination to open File Explorer.
- Navigate to the item you are having issues with and right-click on it.
- Click on Properties in the context menu.
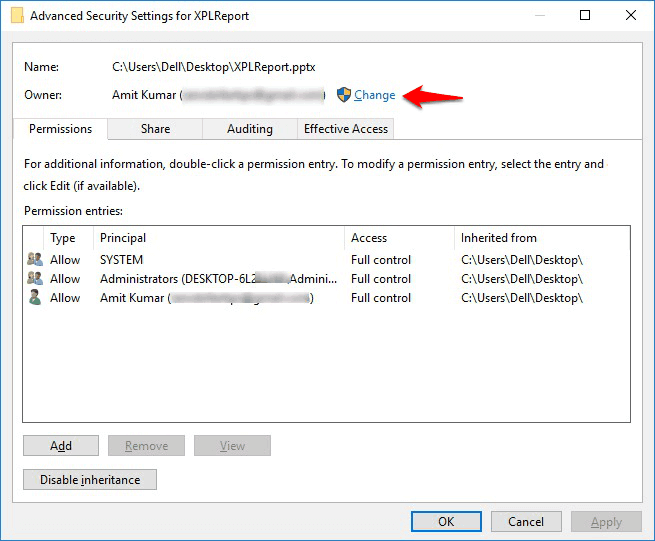
- Go to the Security tab and click the Advanced button.
- Click the Change link on Owner.
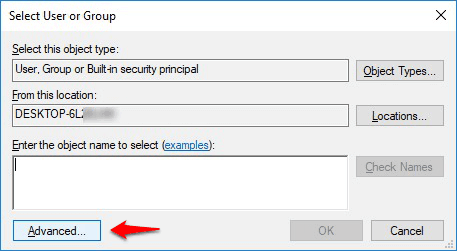
- When the Select User or Group box opens, type the name of your user account into the ‘Enter the object name to select’ field.
- Click the Check Names button to confirm the username.
- Click OK.
- Now, mark the ‘Replace owner on subcontainers and objects’ checkbox.
- Click Apply.
- Click OK.
- Click OK again.
Using Command Prompt (Admin):
Follow these steps:
- Log into Windows with your Administrator account.
- Open Command Prompt (Admin). To do so, go to the Start menu and type “CMD” (no quotes) into the search box.
- Then, right-click on Command Prompt in the search results and click Run as Administrator in the context menu.
- If the system prompts you, enter your Admin account credentials.

- Click the Yes button on the User Account Control dialog to allow Command Prompt to make changes to your computer.
- When the Command Prompt (Admin) window opens, input the following command and press Enter to run it:

takeown /f “folder_path” /r /d y
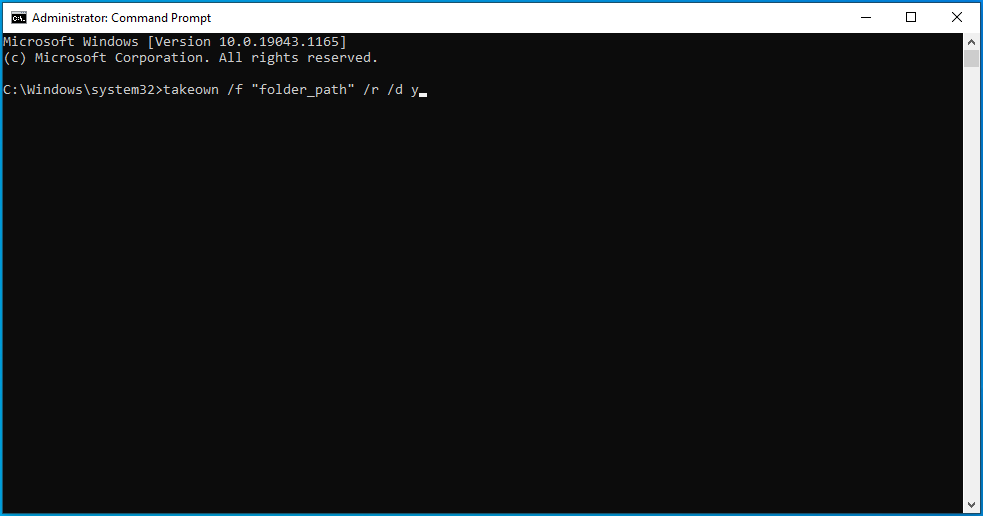
Note: Ensure that you replace “folder_path” in the command with the actual location of the item that’s triggering the ‘You need permission to perform this action’ message. If you are not sure of the path, go to File Explorer and locate the item. Then, right-click on it and click on Properties in the context menu, and, afterward, copy the item’s location.
- After executing the command, you’ll now have ownership of the file, folder, or directory. Close the Command Prompt (Admin) window and restart your computer.
Creating a .bat File:
You can use a .bat file to gain ownership of an item on your PC. Creating such a file is easy. Here’s how:
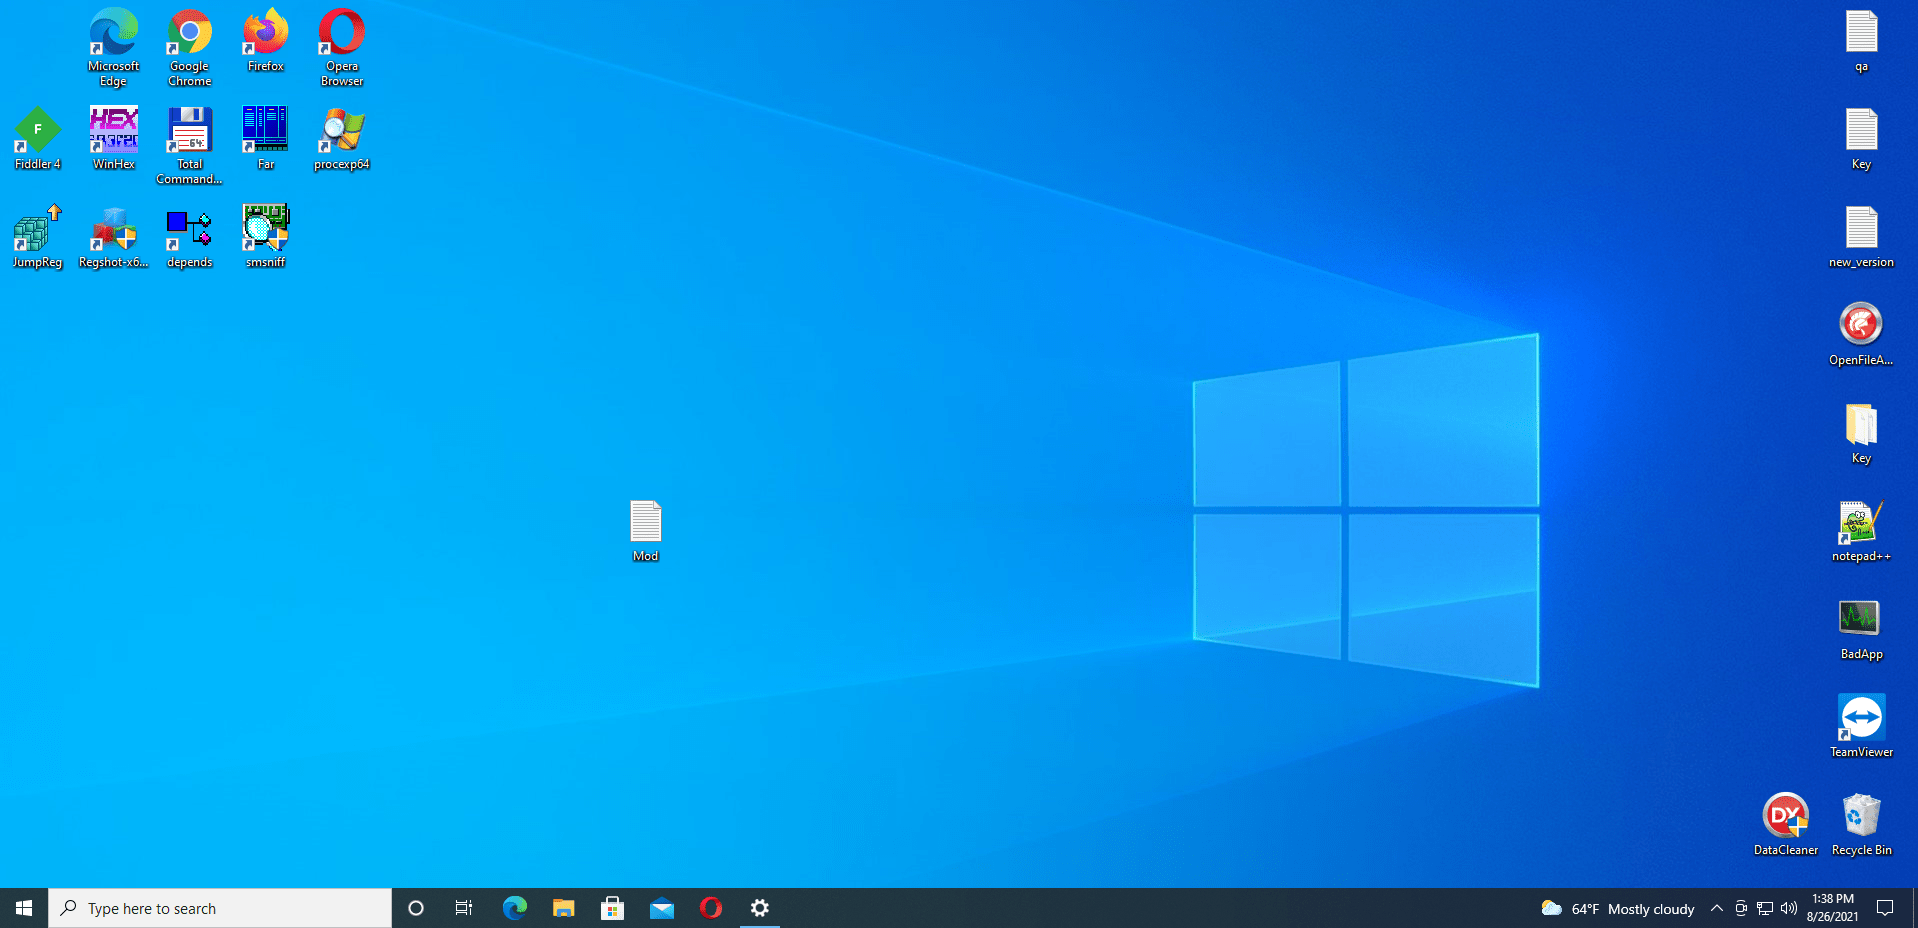
- Right-click on a blank area on your desktop and hover over New.

- Select Text Document and name the new document as ‘Mod.txt.’
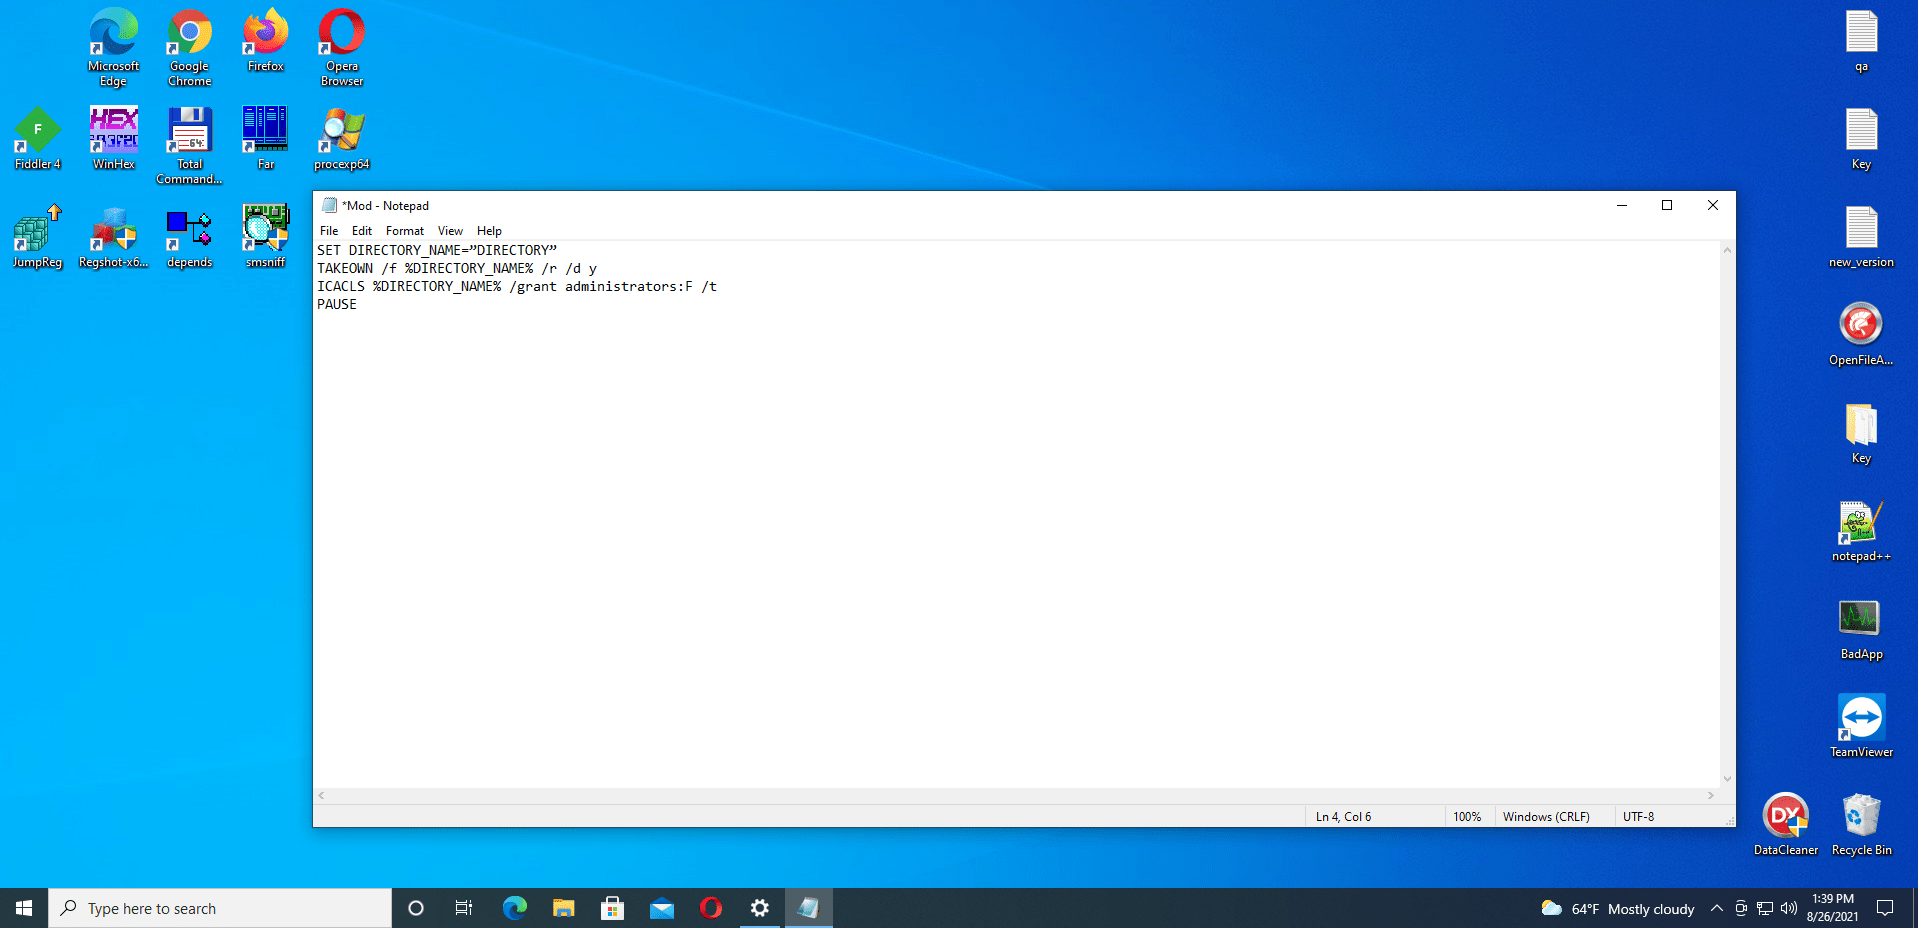
- Use a text editor to open Mod.txt. Then, copy and paste the following:
SET DIRECTORY_NAME=”DIRECTORY”
TAKEOWN /f %DIRECTORY_NAME% /r /d y
ICACLS %DIRECTORY_NAME% /grant administrators:F /t
PAUSE
Note: Ensure that you replace DIRECTORY with the actual path of the item you are having issues with. If you are not sure of the path, go to File Explorer and right-click on the item (be it a file or folder), then click on Properties and copy the text under Location.
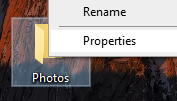
- Save the changes.
- Go to your desktop and right-click on the Mod.txt. Select Rename and rename it as ‘Mod.bat.’ The system will display a warning, letting you know that you are about to change the file extension. Click Yes to proceed.
- Right-click on Mod.bat and select Run as Administrator in the context menu.
- Afterward, try performing the restricted action again and see whether the ‘You need permission to perform this action’ message will still appear.
Fix 7: Scan Your PC for Malware
The ‘You need permission to perform this action’ could be caused by some malware that has hijacked your computer and taken control of its files and processes. These malicious items may also have corrupted or deleted some entries in the registry as well as your system files.
You need to act fast in this regard. If you don’t have a third-party antivirus program on your PC, it means that Microsoft Defender is active but hasn’t been getting updates. That’s why malware was able to invade.
If you do have a third-party antivirus program, it’s possible that it’s not robust enough to detect elusive threats. It could also be that you haven’t been updating it.
Either way, we suggest that you update your antivirus, whichever it is you are using, and run a scan at once.
If you are using Microsoft Defender, see that it has the latest security updates. Then, proceed to run a scan. Here’s how to run an advanced scan to deal with stubborn threats:
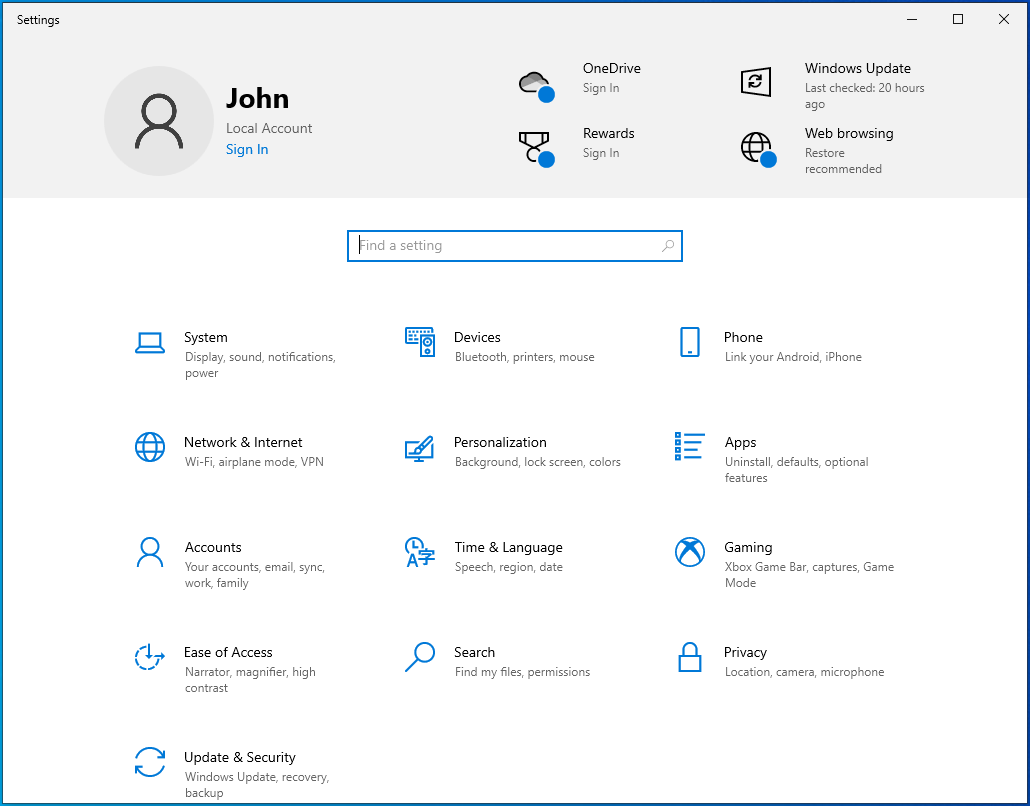
- Press the Windows + I keyboard combination to open the Settings app.

- Click on Update & Security.
- Click on Windows Security in the left pane.
- Click on Virus & Threat Protection. It is the shield icon.
- Select Scan Options under Current Threats. If you are using an older version of Windows 10, select ‘Run a New Advanced Scan.’
- You’ll see three options: Full Scan, Custom Scan, and Microsoft Defender Offline Scan. First, select Full Scan and click Scan Now. After the scan is complete, run the Microsoft Defender Offline Scan.
If you are using a third-party antivirus program, we suggest you also get Auslogics Anti-Malware to complement it. This tool was designed and released by a Microsoft Silver Application Developer.
The program can detect deeply hidden threats that your current antivirus might miss. It is user-friendly and easy to set up and run.
Fix 8: Run A DISM and SFC Scan
Verify the integrity of your system files by running Deployment Image Servicing and Management (DISM) and System File Checker (SFC) scans. Here’s how to go about it:
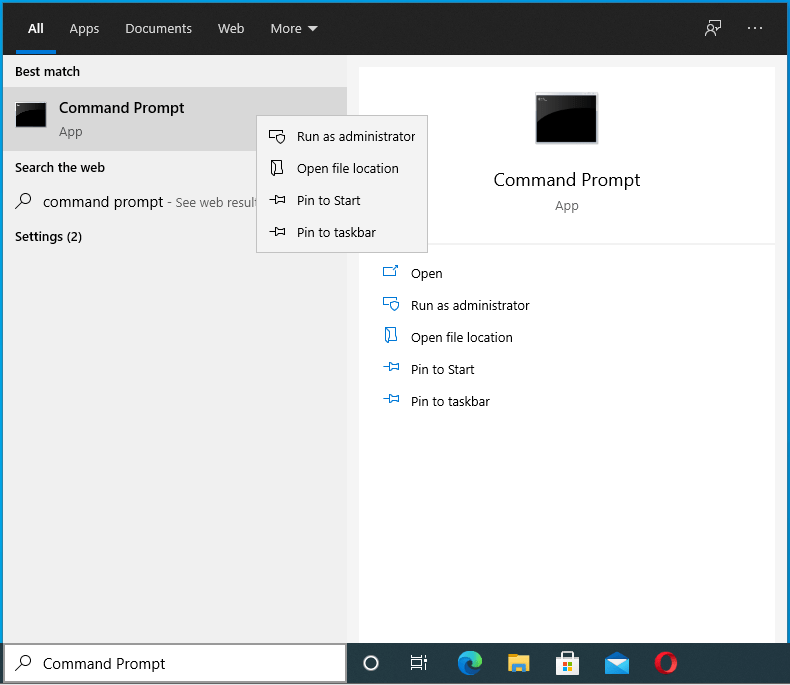
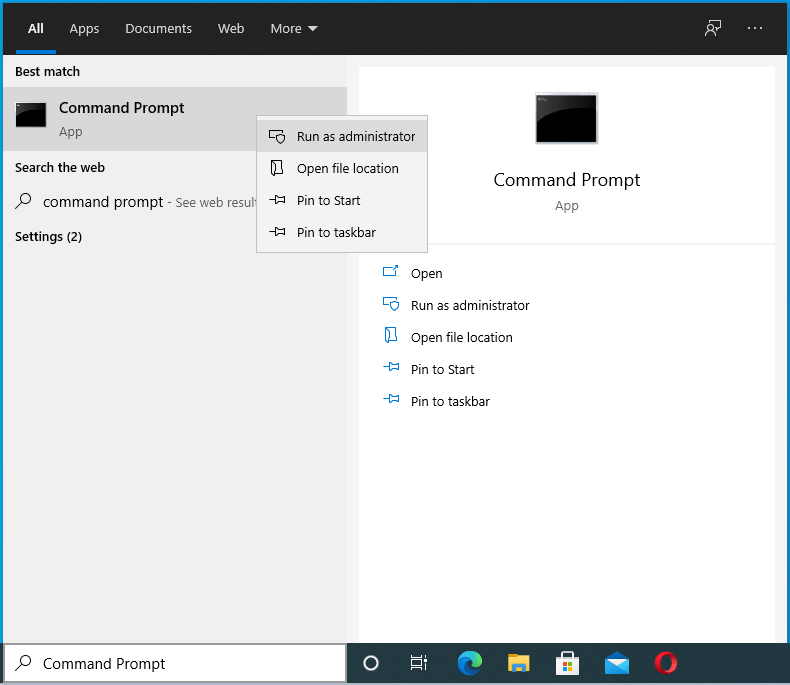
- Go to the Start menu and type “Command Prompt” (no quotes) into the search bar.
- Right-click on the option when it appears in the search results.
- Select Run as Administrator.
- If the system requests your administrator credentials, provide them.
- Click the Yes button on the User Account Control dialog to allow Command Prompt to make changes to your PC.
- When the Command Prompt (Admin) window opens, turn on your internet connection and input the following command (you can copy and paste it). Then, press Enter on your keyboard to execute it:


DISM /online /cleanup-image /restorehealth

- Wait for the scan to complete. It may take up to 30 minutes depending on your system. You may want to plug in your power cord to avoid running out of battery power and interrupting the scan.

- After the scan is done, input the following command and press Enter to run it:
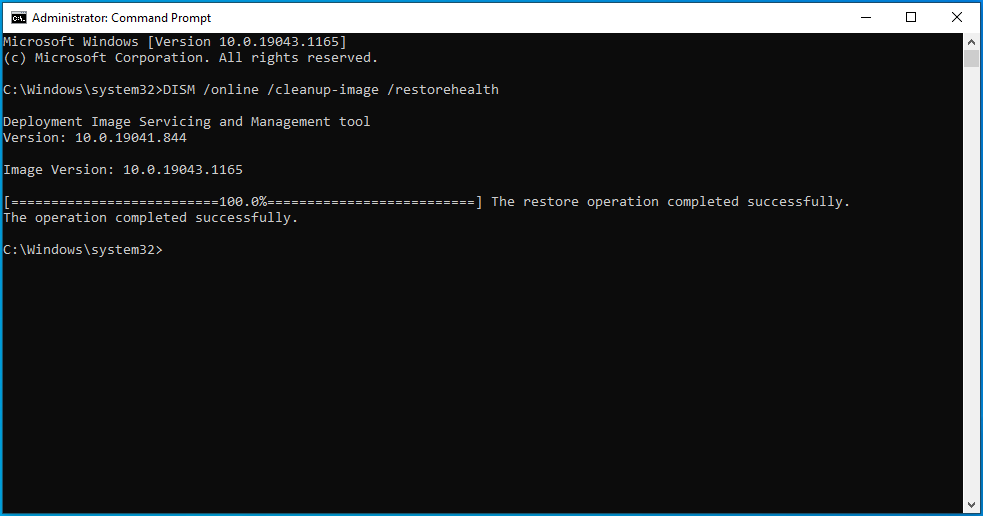
sfc /scannow
- Also, wait for the scan to complete. It will display the results to let you know the issues that were fixed.
- Afterward, close the Command Prompt (Admin) window and restart your computer.
Fix 9: Run A CHKDSK Scan
Your hard drive might contain some errors and that’s why you are unable to perform certain actions. To find out, run a CHKDSK scan:
- Go to the Start menu and type “Command Prompt” (no quotes) in the search bar.
- Right-click on Command Prompt in the search results and select Run as Administrator in the context menu.
- Provide the password of your admin account if the system prompts for it.
- Click the Yes button on the User Account Control dialog to allow Command Prompt to make changes to your computer.
- Input the following command and press Enter on your keyboard to run it:
chkdsk /r

- When the process is complete, close the Command Prompt (Admin) window and restart your computer.
Fix 10: Start Your PC in Safe Mode
You can boot your PC into Safe Mode and try accessing the restricted file once more. Here’s how to boot Windows in Safe Mode:
- Press the Windows + R keyboard combination to invoke the Run dialog.
- Type “Msconfig” (no quotes) and press Enter or click the OK button to open System Configuration.
- Go to the Boot tab.

- Mark the Safe Boot checkbox under the Boot Options section.
- Click the Apply button and click the OK button.
- Restart your system to boot into Safe Mode. Try performing the restricted action now and see whether it goes through.

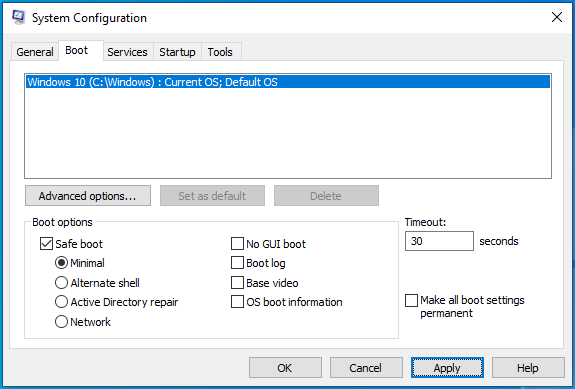
To boot Windows normally again, open System Configuration, as shown previously. Mark the Safe Boot checkbox, and then click Apply > OK.
Fix 11: Disable Conflicting Programs
Some users reported that the ‘You need permission to perform this action’ message was caused by their third-party antivirus program. Consider disabling your security app temporarily and see if that will fix the issue. Follow the steps below:
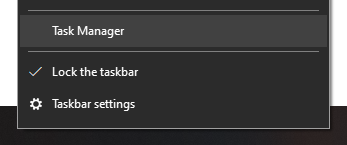
- Right-click on the Start button in the bottom-left corner of your screen or press the Windows + X keyboard combination to open the Power User menu.
- Click on Task Manager.
- Go to the Startup tab and select your antivirus program. Then, click the Disable button to prevent the program from starting automatically when you boot your PC.
- Restart your computer.
- Try performing the restricted action again. See if it goes through. Afterward, re-enable your antivirus or consider using the Windows built-in Microsoft Defender instead to protect your PC.
Fix 12: Reinstall the Problematic Program
Does the ‘You need permission to perform this action’ message appears when you are trying to run an app? Are you logged in to your admin account when this happens? If so, it’s difficult to tell what’s causing the permission issue. So, try reinstalling the app and see if that helps:
- Press the Windows + I keyboard combination to open the Settings app.
- Click the Apps tile on the Settings home page.
- Click on Apps & Features in the left pane.
- Now, go through the list of apps and locate the app you are having trouble accessing. Click on it and click the Uninstall button.
- Restart your PC and reinstall the app. See if the problem is resolved.
If the issue persists, it’s likely that another program or process on your computer is the reason why. You can find out by running a clean boot. A clean boot will start Windows with a minimal set of drivers and startup programs.
It is similar to starting your system in Safe Mode. However, it gives you control over which services and programs run at startup so that you can pin down the cause of your troubles.
Follow these steps to get it done:
- Sign in to Windows with your admin account.
- Open the Run dialog: Press the Windows + R combination on your keyboard.
- Type “Msconfig” (no quotes) and click the OK button to open System Configuration.
- Go to the Services tab and mark the Hide all Microsoft Services checkbox. Then, click the Disable All button.
- Go to the Startup tab and click the Open Task Manager link.
- Switch to the Startup tab in Task Manager and disable the startup items. That is, click on each one and click the Disable button.
- Close the Task Manager and click OK in System Configuration.
- Restart your computer. It will start in a clean boot environment. Then, try running your app again. See if the ‘Need permission’ message will still appear. If the problem is resolved, it means that one of the disabled services or startup items was causing the conflict. To find out which one, systematically enable them and restart your computer each time until you cannot run your app again. Then, you’ll know exactly the startup item or service that was triggering the issue.
Fix 13. Clean Up the Registry
You should check for corruptions and invalid entries in the registry. They could be the source of your troubles. To get this task done without harming your OS, we suggest running the Registry Cleaner tool in Auslogics BoostSpeed.
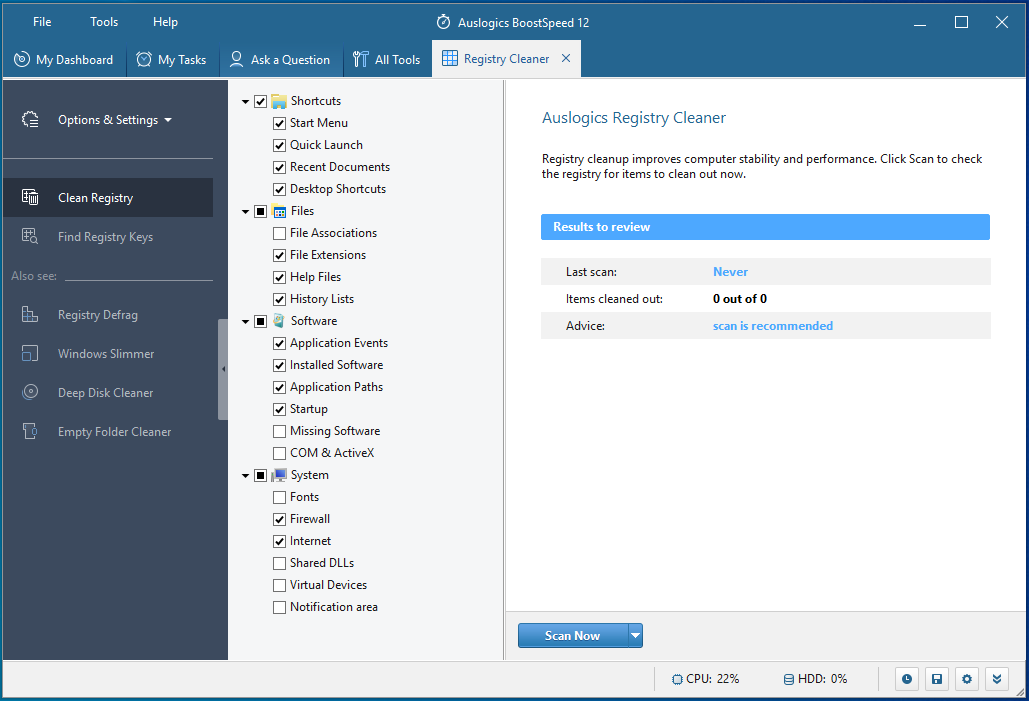
It will safely remove and replace corrupt, invalid, and empty keys in the registry.
Fix 14: Disable User Account Control (UAC)
User Account Control is a security system in Windows that helps prevent apps from making unsolicited changes to your OS. It is ill-advised to disable it. However, if you are determined, you can disable UAC temporarily. See if you will be able to run your app without the ‘You need permission to perform this action’ message.
Follow these steps to disable UAC via the Control Panel:
- Press the Windows + R combination on your keyboard to open the Run dialog.
- Type “Control Panel” (no quotes) and press Enter or click OK.
- Search for User Accounts and click on it.
- Click the ‘Change User Account Control settings’ link.
- Drag the slider down to Never Notify and click OK.


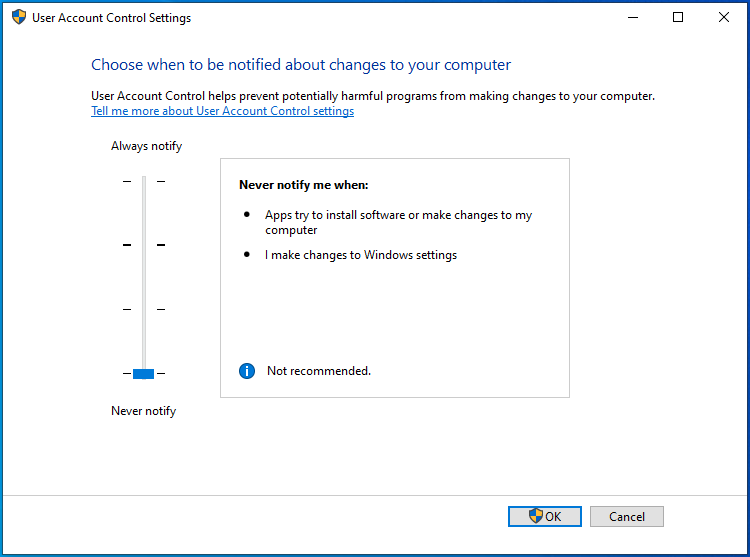
Try running your app again and see if the problem will persist. Don’t forget to turn on UAC notifications afterward.
Fix 15: Reset Your OS
If none of the solutions presented here helped you, you have no other alternative but to reset your operating system. You may want to perform a backup first to save your files. Afterward, follow the procedure below:
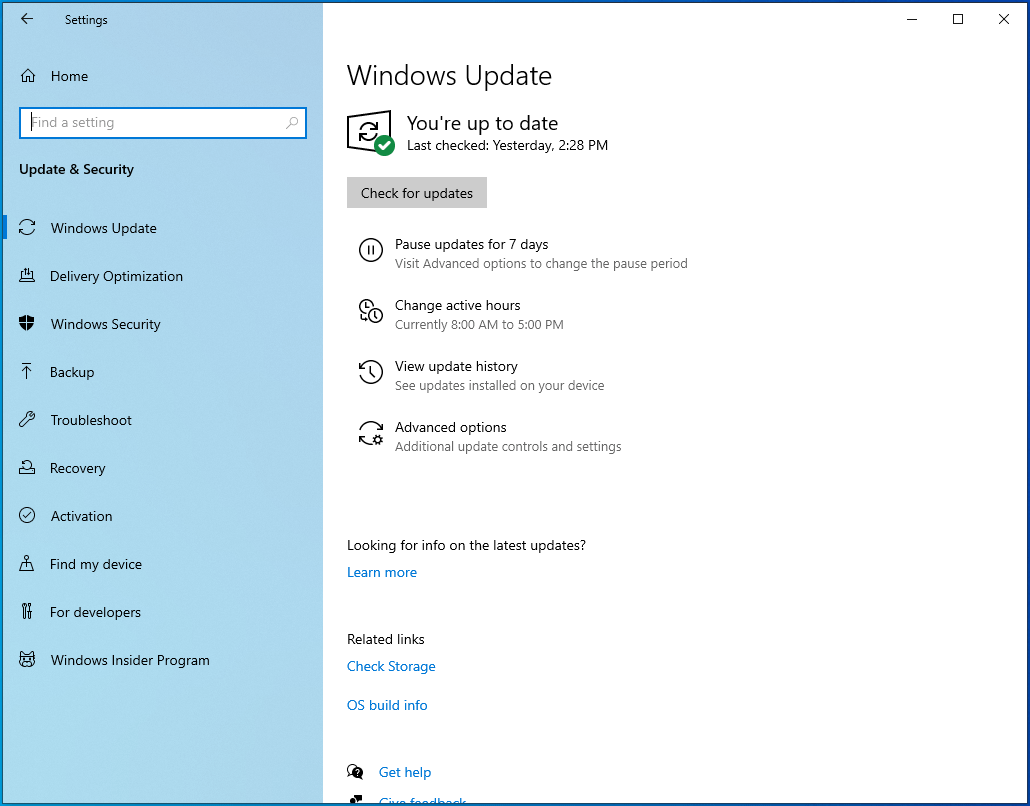
- Go to Windows Settings: Press the Windows + I keyboard combination to invoke Settings.
- Click on Update & Security.
- Click on Recovery in the left pane.
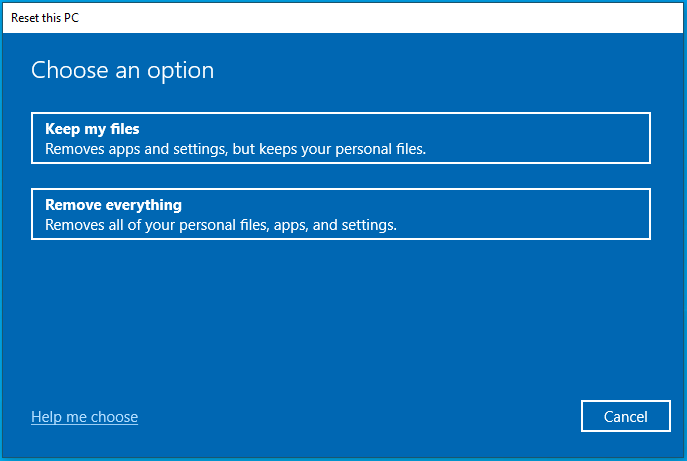
- Click Get Started under Reset this PC on the right-hand side of the page.
- Select Remove Everything.

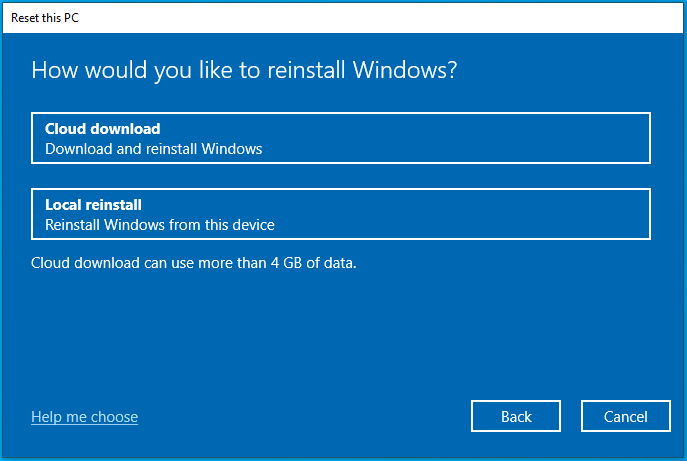
- Choose Cloud Download or Local Reinstall, whichever method you prefer to install Windows.
- Click Next.
- Click Reset.


After you’ve reinstalled your OS, you now have the default settings and all files and apps are removed. It is expected that you won’t run into the ‘You need permission to perform this action’ message anymore.
Conclusion
Does Windows prevent you from running apps? Is an error message stopping you from opening, copying, moving, and renaming files and folders? If so, the solutions in this article should help you overcome the issue.
If you’ve found this guide useful, don’t hesitate to leave us a comment in the section below. Let us know the fix that worked for you.
Check out our blog for more Windows 10 tips.
Download PC Repair Tool to quickly find & fix Windows errors automatically
There are some files necessary for the proper working of your computer. Therefore, Microsoft doesn’t want you to edit these files. Because of this, you may see a “You need permission to perform this action” message on Windows 11/10. Even though it is not an error but it can be a bit frustrating.
These are the things you need to do to get around the “You need permission to perform this action” message on Windows 11/10:
- Check if you are an admin
- Take Full Control
- Take Ownership of File and Folder
- Add to Administrator Group
Let us talk about them in detail.
1] Check if you are an admin

Before moving any further we need to make sure that you are the admin. If not, you may face this error with some folders which require administrator privileges to open.
So, to check that, launch Control Panel by Win + R, type “Control”, and hit Enter.
Click User Accounts and check the “User” section, there alongside your Profile Picture you will see your Account type. As you can see in the screenshot that my account type is Administrator.
2] Take Full Control
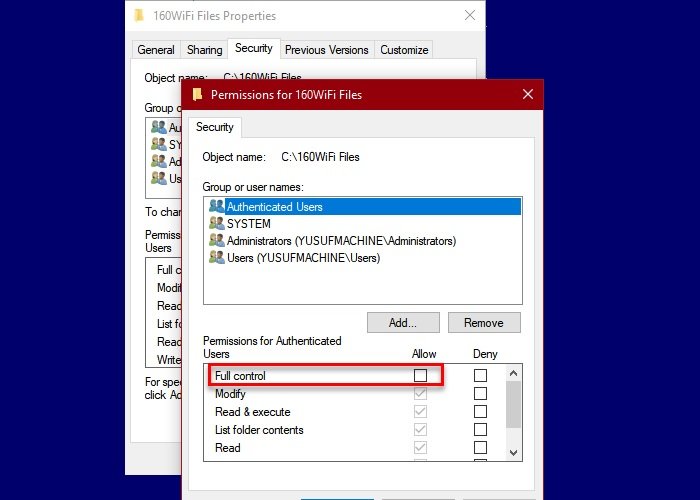
If you are an administrator and still not able to access the file, you need to take full control of the file or folder that’s giving you the message. To do that, right-click on the folder and select Properties.
Go to the Security tab, click Edit, and tick “Allow” from the Full control section. Finally, click Apply > Ok to end things up. Now, try opening the folder and check if the issue persists.
3] Take Ownership of File and Folder
If you don’t have ownership of that particular file or folder, you may face this error. Take ownership to get around the issue.
TIPS:
- Ultimate Windows Tweaker will let you add the Take Ownership of Files and Folders easily to the context menu.
- RegOwnIt lets you easily take ownership of Registry keys.
4] Add to Administrators Group

If you are not a part of the Administrators group, you will face the “You need permission to perform this action” error on Windows 10. So, the best solution for you would be to add yourself to the Administrators Group. If you don’t know how to do it, follow the given steps.
- Launch Computer Management by searching it out from the Start Menu.
- Now, expand Local Users and Groups and click Users.
- Right-click on the user you want to add to the Administrators Group, and select Properties.
- Go to the “Members of” tab and click Add.
- Type “Administrators” in “Enter the object names to select” and click Check Names > Ok
- Click Apply > Ok.
Now, go to the folder that was giving you the “You need permission to perform this action” error and check if the persists.
TIP: DropPermission is a freeware that may interest you.
All the best!
Related:
- Windows cannot access the specified device, path or file error message
- You don’t have permission to modify files in this network location
- You’ll need to provide administrator permission to delete this folder
- You don’t currently have permission to access this folder or file.

Yusuf is currently pursuing B.Tech in Delhi. He is a keen follower of the Windows ecosystem and enjoys working on his Windows 11 PC.
-
MiniTool
-
MiniTool News Center
- You Need Permission To Perform This Action: Solved
By Sarah | Follow |
Last Updated May 20, 2021
![]()
Windows will prevent you from doing some things when you haven’t had enough permission. Then, you’ll receive the You need permission to perform this action error message. How can you complete such operations? Please find answers here.
MiniTool Solution offers tools to help you protect system & improve performance.
To ensure system security, Windows will not allow you to perform some actions unless you have enough permission. You’ll need to run some programs as Administrator in order to get more control over them. However, there are still some actions that Windows locks down even if you’re an Administrator.
How to run programs as Administrator?
Error Message: You Need Permission to Perform This Action
If you are trying to do some things that Windows don’t allow you to do, a prompt window will pop up informing you that You need permission to perform this action.
Popular Actions & Error Messages
Possible actions that could lead to the access denied error:
- Copy a folder/file. (Can’t copy or move files on Windows 10.)
- Install a program.
- Delete a folder/file.
- Change the name of a folder/file.
- Etc.
How to fix You need permission to perform this action when trying to delete WindowsApps folder?
You will probably see the following error messages in the File Access Denied/Folder Access Denied window:
- You’ll need to provide administrator permission to copy this folder.
- You’ll need to provide administrator permission to copy to this folder.
- You’ll need to provide administrator permission to delete this folder.
- You require permission from administrators to make changes to this folder.
- You don’t currently have permission to access this folder.
- Etc.
Well, the root reason is you do not have the right security permissions. To solve this problem, you must gain proper permissions before performing such tasks.
Note: You may even receive this error message when trying to change the time zone: You do not have permission to perform this task.
Fix: You Don’t Have Permission to Access
Solutions to “You Need Permission to Perform This Action”
If the system tells you that you don’t have permission to access a file or folder, you should try these solutions to fix the access denied error.
- Change the owner of target file or folder.
- Change the security permissions.
- Run an SFC scan.
- Use Windows Defender to scan your PC for malware.
- Disable the third-party security software.
- Shift to another account with admin privileges.
- Add your account to the Administrator Group.
- Disable UAC (User Account Control).
- Reboot your PC in Safe Mode.
- Repair the corrupted system registry.
- Reinstall the affected programs.
Method 1: Change the Owner
- Open Windows Explorer to locate the target folder/file.
- Right click on the folder/file and choose Properties.
- Shift to the Security tab from the General tab.
- Click on the Advanced button after For special permissions or advanced settings.
- Look at the Owner section in the upper left.
- Click the Change link to open Select User or Group window.
- Click on the Advanced button at the bottom left.
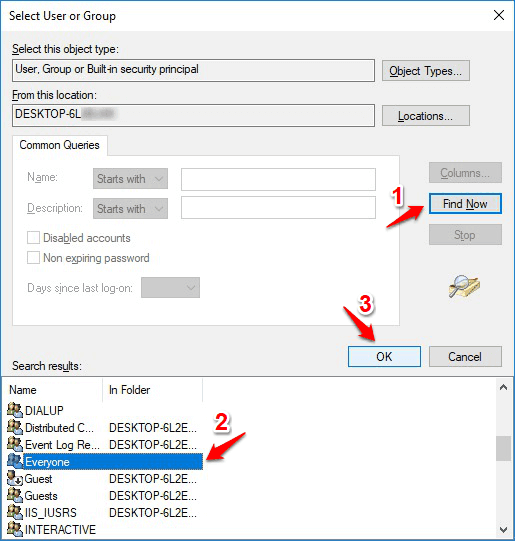
- Click on the Find Now button in the pop-up window.
- Select the group with full file permission on your PC from the Search results list.
- Click on the OK button to confirm your selection.
- Go to the Permissions tab in the Advanced Security Settings for foldername window.
- Click on the Add button.
- Click Select a principal link.
- Repeat step 7 ~ step 10 to select the desired user or group.
- Select Allow from the submenu of Type.
- Check Full control under Basic permissions.
- Click on the OK button to save the changes.

Windows Explorer Needs To Be Restarted: Problem Solved!
Method 2: Change Security Permissions with Command Prompt
- Click on the search icon or search box on the taskbar.
- Type cmd and right click on Command Prompt from the result.
- Choose Run as administrator.
- Type takeown /f <path_to_the_folder> /r /d y and hit Enter to take the ownership of certain directory.
- Type icacls <path_to_the_folder> /grant administrators:F /T and hit Enter.
- Wait for the command to complelete.

That’s all I want to share with you when you encounter the error You need permission to perform this action.
About The Author

Position: Columnist
Sarah has been working as an editor at MiniTool since she graduated from university. Sarah aims at helping users with their computer problems such as disk errors and data loss. She feels a sense of accomplishment to see that users get their issues fixed relying on her articles. Besides, she likes to make friends and listen to music after work.

If you are facing the error message “You need permission to perform this action” while trying to make changes to any file, delete or move any folder or file then the most likely cause for this error message is that your user account doesn’t have necessary security permissions for that file or folder. Sometimes this happens when some other program is using the file or folder which you wish to modify such as your antivirus software might be scanning the files or folders and that’s why you are not able to modify the file.
These are some common errors which you will be facing while trying to delete or modify files or folders on Windows 10:
- File Access Denied: You need permission to perform this action
- Folder Access Denied: You need permission to perform this action
- Access denied. Contact your administrator.
- You don’t currently have permission to access this folder.
- File or Folder Access Denied for External Hard Drive or USB.
So if you’re facing the above error message then it is best to wait for some time or restart your PC and again try to make changes to the file or folder as an Administrator. But even after doing so you’re still unable to make changes and facing the above error message then don’t worry as today we are going to see how you can fix You need permission to perform this action error on Windows 10 with the help of the below-listed troubleshooting guide.
Contents
- Fix You Need Permission To Perform This Action Error
- Method 1: Restart the PC in Safe mode
- Method 2: Change Permissions
- Method 3: Change Folder’s Owner
- Method 4: Delete the folder using Command Prompt
- Method 5: Use Unlocker to delete the locked file or folder
- Method 6: Use MoveOnBoot
Make sure to create a restore point just in case something goes wrong.
Method 1: Restart the PC in Safe mode
Many users have reported that restarting their PC in Safe mode has fixed the error message “You Need Permission To Perform This Action”. Once the system is booted into safe mode you would be able to make changes, modify or delete the file or folder which earlier was showing the error. If this method doesn’t work for you then you can try other methods listed below.

Method 2: Change Permissions
1.Right-click on the file or folder which is showing the above error message then select Properties.

2.Here you need to switch to the Security section and click on the Advanced button.

3.Now you need to click on Change link next to the current owner of the file or folder.

4. Then again click on the Advanced button on the next screen.

5.Next, you need to click on Find Now, it will populate some options on the same screen. Now select the desired user account from the list & click OK as shown in the below image.
Note: You can select which group should have the full file permission on your computer, it can be your user account or Everyone on the PC.

6.Once you select the user account then click OK and it will take you back to the Advanced Security Settings window.

7.Now in the Advanced Security Setting window, you need to checkmark “Replace owner on subcontainers and objects” and “Replace all child object permissions entries with inheritable permission entries from this object”. Once you are done with this step, you just need to click Apply followed by OK.

8.Then click OK and again Open Advanced Security Settings window.
9.Click Add and then click Select a principal.


10.Again add your user account and click OK.
11.Once you had set your principal, set the Type to be Allow.

12.Make sure to checkmark Full Control and then click OK.
13.Checkmark “Replace all existing inheritable permissions on all descendants with inheritable permissions from this object” in the Advanced Security Settings window.

14.Click Apply followed by OK.
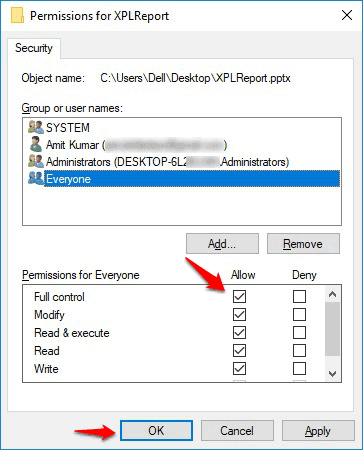
Method 3: Change Folder’s Owner
1.Right-click that specific folder or file which you wish to modify or delete & choose Properties.
2.Go to the Security tab and the group of users will appear.

3.Select the appropriate username (in most cases it will be Everyone) from the group and then click on the Edit button.
6.From the list of permissions for Everyone checkmark Full Control.

7.Click on the OK button.
If you can’t find Everyone or any other user group then follow these steps:
1.Right-click on the file or folder which is showing the above error message then select Properties.
2.Here you need to switch to the Security section and click on the Add button.

3.Click on Advanced on Select User or Group window.

4.Then click on Find Now and select your administrator account and click OK.

5.Again click OK to add your administrator account to the Owner group.

6.Now on the Permissions window select your administrator account and then make sure to checkmark Full Control (Allow).

7.Click Apply followed by OK.
Now again try to modify or delete the folder and this time you won’t face the error message “You Need Permission To Perform This Action“.
Method 4: Delete the folder using Command Prompt
1.Press Windows Key + X then select Command Prompt (Admin) or use this guide to open an elevated command prompt.

2.To take the ownership permission for deleting the file or folder and fixing File permission error, you need to enter the following command and hit Enter:
takeown /F “Drive_Name:_Full_Path_of_Folder_Name” /r /d y
Note: Replace “Drive_Name:_Full_Path_of_Folder_Name” with the actual full path of the file or folder which you wish to delete.

3.Now you need to provide the full control of the file or folder to the administrator:
icacls “Drive_Name:_Full_Path_of_Folder_Name” /grant Administrators:F /t

4.Finally delete the folder using this command:
rd “Drive_Name:_Full_Path_of_Folder_Name” /S /Q
As soon as the above command completes, the file or folder will be successfully deleted.
Method 5: Use Unlocker to delete the locked file or folder
Unlocker is a free program that does a great job of telling you which programs or processes are currently holding locks on the folder.
1.Installing Unlocker will add an option to your right-click context menu. Go to the folder, then right-click and choose Unlocker.

2.Now it will give you a list of processes or programs that have locks on the folder.

3.There may be many processes or programs listed, so you can either kill the processes, unlock or unlock all.
4.After clicking unlock all, your folder must be unlocked and you can either delete or modify it.

This will definitely help you Fix You Need Permission To Perform This Action error, but if you’re still stuck then continue.
Method 6: Use MoveOnBoot
If none of the above method work than you can try to delete the files before Windows boots up completely. Actually, this can be done using a program called MoveOnBoot. You just have to install MoveOnBoot, tell it which files or folders you want to delete that you aren’t able to delete and then restart the PC.

Recommended:
- Fix Application has been blocked from accessing Graphics hardware
- How to Repair Corrupted System Files in Windows 10
- 4 Ways to Update Graphics Drivers in Windows 10
- How to Create Windows 10 Account Using Gmail
I hope the above steps were helpful and now you can easily Fix You Need Permission To Perform This Action Error, but if you still have any questions regarding this tutorial then feel free to ask them in the comment section.
Getting the error “You need permission to perform this action” in Windows 10 while trying to copy, delete or move the file and folder? Learn how to fix it.
Are you frequently facing You need permission to perform this action Windows 10 issue?
Well, it is certainly dispiriting when you are losing control over your personal computer. It would not be wrong to say that if such a problem arrives in your PC, it turns to manage your day-to-day tasks into a nightmare.
Sometimes, you might get into this very common but annoying issue “You need permission to perform this action” and that too for no reason. Meaning that this issue can come up any time and run you into a mess.
Though you will not get such an error on a constant basis, you can spot it while copying, moving, or deleting any file and folder, or installing a specific program.
In most of the cases, it happens either due to the security permissions issue or if that particular file/folder is being used by another program.
Luckily, there are a couple of easy ways to solve “You need permission to perform this action” error in Windows 10 operating system. You have to simply follow the methods below.
Before following the effective methods explained in this tutorial, you should make a few basic changes first and see if it helps. You should scan your computer for malware, temporarily disable all the third-party antivirus software (if you are using any), and boot Windows 10 in safe mode.
If any of these actions don’t help you, follow the below-given troubleshooting solutions and get rid of You need permission to perform this action Windows 10 error. Here we go:
Method 1: Change the Ownership of File and Folder
As we have discussed above, if you don’t have specific security permissions of any file and folder then Windows 10 will deny you the access to that file or folder. But if your account has administrative privileges, you can easily take ownership of certain files and folders on your computer.
Follow these steps and learn how to change the ownership of file and folder in Windows 10:
Step (1): First of all, open File Explorer and find the file or folder (which is showing you the error) you want to have full access.

Step (2): Now, right-click on it and then select Properties option.
Step (3): On the Properties dialog box, go to the Security tab and then from the Group and user names section, select the Administrator.
Step (4): Now for special permissions or advanced settings, click on the Advanced button.
Step (5): On the Advanced Security Settings page, click on the Change link in the Owner field.
Step (6): Next, on Select User or Group window, click on the Advanced button.
Step (7): Now on the advanced settings of Select User or Group, click on Find Now button. And from the search result, select your user account and then click on the OK button.
Step (8): On the Select User or Group page, click on the OK button to complete this task.

Once the ownership changed, now you’ll have to grant full access control to your account. To do this, follow these steps:
Step (9): On the Advanced Security Settings page, click on the Add button under the Permissions tab.

Step (10): And on the Permissions Entry window, click on the Select a principal link.

Step (11): Now repeat the Step (6) to Step (8) to select the desired user or group.
Step (12): Once you are on the Permission Entry window, select the Full control option under the Basic permission section and then click on the OK button to save the changes.
This method will help you in having the ownership of the file or folder you have chosen and now you can easily edit them on your computer without any restrictions. You need permission to perform this action error might have gone now, you can also opt for the second method is this does not work for you.
Method 2: Change Permissions without Changing the Ownership
At times, it is not necessary to change the ownership for accessing any specific file or folder. You only need to have the right permissions. It might happen on certain sensitive files that if you change the ownership, it might bring up some unwanted problems. So in such cases, modifying the computer’s security permissions is the best option.
Here’s how to get rid of “You need permission to perform this action” error in Windows 10 just by changing the security permission of file and folder:
Step (1): At first, open File Explorer and find the file or folder (which is causing the error) you want to have full access.
Step (2): Now, right-click on it and then select Properties option.
Step (3): On the Properties dialog box, go to the Security tab and then click on the Edit button.
Step (4): Now on the Permissions dialog box, select the Administrator from the Group and user names section, and then click on the Add button.
Step (5): Next, on Select User or Group window, click on the Advanced button.
Step (6): Now on the advanced settings of Select User or Group, click on Find Now button. And from the search result, select the desired user or group and then click on the OK button.

Step (7): On the Select User or Group page, click on the OK button to add the selected account to the Group or user names list.
Step (8): Now on the Permissions dialog box, select your account from the Group and user names section, and then select Full control in Allow column.
Step (9): Finally, click on the Apply and OK button to save the changes.
After allowing the Full control privileges to the selected user account or group, you should be able to access that file or folder without any error and warning.
Conclusion
We hope these step by step solutions helped you in solving “You need permission to perform this action” error while trying to copy, delete or move the file and folder in Windows 10 computers.
If any other file access denied error messages are causing problems on your Windows 10 PC then feel free to let us know using the comment section below. We will get back to you as soon as possible.
You may also be interested in checking out:
- There is no email program associated to perform the requested action
- How to Enable Copy and Paste in Command Prompt on Windows 10
- How to Fix “Cannot Delete” or “Access Denied” Error in Windows 10 / 8 / 7
- How to Force Delete Files or Folders in Windows 10
- How to Create Undeletable Folder in Windows 10 using CMD
- How to Bypass Google Drive Download Limit for Shared Files