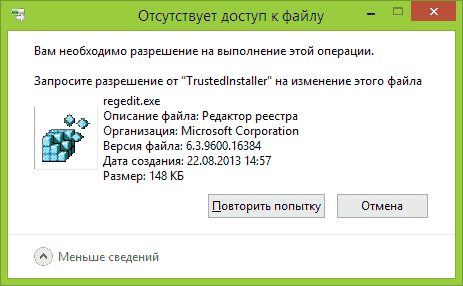
 Если TrustedIstaller не дает удалить папку или файл, несмотря на то, что вы являетесь администратором системы, а при попытке вы видите сообщение «Отсутствует доступ. Вам необходимо разрешение на выполнение этой операции. Запросите разрешение от TrustedInstaller на изменение папки или файла», в этой инструкции подробно о том, почему это происходит и как запросить это самое разрешение.
Смысл происходящего в том, что многие системные файлы и папки в Windows 7, 8 и Windows 10 «принадлежат» встроенной системной учетной записи TrustedInstaller и только эта учетная запись имеет полный доступ к папке, которую вы хотите удалить или изменить иным образом. Соответственно, чтобы убрать требование запросить разрешение, нужно сделать текущего пользователя владельцем и предоставить ему необходимые права, что и будет показано ниже (в том числе в видео инструкции в конце статьи).
Также покажу, как снова установить TrustedInstaller в качестве владельца папки или файла, так как это бывает нужным, но почему-то ни в одном руководстве не раскрывается.
Как удалить папку, которую не дает удалить TrustedInstaller
Описанные ниже действия не будут отличаться для Windows 7, 8.1 или Windows 10 — одни и те же шаги требуется выполнить во всех этих ОС, если нужно удалить папку, а сделать это не получается из-за сообщения, что нужно запросить разрешение от TrustedInstaller.
Как уже было сказано, требуется стать владельцем проблемной папки (или файла). Стандартный путь для этого:
- Кликните правой кнопкой мыши по папке или файлу и выберите пункт «Свойства».
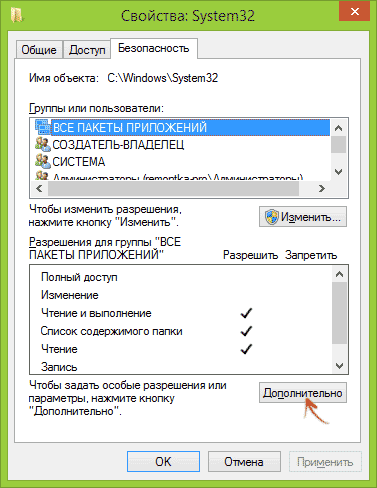
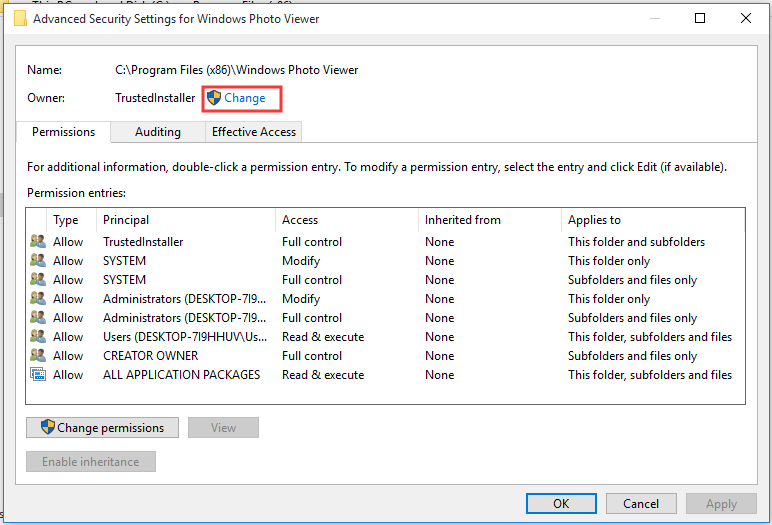
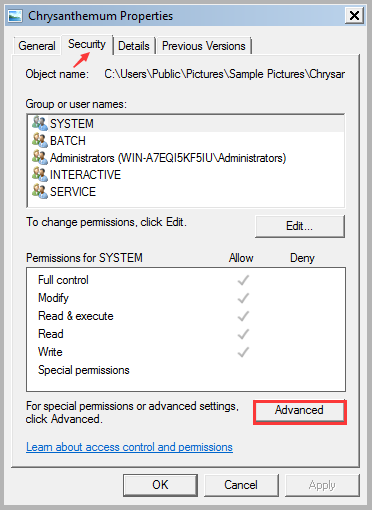
- Откройте вкладку «Безопасность» и нажмите кнопку «Дополнительно».

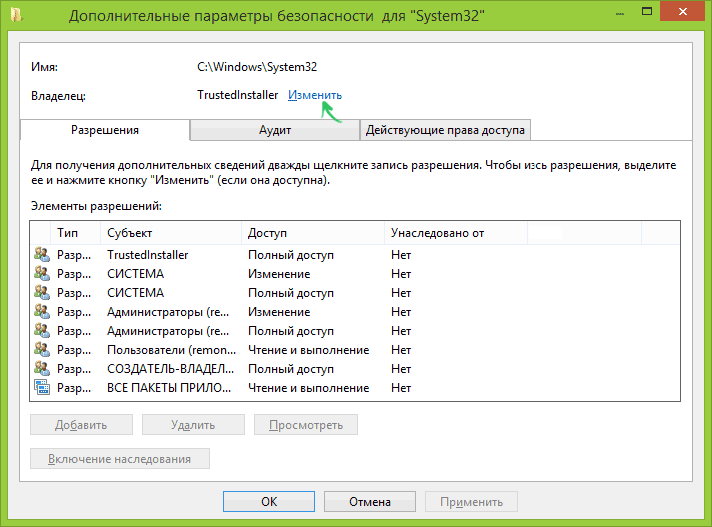
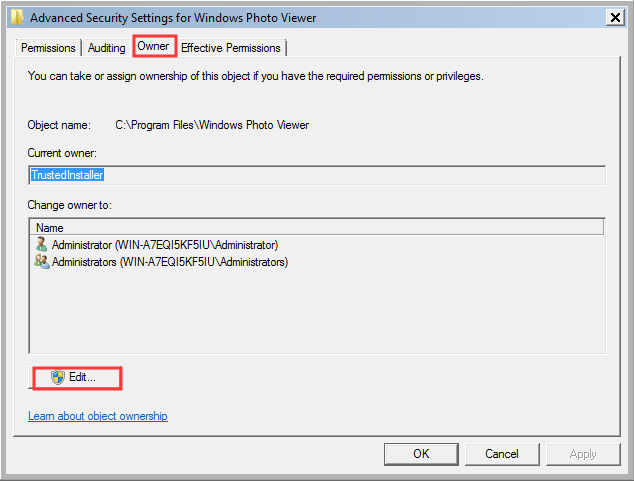
- Напротив пункта «Владелец» нажмите «Изменить», а в следующем окне нажмите кнопку «Дополнительно».

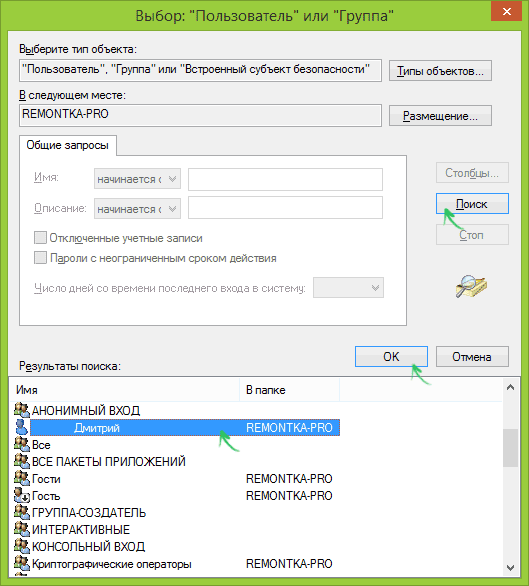
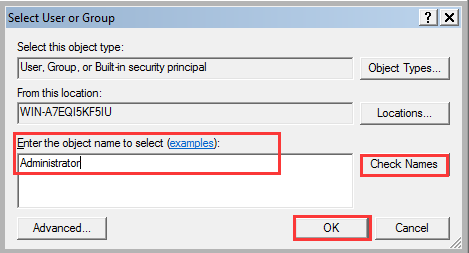
- В следующем окне нажмите «Поиск», а потом в списке выберите пользователя (себя).

- Нажмите Ок, а затем — еще раз Ок.
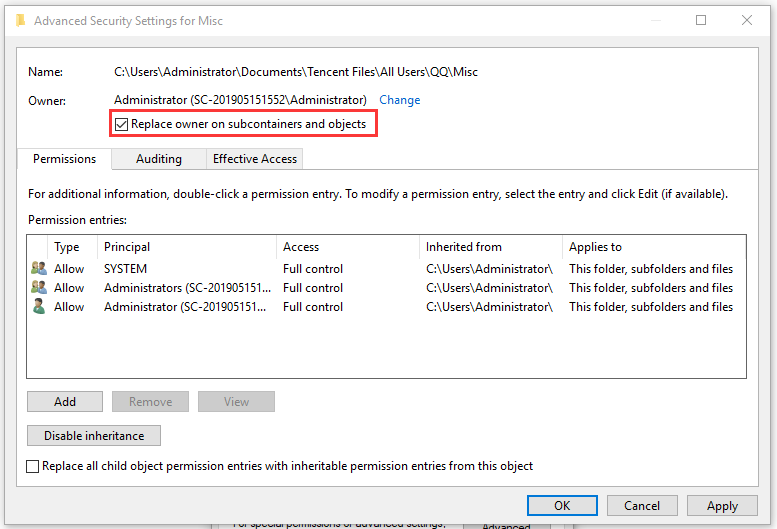
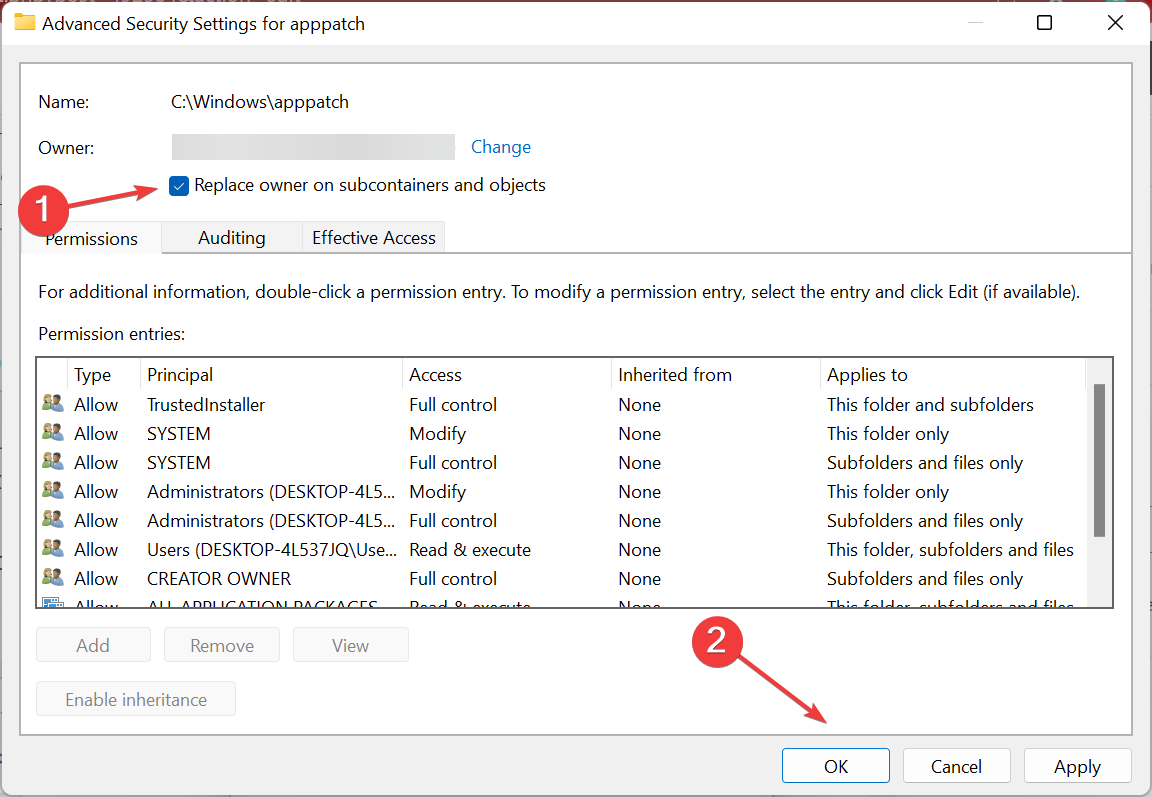
- Если вы меняете владельца папки, то в окне «Дополнительные параметры безопасности» появится пункт «Заменить владельца подконтейнеров и объектов», отметьте его.

- Последний раз нажмите Ок.

Есть и другие способы, некоторые из которых могут показаться вам проще, см. инструкцию Как стать владельцем папки в Windows.
Однако, проделанных действий обычно недостаточно для того, чтобы удалить или изменить папку, хотя и сообщение о том, что нужно запросить разрешение от TrustedInstaller должно исчезнуть (вместо этого будет писать, что нужно запросить разрешение у самого себя).
Установка разрешений
Чтобы все-таки получить возможность удаления папки, вам также потребуется дать себе необходимые разрешения или права для этого. Чтобы это сделать, снова зайдите в свойства папки или файла на вкладку «Безопасность» и нажмите «Дополнительно».

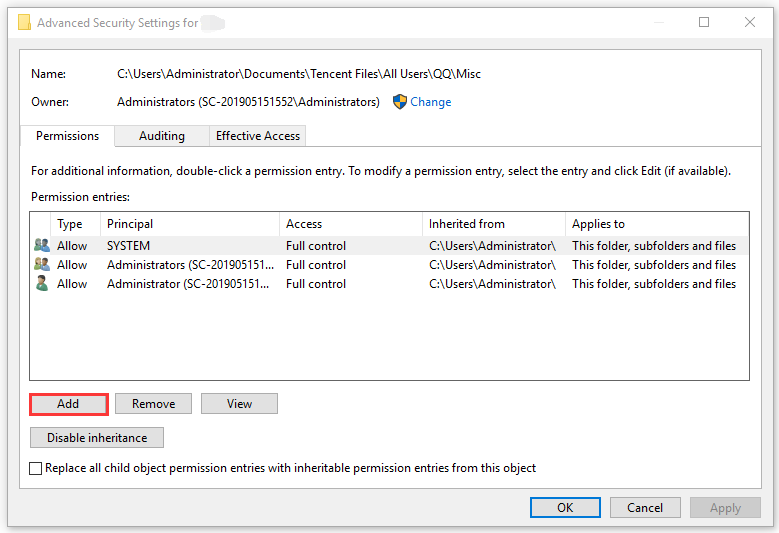
Посмотрите, присутствует ли ваше имя пользователя в списке «Элементы разрешений». Если нет — нажмите кнопку «Добавить» (возможно, сначала нужно будет нажать кнопку «Изменить» со значком прав администратора).
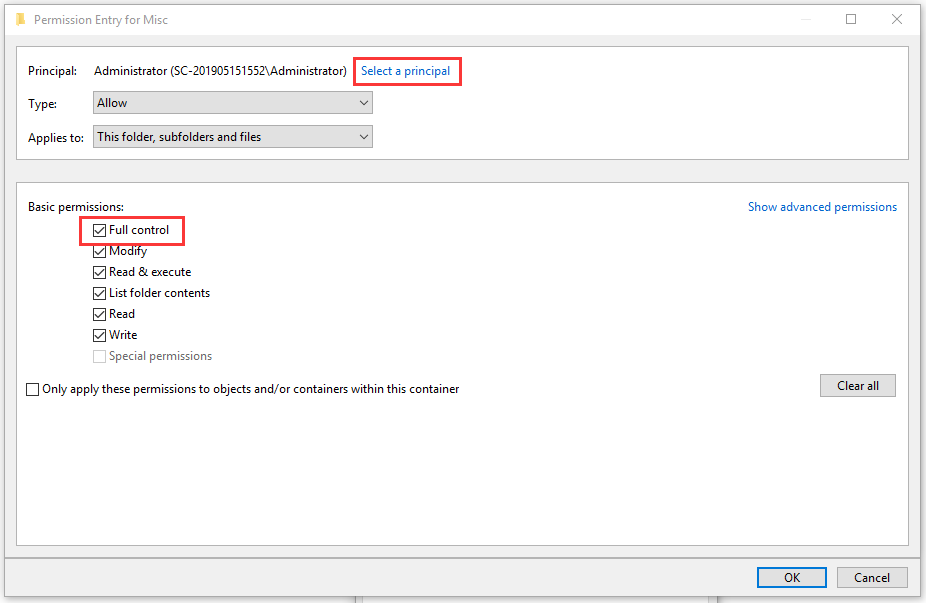
В следующем окне нажмите «Выберите субъект» и найдите свое имя пользователя так же, как на первом этапе в 4-м пункте. Установите полные права доступа для этого пользователя и нажмите «Ок».
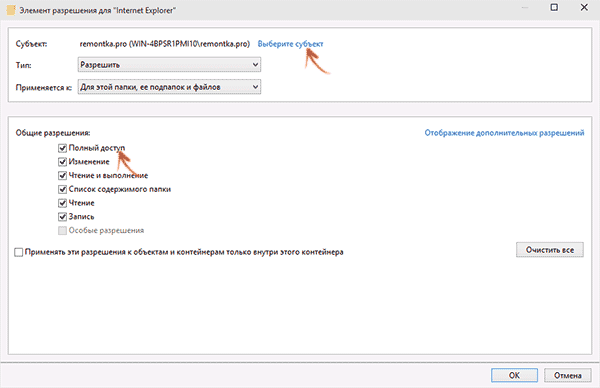
Вернувшись в окно «Дополнительные параметры безопасности» отметьте так же пункт «Заменить все записи разрешений дочернего объекта наследуемыми от этого объекта». Нажмите «Ок».
Готово, теперь попытка удалить или переименовать папку не будет вызывать каких-либо проблем и сообщение об отказе в доступе. В редких случаях требуется так же зайти в свойства папки и убрать отметку «Только для чтения».
Как запросить разрешение от TrustedInstaller — видео инструкция
Ниже — видео руководство в котором наглядно и по шагам показаны все действия, которые были описаны. Возможно, кому-то так будет более удобно воспринимать информацию.
Как сделать TrustedInstaller владельцем папки
После изменения владельца папки, если вам потребовалось вернуть всё «как было» тем же способом, который был описан выше, вы увидите, что TrustedInstaller нет в списке пользователей.
Для того, чтобы установить этот системный аккаунт в качестве владельца, проделайте следующее:
- Из предыдущего порядка действий выполните первые два шага.
- Нажмите «Изменить» напротив пункта «Владелец».
- В поле «Введите имена выбираемых объектов» введите NT SERVICETrustedInstaller

- Нажмите Ок, отметьте «Заменить владельца подконтейнеров и объектов» и еще раз нажмите кнопку Ок.

Готово, теперь TrustedInstaller снова является владельцем папки и просто так ее не удалишь и не изменишь, снова будет появляться сообщение о том, что отсутствует доступ к папке или файлу.
A great many users complained that they always failed to delete some files from their PC. When the problem happens, an error message pops up stating “You require permission from TrustedInstaller”. How to fix the issue? Let’s see this post of MiniTool. You will get more detailed information.
You Require Permission from TrustedInstaller Windows 10
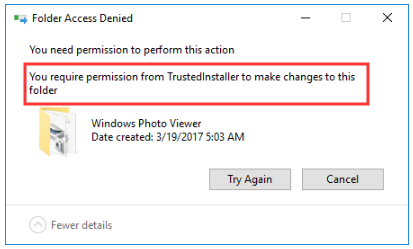
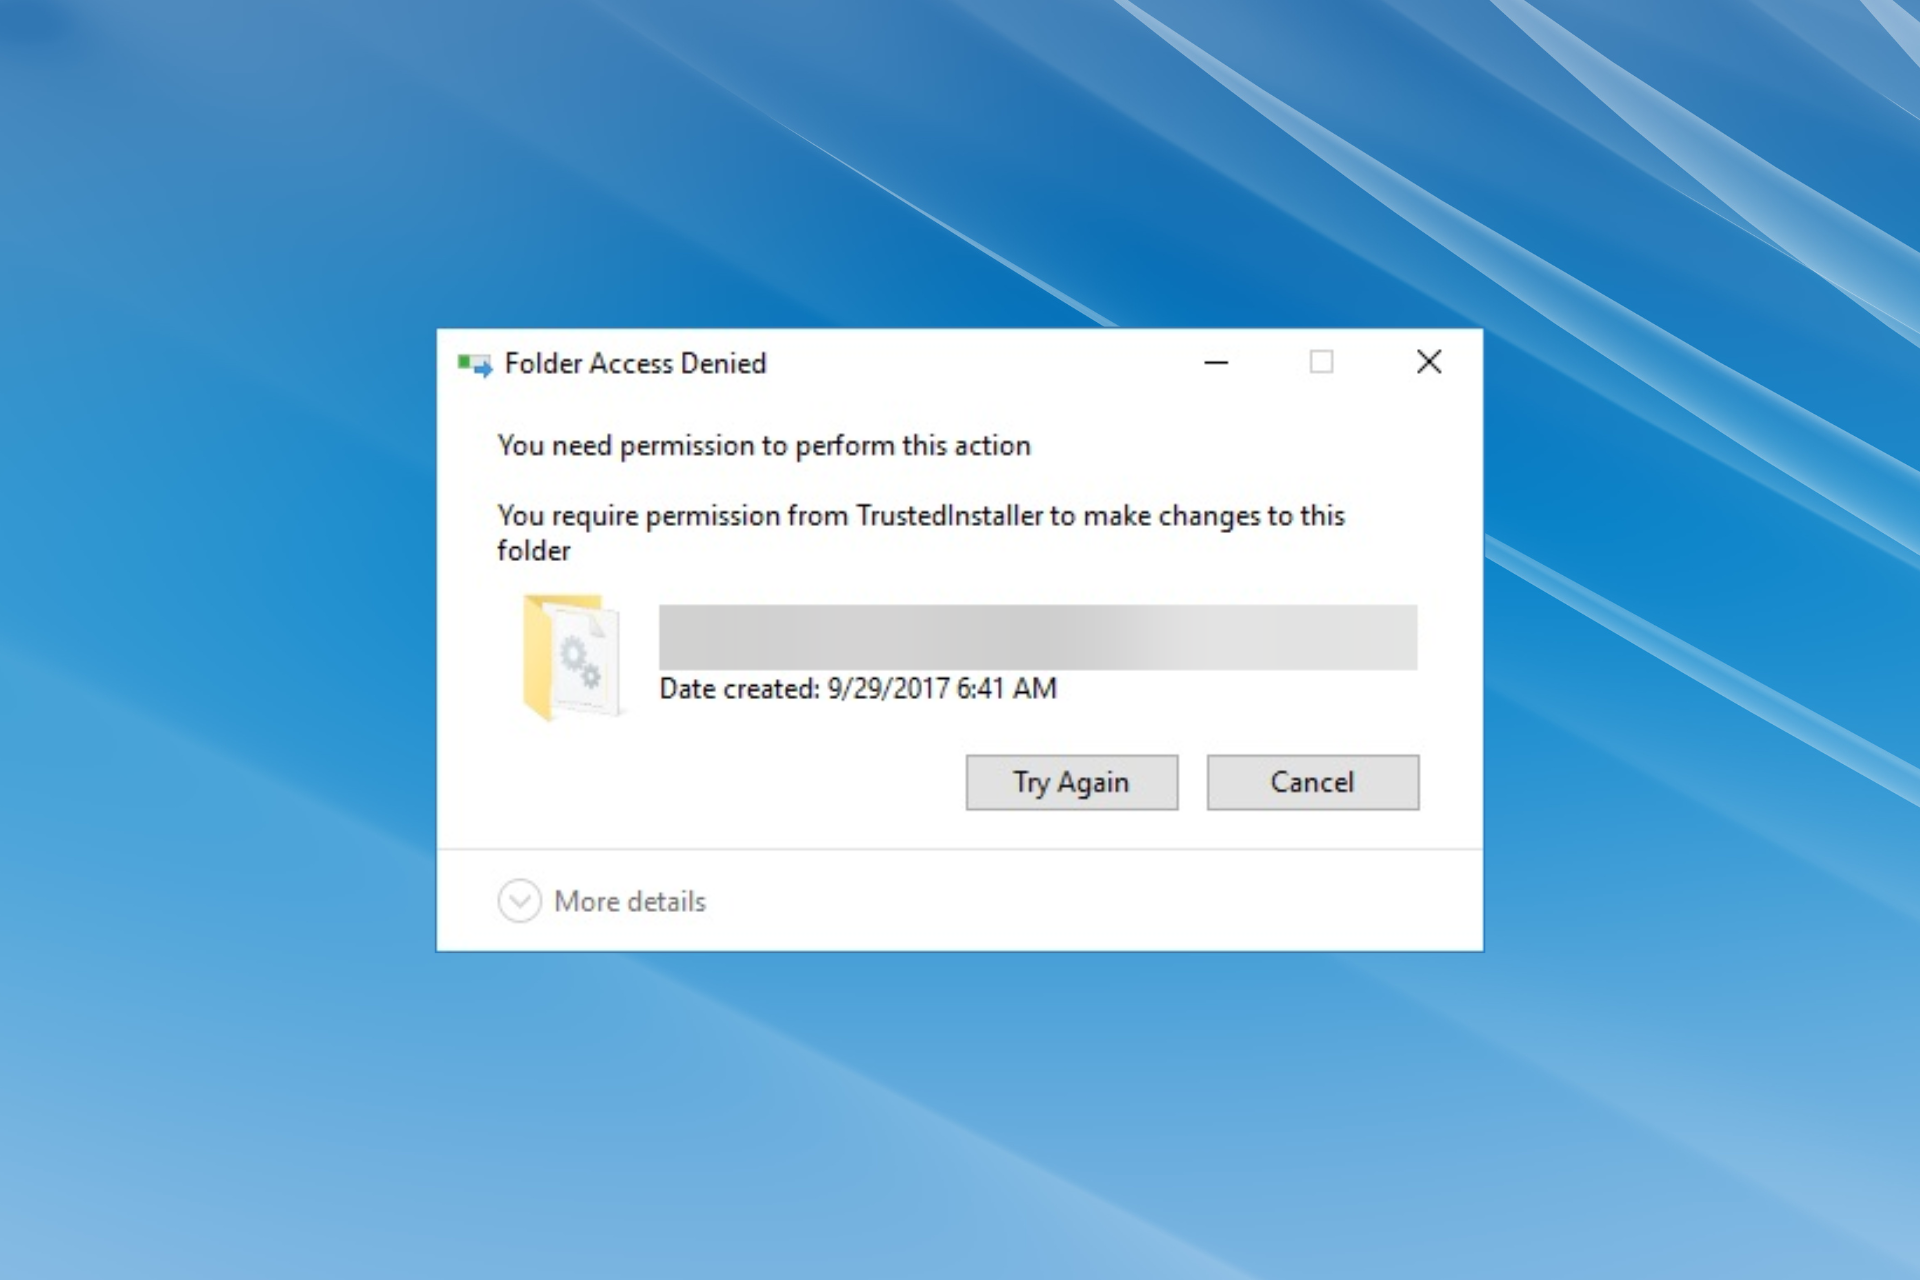
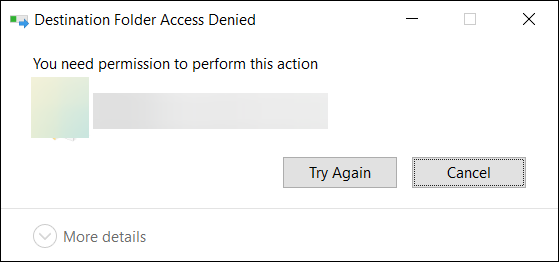
According to the report, users encounter the folder access denied error message that states «You require permission from TrustedInstaller to make changes to this folder». You may wonder why you cannot access the folder even though you have the Windows administrator privilege.
This error stirs a question of what Trustedinstaller is. In fact, TrustedInstaller is an important built-in account (NT SERVICETrustedInstaller) in Windows that is used to protect the core Windows files.
The TrustedInstaller user account is used to install, modify and delete Windows updates for Windows Modules Installer service. At the same time, it is responsible for removing some optional Windows components.
For example, when you delete the Windows update folders like Windows.old folder that is created after you update the Windows or rename these folders, you will receive the error “you need permission from TrustedInstaller”.
However, if you still want to delete these files, you will have to get the ownership of them from the TrustedInstaller account.
How to Get Permission from TrustedInstaller to Make Changes to This Folder
Get Permission from TrustedInstaller on Windows 10
Here’s a full guide to get the permission from TrustedInstaller user account on Windows 10, just keep reading.
Note: In most cases, the TrustedInstaller user account is used to protect your system files for a good reason. So, you just need to take ownership of the files that you want to delete or change.
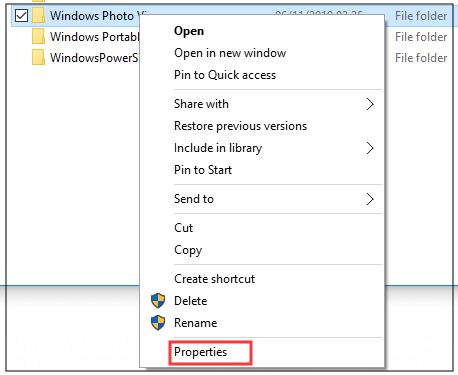
Step 1. Open your File Explorer, and then navigate to the file or folder that states the error “you require permission from TrustedInstaller”, and right-click it and select the Properties.
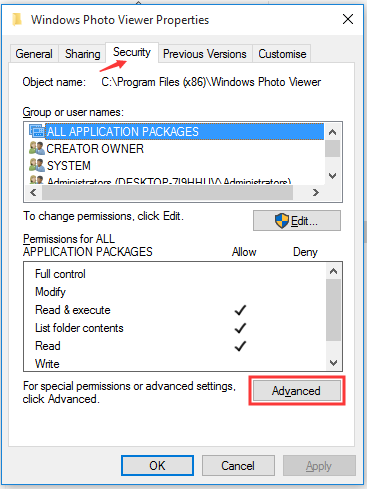
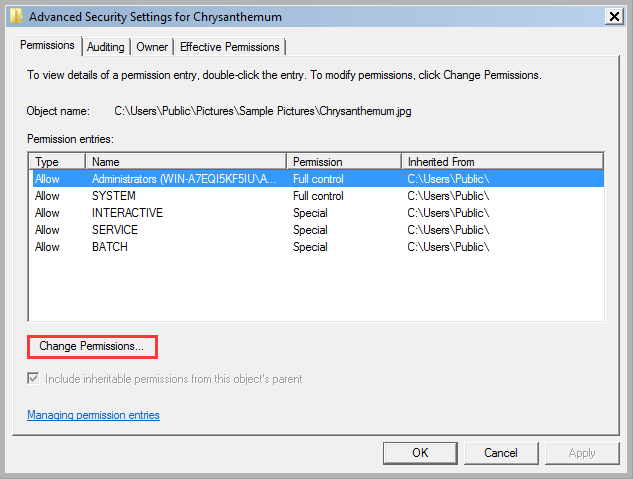
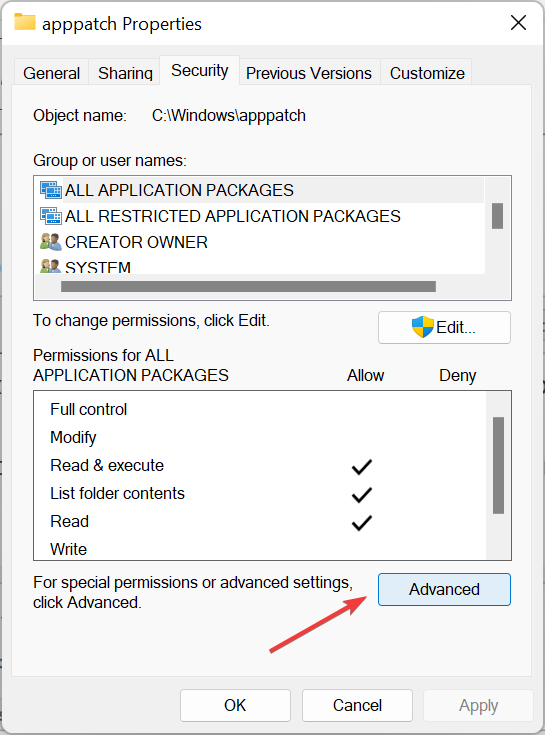
Step 2. In the Properties window, navigate to the Security tab and click on the Advanced button.
Step 3. Now the Advanced Security Settings window pops up, click the Change button next to Owner: TrustedInstaller.
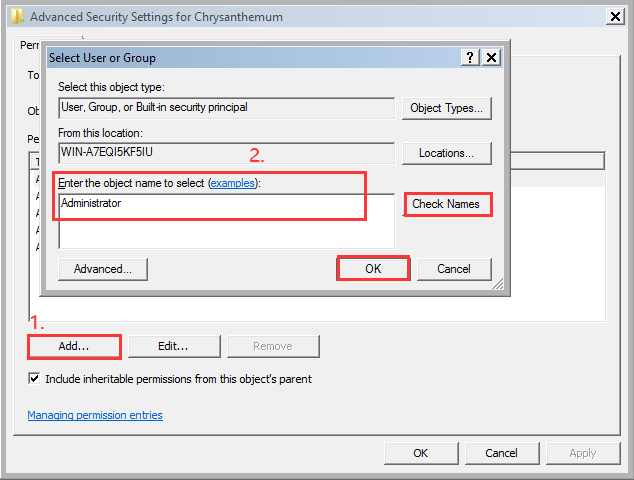
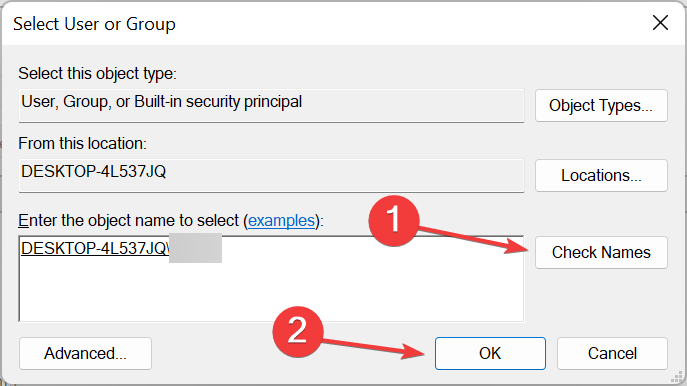
Step 4. Enter the object name that you are using on your computer and click on Check Names button. Then Windows will check and complete the full object name automatically. Once the full name completes, click on OK.
Tip: Type the user name that controls your files and folders into the box. Here we take Administrator for example.

Step 5. In the pop-up window, tick the checkbox next to Replace owner on sub containers and objects, make sure you select it and click on OK.
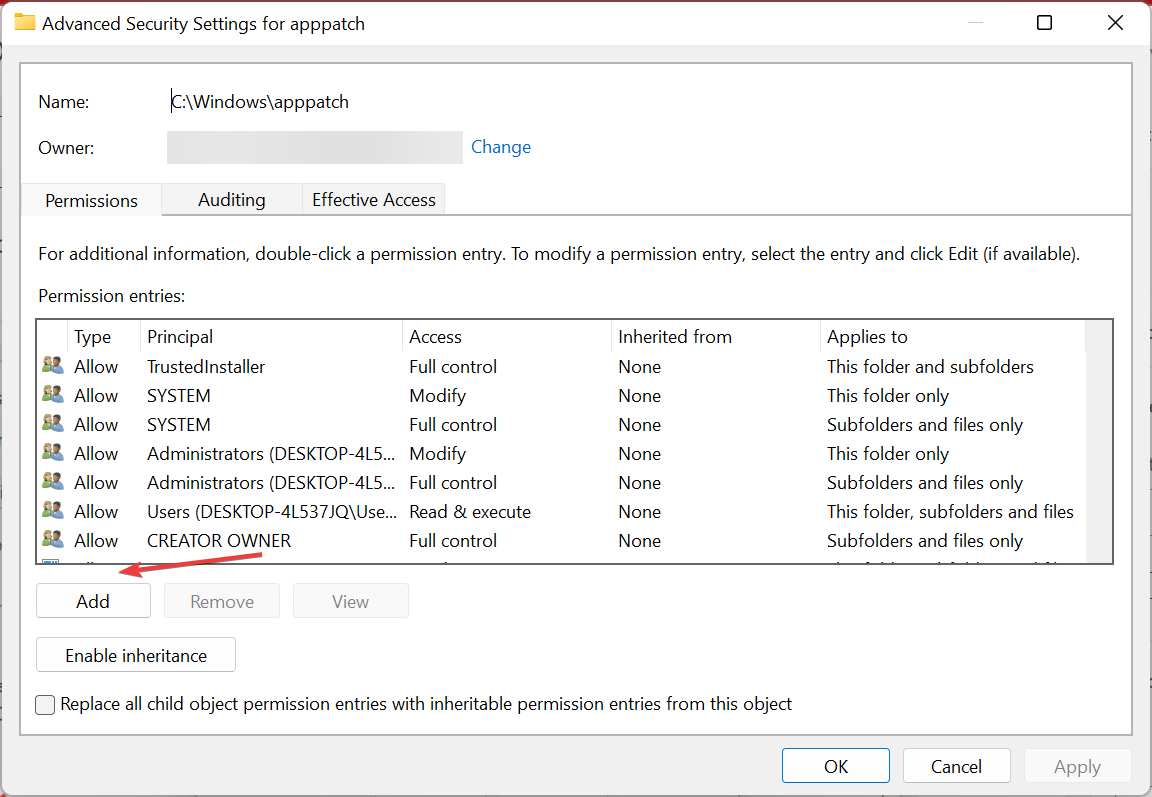
Step 6. Click on the Add button in the Advanced Security Settings window.
Tip: If the Add button is grayed out, check if the inheritance is enabled. If not, click on the Enable inheritance button at the bottom of the window.
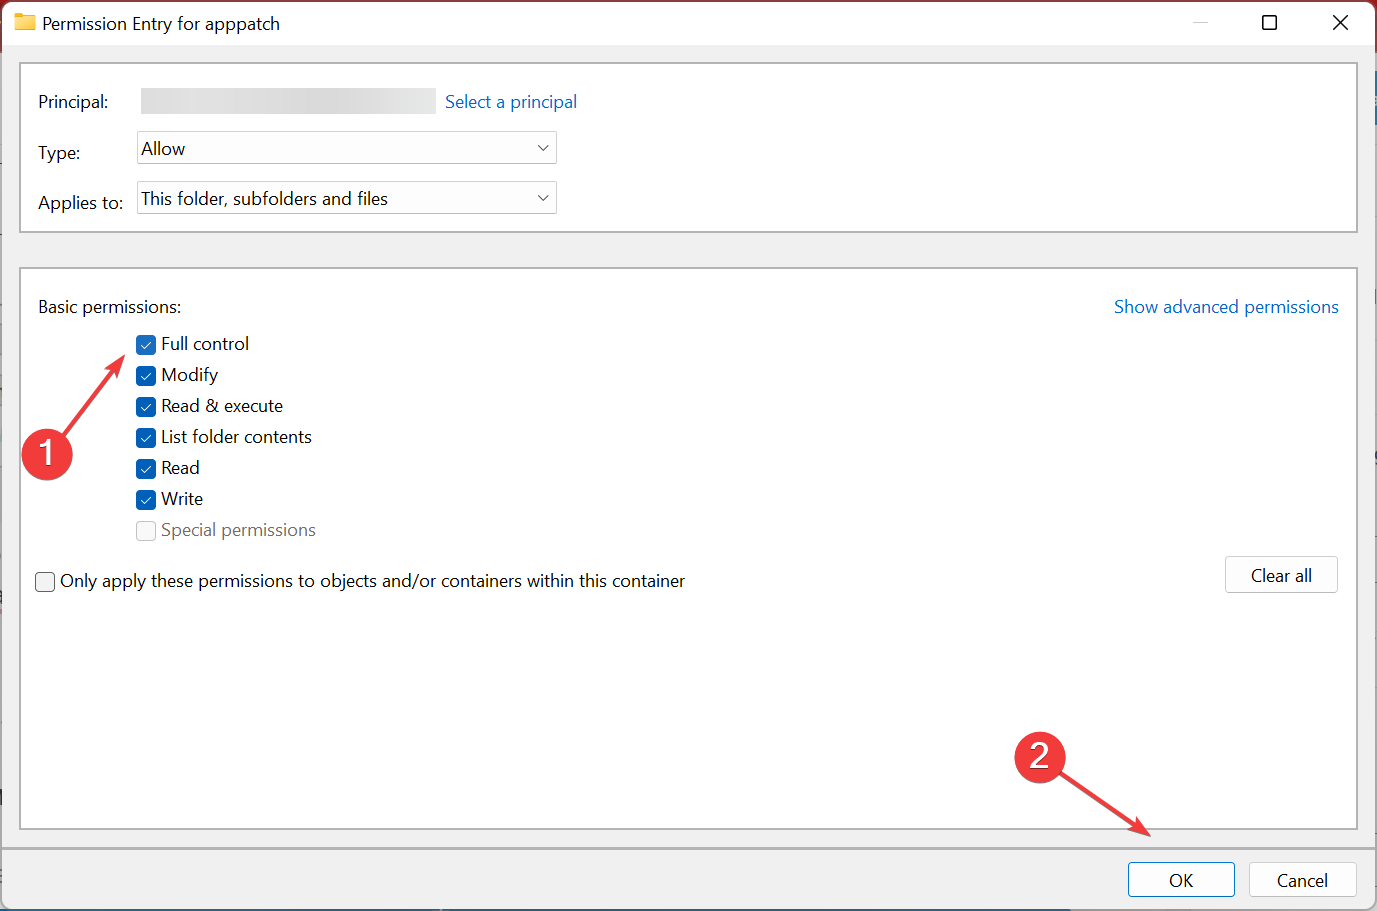
Step 7. Click on Select a principal button in the pop-up window and repeat the procedure in Step 4 to type your object name.
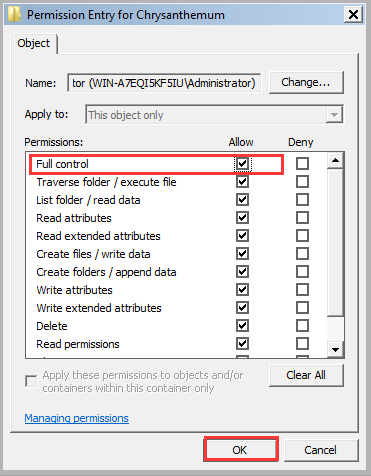
Step 8. Tick the checkbox next to Full Control at the Basic permissions tab, and then click OK exit the current window.
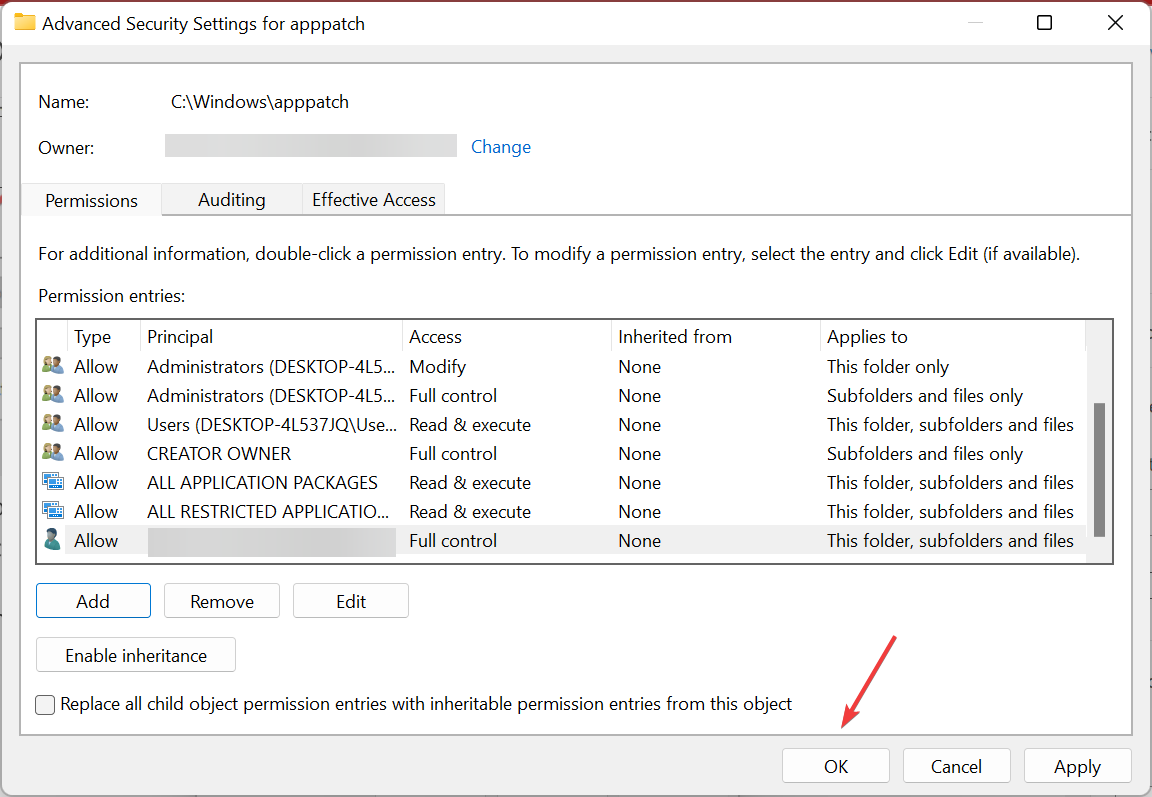
Step 9. Click on the OK and Apply button in the Advanced Security Settings window to execute these changes.
Now, you should get permission from TrustedInstaller to make changes to this folder on Windows 10. Do you want to know how to get permissions from TrustedInstaller on Windows 7? Please keep reading the following part.
Get Permission from TrustedInstaller on Windows 7
If your computer is Windows 7, you can follow the steps below to get permission from TrustedInstaller. For that:
Step 1. Open the File Explorer on Windows 7. Then right-click the affected file or folder and select the Properties.
Step 2. Go to the Security tab and click on the Advanced button.
Step 3. Navigate to the Owner tab and click on the Edit button in the Advanced Security Settings window.
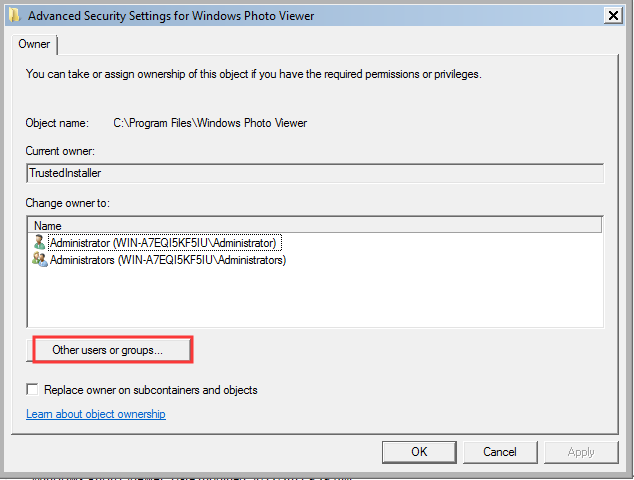
Step 4. Click on the Other users or groups button in the pop-up window.
Step 5. In the new window, enter the user name you are using on this computer in the box and click on the Check Names button. After that, Windows will check and name the object automatically. Then click on OK button.
Step 6. Then click on the Advanced button again like Step 2, and click on Change permissions button.
Step 7. Click on the Add button to open the Permission Entry window. Then you will see a window that is similar to the one appeared in Step 5, just repeat the Step 5 to enter the same user name.
Step 8. Select the checkbox of Full control in the Permissions tab and click the OK button.
Step 9. Now, back to the Advanced Security Settings window, click OK and Apply buttons to execute the above changes.
Now, you can try deleting the files and check if the error “you require permission from TrustedInstaller” on Windows 7 is fixed.
Modify security settings through File Explorer or Command Prompt
by Vladimir Popescu
Being an artist his entire life while also playing handball at a professional level, Vladimir has also developed a passion for all things computer-related. With an innate fascination… read more
Updated on September 2, 2022
Reviewed by
Vlad Turiceanu

Passionate about technology, Windows, and everything that has a power button, he spent most of his time developing new skills and learning more about the tech world. Coming… read more
- Windows will sometimes require permission from Trustedinstaller to allow you to make changes to critical system files.
- In such cases, you should only proceed when sure that performing the action will not harm the OS.
- If you are, you could take access to these files/folders using File Explorer and the Command Prompt.
XINSTALL BY CLICKING THE DOWNLOAD FILE
This software will repair common computer errors, protect you from file loss, malware, hardware failure and optimize your PC for maximum performance. Fix PC issues and remove viruses now in 3 easy steps:
- Download Restoro PC Repair Tool that comes with Patented Technologies (patent available here).
- Click Start Scan to find Windows issues that could be causing PC problems.
- Click Repair All to fix issues affecting your computer’s security and performance
- Restoro has been downloaded by 0 readers this month.
TrustedInstaller is a legit Windows component and belongs to Windows Modules Installer. And users generally find out about it when seeing the You require permission from TrustedInstaller to make changes to this folder error.
TrustedInstaller is one of the core components of Windows Resource Protection, included in every iteration of Windows since Vista.
Although you are signed into the system with an Administrator account, when trying to access, rename, or delete certain files, you might stumble upon a message that reads, You require permission from TrustedInstaller to delete this file, or even regarding other changes.
If you are confident about your action and realize that it wouldn’t adversely affect the system, there’s a tweak you can apply to move forward.
What is TrustedInstaller permission?
TrustedInstaller permissions are basically the ones that you require when accessing, renaming, or deleting certain critical files on the computer. This includes system files and Windows.old folder (contains files for the previous iteration after you upgrade the OS), amongst others.
TrustedInstaller is a built-in user account with permissions to access to these files, and until you have them, you can’t make any changes to the files.
Consider it an additional security measure enforced by Windows to prevent users from making drastic changes on the computer that may affect the proper functioning of the OS.
Where can I find TrustedInstaller?
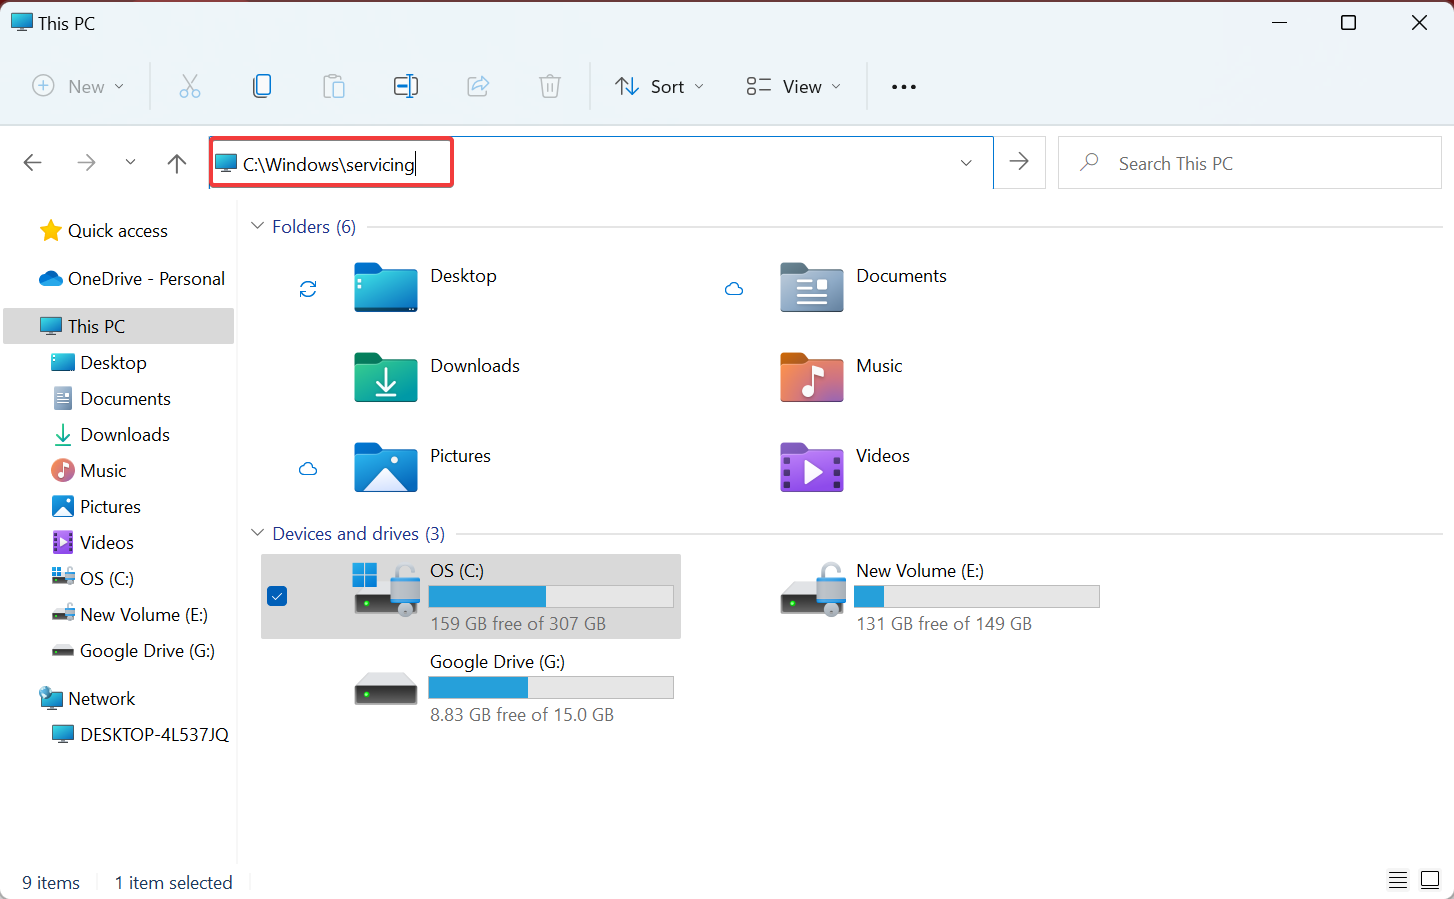
- Press Windows + E to launch File Explorer, paste the following path in the address bar, and hit Enter:
C:Windowsservicing
- You will now find the TrustedInstaller file located here.
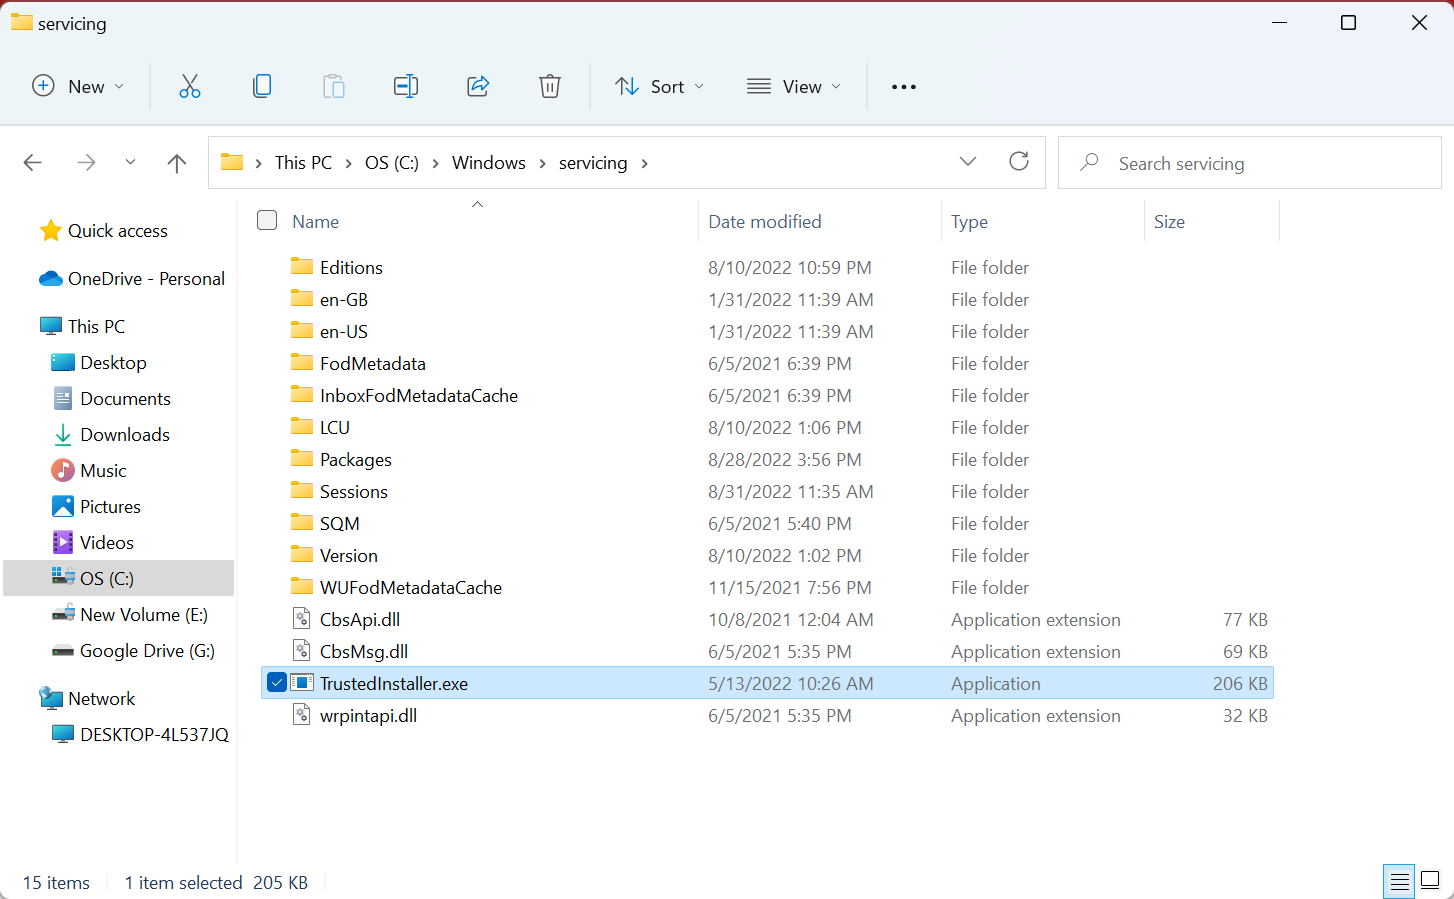
TrustedInstaller has a process located within the system drive and can be easily located. We strongly advise against making any changes to it.
Also, if you are interested, find out all about TrustedInstaller, and how to fix issues with it.
Now, that you have a basic understanding of TrustedInstaller, let’s find out how you can fix the You require permission from TrustedInstaller error.
How do I get permission for TrustedInstaller?
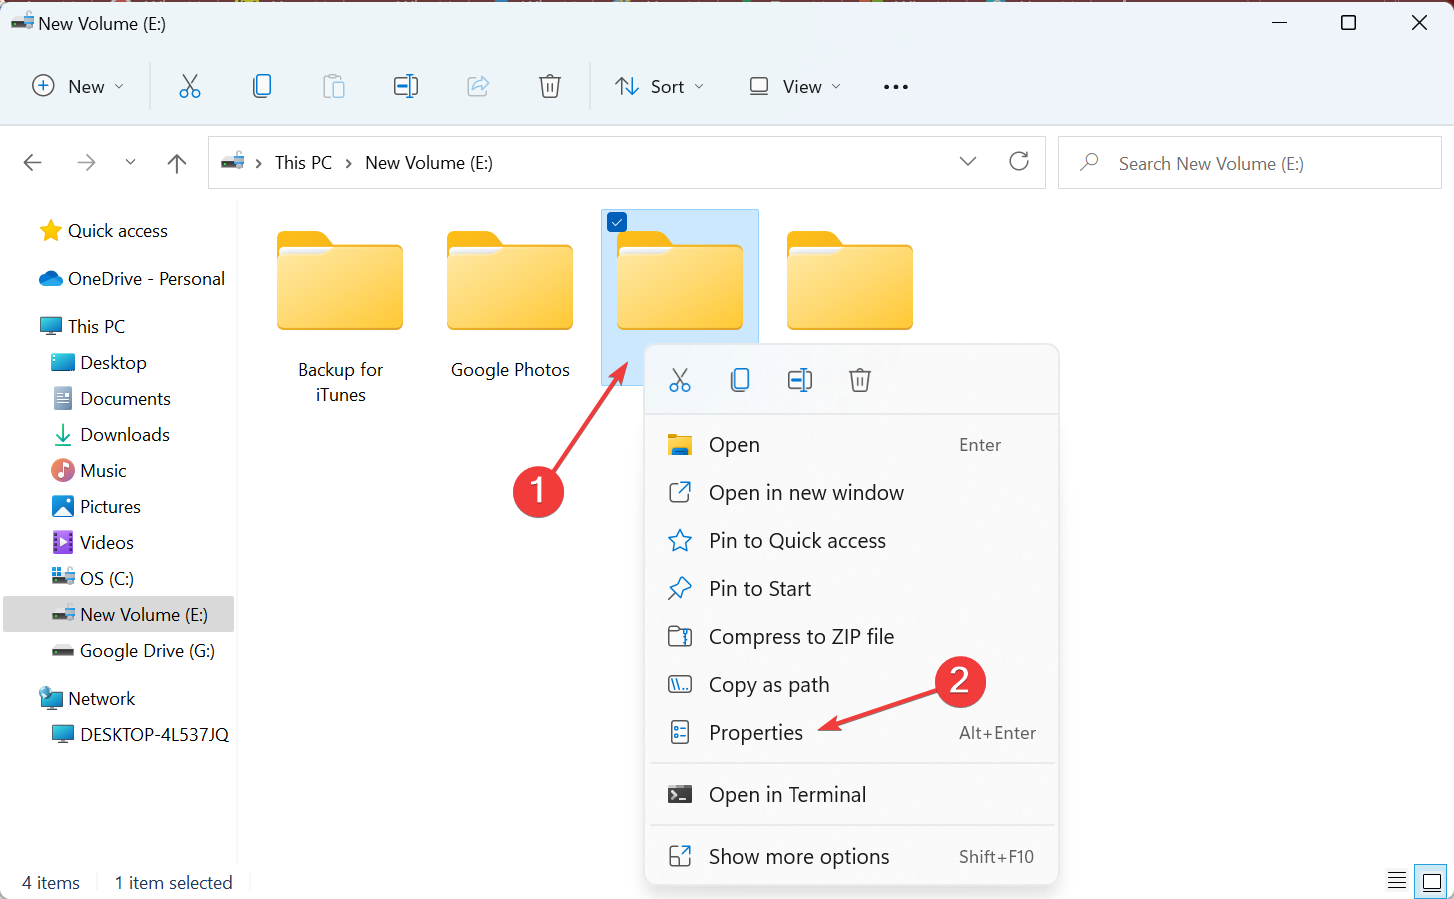
1. From the file/folder properties
- Right-click on the file or the folder you want to change or delete, and select Properties.
- Now, head to the Security tab and then click on Advanced.

- You will see that the owner of the file is TrustedInstaller. So click on Change. (For older Windows versions, there’s a separate tab for Owners).

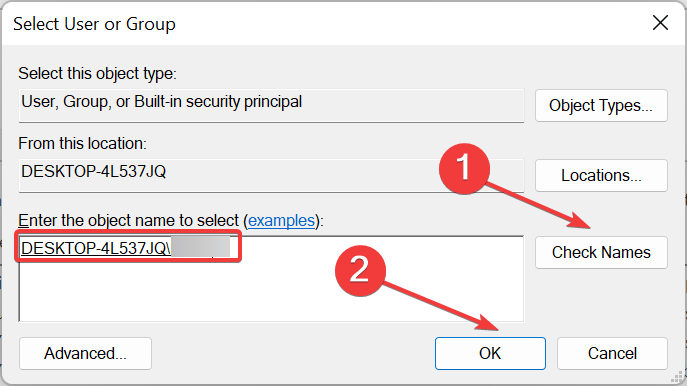
- In the window that pops up, type the user name you are using on the computerand, click the Check Names button. Windows will automatically check and complete the full object name. Then click on OK.

- Also check the box before Replace owner on sub containers and objects), then click OK.
- In the Properties, again click on Advanced.
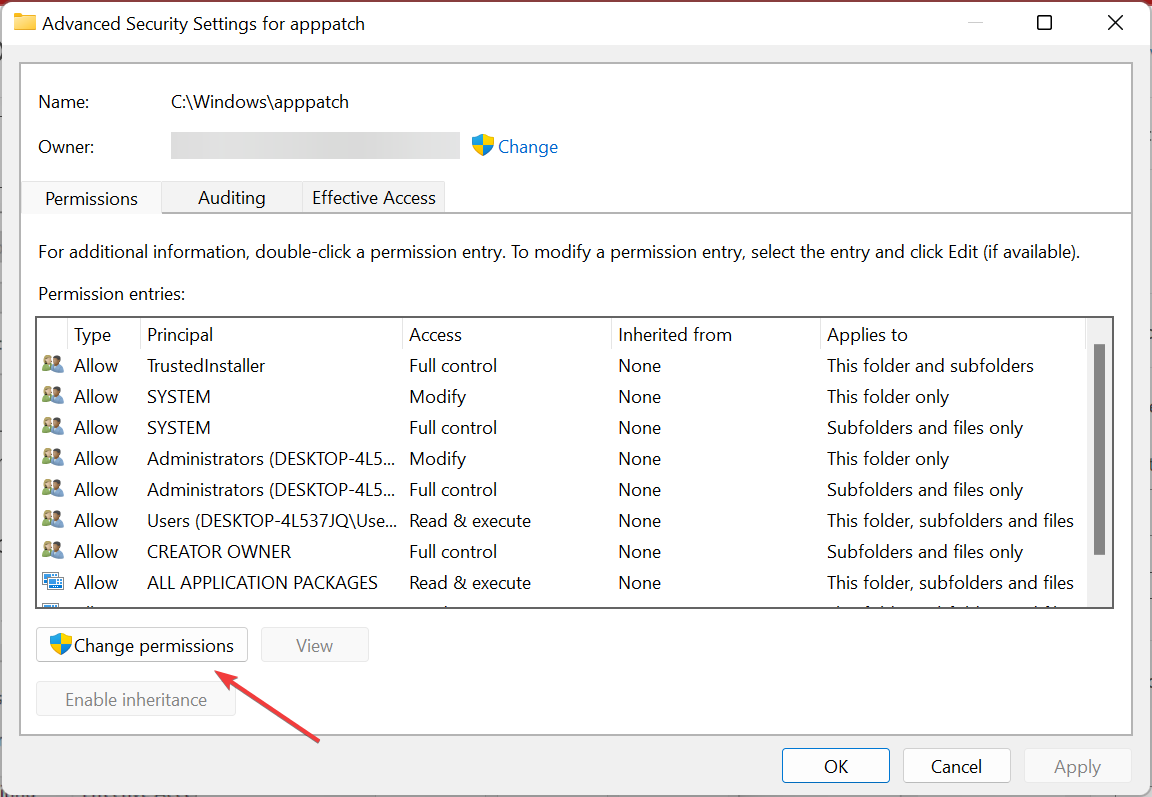
- Now, click on the Change permissions button under the Permissions tab.
- Next, click on Add.
- Click on Select a principal.

- Again, enter your user account here, click on Check Names, and once it’s identified and listed, click OK.
- Tick the checkbox for Full Control under Basic permissions, and click OK.

- Once again, click OK to apply the changes.
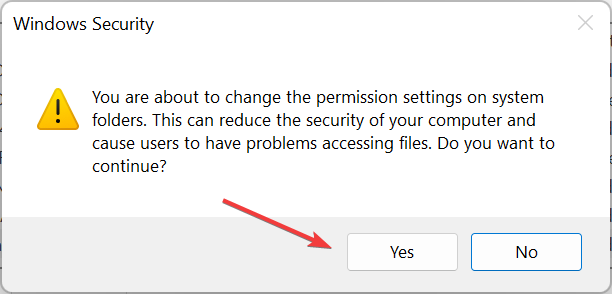
- Finally, click Yes in the confirmation prompt that pops up.


Some PC issues are hard to tackle, especially when it comes to corrupted repositories or missing Windows files. If you are having troubles fixing an error, your system may be partially broken.
We recommend installing Restoro, a tool that will scan your machine and identify what the fault is.
Click here to download and start repairing.
This will change ownership, and you should not see the You require permission from TrustedInstaller to make changes to this file message for that particular file.
2. Using Command Prompt

NOTE
Before executing the steps listed here, make sure you are logged in with an Administrator account. In case you are using a Standard account, switch to an Administrator account and then proceed.
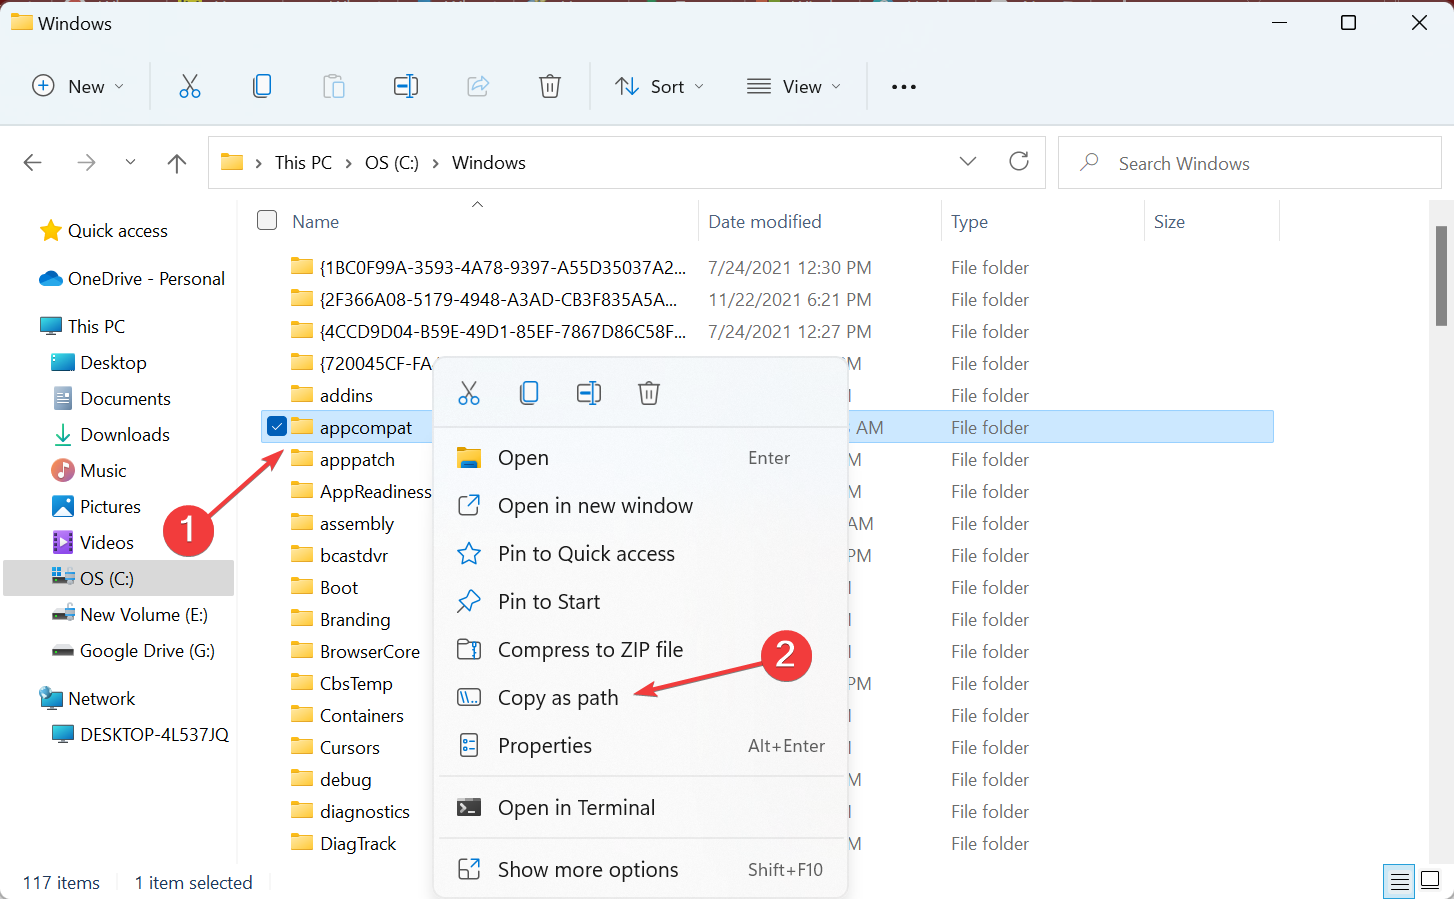
- Right-click on the file that you want to take ownership of, and select Copy as path.
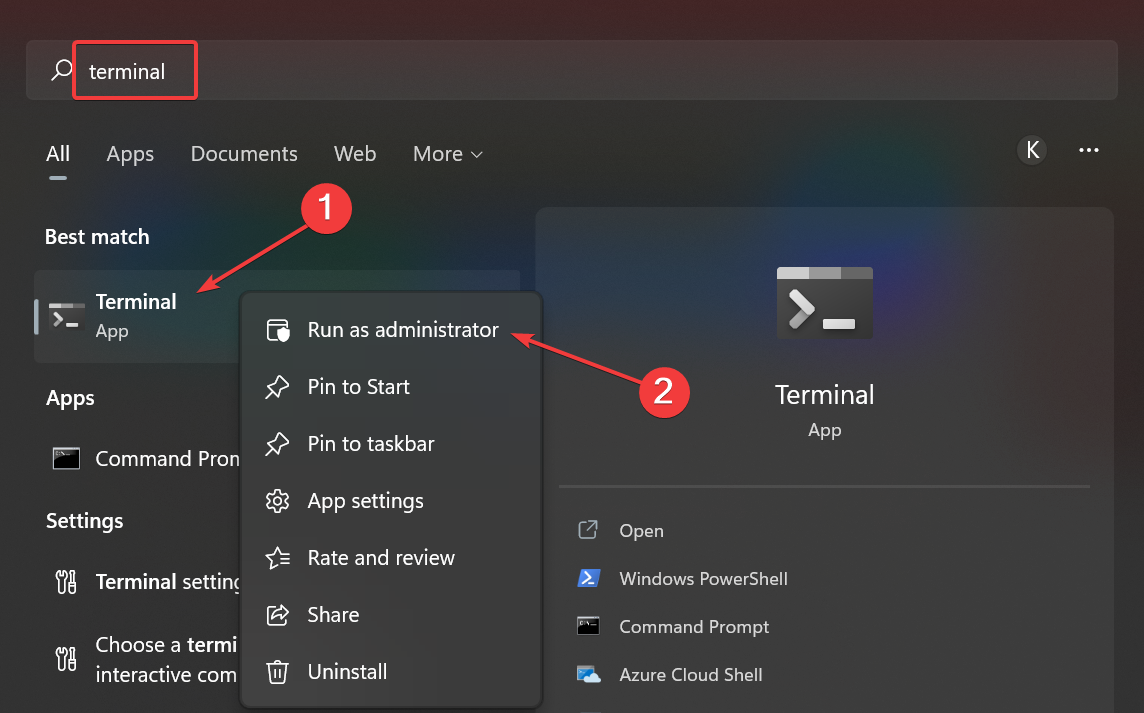
- Now, press Windows + S, type Terminal in the text field, right-click on the relevant search result, and select Run as administrator.

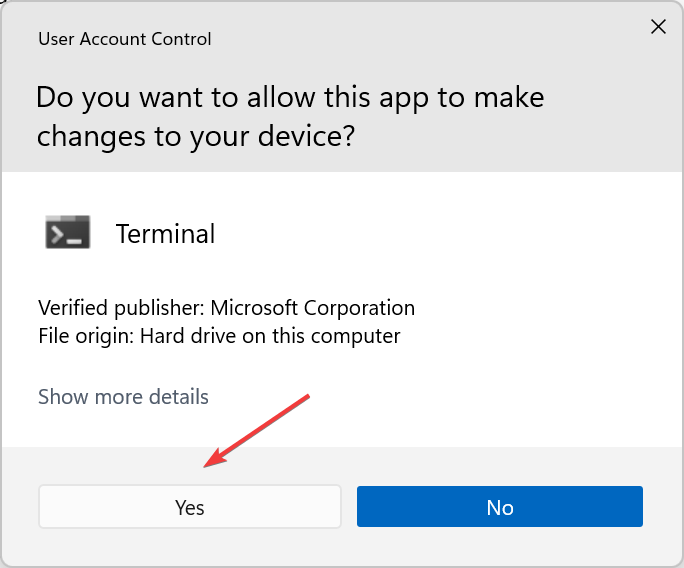
- Click Yes in the UAC prompt.

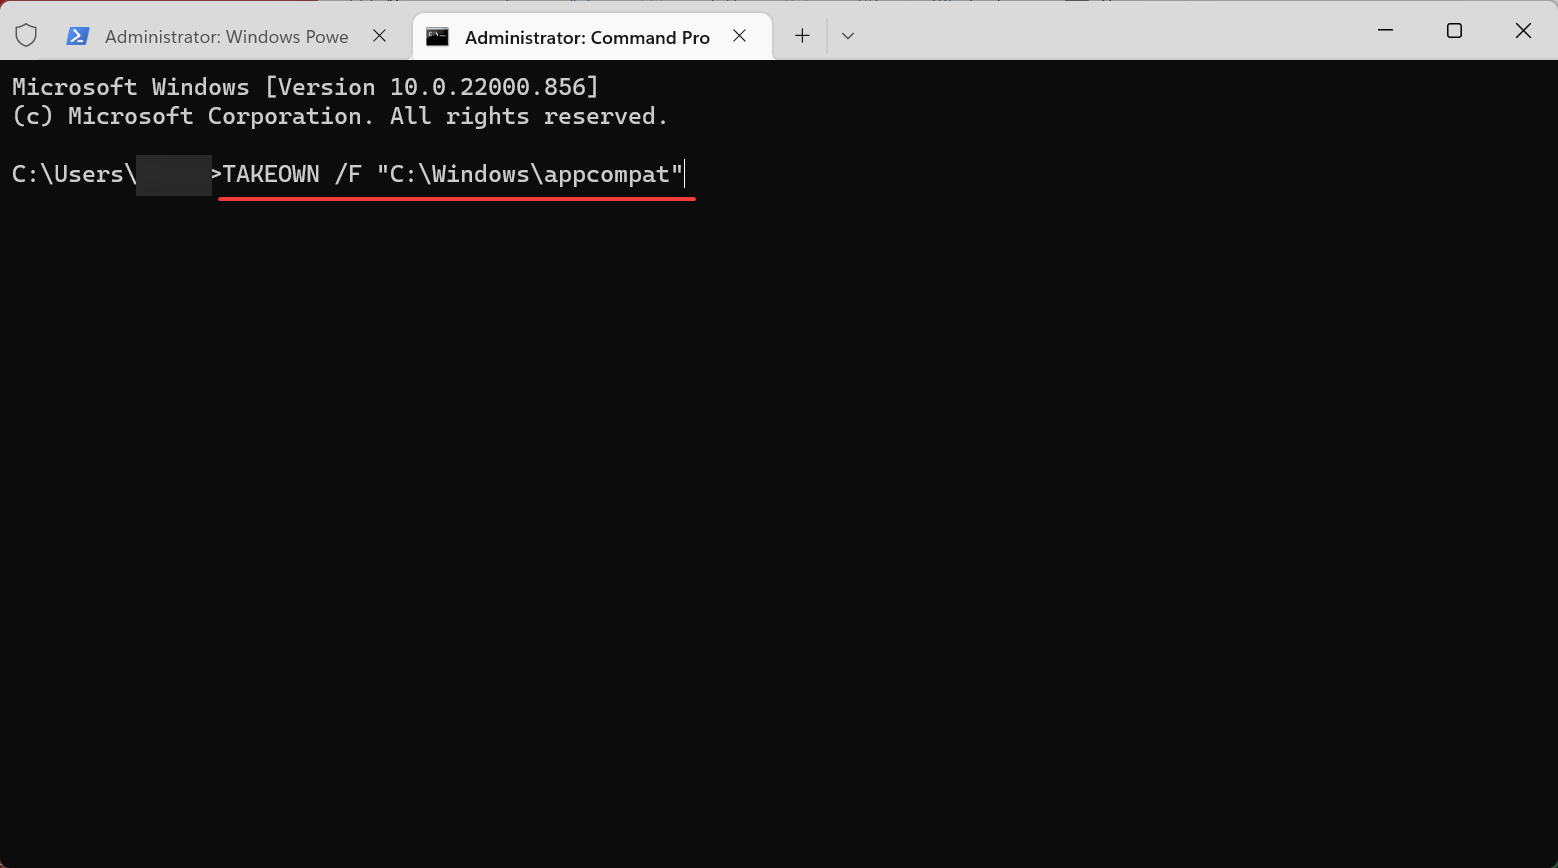
- Press Ctrl + Shift + 2 to open Command Prompt.
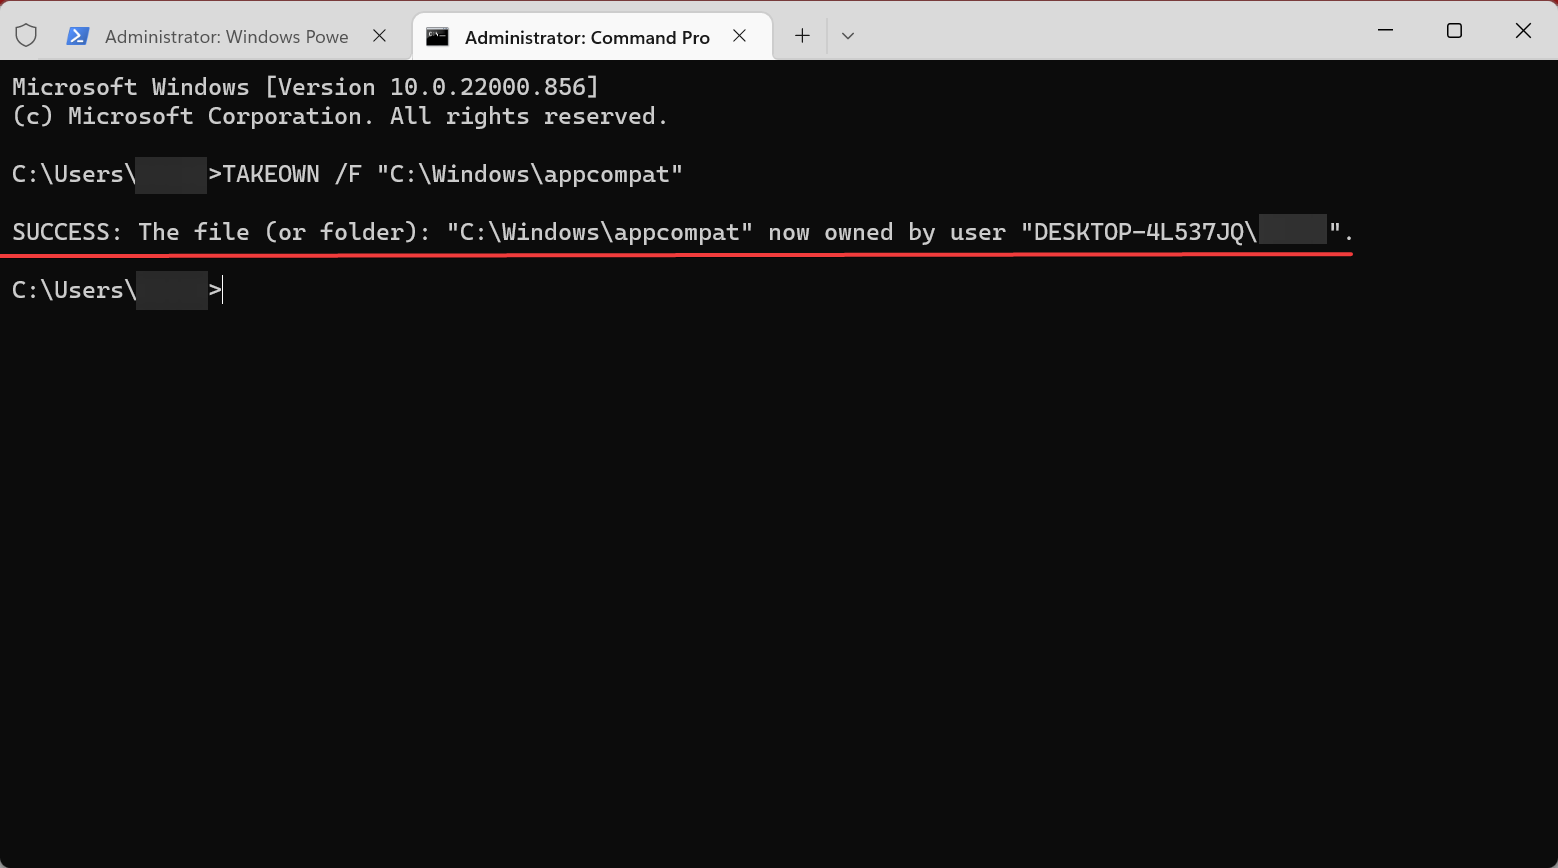
- Now, paste the following command, followed by the file path (without brackets) that you copied earlier, and hit Enter:
TAKEOWN /F (file path)
- Once done, you would receive Success: The file (or folder): “file path” now owned by user “your username”.
That’s it! The Command Prompt method is relatively simpler and quicker. With the detailed step-by-step process listed here, anyone can fix the You require permission from TrustedInstaller error in Windows.
How can I fix You require permission from TrustedInstaller on Windows 11?
There are two ways for it, either to head to Advanced Security Settings and then take over the access of the required file or run a simple command in the Command Prompt.
Both methods have been listed in the previous section, and you should be able to fix the error using any one of them in no time.
How do I fix I need permission to perform this action?
A fairly common error, it arises when you try to access files owned by an administrator on the computer. In this case, switching to an administrator account should do the trick.
If that doesn’t work, convert all the other account types to Standard, log in with the only Administrator account, and try performing the action.
In some cases, the error message will specify who to take the permission from, be it another user account or TrustedInstaller. For the former, you can ask them to provide the required permission, and if it’s the latter, the steps listed in the earlier sections should help.
Besides, check for malware, disable third-party antivirus or other security software, and if nothing else works, boot Window in Safe Mode and then perform the action.
That’s all there’s to the TrustedInstaller error in Windows 10 and 11. Also, the methods listed here would work when getting the You require permission from TrustedInstaller error in Windows Server 2016.
Besides, find out what to do in case of the You need administrator permission to delete this folder error.
If you have any other queries or want us to cover a specific topic, drop a comment below.
Still having issues? Fix them with this tool:
SPONSORED
If the advices above haven’t solved your issue, your PC may experience deeper Windows problems. We recommend downloading this PC Repair tool (rated Great on TrustPilot.com) to easily address them. After installation, simply click the Start Scan button and then press on Repair All.
![]()
Newsletter
How to Get Permission From Trustedinstaller in Windows 10
Get around the ‘you require permission from Trustedinstaller’ pop-up
Updated on November 10, 2021
What to Know
- Command Prompt: Type TAKEOWN /F filename and then press Enter.
- File Explorer: Right-click > Properties > Security > Advanced > Change Permissions > enter username > Check Names > Apply.
When you go to remove a particular file on Windows 10, you may receive an error message stating, «you require permission from TrustedInstaller» to delete it. This article explains how to resolve the Windows 10 TrustedInstaller error using the Command Prompt or File Explorer.
How to Fix the ‘TrustedInstaller’ Error Using the Windows 10 Command Prompt
The Command Prompt function allows PC users to fix Windows 10 issues by enabling you to perform administrative tasks. Every Windows PC has Command Prompt, and it’s easy to use with a little instruction.
Make sure you’re using Windows as an administrator.
-
Open Command Prompt using the Windows Start Menu or Search Bar.
-
Enter the following text to take control of a particular file: TAKEOWN /F (filename).
Enter the full file name and path. Do not include any parentheses.
-
If the command was entered properly, you’ll receive the following notification: Success: The file (or folder): “filename” now owned by user “Computer Name/User Name.”
How to Fix the TrustedInstaller Error Using File Explorer
If you don’t feel comfortable using the Command Prompt to take ownership, there is another option. Once you use File Explorer to gain access using the following steps, you can delete or modify files as needed.
Make sure you are logged in as an administrator.
-
Open File Explorer, then right-click the folder or file you want to take ownership of.
-
Select Properties from the menu that appears.
-
Select the Security tab, then select Advanced.
-
Select Change Permissions.
-
Input your User Name into the blank space and select Check Names.
If your account name doesn’t pop up, you can look for it manually in the list of users.
-
Check the box next to Replace owner on sub containers and objects.
-
Select Apply, close the Properties Window, then open it again.
-
Once again, select the Security tab again, then select Advanced.
-
From the Permission window, select Add.
-
Choose Select a Principal, input your User Name, check all permission boxes, then select OK.
-
Check the box next to Replace all child object permission entries with inheritable permission entries from this object, then select Apply.
What Is the ‘TrustedInstaller’ Error and Why Does It Appear When I Try to Delete Files?
Provided you’re the primary user of your home computer, you might be surprised to find out you need anyone’s permission to deal with files on your PC.
All Windows 10 PCs have an in-built Microsoft account, known as the NT SERVICE/TrustedInstaller. This account exists to prevent accidental damage to your Windows PC and is given ownership over many important files on your computer. For you to be able to take control of your files, you’ll need to make yourself the owner of the files.
Thanks for letting us know!
Get the Latest Tech News Delivered Every Day
Subscribe
В Windows существует компонент TrustedInstaller, который ответственен за модифицирование системных файлов. Иногда при проведении тех или иных операций пользователь сталкивается с ошибками, например, если TrustedInstaller не дает удалить папку в Windows 10. Ситуация сама по себе достаточно неприятная, но при правильном подходе ее получится устранить.
В данной статье мы подробно разберемся с данной темой и расскажем, что нужно делать. Это поможет с решением многих проблем, в том числе и со сбоем «Запросите разрешение от TrustedInstaller».
Содержание
- Что такое пользователь TrustedInstaller
- Как удалить папку, которую не дает удалить TrustedInstaller
- Как изменить владельца папки Windows 10
- Как получить доступ к папке Windows 10
- Установка разрешений
- Видео инструкция — как получить разрешение TrustedInstaller Windows 10
Что такое пользователь TrustedInstaller
Начать хотелось бы с вопроса: Что такое TrustedInstaller? Во время установки Windows человек создает себе учетную запись с правами администратора. Это можно сделать и в любое другое время. Но в самой системе сразу же появляется отдельная учетная запись под названием TrustedInstaller. Она используется для защиты важных данных.
То есть появление подобной ошибки говорит о том, что вы пытаетесь изменить системные файлы. А значит, продолжать стоит исключительно тогда, когда вам понятно, что работа компьютера не будет нарушена.
В следующем разделе статьи мы расскажем, как получить разрешение от TrustedInstaller.
Как удалить папку, которую не дает удалить TrustedInstaller
Вся процедура включает в себя три глобальных шага: выбор нового владельца, затем идет получение полного доступа и включение разрешения на удаление. Сразу же после описанных действий папку или файл можно будет без каких-либо проблем удалить. Давайте разбираться, как выдать разрешение от TrustedInstaller.
А вот пытаться удалить TrustedInstaller нет никакого смысла, ведь это системный компонент Windows.
Как изменить владельца папки Windows 10
Вне зависимости от версии операционной системы, порядок действий всегда будет идентичным. Для изменения владельца с TrustedInstaller на другого выполните такую процедуру:
- Откройте местоположение папки в Проводнике Windows.
- Кликните по ней правой клавишей мыши.
- Сразу же после перейдите на страницу «Свойства».

- Посетите вкладку «Безопасность» в новом окне.
- Кликните по выделенной стрелочкой кнопке.

- Сразу же после нажмите на надпись «Изменить», расположенной правее графы «Владелец».

- Теперь кликните по кнопке «Дополнительно…».
- Нажмите на «Поиск» и отыщите свой профиль в появившемся списке.
- Дважды кликните на «ОК» в разных окнах.

- Теперь активируйте опцию «Заменить владельца…».
- Поочередно нажмите на «Применить» и «ОК».


После выполнения описанных действий для удаления папки будет требоваться не разрешение от TrustedInstaller, а от выбранной учетной записи. Посмотрим, как это делается.
Как получить доступ к папке Windows 10
Для получения полного доступа к папке выполните следующие шаги:
- Вернитесь к окну «Свойства» и вкладке «Безопасность».
- Кликните по пункту «Изменить…».
- В списке «Группы и пользователи» выберите графу «Пользователи…».
- Теперь активируйте пункт «Разрешить» для параметра «Полный доступ» в блоке снизу.
- Нажмите на кнопку «Применить», а затем «Да» в окне подтверждения.

- Два раза кликните по кнопке «Да».


Как мы и говорили ранее, теперь разрешение от TrustedInstaller не требуется. Остается только проверить, есть ли у текущего пользователя права на изменение папки.
Хотелось бы напомнить, что TrustedInstaller предназначается для защиты системных файлов и папок от изменения и удаления. Поэтому стоит быть особенно аккуратным, когда появляется подобная ошибка. Продолжать имеет смысл, если вы уверены, что в результате ваших действий не будут стерты какие-то важные данные, из-за которых не перестанет работать Windows.
Установка разрешений
Мы уже выдали полный доступ к модифицированию директории для группы «Пользователи». Давайте проверим, все ли настроено правильно, и посмотрим права на изменение системных файлов. Для этого:
- Опять перейдите к свойствам папки через контекстное меню.
- Во вкладке «Безопасность» нажмите на пункт «Дополнительно».
- Выделите графу «Пользователи…» в столбце «Субъект».
- Нажмите на кнопку «Изменить».


Удостоверьтесь, что активен пункт «Полный доступ». Это говорит о том, что пользователь может совершать любые действия с данной папкой. При необходимости можно выдать права только на удаление. Для этого нажмите на надпись «Отображение дополнительных разрешений». И в новом списке активируйте пункт «Удаление».
В опции «Тип» должно быть выбрано «Разрешить», а в «Применяется к» вариант «Для этой папки, ее подпапок и файлов». Если все настроено правильно, то нажмите на кнопку «ОК».
А теперь примените новые параметры и проверьте, удаляется ли папка.
Напоследок хотелось бы добавить, как вернуть для TrustedInstaller разрешение на изменение папки:
- Снова откройте ее свойства, страница «Безопасность».
- Кликните по кнопке «Дополнительно».
- В графе «Владелец» кликнуть на «Изменить».
- Активируйте текстовое поле «Введите имена выбираемых объектов».
- Вставьте туда команду: NT SERVICETrustedInstaller
- Нажмите на «ОК».

- Включите опцию «Заменить владельца подконтейнеров и объектов» и примените изменения.


В результате доступ к папке Windows 10 вернется к системному профилю.
Видео инструкция — как получить разрешение TrustedInstaller Windows 10
Мы постарались максимально подробно расписать, что такое TrustedInstaller в Windows и как обойти ошибку при удалении файлов и папок, подкрепив процедуру снимками экрана и пояснениями. Но все равно некоторые моменты могут быть непонятны, особенно не слишком разбирающимся в компьютерах пользователям. По этой причине мы прикрепляем ссылку на видеоинструкцию, где все показано еще более наглядно:
После выполнения описанных действий вам не придется запрашивать разрешение от TrustedInstaller на удаление папки.