Есть не так уж много вариантов использования нескольких дистрибутивов Linux на одной машине. Вы можете установить их все на жесткий диск, на виртуальную машину или сохранить в виде ISO образа и загружаться в реальном времени.
Первый и второй способы не очень выгодны так как требуют очень много места на жестком диске, с другой стороны, для третьего способа нужно иметь CD диск или USB флешку для хранения образа и загрузчика. Но есть еще один вариант — хранить ISO образ на жестком диске, и загружаться с него по мере надобности. Здесь не нужно столько дискового пространства как при установке, и не нужен внешний носитель информации. В этой статье будет рассмотрена загрузка с ISO образа в Grub.
Что нам понадобится
В этой статье мы будем использовать загрузчик Grub, впрочем, он и так используется в большинстве дистрибутивов Linux. Также нам понадобится ISO образ, с которого будем загружаться и вы должны знать на каком разделе он размещён. Удобнее всего разместить его на загрузочном разделе. Чтобы узнать какой раздел диска у вас загрузочный выполните:
fdisk -l
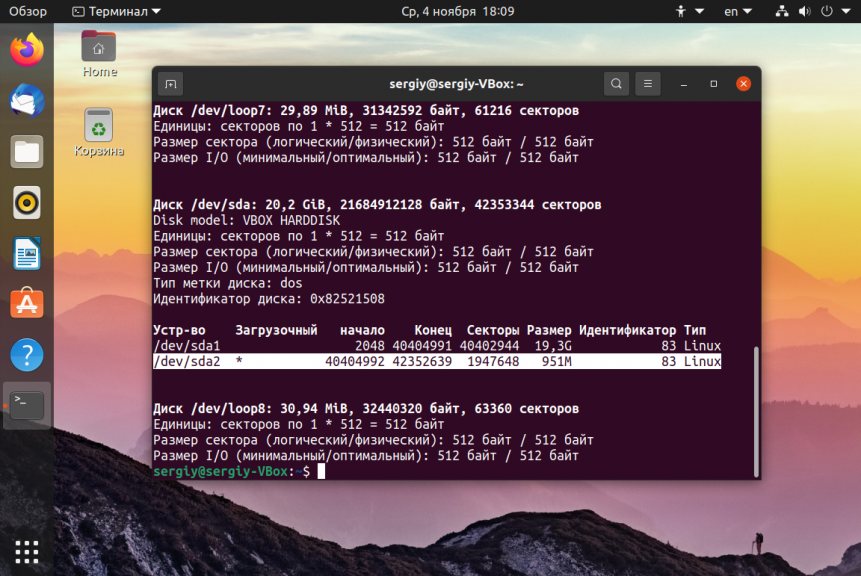
Загрузочный раздел будет помечен знаком * в колонке Загрузочный или Boot. Например, у меня /dev/sda2 или как пишется в Grub hd0,2 — загрузочный.
Разделы /dev/sda1 и /dev/sdb3 будут называться в Grub hd0,1 и hd1,3 соответственно. В синтаксисе Grub именование дисков начинается с нуля, а именование разделов с единицы.
Сначала откройте файл /etc/default/grub и закомментируйте там эту строку если она там есть:
GRUB_HIDDEN_TIMEOUT=0
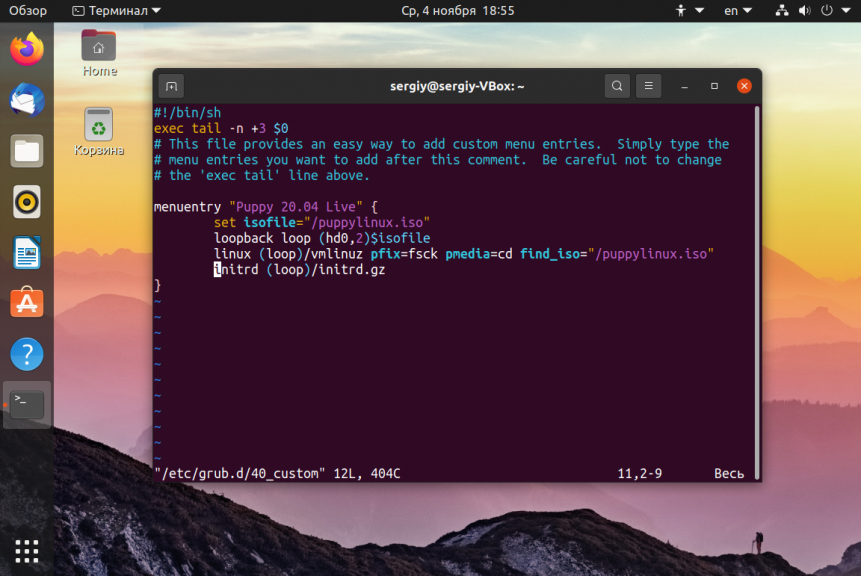
Перед строчкой должна стоять решетка. Сохраните изменения, а затем откройте файл /etc/grub.d/40_custom. Здесь мы добавим пункт для загрузки с образа, синтаксис выглядит следующим образом:
menuentry «Заголовок пункта» {
set isofile=«Адрес ISO файла»
loopback loop Раздел в форме записи Grub на котором расположен ISO$isofile
Параметры загрузки ядра
}
Перед тем, как переходить к настройке Grub надо выяснить ещё один момент. Как в оригинальном образе выполняется загрузка дистрибутива. Обычно в каждом загрузочном образе есть папка Grub в которой можно посмотреть файл grub.cfg или другой подобный, например loopback.cfg и узнать какими строками там загружается ядро:

Только перед путями к файлам надо добавить адрес (loop). Путь к образу надо указывать от начала того диска, на котором он расположен. Например, если диск расположен в корне загрузочного раздела, который монтируется в /boot, то и путь будет /файл.iso, а не /boot/файл.iso. Теперь можно переходить к примеру, запись для загрузки Puppy Linux будет выглядеть вот так:
menuentry "Puppy 20.04 Live" {

set isofile="/puppylinux.iso"

loopback loop (hd0,2)$isofile

linux (loop)/vmlinuz pfix=fsck pmedia=cd findiso="/puppylinux.iso"

initrd (loop)/initrd.gz

}
Каждый дистрибутив индивидуален и надо с каждым разбираться отдельно. Если вы хотите запускать Gparted:
menuentry "GParted Live amd64" {

set isofile="/gparted-live-0.18.0-2-amd64.iso"

loopback loop (hd0,2)$isofile

loopback loop $isofile

linux (loop)/live/vmlinuz boot=live config union=aufs noswap noprompt ip=frommedia toram=filesystem.squashfs findiso=${isofile}

initrd (loop)/live/initrd.img

}
Или даже Fedora Linux:
menuentry "Fedora Live" {

set isofile="/Fedora.iso"

loopback loop (hd0,2)$isofile

loopback loop $isofile

linux (loop)/isolinux/vmlinuz0 root=live:CDLABEL=Fedora-Live rootfstype=auto ro rd.live.image quiet rhgb rd.luks=0 rd.md=0 rd.dm=0 iso-scan/filename=${isofile}

initrd (loop)/isolinux/initrd0.img

}
Обратите внимание, что опции будут меняться в зависимости от дистрибутива и расположения в нем загрузочных файлов. Кроме того, важно то где размещен ISO образ, если ваш домашний каталог зашифрован лучше его хранить на загрузочном разделе, как в примерах выше.
Хотите больше? Можно загрузится с ISO для автоматического выполнения каких-либо действий. Например, если вы параноик и хотите иметь возможность быстро стереть свой жесткий диск можно использовать DBAN. Но будьте осторожны так как это сотрет все данные без возможности восстановления.
menuentry "Darik's Boot and Nuke" {

set isofile="/dban.iso"

loopback loop (hd0,1)$isofile

linux (loop)/dban.bzi nuke="dwipe" silent

}
Есть еще много вещей, которые можно сделать с помощью загрузки ISO образа в Grub, неважно хотите ли вы очень быструю Live систему или иметь возможность уничтожить все кончиком пальца.
Загрузка windows с iso образа в Grub
Если вам нужна загрузка Windows с ISO образа Grub, то это делается тоже не очень сложно, но немного по другому. Сначала нужно скачать syslinux и извлечь оттуда memdisk в папку /boot/. Это должна быть папка, куда установлены файлы Grub. Дальше добавьте в конфигурационный файл 40-grub.conf такие строки:
menuentry "Boot Windows" {

search -f "--set-root /Windows.iso"

insmod memdisk

linux16 /boot/memdisk iso

initrd16 /Windows.iso

}
Образ Windows должен лежать в корне одного из разделов и называться Windows.iso, дальше команда search автоматически найдет этот раздел и установит его в качестве корня. Потом останется только загрузка windows с iso образа grub.
Завершение настройки Grub
Мы все подготовили, теперь остается обновить конфигурацию загрузчика Grub, чтобы новые пункты добавились в /boot/grub/grub.cfg и появились в меню загрузки. Для Ubuntu команда будет выглядеть вот так:
sudo update-grub
В других дистрибутивах может понадобится команда:
sudo grub-mkconfig -o /boot/grub/grub.cfg
Затем можно перезагрузиться и посмотреть что получилось:
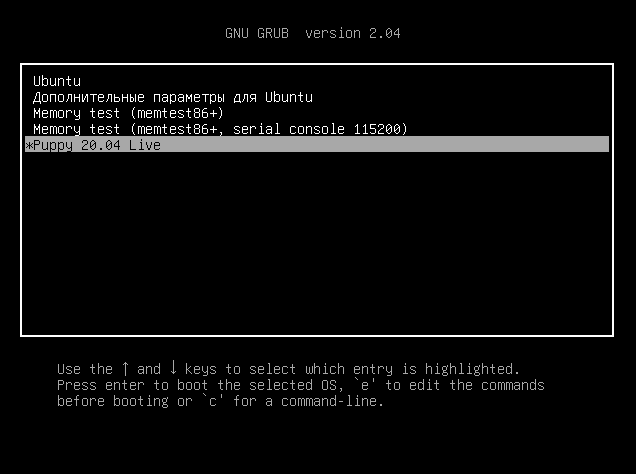
Если что-то пошло не так, вы можете нажать клавишу E и редактировать этот пункт меню чтобы попытаться исправить проблему прямо в загрузчике.
Выводы
Теперь вы знаете как выполняется загрузка iso образа grub, здесь нет ничего сложного, но зато это очень полезная возможность получить несколько систем на своем компьютере, затратив при этом минимум памяти и времени на их установки. Если у вас остались вопросы, спрашивайте в комментариях!

Статья распространяется под лицензией Creative Commons ShareAlike 4.0 при копировании материала ссылка на источник обязательна .
Если grub не принципиален и хочется простоты работы с установочными образами, рекомендую обратить внимание на Ventoy для того чтобы создать загрузочную флешку, необходимо всего лишь установить программу на флешку и скопировать обычным способом ISO образы на эту флешку, работает с разными системами.

Компромиссное решение
Для наиболее полного ответа проделал эксперимент.
К сожалению 32gb флешки не было под рукой, но хватило и 8gb
C помощью GParted разбил ее на 3 раздела:

На второй раздел обычным способом скопировал файлы из iso (win10) Третий оставил пустым так как предположил если сработает со вторым то и с третьим заработает (по принципу индукции).
На первый раздел установил grub, у меня в системе он второй версии поэтому соответственно устанавливал ее:
- смонтровал первый раздел
mkdir /mnt/USB && mount /dev/sdb1 /mnt/USB
- поставил:
grub-install --force --removable --no-floppy --target=i386-pc --boot-directory=/mnt/USB/boot /dev/sdb
- скачал конфиг:
cd /mnt/USB/boot/grub
wget pendrivelinux.com/downloads/multibootlinux/grub.cfg
- внес изменения
# This Menu entry brought to you courtesy of https://www.pendrivelinux.com/boot-multiple-iso-from-usb-via-grub2-using-linux/

set timeout=60
set default=0

menuentry "Windows 10" {
    insmod part_msdos
    insmod ntfs
    insmod ntldr
    set root='hd0,msdos2'
    ntldr ($root)/bootmgr
}

menuentry "Reboot" {
    reboot
}
menuentry "Shut Down" {
    halt
}
Значение для рута получил командой search -u UUID из под grub, для этого после загрузки с флешки можно нажать c после чего появится ожидание ввода команд grub> где и следует ввести комманду поиска.
Сам UUID глянул в GParted:

Таким образом распаковывая iso в разные разделы и находя их по UUID можно создать флешку с разными версиями Windows.
На заключительном этапе очень помог kvm, устанавливал так для KDE:
sudo apt-get install qemu-kvm
Для теста под linux достаточно ввести команду:
sudo kvm -boot c -drive file=/dev/sdb,cache=none -m 1024
Опция -m 1024 отвечает за оперативку, меньше делать не стоит, лучше больше.
В финале я добрался до приветствия, пришлось подождать минут 10.

Наверняка почти у каждого пользователя ОС Linux и ОС Windows, а я имею в виду именно тех, у кого, в силу ряда причин, установлены обе системы, время от времени возникал вопрос: «А нельзя ли, черт возьми, придумать способ, с помощью которого можно было бы устанавливать эти системы в произвольном порядке? Без порчи настроек загрузчика?» Ведь если ставим сначала Windows а потом Linux всё хорошо — линуксовый загрузчик (например GRUB) обычно подхватывает bootmgr. Если ставить в обратном порядке то увы. Даже с использованием GPT + EFI. В случае с EFI нет опасности перезаписи MBR, зато таки есть один нюанс, который лично мне не нравится — установщик Windows в режиме EFI хоть и не перезаписывает сектора диска своим кодом, но зато переопределяет NVRAM, подсовывая туда путь к своему загрузчику. Так что функционал GBUB всё равно приходится восстанавливать. В настройках штатного установщика нет опций для кастомизации процесса установки загрузчика. А что если… не использовать стандартный установщик?! Ну, или почти не использовать…

И такой способ есть. И основан он на технологии установки Windows, которую мы имеем в её дистрибутивах начиная с «семерки». Способ работает для случая Windows версий 7/8/8.1/10, как в случае с MBR + BIOS системы, так в случае с EFI + GPT. Установить систему можно как в раздел HDD, так и на VHD. При этом функционал установщика нужен нам в общем-то для запуска программы настройки BCD-хранилища конфигурации загрузчика. Вместо установочного диска можно использовать загрузочный носитель на основе WinPE. Если бы утилитам bcdedit.exe и BootICE была *nix альтернатива, весь процесс развертывания системы можно было бы вообще выполнить в среде Linux.
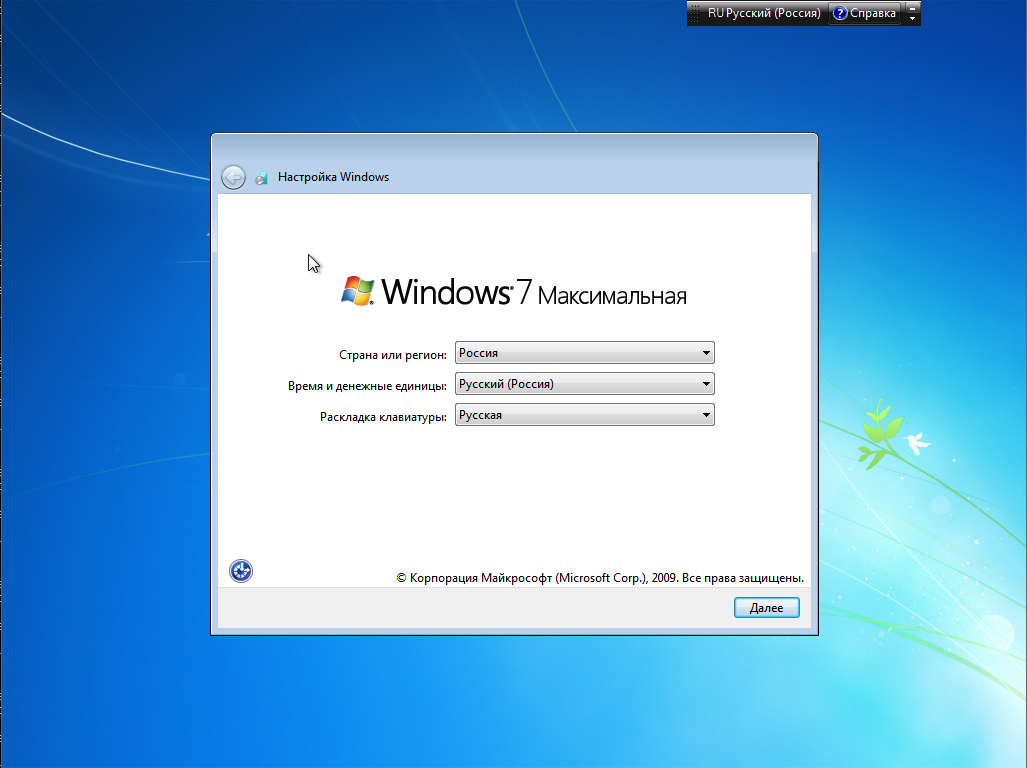
Предположим у вас имеется компьютер, с установленным на HDD загрузчиком GRUB2 и свободным разделом, отформатированном в NTFS. Устанавливать будем Windows 7 Ultimate SP1. Для этого потребуются:
- Установочный диск с виндой
- Чистая флешка объемом >= 4 Gb
- Архиватор 7-zip соответствующей разрядности
- Утилита BootICE, желательна, но совершенно не обязательна, можно обойтись и bcdedit.exe, входящим в дистрибутив винды
1. Создаем загрузочную флешку
Дело в том, что семерка не хочет устанавливаться в EFI-режиме с DVD. Вот не хочет и всё. К тому же, на установочном носителе нам понадобятся дополнительные утилиты, которые туда надо поместить, а в случае с флешкой это несколько проще, чем в случае с DVD.
Монтируем установочный образ с виндой, допустим он лежит у нас в /home/$USER/install с именем win7-setup.iso
$ mkdir ~/iso

$ sudo mount -t udf ~/install/win7-setup.iso ~/iso
Вставляем флешку в USB-порт. Допустим, она получила имя устройства /dev/sdb. Выполним её разметку в формате MBR
$ sudo fdisk /dev/sdb
Создем на флешке один единственный раздел. После чего форматируем её в FAT
$ sudo mkfs.vfat /dev/sdb1
Копируем содержимое дистрибутива винды на флешку
$ mkdir /tmp/flash

$ sudo mount /dev/sdb1 /tmp/flash -o uid=1000,gid=100,fmask=113,dmask=002

$ cp -rv ~/iso/* /tmp/flash/
Скопируем конфиги EFI-загрузчика на уровень выше
$ cp -rv ~/tmp/flash/efi/microsoft/* ~/tmp/flash/efi/
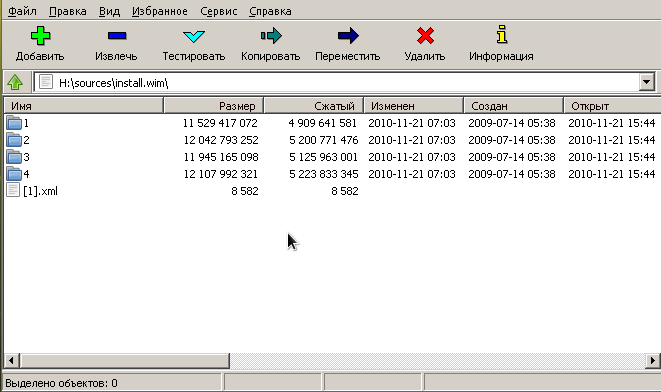
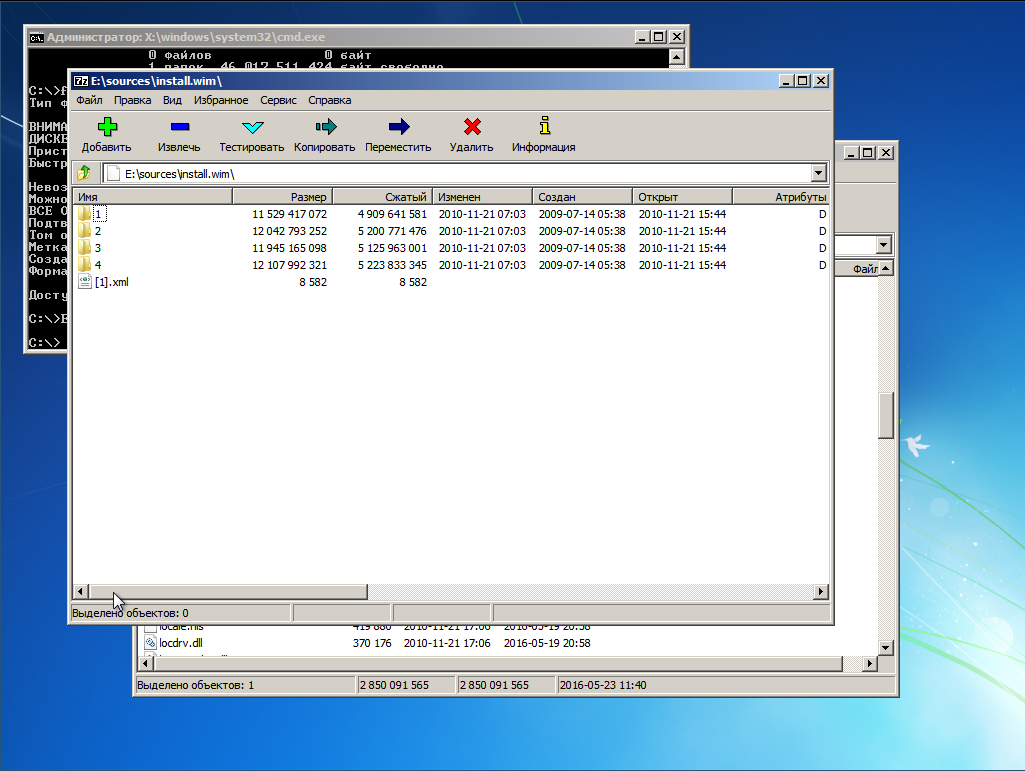
Теперь нам нужен EFI-загрузчик винды. Его придется выцарапать из дистрибутива. Это легко сделать с помощью архиватора 7-zip, который имеется в репозитории extra/p7zip. Все содержимое дистрибутива винды сжато в образ wim-формата находится на установочном DVD в файле source/install.wim. Обычно этот образ имеет следующую структуру

В каталогах с именами в виде цифр 1-4 находятся разные редакции винды. Чтобы выбрать нужную надо посмотреть внутрь файла с именем [1].xml. Распакуем его в /tmp
$ cd /tmp

$ 7z e ~/iso/sources/install.wim [1].xml
и посмотрим с помощью какого-нибудь браузера, ибо в текстовом редакторе он выглядит ужасно, а специального редактора xml у меня в наличии не оказалось. Каждую редакцию винды описывают структурой вида

где нода EDITIONID указывает на редакцию. Параметр INDEX — как раз номер каталога, в котором валяется нужная редакция. Итак, мне нужна Ultimate, а это индекс 4. Соответсвенно выковыриваем загрузчик оттуда
$ 7z e ~/iso/sources/install.wim 4/Windows/Boot/EFI/bootmgfw.efi
Оки, теперь перенесем полученный файл на флешку
$ mv bootmgfwm.efi /tmp/flash/efi/boot/bootx64.efi
Порядок, теперь у нас в наличии загрузочная флешка для установки винды. Теперь добавим на неё необходимые для установки утилиты — виндозную версию архиватора 7-zip и утилиту BootICE. Архиватор качаем с официального сайта и распаковываем на флешку в каталог utils
$ mkdir -p /tmp/flash/utils/7-Zip/

$ cd /tmp/flash/utils/7-Zip/

$ 7z x ~/downloads/7z1602-x64.exe
Туда же помещаем и bootice
$ cp ~/install/BOOTICEx64.exe /tmp/flash/utils
Уф, всё, отмонтируем флешку
$ cd ~

$ sudo umount /tmp/flash/
Перезагружаемся. Если у вас система с EFI и съемные диски стоят в приоритете загрузки, то компьютер загрузится в установку винды автоматом. Если же появилось таки меню GRUB, ничего страшного, жмем «С» и в консоли набиваем команду exit. Вас вывалит в меню EFI, где выбираем загрузку с флешки. Если же ваша система с BIOS, то тут чуть сложнее, ибо мы не стали заморачиваться с настройкой MBR на флешке. Тогда в консоли GRUB даем команду ls — появится список всех дисков и разделов. Находим нашу флешку, она отобразится в виде (hdX, msdosY), где X, Y — номер диска и раздела соответственно. Теперь вбиваем в консоли команды
grub> set root=hdX,Y

grub> ntldr /bootmgr

grub> boot
Начнется загрузка установщика винды. Он то загрузится, но нам он и не нужен — мы всё будем делать руками. Чтобы стало понятно, что к чему, придется рассмотреть некоторую теорию
2. О развертывании Windows из WIM-образа и капризном нраве Sysprep
Начиная с семерки установка Windows заключается в следующих этапах
- Разметка диска в соответствии с архитектурой системы инициализации оборудования. Если BIOS — установщик размечает диск в MBR. При наличии активной EFI — разметка будет GPT.
- Распаковка образа install.wim в выбранный для установки раздел
- Установка загрузчика и перезагрузка
- Инициализация оборудования. Ребут
- Локализация, ввод ключа, окончание настройки системы
Это стандартный путь. У нас же диск уже размечен. И нам не нужна автоматическая установка загрузчика — мы поставим его вручную. Разметка диска должна удовлетворять следующим требованиям
- Если система с EFI на диске должен присутствовать FAT-раздел с типом 0xEF. Если у нас уже установлен линукс с EFI-загрузчиком, то таковой раздел уже имеется
- Если система с BIOS, то раздел, в котором располагается загрузчик, а это наш NTFS-раздел должен быть активным. Это очень важно! Почему, будет объяснено ниже.
Таким образом, перед распаковкой системы мы должны убедится в том, что перечисленные требования выполнены. После того, как мы распакуем все файл системы и установим загрузчик, система перезагрузиться. После перезагрузки запустится утилита Sysprep, среди прочего настраивающая оборудования и проверяющая конфигурацию системы. Так вот, если в режиме EFI Sysprep не найдет загрузчик и его конфигурацию в EFI-разделе по пути EFI/microsof/boot, а в системе с BIOS каталог Boot и bootmgr будут лежать в неактивном разделе, то Sysprep завершится с ошибкой sysprep generalize error, а в лог, расположенный по адресу WindowsPanthersysperr.log выплюнет что-то похожее на
2015-03-11 16:55:42, Error [0x0e00b3] TOOL Sysprep_Specialize_Bcd: There was an error opening the system store. Status=[0xC0000098]

2015-03-11 16:55:42, Error [0x0f0082] SYSPRP LaunchDll:Failure occurred while executing 'c:WindowsSystem32spbcd.dll,Sysprep_Specialize_Bcd', returned error code 1006

2015-03-11 16:55:42, Error [0x060435] IBS Callback_Specialize: An error occurred while either deciding if we need to specialize or while specializing; dwRet = 0x3ee
и никакие танцы с бубном нам уже не помогут. Винда требует, чтобы загручик лежал в загрузочном разделе и точка. В случае с BIOS просто делаем активным раздел NTFS в котором лежит винда и туда же кладем и загрузчик. Грузится будем всё равно с помощью GRUB, а ему все равно, какой раздел будет активным. В случае с EFI загрузчик придется положить рядом с GRUB в EFI-разделе.
3. Распаковка системы
Итак, определимся, куда мы хотим ставить винду. Можно поставить в NTFS-раздел, а можно и в VHD-диск. Это уж как вам хочется. Я буду показывать процесс на примере с виртуальной машиной EFI, имеющей следующую разметку
The protective MBR's 0xEE partition is oversized! Auto-repairing.
Partition table scan:
MBR: protective
BSD: not present
APM: not present
GPT: present
Found valid GPT with protective MBR; using GPT.
Command (? for help): p
Disk /dev/loop1: 104857600 sectors, 50.0 GiB
Logical sector size: 512 bytes
Disk identifier (GUID): 0D217C93-6699-435A-9BBB-61DFAA6F30B7
Partition table holds up to 128 entries
First usable sector is 34, last usable sector is 104857566
Partitions will be aligned on 2048-sector boundaries
Total free space is 4029 sectors (2.0 MiB)
Number Start (sector) End (sector) Size Code Name
1 2048 206847 100.0 MiB EF00 EFI system partition
2 206848 104855551 49.9 GiB 0700 Basic data partition
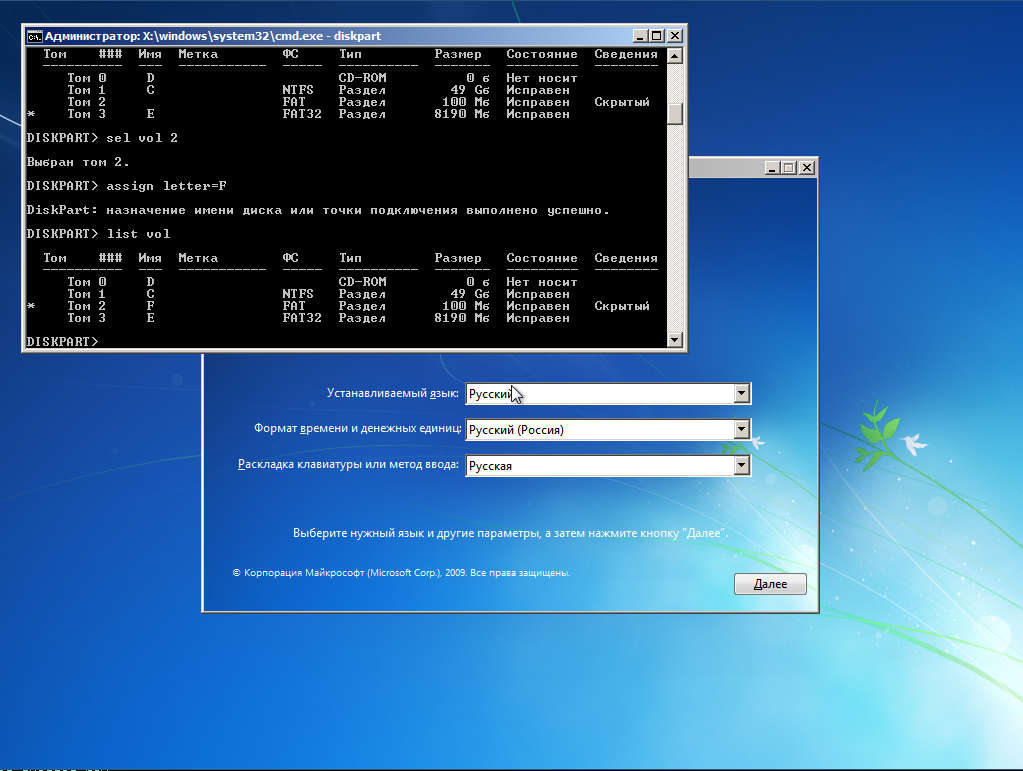
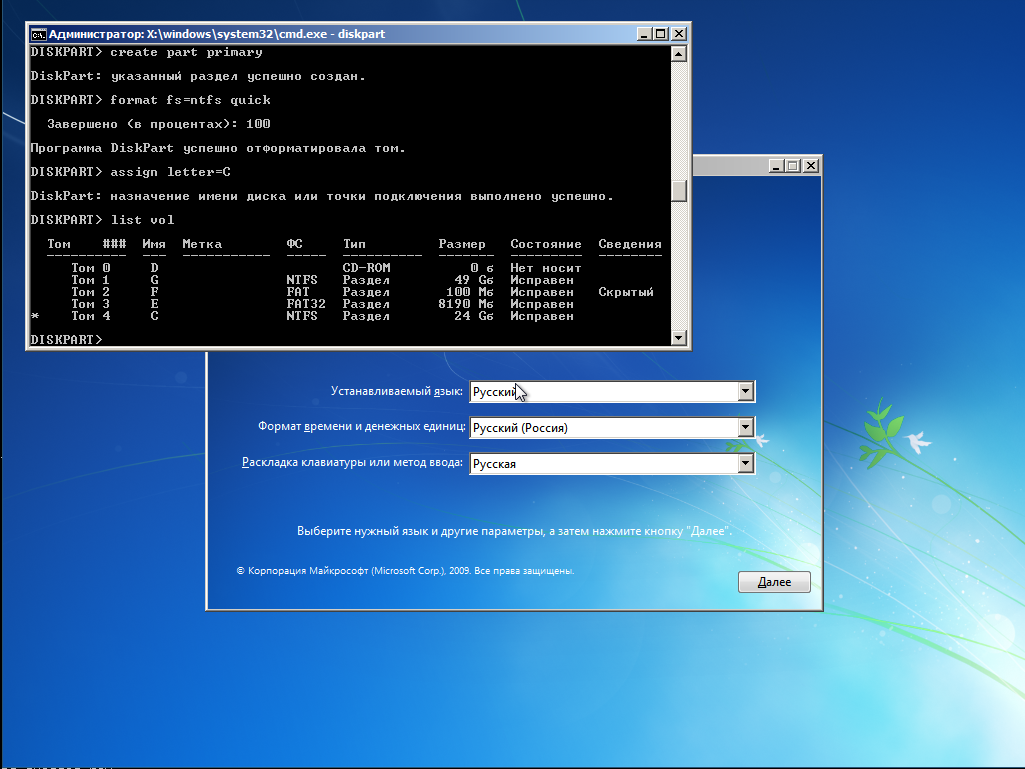
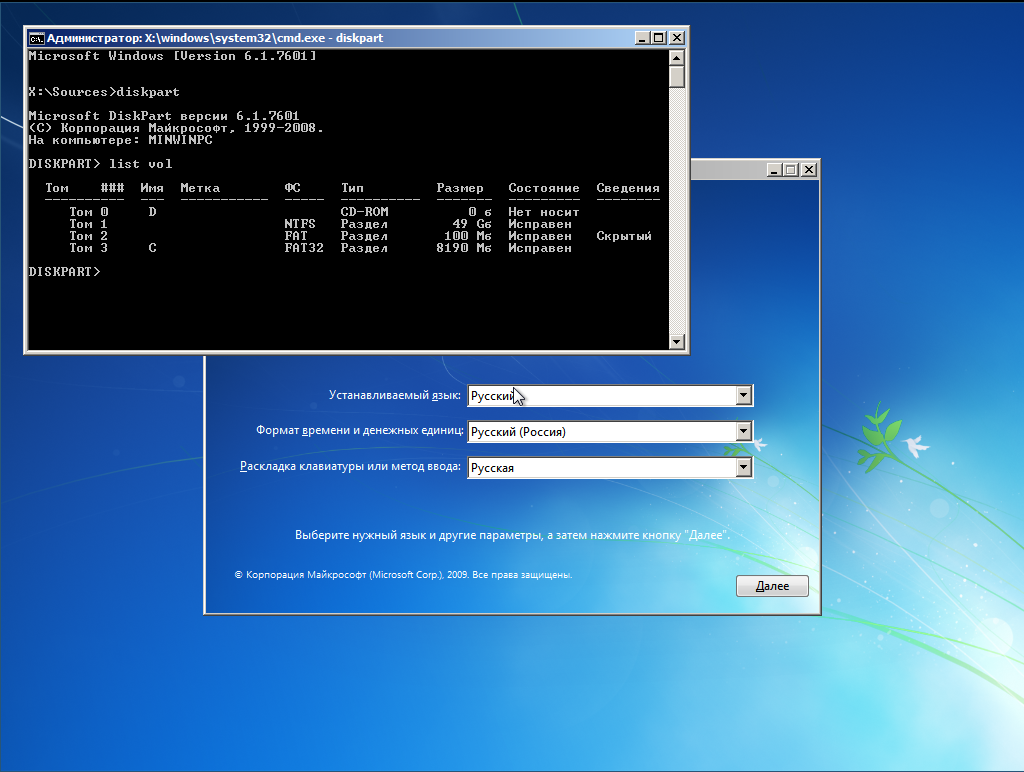
На этом диске нет линукса, установлен только GRUB в раздел с EFI. Если мы ставим систему непосредственно в NTFS-раздел, то загружаемся с флешки, дожидаемся запуска программы установки и жмем Shift + F10, чтобы вызвать консоль. Запускаем утилиту diskpart и смотрим список подключенных томов
X:sources> diskpart

DISKPART> list vol

Видим, что флешка (объемом 8 Гб) подключена как диск C:, а раздел для установки вовсе не смонтирован. Непорядок. Делаем так
DISKPART> sel vol 3

DISKPART> remove

DISKPART> assign letter=E

DISKPART> sel vol 1

DISKPART> assign letter=C

DISKPART> list vol

DISKPART> sel vol 2

DISKPART> assign letter=F
Вот теперь порядок, диск на который будем ставить винду стал диском C:, флешка — диском E:, а EFI-раздел — диском F:
Если же мы хотим поставить систему на VHD, то делаем так
DISKPART> sel vol 3

DISKPART> remove

DISKPART> assign letter=E

DISKPART> sel vol 1

DISKPART> assign letter=G

DISKPART> exit
Для порядка создаем каталог с образами
X:sources> md G:vhd

X:sources> diskpart
Создаем виртуальный диск, создаем на нем разметку GPT и раздел NTFS и монтируем его к C:
DISKPART> create vdisk file="G:vhdwin7.vhd" maximum=25600 type=fixed

DISKPART> attach vdisk

DISKPART> clean

DISKPART> convert gpt

DISKPART> create part primary

DISKPART> format fs=ntfs quick

DISKPART> assign letter=C
EFI-раздел монтируем к F:
DISKPART> sel vol 2

DISKPART> assign letter=F
Получаем такую картину
Очень важно! Убеждаемся в том, что EFI-раздел отформатирован именно в FAT, а не в FAT32. Иначе Sysprep не простит нам этой ошибки. Если на компе уже есть линукс, то настройки будут верны.
Теперь распаковываем дистрибутив на диск C:
X:sources> E:

E:> utils7-Zip7zFM.exe
Откроется GUI архиватора 7-zip. В нем открываем каталог E:sources, находим там файл install.wim

Правой кнопкой на этом файле вызываем контектстное меню и переходим по 7-zip -> Открыть архив. Появится содержимое образа.

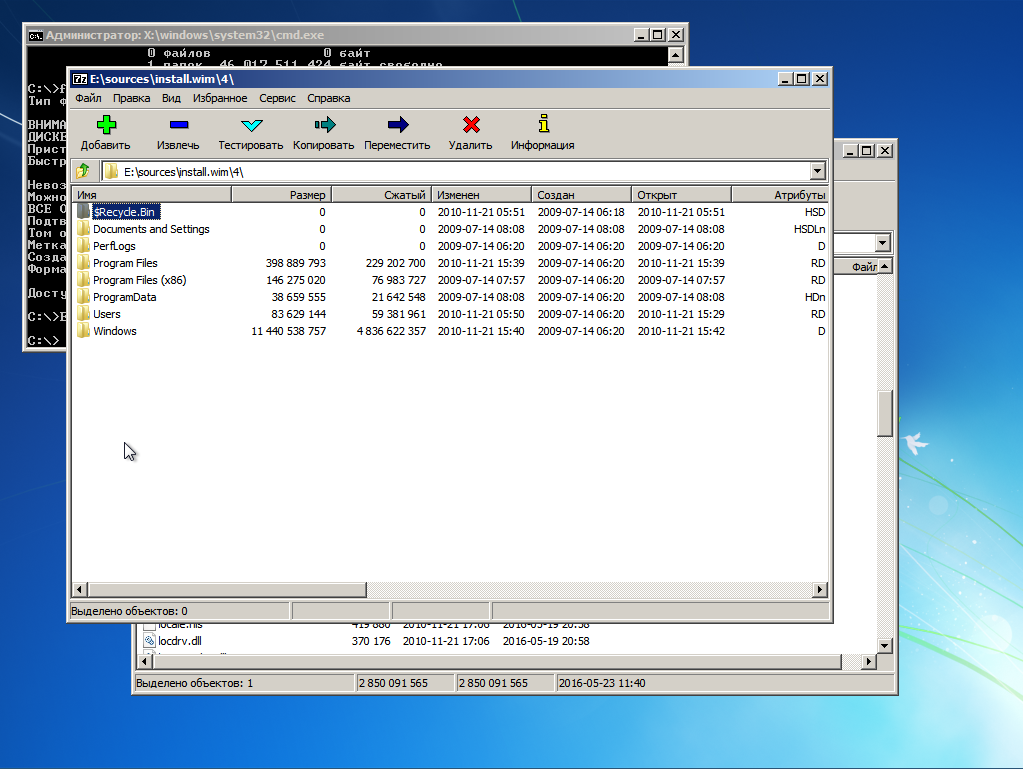
Лезем в папку 4 — там лежит Ultimate

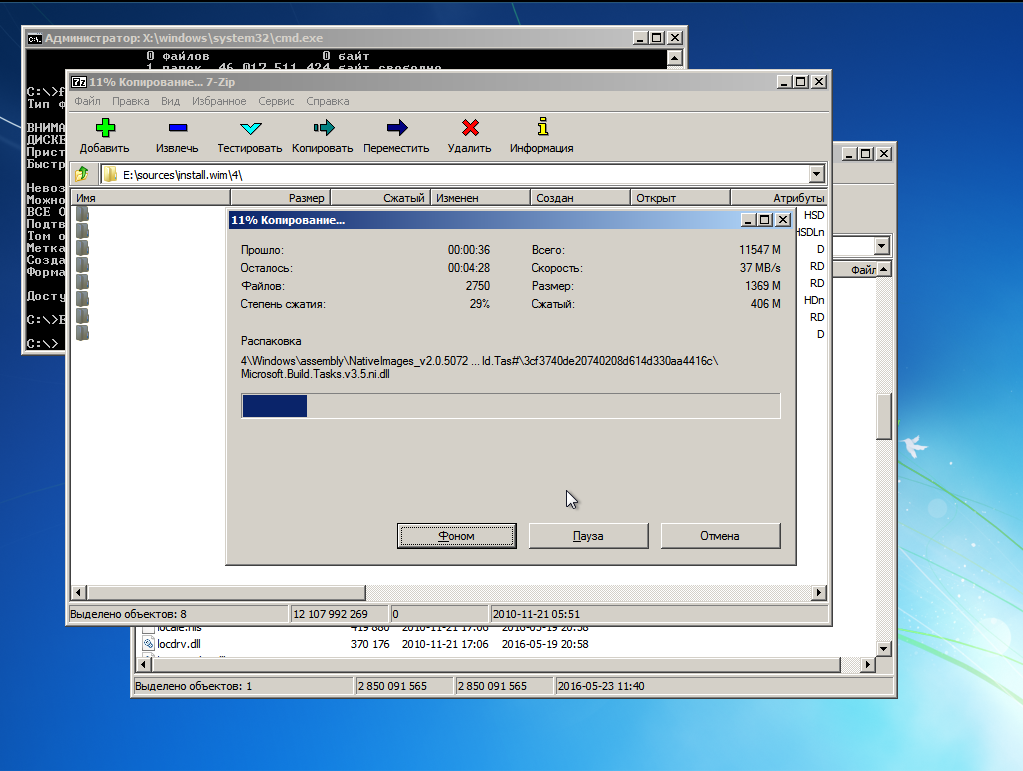
Выделяем всё Ctrl + A и жмем кнопку «Извлечь». Появится окно, где нам предложат указать путь распаковки
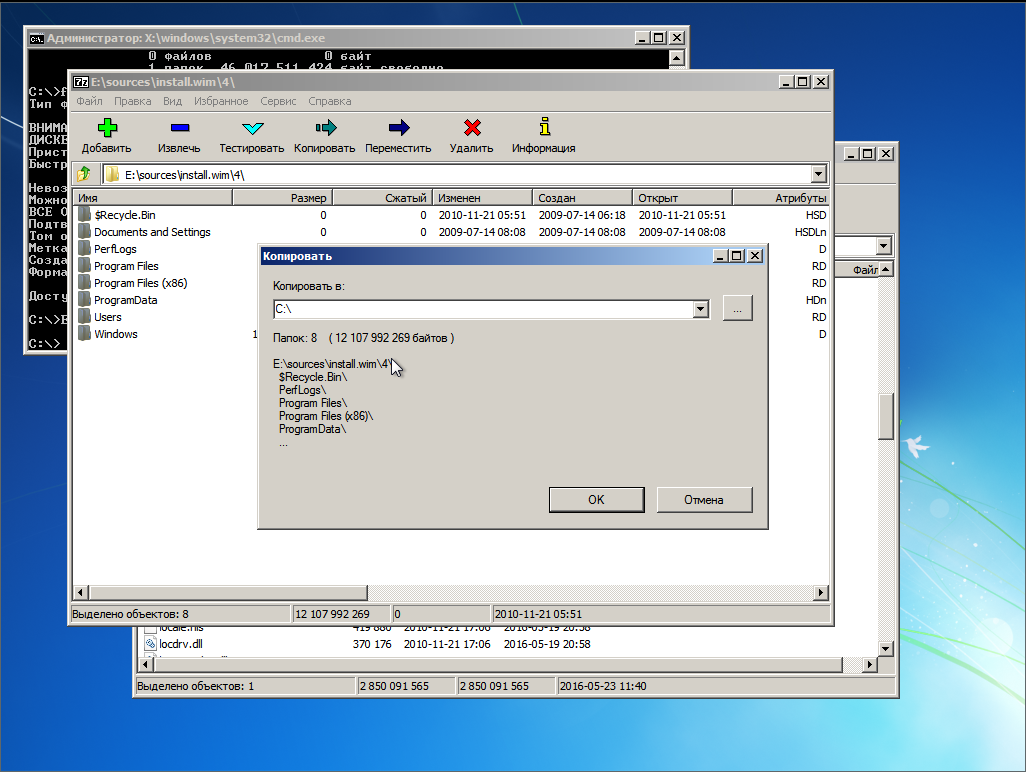
Указываем корень диска C: и жмем ОК.

Ну и теперь, как говорится: «Откиньтесь на спинку кресла и…»
4. Установка и настройка загрузчика
Итак, после некоторого время ожидания распаковка окончена. И вот тут, вот в этом месте винда обчно делает бяку, а именно портит MBR или перенастраивает NVRAM. Но мы не дадим ей этого сделать — мы установим загрузчик вручную.
В случае с EFI, переходим на раздел EFI, смонтированный к F: и создаем необходимые пути и копируем файлы загрузчика
E:> F:

F:> mkdir EFImicrosoftboot

F:> xcopy C:WindowsBootEFI* F:EFImicrosoftboot /s /e

F:> mkdir EFImicrosoftbootFonts

F:> xcopy C:WindowsBootFonts* F:EFImicrosoftbootFonts /s /e

F:> copy C:WindowsSystem32configBCD-Template F:EFImicrosoftbootBCD
Отлично, загрузчик скопирован. Теперь настроим его
F:> E:utilsBOOTICEx64.exe
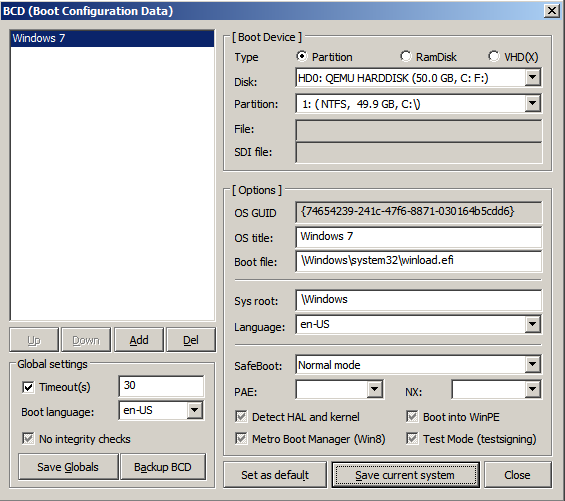
Открываем файл F:EFIMicrosoftBootBCD. В случае установки на раздел, его параметры задаются так
Если же мы устанавливали систему на VHD, то настройки будут такими
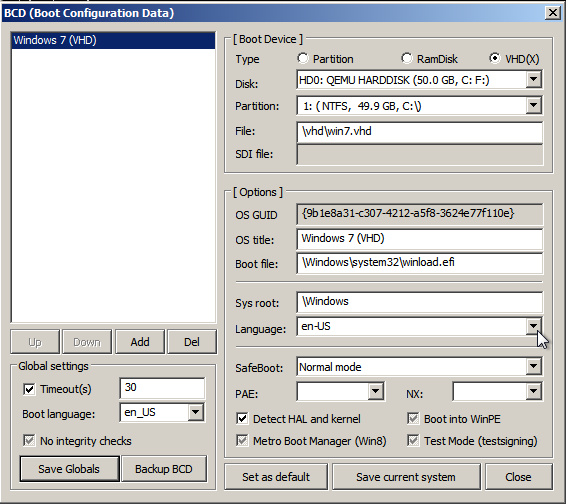
Важно! Имя вторичного загрузчика для EFI-системы winload.efi, для BIOS-системы — winload.exe.
В случае, если мы устанавливаем BIOS-систему установка загрузчика будет выглядеть так
F:> mkdir C:Boot

F:> xcopy C:WindowsBootPCAT* C:Boot /s /e

F:> mkdir C:BootFonts

F:> xcopy C:WindowsBootFonts* C:BootFonts /s /e

F:> copy C:Bootbootmgr C:bootmgr

F:> copy C:WindowsSystem32configBCD-Template C:BootBCD
Важно! Раздел, смонтированный к C: (там где размещен загрузчик) обязан быть активным! Убедитесь в этом перед перезагрузкой!
Настройку выполняем так же точно, используя BootICE.
Ну, вроде все. Закрываем все окна и идем в ребут. Флешку можно вытащить из компа.
5. Скрестим пальцы да вознесем молитвы тебе, о Великий и Ужасный Sysprep…!
GRUB у нас еще не настроен пункта для винды в меню нет. Как только появится меню GRUB жмем «C». В консоли набираем
grub> set root=hdX,Y

grub> chainloader /EFI/Microsoft/Boot/bootmgfw.efi

grub> boot
X, Y — соответственно диск и раздел, где лежит загрузчик. Это в случае EFI. В случае с BIOS делаем так
grub> set root=hdX,Y

grub> ntldr /bootmgr

grub> boot
X, Y — диск и раздел с NTFS. Там где распакована винда и лежит её загрузчик.
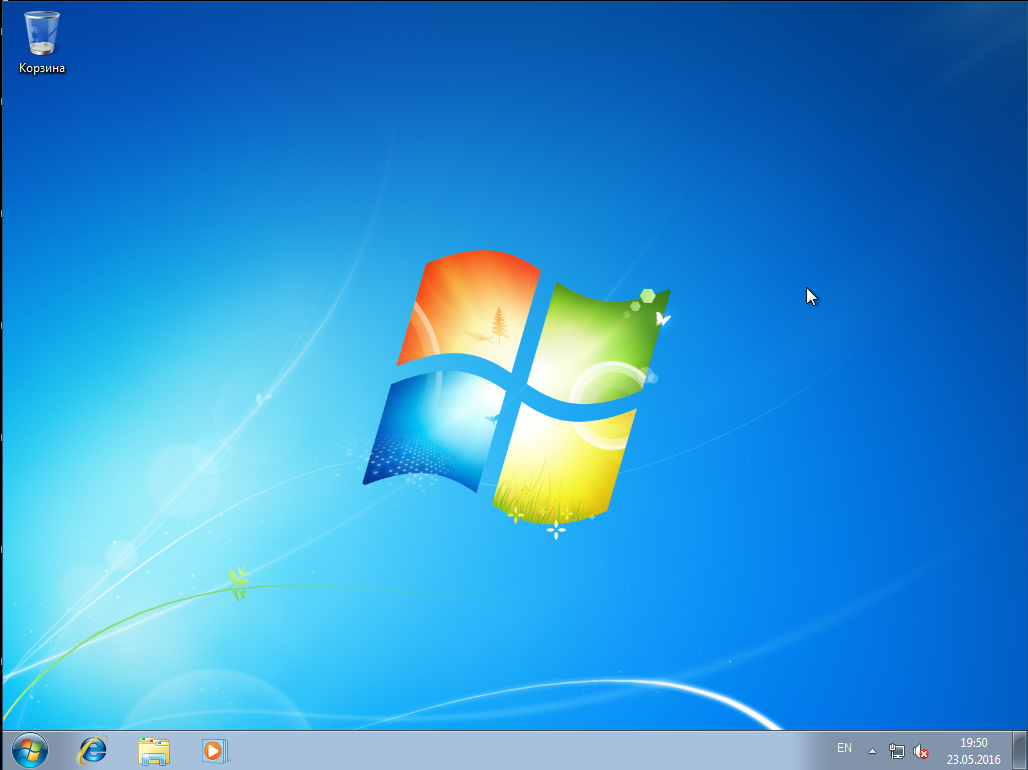
В режиме EFI вместо логотипа винды я увидел черный экран, так как не нашел в дистрибутиве билиотеки bootres.dll, которую надо поместить в папку EFIMictosoftBootResourses. В случае с BIOS всё в порядке — знакомая эмблема «семерки». А потом в обоих случаях увидим это

Это работает Sysprep. На 57% моргнет экран — настраивается видяха. И если мы все сделали верно, то надпись «Применение параметров системы» повисит довольно долго, потом система сообщит, что установка будет продолжена после перезагрузки. Если мы где-то напортачили с установкой загрузчика — неправильный EFI раздел или неактивный NTFS, то тогда будет ошибка  Но мы молодцы и у нас все получится, и после очередной перезагрузки мы увидим это

а потом, наконец вот это
Дальше все как при обычной, штатной установке.
6. Настраиваем GRUB
Обратили внимание на то, что каждый раз мы грузим систему из консоли GRUB руками. Это очень хорошо — значит ни MBR ни NVRAM не перезаписаны коварным майкрософтом. Настало время грузится в арч и добавить в меню GRUB новый пункт
menuentry 'Windows 7 Ultimate SP1 (EFI)' {
set root=hdX,Y
chainloader /EFI/Microsoft/Boot/bootmgfw.efi
}
в случае EFI. Или
menuentry 'Windows 7 Ultimate SP1' {
set root=hdX,Y
ntldr /bootmgr
}
в случае BIOS. Применяем настройки GRUB и перезагружаемся и видем систему в пункте меню загрузки
после выбора которого получаем загруженную Windows

Заключение
Упреждая гнев профессиональных win-админов, скажу сразу — я знаю о DISM. Именно информация об этой системе и привела меня к описанному решению. Цель была одна — выяснить сколько нужно возможностей собственно Windows для установки Windows.
Оказалось вот что — для установки Windows её среда необходима только для одного — настройки BCD-хранилища. Всё. Остальное можно сделать из среды любой другой операционной системы.
Если написать аналог bcdedit.exe под Linux, то установить Windows можно будет с линуксового Live-носителя.
Booting Windows XP with grub4dos
Booting the actual ISO with grub legacy or grub2 won’t work, but with older windows versions (i.e. XP) it is possible to unpack the i386 folder from the ISO to the USB stick, and then use grub4dos to call the bootloader:
title windows installer via setupldr.bin
find --set-root /i386/setupldr.bin
chainloader /i386/setupldr.bin
or
title windows installer via /bootsect.bin
find --set-root /i386/setupldr.bin
chainloader /bootsect.bin
This might not work with newer windows versions or with newer hardware but there is also the option of..
Booting Windows 7 with grub2
With grub2 apparently something like this could work for Windows 7:
menuentry "Windows 7 (bootmgr)" --class windows --class os {
    insmod part_msdos
    insmod ntfs
    insmod ntldr
    ### A: either use this line or the next one, but not both
    set root='(hd0,msdos1)'
    ### B:
    ### search --no-floppy --set=root --fs-uuid ____INSERT_PARTITION_UUID_HERE___
    ntldr ($root)/bootmgr
}
Option A assumes your bootable USB stick/HDD is the first device and has a msdos style partition table. Adjust to match your configuration. If your boot device has a GPT partition table, then most likely you’ll need to use (hd0,gpt1) (GPT in general is trickier to set up).
Option B uses the drive’s unique UUID, which can be seen on Linux with sudo blkid or on OSX with e.g. diskutil info disk0s1 (or Disk Utility > Info).
The final entry might look for example like this:
menuentry "Windows 7 installer" --class windows --class os {
    insmod part_msdos
    insmod ntfs
    insmod ntldr
    search --no-floppy --set=root --fs-uuid 0E239BC6-F960-3107-89CF-1C97F78BB46B
    ntldr /bootmgr
}
Системное администрирование
Рекомендация: подборка платных и бесплатных курсов монтажа видео — https://katalog-kursov.ru/
Наверняка почти у каждого пользователя ОС Linux и ОС Windows, а я имею в виду именно тех, у кого, в силу ряда причин, установлены обе системы, время от времени возникал вопрос: «А нельзя ли, черт возьми, придумать способ, с помощью которого можно было бы устанавливать эти системы в произвольном порядке? Без порчи настроек загрузчика?» Ведь если ставим сначала Windows а потом Linux всё хорошо — линуксовый загрузчик (например GRUB) обычно подхватывает bootmgr. Если ставить в обратном порядке то увы. Даже с использованием GPT + EFI. В случае с EFI нет опасности перезаписи MBR, зато таки есть один нюанс, который лично мне не нравится — установщик Windows в режиме EFI хоть и не перезаписывает сектора диска своим кодом, но зато переопределяет NVRAM, подсовывая туда путь к своему загрузчику. Так что функционал GBUB всё равно приходится восстанавливать. В настройках штатного установщика нет опций для кастомизации процесса установки загрузчика. А что если… не использовать стандартный установщик?! Ну, или почти не использовать…

И такой способ есть. И основан он на технологии установки Windows, которую мы имеем в её дистрибутивах начиная с «семерки». Способ работает для случая Windows версий 7/8/8.1/10, как в случае с MBR + BIOS системы, так в случае с EFI + GPT. Установить систему можно как в раздел HDD, так и на VHD. При этом функционал установщика нужен нам в общем-то для запуска программы настройки BCD-хранилища конфигурации загрузчика. Вместо установочного диска можно использовать загрузочный носитель на основе WinPE. Если бы утилитам bcdedit.exe и BootICE была *nix альтернатива, весь процесс развертывания системы можно было бы вообще выполнить в среде Linux.
Предположим у вас имеется компьютер, с установленным на HDD загрузчиком GRUB2 и свободным разделом, отформатированном в NTFS. Устанавливать будем Windows 7 Ultimate SP1. Для этого потребуются:
- Установочный диск с виндой
- Чистая флешка объемом >= 4 Gb
- Архиватор 7-zip соответствующей разрядности
- Утилита BootICE, желательна, но совершенно не обязательна, можно обойтись и bcdedit.exe, входящим в дистрибутив винды
1. Создаем загрузочную флешку
Дело в том, что семерка не хочет устанавливаться в EFI-режиме с DVD. Вот не хочет и всё. К тому же, на установочном носителе нам понадобятся дополнительные утилиты, которые туда надо поместить, а в случае с флешкой это несколько проще, чем в случае с DVD.
Монтируем установочный образ с виндой, допустим он лежит у нас в /home/$USER/install с именем win7-setup.iso
$ mkdir ~/iso

$ sudo mount -t udf ~/install/win7-setup.iso ~/iso
Вставляем флешку в USB-порт. Допустим, она получила имя устройства /dev/sdb. Выполним её разметку в формате MBR
$ sudo fdisk /dev/sdb
Создем на флешке один единственный раздел. После чего форматируем её в FAT
$ sudo mkfs.vfat /dev/sdb1
Копируем содержимое дистрибутива винды на флешку
$ mkdir /tmp/flash

$ sudo mount /dev/sdb1 /tmp/flash -o uid=1000,gid=100,fmask=113,dmask=002

$ cp -rv ~/iso/* /tmp/flash/
Скопируем конфиги EFI-загрузчика на уровень выше
$ cp -rv ~/tmp/flash/efi/microsoft/* ~/tmp/flash/efi/
Теперь нам нужен EFI-загрузчик винды. Его придется выцарапать из дистрибутива. Это легко сделать с помощью архиватора 7-zip, который имеется в репозитории extra/p7zip. Все содержимое дистрибутива винды сжато в образ wim-формата находится на установочном DVD в файле source/install.wim. Обычно этот образ имеет следующую структуру
В каталогах с именами в виде цифр 1-4 находятся разные редакции винды. Чтобы выбрать нужную надо посмотреть внутрь файла с именем [1].xml. Распакуем его в /tmp
$ cd /tmp

$ 7z e ~/iso/sources/install.wim [1].xml
и посмотрим с помощью какого-нибудь браузера, ибо в текстовом редакторе он выглядит ужасно, а специального редактора xml у меня в наличии не оказалось. Каждую редакцию винды описывают структурой вида

где нода EDITIONID указывает на редакцию. Параметр INDEX — как раз номер каталога, в котором валяется нужная редакция. Итак, мне нужна Ultimate, а это индекс 4. Соответсвенно выковыриваем загрузчик оттуда
$ 7z e ~/iso/sources/install.wim 4/Windows/Boot/EFI/bootmgfw.efi
Оки, теперь перенесем полученный файл на флешку
$ mv bootmgfwm.efi /tmp/flash/efi/boot/bootx64.efi
Порядок, теперь у нас в наличии загрузочная флешка для установки винды. Теперь добавим на неё необходимые для установки утилиты — виндозную версию архиватора 7-zip и утилиту BootICE. Архиватор качаем с официального сайта и распаковываем на флешку в каталог utils
$ mkdir -p /tmp/flash/utils/7-Zip/

$ cd /tmp/flash/utils/7-Zip/

$ 7z x ~/downloads/7z1602-x64.exe
Туда же помещаем и bootice
$ cp ~/install/BOOTICEx64.exe /tmp/flash/utils
Уф, всё, отмонтируем флешку
$ cd ~

$ sudo umount /tmp/flash/
Перезагружаемся. Если у вас система с EFI и съемные диски стоят в приоритете загрузки, то компьютер загрузится в установку винды автоматом. Если же появилось таки меню GRUB, ничего страшного, жмем «С» и в консоли набиваем команду exit. Вас вывалит в меню EFI, где выбираем загрузку с флешки. Если же ваша система с BIOS, то тут чуть сложнее, ибо мы не стали заморачиваться с настройкой MBR на флешке. Тогда в консоли GRUB даем команду ls — появится список всех дисков и разделов. Находим нашу флешку, она отобразится в виде (hdX, msdosY), где X, Y — номер диска и раздела соответственно. Теперь вбиваем в консоли команды
grub> set root=hdX,Y

grub> ntldr /bootmgr

grub> boot
Начнется загрузка установщика винды. Он то загрузится, но нам он и не нужен — мы всё будем делать руками. Чтобы стало понятно, что к чему, придется рассмотреть некоторую теорию
2. О развертывании Windows из WIM-образа и капризном нраве Sysprep
Начиная с семерки установка Windows заключается в следующих этапах
- Разметка диска в соответствии с архитектурой системы инициализации оборудования. Если BIOS — установщик размечает диск в MBR. При наличии активной EFI — разметка будет GPT.
- Распаковка образа install.wim в выбранный для установки раздел
- Установка загрузчика и перезагрузка
- Инициализация оборудования. Ребут
- Локализация, ввод ключа, окончание настройки системы
Это стандартный путь. У нас же диск уже размечен. И нам не нужна автоматическая установка загрузчика — мы поставим его вручную. Разметка диска должна удовлетворять следующим требованиям
- Если система с EFI на диске должен присутствовать FAT-раздел с типом 0xEF. Если у нас уже установлен линукс с EFI-загрузчиком, то таковой раздел уже имеется
- Если система с BIOS, то раздел, в котором располагается загрузчик, а это наш NTFS-раздел должен быть активным. Это очень важно! Почему, будет объяснено ниже.
Таким образом, перед распаковкой системы мы должны убедится в том, что перечисленные требования выполнены. После того, как мы распакуем все файл системы и установим загрузчик, система перезагрузиться. После перезагрузки запустится утилита Sysprep, среди прочего настраивающая оборудования и проверяющая конфигурацию системы. Так вот, если в режиме EFI Sysprep не найдет загрузчик и его конфигурацию в EFI-разделе по пути EFI/microsof/boot, а в системе с BIOS каталог Boot и bootmgr будут лежать в неактивном разделе, то Sysprep завершится с ошибкой sysprep generalize error, а в лог, расположенный по адресу WindowsPanthersysperr.log выплюнет что-то похожее на
2015-03-11 16:55:42, Error [0x0e00b3] TOOL Sysprep_Specialize_Bcd: There was an error opening the system store. Status=[0xC0000098]

2015-03-11 16:55:42, Error [0x0f0082] SYSPRP LaunchDll:Failure occurred while executing 'c:WindowsSystem32spbcd.dll,Sysprep_Specialize_Bcd', returned error code 1006

2015-03-11 16:55:42, Error [0x060435] IBS Callback_Specialize: An error occurred while either deciding if we need to specialize or while specializing; dwRet = 0x3ee
и никакие танцы с бубном нам уже не помогут. Винда требует, чтобы загручик лежал в загрузочном разделе и точка. В случае с BIOS просто делаем активным раздел NTFS в котором лежит винда и туда же кладем и загрузчик. Грузится будем всё равно с помощью GRUB, а ему все равно, какой раздел будет активным. В случае с EFI загрузчик придется положить рядом с GRUB в EFI-разделе.
3. Распаковка системы
Итак, определимся, куда мы хотим ставить винду. Можно поставить в NTFS-раздел, а можно и в VHD-диск. Это уж как вам хочется. Я буду показывать процесс на примере с виртуальной машиной EFI, имеющей следующую разметку
The protective MBR's 0xEE partition is oversized! Auto-repairing.
Partition table scan:
MBR: protective
BSD: not present
APM: not present
GPT: present
Found valid GPT with protective MBR; using GPT.
Command (? for help): p
Disk /dev/loop1: 104857600 sectors, 50.0 GiB
Logical sector size: 512 bytes
Disk identifier (GUID): 0D217C93-6699-435A-9BBB-61DFAA6F30B7
Partition table holds up to 128 entries
First usable sector is 34, last usable sector is 104857566
Partitions will be aligned on 2048-sector boundaries
Total free space is 4029 sectors (2.0 MiB)
Number Start (sector) End (sector) Size Code Name
1 2048 206847 100.0 MiB EF00 EFI system partition
2 206848 104855551 49.9 GiB 0700 Basic data partition
На этом диске нет линукса, установлен только GRUB в раздел с EFI. Если мы ставим систему непосредственно в NTFS-раздел, то загружаемся с флешки, дожидаемся запуска программы установки и жмем Shift + F10, чтобы вызвать консоль. Запускаем утилиту diskpart и смотрим список подключенных томов
X:sources> diskpart

DISKPART> list vol
Видим, что флешка (объемом 8 Гб) подключена как диск C:, а раздел для установки вовсе не смонтирован. Непорядок. Делаем так
DISKPART> sel vol 3

DISKPART> remove

DISKPART> assign letter=E

DISKPART> sel vol 1

DISKPART> assign letter=C

DISKPART> list vol

DISKPART> sel vol 2

DISKPART> assign letter=F
Вот теперь порядок, диск на который будем ставить винду стал диском C:, флешка — диском E:, а EFI-раздел — диском F:

Если же мы хотим поставить систему на VHD, то делаем так
DISKPART> sel vol 3

DISKPART> remove

DISKPART> assign letter=E

DISKPART> sel vol 1

DISKPART> assign letter=G

DISKPART> exit
Для порядка создаем каталог с образами
X:sources> md G:vhd

X:sources> diskpart
Создаем виртуальный диск, создаем на нем разметку GPT и раздел NTFS и монтируем его к C:
DISKPART> create vdisk file="G:vhdwin7.vhd" maximum=25600 type=fixed

DISKPART> attach vdisk

DISKPART> clean

DISKPART> convert gpt

DISKPART> create part primary

DISKPART> format fs=ntfs quick

DISKPART> assign letter=C
EFI-раздел монтируем к F:
DISKPART> sel vol 2

DISKPART> assign letter=F
Получаем такую картину

Очень важно! Убеждаемся в том, что EFI-раздел отформатирован именно в FAT, а не в FAT32. Иначе Sysprep не простит нам этой ошибки. Если на компе уже есть линукс, то настройки будут верны.
Теперь распаковываем дистрибутив на диск C:
X:sources> E:

E:> utils7-Zip7zFM.exe
Откроется GUI архиватора 7-zip. В нем открываем каталог E:sources, находим там файл install.wim

Правой кнопкой на этом файле вызываем контектстное меню и переходим по 7-zip -> Открыть архив. Появится содержимое образа.
Лезем в папку 4 — там лежит Ultimate
Выделяем всё Ctrl + A и жмем кнопку «Извлечь». Появится окно, где нам предложат указать путь распаковки

Указываем корень диска C: и жмем ОК.
Ну и теперь, как говорится: «Откиньтесь на спинку кресла и…»
4. Установка и настройка загрузчика
Итак, после некоторого время ожидания распаковка окончена. И вот тут, вот в этом месте винда обчно делает бяку, а именно портит MBR или перенастраивает NVRAM. Но мы не дадим ей этого сделать — мы установим загрузчик вручную.
В случае с EFI, переходим на раздел EFI, смонтированный к F: и создаем необходимые пути и копируем файлы загрузчика
E:> F:

F:> mkdir EFImicrosoftboot

F:> xcopy C:WindowsBootEFI* F:EFImicrosoftboot /s /e

F:> mkdir EFImicrosoftbootFonts

F:> xcopy C:WindowsBootFonts* F:EFImicrosoftbootFonts /s /e

F:> copy C:WindowsSystem32configBCD-Template F:EFImicrosoftbootBCD
Отлично, загрузчик скопирован. Теперь настроим его
F:> E:utilsBOOTICEx64.exe
Открываем файл F:EFIMicrosoftBootBCD. В случае установки на раздел, его параметры задаются так

Если же мы устанавливали систему на VHD, то настройки будут такими

Важно! Имя вторичного загрузчика для EFI-системы winload.efi, для BIOS-системы — winload.exe.
В случае, если мы устанавливаем BIOS-систему установка загрузчика будет выглядеть так
F:> mkdir C:Boot

F:> xcopy C:WindowsBootPCAT* C:Boot /s /e

F:> mkdir C:BootFonts

F:> xcopy C:WindowsBootFonts* C:BootFonts /s /e

F:> copy C:Bootbootmgr C:bootmgr

F:> copy C:WindowsSystem32configBCD-Template C:BootBCD
Важно! Раздел, смонтированный к C: (там где размещен загрузчик) обязан быть активным! Убедитесь в этом перед перезагрузкой!
Настройку выполняем так же точно, используя BootICE.
Ну, вроде все. Закрываем все окна и идем в ребут. Флешку можно вытащить из компа.
5. Скрестим пальцы да вознесем молитвы тебе, о Великий и Ужасный Sysprep…!
GRUB у нас еще не настроен пункта для винды в меню нет. Как только появится меню GRUB жмем «C». В консоли набираем
grub> set root=hdX,Y

grub> chainloader /EFI/Microsoft/Boot/bootmgfw.efi

grub> boot
X, Y — соответственно диск и раздел, где лежит загрузчик. Это в случае EFI. В случае с BIOS делаем так
grub> set root=hdX,Y

grub> ntldr /bootmgr

grub> boot
X, Y — диск и раздел с NTFS. Там где распакована винда и лежит её загрузчик.
В режиме EFI вместо логотипа винды я увидел черный экран, так как не нашел в дистрибутиве билиотеки bootres.dll, которую надо поместить в папку EFIMictosoftBootResourses. В случае с BIOS всё в порядке — знакомая эмблема «семерки». А потом в обоих случаях увидим это

Это работает Sysprep. На 57% моргнет экран — настраивается видяха. И если мы все сделали верно, то надпись «Применение параметров системы» повисит довольно долго, потом система сообщит, что установка будет продолжена после перезагрузки. Если мы где-то напортачили с установкой загрузчика — неправильный EFI раздел или неактивный NTFS, то тогда будет ошибка Но мы молодцы и у нас все получится, и после очередной перезагрузки мы увидим это

а потом, наконец вот это

Дальше все как при обычной, штатной установке.
6. Настраиваем GRUB
Обратили внимание на то, что каждый раз мы грузим систему из консоли GRUB руками. Это очень хорошо — значит ни MBR ни NVRAM не перезаписаны коварным майкрософтом. Настало время грузится в арч и добавить в меню GRUB новый пункт
menuentry 'Windows 7 Ultimate SP1 (EFI)' {
set root=hdX,Y
chainloader /EFI/Microsoft/Boot/bootmgfw.efi
}
в случае EFI. Или
menuentry 'Windows 7 Ultimate SP1' {
set root=hdX,Y
ntldr /bootmgr
}
в случае BIOS. Применяем настройки GRUB и перезагружаемся и видем систему в пункте меню загрузки

после выбора которого получаем загруженную Windows
Заключение
Упреждая гнев профессиональных win-админов, скажу сразу — я знаю о DISM. Именно информация об этой системе и привела меня к описанному решению. Цель была одна — выяснить сколько нужно возможностей собственно Windows для установки Windows.
Оказалось вот что — для установки Windows её среда необходима только для одного — настройки BCD-хранилища. Всё. Остальное можно сделать из среды любой другой операционной системы.
Если написать аналог bcdedit.exe под Linux, то установить Windows можно будет с линуксового Live-носителя.
This tutorial will be showing you how to boot ISO files stored on your hard drive with the GRUB2 boot loader. Normally you need to create a live DVD or live USB in order to boot Linux ISO images. You can do it with graphical tools or from the command line. But what if you don’t have an optical disk or USB thumb drive around, or your computer does not support burning ISO images to an optical disk?

GRUB to the rescue
GRUB2 (GRand Unified Bootloader) is the standard boot loader for Linux. It can boot Linux ISO image files stored on the hard drive without a USB or DVD. GRUB Legacy (version 0.x) doesn’t have this feature. Many Linux distributions can be booted directly from an ISO file.
- GRUB2 supports many file systems, including but not limited to
ext4,HFS+, andNTFS, which means you can put your ISO file on any of these file systems. - GRUB2 can read files directly from LVM and RAID devices.
- GRUB2 also has network support. You can load ISO images over the network by using the TFTP protocol.
To use GRUB2 to boot ISO files, you need a Linux distro with GRUB2 as the boot loader already installed on your computer. The following instructions work on both the traditional BIOS and the newer UEFI firmware. However, if you use UEFI, then you should disable secure boot in the firmware for GRUB2 to boot ISO files, otherwise, you might see the “can not find command loopback” error.
Now let’s get started.
Boot Ubuntu ISO Files From GRUB2
Log in to a computer running Linux and download an Ubuntu ISO image file. Then open up a terminal window and edit the /etc/grub.d/40_custom file with a command-line text editor like Nano.
sudo nano /etc/grub.d/40_custom
The first line of this file is #! /bin/sh indicating it’s a shell script. In this file, we can add custom entries to the GRUB boot menu.
Copy and paste the following text at the end of this file.
menuentry "ubuntu-20.04.2.0-desktop-amd64.iso" {
  insmod ext2
  set isofile="/home/linuxbabe/Downloads/ubuntu-20.04.2.0-desktop-amd64.iso"
  loopback loop (hd0,5)$isofile
  linux (loop)/casper/vmlinuz boot=casper iso-scan/filename=$isofile quiet noeject noprompt splash
  initrd (loop)/casper/initrd
}
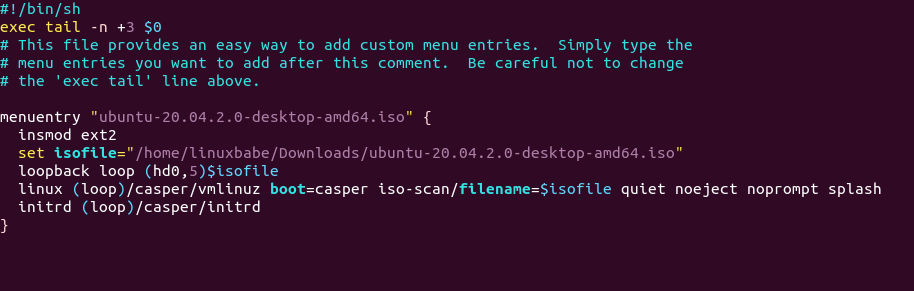
Where:
- menuentry: This entry will be displayed on the GRUB2 boot menu. You can name it whatever you like.
- The insmod command inserts a module. Since the ISO file is stored under my
ext4home dierctory, theext2module is needed. If it’s stored on an NTFS partition, then you needinsmod ntfsinstead. Note that GRUB may not be able to recognize XFS and Btrfs file system, so it’s not recommended to store the ISO file on a XFS or Btrfs partition. - set isofile: Specify that path of your ISO image file. Here I’m using Ubuntu 20.04 Desktop ISO file saved under the
Downloadsfolder. - loopback: Mount the ISO file.
hd0means the first hard drive in the computer and5means the ISO file is stored on the 5th disk partition. - The
linuxcommand loads a Linux kernel from the specified path. casper/vmlinuz.efi is the linux kernel inside the Ubuntu ISO image. - The
initrdcommand loads an initial ramdisk from the specified path. It can only be used after thelinuxcommand has been run. The initial ramdisk is a minimal root file system mounted to the RAM. casper/initrd.lz is the initrd file inside the Ubuntu ISO image.
Note that GRUB does not distinguish IDE from SCSI. In Linux kernel:
/dev/hdarefers to the first IDE hard drive and/dev/sdarefers to the first SCSI or SATA hard drive./dev/nvme0n1refers to the first NVMe SSD./dev/nvme1n1refers to the second NVMe SSD.
But in GRUB, the first hard drive is always referred to as hd0, no matter what the interface type is. Also note that partition numbers in GRUB start at 1, not 0.
If the ISO file is stored on an extended partition of MBR disk, the partition number starts from 5, instead of 1. For example, the first logical partition inside an extended partition will be numbered as 5; the second logical partition inside an extended partition will be numbered as 6. To check your partition number, you can run lsblk or sudo parted -l command in the terminal window.
Save and close the file. (Press Ctrl+O, then press Enter to save a file in Nano text editor. Press Ctrl+X to exit.)
Then update GRUB boot menu with the following command:
sudo grub-mkconfig -o /boot/grub/grub.cfg
On Fedora, CentOS, RHEL, OpenSUSE, the command to run is:
sudo grub2-mkconfig -o /boot/grub2/grub.cfg
On Debian, Ubuntu, Linux Mint, you can use the following command to update GRUB boot menu.
sudo update-grub
You might not see the new menu entry right away, but you will see it when you reboot your computer.
sudo shutdown -r now
You will see your custom entry at the bottom of the GRUB2 boot menu. If GRUB couldn’t boot your ISO image, please check /etc/grub.d/40_custom file to see if there is a typo or you left out a space or something like that.

You can add as many menu entries as you like in the /etc/grub.d/40_custom file.
Debian ISO
Download the Debian live CD ISO file. Next, open up a terminal window and edit the /etc/grub.d/40_custom file with a text editor such as Nano.
sudo nano /etc/grub.d/40_custom
In this file, we can add custom entries to the GRUB boot menu. In this case, we want to add an entry to boot a Debian ISO file.
menuentry "debian-live-10.8.0-amd64-lxqt.iso" {
  insmod ext2
  set isofile="/home/linuxbabe/Downloads/debian-live-10.8.0-amd64-lxqt.iso"
  loopback loop (hd0,5)$isofile
  linux (loop)/live/vmlinuz-4.19.0-14-amd64 boot=live findiso=$isofile
  initrd (loop)/live/initrd.img-4.19.0-14-amd64
}
Note that the vmlinuz and initrd.img file include version number. You should mount your Debian ISO file and check if you should update it. Save and close the file. Then update GRUB boot menu.
sudo grub-mkconfig -o /boot/grub/grub.cfg
or
sudo grub2-mkconfig -o /boot/grub2/grub.cfg
Arch Linux ISO
Download the Arch Linux ISO file. Next, open up a terminal window and edit the /etc/grub.d/40_custom file with a text editor such as Nano.
sudo nano /etc/grub.d/40_custom
In this file, we can add custom entries to the GRUB boot menu. In this case, we want to add an entry to boot a Arch Linux ISO file.
menuentry "archlinux-2021.03.01-x86_64.iso" {
  insmod ext2
  set isofile="/home/linuxbabe/Downloads/archlinux-2021.03.01-x86_64.iso"
  loopback loop (hd0,5)$isofile
  linux (loop)/arch/boot/x86_64/vmlinuz-linux archisolabel=ARCH_202103 img_dev=/dev/sda5 img_loop=$isofile earlymodules=loop
  initrd (loop)/arch/boot/x86_64/initramfs-linux.img
}
Note that if you download a newer Arch Linux ISO file such as archlinux-2021.04.01-x86_64.iso, then you need to update the archisolabel to ARCH_202104. You can also find out what the label should be by mounting the Arch Linux ISO in your file manager. The label will be shown in your file manager.

Also you might need to change the value of img_dev. It’s the name of the device where your ISO file is stored.
Save and close the file. Then update GRUB boot menu.
sudo grub-mkconfig -o /boot/grub/grub.cfg
or
sudo grub2-mkconfig -o /boot/grub2/grub.cfg
Clonezilla Live ISO
Clonezilla is a free open-source and reliable tool for bare metal backup and recovery of disk drives. Download the Clonezilla live ISO file. Next, open up a terminal window and edit the /etc/grub.d/40_custom file with a text editor such as Nano.
sudo nano /etc/grub.d/40_custom
In this file, we can add custom entries to the GRUB boot menu. In this case, we want to add an entry to boot Clonezilla Live ISO file.
menuentry "clonezilla-live-20210127-groovy-amd64.iso" {
  insmod ext2
  set isofile="/home/linuxbabe/Downloads/clonezilla-live-20210127-groovy-amd64.iso"
  loopback loop (hd0,5)$isofile
  linux (loop)/live/vmlinuz boot=live findiso=$isofile
  initrd (loop)/live/initrd.img
}
Save and close the file. Then update GRUB boot menu.
sudo grub-mkconfig -o /boot/grub/grub.cfg
or
sudo grub2-mkconfig -o /boot/grub2/grub.cfg
RHEL 8/CentOS Stream ISO
First, download the ISO image file. For RHEL 8, please read the following article to learn how to download ISO image file.
- How to Download and Install RHEL8 For Free (Red Hat Enterprise Linux)
CentOS Stream ISO image can be downloaded from its official website.
Next, open up a terminal window and edit the /etc/grub.d/40_custom file with a text editor such as Nano.
sudo nano /etc/grub.d/40_custom
In this file, we can add custom entries to the GRUB boot menu. In this case, we want to add an entry to boot RHEL 8/CentOS/Fedora ISO file.
menuentry "rhel-8.3-x86_64-boot.iso" {
  insmod ext2
  set isofile="/home/linuxbabe/Downloads/rhel-8.3-x86_64-boot.iso"
  loopback loop (hd0,5)$isofile
  linux (loop)/isolinux/vmlinuz noeject inst.stage2=hd:/dev/sda5:$isofile
  initrd (loop)/isolinux/initrd.img
}
In the above code, /dev/sda5 is the 5th partition of the first disk where the ISO image file is stored. Save and close the file. Then update GRUB boot menu.
sudo grub-mkconfig -o /boot/grub/grub.cfg
or
sudo grub2-mkconfig -o /boot/grub2/grub.cfg
Fedora ISO
Fedora ISO image can be downloaded from its official website. Next, open up a terminal window and edit the /etc/grub.d/40_custom file with a text editor such as Nano.
sudo nano /etc/grub.d/40_custom
In this file, we can add custom entries to the GRUB boot menu. In this case, we want to add an entry to boot Fedora ISO file.
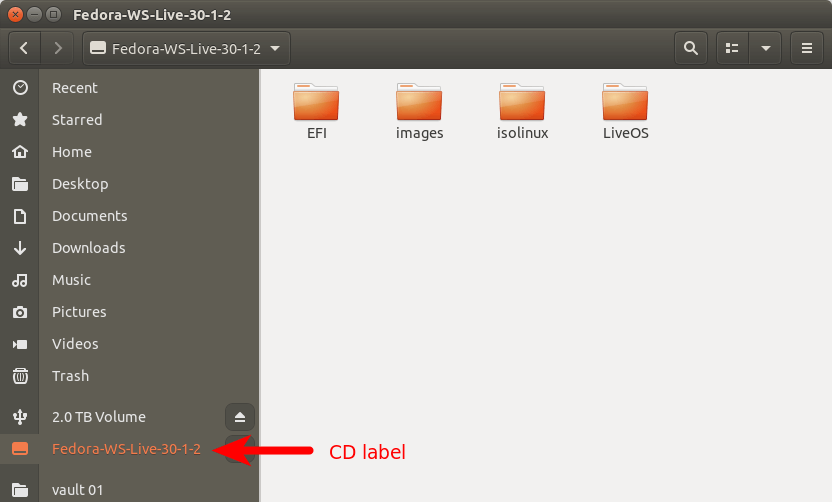
menuentry "Fedora-Workstation-Live-x86_64-33-1.2.iso" {
  insmod ext2
  set isofile="/home/linuxbabe/Downloads/Fedora-Workstation-Live-x86_64-33-1.2.iso"
  loopback loop (hd0,5)$isofile
  linux (loop)/isolinux/vmlinuz root=live:CDLABEL=Fedora-WS-Live-33-1-2 rd.live.image verbose iso-scan/filename=$isofile
  initrd (loop)/isolinux/initrd.img
}
In the above code, CDLABEL is the the label displayed in your file manager when the ISO image is mounted.
Save and close the file. Then update GRUB boot menu.
sudo grub-mkconfig -o /boot/grub/grub.cfg
or
sudo grub2-mkconfig -o /boot/grub2/grub.cfg
OpenSUSE Leap Live ISO
Download the OpenSUSE Leap live ISO file. Next, open up a terminal window and edit the /etc/grub.d/40_custom file with a text editor such as Nano.
sudo nano /etc/grub.d/40_custom
In this file, we can add custom entries to the GRUB boot menu. In this case, we want to add an entry to boot OpenSUSE Leap Live ISO file.
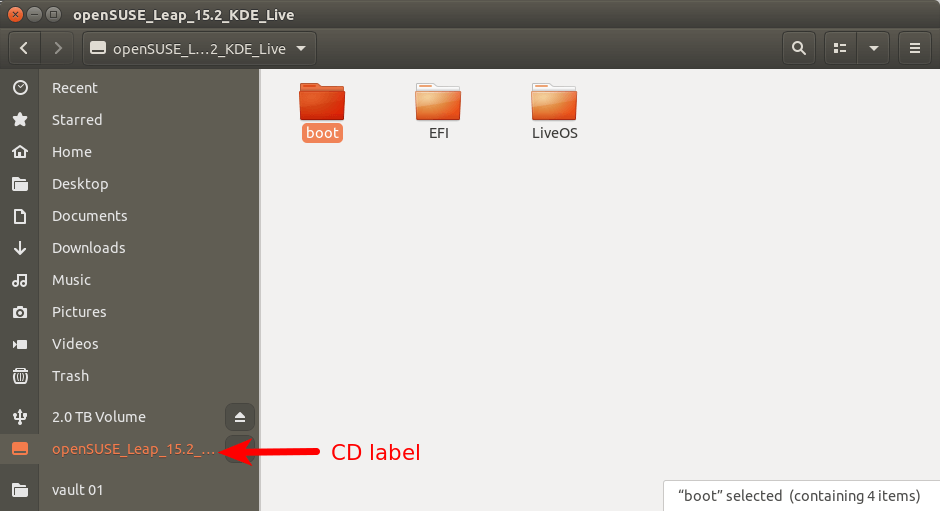
menuentry "openSUSE-Leap-15.2-KDE-Live-x86_64-Build31.383-Media.iso" {
  insmod ext2
  set isofile="/home/linuxbabe/Downloads/openSUSE-Leap-15.2-KDE-Live-x86_64-Build31.383-Media.iso"
  loopback loop (hd0,5)$isofile
  linux (loop)/boot/x86_64/loader/linux boot=isolinux root=live:CDLABEL=openSUSE_Leap_15.2_KDE_Live rd.live.image verbose iso-scan/filename=$isofile
  initrd (loop)/boot/x86_64/loader/initrd
}
In the above code, CDLABEL is the the label displayed in your file manager when the ISO image is mounted.
Save and close the file. Then update GRUB boot menu.
sudo grub-mkconfig -o /boot/grub/grub.cfg
or
sudo grub2-mkconfig -o /boot/grub2/grub.cfg
Kali Linux Live ISO
Download the Kali Linux live ISO file. Next, open up a terminal window and edit the /etc/grub.d/40_custom file with a text editor such as Nano.
sudo nano /etc/grub.d/40_custom
In this file, we can add custom entries to the GRUB boot menu. In this case, we want to add an entry to boot a Kali Linux Live ISO file.
menuentry "kali-linux-2021.1-live-amd64.iso" {
  insmod ext2
  set isofile="/home/linuxbabe/Downloads/kali-linux-2021.1-live-amd64.iso"
  loopback loop (hd0,5)$isofile
  linux (loop)/live/vmlinuz boot=live findiso=$isofile
  initrd (loop)/live/initrd.img
}
Save and close the file. Then update GRUB boot menu.
sudo grub-mkconfig -o /boot/grub/grub.cfg
or
sudo grub2-mkconfig -o /boot/grub2/grub.cfg
Linux Mint Live ISO
Download the Linux Mint ISO file. Next, open up a terminal window and edit the /etc/grub.d/40_custom file with a text editor such as Nano.
sudo nano /etc/grub.d/40_custom
In this file, we can add custom entries to the GRUB boot menu. In this case, we want to add an entry to boot a Linux Mint ISO file.
menuentry "linuxmint-20.1-cinnamon-64bit.iso" {
  insmod ext2
  set isofile="/home/linuxbabe/Downloads/linuxmint-20.1-cinnamon-64bit.iso"
  loopback loop (hd0,5)$isofile
  linux (loop)/casper/vmlinuz boot=casper iso-scan/filename=$isofile quiet noeject noprompt splash
  initrd (loop)/casper/initrd.lz
}
Save and close the file. Then update GRUB boot menu.
sudo grub-mkconfig -o /boot/grub/grub.cfg
or
sudo grub2-mkconfig -o /boot/grub2/grub.cfg
Finding Out the Linux kernel and initrd File Name
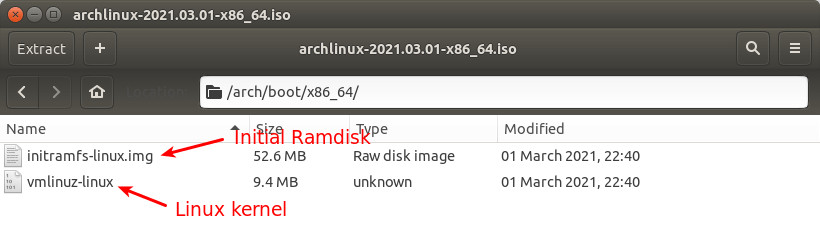
The Linux kernel and initrd (initial ramdisk) file can be different for different Linux ISO images. For Ubuntu, the Linux kernel is located at /casper/vmlinuz and the initrd image file is located at /casper/initrd. If you don’t know where they are located, just open your ISO image with archive manager. The following screenshot shows the Arch Linux ISO image file.
Display GRUB Boot Menu
Some Linux distributions like Ubuntu hide the GRUB boot menu if there’s only one OS installed on the hard drive. To show the GRUB boot menu, edit a configuration file.
sudo nano /etc/default/grub
Find the following line, which tells GRUB to hide the boot menu.
GRUB_TIMEOUT_STYLE=hidden
Add the # character at the beginning to comment out this line.
#GRUB_TIMEOUT_STYLE=hidden
Then find the following line.
GRUB_TIMEOUT=0
Change 0 to 10, so you will have 10 seconds to choose an entry in the GRUB boot menu.
GRUB_TIMEOUT=10
Save and close the file. Then update GRUB configurations.
sudo update-grub
Change the Boot Order in GRUB
Let’s say you want to boot into the ISO by default in GRUB, then edit the configuration file.
sudo nano /etc/default/grub
Find the following line, which makes GRUB select the first entry in the boot menu.
GRUB_DEFAULT=0
Change it to something like this:
GRUB_DEFAULT="clonezilla-live-20210127-groovy-amd64.iso"
If the /etc/grub.d/40_custom file has this entry menuentry "clonezilla-live-20210127-groovy-amd64.iso", then GRUB will select this entry by default. Update GRUB for the changes to take effect.
sudo update-grub
You can also keep the default boot order, but boot an ISO file for the next boot only with:
sudo grub-reboot clonezilla-live-20210127-groovy-amd64.iso
or
sudo grub2-reboot clonezilla-live-20210127-groovy-amd64.iso
Then reboot.
sudo shutdown -r now
Additional Tips
If you have a SATA disk and an NVMe SSD inside your computer, the SATA disk is the first and the NVMe SSD is the second. The same goes for a USB drive and an NVMe SSD. If you have an optical disk, then GRUB might think the optical disk is the first disk.
If you see the following error when GRUB trying to boot an ISO image file, it likely that you have specified the ISO file location to an optical disk.
can not get C/H/S value
If you have a file system that spans the entire disk, then you don’t need to specify the partition number in GRUB. For example, I have an ISO file on my second disk. I didn’t make any partitions on the second disk, so I can specify (hd1) in GRUB configuration file.
loopback loop (hd1)$isofile
If you see an error message like below when updating the GRUB boot menu, you can ignore this error.
grub-probe: error: cannot find a GRUB drive for /dev/loop11p3. Check your device.map.
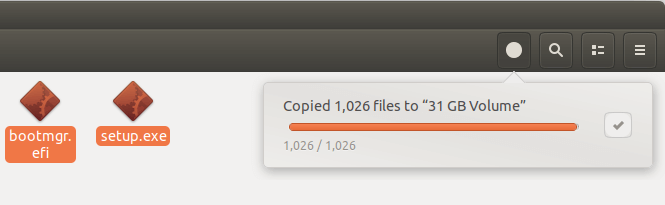
Windows 10 ISO
Yes, you can create a Windows 10 bootable USB on Ubuntu or any Linux distro. If you don’t have a USB thumb drive, you can boot Windows 10 ISO on the hard drive with GRUB2. Download the Windows 10 ISO file. Note that you might not be able to download the ISO from this link on a Windows computer. This download link is visible to users on Linux computer.
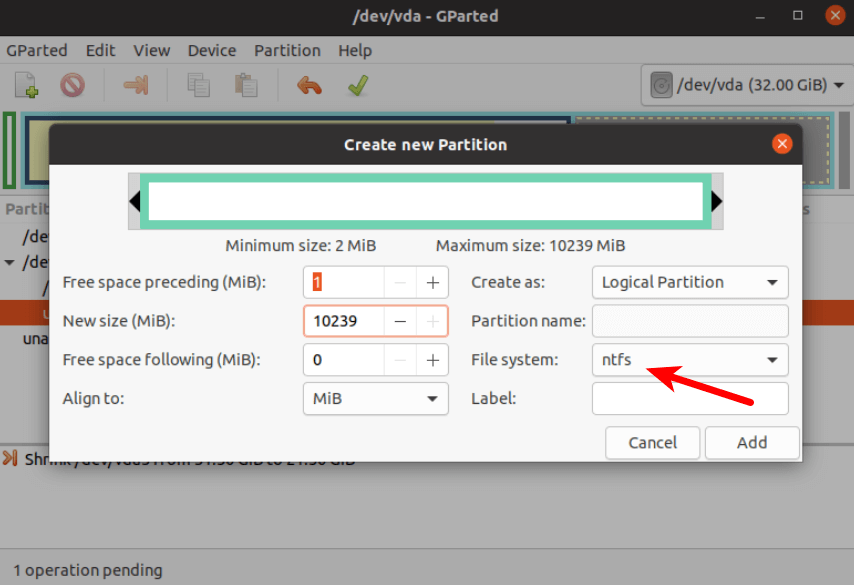
GRUB2 can not boot Windows 10 ISO directly. You need to create a separate NTFS partition on your disk with a partition editor like GParted and extract the Windows 10 ISO to that partition. The latest Windows 10 ISO file is 5.8G. The new NTFS partition should be at least 7G and it should not be used to store any other files.
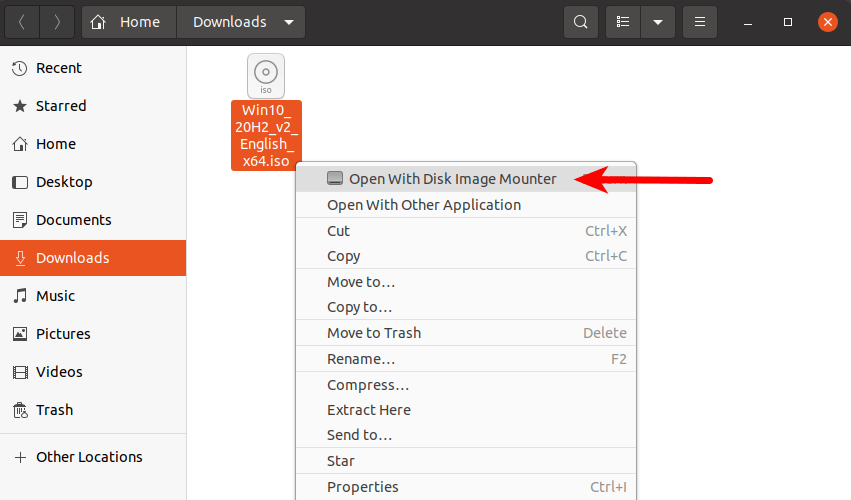
Then find your Windows 10 ISO in file manager. Open it with disk image mounter.
Open the mounted file system. Select all files and folders and copy them to the NTFS partition.
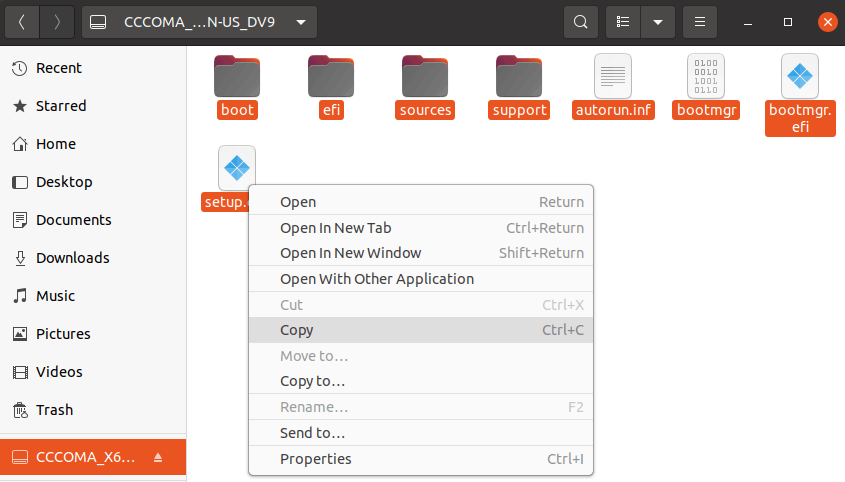
Sometimes the file manager on Ubuntu hangs and it seems that the copy operation has stopped. Actually, it’s working. Just be patient. When you see a checkmark, it means the copy operation has finished.
Next, open up a terminal window and edit the /etc/grub.d/40_custom file with a text editor such as Nano.
sudo nano /etc/grub.d/40_custom
In this file, we can add custom entries to the GRUB boot menu. In this case, we want to add an entry to boot the Windows 10 installer. If your computer still uses the traditional BIOS firmware, then add the following text in this file.
menuentry "Windows-10-Installer.iso" {
  set root=(hd0,6)
  insmod part_msdos
  insmod ntfs
  insmod ntldr
  #uncomment the following line if your computer has multiple hard drives.
  #drivemap -s (hd0) ${root}
  ntldr /bootmgr
}
My NTFS partition number is 6, so I use (hd0,6) as the root. You can run sudo parted -l command to check your NTFS partition number. If your computer has multiple hard drives, use the drivemap command to set the partition (hd0,6) as the first hard disk, so Windows will be able to boot.
If your computer uses UEFI firmware, then add the following text in this file.
menuentry "Windows-10-Installer.iso" {
  set root=(hd0,6)
  insmod part_gpt
  insmod ntfs
  insmod chain
  chainloader /efi/boot/bootx64.efi
}
Save and close the file. Then update GRUB boot menu.
sudo grub-mkconfig -o /boot/grub/grub.cfg
or
sudo grub2-mkconfig -o /boot/grub2/grub.cfg
Unplug all your external USB storage devices, then reboot your computer. Note that the Windows desktop ISO installer doesn’t work properly on Proxmox KVM virtual machines.
Wrapping Up
I hop this tutorial helped you boot ISO files with GRUB2 boot loader. As always, if you found this post useful, then subscribe to our free newsletter to get more tips and tricks. Take care 🙂
GRUB2 was designed with an improved chainload mode when compared to GRUB Legacy.
Another grub.cfg
It is possible to load a grub configuration file from another filesystem, using the UUID of that filesystem as it is visible from /dev/disk/by-uuid/.
FILE grub.cfgChainloading another GRUB configuration file
search --no-floppy --fs-uuid --set=root 00000000-0000-0000-0000-000000000000 set prefix=($root)/grub configfile /grub/grub.cfgISO images
The new ISO (or loop) chainload mechanism makes chainloading a breeze. It is possible to chainload ISO images (LiveCD/DVDs) with GRUB Legacy, however there exists no way to pass kernel cmdline arguments before boot. In any case, the ISO images in question should be built keeping kernel cmdline arguments in mind.
Without kernel cmdline options, booting ISO images with GRUB2 will fail in the physical media check/test stage of the ISOs boot process. Gentoo liveCD is handy because it has a minimal shell which lets the user mount the squashed image to the correct location and then press the Esc key to continue the boot process. This makes it possible to have a handy way to install an operating system with everything in RAM, especially for «light weight» LiveCDs. No more need to listen to a whining CD/DVD drive on each new command!
To chainload an ISO with custom or default kernel command line arguments, an entry similar to the following can be added to GRUB2’s grub.cfg file:
FILE
/boot/grub/grub.cfgExample entry for chainloading an ISO filemenuentry "SYSRESCUECD" { set iso=/systemrescuecd-x86-3.8.1.iso loopback loop ${iso} linux (loop)/isolinux/rescue64 nomodeset vga=791 docache setkmap=fr isoloop=${iso} initrd (loop)/isolinux/initram.igz }For a permanent and automatic entry to GRUB2’s grub.cfg file, a custom script could be added to the /etc/grub.d script location:
FILE
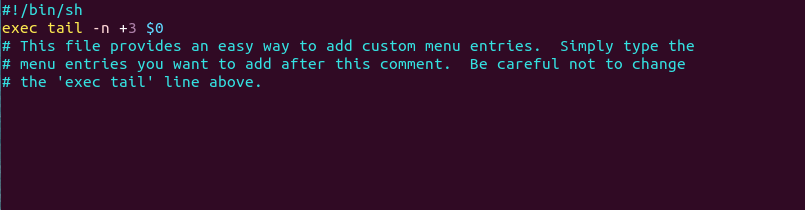
/etc/grub.d/40_customCustom script to load a CD#!/bin/sh exec tail -n +3 $0 menuentry "GRUB4DOS" { linux /grub4dos-0.4.4/grub.exe --config-file=/menu.lst } menuentry "SYSRESCUECD" { set iso=/systemrescuecd-x86-3.8.1.iso loopback loop ${iso} linux (loop)/isolinux/rescue64 nomodeset vga=791 docache setkmap=fr isoloop=${iso} initrd (loop)/isolinux/initram.igz } menuentry "STG3-AMD64" { set cmdline="dokeymap looptype=squashfs loop=/image.squashfs cdroot" loopback loop /stg3-amd64-<DATE>.iso linux (loop)/isolinux/gentoo $cmdline root=/dev/ram0 init=/linuxrc initrd=gentoo.igz initrd (loop)/isolinux/gentoo.igz } menuentry "gentoo installation iso" { set iso=/install-x86-minimal-DATETIME.iso bootoptions="isoboot=$iso root=/dev/ram0 init=/linuxrc dokeymap looptype=squashfs loop=/image.squashfs cdroot vga=791" loopback loop ${iso} linux (loop)/boot/gentoo $bootoptions initrd (loop)/boot/gentoo.igz }Do not forget to make the script executable:
root #chmod +x /etc/grub.d/40_customFinally regenerate GRUB2’s grub.cfg file using grub2-mkconfig command.
Another bootloader
Chainloading another bootloader to GRUB2 is fairly easy.
Something as simple as the following example is enough to boot another disk that uses a «Custom Super Bootloader»:
FILE
/etc/grub.d/40_customChainloading another bootloadermenuentry "Custom Super Bootloader Example" { insmod part_msdos insmod chain chainloader (hd1,1)+1 }TrueCrypt
Chainloading the TrueCrypt bootloader on a separate disk is relatively simple and can be done in GRUB2 like any other bootloader:
FILE
/etc/grub.d/40_customChainloading TrueCrypt bootloader on a separate disktitle Windows7-TrueCrypt-BIOS/MBR find --set-root /truecrypt_rescue_image.iso map --mem /truecrypt_rescue_image.iso (hd32) map (hd0) (hd1) map (hd1) (hd0) map --hook root (hd32) chainloader (hd32)Note
The remapping may not be necessary if the system has a single boot disk. The mapping is necessary before chainloading TrueCrypt bootloader in the case that the boot disk (hd1 as shown in the example above) should appear as the primary boot device (hd0), otherwise TrueCrypt would fail to boot because the correct disk will not be found.Chainloading a disk with TrueCrypt in the MBR or a rescue CD image located in encrypted partitions is not possible with GRUB2 (see bug #385619). Use either GRUB Legacy or GRUB4DOS as workaround. GRUB4DOS has an interface very similar to GRUB Legacy and a menu.lst entry which can be used to chainload the TrueCrypt bootloader or to boot a rescue CD (from an encrypted partition on the same disk).
Another workaround is to boot from TrueCrypt as the main boot loader and then hit the Esc to chainload the following partition (if one exists) or the following disk. Then have GRUB2 installed on the partition instead of in the MBR itself so that GRUB2 is chainloaded.
Windows (MSDOS based boot loaders)
When Windows (or another MS DOS based boot loader) is installed on another disk, then regular chainloading in the grub.cfg may be sufficient to boot it. However, if Windows is on the same disk on a different partition, or if regular chainloading doesn’t work, then read on.
Microsoft Windows 8 (and above versions) are no longer installed using MSDOS partitions by default, however they do maintain backwards compatibility with BIOS MBR systems. In order to specify Windows 8 (and above) to use MSDOS partitioning the Windows installation DVD needs to be booted in BIOS mode (a non-UEFI boot mode) in order for Windows to install into MSDOS partitions. Manually create a MSDOS partition layout, then manually boot the Windows DVD using a BIOS option in the boot menu list. Sometimes it is necessary in the BIOS firmware configuration tool to disable UEFI mode completely in order to force BIOS MBR mode.
The simplest way to dual boot Windows (or MS-DOS) is to add an MBR menu entry to GRUB2’s grub.cfg file for each Windows operating system installed.
For instance, to boot Windows 7, add the following to the grub.cfg file:
FILE
/etc/grub.d/40_customWindows 7 examplemenuentry "Windows 7 BIOS MBR" { insmod part_msdos insmod ntldr insmod ntfs ntldr (hd0,msdos1)/bootmgr }A Windows XP example:
FILE
/etc/grub.d/40_customWindows XP examplemenuentry "Windows XP BIOS MBR" { insmod part_msdos insmod ntldr insmod ntfs ntldr (hd0,msdos1)/ntldr }Instead of using GRUB2’s device syntax, the UUID of the partition containing the Windows bootloader can be used like so:
FILE
/etc/grub.d/40_customUUID examplemenuentry "Windows 10" { insmod ntfs insmod ntldr insmod part_msdos insmod search_fs_uuid search --no-floppy --fs-uuid --set=root 1AECC5A1ECC57811 ntldr /bootmgr }Filesystem UUIDs can be obtained with blkid.
Note
Some users report the above method using UUIDs works better for Windows 7 or 10.An entry for a GPT hybrid MBR works a bit different than the previous BIOS-MBR examples. Booting multiple versions of Windows can be achieved with remapping and/or hiding partitions with GRUB2’s
parttooloption:FILE
/etc/grub.d/40_customExample for GPT hybrid MBRmenuentry "Windows 7 BIOS MBR" { insmod part_msdos insmod chain parttool hd1,msdos1 hidden+ boot- parttool hd1,msdos2 hidden- boot+ chainloader (hd1,msdos2)+1 }Note
Remapping the disk withparttoolin the manner above is only required if multiple Windows systems are installed on the same disk.Remapping the devices to set the primary boot disk to other disks can be achieved by using the
drivemapoption like so:FILE
/etc/grub.d/40_customRemapping devices examplemenuentry "Windows 7 BIOS MBR" { insmod part_msdos insmod chain drivemap hd0 hd1 chainloader (hd1,msdos2)+1 }Probing
GRUB2 is capable of automatically finding Windows partitions and assigning the root partitions. The Windows partition must first be mounted before the probe will be successful. See notes at the end of this section concerning missing C:bootmgr and C:Boot files and folders; it is wise to make sure these folders do exist before trying to boot Windows using GRUB2.
GRUB2’s probing feature requires the sys-boot/os-prober package which is not initially pulled in when installing GRUB2.
root #emerge --ask --newuse sys-boot/os-prober
root #grub2-probe --target=hints_string /mnt/windows7/bootmgr--hint-bios=hd1,msdos1 --hint-efi=hd1,msdos1 --hint-baremetal=ahci1,msdos1
root #grub2-probe --target=fs_uuid /mnt/windows7/bootmgr2ABF87DC395CFC02From the output provided by the above two commands, the
searchline within GRUB2’s grub2.cfg file (below) can be constructed. Remapping the drive and partition as the first hard drive and first partition will make Windows XP or Windows 8 more free of silent errors while loading.FILE
/etc/grub.d/40_customConstructing the search linemenuentry 'Microsoft Windows 7 or Windows 8 (on sdb1)' --class windows { insmod part_msdos insmod ntfs insmod search_fs_uuid insmod ntldr search --fs-uuid --set=root --hint-bios=hd1,msdos1 --hint-efi=hd1,msdos1 --hint-baremetal=ahci1,msdos1 2ABF87DC395CFC02 drivemap (hd1,msdos1) (hd0,msdos1) #Or, "drivemap (hd1,msdos2) (hd0,msdos1)" for those with Windows installed on sdb2) ntldr /bootmgr }Important
If the C:bootmgr and the C:Boot folders through which the bootmgr file is linked do not exist, then the files need to be installed using an Administrator cmd.exe shell (escalated command prompt). Regeneration should be possible by using this command:
C:>bcdboot c:Windows /s c:Seeing a boot error message concerning a missing bootmgr file after attempting to boot one of the previously mentioned grub.cfg entries is the indication the C:Boot folder is missing. This happens when using Windows 8 since the C:Boot folder does not seem to be generated by default.
Dual-booting Windows on UEFI with GPT
In the case the Windows bootloader was overwritten with GRUB2 or if bootmgr doesn’t do the trick, a UEFI dual boot could be achieved using the following menu entry:
FILE
/etc/grub.d/40_customUEFI dual-bootmenuentry "Windows 7 UEFI/GPT" { insmod part_gpt insmod search_fs_uuid insmod chain search --fs-uuid --no-floppy --set=root 28cf-35de chainloader ($root)/EFI/MICROSOFT/BOOT/bootmgfw.efi }See also
- UEFI Dual boot with Windows 7/8 — describes how to dual boot Microsoft Windows on a UEFI computer.