-
Для создания лучшей командной строки PowerShell теперь является стандартной командной оболочкой, которая запускается в проводнике. Она заменяет командную строку (cmd.exe), которая ранее была доступна в меню по нажатию клавиш Windows + X, в меню «Файл» проводника и в контекстном меню, которое открывается щелчком правой кнопкой мыши при нажатой клавише Shift в проводнике. Вы по-прежнему можете ввести cmd (или powershell) в адресной строке проводника для запуска командной оболочки.
-
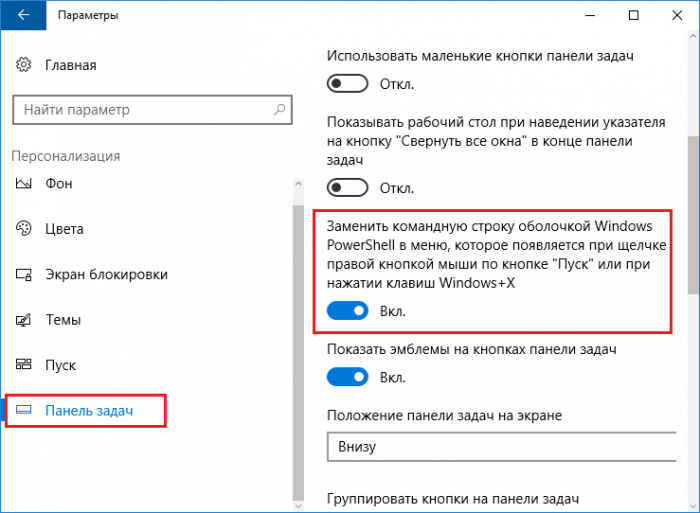
Пользователи, предпочитающие командную строку, могут отключить измененную функцию клавиш Windows + X. Для этого нужно открыть меню «Параметры» > «Персонализация» > «Панель задач», и отключить параметр Заменить командную строку оболочкой Windows PowerShell в меню, которое появляется при щелчке правой кнопкой мыши по кнопке «Пуск» или при нажатии клавиш Windows+X.
Нужна дополнительная помощь?
In this guide, we will show you the steps to replace PowerShell with Command Prompt on your Windows 11 PC. No matter how hard Windows try to make PowerShell the go-to choice for the users, some tech enthusiasts (including myself) are always inclined toward CMD. However, that hasn’t stopped the Silicon Valley giants from giving more weightage to PowerShell.
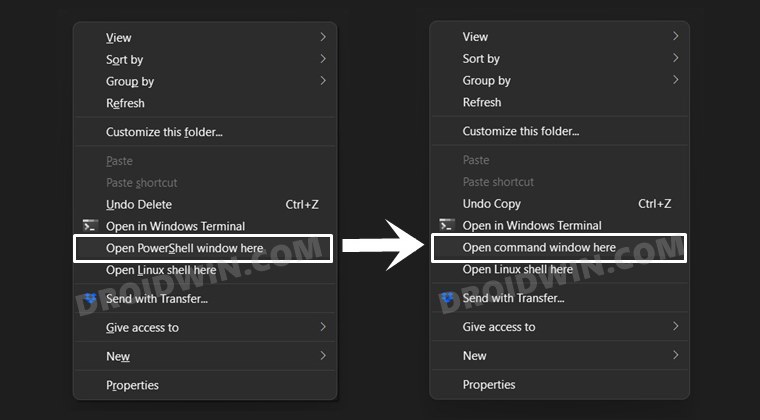
When you bring up the context menu, either by right-clicking on the Windows icon or performing a right-click while holding the Shift key, the Command Prompt is nowhere to be found. Rather, it has now been replaced with PowerShell. Fortunately, there’s still a slight ‘window’ of opportunity left through which you could replace PowerShell with Command Prompt on your Windows 11 PC. And this guide shall make you aware of just that. So without further ado, let’s get started.
- 10 Methods to Open Command Prompt (CMD) in Windows 11
- How to Download and Install Windows 11 Insider Preview Build
- Fix: This PC can’t run Windows 11 | The PC must support TPM 2.0
- How to Install Windows 11 on any PC using Virtual Machine
In Windows 10, you could easily replace PowerShell with CMD in the Windows+X menu by going to Settings > Personalization > Taskbar. However, at the time of writing, this feature is yet to be added in Windows 11 Insider Preview. But there’s still a Registry Editor tweak through which this process could be carried out. Let’s check it out.
STEP 1: Add CMD to Windows 11 Context Menu
- To begin with, bring up the Run dialog box via Ctrl+R shortcut keys.
- Then type in regedit and hit Enter. This shall open the Registry Editor.
- Now head over to the below location (you may also copy-paste this location in the address bar):
ComputerHKEY_CLASSES_ROOTDirectoryBackgroundshellcmd
- Now select the cmd folder from the left menu bar, right-click on it, and select Permissions.

- Then click on the Advanced button.

- After this, click on Change.

- Under the Enter the object name to change dialog box, type in your username and click OK. [To check your username in Windows 11, launch CMD, type in echo %username% and hit Enter].

- Then double click on Administrator, checkmark the Full Control dialog box, and click OK.

- Now go back to Registry Editor and select the cmd folder from the left menu bar.
- On the right side, select the HideBasedOnVelocityld file, right-click and select Rename. Add _bac at the end of the name and save it.


What we did just now: well, we needed to remove the HideBasedOnVelocityld file. However, deleting it is never a good option, hence we added _bac so that Windows wouldn’t be able to recognize the file but at the same time, we still have this file in our hands.

That’s it, the process stands complete. You may now head over to the folder of your choice, press and hold the Shift key and perform a right-click, the Command Prompt option will now be visible.
STEP 2: Remove PowerShell from Windows 11 Context Menu
This guide talks about the steps to replace PowerShell with Command Prompt on Windows 11, however, till now we have only added the CMD option. Let’s now check out the steps to remove the PowerShell from the context menu (this is optional and is only done to make the right-click menu clutter-free).
- Open Registry Editor and head over to the below location:
ComputerHKEY_CLASSES_ROOTDirectoryBackgroundshellPowershell
- Select the PowerShell folder from the left menu bar, right-click on it, and select Permissions.

- We will be applying the same permissions as before. So click on the Advanced button.
- Then click on Change. Under the Enter the object name to change dialog box, type in your username and click OK.

- Then double click on Administrator, checkmark the Full Control dialog box, and click OK.
- Now go back to Registry Editor and select the PowerShell folder from the left menu bar.
- Select the ShowBasedOnVelocityId file, right-click on it and select Rename. Add _bac at the end.

- Now right-click in an empty location, select New > DWord (32-Bit) Value. Name this file as HideBasedOnVelocityId.

- Double click to open this file and type in 639bc8 under Value Data. Leave the Base as Hexadecimal and click OK.

- That’s it. Head over to the desired location, press and hold the Shift Key, and right-click in an empty location. The PowerShell option will no longer be there.


So these were the instructions to replace PowerShell with Command Prompt in Windows 11.
FAQs: How to Revert Everything to Default
if you wish to revert everything back to their default settings, i.e. bring back the PowerShell and remove the Command Prompt from Windows 11, then here’s what you need to do:
- First off, go to the below location:
ComputerHKEY_CLASSES_ROOTDirectoryBackgroundshellcmd
- Rename the HideBasedOnVelocityld_bac file back to HideBasedOnVelocityld. This will remove the CMD option from the context menu.
- After that, go to the below location:
ComputerHKEY_CLASSES_ROOTDirectoryBackgroundshellPowershell
- Rename the ShowBasedOnVelocityId_bac file back to ShowBasedOnVelocityId.
- Then delete the HideBasedOnVelocityId file and the PowerShell option will be back. That’s it.
With this, we round off this guide on how to replace PowerShell with Command Prompt on your Windows 11 PC. As of now, there doesn’t seem to be an option to add the CMD option in the Windows context menu (Windows+X menu). As and when I get hold of the same, will update the guide accordingly. With that said, if you have any queries, do let us know in the comments.
About Chief Editor

Sadique Hassan
administrator
A technical geek by birth, he always has a keen interest in the Android platform right since the birth of the HTC Dream. The open-source environment always seems to intrigue him with the plethora of options available at his fingertips. “MBA by profession, blogger by choice!”
В этом руководстве мы покажем вам, как заменить PowerShell на командную строку на вашем ПК с Windows 11. Как бы тяжело Windows пытается сделать PowerShell предпочтительным выбором для пользователей некоторые технические энтузиасты (включая меня) всегда склоняются к CMD. Однако это не помешало гигантам Силиконовой долины придать большее значение PowerShell.
Когда вы вызываете контекстное меню, либо щелкнув правой кнопкой мыши значок Windows, либо щелкнув правой кнопкой мыши, удерживая клавишу Shift, командную строку нигде не найти. Скорее, теперь он заменен PowerShell. К счастью, все еще остается небольшое «окно» возможностей, через которое вы можете заменить PowerShell на командную строку на своем ПК с Windows 11. И это руководство познакомит вас именно с этим. Итак, без лишних слов, приступим.
В Windows 10 вы можете легко заменить PowerShell на CMD в меню Windows + X, выбрав «Настройки»> «Персонализация»> «Панель задач». Однако на момент написания этой статьи эта функция еще не была добавлена в Windows 11 Insider Preview. Но есть еще настройка редактора реестра, с помощью которой можно выполнить этот процесс. Давайте проверим это.
ШАГ 1. Добавьте CMD в контекстное меню Windows 11.
- Для начала вызовите диалоговое окно «Выполнить» с помощью сочетания клавиш Ctrl+R.
- Затем введите regedit и нажмите Enter. Откроется редактор реестра.
- Теперь перейдите в указанное ниже место (вы также можете скопировать и вставить это место в адресную строку): ComputerHKEY_CLASSES_ROOTDirectoryBackgroundshellcmd
- Теперь выберите папку cmd в левой строке меню, щелкните ее правой кнопкой мыши и выберите «Разрешения».
- Затем нажмите кнопку «Дополнительно».
- После этого нажмите Изменить.
- В диалоговом окне «Введите имя объекта для изменения» введите свое имя пользователя и нажмите «ОК». [To check your username in Windows 11, launch CMD, type in echo %username% and hit Enter].
- Затем дважды щелкните «Администратор», установите флажок в диалоговом окне «Полный доступ» и нажмите «ОК».
- Теперь вернитесь в редактор реестра и выберите папку cmd в левой строке меню.
- С правой стороны выберите файл HideBasedOnVelocityld, щелкните правой кнопкой мыши и выберите «Переименовать». Добавьте _bac в конце имени и сохраните его.
Что мы только что сделали: нам нужно было удалить файл HideBasedOnVelocityld. Однако его удаление никогда не является хорошим вариантом, поэтому мы добавили _bac, чтобы Windows не смогла распознать файл, но в то же время этот файл все еще был у нас в руках.
Вот и все, процесс завершен. Теперь вы можете перейти в папку по вашему выбору, нажать и удерживать клавишу Shift и выполнить щелчок правой кнопкой мыши, теперь будет видна опция командной строки.
ШАГ 2. Удалите PowerShell из контекстного меню Windows 11.
В этом руководстве рассказывается о шагах по замене PowerShell на командную строку в Windows 11, однако до сих пор мы добавили только параметр CMD. Давайте теперь рассмотрим шаги по удалению PowerShell из контекстного меню (это необязательно и делается только для того, чтобы не загромождать контекстное меню).
- Откройте редактор реестра и перейдите в следующую папку: ComputerHKEY_CLASSES_ROOTDirectoryBackgroundshellPowershell.
- Выберите папку PowerShell в левой строке меню, щелкните ее правой кнопкой мыши и выберите «Разрешения».
- Мы будем применять те же разрешения, что и раньше. Итак, нажмите кнопку «Дополнительно».
- Затем нажмите «Изменить». В диалоговом окне «Введите имя объекта для изменения» введите свое имя пользователя и нажмите «ОК».
- Затем дважды щелкните «Администратор», установите флажок в диалоговом окне «Полный доступ» и нажмите «ОК».
- Теперь вернитесь в редактор реестра и выберите папку PowerShell в левой строке меню.
- Выберите файл ShowBasedOnVelocityId, щелкните его правой кнопкой мыши и выберите «Переименовать». Добавьте _bac в конце.
- Теперь щелкните правой кнопкой мыши в пустом месте, выберите «Создать»> «Значение DWord (32-разрядное)». Назовите этот файл как HideBasedOnVelocityId.
- Дважды щелкните, чтобы открыть этот файл, и введите 639bc8 в поле «Значение данных». Оставьте базу в шестнадцатеричном формате и нажмите OK.
- Вот и все. Перейдите в нужное место, нажмите и удерживайте клавишу Shift и щелкните правой кнопкой мыши в пустом месте. Параметр PowerShell больше не будет.
Итак, это были инструкции по замене PowerShell на командную строку в Windows 11.
Часто задаваемые вопросы: как вернуть все к настройкам по умолчанию
если вы хотите вернуть все к настройкам по умолчанию, то есть вернуть PowerShell и удалить командную строку из Windows 11, то вот что вам нужно сделать:
- Прежде всего, перейдите в следующую папку: КомпьютерHKEY_CLASSES_ROOTDirectoryBackgroundshellcmd
- Переименуйте файл HideBasedOnVelocityld_bac обратно в HideBasedOnVelocityld. Это удалит параметр CMD из контекстного меню.
- После этого перейдите в следующую папку: КомпьютерHKEY_CLASSES_ROOTDirectoryBackgroundshellPowershell
- Переименуйте файл ShowBasedOnVelocityId_bac обратно в ShowBasedOnVelocityId.
- Затем удалите файл HideBasedOnVelocityId, и параметр PowerShell вернется. Вот и все.
На этом мы завершаем это руководство о том, как заменить PowerShell на командную строку на вашем ПК с Windows 11. На данный момент, похоже, нет возможности добавить параметр CMD в контекстное меню Windows (меню Windows + X). Как и когда я получу то же самое, обновлю руководство соответствующим образом. С учетом сказанного, если у вас есть какие-либо вопросы, сообщите нам об этом в комментариях.
Windows PowerShell is the new avatar of the Command Prompt with lots of new features and capabilities. With the Windows 10 Creators Update, Microsoft replaced CMD with PowerShell. If you are unable to find the option to launch the Command Prompt from the Power User Menu and the Context menu, there are a couple of ways to make things right. In this tutorial, see how we can replace PowerShell with Command Prompt in Windows 10 and Windows 11.
There are more than 18 ways to open the Command Prompt in Windows 10. However, we’ll discuss only 2 of them here. We’ll check out the easy way to replace PowerShell with Command Prompt from Windows settings. In case you want to learn how to open the Command Prompt instead of PowerShell in a folder, you can make changes to the Registry Editor to replace PowerShell with CMD in the Windows context menu.
Don’t Miss: How to Check MD5 Checksum and SHA Hash of a File in Windows
This tip to replace PowerShell with the Command Prompt in the Power User Menu works only in Windows 10. You can follow the quick steps given below to bring back the Command Prompt in the Power User Menu on your Windows PC.
- Click Start (Windows logo icon in the bottom-left corner of the screen) and choose Settings.

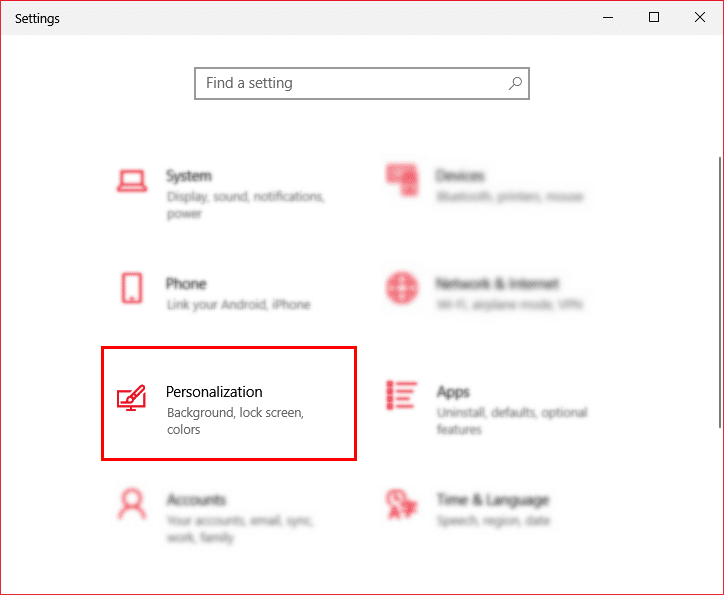
- Next, click Personalization. You can directly access the personalization menu by doing a right-click on the desktop screen and selecting the Personalize option.

- Now click Taskbar on the left panel in the Settings window.
- After that, click the toggle button below ‘Replace Command Prompt with Windows PowerShell in the menu when I right-click the start button or press Windows Logo Key + X‘ on the right panel.


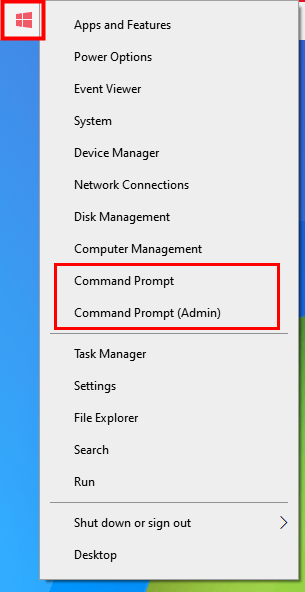
Once you have done that the 2 options to open Powershell in the Power User Menu will be replaced by Command Prompt and Command Prompt (Admin) respectively as shown below.
2. Replace PowerShell with CMD in File Explorer
If you want to open Command Prompt instead of PowerShell in a folder or File Explorer, you’ll need to replace PowerShell with CMD in the right-click Context Menu on your Windows 10 or 11 PC. We can do some tweaks to the Registry Editor to make this happen. Let’s begin.
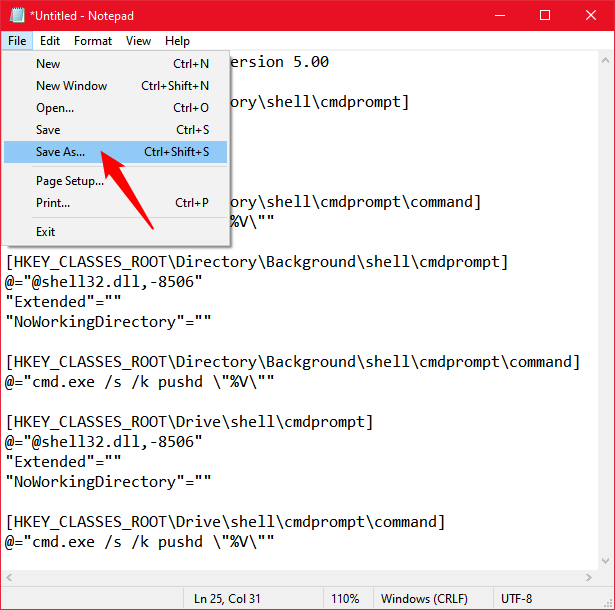
- Press the Windows Logo key on your keyboard, look for the Notepad++ app in the Start menu and open it.

- Now, copy the following code and paste it into the empty Notepad file.
Windows Registry Editor Version 5.00
[HKEY_CLASSES_ROOTDirectoryshellcmdprompt]
@="@shell32.dll,-8506"
"Extended"=""
"NoWorkingDirectory"=""

[HKEY_CLASSES_ROOTDirectoryshellcmdpromptcommand]
@="cmd.exe /s /k pushd "%V""

[HKEY_CLASSES_ROOTDirectoryBackgroundshellcmdprompt]
@="@shell32.dll,-8506"
"Extended"=""
"NoWorkingDirectory"=""

[HKEY_CLASSES_ROOTDirectoryBackgroundshellcmdpromptcommand]
@="cmd.exe /s /k pushd "%V""

[HKEY_CLASSES_ROOTDriveshellcmdprompt]
@="@shell32.dll,-8506"
"Extended"=""
"NoWorkingDirectory"=""

[HKEY_CLASSES_ROOTDriveshellcmdpromptcommand]
@="cmd.exe /s /k pushd "%V""
- Click File and choose the Save As… option.

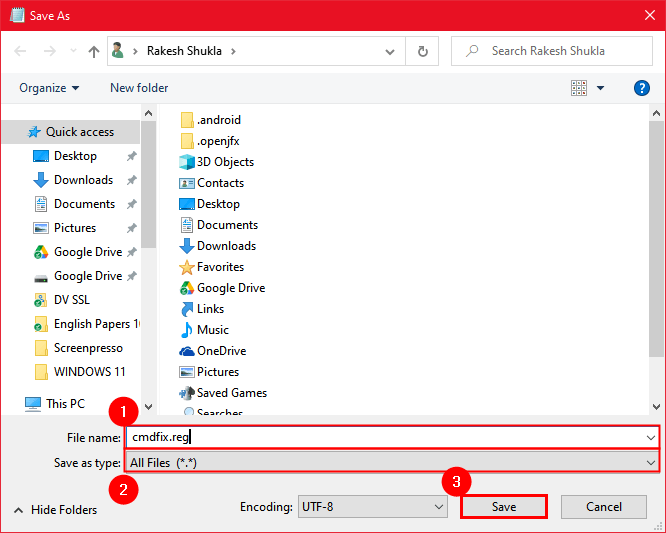
- When you click the Save As… option, you’ll be prompted to assign a file name and type. Click the File name section and type ‘cmdfix.reg‘ as the file name. Then click the drop-down icon in front of the Save as type box and select All Files. Finally, Save the file to your preferred location.

- Once you have saved the file, navigate to cmdfix.reg and double-click it. When prompted, choose Yes.
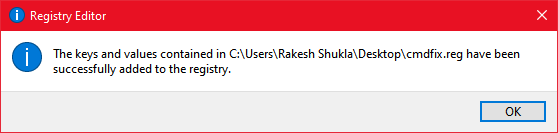
- Next, you’ll see a pop-up window asking if you want to add the new configuration to the registry. Choose Yes.

- The newly created cmdfix.reg will be added to the registry.


You have successfully replaced PowerShell with CMD in the Windows 10 or 11 right-click context menu. Do not forget to check out our detailed tutorial on customizing the Windows context menu. You should now be able to open the Command Prompt instead of PowerShell in a folder.
Anyway, in case you want to undo the changes made by this registry editor tweak anytime later, just paste the following text into a new notepad file.
Windows Registry Editor Version 5.00

[-HKEY_CLASSES_ROOTDirectoryshellcmd2]

[-HKEY_CLASSES_ROOTDirectoryBackgroundshellcmd2]

[-HKEY_CLASSES_ROOTDriveshellcmd2]

[-HKEY_CLASSES_ROOTLibraryFolderBackgroundshellcmd2]
Make sure that you name this notepad file as ‘Defaultcmd.reg‘ and select ‘All Files‘ as the file type before saving it. Double-click the file, and select Yes.
Don’t Miss: 250+ Keyboard Shortcuts for Windows 10 and 11
3. Edit Registry Entries to Replace PowerShell with CMD
While the trick we mentioned above should work fine, there’s one more way you can use to replace PowerShell with Command Prompt in Windows 10 and 11. This method involves manually editing the registry entries.
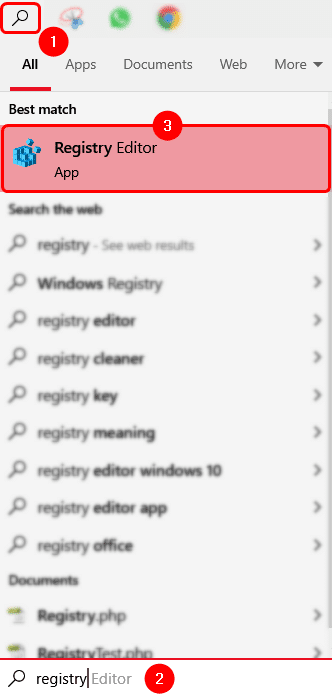
- Click the Search icon and type “registry” in the text box and click Registry Editor.

- Alternatively, you can open the Run window by pressing Windows Logo Key + R, and type “regedit” to open Registry Editor.

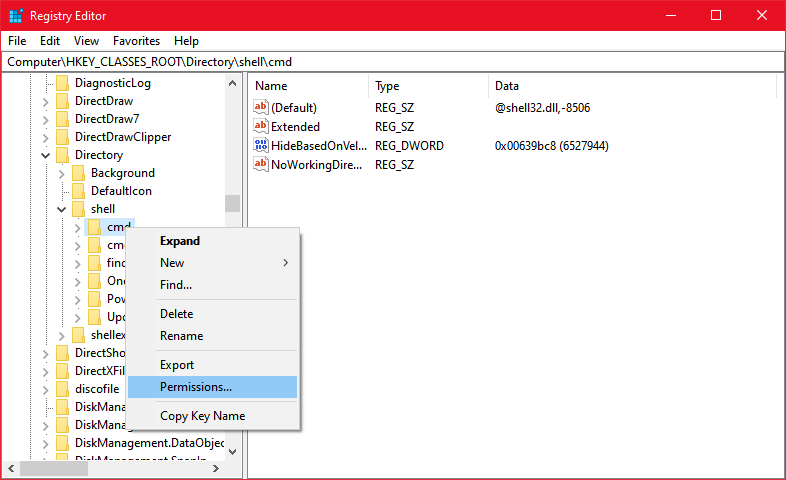
- Now, navigate to HKEY_CLASSES_ROOTDirectoryshellcmd.

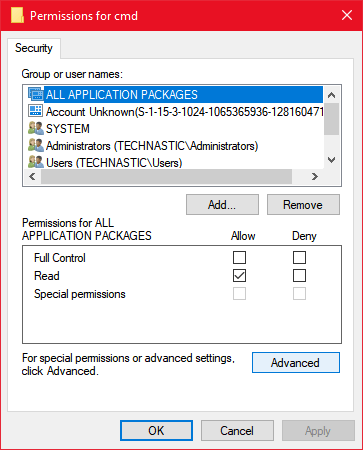
- Right-click on the cmd folder and choose Permissions from the context menu.
- When a small window entitled Permissions for cmd pops up, click the Advanced button.

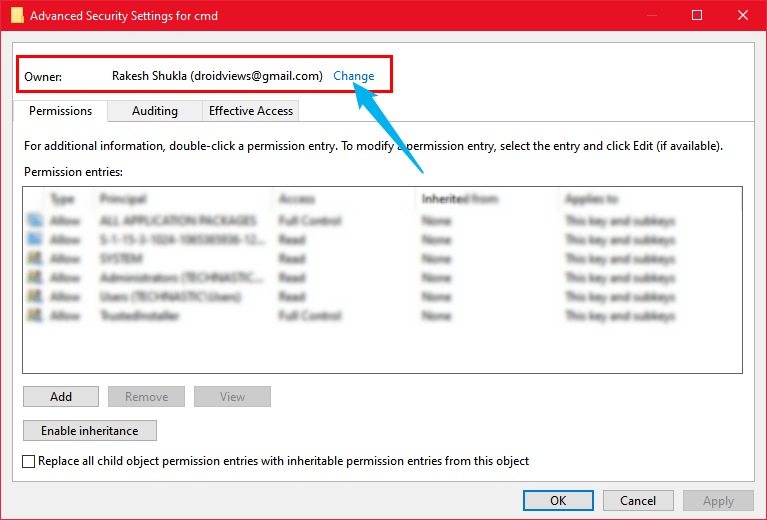
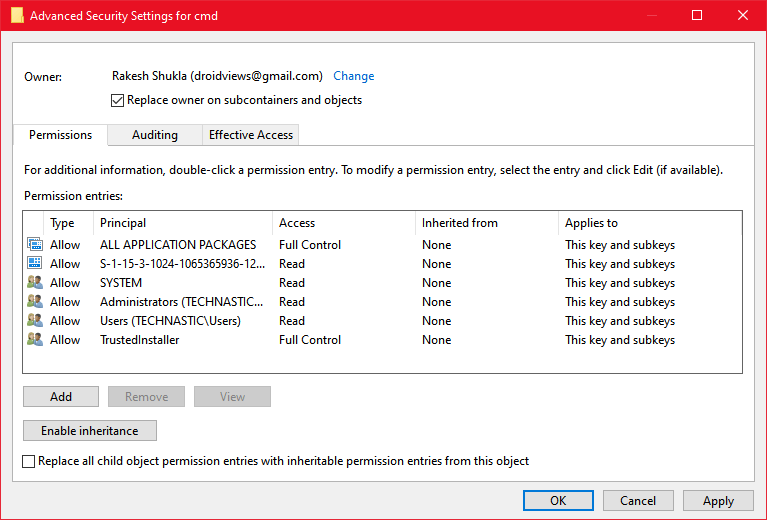
- The Advanced Security Settings window will appear. Click the Change option to change the permission settings for the Owner.

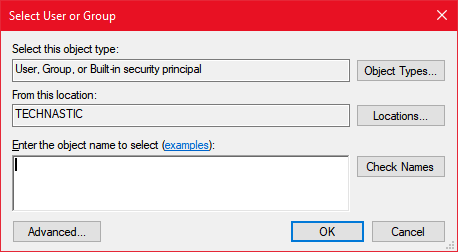
- In the Select User or Group window, click the Advanced button.

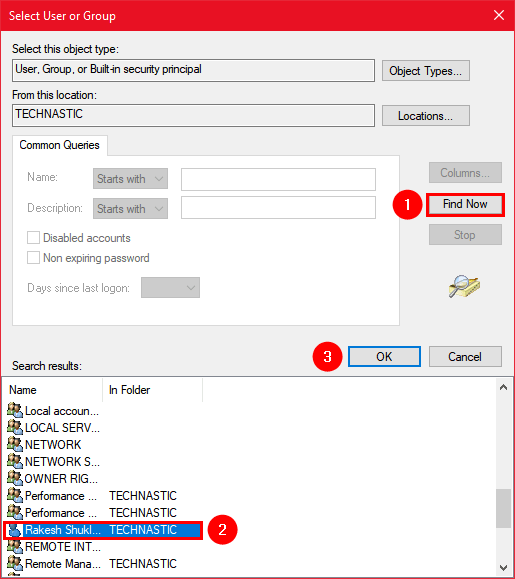
- In the window that pops up next, click the Find Now button. Then select your user group from the search results and click OK.

- When you return back to the Advanced Security Settings for cmd window, check the Replace owner on subcontainers and objects option. Then click Apply and OK respectively.
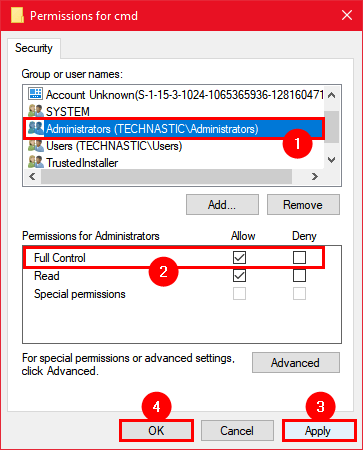
- Finally, you’ll return to the Permissions for cmd window from where you initially started. Now, select Administrators under Group or user names, and check the Allow box next to Full Control under Permissions for Administrators. Click the Apply button followed by OK.
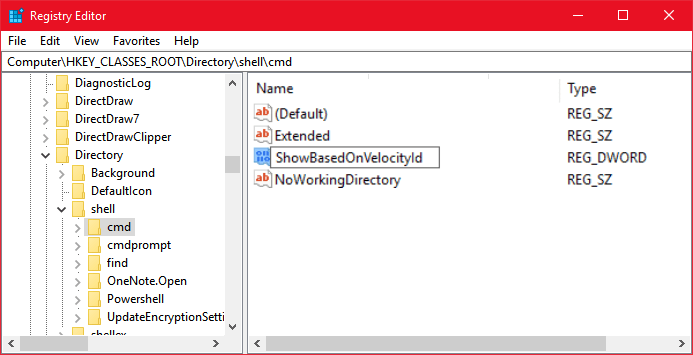
- When you come back to HKEY_CLASSES_ROOTDirectoryshellcmd path in the Registry Editor, right-click on the HideBasedOnVelocityId entry. Choose the Rename option.

- Rename the entry to ShowBasedOnVelocityId.

- As soon as the name of the DWORD entry is changed, PowerShell will be replaced by CMD in the right-click menu in Windows 10 or 11.


Done! Now, open a folder and press the Shift key + right-click. You should be able to open Command Prompt instead of PowerShell in a folder. Actually, you’ll have the options to open PowerShell and Command Prompt both in the context menu in the File Explorer.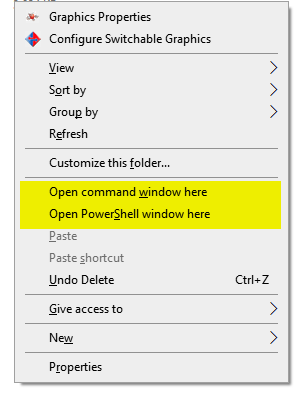
In case you want to remove the Open PowerShell window here option from the File Explorer context menu do as directed below. The steps are almost the same as you went through a while ago to replace PowerShell with the Command Prompt in the right-click menu.
- Open Registry Editor and navigate to HKEY_CLASSES_ROOTDirectoryshellPowerShell.
- Right-click on PowerShell and then select Permissions from the context menu.
- Now repeat Steps 5-10 from above.
- After that, right-click on ShowBasedOnVelocityId and rename it to HideBasedOnVelocityId.
- The Open Powershell window here option will be removed from the context menu.
In case you want to replace the Command Prompt with PowerShell in the File Explorer right-click menu, follow the quick steps described below.
- Open the Registry Editor and navigate to HKEY_CLASSES_ROOTDirectoryshellcmd.
- Right-click on ShowBasedOnVelocityld and rename it to HideBasedOnVelocityld.
- Now, navigate to HKEY_CLASSES_ROOTDirectoryshellPowerShell, right-click on HideBasedOnVelocityld and rename it to ShowBasedOnVelocityld.
I hope you were able to replace PowerShell with CMD in Windows 10 or 11 (or vice versa) using this tutorial. In case you get stuck at any step and need help or just have something to share about the topic, feel free to drop us a comment.
Also, if you own an old laptop or PC that doesn’t support the Windows 11 upgrade the official way, read our tutorial about installing Windows 11 on unsupported hardware (CPU or TPM).
Read Next: How to Enable God Mode on Windows 10 & 11
Switch to Command Prompt or Powershell within a few clicks
by Milan Stanojevic
Milan has been enthusiastic about technology ever since his childhood days, and this led him to take interest in all PC-related technologies. He’s a PC enthusiast and he… read more
Updated on September 19, 2022
Reviewed by
Vlad Turiceanu

Passionate about technology, Windows, and everything that has a power button, he spent most of his time developing new skills and learning more about the tech world. Coming… read more
- If you want to change the default Terminal in Windows 11, just modify a single setting from the command-line application.
- Windows 11 supports multiple shells, so you’re entitled to change the default shell and pick the one that works best in your case.
- When using this OS, note that you don’t have to set Windows Terminal since it’s already a default command-line tool.
XINSTALL BY CLICKING THE DOWNLOAD FILE
- Download Restoro PC Repair Tool that comes with Patented Technologies (patent available here).
- Click Start Scan to find Windows 11 issues that could be causing PC problems.
- Click Repair All to fix issues affecting your computer’s security and performance
- Restoro has been downloaded by 0 readers this month.
Windows Terminal is the default command-line tool on Windows 11, and it works as a replacement for the PowerShell and Command Prompt.
The software has many improvements, and it can run various shell interfaces side by side, so you won’t have to learn to use a new tool from scratch.
Thanks to this feature, there’s no need to start Command Prompt, PowerShell, or any other shell individually since you can run them all from a single application.
Windows Terminal can run multiple shell interfaces, therefore many users are wondering is it possible to set a default command-line shell.
We’re happy to inform you that this is one of the features that the Terminal supports, and in this guide, we’re going to show you how to easily change the default Terminal in Windows 11.
Is Windows Terminal a new application?
Windows Terminal is a modern terminal app for Windows that works with various shells such as Command Prompt, PowerShell, and Windows Subsystem for Linux.
Do keep in mind that Windows Terminal isn’t a new application. It was released in 2019 and it is available for download from the Microsoft Store for Windows 10.
You can easily install Windows Terminal when using Windows 10, yet with Windows 11, the Terminal is now the default command-line application, so there’s no need to download and install it separately.
Are Command Prompt and Windows PowerShell still available in Windows 11?
Yes, Command Prompt and Windows PowerShell are available in Windows 11, and Windows Terminal can run both of them or any other installed shell interface.
If you want to use PowerShell or Command Prompt instead of Windows Terminal, you can just search for them and open the app the same way you did on previous versions of Windows.
How can I change the default Terminal in Windows 11?
1. Change the Terminal settings
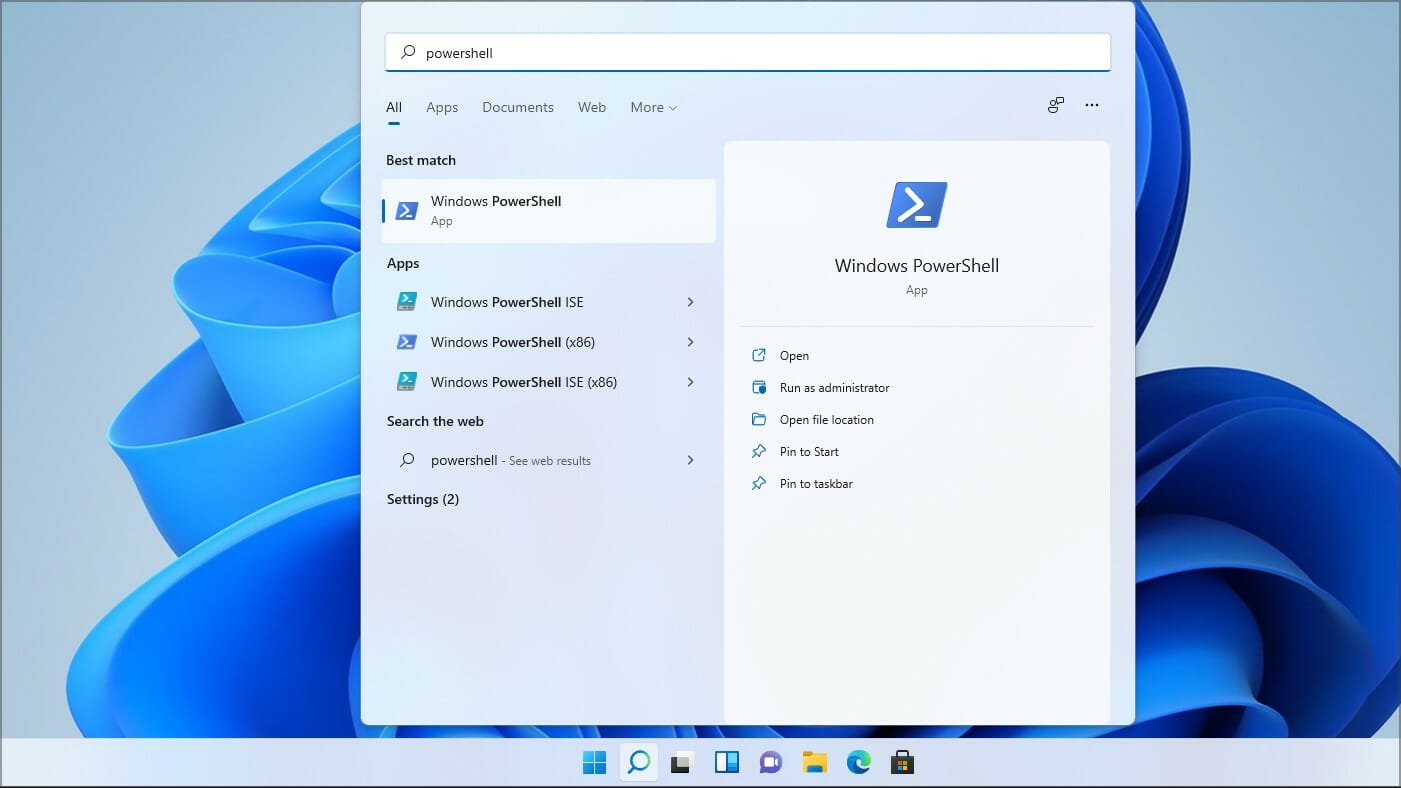
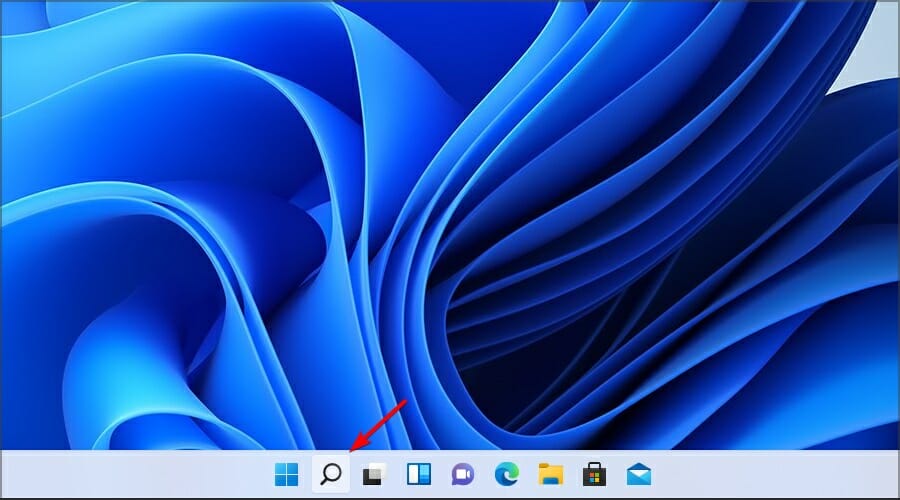
1. Click the Search icon in the Taskbar.
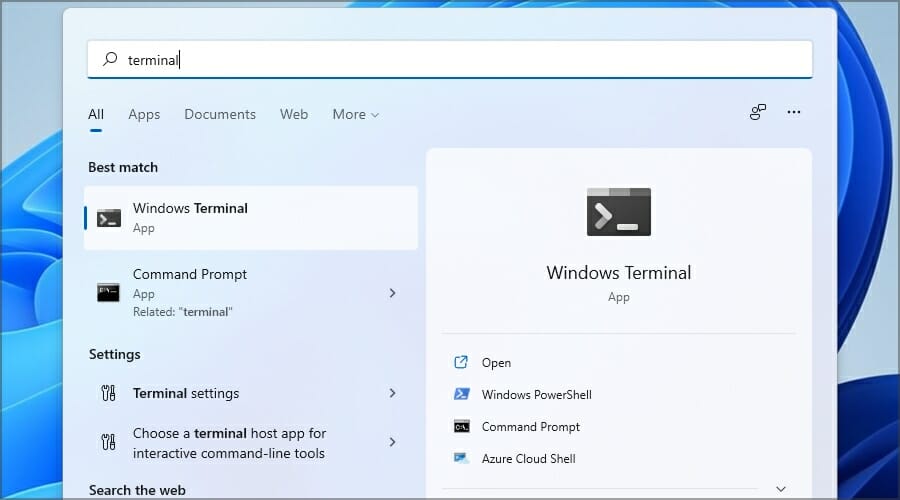
2. Now type Windows Terminal in the search box and select the app from the list of results.
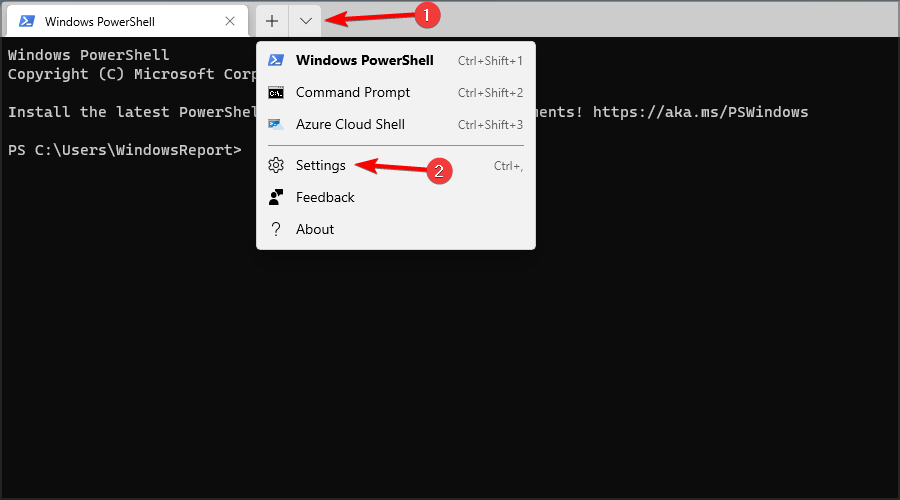
3. Click the down arrow next to the Open tab and choose Settings from the menu.
Some PC issues are hard to tackle, especially when it comes to corrupted repositories or missing Windows files. If you are having troubles fixing an error, your system may be partially broken.
We recommend installing Restoro, a tool that will scan your machine and identify what the fault is.
Click here to download and start repairing.
4. Now select the desired Default profile.
5. Click Save.
In order to change the default terminal on Windows 11, you can access Windows Terminal’s settings and modify them to your liking.
Your default command-line shell can be changed, and each time you start the Terminal, the selected application will be used to process your commands.
2. Change the Command Prompt or PowerShell settings
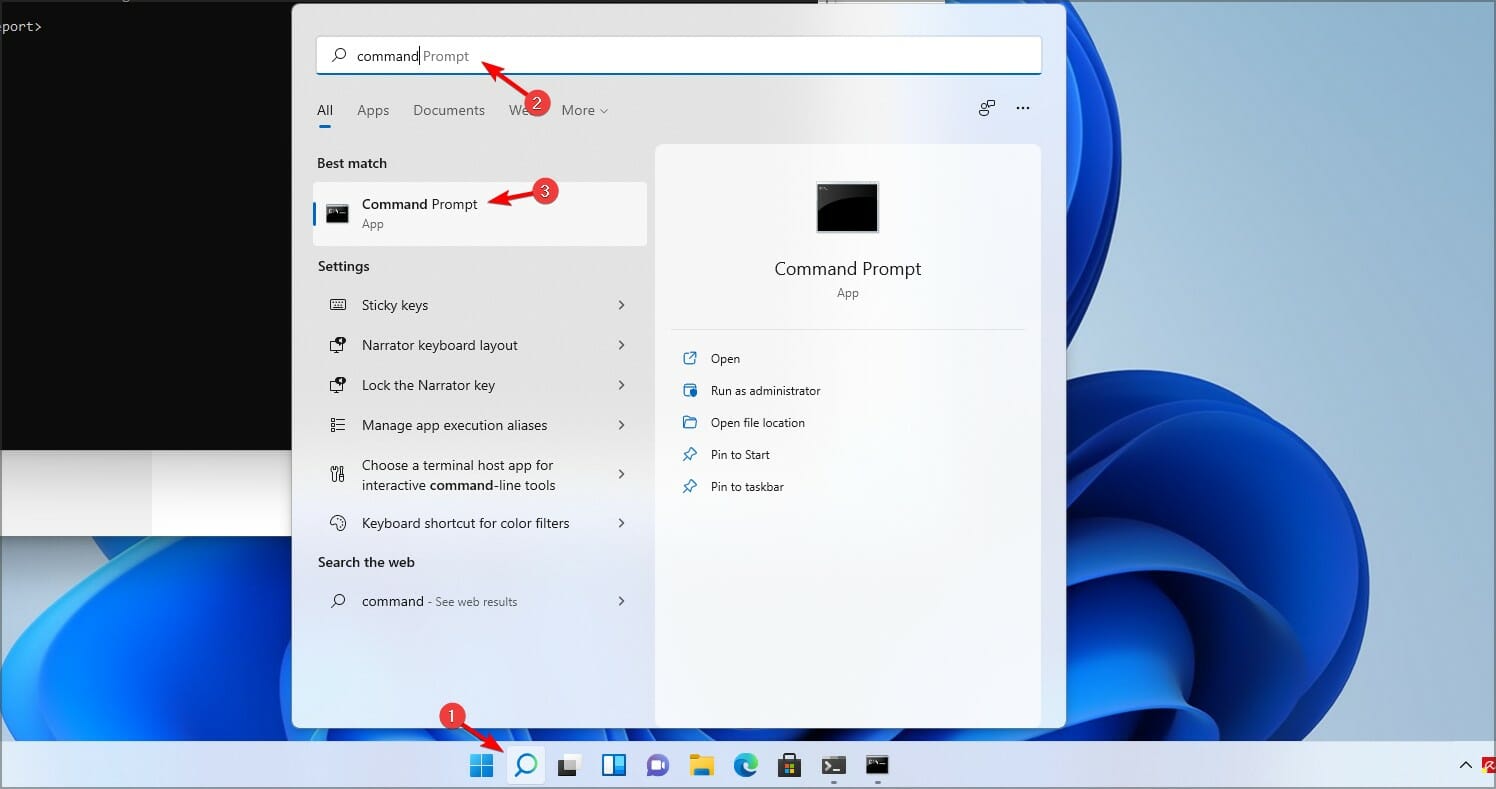
- Open Command Prompt (or PowerShell). You can do that by opening Search, typing command prompt, and choosing Command Prompt from the list of results.

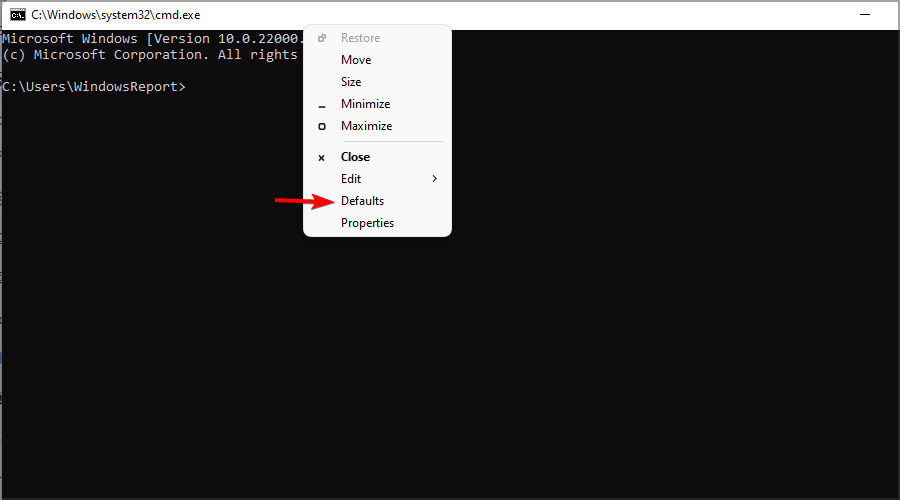
- Right-click the title bar and choose Defaults.

- Navigate to the Terminal tab and change the Default Terminal Application. Click OK to save the changes.


If you have issues starting PowerShell, be sure to check our Windows PowerShell has stopped working guide to see how to fix them properly.
What features does Windows Terminal have?
Windows Terminal has many unique features, and the first one that you’ll notice is the multi-tab interface allowing you to have several tabs open.
This is crucial because the Terminal works with multiple shells, so you can take advantage of both Command Prompt and PowerShell from a single application.
Customization features are plentiful and you can rename tabs, give them different colors to distinguish them better, or change the color scheme of the entire application.
Lastly, Windows Terminal has a dedicated search feature allowing you to easily find any output.
How can I open Windows Terminal?
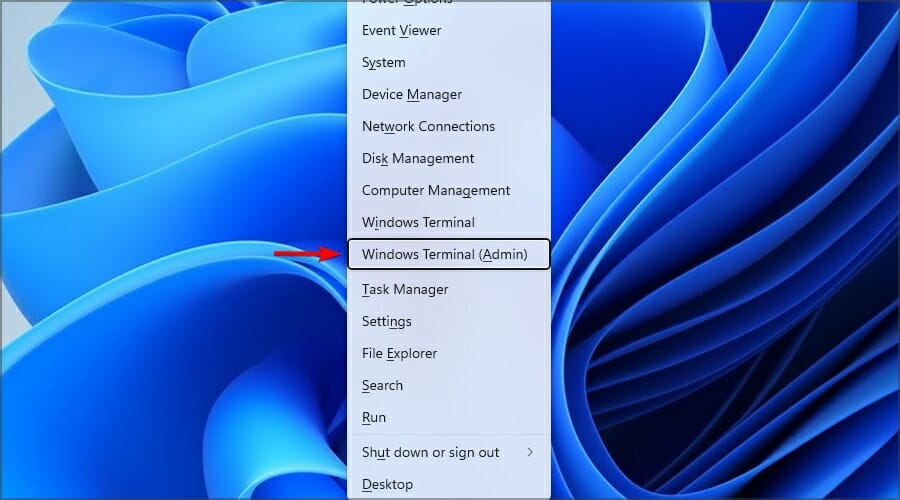
- Press Windows Key + X.
- Now select Windows Terminal from the list.
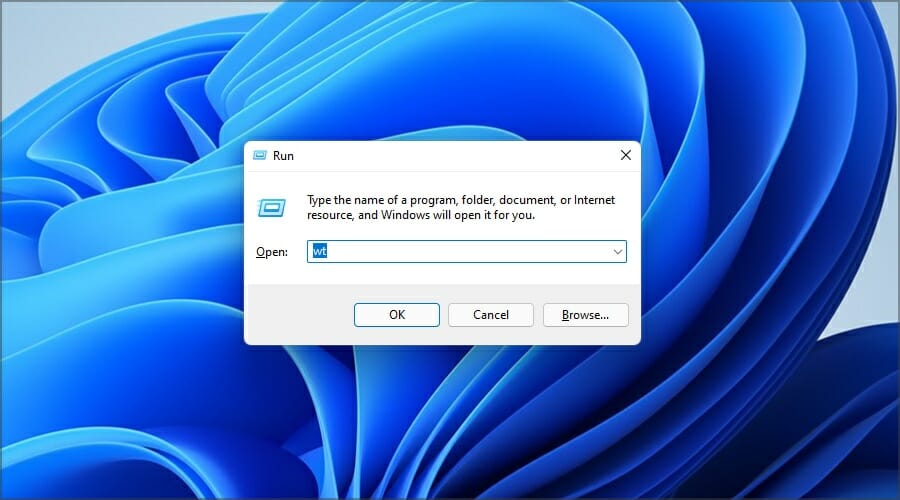
2. Use the Run dialog
- Press Windows Key + R.
- Now type wt and press Enter.
- Right-click any open directory.
- Now choose Open in Windows Terminal from the menu.
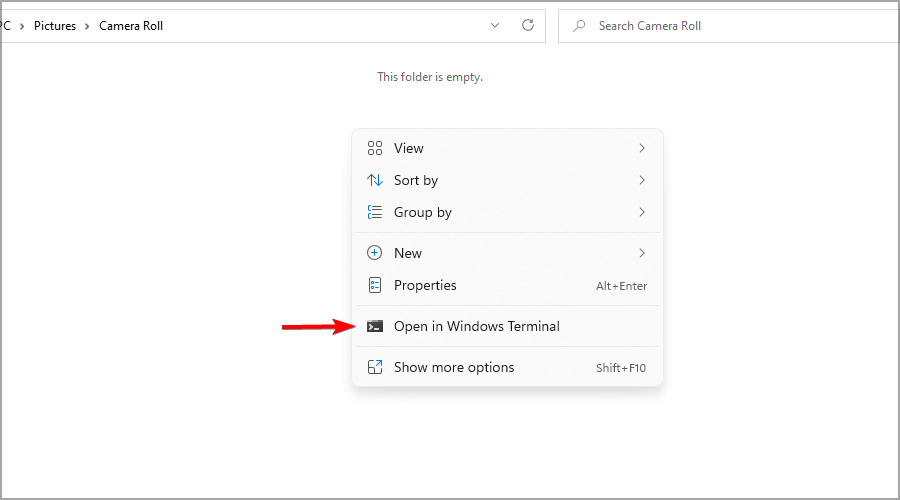
Keep in mind that this method will open the Terminal in that directory and not in the default one.
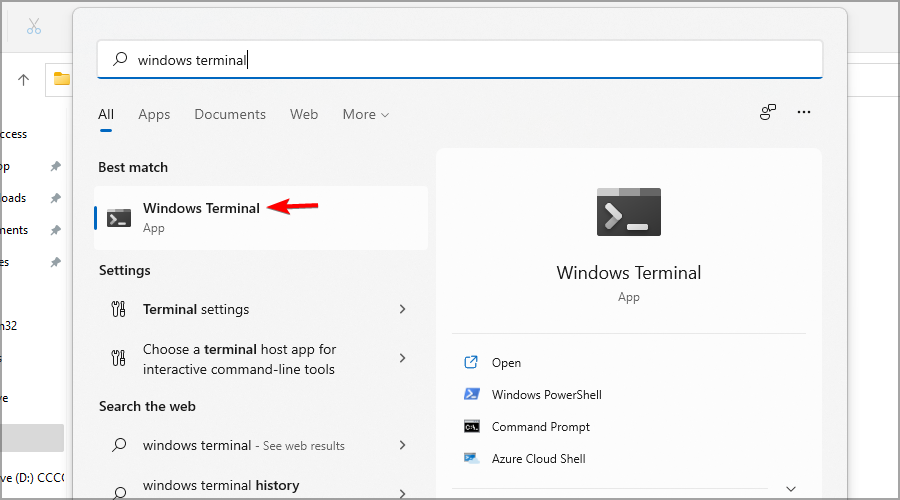
4. Use Search
- Press Windows Key + S.
- Enter Windows Terminal and select Windows Terminal from the list of results.
The Terminal is a great command-line tool, and changing the default Terminal in Windows 11 is simple and can be performed in a matter of seconds.
By default, the Terminal is set to run PowerShell, and from it, you should be able to run most commands, but if you need to switch your default shell, you are able to do it with the instructions from our guide.
Things aren’t at all complicated if you’re a Mac user either. You can quickly open a file from Mac Terminal to make commands shorter and easier to remember.
Are you using the new command line in Windows 11 as well? Let us know in the comments section below what you think of it.
Still having issues? Fix them with this tool:
SPONSORED
If the advices above haven’t solved your issue, your PC may experience deeper Windows problems. We recommend downloading this PC Repair tool (rated Great on TrustPilot.com) to easily address them. After installation, simply click the Start Scan button and then press on Repair All.
![]()
Newsletter
Switch to Command Prompt or Powershell within a few clicks
by Milan Stanojevic
Milan has been enthusiastic about technology ever since his childhood days, and this led him to take interest in all PC-related technologies. He’s a PC enthusiast and he… read more
Updated on September 19, 2022
Reviewed by
Vlad Turiceanu
Passionate about technology, Windows, and everything that has a power button, he spent most of his time developing new skills and learning more about the tech world. Coming… read more
- If you want to change the default Terminal in Windows 11, just modify a single setting from the command-line application.
- Windows 11 supports multiple shells, so you’re entitled to change the default shell and pick the one that works best in your case.
- When using this OS, note that you don’t have to set Windows Terminal since it’s already a default command-line tool.
XINSTALL BY CLICKING THE DOWNLOAD FILE
- Download Restoro PC Repair Tool that comes with Patented Technologies (patent available here).
- Click Start Scan to find Windows 11 issues that could be causing PC problems.
- Click Repair All to fix issues affecting your computer’s security and performance
- Restoro has been downloaded by 0 readers this month.
Windows Terminal is the default command-line tool on Windows 11, and it works as a replacement for the PowerShell and Command Prompt.
The software has many improvements, and it can run various shell interfaces side by side, so you won’t have to learn to use a new tool from scratch.
Thanks to this feature, there’s no need to start Command Prompt, PowerShell, or any other shell individually since you can run them all from a single application.
Windows Terminal can run multiple shell interfaces, therefore many users are wondering is it possible to set a default command-line shell.
We’re happy to inform you that this is one of the features that the Terminal supports, and in this guide, we’re going to show you how to easily change the default Terminal in Windows 11.
Is Windows Terminal a new application?
Windows Terminal is a modern terminal app for Windows that works with various shells such as Command Prompt, PowerShell, and Windows Subsystem for Linux.
Do keep in mind that Windows Terminal isn’t a new application. It was released in 2019 and it is available for download from the Microsoft Store for Windows 10.
You can easily install Windows Terminal when using Windows 10, yet with Windows 11, the Terminal is now the default command-line application, so there’s no need to download and install it separately.
Are Command Prompt and Windows PowerShell still available in Windows 11?
Yes, Command Prompt and Windows PowerShell are available in Windows 11, and Windows Terminal can run both of them or any other installed shell interface.
If you want to use PowerShell or Command Prompt instead of Windows Terminal, you can just search for them and open the app the same way you did on previous versions of Windows.
How can I change the default Terminal in Windows 11?
1. Change the Terminal settings
1. Click the Search icon in the Taskbar.
2. Now type Windows Terminal in the search box and select the app from the list of results.
3. Click the down arrow next to the Open tab and choose Settings from the menu.
Some PC issues are hard to tackle, especially when it comes to corrupted repositories or missing Windows files. If you are having troubles fixing an error, your system may be partially broken.
We recommend installing Restoro, a tool that will scan your machine and identify what the fault is.
Click here to download and start repairing.
4. Now select the desired Default profile.
5. Click Save.
In order to change the default terminal on Windows 11, you can access Windows Terminal’s settings and modify them to your liking.
Your default command-line shell can be changed, and each time you start the Terminal, the selected application will be used to process your commands.
2. Change the Command Prompt or PowerShell settings
- Open Command Prompt (or PowerShell). You can do that by opening Search, typing command prompt, and choosing Command Prompt from the list of results.
- Right-click the title bar and choose Defaults.
- Navigate to the Terminal tab and change the Default Terminal Application. Click OK to save the changes.
If you have issues starting PowerShell, be sure to check our Windows PowerShell has stopped working guide to see how to fix them properly.
What features does Windows Terminal have?
Windows Terminal has many unique features, and the first one that you’ll notice is the multi-tab interface allowing you to have several tabs open.
This is crucial because the Terminal works with multiple shells, so you can take advantage of both Command Prompt and PowerShell from a single application.
Customization features are plentiful and you can rename tabs, give them different colors to distinguish them better, or change the color scheme of the entire application.
Lastly, Windows Terminal has a dedicated search feature allowing you to easily find any output.
How can I open Windows Terminal?
- Press Windows Key + X.
- Now select Windows Terminal from the list.
2. Use the Run dialog
- Press Windows Key + R.
- Now type wt and press Enter.
- Right-click any open directory.
- Now choose Open in Windows Terminal from the menu.
Keep in mind that this method will open the Terminal in that directory and not in the default one.
4. Use Search
- Press Windows Key + S.
- Enter Windows Terminal and select Windows Terminal from the list of results.
The Terminal is a great command-line tool, and changing the default Terminal in Windows 11 is simple and can be performed in a matter of seconds.
By default, the Terminal is set to run PowerShell, and from it, you should be able to run most commands, but if you need to switch your default shell, you are able to do it with the instructions from our guide.
Things aren’t at all complicated if you’re a Mac user either. You can quickly open a file from Mac Terminal to make commands shorter and easier to remember.
Are you using the new command line in Windows 11 as well? Let us know in the comments section below what you think of it.
Still having issues? Fix them with this tool:
SPONSORED
If the advices above haven’t solved your issue, your PC may experience deeper Windows problems. We recommend downloading this PC Repair tool (rated Great on TrustPilot.com) to easily address them. After installation, simply click the Start Scan button and then press on Repair All.
![]()
Newsletter
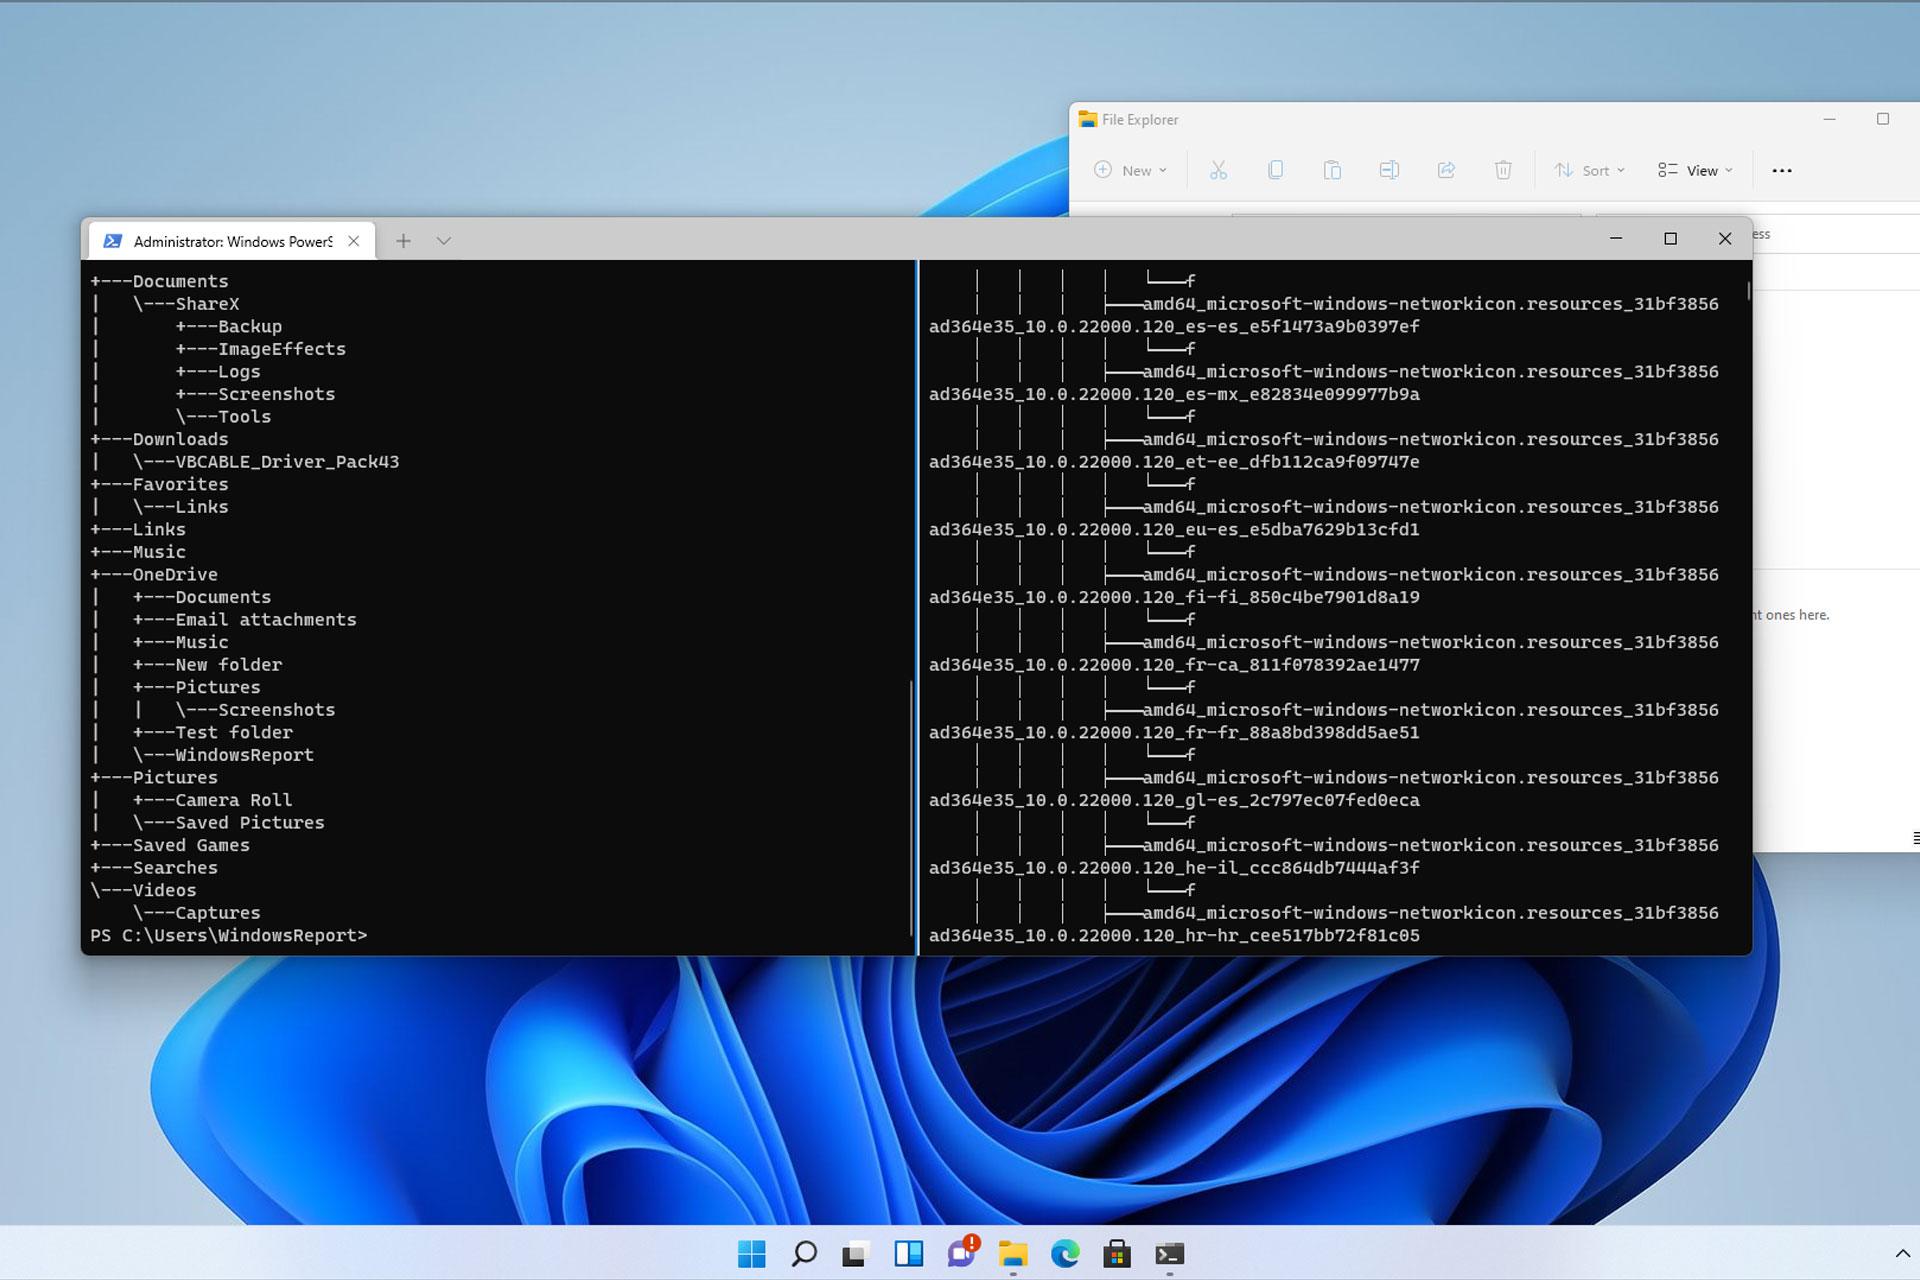
Терминал Windows — это терминальное приложение с несколькими вкладками для работы с командной строкой, PowerShell и тд. Терминал Windows обеспечивает доступность различных оболочек в одном окне — функция, которой раньше не было. Это мощный и эффективный инструмент, если вы не можете найти его на своем компьютере, просто загрузите его из Microsoft Store.
Вкладка PowerShell открывается по умолчанию при запуске терминала Windows.
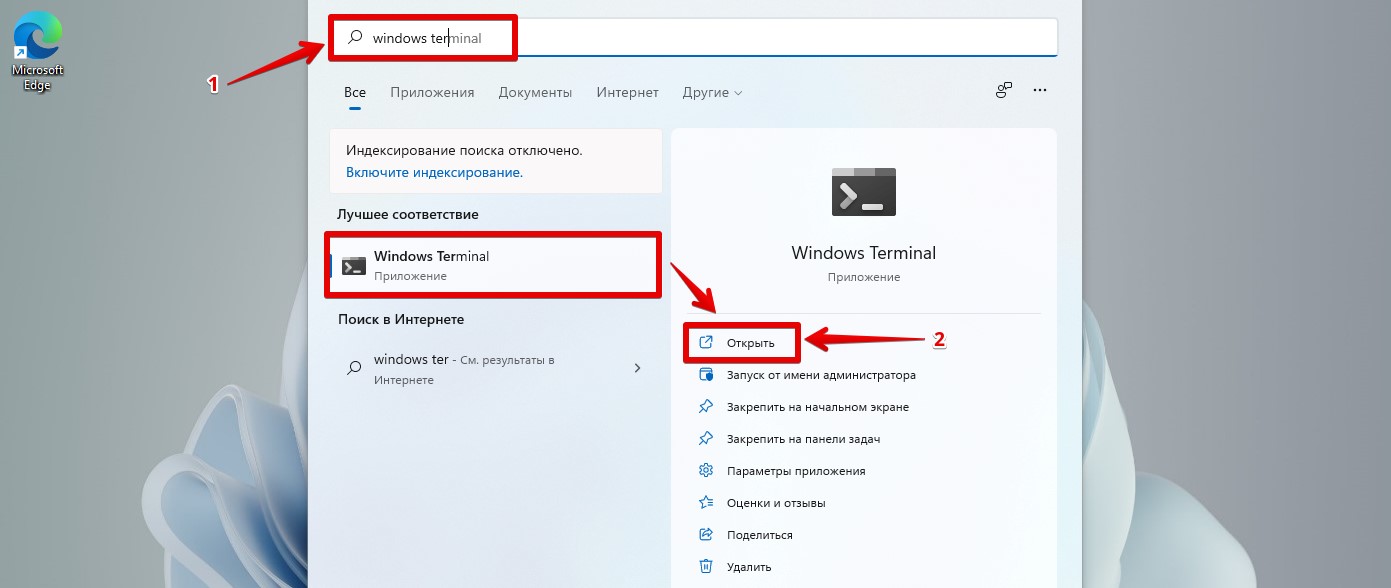
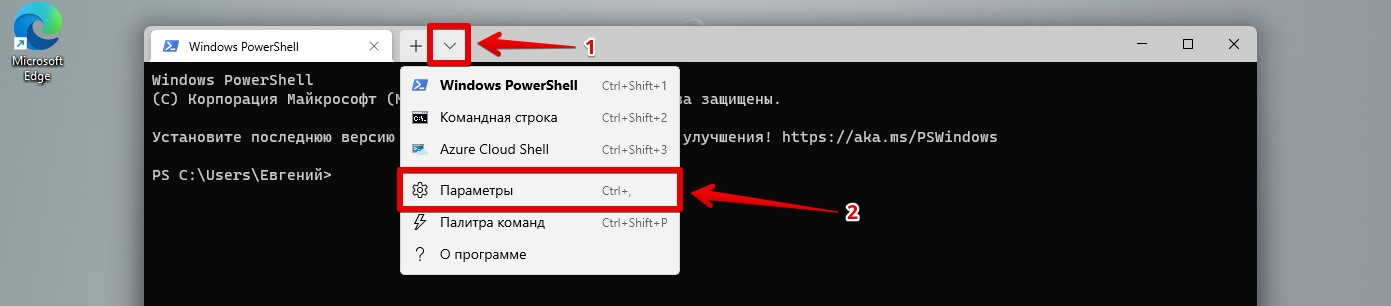
Чтобы изменить профиль по умолчанию на Командную строку в Терминале Windows, нажимаем «Win+S» на клавиатуре, чтобы открыть меню «Поиск». Затем вводим поисковый запрос «Windows Terminal» и запускаем найденное приложение.
В терминале Windows щелкаем вкладку со стрелкой вниз и выбираем «Параметры» из меню. Либо нажимаем одновременно клавиши «Ctrl» и «+».
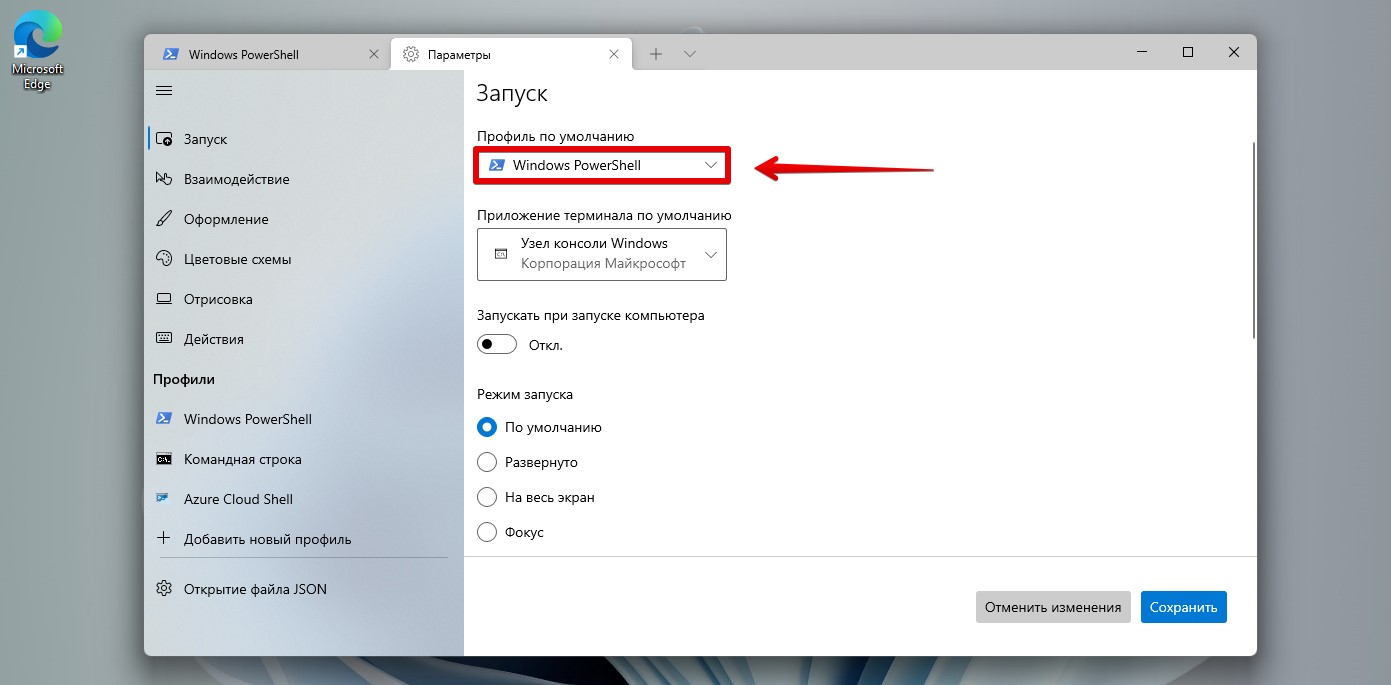
Находим раздел «Профиль по умолчанию» и щелкаем по раскрывающемуся списку.
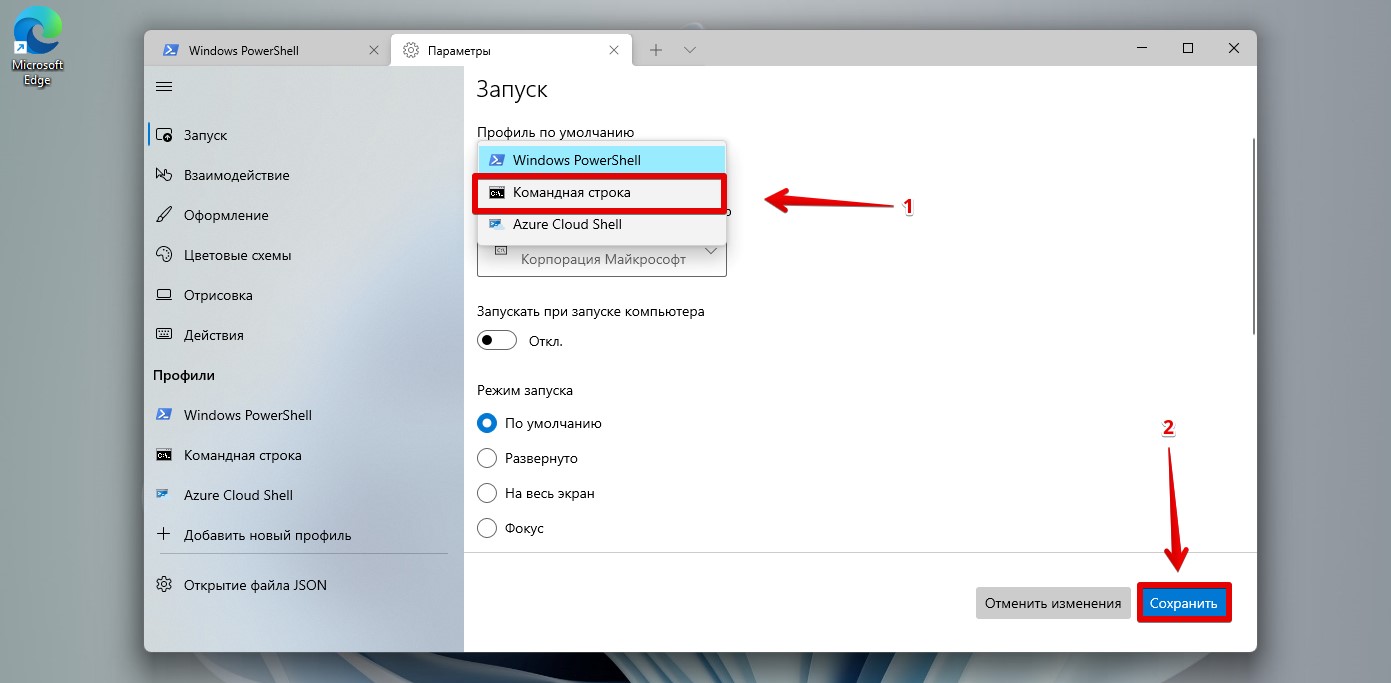
Выбираем пункт «Командная строка» и нажимаем «Сохранить«.
Теперь наш компьютер с Windows 11 будет открывать командную строку вместо PowerShell при каждом запуске Windows Terminal. Это поможет сэкономить время при навигации и открытии командной строки в последующих запусках.
Валентина: после последних обновлений почему-то в контекстных меню пропала возможность быстрого доступа и запуска Windows PowerShell (имею в виду Win X). У меня такой вопрос: есть ли какой-то не очень сложный способ поменять командную строку на более привычную для меня PowerShell: Вообще, где отыскать такие настройки, или опции…
Иногда приключаются некоторые закавыки, которые нарушают привычную работу за компьютером. Частенько все это происходит, конечно же, и из-за обновлений, либо (что тоже нередко) по вине самого пользователя (когда тот изменил настройки ОС и подзабыл о них…).
Сегодня доподлинно разберемся, каким образом заменить Windows PowerShell на Командную строку и наоборот?
-
заменить командную строку на PowerShell и наоборот — Windows 10
-
как заменить Windows PowerShell на Командную строку (cmd)
-
заменяем командную строку на PowerShell в Windows 10
Одно из встроенных средств Виндовс (разработка Microsoft) с открытым исходным кодом. Оболочка с интерфейсом командной строки (CMD), работающая по сопутствующему языку сценариев. На конференции разработчиков в сентябре 2003 года язык впервые был представлен общественности.
Аналог Командной строки — более современного формата.
Изначально средство (или командный интерпретатор) разрабатывалось как компонент Windows и мело название Windows PowerShell.
вернуться к оглавлению ↑
заменить командную строку на PowerShell и наоборот — Windows 10
Если у нас активна оболочка PowerShell, тогда дела в контекстных меню будут обстоять так, как показано на картинке ниже, а значит запустить полезную утилиту PowerShell будет очень просто:
а) запустить PowerShell возможно так (НЕ от администратора) — нажимаем кнопку на клавиатуре Shift и на пустом месте рабочего стола вызываем контекстное меню (клик правой клавишей мыши).

либо: кликаем одновременно по кнопкам Win + X (коричневая стрелка на картинке ниже) (полезные горячие клавиши
В статье будет дан список наиболее распространённых комбинаций клавиш компьютера (так называемых — Горячих клавиш) — те используются для быстрого доступа к определённым инструментам той или другой системной программы, да и самой Виндовс. Также рассмотрим важные запросы (команды) к ОС Windows через Командную строку для более эффективной работы на компьютере).

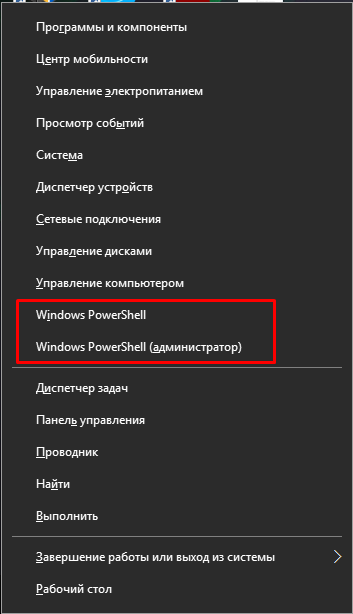
Откроется, такое меню (его еще называют Win X). Как видим, в опциях есть два варианта запустить, в данном случае, Windows PowerShell — стандартный запуск, и от имени Администратора, что в большинстве случаев предпочтительнее…
вернуться к оглавлению ↑
как заменить Windows PowerShell на Командную строку (cmd)
Чтоб заменить в контекстном меню рабочего стола (и при горячем клике Win + X) на Командную строку (cmd) поступаем таким нехитрым образом:
а) наводим курсор в трее (панель инструментов) на пустое место /коричневая стрелка/и нажимаем правую клавишу мыши…
…откроется такое вспомогательное меню Панели инструментов):
")
Переходим в меню Параметры, а именно в этом случае войдем в нужный нам конкретный раздел опций Параметры панели задач.
Запустится консоль Параметры. Что нам в нем нужно поправить…
")
…только и останется сделать, чтобы изменить оболочку Windows PowerShell на Командную строку (либо наоборот), так это то, что перевести радиокнопку в требуемое состояние: вправо или влево (на картинке выше обведено).
Например, мы хотим, чтоб обновленная оболочка Windows PowerShell в контекстных меню (для быстрого запуска) была заменена на Командную строку (cmd), переводим кнопку Влево (не в активное состояние), т.е. отключаем PowerShell.
Получится такая картинка…
")
вернуться к оглавлению ↑
заменяем командную строку на PowerShell в Windows 10
…ну и как понимаете, чтобы, соответственно, заменить командную строку на PowerShell в Windows 10 потребуется совершить все описанные шаги выше — как говорится, от обратного.
как эпилог высказанному:
Теперь вы можете работать с Командной строкой прямо из контекстных меню: Win + X или меню рабочего стола. А уж с каким из инструментов ОС Windows (PowerShell или командной строкой) предпочтительнее для вас работать, придется выбирать лично!.. Советы, в данном случае, излишни.
Оба инструмента призваны решать по сути одни и те же задачи. PowerShell считается наиболее продвинутым, современным, а потому несколько обширнее возможности.
Путь до необходимых опций: Win + I / Параметры / Персонализация / Панель задач
Напоминаю, для большинства запросов (команд) правильнее всего запускать Командную строку (да и Windows PowerShell) от имени Администратора! НЕ забывайте..!
Желаю вам всяческих успехов..! и, конечно же, читайте наш сайт Комплитра.
Если что-то не ясно и остались вопросы, делитесь ими в комментариях…
все статьи:  Сергей Кролл ATs владелец, автор cайта COMPLITRA.RU
…веб разработчик студии ATs media — запросто с WordPress
занимаюсь с 2007-года веб разработкой — преимущественно работаю с WordPress в студии ATs media
Те, то уже пользовались PowerShell знают, что она почти тоже самое, что и командная строка, только с большими возможностями. Подробнее о PowerShell читаем здесь.
Итак, когда мы нажимаем на меню Win+X, его еще называют меню WinX, там появляются различные пункты работы с системой. Также там есть и командная строка, которую мы можем открыть, как от имени пользователя, так и от имени администратора. Но что, если заменить ее на другую утилиту, скажем подобную, которая имеет название PowerShell?
Это интересно: Как с помощью PowerShell загрузить файл на компьютер?
Давайте перейдем в параметры системы, для этого нажимаем Win+I, либо перейдем туда из меню Пуск. После открытия окна нажимаем на «Персонализация».
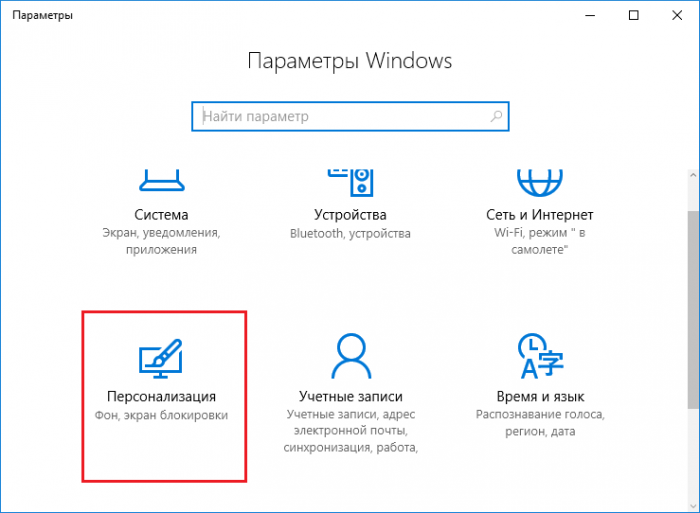
Слева переходим в пункт «Панель задач». При отображении новых элементов справа, мы должны поставить там во включенное положение пункт «Заменить командную строку оболочкой Windows PowerShell в меню…».
Далее вы можете нажать комбинацию Win+X и увидеть, что наши параметры уже работают.
Второй способ – файл bat
Это интересно: Что делать, если в Windows 10 не открывается меню пуск? [Утилита исправления]
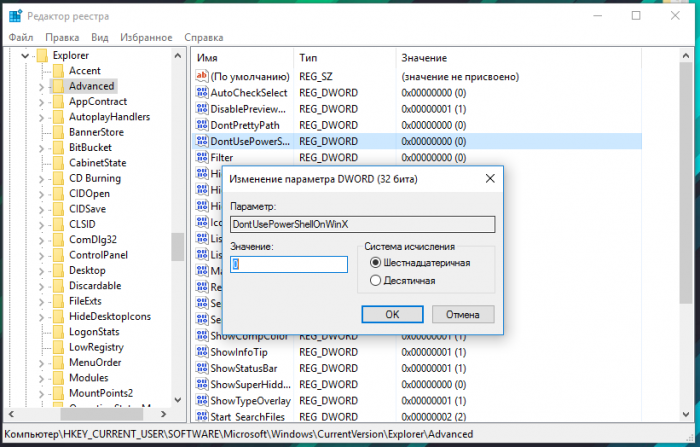
Ребята, можно изменить командную строку на PowerShell с помощью реестра. Открываем реестр с помощью Win+R и вводим туда команду regedit. Потом идем вот в такой раздел:
HKEY_CURRENT_USERSOFTWAREMicrosoftWindowsCurrentVersionExplorerAdvanced
Там находим параметр DontUsePowerShellOnWinX. Если его значение равно 0 – будет показываться PowerShell, если значение 1 – это командная строка.
Можно, конечно, поступить еще проще – скачать уже готовые bat-файлы. У меня вполне безопасны, поэтому насчет вирусов можете не беспокоится.
- Замена командной строки на PowerShell – https://yadi.sk/d/uzXkQi2DzWgyN
- Замена PowerShell на командную строку – https://yadi.sk/d/RpL4ECxdzWh5Z
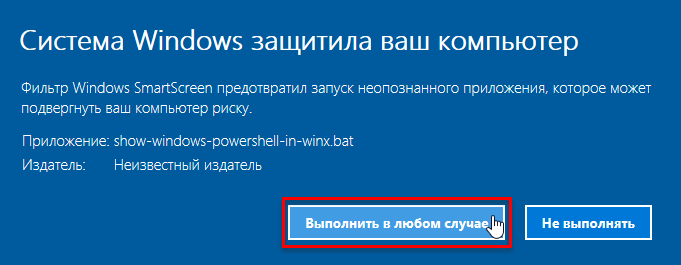
Чтобы впервые запустить данный файл понадобится в открывшемся окне нажать кнопку «Подробнее», а потом «Выполнить в любом случае».
Таким образом, вы моете заменять командную строку на оболочку PowerShell и наоборот.
Существует три способа заменить Терминал на Командную Строку в Windows 11 и поставить его в качестве консоли приложение. Консоль по умолчанию — это процесс, в котором открываются при запуске программы для командной строки, такие как diskpart или sfc.
Консоль по умолчанию также отвечает за запуск интерпретаторов PowerShell, командной строки и WSL. Они выполняются внутри процесса консоли, который обрабатывает их вывод и предоставляет им определенные системные ресурсы.
Windows 11 позволяет вам установить Терминал Windows или классическую консоль (conhost) в качестве программного обеспечения консоли по умолчанию. Со второй вы уже наверняка знакомы, так как она доступна в Windows десятилетиями.
Приложение «Терминал Windows» — это новое современное приложение, которое значительно расширяет возможности окна командной строки. Он поддерживает вкладки, отрисовку текста с графическим ускорением, профили, настраиваемый внешний вид и горячие клавиши, а также многое другое.
С Терминалом Windows вы сможете запустить PowerShell, WSL и командную строку одновременно в одном окне, но в разных вкладках, поскольку каждый из инструментов будет иметь свой собственный профиль.
С conhost в качестве консоли PowerShell, WSL и командная строка будут работать в своих собственных окнах и будут ограничены классическим набором функций.
Существует три способа изменить консоль по умолчанию в Windows 11. Вы можете установить предпочтительное приложение, выполняющее роль командной строки, с помощью Параметров Windows, непосредственно из настроек терминала Windows, а также в свойствах окна классической командной строки. Давайте рассмотрим эти методы.
Как заменить Терминал Windows на Командную Строку в Параметрах
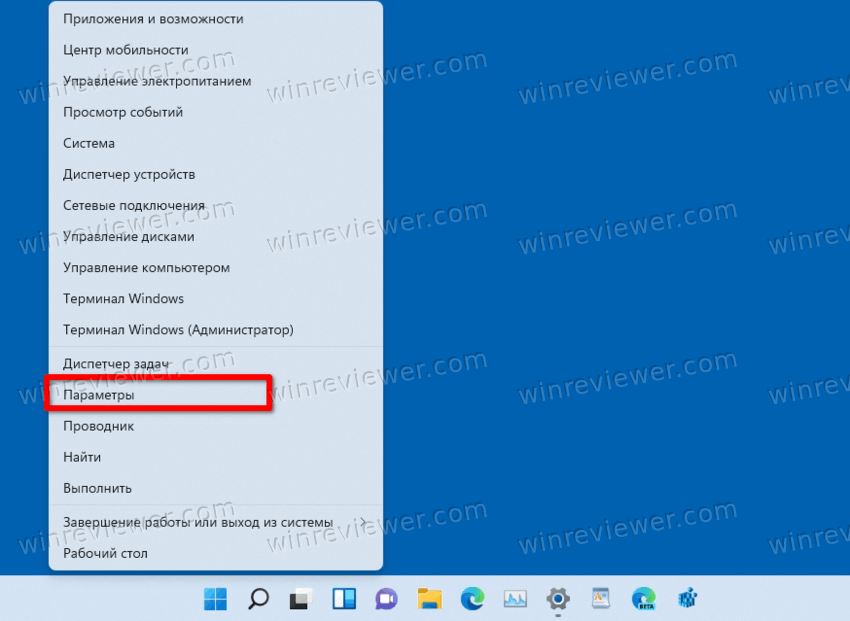
- Щелкните правой кнопкой мыши кнопку «Пуск» и выберите в меню «Параметры».

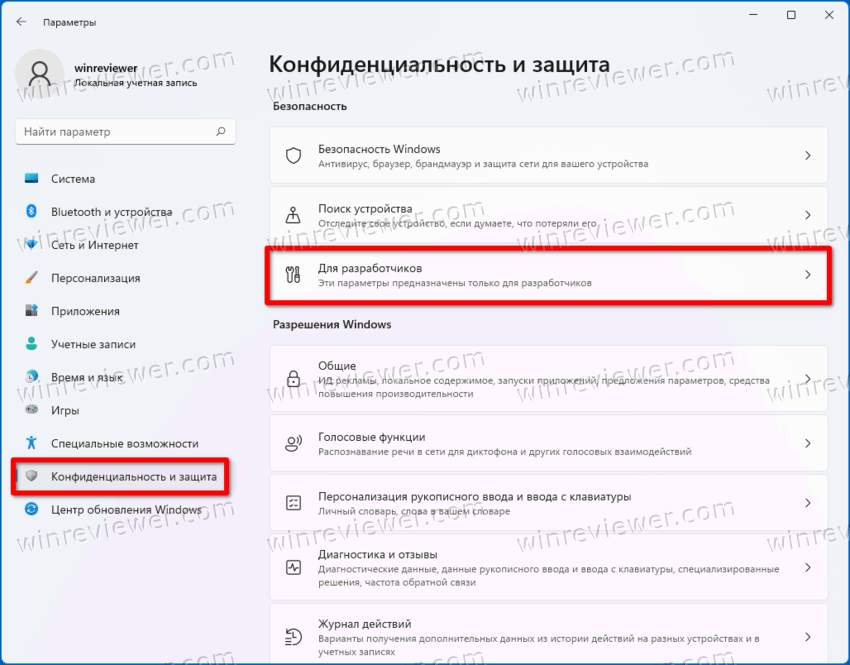
- Слева выберите Конфиденциальность и безопасность. Справа нажмите Для разработчиков.

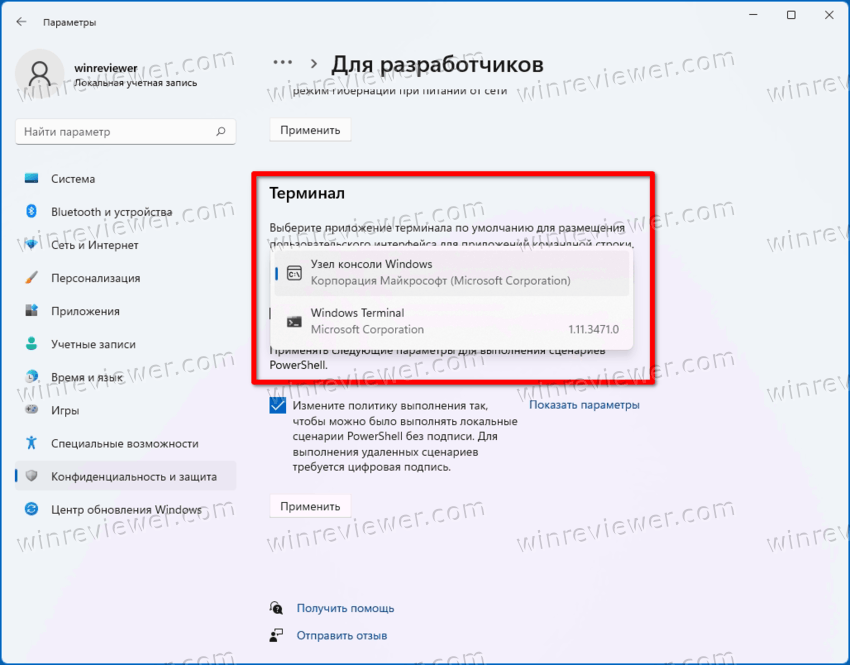
- На следующей странице выберите Узел консоли Windows, чтобы использовать классическую Командную строку по умолчанию, в раскрывающемся меню Терминал.
- Соответственно, опция Терминал Windows сделает приложение консолью по умолчанию.
Готово!
Помимо приложения «Параметры системы», вы можете указать предпочитаемое консольное приложение прямо в настройках Терминала Windows. Он имеет очень тесную интеграцию с ОС, например он доступен в контекстном меню проводника.
Изменить консоль по умолчанию в Windows 11 в настройках терминала Windows
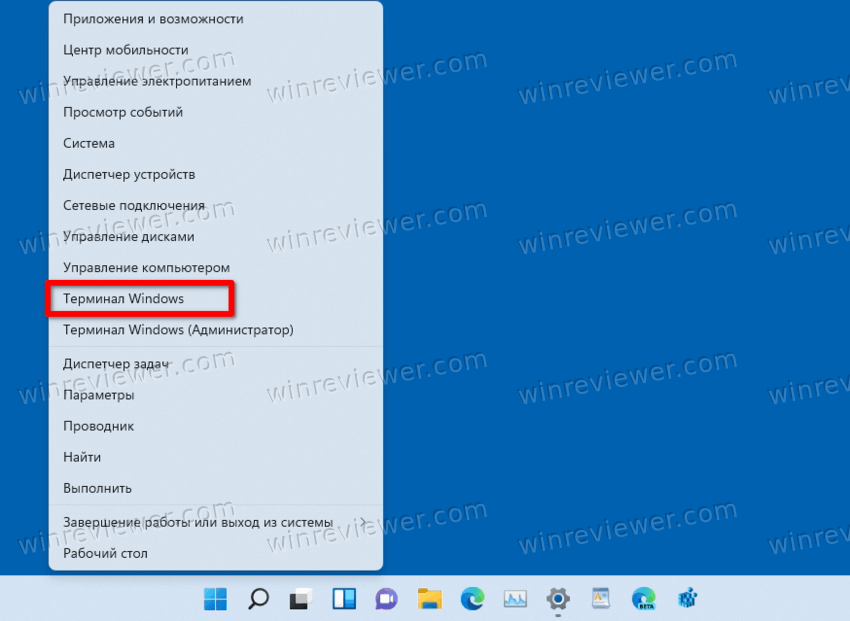
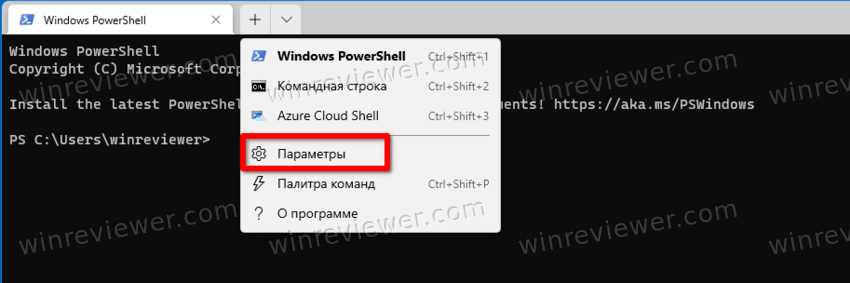
- Нажмите Win + X и выберите Терминал Windows из меню.
- В Терминале Windows нажмите кнопку со стрелкой вниз и выберите «Параметры».

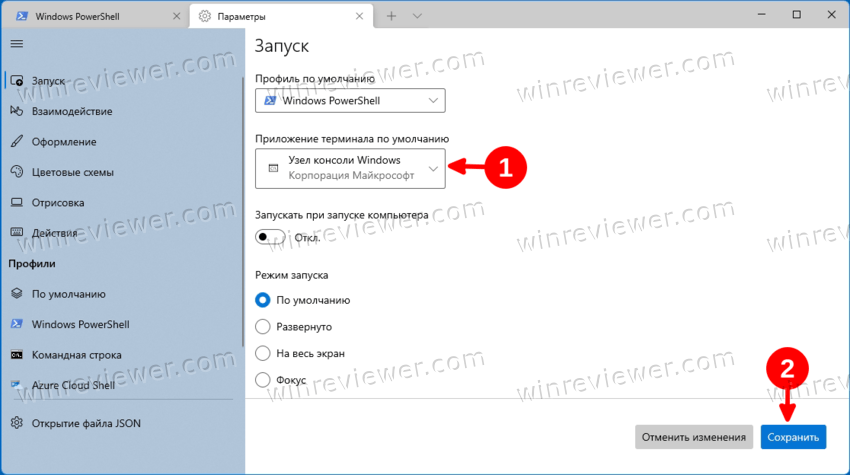
- В левой панели настроек выберите Запуск.
- Справа выберите Терминал Windows или Узел консоли Windows в раскрывающемся меню Терминальное приложение по умолчанию.

- Нажмите кнопку «Сохранить», чтобы применить изменения.
Готово!
Наконец, вы можете изменить предпочтительное приложение терминала прямо в параметрах командной строки. Имейте в виду, что этот метод работает только в том случае, если текущее приложение терминала настроено на Хост консоли Windows, а не на Windows Terminal. Сделайте следующее.
Как изменить приложение терминала по умолчанию в свойствах командной строки
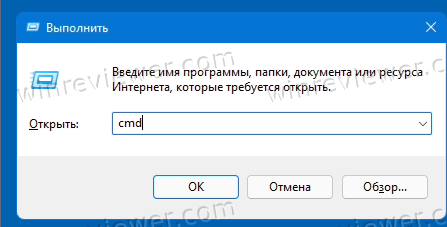
- Нажмите Win + R и введите
cmd.exeв поле «Выполнить», чтобы открыть новую командную строку.
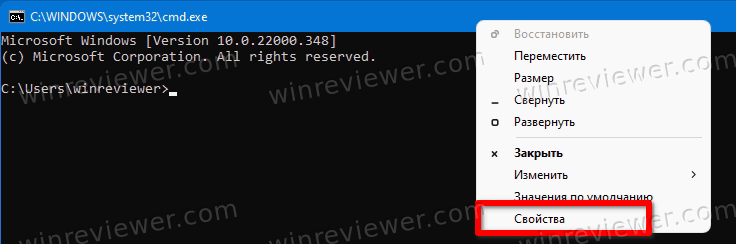
- Щелкните правой кнопкой мыши строку заголовка и выберите в меню «Свойства».

- Перейдите на вкладку «Терминал» в диалоговом окне «Свойства».
- В разделе «Терминальное приложение по умолчанию» выберите либо Узел консоли Windows, либо Терминал Windows.

- Щелкните ОК, чтобы сохранить изменения.

Готово!
Опять же, вы не сможете открыть свойства командной строки, если вы уже установили в качестве консоли по умолчанию терминал Windows. В этом случае вы должны использовать любой из методов, рассмотренных выше, чтобы переключить его обратно на Windows Console Host.
На этом всё.
Источник: Winaero
💡Узнавайте о новых статьях быстрее. Подпишитесь на наши каналы в Telegram и Twitter.
Судя по тому, что вы читаете этот текст, вы дочитали эту статью до конца. Если она вам понравилась, поделитесь, пожалуйста, с помощью кнопок ниже. Спасибо за вашу поддержку!