
Любой среднестатистический пользователь компьютера ежедневно загружает или удаляет файлы. При использовании второго сценария данные либо попадают в корзину, либо исчезают с накопителя полностью без предупреждений. Но владелец устройства может активировать подтверждение удаления файлов в операционной системе Windows 10, которое будет спрашивать его о намерениях в виде дополнительного окна.
Зачем включать в Windows окно подтверждения удаления?
Существует немало стереотипных шуток касательно разного рода подтверждающих окон. Но на самом деле в них есть определенная польза.

Судите сами, для удаления лишней информации владельцы ПК идут двумя путями:
- нажимают на кнопку «Удалить» из диалогового окна, вызываемого кликом ПКМ по ненужному файлу;
- нажимают на клавишу «Del».
Если в первом случае пользователь отдает себе отчет, что после нажатия на заветную кнопку файл исчезнет, то во втором сценарии велик риск случайного удаления информации. Обычно клавиша «Del» располагается в ряду функциональных F-кнопок. Поэтому вместо нажатия на «F12» хозяин ПК может попасть по клавише «Del», и тогда данные будут удалены.

Хорошо, если файл попадет в корзину, и у пользователя останется возможность восстановления. Но, когда места на компьютере мало, или удаляемая информация имеет большой размер, данные исчезают бесследно. Задумываясь над этим, мнение относительно подтверждающего окна меняется на 180 градусов, и человек уже пытается найти способ активации не такой уж бесполезной функции.
Как включить?
По умолчанию на компьютерах с Windows 10 функция не работает. Связано это с тем, что пользователи нередко жаловались разработчикам на назойливые окна при удалении. Программистами Microsoft было отключить эту опцию, но при желании любой владелец компьютера может вновь ее активировать одним из способов, представленных ниже.
Через настройки
Это самый простой способ включения подтверждающего окна. Для его реализации придется настроить корзину:
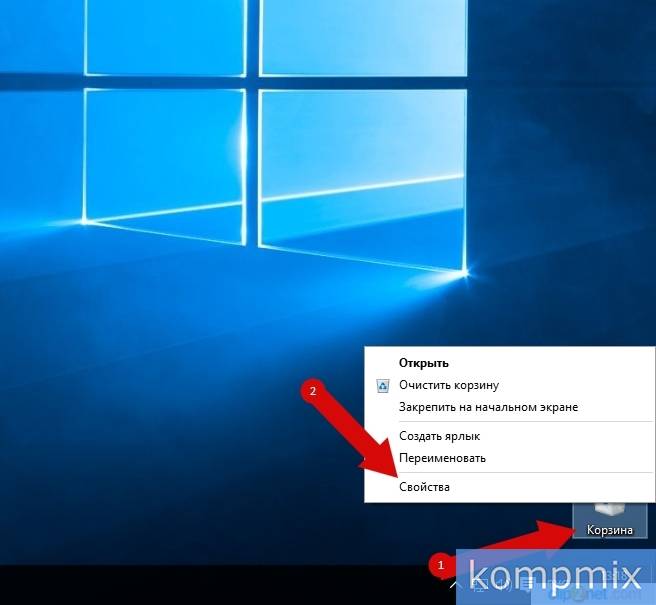
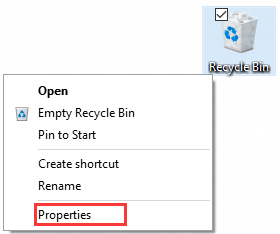
- Щелкните ПКМ по иконке корзины, расположенной на рабочем столе.
- Перейдите в «Свойства»
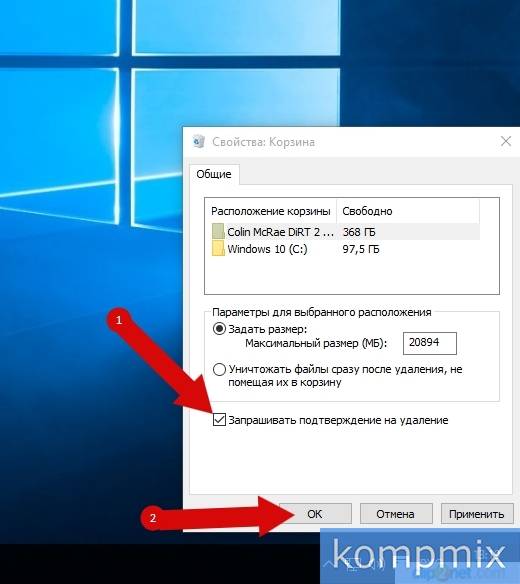
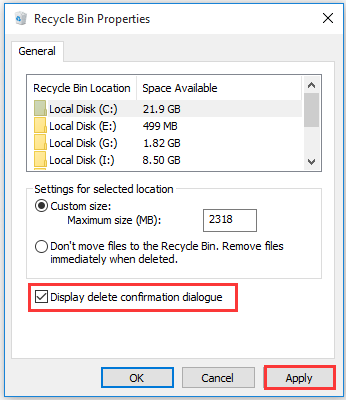
- Отметьте галочкой пункт «Запрашивать подтверждение на удаление».
- Нажмите на кнопку «Применить», чтобы сохранить изменения, а затем покиньте меню настроек.
Изменения сразу же вступят в силу, и вам не придется беспокоиться о сохранности файлов. Перезагрузка устройства тоже не требуются. А при желании вы можете изменить другие настройки корзины через меню «Свойств». Например, увеличить или уменьшить ее размер.
С помощью реестра
С точки зрения простоты использования этот способ можно назвать более сложным. В отличие от предыдущего варианта, пользователь делает запрос на активацию функцию вручную, а не автоматически. Но, если настройки корзины не помогли включить подтверждение удаления, то иных способов не остается:
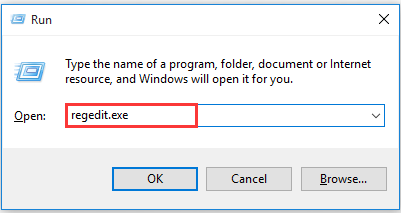
- Откройте окно «Выполнить», зажав клавиши «Win» + «R».
- Введите запрос «regedit» и нажмите на кнопку «ОК».

- Перейдите по пути KEY_CURRENT_USERSOFTWAREMicrosoftWindowsCurrentVersionPoliciesExplorer.
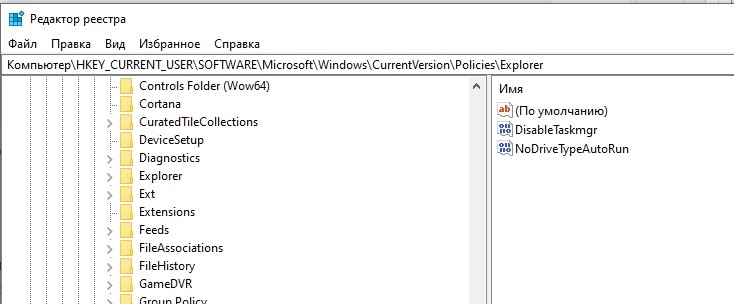
- Щелкните ПКМ и под именем «ConfirmFileDelete» создайте 32-битный параметр DWORD.
- Двойным кликом ЛКМ откройте настройки параметра.
- Присвойте ему значение «1».
- Сохраните настройки.

Выполнив все шаги из указанного алгоритма, вы заставите компьютер спрашивать его владельца о своем намерении перед удалением файлов.
Редактор групповой политики
Заключительный вариант, который подойдет только владельцам ПК на базе Windows 10 Pro, Enterprise или Education:
- Через окно «Выполнить» обработайте запрос «gpedit.msc».

- Перейдите по пути Конфигурация пользователяАдминистративные шаблоныКомпоненты WindowsПроводник.
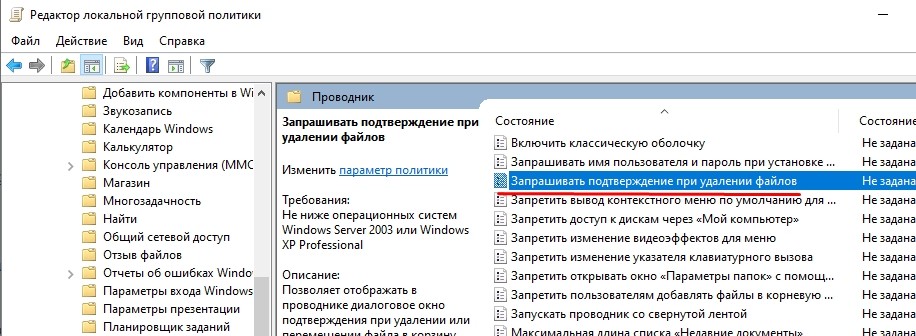
- Двойным щелчком ЛКМ запустите настройки параметра «Запрашивать подтверждение при удалении файла».
- Поставьте отметку на «Включено» и сохраните изменения.

Также не забудьте перезапустить «Проводник» или сам компьютер, так как изменения могут не вступить в силу.
Содержание
- 1 Настройка корзины
- 2 Пошаговая инструкция
- 3 Подтверждаем удаление файла в корзину в Windows 10
<index>
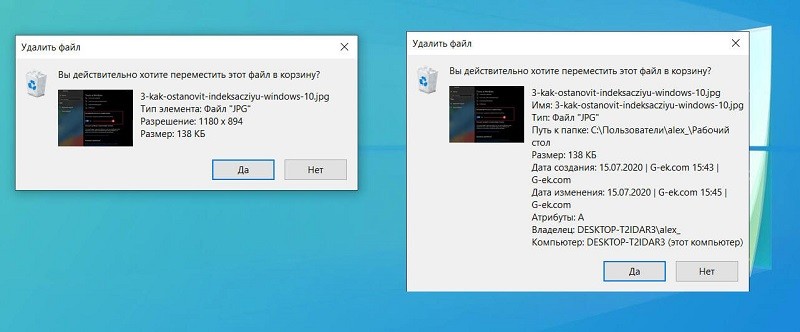
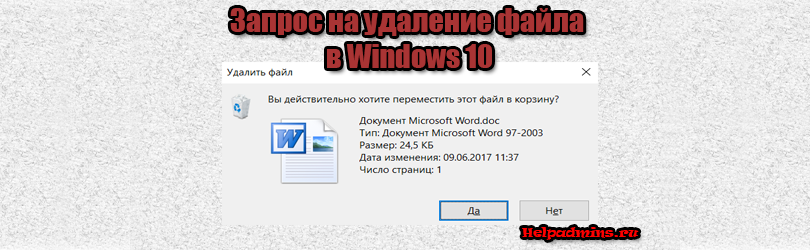
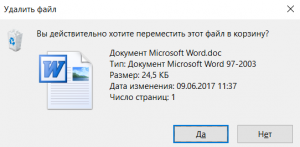
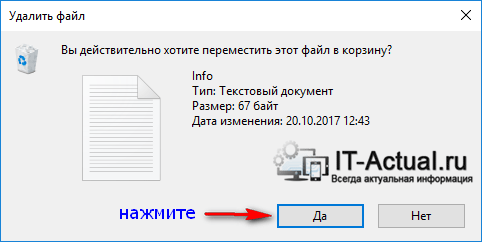
Многие пользователи, особенно те, кто ранее пользовался Windows 7 и другими более старыми версиями Windows, заметили, что в Windows 10 процесс удаления файла или папки происходит без выведения подтверждения на выполнение данного действия. Проще говоря — при нажатии на клавишу Delete не отображается вот это окно:

Вид окна с запросом на удаление
Большая масса пользователей отмечают это не совсем удобным, учитывая что не редко удаление того или иного файла происходит случайно. Для Windows 8.1 данный вопрос также актуален.
В данной статье мы расскажем как вернуть окно подтверждения при удалении файла или папки в Windows 10.
Настройка корзины
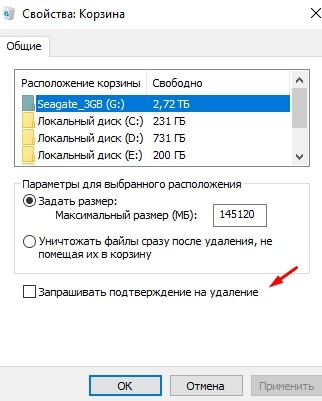
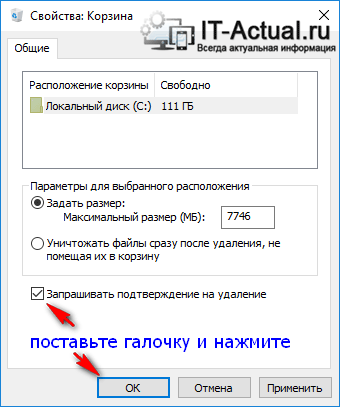
Для того, чтобы при каждом нажатии на кнопку Delete с предварительно выделенным файлом или папкой выводился запрос на подтверждение удаления нужно отметить всего одну галочку в свойствах корзины.
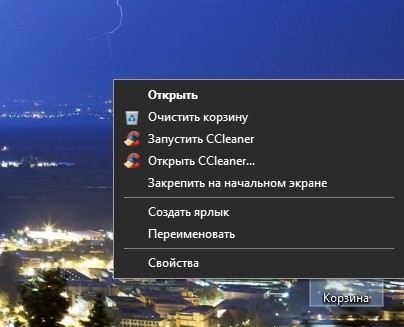
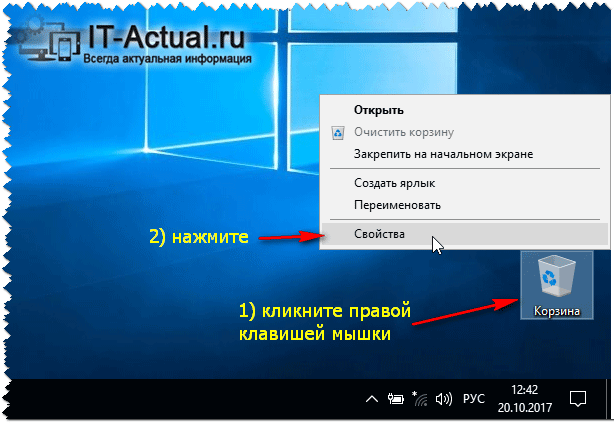
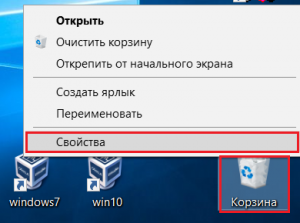
Для этого нужно кликнуть правой кнопкой мыши по значку «Корзина» на рабочем столе и в открывшемся контекстном меню выбрать «Свойства».

Свойства корзины
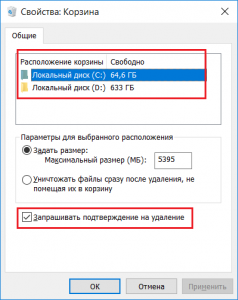
Появится окно, в котором будут отображены все локальные диски вашего компьютера. В самом низу окна будет галочка «Запрашивать подтверждение на удаление». Ее нужно установить для каждого локального диска.

Включение отображения запроса на удаление файла в Windows 10
Для этого выделяете каждый диск в списке кликом левой кнопкой мыши и устанавливаете эту галочку. Проверьте чтобы данная галочка стояла на каждом поочередно выделенном локальном диске.
После этого нажимаете на кнопку «Ок» и убеждаетесь в том, что при удалении любого файла или папки на экране отображается окно с подтверждением.
</index>
Процесс удаление файлов в операционной системе Windows 10 несколько изменился и теперь не требует подтверждения удаления в отдельном окне. В данной версии операционной системы после выбора команды «Удалить» в контекстном меню или нажатия на клавиатуре клавиши «Del» файл автоматически будет перенесен в папку «Корзина». Некоторые пользователи все же не оценили данное обновление и желают продолжать работу, подтверждая удаление, как это было ранее в операционных системах до версии Windows 7 включительно. Включить функцию подтверждения удаления файлов просто. И в этой пошаговой инструкции с фотографиями мы покажем Вам, как быстро включить подтверждение удаления файлов в операционной системе Windows 10.
Пошаговая инструкция
Шаг 1
Начните с того, что кликните правой кнопкой мыши по значку «Корзина» на рабочем столе. Затем в контекстном меню выберите команду «Свойства».
 Шаг 2
Шаг 2
В открывшемся окне «Свойства: Корзина» поставьте отметку возле строки «Запрашивать подтверждение на удаление». Для сохранения изменение щелкните кнопку «Ок». Если информация помогла Вам – жмите Спасибо!
![]() Приветствую, дорогой посетитель!
Приветствую, дорогой посетитель!
По умолчанию в Windows 10 удаляемые файлы перемешаются в корзину, при этом в момент удаления (или правильнее сказать перемещения в корзину) не появляется никакого подтверждающего эту процедуру запроса. Это может сбивать с толку и приводить к случайному удалению тех или иных файлов и папок. В итоге важные документы или любые другие файлы оказываются в корзине, которая зачастую очищается без оглядки на то, что в ней находится.
Однако в Windows 10 предусмотрено включение соответствующего подтверждающего она, без нажатия соответствующего пункта в котором удаление файла иили папки в корзину произведено не будет.
И в данном руководстве мы детально расскажем и покажем, как включить данный подтверждающий системный запрос.
Подтверждаем удаление файла в корзину в Windows 10
Для включения этой возможности, необходимо совершить следующее действие:
- На находящейся на рабочем столе «Корзине» необходимо совершить клик правой клавишей мышки. Появится контекстное меню, в котором необходимо нажать на пункт Свойства.

- Далее в открывшемся окне свойств корзины необходимо поставить галочку у пункта «Запрашивать подтверждение на удаление» и нажать клавишу с надписью OK, дабы сохранить настройку.

- Теперь при попытке удаления того или иного файла или папки, будет выводиться запрос, с которым в обязательном порядке требуется согласиться, в ином случае удаление не будет произведено.


По сути это всё, что требуется активации подтверждения перемещения удаляемого файлапапки в корзину Windows.
При данном подходе риск случайного удаления файла сведён к минимуму, что, несомненно, не может не радовать.
Кстати, возможно вам будет интересен материал о том, как быстро удалять файлы и папки сразу (без предварительного перемещения их в корзину). Читайте об этом в статье «Как удалить файл сразу (минуя корзину) в Windows 10».
![]()
Весьма надеюсь, что приведённая на страницах сайта IT-Actual.ru инструкция вам помогла, и вы с лёгкостью осуществили задуманное. Напоследок хочу пожелать вам никогда не терять важных файлов и в целом данных в процессе работы за компьютером.
Встретимся в новых материалах на сайте. Удачи!
Используемые источники:
- http://helpadmins.ru/windows-10-udalyaet-fayly-bez-preduprezhdeniya-k/
- http://kompmix.ru/windows_10/kak_vklyuchit_podtverzhdenie_udaleniya_fajlov_v_windows_10.html
- https://it-actual.ru/how-to-enable-delete-confirmation-dialog-in-windows-10.html
Оценка статьи:
![]()
![]()
![]()
![]()
![]() (пока оценок нет)
(пока оценок нет)
![]() Загрузка…
Загрузка…
Похожие публикации
Любой средний пользователь компьютера загружает или удаляет файлы ежедневно. Во втором сценарии данные попадают в корзину или полностью исчезают с диска без предупреждения. Но владелец устройства может активировать подтверждение удаления файлов в операционной системе Windows 10, которое спросит у него о намерениях в виде дополнительного окна.
Существует множество стереотипных шуток о всевозможных окнах подтверждения. Но на самом деле у них есть определенное преимущество.

Судите сами, для удаления лишней информации владельцы ПК поступают двумя способами:
- нажмите кнопку «Удалить» из диалогового окна, вызываемого щелчком правой кнопкой мыши по ненужному файлу;
- нажмите кнопку «Удалить».
Если в первом случае пользователь осознает, что после нажатия заветной кнопки файл исчезнет, то во втором велик риск случайного удаления информации. Обычно клавиша Del находится в строке клавиши F. Поэтому вместо нажатия «F12» владелец ПК может нажать клавишу «Удалить», тогда данные будут удалены.

хорошо, если файл окажется в корзине, и у пользователя будет возможность восстановить его. Но, когда на компьютере мало места или удаленная информация имеет большой размер, данные исчезают без следа. При этом мнение об окне подтверждения меняется на 180 градусов и человек уже пытается найти способ активировать не столь уж бесполезную функцию.
Как включить?
По умолчанию эта функция не работает на компьютерах с Windows 10. Это связано с тем, что пользователи часто жаловались разработчикам на раздражающие окна во время удаления. Программистам Microsoft пришлось отключить эту опцию, но при желании любой владелец компьютера может снова включить ее одним из способов, представленных ниже.
Через настройки
Это самый простой способ включить окно подтверждения. Для его реализации вам потребуется настроить корзину:
- Щелкните правой кнопкой мыши значок корзины на рабочем столе.
- Перейдите в «Свойства»
- Установите флажок «Запросить подтверждение отмены».
- Нажмите кнопку «Применить», чтобы сохранить изменения, а затем выйдите из меню настроек.
Изменения вступят в силу немедленно, и вам не придется беспокоиться о безопасности ваших файлов. Также нет необходимости перезагружать устройство. А при желании вы можете изменить другие настройки корзины через меню «Свойства». Например, увеличить или уменьшить его размер.
С помощью реестра
С точки зрения удобства использования этот способ можно назвать более сложным. В отличие от предыдущего варианта, пользователь запрашивает активацию функции вручную, а не автоматически. Однако, если настройки вашей корзины не помогли включить подтверждение удаления, других способов нет:
- Откройте окно «Выполнить», удерживая клавиши Win + R».
- Введите запрос «regedit» и нажмите кнопку «ОК».
- Перейдите по пути KEY_CURRENT_USER SOFTWARE Microsoft Windows CurrentVersion Policies Explorer.
- Щелкните правой кнопкой мыши и под именем «ConfirmFileDelete» создайте 32-битное значение DWORD.
- Дважды щелкните ЛКМ, чтобы открыть настройки параметров.
- Присвойте ему значение «1».
- Сохраните ваши настройки.
После выполнения всех шагов указанного алгоритма вы заставите компьютер спросить своего владельца о своих намерениях перед удалением файлов.
Редактор групповой политики
Последний вариант, подходящий только для владельцев ПК с Windows 10 Pro, Enterprise или Education:
- Через окно «Выполнить» обработайте запрос «gpedit.msc».
- Перейдите в Конфигурация пользователя Административные шаблоны Компоненты Windows Проводник Windows.
- Дважды щелкните ЛКМ, чтобы начать настройку параметра «Запрашивать при удалении файла».
- Установите флажок «Включено» и сохраните изменения.
Также не забудьте перезапустить проводник или сам компьютер, поскольку изменения могут не вступить в силу.
Источник изображения: it-tehnik.ru
Как в Windows 10 вернуть окно подтверждения удаления файла?
Многие пользователи, особенно те, кто ранее пользовался Windows 7 и другими более старыми версиями Windows, заметили, что в Windows 10 процесс удаления файла или папки происходит без выведения подтверждения на выполнение данного действия. Проще говоря – при нажатии на клавишу Delete не отображается вот это окно:
Вид окна с запросом на удаление
Большая масса пользователей отмечают это не совсем удобным, учитывая что не редко удаление того или иного файла происходит случайно. Для Windows 8.1 данный вопрос также актуален.
В данной статье мы расскажем как вернуть окно подтверждения при удалении файла или папки в Windows 10.
Настройка корзины
Для того, чтобы при каждом нажатии на кнопку Delete с предварительно выделенным файлом или папкой выводился запрос на подтверждение удаления нужно отметить всего одну галочку в свойствах корзины.
Для этого нужно кликнуть правой кнопкой мыши по значку “Корзина” на рабочем столе и в открывшемся контекстном меню выбрать “Свойства”.
Свойства корзины
Появится окно, в котором будут отображены все локальные диски вашего компьютера. В самом низу окна будет галочка “Запрашивать подтверждение на удаление”. Ее нужно установить для каждого локального диска.
Включение отображения запроса на удаление файла в Windows 10
Для этого выделяете каждый диск в списке кликом левой кнопкой мыши и устанавливаете эту галочку. Проверьте чтобы данная галочка стояла на каждом поочередно выделенном локальном диске.
После этого нажимаете на кнопку “Ок” и убеждаетесь в том, что при удалении любого файла или папки на экране отображается окно с подтверждением.
Лучшая благодарность автору — репост к себе на страничку:
A lot of users want to have a confirmation prompt when deleting a file. At this time, you need to enable the Windows 10 confirm delete feature. How to disable/enable Windows 10 delete confirmation? This post of MiniTool will walk you through a step-by-step guide and help you recover deleted data.
About Window 10 Confirm Delete
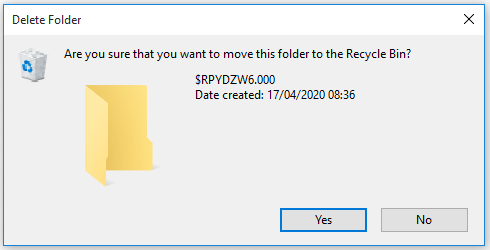
If you are using Windows 8 or the latest Windows 10 operating system, you may have found that you won’t be prompted with a confirmation message when deleting a file. This is because the Windows 10 confirm delete feature is disabled by default.
If you haven’t enabled this option, then the file or folder will be moved to the Recycle Bin directly when you press the Delete key. Sometimes, the selected files could be permanently deleted without moving them to the Recycle Bin if the files are too large or you select the checkbox for Don’t move to the Recycle Bin.
To avoid deleting files by mistake, a lot of Windows 10 users want to enable Windows 10 delete confirmation. After enabling this feature, then confirmation dialogue will pop up with the message “Are you sure that you want to move this file/folder/shortcut to the Recycle Bin?”
How to Disable/Enable Windows 10 Confirm Delete
There are 3 simple methods to disable/enable the confirm deletion dialogue box on Windows 10. You can set it by using the Recycle Bin as well as Registry Editor and Group Policy Editor.
Method 1. Use the Recycle Bin Properties Option
The first and simplest method to enable the confirm delete Windows 10 feature is to use the Recycle Bin properties option. To do so, follow the step-by-step guide below:
Step 1. Right-click the Recycle Bin shortcut on your desktop and select Properties from the pop-up menu.
Step 2. In the Properties window, tick the checkbox for the Display delete confirmation dialogue and click on Apply button to make the change take effect.
Tip: If you want to delete a file or folder as fast as possible, you can disable this feature by unselecting the Display delete confirmation dialogue checkbox.
After that, the Windows 10 confirm delete dialogue box will appear on the screen when deleting a file.
Method 2. Use the Registry Editor
In addition, you can use the Registry Editor to enable the delete confirmation Windows 10 feature. Here is a complete guide for you.
Step 1. Press Win + R keys to open the Run dialogue box, and then type regedit.exe in the box and hit Enter key. Click on the Yes button to open the Registry Editor if you are prompted.
Step 2. In the Registry Editor window, go to the following path via the left-hand navigation bar. The destination path may be slightly different depending on your Windows 10 version.
HKEY_CURRENT_USERSoftwareMicrosoftWindowsCurrentVersionPolicies or
HKEY_CURRENT_USERSoftwareMicrosoftWindowsCurrentVersionPoliciesExplorer
Step 3. Once you arrive at the destination path, right-click the blank area on the right side and select New > DWORD (32-bit) Value from the pop-up menu.
Step 4. Name the new key to ConfirmFileDelete, and then double click the key and set its Value data to 1, and click on OK to save the change.
Tip: You can disable the confirm deletion feature by setting its Value data to 0.

Step 5. Exit the Registry Editor window and restart your computer to make it take effect
Method 3. Use the Local Group Policy Editor
This method is suitable for a system administrator who want to enable the Windows 10 confirm delete feature for all users in the enterprise. If you are using a Windows 10 Pro or Enterprise operating system, then you can use the Group Policy Editor. Here’s how:
Step 1. Open the Run dialogue box again, and then type gpedit.msc in it and hit Enter.
Step 2. In the Local Group Policy Editor window, go to the following path via the left-hand navigation bar.
User ConfigurationAdministrative TemplatesWindows ComponentsFile Explorer
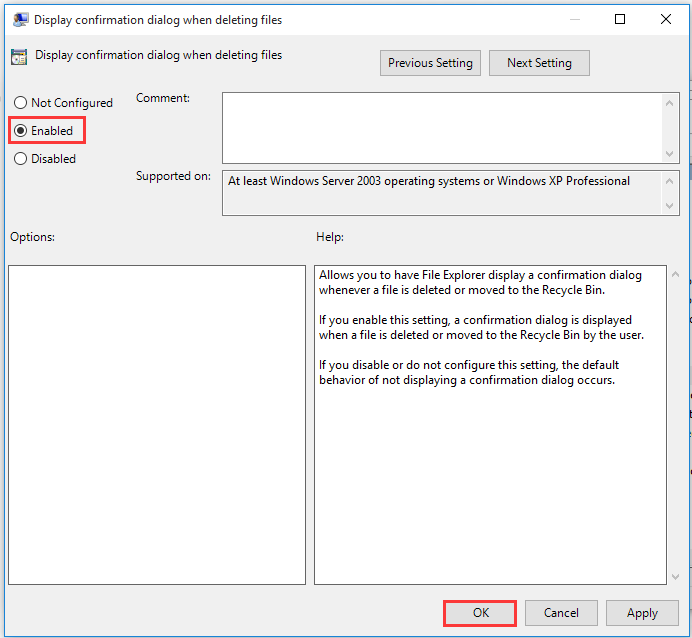
Step 3. On the right side, scroll down the list of entry keys until you find the Display confirmation dialogue when deleting files entry and double click it.

Step 4. In the pop-up window, select the Enabled option and click on OK button to turn on the confirm deletion feature. If you want to turn off this feature, then select the Disabled option. After that, exit the editor and restart your computer to take it into effect.
How to enable Windows 10 confirm delete? Three methods have been illustrated to you. You can select one based on your demands. Here comes a new question. What would happen if I disable the confirm deletion? Let’s keep reading the following part.
What Would Happen If I Disable Windows 10 Delete Confirmation
After the confirm delete Windows 10 feature is disabled, you can directly press the Delete key to remove the files without any confirmation dialogue. For those who want to delete files as fast as possible, disabling this feature is an ideal choice.
Sometimes, however, you may get into trouble because of this choice. Usually, the selected files or folders will be moved into the Recycle Bin. Then you can open the Recycle Bin again and restore them from it. But there are some exceptions that cause you to lose data.
Here we summarize 2 main cases that you may encounter after disabling the Windows 10 delete confirmation.
Case 1. You delete the files or folders in the local disk.
If you delete the files or folders with small size, you can open the Recycle Bin and restore them. However, if the deleted files are larger than the maximum size of your Recycle Bin, the selected item will be deleted permanently without being put into Recycle Bin for temporary storage.
Tip: If the Windows 10 confirm delete feature is enabled, you may receive the message “The file is too large for the Recycle Bin. Do you want to permanently delete it?”
Case 2. You delete the files or folder from a removable storage device.
If you delete files from an external storage device, then the files or folders will be directly deleted without being moving into the Recycle Bin no matter how large the files are. Here is a true example from answers.microsoft.com who reported the files are gone over from an external drive.
Separate from Recycle Bin: When I am connected to an external drive (my Android phone, connected via USB in “File Transfer” mode), I can view, copy and delete files (e.g. photos) on that drive. However, when I delete files on my phone, I don’t get any confirmation dialogue! This is a case where I definitely want confirmation because there is no Recycle Bin — the files are gone forever. Any thoughts? I am running Windows 10 Home. What should I do to restore my files? Please help!
In order to avoid data loss, we recommend you enable the delete confirmation Windows 10 feature. However, there are still a great many people using the default settings. What can I do if the files are deleted accidentally? Let’s keep reading.
How to Recover Lost Data After the Windows 10 Delete Confirmation Is Disabled
How to recover deleted data on Windows 10? Here you can choose a method based on your own situation. If the deleted files are located on the local disk, please refer to case 1. If you accidentally delete the files of an external drive, you can read case 2.
Case 1. Recover Lost Data from Local Disk
For the small files or folders, it is very simple to restore. You can open your Recycle Bin, and then right-click the files that want to recover and select Restore from the context menu. However, the large files won’t be moved into the Recycle Bin.
At this time, you need a professional tool to recover deleted files. Here MiniTool Partition Wizard is highly recommended. It is a multifunctional partition manager that can help you convert MBR to GPT, convert FAT to NTFS, format hard drive, perform disk benchmark, migrate OS to SSD/HD, extend partition, etc.
Tip: MiniTool Partition Wizard Free Edition doesn’t support data recovery. You need to install a Pro Ultimate edition or a more advanced edition to recover lost data.
Now, press the button below to download this program and install it on your Windows 10 PC.
Buy Now
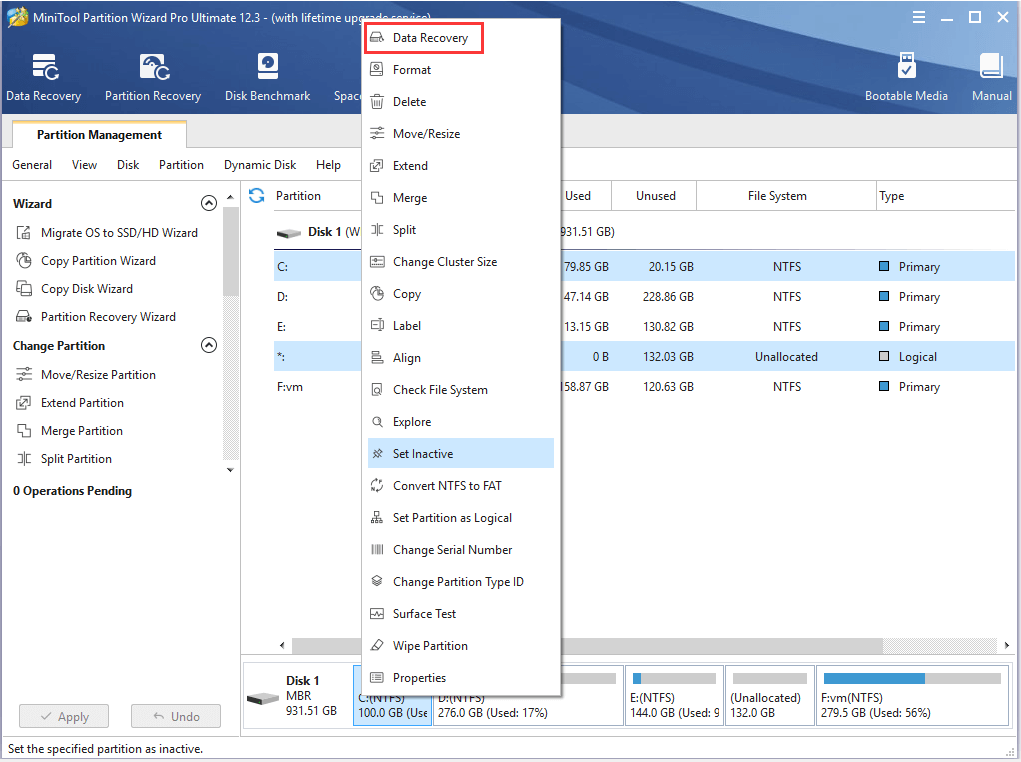
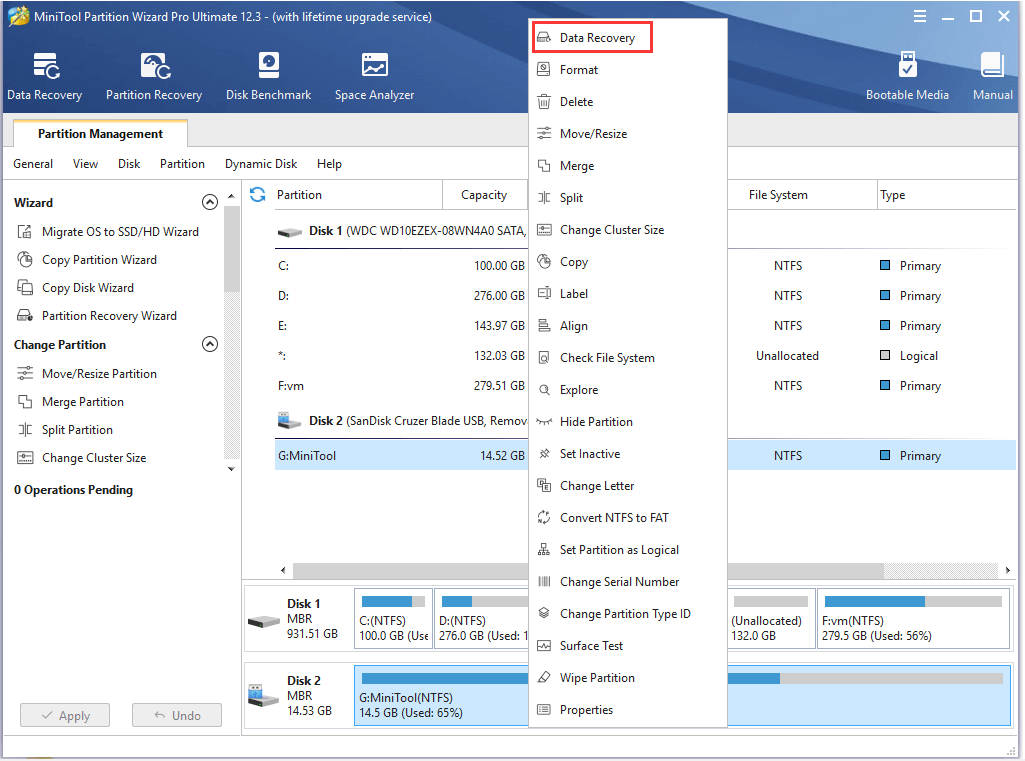
Step 1. Launch the program to enter its main interface, and then right click the drive that you delete the files and select Data Recovery.
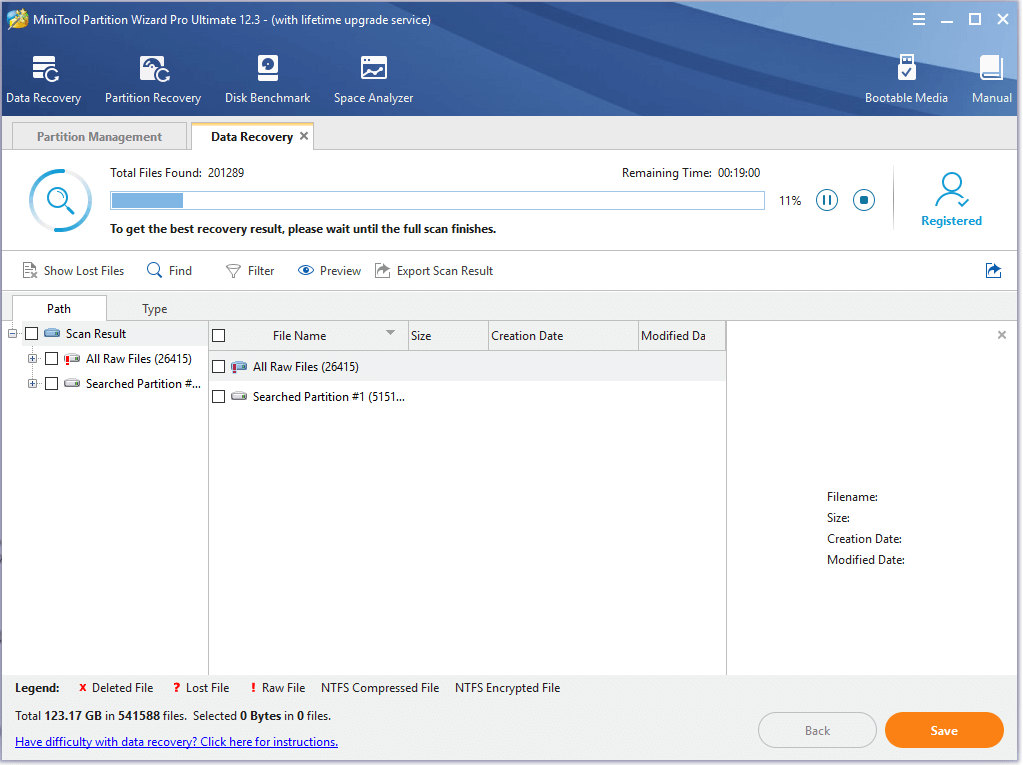
Step 2. Then you need to wait for this scan to complete. After the scan completes, tick the checkboxes next to the needed files and click on the Save button.
Tip: Also, if you have found your needed file, you can click on the Pause or Stop button to pause this process and click on the Save button to restore the file. You can utilize the Show Lost Files feature to find needed files quickly.
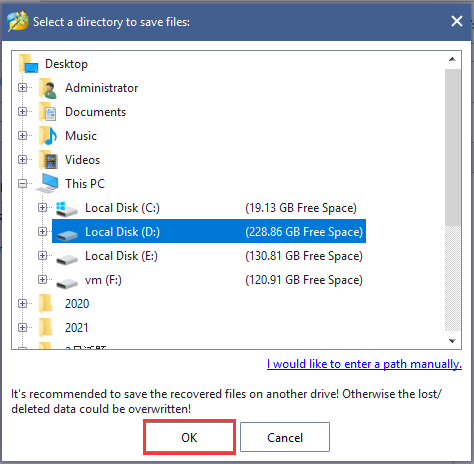
Step 3. Select a directory to save the needed files and click on OK. Here we recommend you save the recovered files to another drive. Otherwise, the recovered data could be overwritten.
Case 2. Recover Lost Data from a Removable Storage Device
MiniTool Partition Wizard can not only recover lost data on the local disk but on an external drive. If you accidentally delete the files from a removable storage device, you can utilize the Data Recovery feature as well. Here is a quick guide for you.
Buy Now
Step 1. Connect your external storage device to the Windows PC.
Step 2. Launch this software to enter its main interface, and then right-click the external drive from the disk map and select Data Recovery. Here we take a USB flash drive for example.
Step 3. Then you can refer to Step 2 to Step 3 in the above case to save the lost files to another location.
After updating my system to Windows 10, I found the files are deleted quickly without any confirmation message. I want to avoid accidental deletions. Fortunately, this post helped me enable the Windows 10 confirm delete feature. Perhaps you are looking for such an article. Click to Tweet
Bottom Line
How to enable Windows 10 delete confirmation? How to recover the accidentally deleted data? Now, I believe that you have already known the answers to this post. If you have any better ideas on this topic, write them in the comment area. Also, you can send us an email via [email protected] if you have any suggestions about the MiniTool software.
Windows 10 Confirm Delete FAQ
How to turn off the single click delete?
- Press Win + E keys to open the File Explorer.
- Navigate to the View tab and select the Options > Change folder and search options from the top menu.
- In the pop-up window, select the Double click to open an item option under the Click items as follows
How to disable Recycle Bin auto-deletion on Windows 10?
To do so, follow the steps below to stop Windows from automatically emptying your Recycle Bin
- Press Win + I keys to open the Settings app, and then navigate to the System
- Select Storage from the left menu.
- To >disable Recycle Bin auto-deletion, toggle of the switch for Storage Sense can automatically free up space by getting rid of files you don’t need, like temporary files and content in your Recycle.
How to show the Recycle Bin on Windows 10?
- Press Win + I keys to open the Settings app, and then navigate to the Personalization
- Select Themes from the left menu, scroll down the right sidebar, and click on the Desktop icon settings
- Tick the checkbox for the Recycle Bin and click on Apply to execute the change.
A lot of users want to have a confirmation prompt when deleting a file. At this time, you need to enable the Windows 10 confirm delete feature. How to disable/enable Windows 10 delete confirmation? This post of MiniTool will walk you through a step-by-step guide and help you recover deleted data.
About Window 10 Confirm Delete
If you are using Windows 8 or the latest Windows 10 operating system, you may have found that you won’t be prompted with a confirmation message when deleting a file. This is because the Windows 10 confirm delete feature is disabled by default.
If you haven’t enabled this option, then the file or folder will be moved to the Recycle Bin directly when you press the Delete key. Sometimes, the selected files could be permanently deleted without moving them to the Recycle Bin if the files are too large or you select the checkbox for Don’t move to the Recycle Bin.
To avoid deleting files by mistake, a lot of Windows 10 users want to enable Windows 10 delete confirmation. After enabling this feature, then confirmation dialogue will pop up with the message “Are you sure that you want to move this file/folder/shortcut to the Recycle Bin?”
How to Disable/Enable Windows 10 Confirm Delete
There are 3 simple methods to disable/enable the confirm deletion dialogue box on Windows 10. You can set it by using the Recycle Bin as well as Registry Editor and Group Policy Editor.
Method 1. Use the Recycle Bin Properties Option
The first and simplest method to enable the confirm delete Windows 10 feature is to use the Recycle Bin properties option. To do so, follow the step-by-step guide below:
Step 1. Right-click the Recycle Bin shortcut on your desktop and select Properties from the pop-up menu.
Step 2. In the Properties window, tick the checkbox for the Display delete confirmation dialogue and click on Apply button to make the change take effect.
Tip: If you want to delete a file or folder as fast as possible, you can disable this feature by unselecting the Display delete confirmation dialogue checkbox.
After that, the Windows 10 confirm delete dialogue box will appear on the screen when deleting a file.
Method 2. Use the Registry Editor
In addition, you can use the Registry Editor to enable the delete confirmation Windows 10 feature. Here is a complete guide for you.
Step 1. Press Win + R keys to open the Run dialogue box, and then type regedit.exe in the box and hit Enter key. Click on the Yes button to open the Registry Editor if you are prompted.
Step 2. In the Registry Editor window, go to the following path via the left-hand navigation bar. The destination path may be slightly different depending on your Windows 10 version.
HKEY_CURRENT_USERSoftwareMicrosoftWindowsCurrentVersionPolicies or
HKEY_CURRENT_USERSoftwareMicrosoftWindowsCurrentVersionPoliciesExplorer
Step 3. Once you arrive at the destination path, right-click the blank area on the right side and select New > DWORD (32-bit) Value from the pop-up menu.
Step 4. Name the new key to ConfirmFileDelete, and then double click the key and set its Value data to 1, and click on OK to save the change.
Tip: You can disable the confirm deletion feature by setting its Value data to 0.
Step 5. Exit the Registry Editor window and restart your computer to make it take effect
Method 3. Use the Local Group Policy Editor
This method is suitable for a system administrator who want to enable the Windows 10 confirm delete feature for all users in the enterprise. If you are using a Windows 10 Pro or Enterprise operating system, then you can use the Group Policy Editor. Here’s how:
Step 1. Open the Run dialogue box again, and then type gpedit.msc in it and hit Enter.
Step 2. In the Local Group Policy Editor window, go to the following path via the left-hand navigation bar.
User ConfigurationAdministrative TemplatesWindows ComponentsFile Explorer
Step 3. On the right side, scroll down the list of entry keys until you find the Display confirmation dialogue when deleting files entry and double click it.
Step 4. In the pop-up window, select the Enabled option and click on OK button to turn on the confirm deletion feature. If you want to turn off this feature, then select the Disabled option. After that, exit the editor and restart your computer to take it into effect.
How to enable Windows 10 confirm delete? Three methods have been illustrated to you. You can select one based on your demands. Here comes a new question. What would happen if I disable the confirm deletion? Let’s keep reading the following part.
What Would Happen If I Disable Windows 10 Delete Confirmation
After the confirm delete Windows 10 feature is disabled, you can directly press the Delete key to remove the files without any confirmation dialogue. For those who want to delete files as fast as possible, disabling this feature is an ideal choice.
Sometimes, however, you may get into trouble because of this choice. Usually, the selected files or folders will be moved into the Recycle Bin. Then you can open the Recycle Bin again and restore them from it. But there are some exceptions that cause you to lose data.
Here we summarize 2 main cases that you may encounter after disabling the Windows 10 delete confirmation.
Case 1. You delete the files or folders in the local disk.
If you delete the files or folders with small size, you can open the Recycle Bin and restore them. However, if the deleted files are larger than the maximum size of your Recycle Bin, the selected item will be deleted permanently without being put into Recycle Bin for temporary storage.
Tip: If the Windows 10 confirm delete feature is enabled, you may receive the message “The file is too large for the Recycle Bin. Do you want to permanently delete it?”
Case 2. You delete the files or folder from a removable storage device.
If you delete files from an external storage device, then the files or folders will be directly deleted without being moving into the Recycle Bin no matter how large the files are. Here is a true example from answers.microsoft.com who reported the files are gone over from an external drive.
Separate from Recycle Bin: When I am connected to an external drive (my Android phone, connected via USB in “File Transfer” mode), I can view, copy and delete files (e.g. photos) on that drive. However, when I delete files on my phone, I don’t get any confirmation dialogue! This is a case where I definitely want confirmation because there is no Recycle Bin — the files are gone forever. Any thoughts? I am running Windows 10 Home. What should I do to restore my files? Please help!
In order to avoid data loss, we recommend you enable the delete confirmation Windows 10 feature. However, there are still a great many people using the default settings. What can I do if the files are deleted accidentally? Let’s keep reading.
How to Recover Lost Data After the Windows 10 Delete Confirmation Is Disabled
How to recover deleted data on Windows 10? Here you can choose a method based on your own situation. If the deleted files are located on the local disk, please refer to case 1. If you accidentally delete the files of an external drive, you can read case 2.
Case 1. Recover Lost Data from Local Disk
For the small files or folders, it is very simple to restore. You can open your Recycle Bin, and then right-click the files that want to recover and select Restore from the context menu. However, the large files won’t be moved into the Recycle Bin.
At this time, you need a professional tool to recover deleted files. Here MiniTool Partition Wizard is highly recommended. It is a multifunctional partition manager that can help you convert MBR to GPT, convert FAT to NTFS, format hard drive, perform disk benchmark, migrate OS to SSD/HD, extend partition, etc.
Tip: MiniTool Partition Wizard Free Edition doesn’t support data recovery. You need to install a Pro Ultimate edition or a more advanced edition to recover lost data.
Now, press the button below to download this program and install it on your Windows 10 PC.
Buy Now
Step 1. Launch the program to enter its main interface, and then right click the drive that you delete the files and select Data Recovery.
Step 2. Then you need to wait for this scan to complete. After the scan completes, tick the checkboxes next to the needed files and click on the Save button.
Tip: Also, if you have found your needed file, you can click on the Pause or Stop button to pause this process and click on the Save button to restore the file. You can utilize the Show Lost Files feature to find needed files quickly.
Step 3. Select a directory to save the needed files and click on OK. Here we recommend you save the recovered files to another drive. Otherwise, the recovered data could be overwritten.
Case 2. Recover Lost Data from a Removable Storage Device
MiniTool Partition Wizard can not only recover lost data on the local disk but on an external drive. If you accidentally delete the files from a removable storage device, you can utilize the Data Recovery feature as well. Here is a quick guide for you.
Buy Now
Step 1. Connect your external storage device to the Windows PC.
Step 2. Launch this software to enter its main interface, and then right-click the external drive from the disk map and select Data Recovery. Here we take a USB flash drive for example.
Step 3. Then you can refer to Step 2 to Step 3 in the above case to save the lost files to another location.
After updating my system to Windows 10, I found the files are deleted quickly without any confirmation message. I want to avoid accidental deletions. Fortunately, this post helped me enable the Windows 10 confirm delete feature. Perhaps you are looking for such an article. Click to Tweet
Bottom Line
How to enable Windows 10 delete confirmation? How to recover the accidentally deleted data? Now, I believe that you have already known the answers to this post. If you have any better ideas on this topic, write them in the comment area. Also, you can send us an email via [email protected] if you have any suggestions about the MiniTool software.
Windows 10 Confirm Delete FAQ
How to turn off the single click delete?
- Press Win + E keys to open the File Explorer.
- Navigate to the View tab and select the Options > Change folder and search options from the top menu.
- In the pop-up window, select the Double click to open an item option under the Click items as follows
How to disable Recycle Bin auto-deletion on Windows 10?
To do so, follow the steps below to stop Windows from automatically emptying your Recycle Bin
- Press Win + I keys to open the Settings app, and then navigate to the System
- Select Storage from the left menu.
- To >disable Recycle Bin auto-deletion, toggle of the switch for Storage Sense can automatically free up space by getting rid of files you don’t need, like temporary files and content in your Recycle.
How to show the Recycle Bin on Windows 10?
- Press Win + I keys to open the Settings app, and then navigate to the Personalization
- Select Themes from the left menu, scroll down the right sidebar, and click on the Desktop icon settings
- Tick the checkbox for the Recycle Bin and click on Apply to execute the change.
![]() Приветствую, дорогой посетитель!
Приветствую, дорогой посетитель!
По умолчанию в Windows 10 удаляемые файлы перемещаются в корзину, при этом в момент удаления (или правильнее сказать перемещения в корзину) не появляется никакого подтверждающего эту процедуру запроса. Это может сбивать с толку и приводить к случайному удалению тех или иных файлов и папок. В итоге важные документы или любые другие файлы оказываются в корзине, которая зачастую очищается без оглядки на то, что в ней находится.
Однако в Windows 10 предусмотрено включение соответствующего подтверждающего окна, без нажатия соответствующего пункта в котором удаление файла иили папки в корзину произведено не будет.
![]()
И в данном руководстве мы детально расскажем и покажем, как включить данный подтверждающий системный запрос.
Для включения этой возможности, необходимо совершить следующее действие:
![]()
- На находящейся на рабочем столе «Корзине» необходимо совершить клик правой клавишей мышки. Появится контекстное меню, в котором необходимо нажать на пункт Свойства.
- Далее в открывшемся окне свойств корзины необходимо поставить галочку у пункта «Запрашивать подтверждение на удаление» и нажать клавишу с надписью OK, дабы сохранить настройку.
- Теперь при попытке удаления того или иного файла или папки, будет выводиться запрос, с которым в обязательном порядке требуется согласиться, в ином случае удаление не будет произведено.

По сути это всё, что требуется активации подтверждения перемещения удаляемого файлапапки в корзину Windows.
При данном подходе риск случайного удаления файла сведён к минимуму, что, несомненно, не может не радовать.
Кстати, возможно вам будет интересен материал о том, как быстро удалять файлы и папки сразу (без предварительного перемещения их в корзину). Читайте об этом в статье «Как удалить файл сразу (минуя корзину) в Windows 10».
![]()
Видеоинструкция
Весьма надеюсь, что приведённая на страницах сайта IT-Actual.ru инструкция вам помогла, и вы с лёгкостью осуществили задуманное. Напоследок хочу пожелать вам никогда не терять важных файлов и в целом данных в процессе работы за компьютером.
Встретимся в новых материалах на сайте. Удачи!
Пожертвование сайту IT-Actual.ru (cбор пожертвований осуществляется через сервис «ЮMoney»)
На что пойдут пожертвования реквизиты других платёжных систем
Привет.
Не секрет, что в экономике ныне дела обстоят не лучшим образом, цены растут, а доходы падают. И данный сайт также переживает нелёгкие времена 
Если у тебя есть возможность и желание помочь развитию ресурса, то ты можешь перевести любую сумму (даже самую минимальную) через форму пожертвований, или на следующие реквизиты:
Номер банковской карты: 5331 5721 0220 5546
Кошелёк ЮMoney: 410015361853797
Кошелёк WebMoney: Z812646225287
PayPal: paypal@it-actual.ru
BitCoin: 1DZUZnSdcN6F4YKhf4BcArfQK8vQaRiA93
Оказавшие помощь:
Сергей И. — 500руб
<аноним> — 468руб
<аноним> — 294руб
Мария М. — 300руб
Валерий С. — 420руб
<аноним> — 600руб
Полина В. — 240руб
Деньги пойдут на оплату хостинга, продление домена, администрирование и развитие ресурса. Спасибо.
С уважением, создатель сайта IT-Actual.ru