I’ve just inherited a java application that needs to be installed as a service on XP and vista. It’s been about 8 years since I’ve used windows in any form and I’ve never had to create a service, let alone from something like a java app (I’ve got a jar for the app and a single dependency jar — log4j). What is the magic necessary to make this run as a service? I’ve got the source, so code modifications, though preferably avoided, are possible.
3
Apache Commons Daemon is a good alternative. It has Procrun for windows services, and Jsvc for unix daemons. It uses less restrictive Apache license, and Apache Tomcat uses it as a part of itself to run on Windows and Linux! To get it work is a bit tricky, but there is an exhaustive article with working example.
Besides that, you may look at the binservice.bat in Apache Tomcat to get an idea how to setup the service. In Tomcat they rename the Procrun binaries (prunsrv.exe -> tomcat6.exe, prunmgr.exe -> tomcat6w.exe).
Something I struggled with using Procrun, your start and stop methods must accept the parameters (String[] argv). For example «start(String[] argv)» and «stop(String[] argv)» would work, but «start()» and «stop()» would cause errors. If you can’t modify those calls, consider making a bootstrapper class that can massage those calls to fit your needs.
5
With Apache Commons Daemon you can now have a custom executable name and icon! You can also get a custom Windows tray monitor with your own name and icon!
I now have my service running with my own name and icon (prunsrv.exe), and the system tray monitor (prunmgr.exe) also has my own custom name and icon!
-
Download the Apache Commons Daemon binaries (you will need prunsrv.exe and prunmgr.exe).
-
Rename them to be
MyServiceName.exeandMyServiceNamew.exerespectively. -
Download WinRun4J and use the
RCEDIT.exeprogram that comes with it to modify the Apache executable to embed your own custom icon like this:> RCEDIT.exe /I MyServiceName.exe customIcon.ico > RCEDIT.exe /I MyServiceNamew.exe customTrayIcon.ico -
Now install your Windows service like this (see documentation for more details and options):
> MyServiceName.exe //IS//MyServiceName --Install="C:path-toMyServiceName.exe" --Jvm=auto --Startup=auto --StartMode=jvm --Classpath="C:path-toMyJarWithClassWithMainMethod.jar" --StartClass=com.mydomain.MyClassWithMainMethod -
Now you have a Windows service of your Jar that will run with your own icon and name! You can also launch the monitor file and it will run in the system tray with your own icon and name.
> MyServiceNamew.exe //MS//MyServiceName
8
One more option is WinRun4J. This is a configurable java launcher that doubles as a windows service host (both 32 and 64 bit versions). It is open source and there are no restrictions on its use.
(full disclosure: I work on this project).
3
Yet another answer is Yet Another Java Service Wrapper, this seems like a good alternative to Java Service Wrapper as has better licensing. It is also intended to be easy to move from JSW to YAJSW. Certainly for me, brand new to windows servers and trying to get a Java app running as a service, it was very easy to use.
Some others I found, but didn’t end up using:
- Java Service Launcher I didn’t use this because it looked more complicated to get working than YAJSW. I don’t think this is a wrapper.
- JSmooth Creating Window’s services isn’t its primary goal, but can be done. I didn’t use this because there’s been no activity since 2007.
2
If you use Gradle Build Tool you can try my windows-service-plugin, which facilitates using of Apache Commons Daemon Procrun.
To create a java windows service application with the plugin you need to go through several simple steps.
-
Create a main service class with the appropriate method.
public class MyService { public static void main(String[] args) { String command = "start"; if (args.length > 0) { command = args[0]; } if ("start".equals(command)) { // process service start function } else { // process service stop function } } } -
Include the plugin into your
build.gradlefile.buildscript { repositories { maven { url "https://plugins.gradle.org/m2/" } } dependencies { classpath "gradle.plugin.com.github.alexeylisyutenko:windows-service-plugin:1.1.0" } } apply plugin: "com.github.alexeylisyutenko.windows-service-plugin"The same script snippet for new, incubating, plugin mechanism introduced in Gradle 2.1:
plugins { id "com.github.alexeylisyutenko.windows-service-plugin" version "1.1.0" } -
Configure the plugin.
windowsService { architecture = 'amd64' displayName = 'TestService' description = 'Service generated with using gradle plugin' startClass = 'MyService' startMethod = 'main' startParams = 'start' stopClass = 'MyService' stopMethod = 'main' stopParams = 'stop' startup = 'auto' } -
Run createWindowsService gradle task to create a windows service distribution.
That’s all you need to do to create a simple windows service. The plugin will automatically download Apache Commons Daemon Procrun binaries, extract this binaries to the service distribution directory and create batch files for installation/uninstallation of the service.
In ${project.buildDir}/windows-service directory you will find service executables, batch scripts for installation/uninstallation of the service and all runtime libraries.
To install the service run <project-name>-install.bat and if you want to uninstall the service run <project-name>-uninstall.bat.
To start and stop the service use <project-name>w.exe executable.
Note that the method handling service start should create and start a separate thread to carry out the processing, and then return. The main method is called from different threads when you start and stop the service.
For more information, please read about the plugin and Apache Commons Daemon Procrun.
1
I think the Java Service Wrapper works well. Note that there are three ways to integrate your application. It sounds like option 1 will work best for you given that you don’t want to change the code. The configuration file can get a little crazy, but just remember that (for option 1) the program you’re starting and for which you’ll be specifying arguments, is their helper program, which will then start your program. They have an example configuration file for this.
answered Sep 16, 2008 at 2:34
![]()
Ed ThomasEd Thomas
1,1531 gold badge12 silver badges21 bronze badges
Use «winsw» which was written for Glassfish v3 but works well with Java programs in general.
Require .NET runtime installed.
2
JavaService is LGPL. It is very easy and stable. Highly recommended.
With Java 8 we can handle this scenario without any external tools. javapackager tool coming with java 8 provides an option to create self contained application bundles:
-native type
Generate self-contained application bundles (if possible). Use the -B option to provide arguments to the bundlers being used. If type is specified, then only a bundle of this type is created. If no type is specified, all is used.
The following values are valid for type:
-native type
Generate self-contained application bundles (if possible). Use the -B option to provide arguments to the bundlers being used. If type is specified, then only a bundle of this type is created. If no type is specified, all is used.

The following values are valid for type:

all: Runs all of the installers for the platform on which it is running, and creates a disk image for the application. This value is used if type is not specified.
installer: Runs all of the installers for the platform on which it is running.
image: Creates a disk image for the application. On OS X, the image is the .app file. On Linux, the image is the directory that gets installed.
dmg: Generates a DMG file for OS X.
pkg: Generates a .pkg package for OS X.
mac.appStore: Generates a package for the Mac App Store.
rpm: Generates an RPM package for Linux.
deb: Generates a Debian package for Linux.
In case of windows refer the following doc we can create msi or exe as needed.
exe: Generates a Windows .exe package.
msi: Generates a Windows Installer package.
1
I’ve used JavaService before with good success. It hasn’t been updated in a couple of years, but was pretty rock solid back when I used it.
answered Sep 16, 2008 at 2:20
2
I didn’t like the licensing for the Java Service Wrapper. I went with ActiveState Perl to write a service that does the work.
I thought about writing a service in C#, but my time constraints were too tight.
answered Sep 16, 2008 at 2:27
![]()
Hugh BuchananHugh Buchanan
1,9113 gold badges13 silver badges9 bronze badges
1
I always just use sc.exe (see http://support.microsoft.com/kb/251192). It should be installed on XP from SP1, and if it’s not in your flavor of Vista, you can download load it with the Vista resource kit.
I haven’t done anything too complicated with Java, but using either a fully qualified command line argument (x:java.exe ….) or creating a script with Ant to include depencies and set parameters works fine for me.
answered Sep 16, 2008 at 2:34
![]()
KevinKevin
611 silver badge6 bronze badges
1
it’s simple as you have to put shortcut in
Windows 7
C:usersAll UsersStart MenuProgramsStartup(Admin) or User home directory(%userProfile%)
Windows 10 :
In Run shell:startup
in it’s property -> shortcut -> target — > java.exe -jar D:..runJar.jar
NOTE: This will run only after you login
With Admin Right
sc create serviceName binpath= "java.exe -jar D:..runJar.jar" Will create windows service
if you get timeout use cmd /c D:JAVA7~1jdk1.7.0_51binjava.exe -jar d:jenkinsjenkins.war but even with this you’ll get timeout but in background java.exe will be started. Check in task manager
NOTE: This will run at windows logon start-up(before sign-in, Based on service ‘Startup Type‘)
Detailed explanation of creating windows service
1
Another good option is FireDaemon. It’s used by some big shops like NASA, IBM, etc; see their web site for a full list.
answered Sep 16, 2008 at 6:40
![]()
Andrew SwanAndrew Swan
13.3k22 gold badges69 silver badges98 bronze badges
0
I am currently requiring this to run an Eclipse-based application but I need to set some variables first that is local to that application. sc.exe will only allow executables but not scripts so I turned to autoexnt.exe which is part of the Windows 2003 resource kit. It restricts the service to a single batch file but I only need one batch script to be converted into a service.
ciao!
answered Sep 23, 2008 at 0:26
I have been using jar2exe for last few years to run our Java applications as service on Windows. It provides an option to create an exe file which can be installed as Windows service.
It’s possible to implement a Windows service in 100% Java code by combining the use of Foreign Memory and Linker API (previewing from JDK16 upwards) with OpenJDK jextract project to handle the Windows Service callbacks, and then use jpackage to produce a Windows EXE which can then be registered as a Windows Service.
See this example which outlines the work needed to implement a Windows service. All Windows service EXE must provide callbacks for the main entrypoint ServiceMain and Service Control Handler, and use API calls StartServiceCtrlDispatcherW, RegisterServiceCtrlHandlerExW and SetServiceStatus in Advapi.DLL.
The flow of above callbacks in Java with Foreign Memory structures are:
main()
    Must register ServiceMain using StartServiceCtrlDispatcherW
    Above call blocks until ServiceMain exits

void ServiceMain(int dwNumServicesArgs, MemoryAddress lpServiceArgVectors)
    Must register SvcCtrlHandler using RegisterServiceCtrlHandlerExW
    Use SetServiceStatus(SERVICE_START_PENDING)
    Initialise app
    Use SetServiceStatus(SERVICE_RUNNING)
    wait for app shutdown notification
    Use SetServiceStatus(SERVICE_STOPPED)

int SvcCtrlHandler(int dwControl, int dwEventType, MemoryAddress lpEventData, MemoryAddress lpContext)
    Must respond to service control events and report back using SetServiceStatus
    On receiving SERVICE_CONTROL_STOP reports SetServiceStatus(SERVICE_STOP_PENDING)
        then set app shutdown notification
Once finished the Java application, jpackage can create runtime+EXE which can then be installed and registered as a Windows Service. Run as Adminstrator (spaces after = are important):
sc create YourJavaServiceName type= own binpath= "c:Program FilesYour Release Diryourjavaservice.exe"
Введение
В общем, расскажу я вам сказку про Terracota’овский сервер.
В одной далёкой галактике
На одной из наших виртуалок на конторе, жила-была ВебСфера(прожорливая сволочь), которая голодала от недостатка места на жёстом диске и, как результат, приложения живущие на ней начинали сильно лагать, вследствие чего приходилось часто приходилось ребутать вирталку для нормальной жизни приложений на сфере. Но не одиноки мы во вселенной(возможно), тем не менее на Земле так точно не одни, так и на виртуалке кроме сферы жили и другие монстры, куда менее прожорливые, вроде Terracotta сервера и других приложений. Так вот,
вследствие перерождения галактики
перезагрузки виртуалки терракотовский сервак постоянно надо было поднимать, так как наши приложения хранящие данные в кластере не могли запуститься, потому ожидали коннекшена от лежачего сервака. Естественно, кому-то из команды постоянно приходилось запускать Терракотту вручную, что, в общем, то было утомительно:). Мною было принято решение
создать галактический отряд
windows сервис по поднятию сервера после перезагрузки виртуалки, что казалось задачей на 15 минут, и тут я наткнулся на
Дарта Вейдера
подводные камни. Хренова конечно, что из коробки в терракоте нет создания сервиса после установки.
К делу
Посмотрим, что у нас есть:
- Windows Server 2008 какой-то edition(с установленным Windows Resource Kit Tools).
- Установленная JDK6
- Terracotta
- Световые мечи
Чего не хватало:
- Пива
- srvany.exe – утилита, позволяющая запускать любую программу как службу, позволяя тем самым создавать пользовательские службы(странно но у меня на виртуалке этого файла не было). Скачаваем с инета.
- Знаний использования реестра.(Этот недостатот быстро отпадает)
Для начала скопируем скачанный srvany.exe в папки /bin с терракотой. В моём случае нехватало батника для создания сервиса, т.к. путь к терракоте содержал
пробелы. Если кто знает как в консоли прописывать пути без пробелов, прошу писать в комменты.
Сообственно createService.bat:
sc.exe create Terracotta binPath=“c:Program Filesterracotta-3.2.1_1binsrvany.exe” type=own start=auto DisplayName=“Terracotta Server 3.2.1_1”
Думаю пояснений не требуется. Windows сервис требует данных о приложении в регистре. Создаём tcservice.reg:
REGEDIT4

[HKEY_LOCAL_MACHINESYSTEMCurrentControlSetServicesTerracottaParameters]

"Application"=""C:\Java\jdk1.6.0_17\bin\java.exe\"

"AppParameters"="-cp c:\Program Files\terracotta-3.2.1_1\lib\tc.jar -server -Xms4G –Xmx4G -XX:+HeapDumpOnOutOfMemoryError -Dtc.install-root=c:\Program files\terracotta-3.2.1_1 com.tc.server.TCServerMain"

"AppDirectory"="c:\Program Files\terracotta-3.2.1_1\"
И запускаем его. Не знаю почему, да и в общем то времени на разборку не было, но скрипт у меня не запускался, а данные в регистр не попадали:(. Поэтому делаем всё ручками. Запускаем regedit, заходим по пути HKEY_LOCAL_MACHINESYSTEMCurrentControlSetServicesTerracottaParameters и создаём там строковые параметры типа Application с указанием путей типа С:\Java\jdk1.6.0_17\bin\java.exe Также можно применить дополнительные параметры, если терракота работает не с дефолтовыми настройками:
"AppParameters"="-cp c:\ Program Files \terracotta-3.2.1_1\lib\tc.jar -server –Xms512M –Xmx512M -XX:+HeapDumpOnOutOfMemoryError -Dtc.install-root=c:\terracotta\terracotta-3.2.1_1 com.tc.server.TCServerMain -f c:\ Program Files \my-tc-config.xml -n Server1"
Всё сделали. Тестим заходим в Панель Управления -> Администрирование –> Службы, ищем сервис с названием Terracotta Server 3.2.1_1. Запускаем. Провеяем порты и видим, что приложение стартануло, если нет, проверьте правильность указания путей. Надо бы ещё убедиться что приложение встанет после перезагрузки виртуалки. Значит, что делаем?
Выключаем сервер из розетки
перезагружаем виртуалку – видим, что сервер поднялся автоматически. Ура. Таким макаром можно любое Java приложение сделать как windows сервис.
I’ve just inherited a java application that needs to be installed as a service on XP and vista. It’s been about 8 years since I’ve used windows in any form and I’ve never had to create a service, let alone from something like a java app (I’ve got a jar for the app and a single dependency jar — log4j). What is the magic necessary to make this run as a service? I’ve got the source, so code modifications, though preferably avoided, are possible.
3
Apache Commons Daemon is a good alternative. It has Procrun for windows services, and Jsvc for unix daemons. It uses less restrictive Apache license, and Apache Tomcat uses it as a part of itself to run on Windows and Linux! To get it work is a bit tricky, but there is an exhaustive article with working example.
Besides that, you may look at the binservice.bat in Apache Tomcat to get an idea how to setup the service. In Tomcat they rename the Procrun binaries (prunsrv.exe -> tomcat6.exe, prunmgr.exe -> tomcat6w.exe).
Something I struggled with using Procrun, your start and stop methods must accept the parameters (String[] argv). For example «start(String[] argv)» and «stop(String[] argv)» would work, but «start()» and «stop()» would cause errors. If you can’t modify those calls, consider making a bootstrapper class that can massage those calls to fit your needs.
5
With Apache Commons Daemon you can now have a custom executable name and icon! You can also get a custom Windows tray monitor with your own name and icon!
I now have my service running with my own name and icon (prunsrv.exe), and the system tray monitor (prunmgr.exe) also has my own custom name and icon!
-
Download the Apache Commons Daemon binaries (you will need prunsrv.exe and prunmgr.exe).
-
Rename them to be
MyServiceName.exeandMyServiceNamew.exerespectively. -
Download WinRun4J and use the
RCEDIT.exeprogram that comes with it to modify the Apache executable to embed your own custom icon like this:> RCEDIT.exe /I MyServiceName.exe customIcon.ico > RCEDIT.exe /I MyServiceNamew.exe customTrayIcon.ico -
Now install your Windows service like this (see documentation for more details and options):
> MyServiceName.exe //IS//MyServiceName --Install="C:path-toMyServiceName.exe" --Jvm=auto --Startup=auto --StartMode=jvm --Classpath="C:path-toMyJarWithClassWithMainMethod.jar" --StartClass=com.mydomain.MyClassWithMainMethod -
Now you have a Windows service of your Jar that will run with your own icon and name! You can also launch the monitor file and it will run in the system tray with your own icon and name.
> MyServiceNamew.exe //MS//MyServiceName
8
One more option is WinRun4J. This is a configurable java launcher that doubles as a windows service host (both 32 and 64 bit versions). It is open source and there are no restrictions on its use.
(full disclosure: I work on this project).
3
Yet another answer is Yet Another Java Service Wrapper, this seems like a good alternative to Java Service Wrapper as has better licensing. It is also intended to be easy to move from JSW to YAJSW. Certainly for me, brand new to windows servers and trying to get a Java app running as a service, it was very easy to use.
Some others I found, but didn’t end up using:
- Java Service Launcher I didn’t use this because it looked more complicated to get working than YAJSW. I don’t think this is a wrapper.
- JSmooth Creating Window’s services isn’t its primary goal, but can be done. I didn’t use this because there’s been no activity since 2007.
2
If you use Gradle Build Tool you can try my windows-service-plugin, which facilitates using of Apache Commons Daemon Procrun.
To create a java windows service application with the plugin you need to go through several simple steps.
-
Create a main service class with the appropriate method.
public class MyService { public static void main(String[] args) { String command = "start"; if (args.length > 0) { command = args[0]; } if ("start".equals(command)) { // process service start function } else { // process service stop function } } } -
Include the plugin into your
build.gradlefile.buildscript { repositories { maven { url "https://plugins.gradle.org/m2/" } } dependencies { classpath "gradle.plugin.com.github.alexeylisyutenko:windows-service-plugin:1.1.0" } } apply plugin: "com.github.alexeylisyutenko.windows-service-plugin"The same script snippet for new, incubating, plugin mechanism introduced in Gradle 2.1:
plugins { id "com.github.alexeylisyutenko.windows-service-plugin" version "1.1.0" } -
Configure the plugin.
windowsService { architecture = 'amd64' displayName = 'TestService' description = 'Service generated with using gradle plugin' startClass = 'MyService' startMethod = 'main' startParams = 'start' stopClass = 'MyService' stopMethod = 'main' stopParams = 'stop' startup = 'auto' } -
Run createWindowsService gradle task to create a windows service distribution.
That’s all you need to do to create a simple windows service. The plugin will automatically download Apache Commons Daemon Procrun binaries, extract this binaries to the service distribution directory and create batch files for installation/uninstallation of the service.
In ${project.buildDir}/windows-service directory you will find service executables, batch scripts for installation/uninstallation of the service and all runtime libraries.
To install the service run <project-name>-install.bat and if you want to uninstall the service run <project-name>-uninstall.bat.
To start and stop the service use <project-name>w.exe executable.
Note that the method handling service start should create and start a separate thread to carry out the processing, and then return. The main method is called from different threads when you start and stop the service.
For more information, please read about the plugin and Apache Commons Daemon Procrun.
1
I think the Java Service Wrapper works well. Note that there are three ways to integrate your application. It sounds like option 1 will work best for you given that you don’t want to change the code. The configuration file can get a little crazy, but just remember that (for option 1) the program you’re starting and for which you’ll be specifying arguments, is their helper program, which will then start your program. They have an example configuration file for this.
answered Sep 16, 2008 at 2:34
![]()
Ed ThomasEd Thomas
1,1531 gold badge12 silver badges21 bronze badges
Use «winsw» which was written for Glassfish v3 but works well with Java programs in general.
Require .NET runtime installed.
2
JavaService is LGPL. It is very easy and stable. Highly recommended.
With Java 8 we can handle this scenario without any external tools. javapackager tool coming with java 8 provides an option to create self contained application bundles:
-native type
Generate self-contained application bundles (if possible). Use the -B option to provide arguments to the bundlers being used. If type is specified, then only a bundle of this type is created. If no type is specified, all is used.
The following values are valid for type:
-native type
Generate self-contained application bundles (if possible). Use the -B option to provide arguments to the bundlers being used. If type is specified, then only a bundle of this type is created. If no type is specified, all is used.

The following values are valid for type:

all: Runs all of the installers for the platform on which it is running, and creates a disk image for the application. This value is used if type is not specified.
installer: Runs all of the installers for the platform on which it is running.
image: Creates a disk image for the application. On OS X, the image is the .app file. On Linux, the image is the directory that gets installed.
dmg: Generates a DMG file for OS X.
pkg: Generates a .pkg package for OS X.
mac.appStore: Generates a package for the Mac App Store.
rpm: Generates an RPM package for Linux.
deb: Generates a Debian package for Linux.
In case of windows refer the following doc we can create msi or exe as needed.
exe: Generates a Windows .exe package.
msi: Generates a Windows Installer package.
1
I’ve used JavaService before with good success. It hasn’t been updated in a couple of years, but was pretty rock solid back when I used it.
answered Sep 16, 2008 at 2:20
2
I didn’t like the licensing for the Java Service Wrapper. I went with ActiveState Perl to write a service that does the work.
I thought about writing a service in C#, but my time constraints were too tight.
answered Sep 16, 2008 at 2:27
![]()
Hugh BuchananHugh Buchanan
1,9113 gold badges13 silver badges9 bronze badges
1
I always just use sc.exe (see http://support.microsoft.com/kb/251192). It should be installed on XP from SP1, and if it’s not in your flavor of Vista, you can download load it with the Vista resource kit.
I haven’t done anything too complicated with Java, but using either a fully qualified command line argument (x:java.exe ….) or creating a script with Ant to include depencies and set parameters works fine for me.
answered Sep 16, 2008 at 2:34
![]()
KevinKevin
611 silver badge6 bronze badges
1
it’s simple as you have to put shortcut in
Windows 7
C:usersAll UsersStart MenuProgramsStartup(Admin) or User home directory(%userProfile%)
Windows 10 :
In Run shell:startup
in it’s property -> shortcut -> target — > java.exe -jar D:..runJar.jar
NOTE: This will run only after you login
With Admin Right
sc create serviceName binpath= "java.exe -jar D:..runJar.jar" Will create windows service
if you get timeout use cmd /c D:JAVA7~1jdk1.7.0_51binjava.exe -jar d:jenkinsjenkins.war but even with this you’ll get timeout but in background java.exe will be started. Check in task manager
NOTE: This will run at windows logon start-up(before sign-in, Based on service ‘Startup Type‘)
Detailed explanation of creating windows service
1
Another good option is FireDaemon. It’s used by some big shops like NASA, IBM, etc; see their web site for a full list.
answered Sep 16, 2008 at 6:40
![]()
Andrew SwanAndrew Swan
13.3k22 gold badges69 silver badges98 bronze badges
0
I am currently requiring this to run an Eclipse-based application but I need to set some variables first that is local to that application. sc.exe will only allow executables but not scripts so I turned to autoexnt.exe which is part of the Windows 2003 resource kit. It restricts the service to a single batch file but I only need one batch script to be converted into a service.
ciao!
answered Sep 23, 2008 at 0:26
I have been using jar2exe for last few years to run our Java applications as service on Windows. It provides an option to create an exe file which can be installed as Windows service.
It’s possible to implement a Windows service in 100% Java code by combining the use of Foreign Memory and Linker API (previewing from JDK16 upwards) with OpenJDK jextract project to handle the Windows Service callbacks, and then use jpackage to produce a Windows EXE which can then be registered as a Windows Service.
See this example which outlines the work needed to implement a Windows service. All Windows service EXE must provide callbacks for the main entrypoint ServiceMain and Service Control Handler, and use API calls StartServiceCtrlDispatcherW, RegisterServiceCtrlHandlerExW and SetServiceStatus in Advapi.DLL.
The flow of above callbacks in Java with Foreign Memory structures are:
main()
    Must register ServiceMain using StartServiceCtrlDispatcherW
    Above call blocks until ServiceMain exits

void ServiceMain(int dwNumServicesArgs, MemoryAddress lpServiceArgVectors)
    Must register SvcCtrlHandler using RegisterServiceCtrlHandlerExW
    Use SetServiceStatus(SERVICE_START_PENDING)
    Initialise app
    Use SetServiceStatus(SERVICE_RUNNING)
    wait for app shutdown notification
    Use SetServiceStatus(SERVICE_STOPPED)

int SvcCtrlHandler(int dwControl, int dwEventType, MemoryAddress lpEventData, MemoryAddress lpContext)
    Must respond to service control events and report back using SetServiceStatus
    On receiving SERVICE_CONTROL_STOP reports SetServiceStatus(SERVICE_STOP_PENDING)
        then set app shutdown notification
Once finished the Java application, jpackage can create runtime+EXE which can then be installed and registered as a Windows Service. Run as Adminstrator (spaces after = are important):
sc create YourJavaServiceName type= own binpath= "c:Program FilesYour Release Diryourjavaservice.exe"
Введение
 В рамках одного из проектов требовалось разработать Windows службу, которая могла бы выполнять ряд действий с помощью Windows API, Websocket и стандартных средств Java. Далее в статье будут описаны шаги, которые были сделаны для создания такой службы.
Потребность в Windows службе возникла из-за необходимости иметь программу со следующими возможностями:
- она должна быть постоянно запущена,
- выполнялась от системного пользователя,
- автоматически запускалась при старте системы,
- чтобы её сложно было остановить обычному пользователю.
Создание минимизированной версии JRE
Так как GraalVM всё ещё не поддерживает создание исполняемых файлов под Windows, было решено воспользоваться другими возможностями, которые предоставляет экосистема Java, а именно создание минимизированной версии JRE.
Для того, чтобы создать минимизированную версию JRE, для начала необходимо узнать зависимости на определенные пакеты, которые будут включены в JRE.
В первую очередь необходимо собрать jar-файл “fat jar” со всеми зависимостями.
Затем выполнить команду jdeps -s <путь к jar-файлу>, чтобы получить список всех зависимостей. Например:
jdeps -s application.jar
application.jar -> java.base
application.jar -> java.datatransfer
application.jar -> java.desktop
application.jar -> java.logging
application.jar -> java.net.http
application.jar -> java.sql
application.jar -> java.xml
application.jar -> jdk.unsupported
application.jar -> not found
Далее создаём нашу версию JRE с данными зависимостями:
jlink —module-path <путь к папке jmods, которая находится в jdk> —add-modules
java.base,java.datatransfer,java.desktop,java.logging,java.net.http,java.sql,java.xml,jdk.unsupported —strip-debug —compress 2 —no-header-files —no-man-pages —output <имя папки, которая будет содержать сгенерированную JRE>
Обратите внимание, что перечисление пакетов для опции —add-modules необходимо разделять запятой и не ставить между ними пробелов. Остальные опции отвечают за сжатие и убирание файлов и другой информации, которая не пригодится для выполнения программы.
После выполнения этих действий JRE будет занимать порядка 30 mb, вместо сотен.
Создание Windows службы из любого приложения
Java не имеет стандартных средств по созданию служб, поэтому были изучены сторонние инструменты и был выбран WinSW в силу его бесплатности и простоты использования.
WinSW
WinSW — это утилита, которая позволяет запустить и обернуть любой процесс как Windows службу. Для того, чтобы начать с ней работать, необходимо скачать исполняемый и конфигурационный файлы по этой ссылке https://github.com/kohsuke/winsw/releases.
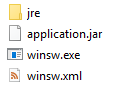
Необходимо поместить эти два файла в директорию. Переименовать исполняемый файл на своё усмотрение и дать такое же название файлу конфигурации, затем поместить в эту директорию jar-файл приложения и созданную JRE.
В конфигурационном файле необходимо прописать минимальную конфигурацию:
<configuration>
  <!-- ID of the service. It should be unique across the Windows system-->
  <id>идентификатор службы</id>
  <!-- Display name of the service -->
  <name>имя</name>
  <!-- Service description -->
  <description>Описание</description>
  <!-- Path to the executable, which should be started -->
  <executable>jrebinjava.exe</executable>
  <arguments>-jar application.jar</arguments>
</configuration>
jrebinjava.exe — относительный путь внутри нашей папки к исполняемому файлу нашей JRE.

После этих действий можно установить службу, для этого необходимо выполнить команду от имени администратора:
winsw.exe install
Список команд можно посмотреть здесь.
Взаимодействие Java и Windows API
Для использования функций Windows (таких как создание нового процесса или добавление ключей реестра) в нашем приложении был использован JNA.
JNA (Java Native Access) предоставляет Java-программам легкий доступ к библиотекам, написанным на другом языке, без написания чего-либо, кроме кода Java. JNA позволяет напрямую вызывать нативные функции, используя обычный вызов метода Java. Большинство методов не требуют специальной обработки или конфигурации; не требуется шаблон или сгенерированный код.
Подключить и работать с JNA очень просто, для этого необходимо скачать jar-файл или подключить зависимость в сборщик проекта — в нашем случает Maven:
<dependency>
<groupId>net.java.dev.jna</groupId>
<artifactId>jna-platform</artifactId>
<version>5.0.0</version>
</dependency>
В нашем проекте мы использовали JNA для достижения следующих целей: заблокировать и сделать вновь доступным диспетчер задач 1) по комбинации Ctrl+Shift+Esc и 2) в меню, доступном по комбинации Ctrl+Alt+Del.
Для достижения этого были использованы класс Advapi32Util (удобная обёртка над библиотекой advapi32.dll) и интерфейс WinReg с полезными константами, которые предоставляют функциональность для внесения изменений в реестр Windows (Рисунок 1. Класс TaskManager с методами enable() и disable() для изменения ключей реестра диспетчера задач).

Рисунок 1. Класс TaskManager с методами enable() и disable() для изменения ключей реестра диспетчера задач.
- Создать новый процесс от имени определённого пользователя Windows. Для этого мы использовали метод CreateProcessAsUser()интерфейса Advapi32. В метод необходимо передать следующие параметры:
- hToken — дескриптор токена пользователя, для которого мы запускаем процесс.
- lpApplicationName — имя модуля, который должен быть выполнен.
- lpCommandLine — командная строка для выполнения.
- lpProcessAttributes — указатель на структуру SECURITY_ATTRIBUTES, которая определяет дескриптор безопасности для нового объекта процесса и определяет, могут ли дочерние процессы наследовать возвращенный дескриптор процесса.
- lpThreadAttributes — указатель на структуру SECURITY_ATTRIBUTES, который определяет дескриптор безопасности для нового объекта потока и определяет, могут ли дочерние процессы наследовать возвращенный дескриптор потока.Создать новый процесс от имени определённого пользователя Windows. Для этого мы использовали метод CreateProcessAsUser() интерфейса Advapi32. В метод необходимо передать следующие параметры:
- bInheritHandles — если этот параметр TRUE, каждый наследуемый дескриптор вызывающего процесса наследуется новым процессом. Если параметр FALSE, процессы не наследуются.
- dwCreationFlags — флаги, которые контролируют класс приоритета и создают процесс.
- lpEnvironment — указатель на блок среды для нового процесса. Если этот параметр равен NULL, новый процесс использует среду вызывающего процесса. Блок среды состоит из блока с нулевым завершением строк с нулевым завершением. Каждая строка имеет следующий вид: name = value 0.
- lpCurrentDirectory — полный путь к текущему каталогу для процесса. Строка также может указывать путь UNC (universal naming convention).
- lpStartupInfo — указатель на структуру STARTUPINFO или STARTUPINFOEX.lpProcessInformation — указатель на структуру PROCESS_INFORMATION, которая получает идентификационную информацию о новом процессе.

Рисунок 2. Метод для создания нового процесса для определённого пользователя Windows.
- Получить токен активного пользователя, т.к. он необходим для создания процесса от определённого пользователя.
private static final Function activeSessionFunc = Function.getFunction("kernel32", "WTSGetActiveConsoleSessionId");
private static final Function userTokenFunc = Function.getFunction("wtsapi32", "WTSQueryUserToken");
public static WinNT.HANDLE getActiveUserToken() {
        PointerByReference pointer = new PointerByReference();
        WinDef.ULONG id = (WinDef.ULONG) activeSessionFunc.invoke(WinDef.ULONG.class, null);
        userTokenFunc.invoke(WinDef.BOOL.class, new Object[]{id, pointer});
        return new WinNT.HANDLE(pointer.getValue());
    }
Работа с процессами
Для работы и слежения за процессами в Windows был использован, добавленный в Java 9, класс ProcessHandle. ProcessHandle позволяет получать и производить различные манипуляции с процессами. В частности, при решении задачи, требовалось собирать PID процессов, фильтровать процессы на основе имени и принудительно завершать необходимые процессы.

Рисунок 3. Класс ProcessHandler с методами takeSnapshot() для создания снимка текущих процессов и closeNewProcesses() для завершения процессов, отличных от снимка.
Взаимодействие с другими компонентами системы
WebSocket
Для Java существует стандартизированный API для работы с WebSocket.
<dependency>
    <groupId>javax.websocket</groupId>
    <artifactId>javax.websocket-api</artifactId>
    <version>1.1</version>
    <scope>provided</scope>
</dependency>
Но одного API недостаточно, поэтому для запуска кода была выбрана одна из его реализаций — Tyrus.
<dependency>
<groupId>org.glassfish.tyrus</groupId>
<artifactId>tyrus-server</artifactId>
<version>1.14</version>
</dependency>
<dependency>
<groupId>org.glassfish.tyrus</groupId>
 <artifactId>tyrus-container-grizzly-server</artifactId>
<version>1.14</version>
</dependency>
Далее можно создать минималистичный сервер и указать обработчики (EndPoints).
 var server = new Server(
                "localhost",
                8080,
                "/endpoints",
                null,
                EndPoint1.class,
    EndPoint2.class,
    ...);
        try {
            server.start();
            Thread.currentThread().join();
        } catch (Exception e) {
            log.error("Ooops! ", e);
        } finally {
            server.stop();
            log.info("Finally...");
        }
Заготовка обработчика выглядит следующим образом:
@ServerEndpoint(value = "endpoint/url")
public class SampleEndpoint {

    @OnOpen
    public void onOpen(Session session) throws IOException {
        // Вызывается при инициализации нового соединения
    }

    @OnMessage
    public void onMessage(Session session, Message message) throws IOException {
        // Вызывается при получении сообщения от клиента
    }

    @OnClose
    public void onClose(Session session) throws IOException {
        // Вызывается при закрытии соединения
    }

    @OnError
    public void onError(Session session, Throwable throwable) {
        // Вызывается при возникновении ошибок
    }
}
HTTP-клиент
С выпуском 11-ой версии Java в ней появился удобный HTTP-клиент, поэтому потребность в сторонних клиентах исчезла.
Для создания экземпляра клиента необходимо воспользоваться билдером. В простейшем случае:
var client = HttpClient .newBuilder() .build()Далее необходимо создать запрос(request), например:
var request = HttpRequest.newBuilder()
                .uri(URI.create("https://myserver.com"))
                .timeout(Duration.ofMillis(1000))
                .header("Content-Type", "application/json")
                .POST(bean.toJSON())
                .build();
Затем этот запрос можно использовать для отправки на сервер:
var response = client.send(closeSession(sessionId, token), HttpResponse.BodyHandlers.ofString());Заключение
Благодаря модульной организации версий Java 9 и выше, утилите WinSW, обновлённому Process API для взаимодействия с процессами операционной системы и библиотеки JNA (Java Native Access), которая предоставляет программам Java простой доступ к нативным библиотекам, мы смогли создать Windows службу с использованием языка Java, на котором была реализована и серверная часть. Что в итоге позволило не вводить в процесс разработки новый язык.
In this blog post, I show you how to install a Java application with WinSW as a Windows service. WinSW is an executable binary, which can be used to wrap and manage any custom process as a Windows service.
Demo
First, we need a demo application. I use a simple Quarkus application for this purpose. You can install any Java application as a service. Usually, you install applications that run forever like an HTTP server in this case.
To bootstrap a Quarkus application run this command
mvn io.quarkus:quarkus-maven-plugin:2.5.1.Final:create -DprojectGroupId=com.testlab -DprojectArtifactId=testservice -DclassName="com.testlab.testservice.GreetingResource" -Dpath="/hello"
cd testservice
We use the application as is with just a small change. I want to create a fat jar. A jar with all dependent libraries included.
You can package your application in any way you want. In this case, I prefer the fat jar installation because I only have to copy one file.
Open srcmainresourcesapplication.properties and insert the following property
quarkus.package.type=uber-jar
Now you can package the application with .mvnw.cmd package. You find the jar in the target folder: testservice-1.0.0-SNAPSHOT-runner.jar
Preparation
You can proceed in different ways. I usually create a new folder where I copy all the files into it that are needed to run the application as a service. Copy the jar from the target folder into this directory.
Java
Next, I download the Java Runtime and also copy it into this folder. This is optional. Your service can access a globally installed Java. But I like to have everything contained in one folder and don’t have to worry about somebody updating or removing the globally installed Java.
I usually download Java from Adoptium. On the release page, you find the ZIP file with the JDK for Windows.
Download the ZIP file and unzip it into the install folder. I unzip it into the java subfolder, so the java.exe is accessible with this path javabinjava.exe
WinSW
Open the release page of the WinSW project and download the executable suitable for your platform.
https://github.com/winsw/winsw/releases
For this demo installation, I download WinSW.NET461.exe. WinSW runs on Windows with .NET Framework 2.0, 4.0 or 4.6.1. If you need to install the service on a Windows without .NET framework, download the core variant WinSW-x64.exe for 64-bit or WinSW-x86.exe` for 32-bit systems.
Copy the executable also into the folder where your jar resided. Rename the WinSW executable to any name you like. For this example, I rename it to testservice.exe. Create an XML with the same base name: testservice.xml. Make sure that the exe and XML file are located in the same folder.
Open the XML file and paste the following code into it.
<service>
  <id>testservice</id>
  <name>Test Service</name>
  <description>This is a test service.</description>
  <executable>"%BASE%javabinjava"</executable>
  <arguments>-jar "%BASE%testservice-1.0.0-SNAPSHOT-runner.jar"</arguments>
  <logmode>rotate</logmode>
  <stopparentprocessfirst>true</stopparentprocessfirst>
</service>
Check the executables path and arguments. %BASE% is an environment variable that points to the directory where the WinSW executable is located. If you want to start the application with a Java that is on the %PATH%, just use <executable>java</executable>.
Relevant here is <stopparentprocessfirst>. This tells WinSW to shutdown the parent process first. In our case this is useful because the main process opens a console (java), which can respond to Ctrl+C and will gracefully shutdown the child process (the Java application).
Check out this wiki page to learn more about all the supported options:
https://github.com/winsw/winsw/blob/master/doc/xmlConfigFile.md
Directory structure
The directory structure of my install folder.
testservice.exe
testservice.xml
testservice-1.0.0-SNAPSHOT-runner.jar
java
  bin
    java.exe
    ...
  conf
  legal
  lib
  ...
Installation
With everything in place you install the Windows service with this command
testservice.exe install
The WinSW command supports the following options:
install: Install the serviceuninstall: Uninstall the servicestart: Start the installed servicestop: Stop the servicerestart: Restart the servicestatus: Show the current service status (NonExistent, Started, Stopped)
The service by default is installed with start mode Automatic. That means Windows starts the service when it boots up. You can change that with the <startmode> configuration in the XML file.
<startmode>Manual</startmode>
To test the installation, open http://localhost:8080 in a browser. You should see the default start page of Quarkus. To test if the graceful shutdown works, stop the service
testservice stop
Open the file testservice.out.log.
2020-05-06 05:30:52,501 INFO  [io.quarkus] (main) Profile prod activated.
2020-05-06 05:30:52,501 INFO  [io.quarkus] (main) Installed features: [cdi, resteasy]
2020-05-06 05:30:54,801 INFO  [io.quarkus] (main) testservice stopped in 0.032s
We see that the application shutdown gracefully because of the testservice stopped log entry.
Note that WinSW creates by default three logs files:
<service>.out.log: Console output from the application (System.out.println)<service>.err.log: Error output from the application (System.err.println)<service>.wrapper.log: Log output from WinSW itself
That concludes this tutorial about installing any Java applications as Windows Service. Optionally you could try and create a native image of your application with GraalVM. The service installation does not change a lot. You don’t need the JRE anymore and have to change <executable> accordingly.
Join the DZone community and get the full member experience.
Join For Free
It sounds like something you’d never need, but sometimes, when you distribute end-user software, you may need to install a java program as a Windows service. I had to do it because I developed a tool for civil servants to automatically convert and push their Excel files to the opendata portal of my country. The tool has to run periodically, so it’s a prime candidate for a service (which would make the upload possible even if the civil servant forgets about this task altogether, and besides, repetitive manual upload is a waste of time).
Even though there are numerous posts and StackOverflow answers on the topic, it still took me a lot of time because of minor caveats and one important prerequisite that few people seemed to have – having a bundled JRE, so that nobody has to download and install a JRE (would complicate the installation process unnecessarily, and the target audience is not necessarily tech-savvy).
So, with maven project with jar packaging, I first thought of packaging an .exe (with launch4j) and then registering it as a service. The problem with that is that the java program uses a scheduled executor, so it never exits, which makes starting it as a process impossible.
So I had to “daemonize” it, using commons-daemon procrun. Before doing that, I had to assemble every component needed into a single target folder – the fat jar (including all dependencies), the JRE, the commons-daemon binaries, and the config file.
You can see the full maven file here. The relevant bits are (where ${installer.dir} is ${project.basedir}/target/installer}):
<plugin>
    <groupId>org.apache.maven.plugins</groupId>
    <artifactId>maven-compiler-plugin</artifactId>
    <version>2.3.2</version>
    <configuration>
        <source>1.8</source>
        <target>1.8</target>
    </configuration>
</plugin>
<plugin>
    <artifactId>maven-assembly-plugin</artifactId>
    <executions>
        <execution>
            <id>assembly</id>
            <phase>package</phase>
            <goals>
                <goal>single</goal>
            </goals>
            <configuration>
                <descriptorRefs>
                    <descriptorRef>jar-with-dependencies</descriptorRef>
                </descriptorRefs>
                <finalName>opendata-ckan-pusher</finalName>
                <appendAssemblyId>false</appendAssemblyId>
            </configuration>
        </execution>
    </executions>
</plugin>
<plugin>
    <groupId>org.apache.maven.plugins</groupId>
    <artifactId>maven-antrun-plugin</artifactId>
    <version>1.7</version>
    <executions>
        <execution>
            <id>default-cli</id>
            <phase>package</phase>
            <goals>
                <goal>run</goal>
            </goals>
            <configuration>
                <target>
                    <copy todir="${installer.dir}/jre1.8.0_91">
                        <fileset dir="${project.basedir}/jre1.8.0_91" />
                    </copy>
                    <copy todir="${installer.dir}/commons-daemon">
                        <fileset dir="${project.basedir}/commons-daemon" />
                    </copy>
                    <copy file="${project.build.directory}/opendata-ckan-pusher.jar" todir="${installer.dir}" />
                    <copy file="${project.basedir}/install.bat" todir="${installer.dir}" />
                    <copy file="${project.basedir}/uninstall.bat" todir="${installer.dir}" />
                    <copy file="${project.basedir}/config/pusher.yml" todir="${installer.dir}" />
                    <copy file="${project.basedir}/LICENSE" todir="${installer.dir}" />
                </target>
            </configuration>
        </execution>
    </executions>
</plugin>
You will notice the installer.bat and uninstaller.bat which are the files that use commons-daemon to manage the service. The installer creates the service. Commons-daemon has three modes: .exe (which allows you to wrap an arbitrary executable), Java (which is like .exe, but for java applications) and JVM (which runs the java application in the same process; I don’t know how exactly though).
I could use all three options (including the launch4j created .exe), but the JVM allows you to have a designated method to control your running application. The StartClass/StartMethod/StopClass/StopMethod parameters are for that. Here’s the whole installer.bat:
commons-daemonprunsrv //IS//OpenDataPusher --DisplayName="OpenData Pusher" --Description="OpenData Pusher"^
     --Install="%cd%commons-daemonprunsrv.exe" --Jvm="%cd%jre1.8.0_91binclientjvm.dll" --StartMode=jvm --StopMode=jvm^
     --Startup=auto --StartClass=bg.government.opendatapusher.Pusher --StopClass=bg.government.opendatapusher.Pusher^
     --StartParams=start --StopParams=stop --StartMethod=windowsService --StopMethod=windowsService^
     --Classpath="%cd%opendata-ckan-pusher.jar" --LogLevel=DEBUG^ --LogPath="%cd%logs" --LogPrefix=procrun.log^
     --StdOutput="%cd%logsstdout.log" --StdError="%cd%logsstderr.log"


commons-daemonprunsrv //ES//OpenDataPusher
A few clarifications:
- The JVM parameter points to the JVM .dll (to be honest, I’m not sure if this will work if there is no other java installation on the machine; it should)
- The StartClass/StartMethod/StopClass/StopMethod point to a designated method for controlling the running application. In this case, starting would just call the main method, and stopping would shut down the scheduled executor, so that the application can exit
- The classpath parameter points to the fat jar
- Using %cd% is risky for determining the path to the current directory, but since the end-users will always be starting it from the directory where it resides, it’s safe in this case.
The windowsService looks like that:
public static void windowsService(String args[]) throws Exception {
     String cmd = "start";
     if (args.length > 0) {
        cmd = args[0];
    }

    if ("start".equals(cmd)) {
        Pusher.main(new String[]{});
    } else {
        executor.shutdownNow();
        System.exit(0);
    }
}
One important note here is the 32-bit/64-bit problem you may have. That’s why it’s safer to bundle a 32-bit JRE and use the 32-bit (default) prunsrv.exe.
I then had an “installer” folder with JRE and commons-daemon folders and two bat files and one fat jar. I could then package that as a self-extractable archive and distribute it (with a manual, of course). I looked into IzPack as well, but couldn’t find how to bundle a JRE (maybe you can).
That’s a pretty niche scenario – usually we develop for deploying to a Linux server, but providing local tools for a big organization using Java may be needed every now and then. In my case the long-running part was a scheduled executor, but it can also run a jetty service that serves a web interface. Why would it do that, instead of providing a URL – in cases where access to the local machine matters. It can even be a distributed search engine (like that) or another p2p software that you want to write in Java.
Java (programming language)
application
Web Service
Published at DZone with permission of Bozhidar Bozhanov, DZone MVB.
See the original article here.
Opinions expressed by DZone contributors are their own.
Introduction
One project required the development of a Windows service that could perform a number of actions using the Windows API, Websocket and standard Java tools. The article below gives the description of the steps that have been taken to create such a service.
The need for the Windows service arose because of the necessity to have a software with the following features:
- it should be constantly running,
- it should be run by a system user,
- it should automatically start when the system starts,
- it should be difficult to be terminated by an ordinary user.

Creating a minimalized JRE version
As GraalVM still does not support creation of executable files for Windows, it was decided to take advantage of other capabilities offered by the Java ecosystem, specifically, creation of a minimalized JRE version.
In order to create the minimized JRE version, first it is needed to know the dependencies on certain packages that will be included in the JRE.
First of all, it is necessary to create the “fat jar” file with all dependencies.
Then run the jdeps -s <path to jar file> command to get a list of all dependencies. For example:
jdeps -s application.jar
application.jar -> java.base
application.jar -> java.datatransfer
application.jar -> java.desktop
application.jar -> java.logging
application.jar -> java.net.http
application.jar -> java.sql
application.jar -> java.xml
application.jar -> jdk.unsupported
application.jar -> not found
After that, create your version of JRE with these dependencies:
jlink –module-path <path to the jmods folder, which is located in jdk> –add-modules
java.base, java.datatransfer, java.desktop, java.logging, java.net.http, java.sql, java.xml, jdk.unsupported –strip-debug –compress 2 –no-header-files –no-man-pages –output <name of the folder that will contain the generated JRE>
Note that the listed packages for –add-modules option should be separated by a comma with no spaces between them. The other options are responsible for compressing and removing files and other information that is not useful for software execution.
After performing these actions, the JRE will take around 30 mb instead of hundreds.
Creating a Windows service from any application
Java does not have standard services creation tools, so third-party tools were studied and WinSW has been selected because it is free and easy to use.

WinSW
WinSW is a utility that allows to start and wrap any process as a Windows service. In order to start working with it, you need to download executable and configuration files through this link https://github.com/kohsuke/winsw/releases.
Place these two files in the directory. Rename the executable file at your discretion and give the same name to the configuration file, then place the application’s jar file and the created JRE in this directory.
Write a minimum configuration in the configuration file:
<configuration>
  <!-- ID of the service. It should be unique across the Windows system-->
  <id>идентификатор службы</id>
  <!-- Display name of the service -->
  <name>имя</name>
  <!-- Service description -->
  <description>Описание</description>
  <!-- Path to the executable, which should be started -->
  <executable>jrebinjava.exe</executable>
  <arguments>-jar application.jar</arguments>
</configuration>
jrebinjava.exe – the relative path inside our folder to our JRE executable file.
 After these actions, you can install the service by running the command as the administrator:
winsw.exe install
The list of commands is available here.
Interaction between Java and Windows API
To use Windows functions (such as creating a new process or adding registry keys) we used JNA in our application.
JNA (Java Native Access) provides Java software with easy access to libraries written in another language without writing anything but Java code. JNA allows calling directly native functions using natural Java method invocation. Most methods require no special handling or configuration; no boilerplate or generated code is required.
Connecting and working with JNA is very easy, you need to download the jar file or connect the dependency to a project builder, which is Maven in our case:
<dependency>
<groupId>net.java.dev.jna</groupId>
<artifactId>jna-platform</artifactId>
<version>5.0.0</version>
</dependency>
In our project we used JNA to achieve the following goals: disable and enable the task manager 1) through the Ctrl+Shift+Esc combination, and 2) in the menu available by the Ctrl+Alt+Del combination.
To achieve these goals, we used the Advapi32Util class (an easy-to-use wrapping around the advapi32.dll library) and the WinReg interface with useful constants which provide functionality to make changes to the Windows registry (Figure 1. TaskManager class with enable() and disable() methods to modify the task manager registry keys).

Figure 1. TaskManager class with enable() and disable() methods to modify the task manager registry keys.
- Create a new process on behalf of a specific Windows user. For this purpose we used the CreateProcessAsUser() method of the Advapi32 interface. The following parameters should be transferred to the method:
- hToken – a handle to the primary token that represents a user for whom we start the process.
- lpApplicationName – the name of the module to be executed.
- lpCommandLine – the command line to be executed.
- lpProcessAttributes – a pointer to a SECURITY_ATTRIBUTES structure that specifies a security descriptor for the new process object and determines whether child processes can inherit the returned handle to the process.
- lpThreadAttributes – a pointer to a SECURITY_ATTRIBUTES structure that specifies a security descriptor for the new thread object and determines whether child processes can inherit the returned handle to the thread.
- bInheritHandles – if this parameter is TRUE, each inheritable handle in the calling process is inherited by the new process. If the parameter is FALSE, the processes are not inherited.
- dwCreationFlags – the flags that control the priority class and create the process.
- lpEnvironment – a pointer to an environment block for the new process. If the parameter is NULL, the new process uses the environment of the calling process. An environment block consists of a null-terminated block of null-terminated strings. Each string is in the following form: name = value 0.
- lpCurrentDirectory – the full path to the current directory for the process. The string can also specify a UNC (universal naming convention) path.
- lpStartupInfo – a pointer to a STARTUPINFO or STARTUPINFOEX.lpProcessInformation structure – a pointer to a PROCESS_INFORMATION structure that receives identification information about the new process.
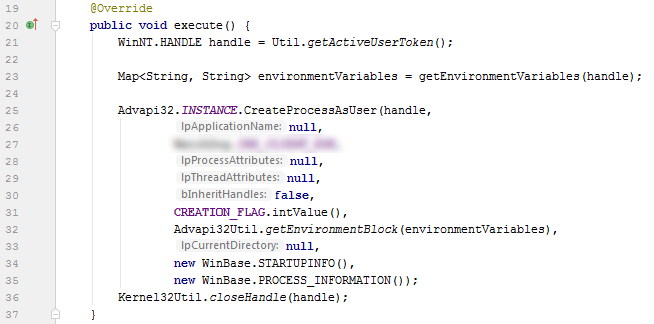
Figure 2. A method for creating a new process for the specific Windows user.
- Receive an active user token, as it is necessary to create a process from the specific user.

Working with processes
For working and tracking processes on Windows, we used the ProcessHandle class added to Java 9. ProcessHandle allows receiving and make various manipulations with processes. In particular, when solving the task, it was required to collect PIDs of processes, filter processes based on the name and abort necessary processes.
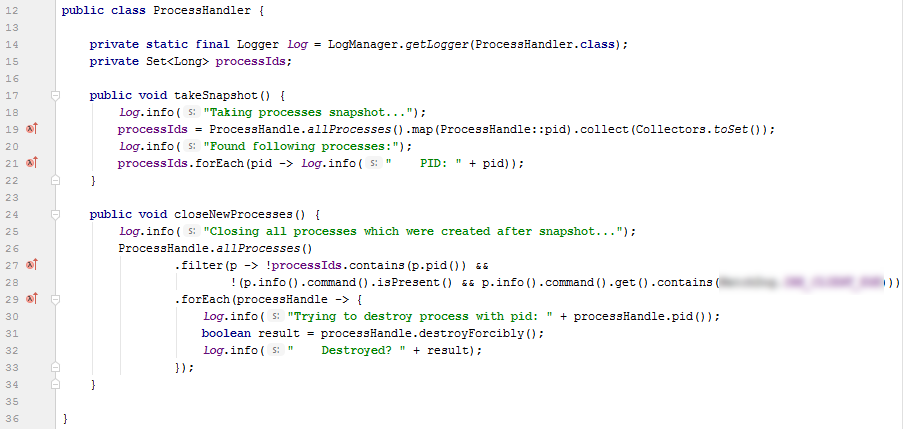
Figure 3. ProcessHandler class with takeSnapshot() method for taking a snapshot of current processes and closeNewProcesses() method for termination of processes different from the snapshot.
Interaction with other system components
WebSocket
For Java there is a standard API for working with WebSocket.
<dependency>
    <groupId>javax.websocket</groupId>
    <artifactId>javax.websocket-api</artifactId>
    <version>1.1</version>
    <scope>provided</scope>
</dependency>
But just the API was not enough, so one of its implementations Tyrus was chosen to run the code.
<dependency>
<groupId>org.glassfish.tyrus</groupId>
<artifactId>tyrus-server</artifactId>
<version>1.14</version>
</dependency>
<dependency>
<groupId>org.glassfish.tyrus</groupId>
 	<artifactId>tyrus-container-grizzly-server</artifactId>
<version>1.14</version>
</dependency>
Then you can create a minimalistic server and specify handlers (EndPoints).
 var server = new Server(
                "localhost",
                8080,
                "/endpoints",
                null,
                EndPoint1.class,
    EndPoint2.class,
    ...);
        try {
            server.start();
            Thread.currentThread().join();
        } catch (Exception e) {
            log.error("Ooops! ", e);
        } finally {
            server.stop();
            log.info("Finally...");
        }
A handler skeleton is looking as follows:
@ServerEndpoint(value = "endpoint/url")
public class SampleEndpoint {

    @OnOpen
    public void onOpen(Session session) throws IOException {
        // Called when a new connection is initialized
    }

    @OnMessage
    public void onMessage(Session session, Message message) throws IOException {
        // Called when a message from the client is received
    }

    @OnClose
    public void onClose(Session session) throws IOException {
        // Called when a connection is closed
    }

    @OnError
    public void onError(Session session, Throwable throwable) {
        // Called when errors appear
    }
}
HTTP Client
The release of the 11th version of Java brought us a convenient HTTP client, so there is no need for third-party clients.
To create a client instance, you need to use a builder. In the simplest case:
var client = HttpClient .newBuilder() .build()After that, you need to create a request, for example:
var request = HttpRequest.newBuilder()
                .uri(URI.create("https://myserver.com"))
                .timeout(Duration.ofMillis(1000))
                .header("Content-Type", "application/json")
                .POST(bean.toJSON())
                .build();
Then this request can be used for sending to the server:
var response = client.send(closeSession(sessionId, token),
HttpResponse.BodyHandlers.ofString())
Conclusion
Due to the modular organization of Java 9 and higher, WinSW utility, updated Process API for interaction with operating system processes and JNA (Java Native Access) library, which provides Java programs with easy access to native libraries, we were able to create a Windows service using Java language which was also used for the server part implementation. As the result, this allowed us not to introduce a new language into the development process.
This blog post describes how to create a windows service from a Java application, it is a slightly more fleshed out version of the JavaZone 2016 lightning talk “A Java windows service in 10 minutes”.
A problem sometimes encountered by a Java programmer, is to make your Java program into a Windows Service. This is may be a bump in your project, particularly if you don’t know anything about windows services, or much about windows for that matter.
The demo created a running, working, Windows service server using 14 lines of Java code, and some maven configuration.
Before starting on the demo, a few words on what windows services are (from a GNU/linux/UNIX perspective):
- Windows services are the “daemons” of the windows world
- Windows services are normally started when the windows system starts, and stopped when the windows system shuts down
- Windows services can be stopped and started by administrator users, both using a GUI and using command line commands
- Windows services can be configured to run with a particular user, restricting what the service can do (default is the local user “Local System”)
To create the installer the demo use a maven plugin called maven-windows-service-installer-plugin. The maven plugin in turn relies on izpack for the installer and uses the apache commons daemon to execute the Java program.
The Java program turned into a windows service during the demo, is the Wiser test SMTP server. Wiser was picked, because:
- It has an appropriate API
- An SMTP service is easy to demonstrate, and it is something other than yet another HTTP service
Since the demo might be hard to follow (a lot of information in 10 minutes), this blog post describes all steps of the demo (note: the complete code can be found on github at https://github.com/sbang/ansmtpserver ).
Required prior knowledge:
- Java programming
- Apache maven
Required software to retrace the demo:
- Apache maven (any maven 2 or 3 will do)
- A Java SDK (I’m using the newest Java 1.8, but any Java SDK 1.7 will probably do)
- An eclipse IDE (I’m using Eclipse Neon, but any recent eclipse will probably do)
- A telnet command line application (since this is for windows, just use Windows cygwin bash with the inetutils package, just run the installer and include inetutils)
To retrace the demo, do the following operations:
- Start eclipse and open the Workspace “C:workspace”
- Right click the package explorer and select New->Other…
- In the “New” dialog box:
- Select Maven->Maven Project
- Click the “Next>” button
- Checkmark the checkbox “Create a simple project (skip archetype selection)” at the to of the dialogbox
- Click the “Next>” button
- In the “Group id” text box, type
ansmtpserver
- In the “Artifact id” text box, type
ansmtpserver
- Click the “Finish” button
- Open the “ansmtpserver” project and double click “pom.xml” to open it
- In the pom.xml editor (title “ansmtpserver/pom.xml”):
- Select the Dependencies tab
- Click the “Add…” button
- In the “Select Dependency” dialog box:
- In the field “Enter groupId, artifactId or sha1 prefix or pattern (*)”, type
windows-installer
- Select “com.alexkasko.installer windows-service-installer-common”
- Click the “OK” button
- In the field “Enter groupId, artifactId or sha1 prefix or pattern (*)”, type
- Click the “Add…” button
- In the “Select Dependency” dialog box:
- In the field “Enter groupId, artifactId or sha1 prefix or pattern (*)”, type
subethamail
- Select “org.subethamail subethasmtp”
- Click the “OK” button
- In the field “Enter groupId, artifactId or sha1 prefix or pattern (*)”, type
- Click the “Add…” button
- In the “Select Dependency” dialog box:
- In the field “Enter groupId, artifactId or sha1 prefix or pattern (*)”, type
slf4j-simple
- Select “org.slf4j slf4j-simple”
- Click the “OK” button
- In the field “Enter groupId, artifactId or sha1 prefix or pattern (*)”, type
- Save the pom.xml file
- Right-click ansmtpserver->src/main/java in the “Package Explorer” and select New->Package
- In the “New Java Package” dialog box:
- Let the “Name” field have its default (“ansmtpserver”)
- Click the “Finish” button
- Right-click the ansmtpserver->src/java/main->ansmtpserver package in the “Package Explorer” and select New->Class
- In the “New Java Class Dialog”
- In the “Name” field, type
AnSmtpServer
- In “Interfaces”, click the “Add…” button
- In the “Implemented Interfaces Selection” dialog box:
- In “Choose interfaces”, type
dae
- In “Matching items”, select “DaemonLauncher – com.alexkasko.installer”
- Click the “OK” button
- In “Choose interfaces”, type
- Click the “Finish” button
- In the “Name” field, type
- Modify the generated AnSmtpServer.java file in the following way
package ansmtpserver; import org.subethamail.wiser.Wiser; import com.alexkasko.installer.DaemonLauncher; public class AnSmtpServer implements DaemonLauncher { private Wiser server; public AnSmtpServer() { super(); server = new Wiser(); server.setHostname("javazone"); server.setPort(2200); } public void startDaemon() { server.start(); } public void stopDaemon() { server.stop(); } }- Add a Wiser field
- In the constructor, create an Wiser instance, set the host name, and the port number
- In the startDaemon() method start the Wiser server
- In the stopDaemon() method stop the Wiser server
- Save the modified AnSmtpServer.java file
- Right-click ansmtpserver->src/main/resources in the “Package Explorer” and select New->File
- In the “New File” dialog box
- In “File name”, type
simplelogger.properties
- Click the “Finish” button
- In “File name”, type
- Modify the “simplelogger.properties” file to have the following content
org.slf4j.simpleLogger.defaultLogLevel=debug
and save the file
- Select the “ansmtpserver/pom.xml” editor, and select the “pom.xml” tab, and paste the following before the </project> end tag. This configuration will be the same for all installers with the exception of the <prunsrvDaemonLauncherClass> tag
<build> <plugins> <plugin> <groupId>com.alexkasko.installer</groupId> <artifactId>maven-windows-service-installer-plugin</artifactId> <version>1.0.6</version> <dependencies> <dependency> <groupId>com.alexkasko.installer</groupId> <artifactId>windows-service-installer-common</artifactId> <version>1.0.6</version> </dependency> </dependencies> <configuration> <prunsrvDaemonLauncherClass></prunsrvDaemonLauncherClass> <use64BitJre>true</use64BitJre> </configuration> <executions> <execution> <id>build-installer</id> <phase>package</phase> <goals> <goal>installer</goal> </goals> </execution> </executions> </plugin> </plugins> </build> - Open ansmtpserver->src/main/java->ansmtpserver->AnSmtpServer.java in the “Package Explorer”, right-click the “AnSmtpServer” class, and select “Copy Qualified Name” and paste the name into the <prunsrvDaemonLauncherClass> element
- Save the pom.xml file
- Open a cmd.exe window, and type the following commands to build the installer
cd c:windowsansmtpserver
mvn clean install
- Open a windows explorer on C:Windowsansmtpservertarget
- Right click the ansmtpserver-0.0.1-SNAPSHOT-installer.zip file and select “Extract all…” to the folder “C:workspaceansmtpservertarget”
- Open the folder “C:workspaceansmtpservertargetansmtpserver-0.0.1-SNAPSHOT-installer”, right-click the “install.exe” file and select “Run as administrator”
- Open a “Cygwin 64 terminal” window and type the following command
telnet localhost 2022
The expected response is
Trying 127.0.0.1...
telnet: Unable to connect to remote host: Connection refused
since nothing is listening to port 2200
- Click the installer all the way to the end, using defaults for everything
- Open the windows services window and there will be a new windows service “ansmtpservice” shown as “Running”

- Try the “telnet localhost 2200” command again, and this time there will be a response, and it will be possible to talk SMTP over the connection

- Stop the “ansmtpservice” service and the telnet connection will be disconnected


Thus ends the installer part.
Some simple improvements to this installer are possible:
- Better descrption for the service in “Windows Services”
- Just add the following to the <configuration> setting of the maven-windows-service-installer-plugin:
<prunsrvServiceName>AnSmtpServer</prunsrvServiceName>
<prunsrvDisplayName>An SMTP server</prunsrvDisplayName>
<prunsrvDescription>This service responds to incoming STMP connections on port 2200.</prunsrvDescription>
- Just add the following to the <configuration> setting of the maven-windows-service-installer-plugin:
- Install the service under “C:Programs and Files”
- Just add the following to the <configuration> setting of the maven-windows-service-installer-plugin:
<izpackDefaultInstallDir>$APPLICATIONS_DEFAULT_ROOTansmtpserver</izpackDefaultInstallDir>
- Just add the following to the <configuration> setting of the maven-windows-service-installer-plugin:
- Attach the zip file containing the installer to the maven artifact, so that the installer can be deployed to a maven repository, where other maven files can download and unpack the installer from (easy distribution)
- Add the following inside <build><plugins></plugins></build> of the pom.xml build
   <plugin>
    <groupId>org.codehaus.mojo</groupId>
    <artifactId>build-helper-maven-plugin</artifactId>
    <version>1.10</version>
    <executions>
     <execution>
      <id>attach-artifacts</id>
      <phase>package</phase>
      <goals>
       <goal>attach-artifact</goal>
      </goals>
      <configuration>
       <artifacts>
        <artifact>
         <file>target/${project.artifactId}-${project.version}-installer.zip</file>
         <type>zip</type>
         <classifier>installer</classifier>
        </artifact>
       </artifacts>
      </configuration>
     </execution>
    </executions>
   </plugin>
  </plugins>
- Add the following inside <build><plugins></plugins></build> of the pom.xml build
A windows-service-installer that contains the above improvements and more, is this installer for Apache Jena Fuseki.