 Специалист
Общие сведения:
Читатели научатся запускать ПО контроллера UniFi в качестве службы Windows.
Службы Windows часто бывают полезны, т.к. работают в фоновом режиме и не требуют внимания пользователя. Таким образом, служба может запускаться при включении компьютера, без вмешательства пользователя.
В UniFi версии 2.2.0, команда UniFi добавила функцию поддержки запуска ПО в качестве службы Windows. Пошаговая инструкция для запуска службы приведена ниже.
Пошаговая инструкция:
- 1. Закройте всё запущенное на контроллере ПО UniFi.
- 2. Откройте командную строку с правами Администратора.
- 3. Выберите директорию установки java.
На 64-битных системах ее можно найти по адресу:
«C:Program Files (x64)Javajre6bin»;
На 32-битных системах ее можно найти по адресу: «C:Program FilesJavajre6bin». - 4. Добавьте путь к директории, указанной выше, в строку PATH (во вкладке Компьютер(Computer)->Свойства(Properties)->
(Расширенные системные настройки)Advanced system settings). - 5. Смените директорию командой «cd unifi_base».
- 6. Введите «java -jar libace.jar installsvc».
Примечание: Рекомендуется использовать последнюю версию контроллера UniFi, т.к. в предыдущих версиях имелись проблемы с выключением службы после выхода Администратора из системы.
Если вы используете Windows x64, установите обе версии Java, x86 и x64, иначе служба не будет корректно запускаться. См.ЭТУ страницу для подробной информации.
При обновлении службы запускайте «java -jar libace.jar stopsvc» (может меняться в зависимости от того, откуда Вы запускаете команду) для остановки службы. Обновите контроллер UniFI. После окончания обновления запустите «java -jar libace.jar startsvc» для старта службы.
Видео-руководство:
Форум UBNT > Ubiquiti > Unifi контроллер
![]() Установленный по-умолчанию контроллер Ubiquiti UniFi Controller запускается как приложение, что не совсем удобно: при перезагрузке машины с контроллером придется логиниться в систему и удостоверяться, что приложение запущено, и сети UniFi осуществляют вещание в штатном режиме. Однако, можно заставить стартовать контроллер как службу Windows. Из коробки этого сделать нельзя, но есть вариант, и сейчас я покажу, как это можно сделать. Приступим.
Установленный по-умолчанию контроллер Ubiquiti UniFi Controller запускается как приложение, что не совсем удобно: при перезагрузке машины с контроллером придется логиниться в систему и удостоверяться, что приложение запущено, и сети UniFi осуществляют вещание в штатном режиме. Однако, можно заставить стартовать контроллер как службу Windows. Из коробки этого сделать нельзя, но есть вариант, и сейчас я покажу, как это можно сделать. Приступим.
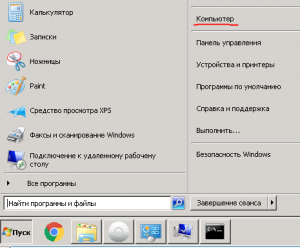
Откройте свойства системы (иконка Компьютер -> клик правой кнопкой мыши -> Свойства, или наберите команду sysdm.cpl в командной строке cmd) см. скриншоты:
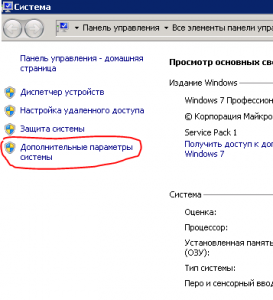
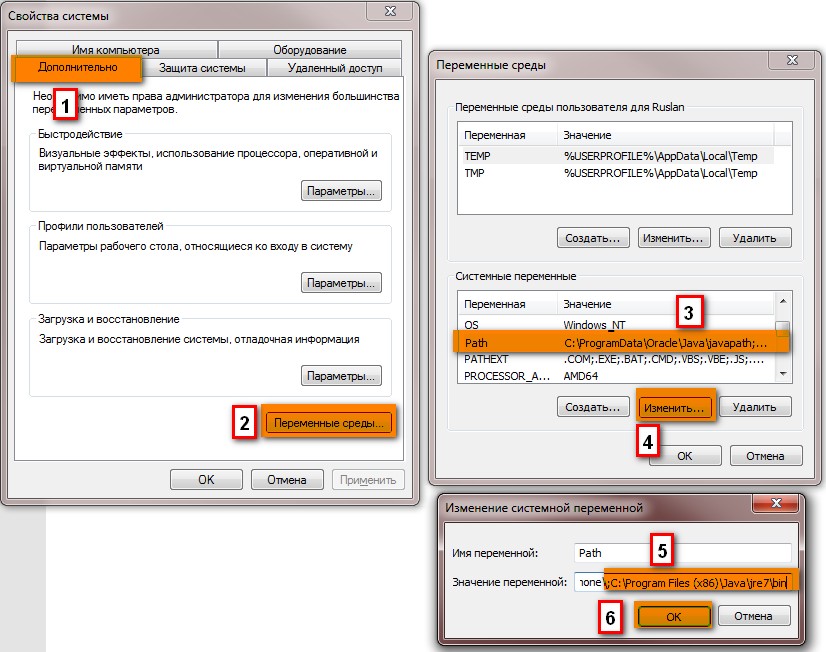
Затем, перейдите во вкладку «Дополнительно», нажмите «Переменные среды», в списке системных переменных выберите «Path», нажмите «Изменить», в значении переменной добавьте через точку с запятой путь до директории «bin» в каталоге, где у вас установлена актуальная версия Java (в зависимости от установленной версии Java путь может быть различным.
Это может быть как системная папка Program Data, так и Program Files (в зависимости от установленной версии Java, а так же версии операционной системы).
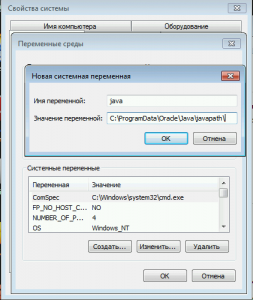
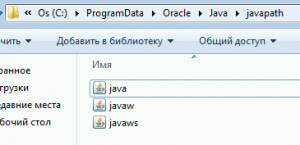
На приведенном ниже скриншоте это директория C:Program DataOracleJavajavapath) и затем нажмите «ОК»:
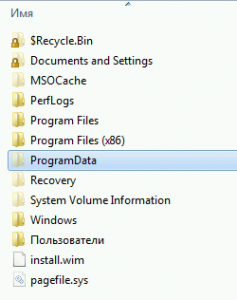
В виде небольшого отступления скажу, что по-умолчанию директория Program Data скрыта, для того чтобы ее увидеть нужно в Параметрах папок сделать видимыми системные и скрытие файлы, как показано на скриншоте:
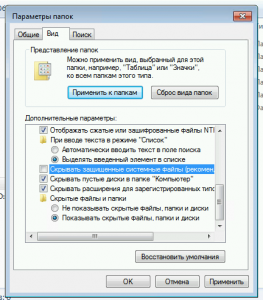
Всё, Program Data доступна для просмотра:
Теперь идем по пути в каталог c Java и сверяем путь до исполняемых файлов:
Затем, нужно запустить командную строку с правами администратора, и с помощью команды cd перейдите в каталог, где у вас установлен Unifi Controller (обычно это %userprofile%Ubiquiti Unifi), и выполните команду: java -jar libace.jar installsvc
В результате выполнения команды должно появиться такое сообщение:
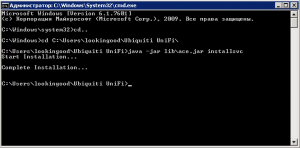
На этом этапе мы зарегистрировали службу UfiFi контроллера.
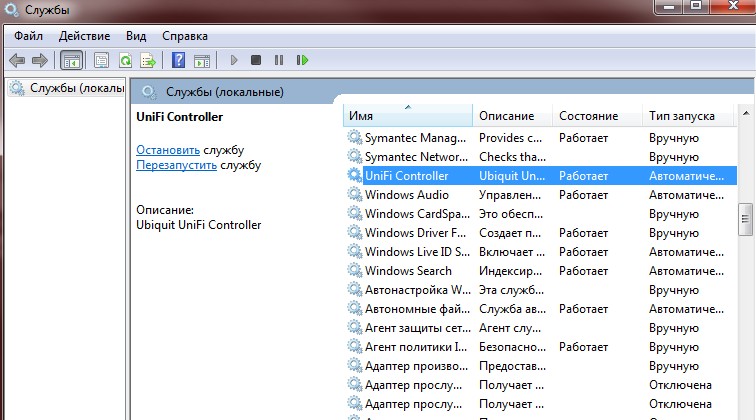
Затем, откройте оснастку управления службами (команда services.msc) и удостоверьтесь, что служба UniFi Contoller присутствует в списке и ей присвоен необходимый тип запуска (например, Автоматический):
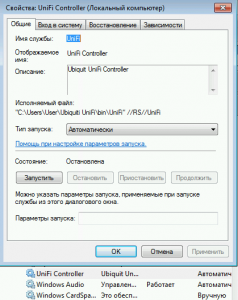
Для запуска UniFi Controller как службы Windows нажмите кнопку Запустить, или воспользуйтесь командой net start "UniFi Controller" для запуска службы в режиме командной строки.
Важно знать, что теперь, перед обновлением контроллера UniFi нужно будет останавливать службу командой
java -jar libace.jar stopsvc(может меняться в зависимости от того, откуда Вы запускаете команду). Затем запускать обновление контроллера, затем, после окончания обновления запускать командуjava -jar libace.jar startsvcдля старта службы.
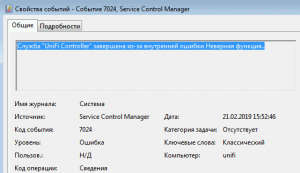
Так же, если во время запуска службы UniFi Controller происходит ошибка, из разряда «Служба UniFi Controller» завершена из-за внутренней ошибки Неверная функция:
Или ошибка «Не удалось запустить службу «UniFi Controller» Специфическая ошибка службы: 1.:
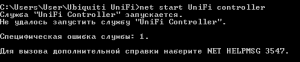
то вам обязательно нужно проверить установленную Java или переустановить её (просто пройдите по ссылке на официальный сайт и скачайте версию под разрядность своей ОС: https://www.java.com/en/download/manual.jsp), если вы установили контроллер на х64-разрядной версии ОС – на всякий случай скачайте и установите обе версии Java (для х 586 и 64-битных ОС).
После переустановки Java запустите службу UniFi Contoller повторно. С вероятностью в 99% она запустится без ошибок.
На этом всё, теперь вы умеете настраивать запуск UniFi Contoller как службу в операционных системах Microsoft Windows, а так же умеете исправлять ошибки при запуске контроллера UniFi.
Если есть вопросы – задавайте в комментариях, подписывайтесь на обновления, делитесь статьей в социальных сетях.
Установленный по умолчанию контроллер Ubiquiti UniFi Controller запускается как приложение, что не совсем удобно: при перезагрузке машины с контроллером придется логиниться в систему и удостоверяться, что приложение запущено, и сети UniFi осуществляют вещание в штатном режиме. Однако можно заставить стартовать контроллер как службу. Приступим.
- Откройте свойства системы (команда sysdm.cpl)
- Перейдите во вкладку «Дополнительно«, нажмите «Переменные среды«, в списке системных переменных выберите «Path«, нажмите «Изменить«, в значении переменной добавьте через точку с запятой путь до директории «bin» в каталоге, где у вас установлена актуальная версия Java (в зависимости от установленной версии Java путь может быть различным; на приведенном ниже скриншоте это C:Program Files (x86)Javajre7bin), и нажмите «Ок«:

- Запустите командную строку с правами администратора, командой cd зайдите в каталог, где у вас установлен Unifi Controller (обычно это %userprofile%Ubiquiti Unifi):
- Выполните команду
java -jar libace.jar installsvc
В результате выполнения команды должно появиться такое сообщение:
- Откройте оснастку управления службами (команда services.msc) и удостоверьтесь, что служба UniFi Contoller присутствует в списке и ей присвоен необходимый тип запуска:


Описано, как запустить ПО контроллера UniFi в виде службы Windows.

Службы Windows часто бывают полезны, так как они являются «фоновыми» приложениями, не требующими внимания со стороны конечного пользователя. При этом способе служба будет запущена при запуске операционной системы и не потребует какого-либо вмешательства со стороны пользователя.
Ниже описаны шаги, позволяющие включить службу:
Шаги процедуры
-
Закройте все копии ПО UniFi, работающие на контроллере.
-
Откройте командную строку, как администратор
-
Отыщите папку, в которой установлен java.
-
Java 7 обычно находится в папке “C:Program FilesJavajre7bin”;
-
Java 8 имеет символьную ссылку, которая уже добавлена в PATH, так что Вам потребуется пропустить шаг 4.
-
Добавьте папку, указанную выше, в PATH (в том виде, в котором PATH отображается в Computer->Properties->Advanced system settings)
-
Запустите командную строку, как администратор, затем смените папку на новое местоположение UniFi в Вашем компьютере, используя команду “cd <unifi_base>”
-
Введите “java -jar lib/ace.jar installsvc”
Если Вы используете Windows x64, пожалуйста, установите и x86, и x64 версию Java, в противном случае служба не сможет правильно запуститься. Убедитесь, что в переменных среды определены пути и x86, и x64. См. ЭТУ страницу, на которой детально описан процес загрузки.
При обновлении службы сначала запустите «java -jar lib/ace.jar uninstallsvc» ( может отличаться в зависимости от того, откуда Вы запускаете команду), чтобы удалить старую службу. Обновите контроллер UniFi После того, как обновление завершится, запустите «java -jar lib/ace.jar installsvc», чтобы установить службу для обновленной копии контроллера.
Если Вы просто остановите службу, а затем запустите ее снова, у Вас будут работать две дублирующие друг друга службы.
Видеоруководство
Introduction
I recently had to prepare replacing an aging Aruba Wi-FI deployment with an effective, more capable and budget friendly solution. It needed to offer both corporate (Radius Server) and guest Wi-Fi access for modern workplace needs.
We selected Ubiquiti equipment to comply with the requirements. Apart from the WAPs all gear goes into server & network racks. The controller had to be implemented on-premises (self-managed, not via a service provider). As they have a modern Hyper-V environment we opted to deploy the controller on a Windows 2019 virtual machine. By the time the solution is deployed that will have become generally available. A Cloud Key appliance or Raspberry PI was less interesting in this environment that had professional racks in available in dedicated server & network rooms.
OK, you can use Windows Server 2016 or Windows Server 2012 R2 as well. Note that I don’t like using a client OS for an infrastructure role. I would also not use older server versions because I like longevity in support. I dislike solutions that are out of support a week after I deployed it. The big take away here is that you want to tweak the standard deployment of the controller a bit.
- Change the install so it is not tied to a user profile
- Run the controller as a service rather than an app you need to start manually or add to auto start.
- Configure a certificate for a decent user experience with the UniFi dashboard
Below are my lab notes as reference to myself and my readers in regards to running the Ubiquiti UniFi Controller as a service on Windows Server 2019.
Installation
For some reason the installer dumps all the files in the user profile of the person running the installer. Which is easy in terms of permissions. But people leave and profiles get deleted. Multiple people need to manage systems so having it tied to an individual isn’t that great.
For a UniFi install is first install java (x64) and a x64 bit browser. Chrome & Firefox are support, others may be as well or just work. The controller runs on Java so that’s a no brainer you need it. You don’t need a browser on the virtual machine per se, but it acts as a console access to the controller via the VM in case of network issues. Having multiple options is good. If you don’t need that, Windows Core will do.
Step by Step
1. Install the controller with the UniFi-installer.exe installer. It will put the installation under C:UsersUSERNAMEUbiquiti UniFi
2. To move the UniFi controller app you copy the entire folder to the desired location. That could be C:Program Files or C:ProgramData. You can even create your own root folder if you don’t want any admin permission to be needed for the folder. For this demo I used C:ProgramDataUbiquiti UniFi.
3. I create a shortcut https://unifi.workinghardinit.work:8443 and change the Icon to one I created for this purpose.

4. I then also change the “Target” path to “C:ProgramDataUbiquiti UniFilibace.jar” ui and “Start in” path to “C:ProgramDataUbiquiti UniFi”path. That way that short cut points to the right location. However, I want my controller to run as a service so we won’t be using that shortcut too much.

Anyway, we have a clean nice setup right now to continue with. Please note you do not need to install a browser on the server itself. This was done to give people a virtual machine console access option in case they have network issue. If don’t want that you can use Windows Server Core
Running as a service
Since we want the controller to always run and behave like a service, we just have some extra work to do. This is documented here: https://help.ubnt.com/hc/en-us/articles/205144550-UniFi-Run-the-Controller-as-a-Windows-service I just adapted this to my path.
1. Close any instances of the UniFi software on the computer. If you just installed the UniFi controller, make sure to open it once by using the icon on the desktop or within the start menu. Once it says “UniFi Controller (a.b.c) started.” you can close the controller program. This is needed to generate some required files for the service to work.
2. Open the command prompt as an Administrator. For example, on Windows 10, right click on the Start Menu and choose “Command Prompt (Admin)”.
3. Change directory to the location of UniFi in your computer using the following command (exactly as it is here, no substituting needed): cd “C:ProgramDataUbiquiti UniFi”
4. Once in the root of the UniFi folder, issue the following (this installs the UniFi Controller service): java -jar libace.jar installsvc
5. Once you’re at a new command prompt line, after it says “Complete Installation…”, issue the following: java -jar libace.jar startsvc
Installing a proper certificate
After entering the FQDN A record or CNAME to your DNS infra you will still get a security warning as we haven’t installed a proper certificate yet.

Let’s fix this unprofessional looking fist view of your controller web application! We’ll use a recent cert from either a corporate or public PKI. Take your pick, there are free ones out there if you need that.
I’m using a wild card certificate and will show you how to implement it with the Unifi controller. The trick is to replace default Keystore with a custom one in which you added your certificate. There is are nice tools for that and the exact method will vary a bit. This is what I did. Note that you can do this on your workstation, no need o do all this on your server with the UniFi Controller. Keep that tidy.
Make sure you have your cert available (exported) as a pfx file.
The Windows application method
Download KeyStore Explorer (http://keystore-explorer.org/downloads.html) and install in on your PC, the default settings are just fine.
Have your certificate exported as pfx file with private key and the option “Include all certificates in the certification path if possible”.
Run KeyStore Explorer and under tools select “Import Key Pair”

As type select PKCS #12

Browse to your pfx cert you created, fill out the correct password and click “Import”

I’m happy with my default alias of * as I have a wild card cert. You should use unifi.domain.ext if you don’t have a wild card to be clear.

Enter the new Key Pair password, again I use “aircontrolenterprise”

Click OK and your see that your import was successful. Click OK.

Now select your keypair and under the File menu select “Save As”

For the password, again, use aircontrolenterprise, click OK and fill out keystore for the file name.

Click save, your done here.
I actually delete the imported key pair form KeyStore Explorer and also shift delete the export pfx. It’s better not to have these sorts of files lingering around on your workstation even when using bitlocker. You must have a cert management process.
The results of your work
Now on your controller VM navigate to your data path, in my case it’s C:ProgramDataUbiquiti UniFidata. Rename the original keystore file to keystor.ori and past the one you created in this folder.

You then need to restart the UniFi Controller service, either in the GUI or via the command prompt.


Give the controller 10 second to get going properly and click your UniFi Dashboard shortcut to browse to the application. And now, as you can see, below we have a much better user experience. This is actually the logon screen after you’ve run through the initial install wizard when you first launch the application.

We now have a well-behaved web application to securely access the UniFi controller and manage the Wi-Fi setup.jjj
The native java tools method
If you want you can use native Java tools to do the same as with the KeyStore Explorer app replace those steps above by the one below.
C:Program FilesJavajre1.8.0_181bin>Keytool.exe -list -keystore C:SysAdminCertsexported_wildcard_workinghardinit_work.pfx -storetype pkcs12 which prompts for your password and outputs:
Enter keystore password:
Keystore type: PKCS12
Keystore provider: SunJSSE
Your keystore contains 1 entry
1524853e062d1785ac5ebedb44a61065, Aug 30, 2018, PrivateKeyEntry,
Certificate fingerprint (SHA1): 7A:82:FC:6E:2D:4D:79:F2:43:7A:FE:57:48:BE:13:FB:C4:AF:ED:71
C:Program FilesJavajre1.8.0_181bin>keytool -importkeystore -srcstoretype pkcs12 -srcalias 1524853e062d1785ac5ebedb44a61065 -srckeystore C:SysAdminCertsexported_wildcard_workinghardinit_work.pfx -keystore C:SysAdminCertskeystore -destalias *.workinghardinit.work
Importing keystore C:SysAdminCertsexported_wildcard_workinghardinit_work.pfx to C:SysAdminCertskeystore…
Enter destination keystore password: aircontrolenterprise
Re-enter new password: aircontrolenterprise
Enter source keystore password: aircontrolenterprise => the password use to protect the pfx exported, can be anything
Warning:
The JKS keystore uses a proprietary format. It is recommended to migrate to PKCS12 which is an industry standard format using “keytool -importkeystore -srckeystore C:SysAdminCertskeystore -destkeystore C:SysAdminCertskeystore -deststoretype pkcs12”.
Conclusion
Ubiquiti delivers value for money Wi-fi solutions. The gear is good and affordable with manageability options that serve the majority of needs for the SME. It perfect for the more demanding SOHO environment.
Ubiquiti offers flexibility but also requires some “tweaking” to get just right. This goes for both the software installation (fixing some default installation choices and installing a certificate) as well as some of the hardware (installing less loud fans) shortcomings.
For many people a virtual machine with Windows is something they already have the infrastructure for. It fist perfectly into their existing operational processes. A virtual machine also fits well into many customers their existing backup and restore scenarios. A virtual machine can also easily be “checkpointed” to revert to a known good situation. This is an extra benefit in case something goes wrong during an upgrade or update wrong. This combined with the Auto Backup Configuration of the UniFi controller cover most bases for quick recovery. Not too many people can restore their raspberry PI or appliance that fast.
We chose to use Windows Server 2019 in this demo as we wanted to future proof the deployment . So we want to deliver the controller on an OS that will serve them well for many years to come.
To recap, first I showed you how to improve on the default installation. We than made the UniFi controller runs as a service. Finally I configured an SSL certficate for the controller app. I hope you liked it and that it helps you out.
Here is a useful guide from Ubiquiti with regards to running the Controller service as a Windows Service. This is essential when running a centralized controller for your APs and to make sure you contoller would run automatically after a restart rather than enabling it to run maunally.
Originally posted at: https://help.ubnt.com/hc/en-us/articles/205144550-UniFi-Run-the-Controller-as-a-Windows-service
Readers will learn how to run the UniFi controller software as a Windows service.
Windows services are often useful since they are “background” applications which don’t require any attention from the end-user. In this way, the service will launch upon startup, without any intervention from the user. The service is a direct replacement/substitute for running the controller program manually (via the icon or a scheduled task), so there is no need to run the controller application if you’re running it as a Windows service.
Table of Contents
- Steps – How to Run the Controller as a Windows Service
- User Notes & Tips
- Related Articles
Steps – How to Run the Controller as a Windows Service
Back to Top
1. Close any instances of the UniFi software on the computer. If you just installed the UniFi controller, make sure to open it once by using the icon on the desktop or within the start menu. Once it says “UniFi Controller (a.b.c) started.” you can close the controller program. This is needed to generate some required files for the service to work.
2. Open the command prompt as an Administrator. For example, on Windows 10, right click on the Start Menu and choose “Command Prompt (Admin)”.
3. Change directory to the location of UniFi in your computer using the following command (exactly as it is here, no substituting needed):
cd "%UserProfile%Ubiquiti UniFi"
4. Once in the root of the UniFi folder, issue the following (this installs the UniFi Controller service):
java -jar libace.jar installsvc
5. Once you’re at a new command prompt line, after it says “Complete Installation…”, issue the following:
java -jar libace.jar startsvc
6. Close the command prompt window either by entering the “exit” command, or clicking the X.
7. There is no longer a controller applet, like that other window that popped up. To access the controller you need to open your browser and go to https://localhost:8443. Alternatively you can use the desired interface IP, or FQDN that is mapped to that host (in place of “localhost”).
Note: You will need to use Oracle Java JRE 8, which you can download HERE. For the UniFi cloud service (unifi.ubnt.com) to work, you need to use x64 Java only (so choose Windows x64 Offline). You can use either x86 or x64 Java for UniFi, but if you use x86 you cannot use the unifi.ubnt.com cloud tie in.When upgrading the service, first perform step 2 and 3, then run “java -jar libace.jar stopsvc” (without quotes) to stop the old the service. After the update is complete, run “java -jar libace.jar startsvc” (without quotes) to start the service for the updated controller instance.
![]() Unifi Controller не заменимая утилита для администрирования Ubiquiti устройств.
Unifi Controller не заменимая утилита для администрирования Ubiquiti устройств.
По умолчанию она работает как программа ( запускается с ярлыка) и если закрыть окно программы то доступ к порталу отключается. Что есть не очень удобно, например вы поставили контроллер на компьютер, потом перезагрузились забыли его вновь запустить и статистика за время не работы контроллера потеряна.
Оригинал статьи как запустить Unifi Controller в виде службы находится на официальном комьюнити.
Я лишь приведу несколько уточнений, которые заметил при установке службы Unifi Controller.
1. Необходимо закрыть программу Unifi Controller
2. Запускаем консоль с правами администратора (Пуск -> Все программы -> Стандартные -> Командная строка) нажав на ярлыке правой кнопкой и в появившемся меню выбрать «Запуск от имени Администратор».
3. Далее пишут определить местонахождение Java и добавить путь к ней в системных переменных Path в «Дополнительных параметрах системы» кнопка «Переменные среды…».
На самом деле в Path уже прописан путь C:ProgramDataOracleJavajavapath в котором находятся ярлыки к необходимым бинарникам Java, и даже после обновления Java все ярлыки обновятся и пути будут правильными.
Следовательно ничего дописывать нигде не нужно.
4. Далее проверяем где находится папка Ubiquiti Unifi обычно она находится в папке пользователя. Для этого переходим в Мой компьютер -> диск C -> Пользователи. Заходим в папку активного пользователя (имя пользователя под которым вы вошли в систему) в моем случае это папка Admin. Убедившись, что папка находится именно здесь в окне Командной консоли, которую мы открыли в п. 2 пишем следующую команду
cd <путь к папке>Ubiquiti UniFi
В моем случае путь к папке был таким C:UsersAdminUbiquiti UniFi
Если путь ввели правильно то командный курсор будет мигать возле такой надписи
C:<путь к папке>Ubiquiti UniFi>_
5. Далее вводим команду:
java -jar libace.jar installsvc
Должно появиться сообщение:
C:UsersAdminUbiquiti UniFi>java -jar libace.jar installsvc
Start Installation…Complete Installation…
6. После успешной установки можем запустить службу Unifi Controller следующей командой:
net start «Unifi Controller»
И должен появиться следующий текст:
C:UsersAdminUbiquiti UniFi>net start «Unifi Controller»
Служба «UniFi Controller» запускается.
Служба «UniFi Controller» успешно запущена.
На этом всё! Теперь при запуске системы служба будет запускаться автоматически.
