Эта статья посвящена особенностям установки Windows 11 на виртуальную машину, запущенную на гипервизорах VMware Workstation ии VMware ESXi. Большинство пользователей при попытке установить Windows 11 в виртуальную машину VMware сталкиваются с ошибкой, сообщающей, что запуск Windows 11 на этом компьютере невозможен. Мы попробуем разобрать, почему появляется это сообщение и можно ли его обойти.
Содержание:
- Установка Windows 11 в виртуальную машину без TPM и Secure Boot
- Установка Windows 11 на VMware Workstation
- Как установить Windows 11 на VMware ESXi?
Microsoft опубликовала набор минимальных системных требований для установки Windows 11:
- 4 Гб RAM;
- Двухъядерный процессор 1 ГГц;
- Чип TPM 2.0 (Trusted Platform Module).
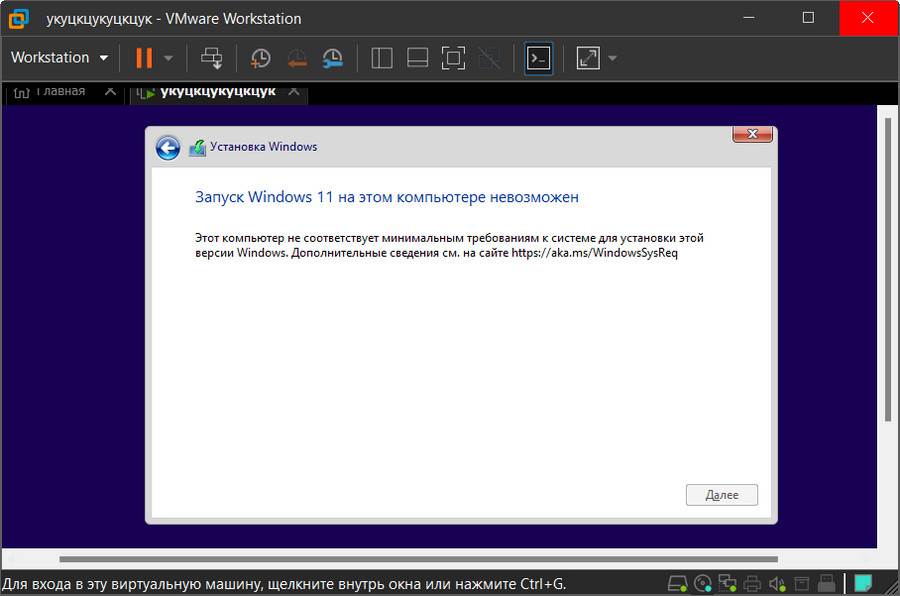
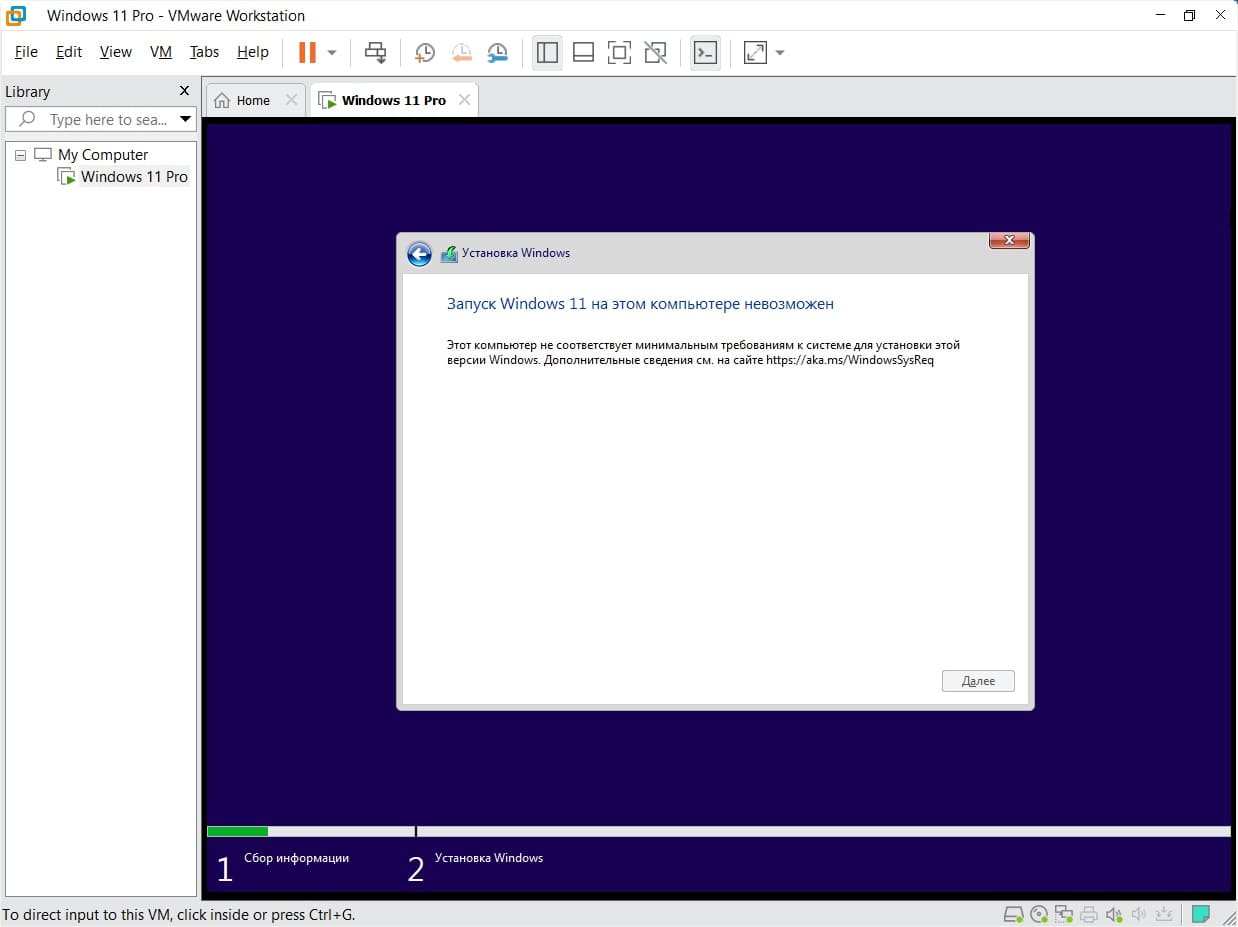
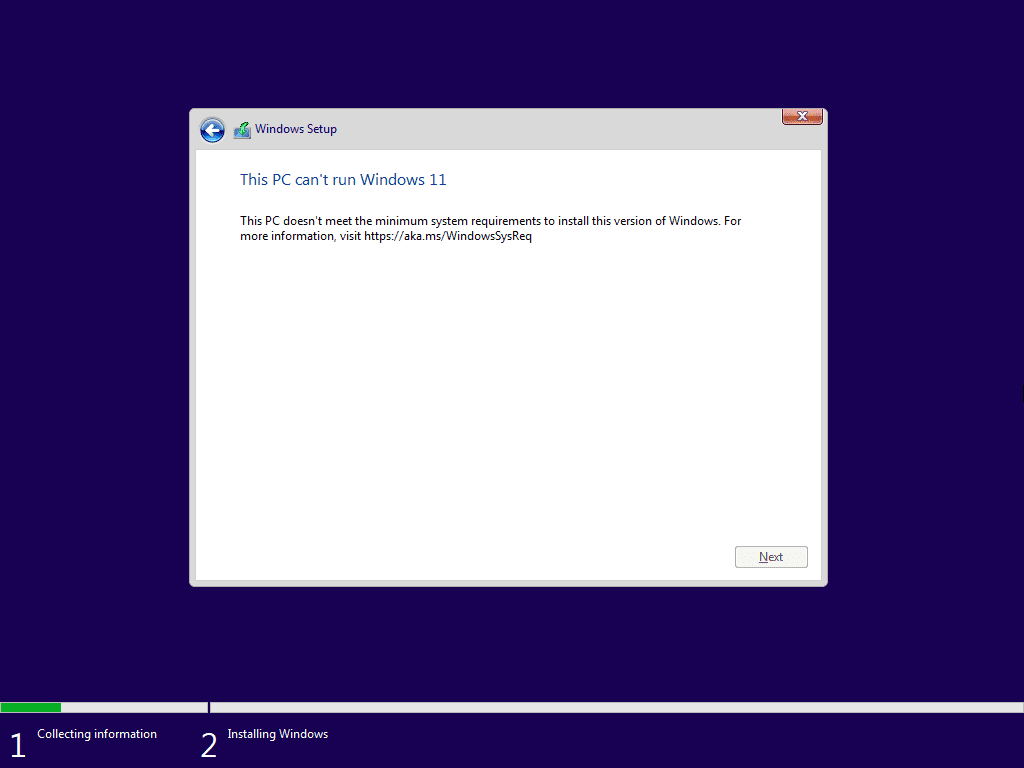
Если ваш компьютер или виртуальная машина не соответствуют этим системным требованиям, то при установке Windows 11 с чистого ISO образа, появится ошибка:
-
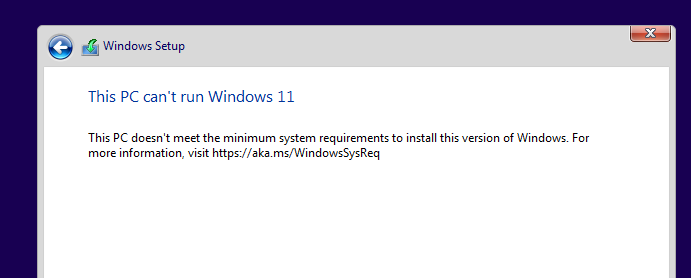
Запуск Windows 11 на этом компьютере не возможен. Этот компьютер не соответствует минимальным требованиям к системе для установки этой версии Windows. Дополнительные сведения см. на сайте aka.ms/WindowsSysReq -
This PC can’t run Windows 11. This PC doesn’t meet the minimum system requirements to install this version of Windows. For more information, visit aka.ms/WindowsSysReq
Установка Windows 11 в виртуальную машину без TPM и Secure Boot
Вы можете пропустить проверку системных требований при установке Windows 11 на виртуальную машину. Можно пропустить проверку минимальных требований по памяти, совместимого CPU, наличию TPM чипа и UEFI + Secure Boot.
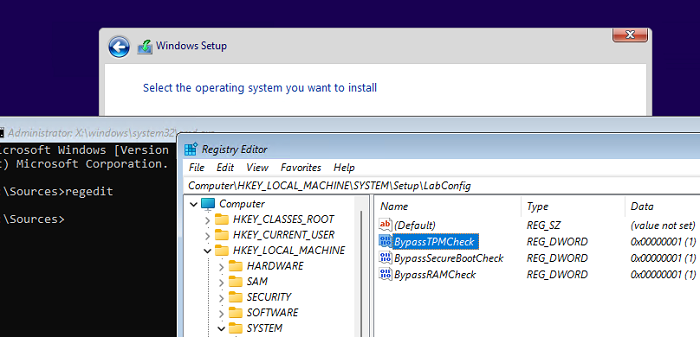
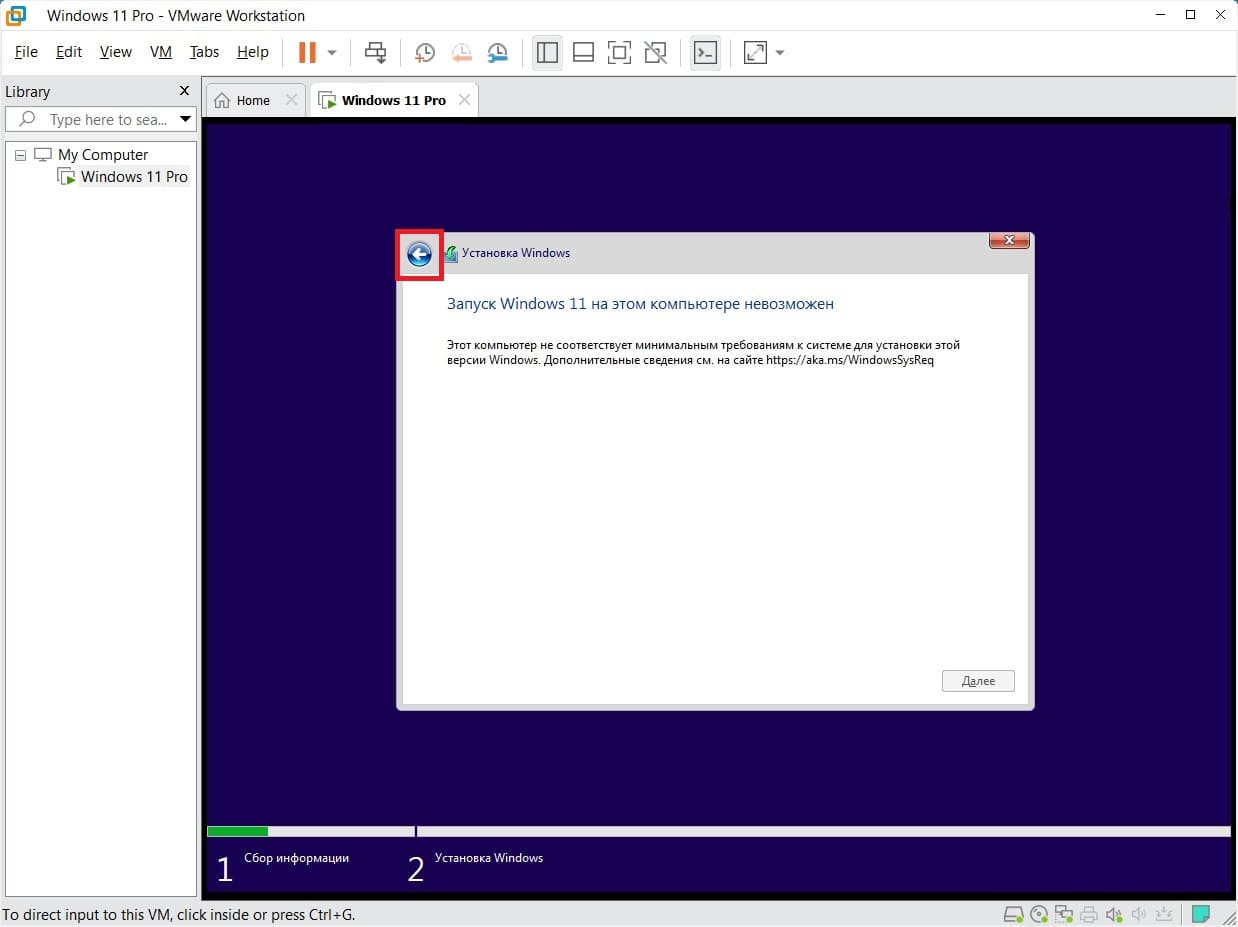
- Для этого нужно запустить обычную установку Windows 11 на виртуальную машину и после появления ошибки установки (скриншот выше), вернуться на один шаг назад (стрелка в окне Windows Setup);
- Нажмите сочетание клавиш
Shift + F10
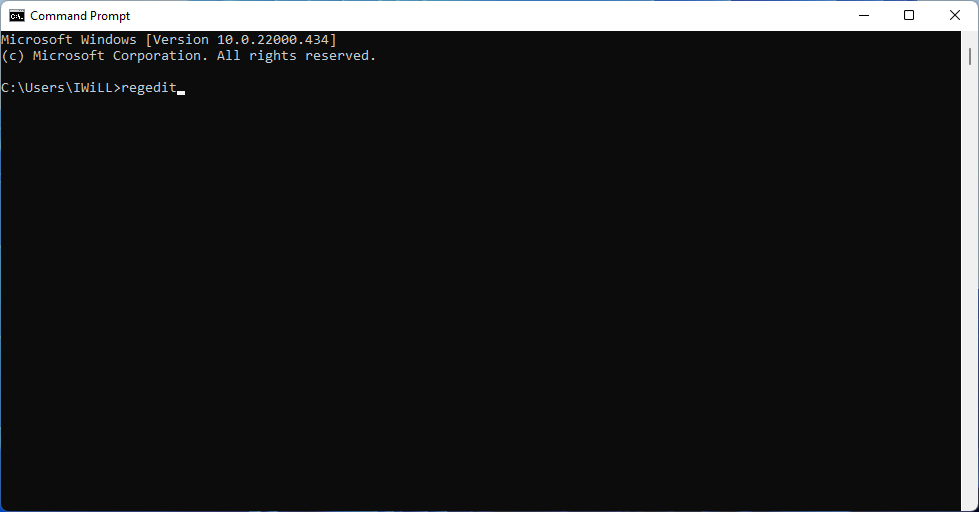
чтобы открыть командную строку; - Наберите команду
regedit.exe
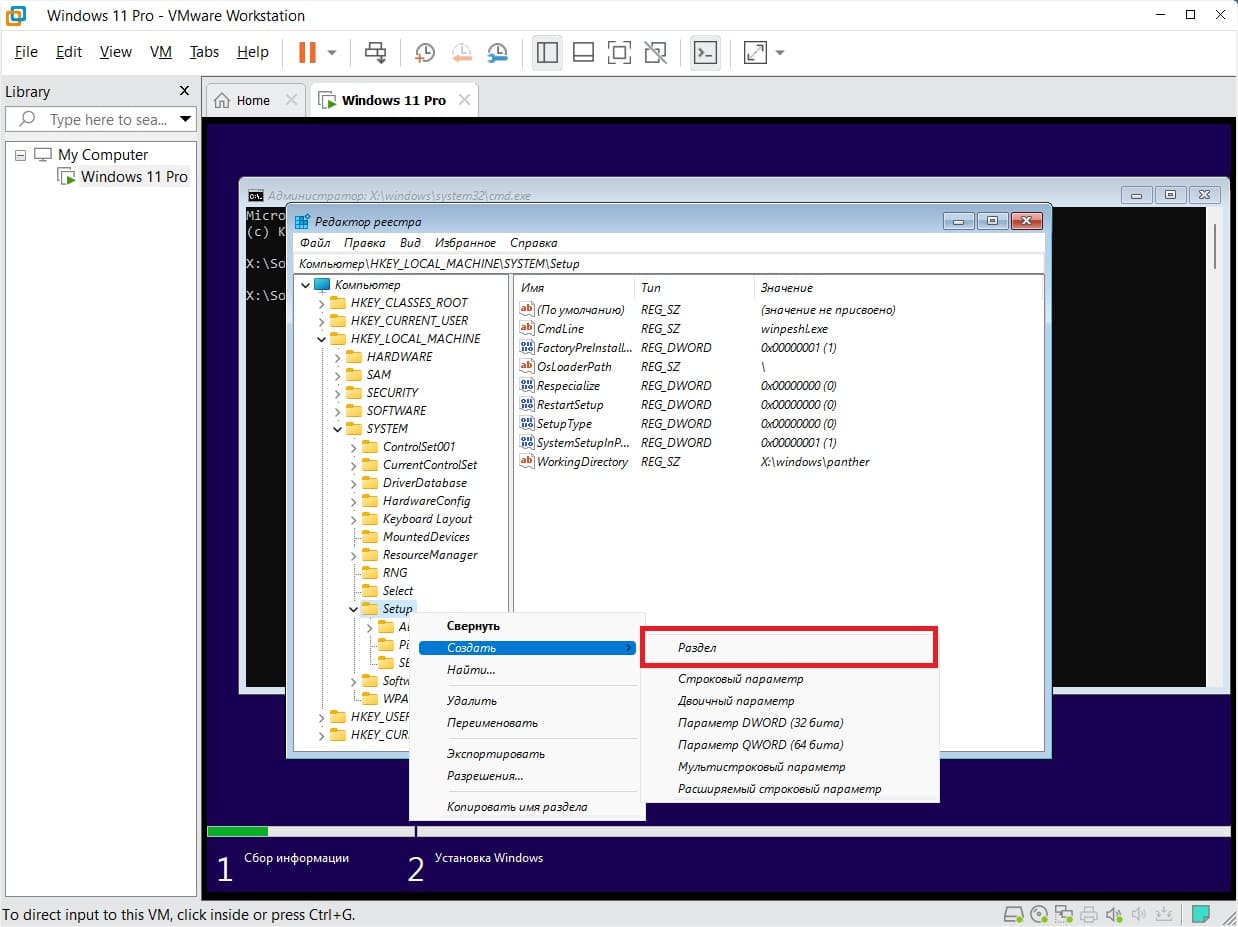
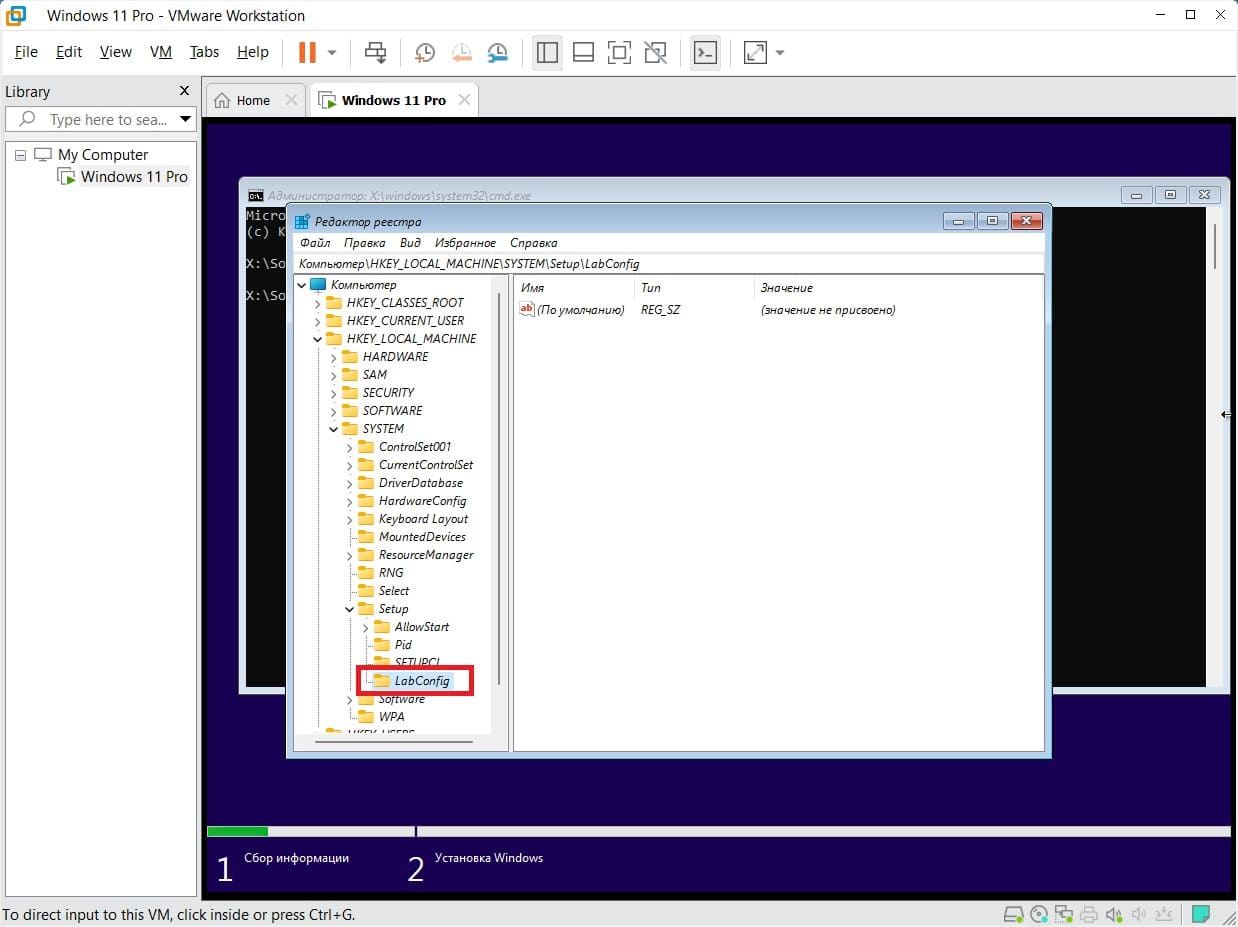
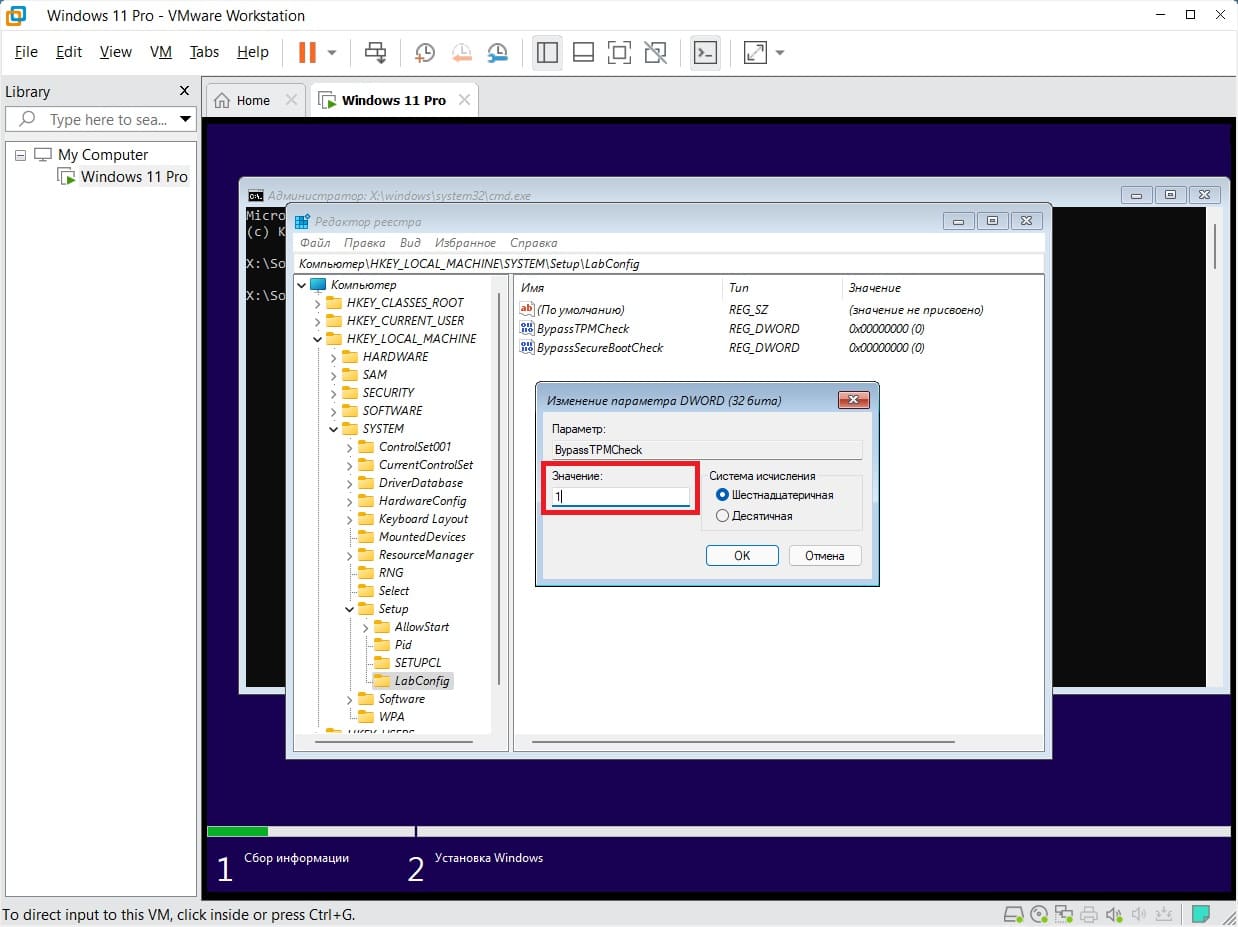
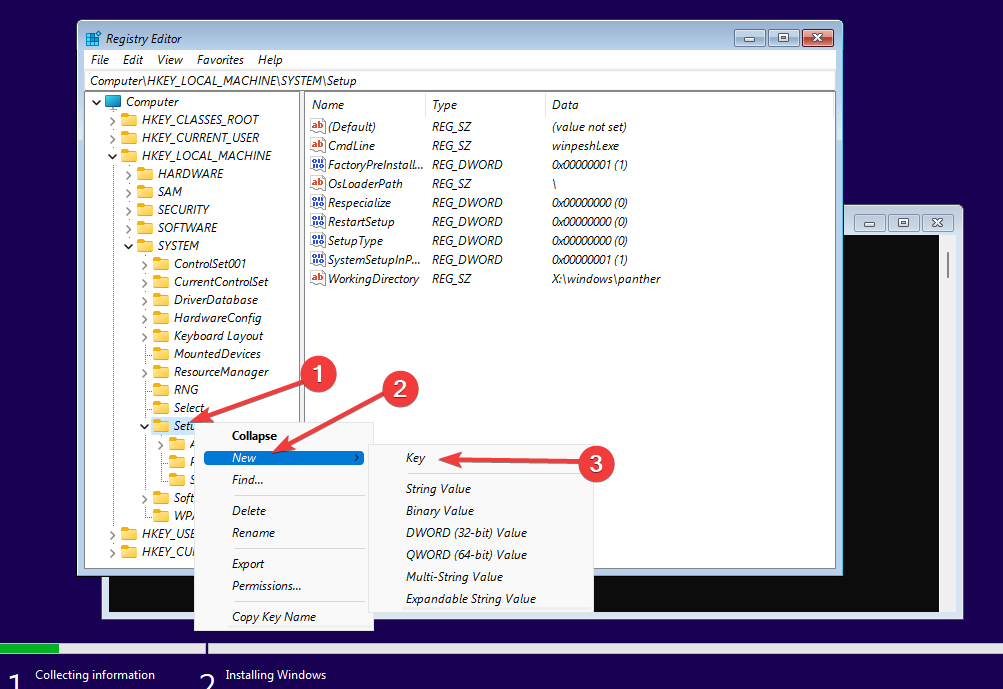
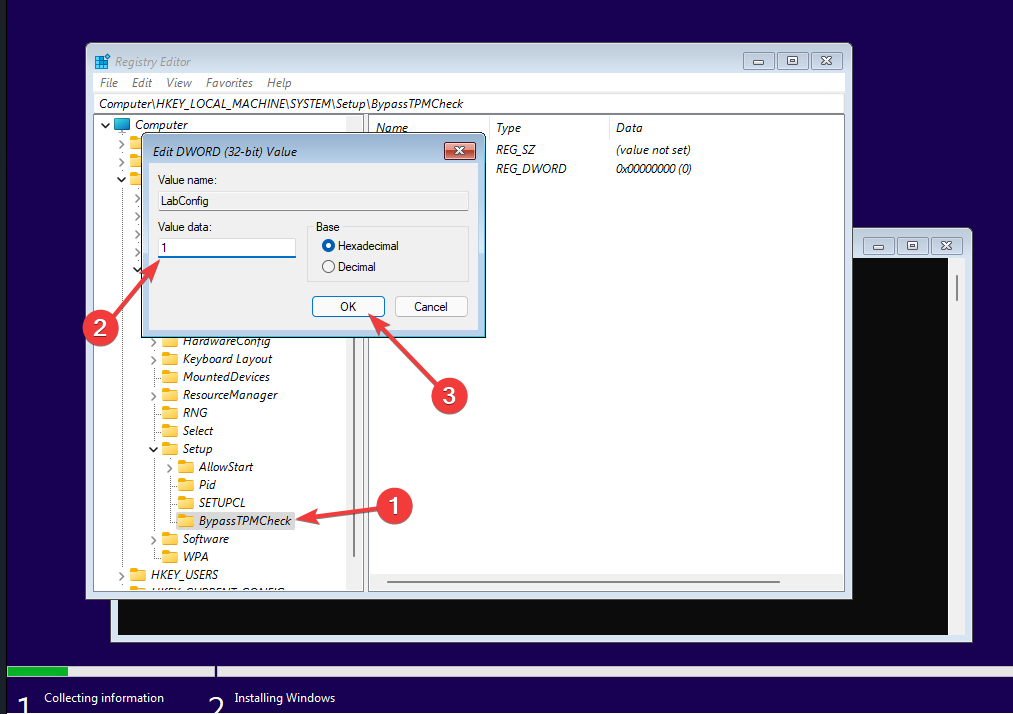
чтобы запустить редактор реестра; - Перейдите в раздел HKEY_LOCAL_MACHINESYSTEMSetup и создайте новую ветку с именем LabConfig;
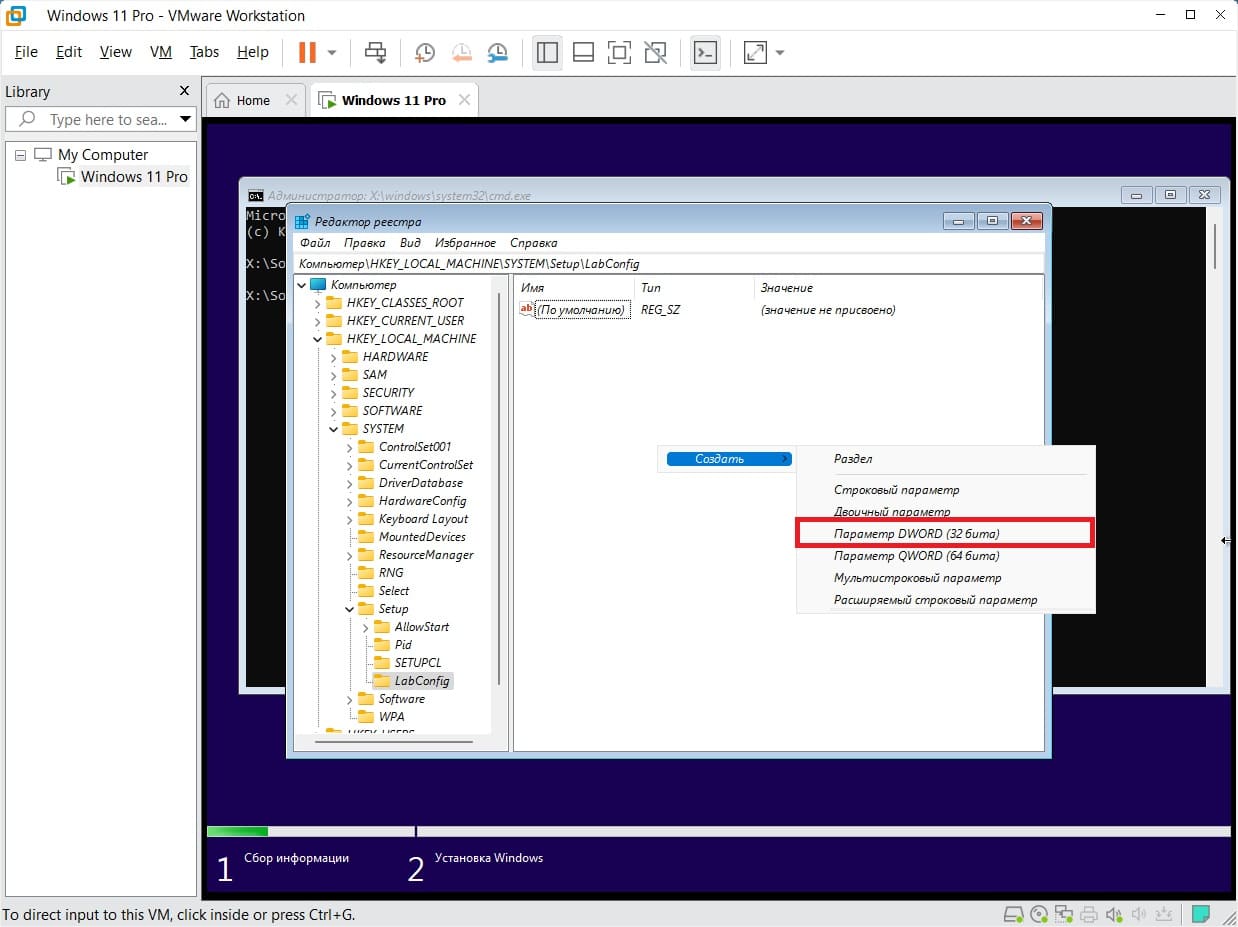
- Создайте в этой ветке три параметра типа DWORD (32-bit) со значениями 1:
- BypassTPMCheck
- BypassSecureBootCheck
- BypassRAMCheck

- Закройте редактор реестра и командную строку и вернитесь в окно установки Windows 11;
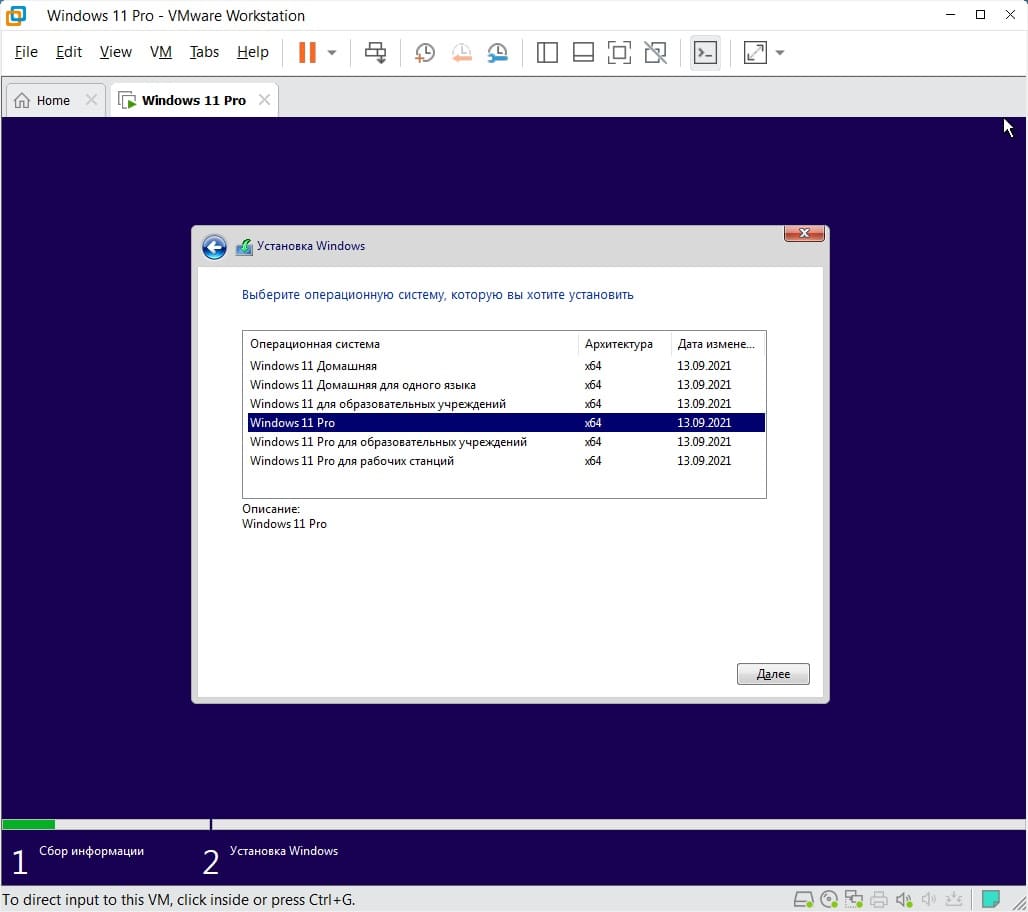
- Выберите нужную редакцию Windows 11 и нажмите Install;
- Теперь вы сможете продолжить установку Windows 11 без проверки минимальных системных требований и без TPM устройства.
Установка Windows 11 на VMware Workstation
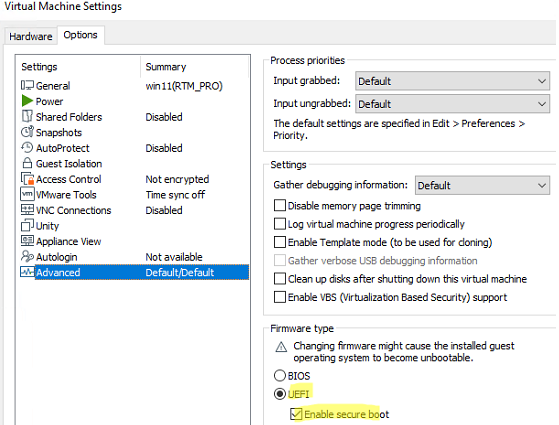
Для установки Windows 11 в нативном режиме (с учетом всех системных требования) на VMware Workstation, вы должны создать виртуальную машину с поддержкой UEFI, Secure Boot и виртуальным чипом TPM.
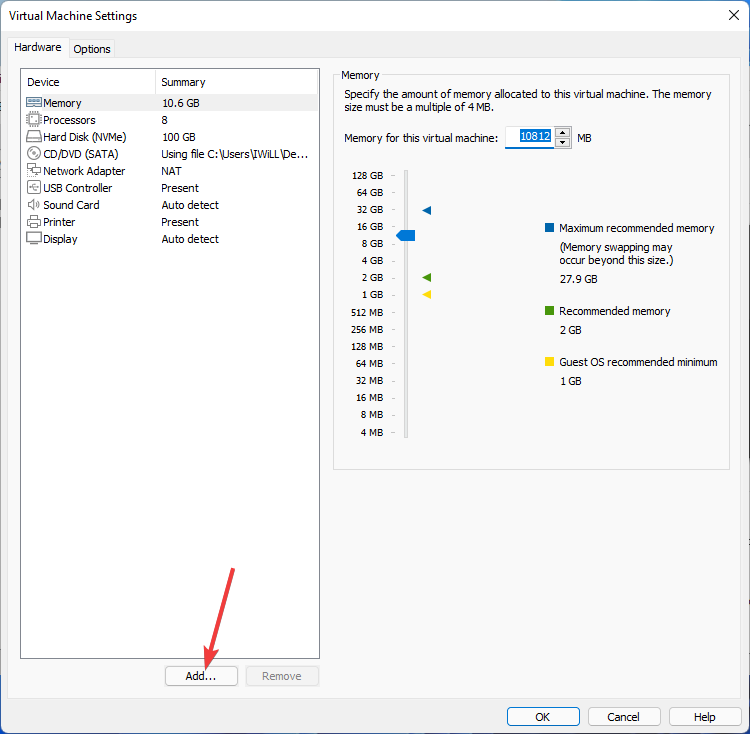
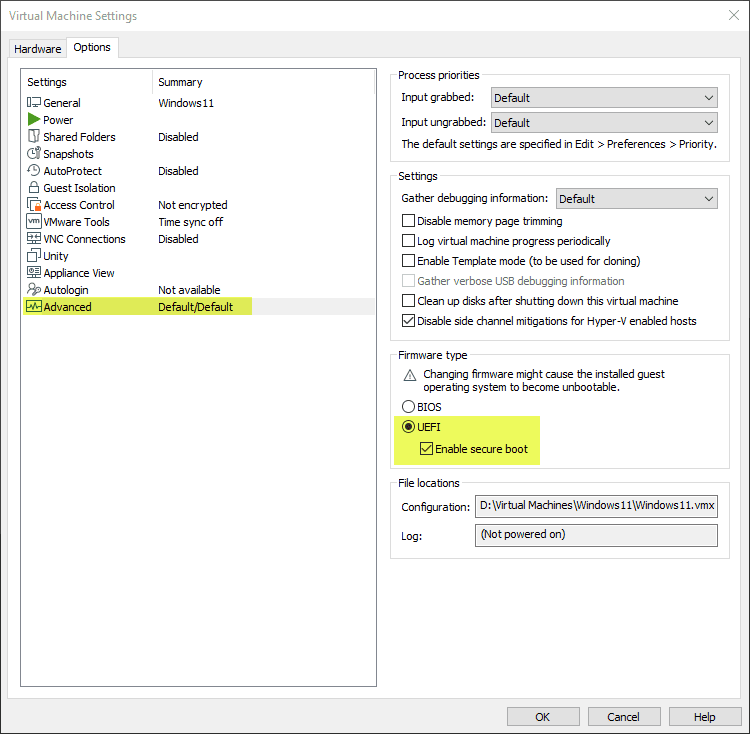
Откройте настройки виртуальной машины, перейдите на вкладку Advanced и убедитесь, что для ВМ используется UEFI firmware с включенной опций Enable secure boot.
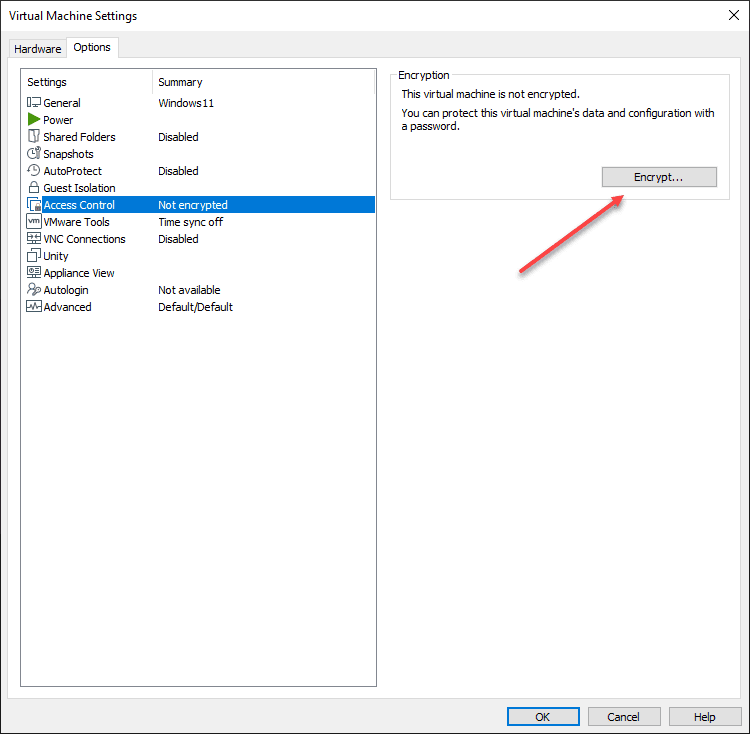
Затем вам нужно добавить виртуальный TPM модуль для ВМ (vTPM). Но перед этим придется зашифровать виртуальную машину VMware Workstation.
В разделе Options перейдите в Access Control и нажмите кнопку Encrypt. Задайте пароль шифрования. Процесс шифрования займет некоторое время.
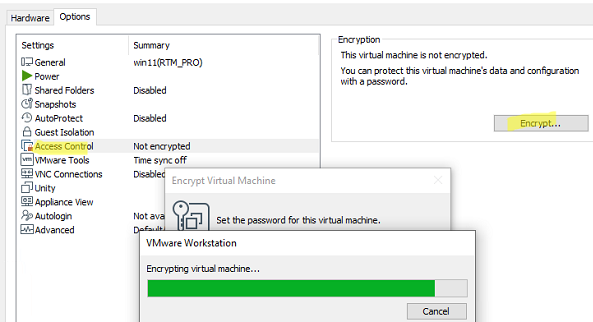
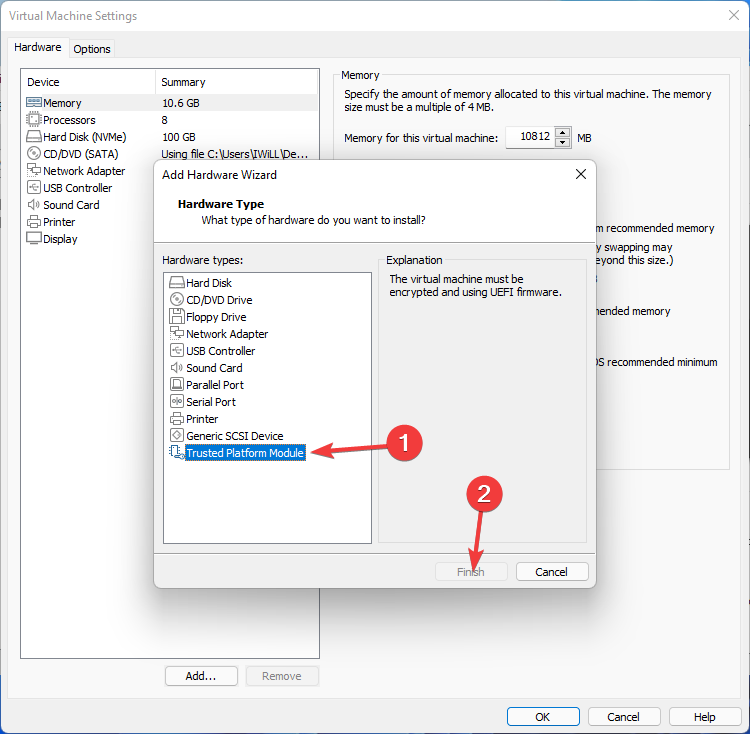
После этого перейдите на вкладку Hardware, нажмите кнопку Add и добавьте Trusted Platform Module.

Теперь вы можете установить Windows 11 на эту виртуальную машину в обычном режиме.
Как установить Windows 11 на VMware ESXi?
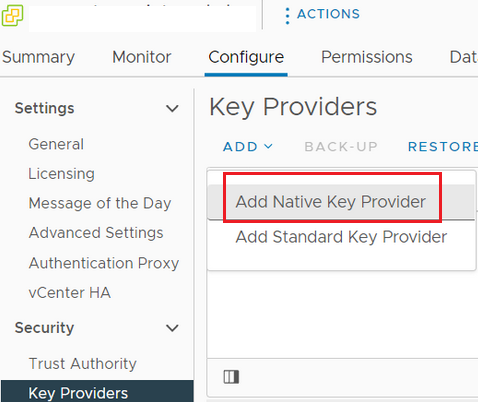
Для установки Windows 11 на виртуальную машину VMware ESXi на vSphere, вам нужно добавить для ВМ виртуальный TPM модуль (Virtual Trusted Platform Module). Но сначала придется настроить Key Management Server (key provider) для управления ключами шифрования.
Начиная с версии vSphere 7.0 для vCenter поддерживается встроенный Key Provider, благодаря чему вам не нужно использовать внешний KMS. Чтобы включить встроенный Key Provider в vCenter:
- Выберите ваш vCenter и перейдите в раздел Configure -> Security -> Key Provider;
- Нажмите Add -> Add Native Key Provider;
- Укажите имя провайдера и отключите опцию «Use key provider only with TPM protected ESXi hosts”. Это позволит использовать vTPM для хостов без физического чипа TPM;
- Далее вам придется создать резервную копию провайдера ключей. Нажмите на кнопку BACK-UP и скачайте файл .p12, который нужно хранить в надежном месте.
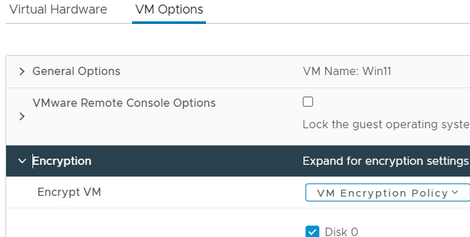
Чтобы включить vTPM для виртуальной машину на VMware ESXi, она должна соответствовать следующим требованиям:
- vSphere 6.7 или новее (не получится использовать бесплатный гипервизор VMware Hypervisor)
- Версия виртуальной машины VM Hardware 14 (ESXi 6.7) и выше
- EFI и Secure Boot
- Шифрование ВМ
- Включена опция Windows Virtualization Based Security в настройках ВМ
Проверьте, что все опции ВМ настроены и можете зашифровать диск вашей ВМ.
Чтобы зашифровать существующую ВМ, перейдите на вкладку VM Options и включите шифрование диска в разделе Encryption.
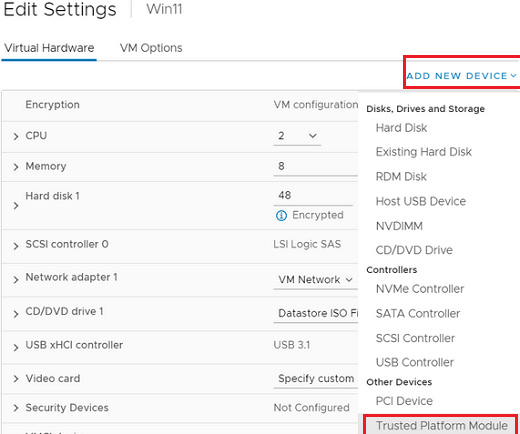
После этого на вкладке Virtual Hardware можно добавить Add New Device -> Trusted Platform Module и запустить обычную установку Windows 11 на эту ВМ.
Пример установки Windows 11 в виртуальную машину Hyper-V описан по ссылке.
В этой публикации, друзья, рассмотрим недавно взволновавшую тестирующих Windows 11 новость: компания Microsoft в блоге инсайдерской программы Windows Insider заявила, что начиная со сборок 22458 на Dev-канале и 22000.194 на Beta-канале к виртуальным машинам для установки на них Windows 11 применяются такие же системные требования, что и для физических компьютеров. В компании изъяснились как всегда расплывчато, мы же имеем факт — у Windows 11 много пунктов системных требований. И виртуальные машины с тем функционалом гипервизоров, что есть сейчас, по условию не смогут соответствовать всем этим требованиям. Как теперь работать с виртуальными машинами в программах VirtualBox, VMware Workstation Pro, VMware Workstation Player и Hyper-V?
Итак, друзья, Microsoft внедрила для виртуальных машин уравниловку с физическими компьютерами в плане системных требований к Windows 11. Эта уравниловка действует начиная с инсайдерских сборок, с 22458 на Dev-канале и с 22000.194 на Beta-канале. И также это правило касается стабильной Windows 11. В ранних же инсайдерских сборках Windows 11 для виртуальных машин никаких требований нет. Но если мы захотим на виртуальной машине обновить более раннюю сборку вручную с использованием свежего установочного ISO, либо через центр обновлений,
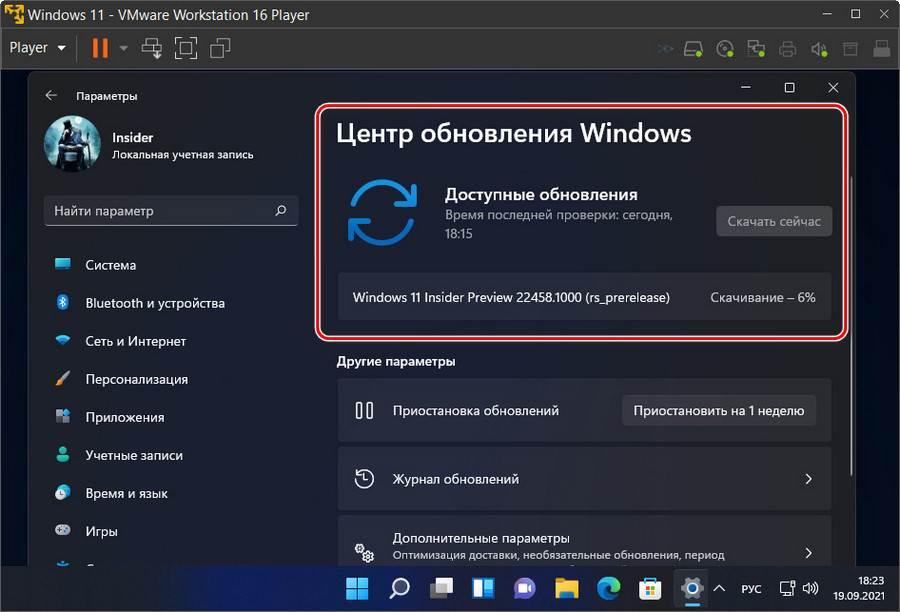
в процессе обновления получим этап проверки на совместимость с Windows 11 и неудовлетворительный результат этой проверки. Машина получит пресловутое уведомление «Этот компьютер не отвечает системным требованиям Windows 11» с констатацией, какому требованию именно не соответствует, либо без констатации вовсе.
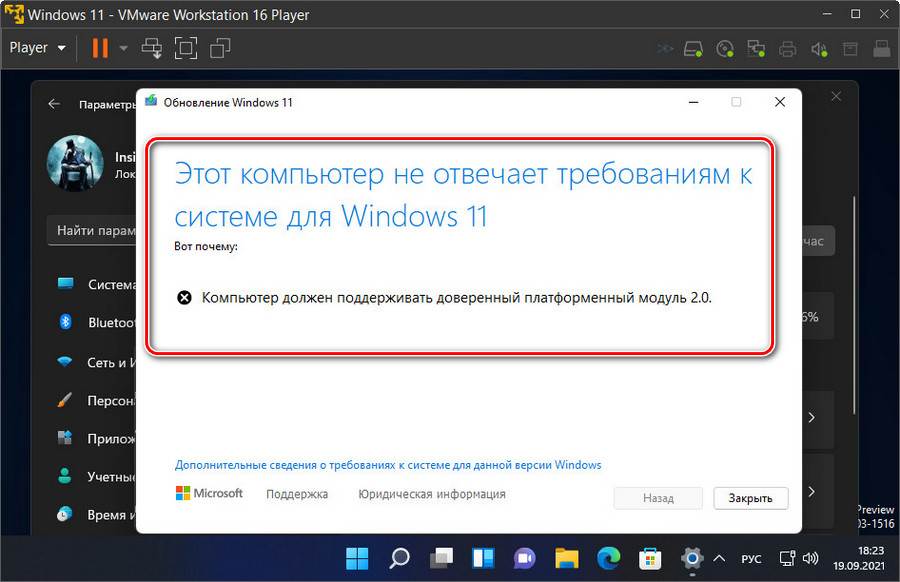
При новой установке на виртуальные машины Windows 11 в окне системного установщика будем видеть уведомление «Запуск Windows 11 на этом компьютере невозможен».
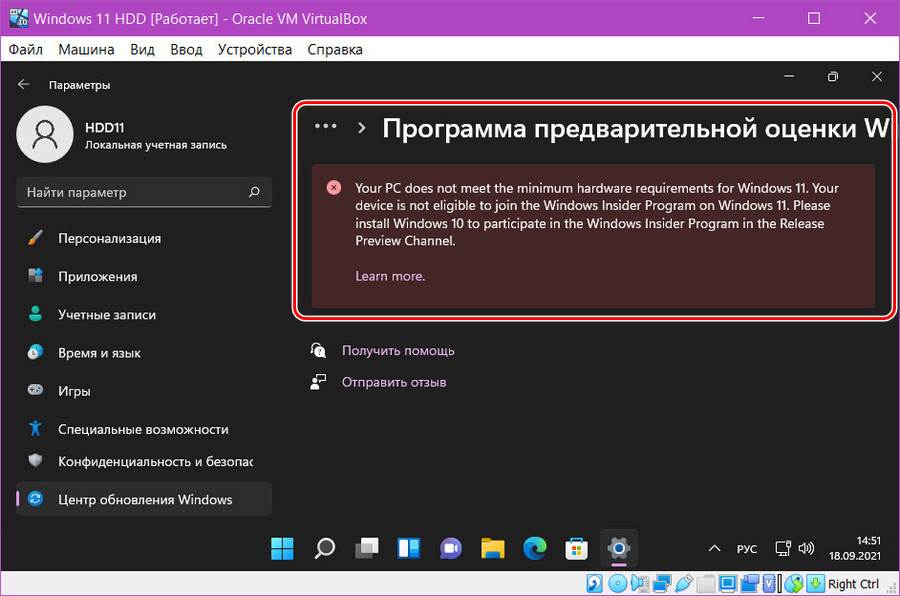
А на виртуальных машинах VirtualBox нам даже не будет доступна программа Windows Insider. При попытке подключиться к ней увидим уведомление «Your PC does not meet the minimum hardware requirements for Windows 11». Что значит, что машина не соответствует минимальным системным требованиям Windows 11.
Всё это, друзья, результат политики Microsoft. На деле пока что требования Windows 11 для виртуальных машин коснулись числа ядер процессора – не менее 2-х, объёма оперативной памяти – не менее 4 Гб, эмуляции прошивки UEFI и модуля безопасности TPM 2.0. А это значит, что официально установить свежие сборки Windows 11 и участвовать в её программе Windows Insider можно только в Hyper-V и актуальной версии программы VMware Workstation Pro (не ниже 14), ибо только они поддерживают эмуляцию TPM 2.0. Возможно, в будущем требования коснутся и самого процессора, т.е. чтобы используемый виртуальной машиной процессор был из перечня официально поддерживаемых. Друзья, если у вас несовместимый с Windows 11 процессор, и у вас с ним на виртуальной машине есть проблемы, отпишитесь в комментариях с описанием проблемы. Ну и давайте разбираться, что можно сделать с виртуальными машинами, чтобы на них можно было установить новые сборки Windows 11.
Обновлено: бесплатный гипервизор VirtualBox поддерживает эмуляцию всех необходимых устройств и технологий для официального использования Windows 11 только начиная с версии программы 7. Детали в статье «Как установить Windows 11 на VirtualBox 7 и выше».
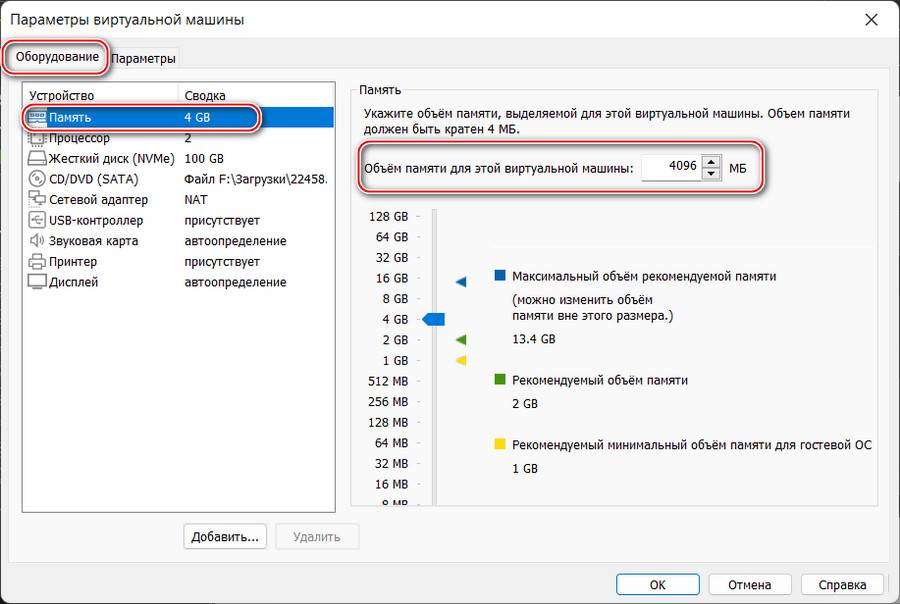
Чтобы благополучно работать с виртуальной машиной с официально установленной Windows 11 в программах VMware Workstation Pro и Workstation Player, нужны их версии не ниже 16.2. А параметры у виртуальной машины должны быть следующие. Во вкладке «Оборудование» в графе оперативной памяти её должно быть не меньше 4 Гб, т.е. не меньше 4096 Мб.
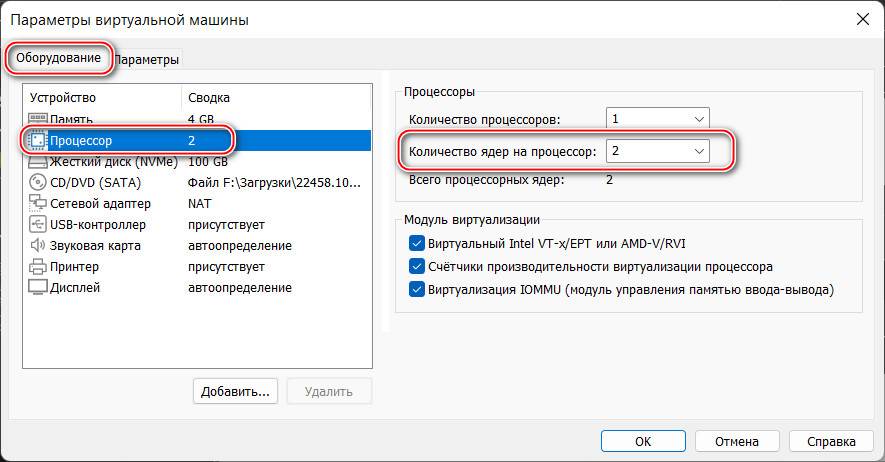
Во вкладке «Оборудование» в графе процессора должно стоять не менее 2-х ядер.
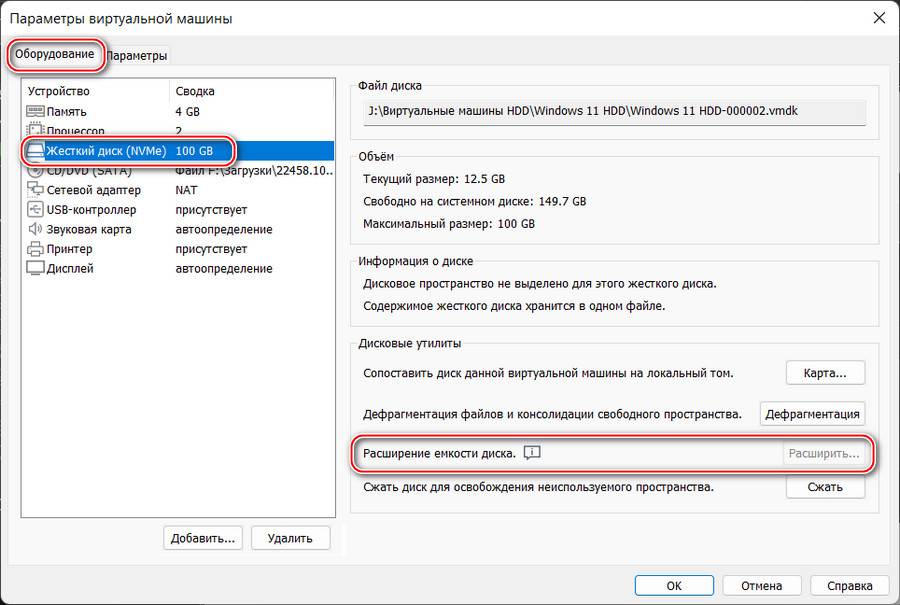
Во вкладке «Оборудование» в графе жёсткого диска должен быть указан виртуальный жёсткий диск с объёмом не меньше 64 Гб. Если у вас меньше, уберите снапшоты виртуальной машины и расширьте жёсткий диск, если он вас динамический.
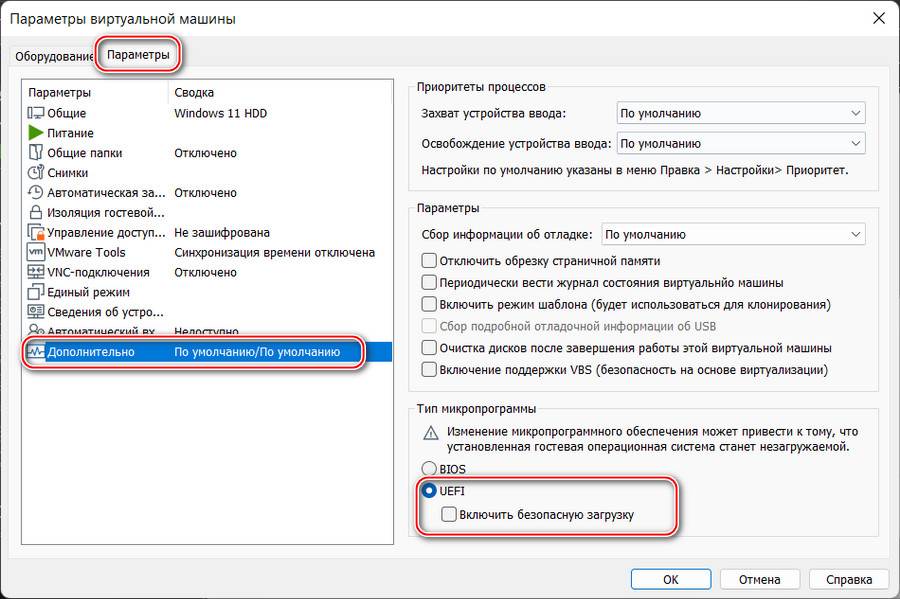
Во вкладке «Параметры» в графе «Дополнительно» должна быть активна эмуляция UEFI. Можете также выставить галочку безопасной загрузки. Пока что это не требуется, но в дальнейшем, возможно, эта настройка будет играть роль.
И необходимо в число оборудования виртуальной машины добавить эмуляцию TPM 2.0. Для этого не нужно, чтобы TPM 2.0 поддерживал ваш физический компьютер.
Обновлено: друзья, в версии VMware Workstation Player 17 и выше реализован улучшенный способ эмуляции TPM 2.0 на виртуальных машинах. Используйте его.
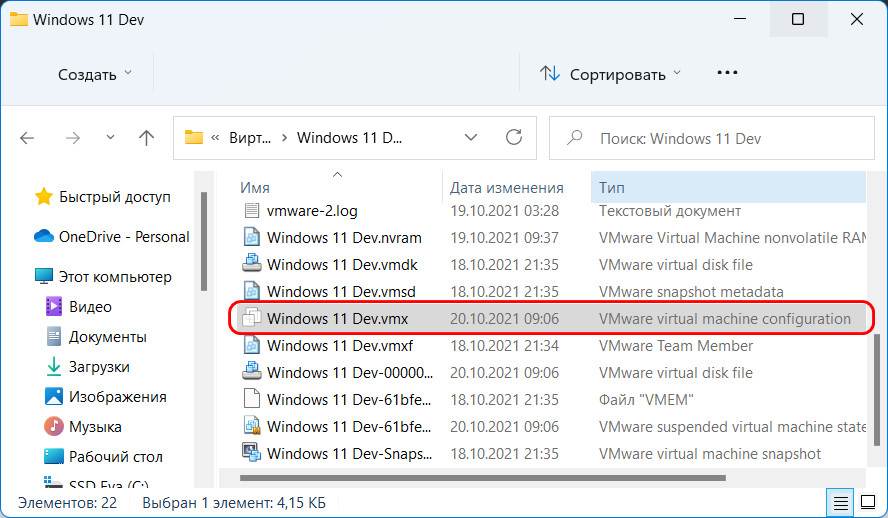
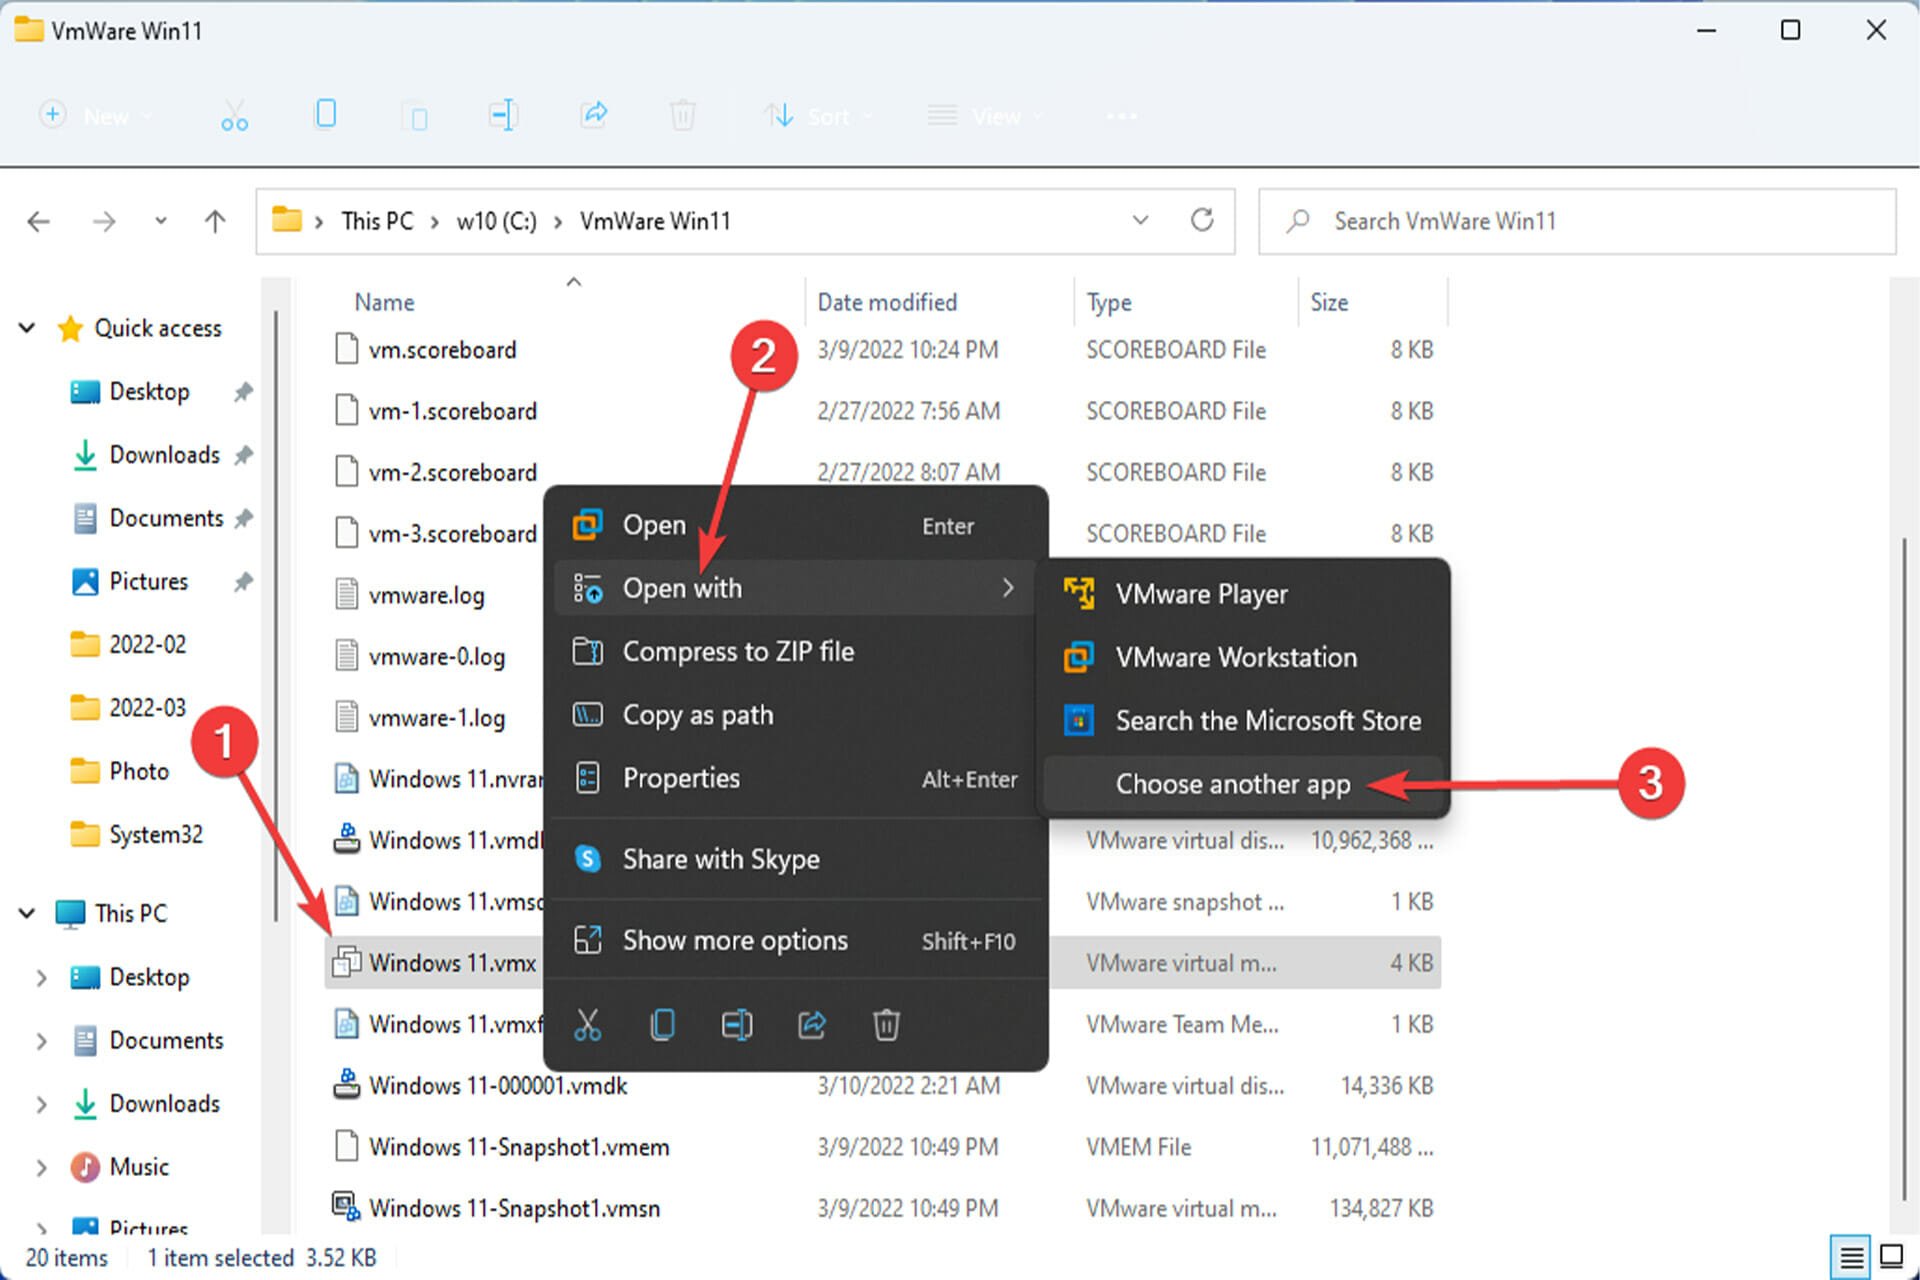
Выключаем виртуальную машину, на которой хотим добавить программный TPM 2.0. Идём по пути нахождения её файлов на жёстком диске. Здесь нам нужен файл конфигурации виртуальной машины с расширением «.wmx».
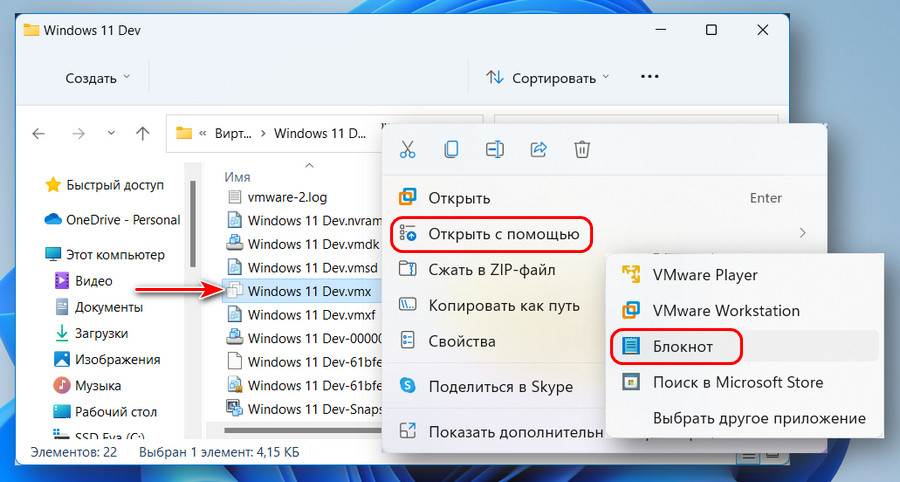
Открываем на этом файле контекстное меню, выбираем «Открыть с помощью» и открываем файл в блокноте Windows.
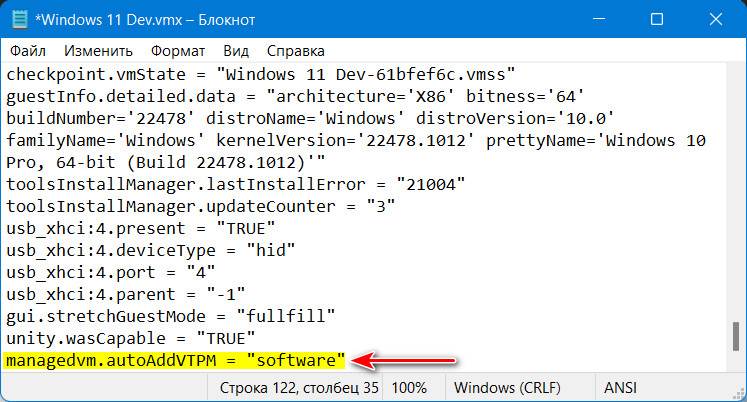
В конце файла вносим:
managedvm.autoAddVTPM = «software»
Жмём Ctrl+S и сохраняем внесённые изменения.
Друзья, комплексный мануал по созданию в этой программе виртуалки для установки на неё Windows 11 смотрите в статье «Как установить Windows 11 на виртуальную машину в программе VMware Workstation Pro».
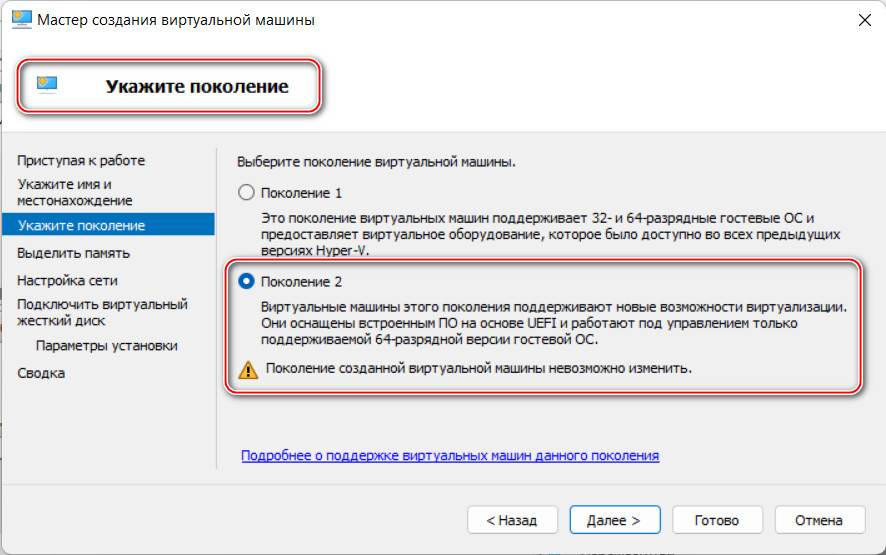
Чтобы без лишней волокиты работать с Windows 11 на виртуальной машине Hyper-V, нужен этот гипервизор с поддержкой машин 2-го поколения на базе UEFI. А это Hyper-V, входящий в состав серверных Windows Server не ранее 2012 R2, а также 64-битных редакций от Pro и выше клиентских Windows начиная с 8.1. В Hyper-V для работы с Windows 11 параметры виртуальной машины должны быть следующими. Сама машина должна быть 2-го поколения, это выбирается при создании машины и не может быть изменено впоследствии.
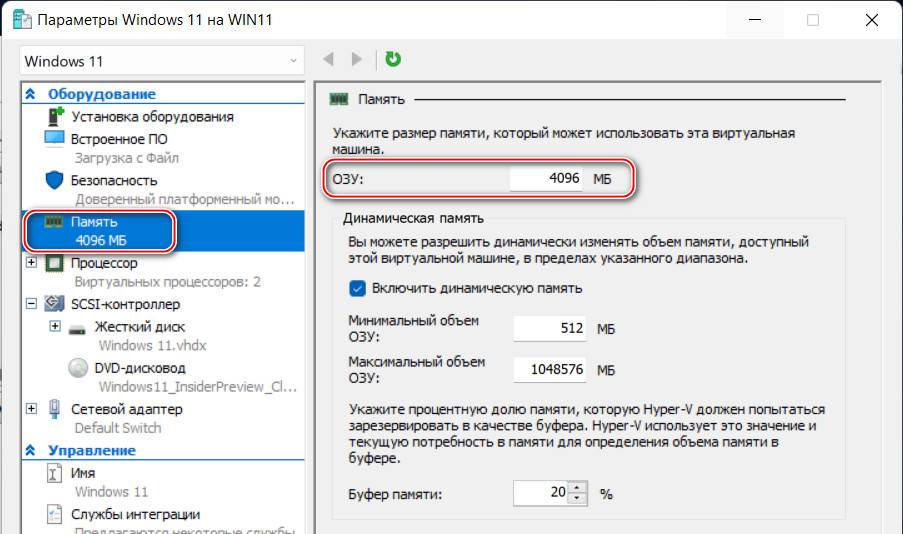
В параметрах оборудования «Память» у машины должно быть оперативной памяти не менее 4 Гб, соответственно, 4096 Мб.
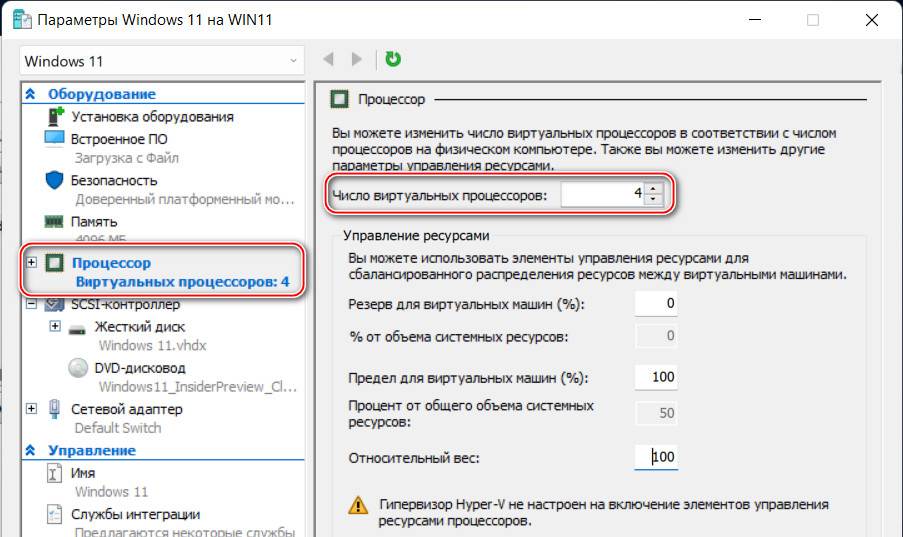
В параметрах оборудования «Процессор» число виртуальных процессоров, т.е. ядер процессора должно быть не менее 2-х.
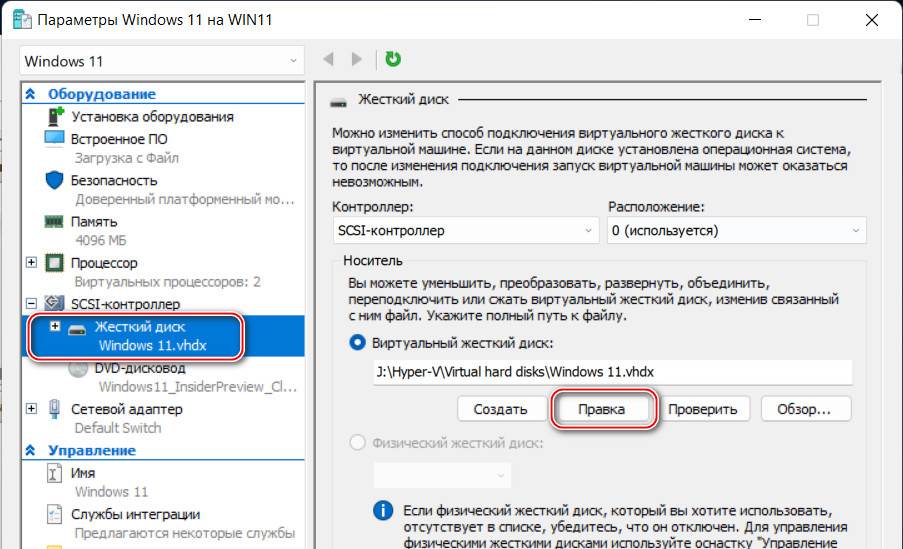
В параметрах оборудования «SCSI-контроллер» должен быть подключён виртуальный жёсткий диск с объёмом не меньше 64 Гб. Если у вас меньше, жмите «Правка».
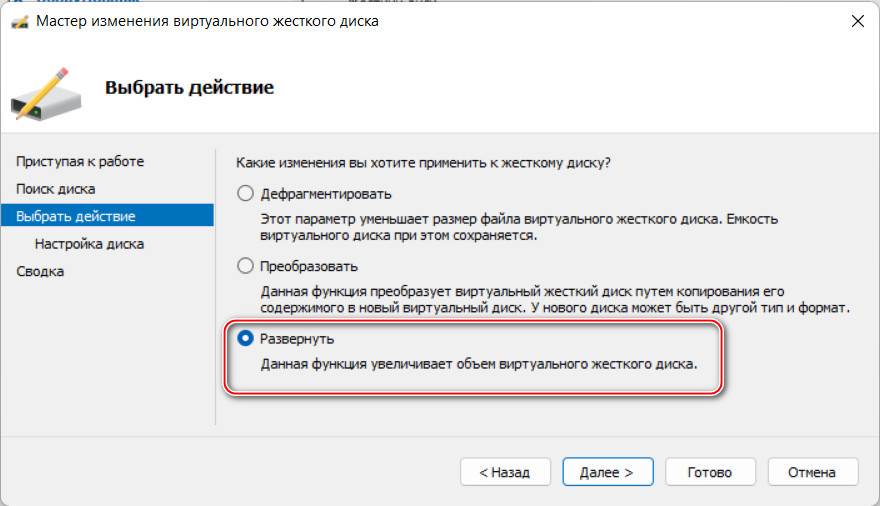
И увеличьте объём с помощью функции «Развернуть».
В параметрах оборудования «Безопасность», если у вас не включена настройка безопасной загрузки, можете включить её. Пока что она не является принципиальной, но в будущем может стать такой. Ну и, наконец, эмуляция TPM 2.0: ставим галочку функции «Поддержка шифрования». Это и есть добавление машине доверенного платформенного модуля TPM 2.0, даже если у вас его физически на компьютере нет.
Не забываем сохранить параметры, и на этом всё. Комплексный мануал по созданию виртуальной машины Hyper-V для установки Windows 11 смотрите в статье «Как создать виртуальную машину с Windows 11 в Hyper-V».
В данной статье мы рассмотрим процесс установки Windows 11 на виртуальной машине VMware. Использовать для этого мы будем VMware Workstation 16 Pro, но Вы можете использовать другие версии данной ВМ, процесс установки от этого не изменится. Так же, мы рассмотрим как обойти ошибку «Запуск Windows 11 на этом компьютере невозможен», если она у Вас возникла из ВМ — VMware.
Помимо всего, для установки нам понадобится сами дистрибутив Windows 11, скачать его Вы можете с официального сайта Microsoft, либо из нашего каталога.
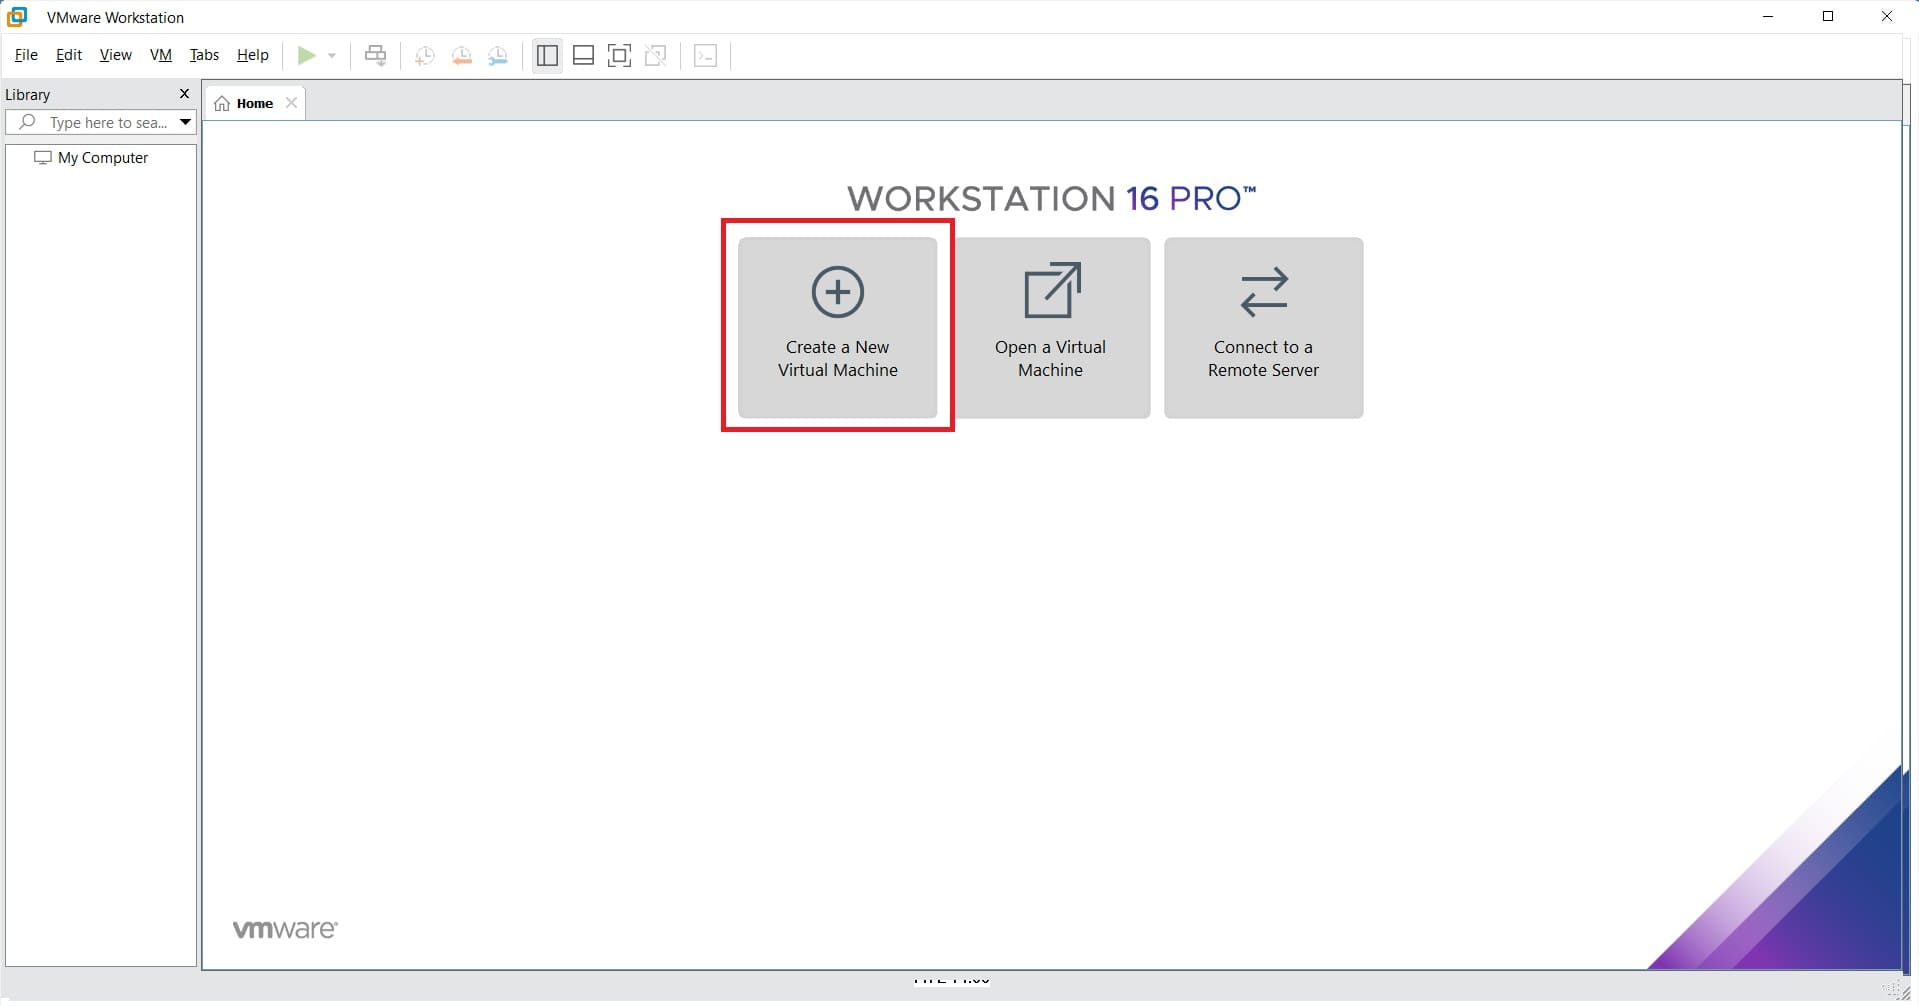
— Запускаем приложение, нажимаем на кнопку «Create a New Virtial Machine».
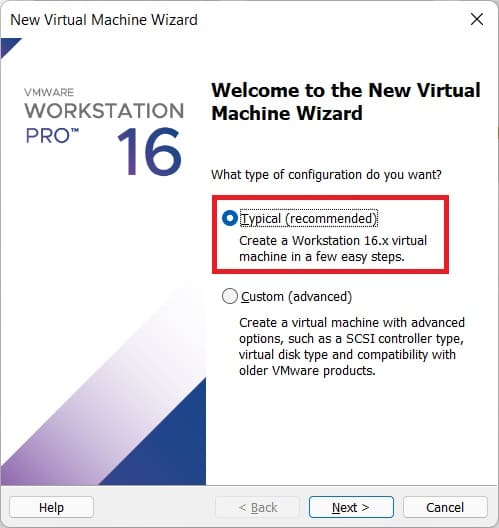
— Выбираем пункт, который рекомендуется приложением.
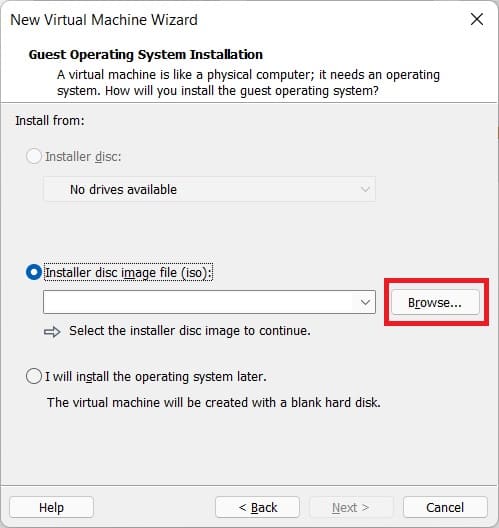
— Далее, нажимаем на «Browse» и выбираем дистрибутив Windows 11, который Вы скачали ранее.
— В верхнем пункте выбираем «Microsoft Windows», а в выпадающем меню версии системы выбраем «Windows 10 x64» (да, именно Windows 10).

— Задаем имя Вашей виртуальной машине, например «Windows 11», имя может быть любое. В «Lacation» задаем локацию, где будет располагаться сам файл виртуальной машины.

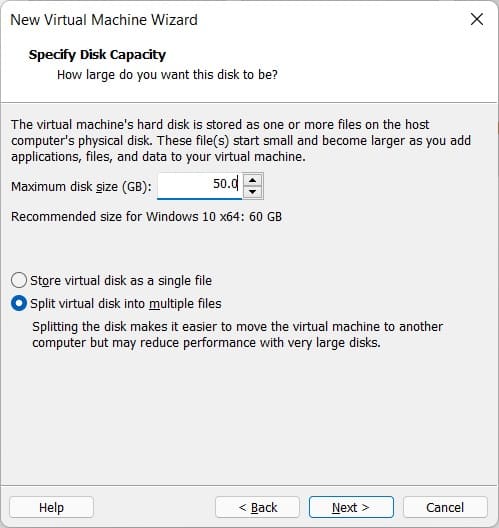
— Следующим шагом необходимо задать выделенное место на жестком диске для ВМ, минимум для Windows 11 — 40 Гб.
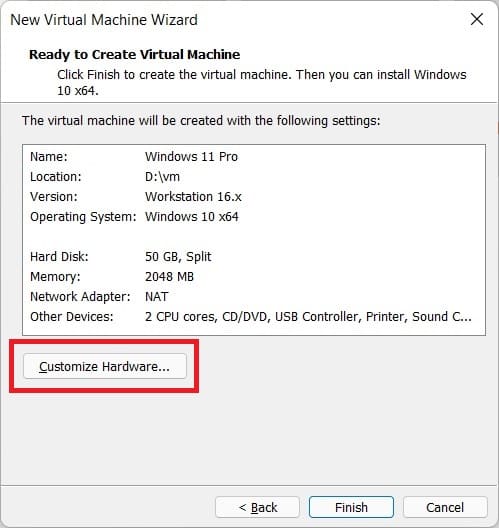
— В следующем окне возвращаемся к настройкам по нажатию на кнопку «Customize Hardware».
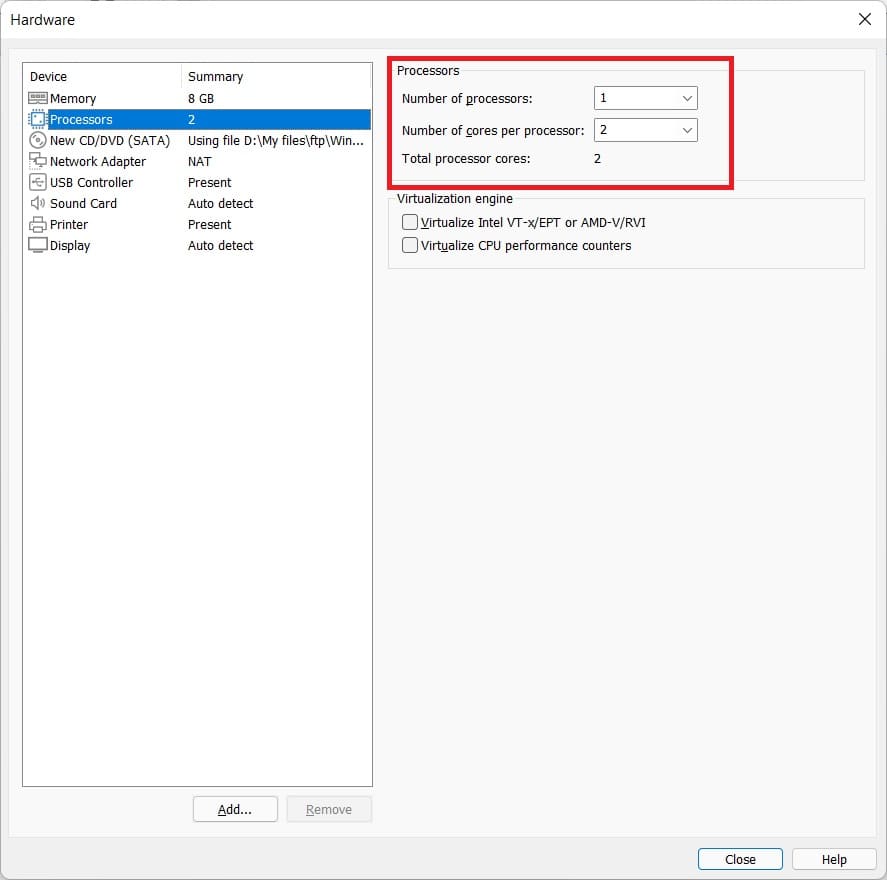
— Во вкладке «Processors» убедитесь, что у Вас задано два Core процессора, т.е 2 ядра. Это минимум для Windows 11. Как должно быть пример на скриншоте ниже.
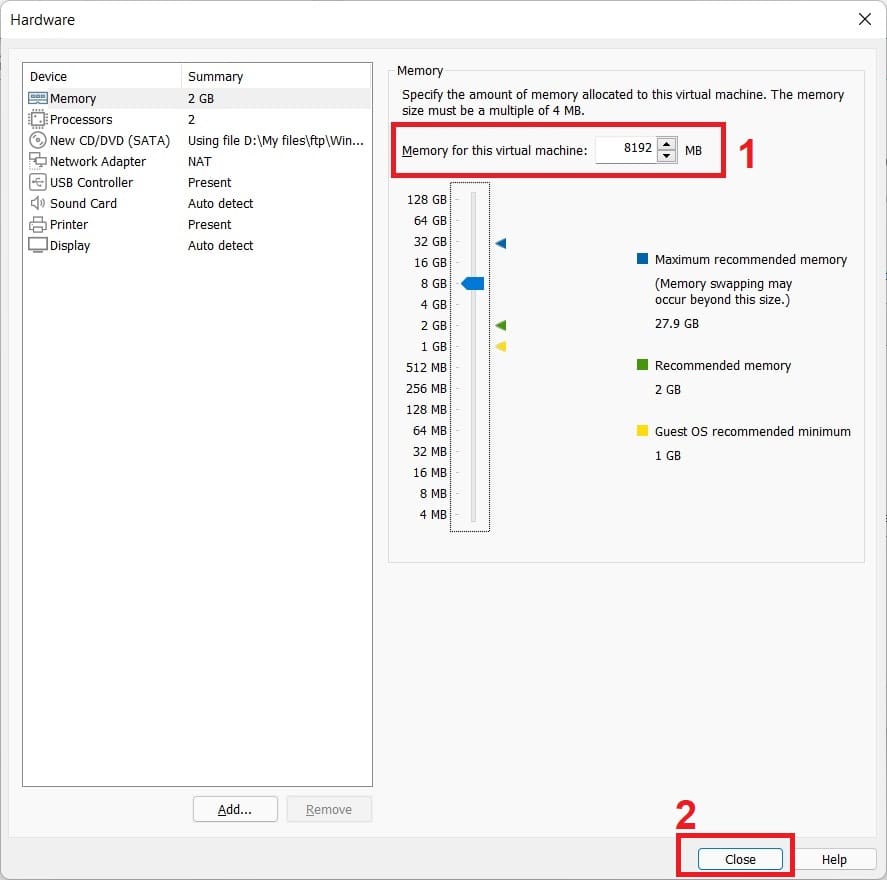
— Во вкладке «Memory» должно быть минимум 4 Гб оперативной памяти — это минимум для Windows 11. Но Вы можете задать больше, в зависимости от имеющиеся у Вас физической ОЗУ. После нажимаем «Close».
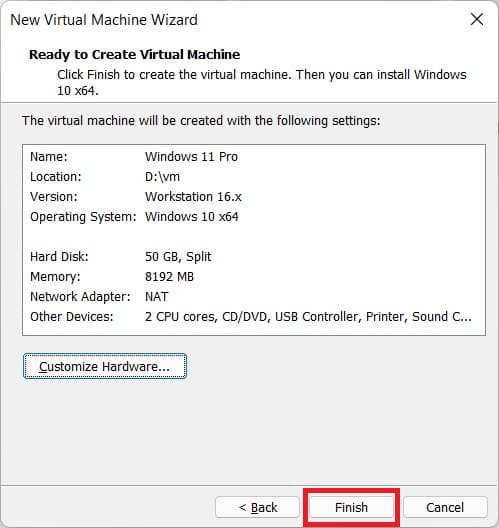
— Теперь можем завершить настройки. Нажимаем «Finish».
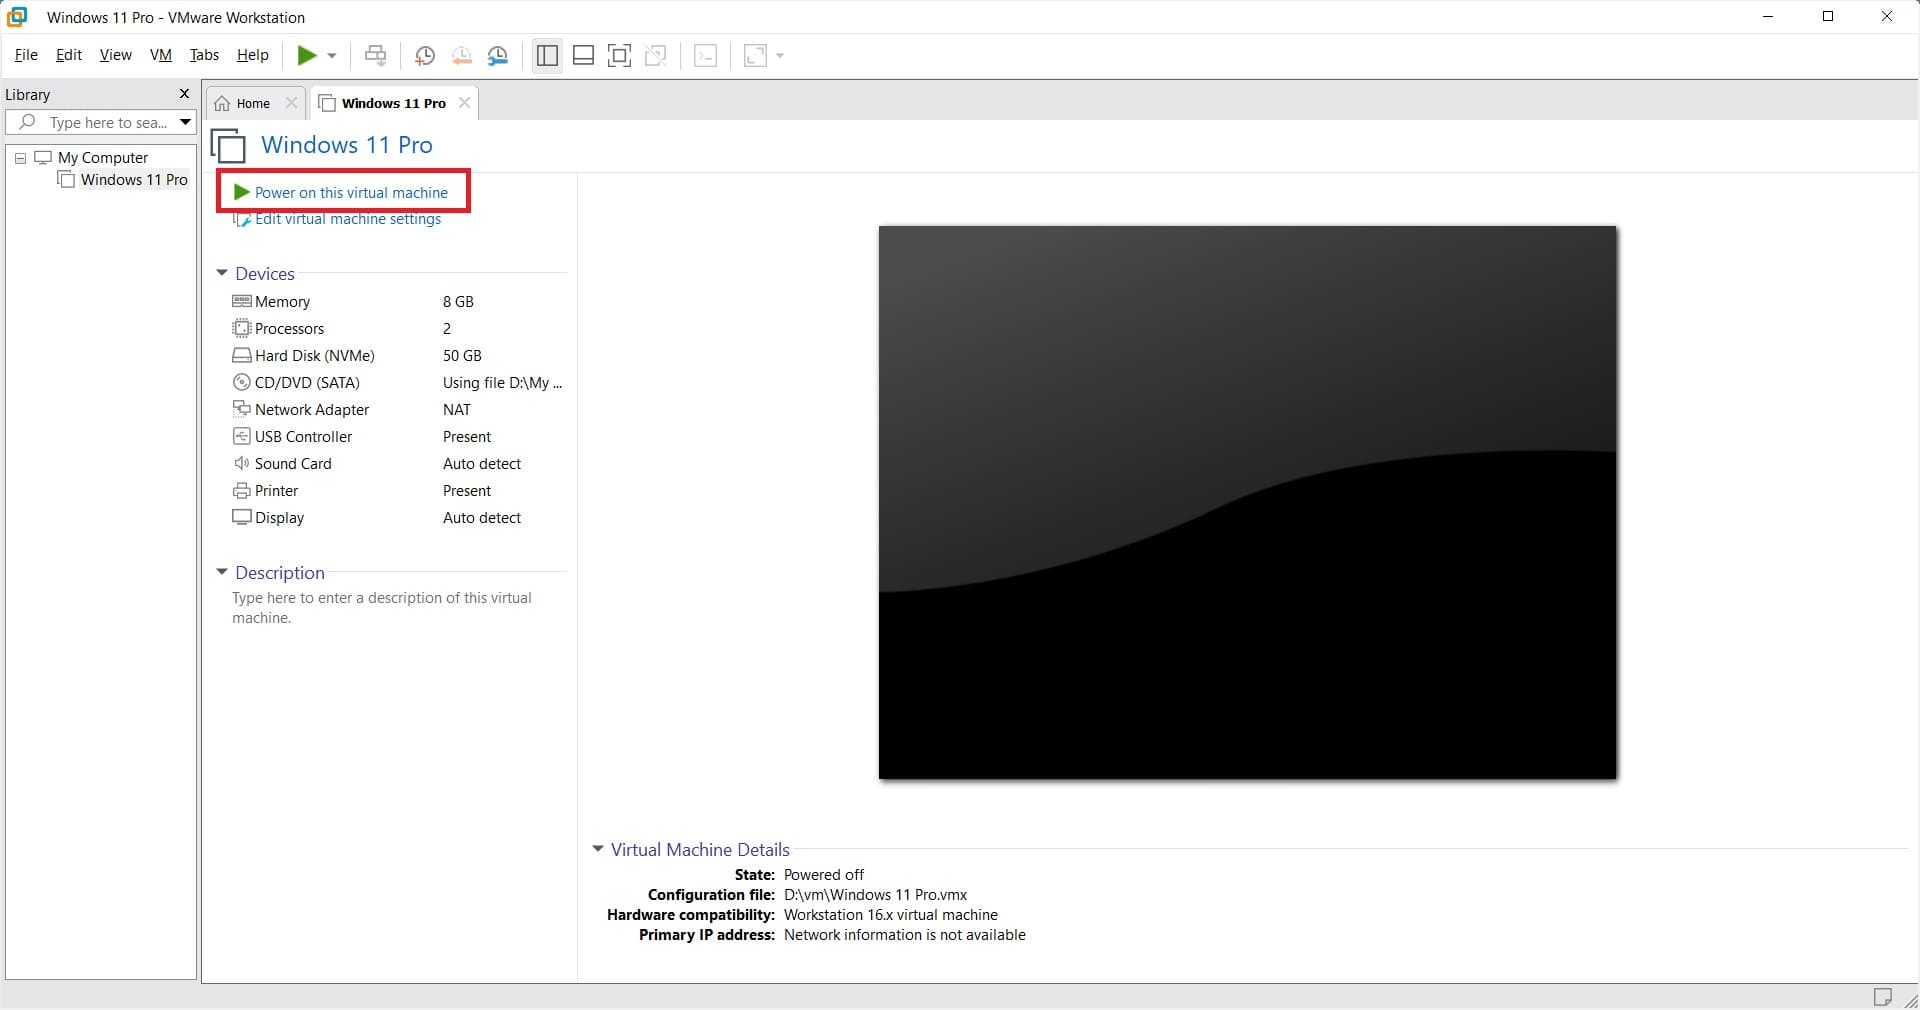
— В главном окне VMware нажимаем на кнопку «Power on this virual machine». Этим мы запускаем установку.
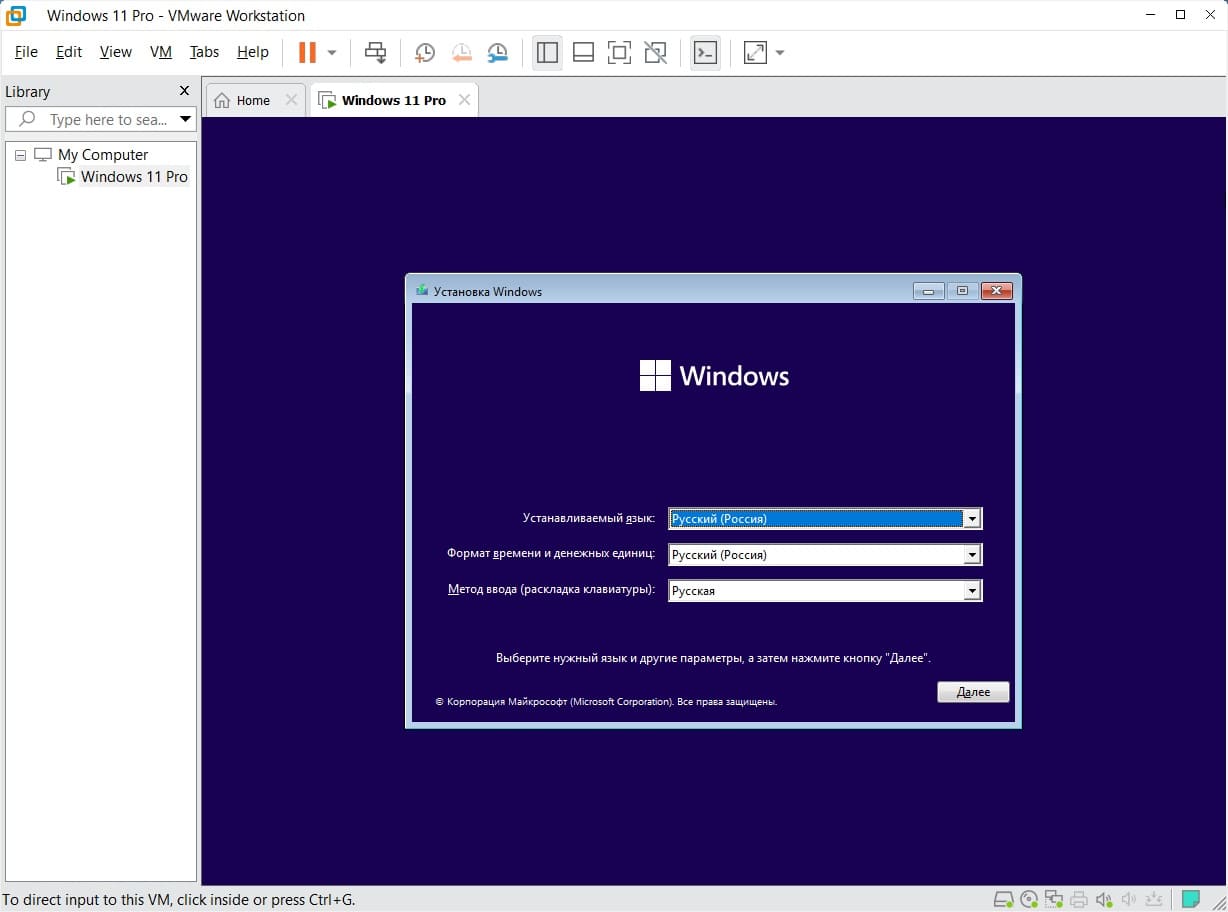
— Далее у нас запустится обычная установка системы, но настройки на этом еще не закончены. Жмем «Далее».
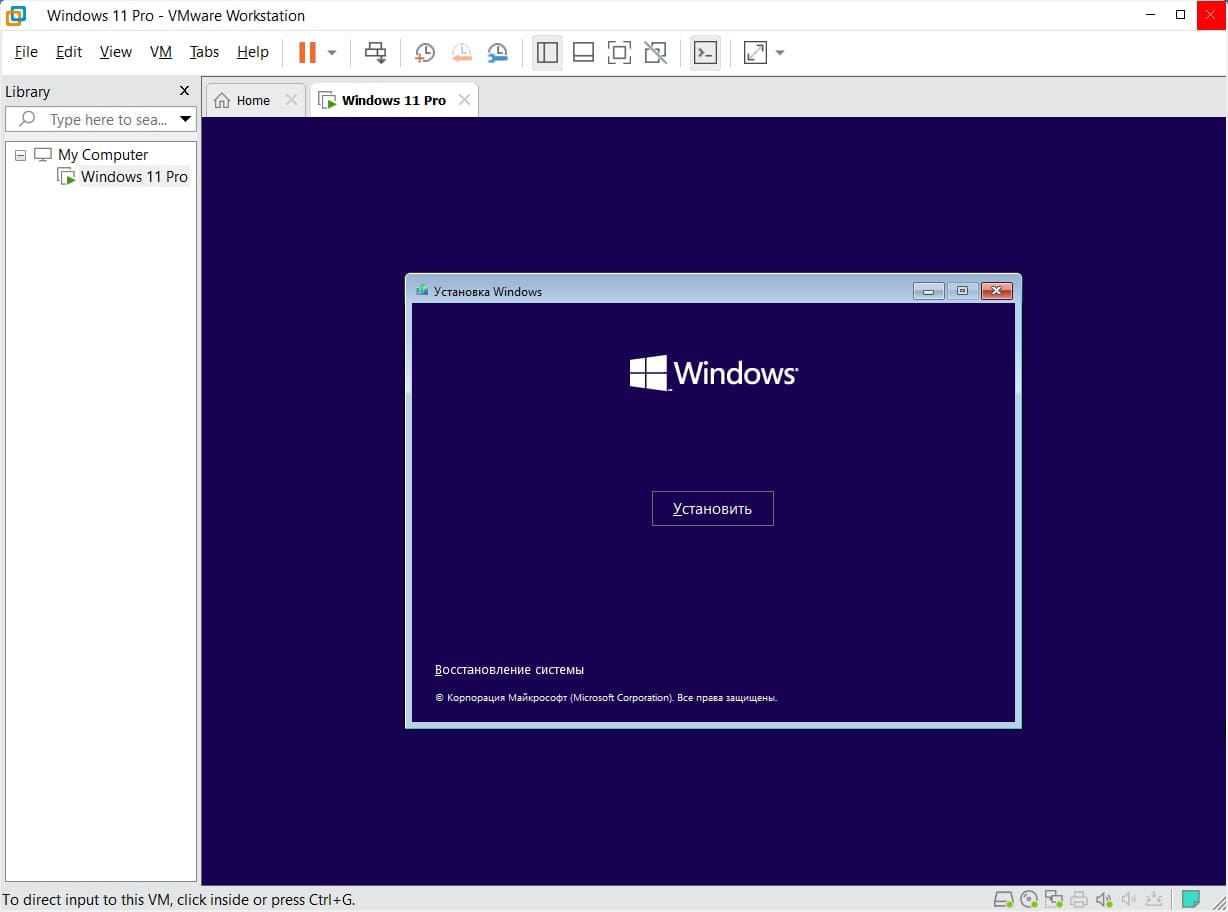
— Нажимаем «Установить».
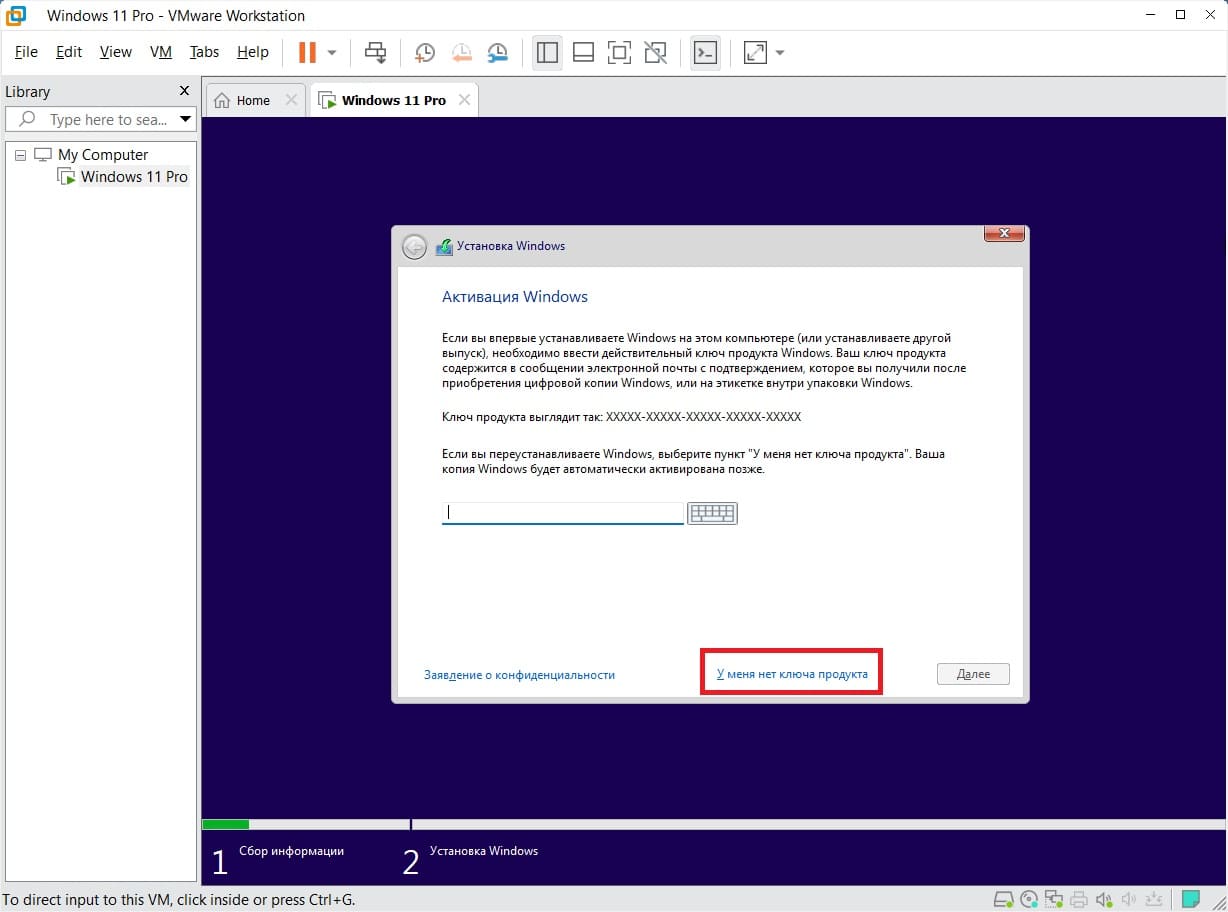
— Следующим окном нажимаем «У меня нет ключа продукта». Активируем систему позднее, когда уже установим ее.
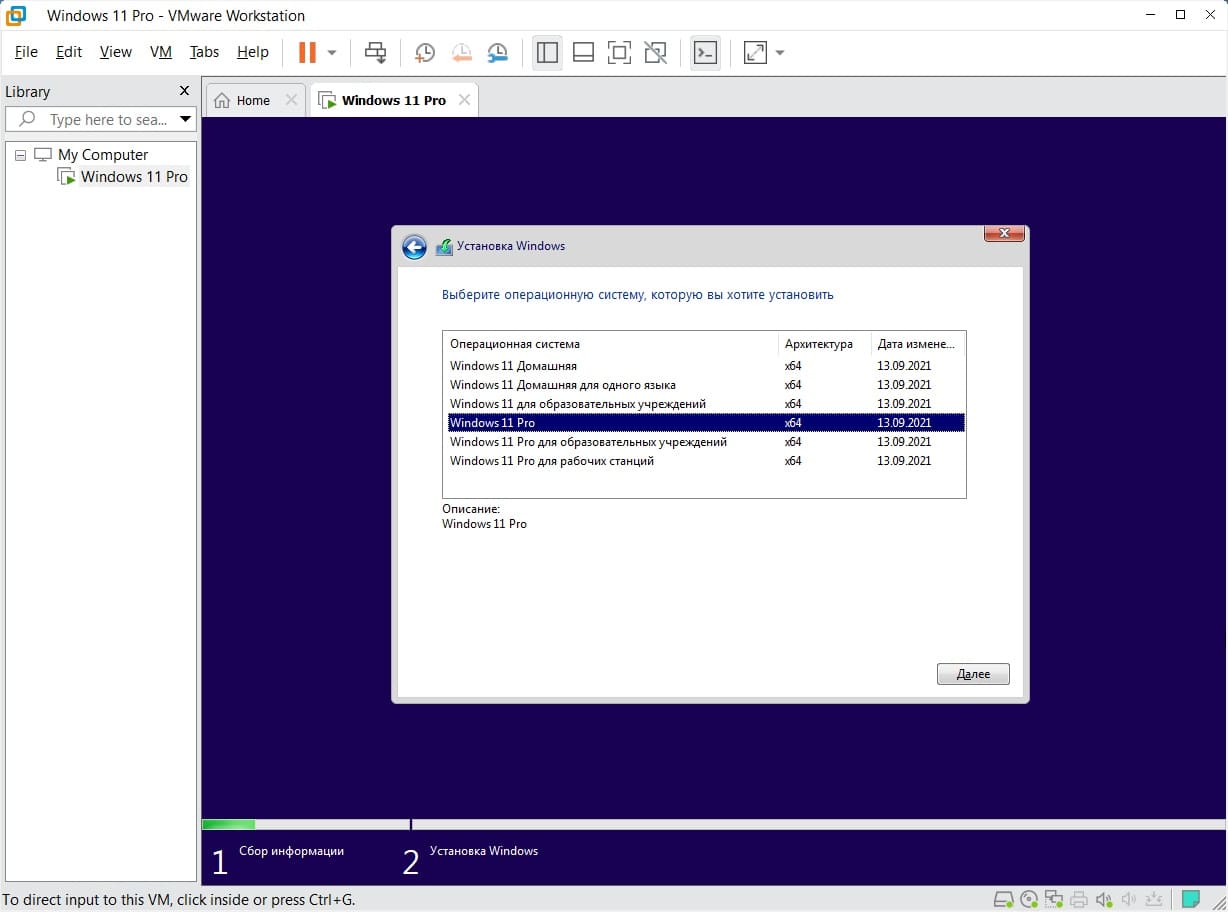
— Выбираем версию Widnows 11, мы выберем Pro. Вы можете выбрать любую другую, по Вашему желанию.
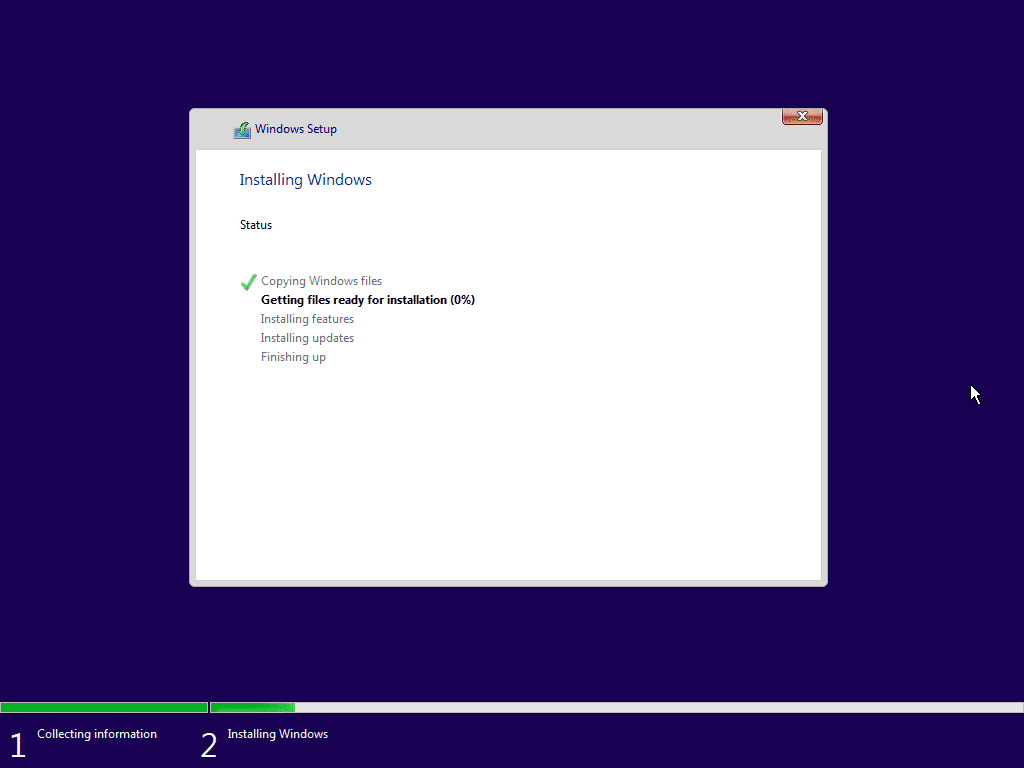
— Следующим окном получаем ошибку «Запуск Windows 11 на этом компьютере невозможен», т.к VMware не может виртуализировать TPM.
— Не закрывая это окно с ошибкой нажимаем горячие клавиши Shift + F10 => В новом окне терминала (командной строки) вводим regedit и нажимаем Enter.

— Далее у Вас откроется окно реестра, заходим в ветку HKEY_LOCAL_MACHINE / SYSTEM / Setup
— На папке Setup нажимаем правой кнопкой мыши => Создать => Раздел.
— Новый раздел называем LabConfig
— В новом разделе LabConfig на пустом месте нажимаем правой кнопкой мыши «Создать» => Параметр DWORD (32 бита)
— Называем новый параметр BypassTPMCheck
— Аналогично создаем еще такой же параметр, но с названием BypassSecureBootCheck. Теперь у Вас два новых параметра BypassTPMCheck и BypassSecureBootCheck.
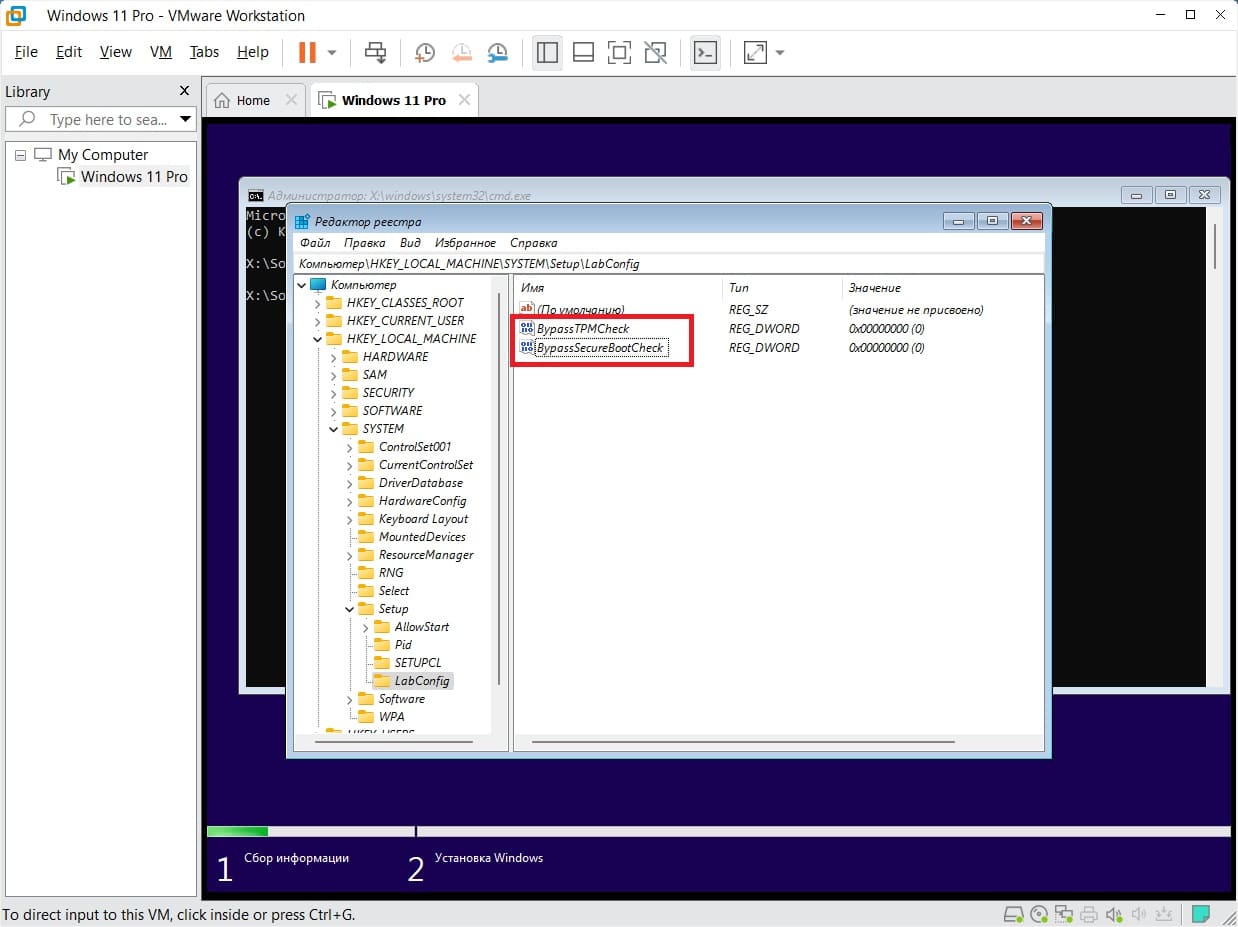
— Далее нужно изменить значения каждого параметра, щелкаем двойным щелчком на каждый созданный параметр и задаем там значение «1».
— Теперь выходим из реестра и терминала по крестику в правом верхнем углу. И в меню установки нажимаем стрелочку назад.
— Снова в меню выбора версии нажимаем «Далее».
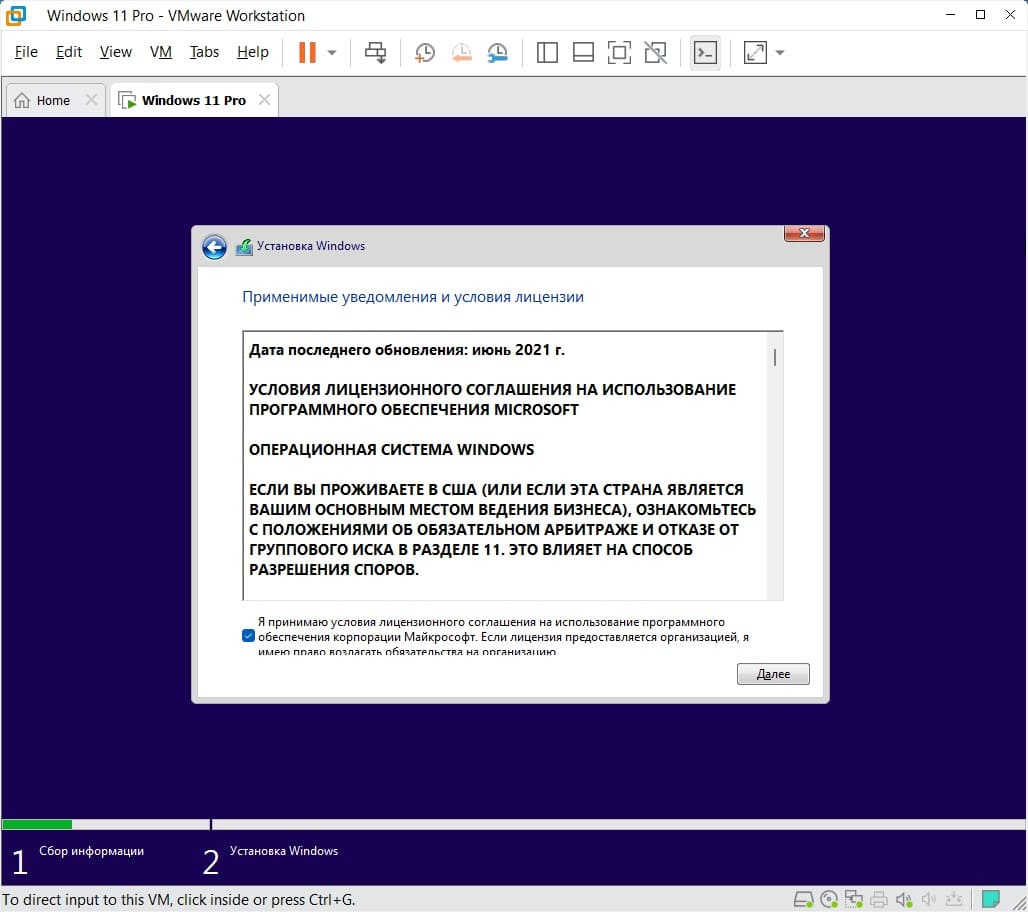
— Соглашаемся с лицензионным соглашением.
— Выборочная установка.
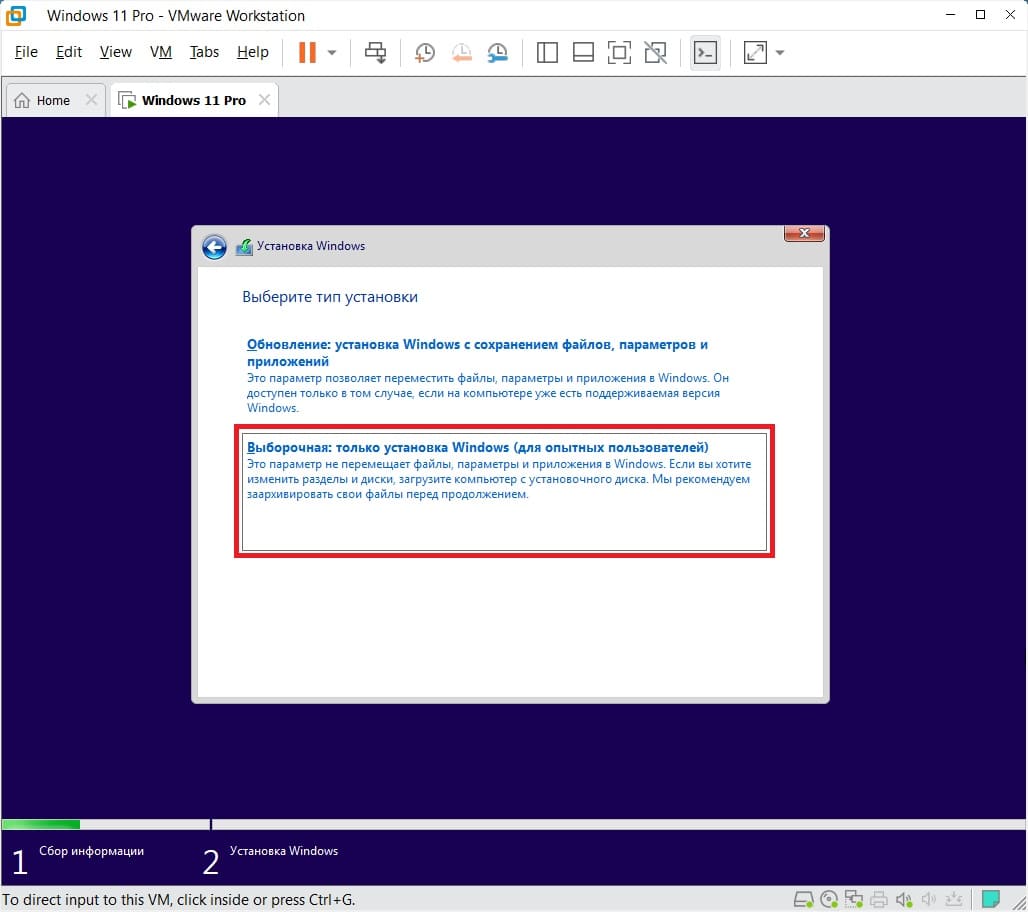
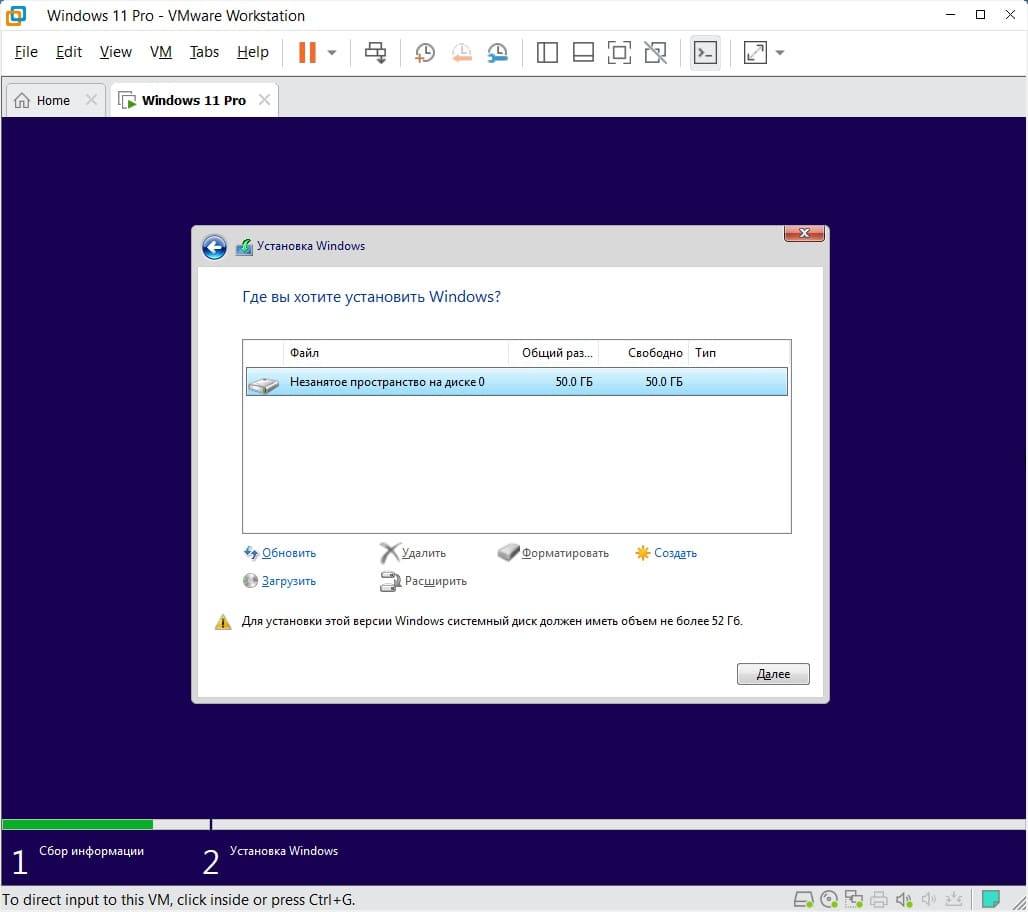
— Выбираем диск, он должен быть один и жмем далее.
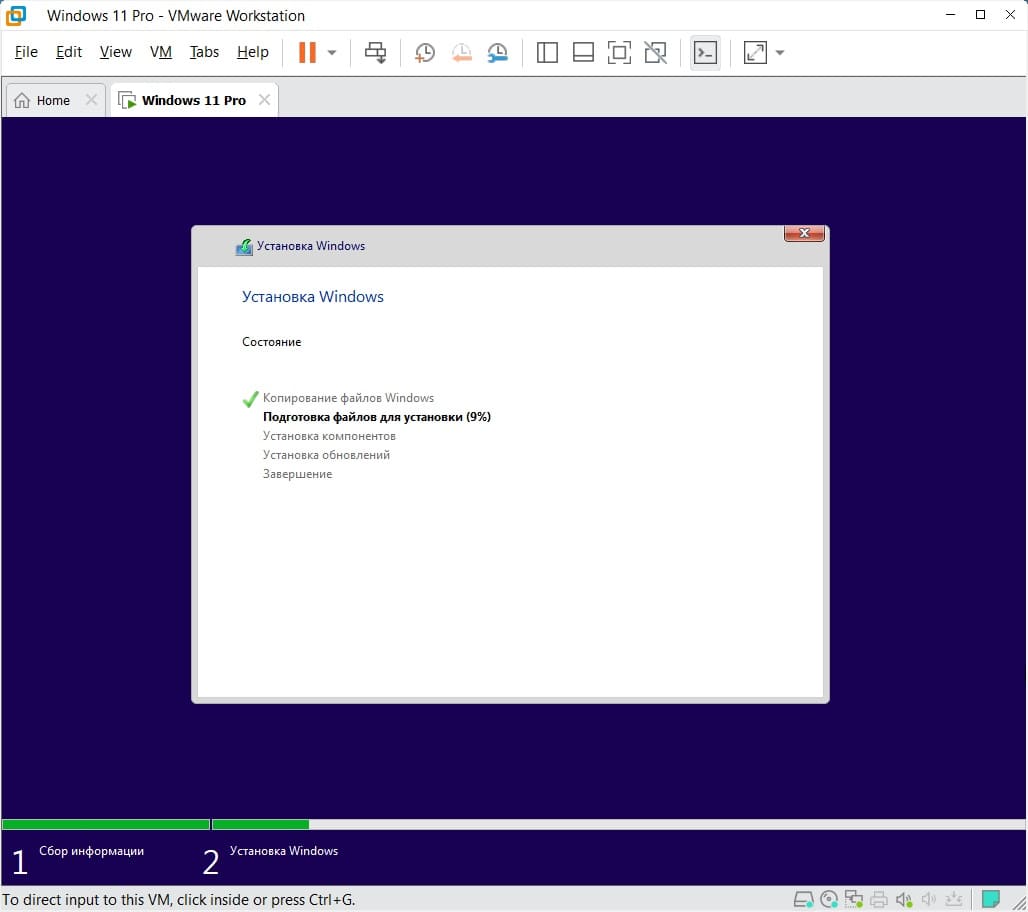
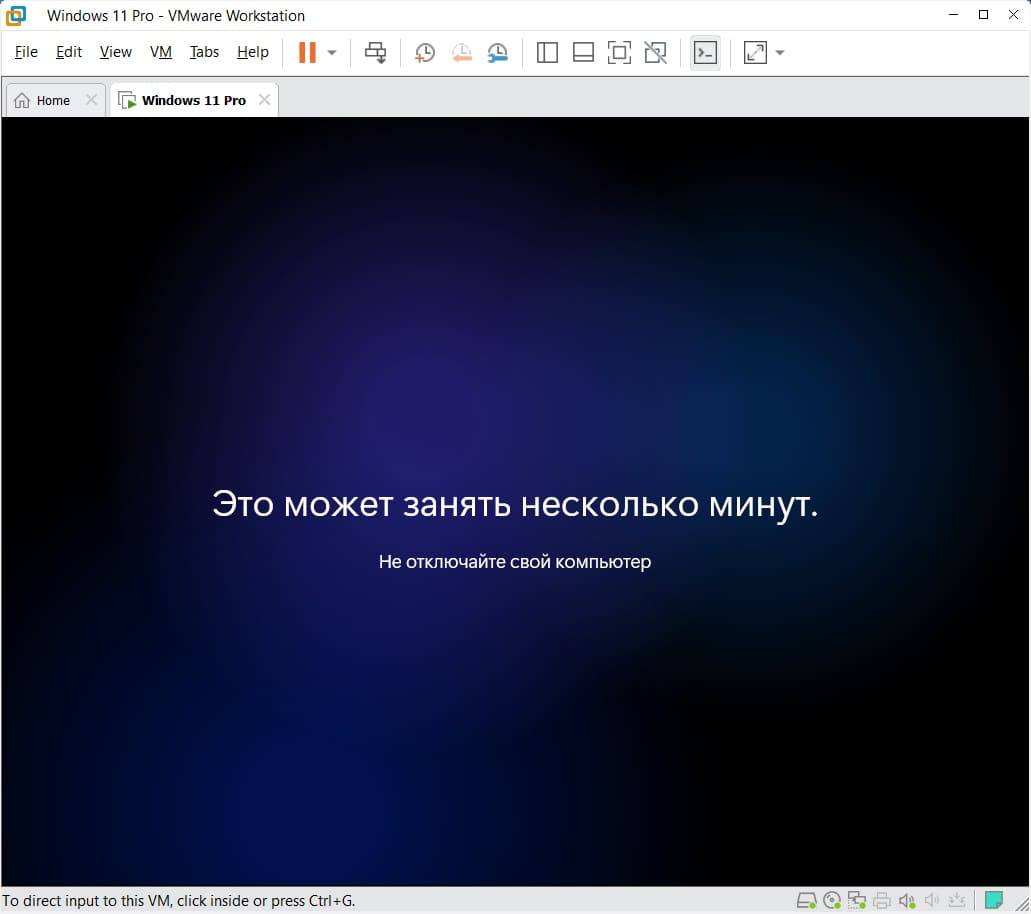
— Дожидаемся окончания распаковки и установки. ВМ несколько раз может перезагрузиться.
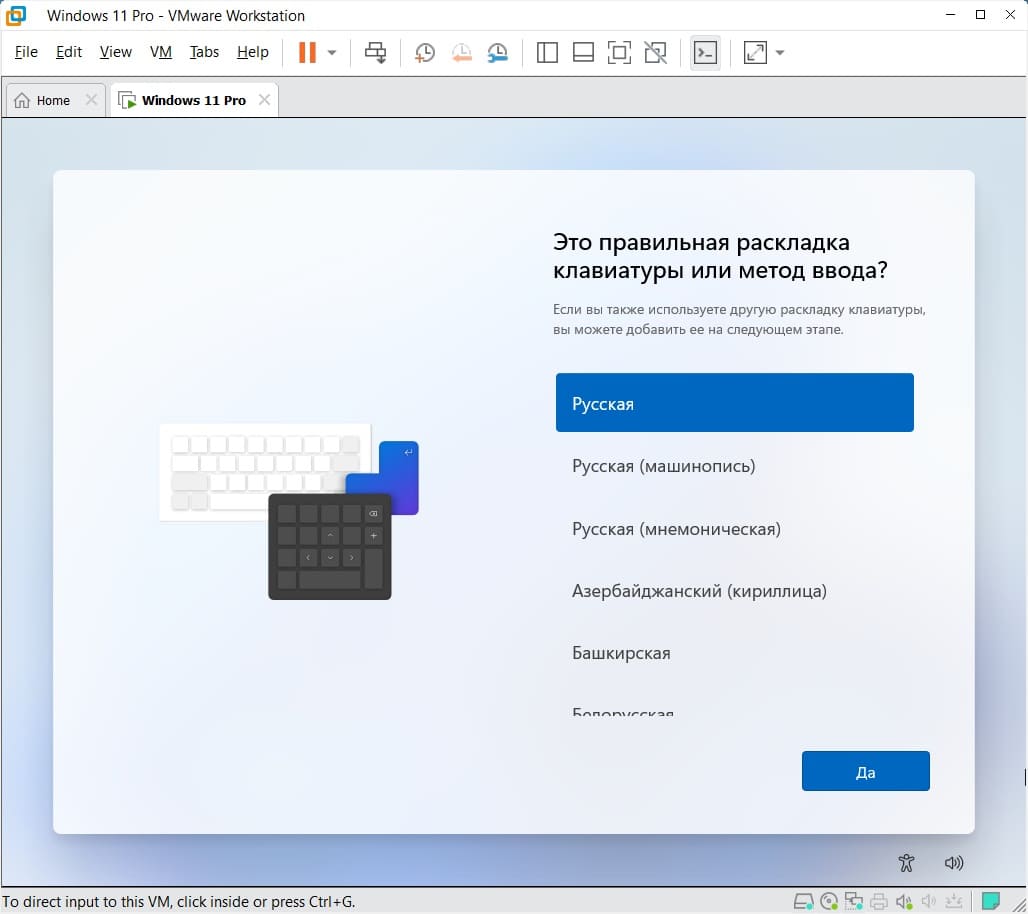
— Приступаем к предварительной настройке ОС. Выбираем регион и раскладку.

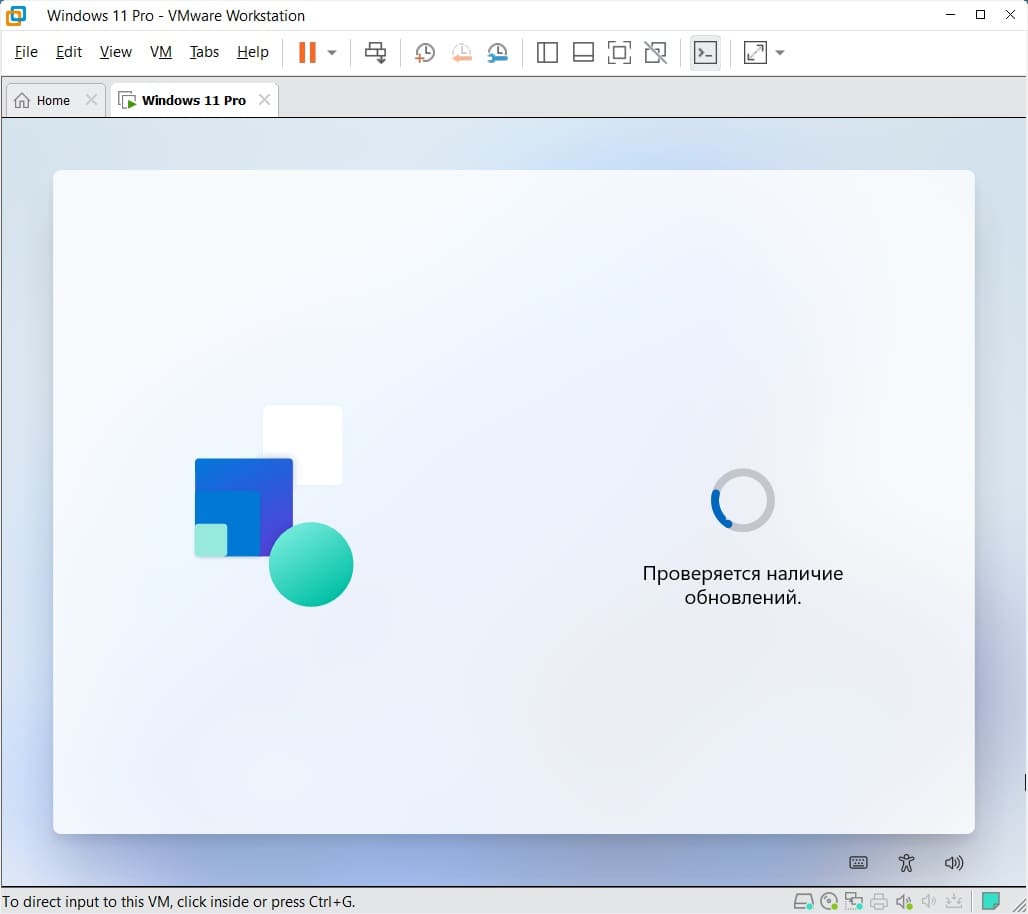
— Система проверит наличие обновлений.
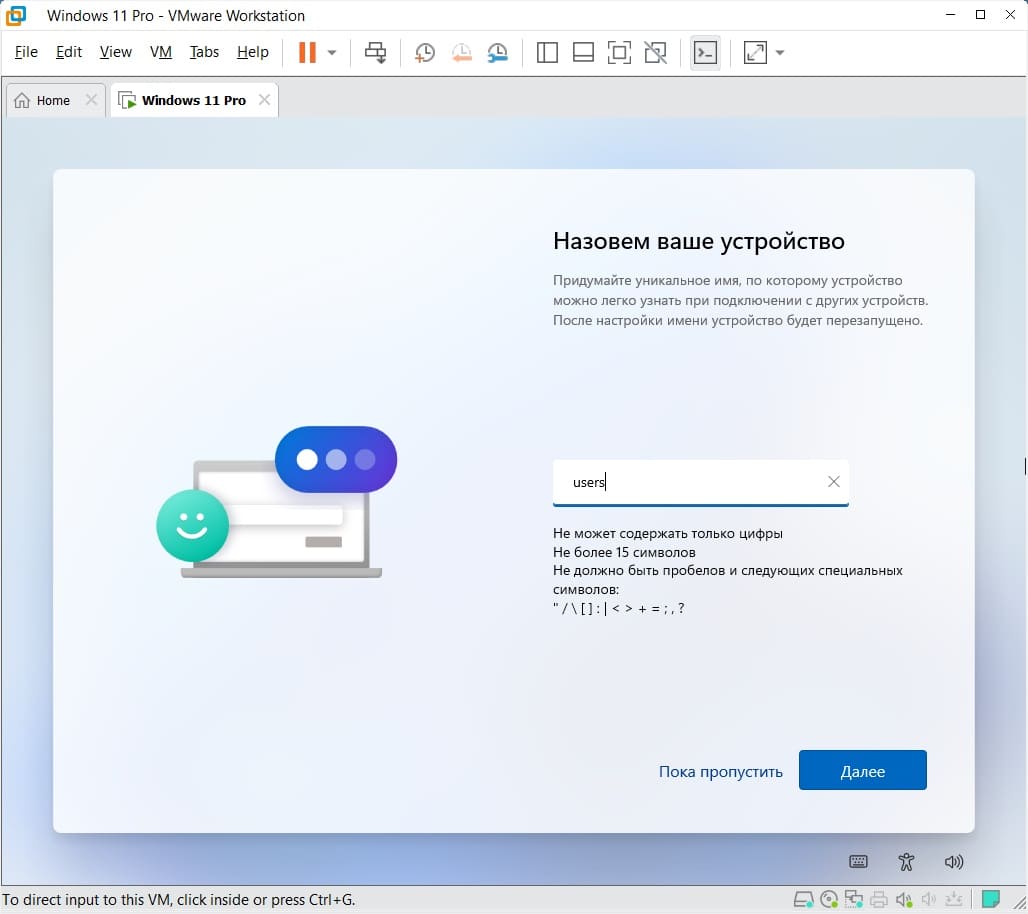
— Зададим имя системе, оно может быть любое.
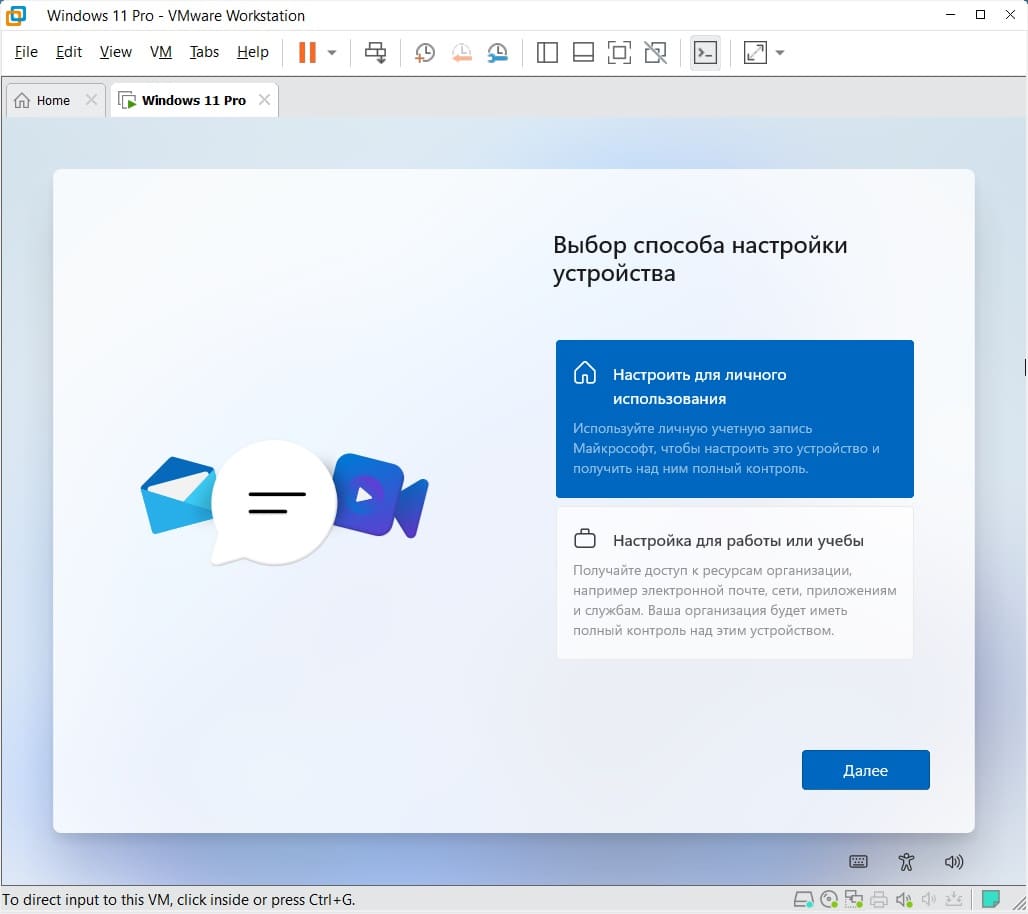
— Выбираем «Для личного использования».
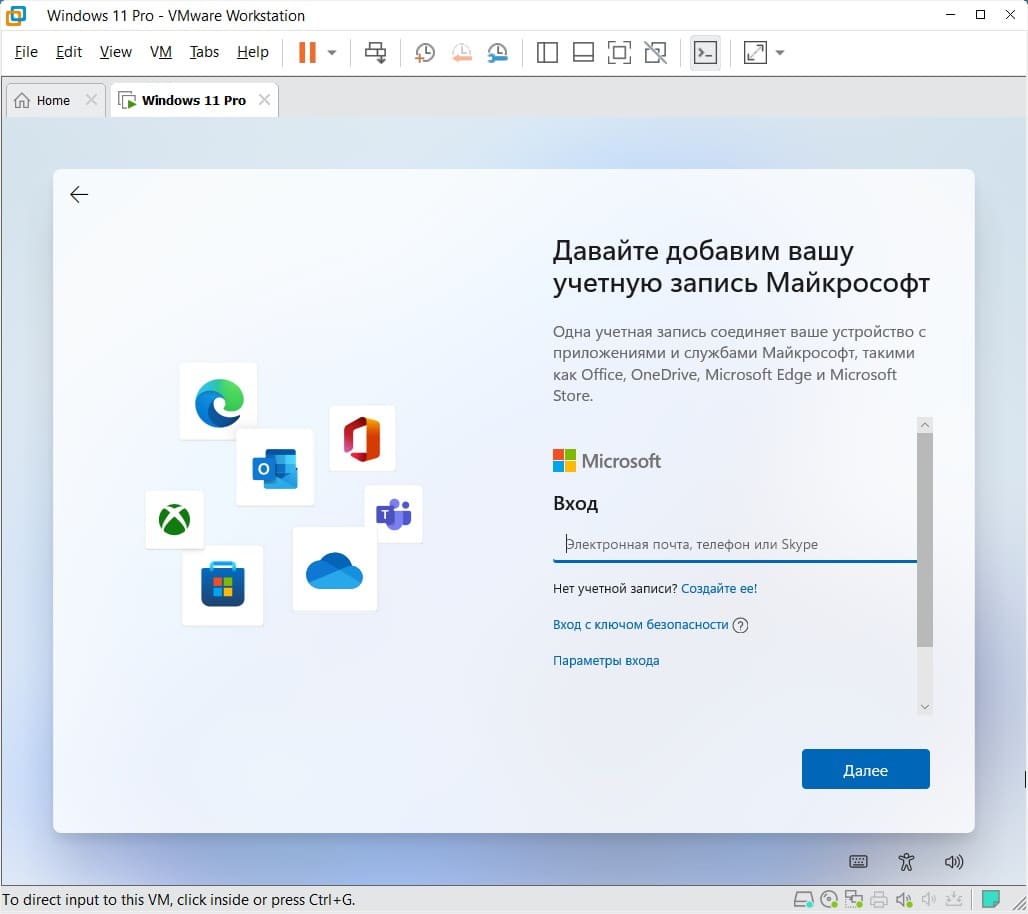
— Теперь совершите авторизацию под Вашей личной учетной записью Microsoft.
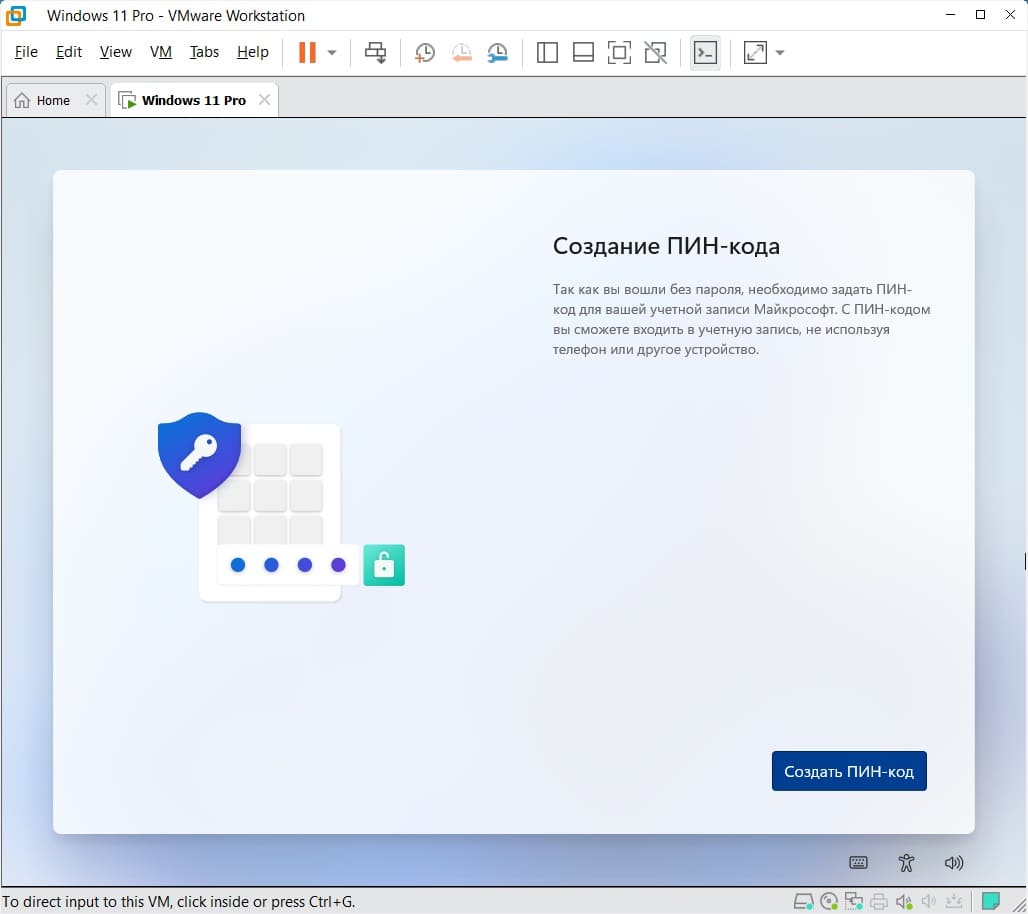
— Задайте пин-код для быстрого входа в систему.
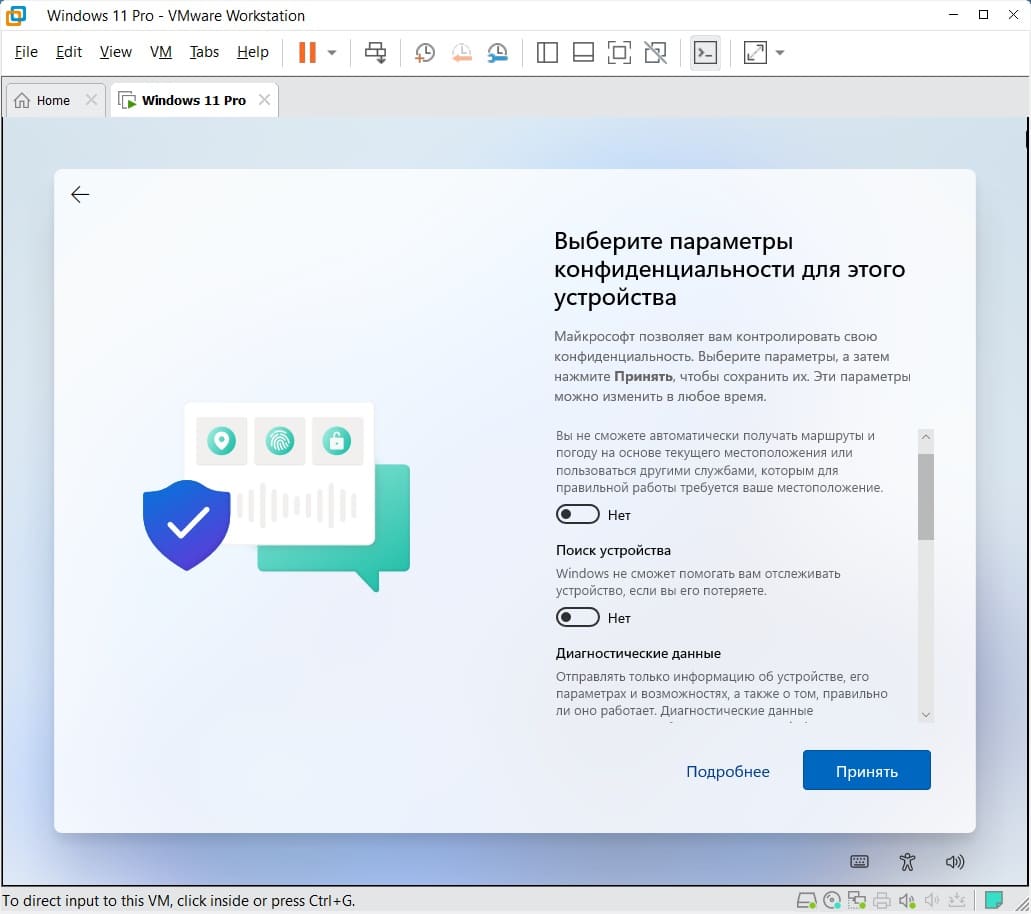
— Теперь задайте параметры конфиденциальности.
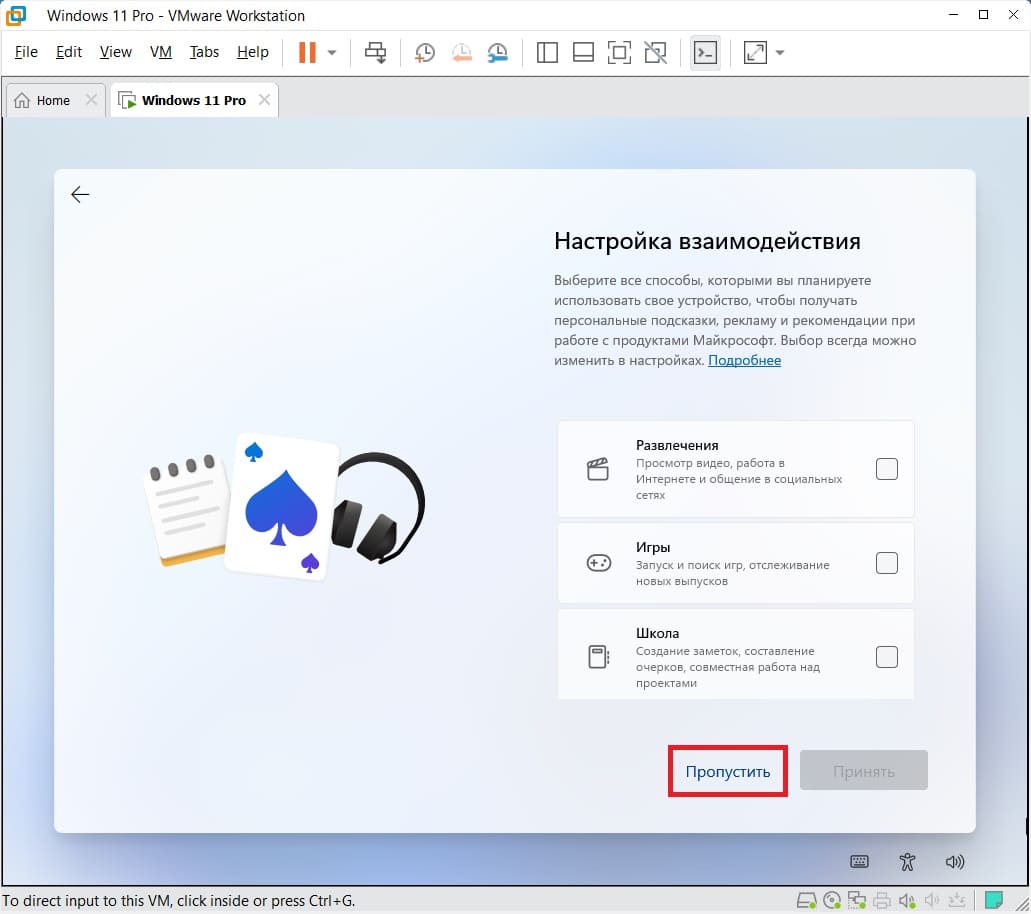
— Пункт настройки взаимодействия можем пропустить.
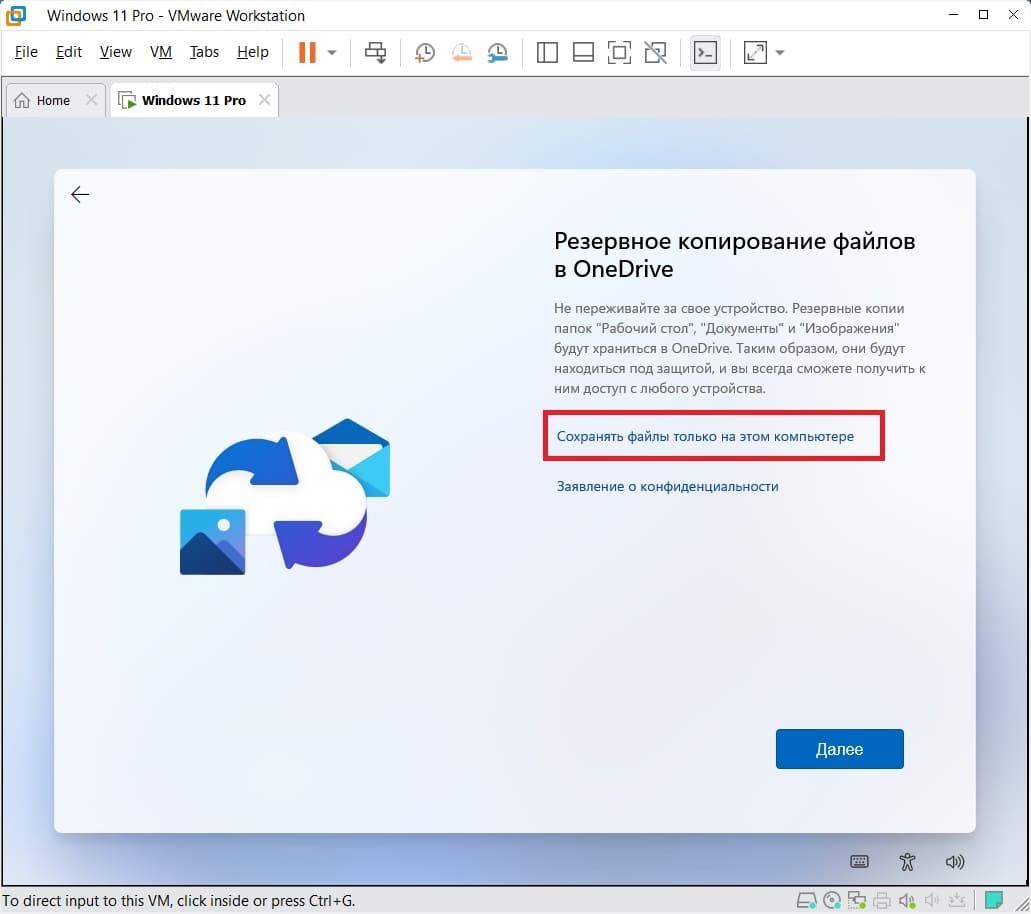
— Далее желательно выбрать «Сохранять файлы только на этом компьютере».
— Дождитесь загрузки обновлений и подготовки рабочего экрана.
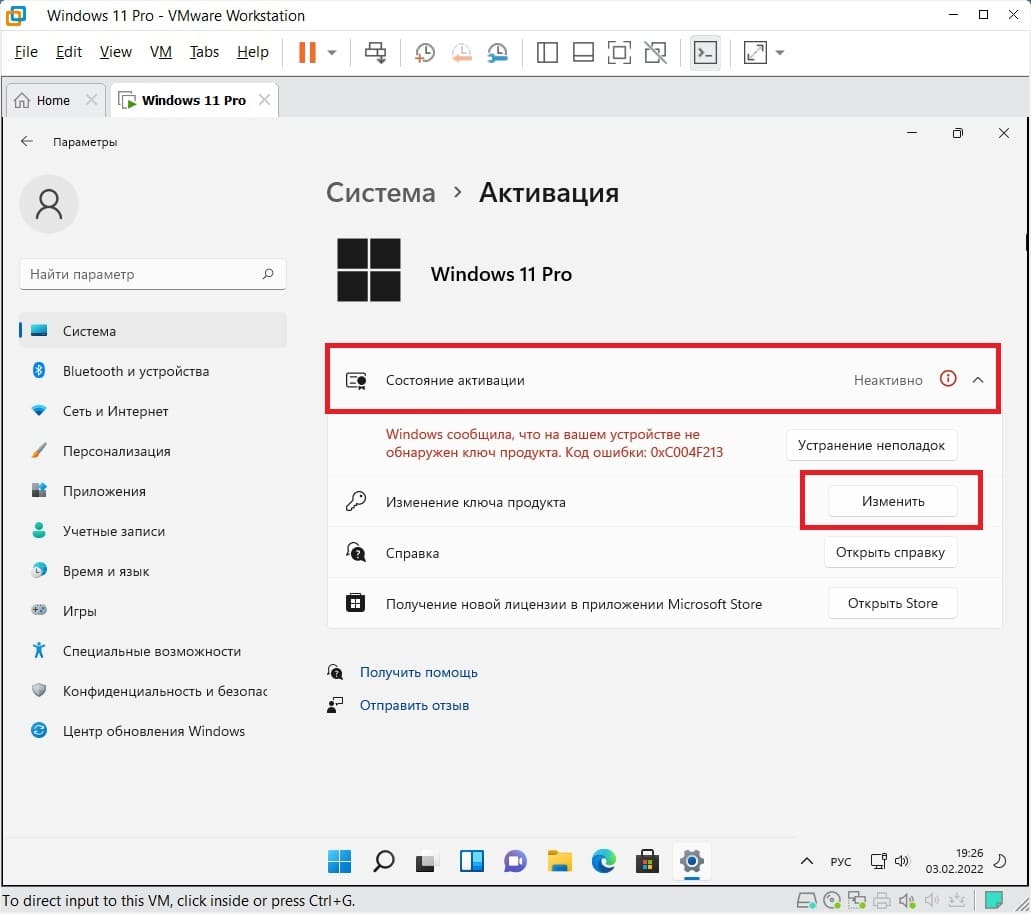
— На этом все. Теперь можем проверить, что у нас установилась корректная версия системы. Для полноценной работы системы — ее необходимо активировать. Нажимаем в меню «О системе» кнопку «Ключ продукта и активация».

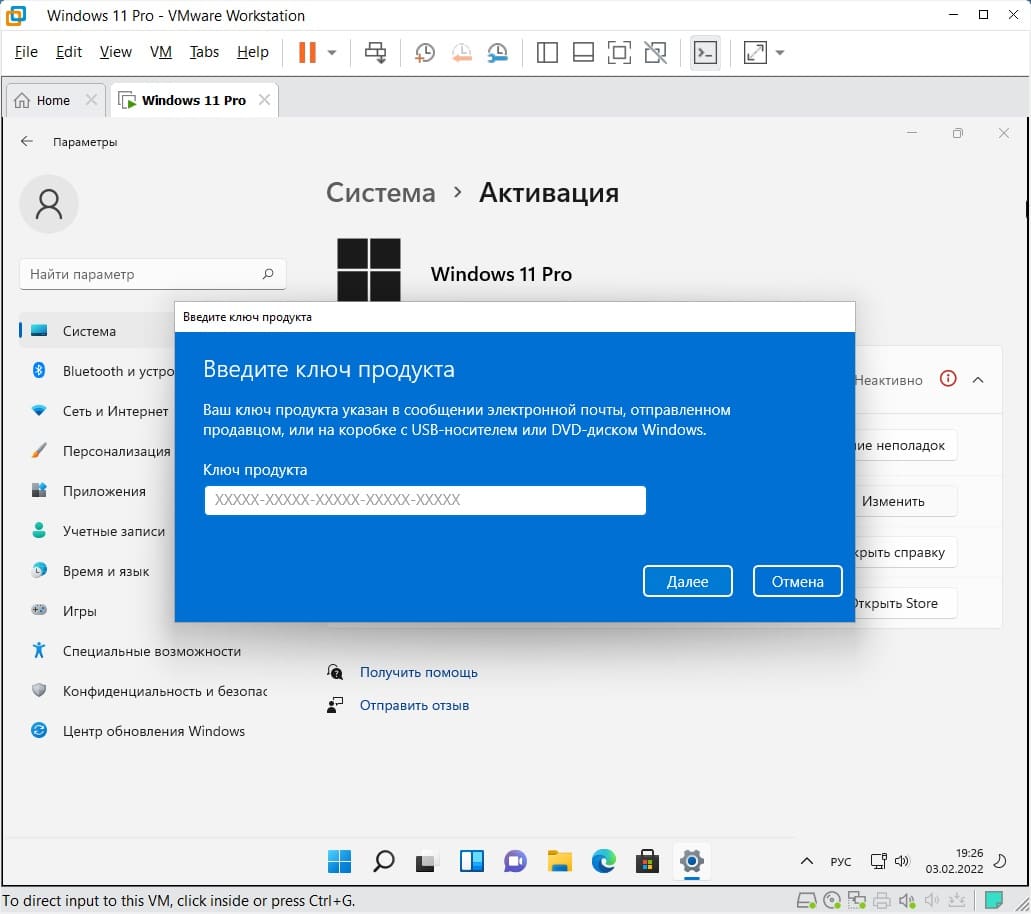
— Видим, что состояние системы «Неактивно», т.е она не активирована. Нажимаем «Изменить» и вводите Ваш ключ. Если у Вас нет оригинального ключа активации приобрести его можете в нашем каталоге от 940 ₽. Моментальная доставка ключа активации на Вашу электронную почту сразу после оплаты товара. Гарантия и бесплатная круглосуточная техподдержка от нашего магазина.
Более подробнее ознакомиться с инструкцией по активации Windows 11 можете в нашей прошлой статье.
by Loredana Harsana
Loredana is a passionate writer with a keen interest in PC software and technology. She started off writing about mobile phones back when Samsung Galaxy S II was… read more
Published on March 26, 2022
- Installing Windows 11 on Vmware Workstation isn’t as simple as it is with other operating systems.
- While installing Windows 11 on a virtual machine, you may encounter errors like This PC can’t run Windows 11.
- TPM 2.0 and secure boot requirements are frequently the sources of these problems.
- Modifying the .vmx file, enabling TPM from the VMware Workstation settings, or adding a few keys to the Registry are all options for resolving such issues.
XINSTALL BY CLICKING THE DOWNLOAD FILE
- Download Restoro PC Repair Tool that comes with Patented Technologies (patent available here).
- Click Start Scan to find Windows 11 issues that could be causing PC problems.
- Click Repair All to fix issues affecting your computer’s security and performance
- Restoro has been downloaded by 0 readers this month.
When trying to install Windows 11 as a guest on your VMware Workstation, you may encounter different types of errors, such as This PC cannot run Windows 11.
The fact that Windows 11 is a free update for Windows 10 users does not negate the reality that the operating system has hardware restrictions.
The problem is usually caused by Trusted Platform Module (TPM), and it can be resolved in a few steps by modifying the registry or VMX file.
Later, we’ll discuss why your VMware crashes and how to fix it, but first, let’s look at solutions to the most common VMware errors in Windows 11.
What causes the VMware Workstation error in Windows 11?
Your system must have the TPM 2.0 and secure boot requirements in order to install Windows 11 successfully.
Even if your PC is compliant, VMware Workstation does not support this feature by default, which results in an error.
Fortunately, you can get around this restriction by modifying the Windows Registry or the VMX file in the working directory.
The error message displayed is This PC can’t run Windows 11; to resolve this problem, follow the steps below.
How can I fix the Windows 11 VMware Workstation error?
1. Edit the VMX file to add VTPM
- Launch VMware Workstation. Create a new virtual machine if you don’t have one already. Also, power off any running virtual machine.
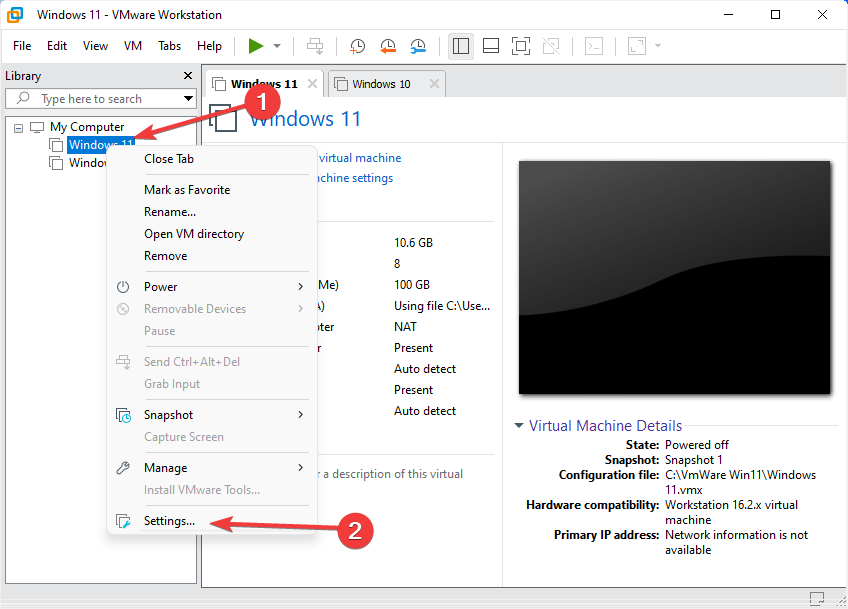
- Right-click on the virtual machine and select Settings.

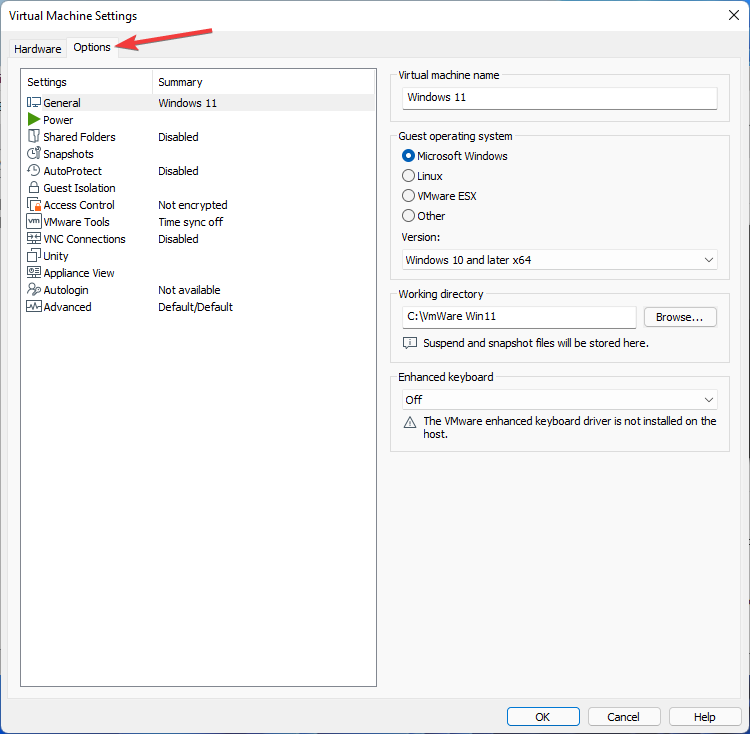
- Open the Options tab in the Settings window.

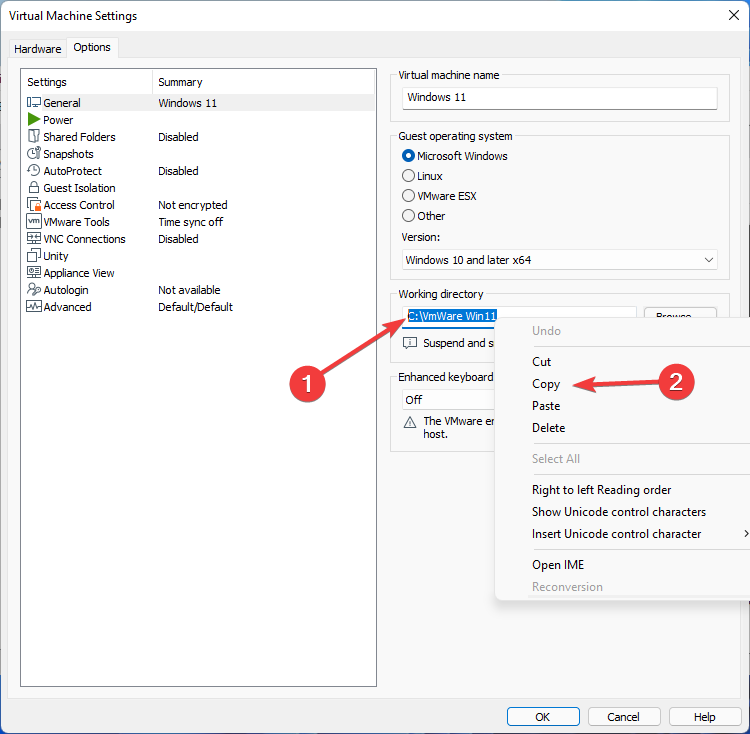
- Locate the Working directory in the right pane. This is where your virtual machine’s VMX file is stored. Then, Copy the path to your clipboard.
- After that, close the Settings window.
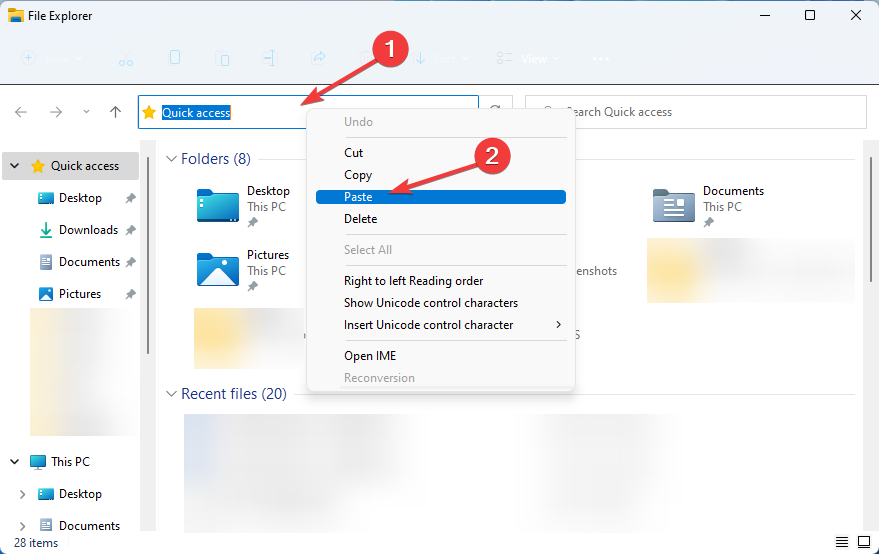
- Press Windows + E at the same time to open File Explorer.
- Right-click in the File Explorer address bar, select Paste, and press Enter.

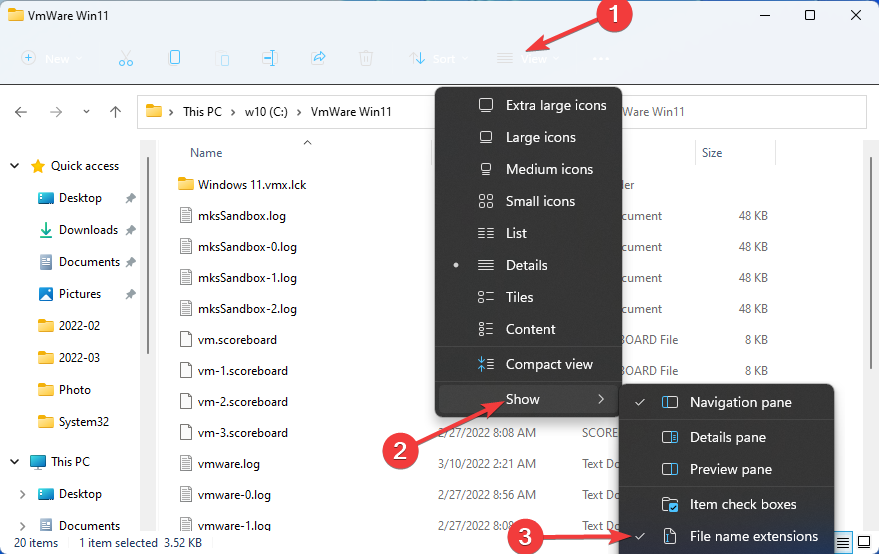
- If you don’t see file extensions, go to View options, hover over Show, then enable the File name extensions option.
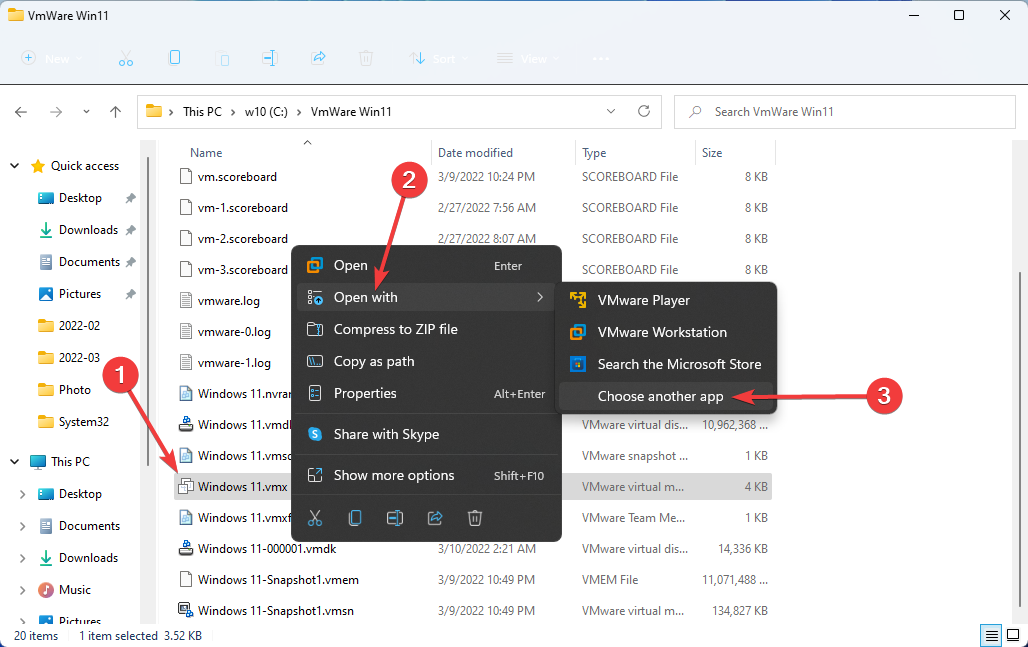
- Locate the file with the .vmx extension, right-click it, and choose Open With, then Choose another app.

- Select Notepad then click OK.
- Add the following line to the end of the file when it opens in Notepad:
managedVM.autoAddVTPM = "software"

- To save the file, press Ctrl + S and then close it.
- Restart VMware Workstation once the file has been edited.
- Now, proceed with the Windows 11 installation. You should be able to skip the TPM check and finish the installation.
Editing your virtual machine’s .VMX file and adding the VTPM (Virtual Trusted Platform Module) is the simplest way to fix the Windows 11 VMware Workstation error.
This solution works with all VMware Workstation versions, including Pro, Player, and Fusion.
2. Enable TPM 2.0
- To begin, open VMware Workstation Pro. If you haven’t already done so, create a new virtual computer.
- Right-click on your virtual machine, then select Settings.
- In the Settings menu, choose the Options tab.
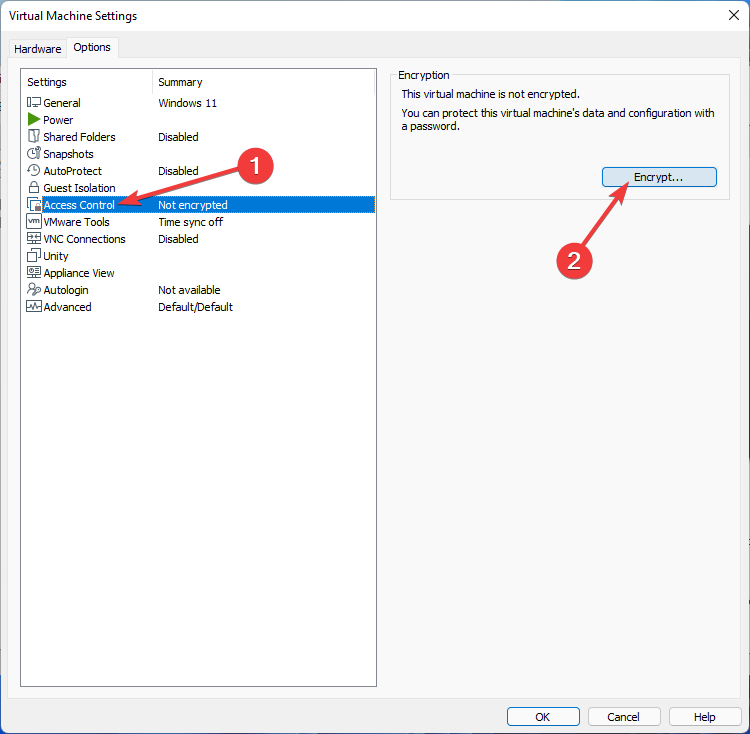
- In the left pane, select the Access Control tab then, in the right pane, click on the Encrypt button.
- Enter an encryption password and confirm it. You’ll need the encryption password to access the virtual machine, so keep it safe.
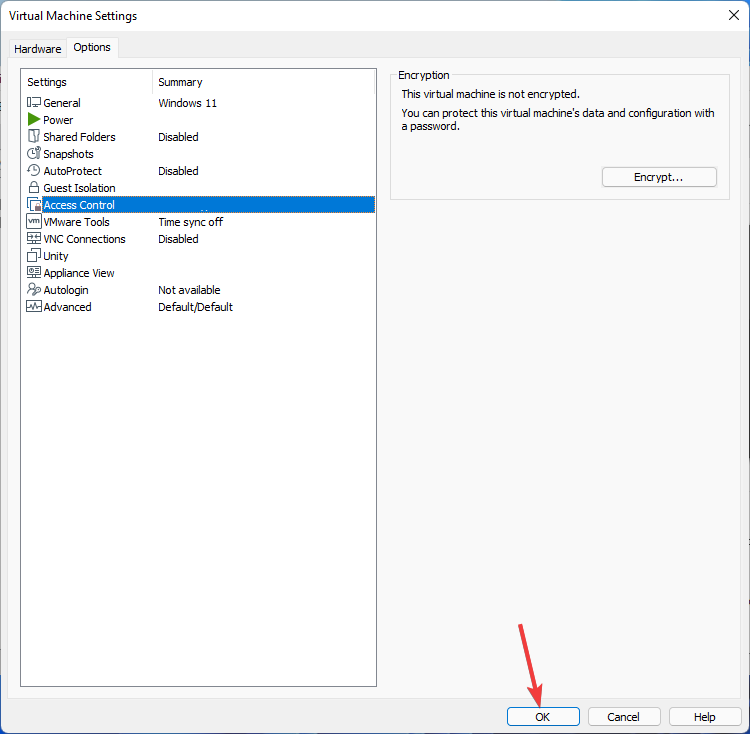
- Wait for the encryption procedure to finish before clicking the Encrypt button.
- When you’re finished, click OK to save your changes.
- TPM can now be installed on your virtual system. To do so, select Settings from the context menu of your encrypted virtual machine.
- Click the Add button on the Hardware tab.
- Select Trusted Platform Module then click the Finish button to add virtual TPM to your virtual machine.
- In the Settings window, Trusted Platform Module will show in the Summary column.
- Click OK to save the changes.
If you use VMware Workstation Pro, you can fix the error by encrypting your virtual machine and then adding a virtual Trusted Platform Module (TPM).
Some PC issues are hard to tackle, especially when it comes to corrupted repositories or missing Windows files. If you are having troubles fixing an error, your system may be partially broken.
We recommend installing Restoro, a tool that will scan your machine and identify what the fault is.
Click here to download and start repairing.
However, if you’re using VMware Workstation Player, move on to the next method, which involves a registry hack and modifying the VMX file.
- How to Add Text in The Snipping Tool [Quickest Ways]
- How to Make Sticky Notes Stay on Top in Windows 11
- Reserved Storage on Windows 11: How to Enable or Disable It
- How to Remove Windows 11 File Explorer Please Sign In
3. Bypass TPM 2.0 requirements
- Set up your virtual machine and start Windows 11 installation process.
- When you get This PC can’t run Windows 11 error press Shift + F10 to open Command Prompt.
- To open Registry Editor, type the following command in the Command Prompt window and hit Enter:
Regedit
- Navigate to the following location in the Registry Editor:
HKEY_LOCAL_MACHINESYSTEMSetup - Right-click on the Setup folder, select New then Key.

- Rename it to BypassTPMCheck.
- Now click BypassTPMCheck, then right-click and hover over New in the right pane, then select DWORD (32-bit) value.
- Rename the value to LabConfig.
- Double-click on it, type 1 in the Value data field of the pop-up menu, then click OK.

- Close the Registry Editor and Command Prompted when you’re finished.
- You’ll be taken back to the Windows Setup window where the error occurred. Click the Back button in the top left corner (back arrow icon).
- Click Next after selecting the Windows edition you want to install.
- You should now be able to complete the Windows 11 setup without encountering any errors.
This solution may seem complicated, but it is universal, and you can use it in all versions of the VMware Workstation.
Also, if you don’t want to encrypt your virtual machine like the previous method, you can bypass the Trusted Platform Module requirement by using this registry hack.
Why does Windows guest in VMware Workstation Pro crash on startup ?
You may encounter another problem when working with VMware Workstation Pro v.16.1.2.
This issue happens if you create a Windows guest VM using Workstation Pro 16.1.2 on Windows 11, and the host system has enabled Hyper-V (in this case, WSL2 has enabled in the host), and you select more than one processor and/or one core processor for the guest, the Windows gust VM crashes at boot.
The error you will see is as follows: VMware Workstation unrecoverable error: (vcpu-0). Exception 0xc0000005 (access violation) has occurred.
It is worth noting that the issue mentioned above often happens to users with AMD Ryzen5950x processors.
However, this error is not a problem anymore. VMware issued an update for Workstation recently to address the problem.
So, if you have the same problem, you do not have to do anything but update your Workstation since this issue occurs in older versions.
Many users that have lab environments and are running VMware Workstation on outdated hardware that lacks a Trusted Platform Module are affected by the Windows 11 VMware problem.
Fortunately, this issue can be solved and all you need to do is follow the steps outlined in this guide. Also, take a look at our article if you’re trying to install Windows 11 on an unsupported PC.
If you’ve tried any of these methods, please share your experiences in the comments section down below!
![]()
Newsletter
by Loredana Harsana
Loredana is a passionate writer with a keen interest in PC software and technology. She started off writing about mobile phones back when Samsung Galaxy S II was… read more
Published on March 26, 2022
- Installing Windows 11 on Vmware Workstation isn’t as simple as it is with other operating systems.
- While installing Windows 11 on a virtual machine, you may encounter errors like This PC can’t run Windows 11.
- TPM 2.0 and secure boot requirements are frequently the sources of these problems.
- Modifying the .vmx file, enabling TPM from the VMware Workstation settings, or adding a few keys to the Registry are all options for resolving such issues.
XINSTALL BY CLICKING THE DOWNLOAD FILE
- Download Restoro PC Repair Tool that comes with Patented Technologies (patent available here).
- Click Start Scan to find Windows 11 issues that could be causing PC problems.
- Click Repair All to fix issues affecting your computer’s security and performance
- Restoro has been downloaded by 0 readers this month.
When trying to install Windows 11 as a guest on your VMware Workstation, you may encounter different types of errors, such as This PC cannot run Windows 11.
The fact that Windows 11 is a free update for Windows 10 users does not negate the reality that the operating system has hardware restrictions.
The problem is usually caused by Trusted Platform Module (TPM), and it can be resolved in a few steps by modifying the registry or VMX file.
Later, we’ll discuss why your VMware crashes and how to fix it, but first, let’s look at solutions to the most common VMware errors in Windows 11.
What causes the VMware Workstation error in Windows 11?
Your system must have the TPM 2.0 and secure boot requirements in order to install Windows 11 successfully.
Even if your PC is compliant, VMware Workstation does not support this feature by default, which results in an error.
Fortunately, you can get around this restriction by modifying the Windows Registry or the VMX file in the working directory.
The error message displayed is This PC can’t run Windows 11; to resolve this problem, follow the steps below.
How can I fix the Windows 11 VMware Workstation error?
1. Edit the VMX file to add VTPM
- Launch VMware Workstation. Create a new virtual machine if you don’t have one already. Also, power off any running virtual machine.
- Right-click on the virtual machine and select Settings.
- Open the Options tab in the Settings window.
- Locate the Working directory in the right pane. This is where your virtual machine’s VMX file is stored. Then, Copy the path to your clipboard.
- After that, close the Settings window.
- Press Windows + E at the same time to open File Explorer.
- Right-click in the File Explorer address bar, select Paste, and press Enter.
- If you don’t see file extensions, go to View options, hover over Show, then enable the File name extensions option.
- Locate the file with the .vmx extension, right-click it, and choose Open With, then Choose another app.
- Select Notepad then click OK.
- Add the following line to the end of the file when it opens in Notepad:
managedVM.autoAddVTPM = "software"
- To save the file, press Ctrl + S and then close it.
- Restart VMware Workstation once the file has been edited.
- Now, proceed with the Windows 11 installation. You should be able to skip the TPM check and finish the installation.
Editing your virtual machine’s .VMX file and adding the VTPM (Virtual Trusted Platform Module) is the simplest way to fix the Windows 11 VMware Workstation error.
This solution works with all VMware Workstation versions, including Pro, Player, and Fusion.
2. Enable TPM 2.0
- To begin, open VMware Workstation Pro. If you haven’t already done so, create a new virtual computer.
- Right-click on your virtual machine, then select Settings.
- In the Settings menu, choose the Options tab.
- In the left pane, select the Access Control tab then, in the right pane, click on the Encrypt button.
- Enter an encryption password and confirm it. You’ll need the encryption password to access the virtual machine, so keep it safe.
- Wait for the encryption procedure to finish before clicking the Encrypt button.
- When you’re finished, click OK to save your changes.
- TPM can now be installed on your virtual system. To do so, select Settings from the context menu of your encrypted virtual machine.
- Click the Add button on the Hardware tab.
- Select Trusted Platform Module then click the Finish button to add virtual TPM to your virtual machine.
- In the Settings window, Trusted Platform Module will show in the Summary column.
- Click OK to save the changes.
If you use VMware Workstation Pro, you can fix the error by encrypting your virtual machine and then adding a virtual Trusted Platform Module (TPM).
Some PC issues are hard to tackle, especially when it comes to corrupted repositories or missing Windows files. If you are having troubles fixing an error, your system may be partially broken.
We recommend installing Restoro, a tool that will scan your machine and identify what the fault is.
Click here to download and start repairing.
However, if you’re using VMware Workstation Player, move on to the next method, which involves a registry hack and modifying the VMX file.
- How to Add Text in The Snipping Tool [Quickest Ways]
- How to Make Sticky Notes Stay on Top in Windows 11
- Reserved Storage on Windows 11: How to Enable or Disable It
- How to Remove Windows 11 File Explorer Please Sign In
- How to Change Real Time Update Speed in Task Manager
3. Bypass TPM 2.0 requirements
- Set up your virtual machine and start Windows 11 installation process.
- When you get This PC can’t run Windows 11 error press Shift + F10 to open Command Prompt.
- To open Registry Editor, type the following command in the Command Prompt window and hit Enter:
Regedit - Navigate to the following location in the Registry Editor:
HKEY_LOCAL_MACHINESYSTEMSetup - Right-click on the Setup folder, select New then Key.
- Rename it to BypassTPMCheck.
- Now click BypassTPMCheck, then right-click and hover over New in the right pane, then select DWORD (32-bit) value.
- Rename the value to LabConfig.
- Double-click on it, type 1 in the Value data field of the pop-up menu, then click OK.
- Close the Registry Editor and Command Prompted when you’re finished.
- You’ll be taken back to the Windows Setup window where the error occurred. Click the Back button in the top left corner (back arrow icon).
- Click Next after selecting the Windows edition you want to install.
- You should now be able to complete the Windows 11 setup without encountering any errors.
This solution may seem complicated, but it is universal, and you can use it in all versions of the VMware Workstation.
Also, if you don’t want to encrypt your virtual machine like the previous method, you can bypass the Trusted Platform Module requirement by using this registry hack.
Why does Windows guest in VMware Workstation Pro crash on startup ?
You may encounter another problem when working with VMware Workstation Pro v.16.1.2.
This issue happens if you create a Windows guest VM using Workstation Pro 16.1.2 on Windows 11, and the host system has enabled Hyper-V (in this case, WSL2 has enabled in the host), and you select more than one processor and/or one core processor for the guest, the Windows gust VM crashes at boot.
The error you will see is as follows: VMware Workstation unrecoverable error: (vcpu-0). Exception 0xc0000005 (access violation) has occurred.
It is worth noting that the issue mentioned above often happens to users with AMD Ryzen5950x processors.
However, this error is not a problem anymore. VMware issued an update for Workstation recently to address the problem.
So, if you have the same problem, you do not have to do anything but update your Workstation since this issue occurs in older versions.
Many users that have lab environments and are running VMware Workstation on outdated hardware that lacks a Trusted Platform Module are affected by the Windows 11 VMware problem.
Fortunately, this issue can be solved and all you need to do is follow the steps outlined in this guide. Also, take a look at our article if you’re trying to install Windows 11 on an unsupported PC.
If you’ve tried any of these methods, please share your experiences in the comments section down below!
![]()
Newsletter
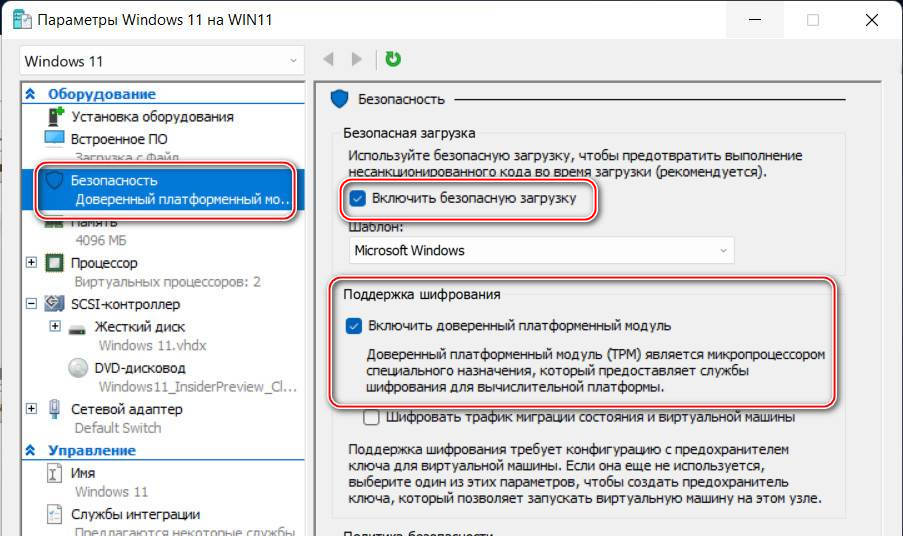
VMware Workstation поддерживает TPM и безопасную загрузку (Secure Boot) для установки операционной системы Windows 11. Наша инструкция покажет как включить данные функции на виртуальной машине.

В процессе разработки Microsoft внедрила соблюдения требований безопасности для установки Windows 11, и в конечном итоге вы не сможете просто установить операционную систему на виртуальную машину VMware Workstation из-за отсутствия доверенного платформенного модуля (TPM) и безопасной загрузки (Secure Boot).
TPM — это аппаратное обеспечение, которое предлагает криптографические функции, такие как создание и хранение ключей шифрования для обеспечения безопасности в таких программах, как Windows Hello, BitLocker и многих других приложениях.
Безопасная загрузка — это технология встроенного программного обеспечения, которая защищает процесс загрузки, чтобы вредоносные программы (например, руткиты) не могли атаковать доверенную ОС во время запуска.
Может быть полезно

Если вы планируете установить сборки Insider Preview или запустить финальную версию Windows 11 на виртуальной машине VMware, приложение имеет параметры TPM и Secure Boot. Поскольку мы имеем дело с виртуализацией, вам не требуется физически иметь компоненты на компьютере.
В этом руководстве вы узнаете, как включить TPM и безопасную загрузку в VMware для установки Windows 11 на виртуальную машину.
Как включить TPM и Secure Boot в VMware для установки Windows 11
1. Скачайте Windows 11 и создайте новую виртуальную машину не запуская установку.
2. Выделите её, кликните правой кнопкой мыши и выберите параметр «Settings».

3. Щелкните вкладку «Options», выберите опцию «Access Control». В разделе «Encryption» нажмите кнопку «Encrypt».

4. Создайте пароль шифрования и снова нажмите «Encrypt».

5. Щелкните «Advanced», в разделе «Firmware type» выберите параметр «UEFI» и установите галочку «Enable secure boot».

6. Перейдите на вкладку «Hardware» и нажмите кнопку «Add».

7. Выберите опцию «Trusted Platform Module» и нажмите «Finish».

Теперь вы сможете установить Windows 11 на виртуальную машину VMware Workstation.
Windows 11 на VirtualBox или ESXi
Всем добра!
Коротко о проблеме ограничения установки при отсутствии модуля TPM и функции Secure Boot
Что бы иметь возможность установить Windows 11 на ESXi или VirtualBox необходимо в момент начала установки, когда вы получили сообщение Запуск Windows 11 на этом компьютере невозможен. Этот компьютер не соответствует минимальным требованиям к системе для установки этой версии Windows, открыть консоль (shift+F10), из консоли открыть редактор реестра (regedit) и в реестре внести следующие изменения:
- HKEY_LOCAL_MACHINES / SYSTEM / Setup. Нажмите по папке Setup правой клавишей мыши и выберите Создать — Раздел
LabConfig - В созданном разделе Создать — Параметр DWORD (32 бита).
BypassTPMCheckиBypassSecureBootCheck - Установить вновь созданным параметрам значение 1.
После выполнения этих действий, закрываем редактор реестра, возвращаемся к окну с сообщение о не соответствии, в левом вехнем углу окна жмем стрелку назад и далее установка пойдет в обход требование о не соответствии минимальным требованиям к системе.
В этой статье рассматриваются особенности установки Windows 11 на виртуальную машину, работающую на VMware Workstation и гипервизоре VMware ESXi. Большинство пользователей при попытке установить Windows 11 на виртуальную машину VMware сталкиваются с ошибкой о том, что Windows 11 не может быть запущена на этом компьютере. Постараемся разобраться, почему появляется это сообщение и можно ли его обойти.
Microsoft опубликовала набор минимальных системных требований для установки Windows 11:
- 4 ГБ оперативной памяти;
- Двухъядерный процессор с тактовой частотой 1 ГГц;
- Микросхема доверенного платформенного модуля (TPM 2.0).
Если ваш компьютер или виртуальная машина не соответствует этим системным требованиям, вы получите сообщение об ошибке при установке Windows 11 из чистого ISO-образа:
-
Запуск Windows 11 на этом компьютере не возможен. Этот компьютер не соответствует минимальным требованиям к системе для установки этой версии Windows. Дополнительные сведения см. на сайте aka.ms/WindowsSysReq -
This PC can’t run Windows 11. This PC doesn’t meet the minimum system requirements to install this version of Windows. For more information, visit aka.ms/WindowsSysReq

Установка Windows 11 в виртуальную машину без TPM и Secure Boot
Вы можете пропустить проверку системных требований при установке Windows 11 на виртуальную машину. Вы можете пропустить проверку минимальных требований к памяти, совместимому процессору, микросхеме TPM и UEFI + Secure Boot.
- Для этого вам необходимо запустить обычную установку Windows 11 на виртуальной машине и после появления ошибки установки (скриншот выше) вернуться на один шаг (стрелка в окне установки Windows);
- Нажмите комбинацию клавиш
Shift + F10, чтобы открыть командную строку;
- Введите команду
regedit.exe, чтобы запустить редактор реестра;
- Перейдите в HKEY_LOCAL_MACHINE SYSTEM Setup и создайте новую ветку с именем LabConfig;
- Создайте в этой ветке три параметра типа DWORD (32 бит) со значениями 1:
- Обход TPMCheck
- BypassSecureBootCheck
- Обход RAMCheck
- Закройте редактор реестра и командную строку и вернитесь в окно установки Windows 11;
- Выберите необходимый выпуск Windows 11 и нажмите «Установить;
- Теперь вы сможете продолжить установку Windows 11 без проверки минимальных системных требований и без TPM устройства.
Установка Windows 11 на VMware Workstation
Чтобы установить Windows 11 изначально (с учетом всех системных требований) на VMware Workstation, вам необходимо создать виртуальную машину с поддержкой UEFI, безопасной загрузкой и виртуальным чипом TPM.
Откройте настройки виртуальной машины, перейдите на вкладку «Дополнительно» и убедитесь, что виртуальная машина использует прошивку UEFI с включенными параметрами «Включить безопасную загрузку.

Затем вам нужно добавить виртуальный TPM для виртуальной машины (vTPM). Но сначала вам нужно будет зашифровать виртуальную машину VMware Workstation.
В разделе «Параметры» перейдите в раздел «Контроль доступа» и нажмите кнопку «Зашифровать». Установите пароль шифрования. Процесс шифрования займет некоторое время.
Затем перейдите на вкладку «Оборудование», нажмите кнопку «Добавить» и добавьте модуль Trusted Platform Module.
Теперь вы можете нормально установить Windows 11 на эту виртуальную машину.
Чтобы установить Windows 11 на виртуальную машину VMware ESXi в vSphere, вам необходимо добавить виртуальный доверенный платформенный модуль для виртуальной машины. Но сначала вам нужно настроить сервер управления ключами (поставщик ключей) для управления ключами шифрования.
Начиная с vSphere 7.0, интегрированный поставщик ключей поддерживается для vCenter, поэтому нет необходимости использовать внешний KMS. Чтобы включить поставщика ключей, встроенного в vCenter:
- Выберите свой vCenter и перейдите в Configure -> Security -> Key Provider;
- Нажмите «Добавить» -> «Добавить поставщика собственных ключей;
- Укажите имя поставщика и отключите параметр «Использовать поставщик ключей только для хостов ESXi, защищенных TPM». Это позволит вам использовать vTPM для хостов без физического чипа TPM;
- Затем вам нужно будет создать резервную копию вашего поставщика ключей. Нажмите кнопку РЕЗЕРВНОЕ КОПИРОВАНИЕ и загрузите файл .p12, который хотите сохранить в надежном месте.
Чтобы включить vTPM для виртуальной машины в VMware ESXi, она должна соответствовать следующим требованиям:
- vSphere 6.7 или новее (бесплатный гипервизор VMware использовать нельзя)
- Аппаратное обеспечение ВМ версии 14 (ESXi 6.7) и новее
- EFI и безопасная загрузка
- Шифрование виртуальной машины
- Включен параметр безопасности на основе виртуализации Windows в настройках виртуальной машины
Убедитесь, что все параметры виртуальной машины настроены и вы можете зашифровать свой диск виртуальной машины.
Чтобы зашифровать существующую виртуальную машину, перейдите на вкладку «Параметры виртуальной машины» и включите шифрование диска в разделе «Шифрование.
Затем на вкладке «Виртуальное оборудование» вы можете добавить «Добавить новое устройство» -> «Надежный платформенный модуль» и выполнить обычную установку Windows 11 на этой виртуальной машине.
Ниже приведен пример установки Windows 11 на виртуальную машину Hyper-V.
Источник изображения: winitpro.ru

Well, are you all excited to run Windows 11 now that it is released a day early? Your excitement may be quickly stifled by an error message that you may receive – This PC can’t run Windows 11. After I had run Windows 11 preview builds inside my VMware Workstation environment without issue, downloading the GA ISO, was a different experience. Let’s take a look at this PC can’t run Windows 11 in VMware Workstation and see the resolution.
Let’s first take a look at the symptom of the issue you might see in VMware Workstation. This is a screenshot from my newly created VM that I set to use UEFI and secure boot, which I assumed would be enough inside the virtual environment for Windows 11. However, notice the following error screen after I chose the edition I wanted to install.
As we have all no doubt heard rumblings of requirements from Microsoft related to security and Trusted Platform Module, I assumed this was related to the TPM device missing from the virtual machine.
For posterity, this is a look at the way the VM was configured when I received the error message related to not being able to run. Note I have UEFI enabled and Enable secure boot. As a note, these are the settings that I have been using to install Windows 11 Preview builds up until this point in the same VMware Workstation environment.

Resolution – Add a Virtual Trusted Platform Module (vTPM) to your VM
The resolution to this issue in my case was adding a virtual trusted platform module (vTPM) to the virtual machine running inside of VMware Workstation. Before you can add the virtual trusted platform module (vTPM) to your virtual machine, you must first encrypt the VM before you can add the TPM module in VMware Workstation.
The process to encrypt your virtual hard disk for your Windows 11 virtual machine will of course depend on the size of the hard disk. The good thing is since we haven’t been able to install anything as of yet, there is no data essentially on the hard disk.
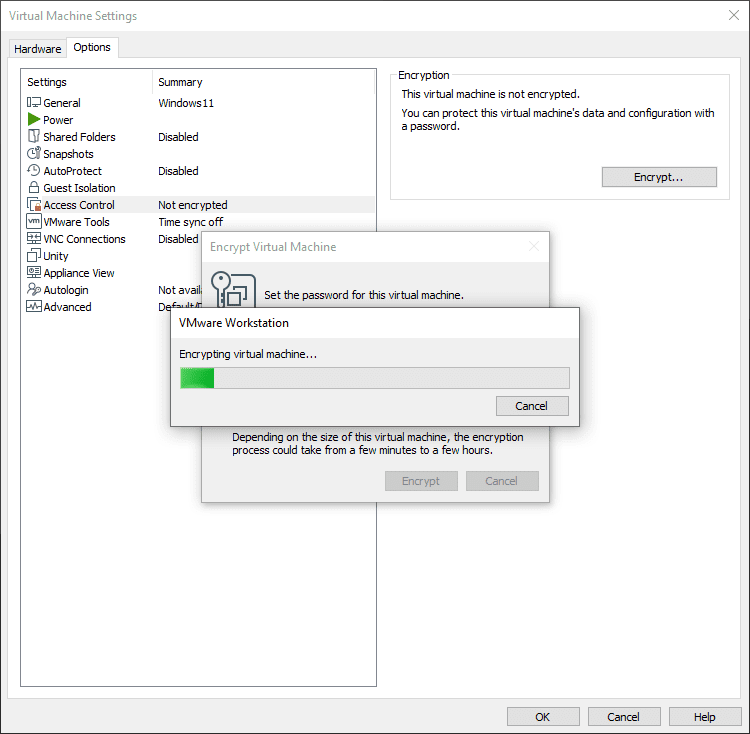
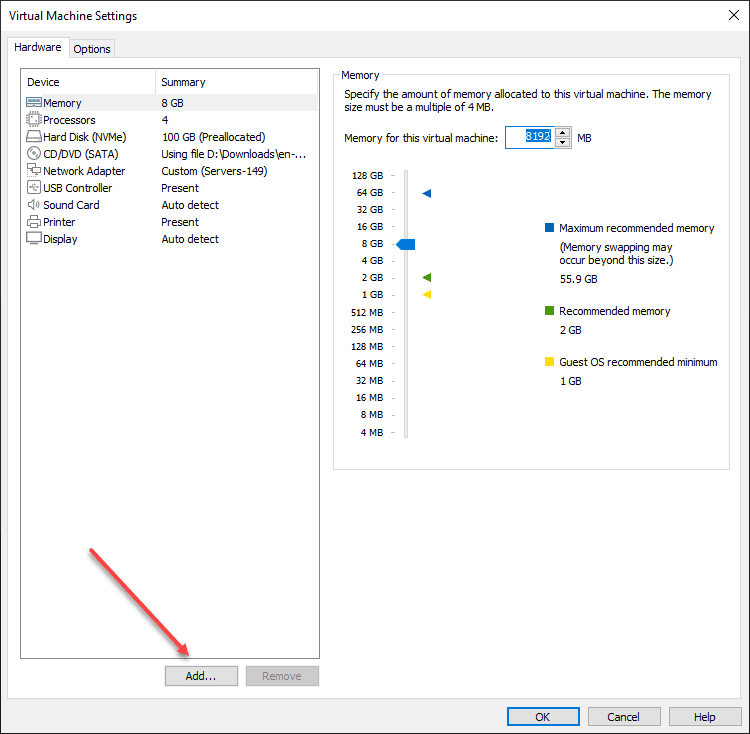
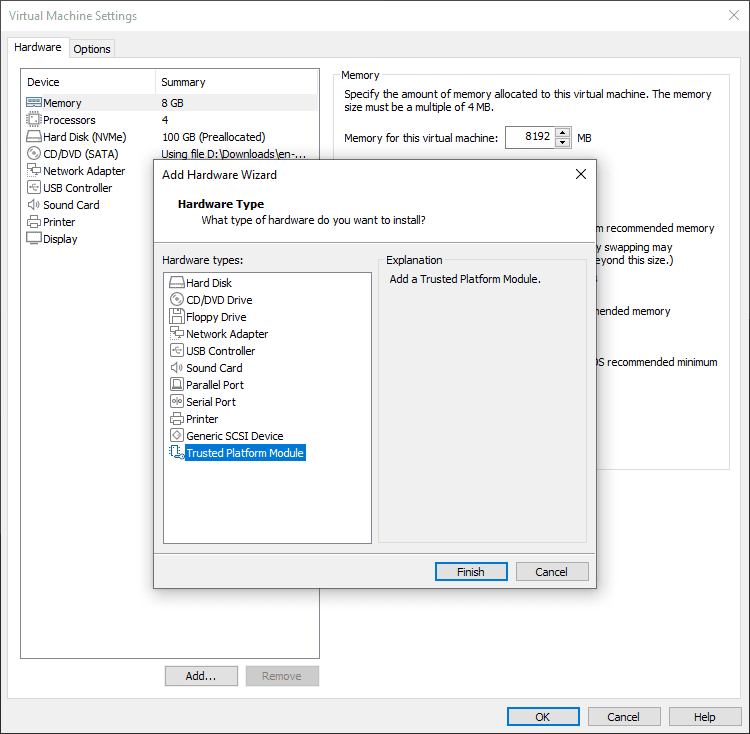
Once the encryption process completes successfully on the Windows 11 virtual machine, edit your virtual machine settings, navigate to Hardware and click Add to begin the process to add new hardware to the VM.
Select the Trusted Platform Module, then, click Finish.
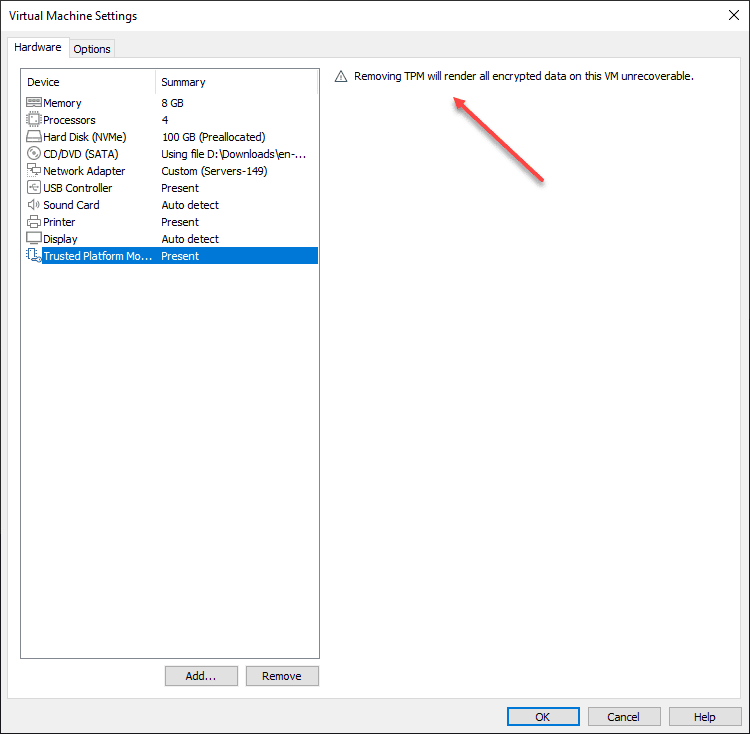
After adding the virtual trusted platform module (vTPM), you will see the warning to the right that Removing TPM will render all encrypted data on this VM unrecoverable. In other words, you are burning the encryption key if you remove the vTPM.
After adding the Trusted Platform Module to the Windows 11 virtual machine, I was now able to step through the install process, select the edition, and move forward with the installer.
Video showing the error installing Windows 11
Wrapping Up
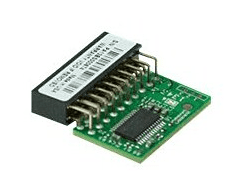
This is going to change things for many who may have lab environments and running VMware Workstation perhaps on older hardware that doesn’t have a Trusted Platform Module to make use of. The major motherboard manufacturers have add-in TPM chips available that can be used to retrofit a TPM module on boards that may not have come with one. An example is the one I found for Supermicro. I am using Supermicro servers in my lab currently that do not have TPM chips installed. However, as an example, you can find an add-in TPM 2.0 card here.
Upgrading to Windows 11 is going to be more of an investment for those without TPM 2.0 cards already installed. However, you should plan on this requirement ahead of time before getting in the middle of an upgrade or install that requires it.