TL;DR:
Q: Can Windows containers run on Linux?
A: No. They cannot.
Containers are using the underlying operating system resources and drivers, so Windows containers can run on Windows only, and Linux containers can run on Linux only.
Q: But what about Docker for Windows? Or other VM-based solutions?
A: Docker for Windows allows you to simulate running Linux containers on Windows, but under the hood a Linux VM is created, so still Linux containers are running on Linux, and Windows containers are running on Windows.
Bonus: Read this very nice article about running Linux docker containers on Windows.
Q: So, what should I do with a .NET Framework 462 application, if I would like to run in a container?
A: It depends. Consider the following recommendations:
-
If it is possible, move to .NET Core. Since .NET Core brings support to most major features of .NET Framework, and .NET Framework 4.8 will be the last version of .NET framework
-
If you cannot migrate to .NET Core — As @Sebastian mentioned — you can convert your libraries to .NET Standard, and have two versions of the application — one on .NET Framework 4.6.2, and one on .NET Core — it is not always obvious. Visual Studio supports it pretty well (with multi-targeting), but some dependencies can require extra care.
-
(Less recommended) In some cases, you can run Windows containers. Windows containers are becoming more and more mature, with better support in platforms like Kubernetes. But to be able to run .NET Framework code, you still need to run on base image of «Server Core», which occupies about 1.4 GB. In same rare cases, you can migrate your code to .NET Core, but still run on Windows Nano server, with an image size of 95 MB.
Leaving also the old updates for history
Update 2: 08.2018
If you are using Docker-for-Windows, you can run now both Windows and Linux containers simultaneously: Running Docker Windows and Linux Containers Simultaneously
Bonus: Not directly related to the question, but you can now run not only the Linux container itself, but also an orchestrator like Kubernetes: Kubernetes is Now Available In Docker Desktop Stable Channel
Updated at 2018:
Original answer in general is right, BUT several months ago, Docker added experimental feature LCOW (official GitHub repository).
From this post:
Doesn’t Docker for Windows already run Linux containers? That’s right.
Docker for Windows can run Linux or Windows containers, with support
for Linux containers via a Hyper-V Moby Linux VM (as of Docker for
Windows 17.10 this VM is based on LinuxKit).The setup for running Linux containers with LCOW is a lot simpler than
the previous architecture where a Hyper-V Linux VM runs a Linux Docker
daemon, along with all your containers. With LCOW, the Docker daemon
runs as a Windows process (same as when running Docker Windows
containers), and every time you start a Linux container Docker
launches a minimal Hyper-V hypervisor running a VM with a Linux
kernel, runc and the container processes running on top.Because there’s only one Docker daemon, and because that daemon now
runs on Windows, it will soon be possible to run Windows and Linux
Docker containers side-by-side, in the same networking namespace. This
will unlock a lot of exciting development and production scenarios for
Docker users on Windows.
Original:
As mentioned in comments by @PanagiotisKanavos, containers are not for virtualization, and they are using the resources of the host machine. As a result, for now a Windows container cannot run «as-is» on a Linux machine.
But — you can do it by using VM — as it works on Windows. You can install a Windows VM on your Linux host, which will allow to run Windows containers.
With it, IMHO running it this way in a production environment will not be the best idea.
Also, this answer provides more details.
Здравствуй, Хабр.
Хочу поделиться с миром достаточно нетипичной, по крайней мере для меня, задачкой и её решением, которое мне кажется вполне приемлемым. Описанное ниже, возможно, не является идеальным выходом из ситуации, но это работает, и работает так, как задумывалось.
Завязка и предпосылки
Появилась по работе задача: нужно на сайт вынести 3D-превьюшки BIM-моделей разного оборудования, материалов, объектов. Нужно что-то легковесное, несложное.
На сайте модели этих объектов хранятся и доступны для скачивания в проприетарных форматах различных САПР и в виде открытых форматов 3D-моделей. Среди них есть и формат IFC. Его-то я и буду использовать, как исходник для решения этого задания.
Один из вариантов исполнения и его особенности
Формально можно было бы ограничиться написанием какого-нибудь конвертера *.ifc во что-то для отображения на web-странице. С этого я и начал.
Для подобного преобразования был избран замечательный тулкит — xBIM Toolkit.
В примерах использования этого инструмента просто и доходчиво описано, как работать с IFC и специализированным для web-форматом *.wexBIM.
Сначала конвертируем *.ifc в *.wexBIM:
using System.IO;
using Xbim.Ifc;
using Xbim.ModelGeometry.Scene;

namespace CreateWexBIM
{
    class Program
    {
        public static void Main()
        {
            const string fileName = "SampleHouse.ifc";
            using (var model = IfcStore.Open(fileName))
            {
                var context = new Xbim3DModelContext(model);
                context.CreateContext();

                var wexBimFilename = Path.ChangeExtension(fileName, "wexBIM");
                using (var wexBiMfile = File.Create(wexBimFilename))
                {
                    using (var wexBimBinaryWriter = new BinaryWriter(wexBiMfile))
                    {
                        model.SaveAsWexBim(wexBimBinaryWriter);
                        wexBimBinaryWriter.Close();
                    }
                    wexBiMfile.Close();
                }
            }
        }
    }
}
Далее полученный файл используется в «плеере» xBIM WeXplorer.
Пример встраивания *.wexBIM в страницу:
<!DOCTYPE html>
<html xmlns="http://www.w3.org/1999/xhtml">
<head>
    <title>Hello building!</title>
    <script src="js/xbim-viewer.debug.bundle.js"></script>
</head>
<body>
    <div id="content">
        <canvas id="viewer" width="500" height="300"></canvas>
        <script type="text/javascript">
            var viewer = new xViewer('viewer');
            viewer.load('data/SampleHouse.wexbim');
            viewer.start();
        </script>
    </div>
</body>
</html>
Что ж, поехали. Беру nuget’ы от xBIM. Пишу консольное приложение, которое на вход принимает пачку путей к *.ifc-файлам, рядом с ними складывает пачку *.wexBIM-файлов. Всё, можно выкладывать на сайт.
Но как-то это простенько… Хочется, чтобы эта программа стала неким сервисом, который по событию загрузки *.ifc на портал, сразу создаёт необходимый *.wexBIM, и он сразу отображается в подготовленном контейнере.
Ок, формирую новые требования:
- пусть задания на конвертацию приходят от нашего RabbitMQ;
- сами задания хочу видеть в виде бинарного сообщения, которое на самом деле будет готовым для десериализации классом, описанным в protobuf-файле;
- задание будет содержать ссылку для скачивания исходного *.ifc-файла с нашего Minio;
- задание также будет сообщать мне, в какой bucket в Minio складывать результат;
- пусть само приложение будет собрано под .net core 3.1 и работет внутри Linux docker-контейнера на нашей «docker-ферме»;
Первые сложности и условности
Описывать подробно первые 4 пункта реализации не стану. Возможно позже.
Заставил приложение слушать очередь заданий и отсылать сообщение с результатом в очередь из CorrelationId сообщения-задания. Прикрутил генерированные классы запрос/ответ из protobuf. Научил скачивать/загружать файлы в minio.
Всё это делаю в проекте консольного приложения. В настройках проекта:
<TargetFramework>netcoreapp3.1</TargetFramework>И на моей машине с Windows 10 всё вполне отлаживается и работает. Но при попытке запустить приложение в WSL ловлю ошибку System.IO.FileLoadException:
Полная информация по ошибке:
{
  "Type": "System.IO.FileLoadException",
  "Message": "Failed to load Xbim.Geometry.Engine64.dll",
  "TargetSite": "Void .ctor(Microsoft.Extensions.Logging.ILogger`1[Xbim.Geometry.Engine.Interop.XbimGeometryEngine])",
  "StackTrace": " at Xbim.Geometry.Engine.Interop.XbimGeometryEngine..ctor(ILogger`1 logger)rn at Xbim.Geometry.Engine.Interop.XbimGeometryEngine..ctor()rn at Xbim.ModelGeometry.Scene.Xbim3DModelContext.get_Engine()rn at Xbim.ModelGeometry.Scene.Xbim3DModelContext.CreateContext(ReportProgressDelegate progDelegate, Boolean adjustWcs)rn at My.Converter.ConvertIfc.CreateWebIfc(String ifcFileFullPath, String wexBIMFolder)",
  "Data": {},
  "InnerException": {
    "Type": "System.IO.FileNotFoundException",
    "Message": "Could not load file or assembly 'Xbim.Geometry.Engine.dll, Culture=neutral, PublicKeyToken=null'. The system cannot find the file specified.",
    "FileName": "Xbim.Geometry.Engine.dll, Culture=neutral, PublicKeyToken=null",
    "FusionLog": "",
    "TargetSite": "System.Reflection.RuntimeAssembly nLoad(System.Reflection.AssemblyName, System.String, System.Reflection.RuntimeAssembly, System.Threading.StackCrawlMark ByRef, Boolean, System.Runtime.Loader.AssemblyLoadContext)",
    "StackTrace": " at System.Reflection.RuntimeAssembly.nLoad(AssemblyName fileName, String codeBase, RuntimeAssembly assemblyContext, StackCrawlMark& stackMark, Boolean throwOnFileNotFound, AssemblyLoadContext assemblyLoadContext)rn at System.Reflection.RuntimeAssembly.InternalLoadAssemblyName(AssemblyName assemblyRef, StackCrawlMark& stackMark, AssemblyLoadContext assemblyLoadContext)rn at System.Reflection.Assembly.Load(String assemblyString)rn at Xbim.Geometry.Engine.Interop.XbimGeometryEngine..ctor(ILogger`1 logger)",
    "Data": {},
    "Source": "System.Private.CoreLib",
    "HResult": -2147024894
  },
  "Source": "Xbim.Geometry.Engine.Interop",
  "HResult": -2146232799
}
Сеанс активного гугления и вдумчивого чтения показал мне, что я крайне невнимателен:
Recently at work, we were evaluating a few options to render building models in the browser. Building Information Modeling (BIM) in interoperability scenarios is done via Industry Foundation Classes, mostly in the STEP Physical File format. The schema is quite huge and complex with all the things you have to consider, so we were glad to find the xBim open source project on GitHub. They’ve got both projects to visualize building models in the browser with WebGL as well as conversion tools to create the binary-formatted geometry mesh. To achieve that, native C++ libraries are dynamically loaded (so no .Net Core compatibility) which must be present in the bin folder. The C++ libraries are expected either in the same folder as the application binaries or in a x64 (or x86, respectively) sub folder (See here for more details). In regular projects, the xBim.Geometry NuGet package adds a build task to copy the dlls into the build output folder, but this doesn’t work with the new tooling. You can, however, get it to work in Visual Studio 2015 by taking care of supplying the interop dlls yourself.
И подобные трудности не у одного меня. Многим хочется xBIM под .Net Core.
Не критично, но многое меняет… Всё упирается в невозможность нормально загрузить Xbim.Geometry.Engine64.dll. Нужно иметь на машине vc_redist.x64.exe. Какие у меня варианты?
Первое, что подумалось: «А может виндовый контейнер с полным .Net Framework использовать?
Доставить Microsoft Visual C++ Redistributable for Visual Studio 2015, 2017 and 2019 в этот контейнер, и всё будет ок?» Я это попробовал:
Испытательный Windows-образ для docker:
Сменил .Net Core на:
<TargetFramework>net47</TargetFramework>Dockerfile:
FROM microsoft/dotnet-framework:4.7
WORKDIR /bimlibconverter
COPY lib/VC_redist.x64.exe /VC_redist.x64.exe
RUN C:VC_redist.x64.exe /quiet /install
COPY bin/Release .
ENTRYPOINT ["MyConverter.exe"]
Что ж, это сработало… It’s alive! Но. А как же наша хостовая Linux-машина с docker? Не получится на неё загнать контейнер с образом на Windows Server Core. Надо выкручиваться…
Компромисс и развязка
Очередной поиск в Сети вывел меня на статью. В ней автор требует от реализации похожего:
To make things worse:
All binaries are 32-bits (x86).
Some require visual C++ redistributable runtime components.
Some require the .NET runtime.
Some need a windowing system, even though we only use the command-line interface (CLI).
В посте описывается потенциальная возможность запуска Windows-приложений в wine в Linux-контейнере. Любопытно, решил я.
После некоторых проб, багов и дополнений был получен Dockerfile:
Docker образ на основе Ubuntu с Wine, .Net Framework и vcredist на борту:
FROM ubuntu:latest
#Добавляем поддержку x86
RUN dpkg --add-architecture i386
    && apt-get update
    #Ставим некоторые необходимые пакеты
    && apt-get install -qfy --install-recommends
        software-properties-common
        gnupg2
        wget
        xvfb
        cabextract
    #Добавляем репозитарий Wine
    && wget -nv https://dl.winehq.org/wine-builds/winehq.key
    && apt-key add winehq.key
    && apt-add-repository 'deb https://dl.winehq.org/wine-builds/ubuntu/ bionic main'
    #Дополнительный репозитарий для корректной установки Wine
    && add-apt-repository ppa:cybermax-dexter/sdl2-backport
    #Ставим сам Wine
    && apt-get install -qfy --install-recommends
        winehq-staging
        winbind
    #Подчищаем лишнее
    && apt-get -y clean
    && rm -rf
      /var/lib/apt/lists/*
      /usr/share/doc
      /usr/share/doc-base
      /usr/share/man
      /usr/share/locale
      /usr/share/zoneinfo
#Переменные окружения для старта Wine
ENV WINEDEBUG=fixme-all
ENV WINEPREFIX=/root/.net
ENV WINEARCH=win64
#Пуск конфигурирования Wine
RUN winecfg
    #Скачиваем winetricks, без них .Net Framework не заведётся
    && wget https://raw.githubusercontent.com/Winetricks/winetricks/master/src/winetricks
    -O /usr/local/bin/winetricks
    && chmod +x /usr/local/bin/winetricks
#Подчищаем лишнее
    && apt-get -y clean
    && rm -rf
      /var/lib/apt/lists/*
      /usr/share/doc
      /usr/share/doc-base
      /usr/share/man
      /usr/share/locale
      /usr/share/zoneinfo
    #Запуск Wine с необходимыми дополнениями
    && wineboot -u && winetricks -q dotnet472 && xvfb-run winetricks -q vcrun2015

WORKDIR /root/.net/drive_c/myconverter/

#Копируем наше приложение
COPY /bin/Release/ /root/.net/drive_c/myconverter/

ENTRYPOINT ["wine", "MyConverter.exe"]
UPD: немного изменил файл для сборки более компактного образа. Спасибо комментарию rueler
Build идёт небыстро, но заканчивается удачно. Пробую, проверяю. Работает!
Итоги, выводы, размышления
Это сработало. На выходе получаем Linux-образ для docker-контейнера. Он «пухловат» (~5.2Гб), но вполне быстро стартует и внутри работает консольное Windows-приложени на .Net Framework 4.7, которое слушает RabbitMQ, пишет логи в Graylog, скачивает и загружает файлы на/в Minio. Обновлять само приложение буду по remote docker API.
Решение утилитарной выделенной задачи реализовано. Возможно, и скорее всего, не универсальное. Но меня в принципе устроило. Может быть кому-то тоже пригодится.
Спасибо, что прочли. На Хабр пишу впервые. Увидимся в комментариях.
Нет, вы не можете запускать контейнеры Windows непосредственно в Linux. Но вы можете запустить Linux в Windows. Вы можете переключаться между контейнерами ОС Linux и Windows, щелкнув правой кнопкой мыши на докере в меню на панели задач. Контейнеры используют ядро ОС.
Могу ли я запустить Windows в контейнере Docker?
Компания Docker демон предоставляет каждому контейнеру все необходимые свойства уровня ядра, чтобы контейнерное приложение могло работать. … Рабочий стол Windows Docker поддерживает подсистему Linux; и в этом случае запущенный контейнер Linux может в конечном итоге работать в Windows.
Могу ли я запустить Windows 10 в Docker?
Docker работает на разных платформах и поддерживает выполнение на узле Windows, включая Windows 10 (Pro или Enterprise). Это делает Windows 10 идеальной средой разработки для сценариев использования Docker. Вдобавок к этому Windows также является единственной платформой, по крайней мере на данный момент, которая может запускать контейнеры на базе Windows и Linux.
Контейнеры работают в Linux?
Ты могу бегать и то и другое Linux и программы и исполняемые файлы Windows в Docker контейнеры. Платформа Docker изначально работает на Linux (на x86-64, ARM и многих других архитектурах ЦП) и в Windows (x86-64). Docker Inc. создает продукты, которые позволяют создавать и запускать контейнеры on Linux, Windows и macOS.
Что такое Kubernetes vs Docker?
Принципиальное различие между Kubernetes и Docker заключается в том, что Kubernetes предназначен для работы в кластере, в то время как Docker работает на одном узле.. Kubernetes более обширен, чем Docker Swarm, и предназначен для эффективной координации масштабных кластеров узлов в производственной среде.
Докер лучше Windows или Linux?
С технической точки зрения там нет реальной разницы между использованием Docker в Windows и Linux. Вы можете добиться того же с помощью Docker на обеих платформах. Не думаю, что можно сказать, что Windows или Linux «лучше» для размещения Docker.
Могут ли контейнеры Docker иметь другую ОС?
Нет. Докер использует контейнеризацию как основная технология, основанная на концепции совместного использования ядра между контейнерами. Если один образ Docker основан на ядре Windows, а другой — на ядре Linux, вы не сможете запустить эти два образа в одной ОС.
Требуется ли Hyper-V для Docker?
README для пользователей Docker Toolbox и Docker Machine: Microsoft Hyper-V требуется для запуска Docker Desktop. Установщик Docker Desktop для Windows при необходимости включает Hyper-V и перезагружает компьютер.
Докер лучше ВМ?
Хотя Docker и виртуальные машины имеют свои преимущества перед аппаратными устройствами, Docker — более эффективный из двух с точки зрения использования ресурсов.. Если бы две организации были полностью идентичны и использовали одно и то же оборудование, то компания, использующая Docker, могла бы поддерживать больше приложений.
Как узнать, работает ли Docker в Linux?
Независимый от операционной системы способ проверить, работает ли Docker, — это спросить Docker, используя команду docker info. Вы также можете использовать служебные программы операционной системы, такие как sudo systemctl is-active docker или sudo status docker или sudo service docker status, или проверить состояние службы с помощью утилит Windows.
Как контейнеры работают в Linux?
Контейнеры Linux работать изначально в операционной системе, разделяя его между всеми вашими контейнерами, чтобы ваши приложения и сервисы оставались легкими и быстро работали параллельно. Контейнеры Linux — это еще один эволюционный скачок в том, как мы разрабатываем, развертываем и управляем приложениями.
Как использовать контейнеры в Linux?
Как начать использовать контейнеры в Linux
- Установите LXC: sudo apt-get install lxc.
- Создайте контейнер: sudo lxc-create -t fedora -n fed-01.
- Перечислите свои контейнеры: sudo lxc-ls.
- Запустите контейнер: sudo lxc-start -d -n fed-01.
- Получите консоль для своего контейнера: sudo lxc-console -n fed-01.
A Step-by-Step Guide to Containerizing a Windows Virtual Machine — with RDP Access — on a Linux Docker Platform with KVM Hypervisor
Background
Recently, I was tasked with developing a PoC of a lab environment where students can access their pre-installed and pre-configured machines — Linux and Windows — to do necessary training exercises. I wanted to make the access to all machines uniform over HTTP/HTTPS (browser-based). While the web-based access to machines can easily be implemented using a platform like Guacamole, the greater challenge was how to deploy the machines in a way that utilizes system resources — particularly, CPU, RAM, and HDD — efficiently and with speed. It became evident by that point that technology like Docker containerization is the best way to go. However, that presented other challenges.
Each of Windows and Linux machines have their own containerization requirements — as will be discussed in the next section. Natively, one cannot run Linux and Windows containers simultaneously on the same Docker daemon. After some research, the solution that presented itself as the most viable was to install each Windows machine as a virtual machine inside a single Linux container. From the perspective of the Docker daemon, all containers are Linux-based. However, some of those containers run a hypervisor, and on top of which there is a Windows VM. Even though a container with a VM in it takes more disk space than other containers, the efficiency in saving disk space when we have many containerized VMs is still high compared to running un-containerized VMs.
Ultimately, I wanted to access a containerized Windows machine using RDP, and enjoy the full remote desktop access to that machine. Unfortunately, there are not satisfactory detailed tutorials and complete walkthroughs that explain the entire procedure easily and clearly. And I had to face many small challenges along the way. During my research, I have also seen many people — on various technical forums — struggling with such an implementation and expressing their frustration! I hope that this document serves as a complete guide to solving that problem.
Why Containerizing a VM: Our Use Case
You might be asking yourself why would someone want to install a VM inside a Container? It looks strange at first since the Container layer seems unnecessary and one can simply install the VM directly on the base OS. However, there are different reasons why this can be a solution and a necessary requirement.
Our particular use case involves spinning up multiple identical Windows VMs to be used by different users. Had we wanted a single VM only, then, there would not be any need to containerize it. But since we want to create many identical VMs, we will save tremendous resources (HDD, RAM, and CPU) by containerizing those VMs.
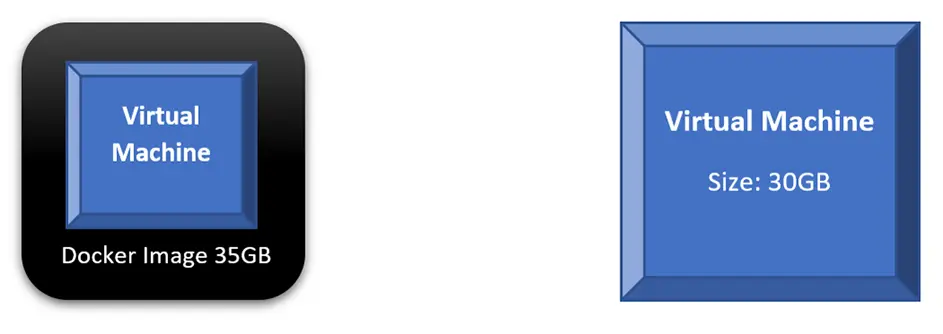
If we compare the scenario where we run a single VM directly on our base OS to a scenario of containerizing that VM, we will find out that both will consume similar disk space and other resources. In fact, every time we want to run the containerized VM, we will do two steps: run the container and then power on the VM. The following diagram shows those two scenarios; a direct VM occupies 30GB on the HDD, while the Docker Image occupies 35GB. Not much benefit — in terms of saving system resources — is achieved here.
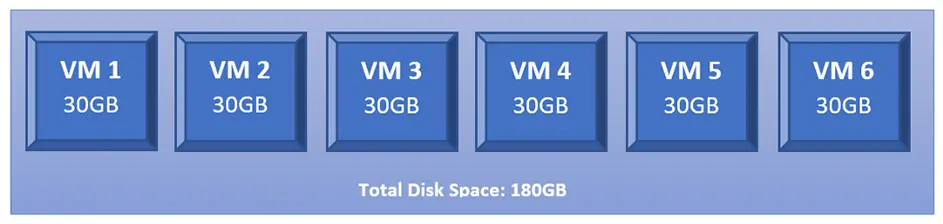
However, what happens if we want to run 6 copies of our intended VMs? We will have to create 6 copies of that VM where each occupies the same disk space as the original one. Thus, if the original VM is 30GB, having 6 copies will occupy 180GB on the HDD.
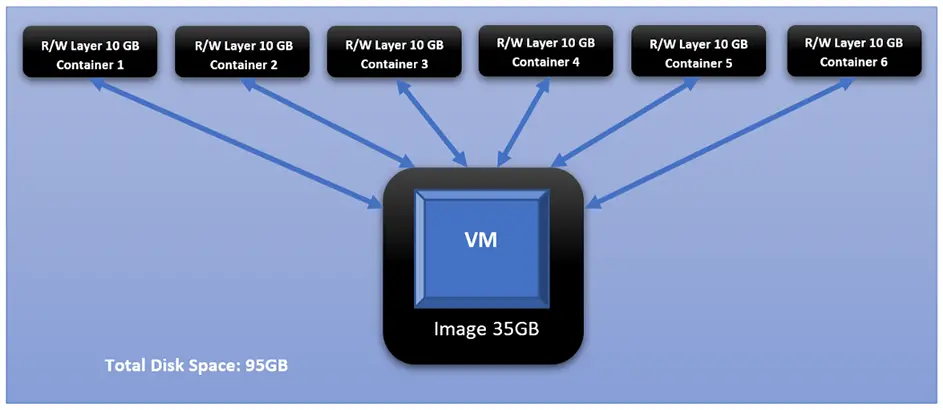
This changes dramatically when we containerize each of those identical VMs. This is the added value of Docker containerization technology. And it owes its value to how Docker differentiates between two main concepts: images and containers. Images are read-only and form the base of containers. Containers created from the same Image share the same read-only core (i.e., the image), while each container adds its own read-write layer that interacts with the read-only image. For more discussion on the difference between Images and Containers, please check this document: <click here>
If we take the 35GB Docker Image, in our example, and creates 6 Containers from it, each Container will create its own read-write layer through which will access the read-only image. At the time of creation, that R/W layer has 0 size; however, as the user starts interacting with the Container — doing things like powering on the VM — that layer’s size starts increasing. And if we assume that all dynamic changes in a single layer have accumulated size of 10GB, that means all 6 containers have added a total of 60BG on top of the original 35GB of the image.
Challenges
Challenge 1 Windows containers on Windows platform, and Linux containers on Linux platform
One of the biggest obstacles you face with Docker, and containerization in general, is that you cannot have Linux and Windows containers running simultaneously on the same platform (i.e., same Docker daemon). The reason for this is that Docker is an OS-Level Virtualization; meaning, its main function is to contain and isolate applications as they run on an Operating System. The Docker daemon provides each container with any necessary kernel-level properties so that the containerized application can run. Because of that, containers running Linux services/applications need to run on a Linux platform, and containers running Windows services/applications need to run on a Windows platform.
The Windows Docker Desktop has the feature of providing a Linux Subsystem; and in this case, running a Linux container can ultimately run on Windows. However, we should note that if this feature is enabled, only Linux containers can run while Windows containers cannot. One has to switch off this feature to run Windows containers; and in this scenario, Linux containers cannot run. It is still not possible to run both Linux and Windows containers simultaneously on the same platform.
If one needs to have Linux and Windows containers running simultaneously and communicating with others, a possible solution is to have each group run on their respective platform, then, configure the network routing, NAT, and port-forwarding rules.
Challenge 2 Windows Docker containers cannot be accessed through RDP or VNC, i.e., no graphical desktop
Even if we decided to have two separate platforms — Windows platform for Windows containers, and Linux platform for Linux containers — with appropriate network configuration, we will face the challenge that Windows containers cannot have a desktop environment. This is a fact for all Windows containers. They are designed and built to run services and applications, and they can be accessed using PowerShell/CMD command-line interface.
Unlike the Linux system where the Desktop environment is an installable service, Windows Desktop comes bundled directly with the OS as shipped by Microsoft. And when it comes to Windows-based containers, Microsoft has published certain images (known as base images) which form the base of any Windows container. Those base images do not come up with a Desktop service, and one does not have the luxury to install it later as an add-on.
For more information about Windows containers/images, <Click Here>
Architecture Overview
Our ultimate goal here is to have a fully running Windows OS, accessible through RDP, and containerized and managed by Docker daemon. And to achieve that, we will have the following:
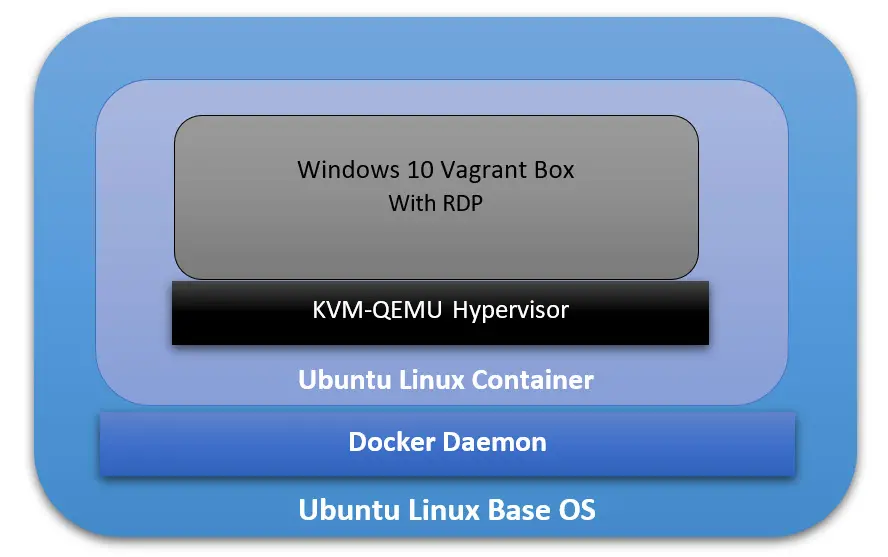
- The Base Operating System: it will be the main platform hosting everything else. In our particular example, it will be an Ubuntu 18.04 Linux machine.
- The Docker Daemon: this is the containerization platform installed on the Base OS. Through Docker, we will create our final “image” out of which we will spawn many containers.
- A Docker Image with an Operating System: This OS will be part of every created container, and its main function is to run a hypervisor on which the Windows VM will be running. In our case here, we will use the Ubuntu:18.04 Docker Image (available on Docker Hub).
- A Hypervisor on the Docker Image: Inside the Ubuntu Docker Image, we will also have a Hypervisor that will allow us to install the Windows VM later. In our particular case, we will use the KVM-QEMU hypervisor.
- The Windows Virtual Machine: this is the machine we are going to access at the end through RDP. In our example, we will use a pre-packaged Windows 10 Vagrant Box available at (https://app.vagrantup.com/peru/boxes/windows-10-enterprise-x64-eval)
Installing Docker on the Main Platform
The first thing we need to do is to install Docker into our main Operating System. For the sake of this tutorial, our main system is Ubuntu 20.04 (Linux Kernel 5.4.0–40-generic) with 70GB HDD, 4GB RAM, and 2 CPU Cores.
Follow the following steps to install Docker:
[1] Update the apt package index and install packages to allow apt to use a repository over HTTPS:
sudo apt-get update

sudo apt-get install apt-transport-https ca-certificates curl gnupg-agent software-properties-common
[2] Add Docker’s official GPG key:
curl -fSSL https://download.docker.com/linux/ubuntu/gpg | sudo apt-key add

sudo apt-key fingerprint 0EBFCD88
[3] Set up the stable Docker’s repository:
sudo add-apt-repository "deb [arch=amd64] https://download.docker.com/linux/ubuntu $(lsb_release -cs) stable"sudo apt updateNote: This is an important step after adding the new repository in Step 3.
[5] Install the latest version of Docker Engine:
sudo apt install docker-ce -yNote: You don’t need to install docker-ce-cli or containerd.io packages since they are installed directly with the docker-ce package.
[6] Start Docker now and configure it to automatically start after a reboot:
sudo systemctl start docker

sudo systemctl enable docker
Building the Right Docker Image
Now that Docker is installed, we can start building the image that will be the base for our Container on which we will have the VM. The first section below explains how to build this image manually without using a Dockerfile. Then, in the second section, I will explain how to automate building the image using a Dockerfile.
However, before building the image, we need to check if our system supports virtualization. Since our Container will run a hypervisor, it will not work unless the main platform supports virtualization. Otherwise, we will face an error later on when trying to install the VM. We can run the following command:
sudo egrep -c '(vmx|svm)' /proc/cpuinfoIf the output is a number greater than 0, then, you are good to proceed further. Otherwise, you need to make sure virtualization (VT-x) is enabled in the BIOS settings. If your main platform is itself a virtual machine, make sure VT-x is enabled through the virtualization software.
- Enable VT-x in VMWare Workstation
- Enable VT-x in Virtualbox
Building the Image without a Dockerfile
[1] Pull the core Docker image ubuntu:18.04:
sudo docker pull ubuntu:18.04Note: to verify that the image has been added successfully, issue the following command:
sudo docker image ls
[2] Run a Container (with the name ubuntukvm) from the Image ubuntu:18:04 with some privileged parameters:
sudo docker run --privileged -it --name ubuntukvm --device=/dev/kvm --device=/dev/net/tun -v /sys/fs/cgroup:/sys/fs/cgroup:rw --cap-add=NET_ADMIN --cap-add=SYS_ADMIN ubuntu:18.04 /bin/bashSince we will install a hypervisor (QEMU-KVM) in this container, we need to run it with certain parameters as follows:
— device=/dev/kvm will map the device /dev/kvm in the main OS inside the Container.
— device=/dev/net/tun will map the device /dev/net/tun in the main OS inside the Container.
—v /sys/fs/cgroup:/sys/fs/cgroup:rw will map the directory /sys/fs/cgroup in the main OS inside the Container, and the Container will have read-write permissions on that directory.
— cap-add=NET_ADMIN will add network admin capabilities to the Container.
— cap-add=SYS_ADMIN will add system admin capabilities to the Container.
Once the command runs successfully, you should be inside the Container with a shell prompt:
root@<container_id>:/#[3] Inside the Container, update the apt package index:
root@<container_id>:/# apt-get update -y[4] Inside the Container, install the hypervisor package QEMU-KVM and Libvirt:
root@<container_id>:/# apt-get install -y qemu-kvm libvirt-daemon-system libvirt-devYou don’t have to install libvirt-clients and bridge-utils as they would already be installed along with libvirt-daemon-sys.
The libvirt-dev is an important package specially to run Vagrant Boxes on.
[5] Change group ownership of /dev/kvm:
root@<container_id>:/# chown root:kvm /dev/kvmNote: the device /dev/kvm must be owned by the group kvm, and any user who needs to run VMs needs to be part of the kvm group.
[6] Start the Libvirt services:
root@<container_id>:/# service libvirtd start

root@<container_id>:/# service virtlogd start
[7] Install the Linux Image package which contains any necessary Kernel modules:
root@<container_id>:/# apt-get install -y linux-image-$(uname -r)Note: this is an important step. There are certain modules (e.g., ip_tables and ip6_tables) that are needed at a later stage; and if they are missing, an error message would be generated.
[8] Install the curl package (it is used to download the Vagrant application):
root@<container_id>:/# apt-get install curl -y[9] Install the net-tools package (it provides ipconfig utility):
root@<container_id>:/# apt-get install net-tools -y[10] Download and run the latest version Vagrant application:
root@<container_id>:/# apt-get install jq -y

root@<container_id>:/# vagrant_latest_version=$(curl -s https://checkpoint-api.hashicorp.com/v1/check/vagrant  | jq -r -M '.current_version')

root@<container_id>:/# echo $vagrant_latest_version

root@<container_id>:/# curl -O https://releases.hashicorp.com/vagrant/$(echo $vagrant_latest_version)/vagrant_$(echo $vagrant_latest_version)_x86_64.deb

root@<container_id>:/# dpkg -i vagrant_$(echo $vagrant_latest_version)_x86_64.deb
Note 1: The above commands perform the following actions:
— Install the JSON Query parser tool, jq, which will be used in the next command.
— Get the Vagrant latest version value and store it in the environment variable vagrant_latest_version.
— Download the latest version of Vagrant package.
— Install the downloaded Vagrant package.
Note 2: It is very important and critical that you download and install Vagrant in this method. Do NOT get it from the Ubuntu repository (or any other Linux repositories, like Red Hat’s) using the command apt-get install vagrant. The reason for this is that the WinRM library is not shipped with Vagrant packages provided by Linux distribution and is shipped natively with the official package. WinRM library is needed to run Windows Vagrant boxes.
[11] Install the Vagrant Libvirt plugin:
root@<container_id>:/# vagrant plugin install vagrant-libvirt[12] Download and install Windows10 Vagrant box:
root@<container_id>:/# mkdir /win10

root@<container_id>:/# cd /win10

root@<container_id>:/win10# vagrant init peru/windows-10-enterprise-x64-eval

root@<container_id>:/win10# VAGRANT_DEFAULT_PROVIDER=libvirt vagrant up
the vagrant init command will download a Vagrantfile which contains the instructions fof building the Vagrant box.
the vagrant up command will build the box. Please note that this command takes some time. The particular Vagrant box we are downloading here (peru/windows-10-enterprise-x64-eval) has a size of 5.62 GB.
once the above command finishes execution, type the following command which will attempt to access the box over RDP. Even though it will fail (since there is no RDP client installed in the Container), we will get the IP address of the Vagrant box:
root@< container_id >:/win10# vagrant rdp==> default: Detecting RDP info…
 default: Address: 192.168.121.68:3389
 default: Username: vagrant
==> default: Vagrant will now launch your RDP client with the connection parameters
==> default: above. If the connection fails, verify that the information above is
==> default: correct. Additionally, make sure the RDP server is configured and
==> default: running in the guest machine (it is disabled by default on Windows).
==> default: Also, verify that the firewall is open to allow RDP connections.
An appropriate RDP client was not found. Vagrant requires either
`xfreerdp` or `rdesktop` in order to connect via RDP to the Vagrant
environment. Please ensure one of these applications is installed and
available on the path and try again.
[13] Set up iptables port forwarding rules:
If you want to access the RDP port on the Vagrant box from out the Container, this is an important step. By default, the Vagrant application configures firewall rules to allow access only from within the Container to the Vagrant box and vice versa. Machines outside the Container do not have any access to the Vagrant box. We would like to set up the rules in such a way to allow our main OS (Ubuntu) to access the Vagrant box on RDP. The following diagram logically illustrates this:

Add the following rules to NAT/Port Forward connections from the main OS to the container on port 3389 to be forwarded to the Vagrant Box on port 3389:
root@<container_id>:/# iptables -A FORWARD -i eth0 -o virbr1 -p tcp --syn --dport 3389 -m conntrack --ctstate NEW -j ACCEPT

root@<container_id>:/# iptables -A FORWARD -i eth0 -o virbr1 -m conntrack --ctstate ESTABLISHED,RELATED -j ACCEPT

root@<container_id>:/# iptables -A FORWARD -i virbr1 -o eth0 -m conntrack --ctstate ESTABLISHED,RELATED -j ACCEPT

root@<container_id>:/# iptables -t nat -A PREROUTING -i eth0 -p tcp --dport 3389 -j DNAT --to-destination 192.168.121.68

root@<container_id>:/# iptables -t nat -A POSTROUTING -o virbr1 -p tcp --dport 3389 -d 192.168.121.68 -j SNAT --to-source 192.168.121.1
After that, we should remove the rules that reject all traffic to/from virb1 interface; these rules take precedent over our newly inserted rules:
root@<container_id>:/# iptables -D FORWARD -o virbr1 -j REJECT --reject-with icmp-port-unreachable

root@<container_id>:/# iptables -D FORWARD -i virbr1 -j REJECT --reject-with icmp-port-unreachable

root@<container_id>:/# iptables -D FORWARD -o virbr0 -j REJECT --reject-with icmp-port-unreachable

root@<container_id>:/# iptables -D FORWARD -i virbr0 -j REJECT --reject-with icmp-port-unreachable
if you mess up the iptables, or if the communication is problematic later, you may want to clear up all tables and then add the rules (mentioned above) on a clean slate. To clear the iptables, issue the following:
root@<container_id>:/# sudo iptables-save > $HOME/firewall.txt

root@<container_id>:/# sudo iptables -X

root@<container_id>:/# sudo iptables -t nat -F

root@<container_id>:/# sudo iptables -t nat -X

root@<container_id>:/# sudo iptables -t mangle -F

root@<container_id>:/# sudo iptables -t mangle -X

root@<container_id>:/# sudo iptables -P INPUT ACCEPT

root@<container_id>:/# sudo iptables -P FORWARD ACCEPT

root@<container_id>:/# sudo iptables -P OUTPUT ACCEPT
[14] Commit all Changes to Create a New Image:
Up to this point, we have a fully running Container with the desired Windows VM. However, we cannot transfer or store that Container. In addition, we cannot create multiple copies of this Container without going through all the steps we have done so far. For this reason, we need to commit the changes to a new Docker Image. The Image can be transferred or stored. Multiple Containers can be created — instantiated — almost immediately.
To commit the changes to a new Image, we need first to exit the Container:
root@<container_id>:/win10# exit

$ sudo docker ps -a
Take note of the Container ID; and then, issue the following command:
$ sudo docker commit <container_id> ubuntukvmNote 1: You can substitute the name “ubuntukvm” with any name you like. This will be the name of the new Image.
Building the Image Using a Dockerfile
Instead of building the Image in a manual way — as shown in the previous section, we can automate the whole process using a Dockerfile.
[1] Prepare the Dockerfile:
In a new directory, create a Dockerfile (with the name Dockerfile), and write the following commands in it. Mostly, they are the same commands we have executed individually in the previous section:
[2] Prepare a Startup Shell Script (startup.sh):
This file will be copied to the Image and will run automatically every time you instantiate a Container from that Image. The script will assign certain permissions and startup the necessary services. In addition, it will create the iptables rules that will port forward RDP traffic.
[3] Build the Container from the Docker file:
sudo chmod +x startup.sh

sudo docker build -t ubuntukvm:latest -f Dockerfile .
[4] Instantiate a Container and Run it:
sudo docker run --privileged -it --name kvmcontainer1 --device=/dev/kvm --device=/dev/net/tun -v /sys/fs/cgroup:/sys/fs/cgroup:rw --cap-add=NET_ADMIN --cap-add=SYS_ADMIN ubuntukvm bashTesting the RDP Access
By now, we should be able to access the RDP service on the Windows Vagrant box by connecting to the IP address of the Docker container. To test that port 3389/tcp (RDP) is reachable from the main OS, we will use a simple Nmap command.
First, if you are inside the Docker container, press Ctrl+p+q to put the Container in the background while running; this should return you to the main OS terminal prompt:
root@<container_id>:/win10# <Ctrl+p+q>

$ sudo nmap -Pn -p 3389 172.17.0.2
Next, we need to install an RDP client for Linux. A popular one is RDesktop:
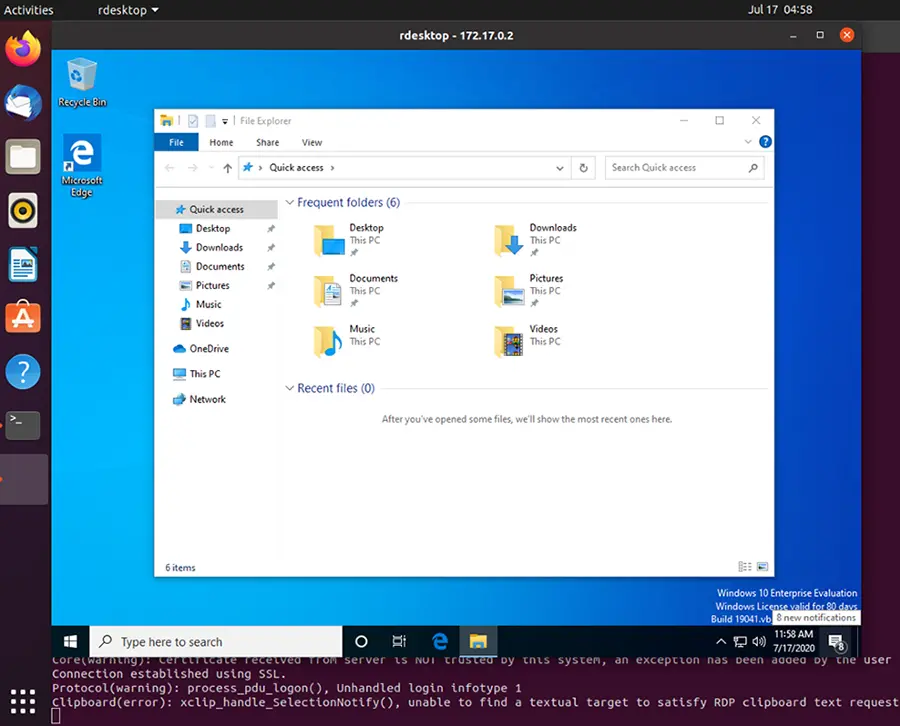
sudo apt-get install rdesktopFinally, we can access the Windows VM:
sudo rdesktop 172.17.0.2The Windows Vagrant box that we have installed has two built-in accounts:
- Username: vagrant Password: vagrant
- Username: Administrator Password: vagrant
Conclusion
I hope this post has been a comprehensive guide to containerize a virtual machine. There are different advantages of running a VM in a Container; one of them is running multiple Containers simultaneously. You can automatically build the desired image using a Dockerfile, or you can build it manually by running each command individually. We have covered both ways in this post.
(Before I waste any of your time, let me start by warning that this post was done using the nVidia gpu that’s on my system. Unfortunately I don’t have (yet) the means (nor time) to properly test this with an AMD or even Intel GPU.)

Well …
Nowadays this isn’t exactly true…
Nor this solution is the best.
But as I said in my profile, I’m just curious.
Things have evolved, tools like lutris or even steam’s proton are providing easier and faster ways of playing games that do not have native linux ports.
I have tried both and things just work. It’s a fact. And I was able to play the ( supported ) games I wanted without big effort:
- With Lutris, I just had to go to the site and pull the pre-configured installer for the game I wanted and let it work it’s magic.
- With Steam Proton, I just had to download the game and play it.
- With Wine itself, either installed by my distro package manager or compiled from source.
All of those, as I stated before just work perfectly (one way or another). But curiosity was still nagging: «Can I just have a container with all that stuff installed and not have all those dependencies dangling on my system?»
In fact, that question always comes back to me once in a while, when I think about how many stuff I have installed on my system and how many I really need on a daily basis. Even further, what will I miss when I change or need to reinstall my distro.
With that in mind, I started to experiment with containers. Even if only to test newer wine versions on a more or less clean way, because I’ve already upgraded to a newer version that unfortunately was broken, and had to reinstall the previous working version packages.
So, I decided to build things up from a Ubuntu Focal container and split in two containers:
- My base container based on Ubuntu having only the nVidia drivers installed
- My actual wine container with all the dependencies for the games.
I went for this approach since gpu drivers don’t come out that often (unfortunately) and I can also have a base image to work with.
Before going into more detail, if you notice anything unusual with the Dockerfiles is because this build system is prepared to be used with Makefiles. But they also can be built normally with the traditional docker build cmd. The defaults can be overridden with —build-arg flags.
Also, make sure the driver version you have installed on your host are the same as the drivers installed inside the container.
Base container
ARG UBUNTU_VERSION=focal
ARG NVIDIA_DRIVER_VERSION=450
FROM ubuntu:$UBUNTU_VERSION

ARG UBUNTU_VERSION
ARG NVIDIA_DRIVER_VERSION

ENV DEBIAN_FRONTEND=noninteractive
ENV UBUNTU_VERSION=$UBUNTU_VERSION
ENV NVIDIA_DRIVER_VERSION=$NVIDIA_DRIVER_VERSION

ENV PKGNV="nvidia-driver-${NVIDIA_DRIVER_VERSION} libnvidia-gl-${NVIDIA_DRIVER_VERSION}:i386"
ENV PKGVK="libvulkan1 libvulkan1:i386 vulkan-tools vulkan-utils"


RUN     dpkg --add-architecture i386 &&
    apt update &&
    apt install -y gnupg2 apt-transport-https curl

RUN apt install -y $PKGNV $PKGVK
So, this is the first container, based on a ubuntu focal version and nvidia drivers 450 (by default), vulkan and a few base tools to be used later. I will refer to it for the next steps as ubuntu-nvidia-vlk:focal.
Wine container
FROM ubuntu-nvidia-vlk:focal

ARG WVERSION="5.17"
ARG WTVERSION="20200412"

ENV WINE_VERSION="${WVERSION}"
ENV PKG_WINE_VERSION="${WVERSION}~${UBUNTU_VERSION}"
ENV WINE_TRICKS_VERSION="${WTVERSION}"

RUN curl -s https://dl.winehq.org/wine-builds/winehq.key | apt-key add - &&
    echo "deb https://dl.winehq.org/wine-builds/ubuntu/ ${UBUNTU_VERSION} main" | tee /etc/apt/sources.list.d/wine.list &&
    apt update &&
    apt install -y winbind cabextract wget fonts-wine ttf-mscorefonts-installer
        winehq-staging=$PKG_WINE_VERSION
        wine-staging=$PKG_WINE_VERSION
        wine-staging-i386=$PKG_WINE_VERSION
        wine-staging-amd64=$PKG_WINE_VERSION

ADD https://github.com/Winetricks/winetricks/archive/${WINE_TRICKS_VERSION}.zip /tmp/wt.zip
RUN unzip /tmp/wt.zip -d /tmp/ &&
    cp /tmp/winetricks-${WINE_TRICKS_VERSION}/src/winetricks /usr/local/bin &&
    rm -Rf /tmp/*
And we can call this our winehq:5.17 container.
So, we have a base container and a wine container.
Since most of the games will ask for winbind and cabextract I’ve decided to put those together with wine. Also, some font packages since they’re used a lot by launchers/loaders.
I guess I could have another stage just for those needed packages, but I didn’t have the time yet to figure out the best stage to put them.
So now we only need to create a script to use the containers to avoid having to memorize a huge command line.
At this point, we could also add dxvk to our container by adding this lines to the dockerfile
ARG DXVKVERSION="1.7.1"
ENV DXVK_VERSION="${DXVK_VERSION}"
ADD https://github.com/doitsujin/dxvk/releases/download/v${DXVK_VERSION}/dxvk-${DXVK_VERSION}.tar.gz /tmp/dxvk.tar.gz
… but DXVK can also be installed by winetricks. So, I’ll just go with winetricks method for now.
We can add this script to one of the PATH directories so we can start the container at any time.
Also, it’s just a personal preference to have all the versions as environment variables on my container, so I can quickly check them any time I need.
It will create a temporary folder on your $HOME/tmp path and use it as $HOME inside the container. Also, the current path which will also be the WINEPREFIX will be placed inside the container on $HOME/game.
I had to do it this way, because the .Xauthority file will be mounted in the home dir and since it’s a volume two things could happen:
1 — if I made the WINEPREFIX my home dir, the .Xauthority file would end up being copied to that location on the host.
2 — if the home dir didn’t exist, it would be created by the user root (the container default user) which could lead to lack of permissions for some apps that use the home dir as default location to write theyr own files ( winetricks, for example).
#!/bin/bash

curdir="$(pwd)"
vhome="${HOME}/tmp/.winestorage"

if [ ! -d "$vhome" ]; then
    echo "creating $vhome"
    mkdir -p $vhome
fi

docker run --rm
    --name wine
    -u $(id -u):$(id -g)
    -e DISPLAY
    -e WINEPREFIX=/wine/game
    -v /tmp/.X11-unix:/tmp/.X11-unix
    -e PULSE_SERVER=unix:/pulse
    -e HOME=/wine
    -v $HOME/.Xauthority:/wine/.Xauthority
    -v /run/user/$(id -u)/pulse/native:/pulse
    --device /dev/nvidia0:/dev/nvidia0
    --device /dev/nvidiactl:/dev/nvidiactl
    --device /dev/nvidia-uvm:/dev/nvidia-uvm
    --device /dev/nvidia-uvm-tools:/dev/nvidia-uvm-tools
    --device /dev/nvidia-modeset:/dev/nvidia-modeset
    -v ${vhome}:/wine
    -v ${curdir}:/wine/game
    -ti
    winehq:5.17
    bash
There are several considerations to this script:
- it will be removed after termination
--rm - it will map my user and group inside the container
-u $(id -u):$(id -g) - it will set the WINEPREFIX env to /wine/game
-e WINEPREFIX=/wine/gameand set my HOME to /wine-e HOME=/wine - it will mount the directory containing the X11 sockets inside the container
-v /tmp/.X11-unix:/tmp/.X11-unix - since I’m using pulesaudio it will define the socket path
-e PULSE_SERVER=unix:/pulseand it will place my actual socket inside the container-v /run/user/$(id -u)/pulse/native:/pulse - it will mount my .Xauthority file on the user’s home directory
-v $HOME/.Xauthority:/wine/.Xauthority - add all my devices corresponding to the nVidia gpu
- and finally mount the home and game paths in the container
We can also extend this script to pass extra wine variables to the container.
Now, inside the container we can just go directly to /wine/game and start installing or playing what we want to run.
When trying to install something that needs extra packages installed, there is also the possibility of opening a new shell, enter the container as root and install what we need just by running docker exec -u root -ti wine bash.
Using wine isn’t really the target of this post, but there is enough information around the internet to help with that. And having winetricks installed is also a nice aid to configure prefixes.
One of the motives I had, using that directory structure (and the $vhome path) was also to try to maintain some cache for winetricks downloads.
I’ve tried this method to launch Battle.net and try a couple of games which worked surprisingly well.
I was also able to run Epic Games Store, but unfortunately had no luck when trying to play the few games I have there. I guess some things were missing on my prefix.
And finally, was able to install Wargaming’s Game Center and play a few rounds of world of tanks.
At this point, most of the needed work is just figuring out which dependencies we need in our prefix and which wine libraries we need to override. Lutris installation scripts are nice to look for more information on a given game.
Some errors still occur, but the wine debug messages can also help to trace some problems and find the possible missing packages we might need to install.
Security Concerns
I’m not going to dive deep into this approach security flaws.
Ari Kalfus already did it very well on his post Running a Graphical Application from a Docker Container — Simply and Securely. It’s worth the read even if you’re not thinking on running any GUI applications.
So, let’s just try to tweak a bit our launcher script to address some of those valid points:
#!/bin/bash

curdir="$(pwd)"
vhome="${HOME}/tmp/.winestorage"

if [ ! -d "$vhome" ]; then
    echo "creating $vhome"
    mkdir -p $vhome
fi

docker run --rm
    --cap-drop=all
    --name wine
    -u $(id -u):$(id -g)
    -e DISPLAY
    -e WINEPREFIX=/wine/game
    -v /tmp/.X11-unix:/tmp/.X11-unix:ro
    -e PULSE_SERVER=unix:/pulse
    -e HOME=/wine
    -v $HOME/.Xauthority:/wine/.Xauthority:ro
    -v /run/user/$(id -u)/pulse/native:/pulse
    --device /dev/nvidia0:/dev/nvidia0
    --device /dev/nvidiactl:/dev/nvidiactl
    --device /dev/nvidia-uvm:/dev/nvidia-uvm
    --device /dev/nvidia-uvm-tools:/dev/nvidia-uvm-tools
    --device /dev/nvidia-modeset:/dev/nvidia-modeset
    -v ${vhome}:/wine
    -v ${curdir}:/wine/game
    -ti
    winehq:5.17
    bash
Bear in mind that one of the things that stops working when we add the --cap-drop=all is the possibility to enter the container as root and change anything on the container system.
Of course there are easier ways to play games on linux, but having this working is a nice thing for me, so I can get rid of many unwanted installed packages on my host system.
I could improve this post on trying to get this working on AMD or Intel graphics, but it’s something I won’t be able to do for now.
Здравствуй, Хабр.
Хочу поделиться с миром достаточно нетипичной, по крайней мере для меня, задачкой и её решением, которое мне кажется вполне приемлемым. Описанное ниже, возможно, не является идеальным выходом из ситуации, но это работает, и работает так, как задумывалось.
Завязка и предпосылки
Появилась по работе задача: нужно на сайт вынести 3D-превьюшки BIM-моделей разного оборудования, материалов, объектов. Нужно что-то легковесное, несложное.
На сайте модели этих объектов хранятся и доступны для скачивания в проприетарных форматах различных САПР и в виде открытых форматов 3D-моделей. Среди них есть и формат IFC. Его-то я и буду использовать, как исходник для решения этого задания.
Один из вариантов исполнения и его особенности
Формально можно было бы ограничиться написанием какого-нибудь конвертера *.ifc во что-то для отображения на web-странице. С этого я и начал.
Для подобного преобразования был избран замечательный тулкит — xBIM Toolkit.
В примерах использования этого инструмента просто и доходчиво описано, как работать с IFC и специализированным для web-форматом *.wexBIM.
Сначала конвертируем *.ifc в *.wexBIM:
using System.IO;
using Xbim.Ifc;
using Xbim.ModelGeometry.Scene;

namespace CreateWexBIM
{
    class Program
    {
        public static void Main()
        {
            const string fileName = "SampleHouse.ifc";
            using (var model = IfcStore.Open(fileName))
            {
                var context = new Xbim3DModelContext(model);
                context.CreateContext();

                var wexBimFilename = Path.ChangeExtension(fileName, "wexBIM");
                using (var wexBiMfile = File.Create(wexBimFilename))
                {
                    using (var wexBimBinaryWriter = new BinaryWriter(wexBiMfile))
                    {
                        model.SaveAsWexBim(wexBimBinaryWriter);
                        wexBimBinaryWriter.Close();
                    }
                    wexBiMfile.Close();
                }
            }
        }
    }
}
Далее полученный файл используется в «плеере» xBIM WeXplorer.
Пример встраивания *.wexBIM в страницу:
<!DOCTYPE html>
<html xmlns="http://www.w3.org/1999/xhtml">
<head>
    <title>Hello building!</title>
    <script src="js/xbim-viewer.debug.bundle.js"></script>
</head>
<body>
    <div id="content">
        <canvas id="viewer" width="500" height="300"></canvas>
        <script type="text/javascript">
            var viewer = new xViewer('viewer');
            viewer.load('data/SampleHouse.wexbim');
            viewer.start();
        </script>
    </div>
</body>
</html>
Что ж, поехали. Беру nuget’ы от xBIM. Пишу консольное приложение, которое на вход принимает пачку путей к *.ifc-файлам, рядом с ними складывает пачку *.wexBIM-файлов. Всё, можно выкладывать на сайт.
Но как-то это простенько… Хочется, чтобы эта программа стала неким сервисом, который по событию загрузки *.ifc на портал, сразу создаёт необходимый *.wexBIM, и он сразу отображается в подготовленном контейнере.
Ок, формирую новые требования:
- пусть задания на конвертацию приходят от нашего RabbitMQ;
- сами задания хочу видеть в виде бинарного сообщения, которое на самом деле будет готовым для десериализации классом, описанным в protobuf-файле;
- задание будет содержать ссылку для скачивания исходного *.ifc-файла с нашего Minio;
- задание также будет сообщать мне, в какой bucket в Minio складывать результат;
- пусть само приложение будет собрано под .net core 3.1 и работет внутри Linux docker-контейнера на нашей «docker-ферме»;
Первые сложности и условности
Описывать подробно первые 4 пункта реализации не стану. Возможно позже.
Заставил приложение слушать очередь заданий и отсылать сообщение с результатом в очередь из CorrelationId сообщения-задания. Прикрутил генерированные классы запрос/ответ из protobuf. Научил скачивать/загружать файлы в minio.
Всё это делаю в проекте консольного приложения. В настройках проекта:
<TargetFramework>netcoreapp3.1</TargetFramework>И на моей машине с Windows 10 всё вполне отлаживается и работает. Но при попытке запустить приложение в WSL ловлю ошибку System.IO.FileLoadException:
Полная информация по ошибке:
{
  "Type": "System.IO.FileLoadException",
  "Message": "Failed to load Xbim.Geometry.Engine64.dll",
  "TargetSite": "Void .ctor(Microsoft.Extensions.Logging.ILogger`1[Xbim.Geometry.Engine.Interop.XbimGeometryEngine])",
  "StackTrace": " at Xbim.Geometry.Engine.Interop.XbimGeometryEngine..ctor(ILogger`1 logger)rn at Xbim.Geometry.Engine.Interop.XbimGeometryEngine..ctor()rn at Xbim.ModelGeometry.Scene.Xbim3DModelContext.get_Engine()rn at Xbim.ModelGeometry.Scene.Xbim3DModelContext.CreateContext(ReportProgressDelegate progDelegate, Boolean adjustWcs)rn at My.Converter.ConvertIfc.CreateWebIfc(String ifcFileFullPath, String wexBIMFolder)",
  "Data": {},
  "InnerException": {
    "Type": "System.IO.FileNotFoundException",
    "Message": "Could not load file or assembly 'Xbim.Geometry.Engine.dll, Culture=neutral, PublicKeyToken=null'. The system cannot find the file specified.",
    "FileName": "Xbim.Geometry.Engine.dll, Culture=neutral, PublicKeyToken=null",
    "FusionLog": "",
    "TargetSite": "System.Reflection.RuntimeAssembly nLoad(System.Reflection.AssemblyName, System.String, System.Reflection.RuntimeAssembly, System.Threading.StackCrawlMark ByRef, Boolean, System.Runtime.Loader.AssemblyLoadContext)",
    "StackTrace": " at System.Reflection.RuntimeAssembly.nLoad(AssemblyName fileName, String codeBase, RuntimeAssembly assemblyContext, StackCrawlMark& stackMark, Boolean throwOnFileNotFound, AssemblyLoadContext assemblyLoadContext)rn at System.Reflection.RuntimeAssembly.InternalLoadAssemblyName(AssemblyName assemblyRef, StackCrawlMark& stackMark, AssemblyLoadContext assemblyLoadContext)rn at System.Reflection.Assembly.Load(String assemblyString)rn at Xbim.Geometry.Engine.Interop.XbimGeometryEngine..ctor(ILogger`1 logger)",
    "Data": {},
    "Source": "System.Private.CoreLib",
    "HResult": -2147024894
  },
  "Source": "Xbim.Geometry.Engine.Interop",
  "HResult": -2146232799
}
Сеанс активного гугления и вдумчивого чтения показал мне, что я крайне невнимателен:
Recently at work, we were evaluating a few options to render building models in the browser. Building Information Modeling (BIM) in interoperability scenarios is done via Industry Foundation Classes, mostly in the STEP Physical File format. The schema is quite huge and complex with all the things you have to consider, so we were glad to find the xBim open source project on GitHub. They’ve got both projects to visualize building models in the browser with WebGL as well as conversion tools to create the binary-formatted geometry mesh. To achieve that, native C++ libraries are dynamically loaded (so no .Net Core compatibility) which must be present in the bin folder. The C++ libraries are expected either in the same folder as the application binaries or in a x64 (or x86, respectively) sub folder (See here for more details). In regular projects, the xBim.Geometry NuGet package adds a build task to copy the dlls into the build output folder, but this doesn’t work with the new tooling. You can, however, get it to work in Visual Studio 2015 by taking care of supplying the interop dlls yourself.
И подобные трудности не у одного меня. Многим хочется xBIM под .Net Core.
Не критично, но многое меняет… Всё упирается в невозможность нормально загрузить Xbim.Geometry.Engine64.dll. Нужно иметь на машине vc_redist.x64.exe. Какие у меня варианты?
Первое, что подумалось: «А может виндовый контейнер с полным .Net Framework использовать?
Доставить Microsoft Visual C++ Redistributable for Visual Studio 2015, 2017 and 2019 в этот контейнер, и всё будет ок?» Я это попробовал:
Испытательный Windows-образ для docker:
Сменил .Net Core на:
<TargetFramework>net47</TargetFramework>Dockerfile:
FROM microsoft/dotnet-framework:4.7
WORKDIR /bimlibconverter
COPY lib/VC_redist.x64.exe /VC_redist.x64.exe
RUN C:VC_redist.x64.exe /quiet /install
COPY bin/Release .
ENTRYPOINT ["MyConverter.exe"]
Что ж, это сработало… It’s alive! Но. А как же наша хостовая Linux-машина с docker? Не получится на неё загнать контейнер с образом на Windows Server Core. Надо выкручиваться…
Компромисс и развязка
Очередной поиск в Сети вывел меня на статью. В ней автор требует от реализации похожего:
To make things worse:
All binaries are 32-bits (x86).
Some require visual C++ redistributable runtime components.
Some require the .NET runtime.
Some need a windowing system, even though we only use the command-line interface (CLI).
В посте описывается потенциальная возможность запуска Windows-приложений в wine в Linux-контейнере. Любопытно, решил я.
После некоторых проб, багов и дополнений был получен Dockerfile:
Docker образ на основе Ubuntu с Wine, .Net Framework и vcredist на борту:
FROM ubuntu:latest
#Добавляем поддержку x86
RUN apt-get update
RUN dpkg --add-architecture i386
#Ставим некоторые необходимые пакеты
RUN apt-get install -qfy --install-recommends software-properties-common gnupg2 wget xvfb cabextract
#Добавляем репозитарий Wine
RUN wget -nv https://dl.winehq.org/wine-builds/winehq.key
RUN apt-key add winehq.key
RUN apt-add-repository 'deb https://dl.winehq.org/wine-builds/ubuntu/ bionic main'
#Дополнительный репозитарий для корректной установки Wine
RUN add-apt-repository ppa:cybermax-dexter/sdl2-backport
#Ставим сам Wine
RUN apt-get install -qfy --install-recommends winehq-staging winbind
#Копируем наше приложение
COPY /bin/Release/ /root/.net/drive_c/myconverter/
#Переменные окружения для старта Wine
ENV WINEDEBUG=fixme-all
ENV WINEPREFIX=/root/.net
ENV WINEARCH=win64
#Пуск конфигурирования Wine
RUN winecfg
#Скачиваем winetricks, без них .Net Framework не заведётся
RUN wget https://raw.githubusercontent.com/Winetricks/winetricks/master/src/winetricks
RUN chmod +x winetricks
RUN cp winetricks /usr/local/bin
#Подчищаем лишнее
RUN apt-get clean
RUN rm -rf /var/lib/apt/lists/*
#Запуск Wine с необходимыми дополнениями
RUN wineboot -u && winetricks -q dotnet472 && xvfb-run winetricks -q vcrun2015

WORKDIR /root/.net/drive_c/myconverter/

ENTRYPOINT ["wine", "MyConverter.exe"]
Build идёт небыстро, но заканчивается удачно. Пробую, проверяю. Работает!
Итоги, выводы, размышления
Это сработало. На выходе получаем Linux-образ для docker-контейнера. Он «пухловат» (~5.2Гб), но вполне быстро стартует и внутри работает консольное Windows-приложени на .Net Framework 4.7, которое слушает RabbitMQ, пишет логи в Graylog, скачивает и загружает файлы на/в Minio. Обновлять само приложение буду по remote docker API.
Решение утилитарной выделенной задачи реализовано. Возможно, и скорее всего, не универсальное. Но меня в принципе устроило. Может быть кому-то тоже пригодится.
Спасибо, что прочли. На Хабр пишу впервые. Увидимся в комментариях.