Содержание
- Вариант 1: Ярлыки пользовательских приложений и папок
- Способ 1: Свойства ярлыка
- Способ 2: Сторонние программы
- Вариант 2: Смена размера значков
- Вопросы и ответы

При смене значка ярлыка будет изменен только ярлык конкретной программы или папки, тогда как оригинал останется таким же, как и был.
Вариант 1: Ярлыки пользовательских приложений и папок
Изменить значки пользовательских приложений или папок можно в разделе со свойствами ярлыка или с помощью специализированного софта, предназначенного для кастомизации операционной системы.
Способ 1: Свойства ярлыка
Ярлыки в Windows 10 помечаются специальным значком со стрелочкой — это говорит о том, что изображение ссылается на файл, который располагается в другом месте. Чтобы изменить изображение ярлыка программы или любой папки, достаточно зайти в его свойства:
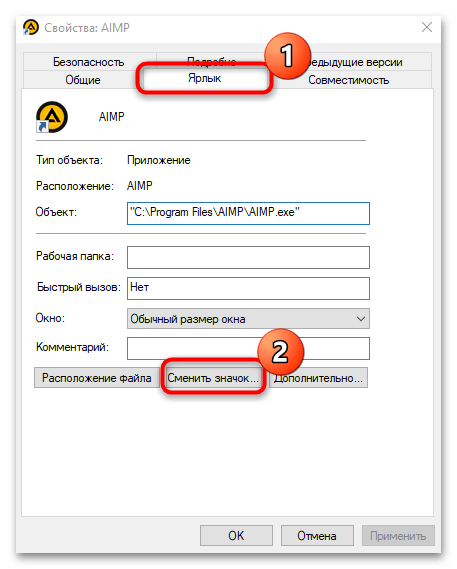
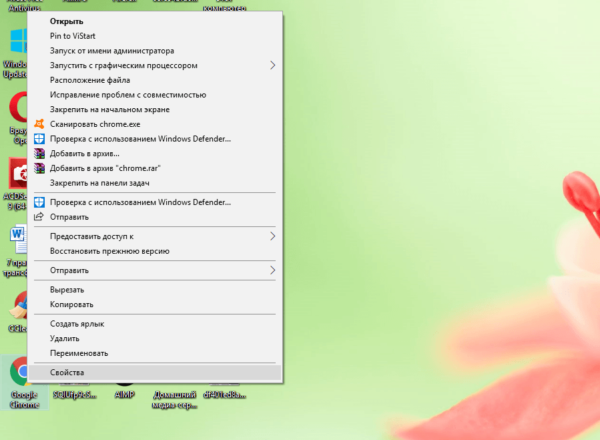
- Щелкните правой кнопкой мыши по ярлыку и из контекстного меню выберите пункт «Свойства».
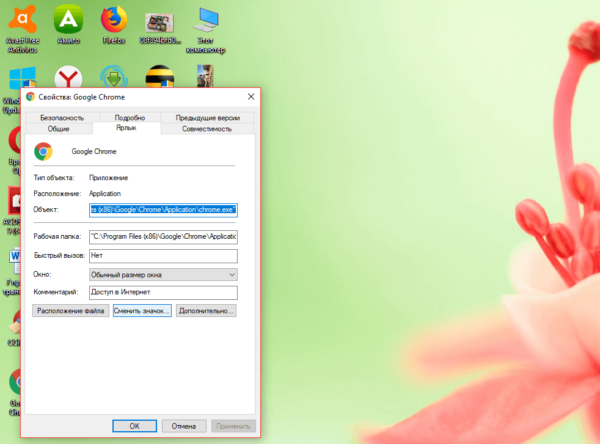
- Перейдите на вкладку «Ярлык», затем кликните по кнопке «Сменить значок…».
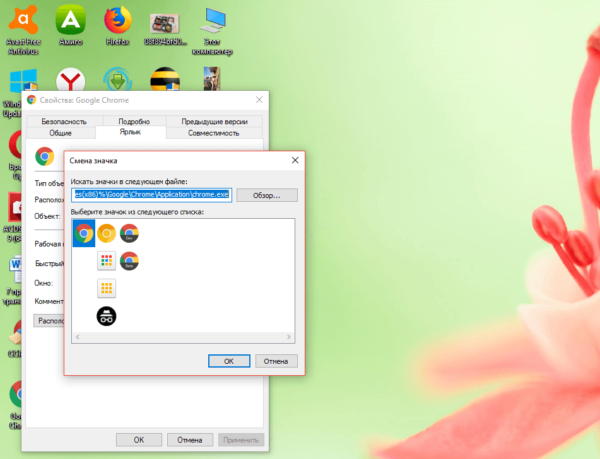
- Откроется дополнительное окно, где доступны различные иконки. Выберите подходящую и нажмите на «ОК».

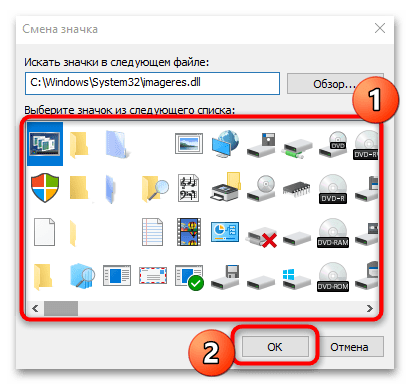
Если нужно указать путь к папке, где есть дополнительные значки, используйте кнопку «Обзор», чтобы запустить штатный «Проводник».

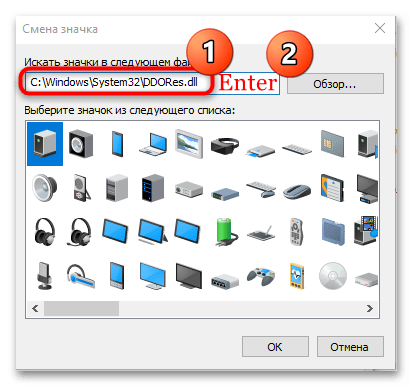
Помимо стандартного набора иконок, в Windows 10 есть еще несколько пакетов, которые расположены по следующим адресам:
C:WindowsSystem32imageres.dllC:WindowsSystem32DDORes.dllC:Windowssystem32pifmgr.dllC:Windowssystem32ddores.dllC:Windowssystem32mmcndmgr.dll
Достаточно скопировать путь и вставить его в строку поиска значков в окне «Смена значка». После этого нужно нажать на клавишу «Enter», и отобразятся другие изображения для иконок.
Похожим образом изменяются иконки самих установленных приложений на компьютере. Если нужно сменить системные значки, например, «Мой компьютер» или «Корзина», то сделать это можно через «Параметры» Windows 10. Более подробный алгоритм действий наш автор разбирал в отдельном материале на нашем сайте. Еще есть статья, где развернуто рассказано о редактировании значков папок, как отдельных, так и всех сразу.
Подробнее:
Изменение иконки приложения в Windows 10
Изменение значков папки на ПК с Windows 10
Способ 2: Сторонние программы
С помощью софта от сторонних разработчиков можно изменить значки на более интересные и нестандартные не только у файлов и папок, но и у ярлыков, локальных дисков и других элементов системы. При этом, как правило, такие приложения предусматривают библиотеки различных иконок, которых нет в системе, что позволяет оригинально персонализировать внешний вид Windows 10. В нашем руководстве со ссылками на скачивание можно ознакомиться с самыми эффективными инструментами для установки новых значков.
Подробнее: Устанавливаем новые иконки в Windows 10
Вариант 2: Смена размера значков
Если надо изменить размер значков ярлыков, то для этого достаточно воспользоваться возможностями операционной системы: «Панелью управления» или параметрами рабочего стола. Также можно использовать настройки «Параметров экрана», но в этом случае поменяется размер не ярлыков, а масштаба экрана в целом. В нашей отдельной статье описаны способы изменения размера значков в Windows 10.
Подробнее: Меняем размер значков на «Рабочем столе» в Windows 10

Еще статьи по данной теме:
Помогла ли Вам статья?
Со временем внешний вид «Рабочего стола» может изрядно наскучить. Многие пользователи ограничиваются простой сменой обоев. Свежую картинку главного окна, однако, можно дополнить новыми значками ярлыков. Как поменять разные виды иконок, рассмотрим в этой статье.
Стандартные или сторонние иконки в формате ico
Для начала необходимо определиться, какие значки вам нужны: классические от компании Microsoft, которые уже хранятся в памяти ПК, либо сторонние изображения. Во втором случае необходимо предварительно создать картинку самому или найти изображение в интернете. Главное условие — оно должно быть маленьким и иметь расширение ico.
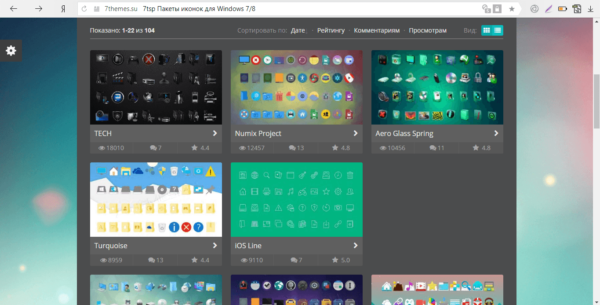
Вы можете найти готовые файлы иконок с различным дизайном на сторонних ресурсах и скачать их оттуда, а затем установить любым из представленных ниже способов в зависимости от вида иконки (папка, ярлык приложения или основной значок Windows). Для поиска воспользуйтесь сервисами Google или Yandex: в строку введите запрос «Иконки на рабочий стол для Windows 10». Разнообразие иконок, доступных для скачивания в интернете, довольно большое: авторские, тематические, стандартные для определённых версий Windows и прочее.
Вы можете одновременно поменять иконки для всех ярлыков с помощью пакета иконок — отдельной коллекции значков, упакованной в один файл с расширением dll. Такие пакеты можно также скачать из различных источников. Однако будьте осторожны при поиске и закачке подобных файлов: доверяйте сайтам, на которых стоит отметка о том, что файлы проверены антивирусом. Иначе вы рискуете скачать вместе с файлом и вредоносную программу.
Фотогалерея: наборы иконок для «Рабочего стола»
Главные иконки Windows на «Рабочем столе» — значки с названиями «Корзина», «Мой компьютер», «Сеть», «Файлы пользователя», «Панель управления» и некоторые другие. Они по умолчанию помещаются на «Рабочий стол» после установки. Вы можете самостоятельно определять, какие из них должны присутствовать на нём, а какие нет. Вы также вправе поменять их внешний вид в системном окне «Параметры» либо с помощью сторонних утилит.
Через окно «Параметры Windows»
Самый простой способ поменять внешний вид основной иконки — зайти в окно с системными параметрами:
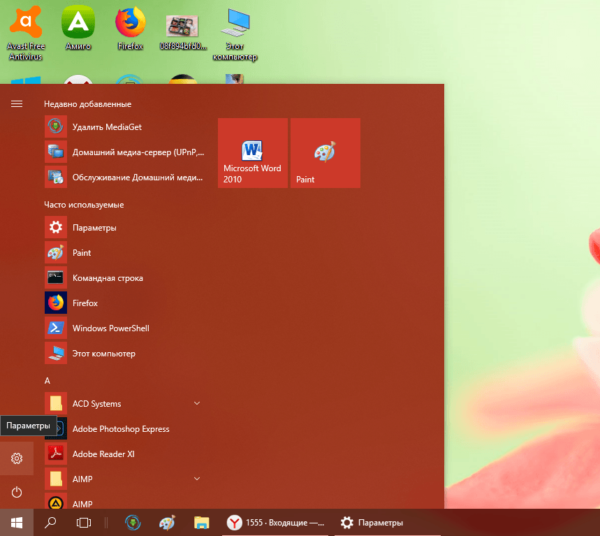
- Чтобы на дисплее появилось окно «Параметры», проще всего одновременно нажать на две клавиши: Win + I. Но это сочетание может и не сработать. На этот случай есть другой способ: нажимаем на кнопку «Пуск» в левом нижнем углу экрана, а в самом меню выбираем второй значок снизу — шестерёнку.

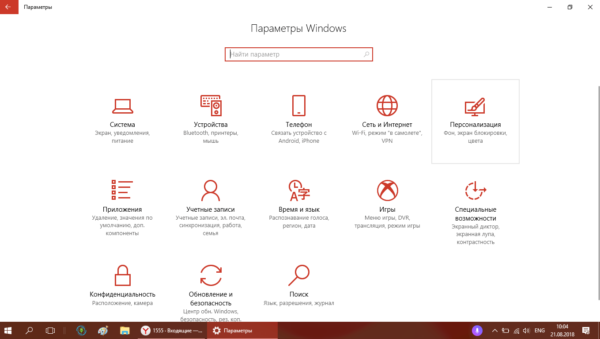
Кликните по иконке в виде шестерёнки в меню «Пуск» - Попадаем в большое меню «Параметры» со множеством разделов. Нам нужна последняя в первом ряду плитка — «Персонализация».

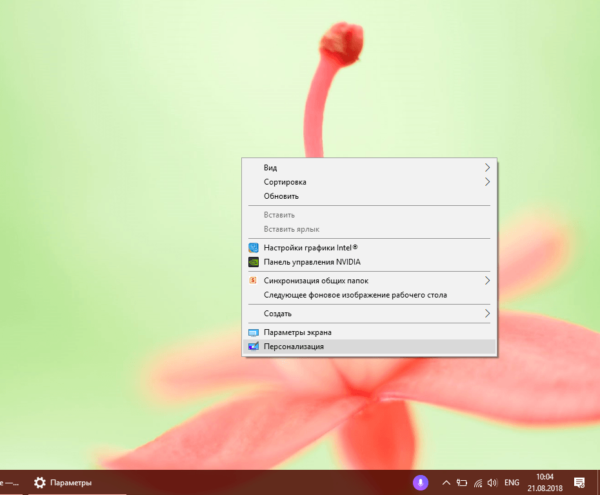
В окне «Параметры» щёлкаем по разделу «Персонализация» - Откроется нужный раздел с вкладками. Это же окно вы можете запустить иным способом: кликните на «Рабочем столе» по области, свободной от иконок, и в контекстном меню выберите самый последний пункт — «Персонализация».

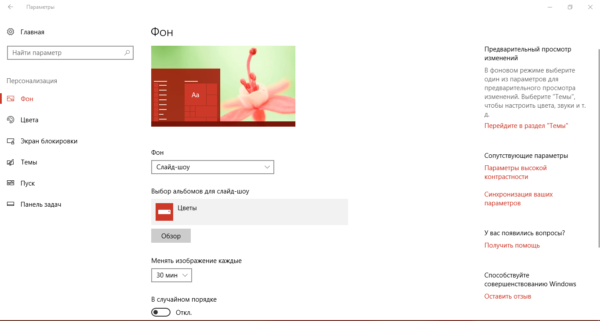
Кликните по пункту «Персонализация» в контекстном меню «Рабочего стола» - Переходим в блок «Темы».

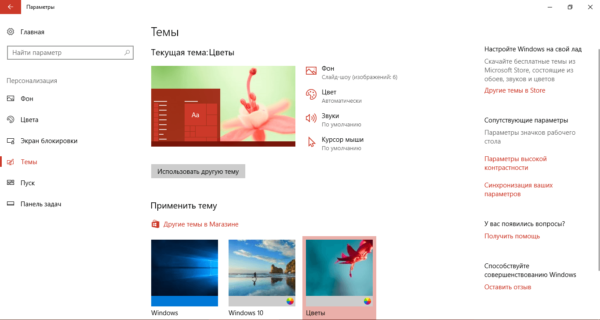
Сразу переходим с вкладки «Фон» на «Темы» - В правой колонке со ссылками на другие окна и разделы кликаем по строке «Параметры значков рабочего стола».

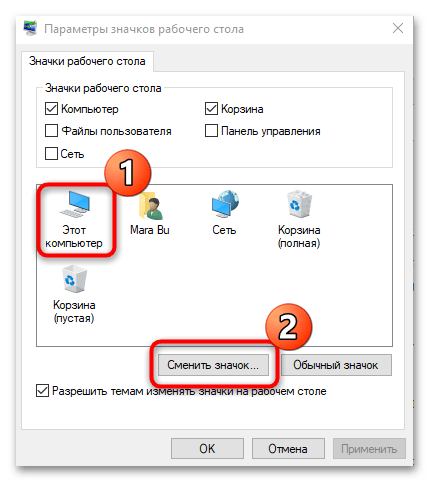
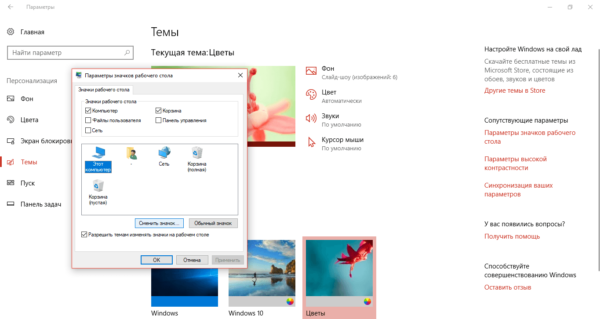
Нажимаем на ссылку «Параметры значков рабочего стола» в правой части окна - Поверх «Параметров» откроется маленькое окошко — выбираем в меню нужную иконку левой клавишей мышки, например, «Этот компьютер». Далее нажимаем на кнопку «Сменить значок».

Кликаем по иконке, которую нужно изменить, и нажимаем на кнопку «Сменить значок» - В третьем окне выбираем иконку из списка стандартных значков Windows либо загружаем свою с помощью кнопки «Обзор».
Выбираем иконку среди доступных либо загружаем свою с помощью кнопки «Обзор» - Если вы выбрали второй вариант (загрузка своих иконок), появится окно «Проводника». Ищем папку с нужным файлом иконки в формате ico. Кликаем по кнопке «Открыть», а затем нажимаем ОК.
Найдите в «Проводнике» нужный файл ico и нажмите на «Открыть» - В окне «Параметры значков» сначала нажимаем «Применить», чтобы все изменения начали действовать. Если хотите поменять значок для других основных иконок Windows, повторите ту же процедуру для каждой из них. Снова нажмите на «Применить», а затем на ОК, чтобы закрыть окно.


С помощью специальных утилит
Существует множество приложений от различных разработчиков, позволяющих изменить до неузнаваемости иконки как основных ярлыков, так и других значков, например, иконки папок. В программах вы можете менять и отдельные значки, и все иконки сразу, то есть устанавливать целый пакет.
IconPackager: удобная и тонкая настройка внешнего вида иконок
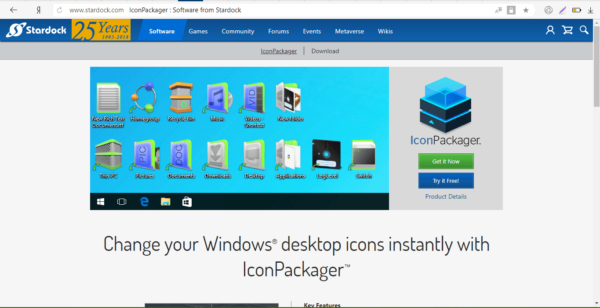
IconPackager — продукт от компании Stardock, которая занимается разработкой утилит для настройки интерфейса «Рабочего стола» Windows. В этой утилите предустановлено несколько пакетов с иконками. Есть также возможность загружать свои и менять иконки в доступных коллекциях, то есть создавать свои уникальные пакеты.
Утилита поддерживает версии Windows выше «семёрки». Минус её в том, что она платная, однако в начале предлагается месяц бесплатного тестирования. Хотя интерфейс на английском языке, пользоваться приложением достаточно удобно:
- Откройте официальный сайт разработчика приложения. Чтобы загрузить инсталлятор, кликаем по синей кнопке Try It Free.

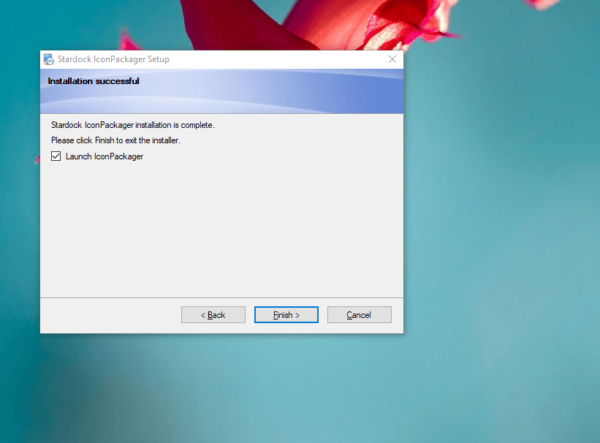
Кликните по синей кнопке Try It Free, чтобы загрузить инсталлятор - Запустите установщик и установите программу, следуя простым инструкциям в окне.
- Нажмите на кнопку Finish, чтобы окно приложения появилось на дисплее.

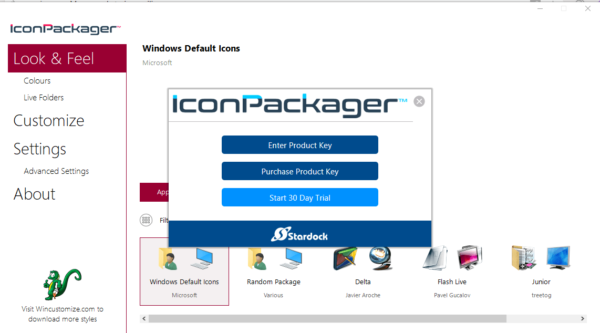
Жмём на Finish, чтобы закрыть «Мастер установки» и открыть окно программы - Чтобы начать пользоваться пробной версией, кликните по кнопке Start 30 Day Trial.

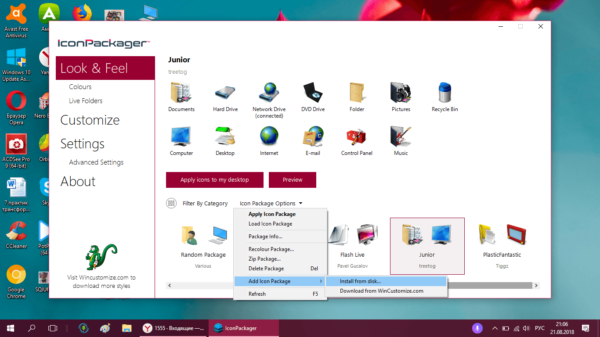
Жмём на Start 30 Day Trial, чтобы начать пользоваться программой бесплатно в течение месяца - Если вы хотите загрузить сторонний значок, который предварительно скачали в интернете, во вкладке Look & Feel нажмите на выпадающее меню Icon Package Options. Выбираем в нём предпоследний пункт Add Icon Package, а затем — Install from disk.

Кликните по Add Icon Package, а затем выберите пункт Install from disk, чтобы загрузить свою коллекцию - В «Проводнике Windows» найдите файл с пакетом иконок и нажмите на «Открыть» — коллекция будет добавлена в перечень доступных на данный момент.
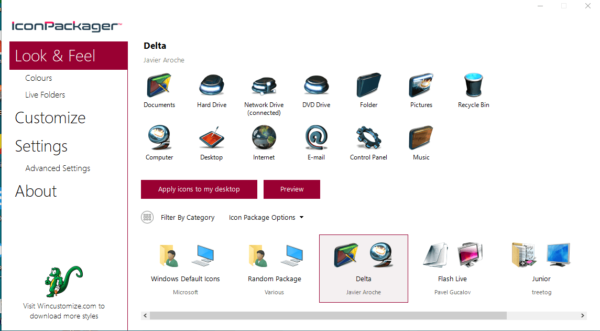
- Вы можете также выбрать тему среди представленных в списке. Попробуем поставить, например, Delta.

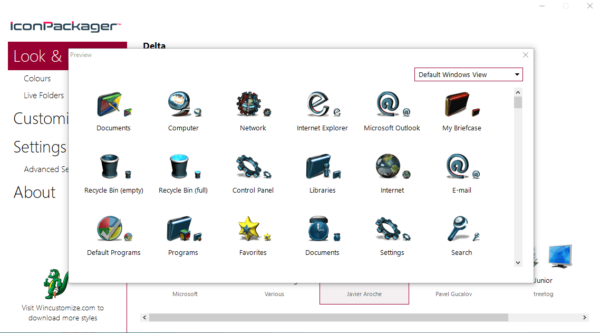
Кликаем по пакету Deltа внизу - Нажмите на Preview, чтобы предварительно посмотреть все иконки в этом пакете. Если они вам нравятся, закрывайте второе окно и смело кликаете по кнопке Apply icons to my desktop.
Нажмите на Preview, чтобы предварительно просмотреть всю коллекцию иконок - Если вы хотите вернуть старые значки Windows на место, просто примените первую тему в списке — Windows Default Icons.
- Во вкладке Colours вы можете изменить цвет, оттенок, яркость иконок.
Во вкладке Colours настройте цветовую гамму имеющихся значков - С помощью пункта I want to adjust the colour of my Icon Package вы сможете подстроить иконки под тему вашего «Рабочего стола» и под цвет «Панели задач». Например, они могут полностью изменить цвет на красный, если стоит тема на Windows с таким оттенком. После всех изменений нажмите на Apply icons to my desktop.
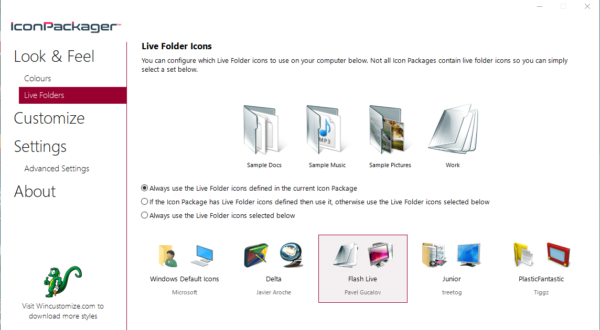
Значки могут приобретать цвет текущей темы Windows - В разделе Live Folders вы можете поставить отдельные иконки для папок — живые значки. Для этого установите отметку слева от пункта Always use the Live Folder icons selected below. Затем просто выберите тип папок.

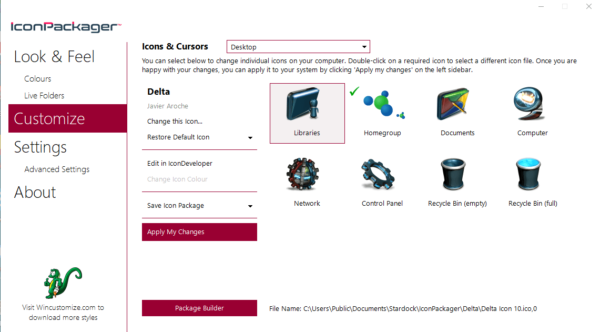
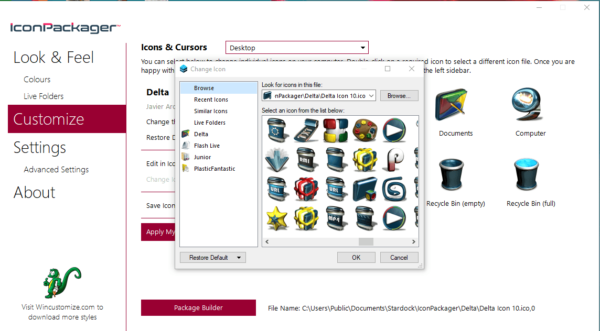
В блоке Live Folders выберите отдельные значки для папок - Вкладка Customize позволяет создавать самостоятельно пакеты иконок. Чтобы изменить определённую иконку, кликните по Change this Icon.

Раздел Customize позволяет создавать свои коллекции и менять те, что представлены в программе - В новом маленьком окошке выберите среди доступных либо добавьте свой значок с помощью кнопки Browse.
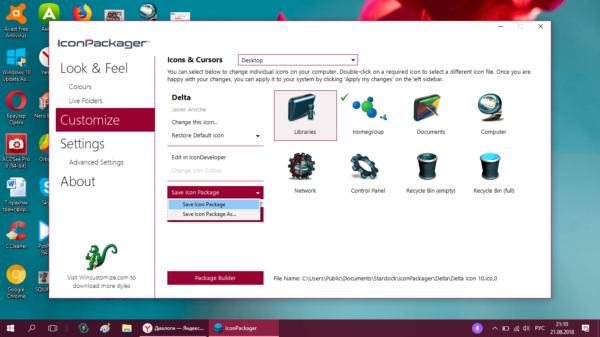
В окне Change Icon выберите значок из доступных в меню либо загрузите свой с помощью клавиши Browse - Когда все изменения в пакет будут внесены, нажмите на Save Icon Package.
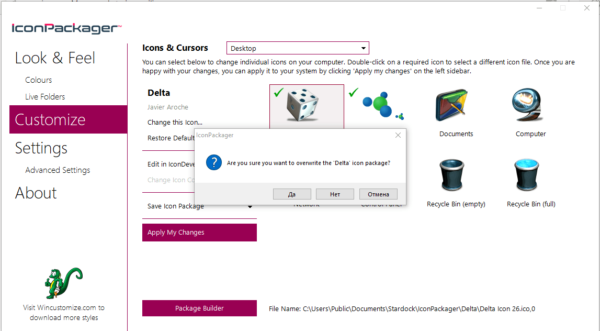
Сохраните изменения в пакете с иконками с помощью опции Save Icon Package - В небольшом окне подтвердите, что хотите внести изменения в пакет. После этого все настройки должны успешно сохраниться.
Нажмите «Да», чтобы подтвердить своё намерение сохранить изменения - В разделе Settings есть дополнительные настройки. В частности, можно определить, какие именно иконки Windows надо менять, а какие не трогать. Здесь вы можете включить изменение указателя мышки Cursors.
Во вкладке Settings вы можете настроить изменение для определённых типов значков: папки, файлы, главные значки Windows и другие


Видео: как установить новые иконки с помощью программы IconPackager
Se7en Theme Source Patcher: бесплатная утилита и большой выбор пакетов
Приложение предназначено для замены всех классических иконок «Рабочего стола», локальных жёстких дисков, папок, а также значков «Панели управления». Изначально программа была создана для «семёрки», но сейчас поддерживает и другие версии Windows, в частности, нашу «десятку».
Программа использует популярный формат сжатия 7z. Минус утилиты в том, что в неё изначально не встроены пакеты иконок. Все коллекции вам необходимо скачивать на том же сайте, откуда вы загружаете приложение, а затем вносить их самостоятельно в базу утилиты для дальнейшего использования. Тем не менее выбор пакетов на этом ресурсе очень большой.
Преимущество этой программы в том, что она бесплатная. Перед заменой значков утилита создаёт точку восстановления и резервную копию системных файлов, чтобы можно было вернуть на место все иконки Windows на классические:
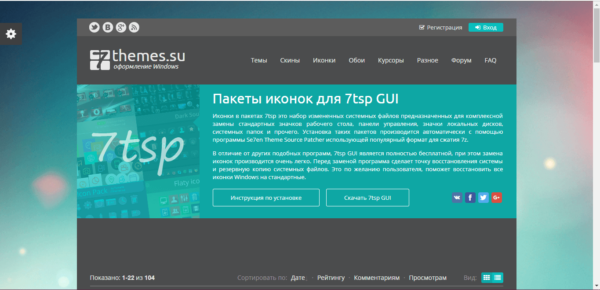
- Переходим на официальный сайт приложения. Нажимаем на кнопку «Скачать».

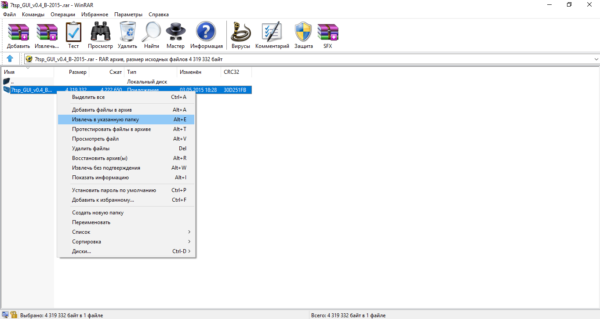
Нажмите на кнопку «Скачать», чтобы загрузить исполняемый файл программы - Ваш обозреватель загрузит архив — откройте его, а в нём кликните правой клавишей мыши по файлу и в меню нажмите на «Извлечь в…». Выберите папку и распакуйте архив.
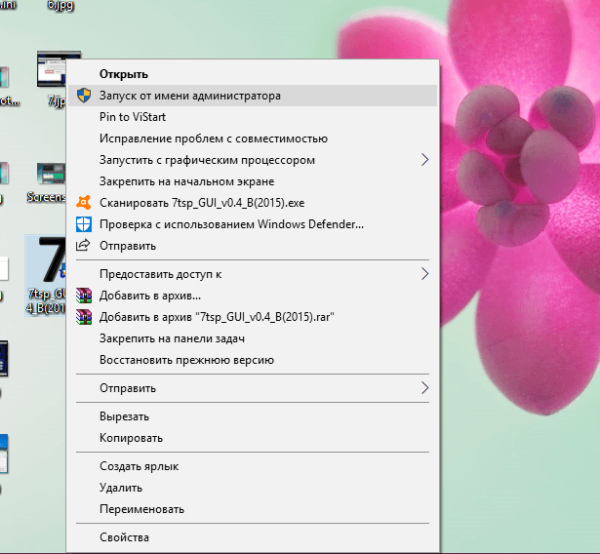
Нажмите на «Извлечь в указанную папку» в контекстном меню файла - Найдите извлечённый файл, щёлкните по нему снова правой клавишей мыши и в контекстном меню кликните по ссылке «Запуск от имени администратора».

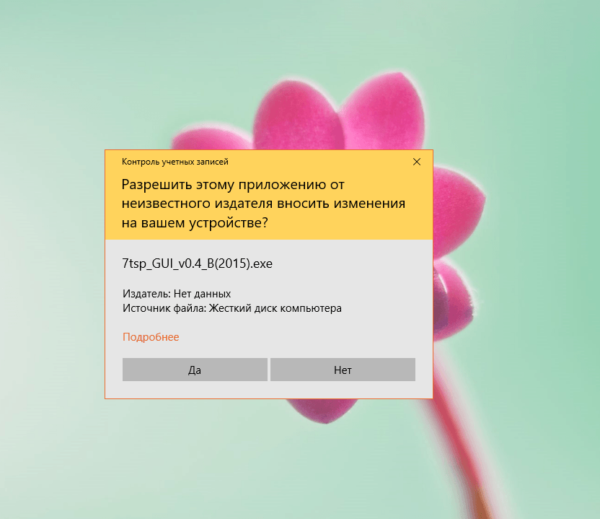
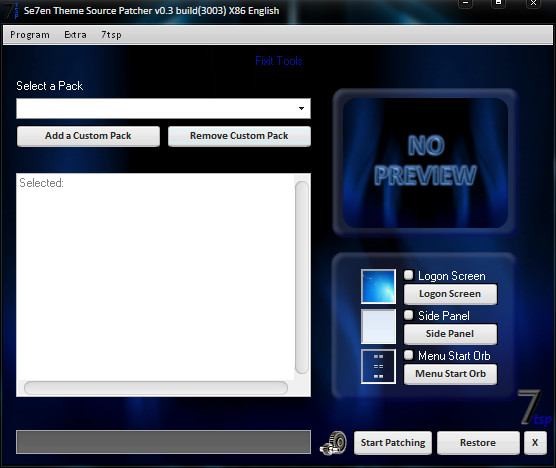
В контекстном меню распакованного файла жмём на «Запуск от имени администратора» - Разрешите этому приложению вносить изменения на ПК, кликнув по «Да» в появившемся системном окне. Приложение не требует установки, поэтому сразу откроется его окно.

Нажмите «Да», чтобы разрешить программе вносить изменения на устройстве - Предварительно выберите и скачайте понравившиеся темы с этого же сайта.

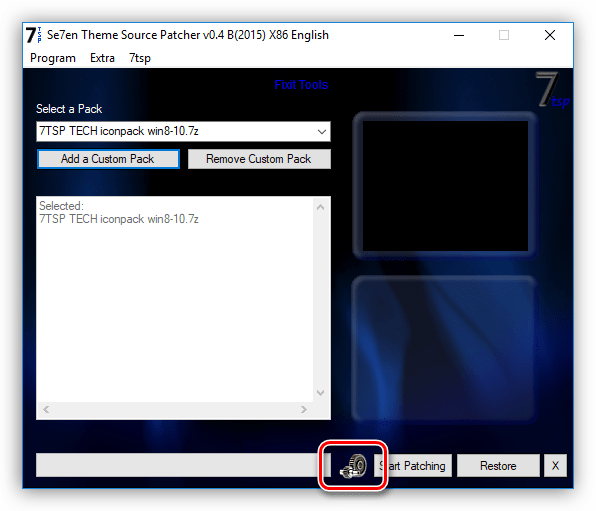
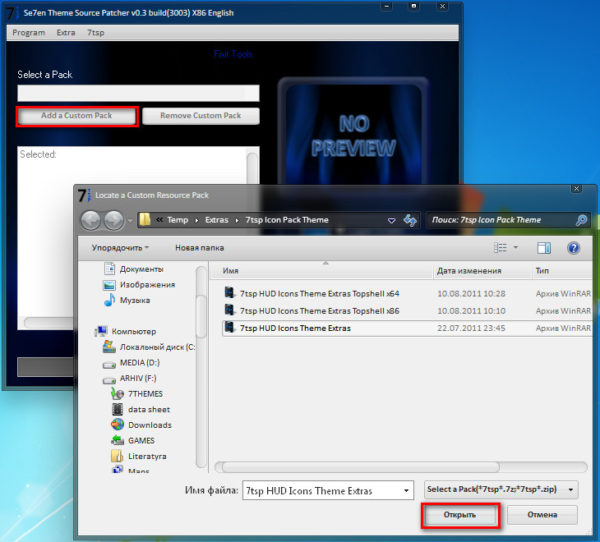
На сайта разработчика скачайте понравившийся пакет иконок - В окне приложения нажмите Add a Custom Pack.

Кликните по кнопке Add a Custom Pack - В «Проводнике Windows» выберите загруженный архив с пакетом иконок и нажмите «Открыть».

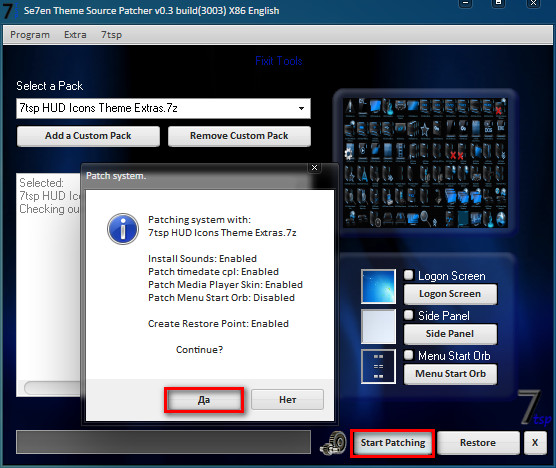
Найдите файл с пакетом иконок и нажмите «Открыть» - Коллекция появится в меню. Внизу окна будет кнопка Start Patching. Нажмите на неё. Утилита спросит, нужно ли создать точку восстановления. Обязательно создаём — нажмите «Да».
Дайте разрешение на создание резервной копии перед установкой новых иконок - Дождитесь завершения процедуры. После этого нужно перезагрузить устройство два раза, чтобы изменения вступили в силу.
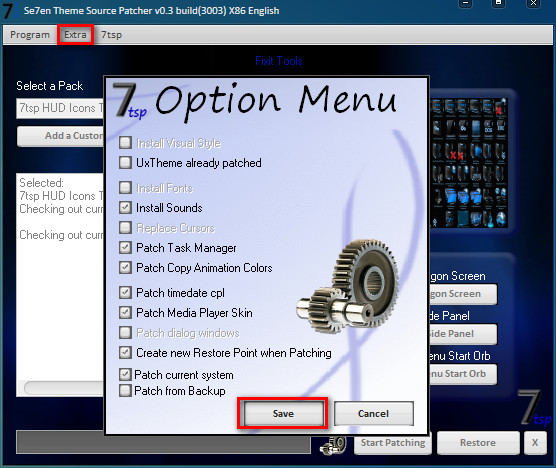
- Пакеты значков от этого разработчика содержат не только иконки, но и некоторые другие элементы интерфейса Windows, например, картинки для замены вида часов, даты и даже окна «Диспетчера задач». Если они вам не нужны, перед установкой коллекции кликните по пункту Extra. В Option Menu снимите галочки с ненужных элементов и нажмите Save.
В Option Menu уберите ненужные пункты, которые вы не хотите менять и нажмите на Save - Если вы хотите восстановить классические иконки Windows, нажмите в окне программы на клавишу Restore в правом нижнем углу. В новом окне поставьте отметку рядом с первым пунктом и нажмите по ОК.
Чтобы вернуть стандартные значки Windows, нажмите Restore, а затем ОК
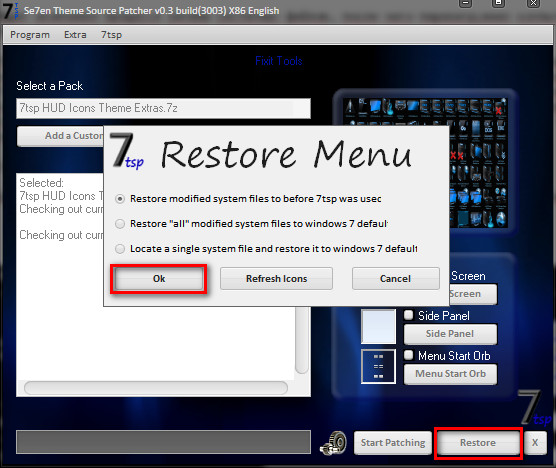
Устанавливать новый пакет иконок нужно обязательно на чистую систему, то есть на классические образы иконок в Windows, а не на сторонние значки. Поэтому сделайте предварительно восстановление с помощью клавиши Restore, если у вас стоят иконки, отличные от стандартных.
Видео: как поставить иконки с помощью утилиты Theme Source Patcher
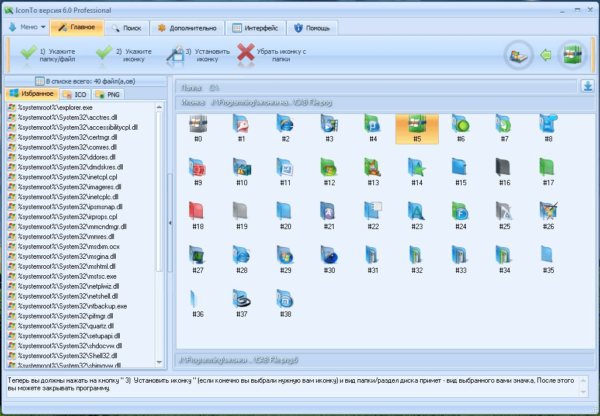
IconTo: приложение со встроенной инструкцией по использованию
IconTo — бесплатное приложение от разработчика AleXStam, которая может менять иконки для системных элементов, папок, разделов жёсткого дисков или даже их групп.
У неё есть следующие преимущества перед другими утилитами:
- Более 300 встроенных иконок. Есть также возможность загружать свои значки.
- Инструкция по установке иконок: внизу окна вы увидите подсказки.
- Есть конвертация форматов png, jpg, ico, а также опция извлечения изображений из файлов в формате dll, exe и некоторых других.
- Интерфейс программы полностью на русском языке.
IconTo подходит для всех версий Windows, начиная с Windows 98 и заканчивая современной «десяткой». Размер загружаемого инсталлятора не превышает 15.1 МБ, поэтому утилита может быть использована на компьютерах с небольшим объёмом памяти. Приложение доступно для загрузки на официальном сайте разработчика.
Как сменить иконку папки на Windows 10
Если вы хотите выделить какую-то папку на общем фоне иконок, чтобы сделать её более узнаваемой, выполните следующие шаги:
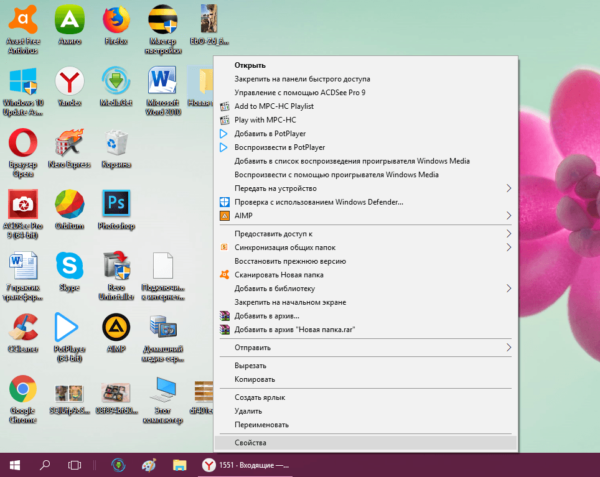
- Нажмите на ярлык папки правой клавишей мыши. В появившемся меню кликните по пункту «Свойства».

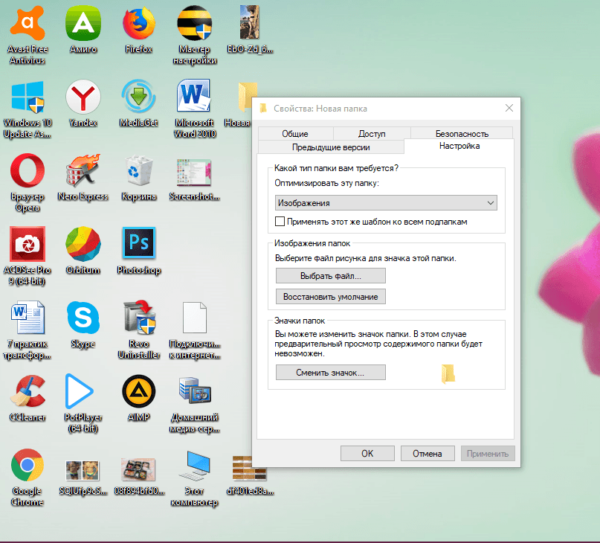
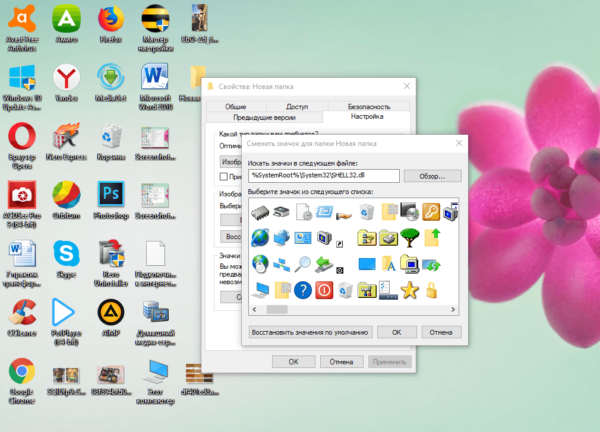
В контекстном меню папки выбираем пункт «Свойства» - На дисплее тут же появится окошко с различными разделами — перейдите на вкладку «Настройка». В последнем разделе нажмите на кнопку «Сменить значок».

Во вкладке «Настройка» жмём на кнопку «Сменить значок» - Выберите значок среди доступных: прокрутите перечень со значками вправо, чтобы ознакомиться со всеми ярлыками. Если у вас есть своё изображение с нужным форматом ico и вы хотите поставить именно его, нажмите «Обзор».

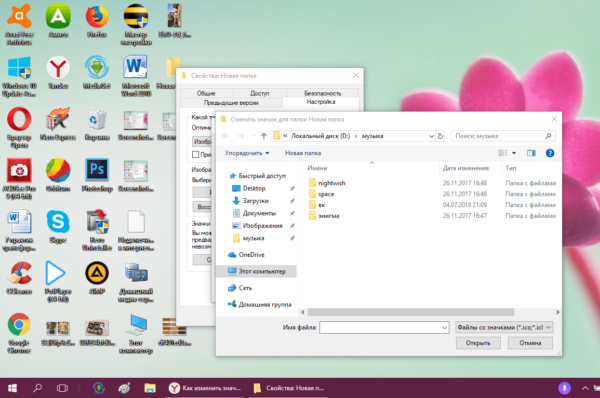
Выберите значок среди предложенных либо нажмите на кнопку «Обзор», если у вас есть своя иконка - В дополнительном окне «Проводник Windows» найдите папку, где хранится изображение. Кликните по нему левой кнопкой, чтобы выделить, а затем нажмите на «Открыть».

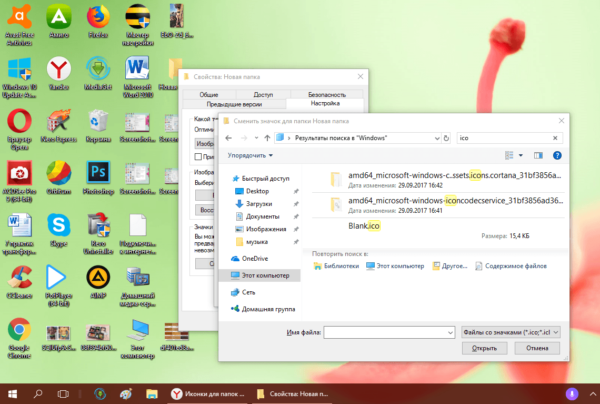
Найдите нужный значок в виде файла с расширением ico в «Проводнике Windows» - Для удобного поиска можно воспользоваться строкой с лупой — просто введите название файла иконки или расширение ico.

В поисковую строку введите ico и найдите нужный файл - Чтобы сохранить изменения, нажмите ОК в окне со списком доступных иконок. После этого значок папки изменится.
Как одновременно заменить все значки папок
Чтобы изменить вид всех папок, нужно прибегнуть к более сложному методу — редактированию реестра в системном окне. Однако этот метод не рекомендуется применять новичкам: лучше воспользуйтесь специальными программами, описанными в разделе «С помощью специальных утилит» в этой статье. Если вы уже уверенный пользователь ПК, тогда можете выполнять манипуляции в системном окне:
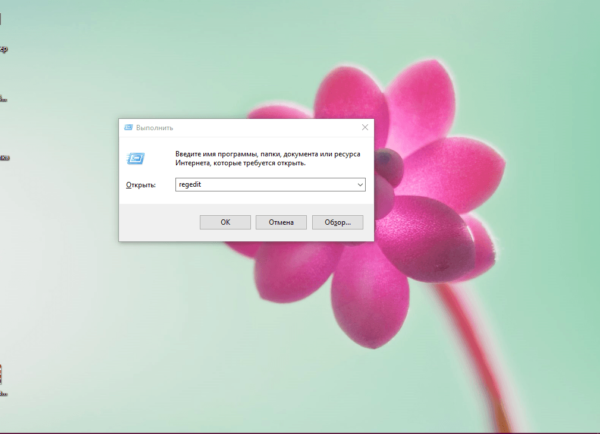
- Для вызова системного окна «Редактор реестра» одновременно нажимаем клавиши Win и R — откроется небольшая панель «Выполнить» с единственной строкой «Открыть». В ней печатаем команду regedit. Чтобы система её выполнила, кликаем по ОК либо нажимаем на Enter.

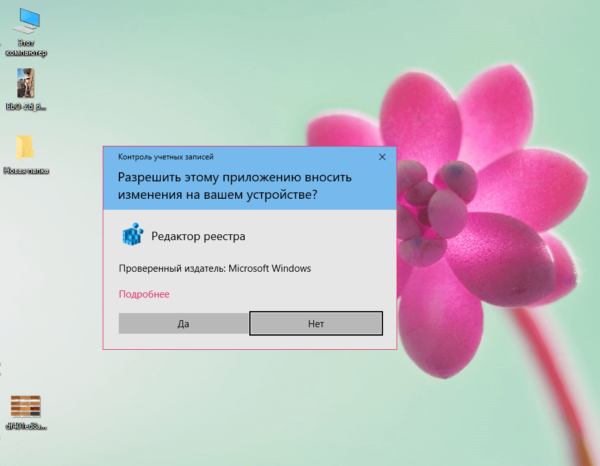
В окне «Выполнить» напишите команду regedit - В следующем окно нажимаем «Да». Так мы дадим разрешение «Редактору реестра» вносить изменения на компьютере.

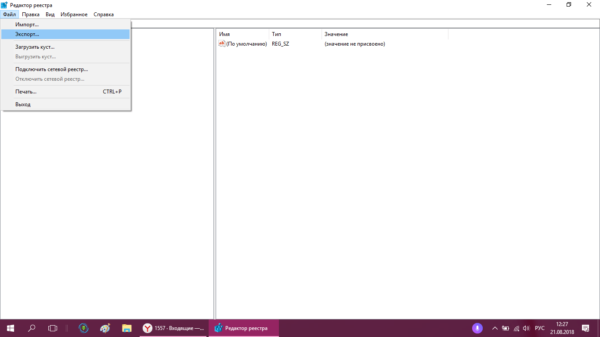
Нажмите «Да», чтобы разрешить системной утилите вносить изменения на устройстве - Сначала сделаем резервную копию на случай неправильного редактирования реестра. На верхней панели находим пункт «Файл» и кликаем по нему левой кнопкой мышки. В появившемся меню нажимаем на «Экспорт».
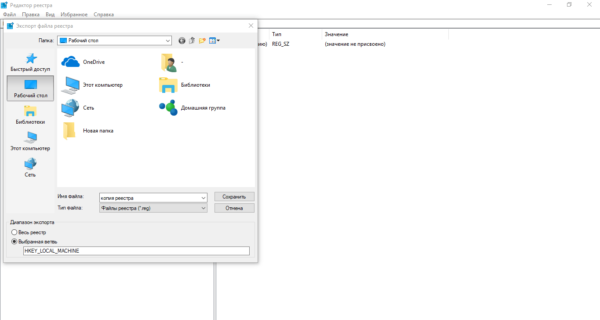
В меню «Файл» выбираем пункт «Экспорт» - В новом открывшемся окне выбираем папку, в которой будет храниться копия. Даём соответствующее имя файлу. Затем нажимаем «Сохранить».
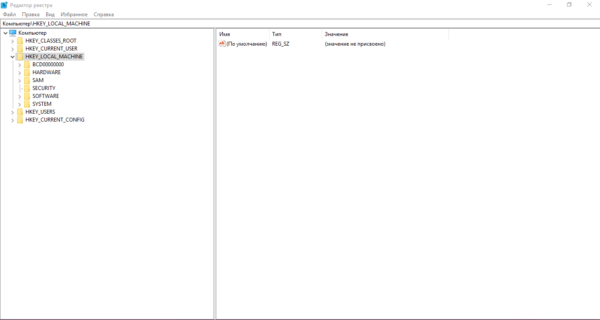
Называем и сохраняем копию в любой папке - Теперь можно приступать к самому редактированию. Дважды кликаем по третьей основной ветке — HKEY_LOCAL_MACHINE.
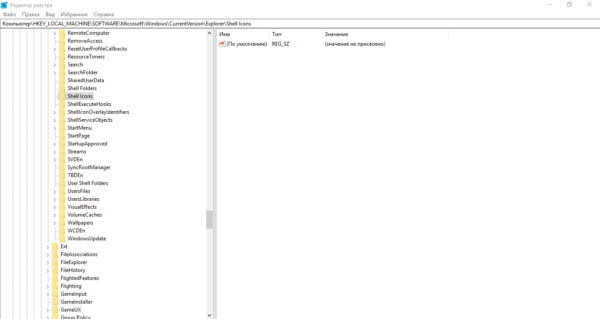
Открываем папку HKEY_LOCAL_MACHINE двойным кликом - Поочерёдно переходим в следующие блоки в той же левой части окна: Microsoft — Windows — CurrentVersion — Explorer — Shell Icons.
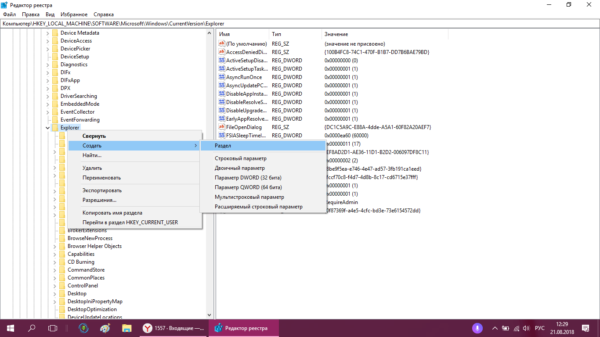
Папка Shell Icons должна находится в разделе Explorer - Если последней папки Shell Icons вы не нашли, создайте этот раздел самостоятельно: жмём правой клавишей мышки по разделу Explorer, выбираем в контекстном меню «Создать», а потом щёлкаем по пункту «Раздел». Называем его соответствующим образом.
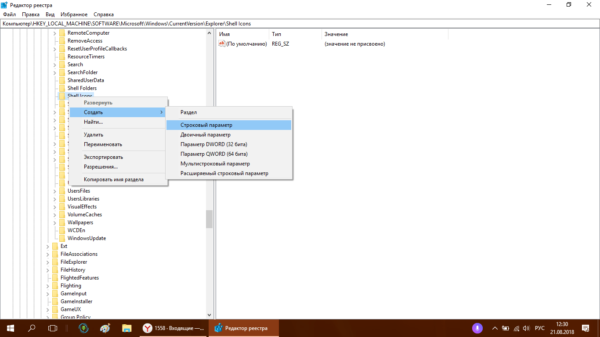
Если у вас нет папки Shell Icons, создайте её с помощью контекстного меню раздела Explorer - Кликаем по Shell Icons. На правой панели кликаем правой клавишей по пустой области для вызова меню. В нём выбираем «Создать», а потом — «Строковый параметр». В качестве названия для новой записи реестра указываем цифру 3.
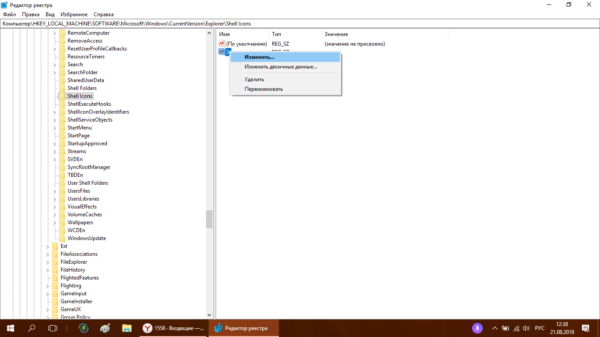
Кликните по пункту «Создать», а затем — «Строковый параметр» - Кликаем по ней правой кнопкой и выбираем «Изменить». Можно также просто дважды нажать на неё левой кнопкой мышки.
Кликните по «Изменить» в контекстном меню только что созданного параметра - В небольшом окне в строке для значения записи вставляем путь к файлу, где должно быть обязательно указано его имя и расширение ico. Жмём на ОК.
В строке «Значение» пишем путь к файлу ico, который должен быть установлен в качестве иконки - Если у вас 64-разрядная система, путь к конечной папке Shell Icons на левой панели будет немного другой: Wow6432Node — Microsoft — Windows — CurrentVersion — Explorer. Далее повторяем те же шаги, что и для 32-разрядной системы.
- Закрываем все окна и перезагружаем устройство. После запуска ОС вы увидите, что иконки всех папок изменились.

Смена иконки ярлыка приложения
Если вам надоели старые иконки ярлыков ваших программ, попробуйте их заменить. Для примера возьмём ярлык популярного обозревателя Google Chrome:
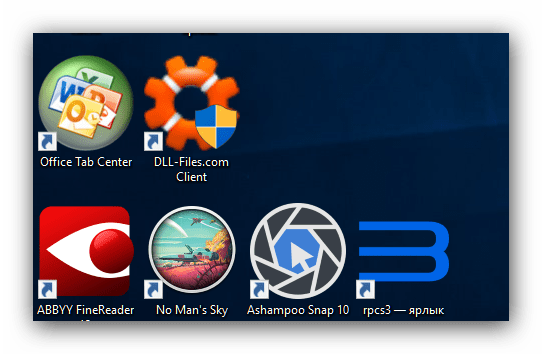
- Ищем на «Рабочем столе» нужную иконку (в нашем случае это значок «Гугл Хрома»). Кликаем по ней правой клавишей мыши для вызова контекстного меню с перечнем опций. Выбираем тот же пункт, что и в случае изменения иконки папки — «Свойства».

Кликните по пункту «Свойства» в контекстном меню ярлыка Google Chrome - Вы сразу попадёте в нужную вкладку — «Ярлык». Кликаем по средней кнопке «Сменить значок».

В разделе «Ярлык» кликаем по кнопке «Сменить значок» - На дисплее возникнет окно наподобие того, что было в инструкции по изменению значка папки. Здесь, однако, будет не такой большой выбор иконок. В качестве источника указываем не системную библиотеку, а исполняемый файл chrome.exe. Делаем выбор, например, в пользу оригинального жёлтого значка. Кликаем по ОК.

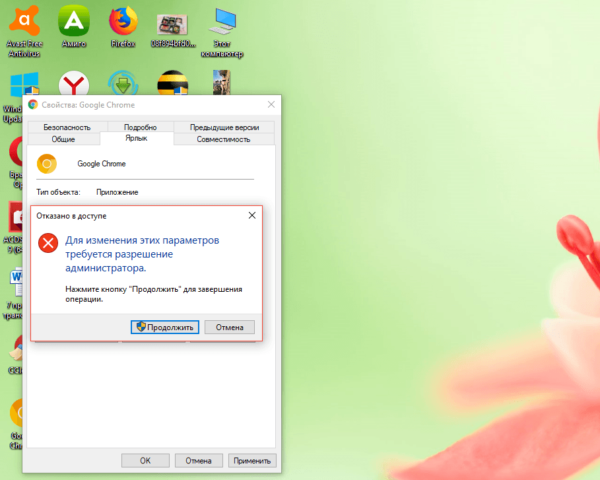
Выберите значок среди доступных либо загрузите свой файл с расширением ico - В окне со свойствами ярлыка жмём сначала «Применить». Система спросит разрешение на внесение изменений. Кликаем по кнопке «Продолжить».

Кликните по кнопке «Продолжить», чтобы все изменения были сохранены - После этого нажимаем на ОК — окно закроется, а иконка значка изменится.
- Если вы хотите поменять значок ярлыка на свой, используйте кнопку «Обзор», чтобы загрузить собственный файл со сторонней картинкой.
Как создать иконку самостоятельно
Если вы хотите установить своё изображение (нарисованное или скачанное с какого-либо сайта) с расширением png или jpg в качестве иконки, вам нужно уменьшить при необходимости его размер с помощью стандартной утилиты Windows Paint, а затем преобразовать его в файл ico с помощью специальных сервисов — конвертеров.
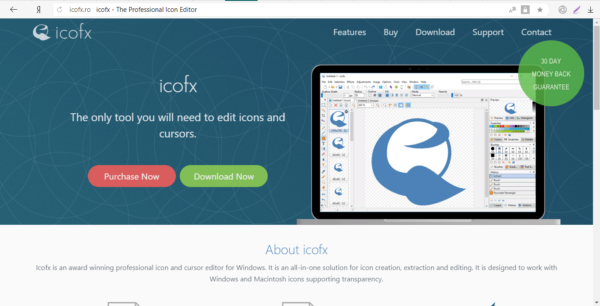
Более простой способ — воспользоваться услугами онлайновых и программных генераторов иконок, которые уже настроены на создание файлов с определённым форматом и другими параметрами, например, размерами картинки. Для примера возьмём программу IcoFX, которая сочетает в себе генератор значков и инструмент для рисования и редактирования картинок. Она платная, но её разработчик, компания IcoFX Software, предоставляет 30 дней бесплатного использования. Как ей пользоваться, расскажем в инструкции:
- Переходим на официальный сайт утилиты. Жмём на зелёную кнопку Download Now.

Жмём на зелёную кнопку Download, чтобы скачать установщик программы - Запускаем установщик и в появившемся маленьком окошке выбираем язык. Русского, к сожалению, там нет, поэтому ставим английский. Жмём на ОК, а в следующем окне соглашаемся с условиями использования приложения. Кликаем по Install.
- Ждём, когда установка закончится, после чего нажимаем Finish в окне c установленной галочкой рядом с пунктом Launch IcoFX.
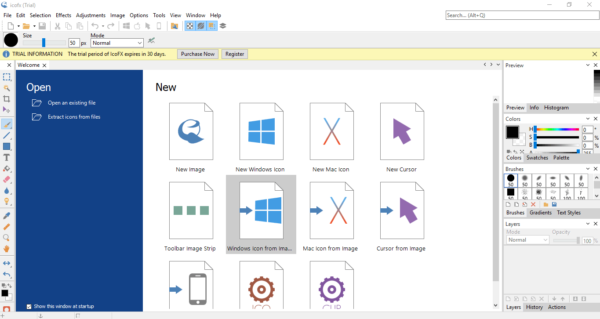
- В окне утилиты выбираем раздел Windows Icon From Image, если у вас уже есть изображение.
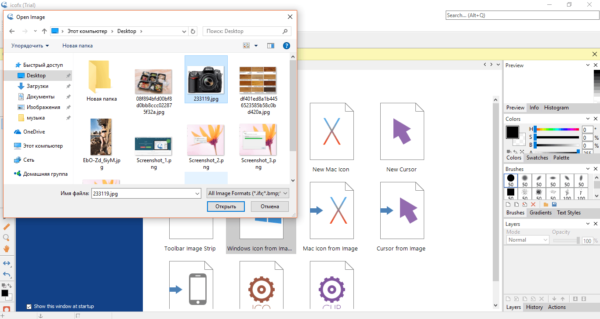
На начальной странице программы кликните по Windows Icon From Image, если вы хотите загрузить изображение - Выбираем файл с картинкой в «Проводнике».
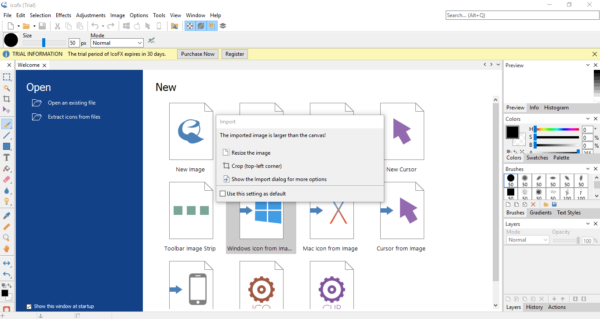
Выберите файл в «Проводнике Windows» и кликните по кнопке «Открыть» - После этого щёлкаем по Resize the image.
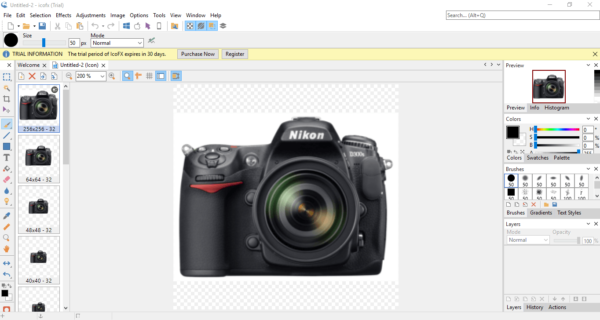
Жмём на пункт Resize the image - Откроется сам редактор с уже загруженным в него изображением.
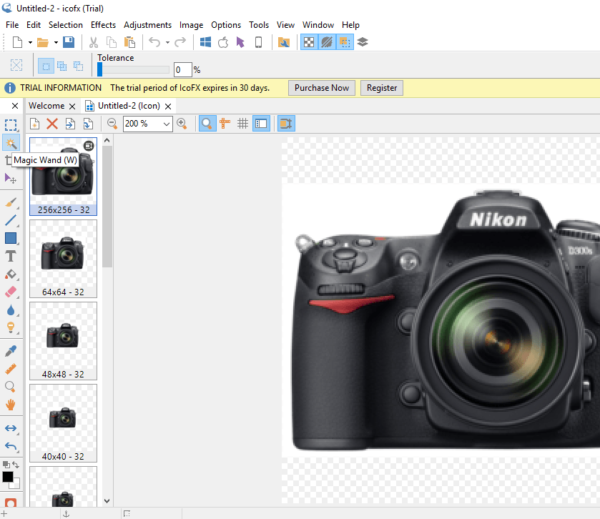
Запустится страница с набором инструментов для редактирования изображения - Наверняка вы захотите убрать фон и оставить для иконки только сам предмет. Чтобы его удалить, кликните по волшебной палочке на левой панели под названием Magic Wand.
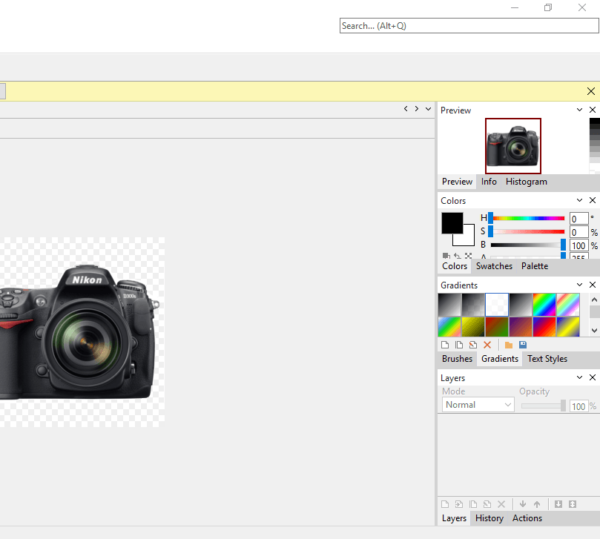
Кликаем по волшебной палочке Magic Wand на левой вертикальной панели - Кликаем по фону два раза — появится пунктирная линия. В левой панели выбираем инструмент для закрашивания, например, Brush («Кисть»). В правой части окна кликаем по плитке с расцветкой шахматной доски.

На правой панели выбираем плитку с шахматным рисунком, чтобы сделать фон прозрачным - Кистью проводим по области, ограниченной пунктирной линией. После этого фон также изменится на изображение с расцветкой шахматной доски. Это будет означать, что он прозрачный.
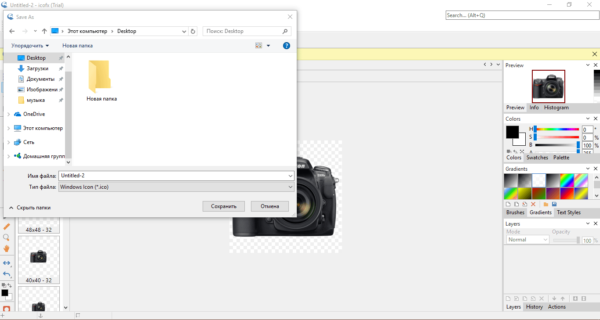
- В верхнем меню выбираем пункт File, а потом нажимаем Save as.

Нажмите Save, чтобы сохранить отредактированное изображение - Выбираем место для хранения иконки и даём ей имя. Жмём на «Сохранить».
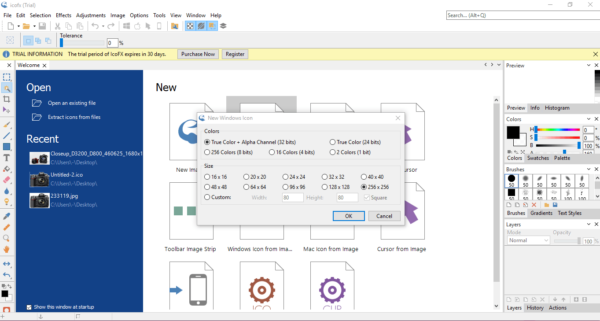
Найдите папку, в которой вы хотите сохранить будущую иконку, и кликните по «Сохранить» - Если вы хотите самостоятельно нарисовать будущую иконку, кликните в начальном окне по New Windows Icon. В следующем окне определитесь с качеством цветов (лучше ставить True Color) и с размером иконки.
Выберите размер и качество цвета будущего рисунка - В редакторе рисуем иконку с помощью доступных инструментов: кисти, карандаша, заливки и других. Если вы хотите, чтобы она получилась ровной, используйте средство Line.
- Когда рисунок будет готов, сохраните его через опцию Save as в меню File и установите в качестве иконки.

Если вас уже не привлекает вид старых иконок на «Рабочем столе», смените их либо на другие классические значки для Windows, либо на свои — любые маленькие изображения в формате ico, найденные в интернете или нарисованные самостоятельно. Для смены иконок можно использовать как встроенные средства Windows, так и сторонние приложения.
- Распечатать
Оцените статью:
- 5
- 4
- 3
- 2
- 1
(12 голосов, среднее: 3.8 из 5)
Поделитесь с друзьями!
![]()
Download Article
An in-depth guide to editing the size and image of your Windows desktop icons
![]()
Download Article
- Showing or Hiding Desktop Icons
- Resizing Desktop Icons
- Changing System Desktop Icons
- Changing Shortcut and Folder Icons
- Adding Shortcuts to the Desktop
- Creating Icon Images
- Downloading Icons
- Q&A
- Tips
- Warnings
|
|
|
|
|
|
|
|
|
Do you want to customize the appearance of the icons on your Windows desktop? You can adjust icons by using the «Properties» options or you make new desktop icons entirely. You’ll only be able to change the icon for system desktop icons, folders, and shortcuts. This wikiHow will show you how to change a desktop icon’s appearance and how to download or create a custom icon on your Windows computer.
Things You Should Know
- Right-click the desktop. Hover over «View», then uncheck «Show desktop icons» to hide them.
- Right-click the desktop, hover over «View», then select a new icon size.
- To change icons, right-click the folder or shortcut. Click «Properties» → «Customize/Shortcut» → «Change Icon».
-

1
-
2
Hover your cursor over «View». This will be at the very top of the menu.
Advertisement
-
3
Click Show desktop icons. When this option in unchecked, all desktop icons will be hidden.
- To show desktop icons again, click Show desktop icons.
Advertisement
-
1
Right-click your desktop. For easier navigation, be sure to minimize all open windows.
- A pop-up menu will open.
-
2
Hover your cursor over «View». This will be at the very top of the menu.
-
3
Select your icon size. You can click Large icons, Medium icons, or Small icons. After clicking, your desktop icons will be changed immediately.
- You can also hold CTRL and scroll up or down on your mouse to increase or decrease the icon size.
Advertisement
-
1
Open Start
. Click the Windows logo in the bottom-left corner of the screen, or press the Windows key.[2]
-
2
Click Settings
. It’s in the lower-left side of the Start window.
-
3
Click Personalization. This is the monitor-shaped icon on the Windows Settings page.
- You can also access this page by right-clicking a blank space on the desktop and then clicking Personalization in the drop-down menu.
-
4
Click Themes. It’s a tab on the left side of the Personalization window.
-
5
Click Desktop icon settings. This link is in the upper-right side of the Themes page. Clicking it opens the Desktop Icon Settings window.
- If you haven’t edited your theme at all, this link will be in the middle of the page beneath the «Related Settings» heading.
- You can also click Get more themes in the Store below the «Apply a theme» heading to browse desktop themes. Some themes will change your desktop icons’ appearances.
-
6
Click an icon you want to change. This will select the icon.
- For example, you might click This PC or Recycle Bin.
- You can also check the box next to a desktop icon’s name at the top of the window to make it appear on your desktop, or uncheck the box to remove it from the desktop.
- Check the «Allow themes to change desktop icons» box on this window to enable theme-related icon changes.
-
7
Click Change Icon. It’s near the bottom of the window.
-
8
Select an icon. You can select two different types of icons:
- System icon: Click an icon in the window.
- Custom icon: Click Browse, then click the folder that your custom icons are in on the left side of the window. Select the icon you want to use, then click Open.
-
9
Click OK. This will assign your selected icon to the desktop program.
-
10
Click Apply, then click OK. Doing so confirms your decision and changes the desktop program’s icon to your selected icon.


Advertisement
-
1
Open the File Explorer
. You can find this icon at the lower-left side of your taskbar, or you can press the Start menu and search for File Explorer.
- You cannot change the icons of specific files (e.g., Notepad files or .exe files) using this method. You’ll only be able to customize desktop shortcuts and folders with this method.
-
2
Click Desktop. It’s a folder in the left-hand column of options in the File Explorer window.
- This may already be pinned under Quick access.
-
3
Click a shortcut or folder icon. Shortcut icons have a white box with an arrow in their lower-left corners.
-
4
Click the Home tab. It’s in the upper-left corner of the File Explorer window. Doing so will open a toolbar at the top of the window.
-
5
Click Properties. This is a white box with a red checkmark in the «Open» section of the toolbar.
- You can also right-click on the icon on your desktop and then click Properties to get to this menu.
- If the icon is pinned to your task bar, you can right-click it and click Properties to get this menu.
-
6
Click Customize or Shortcut. This will be located at the top of the Properties window.
- Shortcut: Click the Shortcut tab at the top of the Properties window.
- Folder: Click the Customize tab at the top of the Properties window.
-
7
Click Change Icon. This will be near the bottom of the window.
-
8
Select an icon. You can select two different types of icons:
- System icon — Click an icon in the window.
- Custom icon — Click Browse, then click the folder that your custom icons are in on the left side of the window. Select the icon you want to use, then click Open.
-
9
Click OK. This will assign your selected icon.
-
10
Click Apply, then click OK. Doing so confirms your decision and changes the original icon to your selected icon.

Advertisement
-
1
Open the File Explorer
. You can find this icon at the lower-left side of your taskbar, or you can press the Start menu and search for File Explorer.
-
2
Click the Desktop folder. It’s on the left side of the File Explorer window.
- This may already be pinned under Quick access.
-
3
Click the Home tab. You’ll find this tab in the upper-left side of the File Explorer window.
-
4
Click New item. It’s in the «New» section of the tool bar at the top of the window.
-
5
Click Shortcut. This option is in the New item drop-down menu. A window with options for your new shortcut will appear.
-
6
Click Browse. It’s in the middle of the page. Doing so opens a pop-up window.
-
7
Scroll down and click the program’s or file’s folder. For example, if the program or file is in the Documents folder, you’d click My Documents.
- You may have to click through several different folders to find the program or file for which you want to create a shortcut.
-
8
Click OK. Doing so sets the desktop shortcut’s target as your selected item.
- If you rename the desktop icon or move it to a new folder, your shortcut will no longer work.
-
9
Click Next, then enter a name. The default name for the shortcut is the same name as the program itself.
-
10
Click Finish. It’s in the bottom-right corner of the window. This will create your shortcut in the folder you selected.
Advertisement
-
1
Open the Paint application on your computer. If you don’t have the Paint application, you can download it from the Microsoft Store.
- Use this method if you want to create custom icons.
-
2
Click File. It’s a blue button in the upper-left corner of the Paint window.
-
3
Click Open. This option is in the File menu. Doing so opens a window where you can open a file location.
- If you’d rather create your own icon by drawing in Paint, skip this step and instead create your drawing.
-
4
Select a picture. You may have to click a location on the left side of the Open window (e.g., Pictures) to find the picture you want to open.
- Skip this step if you’re drawing your own icon.
-
5
Click Open. This will open your image in the Paint window.
- Skip this step if you’re drawing your own icon.
-
6
Click File again. It’s in the top-left corner of Paint.
-
7
Select Save as. This option is near the top of the File menu.
-
8
Click BMP picture. It’s an option to the right of the Save as button. Doing so opens a Save As window where you can name your file.
-
9
Type in your file’s name followed by
.ico. This will ensure that your file is saved as an icon file.- For example, you might name your file «shortcut.ico».
-
10
Navigate to a save location. Do so in the left-hand pane of the Save As window.
- The Pictures folder is a safe place to save your shortcut file.
-
11
Click Save. It’s at the bottom of the window. Doing so will save your icon in your selected folder.
-
12
Change a program’s icon using your created icon. You’ll use the Browse method and select your custom icon from the folder where you saved it.
Advertisement
-
1
Open a web browser. Microsoft Edge is the official Windows 10 browser, though you can use Google Chrome, Firefox, Opera, or another browser.
-
2
Search for Windows icons. Type «download windows desktop icons» into your browser’s address bar or a search engine and press Enter.
- You can narrow your search by entering the program’s name (e.g., «Windows my computer icon») or by using the icon file type (e.g., «ICO»).
- Some popular icon websites include:
- https://www.flaticon.com/
- https://feathericons.com/
- https://fontawesome.com/
- https://boxicons.com/
-
3
Download the icons you want. You can do this by opening a site that has your icons and clicking the Download button. Doing so will save the icons to your computer.
- If you download multiple icons at once, you may have to extract the icons to a regular folder before continuing.
-
4
Open the File Explorer
. You can find this icon at the lower-left side of your taskbar, or you can press the Start menu and search for File Explorer.
-
5
Click Desktop. This folder is on the left side of File Explorer.
-
6
Click your icons folder. Doing so selects it.
- If you just downloaded one icon, select the icon instead.
-
7
Click Home. This tab is in the upper-left corner of the File Explorer window.
-
8
Click Move to. It’s in the «Organize» section of the toolbar at the top of the File Explorer window.
-
9
Click Pictures. This folder is near the middle of the pop-up window.
- You can select any folder on your computer if you don’t want to place your icons in Pictures.
-
10
Click Move. This will send your icons to a folder where you won’t move or delete them.
-
11
Change a program’s icon using your downloaded icon. You’ll use the Browse method and then select an icon from within the Pictures folder to do this.
Advertisement
Add New Question
-
Question
I lost the icon for my email. How do I get it back on my desktop?

Click on your Windows key and type your email program. Then, just drag it onto your desktop.
-
Question
How do I change the background of icon names on my desktop in XP?
Highlight then right-click, and a list of things should pop up. Click on «change.»
-
Question
How do I put icons on my desktop from a program?
If on windows, search using the windows key for the program and then drag and drop it onto your desktop.
See more answers
Ask a Question
200 characters left
Include your email address to get a message when this question is answered.
Submit
Advertisement
-
Some themes will change your desktop icons. To enable this feature, open the Desktop Icon Settings window from within Personalization, then check the «Allow themes to change desktop icons» box and click OK.
-
You can find themes for Windows 10 in the Store, which is an app that comes preinstalled on Windows 10.
Thanks for submitting a tip for review!
Advertisement
-
If you move or delete an icon file, the program you were using the file with will stop displaying the icon.
Advertisement
About This Article
Article SummaryX
1. Click the Start menu and select Settings.
2. Click Personalization.
3. Click Themes.
4. Click Desktop icon settings.
5. Select an icon to change.
6. Click Change Icon.
7. Select a new icon and click OK.
8. Click OK.
Did this summary help you?
Thanks to all authors for creating a page that has been read 2,286,972 times.
Is this article up to date?
![]()
Download Article
An in-depth guide to editing the size and image of your Windows desktop icons
![]()
Download Article
- Showing or Hiding Desktop Icons
- Resizing Desktop Icons
- Changing System Desktop Icons
- Changing Shortcut and Folder Icons
- Adding Shortcuts to the Desktop
- Creating Icon Images
- Downloading Icons
- Q&A
- Tips
- Warnings
|
|
|
|
|
|
|
|
|
Do you want to customize the appearance of the icons on your Windows desktop? You can adjust icons by using the «Properties» options or you make new desktop icons entirely. You’ll only be able to change the icon for system desktop icons, folders, and shortcuts. This wikiHow will show you how to change a desktop icon’s appearance and how to download or create a custom icon on your Windows computer.
Things You Should Know
- Right-click the desktop. Hover over «View», then uncheck «Show desktop icons» to hide them.
- Right-click the desktop, hover over «View», then select a new icon size.
- To change icons, right-click the folder or shortcut. Click «Properties» → «Customize/Shortcut» → «Change Icon».
-
1
-
2
Hover your cursor over «View». This will be at the very top of the menu.
Advertisement
-
3
Click Show desktop icons. When this option in unchecked, all desktop icons will be hidden.
- To show desktop icons again, click Show desktop icons.
Advertisement
-
1
Right-click your desktop. For easier navigation, be sure to minimize all open windows.
- A pop-up menu will open.
-
2
Hover your cursor over «View». This will be at the very top of the menu.
-
3
Select your icon size. You can click Large icons, Medium icons, or Small icons. After clicking, your desktop icons will be changed immediately.
- You can also hold CTRL and scroll up or down on your mouse to increase or decrease the icon size.
Advertisement
-
1
Open Start
. Click the Windows logo in the bottom-left corner of the screen, or press the Windows key.[2]
-
2
Click Settings
. It’s in the lower-left side of the Start window.
-
3
Click Personalization. This is the monitor-shaped icon on the Windows Settings page.
- You can also access this page by right-clicking a blank space on the desktop and then clicking Personalization in the drop-down menu.
-
4
Click Themes. It’s a tab on the left side of the Personalization window.
-
5
Click Desktop icon settings. This link is in the upper-right side of the Themes page. Clicking it opens the Desktop Icon Settings window.
- If you haven’t edited your theme at all, this link will be in the middle of the page beneath the «Related Settings» heading.
- You can also click Get more themes in the Store below the «Apply a theme» heading to browse desktop themes. Some themes will change your desktop icons’ appearances.
-
6
Click an icon you want to change. This will select the icon.
- For example, you might click This PC or Recycle Bin.
- You can also check the box next to a desktop icon’s name at the top of the window to make it appear on your desktop, or uncheck the box to remove it from the desktop.
- Check the «Allow themes to change desktop icons» box on this window to enable theme-related icon changes.
-
7
Click Change Icon. It’s near the bottom of the window.
-
8
Select an icon. You can select two different types of icons:
- System icon: Click an icon in the window.
- Custom icon: Click Browse, then click the folder that your custom icons are in on the left side of the window. Select the icon you want to use, then click Open.
-
9
Click OK. This will assign your selected icon to the desktop program.
-
10
Click Apply, then click OK. Doing so confirms your decision and changes the desktop program’s icon to your selected icon.
Advertisement
-
1
Open the File Explorer
. You can find this icon at the lower-left side of your taskbar, or you can press the Start menu and search for File Explorer.
- You cannot change the icons of specific files (e.g., Notepad files or .exe files) using this method. You’ll only be able to customize desktop shortcuts and folders with this method.
-
2
Click Desktop. It’s a folder in the left-hand column of options in the File Explorer window.
- This may already be pinned under Quick access.
-
3
Click a shortcut or folder icon. Shortcut icons have a white box with an arrow in their lower-left corners.
-
4
Click the Home tab. It’s in the upper-left corner of the File Explorer window. Doing so will open a toolbar at the top of the window.
-
5
Click Properties. This is a white box with a red checkmark in the «Open» section of the toolbar.
- You can also right-click on the icon on your desktop and then click Properties to get to this menu.
- If the icon is pinned to your task bar, you can right-click it and click Properties to get this menu.
-
6
Click Customize or Shortcut. This will be located at the top of the Properties window.
- Shortcut: Click the Shortcut tab at the top of the Properties window.
- Folder: Click the Customize tab at the top of the Properties window.
-
7
Click Change Icon. This will be near the bottom of the window.
-
8
Select an icon. You can select two different types of icons:
- System icon — Click an icon in the window.
- Custom icon — Click Browse, then click the folder that your custom icons are in on the left side of the window. Select the icon you want to use, then click Open.
-
9
Click OK. This will assign your selected icon.
-
10
Click Apply, then click OK. Doing so confirms your decision and changes the original icon to your selected icon.
Advertisement
-
1
Open the File Explorer
. You can find this icon at the lower-left side of your taskbar, or you can press the Start menu and search for File Explorer.
-
2
Click the Desktop folder. It’s on the left side of the File Explorer window.
- This may already be pinned under Quick access.
-
3
Click the Home tab. You’ll find this tab in the upper-left side of the File Explorer window.
-
4
Click New item. It’s in the «New» section of the tool bar at the top of the window.
-
5
Click Shortcut. This option is in the New item drop-down menu. A window with options for your new shortcut will appear.
-
6
Click Browse. It’s in the middle of the page. Doing so opens a pop-up window.
-
7
Scroll down and click the program’s or file’s folder. For example, if the program or file is in the Documents folder, you’d click My Documents.
- You may have to click through several different folders to find the program or file for which you want to create a shortcut.
-
8
Click OK. Doing so sets the desktop shortcut’s target as your selected item.
- If you rename the desktop icon or move it to a new folder, your shortcut will no longer work.
-
9
Click Next, then enter a name. The default name for the shortcut is the same name as the program itself.
-
10
Click Finish. It’s in the bottom-right corner of the window. This will create your shortcut in the folder you selected.
Advertisement
-
1
Open the Paint application on your computer. If you don’t have the Paint application, you can download it from the Microsoft Store.
- Use this method if you want to create custom icons.
-
2
Click File. It’s a blue button in the upper-left corner of the Paint window.
-
3
Click Open. This option is in the File menu. Doing so opens a window where you can open a file location.
- If you’d rather create your own icon by drawing in Paint, skip this step and instead create your drawing.
-
4
Select a picture. You may have to click a location on the left side of the Open window (e.g., Pictures) to find the picture you want to open.
- Skip this step if you’re drawing your own icon.
-
5
Click Open. This will open your image in the Paint window.
- Skip this step if you’re drawing your own icon.
-
6
Click File again. It’s in the top-left corner of Paint.
-
7
Select Save as. This option is near the top of the File menu.
-
8
Click BMP picture. It’s an option to the right of the Save as button. Doing so opens a Save As window where you can name your file.
-
9
Type in your file’s name followed by
.ico. This will ensure that your file is saved as an icon file.- For example, you might name your file «shortcut.ico».
-
10
Navigate to a save location. Do so in the left-hand pane of the Save As window.
- The Pictures folder is a safe place to save your shortcut file.
-
11
Click Save. It’s at the bottom of the window. Doing so will save your icon in your selected folder.
-
12
Change a program’s icon using your created icon. You’ll use the Browse method and select your custom icon from the folder where you saved it.
Advertisement
-
1
Open a web browser. Microsoft Edge is the official Windows 10 browser, though you can use Google Chrome, Firefox, Opera, or another browser.
-
2
Search for Windows icons. Type «download windows desktop icons» into your browser’s address bar or a search engine and press Enter.
- You can narrow your search by entering the program’s name (e.g., «Windows my computer icon») or by using the icon file type (e.g., «ICO»).
- Some popular icon websites include:
- https://www.flaticon.com/
- https://feathericons.com/
- https://fontawesome.com/
- https://boxicons.com/
-
3
Download the icons you want. You can do this by opening a site that has your icons and clicking the Download button. Doing so will save the icons to your computer.
- If you download multiple icons at once, you may have to extract the icons to a regular folder before continuing.
-
4
Open the File Explorer
. You can find this icon at the lower-left side of your taskbar, or you can press the Start menu and search for File Explorer.
-
5
Click Desktop. This folder is on the left side of File Explorer.
-
6
Click your icons folder. Doing so selects it.
- If you just downloaded one icon, select the icon instead.
-
7
Click Home. This tab is in the upper-left corner of the File Explorer window.
-
8
Click Move to. It’s in the «Organize» section of the toolbar at the top of the File Explorer window.
-
9
Click Pictures. This folder is near the middle of the pop-up window.
- You can select any folder on your computer if you don’t want to place your icons in Pictures.
-
10
Click Move. This will send your icons to a folder where you won’t move or delete them.
-
11
Change a program’s icon using your downloaded icon. You’ll use the Browse method and then select an icon from within the Pictures folder to do this.
Advertisement
Add New Question
-
Question
I lost the icon for my email. How do I get it back on my desktop?
Click on your Windows key and type your email program. Then, just drag it onto your desktop.
-
Question
How do I change the background of icon names on my desktop in XP?
Highlight then right-click, and a list of things should pop up. Click on «change.»
-
Question
How do I put icons on my desktop from a program?
If on windows, search using the windows key for the program and then drag and drop it onto your desktop.
See more answers
Ask a Question
200 characters left
Include your email address to get a message when this question is answered.
Submit
Advertisement
-
Some themes will change your desktop icons. To enable this feature, open the Desktop Icon Settings window from within Personalization, then check the «Allow themes to change desktop icons» box and click OK.
-
You can find themes for Windows 10 in the Store, which is an app that comes preinstalled on Windows 10.
Thanks for submitting a tip for review!
Advertisement
-
If you move or delete an icon file, the program you were using the file with will stop displaying the icon.
Advertisement
About This Article
Article SummaryX
1. Click the Start menu and select Settings.
2. Click Personalization.
3. Click Themes.
4. Click Desktop icon settings.
5. Select an icon to change.
6. Click Change Icon.
7. Select a new icon and click OK.
8. Click OK.
Did this summary help you?
Thanks to all authors for creating a page that has been read 2,286,972 times.